This guide covers all of the currently discovered items in Returnal. It contains Full list of all Artifacts, Augments, Consumables, Parasites and Weapons. We explain the effect of each one and its benefits and best uses. Getting the equipment is half the job done. The other half is knowing how to use it to draw the most out of it and this guide will help you learn exactly that!
There are many categories of things to cover here. We start with the smallest, but most important group first, the Permanent Unlocks. Then we move into the less-permanent upgrades.
Table of contents
- Permanent Equipment Unlocks
- Artifacts
- Adrenaline Enchancer
- Adrenaline Leech
- Adrenaline Stimulants
- Alt-Fire Augment
- Alt-Fire Protection
- Astronaut Figurine
- Blade Balancer
- Blown Nightlight
- Damage Augment
- Dash Blast
- Execution Blast
- Execution Bolts
- Execution Coolant
- Execution Rush
- Golden Coil
- Murmuring Cocoon
- Obolite Extractor
- Obolite Stabilizer
- Overload Bolts
- Overload Rush
- Phantom Limb
- Progenitor Egg
- Projectile Response
- Protection Augment
- Pulsating Mass
- Repair Circuit
- Resin Enhancer
- Resinous Shield
- Unfed Pod
- Visceral Knot
- Wound Seekers
- Xeno-Tech Sight
- Parasites
- Consumables
- Atropian Key
- Calibrator
- Anti-Energy Pulse
- Ground Surge
- Silphium Vial
- Large Silphium Vial
- Nullification Sphere
- Obolite Siphon
- Reflex Stimulant
- Apex Sphere
- Residual Sphere
- Interference Sphere
- Extermination Sphere
- Translocation Sphere
- Alt-Fire Coolant
- Damage Siphon
- Repair Enhancer
- Shield Vial
- Shocking Springs
- Energy Barricade
- Weapons
Permanent Equipment Unlocks
These are upgrades you get that will persist between runs. Each adds extra, permanent functionality to your character in some way or form.
Atropian Weapon Charger
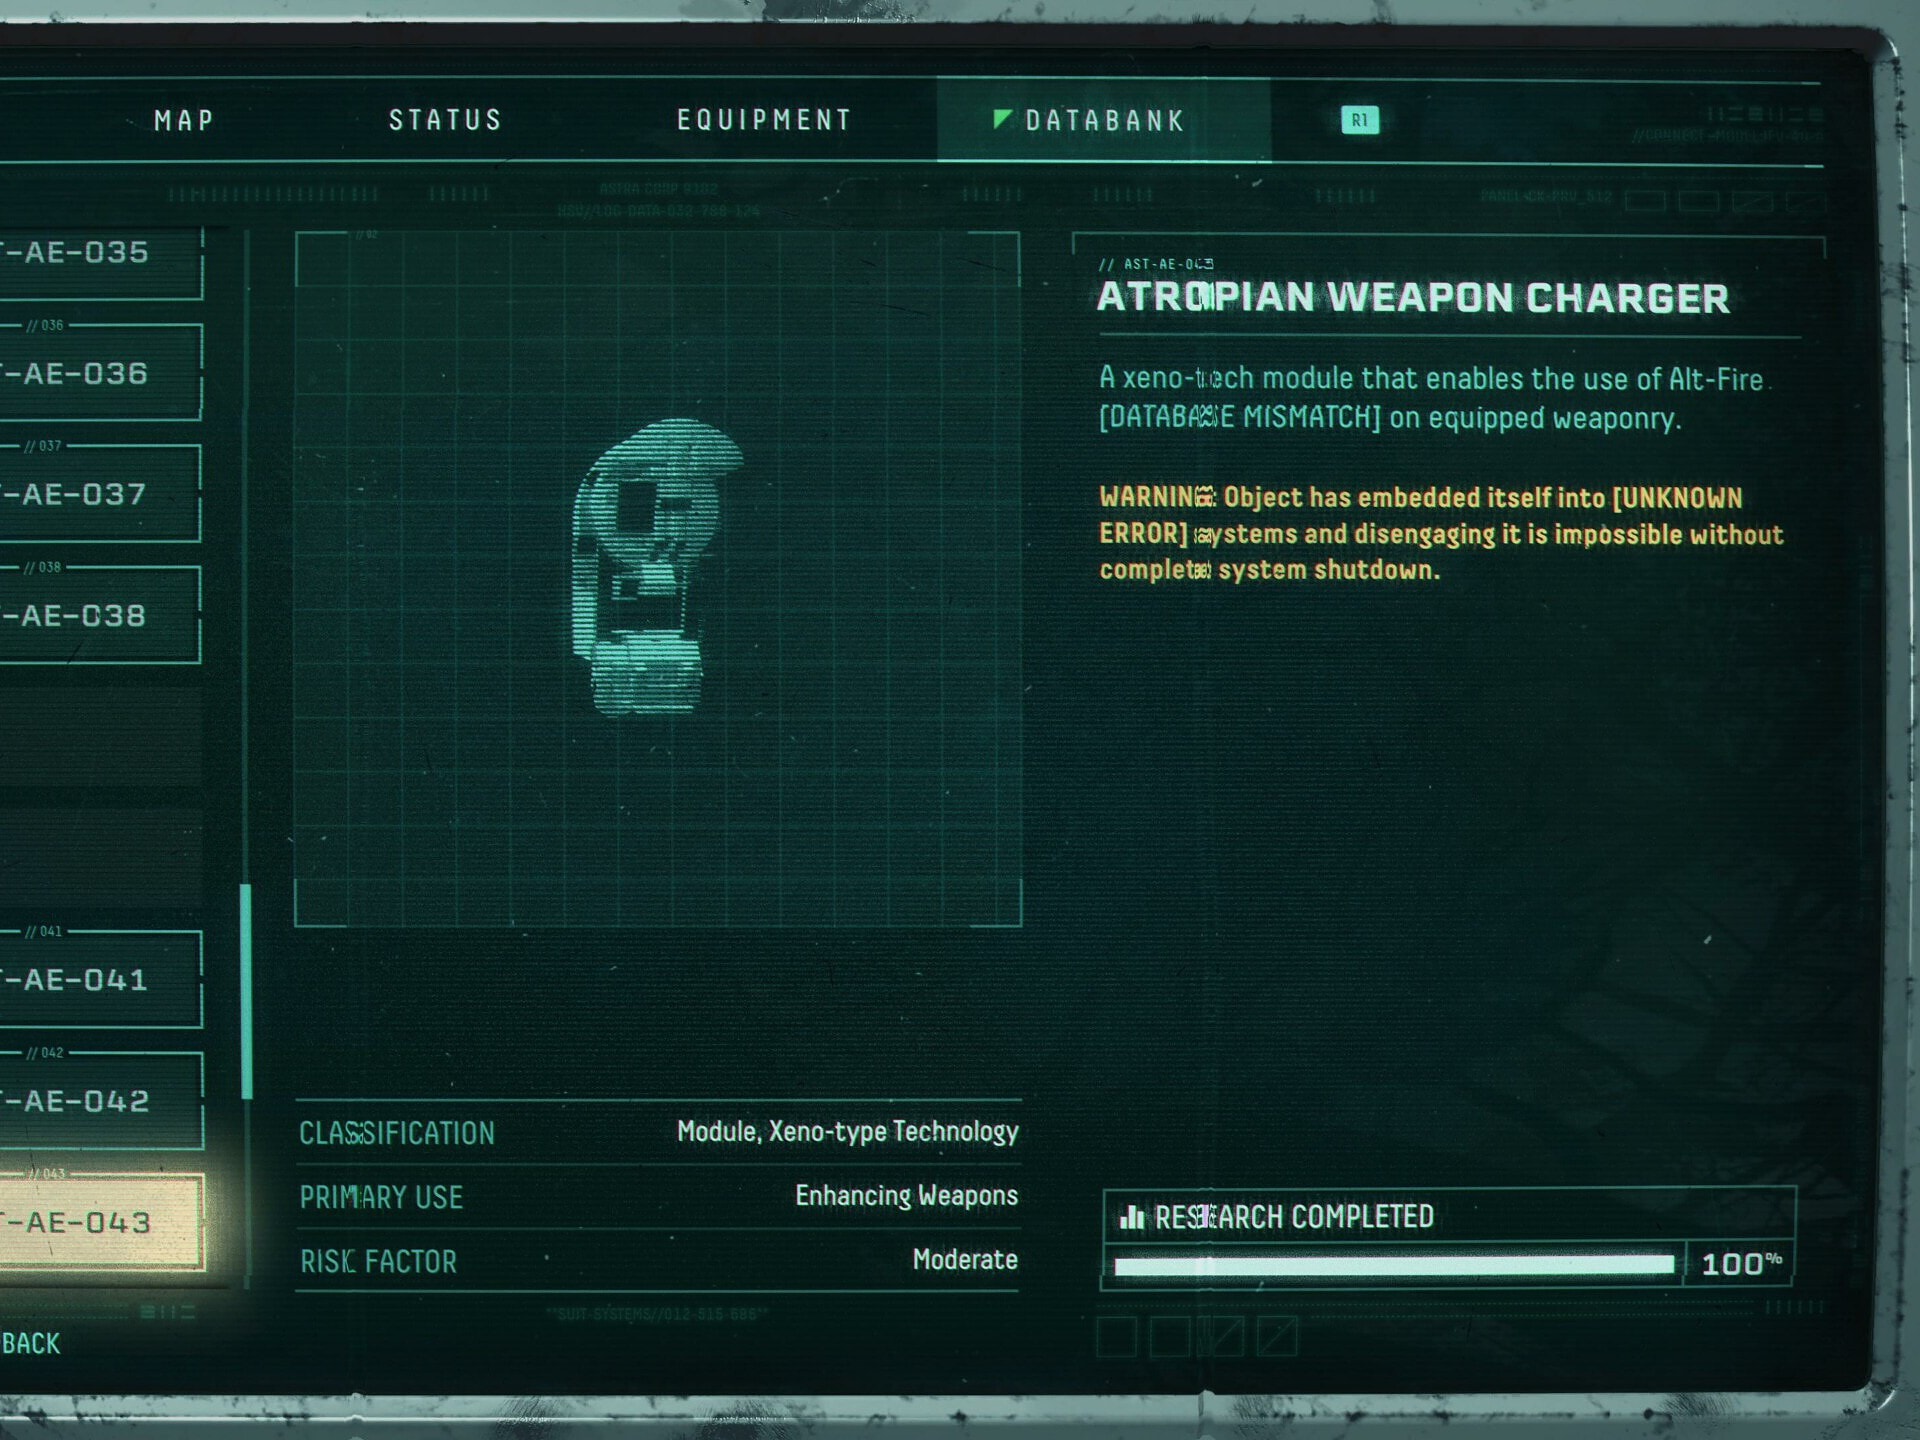
The very first permanent upgrade you’ll get is the Atropian Weapon Charger. This upgrade will enable the use of Alt-Fire for all weapons. Any Alt-fire appears to be capable of being found on any weapon type, though some may actually have weapons they might not appear on.
Hermetic Transmitter
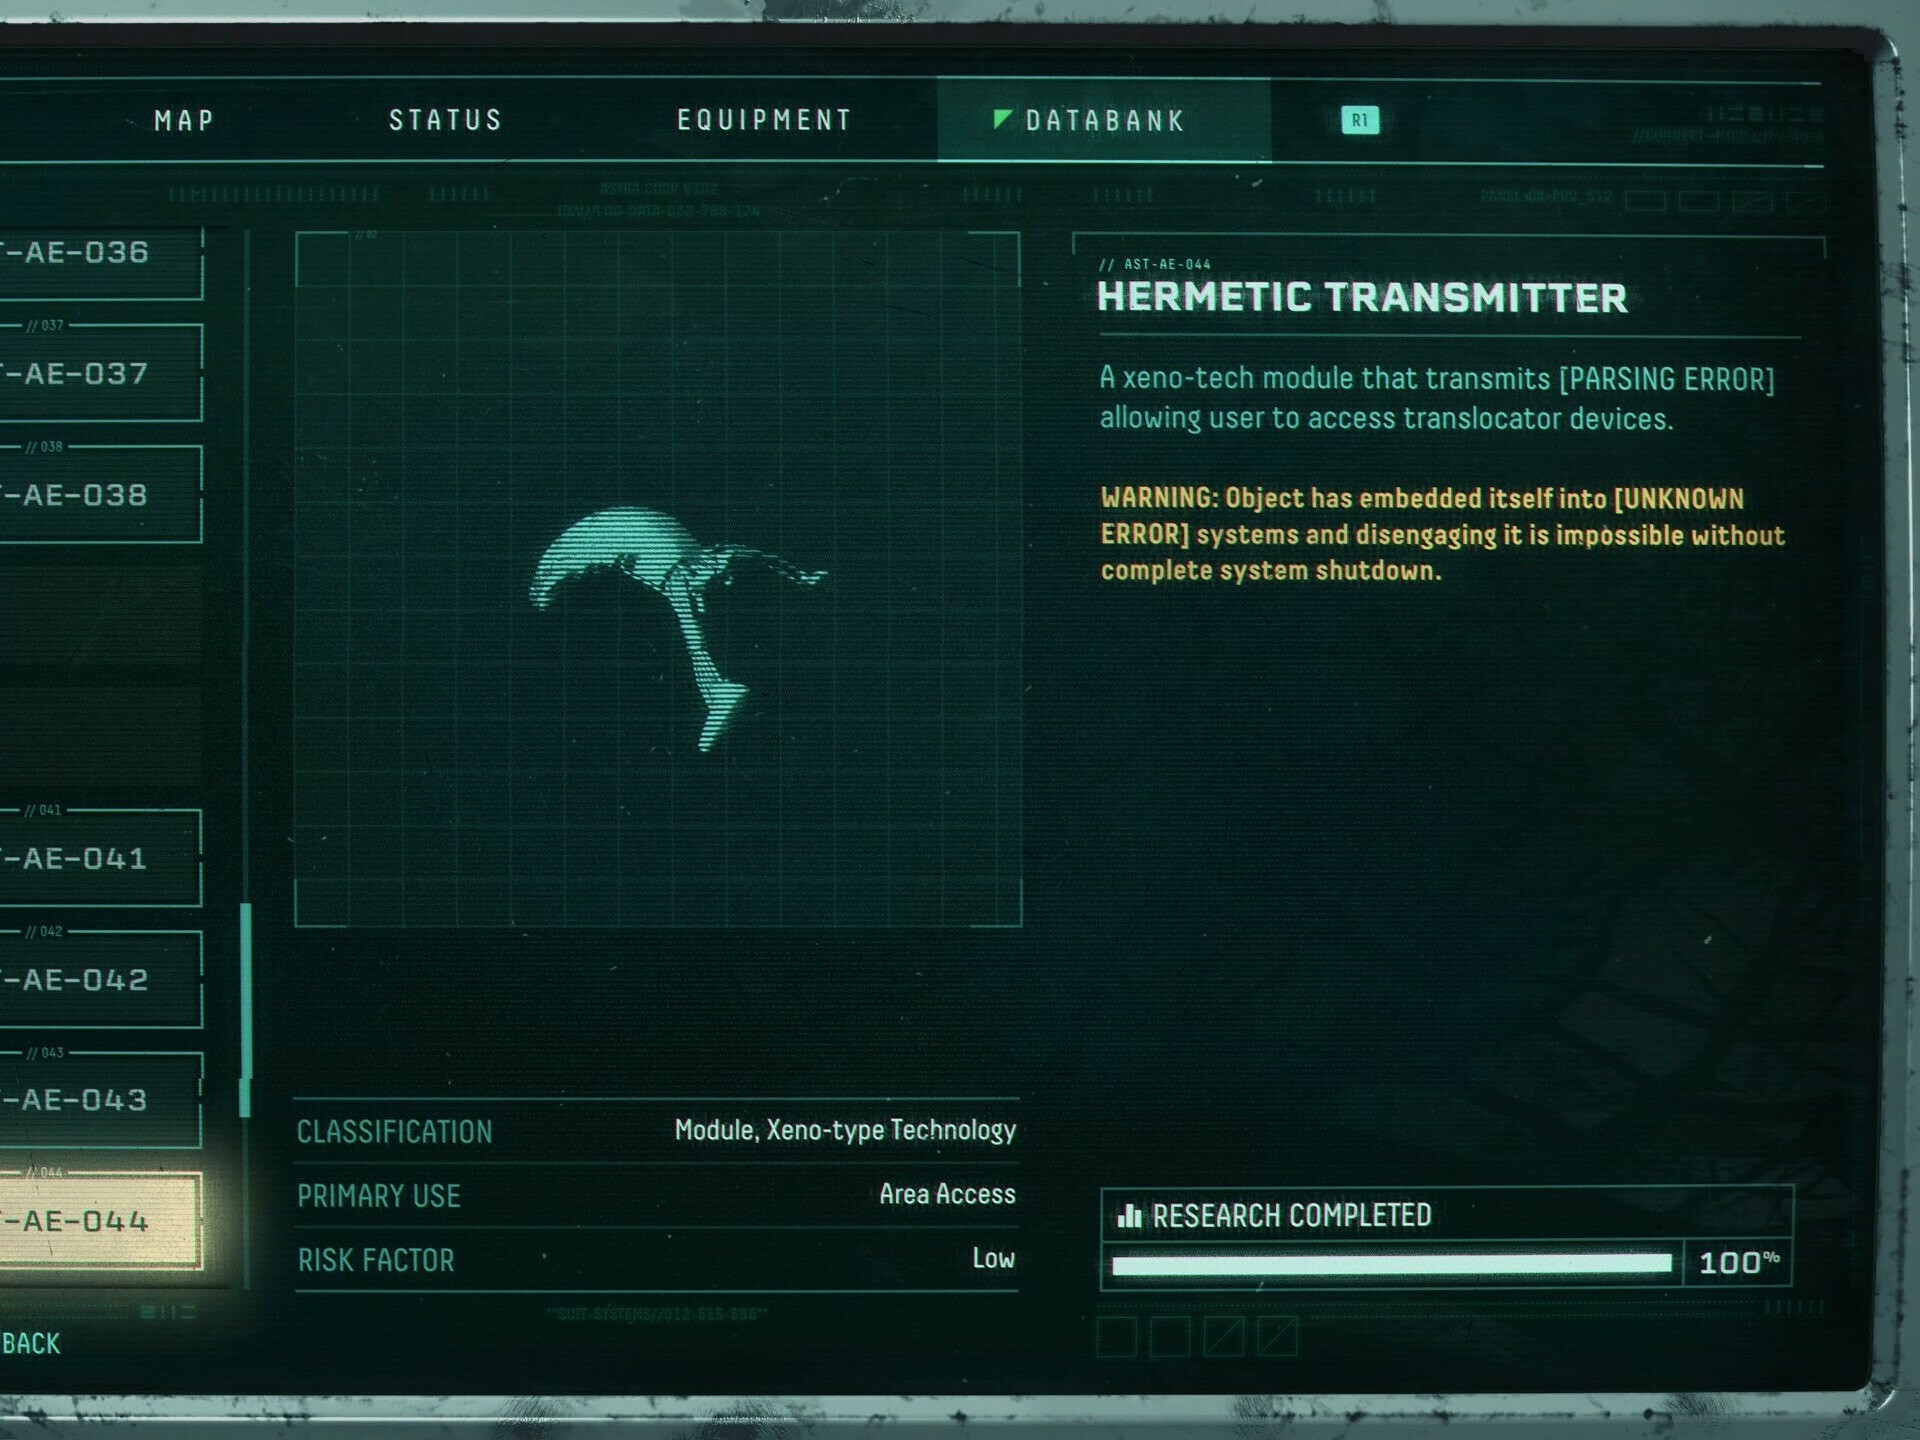
This upgrade will enable the use of both short distance and long distance translocators. It’s found in a chamber deep into the Forest Biome. This unlocks further areas to be explored in the Forest Biome as well as future biomes.
Atropian Blade
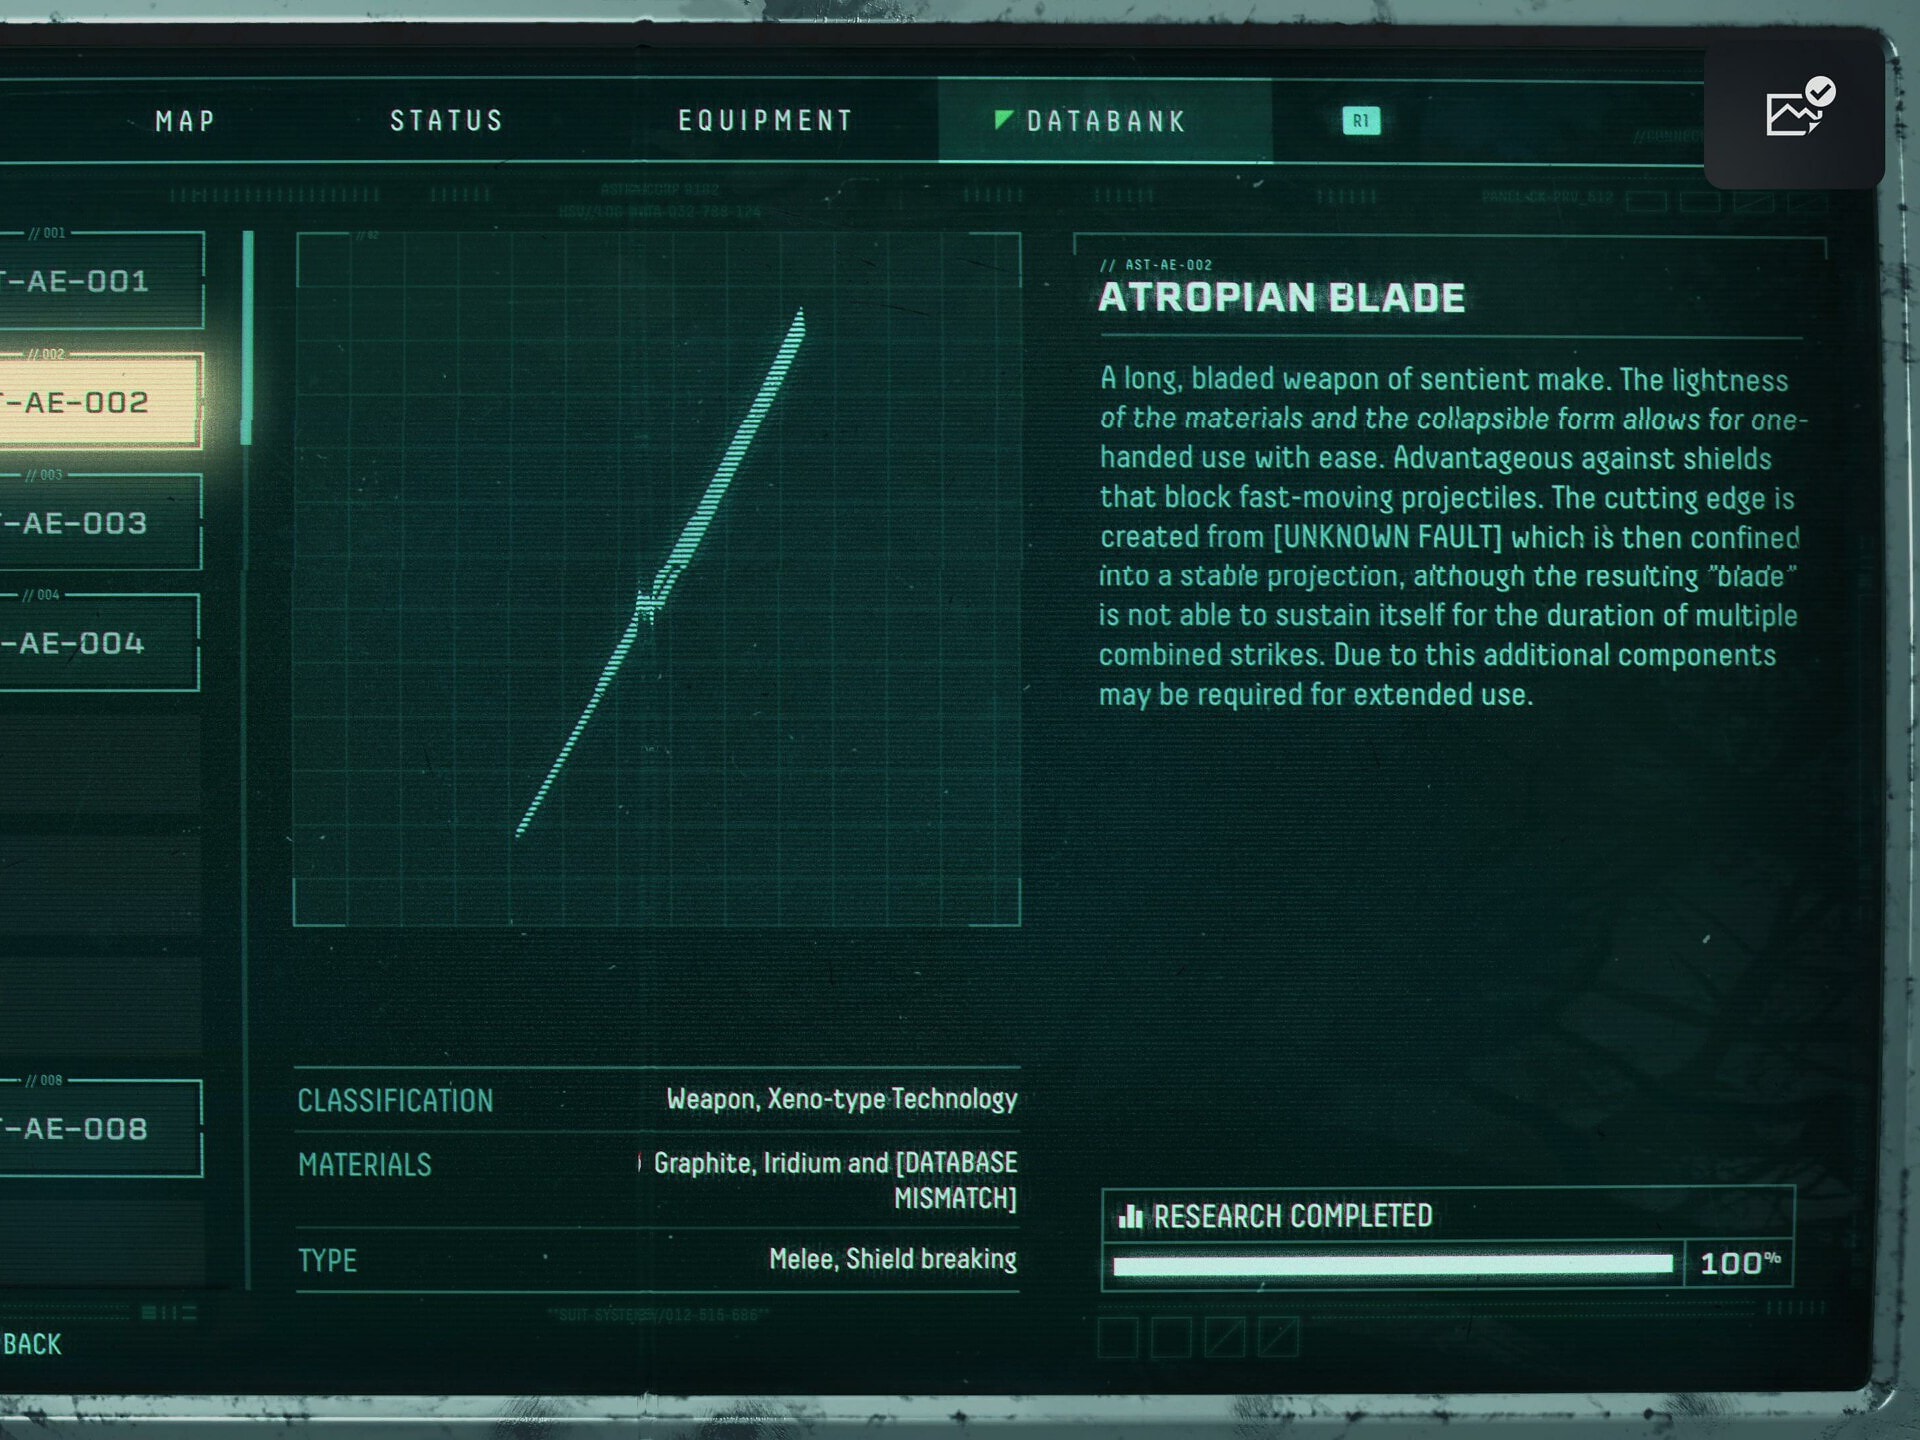
After acquiring the Hermetic Transmitter, you’ll finally be able to reach the Crimson Altar. Though until you Defeat the Boss of the Forest Biome, This blade will be the only thing to acquire here.
This handy upgrade enables Melee attacks. These melee attacks can deal heavy damage to foes, cut glowing vines and even break energy barriers.
Anathema Key
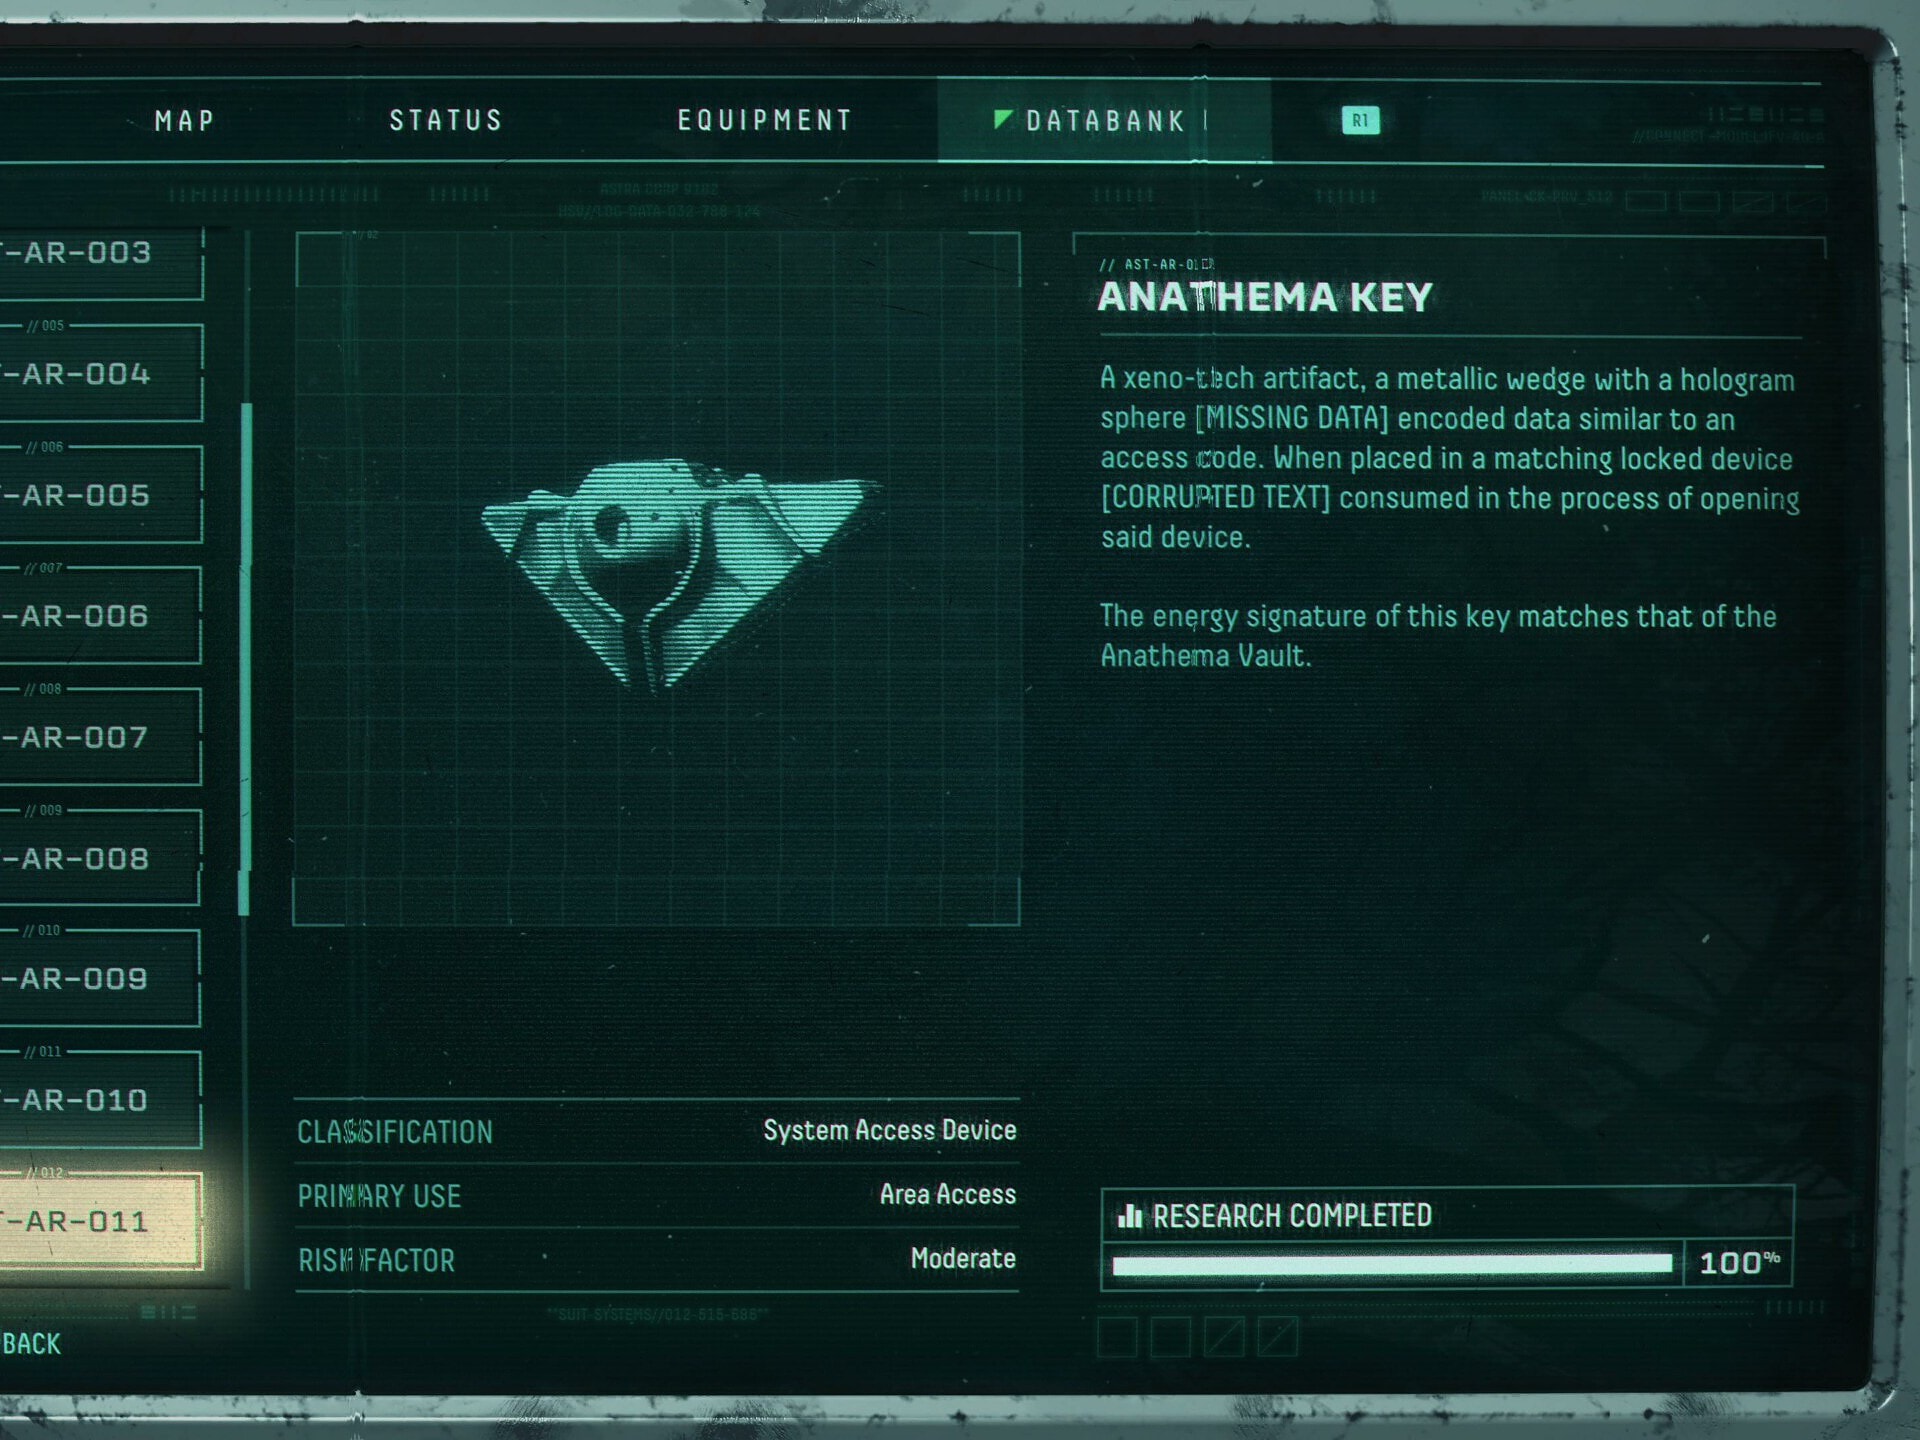
This large key found in the Forest Biome enables access to the Anathema Vault. This Vault houses the boss of the Forest Biome, Phrike. Once Picked up, it stays in your Inventory permanently.
The Vault only needs to be opened once to be accessible in future cycles. You are not required to find the Anathema Key each cycle.
Crimson Key
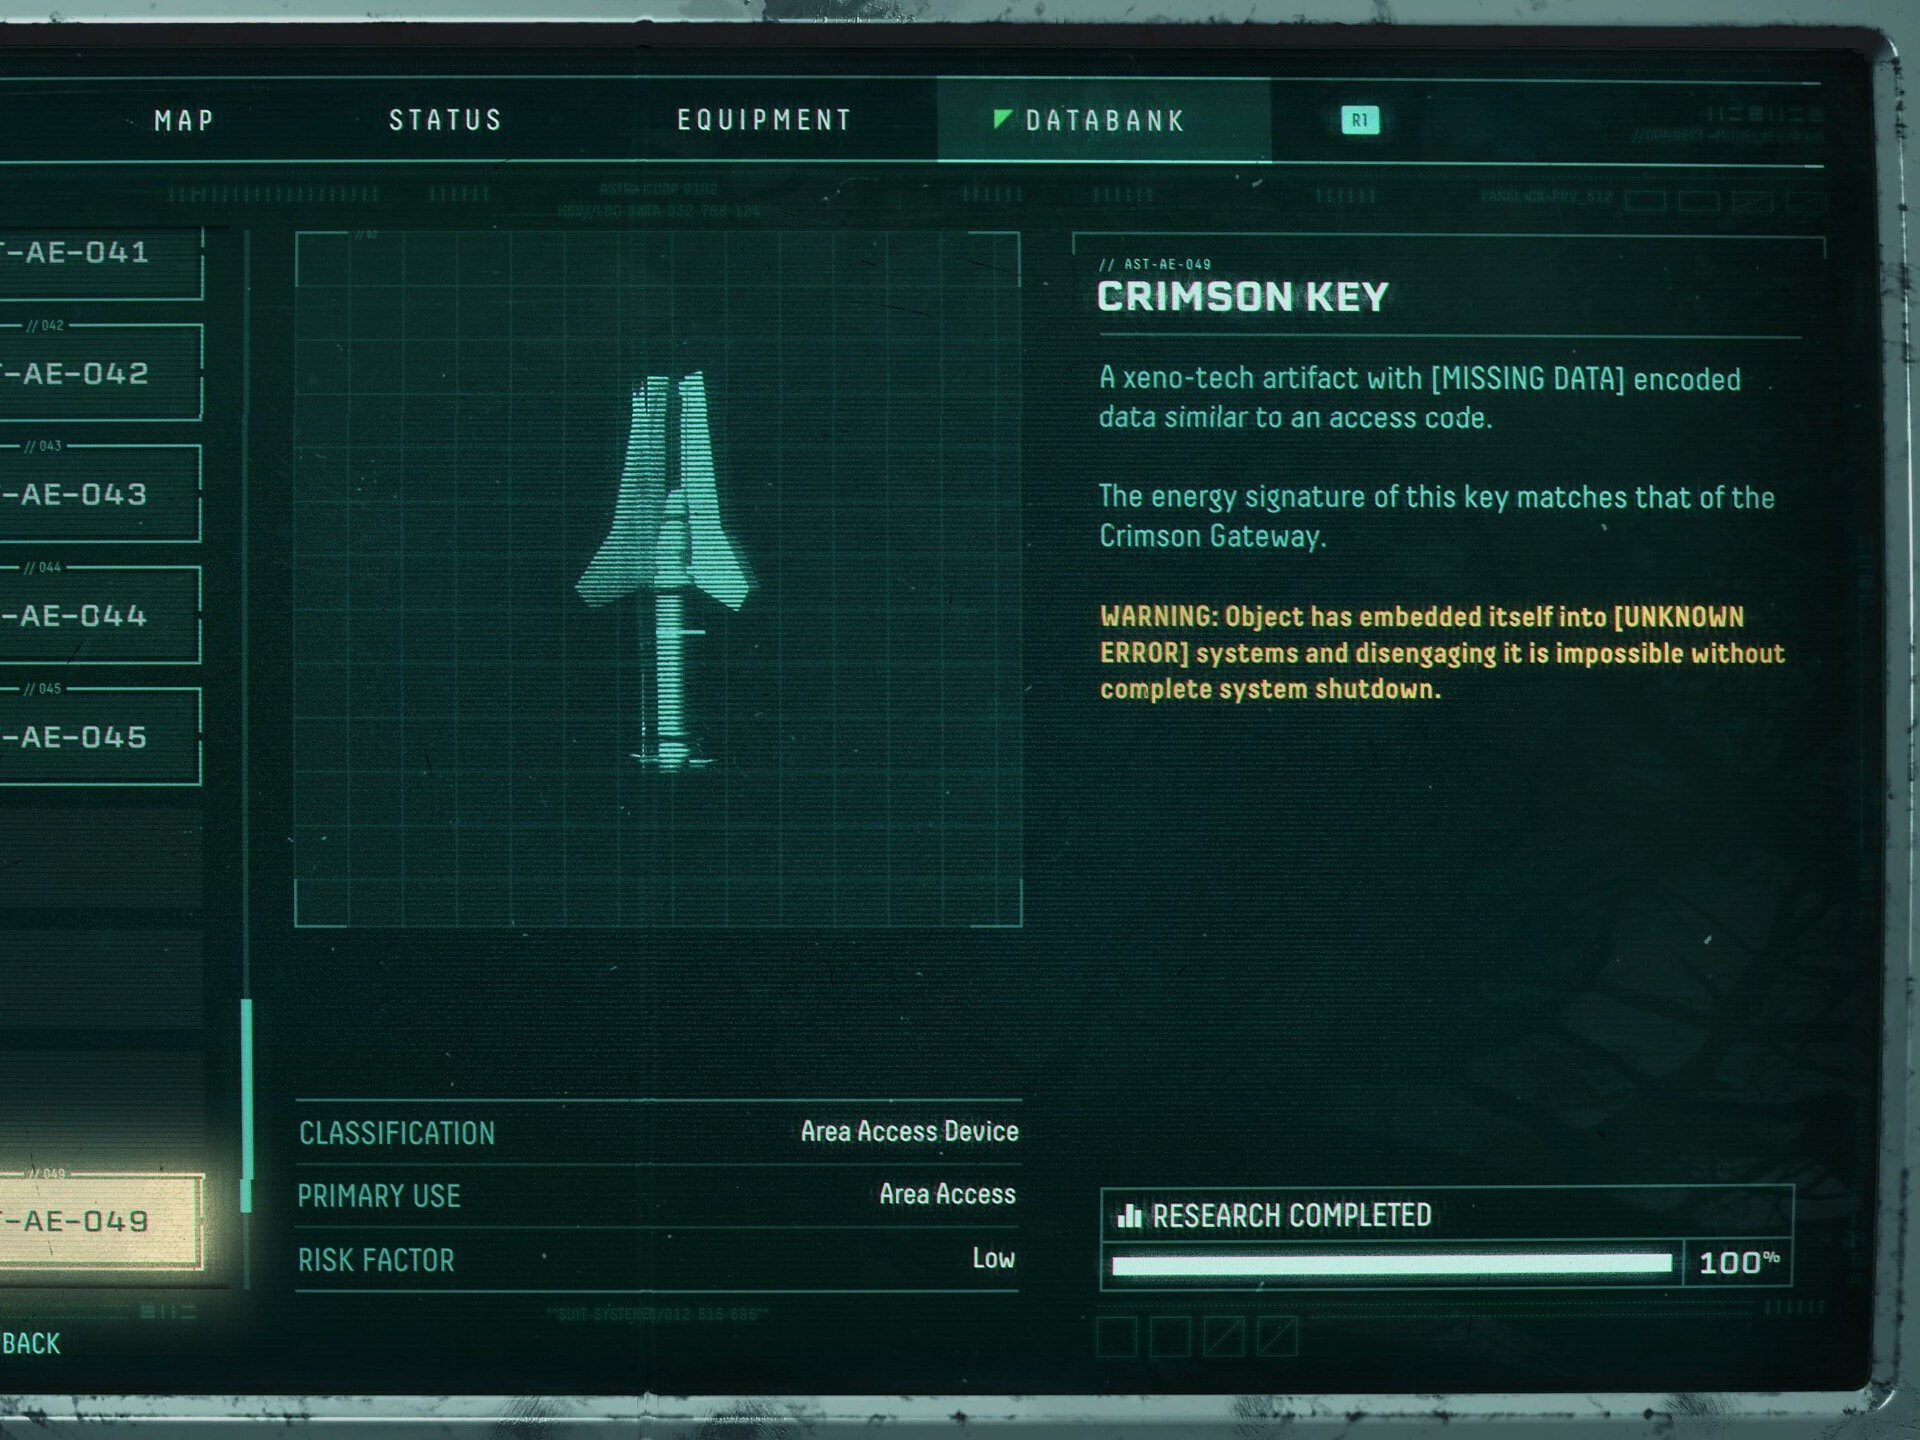
This key enables the use of the Crimson Altar to reach the second Biome, the Crimson Wastes. This drops on the first Defeat of the boss of the Forest Biome.
Once obtained you can skip Phrike on future cycles and go straight to the Crimson Wastes, unless you want the chance at new unlocks as drops from the boss or by depositing Datacubes into the device after the boss.
Icarian Grapnel
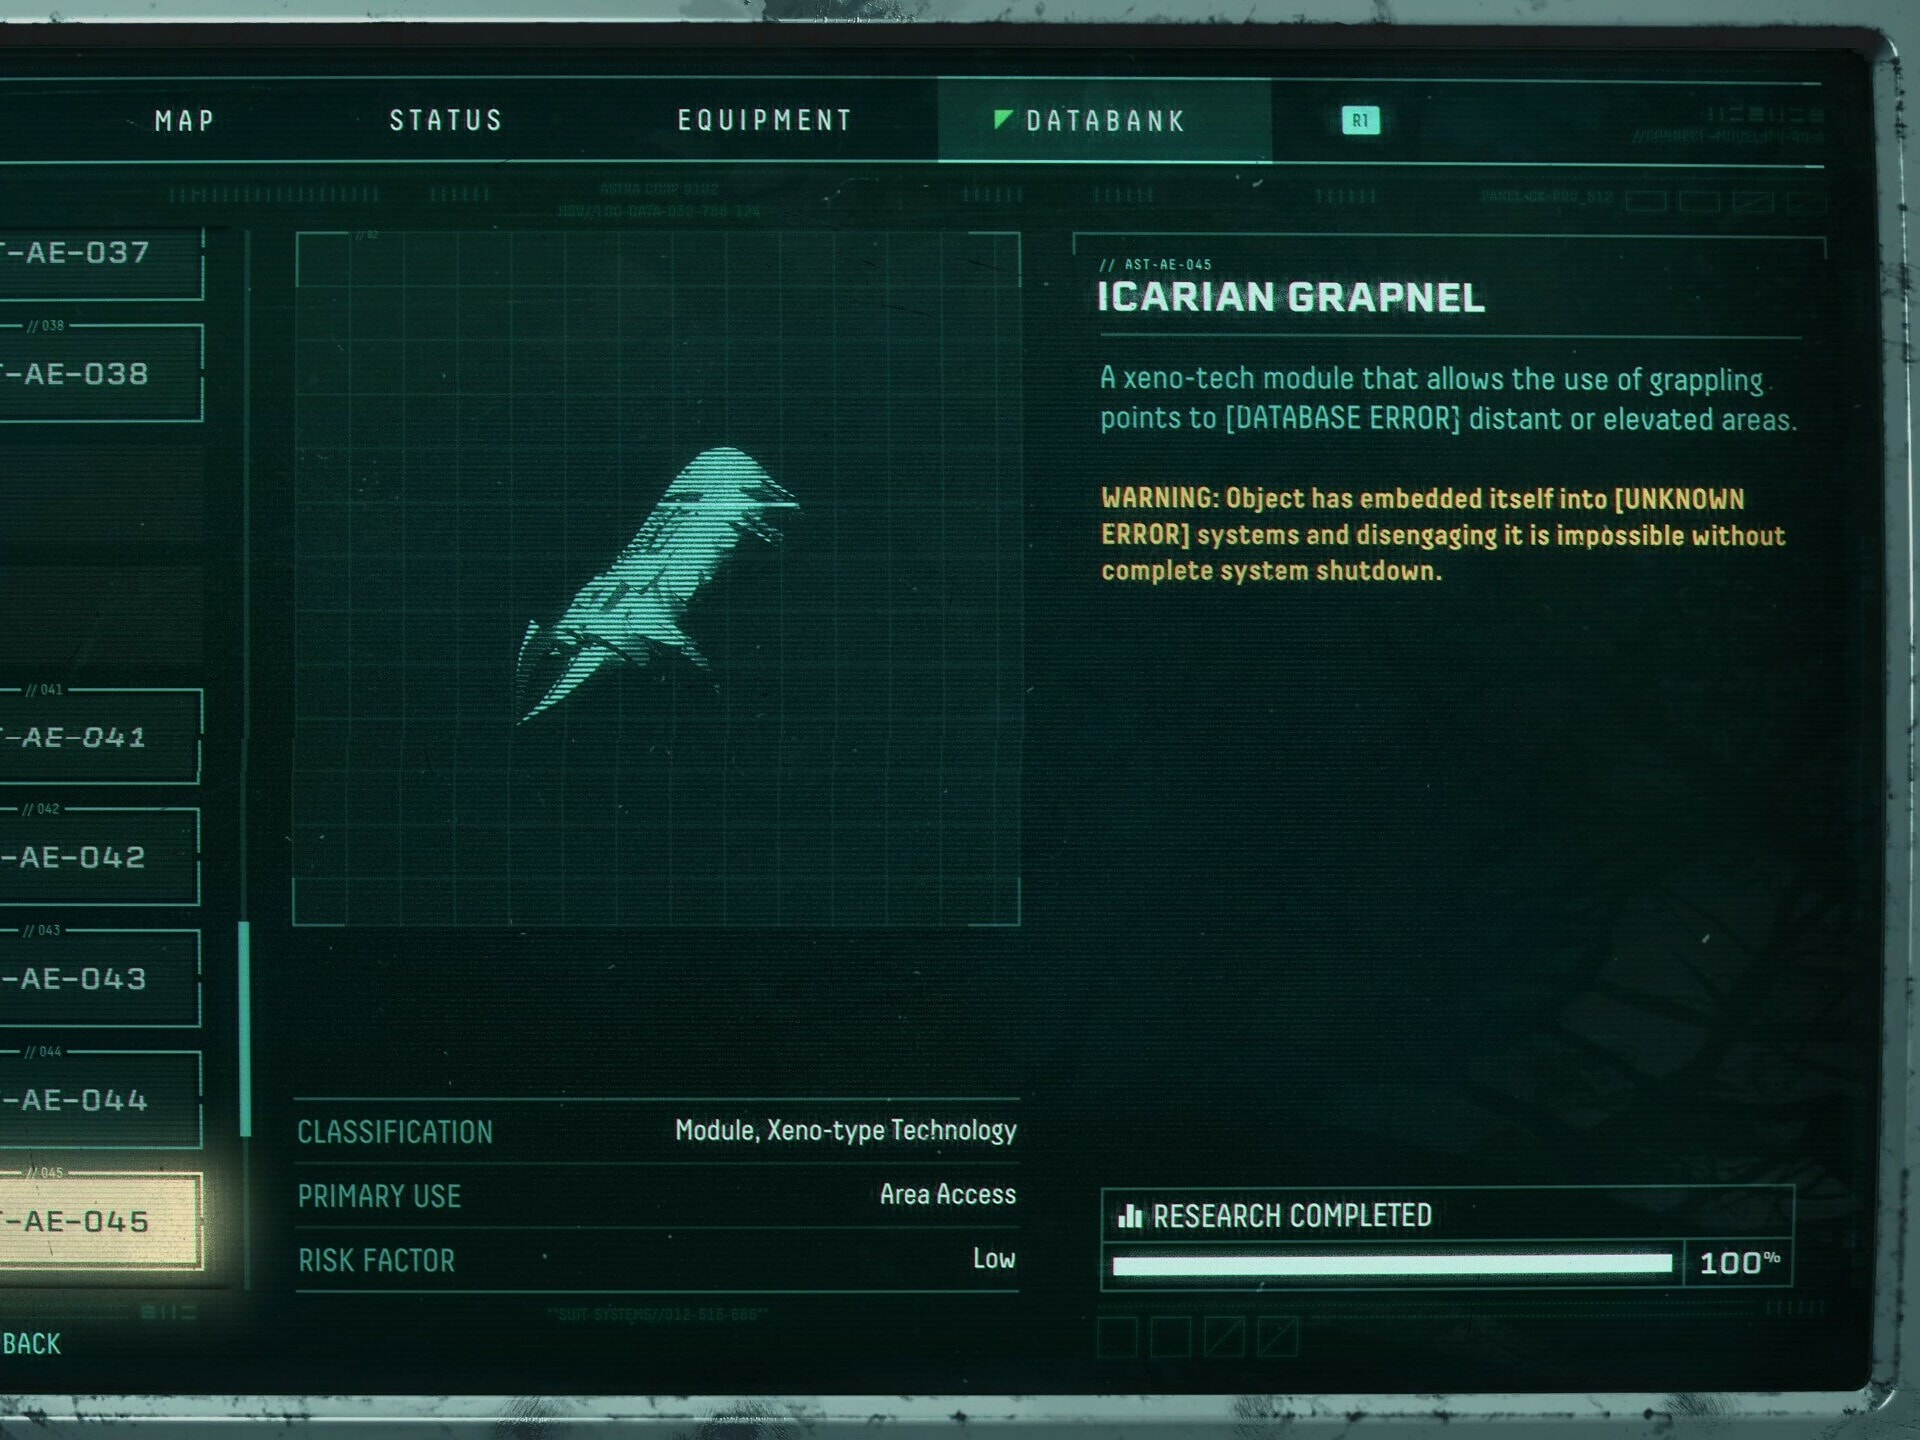
This useful tool you won’t unlock until defeating the Boss of the Desert Biome, Ixion. As it’s name suggests, this item allows you grapple to the glowing orange points you’ve seen all over the map, as well as the floating orange hooks.
As a Bonus, this also enables access extra paths that let you jump to the Citadel Biome from the Forest Biome, while also enabling the path from the Desert Biome to the Citadel Biome.
Xeno-Tech Prism
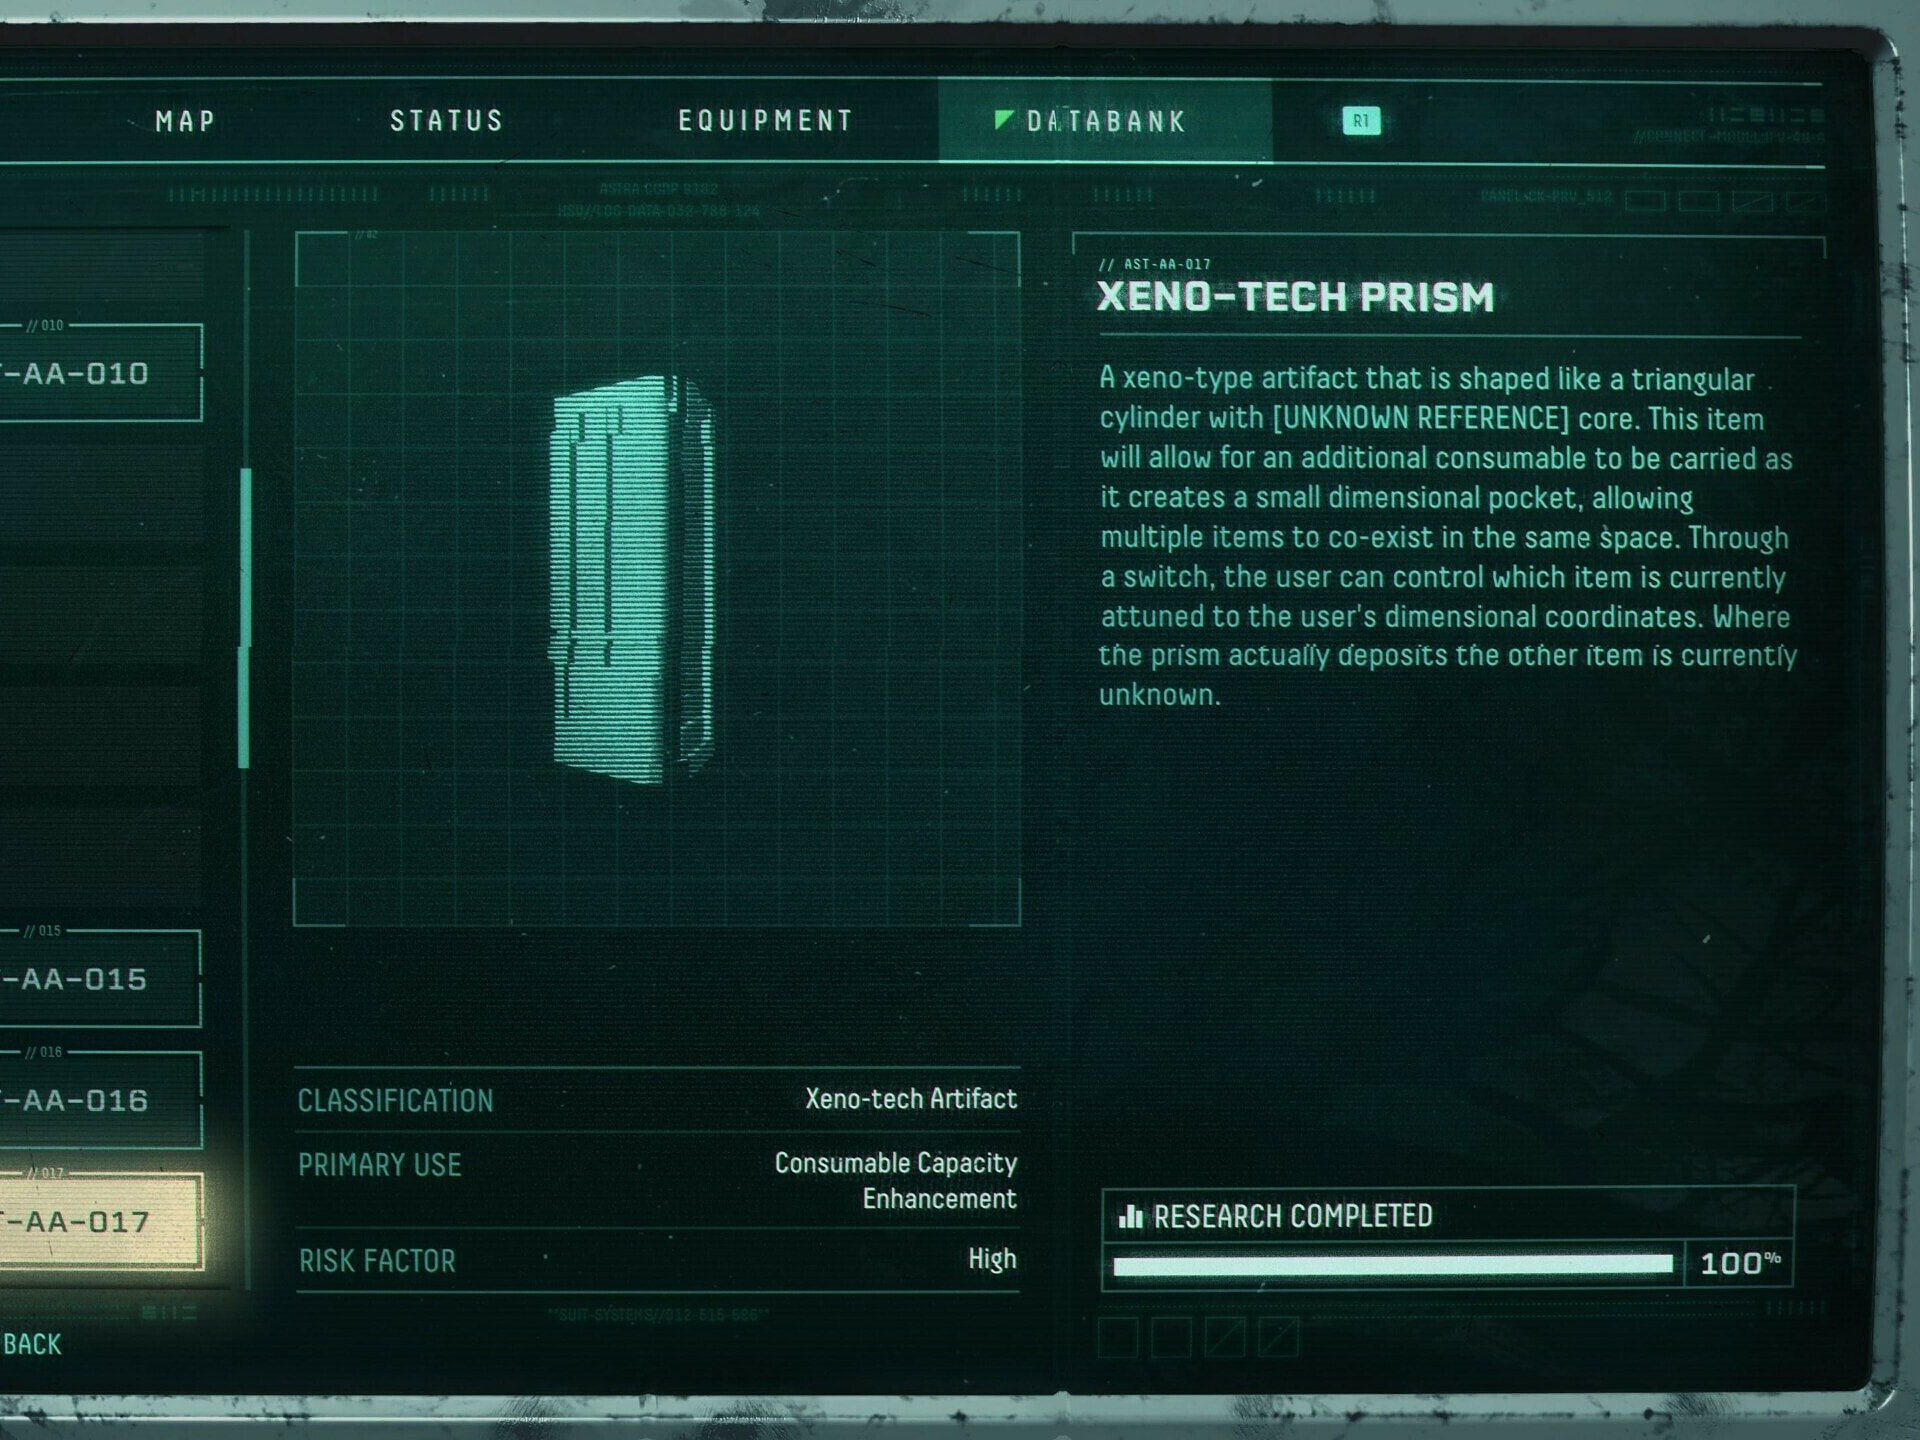
These Items increase the number of Consumables you can carry at any time. The first one is obtained at the beginning of the Crimson Wastes (Desert Biome)
Artifacts
Artifacts are obtained and used in the current cycle. They provide a variety of semi-permanent effects that are all beneficial to any run, but can supplement certain gear over others. These are unlocked through Datacubes, Repeating Bosses, Natural spawns, charging the Cthonos as well as other events. Augments will be included in this list due to their similarities.
Adrenaline Enchancer
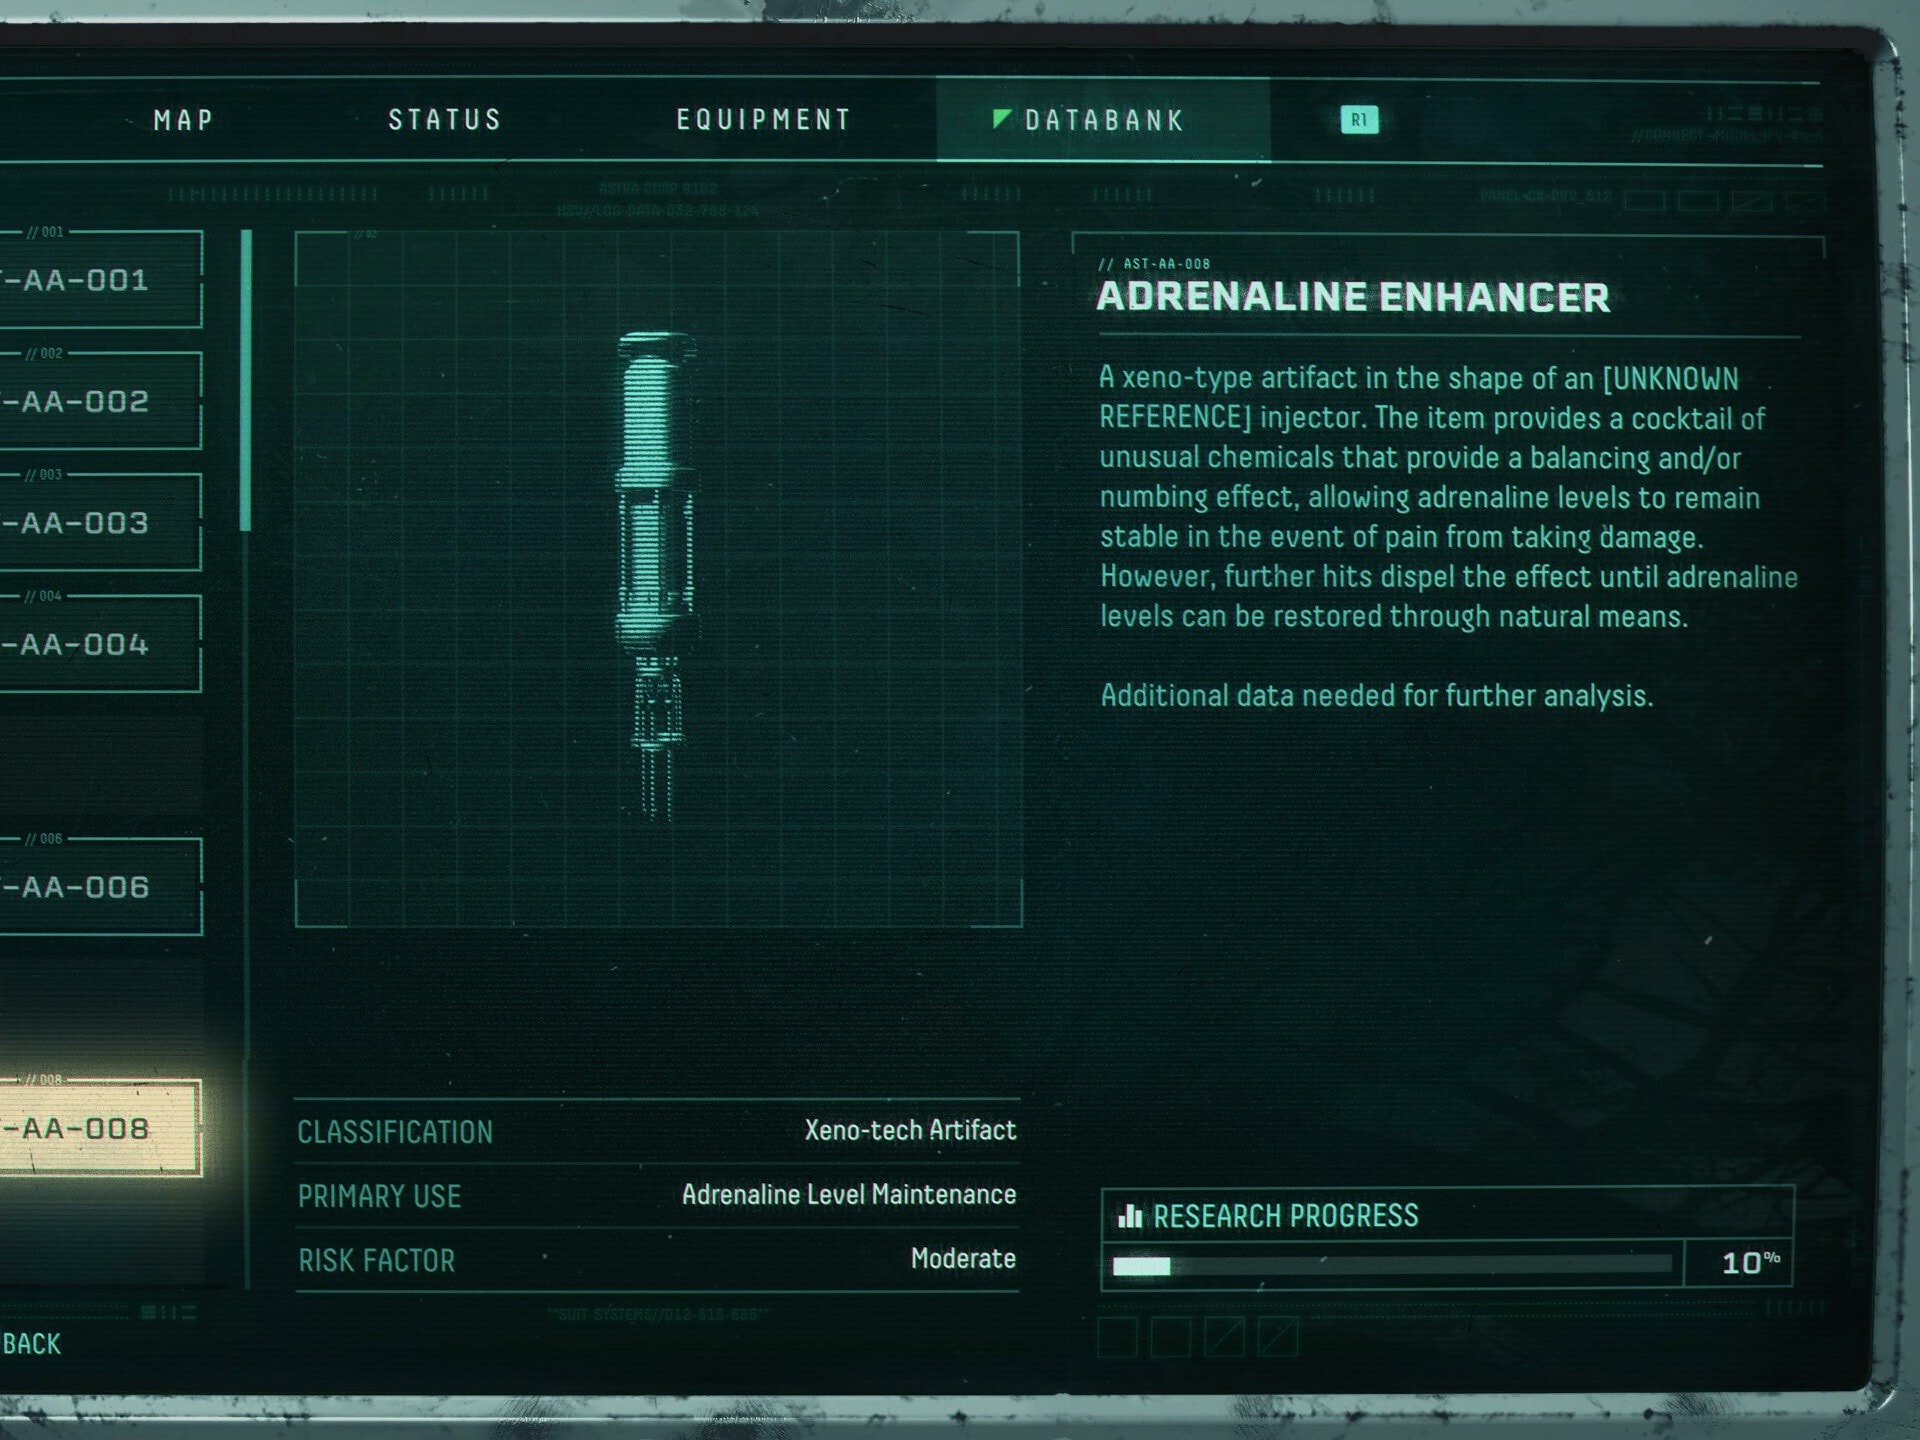
While you have this Artifact, You can take an extra hit before losing Adrenaline Levels.
This is easily one of the most useful artifacts available. Maintaining Adrenaline will make it easier and easier to progress, thanks to the Increased Obolite Gain and Increased Proficiency Gain from Adrenaline.
Adrenaline Leech

While you have this Artifact, You heal for 5% of damage dealt per Adrenaline level.
This is a decent artifact if you’re expecting to take heavy damage then rebuild your Adrenaline. It’s a bit niche despite being tied to adrenaline, only offering benefits if you take damage. Paired with the Adrenaline Enhancer though, it can be a very useful item.
Adrenaline Stimulants
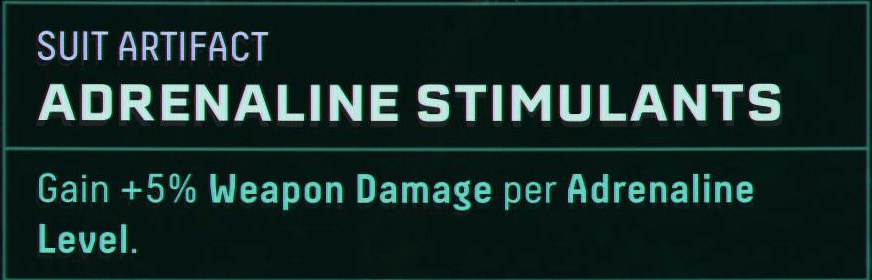
While you have this Artifact, Gain 5% Weapon Damage per Adrenaline Level.
If you can maintain Max Adrenaline, this is just free damage. Worth taking any time you find it.
Alt-Fire Augment
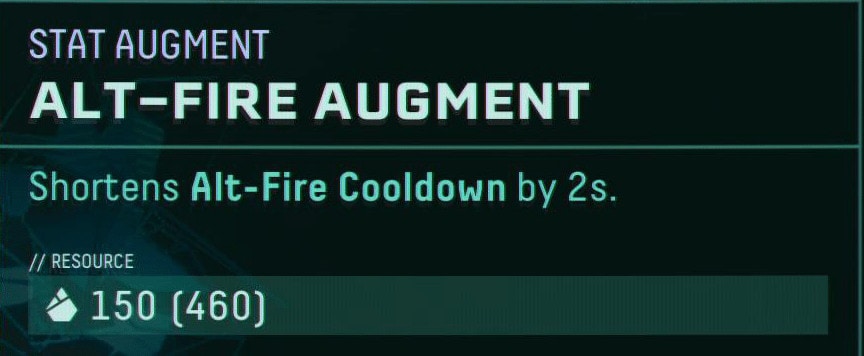
While you have this Augment, Alt-Fire Cooldown is reduced by two seconds.
This works best for Alt fires that are a single use. It’s less effective for beam type alt fires like Void Beam or Shocksteam. The single use one tend to be more powerful and have longer cooldowns that benefit from this.
Alt-Fire Protection
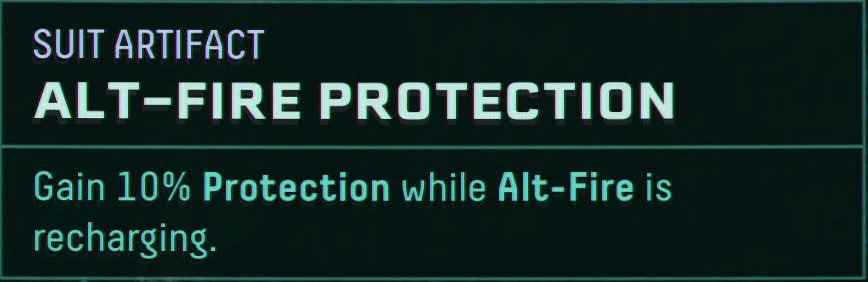
While you have this Artifact, Gain 10% Protection while Alt-fire is on Cooldown
This works decently well with any Alt-fire as long as you make use of the Alt-fire every chance you get. It can help build the habit of using Alt-fire more often as well, which can be good or bad.
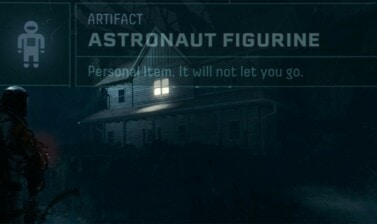
Astronaut Figurine
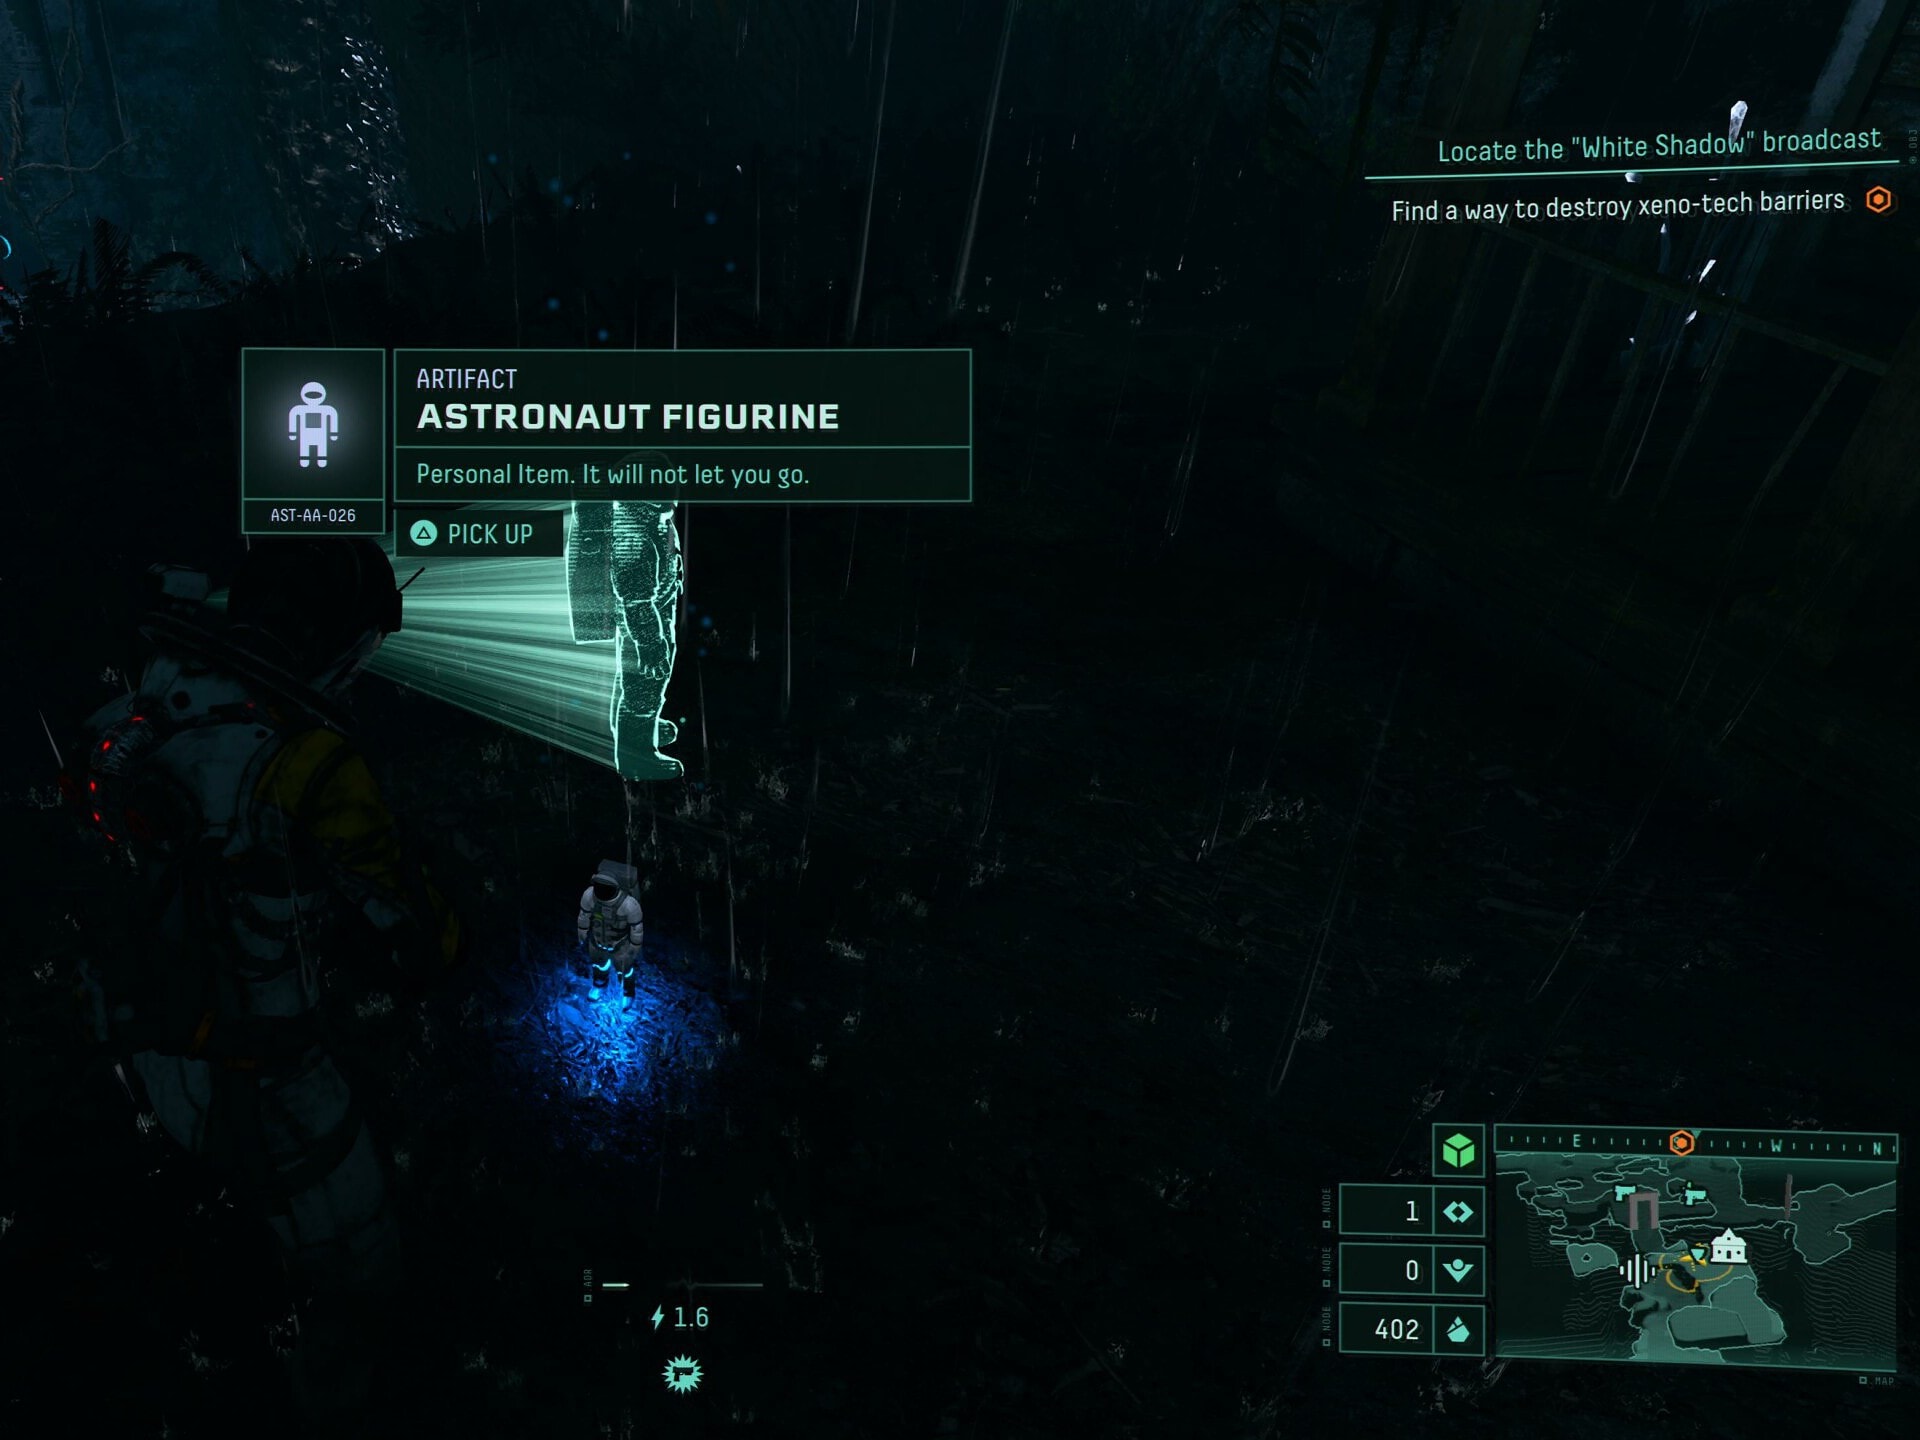
While you have this Artifact, you Revive to 50% Integrity after taking fatal damage.
It’s definitely a must-have for going into a new Biome or fighting a new boss. Its life-saving ability will often allows you to progress further than usual.
This particular artifact, unlike most others requires you to visit a side area to unlock. You can read our How to unlock the Astronaut Figurine Guide here for additional details on that.
Blade Balancer
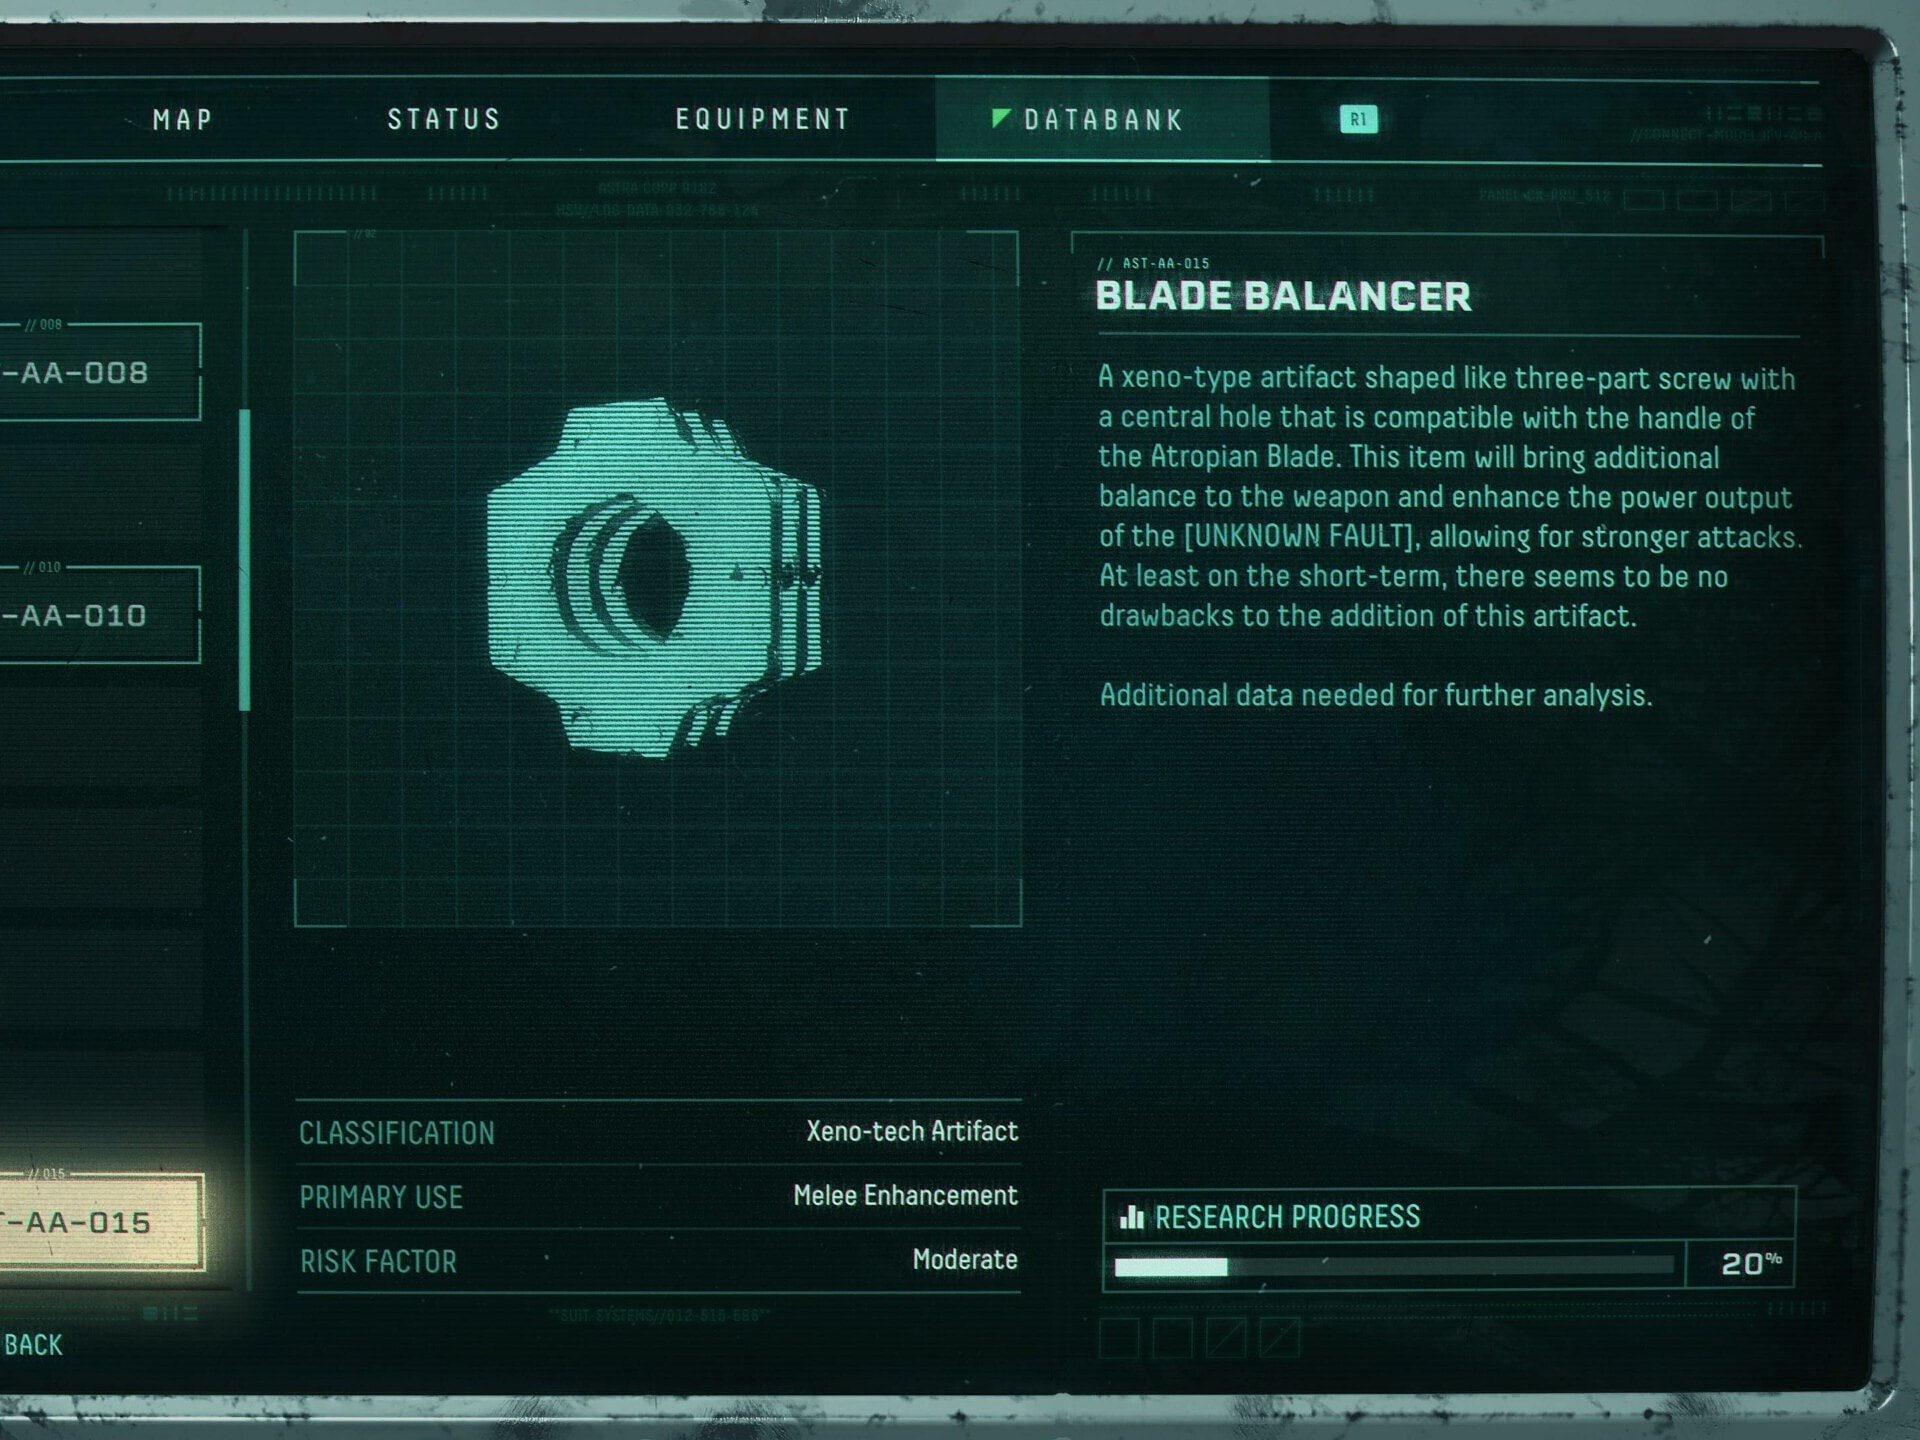
While you have this Artifact, Deal increased melee damage.
By itself, this is actually pretty lackluster despite being a melee buff. Your melee is already strong enough to one shot a lot of weaker mobs, so this only means extra damage against bigger targets, and more stagger potential.
Blown Nightlight
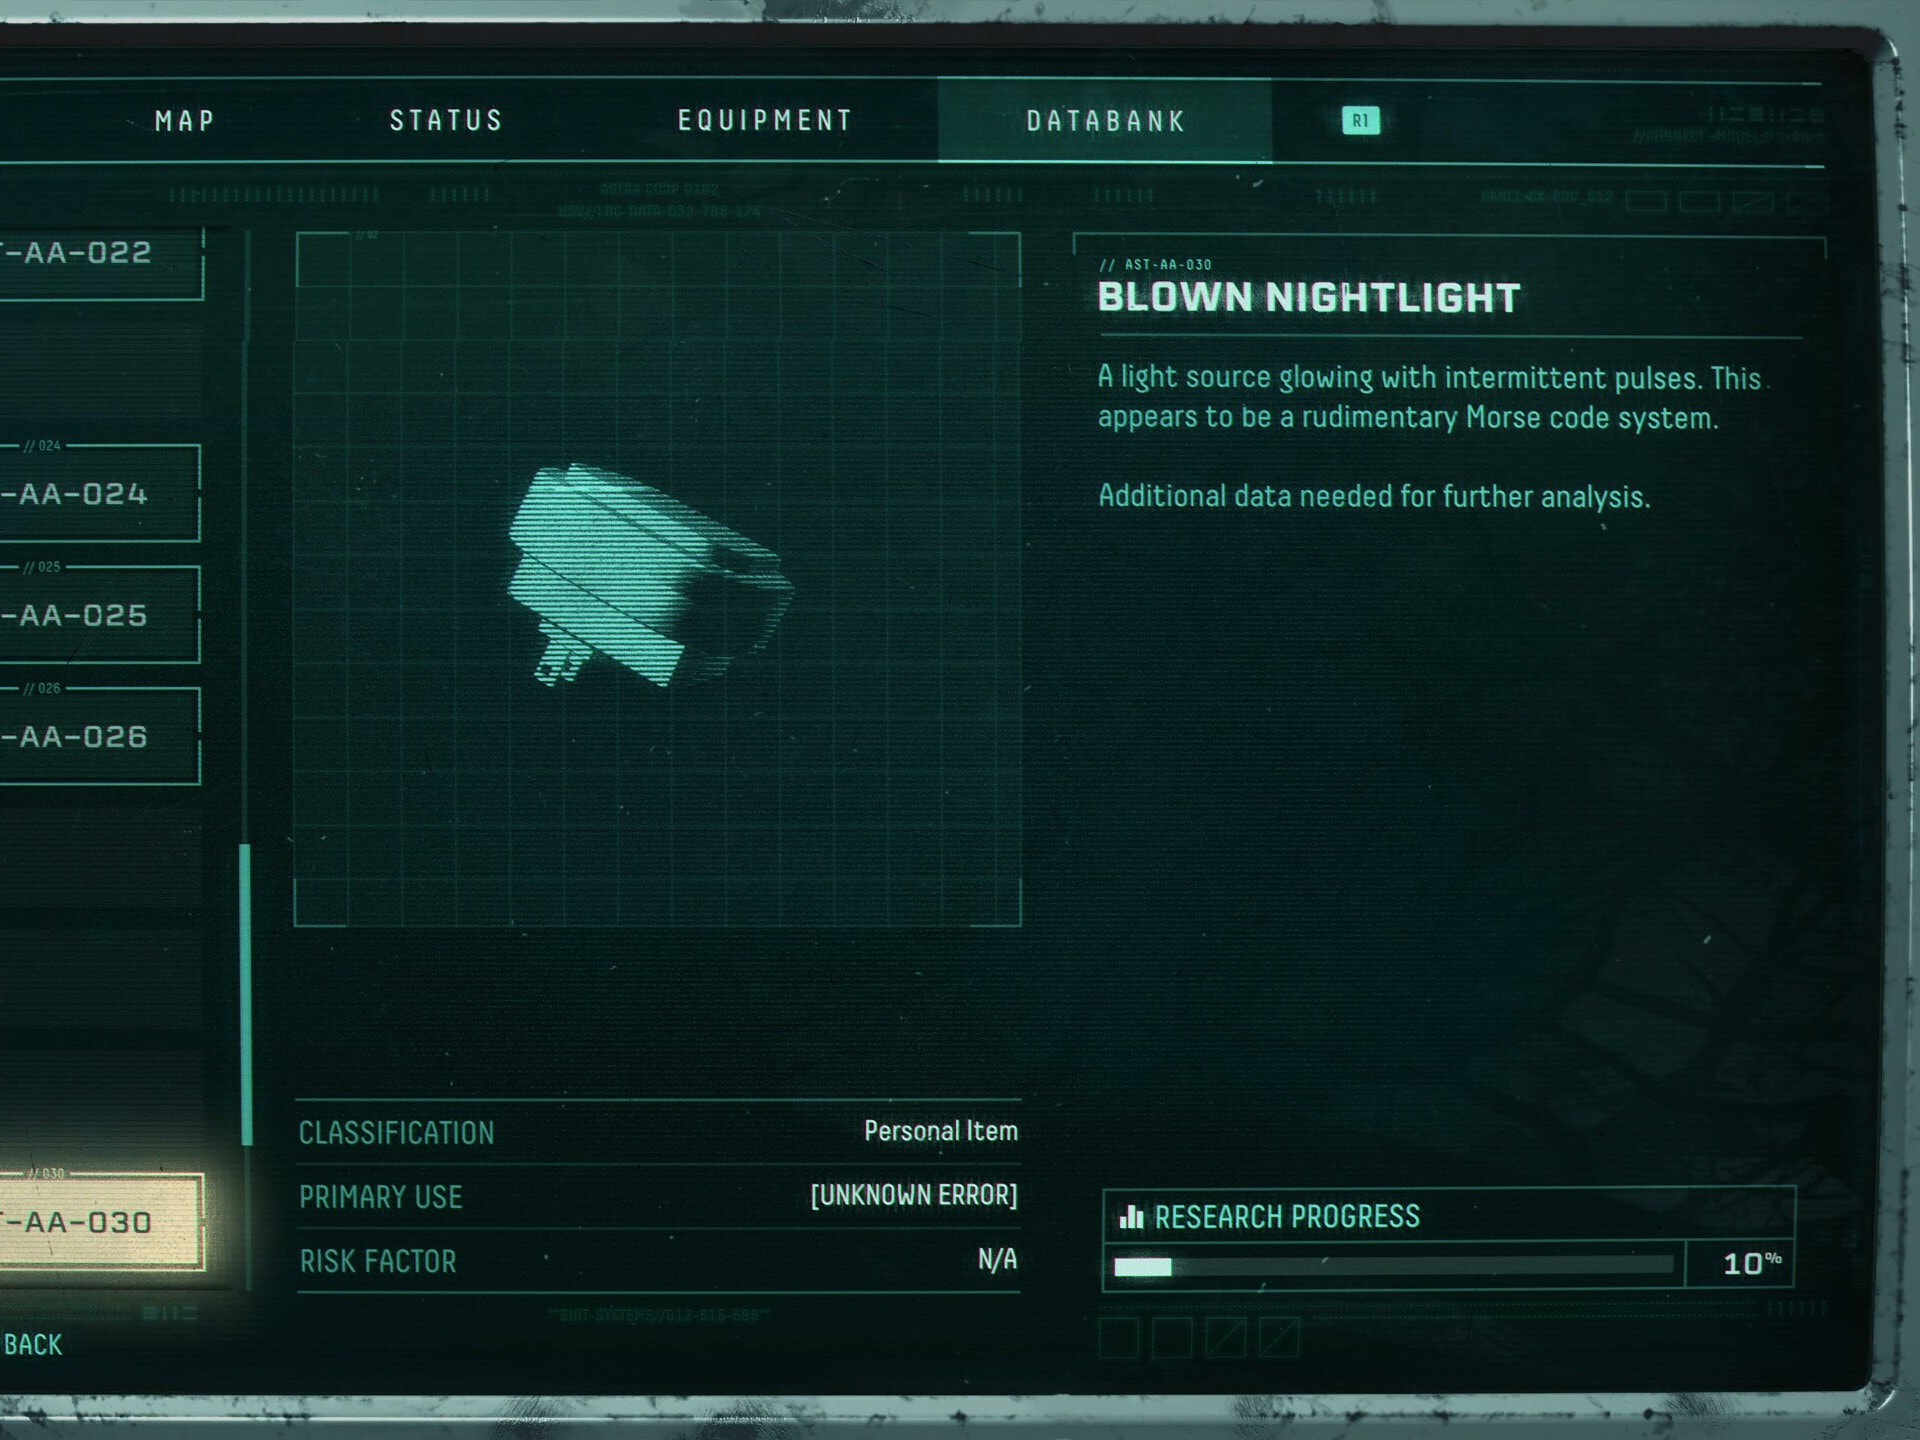
While you have this Artifact, Weapon Damage Increases while at Full or Low Integrity.
This can be useful if you’re maintaining Full Integrity. Trying to keep it active at Low Integrity is much harder and riskier. Any healing or damage can bump you out of either threshold and just makes this less worth the time to pick up.
Damage Augment
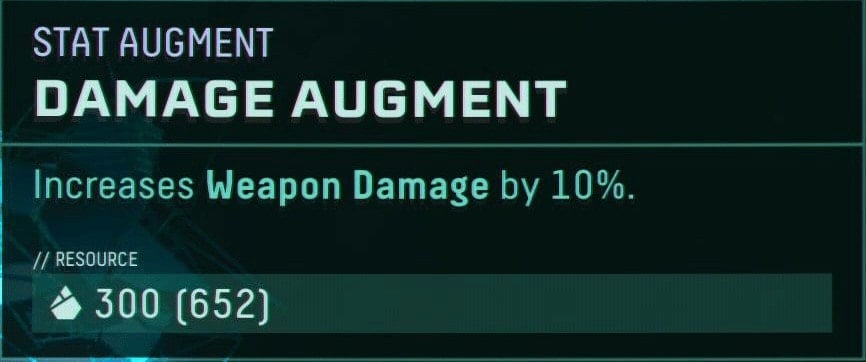
While you have this Augment, Weapon Damage is increased by 10%.
This is a pretty good Augment, given that it’s extra damage. Though you won’t see it until after the first stage, so it ends up having a bit less impact by the point you can see it.
Dash Blast
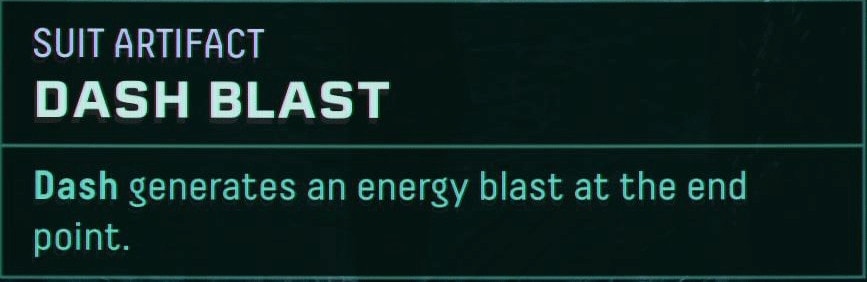
While you have this Artifact, Dashes will generate an energy blast to be released at the end point of the dash.
Having your Dash be a damage option is nice, but this doesn’t deal enough damage to want to dash into enemies and leave yourself vulnerable. It can have niche use if stacked with other bonuses, but by itself it’s not worth using.
Execution Blast

While you have this Artifact, Melee Kills will emit an energy blast.
Melee is capable of carrying you through the first biome, this helps it do that easier by giving it mobbing potential. Similar to Dash Blast, the damage isn’t amazing, but leaves you a bit less vulnerable in its use. Past early stages though, it falls off due to enemy Health.
Execution Bolts
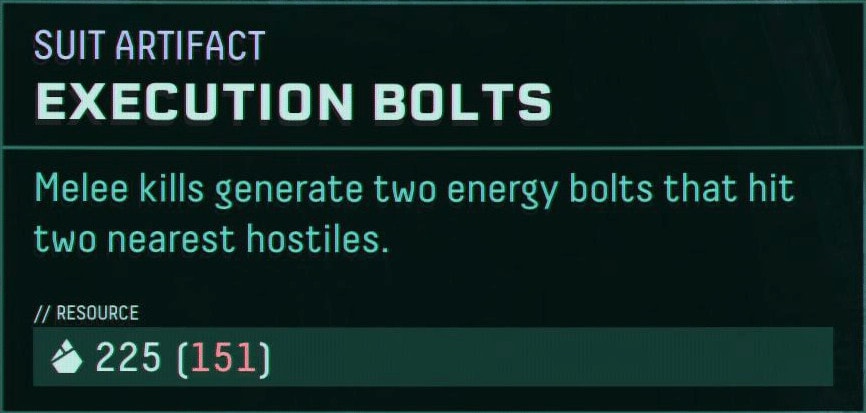
While you have this Artifact, Melee Kills will generate two energy bolts that hit the two closest enemies.
Considering this bolts are instant hits that deal pretty good damage, this can be incredibly helpful early on. Later into runs it becomes less useful though, as there’s more flying enemies and the ground enemies don’t immediately die to Melee.
Execution Coolant

While you have this Artifact, Melee Kills reduce Alt-fire cooldown by five seconds.
This can be incredibly useful at all stages, unlike the other Melee-based Artifacts. Alt-fires are powerful in their own right, and recharing them faster can help you melt groups of enemies. Getting Melee Kills will still be difficult however.
Execution Rush
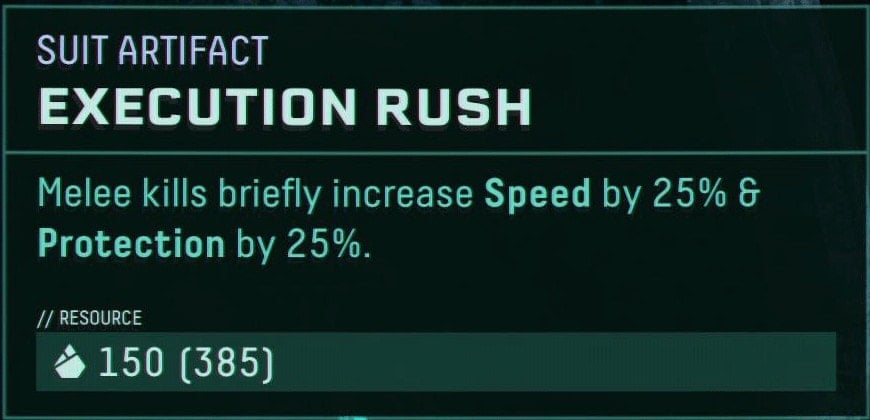
While you have this Artifact, Melee kills briefly increase Speed and Protection by 25%.
Like other Melee-based Artifacts, it’s useful early, but not much later on. While it offers a ton of protection, Melee Kills are still harder to come by later into the game.
Golden Coil
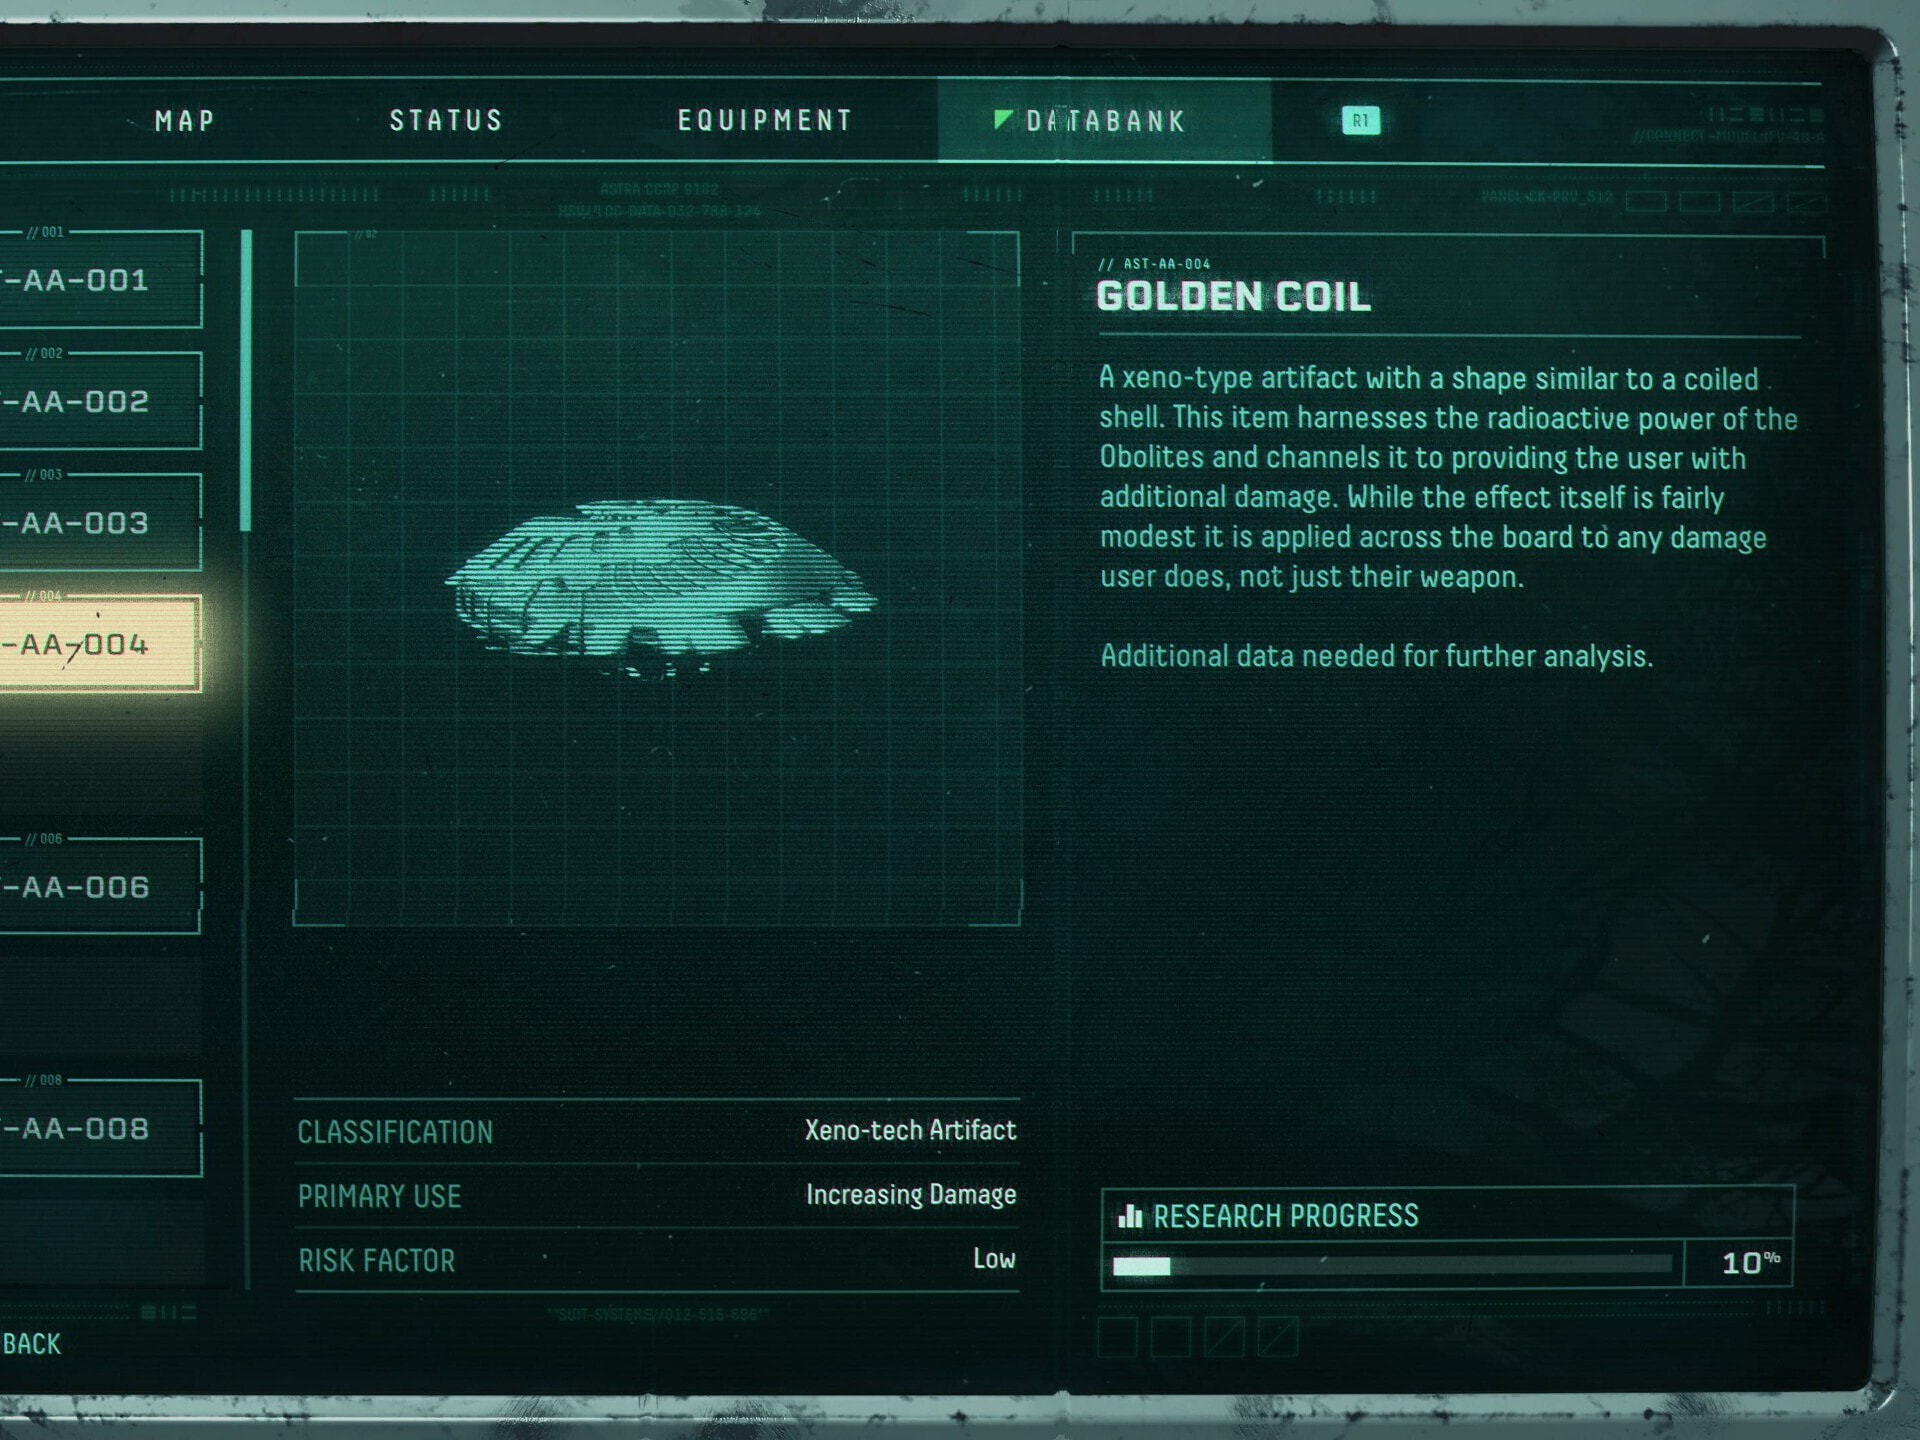
While you have this Artifact, Gain 5% damage for every 200 Obolites you hold, max bonus of 20%.
If you can Maintain Max Adrenaline, you can get the full benefit from this at a decent pace. It’s worth picking up in most situations, even if you don’t immediately benefit from it. Fabricators don’t appear to be too common, so it’s easy to have a ton of Obolites built up.
Murmuring Cocoon
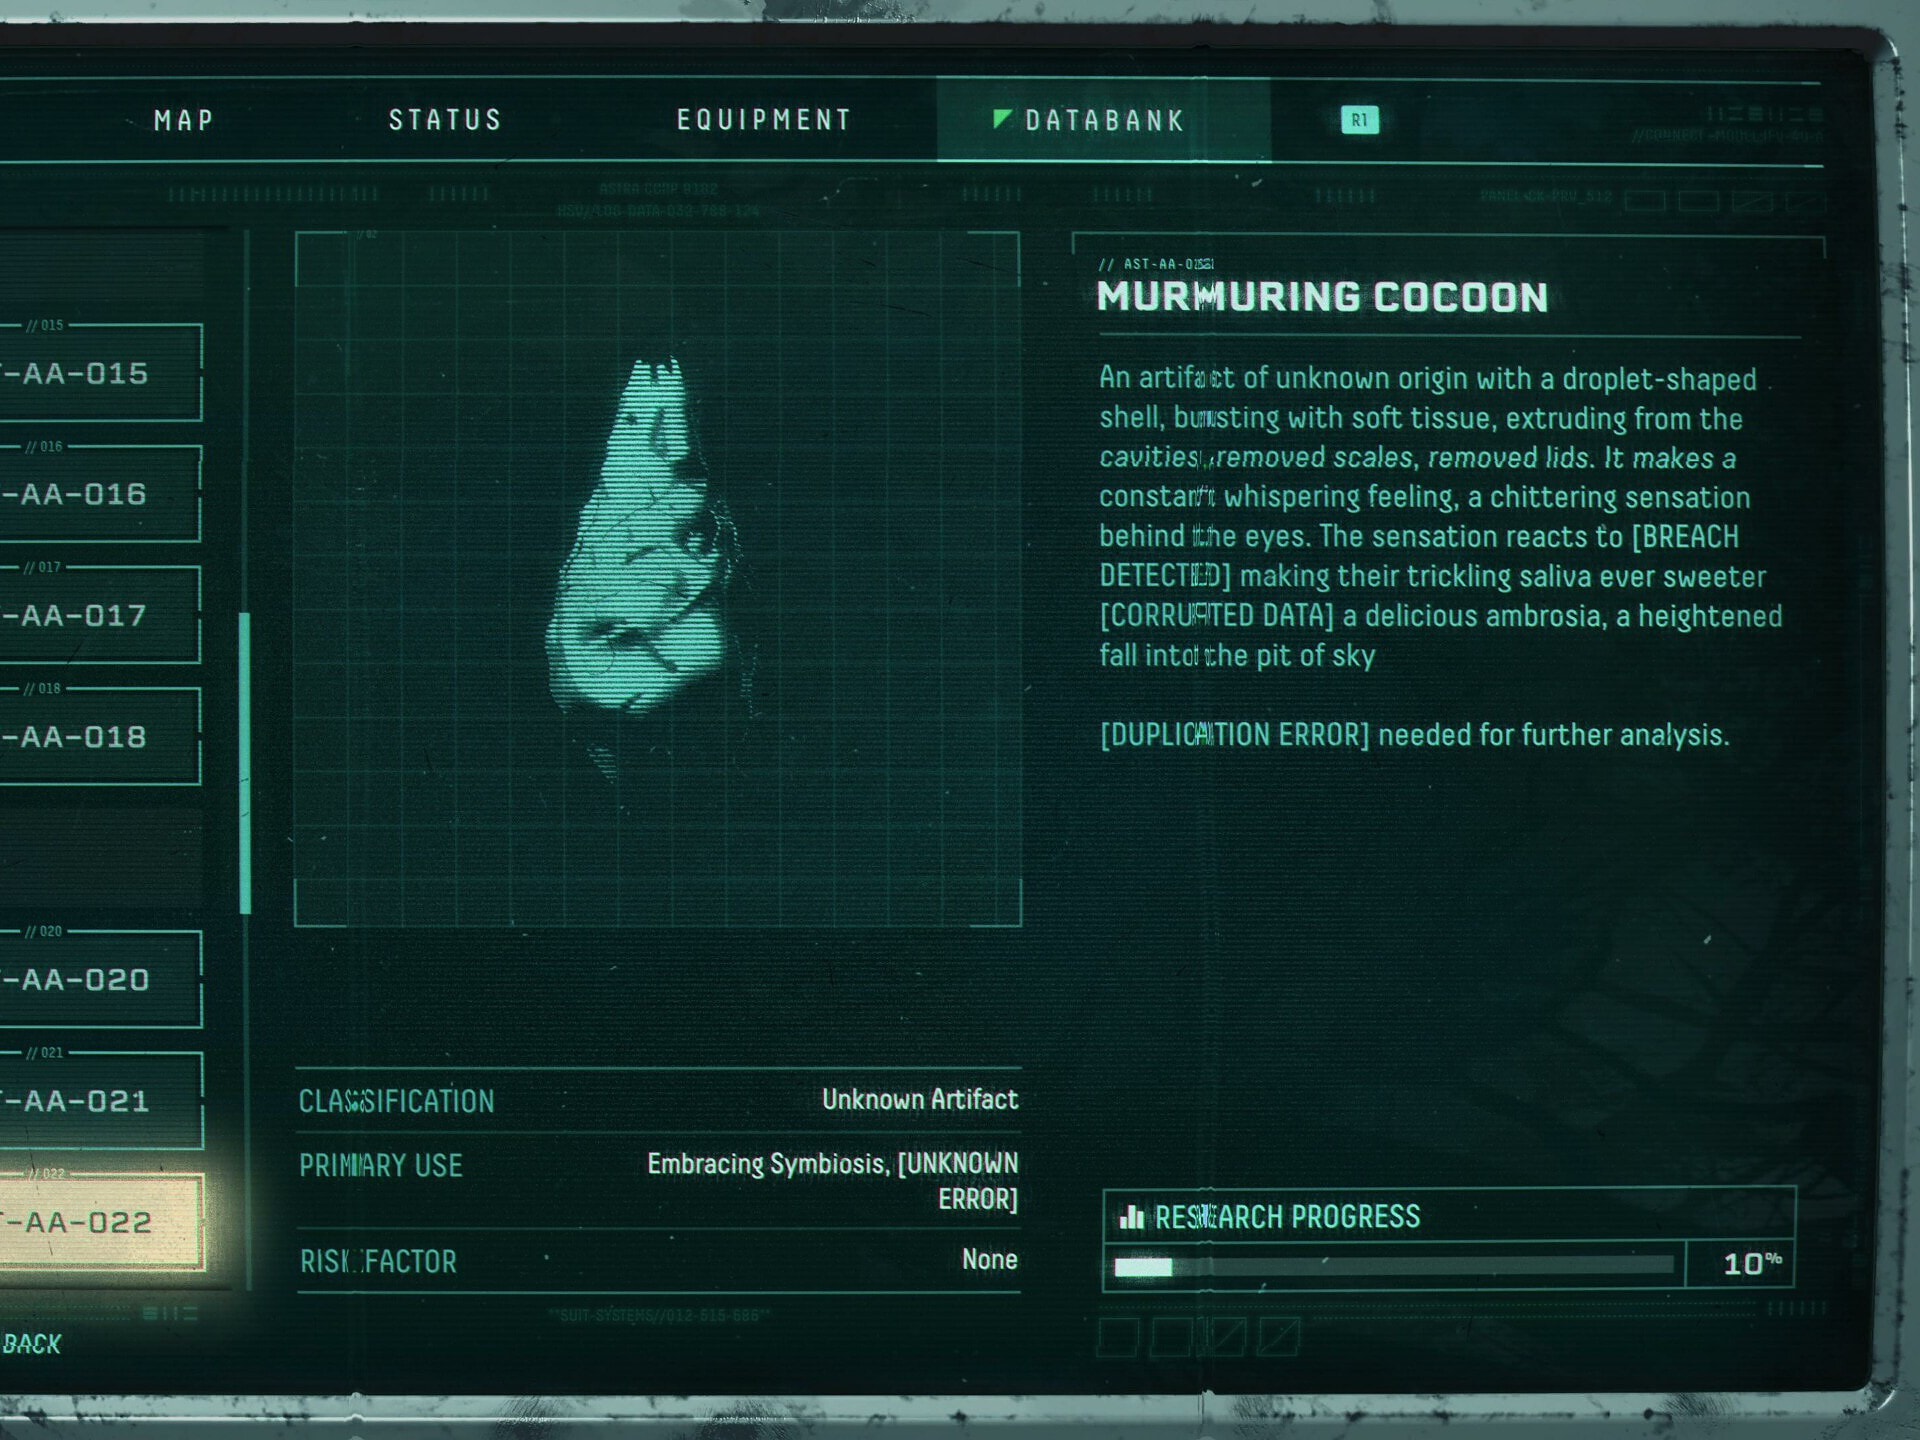
While you have this Artifact, Increase the Positive effects of Parasites.
This is almost always a good Artifact to grab. While not all Parasites are the best to pair with it, ones like the Wiretail and Sagetooth. The better the positive effect, the better this item is.
Obolite Extractor
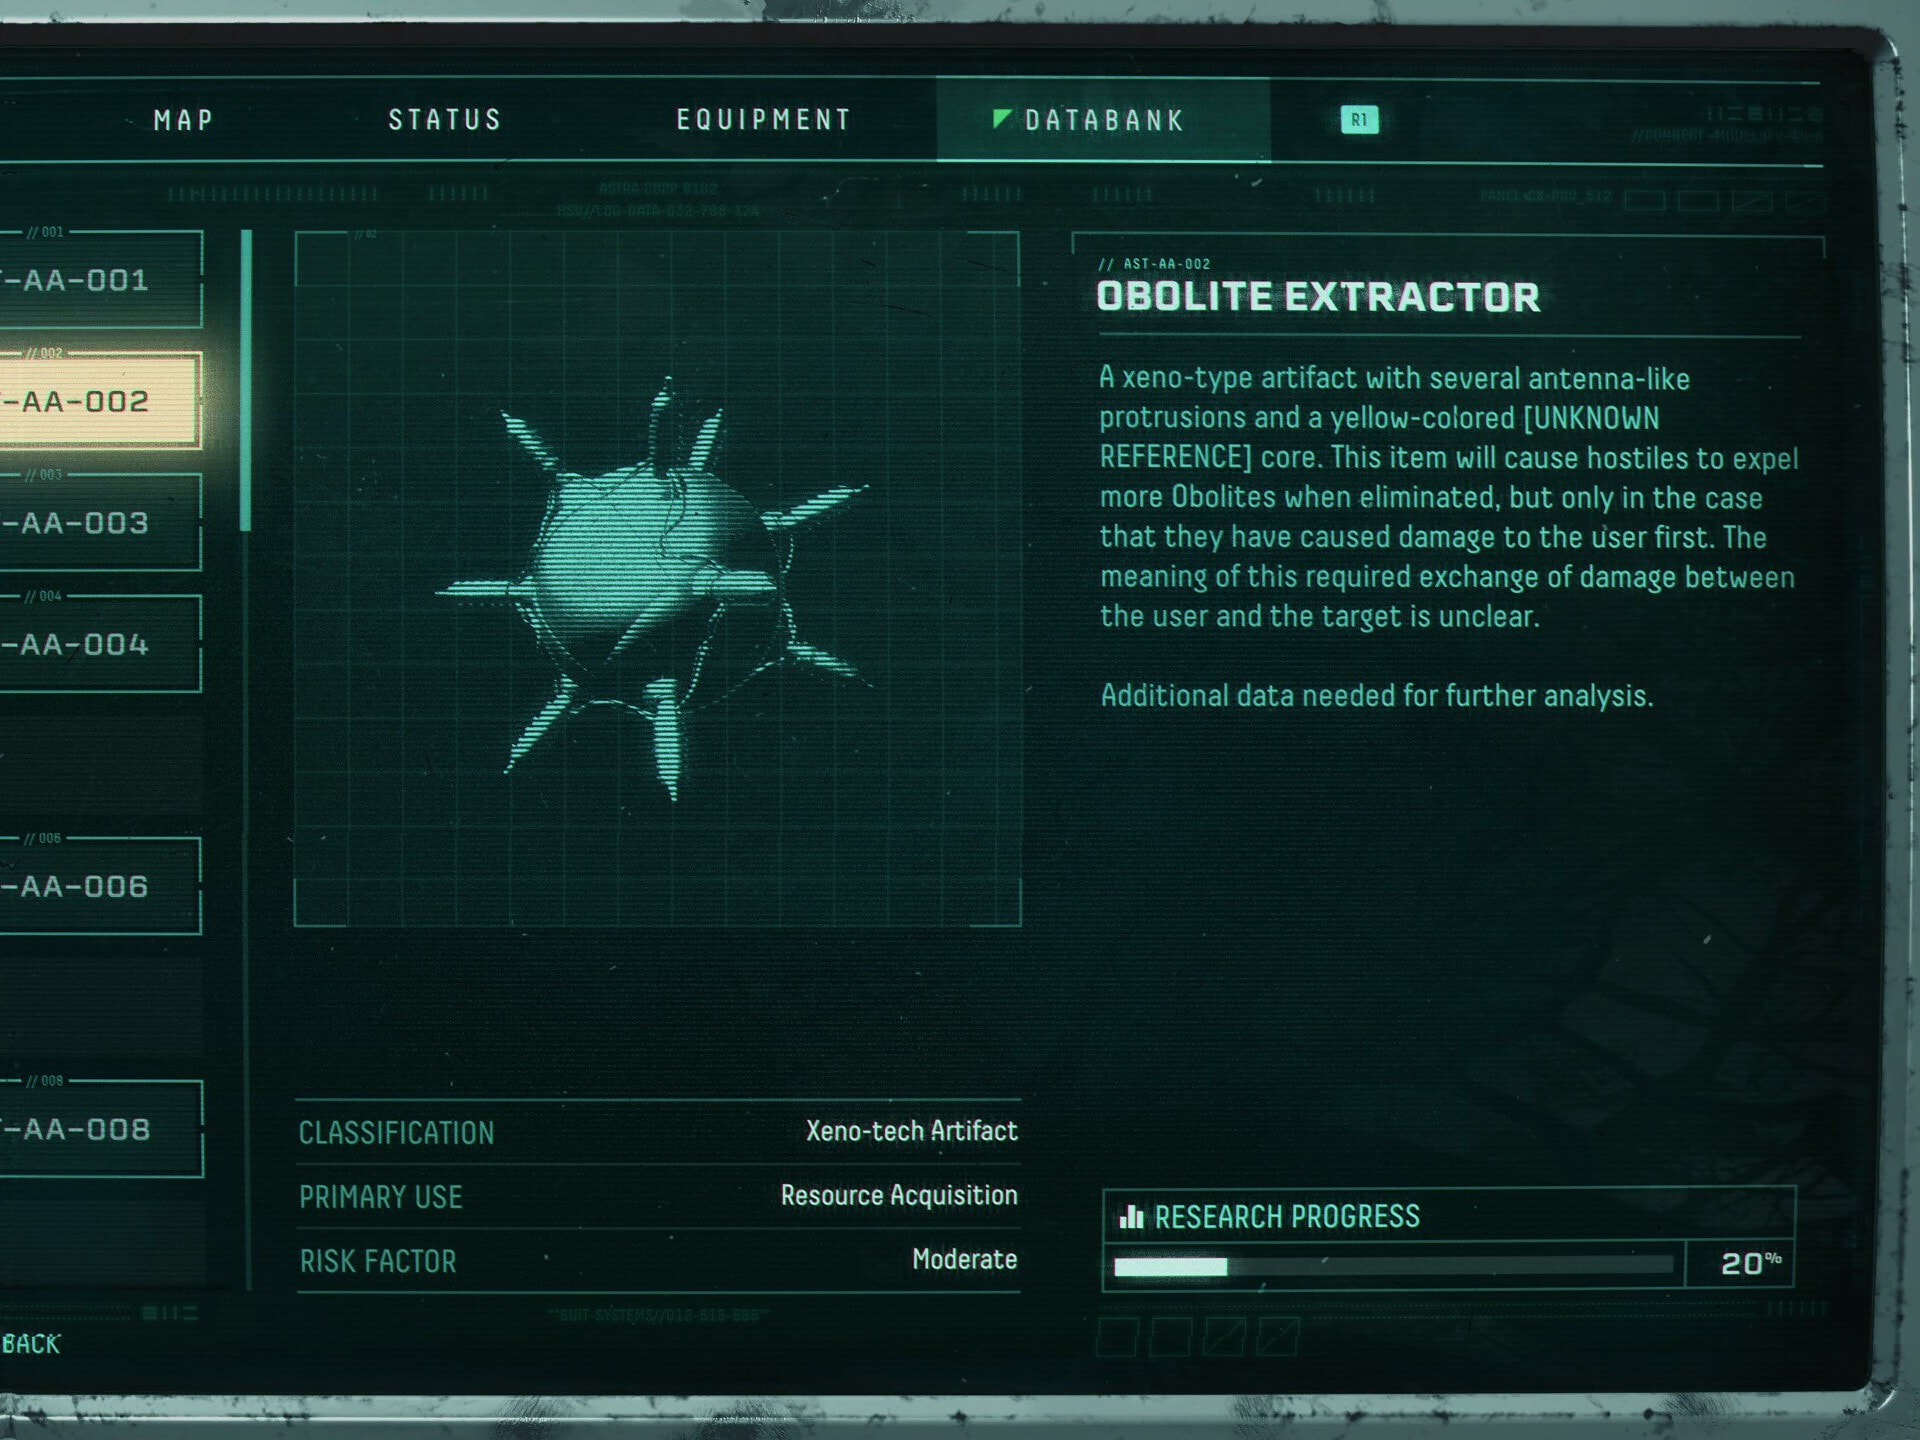
While you have this Artifact, Enemies that have injured you drop 50% more Obolites.
This is useless most of he time, however, it does help increase boss payout more often than not. Bosses tend to be the only thing that will ever hit you, just due to the area coverage of their attacks. You could let other enemies hit you, but since this is the equivalent of Level 5 Adrenaline.. it’s not usually worth it.
Obolite Stabilizer
While you have this Artifact, Dropped Obolites last three seconds longer.
Almost always a good pickup. This artifact alone can offset a couple common Parasite debuffs and make it easier to fix a lot of Malfunctions.
Overload Bolts

While you have this Artifact, Successful Overloads generate two energy bolts that hit the two neatest Hostiles.
Unlike the Melee version of this Artifact, this one will always remain useful. As long as you can reliably hit Overload timings, it will out put plenty of damage. It’s much more effective on weapons like the Rotgland Lobber which have frequent Overload timings.
Overload Rush
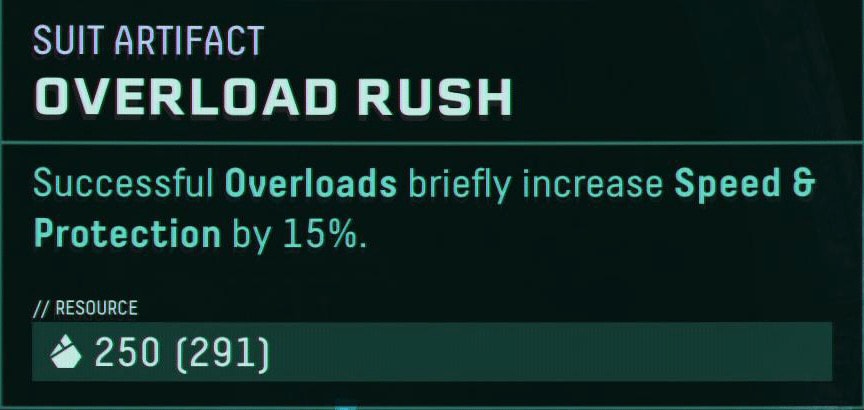
While you have this Artifact, Successful Overloads briefly increase Speed and Protection by 15%.
Despite being weaker, this Artifact is still more effective than the Melee version. Like the other Overload Artifacts, it works best on weapon with frequent overload timings.
Phantom Limb
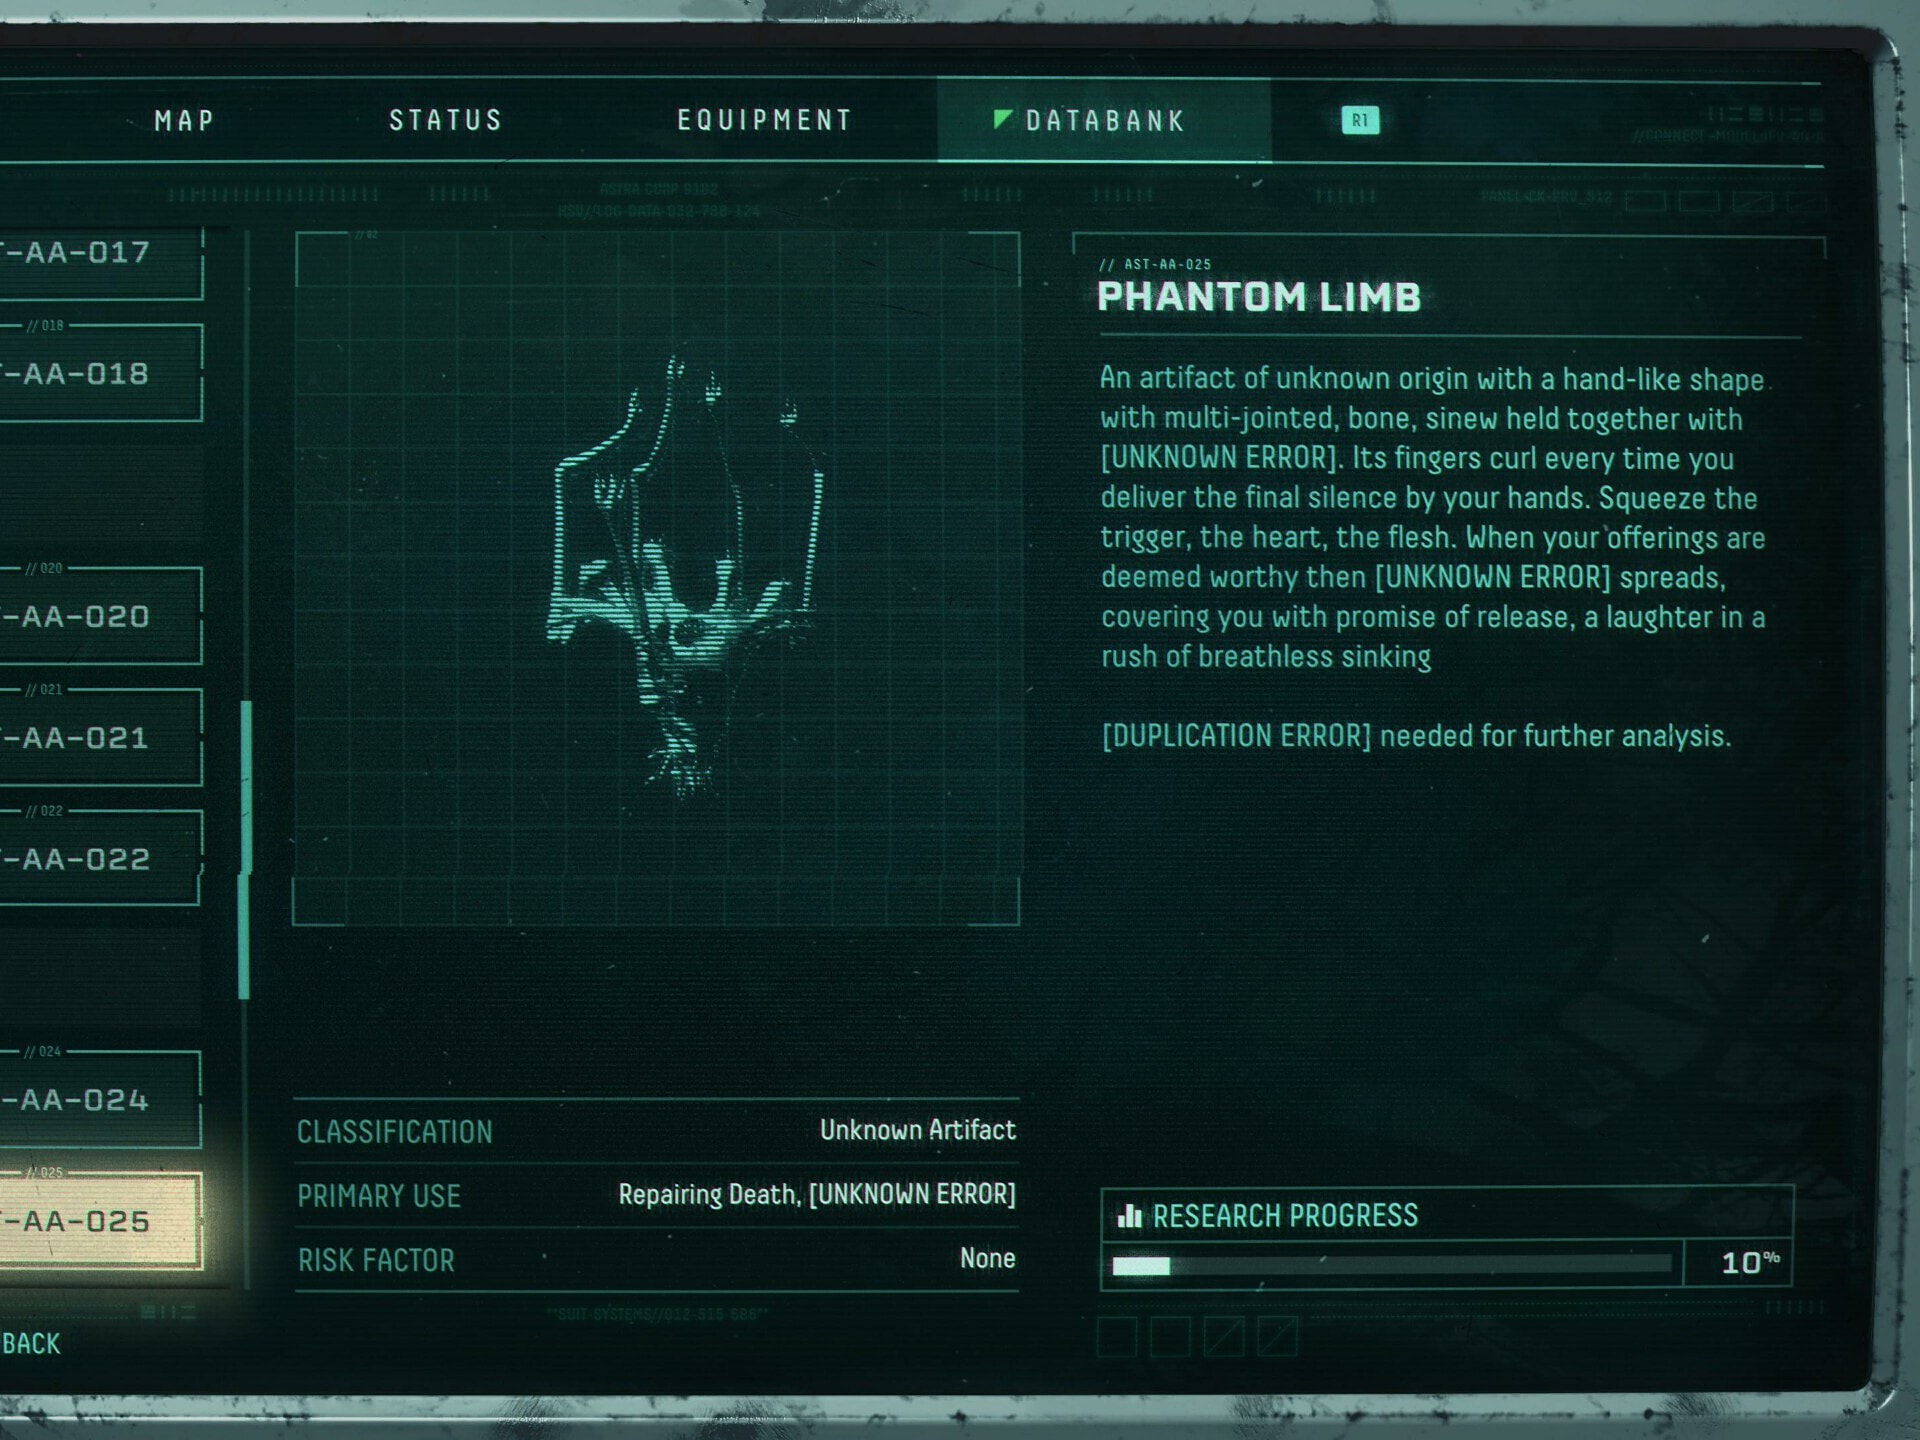
While you have this Artifact, Killing enemies has a 10% chance to recover Integrity.
This artifact can be useful, but the chance it actives is pretty low, to the point it’s easier to save the obolites if it shows up in a Fabricator and just focus on avoiding damage.
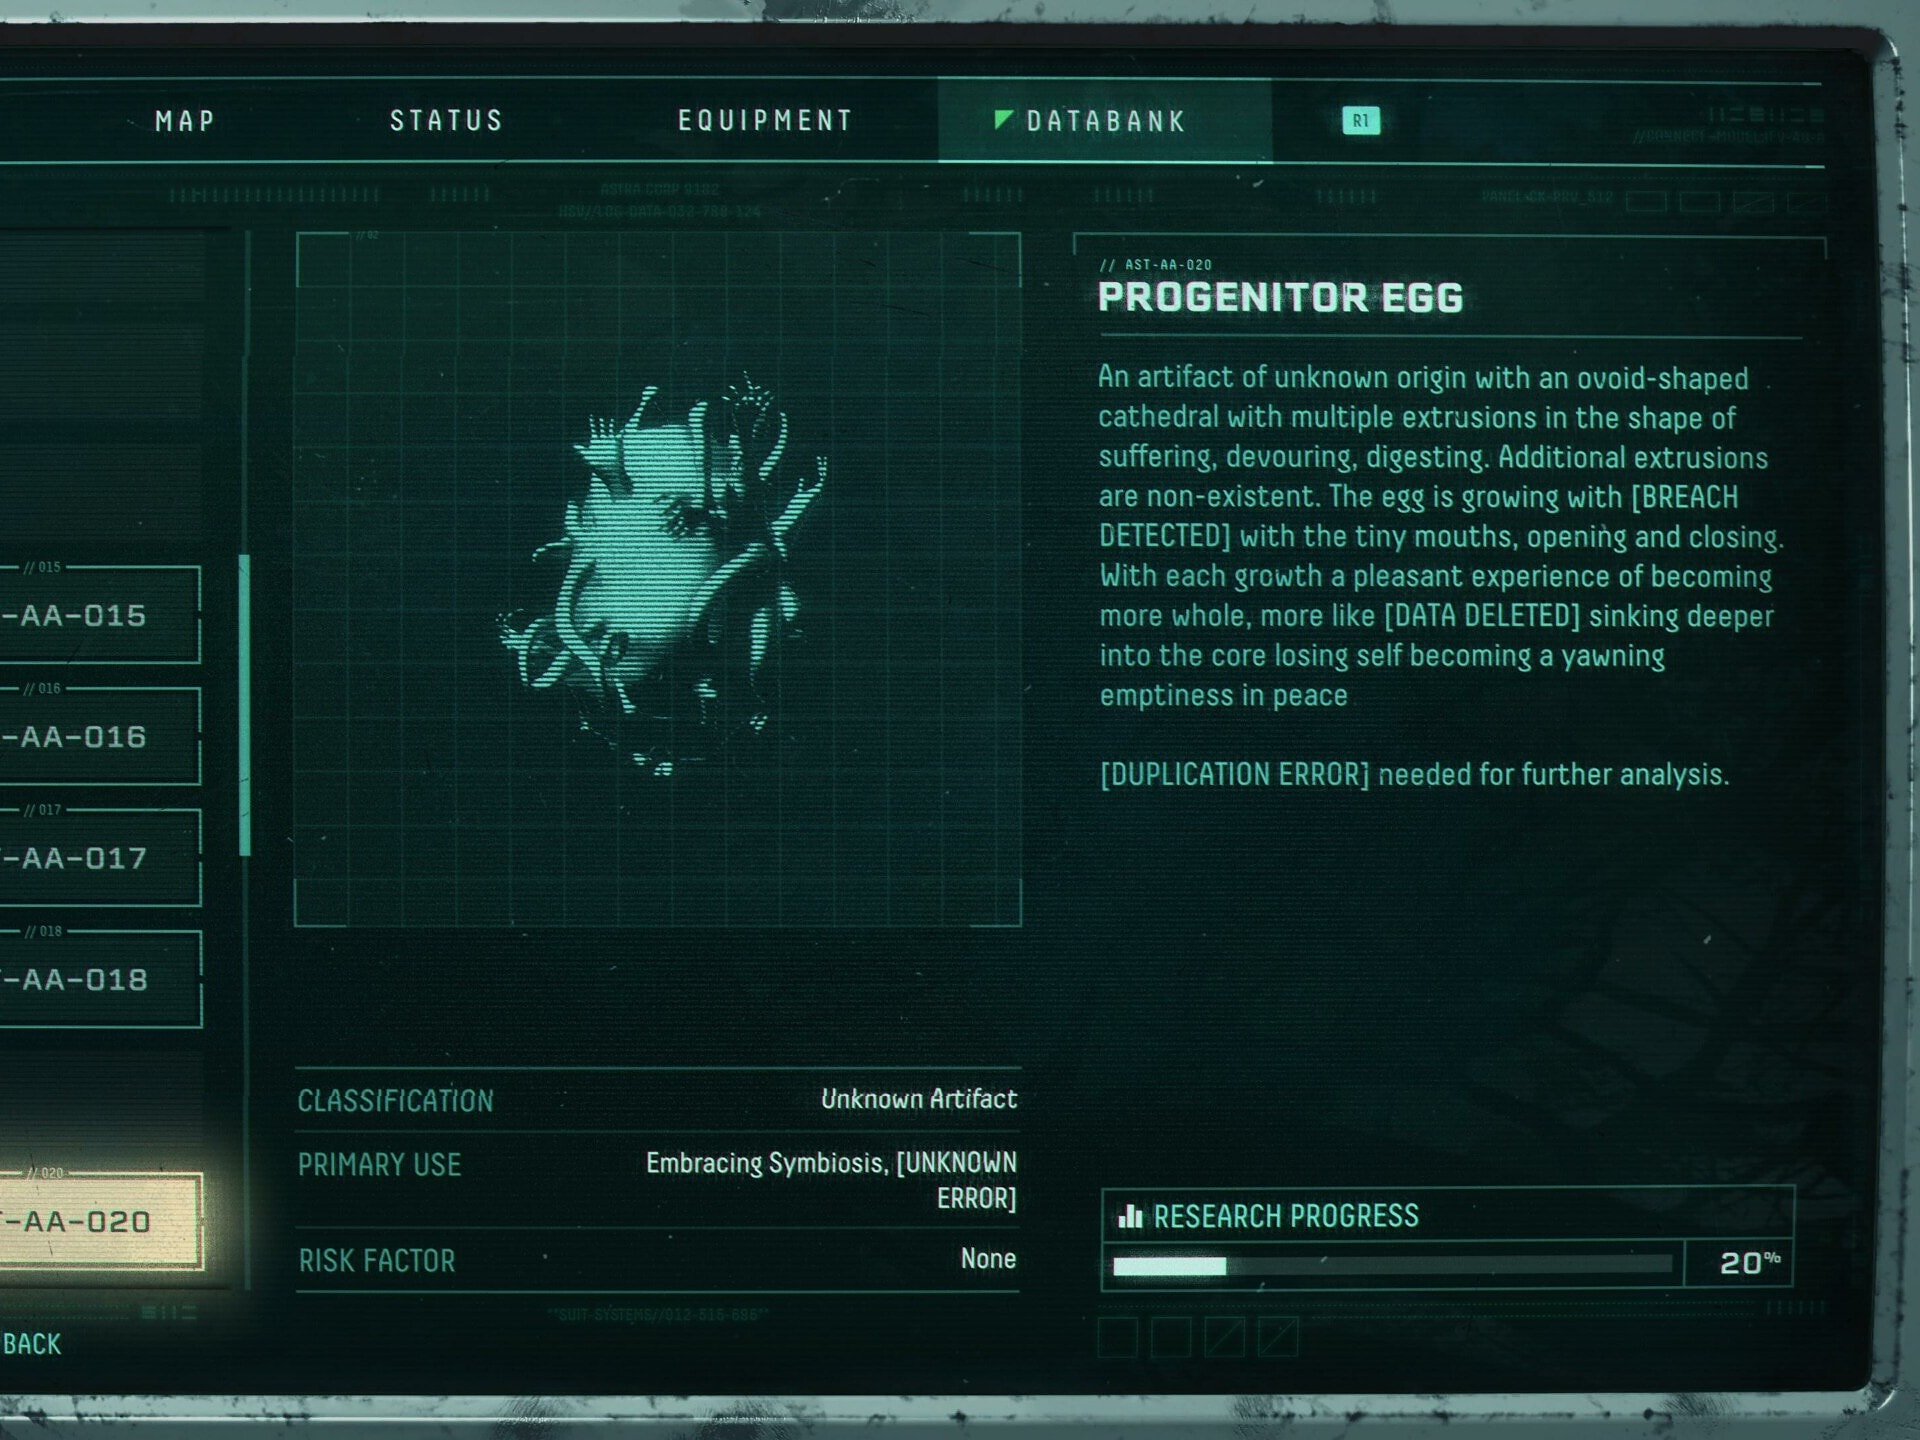
Progenitor Egg

While you have this Artifact, Attaching or Detaching Parasites repairs Integrity.
If you get this artifact early into a run it cna help a lot. It will often offset a lot of forced damage from Malfunctions or Parasite prefixes. It’s still pretty niche as avoiding damage can be easier than healing any damage taken.
Projectile Response

While you have this Artifact, Your suit will emit projectile when you take damage.
Since this requires you to get hit, it’s general usefulness lies in fighting bosses. Since boss fights can be plenty chaotic, it’s easier to get hit by stray projectiles.
Protection Augment
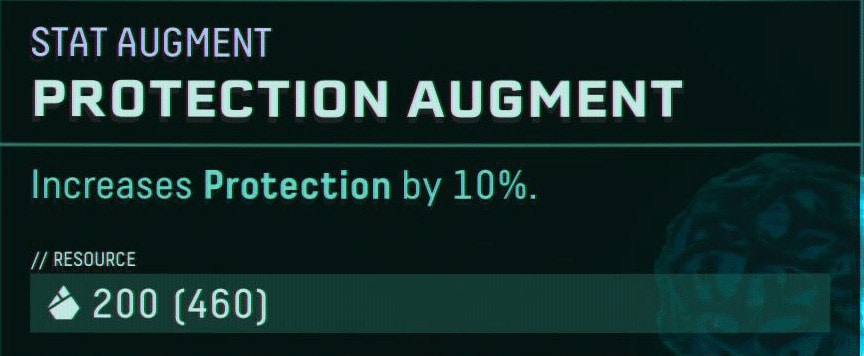
While you have this Augment, Protection is increased by 10%.
This is always worth the pickup if you see it. More protection helps you survive longer, even if you get hit often. The only reason not to take it is if you don’t have the Obolites.
Pulsating Mass
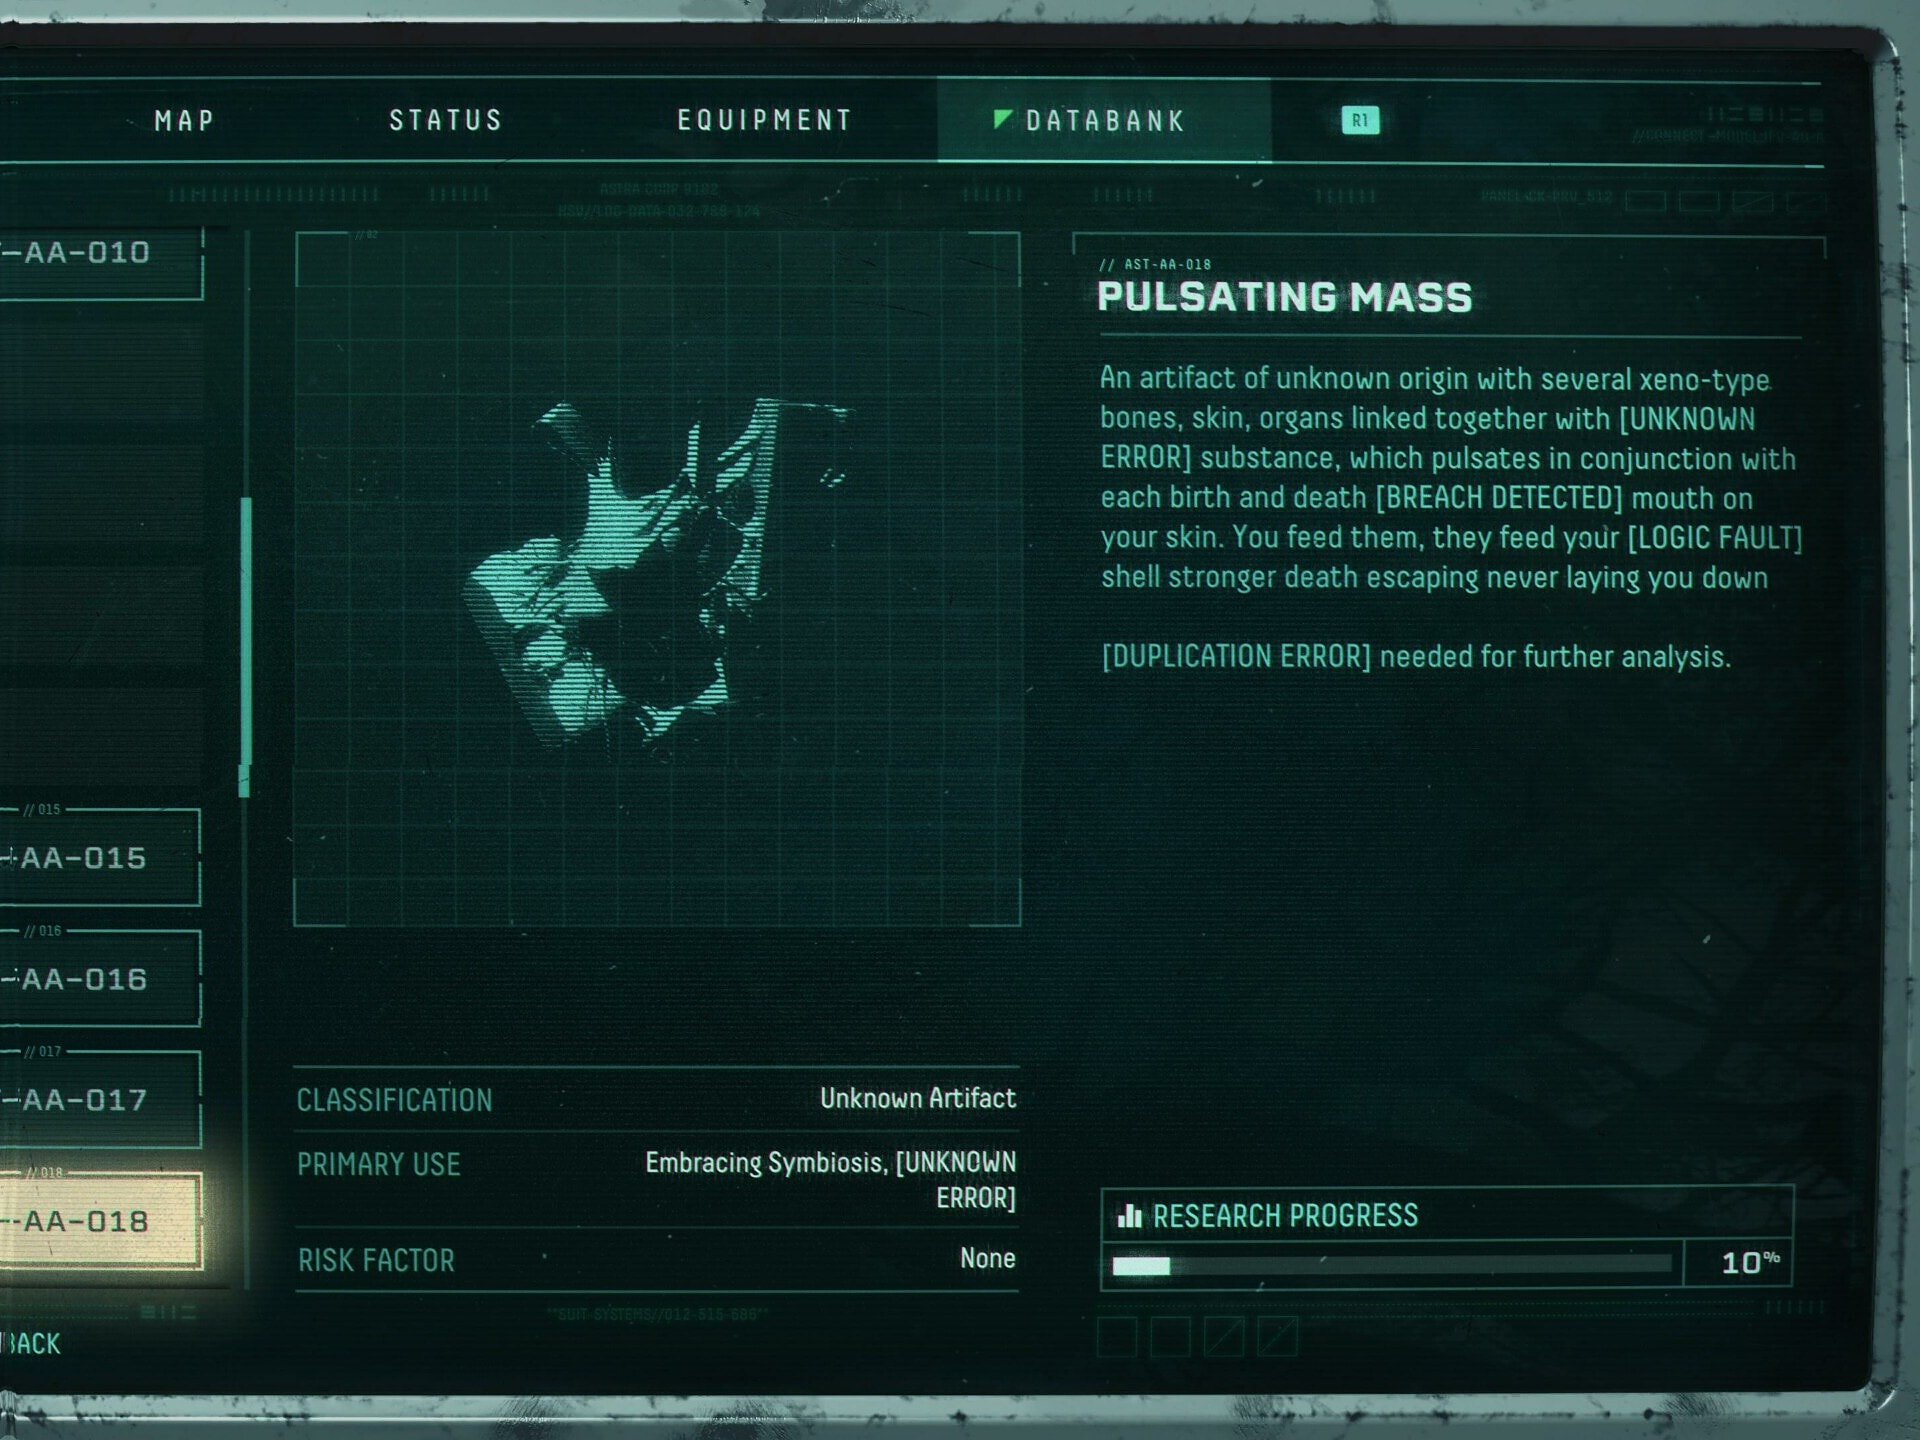
While you have this Artifact, Attaching or detaching Parasites improves your Max Integrity.
This artifact works best if gotten early in a cycle. Parasites are pretty common, and this effect isn’t hard to trigger due to that. Just be careful which Parasites you pickup.
Repair Circuit
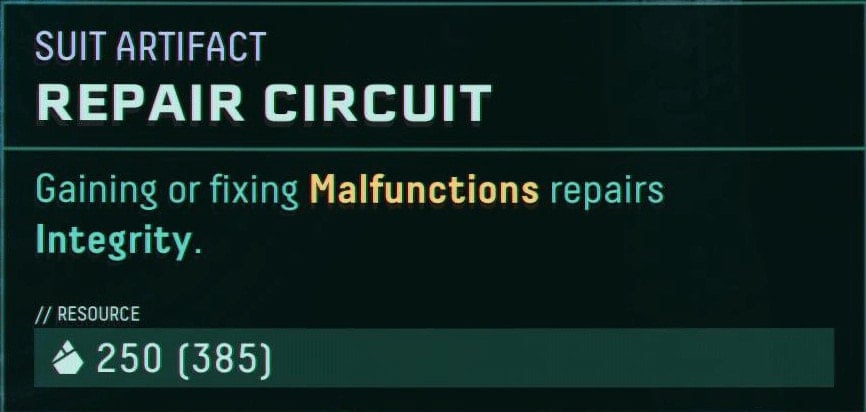
While you have this Artifact, Gaining or Fixing Malfunctions repairs Integrity.
This artifact rewards you for taking chances with Malignant Items or chests. It’s generally worth grabbing, since Maglinant chests in particular tend to have better items.
Resin Enhancer
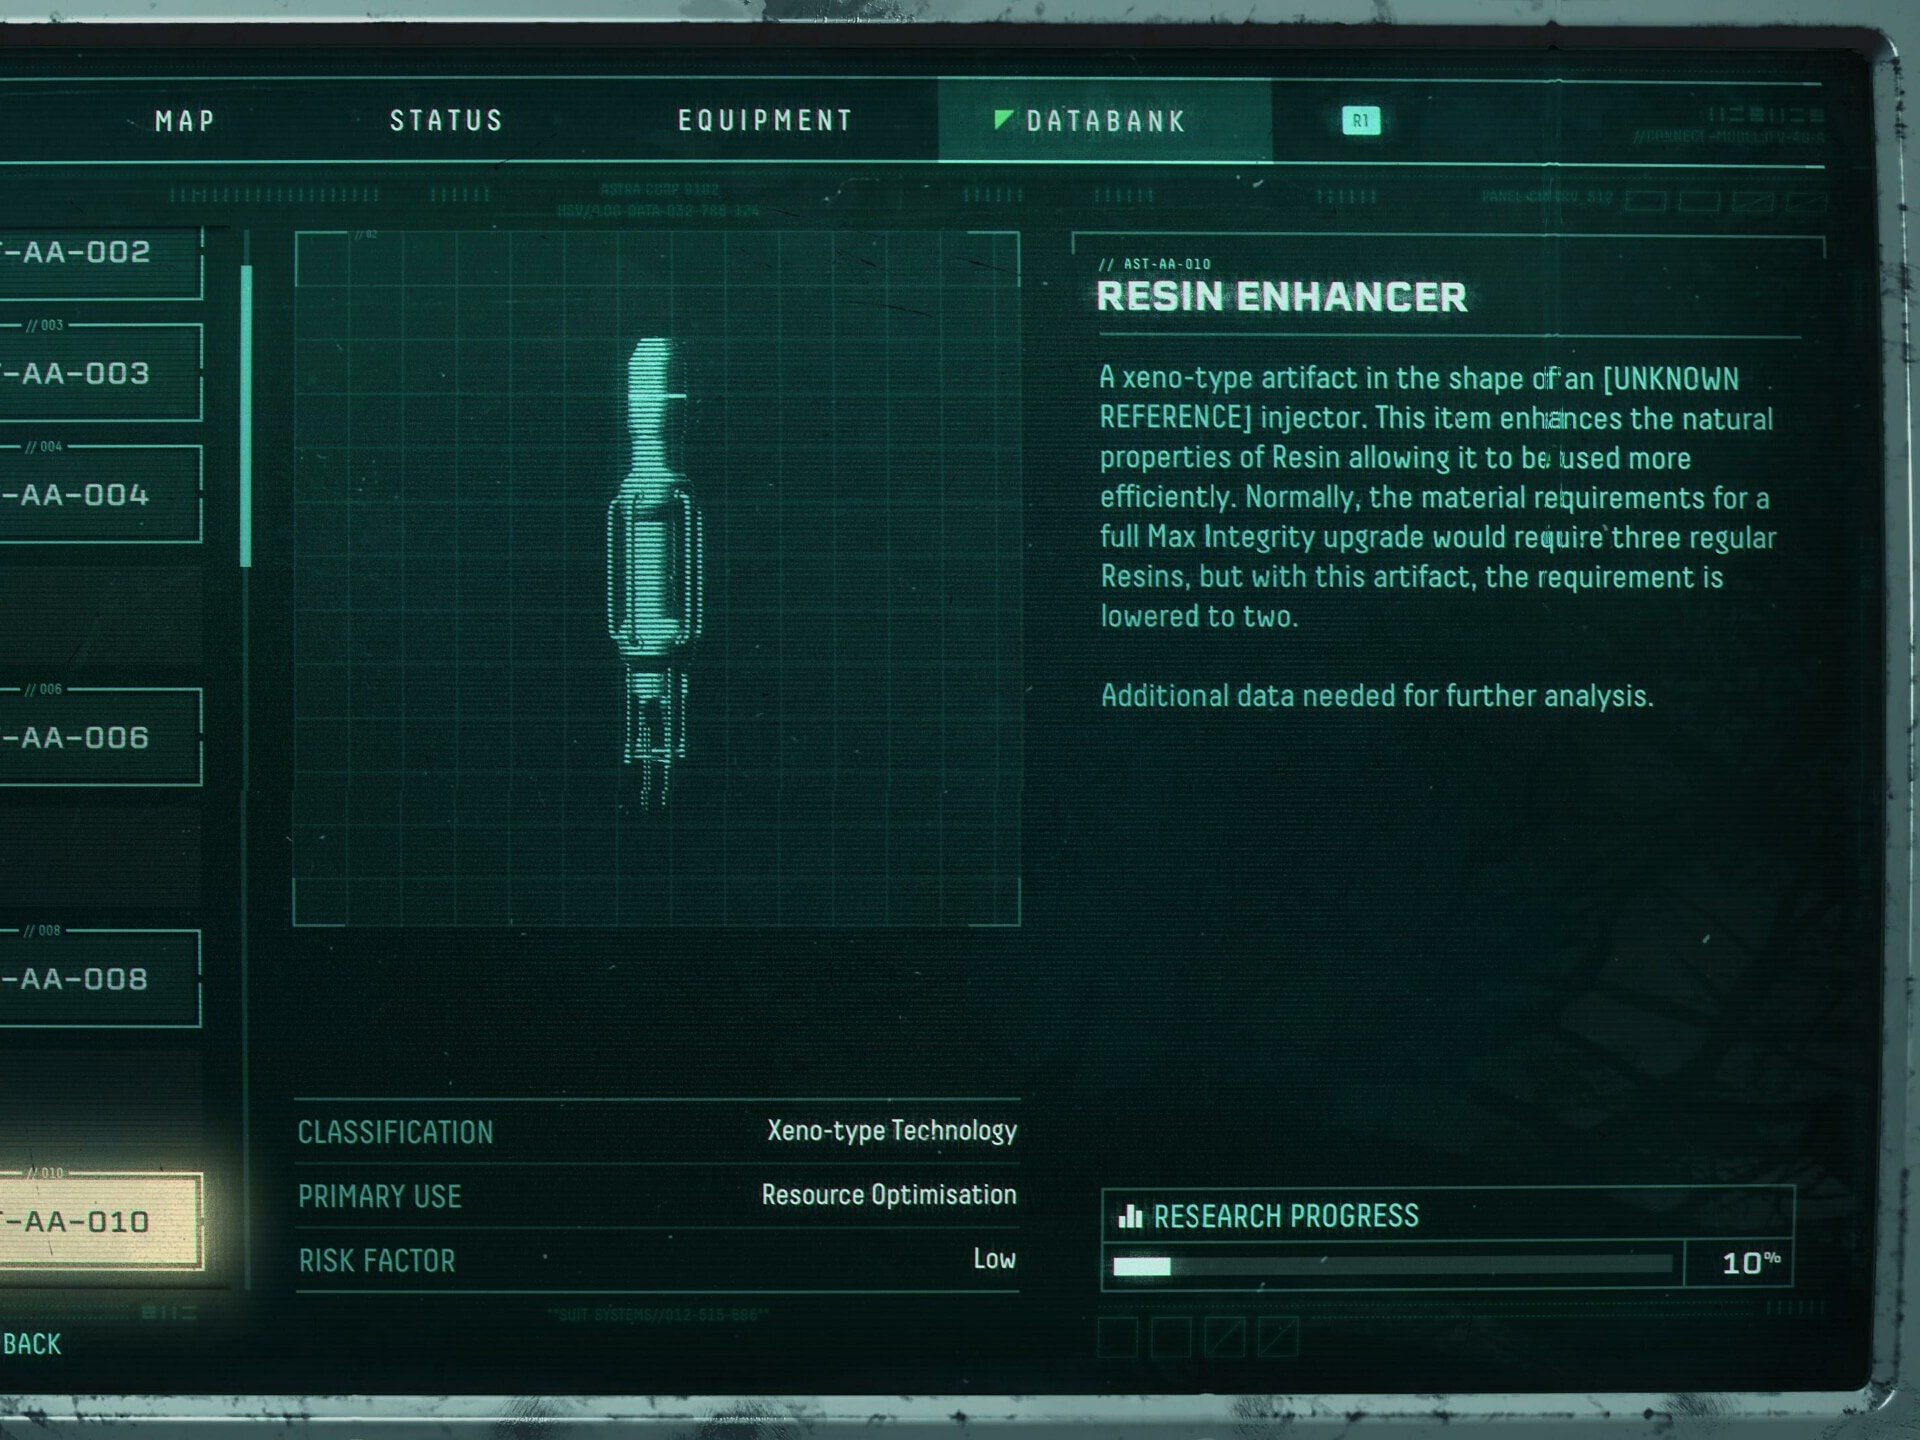
While you have this Artifact, Integrity Increases only require two Resin slots instead of three.
This Artifact is always worth picking up. Reducing the requirement to increase max Health is erally good. The earlier you get it, the stronger it can really be.
Resinous Shield
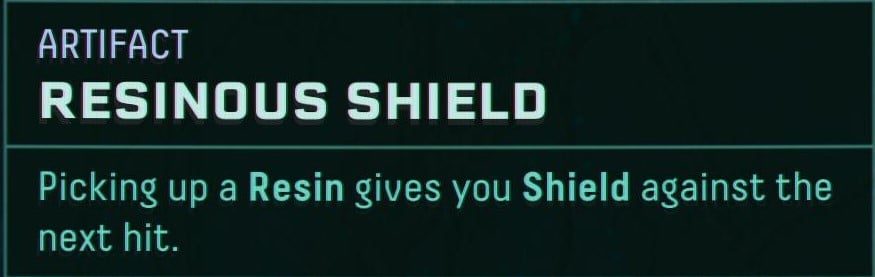
While you have this Artifact, Picking up Resin will grant you a shield against the next hit.
If you’re keeping Full Integrity, there’s almost no reason to pass up this Artifact. At full Integrity, all Silphium becomes Resin. This means a constant supply of shields.
Unfed Pod
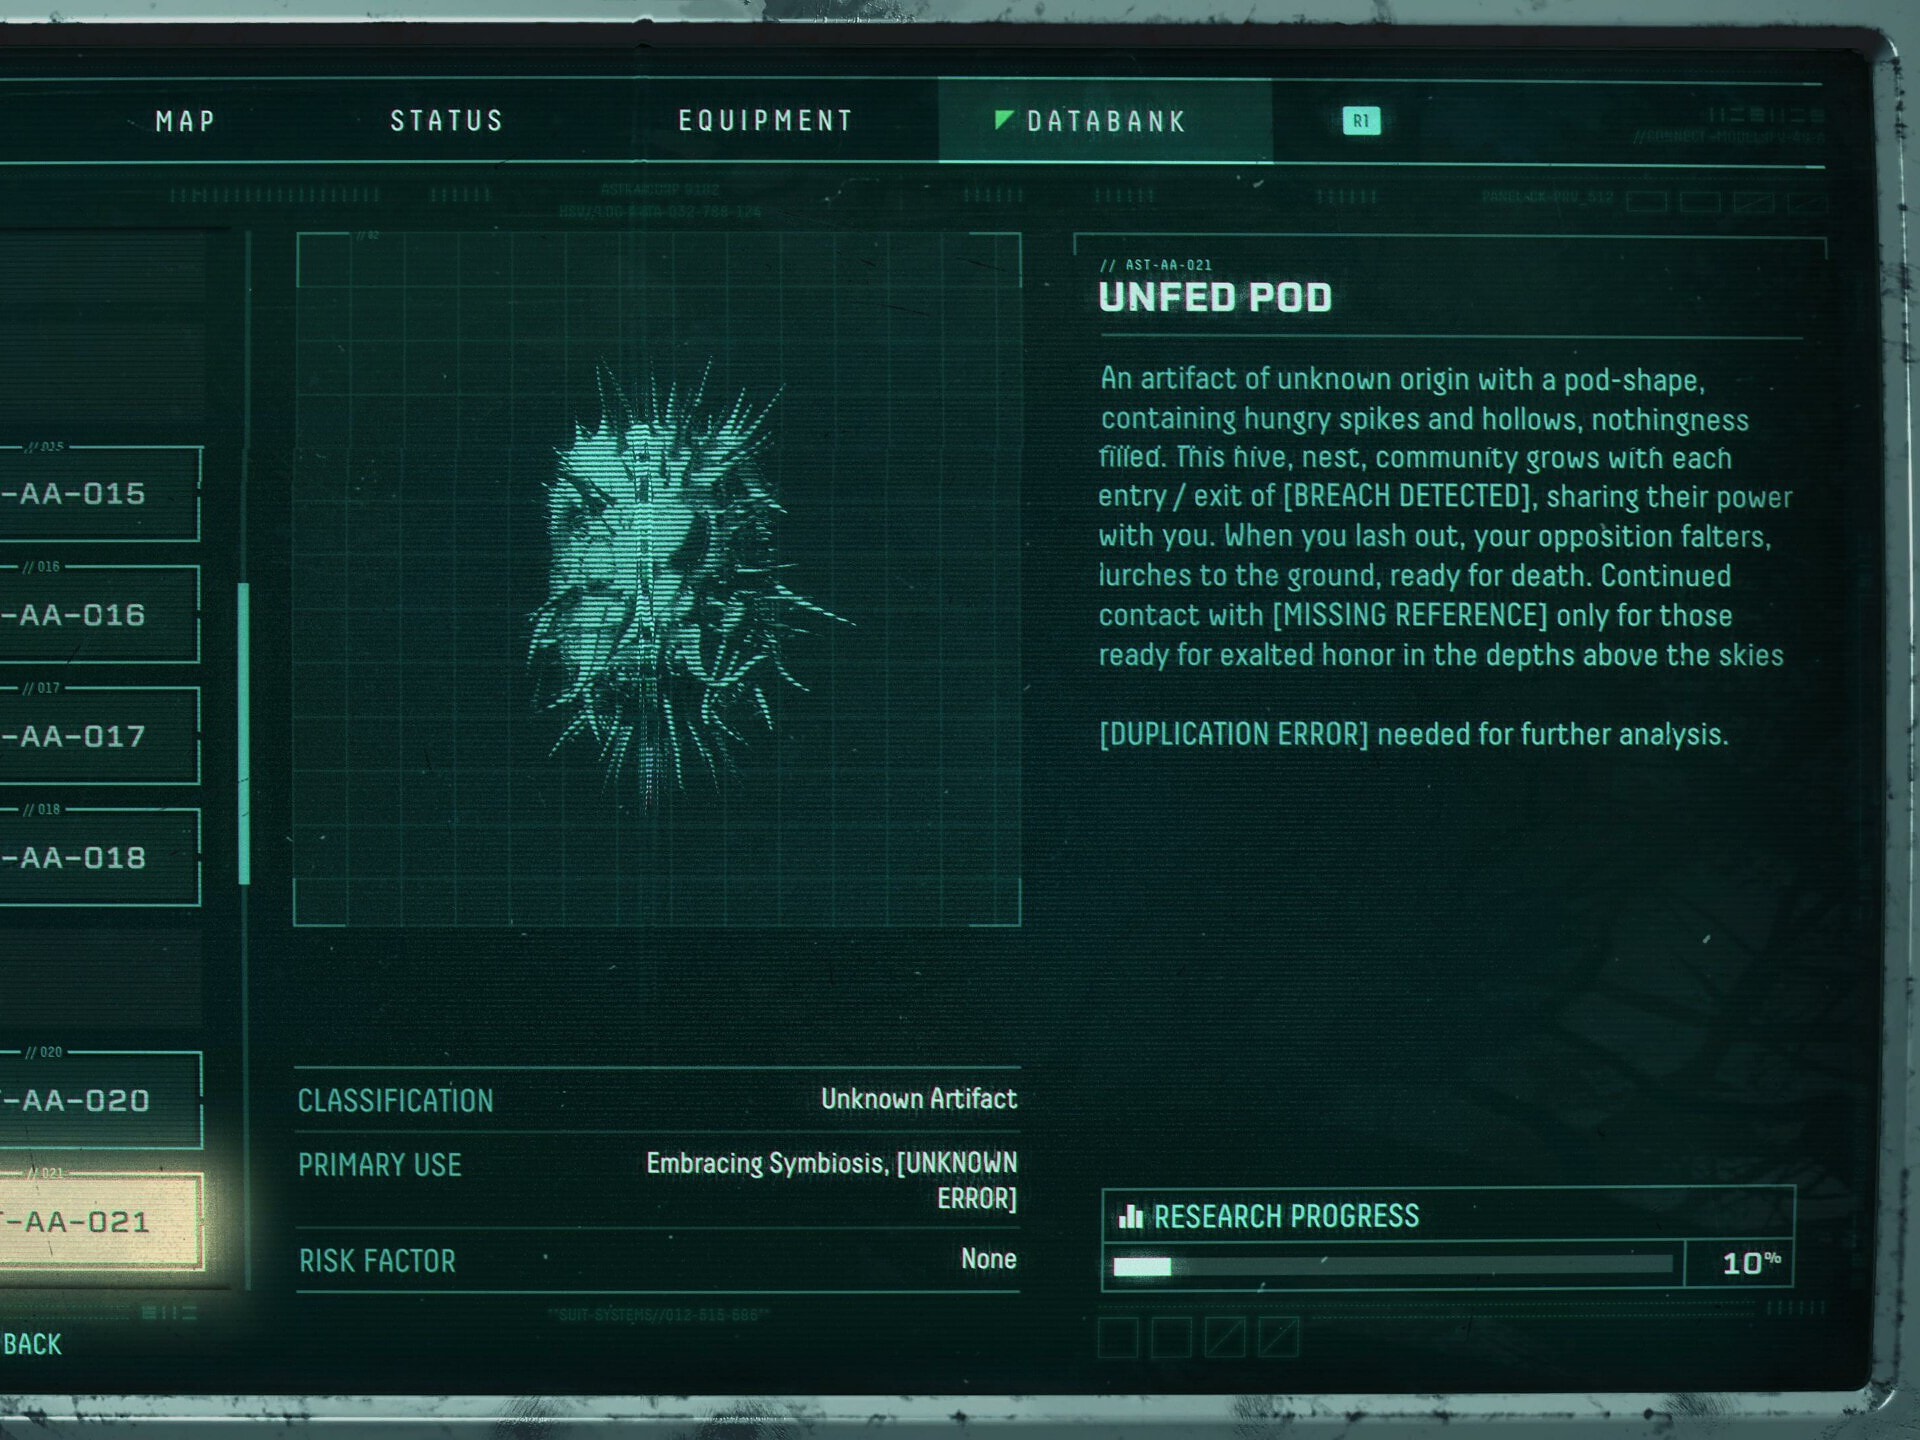
While you have this Artifact, Gain 20% Stagger Power for each Parasite you have.
At first you’d think this artifact is weak, the Stagger power however is very helpful for mitigating damage from tougher enemies. The quicker and more often you can stagger them, the more helpless they will often be.
Visceral Knot
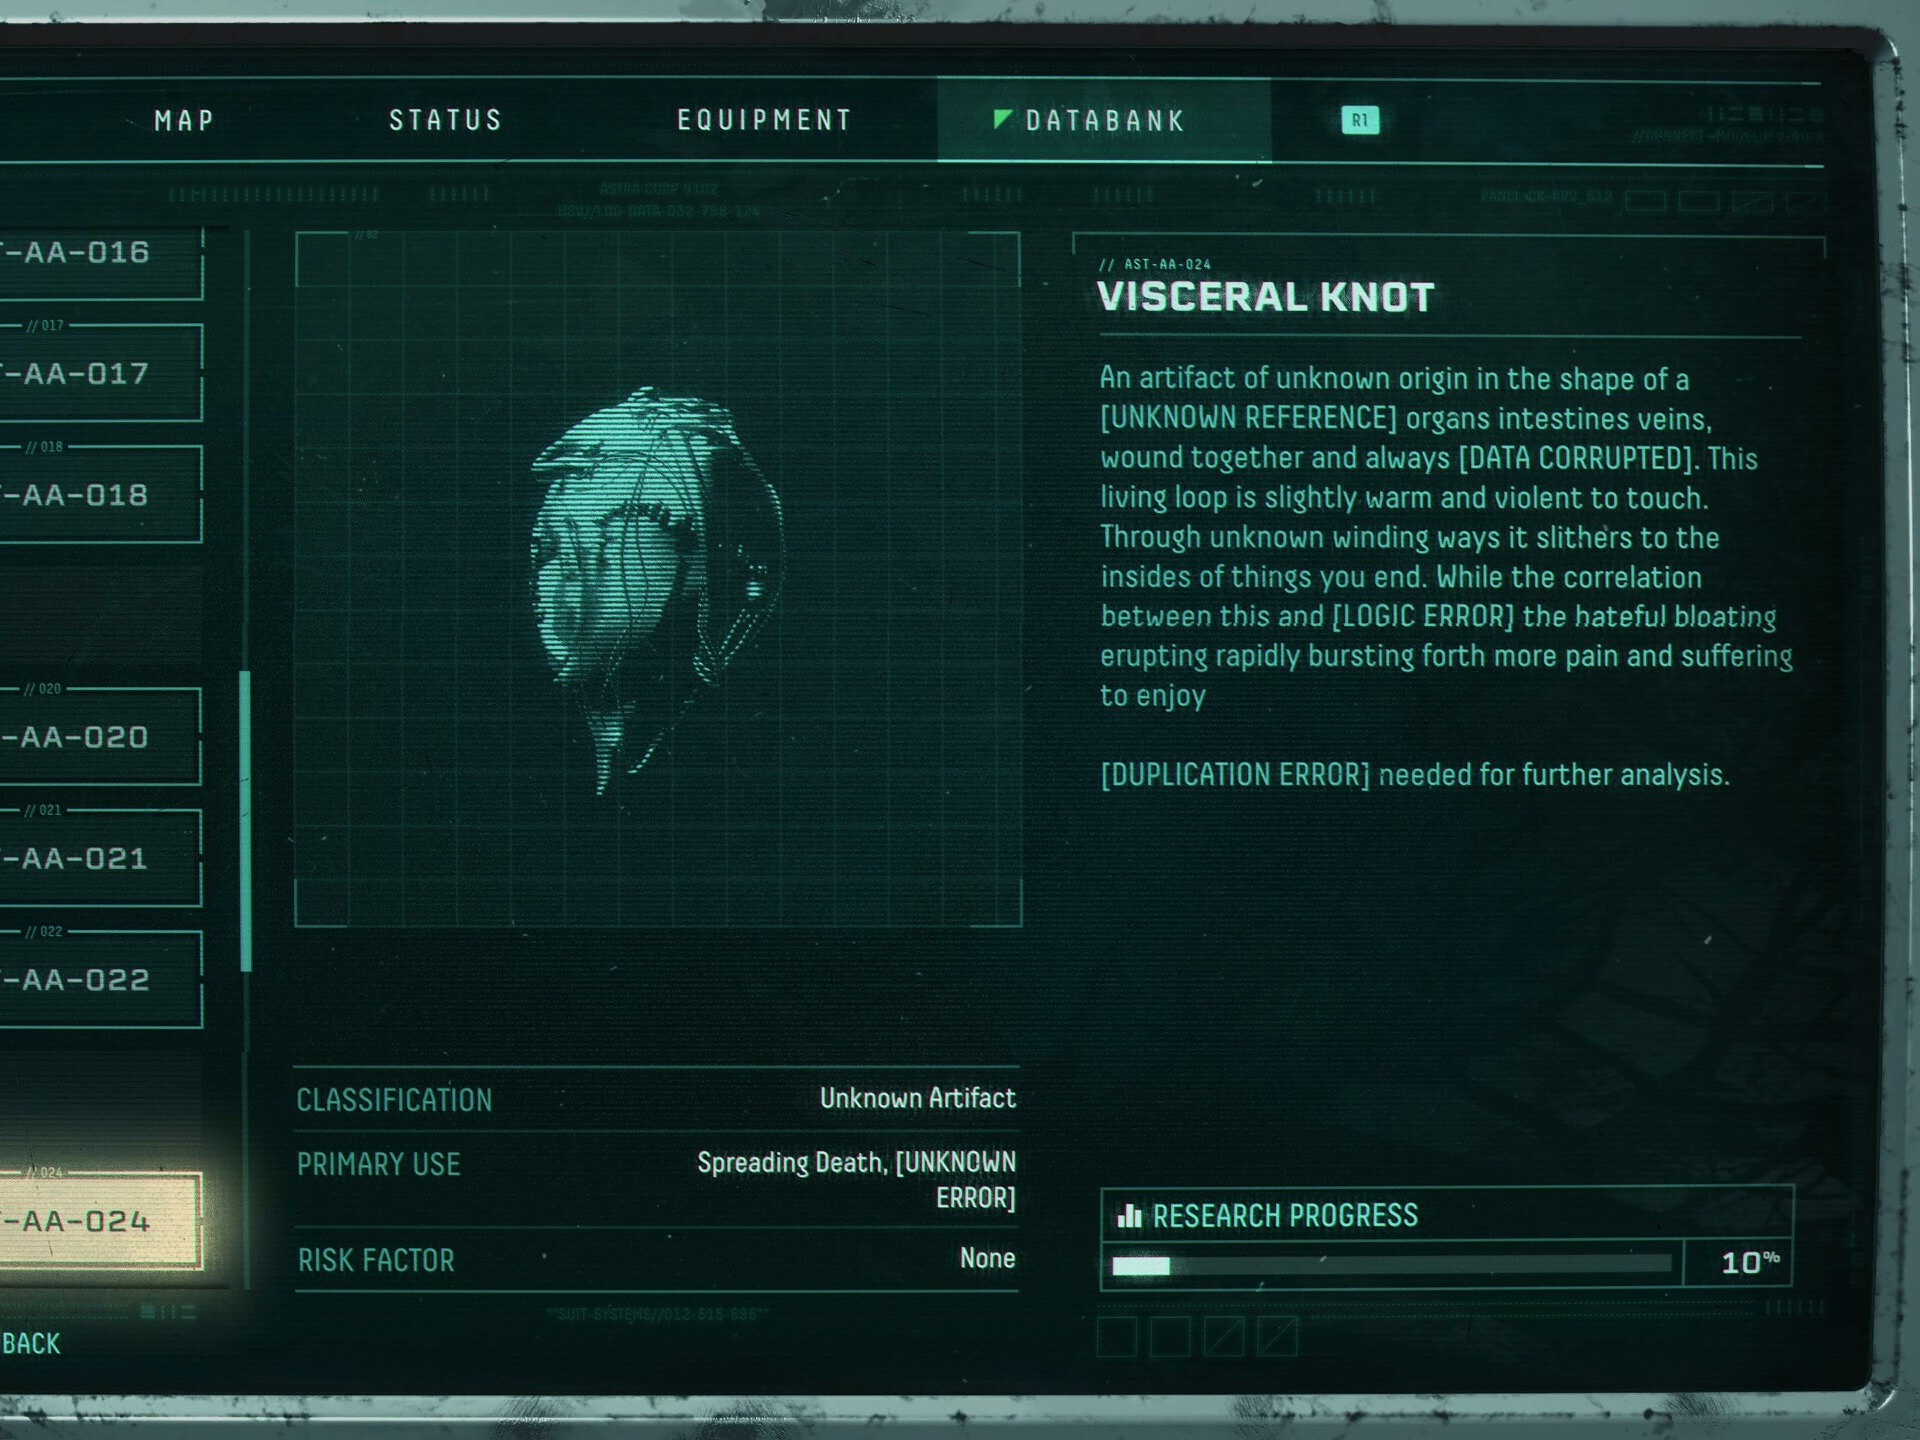
While you have this Artifact, Enemies have a 20% chance to explode on death.
This Artifact provide a bit of bonus Area of Effect damage on kill, occasionally. The chance is high enough to make it worth taking, but explosions aren’t too big, so it really only works weel on large groups.
Wound Seekers
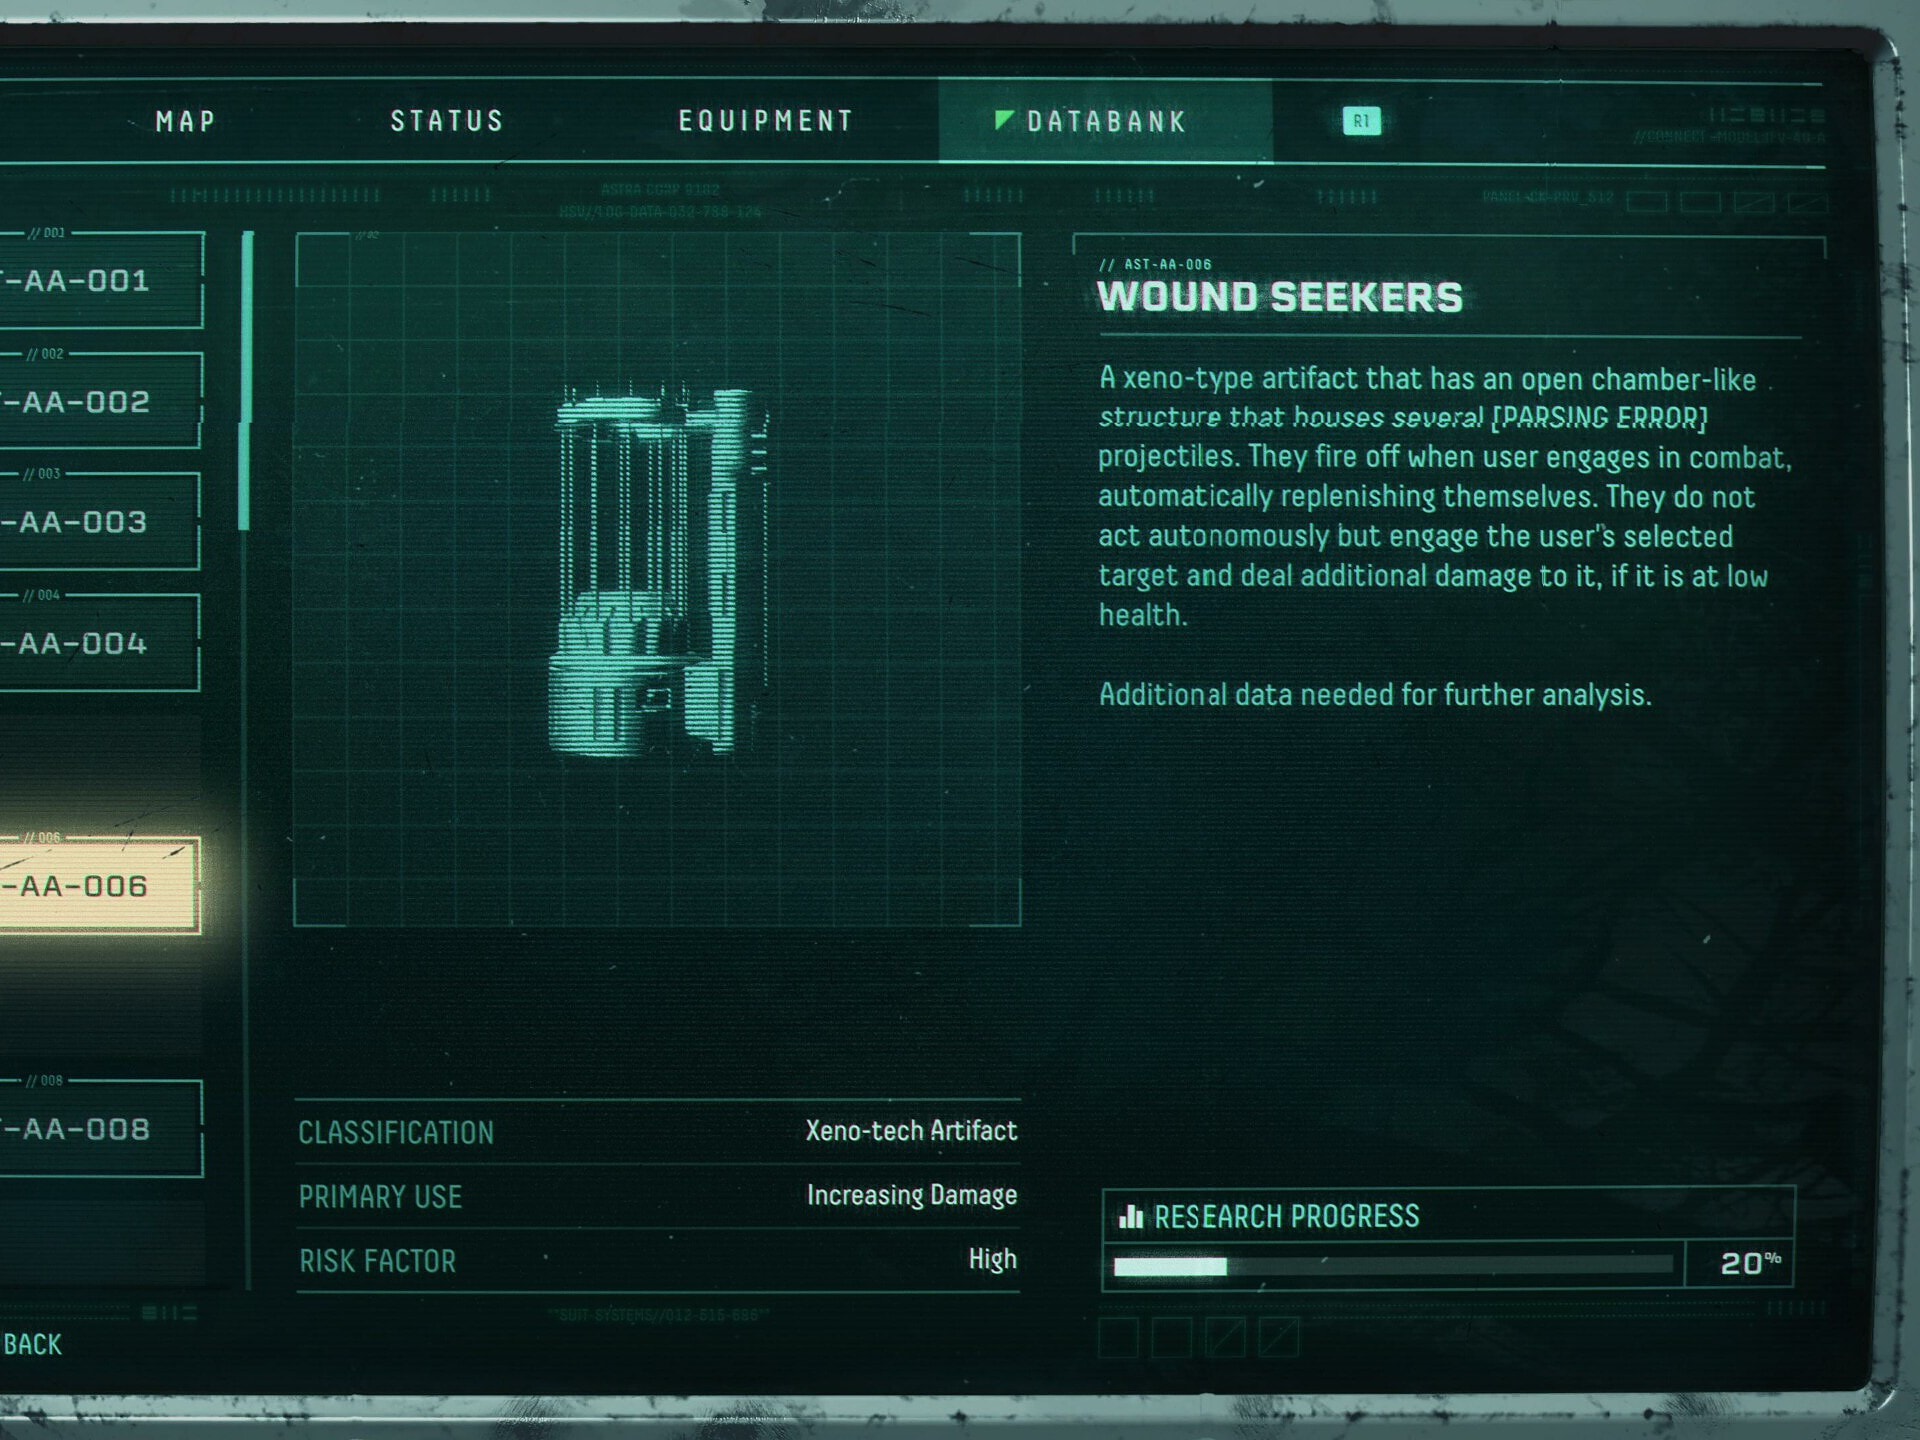
While you have this Artifact, Deal Increased damge to enemies under 30% health.
This Artifact is always worth taking. It helps a ton with bosses and many other tougher enemies. The damage is a nice bonus and really helps you deal with the high priority threats in the game.
Xeno-Tech Sight
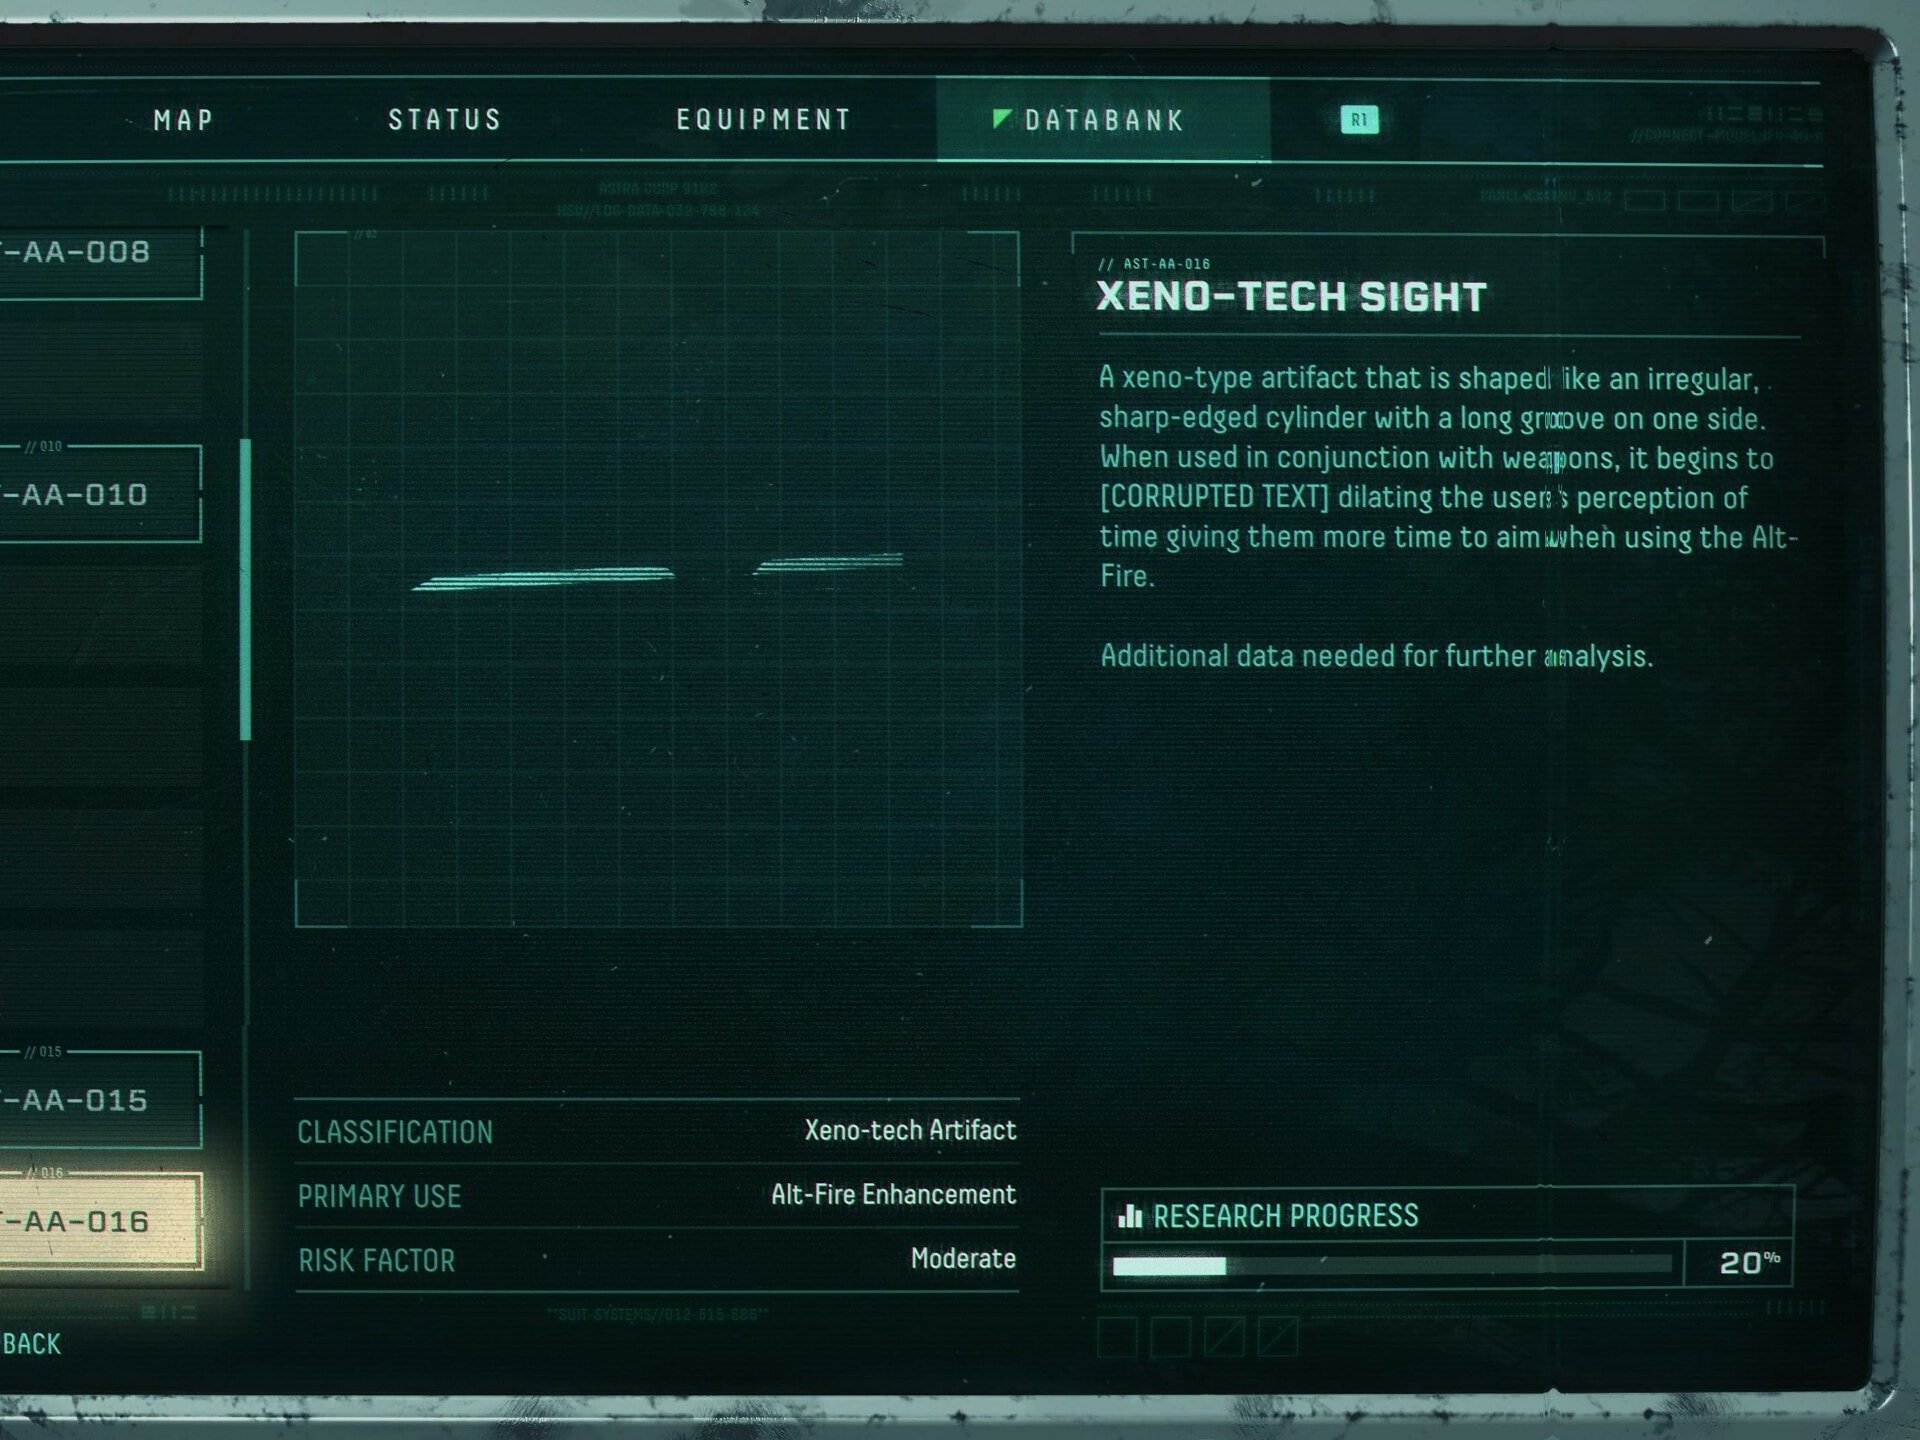
While you have this Artifact, Time is briefly slowed when aiming Alt-Fire.
This Artifact is a bit niche, but still incredibly useful. Since it only requires you to aim yoru Alt Fire, and not actually fire, it’s pretty much an on-demand Reflex Stimulant. Very useful in areas with a lot of enemies, or against enemies that launch high amounts of projectiles.
Parasites
Parasites are Similar to Artifacts, that they can remain with you for a full run. However not all of them will. They all come with negative effects, which will be covered as Prefixes, as they are not restricted to which effect appears on which Parasites
Prefixes
Amnesiac
This prefix when found on any Parasite will Reduce your Weapon Proficiency by a large amount on Detach.
Maintaining high Adrenaline and items that help you maintain Adrenaline, as well as items that increase your Proficiency can offset this bonus really easily.
Constricting
This prefix when found on any Parasite will Cause Damage when picking up Items.
The damage can be entirely counteracted by any means of shielding. Since Silphium doesn’t count as an item for this prefix, the Resinous Shield Artifact makes for a good way to counter this effect.
Corrosive
This prefix when found on any Parasite will Reduce your Protection by 10%.
An increase to incoming damage isn’t too bad usually, though there’s several way to mitigate or offset the extra incoming damage. The Alt-Fire Protection Artifact and Protection Augment being two of the easiest to use or maintain.
Destabilizing
This prefix when found on any Parasite will make Dropped Obolite disappear one second sooner.
Destabilizing has a few options to counteract it in the form of Artifacts. The Obolite Stabilizer being the easiest, greatly counteracting it by adding three additonal seconds to the timer for dropped Obolite.
Jolting
This prefix when found on any Parasite will Trigger two Malfunctions on Detach.
This is more commonly found on the more temporary Parasites, like the Firestinger. These Malfunctions can be counteracted by use of a Nullification Sphere, so long as they’re not too severe.
Oily
This prefix when found on any Parasite will Increase the difficulty of repairing upcoming Malfunctions.
The effect of this prefix can be offset by another Parasite, the Wiretail, which reduces the chances of receiving Malfunctions. Any Malfunctions you do get can also just be removed with the Nullification Sphere.
Ominous
This prefix when found on any Parasite will Increase the chance of finding Malignant Items.
Malignant items are possible to skip over in a lot of cases, which makes this one of the least harmful prefixes. If you do need Malignant items however, The Wiretail Parasite and Nullification Sphere Consumable can easily mitigate or remove Malfunctions.
Sedating
This prefix when found on any Parasite will Increase the the number of kills needed to increase your Adrenaline Level by one.
This effect isn’t harmful unless you find yourself in highly dangerous situations a lot. The Apex Sphere Consumable is a decent counter to this prefix effect. Otherwise, simply maintaining your Adrenaline level is enough.
Slimy
This prefix when found on any Parasite will make Upcoming Malfunctions become more Severe.
The effect of this prefix can actually be offset by another Parasite, the Wiretail, which reduces the chances of receiving Malfunctions. Otherwise, the Nullification Sphere can help fix Malfunctions faster, assuming they’re not severe enough to be a permanent effect, like reduced Integrity
Coldblood
This species of Parasite Reduces the Cooldown of your Alt-Fire by three seconds.
Depending on what Alt-Fires you have available or prefer, it can be incredibly powerful. It’s great for any of the burst damage Alt-Fires like Trackerswarm, Blast Shell and Killshot.
Firestinger
This species of Parasite Increases Speed and Weapon Damage by 25% for the next 25 kills, but detaches afterwards.
This is a very temporary Parasite, as 15 kills can go very quickly. If one of these drops, it’s best to back track to it and grab it before heading into a boss fight, as the bonus damage in those fights makes it well worth any detach cost later.
Goldtail
This species of Parasite makes Dropped Obolites last one and a half seconds longer.
This Parasite can offset any others that have the Destabilizing prefix. Overall though, not really one that’s super worth picking up as there are items that provide better effects without drawbacks.
Lockfeeder
This species of Parasite Allows a Key to be reused, but detaches after the fist use.
Key duplication isn’t a very helpful effect, there’s often plenty of Atropian Keys throughout a cycle to make this never worth using. Since keys can be hoarded from early stages and taken to much later into a cycle, there’s no benefit to this Parasite.
Rotnose
This species of Parasite Grants a 50% chance to find better Salvage from Hostiles.
So long as this isn’t paired with Constricting, this Parasite is always worth grabbing. having a decent chance of finding weapons that are of higher proficiency can really speed up the process of making your weapons better in the long term.
Sagetooth
This species of Parasite Increases Proficiency Gain by 20%.
This parasite is almost always helpful to use, as higher proficiency often means much stronger weapons. Its effect can also offset the Amnesiac prefix of another Parasite, if you happen to have or come across it.
Scabshell
This species of Parasite Increases Protection by 15%.
Depending on the negative Prefix, this Parasite is one of the more helpful ones to have. More protection means less damage taken, which can make some chaotic situations much easier to manage.
Silverskin
This species of Parasite Discounts one item by 30%, but detaches afterwards.
This effect is pretty decent, but also a bit niche in some regards. If you pick up this Parasite, it’s best used on a high cost Artifact or Augment. It’s even better if the Artifact or Augment you get with it offsets any detach penalty.
Slowstitch
This species of Parasite will Autorepairs your Integrity at Low Integrity. For clarity, it slowly heals you to ~30%, if you dip below that level of Integrity.
This is one of the worst Parasites to pick up, ever. There are time where it can be helpful, but those are rare. The heal it provides is incredibly slow, and can very easily be out damaged. It can help between encounters if you get taken down to Critical Integrity levels, but outside of that is essentially useless.
Wireseeker
This species of Parasite Prevents an upcoming Malfunction or removes an existing Malfunction once and detaches afterwards.
This can be helpful, as it’s like a weaker Nullification Sphere. It’s usefulness however depends on the negative prefix that it rolls or if you have a malfunction. It can mitigate the risk or opening a Highly Malignant Container, but if it comes at the cost of damage or even proficiency loss, it can set you back.
Wiretail
This species of Parasite Reduces the probability of receiving a Malfunction.
This is one of the most helpful Parasites out there. The beneficial effect is has can outweigh nearly every negative prefix it could have. Paired with the Ominous prefix, it can bring you a good amount of extra loot in a cycle with less risk.
Consumables
Consumables are single use items that can drop from enemies or chests. Some offer powerful effects, others grant healing and other beneficial effects.
Atropian Key
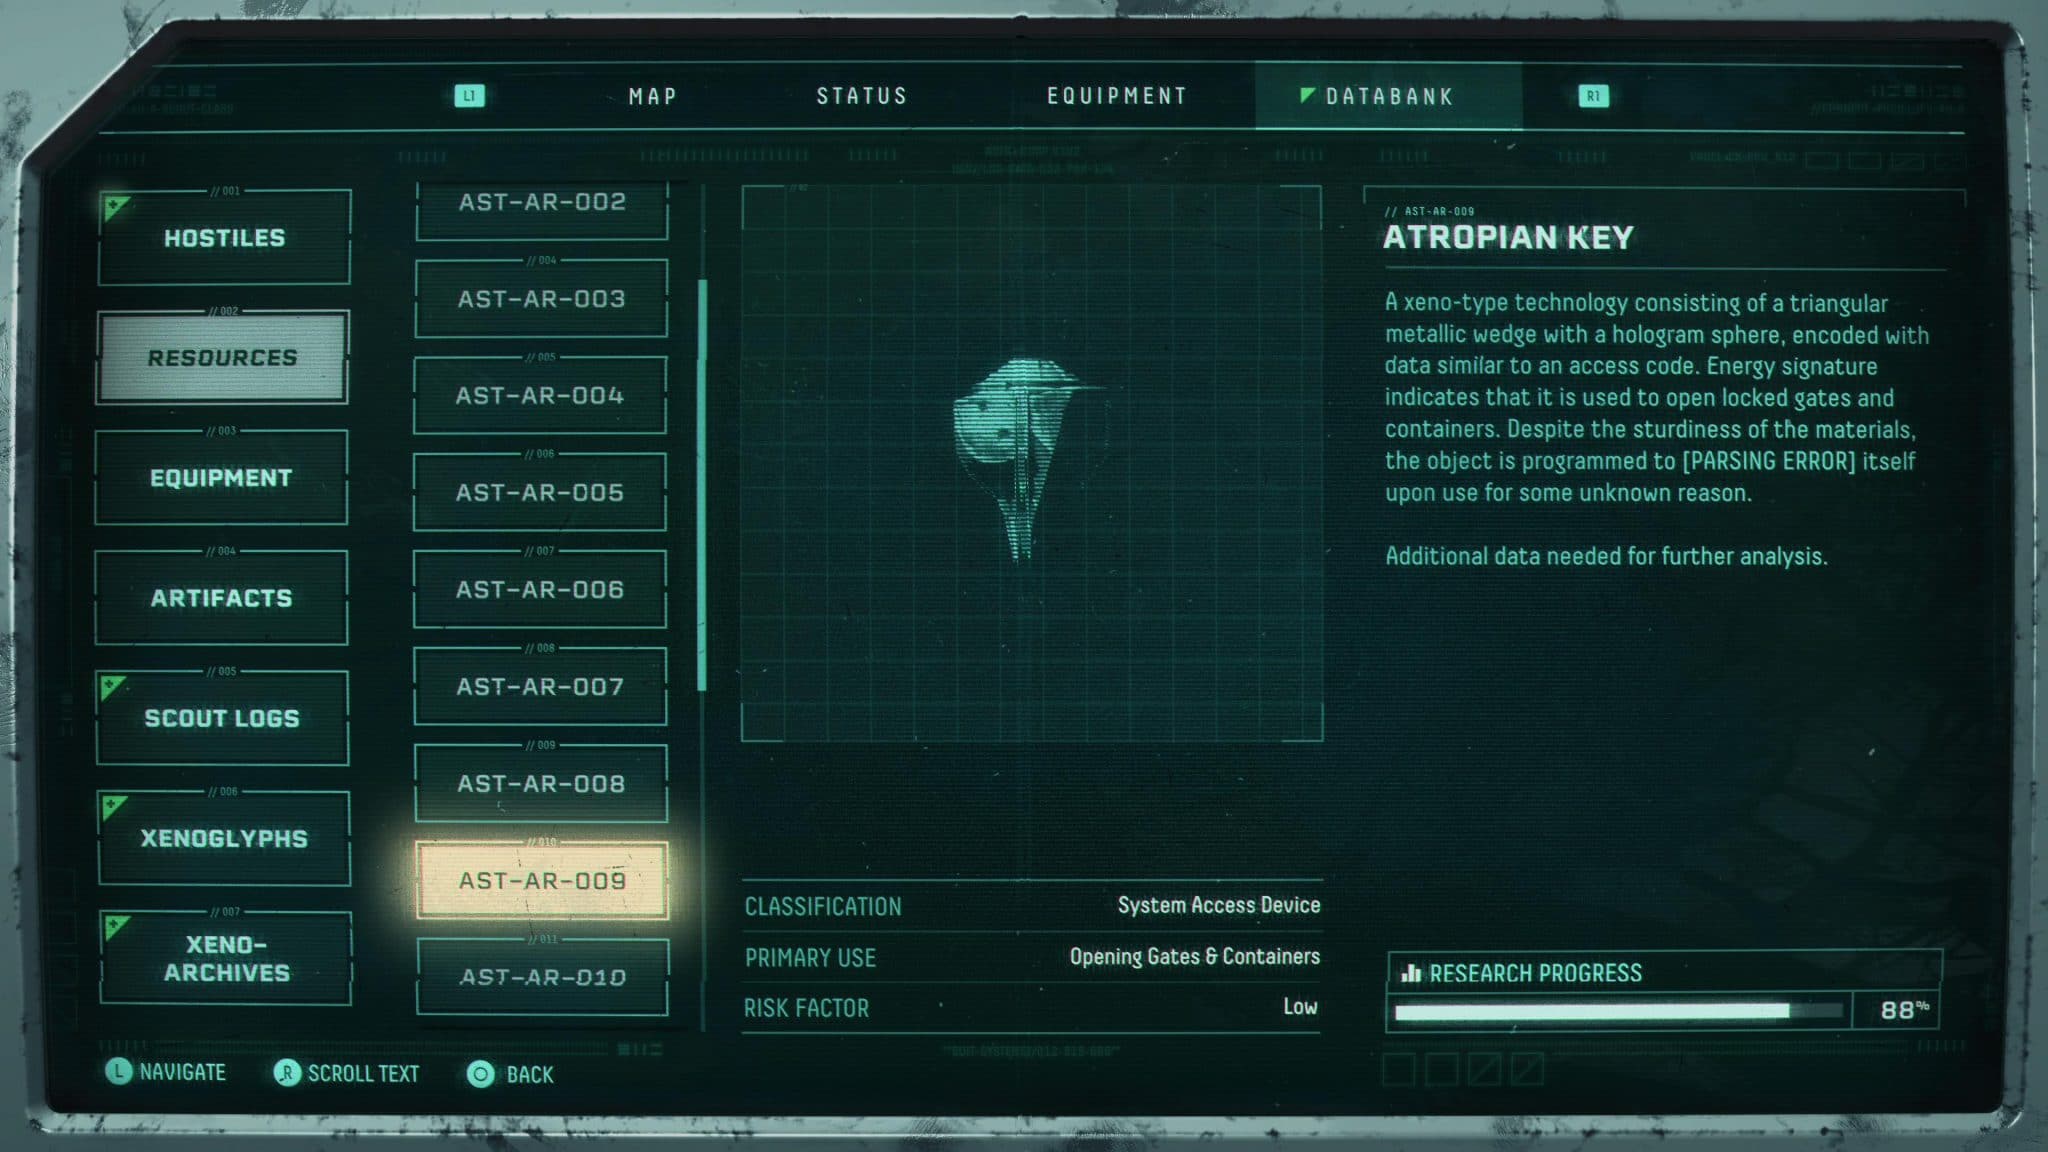
Atropian Keys are used to unlock locked doors and Chests. Usually locked rooms and chests will have slightly better loot. These keys persist between biomes, so there’s no harm in ever having extra.
Calibrator
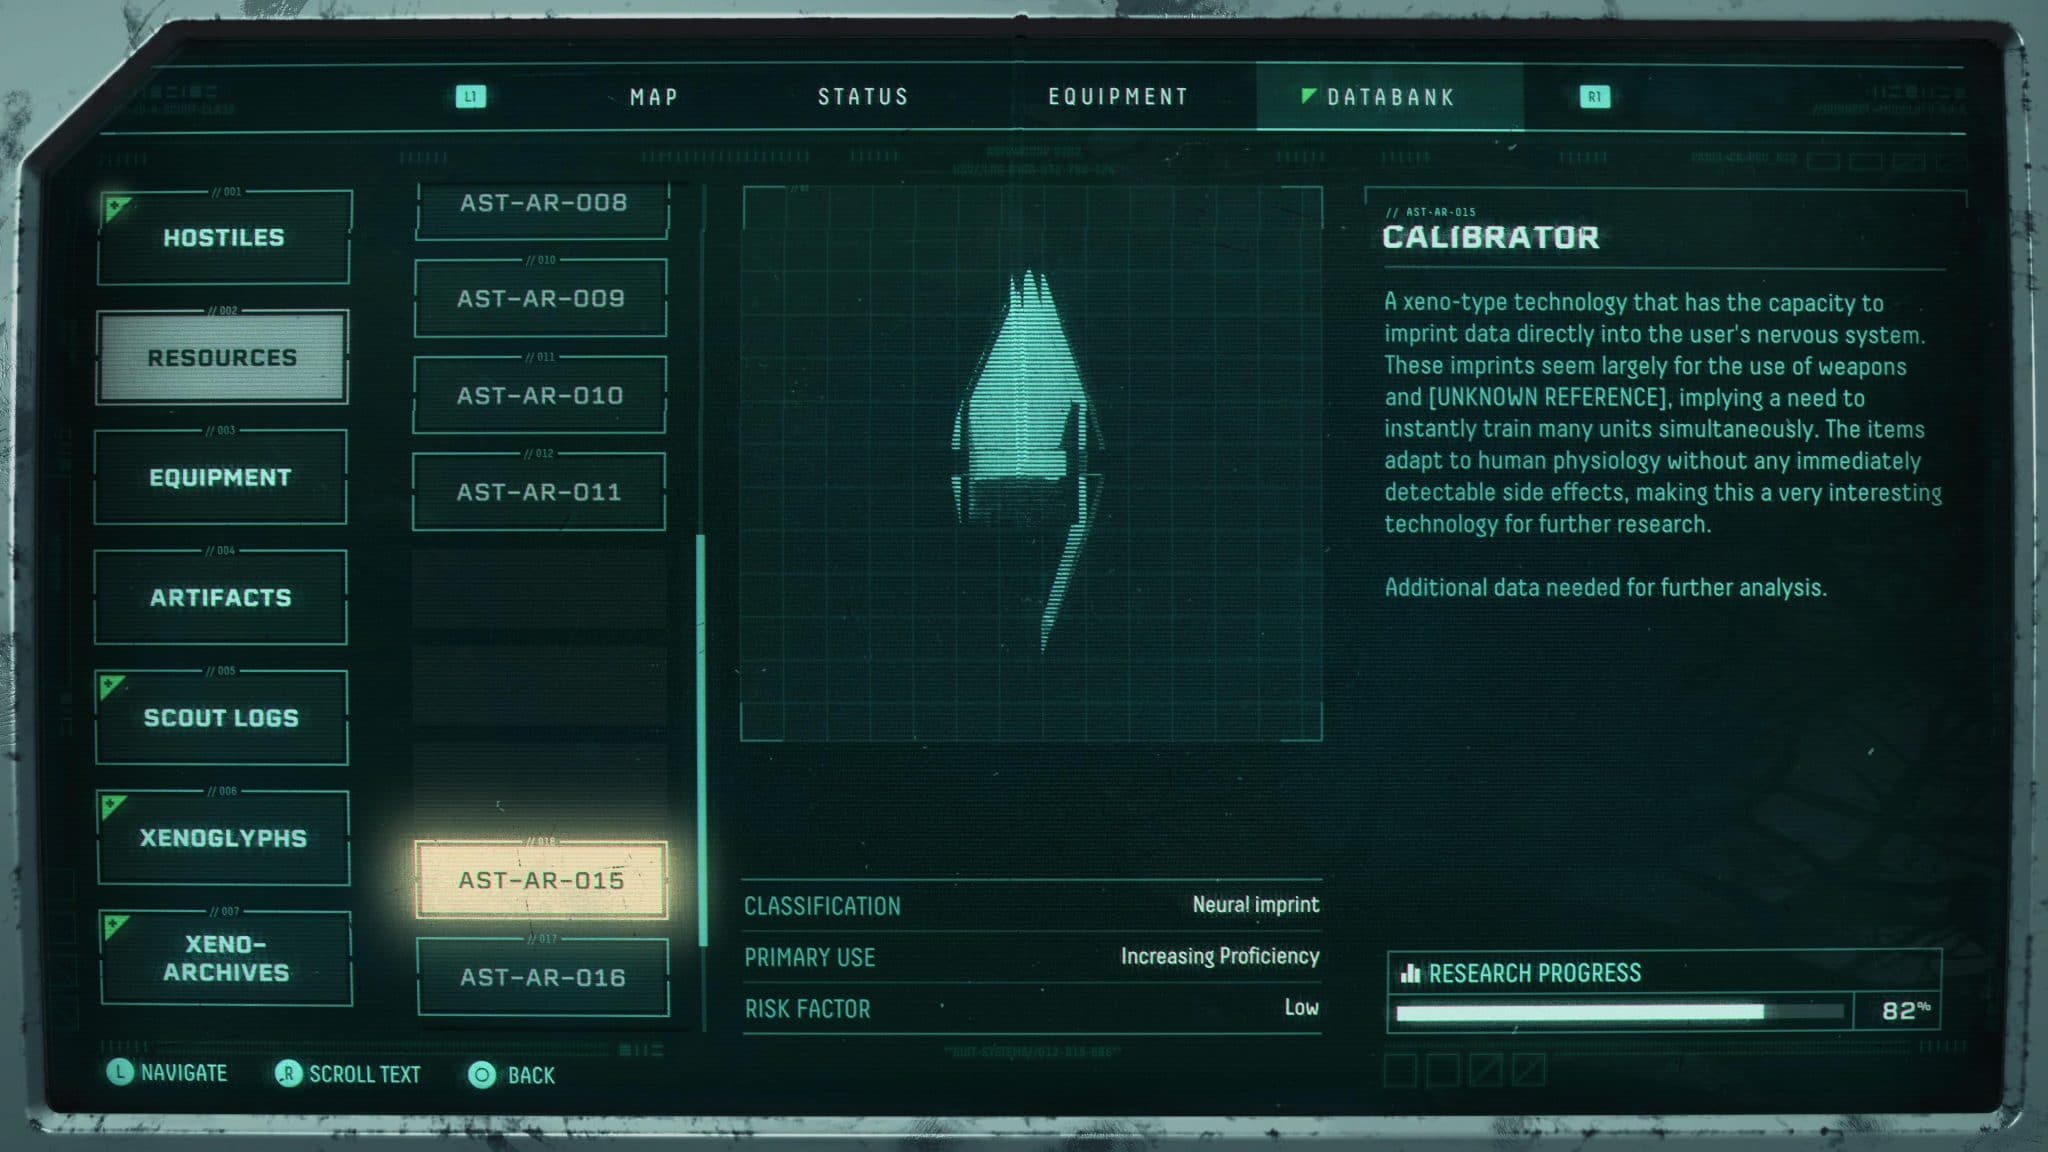
Calibrators come in three types: Broken, Worn, Pristine and Adaptive. Calibrators Increase your Weapon Proficiency, allowing you to find stronger weapons later on.
Small and Worn Calibrators will commonly spawn in the world and occasionally drop off monsters. Pristine Calibrators often are found in locked rooms and other secret areas. Adapative Calibrators will only be found at the start of a new biome. These jump you to the expected Proficiency level for that Biome, making skipping biomes more readily possible.
Anti-Energy Pulse
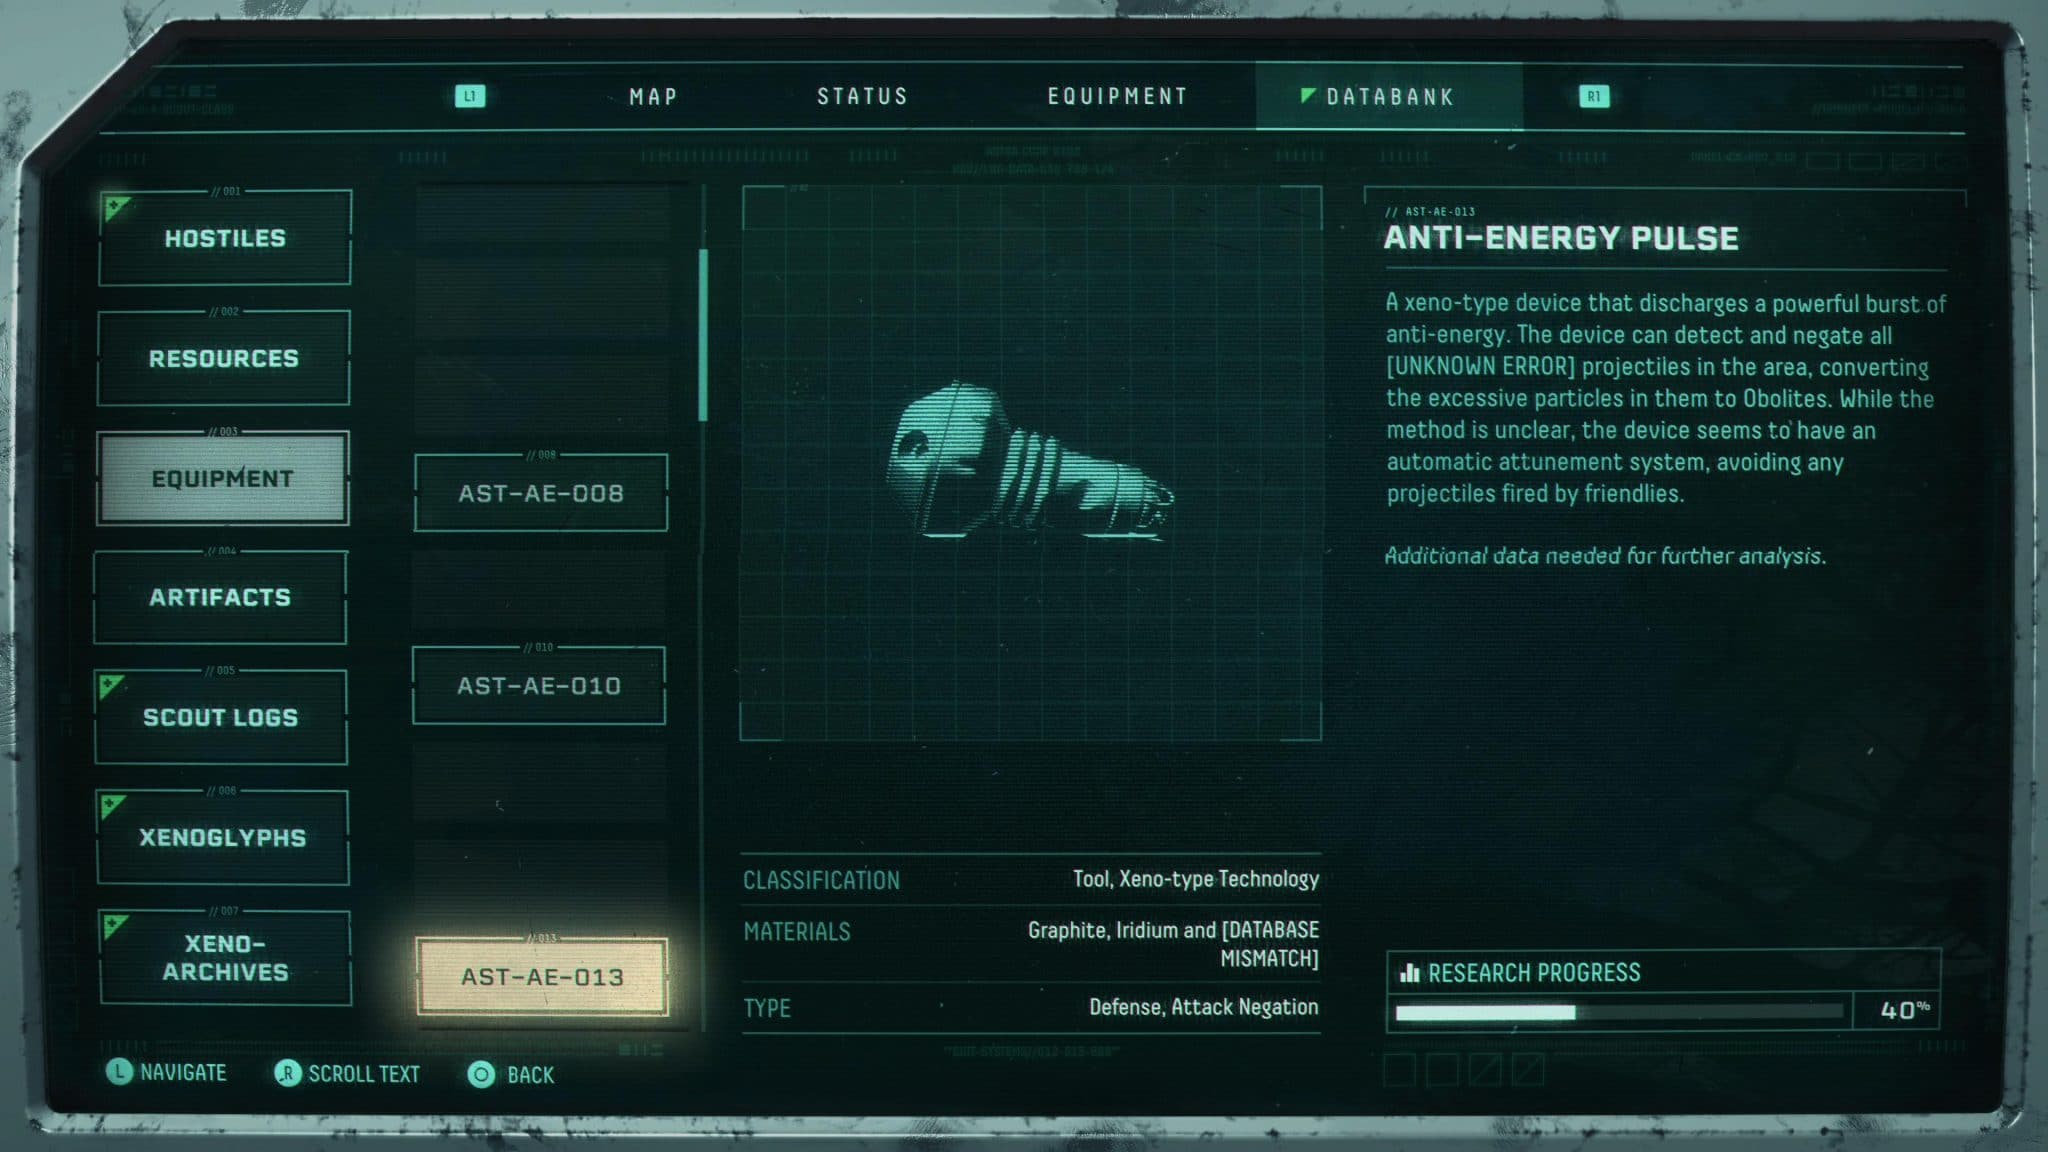
This one releases an expanding burst of energy that turns hostile projectiles into Obolites.
If used correctly, some enemies can be made very profitable as they fire large amounts of projectiles all at once. This can also be useful in boss fights if used right, as the initial use can eat a ton of projectiles and bosses have no shortage of projectiles.
Ground Surge
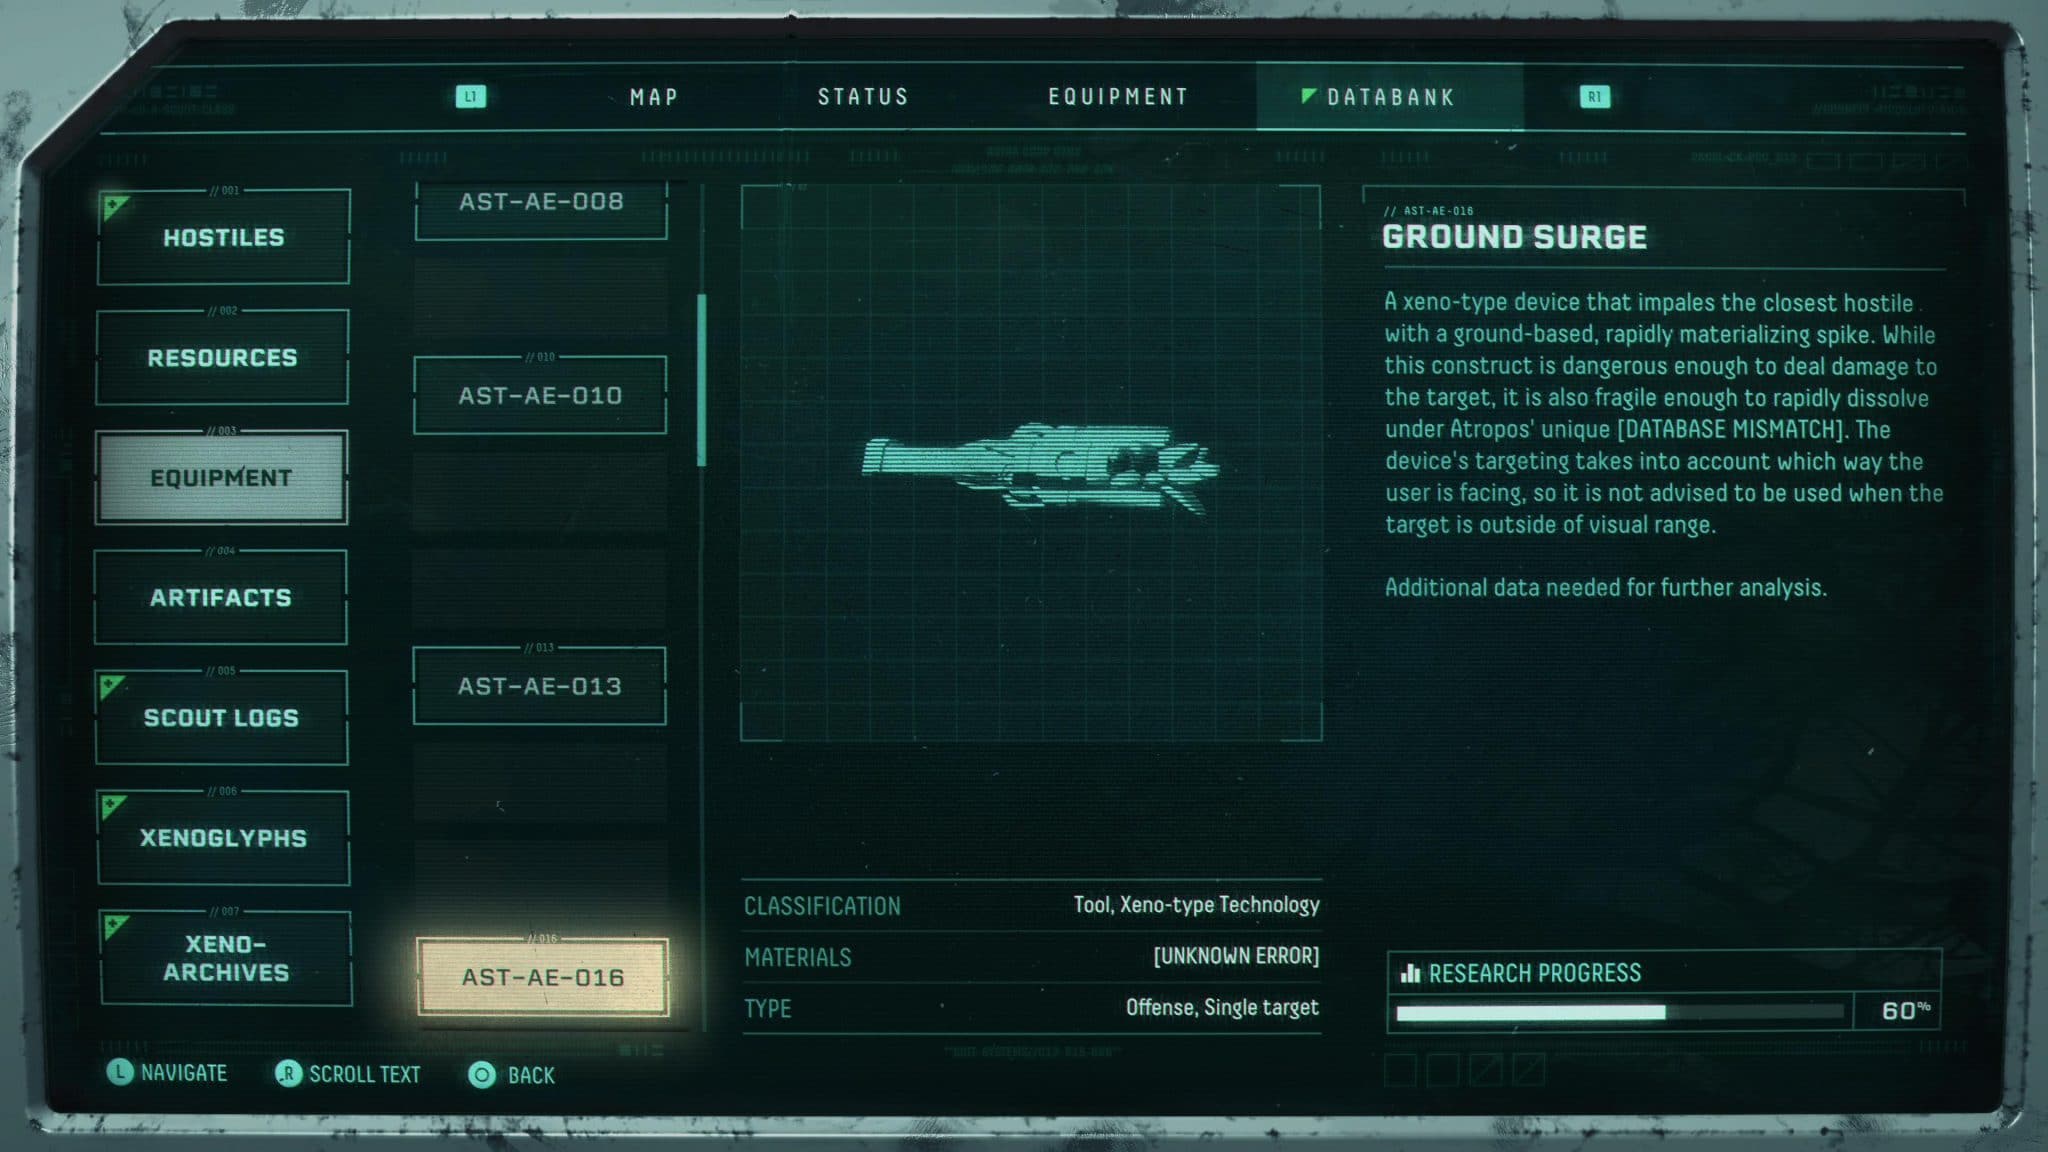
Ground Surge creates a xeno-spike that impales the closest hostile. To use it, Hold L1 and use Right Stick to select the target manually.
This actually deals a sizeable chunk of damage , and if your confident in a boss fight can be an easy way to burst down their last phase. It can also be used to instantly kill a lot of the mobs, or at least deal very heavy damage if they have a decent amount of Health.
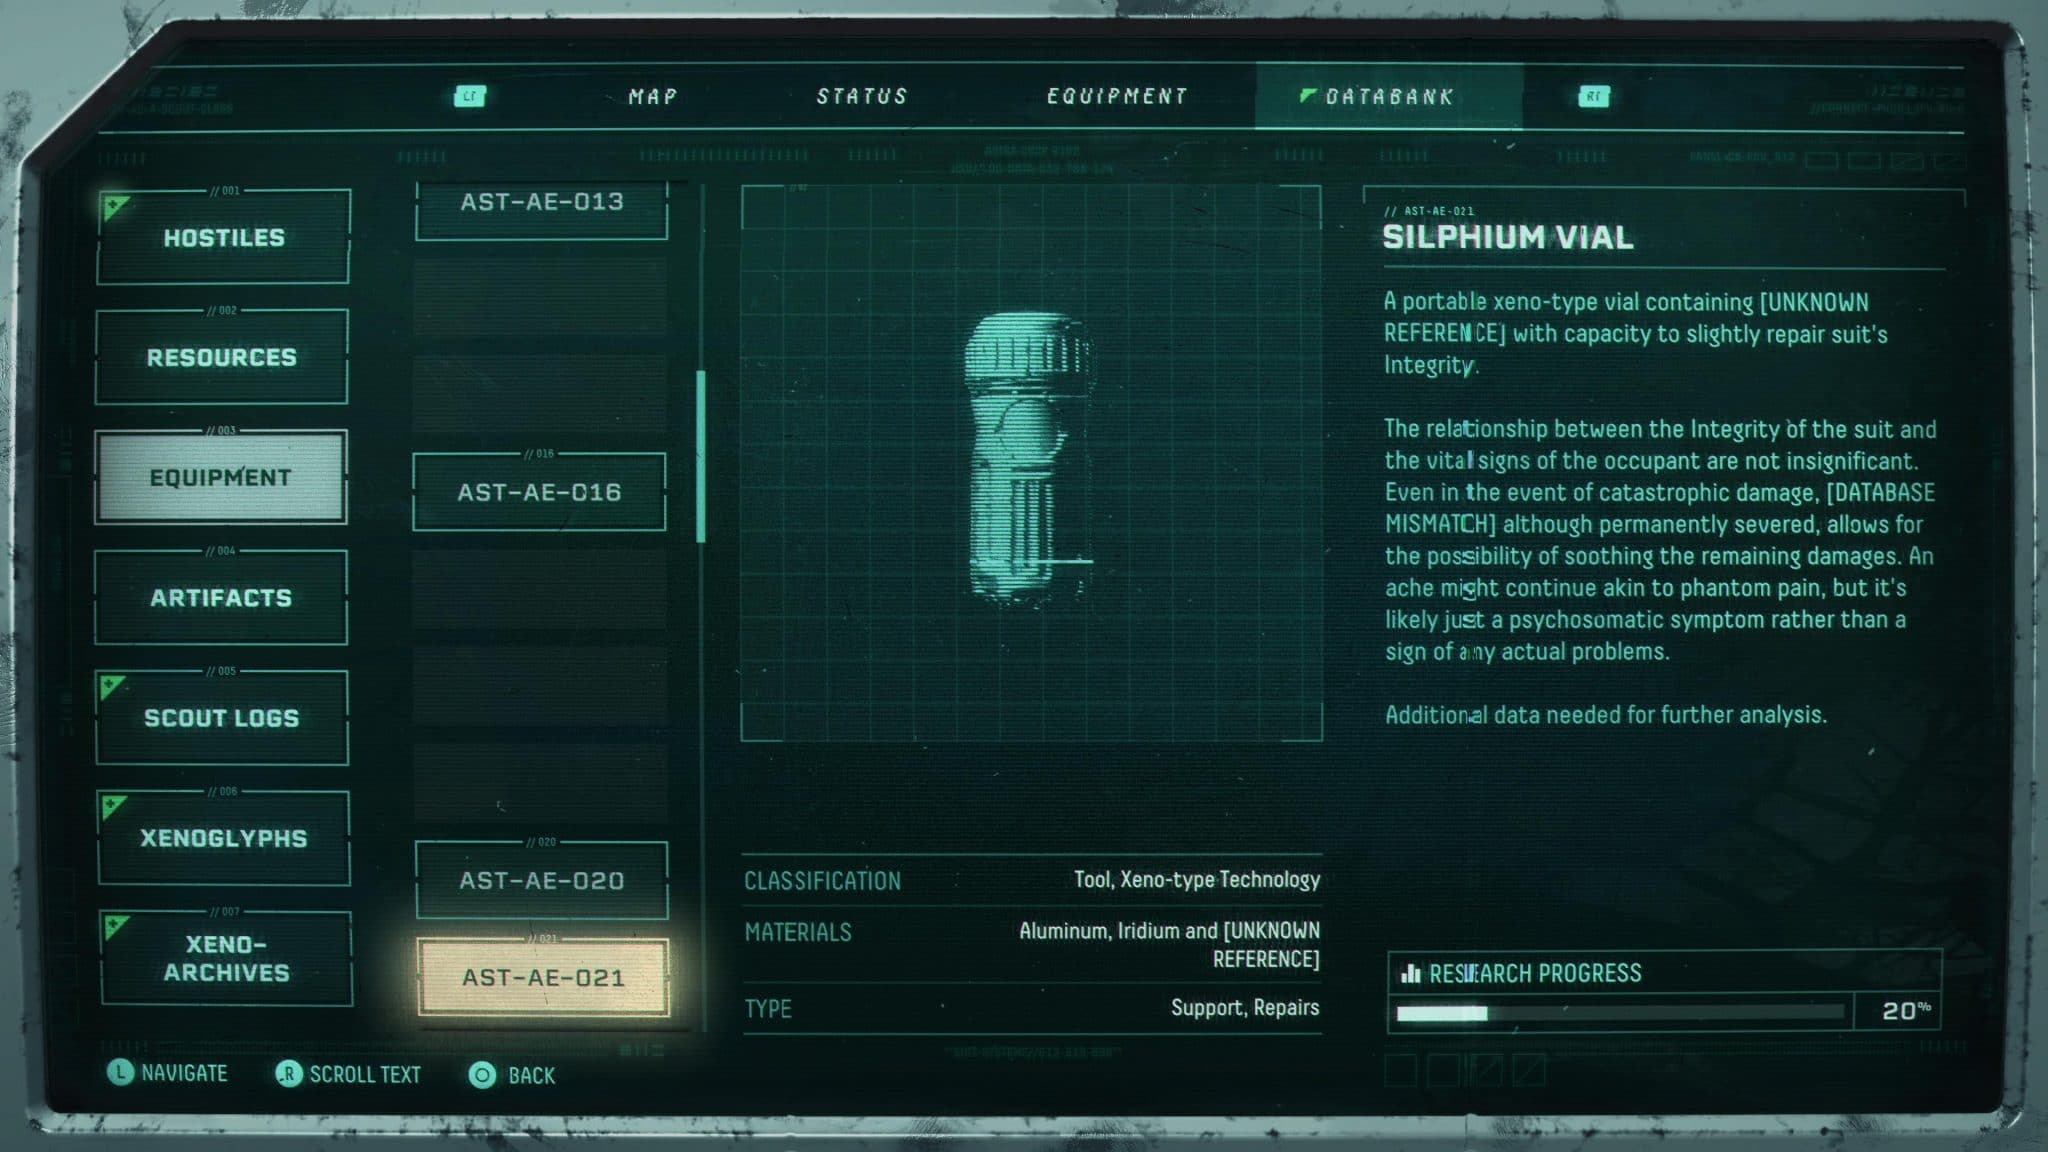
Silphium Vial
This vial of Silphium will recover ~25% Integrity on use. This makes it excellent for boss fights or just holding on to for an emergency heal.
Large Silphium Vial
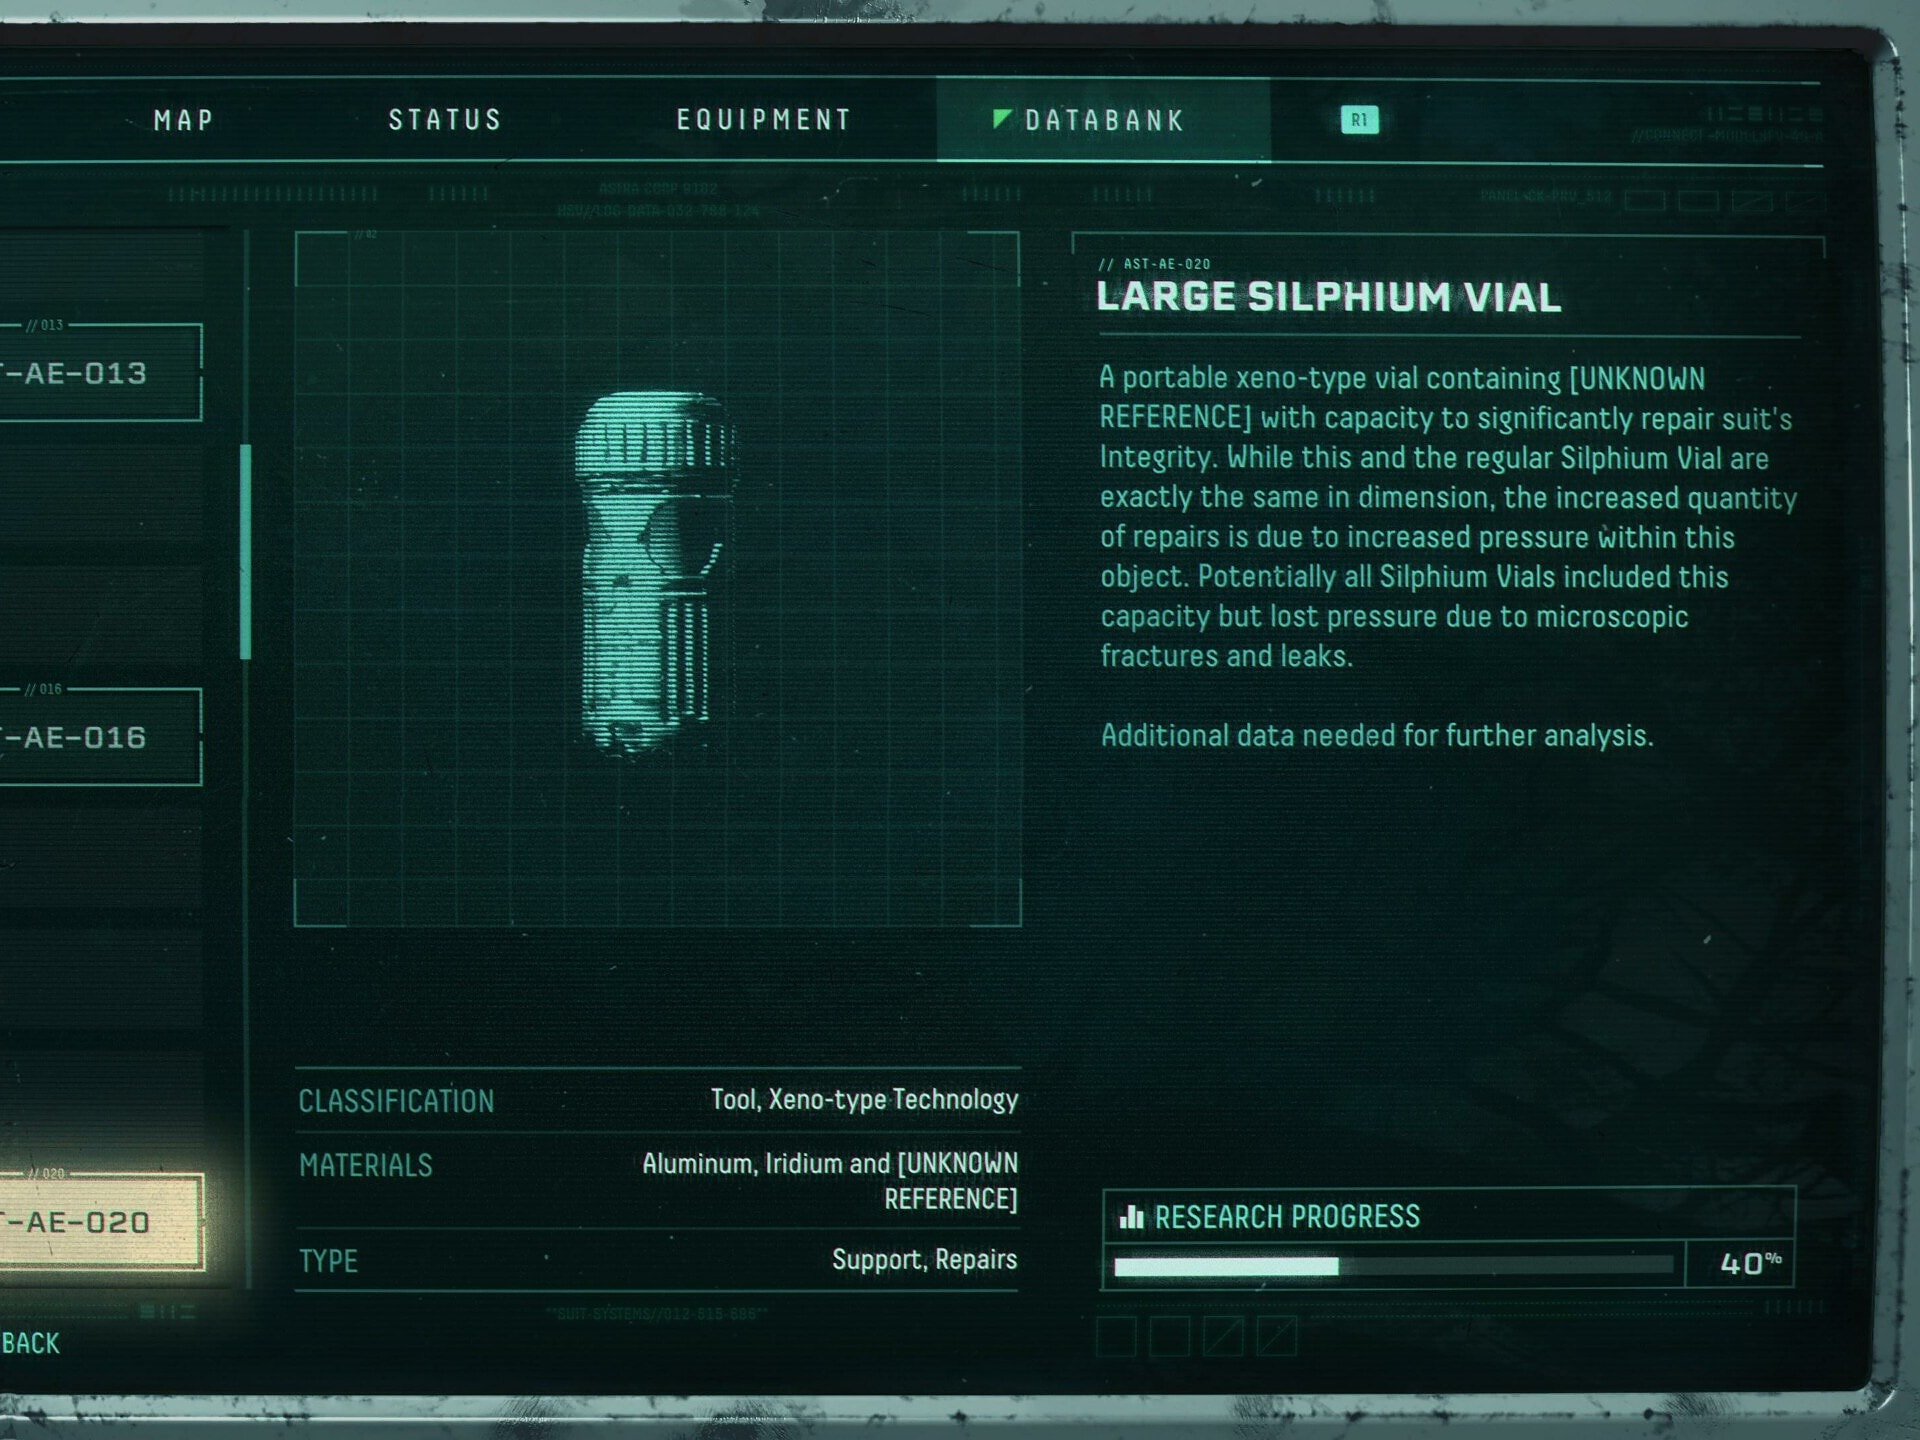
This vial of Silphium will recover ~66% Integrity on use. Similar to the smaller version, it’s great for bosses. It’s also a good way to heal up and turn Silphium chunks into Silphium Resin.
Nullification Sphere
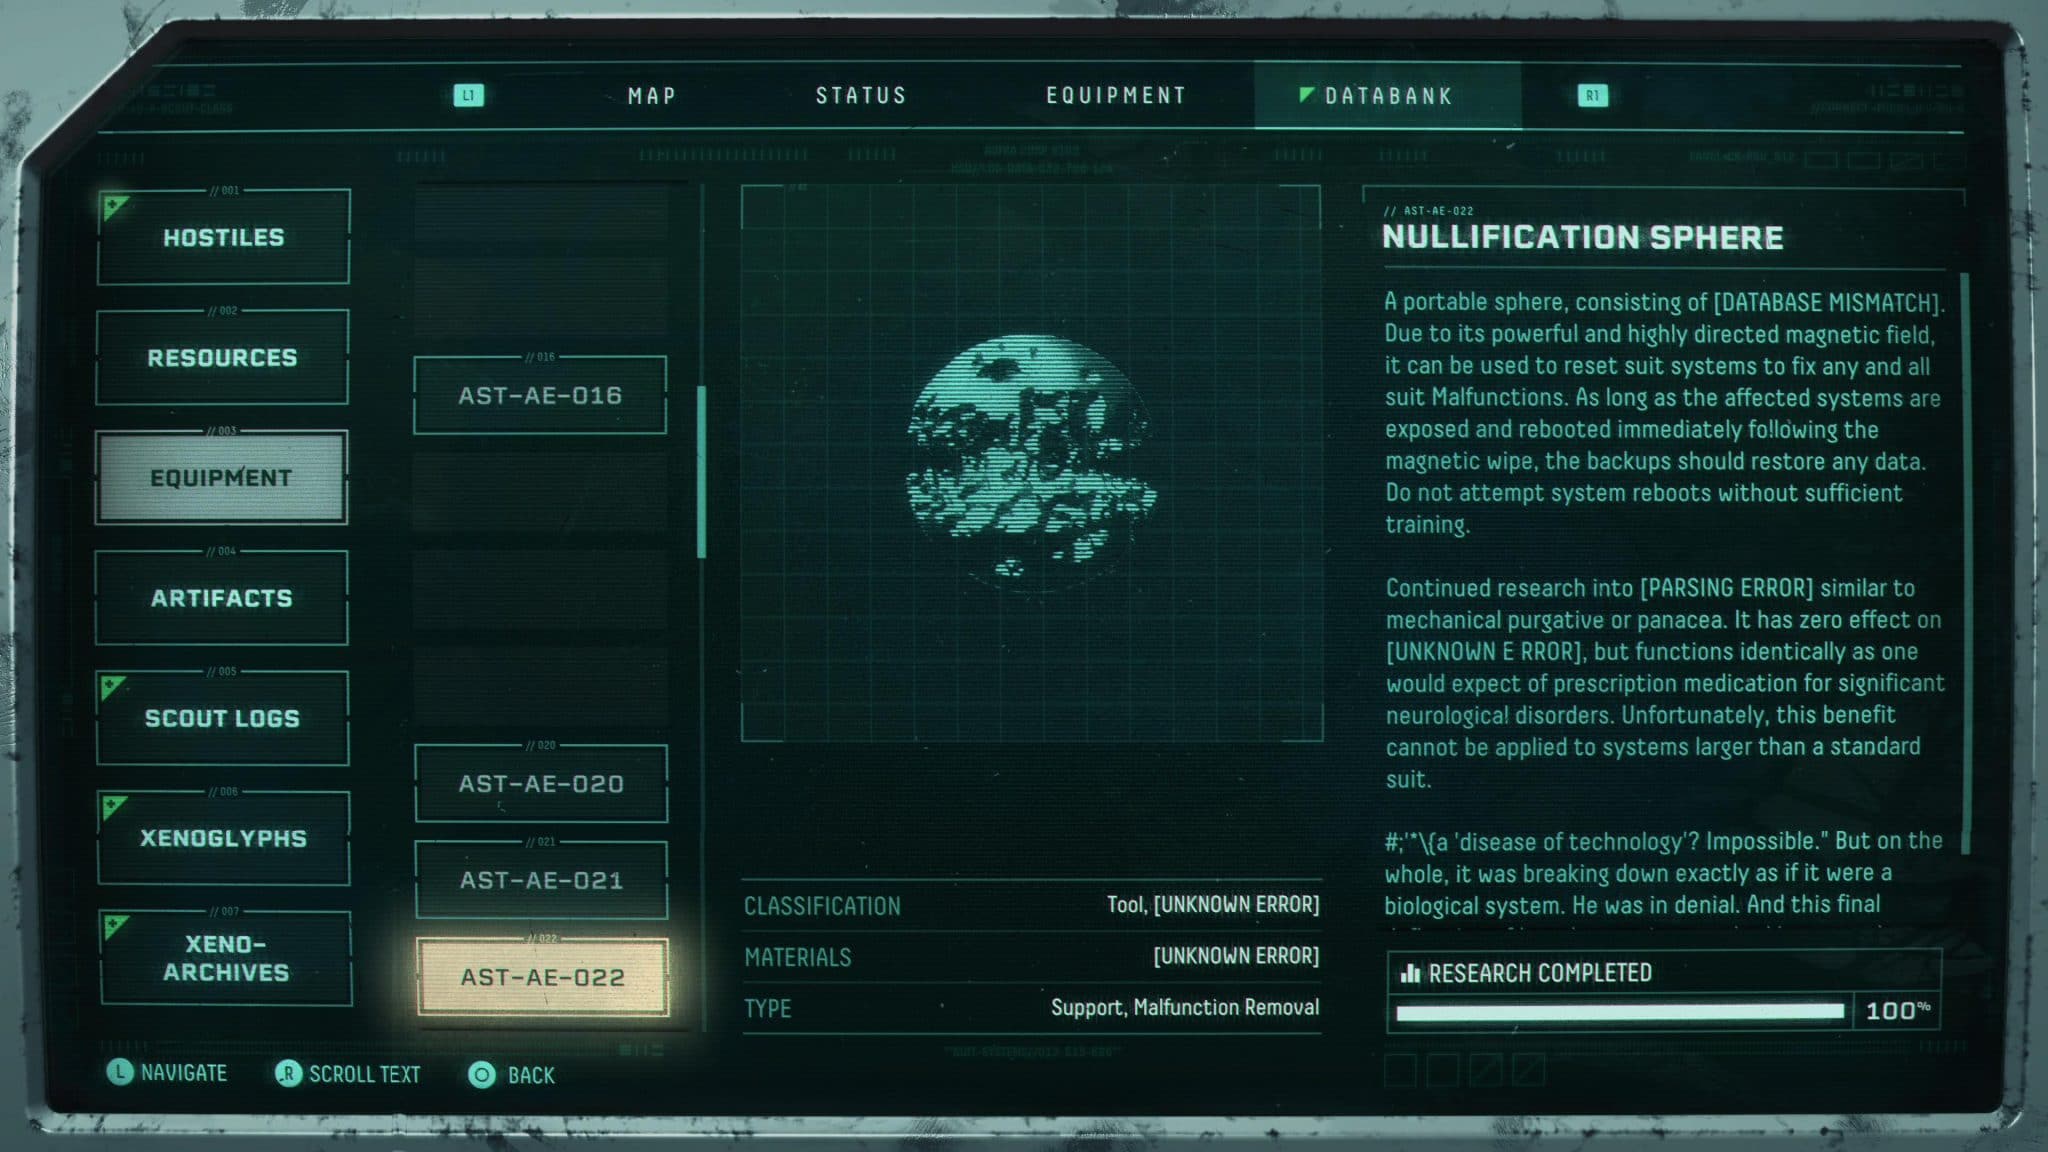
This consumable fixes all Malfunctions.
The most effective use of this item is when you have two or more Malfunctions. If you have one of these on hand, it’s worth the risk to open Malignant and Highly Malignant Chests, as this removes a lot of the risk in doing so.
Obolite Siphon

The Obolite Siphon turns collected Obolites into Silphium.
You get less Obolite overall from using this, but the extra healing can be nice, despite how minor it is most times. Combined with the Anti-Energy Pulse, it can result in a sizable burst of healing, though still a waste of obolites.
Reflex Stimulant
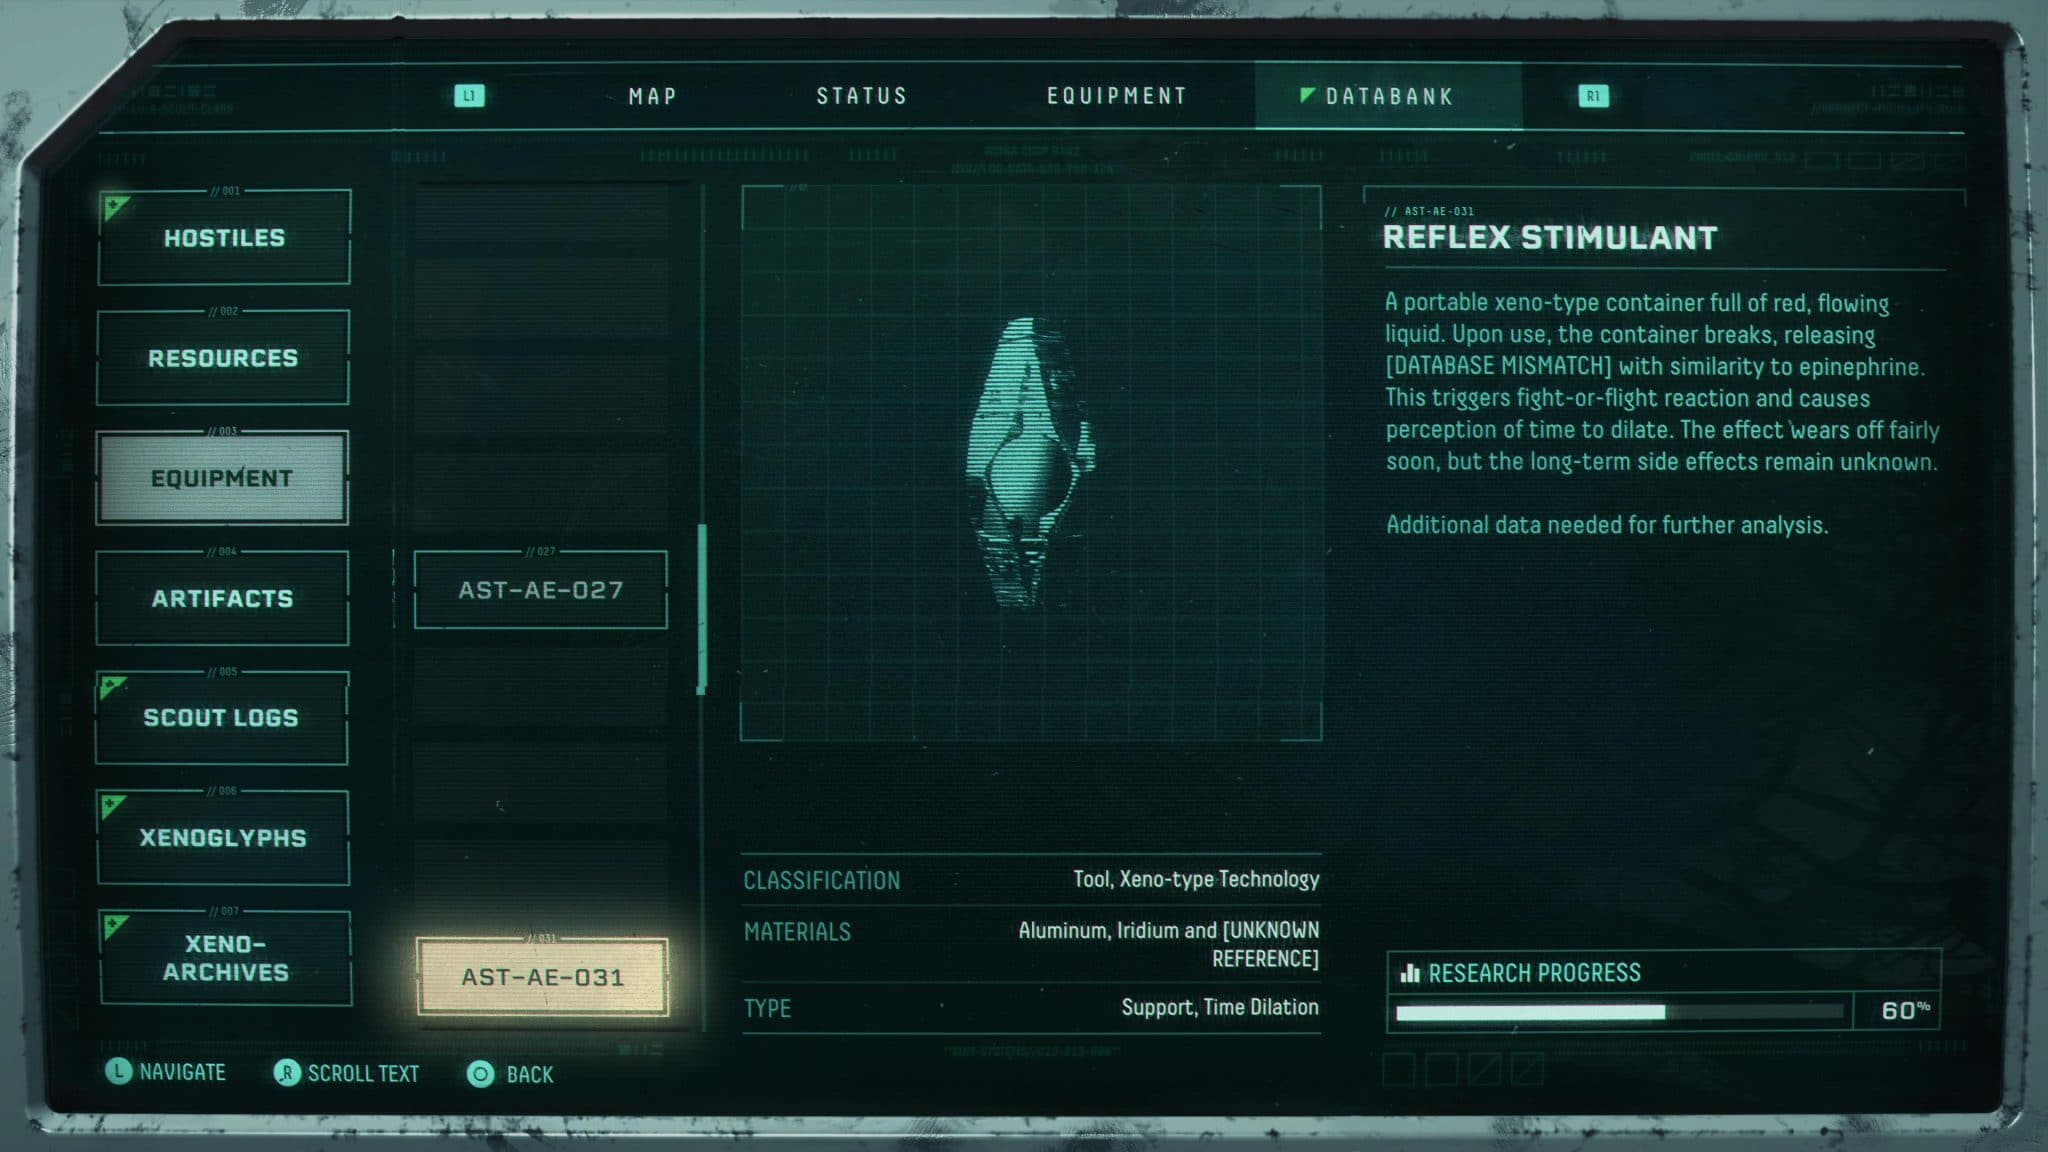
Reflex Stimulant enhances reflexes, slowing down perception of time. Its duration is 10s.
These can be really helpful in boss fights, or other chaotic encounters. This will give you enough extra time to react to incoming projectiles and attacks.
Apex Sphere
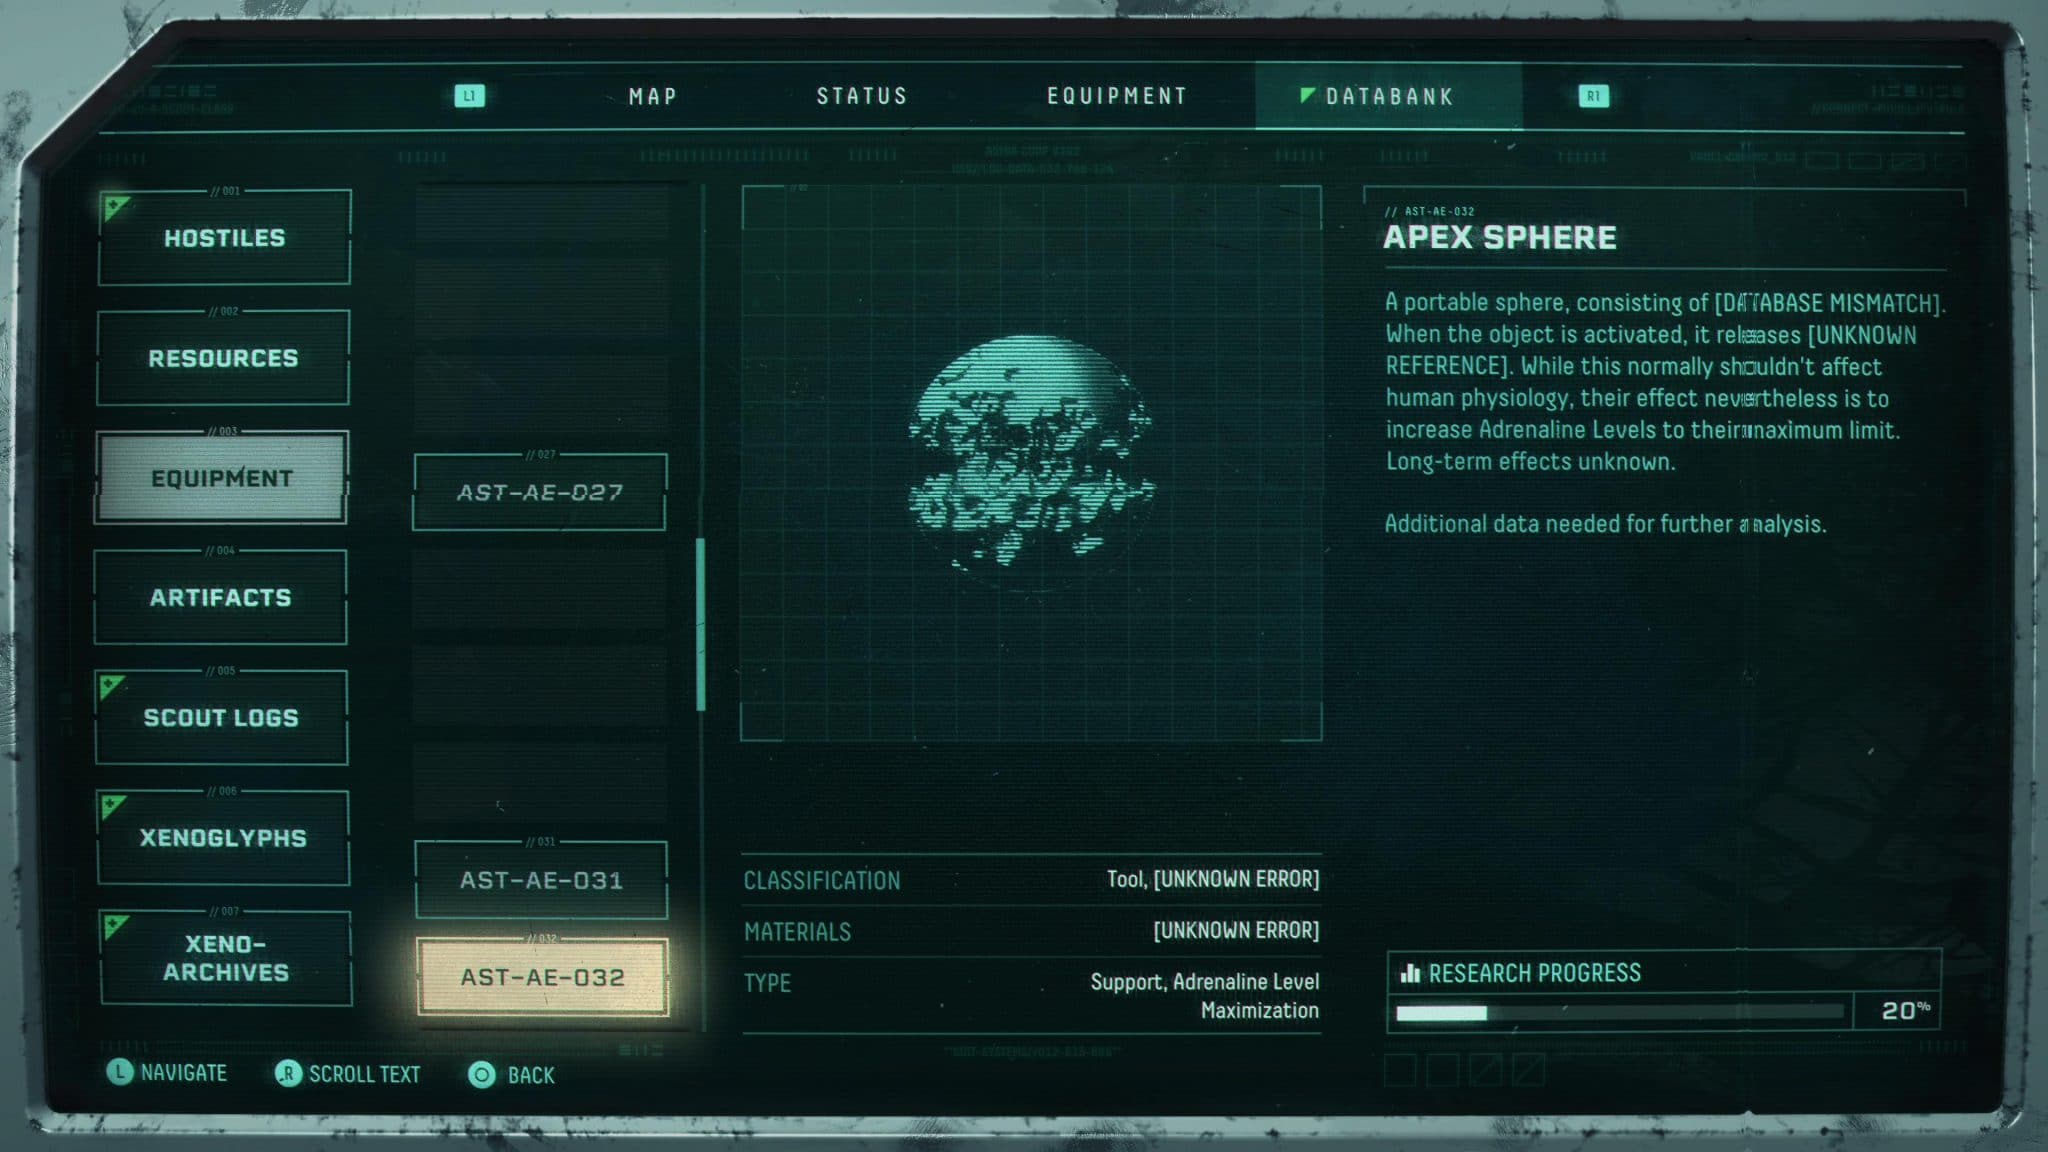
The Apex Sphere allows you to Instantly reach Max Adrenaline.
As long as you can avoid losing it, this can be a very good item to use on the spot if you’re not already at Max Adrenaline. Given that Adrenaline increases Obolite and Proficiency Gain, better sight as well as a stronger melee, it’s highly worth it.
Residual Sphere
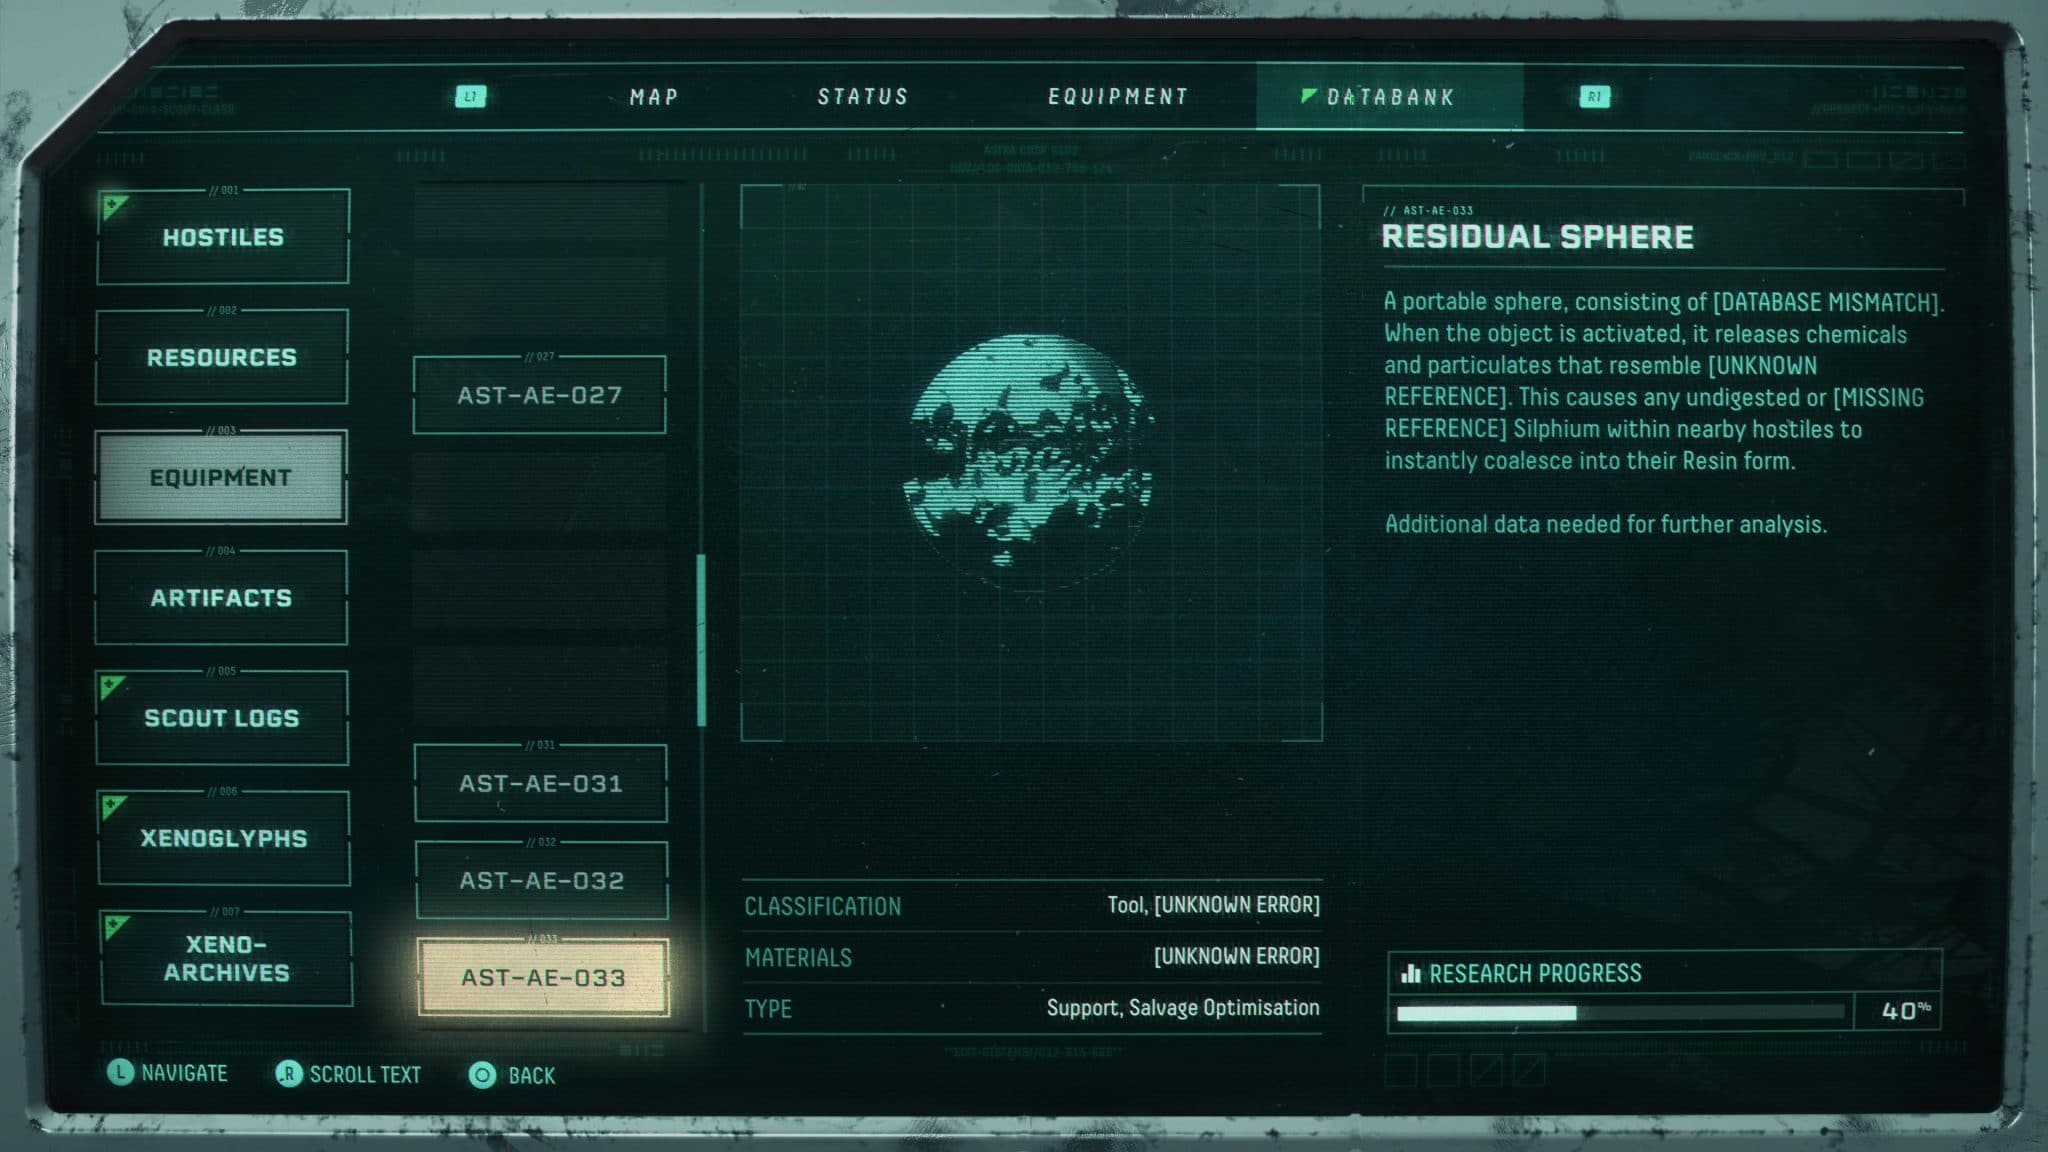
This sphere makes it so hostiles have a chance to drop Resin on death. Its effect lasts for half a minute.
This can give you a good boost of health if used in a room with a lot of enemies that you can dispatch quickly.
Interference Sphere
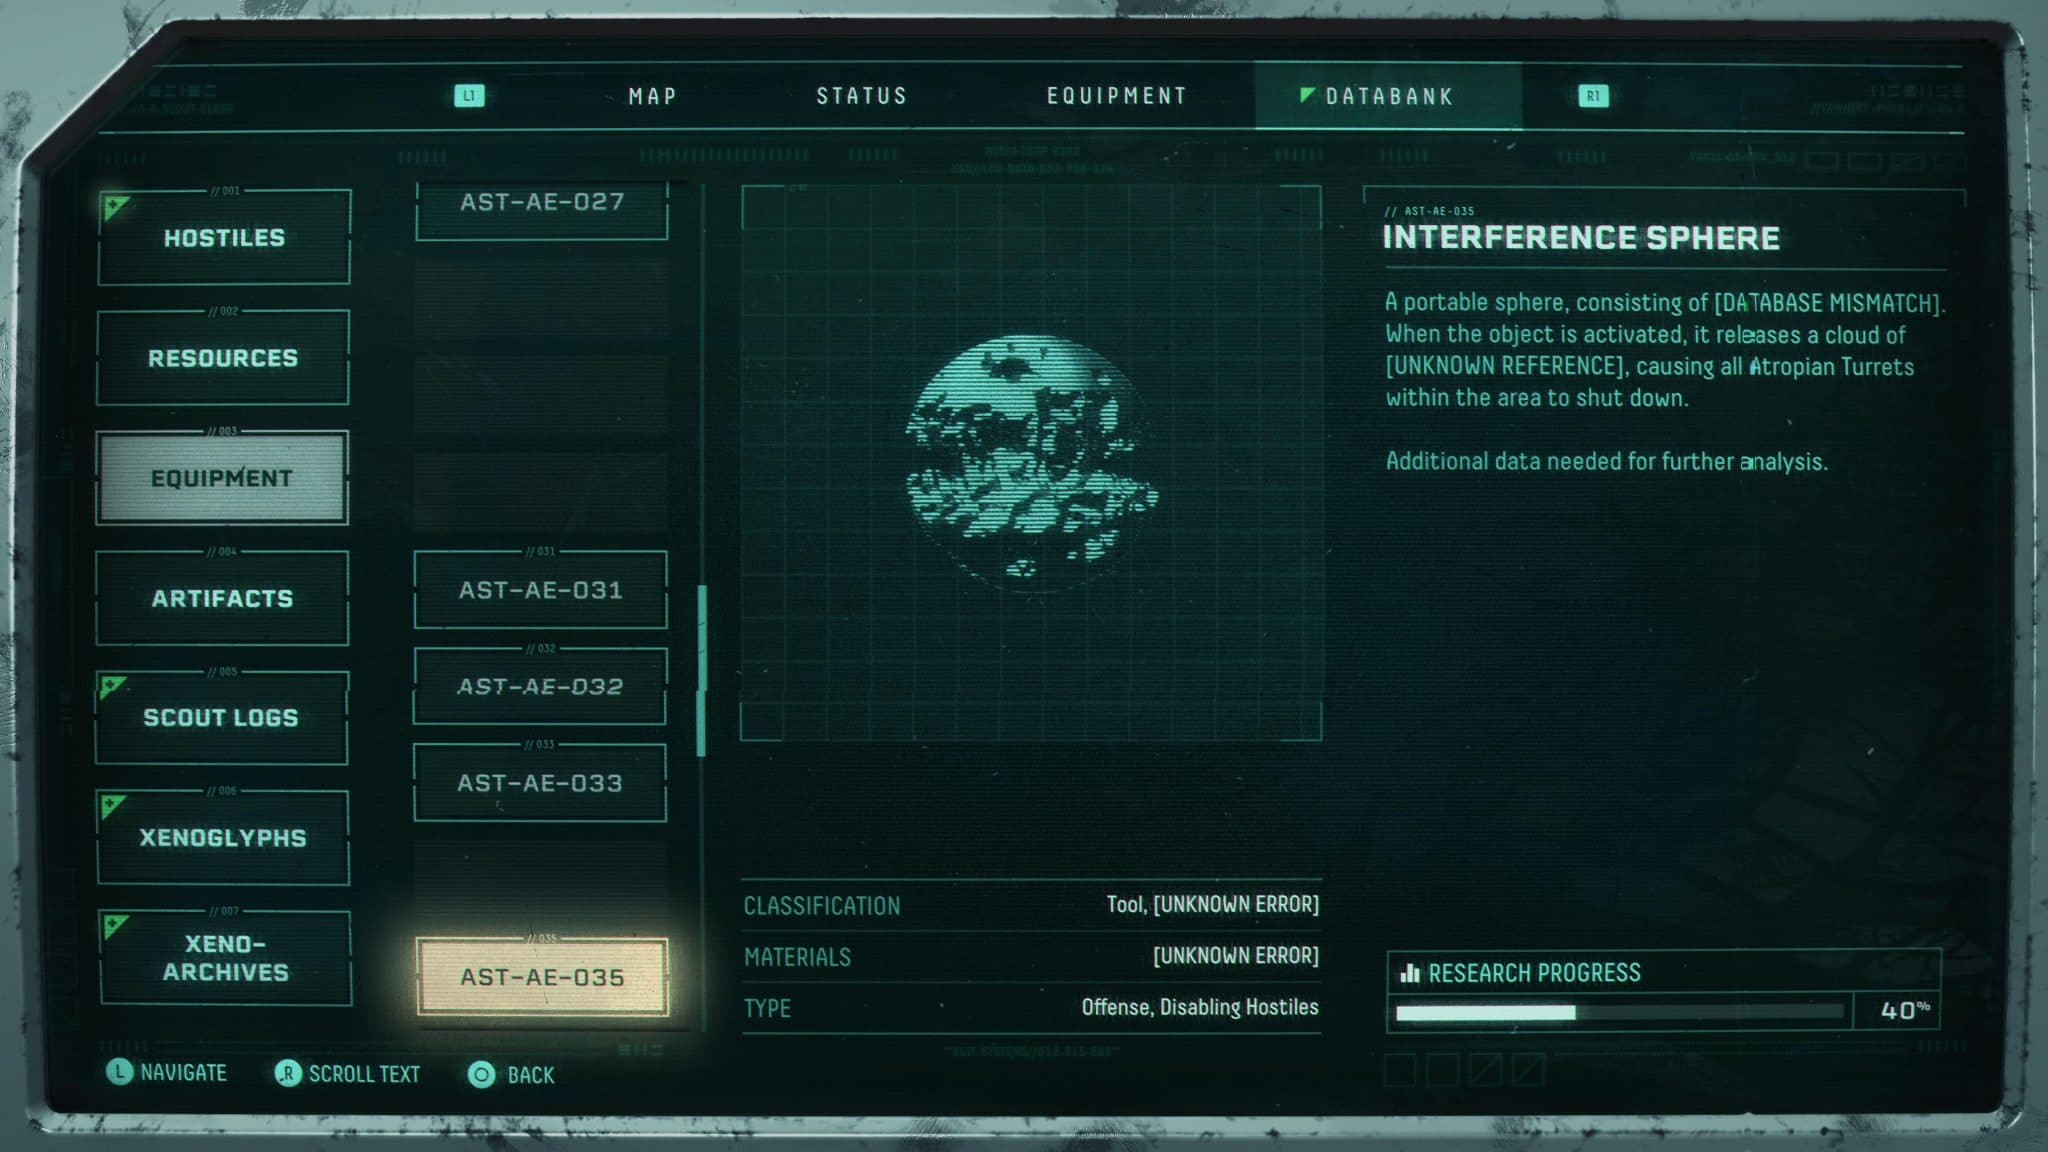
This consumable disables all turrets within an area.
One of the least useful consumables in the game. The only time it’s niche and useful is if there’s a lot of shielded turrets, but those times are pretty rare.
Extermination Sphere
This one detaches all Parasites.
Depending on the Parasites you have, this can be helpful but usually isn’t. If you manage to defeat any boss, there’s a device afterwards that will do the same thing, but also give you Obolites too.
Translocation Sphere
Translocation Sphere transports you to an unknown location.
Definitely not one of the more useful consumables, but they can get out of a sticky situation. Just have to hope that it doesn’t immediately place you into another one.
Alt-Fire Coolant
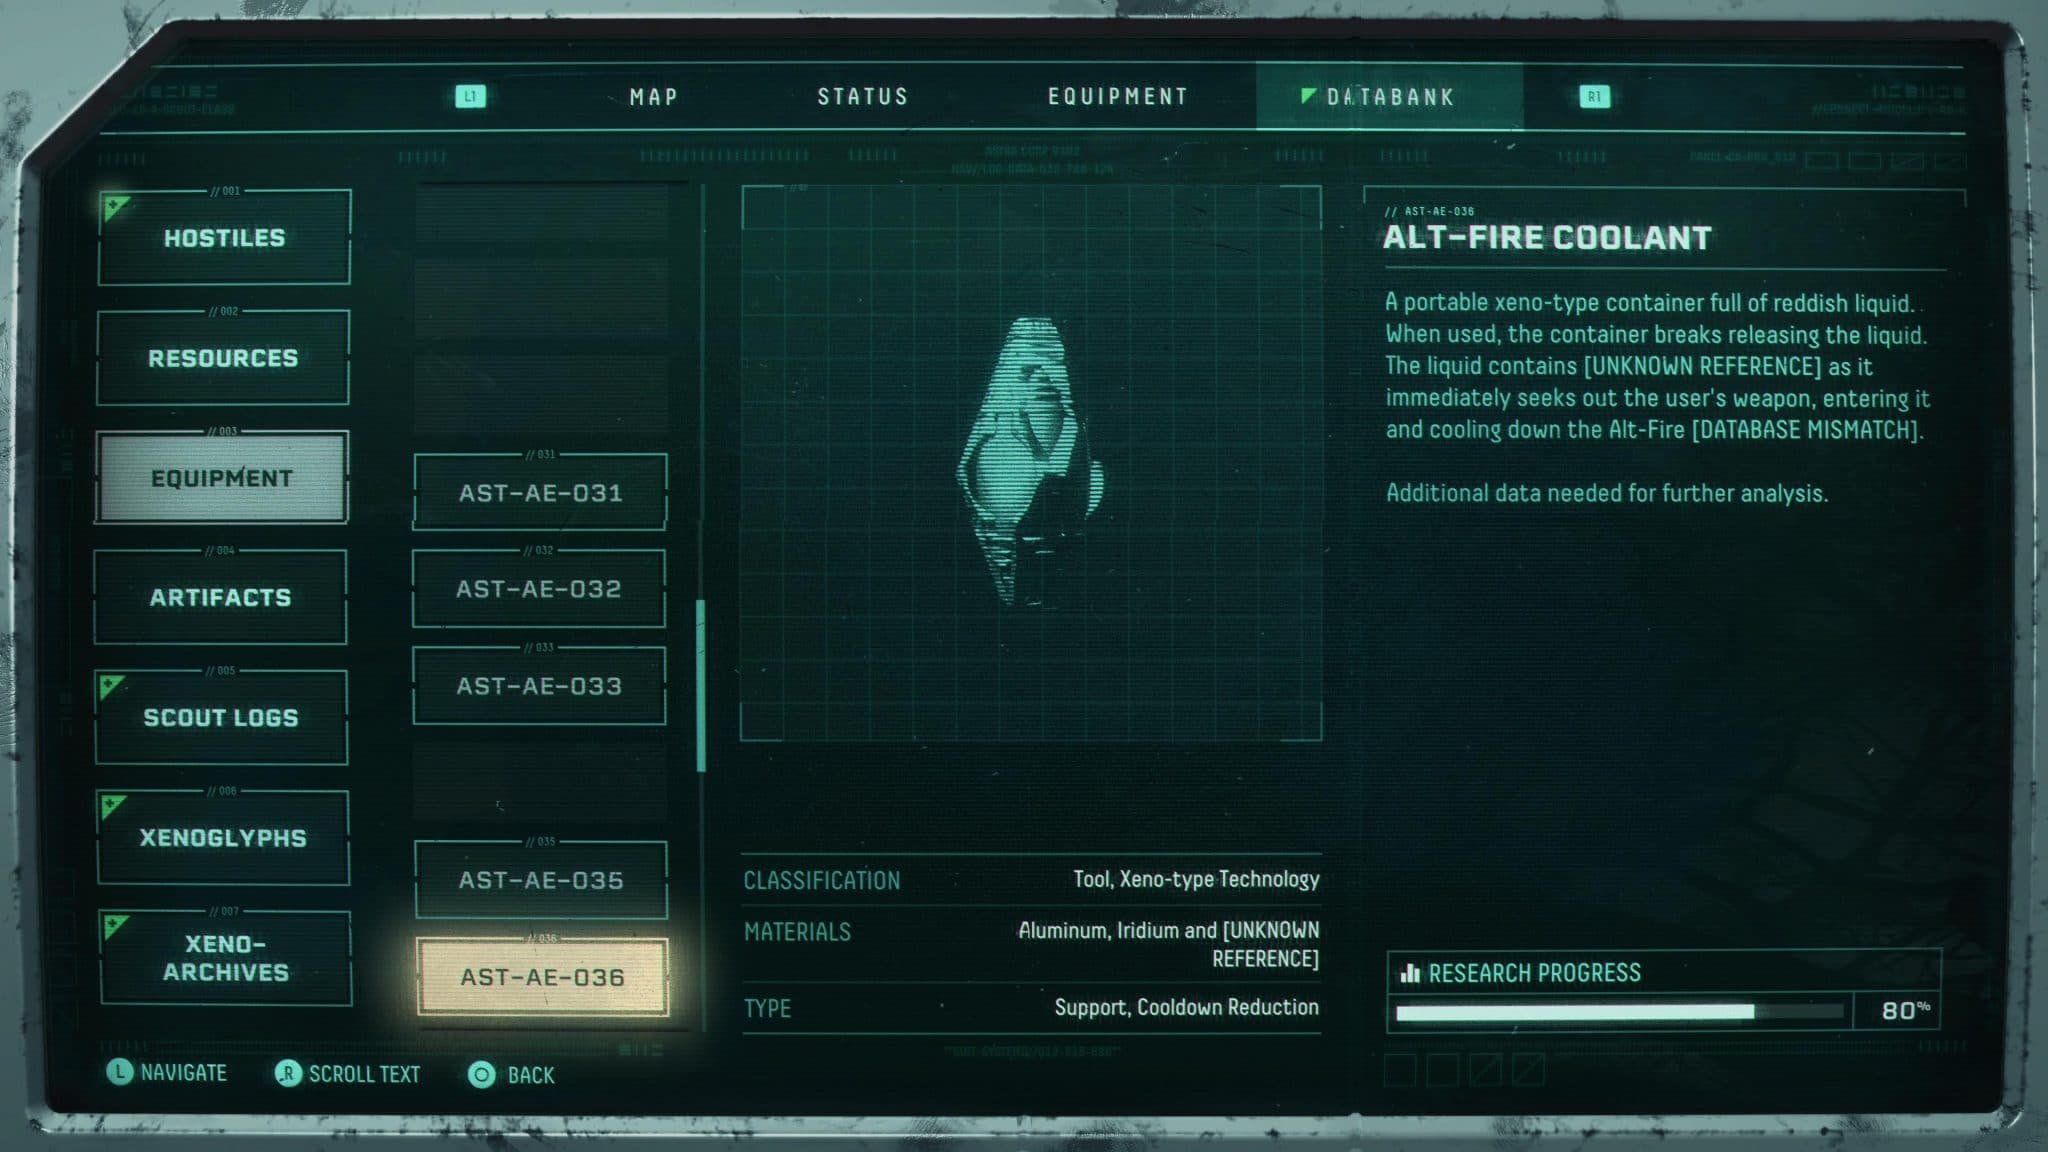
The Alt-Fire Coolant can be powerful in the right situations, getting you a bit of extra burst damage of your Alt-fire,
Damage Siphon
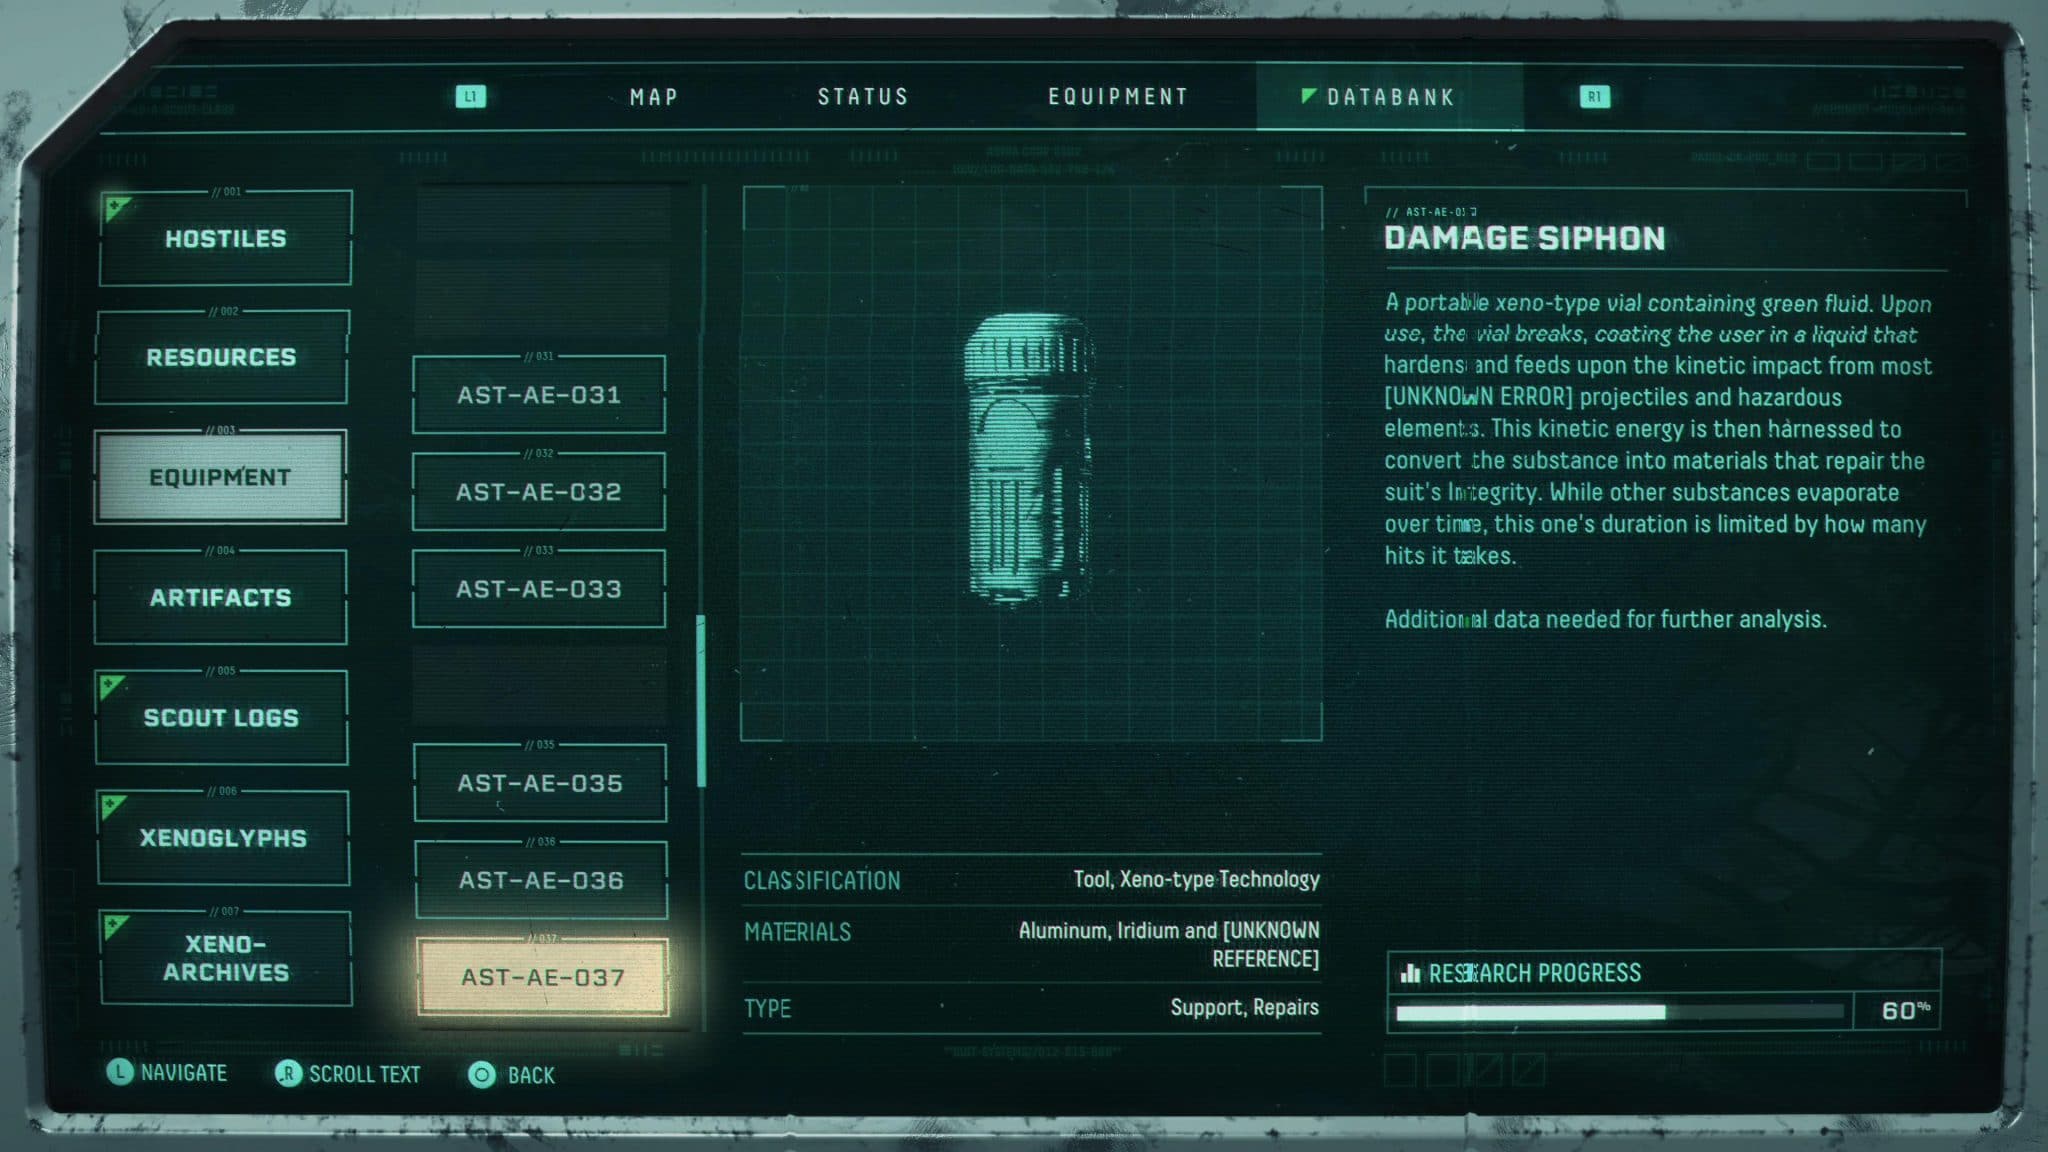
The Damage Siphon consumable converts damage dealt into Integrity. It lasts until you take two hits. This consumable is unlocked by Extracting the Damage Siphon Datacube.
This can be a very potent healing option. Though it’s highly weapon dependant, which means depending on the weapon, it can fall short. With skillful play however, it can be maintained for quite a long time, which makes it worth the pick up regardless of your weapon.
Repair Enhancer
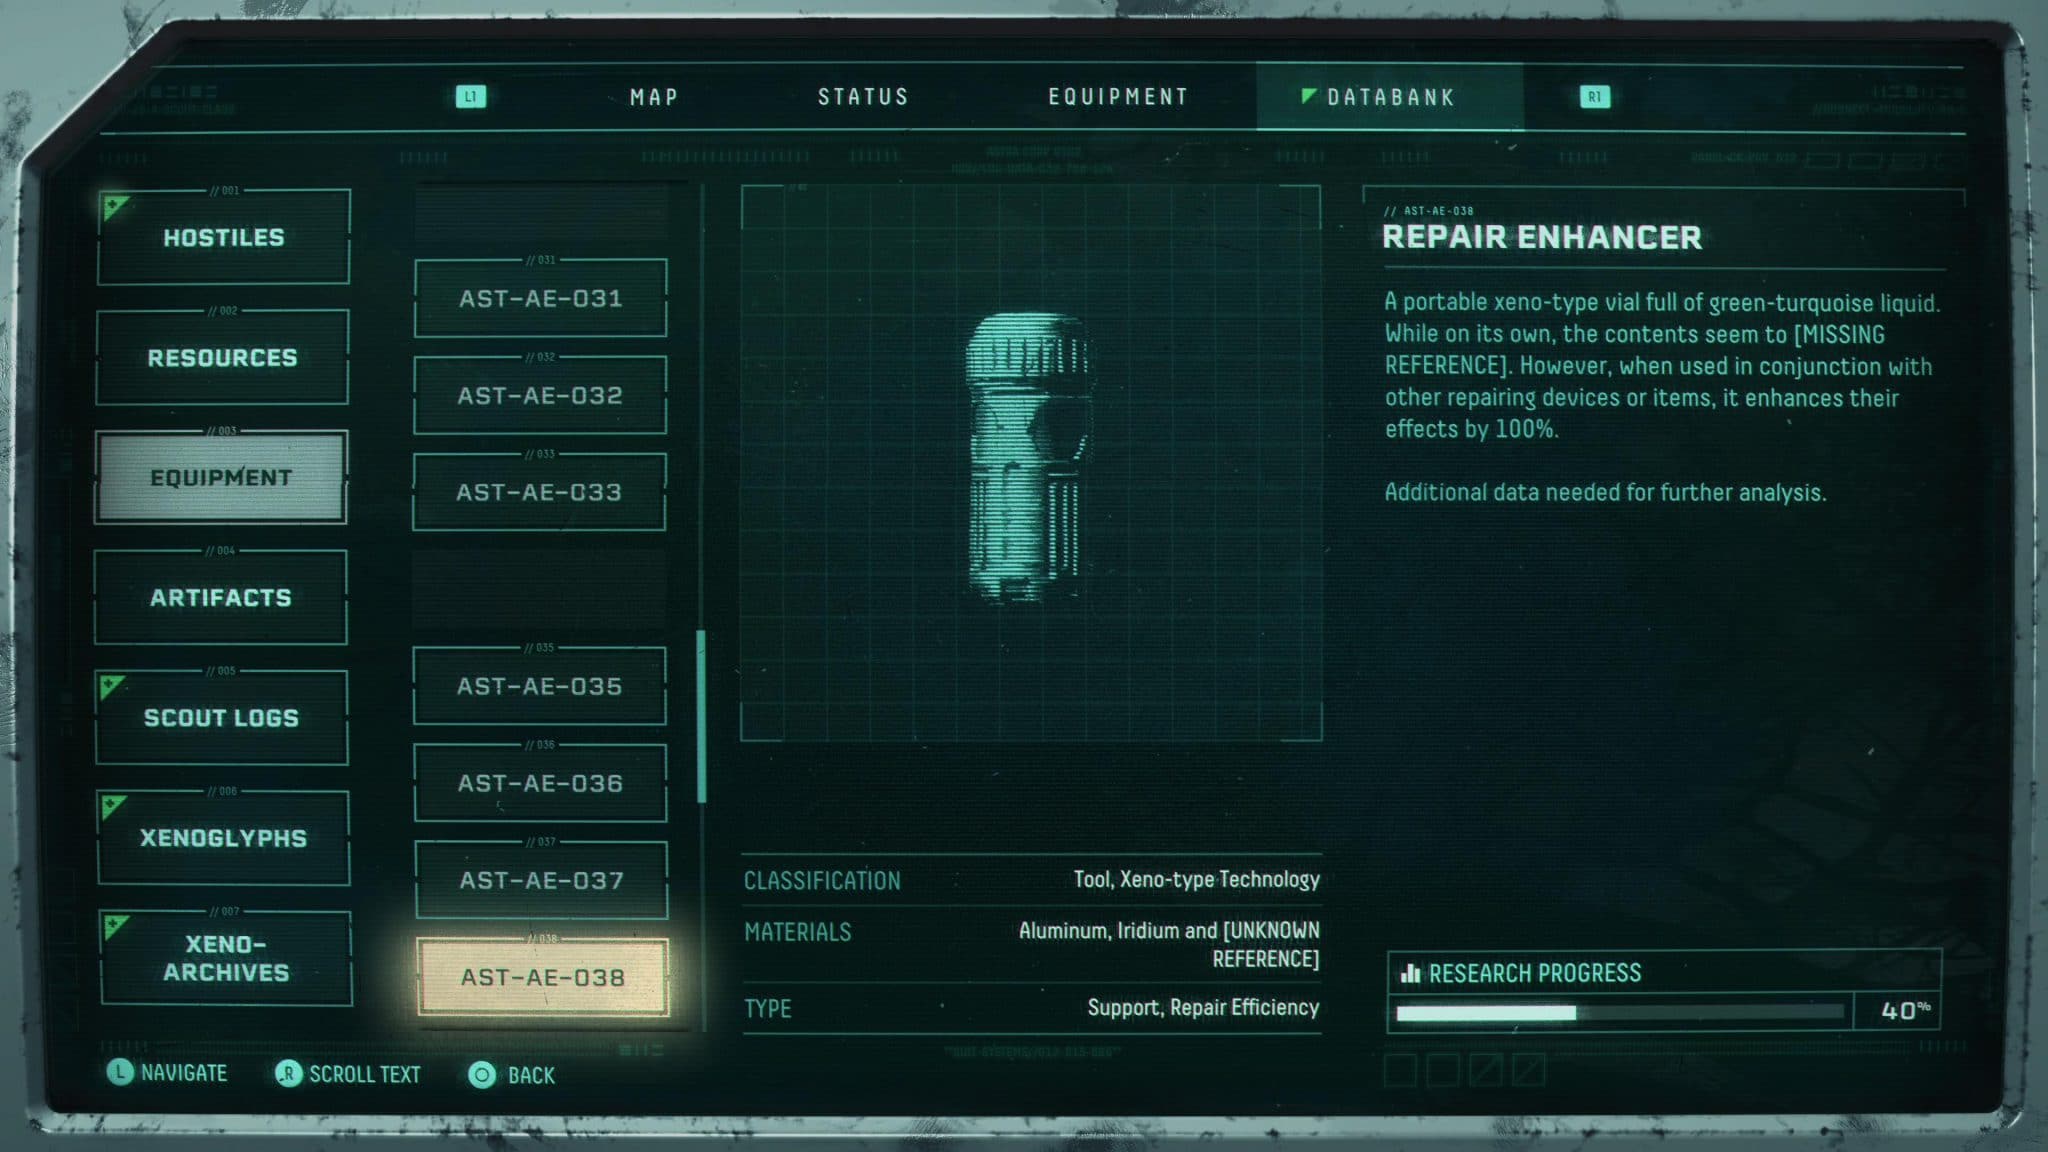
This item Doubles Suit Repair Efficiency. Its duration is 60s.
This can be useful if you’re looking to save Large Silphium to increase your health later, and will make the Smaller Silphiums heal for more and make it easier to claim the Large Resins.
Shield Vial
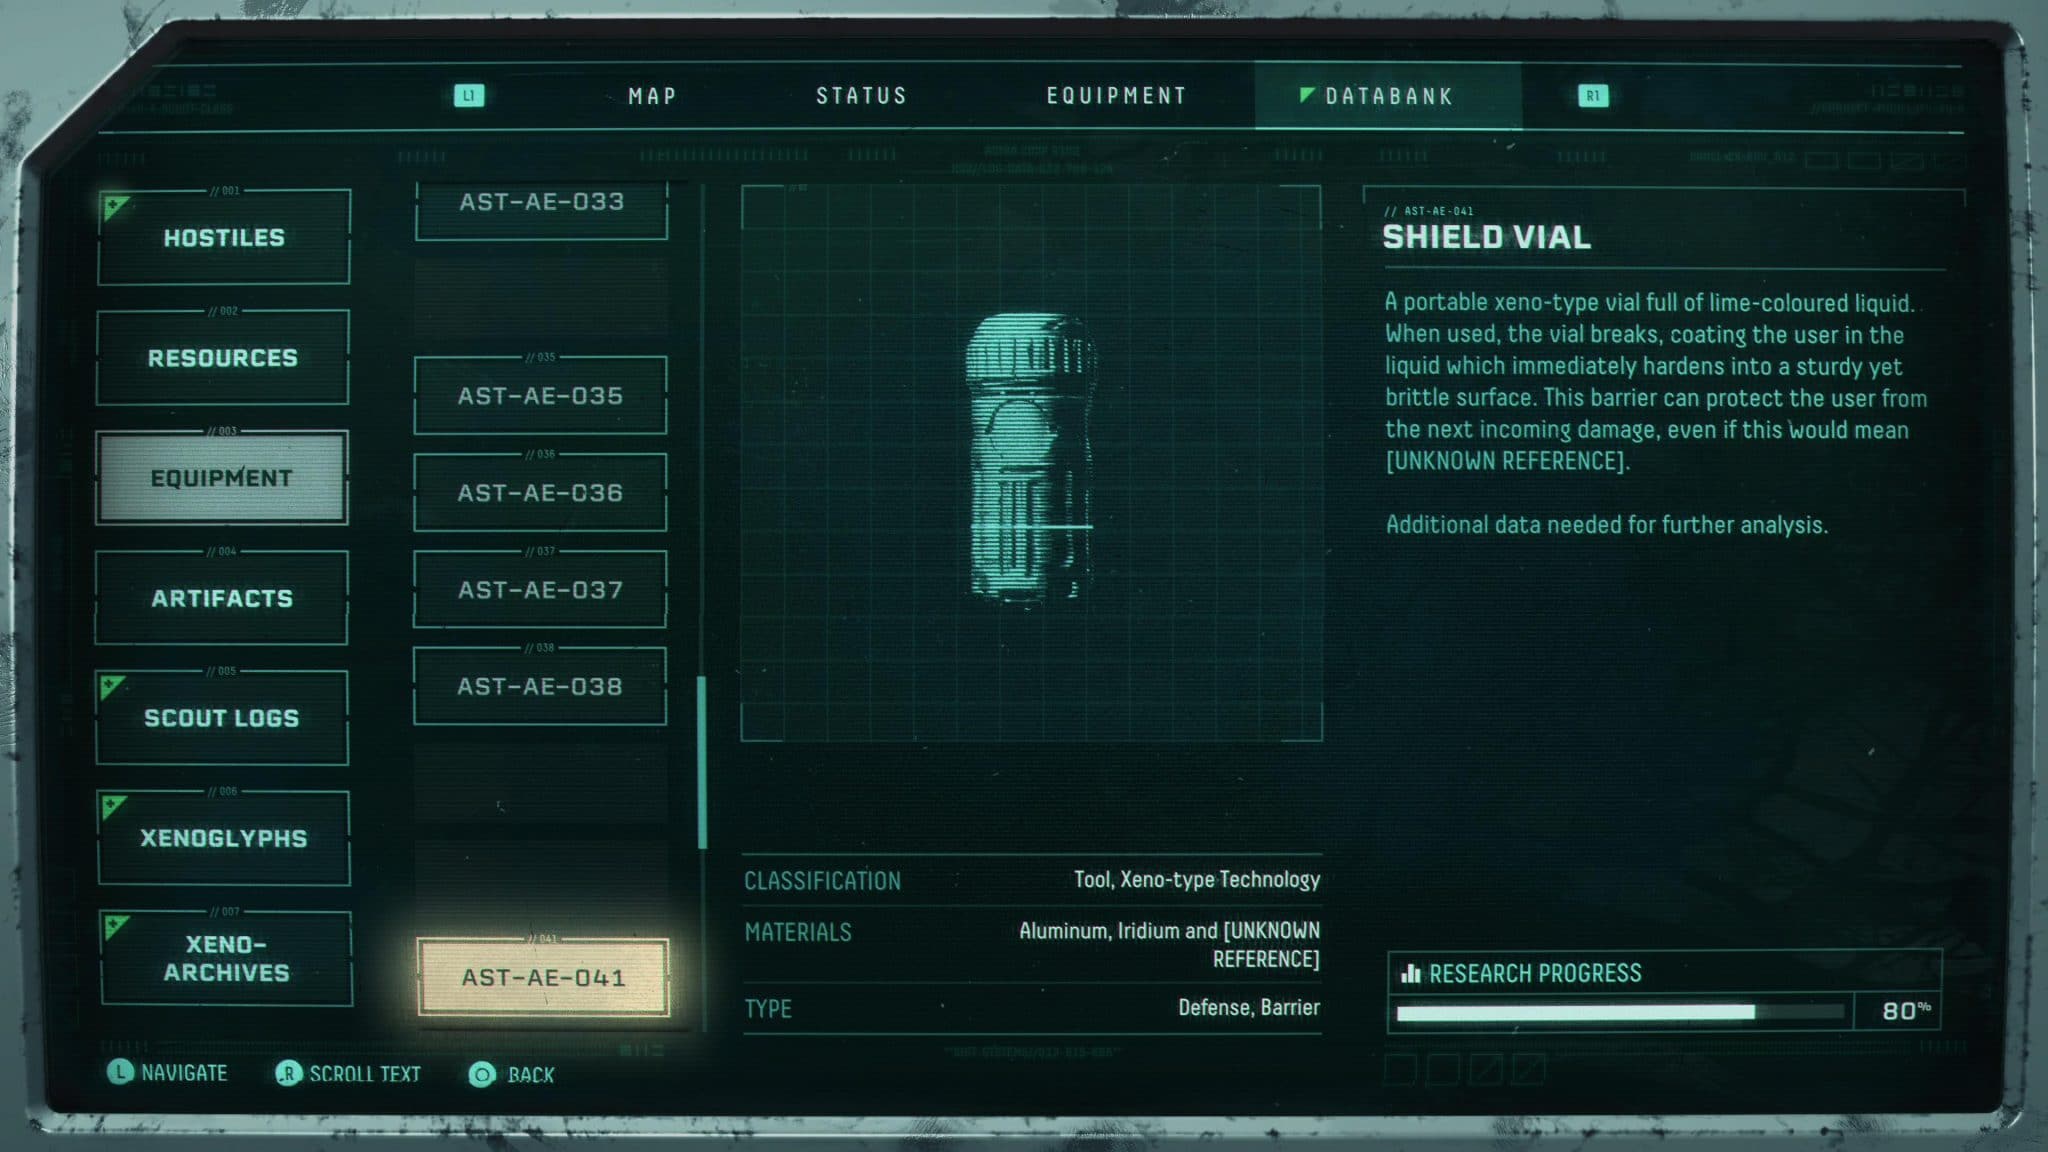
Shield Vial creates a Shield against the next hit you receive.
This consumable can be a great tool for Mitigating forced Parasite damage or other hard to avoid attacks.
Shocking Springs
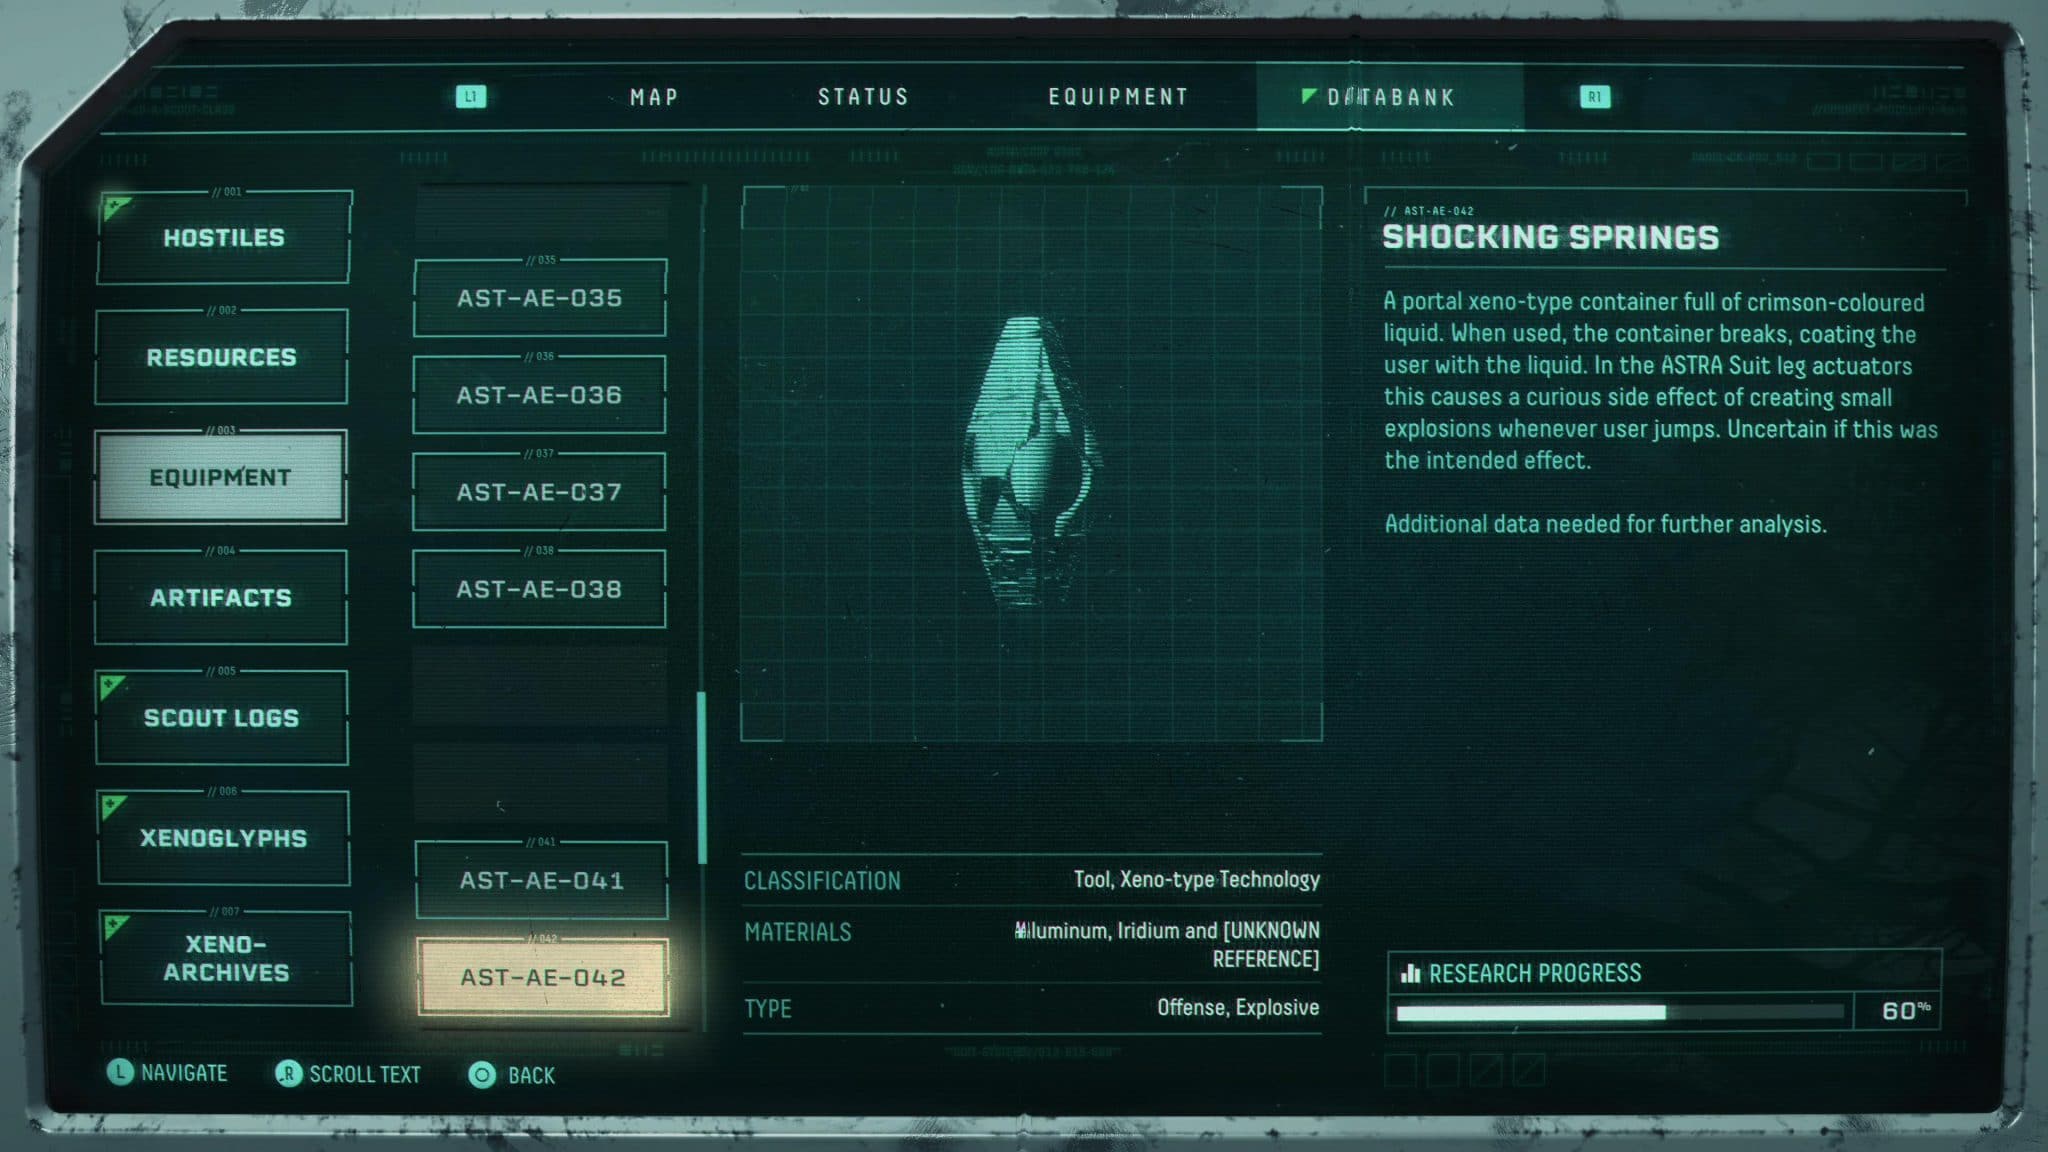
Your jumps create energy blasts on landing. The effect of this consumable lasts for 30s.
This isn’t bad for an early consmable as when used right it can do okay damage. The only problem it has is the short range of the energy blast. It’s puts you very close to enemies, and can’t hit aerial enemies unless you’re directly under them in a lot of cases.
Energy Barricade
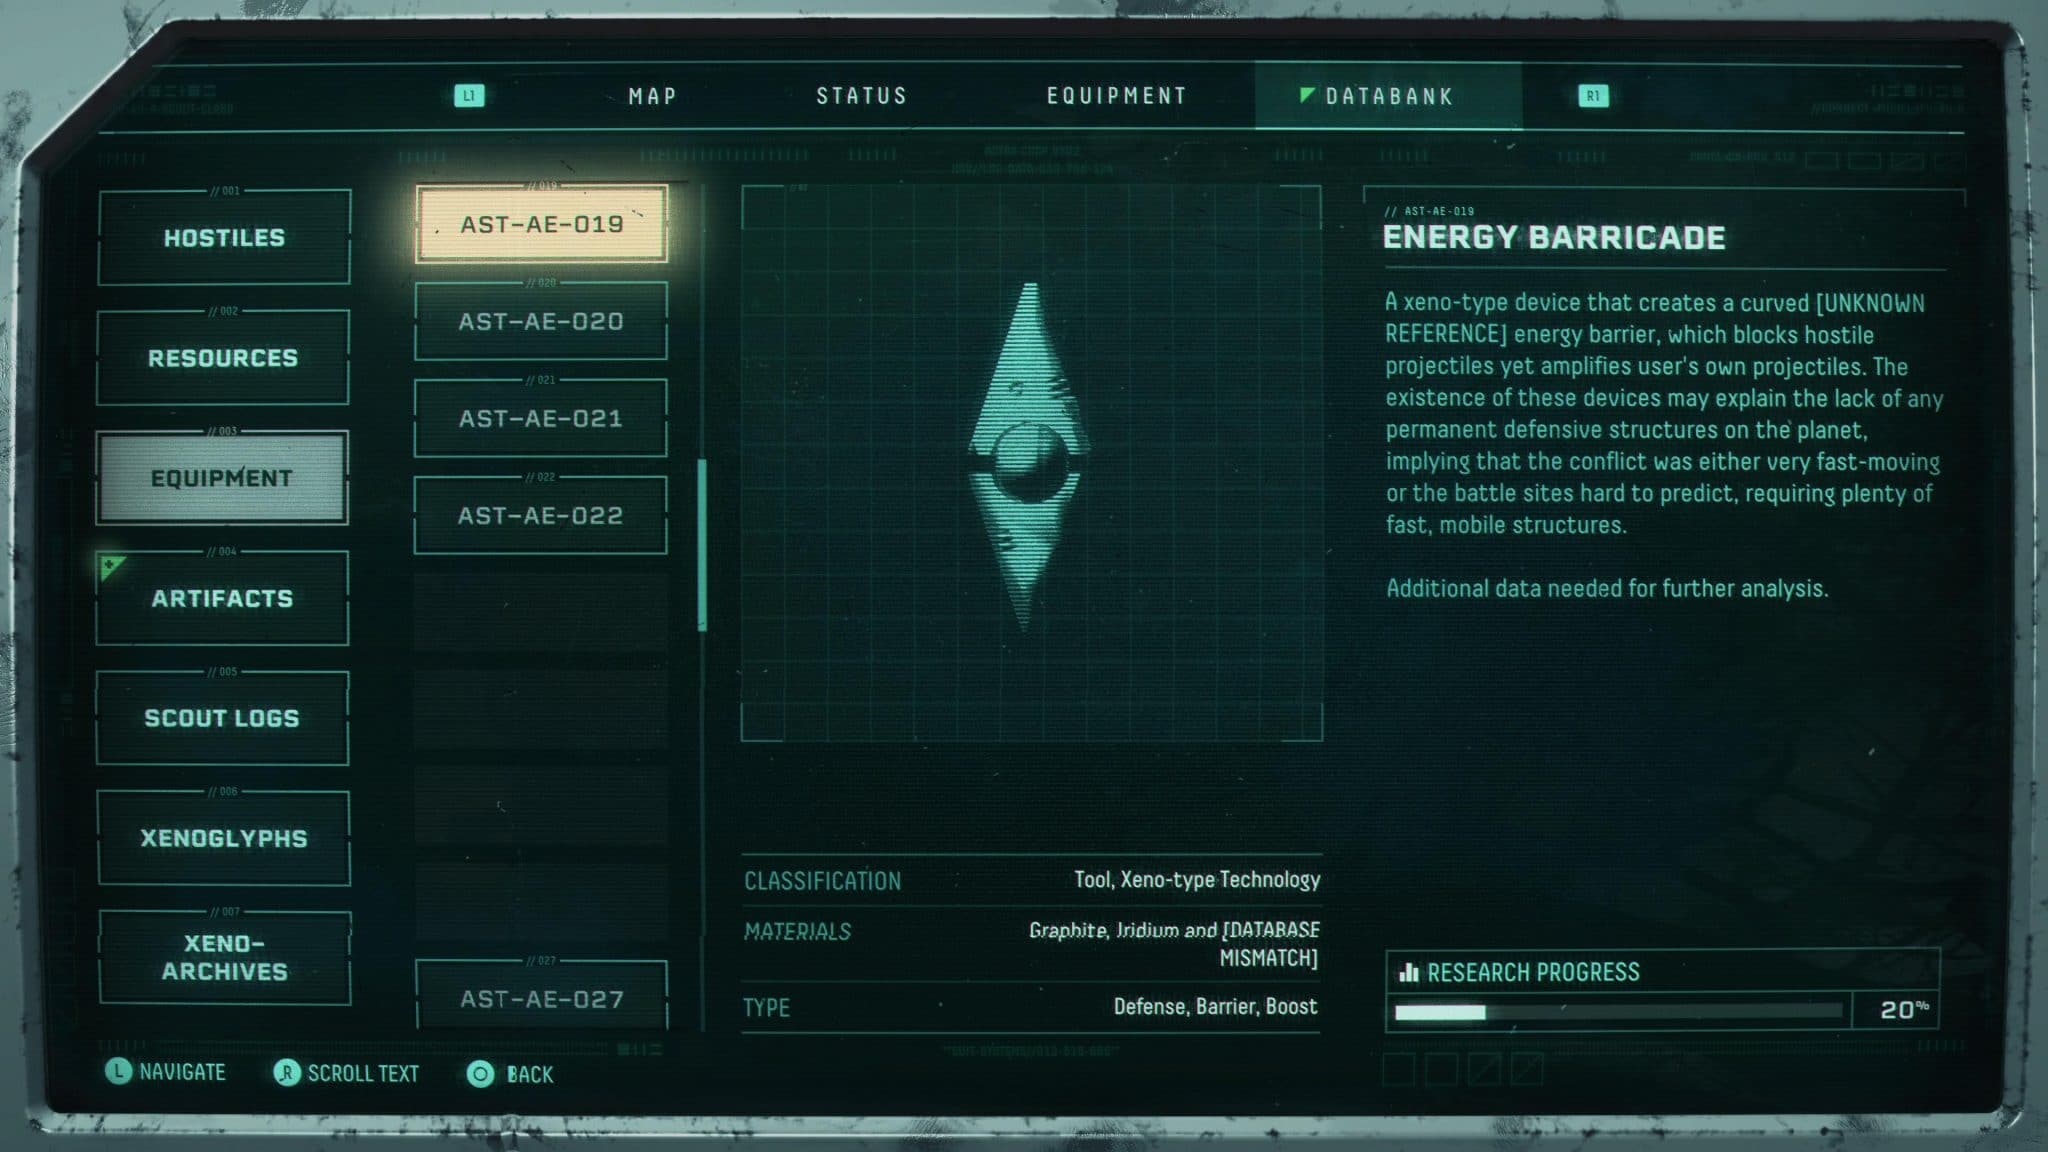
The Energy Barricade creates an immobile barricade that blocks enemy projectiles and boosts friendly projectiles. This unlocks through the use of the Cthonos.
Weapons
This section will cover the Weapons, their Traits and the Alt-fires that are currently known. We’ll cover the Alt-fires first, as they aren’t weapon exclusives.
Alt-Fires
These are powerful alternate attacks that can be found on the various weapons. More and more will appear as you reach later Biomes.
Trackerswarm
When charged Trackerswarm can be used to release a swarm of homing missiles that focus on the target closest to the crosshair. This Alt-Fire provides a reliable single target burst option.
Horizontal Barrage
When charged Horizontal Barrage releases a line of Bouncing grenades that explode after a duration or on impact with an enemy. This can greatly help dispatch large groups of ground-bound enemies, but isn’t great for hitting flying foes.
Shockstream
When Charged Shockstream enables you to fire off a wide area damage beam for a short duration. This can very easily and quickly dispatch large groups of flying enemies if they’re in range.
Blast Shell
When Charged, Blast Shell allows you to release a single, powerful grenade that explodes on contact with an enemy or after a short duration. This can very easily take care of large groups of weaker enemies.
Shieldbreaker
When charged Shieldbreaker can be used to fire a projectile that deals moderate damage and break shields without the use of Melee. This Alt-Fire become available after visiting the Crimson Wastelands (Desert Biome).
Void Beam
When charged, Void Beam will allow you to fire a beam with ramping damage the longer it is fired. This can be a potent single target option with good aim, but can easily take care of small groups of enemies as well. This Alt-Fire becomes Available after visiting the Crimson Wastelands (Desert Biome)
Killshot
When charged, Killshot allows you to fire a high damage shot which deals extra damage when hitting an enemy’s weakpoint. This is a highly potent single target damage option, provided you can hit an enemy’s weakpoint.
Sidearm SD-M8
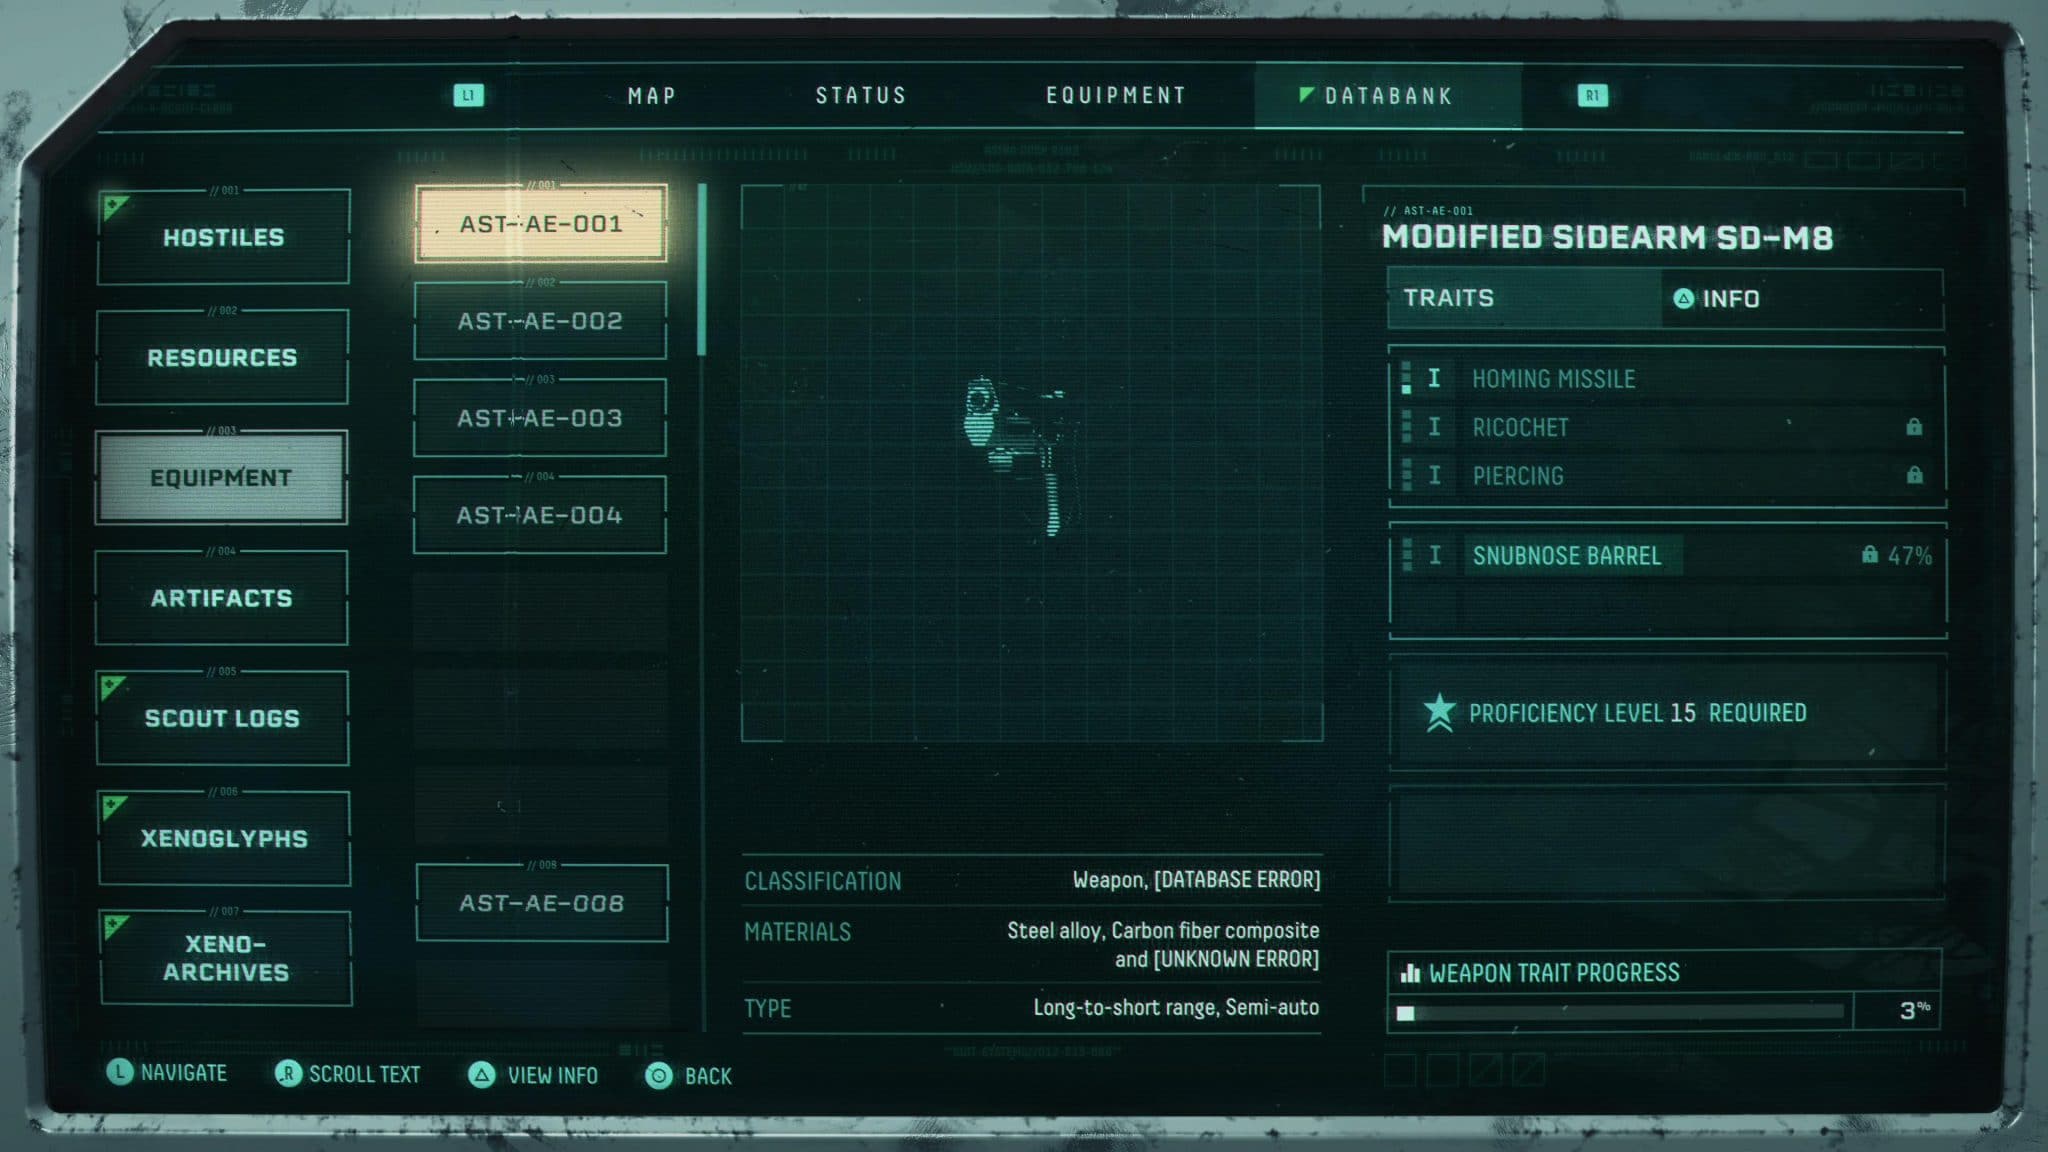
Every cycle will see you starting with the Sidearm SD-M8. It’s a pretty basic pistol, but can do fairly decent damage with the right traits.
The Homing Missile trait releases Homing Missiles in additional to your normal shots. these will often focus on the target you’re aiming at, or the closest enemy if not targeting anything.
The Ricochet trait will make your bullet ricochet to an nearby enemy as well as bounce off walls, giving it a bit of mobbing power.
The Piercing trait will allow the SD-M8’s shot to pierce enemies. If you get situation where enemies line up, this can help with mobbing. Those opportunities are pretty rare though.
The Snubnose Barrel trait will increase the damage of your shots, but at the cost of accuracy. This will let it kill early enemies faster, but also make it a closer range weapon overall.
Tachyomatic Carbine
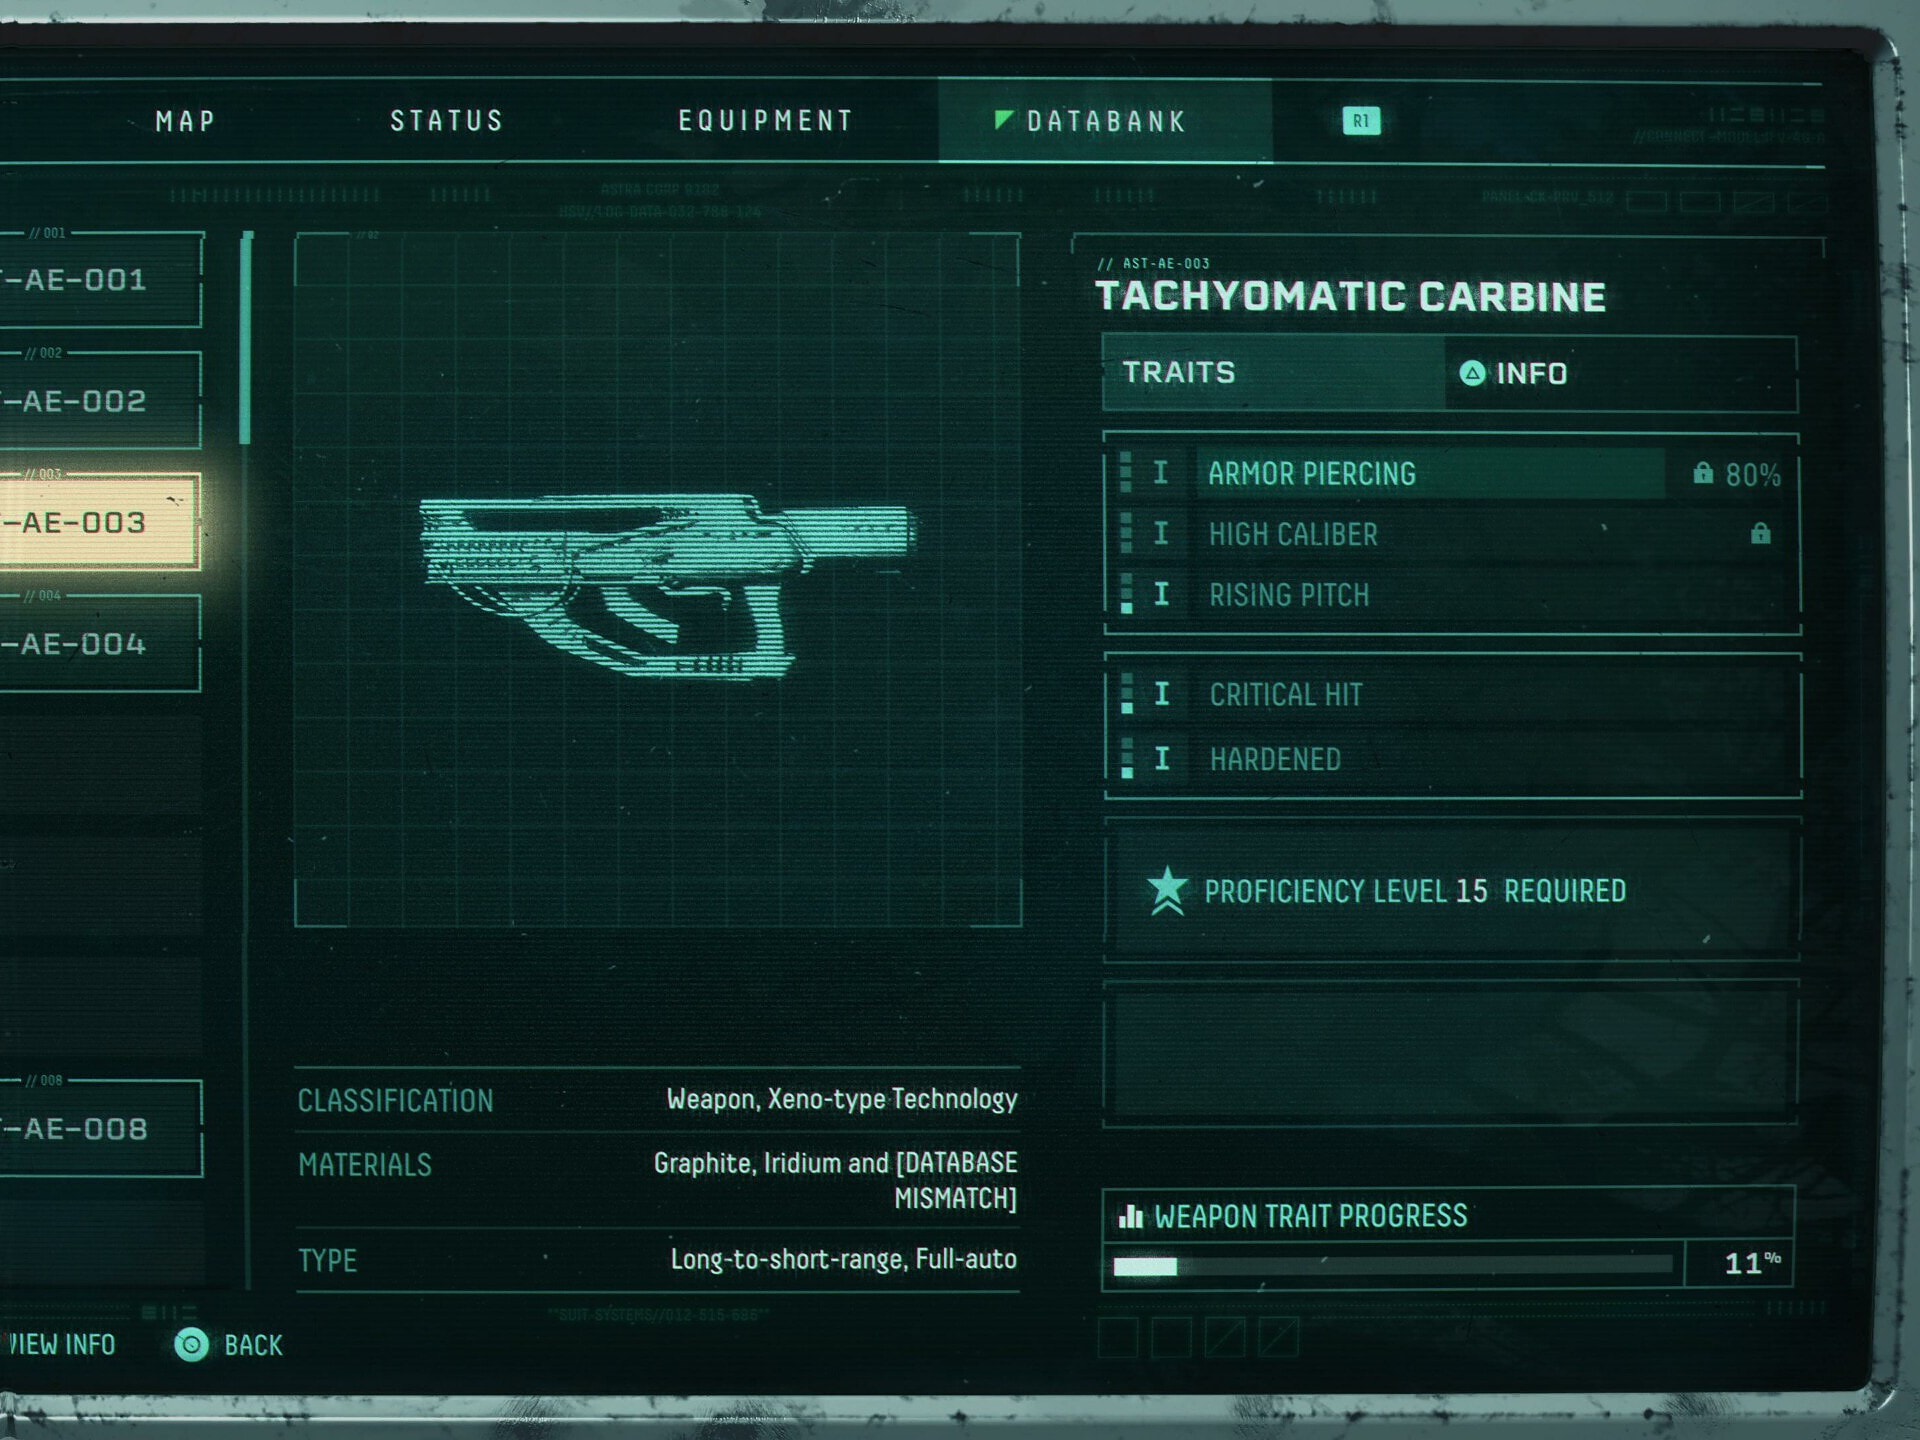
The Tachyomatic Carbine is as the name suggest your typical assault rifle weapon. It’s fully automatic and a solid improvement over the SD-M8 you start with.
The Armor Piercing Trait will allow your shots to pierce enemies and ricochet off walls. This can be a powerful trait when combined with most of the damage mods for this gun. By itself however, it can be pretty lacking.
The High Caliber trait increases the damage of the gun, but reduces the rate of fire. Personally, I don’t find the trade off too worth it, as it lowers the overall DPS of the weapon. Rising Pitch can balance it out and make it a worthwhile pick up though.
the Rising Pitch trait increases the fire rate the longer the trigger is held. While it doesn’t quite get up to Hollowseeker’s rate of fire, it does fire quite fast. This trait alone can be a good boost to overall DPS and is generally worth picking up.
The Critical Hit trait give the weapon a chance to hit for double damage. This chance is kind of low, but does help increase its DPS overall. This trait works best in combination with other traits and isn’t too valuable by itself.
The Hardened trait increases your protection briefly after killing with this weapon. It can be very helpful early on, prior to getting artifacts or augments, but falls off in practicality later on in a cycle.
Spitmaw Blaster
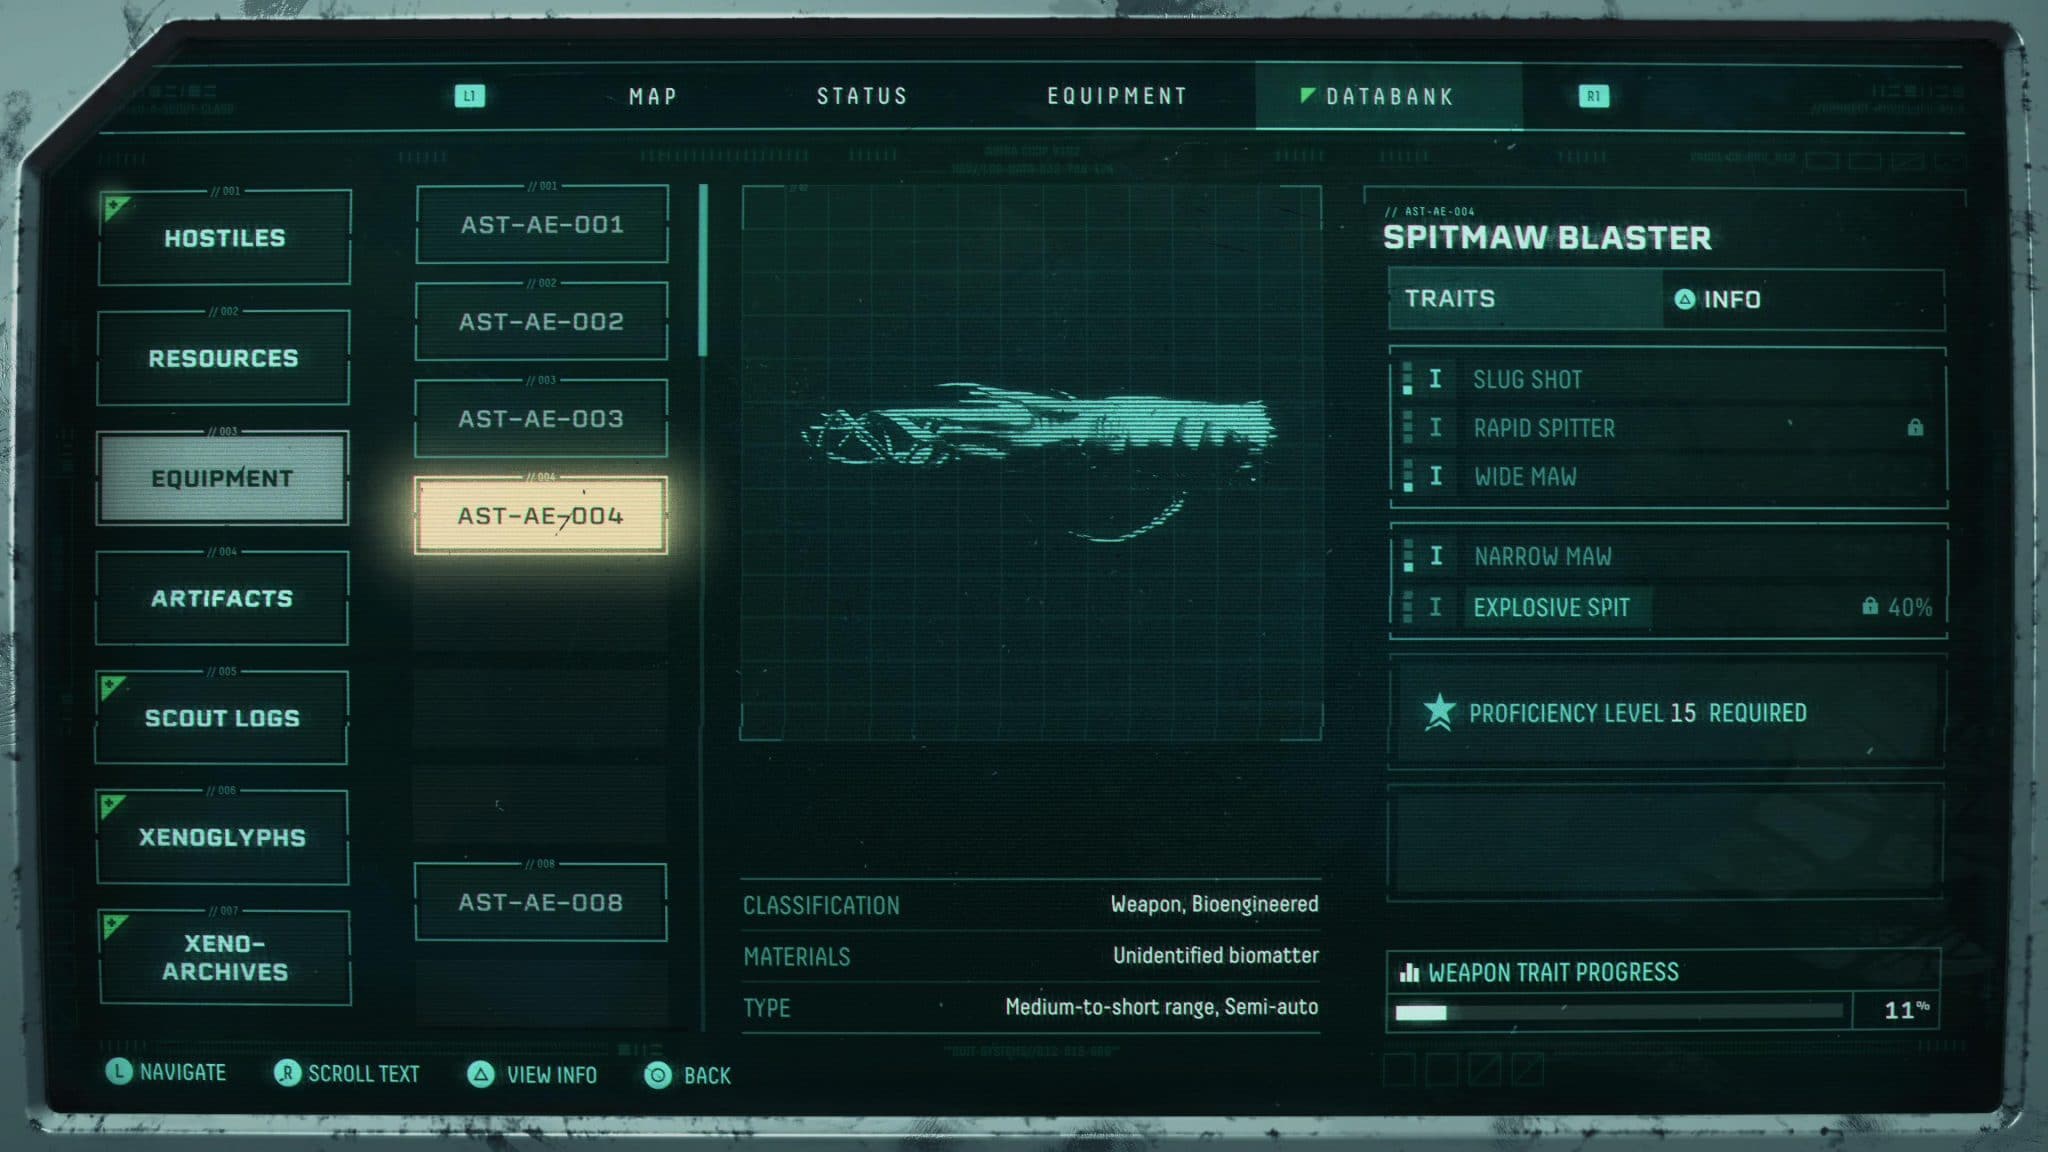
The Spitmaw Blaster is your typical shotgun-like weapon. It fires a spread of acidic pellets which can deal heavy damage if all pellets hit. It’s capable of dispatching weaker enemies quite quickly.
The Slug Shot trait makes the Spitmaw Blaster fire a high damage slug round in addition to its normal pellets. This Trait gives this weapon more reliable single target damage as well as better ability to deal with flying threats.
The Rapid Spitter trait enables fully automatic fire. This can be a very good quality of life trait, but doesn’t tend to be powerful on its own. Paired with a damage trait it can significantly increase its DPS.
The Wide Maw trait increases the damage of the pellets, but also increases the spread of the pellets. This makes it a much more powerful close range option, but weaker outside of of that.
The Narrow Maw trait can be unlocked by using a Proficiency 5 or higher with the weapon trait. This trait reduces the spread of the pellets, making it easier to deal high damage at medium range, as well as more consistently deal damage to flying foes.
The Explosive Spit trait can be unlocked by using a Proficiency 5 or higher with the weapon trait. This trait will make pellets explode on contact or at the end of their range. This trait essentially makes the Spitmaw Blaster into a flak cannon, which can make it very easy to deal high damage to flying threats, or just improve it general mobbing ability.
Hollowseeker

The Hollowseeker is a weapon that very rapidly fires homing projectile. The projectiles will home on the enemy on your crosshair, they will not seek targets unless they pass close enough to one. This weapon’s traits can make up for it’s lack of immediate damage very easily.
The Phasing Rounds trait allows the Hollowseeker’s shot to pass through terrain. This can be helpful as it allows you to use cover and still do damage.
The Waves trait will have the Hollowseeker launch wave projectiles on occasion, in addition the normal projectiles. This trait gives the weapon a much needed boost for single target DPS, letting it more quickly dispatch high health enemies. It also gives the weapon decent mobbing capabilities in some situations.
The Serrated Projectiles trait will add an additional Damage over Time effect to your shots. So far I haven’t found this trait to be exceptionally good or powerful, but extra damage will help this gun regardless.
The Shrapnel trait can be unlocked by using a Proficiency 5 or higher with the weapon trait. This trait will gives enemies killed by this weapon a chance to explode, dealing damage to nearby enemies. This is an okay, but unreliable boost to this weapon’s mobbing capabilities.
The Retarget trait can be unlocked by using a Proficiency 5 or higher with the weapon trait. This trait will make projectiles seek out another target if one is in range after hitting its initial target. This can do wonder for its mobbing capabilities, but works best paired with another damage mod.
Electropylon Driver
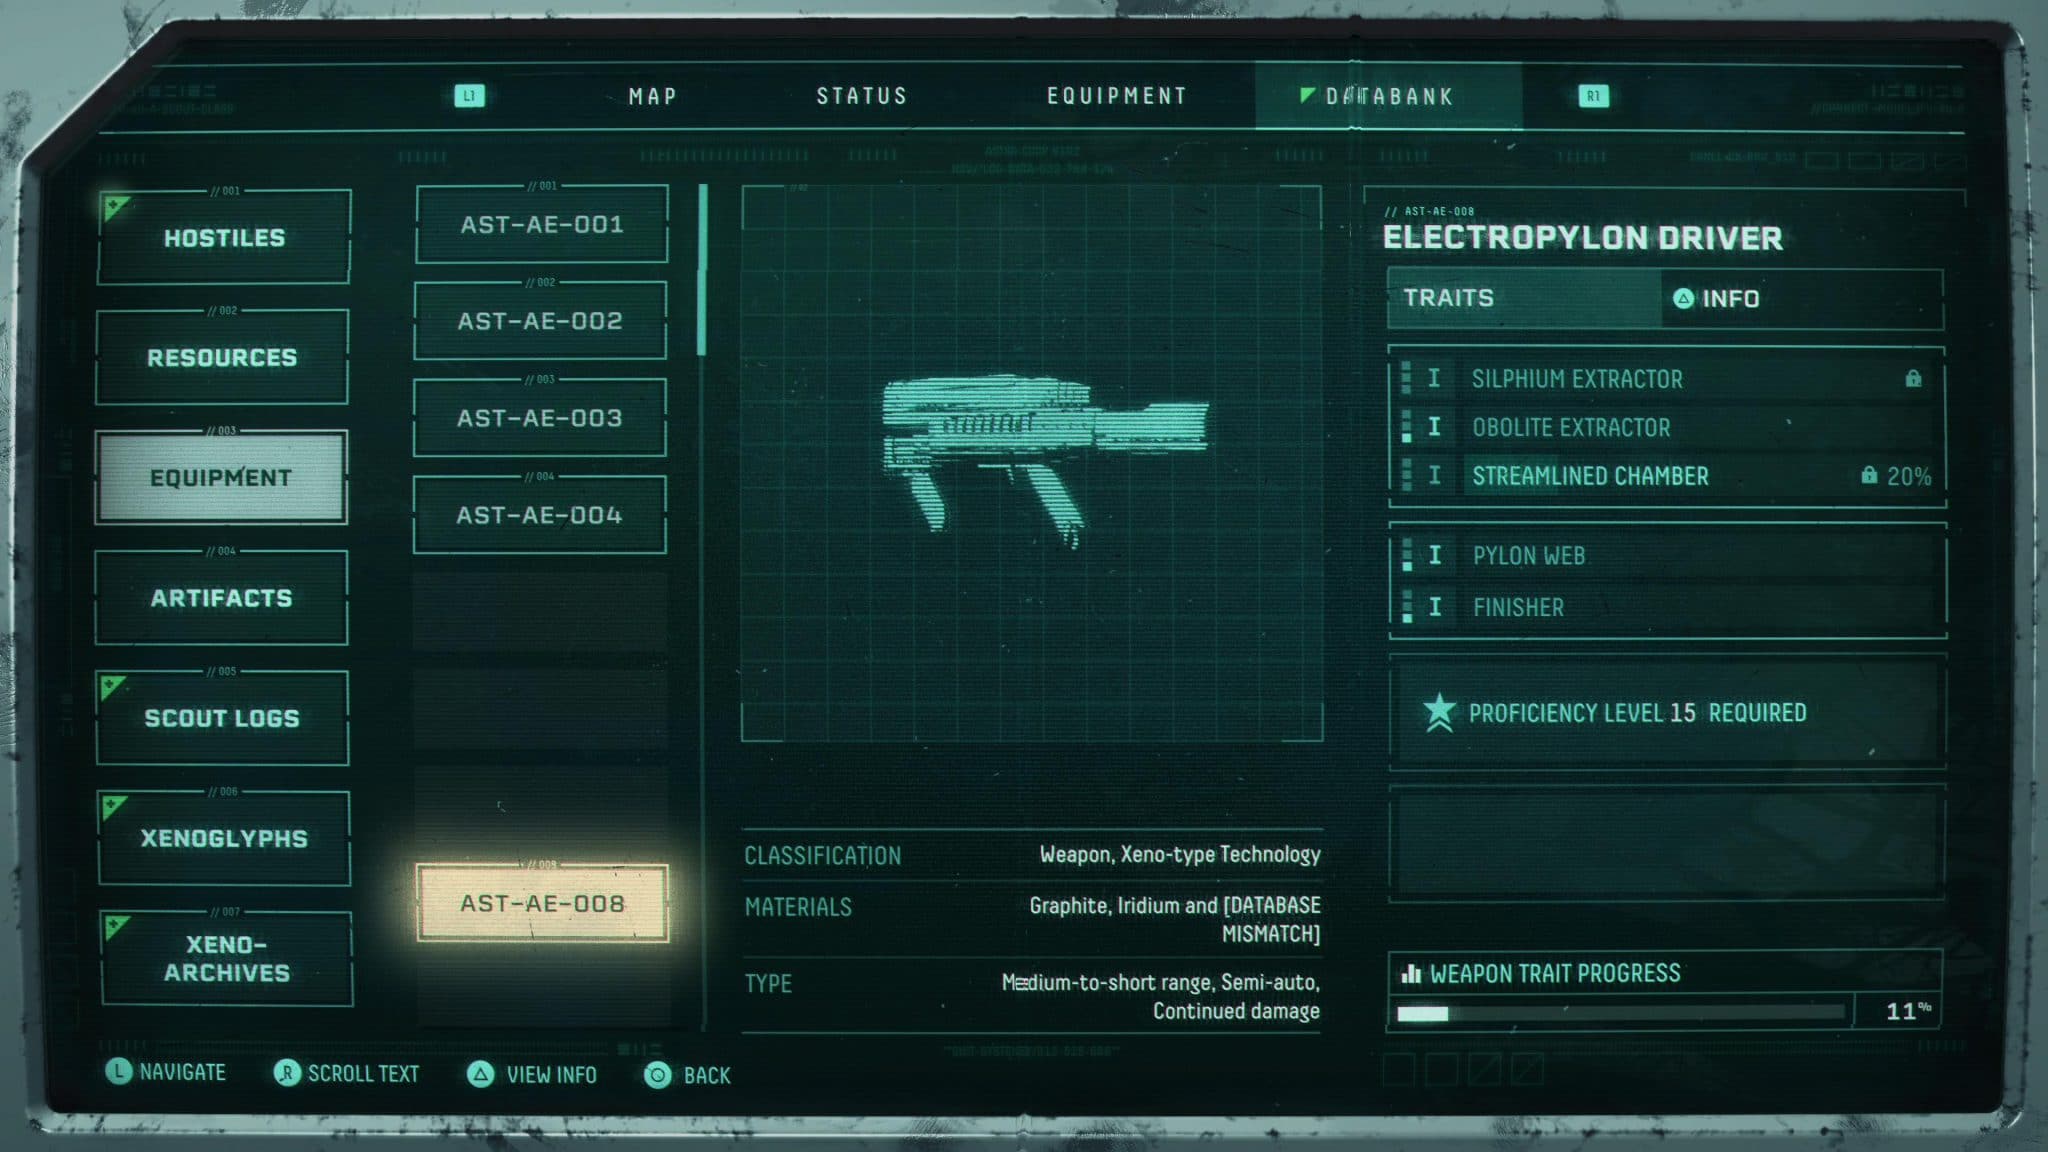
This weapon launches electrically-charged pylons. Each pylon will link and create a chain of electricity between them. Direct hits will result in Damage over Time, as well as enemies standing on a chain. With the right traits, this weapon can shred enemies pretty quickly.
The Silphium Extractor trait will makes enemies have an increased chance of dropping Silphium on death. This can very easily and quickly boost your max health if you avoid damage while killing enemies.
The Obolite Extractor trait will make enemies drop additional Obolites. This can help you out a fair amount if you struggle to maintain Level 5 Adrenaline. It can payoff even more if you can, but other traits tend to help more at that point.
The Streamlined Chamber trait will increase the rate of fire for the pylons, allowing you to get chains going faster. It’s not super helpful, compared to the Pylon Web trait in my opinion, as that trait does this better. Though this may be a more niche option for single target damage.
The Pylon Web trait can be unlocked by using a Proficiency 5 or higher with the weapon trait. This trait reduces your ammo to two shots, but each fires a set of 5 pylons, which as the name implies sets up a Web of pylon chains instantly. This is a good damage option over all, and can even work well into bosses.
The Finisher trait can be unlocked by using a Proficiency 5 or higher with the weapon trait. This trait increases the damage of the weapon to enemies at low health. The bonus damage and health threshold are not stated, but the health threshold is likely 33% or less. This trait, when paired with Pylon Web can tear though groups of enemies very easily.
Rotgland Lobber
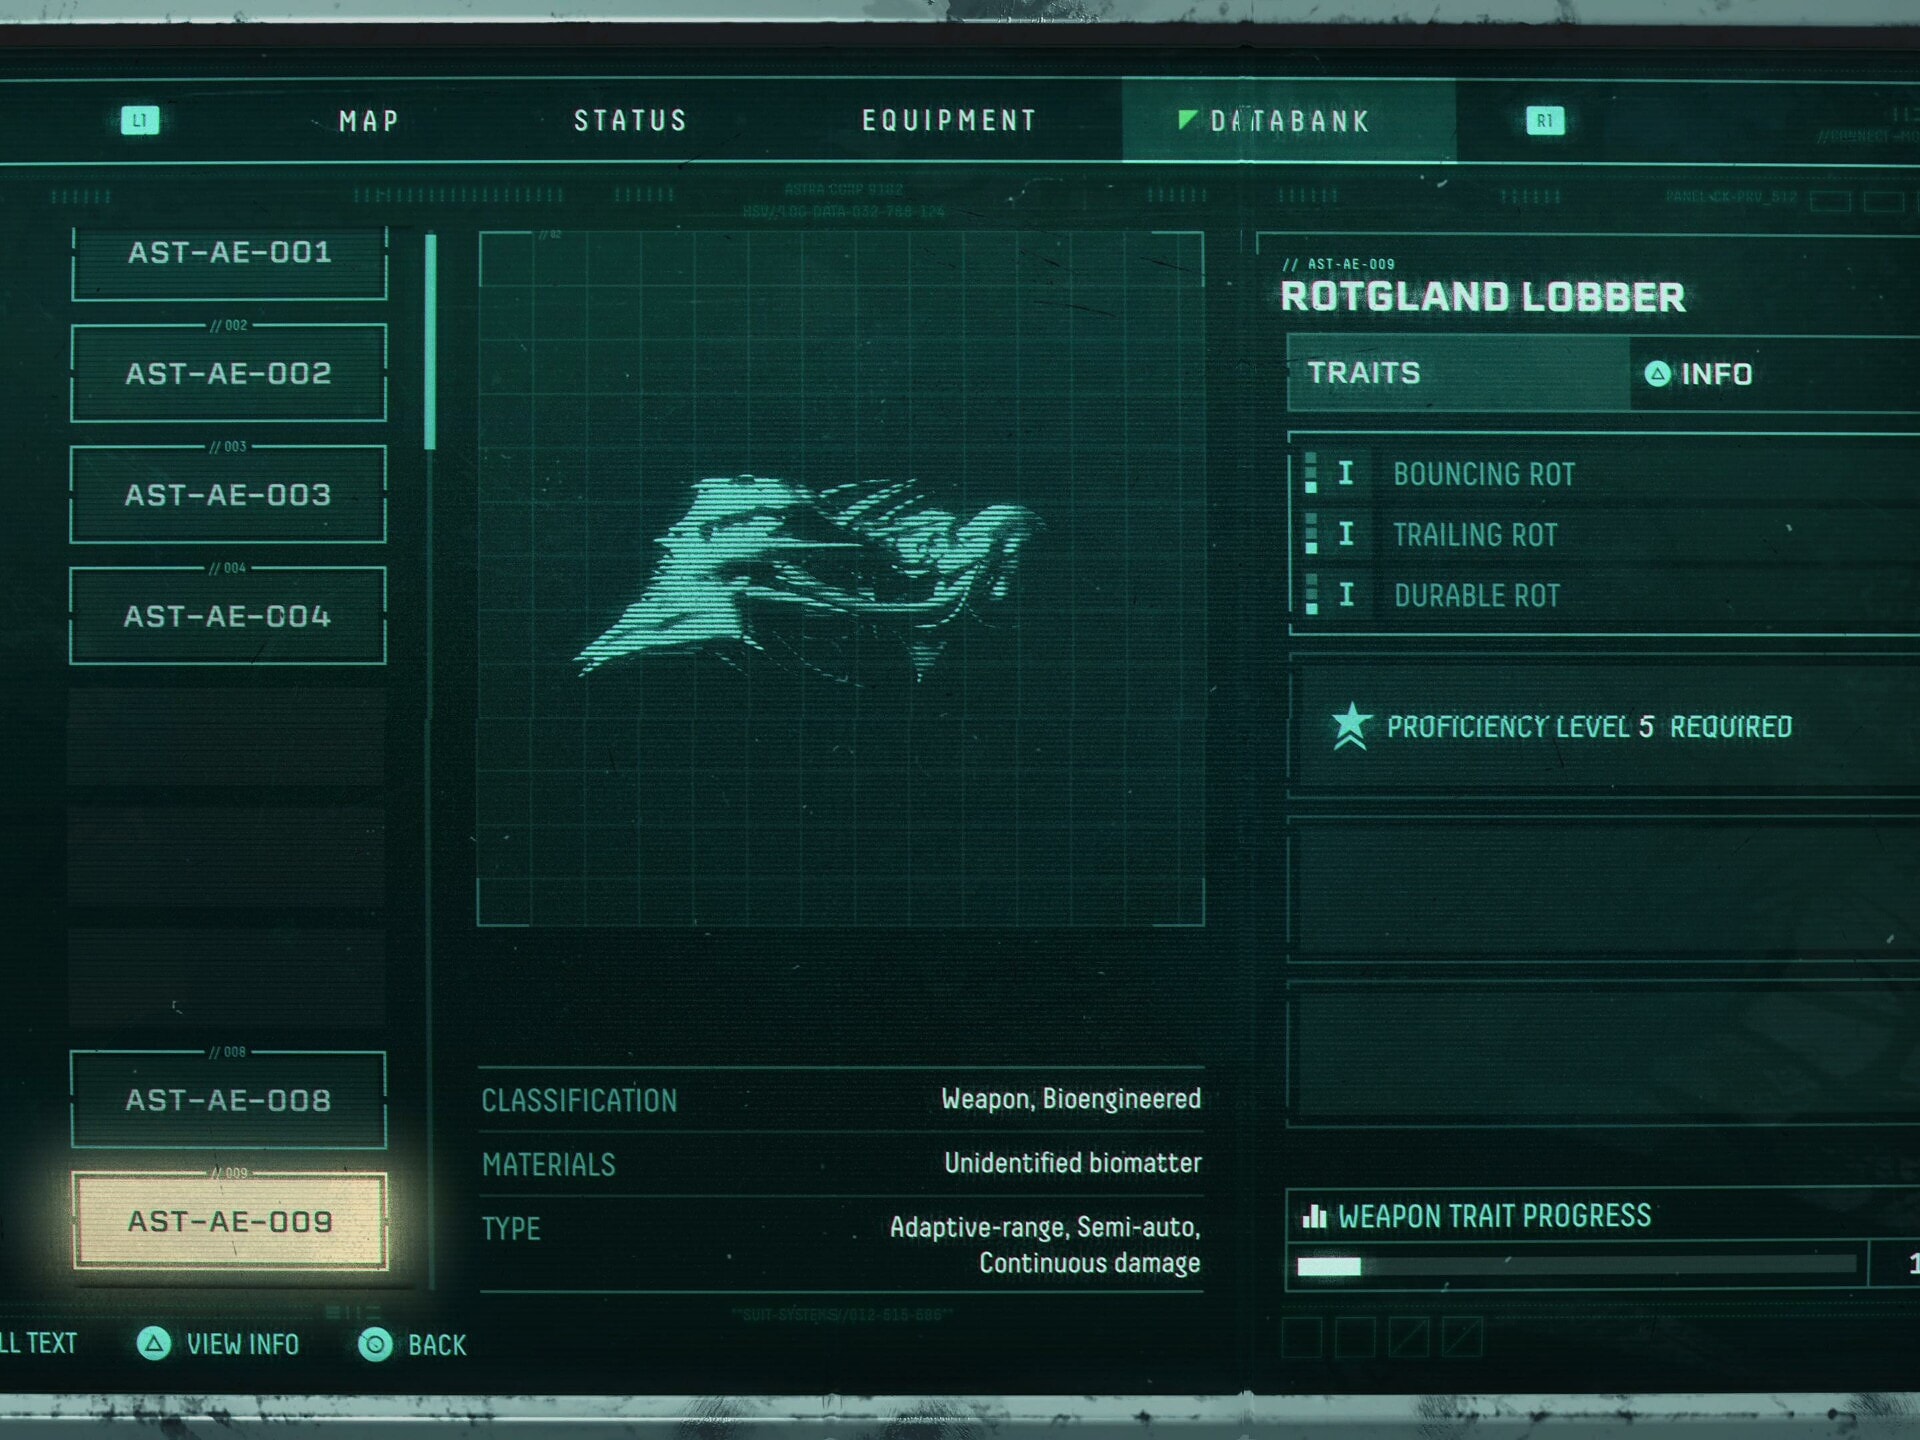
The Rotgland Lobber is weapon that can be charged and deals decent Damage over time. Charging the weapon appears to make the Acid effect last longer. This weapon becomes available after unlocking the Icarian Grapnel and finding it’s static spawn in the Forest Biome.
The Bouncing Rot trait will make the projectile bounce off enemies or surfaces. With a bit of luck this trait can make up for the weapons lack of mobbing ability.
The Trailing Rot trait will make the Projectile of this weapon leave a trail of acid as they travel, damaging everything in the trail. Currently unknown if the trail left behind inflicts the Damage over Time effect, if it did it could make this a better trait.
The Durable Rot trait will increase the duration of the Damage over Time effect. This trait will help with providing reliable single target damage, as the longer lasting damage effect allows you to deal more damage per shot, and lets you focus on dodging more.
Note: This guide is in the process of being updated still. If you want to share your own experience or have discovered a new equipment item that is not included here yet, please, leave a comment below the article and help us out to make this guide as complete as it can be!