This guide explains the Glaivier Control Build. We’ll talk about everything from Gear to stats, including Engravings, Gems, Runes and Rotations!
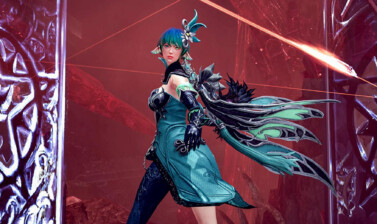
In Lost Ark, the Control Glaivier focuses on using only the Glaive’s Flurry Stance, locking the Spear and its Focus Stance out entirely. This simplifies the required stats and gear for the Glaivier, but creates a build that’s highly positional reliant, but also very strong.
In this guide, we’ll be expanding on the information provided in our Beginner Glaivier Guide. Be sure to check that out if any of the choices in the guide below don’t fully make sense you to.
Table of Contents:
- Introduction to Control Glaivier Build
- Recommended Stats
- Recommended Engravings
- Skills and Tripods
- Skill Rune Options
- Skill Gem Choices
- Skill Rotations
Introduction to Control Glaivier Build
This build is great for those that prefer rapid attacks over burst heavy playstyles. With Swiftness being the major stat, you’ll end up with quite low cooldowns. In addition, there’s no stance swapping, which makes it a bit easier to play. It has a much smoother playstyle and ends up being a great build for both Mobbing and Bossing, allowing you to stick with a single build for most content.
Ultimately, compared to the Pinnacle Glaivier it ends up being a much higher damage build but requires a lot more gear and better positioning to deal its damage. It’s more back attack reliant on the bonus Crit Rate. We take advantage of this more strict positioning to get even more damage out of the class.
Gearing up a Control Glaivier isn’t quite as painful, since they’re not fully reliant on raw damage engravings like the Pinnacle Build, which tends to be a bit more expensive. So you have some much cheaper options available in that regard.
We’re forced to go for the typical Crit Rate Gear Sets and Engravings as unlike Focus Stance Skills, Flurry Skills generally lack Crit Rate bonuses. However, they have a lot of strong damage bonuses, which make up for the lack of Damage Engravings or Crit Damage Sets.
Control Glaivier Gear Sets
For the most part, you can get away with using your Chaos Dungeon Set until mid-late T3, where you’ll get your legendary Abyss Sets. However, if you were playing Glaivier from Tier 1 as a main, we’ll highlight the best sets to use below.
Early Tier 1 – Seraphic Oath
This set comes from the Ancient Elveria Abyssal Dungeon unlocked after completing North Vern. Completion of each stage will reward you with a material called Knight’s Oath, which can be taken to the Abyss Crafting NPC in Southeastern North Vern or Western Rohendel to craft this set.
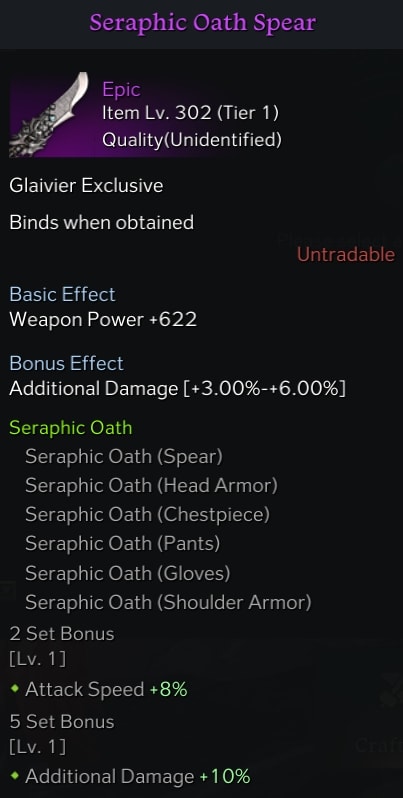
This set’s 2-piece effect grants 8% Attack Speed with its 2-Piece set bonus, as well as 10% Damage with a 5-piece set.
Both parts of this set bonus are great for us, as we’ll want the Attack Speed to speed up our animations as well as the extra damage.
Late Tier 1 – Boisterous Elemental Set
This set comes from the Phantom Palace Abyssal Dungeon unlocked after completing Rohendel. Completion of each stage will reward you with a material called Elemental’s Fury, which can be taken to the Abyss Crafting NPC in Southeastern North Vern or Western Rohendel to craft this set.
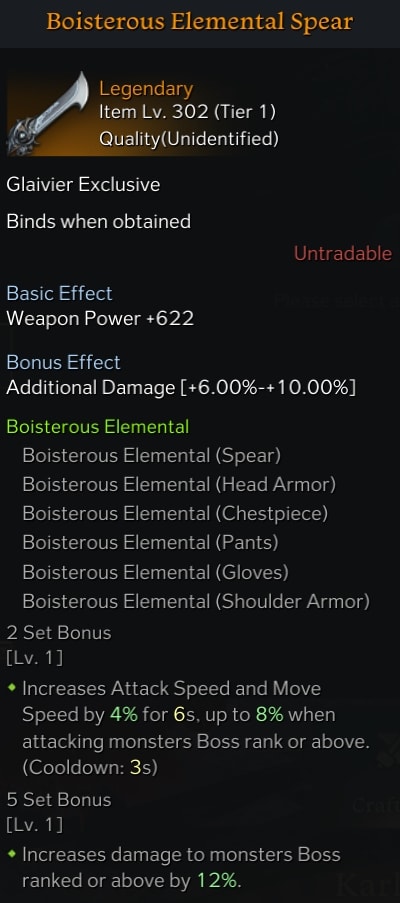
This Set’s 2-piece effect grants a stacking bonus that provides 4% Attack and Move Speed, stacking up to 8% while attacking a Boss or Higher Monster. The 5-Piece bonus grants 12% Damage while attacking a Boss or Higher Monster.
Both parts of this set bonus are great for us, Movement speed helps with positioning, Attack Speed makes our attack animations faster, and damage is just damage.
Tier 2 – Unyielding Will Set
This set comes from the Gate of Paradise Abyssal Dungeon unlocked after completing Feiton. Completion of each stage will reward you with a material called Guardian’s Will, which can be taken to the Abyss Crafting NPC in Northern Yorn or Northwestern Feiton to craft this set.
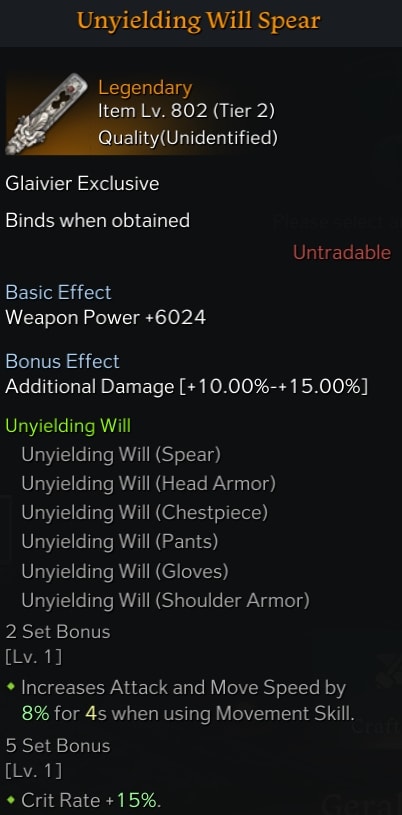
This set’s 2-piece effect grants 8% Attack and Move Speed for 4 seconds after using a Movement Skill. The 5-piece bonus grants 15% Crit Rate.
We skip the Marvelous Earth Set, as it doesn’t grant a whole lot of a bonus for using it over just Chaos Dungeon gear. Slightly higher HP and Defense are nice but other than that it’s better to go straight to the Unyielding Will Set.
The main thing we want for this set is the 5 piece bonus. Having 15% extra crit rate will help you get a lot of extra damage out of your class, as Crit Rate is something this build lack over the Pinnacle Build.
Mid Tier 3 – Preordained Dilligence Set
This set comes from the Argos Abyssal Raid unlocked after reaching Item level 1340. Completion of each phase will reward you with a material called Aros’ Blood, which can be taken to the Abyss Crafting NPC in the middle of Punika to craft this set.
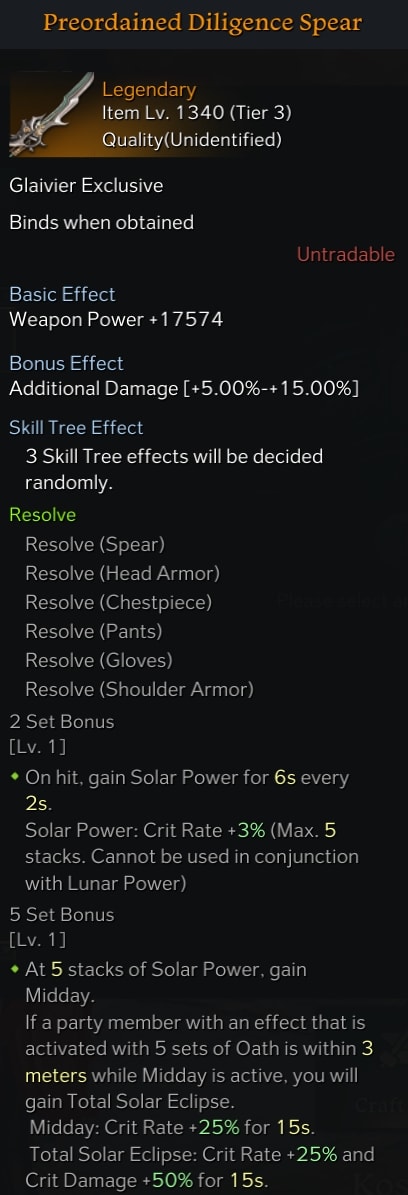
This Set’s 2-piece effect grants the Solar Power buff on hit once every 2 seconds which lasts for 6 seconds. Solar Power grants 3% Crit Rate per Stack, stacking up to 5 times for 15 Crit Rate.
With a 5-piece set you gain the Midday Effect when you reach 5 Stacks, which grants 25% Crit Rate for 15 Seconds. If another player with the Harsh Oath Set’s Full Moon set bonus is near you while Midday is active, you instead gain Total Solar Eclipse, granting 25% Crit Rate and 50% Crit Damage for 15 seconds.
This will be the final gear set you use until the release of the Valtan Legion Raid.
Recommended Control Glaivier Stats
The Glaivier uses only two main Stats, Swiftness and Crit. Both of these help the class pump out more damage. You’ll be running Swiftness and Crit at around 3:1 Ratio, heavily investing in Swiftness.
 Swiftness
 Swiftness
Our Primary Stat is Swiftness. As a DPS-focused build, we want to be able to keep our skills going frequently with as little downtime as possible. So we’ll be stacking this as much as we can. Ind doing so our Swiftness stat should be roughly 75% of our total stats from accessories.
We should reach around 15% Increased Attack and Movement Speed, and roughly 20% Cooldown Reduction from this much Swiftness. Which helps reduces the cooldown of our skills by a few seconds, speeding up our rotations.
We’ll be aiming to have this as our stat on every single accessory unless we need a bit of Crit, then a Ring will also be Crit Instead. Otherwise, only our Necklace will have Crit on it.
 Crit
Crit
 Crit
CritAs a DPS Build that lacks Crit Tripods, we’ll need some Crit Stat to be able to help us crit often. Having Crit on just or Necklace will put us right around 65% Crit Rate without synergy skills or set bonuses from other players. This ends up being roughly 25% of our total stats from Accessories.
This is because the Crit stat from the Necklace alone will be granting 15-20% Crit Rate in Tier 3. In Addition, our own Synergy Skill grants 18%, we can get up another 15% from Adrenaline, and another 15-25% from the Preordained Diligence Set. Though once you move away from that set, you will crit less often.
We’ll primarily only be taking this on our Necklace since it can have 2 stats on it. This provides enough extra Crit Rate with all of our other expected bonuses that we’ll be right where we need to be.
Recommended Control Glaivier Engravings
There are three Engravings that are essential to maximizing our Damage. Beyond those three, there are some options that can be worth considering.
For further information on these Engravings, check out our Engraving Guide which details all of the Engravings, including those found below.
 Control
 Control
This is our Class Engraving and is mandatory for this build to actually function well, as it adds 36% Damage to our skills when maxed. This is a huge boost in damage which helps to give this build an edge in damage over the Pinnacle Build.
Ambush Master
 Ambush Master
This class is heavily reliant on Back Attacks for the extra Crit Rate. With that in mind, it makes Ambush Master an easy 2nd or 3rd engraving. When maxed, it will increase our back attack damage by 25%.
Adrenaline
 Adrenaline
Adrenaline is essential to getting our Crit Rate where we need it to be. While it’s not 100% Mandatory, it will allow you to consistently crit and get the most out of this build. It really helps to shore up our shortage of Crit Rate while also giving us a bit of Attack power as it stacks.
Raid Captain
 Raid Captain
Since this build Stacks Swiftness, we can also make use of Raid Captain. Since Raid Captain scales off our Movement Speed, we won’t need much to make this a viable option. Typically we’ll get this from a Rage Rune, Support Buffs, or other Party Synergy Skills.
Cursed Doll
 Cursed Doll
Cursed Doll is one of those Engravings that’s always viable. However, to make the penalty worthwhile, it needs to be maxed or we’re not getting much but the penalty. Reduced healing isn’t the end of the world either, just means it’ll be harder for support or our potions to heal us.
Grudge
 Grudge
Much Like Cursed Doll, Grudge is always viable for most non-Chaos Dungeon endgame content. The huge damage bonus we get versus Bosses makes it phenomenal. However, we take increased damage, making it even more essential to max this out. Taking this engraving at Level 1 or Level 2 is an absolute waste, especially if you don’t know an encounter well enough.
Control Glaivier Skills and Tripods
The Control Glaivier gets a good mix of strong and quick skills, which all pack quite a bit of damage as well as AoE. Below are our choice of 8 recommended skills and their Tripods, as well as a couple of optional choices at the end if you wish to replace another skill with them.
Chain Slash
Chain Slash is one of our shorter damage cooldowns, so it will be use frequently in our damage rotation. It does great damage and gets great AoE and range from Brilliant Spear.
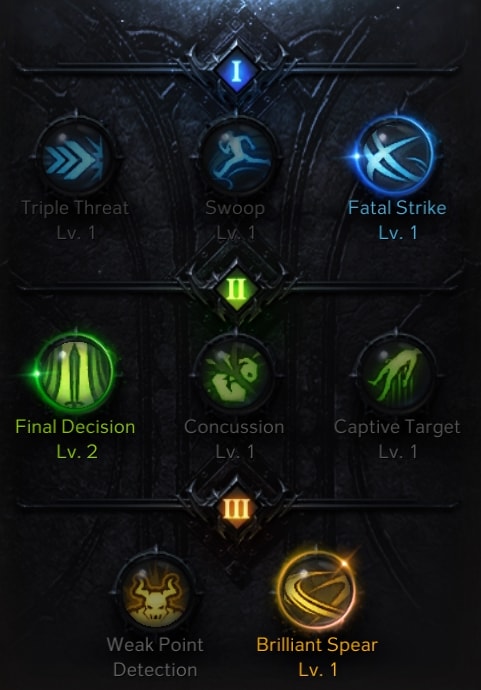
Chain Slash uses the Fatal Strike, Final Decision, and Brilliant Spear Tripods. These boost its damage, range and flexibility.
Fatal Strike increases the hit count of Chain Slash, extending it to 4 hits, from the previous three. It also removes the turn slashes which makes it easier to get damage out of. Final Decision allows the skill to expend your Dual Meter to boost its damage significantly. Brilliant Spear increases the damage of the skill, will making each swing create energy waves that deal damage up to 8 meters away.
Flash Kick
Flash Kick is Primarily our Mobility tool, but if you have extra Points, it can be a worthwhile investment for damage, as it’s a strong multi-hit skill if you’re using it while in range.
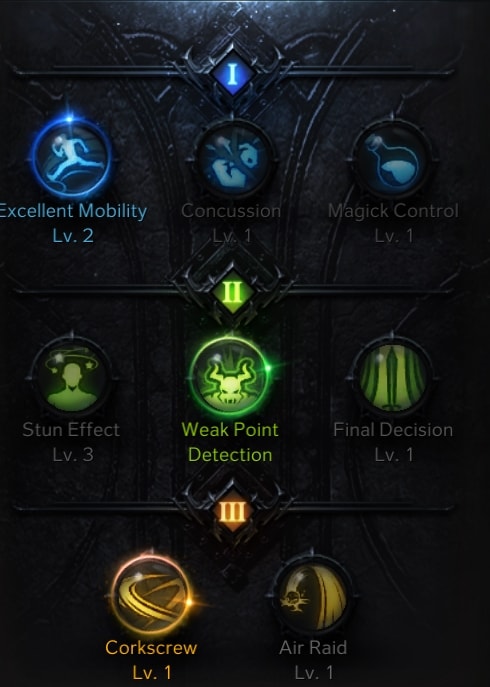
Flash Kick uses the Excellent Mobility, Weak Point Detection, and Corkscrew Tripods. These increase its mobility and boost its damage a fair bit.
Excellent Mobility extends the range of the movement, increasing it from a 7-meter range to a 9-meter range, up to 11 meters when maxed. Weak Point Detection adds Addition damage to bosses, which makes it a great option to pick. Corkscrew adds a little bit of Stagger, while increasing damage.
You can also opt for Final Decision in the second row for more damage, but it will also expend your Dual Meter, regardless if it hits the target or not. Weak Point Detection is a well-rounded option for utility, but Final Decision is ultimately more damage.
Half Moon Slash
Half Moon Slash is one of our heavy-hitting skills. With our Tripod setup, it becomes a strong Multi-hit skill that will be exceptionally great at activating the Conviction Rune, which helps us with some much-needed mana sustain.
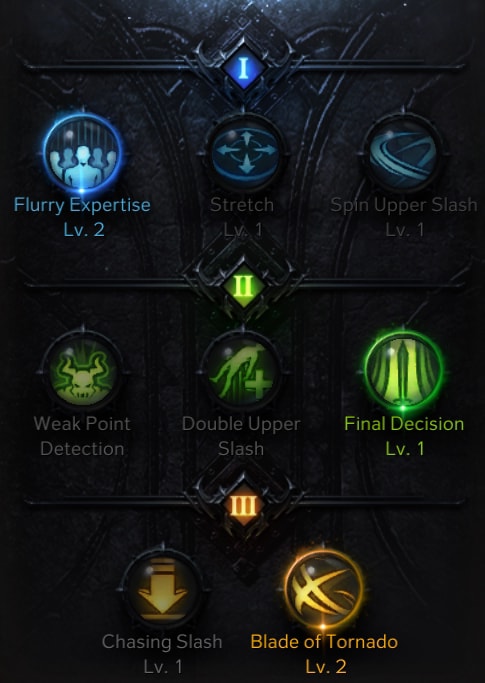
Half Moon Slash uses the Flurry Expertise, Final Decision, and Blade of Tornado Tripods. These boost its damage to a very high degree while adding the multi-hitting whirlwind effect.
Flurry Expertise adds a good bit of damage when you’re hitting either single targets or a large group. Final Decision expends the Dual Meter to give a high damage boost. Blade of Tornado adds the whirlwind effect, which increases the hit count from 4 to around 10 giving plenty of chances to activate Conviction.
Raging Dragon Slash
By default Raging Dragon Slash already hits like a truck. This is why our early tripods for it focus more on utility rather than damage. We still boost its damage while also making it a strong multi-hit skill with the last tripod.
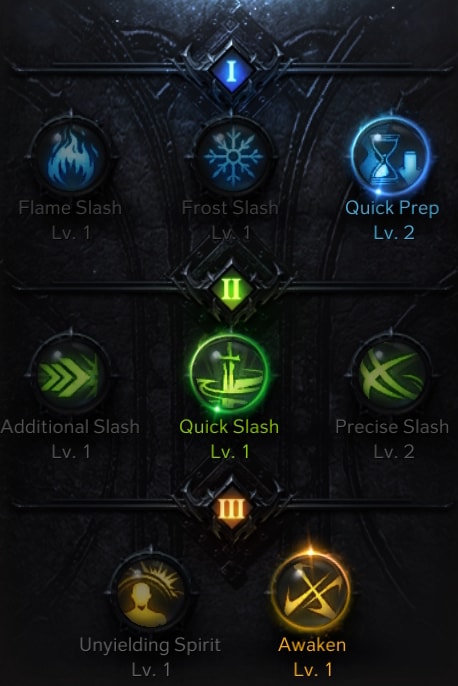
Raging Dragon Slash uses the Quick Prep, Quick Slash, and Awaken Tripods. These Tripods allow us to use it more frequently while making it a faster and stronger skill.
Quick Prep reduces its cooldown, bringing it more in line with our other cooldowns. This allows us to use it more often and smooths out our rotations. Quick Slash speeds up the animation making it a much easier-to-use skill. Awaken increases the damage of the skill both by directly boosting damage and by increasing its Crit Rate by 25%. In addition, Awaken also makes it a multi-hit skill which makes it incredibly good for Staggering foes as well.
Shackling Blue Dragon
Shackling Blue Dragon is our Party Synergy Skill, and reaching Level 10 with this skill will be a high priority to make that Synergy Stronger. The Glaivier’s Party Synergy called Critical Spear, will reduce a target’s Critical Resistance by 18% for 6 seconds.
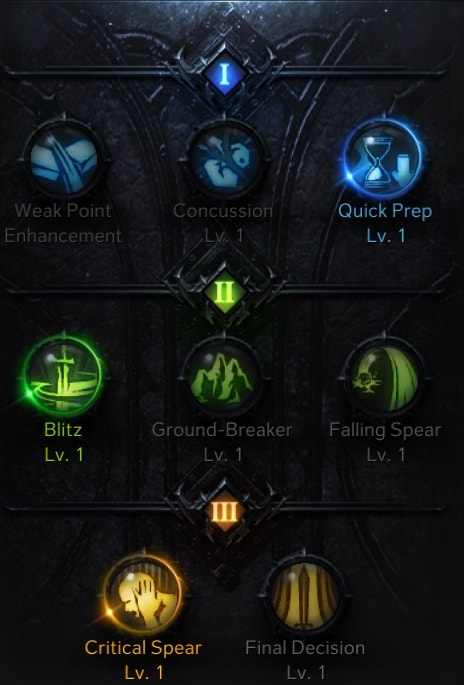
Shackling Blue Dragon uses the Quick Prep, Blitz, and Critical Spear Tripods. These tripods allow it to be used more often while making it a faster attack with a stronger debuff.
Quick Prep Reduces the Cooldown of Shackling Blue Dragon by 2-5 seconds, bringing it closer to lining up with our other skills. Blitz makes Shackling Blue Dragon a quick ground slam that inflicts the debuff, rather than a lengthy spin animation, making it more reliable to use. Critical Spear grants an additional 10% Crit Resistance Reduction to the baseline debuff allowing it to reach 18%.
Soul Cutter
Soul Cutter is another damage skill we’ll be using often due to its low cooldown with the Quick Prep Tripod. It does great damage, and can even be made to deal strong stagger as well, making it a flexible skill.
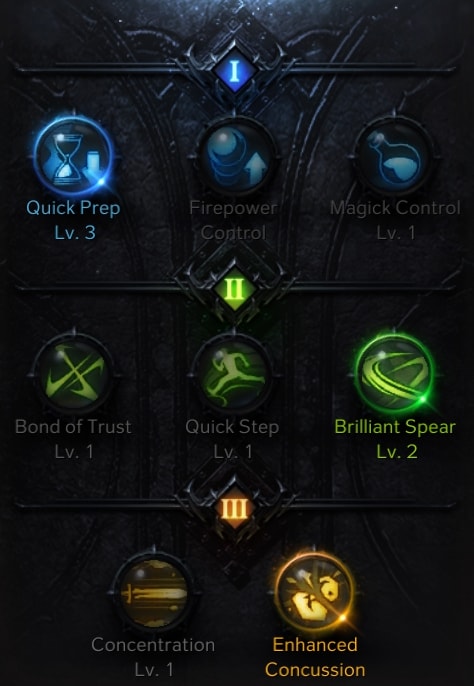
Soul Cutter uses the Quick Prep, Brilliant Spear, and Enhanced Concussion Tripods. These increase its damage and stagger power significantly, while also giving the skill some extra range.
Quick Prep reduces Soul Cutter’s cooldown, bringing it closer to skills like Chain Slash, making it able to be used frequently. Brilliant Spear increases damage while adding energy waves that hit targets up to 8 meters away. These waves also give it a good amount of AoE.
Vault
Vault is primarily our Counter skill and will be the last skill you should ever consider upgrading. While it can be made to do damage, we really only need it as a counter skill.
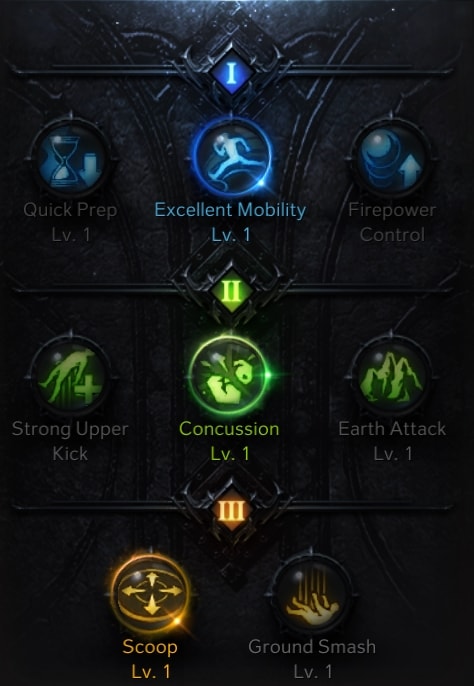
Vault uses the Excellent Mobility Tripod. Additionally, Concussion and Scoop can be used if you have points to spare. This adds a short dash, as well as some extra damage and stagger.
Excellent Mobility makes it so you dash a short distance when using our counter skill, making it so we don’t have to be hugging the boss to counter them. If used, Concussion adds extra stagger to the skill, boosting it to Mid, or two levels of stagger. Scoop adds a bit of additional AoE, while giving a slightly quicker animation.
Wheel of Blades
Wheel of Blades is a very low-cost skill that does great damage. It’s an excellent option for triggering the Judgment Rune, as it hits multiple times with a tripod that enables us to use it twice.

Wheel of Blades uses the Magick Control, Weak Point Detection, and Consecutive Spin Tripods. This makes it more comfortable to use and boosts its damage while allowing it to be used twice.
Magick Control helps a fair bit, as even though this skill has a low cost, we’ll be using it twice with every cast, thanks to Consecutive Spin. This keeps its total mana consumption low. Weak Point Detection adds additional damage to targets that are push-immune, which are the only targets that we need the extra damage for anyways.
Spear Dive
Spear Dive is a good mobility tool but is slightly inferior to Flash Kick in most cases. Typically you’d slot this over Vault for extra mobility if the counter isn’t necessary to have. If you prefer it, it can also be used over Flash Kick, but it provides much less mobility overall.
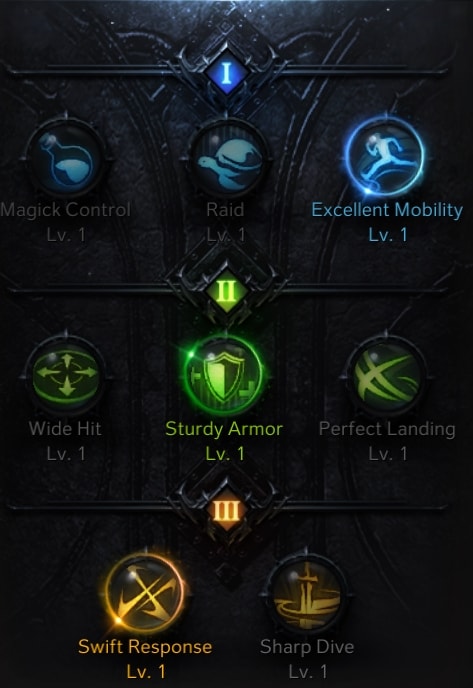
Spear Dive uses the Excellent Mobility Tripod. Additionally, Sturdy Armor and Swift Response may also be used. This gives the skill more mobility while providing a bit of utility.
Excellent Mobility extends the range of the dash, increasing its range from 5 meters to 7 meters, or the same as Flash Kick without a tripod. Sturdy Armor reduces incoming damage during the animation of Spear Dive. Swift Response lowers the cooldown and reduces the ending animation.
Sharp Dive can be used over Swift Response to get a bit more range than what the base skill offers but leaves the skill with it’s cooldown being longer than that of Flash Kick. It’s a great PvP option, but that’s not relevant here.
Stampeding Slash
Stampeding Slash is a higher damage alternative to Wheel of Blades for activating the Judgment Rune, but requires very high Swiftness or triggering a Rage Rune for it to be comfortable to use. Unlike Wheel of Blade, the tripods we use will leave this skill without mobility, so it can lock us in place unless we cancel it with our dodge.
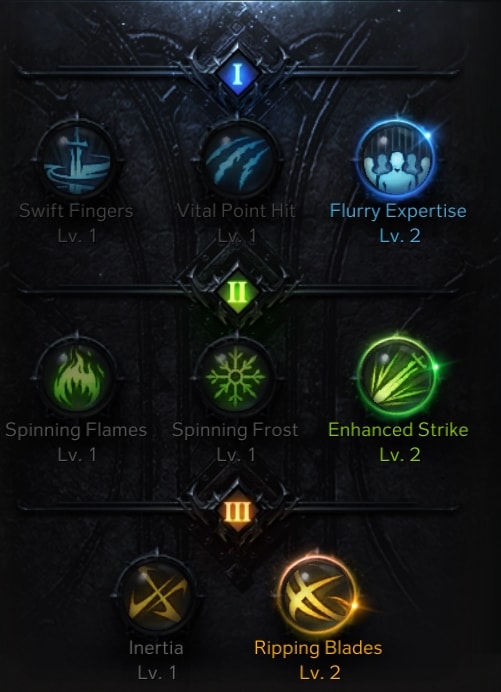
Stampeding Slash uses the Flurry Expertise, Enhanced Strike, and Ripping Blades Tripods. This heavily increases the damage of the skill, but leaves it a rather slow skill compared to many others in our kit.
Flurry Expertise makes it a good option for both Mobbing and Bossing cases. Enhanced Strike is purely a damage increase for the skill, as the other option don’t offer nearly as much. Ripping Blades doubles the hit count prior to the finishing blow, making the skill 7 hits, which allows it to reliably activate the Judgment Rune while boosting its damage further.
Control Glaivier Skill Rune Options
Below are our recommendations for Runes, as well as a few options that you can swap out if you have the required Runes.
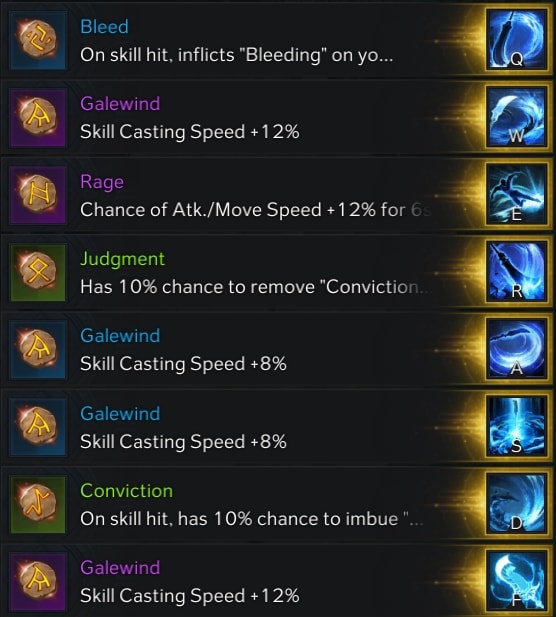
We use Bleed on Vault, as having a DoT effect is quite nice and it is one of our shorter cooldowns which gives it high uptime. Some bosses, like Seto from the Aira’s Oculus Abyssal Dungeon, will heal if they go undamaged for a second, and this rune prevents that. If you’re not using Vault, place it on the chosen replacement skill
We Use Galewind Runes on Chain Slash, Raging Dragon Slash, and Soul Cutter. This helps speed up the animations for the skills that really need it.
While we have It also on Shackling Blue Dragon above, it’s not optimal and would make better use of a Focus Rune.
The order to prioritize the listed skills when deciding what Galewind Rune to use where is as follows:
- Raging Dragon Slash
- Chain Slash
- Soul Cutter
 Raging Dragon Slash
 Chain Slash
 Soul Cutter
Raging Dragon Slash should always get your best Galewind, as even with Tripod it’s a slower skill. Chain Slash is the next highest, as it will be used incredibly often and makes it much quicker as well. Soul Cutter is last, as it is similar to Chain Slash just with a longer cooldown.
We put Conviction on Half Moon Slash as it’s a strong multi-hit skill that we open most rotations with and will use often. The Conviction and Judgement combo is vital to both speeding up our rotation, as well as giving us mana sustain.
The other half of this combo is Judgment on Wheel of Blades or Stampeding Slash. Both of these skills are great for activating Judgment, which skill use is mostly preference at the high end, but Stampeding Slash will demand higher Swiftness to be a smoother attack.
Finally, we use Rage on Flash Kick as we’ll often be using it to gap close, which can speed it up, as well as the rest of the skills that follow. In addition to Attack Speed, you also get movement speed, which will help you reach the maximum bonus for Raid Captain and provide additional damage.
If you have a Focus Rune, consider using it on Shackling Blue Dragon. It has a high mana cost and will help keep you from running out of mana.
Skill Gem Choices
Being a DPS, we’ll be looking to add damage and cooldown to our 5 biggest damage skills as per the strategy mentioned in our Gem System Guide.
Damage Gems
We’ll have five damage gems for our major skills. This will be all of our non-mobility and non-utility skills. Those Gems are as follows:
- Chain Slash
- Half Moon Slash
- Raging Dragon Slash
- Soul Cutter
- Wheel of Blades (Or Stampeding Slash)
These are our core damage skills. Regardless if Flash Kick, Shackling Blue Dragon, Spear Dive, or Vault are leveled and given tripods, they will do much less damage than these skills.
Cooldown Gems
We’ll have six Cooldown gems, five to pair with our Damage gems, and one extra slot to use as desired. The six cooldown gems we’ll be using are as follows:
- Chain Slash
- Half Moon Slash
- Raging Dragon Slash
- Soul Cutter
- Wheel of Blades (Or Stampeding Slash)
- Shackling Blue Dragon
Usually filling this last slot with cooldown for your Party Synergy Skill is the most optimal choice. This is especially true here, as Shackling Blue Dragon has a pretty lengthy cooldown. This gem will help to keep it closer to your damage skills and help your rotation work out better, while also increasing its overall uptime.
Optionally this last slot can also be Flash Kick, which would serve two purposes by letting you use it more often. First is mobility, letting you get in and out of range much easier. The second is damage, as it can deal a fair bit of damage when maxed out and given damage tripods. However, Shackling Blue Dragon is still the better option overall, as you will want to have it up often.
Control Glaivier Rotations
We have two primary rotations that we’ll follow as closely as we can. One for when Conviction/Judgment activates and one for when it doesn’t.
Conviction Rotation
This will be the rotation you’re trying to do when the Conviction and Judgment runes are off cooldown, as they have a 30-second cooldown after you activate Judgment.
- Flash Kick
- Shackling Blue Dragon
- Half Moon Slash
- Raging Dragon Slash
- Wheel of Blades (Or Stampeding Slash)
- Soul Cutter
- Chain Slash
 Follow Standard Rotation
 Flash Kick
  Shackling Blue Dragon
 Half Moon Slash
 Wheel of Blades (Or Stampeding Slash)
 Follow Standard Rotation
We open with Flash Kick, this is both to get the damage out of it, but also to try to trigger our Rage Rune as we go in. This is followed by Shackling Blue Dragon to apply our Party Synergy, and boost our crit rate for the rest of the rotation. Then we go into our damage skills.
Starting with Half Moon Slash to try and activate Conviction and get the Whirlwind going. Then we use Raging Dragon Slash to get its cooldown going and give an extra second for Conviction to activate. We follow this with Wheel of Blades to hopefully activate Judgment, which will help us recover mana and reduce the cooldown of this core rotation.
Then this is followed by our remaining damage skills, Soul Cutter and Chain Slash. Both of these have shorter cooldowns than the skills used earlier in the rotation, which is why they don’t need to be on cooldown when triggering Judgment.
Finally, we go into our Standard Rotation until Conviction and Judgment is off cooldown and ready to use.
Standard Rotation
This is the rotation we’d use while Conviction and Judgment are not able to be activated. It’s closer to a skill priority order rather than an actual rotation. There are specific skills you’d want to use together to get the most out of them.
- Shackling Blue Dragon
- Half Moon Slash
- Raging Dragon Slash
- Chain Slash
- Wheel of Blades
- Soul Cutter
It’s very similar to the Conviction rotation, just using Chain Slash sooner. This is because it has a shorter cooldown so you want it to start its cooldown early in the rotation so you can use it again sooner.
Ideally, you’d want to only use Raging Dragon Slash when you have both Shackling Blue Dragon and Half Moon Slash available. This is because you want Raging Dragon Slash to benefit from Shackling Blue Dragon with every cast, and they typically align pretty well by default as long as they have the same gem level.
The Remaining three skills should be used pretty much off cooldown to maintain damage as they’ll be able to be used twice for every time the other skills are used once.
Check out the Lost Ark Guides available on VULKK.com and stay up-to-date with the latest news about the game.