This guide explains the Destroyer Hammer of Rage Build. We’ll talk about everything from Gear to stats, including Engravings, Gems, Runes and Rotations!
In Lost Ark, the Hammer of Rage Destroyer focuses on cycling skills to fill your Gravity Cores, then using a Gravity Release skill to spend them. These Gravity Cores will often be empowering our Gravity Release skills as well as providing much-needed shields.
In this guide, we’ll be expanding on the information provided in our Beginner Destroyer Guide. Be sure to check that out if any of the choices in the guide below don’t fully make sense you to.
Table of Contents:
- Introduction to Hammer of Rage Destroyer Build
- Recommended Gear Sets
- Recommended Stats
- Recommended Engravings
- Skills and Tripods
- Skill Rune Options
- Skill Gem Choices
- Skill Rotations
Introduction to Hammer of Rage Destroyer Build
This build is great for those that prefer constant attacks over burst heavy playstyles. Despite heavily investing in Crit, you still end up with enough Swiftness that ends up making your skills rotate smoothly and just a bit Specialization to help strengthen the Concentration Skills.
Hammer of Rage tends to be the favored build and engraving for Destroyers, as Gravity Training is very heavily reliant on gear. This makes Hammer of Rage much easier to get up and running, as well as just having a much smoother skill rotation
Gearing up a Hammer of Rage Destroyer isn’t too bad, as you have a good few options you can pick up in addition to your Class Engraving. It is not a necessity to go after the typical Cursed Doll and Grudge, as many builds need to do for maximum damage.
For the most part, we’ll still be going the Crit Rate sets early on, because even when stacking Crit as a stat, early on there’s not going to be much of a better option. Later into Tier 3, this does change though.
Hammer of Rage Destroyer Gear Sets
For the most part, you can get away with using your Chaos Dungeon Set until mid-late T3, where you’ll get your legendary Abyss Sets or Legion Raid Sets. However, if you were playing Destroyer from Tier 1 as a main, we’ll highlight the best sets to use below.
Early Tier 1 – Seraphic Oath
This set comes from the Ancient Elveria Abyssal Dungeon unlocked after completing North Vern. Completion of each stage will reward you with a material called Knight’s Oath, which can be taken to the Abyss Crafting NPC in Southeastern North Vern or Western Rohendel to craft this set.
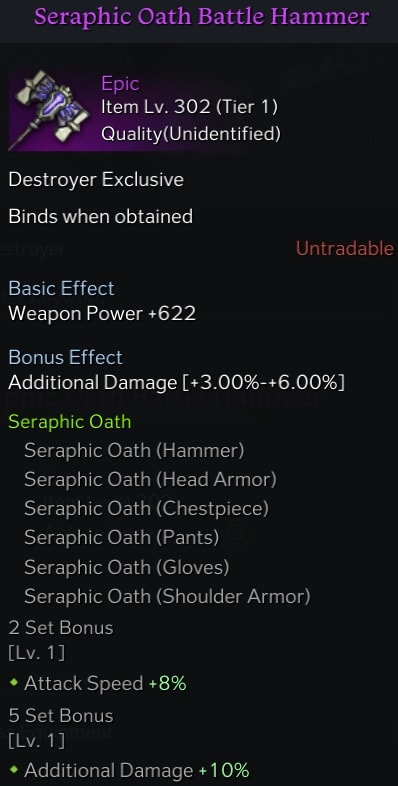
This set’s 2-piece effect grants 8% Attack Speed with its 2-Piece set bonus, as well as 10% Damage with a 5-piece set.
Both parts of this set bonus are great for us, as we’ll want the Attack Speed to speed up our animations as well as the extra damage.
Late Tier 1 – Boisterous Elemental Set
This set comes from the Phantom Palace Abyssal Dungeon unlocked after completing Rohendel. Completion of each stage will reward you with a material called Elemental’s Fury, which can be taken to the Abyss Crafting NPC in Southeastern North Vern or Western Rohendel to craft this set.
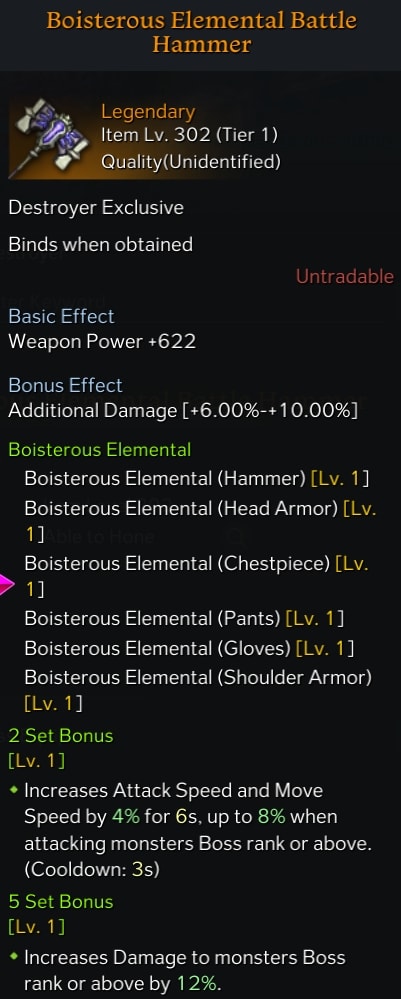
This Set’s 2-piece effect grants a stacking bonus that provides 4% Attack and Move Speed, stacking up to 8% while attacking a Boss or Higher Monster. The 5-Piece bonus grants 12% Damage while attacking a Boss or Higher Monster.
Both parts of this set bonus are great for us, Movement speed helps with positioning, Attack Speed makes our attack animations faster, and damage is just damage.
Tier 2 – Unyielding Will Set
This set comes from the Gate of Paradise Abyssal Dungeon unlocked after completing Feiton. Completion of each stage will reward you with a material called Guardian’s Will, which can be taken to the Abyss Crafting NPC in Northern Yorn or Northwestern Feiton to craft this set.
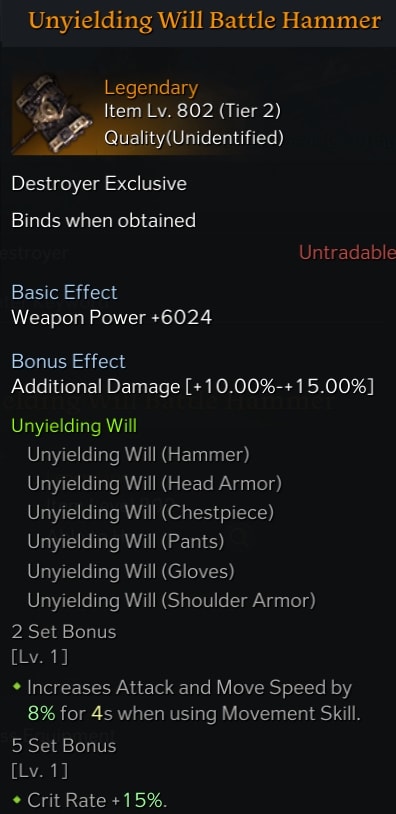
This set’s 2-piece effect grants 8% Attack and Move Speed for 4 seconds after using a Movement Skill. The 5-piece bonus grants 15% Crit Rate.
We skip the Marvelous Earth Set, as it doesn’t grant a whole lot of a bonus for using it over just Chaos Dungeon gear. Slightly higher HP and Defense are nice but other than that it’s better to go straight to the Unyielding Will Set to save the Silver of crafting and transferring.
The main thing we want for this set is the 5 piece bonus. Having 15% extra crit rate will help you get a lot of extra damage out of our class, as early on we won;t be able to stack too much Crit in stats.
Mid Tier 3 – Preordained Diligence Set
This set comes from the Argos Abyssal Raid unlocked after reaching Item level 1340. Completion of each phase will reward you with a material called Aros’ Blood, which can be taken to the Abyss Crafting NPC in the middle of Punika to craft this set.
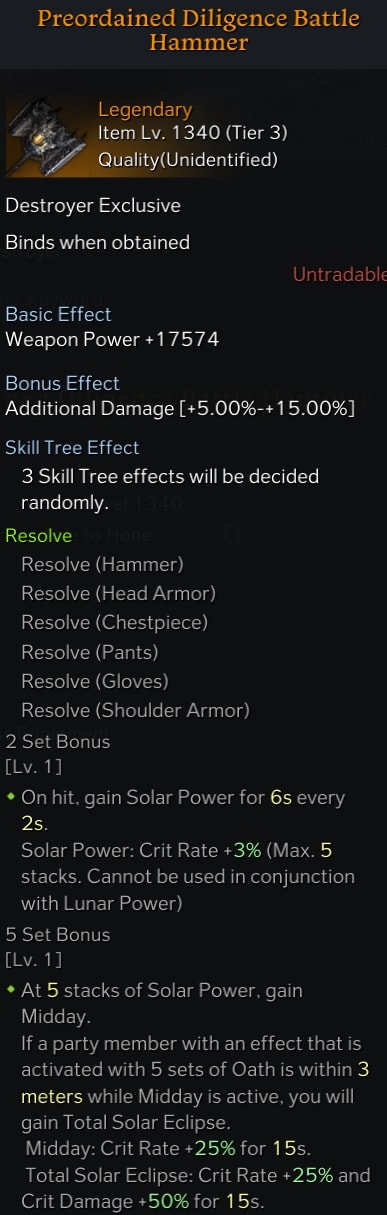
This Set’s 2-piece effect grants the Solar Power buff on hit once every 2 seconds which lasts for 6 seconds. Solar Power grants 3% Crit Rate per Stack, stacking up to 5 times for 15 Crit Rate.
With a 5-piece set you gain the Midday Effect when you reach 5 Stacks, which grants 25% Crit Rate for 15 Seconds. If another player with the Harsh Oath Set’s Full Moon set bonus is near you while Midday is active, you instead gain Total Solar Eclipse, granting 25% Crit Rate and 50% Crit Damage for 15 seconds.
For the time being, this also helps us transiition into our current upper limit of gearing as well by making this set, as we’ll end up keeping a couple pieces.
Tier 3 Legion Raid Sets
With the Introduction of the Valtan Legion Raid, we now have access to several unique sets that can provide a decent bonus. There’s one standout set that we will ultimately want to have a 6-piece set of, which is the Earth’s Entropy Set. However, until the Vykas Legion Raid is released, we cannot get the 6-piece set effect.
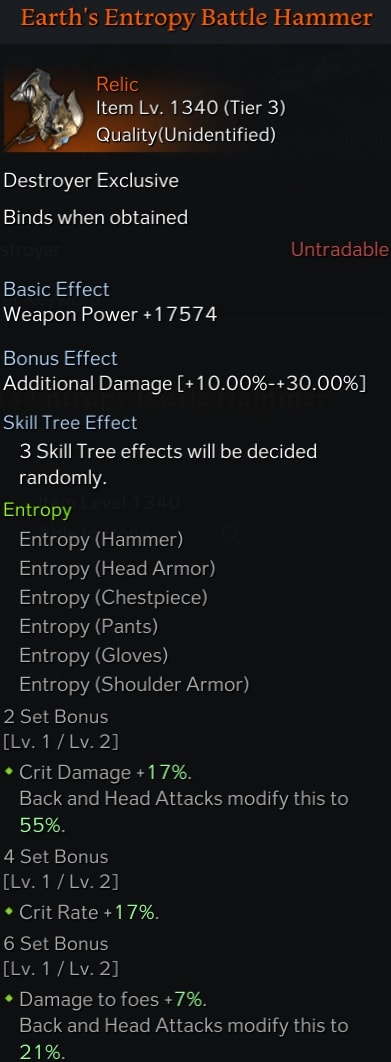
Since we cannot get the 6-piece set effects, we’ll just get the 2-piece for now, which will grant 55% Crit Damage for performing Frontal or Back Attacks. Since Destroyer has the Frontal Attack property on nearly all of their skills, we can make very good use of this effect.
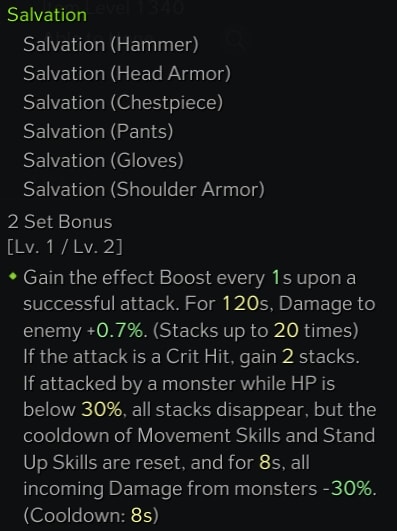
So now, what we can do to fill out the rest of our armor slots without sacrificing any damage potential is to use other sets for the time being. The Other two sets we’ll want to use are Preordained Diligence (our previous gear set) and Poem of Salvation.
Until we’re able to get 6 piece, this is the best option we have available. So our Final gear setup until Vykas looks like this:
- Earth’s Entropy Weapon
- Earth’s Entropy Helmet
- Preordained Chest
- Preordained Pants
- Salvation Gloves
- Salvation Shoulders
And this provides us with the 2 piece effects. which grants the following bonuses:
- 2-piece Entropy Bonus
- 17% increased Crit Damage, modified to 55% for Frontal and Back Attacks.
- 2-piece Salvation Bonus
- Gain a stack of Boost for a successful attack, and gain 2 stacks for Critical Hits. Each stack of Boost grants 0.7%, up to a max of 14% (20 stacks). If hit under 30% Health, the cooldown of your Dash and Stand Up skills are reset and you take 30% reduced damage for 8 seconds.
- 2-piece Preordained Bonus
- On hit, gain Solar Power for 6 seconds. Can only trigger once every 2 seconds. Solar Power grants 3% Crit Rate per stack, up to 15%.
We use this setup as the Preordained Diligence 2-piece set grants a similar bonus as the 4-piece Entropy. However, it requires stacking which Entropy does not. The 2-piece Salvation set grants us a stacking damage bonus, which ends up giving a similar but weaker bonus as the 6-piece Entropy set. So it functions as a discount 6-piece Entropy set until we can get the set proper.
Recommended Hammer of Rage Destroyer Stats
The Destroyer uses only two main Stats, Swiftness and Crit. Both of these help the class pump out more damage. You’ll be running Swiftness and Crit at around 3:1 Ratio, heavily investing in Swiftness.
 Crit
Crit
 Crit
CritCrit is where we’ll be investing a lot of our stats. This is because the Destroyer lacks Crit Tripods. While we get some from Hammer of Rage, it’s not enough on its own, so we’re trying to boost it up and we’ll be looking to get it on nearly all of our accessories, except for a single Ring or Earring.
This will give us more than enough crit regardless of which set we choose to use to crit often enough. While the relic set we eventually get will also provide Crit Rate, currently we cannot get to the point it does. We still need to keep that in mind though, so we don’t overcap on crit.
 Swiftness
 Swiftness
Swiftness we’ll only be picking up on our necklace. We need this little bit of Swiftness to help speed up our animations, as well as smooth out our skill rotations. It’s not going to be a huge reduction for our cooldowns but it does help just enough.
 Specialization
 Specialization
Specialization we’ll only want on a single ring or Earring in the late game. This is just a slight damage bump for our Concentration skills, as well as helps to charge Hypergravity Mode slightly faster. Overall, it’s a recommended optimization, but you can choose to not go for it if desired, as it’s mostly to not over-cap crit and we don’t need the extra Swiftness all too much.
Recommended Hammer of Rage Destroyer Engravings
There are three Engravings that are essential to maximizing our Damage. Beyond those three, there are some options that can be worth considering.
For further information on these Engravings, check out our Engraving Guide which details all of the Engravings, including those found below.
 Hammer of Rage
 Hammer of Rage
This is our Class Engraving and is mandatory for this build to actually function well. This will grant 3%/4%/5% Crit Rate and 5%/10%/15% per Gravity Core Consumed. When maxed and used properly, this will be granting 15% Crit Rate and 45% Crit Damage to each and every one of our Gravity Release Skills.
Super Charge
 Super Charge
Super Charge grants 8%/20%/40% Charge Speed and 4%/10%/20% damage for charge skills. Since three of the four Gravity Release Skills we’ll be using are Charge Skills, or become Charge skills, this is highly beneficial for both the charge speed and the extra damage it provides to our main damage skills.
Barricade
 Barricade
Barricade provides 3%/8%/16% damage while shielded. Since we get a shield every time we use Gravity Cores, this becomes free damage for our heavy-hitting Gravity Release skills.
Master Brawler
 Master Brawler
Master Brawler provides 5%/12%/25% when performing Frontal Attacks. Since all of the skills we’ll be using in this build have the Frontal Attack Modifier they will all benefit from this engraving making it a very strong option
Cursed Doll
 Cursed Doll
Cursed Doll is one of those Engravings that’s always viable. However, to make the penalty worthwhile, it needs to be maxed or we’re not getting much but the penalty. Reduced healing isn’t the end of the world either, just means it’ll be harder for support or our potions to heal us.
Grudge
 Grudge
Much Like Cursed Doll, Grudge is always viable for most non-Chaos Dungeon endgame content. The huge damage bonus we get versus Bosses makes it phenomenal. However, we take increased damage, making it even more essential to max this out. Taking this engraving at Level 1 or Level 2 is an absolute waste, especially if you don’t know an encounter well enough.
Hammer of Rage Destroyer Skills and Tripods
The Hammer of Rage Destroyer gets a good mix of strong and quick skills, which all pack quite a bit of damage as well as AoE. Below are our choice of 8 recommended skills and their Tripods, as well as a couple of optional choices at the end if you wish to replace another skill with them.
Heavy Crush
 Heavy Crush
Heavy Crush is a quick and consistent core-generating skill. While it only grants a single Gravity core, its quick cooldown makes it vital to your skill rotation.
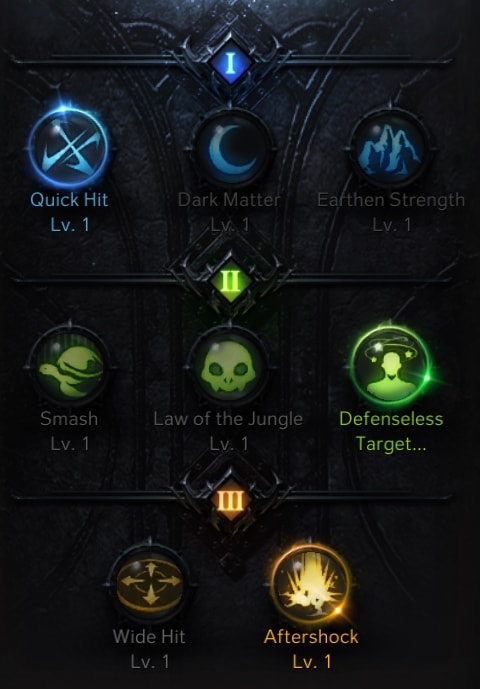
Heavy Crush uses the Quick Hit Tripod. While you often won’t upgrade it any further, if you chose to do so the Defenseless Target and Aftershock Tripods add the most damage to the skill.
Quick Hit reduces the wind-up time for the skill, making it very quick and reliable. Since you’ll be using it several times in a full rotation, this lets you get your skills out much quicker. Defenseles Target is a bit hit or miss, since it requires a stunned or staggered target. This means it won’t be a stable damage increase in the long run but the only damage option available for that row. Aftershock adds extra shockwaves to the skill, letting it deal more damage over time.
Jumping Smash
 Jumping Smash
Jumping Smash is Primarily our Mobility tool, but also or main source of applying Defense Reduction. Having Defense Reduction on our gap closing skill allows us to jump right in and start our rotation and boost all of the skills that come after.
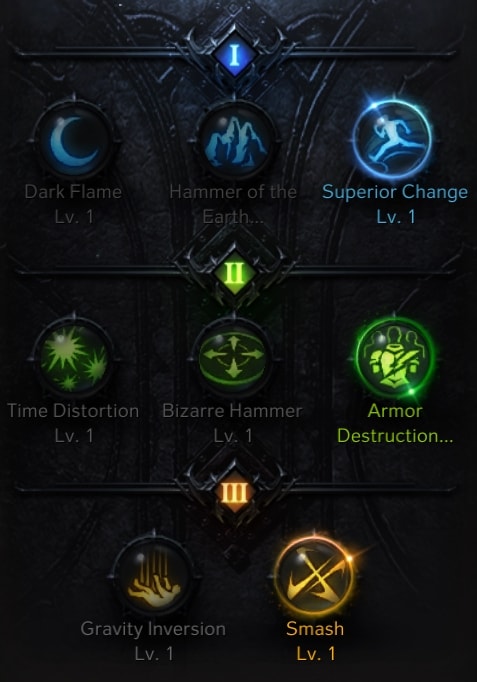
Jumping Smash uses the Superior Change, Armor Destruction and Smash Tripods. These increase its mobility and boost its damage a fair bit.
Superior Change increases the movement distance, making the distance travelled 12 meters prior to picking up Smash, and 7 meters after acquiring Smash. Armor Destruction applies our Synergy skill and reduces the enemy’s armor boosting both our damage as well as out allies damage. Smash makes the skill much quicker and allows it to deal even more damage.
Power Strike
 Power Strike
Power Strike is both our counter and another Core-generating skill. It’s a fairly quick skill and does plenty of damage as well. While it has access to Armor Destruction, this Tripod should only ever be used if you swap out Jumping Smash for an alternative skill.
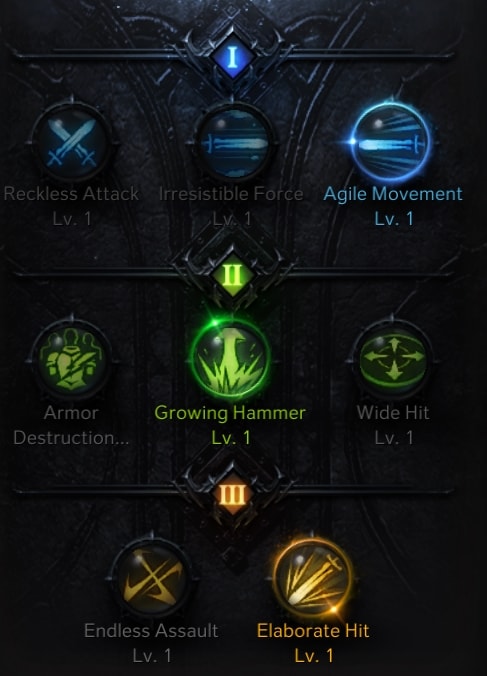
Power Stike uses the Agile Movement, Growing Hammer, and Elaborate Hit Tripods. These boost its damage to by a huge margin, while making it a quick and smoother attack.
Agile Movement speeds up the animation of the skill, making it easier to use despite lacking Super Armor. Growing Hammer makes it so each hit boosts the damage of following hit. Elabroate Hit adds a high boost of damage to the final hit.
Endure Pain
 Endure Pain
Endure Pain is our taunt skill, which is great for interrupting enemy patterns and guaranteeing Frontal Attacks. In addition to the taunt, it also provides quite a bit of damage reduction as well, letting you really shrug off hits.
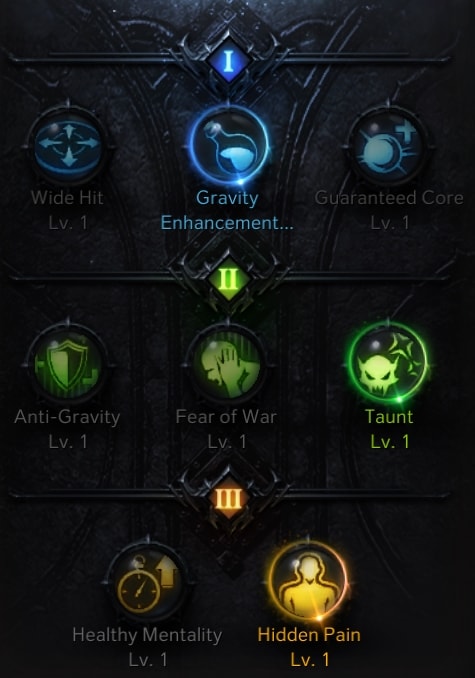
Endure Pain uses the Gravity Enhancement, Taunt, and Hidden Pain Tripods. These enable the skill to taunt, make it less costly to use, and amps up the Damage reduction it provides.
Gravity Enhancement isn’t always going to be the best option to use, as Wide Hit helps the skill a lot more. However, until you get a high tier Focus Rune, Gravity Enhancement is a stronger choice due to the skill”s high mana cost. Taunt is good option to have, allowing you to interrupt boss patterns and keep them from running away. Hidden Pain increases the damage reduction the skill offers to 90%, which is strong in its own right. However, towards the end of Tier 3 gearing, having a higher level of the Healthy Mentality Tripod can be just as good, offering the base damage reduction for much longer.
Full Swing
 Full Swing
Full Swing is the first of our charging Gravity Release Skills that will benefit from Super Charge. This is stong multi-hit skill with high stagger, making it a great option for quickly meeting a stagger check. Over its multiple hits, it will end up dealing fairly high damage as well.
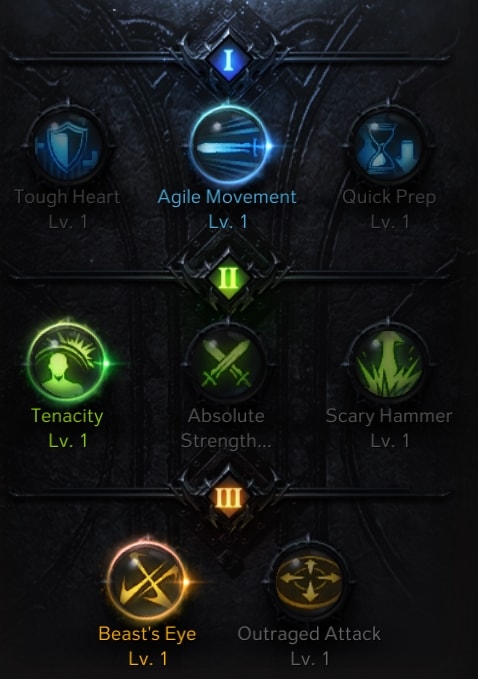
Full Swing uses the Agile Movement, Tenacity, and Beast’s Eye Tripods. These Tripods allow the skill to be reliably executed and deal high damage.
Agile Movement speed up the animation of this skill, which is absolutely necessary when using Beast’s Eye. Tenacity provides Level 2 Super Armor, making the skill harder to interrupt. Alternatively you can ue Scary hammer here for the extra damage that works well with Beast’s Eye. Beast’s Eye cuts down the skill’s charge time while in massively boosts its damage in exchange for a slightly longer animation.
Earth Eater
 Earth Eater
Earth Eater is our next Gravity Release Skill that will benefit from Super Charge. This is a skill that will deal a single heavy hit of damage, and be strong source of damage. It’s also the first of our skills that require all 3 Gravity Cores to deal maxminum damage, tahnsk to Absolute Strength.
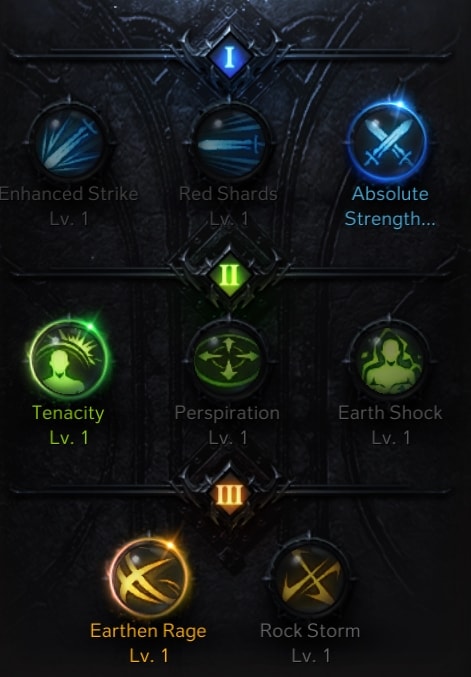
Earth Eater uses the Absolute Strength, Tenacity, and Earthen Rage Tripods. These allow the skill to be executed reliably, while boosting its damage and making it a charge skill.
Absolute Stength will allow you to ingore a large portion of an enemy’s defense, which allows the skill to deal more damage. You can alternatively use Enhanced Strike here as well, as it does offer more raw damage later into gearing. Tenacity is the go-to option here, making the skill safer to use. Earthen Rage makes the skill into a charge skill so it can benefit from Super Charge and heavily boosts the damage of the skill
Perfect Swing
 Perfect Swing
Perfect Swing is our single hardest hitting skill. It can take a bit to full charge it up, but the damage is unmatched acorss the rest of the Destroyer’s kit. This skill definitely has a few Quality of Life tripods it can use, which we personally recommend, but once you’re famailiar with an encounter you can swap to pump more damage into it.
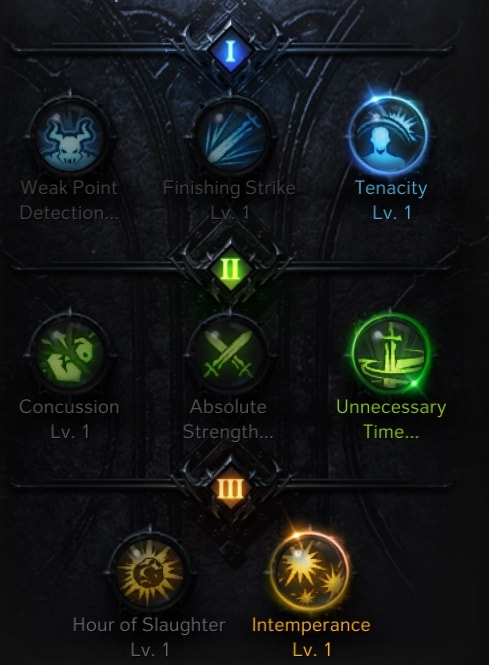
Perfect Swing uses the Tenacity, Unnecessary Time, and Intemperance Tripods. These make the skill both safer and more reliable while adding to its damage.
Tenacity is a Quality of life option, making it harder for the charge to be interrupted. Alterntatively, you cna use Weak Point Detection to increases its damage output. Uncecessary helps to shorten charge time further on top of Intemperance. This again can be replaced with Absolute Strength to increases its damage output. Intemperance reduces the overall charge time, and adds another level of charging, for maximum damage.
Seismic Hammer
Seismic Hammer is nice, big AoE Gravity Release skill that deals a ton of damage. While this one doesn’t benefot from Super Charge like the other Gravity Release skills, it does plenty of damage by itself and is pretty hard to miss on most targets.
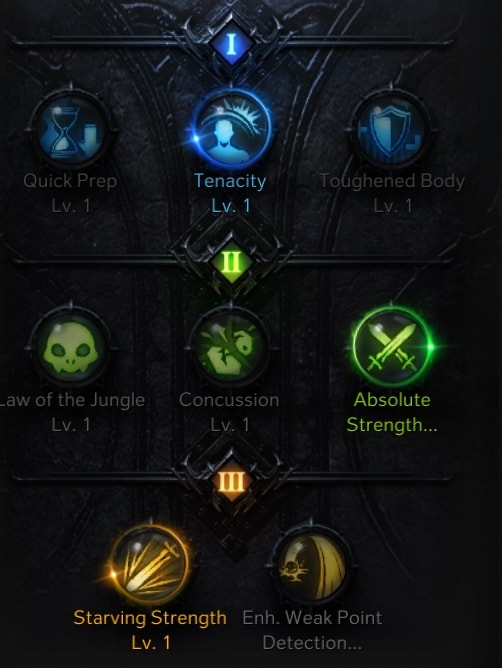
Seismic hammer uses teh Tenacity, Absolute Strength, and Starving Strength Tripods. This makes it more comfortable to use and boosts its damage to a high degree while making more reliable.
Tenacity is a Quality of Life option here, the skill is fairly quick and hard to interrupt, but it helps to migitigate the times you use it only to get smacked out of it. Alternatively, you can use Quick Prep to allow for more frequent usage. Absolute Strength is the best damage option form this skill fo the second row. Starving Strength makes the skill a circular AoE around you, rather than a forward cone. This allows it to be used while facing any direction and still reliably hit.
Dreadnaught
 Dreadnaught
Dreadnaught is an alternative counter skill that can be used in place of Power Strike or instead of Jumping Smash as a higher damage alterative skill. Similar to Power Strike, you only would want to use the Armor Destruction tripod if it’s replacing Jumping Smash.
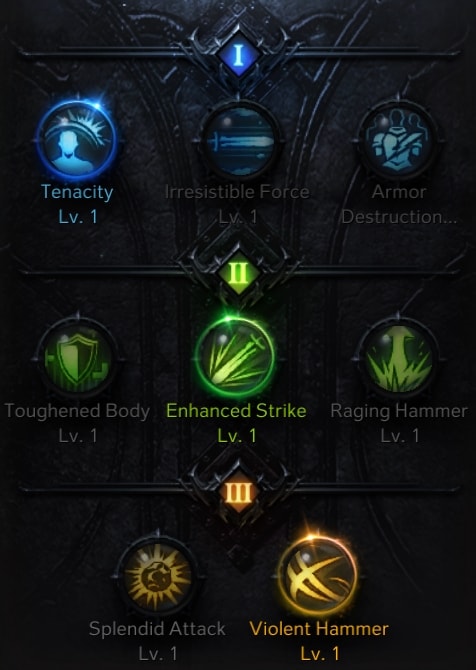
Dreadnaught uses the Tenacity, Enhanced Strike, and Violent Hammer Tripods. These help the skill to deal more damage while keeping you realtively safe.
Tenacity gives you level 2 Super Armor, making it harder to interrupt this skill and more comfortable to use. Enhanced Strike is used for the single target damage it provides. Toughened Body can also be use to makes the skill even safer, but it doesn’t feel super necessary. Violent Hammer is used to increases the number of hits the skill performs and increase its damage accordingly.
Hammer of Rage Destroyer Skill Rune Options
Below are our recommendations for Runes, as well as a few options that you can swap out if you have the required Runes.
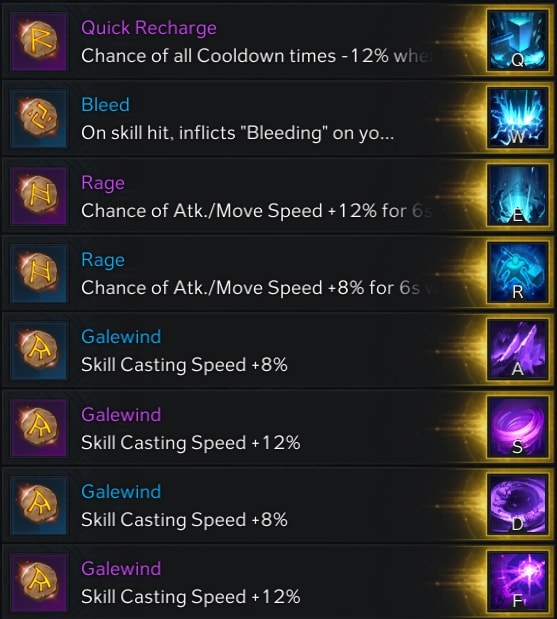
We use Bleed on Vault, as having a DoT effect is quite nice and it is one of our shorter cooldowns which gives it high uptime. Some bosses, like Seto from the Aira’s Oculus Abyssal Dungeon, will heal if they go undamaged for a second, and this rune prevents that. If you’re not using Vault, place it on the chosen replacement skill
We Use Galewind Runes on Earth Eater, Full Swing, Perfect Swing, and Seismic Hammer. This helps speed up the animations for the skills that really need it, primarily your Gravity Release Skills.
The order to prioritize the listed skills when deciding what Galewind Rune to use where is as follows:
- Perfect Swing
- Full Swing
- Earth Eater
- Seismic Hammer
 Seismic Hammer
Perfect Swing should always get your best Galewind, as even with its Tripod, it’s a slower skill. Full Swing and Earth Eater are almost tied for the next best Galewind, but Fullswing benefits a little more due to its longer animation.
We use Quick Recharge on Heavy Crush, as it will be used often and have a higher chance of speeding up our cooldowns. Alternatively, Heavy Crush can use as easily use Rage to speed up the skills that follow, or Bleed to apply a constant damage over time effect.
Rage is a really good option to put on Dreadnaught, Jumping Smash, and Power Strike. This is because these are also skills you’ll be using often and Rage will carry over into the Gravity Release Skill that follows them in your rotations. Alterntaively, one of these skill can use Bleed in place of
If you have a Focus Rune, consider using it on Endure Pain. It has a high mana cost and will help keep you from running out of mana. Alternatively, if you’re running Gravity Enhancement on Endure Pain, you can use use another rune until you geta Focus Rune.
Skill Gem Choices
Being a DPS, we’ll be looking to add damage and cooldown to our 4 Gravity Release skills, or rather our biggest damage skill as per the strategy mentioned in our Gem System Guide.
Damage Gems
We’ll have four damage gems for our major skills. This is all the Gravity Release Skills we use.. Those Gems are as follows:
- Earth Eater
- Full Swing
- Perfect Swing
- Seismic Hammer
These are our core damage skills. Even with Tripods, our core genertating skills don’t deal as much damage as these skills will. This also allows us to add cooldown gems for nearly every skill.
Cooldown Gems
We’ll have seven Cooldown gems, four to pair with our Damage gems, and three extra to use as desired. The seven cooldown gems we’ll be using are as follows:
- Earth Eater
- Full Swing
- Perfect Swing
- Seismic Hammer
- Jumping Smash (or Dreadnaught)
- Power Strike (or Dreadnaught)
- Endure Pain
Using these last three cooldown gems to reduce the cooldowns on our longer cooldown core generating skills helps to really smooth out our rotations and allow them to be used more often. Since we’ll be using them often and they can also be interrupted fairly easily, this helps out a lot over teh course of an encounter.
We opt to not give one to Heavy Crush as it’s cooldown is too low to really benefit from a cooldown gem all that much. The small bit of swiftness we get is generally more than enough.
Hammer of Rage Destroyer Rotations
We have two primary rotations that we’ll follow as closely as we can. One for when when we need to gap close first, which we’ll call the Opening Rotation, and our Standard Rotation.
Opening Rotation
The only real difference between this rotation and our Standard Rotation is opening with Jumping Smash to close the distance. It also changes the order of our core genrators very slightly.
- Jumping Smash
- Heavy Crush
- Perfect Swing
- Power Strike
- Heavy Crush
- Seismic Hammer
 Repeat Steps 1 & 2
- Earth Eater
- Repeat Steps 4 & 5
- Full Swing
- Repeat Rotation, or switch to Standard rotation.
 Repeat Steps 1 & 2
We open with Jumping Smash to close the gap and generate 2 Gravity Cores. This is followed by heavy Crush to generate our third core, and followed with Perfect Swing since it deals the most damage.
We then generate another 3 Gravity Cores, and use Seismic Hammer. We use Seismic Hammer here as with the Quick Prep Rune, it will be one of our shorter cooldown Gravity Release Skills. If you’re not using Quick Prep, you can use any Gravity Release Skill.
After this, the order which you use Gravity Reelase skills will just be based on which cooldowns are available. We recommend making Full Swing last, as it typically deals less damage than the other Gravity Release Skills and has a much longer animation.
Standard Rotation
This is the rotation we use if we don’t want to, or need to open with our gap closer.
The biggest thing this rotation does, is uses Heavy Crush first, so that way by the time you use another Core Generator and a Gravity Release skill, Heavy Crush is ready again.
- Heavy Crush
- Jumping Smash OR Power Strike
- Perfect Swing
- Repeat Steps 1 & 2
- Seismic Hammer
- Repeat Steps 1 & 2
- Earth Eater
- Repeat Steps 4 & 5
- Full Swing
- Repeat Rotation.
This rotation doesn’t care which of the other two core generators you use after heavy Crush, so you’ll often use whichever one is off cooldown.
We’ll still use the same priority for Gravity Release Skills, prioritizing Perfect Swing for its damage, then Seismic Hammer for its lower cooldown. Again, we still suggest Full Swing be the last one to use, as it has the longest animation and does a bit less damage.
Check out the Lost Ark Guides available on VULKK.com and stay up-to-date with the latest news about the game.