This guide explains the Deadeye’s Pistoleer Build. We’ll talk about everything from Gear to stats, including Engravings, Gems, Runes and Rotations!
In Lost Ark, the Pistoleer focuses on dealing a constant stream of damage. Since they’re restricted to just a handful of the Deadeye’s larger skill pool, it’s easier to keep them all on rotation.
In this guide, we’ll be expanding on the information provided in our Beginner Deadeye Guide. Be sure to check that out if any of the choices in the guide below don’t fully make sense you to.
Table of Contents:
- Introduction to Pistoleer Deadeye Build
- Recommended Gear Sets
- Recommended Stats
- Recommended Engravings
- Skills and Tripods
- Skill Rune Options
- Skill Gem Choices
- Skill Rotations
Introduction to Pistoleer Deadeye Build
The Pistoleer is a fairly mobile DPS class that excels in dealing consistent damage from a safer range than the Enhanced Weapon Build. While they lack some of the high damage potential damage expected from a Deadeye, they make up for this with very consistent damage output.
Of the two builds for Deadeyes, Pistoleer tends to be the favored one. This is not only because it’s easier to play, but has a higher consistency than Enhanced Weapon. This consistency also allows the Pistoleer Deadeye to be much less reliant on Back Attacks, allowing them to focus on avoiding damage with their positioning.
Despite being a more popular build, the Pistoleer doesn’t often run into trouble when gearing as they will only ever care about two of the three main PvE stats. They don’t stack Crit as high as some other builds, which often allows them to get much cheaper gear overall.
Due to not taking as much Crit on their gear, they’re going to prioritize Gear Sets that provide Attack Speed, Crit Rate, or Damage. Due to the bonus provided by their Specialization stat, they will always avoid Crit Damage Sets.
Pistoleer Deadeye Gear Sets
For the most part, you can get away with using your Chaos Dungeon Set until mid-late T3, where you’ll get your legendary Abyss Sets or Legion Raid Sets. However, if you were playing Pistoleer Deadeye from Tier 1 as a main, we’ll highlight the best sets to use below.
Early Tier 1 – Seraphic Oath
This set comes from the Ancient Elveria Abyssal Dungeon unlocked after completing North Vern. Completion of each stage will reward you with a material called Knight’s Oath, which can be taken to the Abyss Crafting NPC in Southeastern North Vern or Western Rohendel to craft this set.
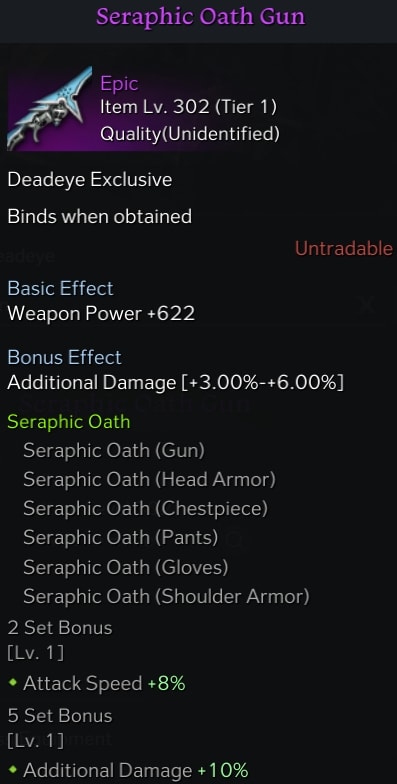
This set’s 2-piece effect grants 8% Attack Speed with its 2-Piece set bonus and 10% Damage with a 5-piece set.
Both parts of this set bonus are great for us, as we’ll want the Attack Speed to speed up a couple of our longer animations as well as the extra damage.
Late Tier 1 – Boisterous Elemental Set
This set comes from the Phantom Palace Abyssal Dungeon unlocked after completing Rohendel. Completion of each stage will reward you with a material called Elemental’s Fury, which can be taken to the Abyss Crafting NPC in Southeastern North Vern or Western Rohendel to craft this set.
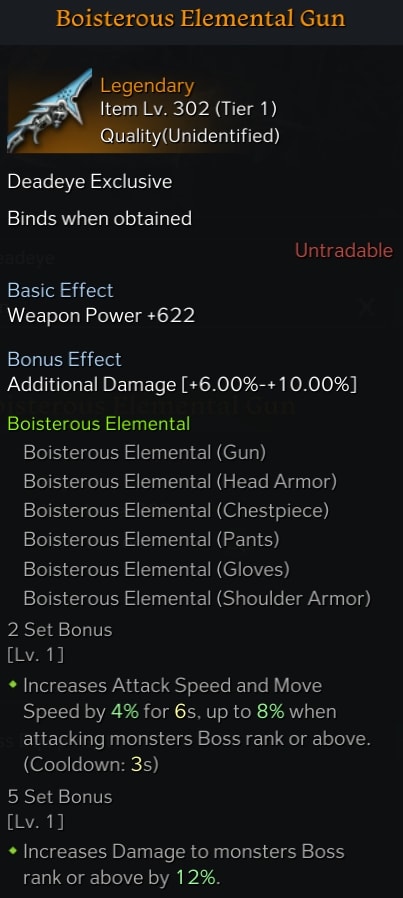
This Set’s 2-piece effect grants a stacking bonus that provides 4% Attack and Move Speed, stacking up to 8% while attacking a Boss or Higher Monster. The 5-Piece bonus grants 12% Damage while attacking a Boss or Higher Monster.
Both parts of this set bonus are great for us, Movement speed helps with positioning, Attack Speed makes our attack animations faster, and damage is just damage.
Tier 2 – Unyielding Will Set
This set comes from the Gate of Paradise Abyssal Dungeon unlocked after completing Feiton. Completion of each stage will reward you with a material called Guardian’s Will, which can be taken to the Abyss Crafting NPC in Northern Yorn or Northwestern Feiton to craft this set.
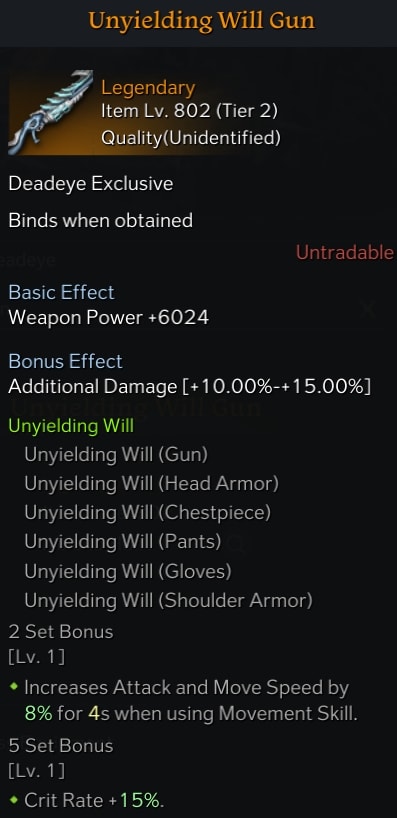
This set’s 2-piece effect grants 8% Attack and Move Speed for 4 seconds after using a Movement Skill. The 5-piece bonus grants 15% Crit Rate.
We skip the Marvelous Earth Set, as it doesn’t grant a whole lot of a bonus for using it over just Chaos Dungeon gear. Slightly higher HP and Defense are nice but other than that it’s better to go straight to the Unyielding Will Set to save the Silver of crafting and transferring.
The main thing we want for this set is the 5 piece bonus. Having 15% extra crit rate will help you get a lot of extra damage out of our class, as early on we won’t be able to stack too much Crit in stats.
Mid Tier 3 – Preordained Diligence Set
This set comes from the Argos Abyssal Raid unlocked after reaching Item level 1340. Completion of each phase will reward you with a material called Aros’ Blood, which can be taken to the Abyss Crafting NPC in the middle of Punika to craft this set.
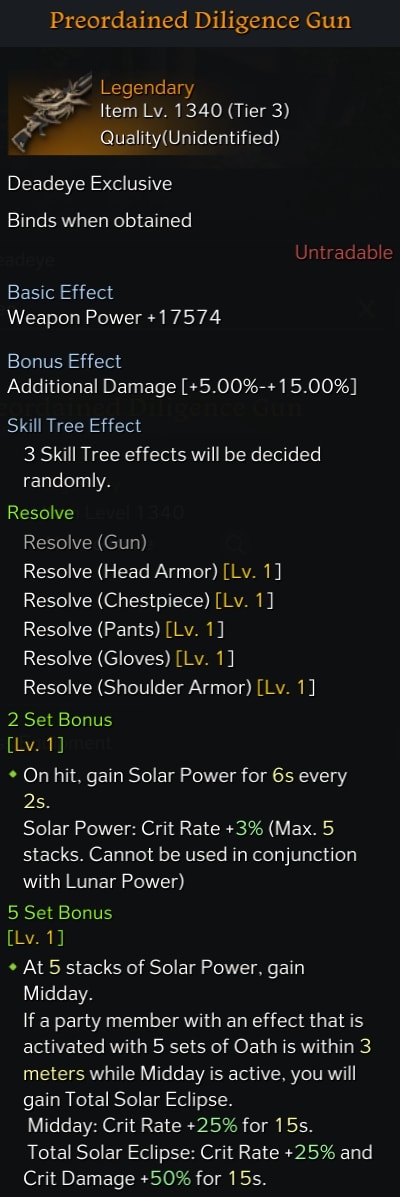
This Set’s 2-piece effect grants the Solar Power buff on hit once every 2 seconds which lasts for 6 seconds. Solar Power grants 3% Crit Rate per Stack, stacking up to 5 times for 15 Crit Rate.
With a 5-piece set, you gain the Midday Effect when you reach 5 Stacks, which grants 25% Crit Rate for 15 Seconds. If another player with the Harsh Oath Set’s Full Moon set bonus is near you while Midday is active, you instead gain Total Solar Eclipse, granting 25% Crit Rate and 50% Crit Damage for 15 seconds.
For the time being, this also helps us transition into our current upper limit of gearing as well by making this set, as we’ll end up keeping a couple of pieces.
Tier 3 Legion Raid Sets
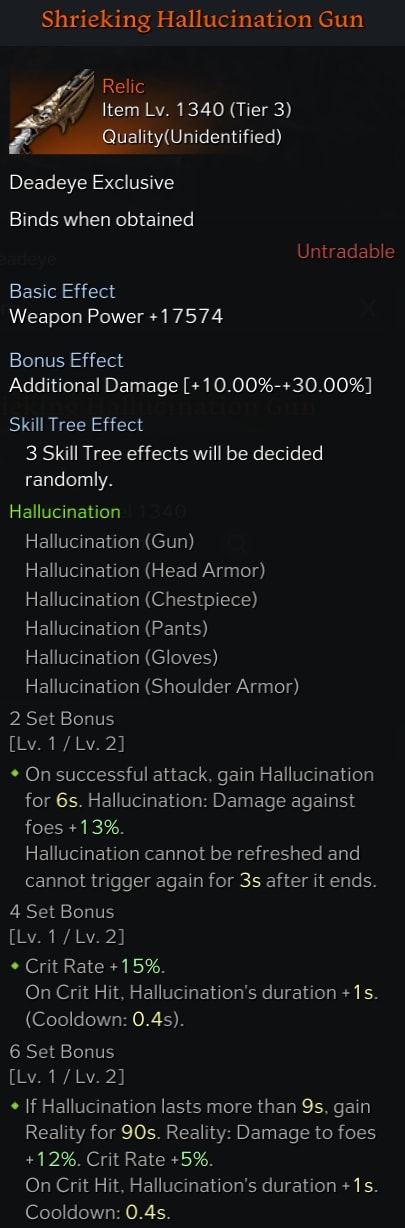
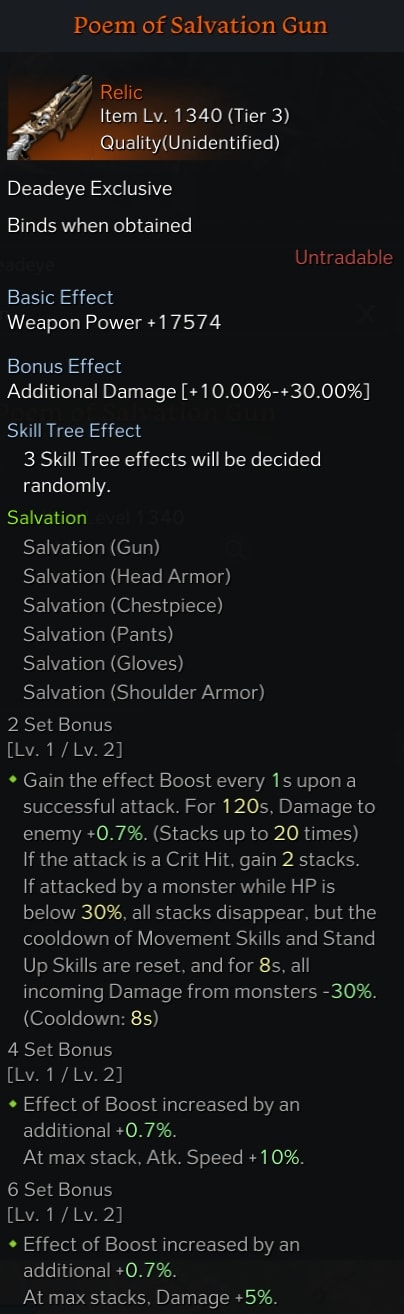
With the Introduction of the Valtan Legion Raid, we now have access to several unique sets that can provide a decent bonus. There are a couple of standout sets that we can target as our 6-piece set, which are the Shrieking Hallucination Set and the Poem of Salvation Set. Both of these sets provide great damage, though Salvation can punish sloppy play making it less ideal for newer players.
Until Vykas is released, we’re unable to fully complete either set. Thankfully, the mixed set we use before then will allow us to flex to either set. We’ll be using 2 pieces of the following sets: Shrieking Hallucination, Preordained Diligence, and Poem of Salvation
Until we’re able to get 6 piece, this is the best option we have available. So our Final gear setup until Vykas looks like this:
- Preordained Diligence Helmet
- Preordained Diligence Chest
- Poem of Salvation Weapon
- Poem of Salvation Gloves
- Shrieking Hallucination Legs
- Shrieking Hallucination Shoulders
And this provides us with the 2 piece effects. which grants the following bonuses:
- 2-piece Preordained Diligence
- On successful attack, gain a stack of Solar Power for 6 seconds. This effect can only trigger once every 2 seconds. Solar Power grants 3% Critical Rate per stack, up to a max of 5 stacks (15%).
- 2-piece Poem of Salvation
- Gain a stack of Boost every second after a successful attack, or 2 on critical hits. For 2 minutes, damage is increased by 0.7% per stack of Boost to a max of 20 stacks (14%).
- If attacked by a monster while under 30% Health, lose all stacks of Boost to reset Movement and Stand Up Skill and reduce incoming damage by 30%. This effect can only trigger once every 8 seconds.
- 2-piece Shrieking Hallucination
- On a successful attack, gain Hallucination for 6 seconds. Hallucination increases damage to enemies by 13%. The duration of this effect cannot be refreshed and has a 3-second cooldown after it ends.
This set of gear allows us to flex to either gear set we want to complete.
Recommended Pistoleer Deadeye Stats
The Pistoleer Deadeye focuses on two main Stats, Specialization and Crit. These help the class perform and fill its role well. It can also make some more niche use of Swiftness to make use of an alternative engraving.
 Specialization
 Specialization
This stat will be on each and every one of your accessories since this will result in a massive boost of Critical Damage to our Pistol Skills. Since we’re restricted to just our Pistol Skills, this means we will always benefit from this regardless of the skill used. In combination with our
 Crit
Crit
 Crit
CritWe’ll only be taking this as our second stat on our Necklace. The small bit of Crit we get from doing so helps us to reach the Crit Chance cap much easier alongside our Engravings and Gear.
 Swiftness
 Swiftness
If you opt to replace the Crit on your Necklace, or pick this up on your Rings, a small bit of Swiftness can enable you to use Raid Captain. However, this slightly limits your flexibility in skill choice as you will need to take the Quick Pace Tripod on Spiral Tracker to have the means of getting the most out of Raid Captain.
Recommended Pistoleer Deadeye Engravings
There are three Engravings that are essential to maximizing our Damage. Beyond those three, there are some options that can be worth considering.
For further information on these Engravings, check out our Engraving Guide which details all of the Engravings, including those found below.
 Pistoleer
 Pistoleer
This is our Class Engraving and is mandatory for this build to actually function well. Once in effect, it restricts the Deadeye to only the Pistol Stance. In exchange, they gain 30%/45%/60% Damage and 60% Stagger Damage. It provides a sizable boost to our damage and some necessary stagger to offset the loss of our Shotgun Stance.
Adrenaline
 Adrenaline
Adrenaline grants a stacking Attack power buff that lasts 6 seconds and grants 0.3%/0.6%/1% Attack power per stack, up to a max of 6; which grants a total of 1.8%/3.6%, 6% Attack Power. When fully stacked, it also provides a 5%/10%/15% Critical Rate bonus. This helps to boost our damage and provides more of the much-needed Critical Rate. Since we have multiple skills under 10 second cooldowns, this is very easy to stack and maintain.
Precise Dagger
 Precise Dagger
Precise Dagger reduces out Critical Damage by 12%, but in exchange grants 4/10%/20% Critical Chance. Since the penalty is a flat one, the High Specialization of a Pistoleer negates this. This becomes free Critical Rate for us, which is both incredibly useful and very powerful. When maxed, it provides a boost similar to that of Enhanced Weapon.
Raid Captain
 Raid Captain
This is a very niche and budget, 4th engraving option you can use prior to Relic Gearing. Raid Captain increases your damage by 10%/22%/45% of your Bonus Movement Speed. Since that bonus is capped for 40%, it provides a max of 4%/8.8%/18% increased damage. If you don’t hit the cap you won;t get this full bonus, which is why you need both Swiftness and to use Spiral Tracker’s Quick Pace Tripod. The Tripod itself provides around 20-25%, depending on level, so ideally you’ll get enough Swiftness to gain 5-10% Movement Speed to be near the cap and allow supports to fill the gap
Cursed Doll
 Cursed Doll
Cursed Doll is one of those Engravings that’s always viable. However, to make the penalty worthwhile, it needs to be maxed or we’re not getting much but the penalty. Reduced healing isn’t the end of the world either, just means it’ll be harder for support or our potions to heal us.
Grudge
 Grudge
Much Like Cursed Doll, Grudge is always viable for most non-Chaos Dungeon endgame content. The huge damage bonus we get versus Bosses makes it phenomenal. However, we take increased damage, making it even more essential to max this out. Taking this engraving at Level 1 or Level 2 is an absolute waste, especially if you don’t know an encounter well enough.
Pistoleer Deadeye Skills and Tripods
The (Build) gets a good mix of strong and quick skills, which all pack quite a bit of damage as well as AoE. Below are our choice of 8 recommended skills and their Tripods, as well as a couple of optional choices at the end if you wish to replace another skill with them.
AT02 Grenade
 AT02 Grenade
This skill is both your main and only party synergy applying skill that we use, as well as an optional Stagger option for situations you really need the extra Stagger.

AT02 Grenade uses the Weakness Exposure, Enhanced Grenade, and Internal Ignition Tripods. This allows it to maintain 100% uptime on our party synergy effect, Weakness Exposure while boosting its damage slightly.
Weakness Exposure allows us to apply our Party Synergy. Enhanced Grenade is bonus damage that we get as a side effect of maxing this skill, though doing so is not a priority. Internal Ignition also provides additional damage, while re-applying Weakness Exposure again.
If you need additional Stagger, Internal Ignition can be swapped with the Firework Tripod. This combined with an Overwhelm Rune boosts your ability to stagger to a more reliable point. It won’t be necessary in most cases, but something useful to keep in mind.
Spiral Tracker
Spiral Tracker is our main filler skill, which we’ll often be throwing out alongside two of our other longer animation skills to deal more damage in a shorter period of time with its short cooldown. Additionally, if desired it can be an alternative source of Weakness Exposure, but this will often be unnecessary.
Spiral Tracker uses the Swift Fingers, Focus Shot, and Heavy Duty Tripods. This boosts its damage potential while making it a faster skill that can be used more often.
Swift Fingers increase the attack speed of the skill, making it a much quicker animation keeping it from locking your down. Focus Shot increases the damage dealt by Spiral Tracker when you place it directly on an enemy. Heavy Duty chances the skill to a stacking skill, allowing you to store up to 2 uses of the skill, which allows for much more frequent usage.
Enforce Execution
 Enforce Execution
Enforce Execution is both our counter and a movement skill with Level 2 Super Armor. This makes it handy for a multitude of situations. Since it has fairly low damage, it makes it much easier to hold it for the situations you need it, without much damage loss.
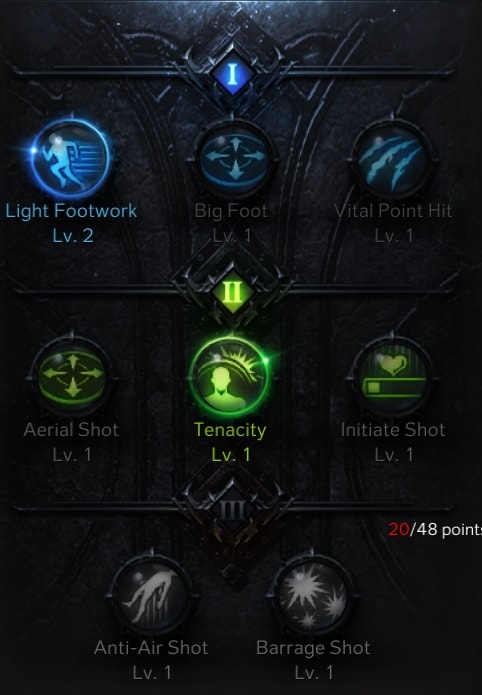
Enforce Execution uses the Light Footwork and Tenacity Tripods. These makes the skill faster and grant the very desirable Super Armor effect.
Light Footwork speeds up the kick animation, giving you both a faster counter and faster mobility. Tenacity Grants us Level 2 Super Armor, which keeps skills from pushing us backwards.
Meteor Stream
 Meteor Stream
Meteor Stream is one of our harder-hitting skills that will make up the bulk of our damage. It’s a fairly slow, but very powerful damage skill; making it one we’ll often use Spiral Tracker with.
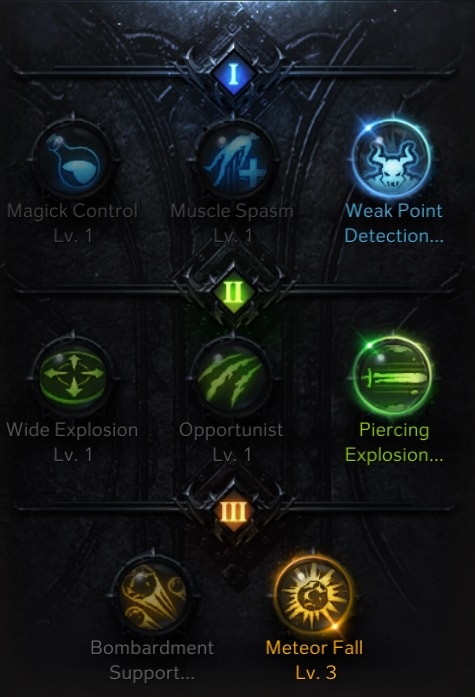
Meteor Stream uses the Weak Point Detection, Piercing Explosion, and Meteor Fall Tripods. These significantly boost Meteor Stream’s damage and speed, making it a more reliable skill.
Weak Point Detection increases damage against Push-Immune foes, or rather Challenge and higher tier monsters. Piercing Explosion allows Meteor Stram to ignore part of the enemy’s defense, increasing damage. Meteor Fall is the slightly weaker option of the two third-row tripods for damage, but gives Meteor Fall some much-needed Attack Speed to make it a faster attack while also giving it a shorter animation.
You can opt for Bombardment Support for maximum damage, but this is only a viable swap against less mobile bosses. If you can make the swap or find yourself able to use it often, you will get more damage and Stagger out of the skill than you would with Meteor Fall.
Equilibrium
 Equilibrium
Equilibrium is another one of our big damage contributors. This skill has a lengthy animation that will lock you in place. Since it doesn’t have access to any Super Armor, you can be knocked out of it, making it a high-risk, high-reward skill. It also happens to be another skill we’ll often pair with Spiral Tracker.
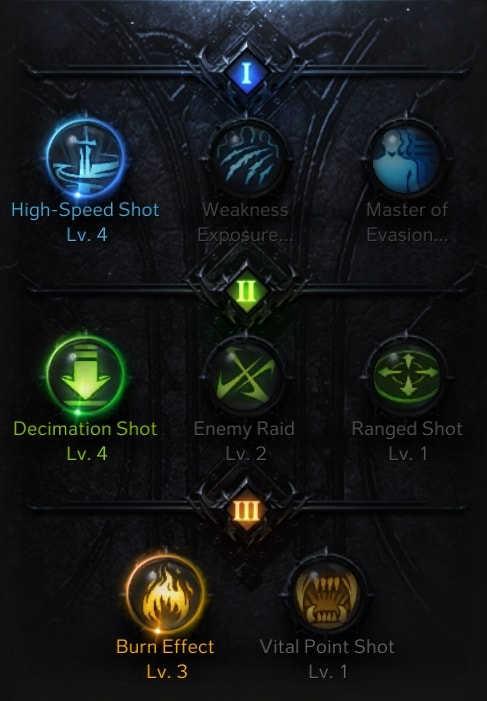
Equilibrium uses the High-Speed Shot, Decimation Shot, and Burn Effect Tripods. These allow the skill to be much easier while drastically improving damage and reducing the time it can lock your down.
High-Speed Shot increases your Attack Speed while using the skill, allowing it to go off much faster and making it a much safer skill by offsetting the Decimation Shot. Decimation Shot is the tripod that causes you to be locked down for a long period, but you gain a ton of damage out of doing so which makes it worth taking. Burn Effect adds an additional stacking burn, increasing the total damage dealt by the skill.
Prior to getting the Preordained Diligence Set, or even maxing Adrenaline and Precise Dagger, it’s much more effective to take Vital Point Shot as your third-row tripod. This covers up the lack of crit, allowing the skill to do great damage, even without the necessary Crit Rate bonuses.
Quick Shot
 Quick Shot
Quick Shot is one of those skill that you have to max out for it to be a good skill. Once you do however, you get one of the Pistoleer’s strongest skills. Though with that power, comes another lengthy animation and yet another skill we’ll want to try to use alongside Spiral Tracker.
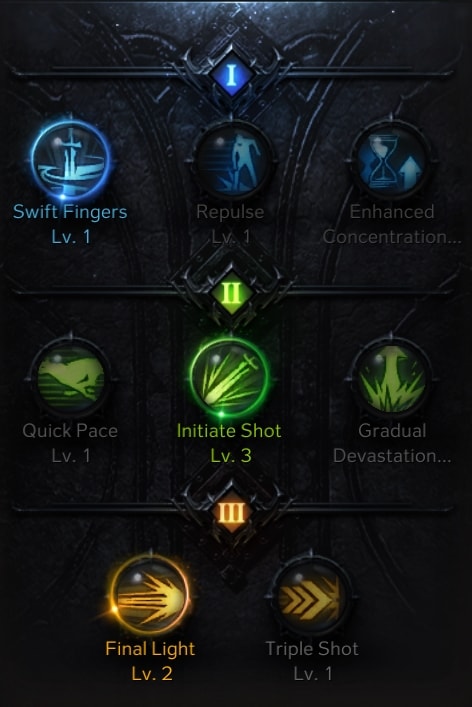
Quick Shot uses the Swift Fingers, Initiate Shot, and Final Light Tripods. These make the skill into an absolute powerhouse, but with a few penalties.
Swift Fingers is taken to help offset Final Light’s wind-up time, which is what makes the skill slower in the first place. Initiate Shot increases our damage by a lot, for any attacks after each hit, which carries over into Final Light. Final Light is a whopping 600% increase in damage that adds both Level 1 Super Armor and Level 1 Weak Point to the second shot. This, however, comes with a slower windup and a 12 second penalty to the skill’s cooldown, increasing it to a 20 second cooldown.
Now Quick Shot is interesting in the fact that also has another combination of tripods that can work decently well when used correctly. This replaces High-Speed Shot with Enhanced Concentration and Final Light with Triple Shot. This results in a weaker skill that can be used to increase the damage of your other skills. This is done by using Quick Shot, then using another skill in-between each of its chain shots.
The difference in damage isn’t super high but can add up over longer fights like Legions Raids.
Cruel Tracker
Cruel Tracker is another skill like Quick Shot, where it’s not amazing initially, but is very strong when maxed out. Unlike Quick Shot though, there are less drawbacks involved in doing so.
Cruel Tracker uses the Swift Fingers, Rapid Fire Enhancement, and Quick Draw Tripods. These boost its damage significantly without slowing it down too much.
Swift Fingers mostly works to offset the longer animation of Rapid Fire Enhancement and Quick Draw. Rapid Fire Enhancement improves the damage of the rapid fire shots that make up the first half of the skill. Quick Draw improves the damage of the second half of the skill, while allowing that second half to be recast.
Alternatively, you cna use Explosive Bullet over Quick Draw, which grants you high Weak Point by giving the final shot Level 2 instead of level 1. This can also deals much higher damage, but releases a slower projectile that doesn’t pass through targets. It does get a bit of AoE, making it a decent swap for Chaos Dungeons, but otherwise, not as great for mobile targets.
Dexterous Shot
 Dexterous Shot
Dexterous Shot is used solely as a strong option for movement and positioning. When you max it out and get the tripods leveled for it, it makes you a much more mobile class. While it won’t fully compare to Enhanced Weapon’s ability to freely use this skill alongside Somersault Shot for mobility, it will close that gap fairly well.
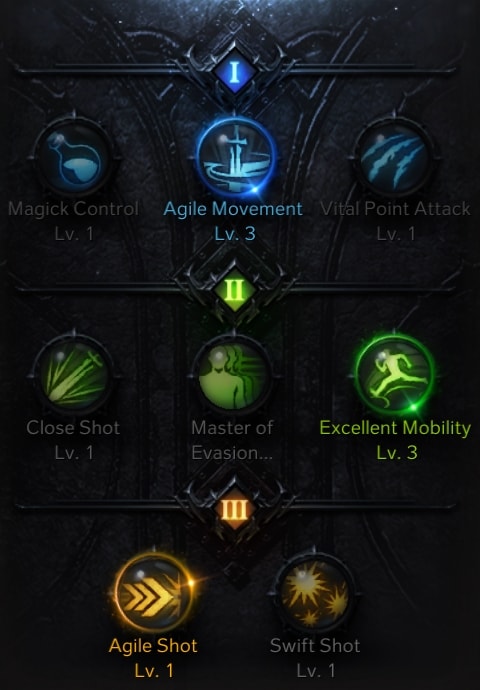
Dexterous Shot uses the Agile Movement, Excellent Mobility, and Agile Shot Tripods. These make the skill faster while increasing both movement distance and the number of times you can move with each use.,
Agile Movement increases Attack Speed, which speeds up the skill’s animation allowing you to move faster. Excellent Mobility increases the distance you move for each use of the skill, adding more mobility overall. Agile Shot allows it to be used three times in a row, which further extends the benefits of the other two tripods.
Plasma Bullet
 Plasma Bullet
Plasma Bullet is an alternative option to using instead of Spiral Tracker. It largely fills the same role and can contribute more damage, but is much less reliable.
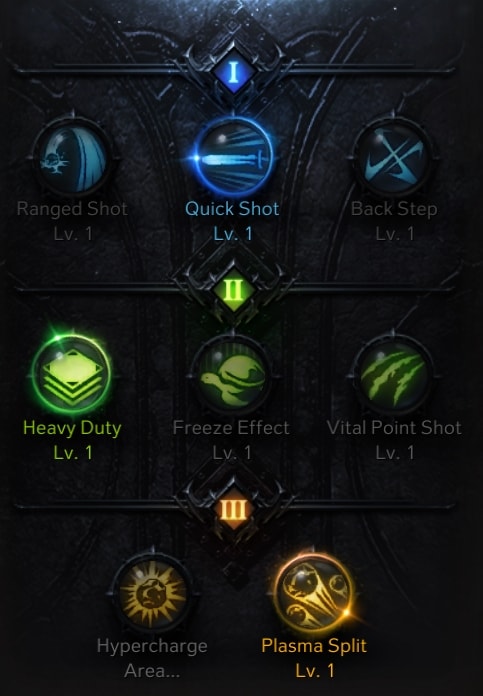
Plasma Bullet uses the Quick Shot, Heavy Duty, and Plasma Split Tripods. These increase the skill’s animation speed, allow it to be used multiple times like Spiral Tracker, and improve its damage.
Quick Shot grants attack speed, which speeds up the skill animation. Heavy Duty allows the skill to be use twice, allowing for more uses and uptime. Plasma Split is the rune that grants the highest damage, but will not always be the one you want to use.
Plasma Split is a fantastic option for damage against larger and slower targets like Guardian Raids. However, against smaller or faster enemies, Hypercharge Area provides a good amount of reliability to the skill, allowing it to deal most of all of its damage consistently. So you can flexibly use these tripods based on the encounter, allowing you to get the best use of the skill.
Pistoleer Deadeye Skill Rune Options
Below are our recommendations for Runes and a few options that you can swap out if you have the required Runes.
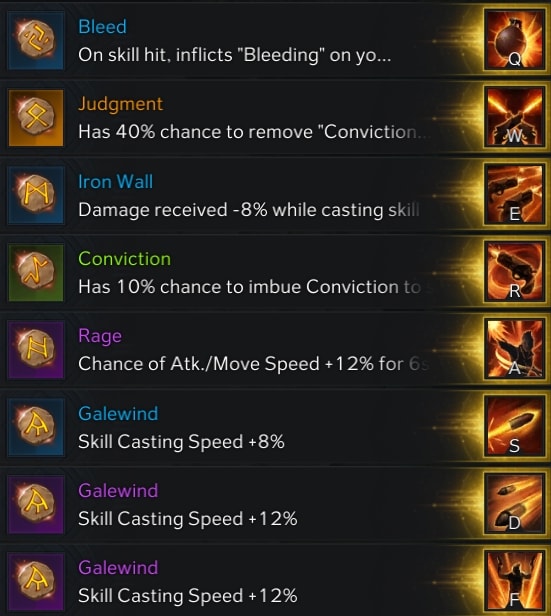
In this build, we’ll be using Galewind Runes on Cruel Tracker, Meteor Stream, and Quick Shot. The order to prioritize the listed skills when deciding what Galewind Rune to use where is as follows:
- Meteor Stream
- Equilibrium (if not using Conviction/Judgment)
- Quick Shot
- Cruel Tracker
These three skills are all on the slow end of our skills, while Equilibrium is used as part of our Conviction and Judgement combo.
We place our Bleed Rune on AT02 Grenade. This is because, with its low cooldown and multiple hits with Internal Ignition, it can maintain this bleed with 100% uptime, much like it does for your synergy effect.
Alternatively, you can slot in Quick Recharge here, for the additional chance to lower your cooldowns or as an alternative to Conviction and Judgment. As mentioned above, AT02 Grenade can also make use of an Overwhelm Rune recombination with the Firework Tripod to increase Stagger Damage.
Spiral Tracker will use the Conviction Rune, while Equilibrium will use Judgment. Since Spiral Tracker will be up often, as well as often being used alongside Equilibrium, it makes it a great choice for triggering Conviction. Equilibrium is great at triggering Judgment once Conviction is active, thanks to its rapid series of attacks.
Alternatively, Spiral Tracker can use a Bleed Rune. This is a good swap for Chaos Dungeons, giving you a bit of extra AoE damage from Spiral Tracker. Equilibrium would would instead get your second highest Galewind.
Dexterous Shot will use a Rage Rune. Since Dextrous Shot is a really low cooldown, it makes it fairly easy to trigger the Rage Rune with it, allowing you to reposition and gain attack speed in a single use.
Finally, Enforce Execution will use a Protection or an Iron Wall Rune. This is because the skill is used purely for utility, and regardless of the means of doing so, reducing incoming damage while using a Super Armor skill is very beneficial. Protection is the stronger of the two options, granting a shield that can potential fully mitigate some attacks. Iron Wall is an okay secondary option that is easier to access, but will only reduce damage and not block it.
Skill Gem Choices
Being a DPS, we’ll be looking to add damage and cooldown to our biggest damage skills as per the strategy mentioned in our Gem System Guide.
Damage Gems
We’ll have 4 damage gems for our major skills. This consist of our heavy damage skills. Those Gems are as follows:
- Cruel Tracker
- Equilibrium
- Meteor Stream
- Quick Shot
These are our core damage skills, which is why they get damage-boosting gems applied to them. This makes them much more potent skill.
Cooldown Gems
We’ll have 4 Cooldown gems, four to pair with our Damage-boosting gems, which leaves three extra slots to use as desired. The cooldown gems we’ll be using are as follows:
- Cruel Tracker
- Equilibrium
- Meteor Stream
- Quick Shot
Being our primary damage skills, we want to be able to use these as often as possible.
Final Gem Options
After our main selection of eight gems, we’re left with three open slots that can flexibly be used how you see fit. Below is a list of options that you may find useful or fit your style better.
- AT02 Grenade Cooldown
- AT02 Grenade Damage
- Spiral Tracker Cooldown
- Spiral Tracker Damage
- Enforce Execution Cooldown
- Dexterous Shot Cooldown
For AT02 Grenade, Cooldown means it will be slightly easier to maintain your Synergy Skill as well as Bleed, or lets you try to trigger Quick Recharge Slightly more often. Increasing the damage of AT02 Grenade is also a good choice, since it will be used so often.
In a similar manner, Cooldown for Spiral Tracker will allow you to use it more often and improve the uptimes of any runes like Bleed or Conviction. Increasing Spiral Tracker’s damage makes it slightly stronger as a filler skill since it will also be used quite often in your rotations.
You can also reduce the cooldown of Dexterous Shot or Enforce Execution. Both of these are utility skills, which doesn’t make them the absolute best options, but are still viable. Reducing Enforce Execution means being able to use Protection or Iron Wall Runes to get yourself out of sticky situations more often. While reducing the cooldown of Dexterous Shot increases your mobility slightly and gives you more chances to trigger Rage.
Pistoleer Deadeye Skill Rotation
We have a single rotation that we’ll follow as closely as we can. While you can alter the order of some skills, after this initial rotation you’ll essentially be using skill as they come off cooldown, save for Equilibrium if Conviction and Judgment are about to be ready.
Standard Rotation
Usually, you want to open a fight with this exact rotation, since you’ll be looking to trigger Conviction and Judgement as often as possible. The main thing we’re trying to do with this opening rotation is delay Equilibrum until the second use of Spiral Tracker. This allows you to put any many skills on cooldown to benefit from Judgment as possible.
- Dexterous Shot
- Spiral Tracker
- AT02 Grenade
- Meteor Stream
- Quick Shot
- Spiral Tracker
- AT02 Grenade (if ready)
- Cruel Tracker
- Equilibrium
We use Dexterous Shot to get into a comfortable position and potentially trigger Rage. We toss out Spiral Tracker, followed immediately by AT02 Grenade to apply the Expose Weakness effect before using any skills. We then use Meteor Stream and Quick Shot, to fit them both into the window of time Expose Weakness is active.
Then we throw out the second charge of Spiral Tracker, this time to trigger Conviction for the combo. This is then immediately followed by AT02 Grenade if it’s ready to re-apply Expose Weakness. Then we use Cruel Tracker to allow Spiral Tracker the maximum amount of time to trigger Conviction. Then we use Equilibrium as soon as Conviction Triggers to attempt to trigger Judgment, which restores MP and lowers our cooldowns.
Check out the Lost Ark Guides available on VULKK.com and stay up-to-date with the latest news about the game.