
This build pushes Ball Lightning to its limits, making it the main attraction and provides one of the highest DPS Sorcerer Builds currently available.
This Sorcerer build guide assumes you’re at least level 50 and have completed enough of your Renown to have gained the 10 additional Skill Points available.
If you want a great leveling build to reach this point with, try our Arc Lash Leveling Build – A build that uses Arc Lash alongside Crackling Energy for great damage.
If you want to level up as a Ball Lightning Sorcerer, at the end of this guide, we have a leveling section showing you how to develop a new character from level 1 with this build.
Table of contents
Build Overview
This build uses Ball Lightning support by the Gravitational Aspect for very high and consistent DPS at close range. This gives it a lot of unique synergies with other skills and items to push the build into a much more powerful position beyond just supplemental damage from Unstable Currents.
This however also means we’ll be playing at a much closer range, which can make it both easier and harder to survive.
Though the use of skills like Ice Armor and Flame Shield helps immensely with mitigating this in combination with the Vyr’s Mastery Key Passive.
We’ll also get more benefits than usual from Damage Reduction to Close affixes.
This build does have two issues we need to solve with our gear, Mana Sustain and Cooldown Reduction. Ball Lightning is a mana-hungry skill, which can very quickly evaporate your mana pool if not managed well. A lot of our defenses will come from Ice Armor and Flame Shield so we’ll need those up as often as possible.
Skill and Passive Breakdown
In this section, we’ll be talking about each skill we use. This is the whys and hows of how the build works, and then we’ll cover the skill point distribution.
Skills
These are the main skills for the build. We’ll explain what purpose each serves and how they fit the build
 Ball Lightning
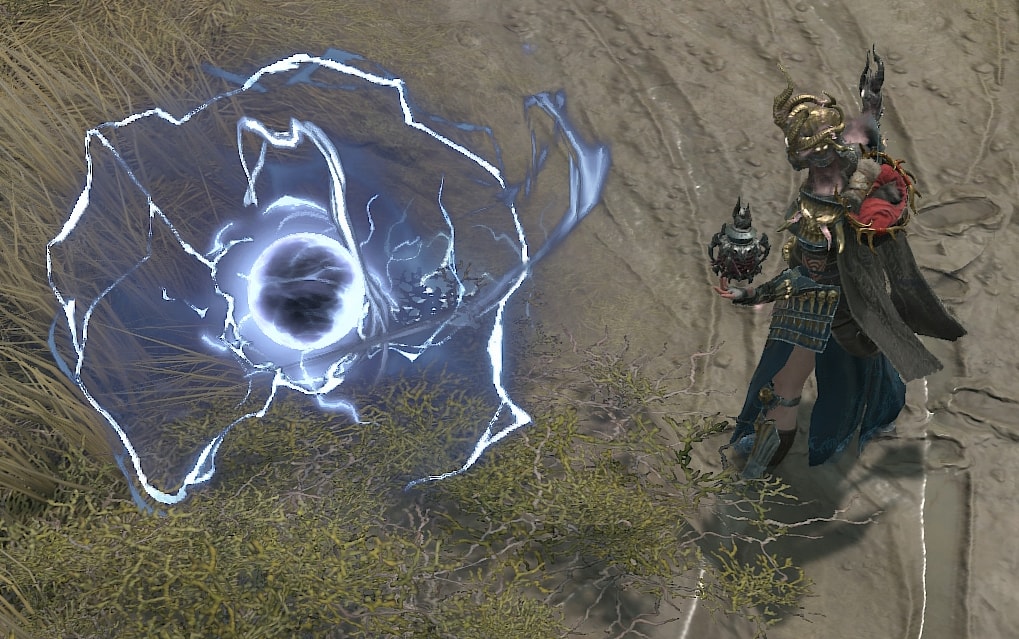
Ball Lightning is our Main DPS skill, which with the Gravatation Aspect will spawn Ball Lightning that orbits our character. This makes Ball Lightning almost a melee skill, but much more reliable and controllable.
Flame Shield
Flame Shield is a great panic button. Not only does it block all incoming damage for a short time, it gives us a burst of movement speed, and recovers some of our missing life at the same time.

Ice Armor
Ice Armor gives us an instant, on-demand Barrier equal to a portion of our Maximum Life. while being a more defensive skill in nature, we’ll mostly be using it to enable effects like the Concieted Aspect.

Teleport
Teleport is our general mobility skill, as well as a reliable way to close distance. Combined with the effects of the Raiment of the Infinite Unique Chest and the Tibault’s Will Unique Pants, Teleport will be a great tool for both Mana Sustain and Burst Damage.

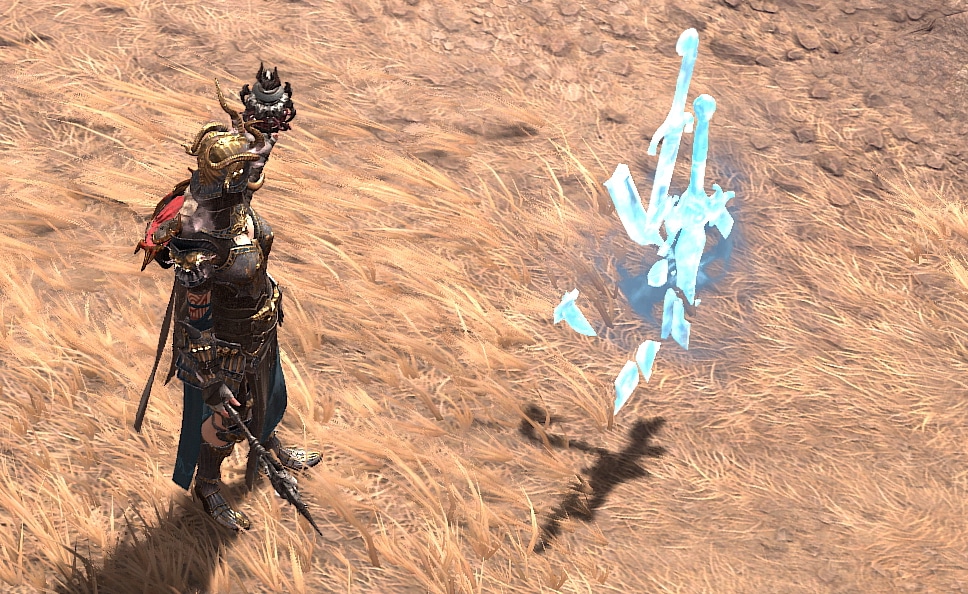
Ice Blades
Ice Blades are a nice supplemental summon we can fit into the build with the extra points we end up with. This allows us to upgrade it to be a useful tool for lowering the cooldown of our Defensive skills, as well as another way to apply Vulnerable.
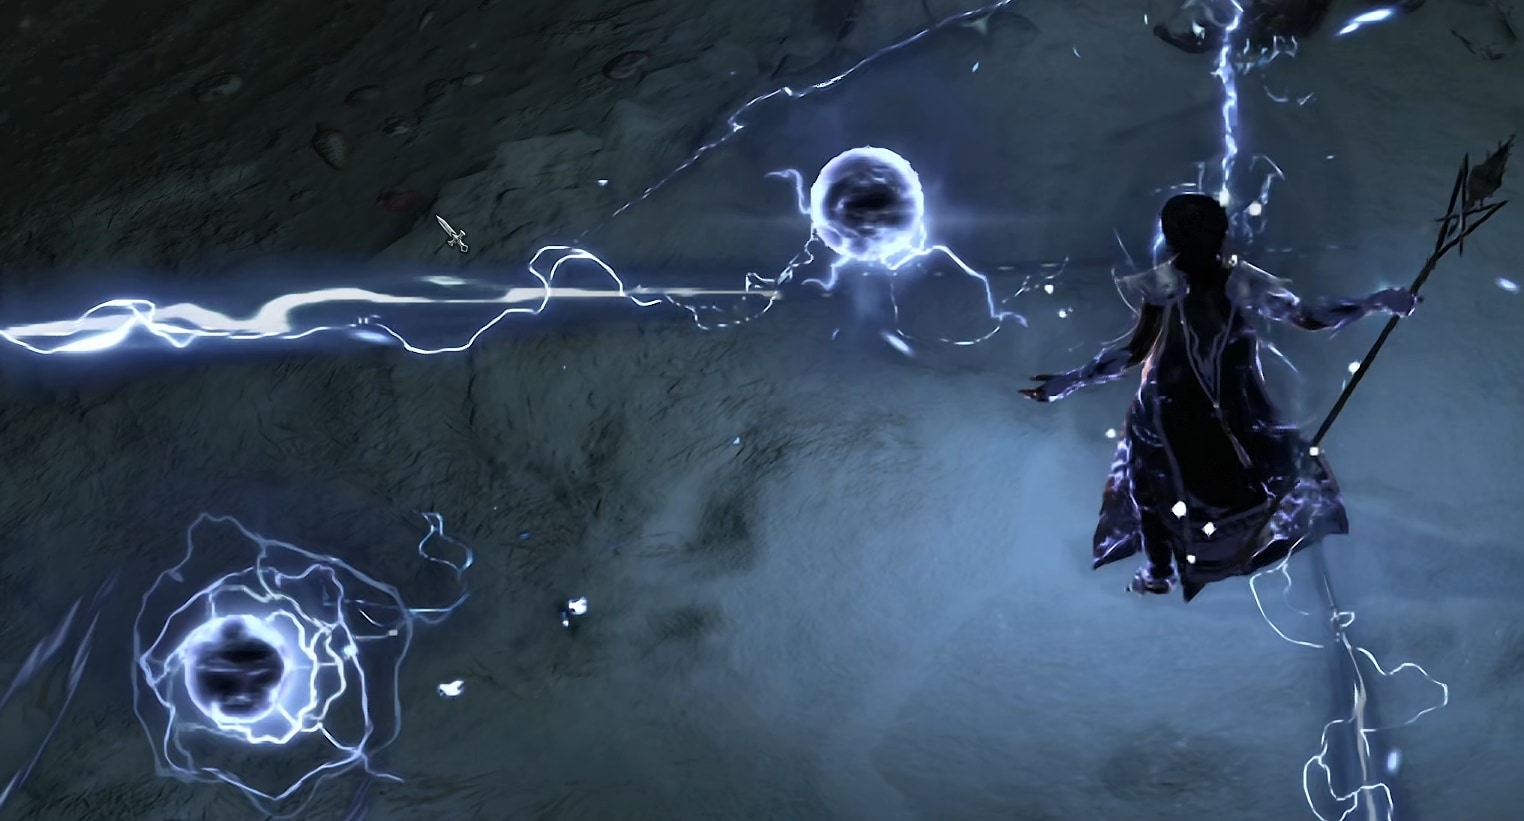
Unstable Currents
Unstable Currents pushes Ball Lightning’s DPS higher, as it will frequently cast Ball Lightning itself while active. Not only this, but it’ll also cast Chain Lighting for more Mana Sustain, as well as Lightning Spear to trigger Protection frequently.
Passives
Here we’re only going to talk about the main passives we want and our Key passive. There are unfortunately a couple we will need to take to get access to these though.
 Key Passive – Vyr’s Mastery
Vry’s Mastery is a very easy call for the build, given how close we get to enemies and how often we group them up. We’ll almost permanently have the benefits of the Charged effect, reducing incoming damage and increasing our damage. Combined with the Mage-Lord’s Aspect, it’s a defensive powerhouse.
Elemental Dominance
Elemental Dominance is one of the main reasons we want great mana sustain, as it will increase our damage while our Mana is above 50%. It’ll be very tough to sustain this effect with Ball Lightning’s base cost of 50, but it will be worth using for some frontloaded damage.
Glass Cannon
Glass Cannon is one of the Sorcerer’s best damage-increasing passives for any build. While it means we need to stack up our defenses a bit more, this isn’t hard to do.
Conjuration Mastery
Conjuration Mastery adds additional value to Ice Blades as well as the Lightning Spears summoned during Unstable Currents. Ultimately, it makes Unstable Currents a more powerful burst window. With the Season 5 changes, this will also add additional Mobility and Mana Sustain in addition to the damage it already provides.
Protection
Protection grants us a shield each time we use a cooldown, manually cast or otherwise. While this will stack with Ice Armor quite nicely, it’s mainly for added survivability during Unstable Currents with how often it sends out Lightning Spears.
Mana Shield
Mana Shield grants us a huge chunk of damage reduction any time we spend 100 Mana. With Ball Lightning’s high upfront costs, we’ll still activate this every few casts of Ball Lightning even after any cost reduction.
Devouring Blaze
Devouring Blaze increases Critical Strike Damage against Burning Enemies. We’ll be able to make use of this by applying Burns with the Firebolt Enchantment.
Invigorating Conduit
Invigorating Conduit provides a nice bit of extra Mana Sustain from the effects of Wizard’s Ball Lightning. It’s not going to perfectly cover the mana costs, but that’s why the Chain Lightning Enchantment exist.
Electrocution
Between stacking Critical Strike Chance on gear, the Coursing Currents passive, and Ball Lighting’s high attack rate, we’ll crit very often. This in turn will reduce the damage enemies deal, making us deceptively durable.
Skill Point Distribution
This is an easy-to-reference table for where we’ll be placing all of our Skill points. These are listed in the order they appear on the skill tree.
| Icon | Skill Name | Skill Tree | Points |
|---|---|---|---|
 | Fire Bolt | Basic | 2 |
 | Chain Lightning | Core | 1 |
 | Devastation | Core | 1 |
 | Elemental Dominance | Core | 3 |
 | Flame Shield | Defensive | 1 |
| Enhanced Flame Shield | Defensive | 1 |
| Shimmering Flame Shield | Defensive | 1 |
 | Ice Armor | Defensive | 1 |
| Enhanced Ice Armor | Defensive | 1 |
 | Teleport | Defensive | 5 |
| Enhanced Teleport | Defensive | 1 |
| Shimmering Teleport | Defensive | 1 |
 | Glass Cannon | Defensive | 3 |
 | Elemental Attunement | Defensive | 1 |
 | Ice Blades | Conjuration | 1 |
| Enhanced Ice Blades | Conjuration | 1 |
| Summoned Ice Blades | Conjuration | 1 |
 | Conjuration Mastery | Conjuration | 3 |
 | Align the Elements | Conjuration | 1 |
 | Mana Shield | Conjuration | 3 |
 | Protection | Conjuration | 3 |
 | Ball Lightning | Mastery | 5 |
| Enhanced Ball Lightning | Mastery | 1 |
| Wizard’s Ball Lightning | Mastery | 1 |
 | Inner Flames | Mastery | 1 |
 | Devouring Blaze | Mastery | 3 |
 | Static Discharge | Mastery | 1 |
 | Invigorating Conduit | Mastery | 3 |
 | Unstable Currents | Ultimate | 1 |
| Prime Unstable Currents | Ultimate | 1 |
 | Coursing Currents | Ultimate | 1 |
 | Electrocution | Ultimate | 3 |
 | Vyr’s Mastery | Key Passive | 1 |
Gearing and Stats
In this section, we’ll cover all the things you’d want to keep an eye out for to enhance the final build. This includes our Recommended Weapons, Enchantments, Aspects, and of course, Uniques.
Recommended Weapons
This build uses a Wand and Focus as its weapons of choice. The Wand grants us faster attacking animations and Vulnerable damage. The Focus allows us to get additional Cooldown Reduction and the extra Aspect slot.
While a Staff could theoretically provide more damage potential, we don’t have an Aspect that provides a huge benefit. If you did go this route, some aspects would need to shift around with Gravitational being in the Staff. Thankfully, Ball Lightning doesn’t use a ton of Aspects so this is an option here.
Ideal Stats
The table below details the ideal stats for our gear, be on the lookout for gear that matches at least two of the three rolls below. We’ve also included Aspects here for easier viewing, refer to the Aspects section for additional details on why these are selected.
Affixes that are CAPITALIZED are the Ideal Affixes to get as a Greater Affix. These are not required but are a good way to push the build further. Affixes in Bold are the ideal Affixes to boost with Masterworking.
In cases where multiple Affixes are listed, the secondary option is for when another stat reaches its cap. This is most common with Armor, where you’d take Maximum Life after reaching the Armor cap.
Affix 1
Intelligence
Affix 2
ATTACK SPEED
Affix 3
Critical Strike Damage
Tempered Affix 1
Shock Critical Strike Damage
Sorcerer – Shock Finesse (Offensive)
Tempered Affix 2
Chance for Ball Lightning Projectiles to Cast Twice
Sorcerer – Shock Augments (Weapon)
Legendary Aspect
Accelerating Aspect
Affix 1
Intelligence
Affix 2
Attack Speed
Affix 3
COOLDOWN REDUCTION
Tempered Affix 1
Shock Critical Strike Damage
Sorcerer – Shock Finesse (Offensive)
Tempered Affix 2
Chance for Ball Lightning Projectiles to Cast Twice
Sorcerer – Shock Augments (Weapon)
Legendary Aspect
Conceited Aspect
Affix 1
Maximum Life
Affix 2
Armor
Affix 3
COOLDOWN REDUCTION
Tempered Affix 1
Maximum Life or Total Armor
General – Worldly Endurance (Defensive)
Tempered Affix 2
Stun Duration
Sorcerer – Sorcerer Control (Utility)
Legendary Aspect
Aspect of Concentration
Unique Item Option
Raiment of the Infinite
Affixes below are used until Unique is acquired
Affix 1
Intelligence
Affix 2
MAXIMUM LIFE
Affix 3
Ranks to Defensive Skills
Tempered Affix 1
Maximum Life or Total Armor
Shared – Worldly Endurance (Defensive)
Tempered Affix 2
Stun Duration
Sorcerer – Sorcerer Control (Utility)
Legendary Aspect
Wildbolt Aspect
Affix 1
MAXIMUM LIFE
Affix 2
Armor
Affix 3
Intelligence
Tempered Affix 1
Maximum Life OR Total Armor
Shared – Worldly Endurance (Defensive)
Tempered Affix 2
Chance to Stun
Shared – Worldly Fortune (Utility)
Legendary Aspect
Mage-Lord’s Aspect
Affix 1
Maximum Life
Affix 2
Attack Speed
Affix 3
CRITICAL STRIKE CHANCE
Tempered Affix 1
Shock Critical Strike Chance
Sorcerer – Shock Finesse (Offensive)
Tempered Affix 2
Chance to Stun
Shared – Worldly Fortune (Utility)
Legendary Aspect
Aspect of Control
Affix 1
MOVEMENT SPEED
Affix 2
Armor OR Maximum Life
Affix 3
Intelligence
Tempered Affix 1
Movement Speed
Shared – Natural Motion (Mobility)
Tempered Affix 2
Chance to Stun
Shared – Worldly Fortune (Utility)
Legendary Aspect
Charged Aspect
Affix 1
Maximum Life
Affix 2
Attack Speed
Affix 3
CRITICAL STRIKE CHANCE
Tempered Affix 1
Shock Critical Strike Damage
Sorcerer – Shock Finesse (Offensive)
Tempered Affix 2
Ranks to Invigorating Conduit
Sorcerer – Sorcerer Stability (Resource)
Legendary Aspect
Recharging Aspect
Unique Item Option
Tal Rasha’s Iridescent Loop
Affixes below are used until Unique is acquired
Affix 1
Maximum Life
Affix 2
Attack Speed
Affix 3
CRITICAL STRIKE CHANCE
Tempered Affix 1
Shock Critical Strike Damage
Sorcerer – Shock Finesse (Offensive)
Tempered Affix 2
Ranks to Invigorating Conduit
Sorcerer – Sorcerer Stability (Resource)
Legendary Aspect
Aspect of the Umbral
Affix 1
COOLDOWN REDUCTION
Affix 2
Maximum Life
Affix 3
Ranks of Devouring Blaze
Tempered Affix 1
Shock Critical Strike Damage
Sorcerer – Shock Finesse (Offensive)
Tempered Affix 2
Unstable Currents Cooldown
Sorcerer – Ultimate Efficiency (Resource)
Legendary Aspect
Gravitational Aspect
Recommended Gems
This build uses Emeralds in our Weapons, Rubies in our Armor, and Skulls in Jewelry.
We opt for Emeralds in our Weapons, focusing heavily on Critical Strikes.
We use Rubies in our Armor, as the extra Maximum Life also increases the strength of our barriers. This also lets us forgo getting Life on everything but our Helmet and still end up with a good amount of Maximum Life
We go with Skulls for Our Jewelry as Sorcerers don’t have nearly the same access to Armor as other classes, and their Intelligence typically gives them all the Elemental Resistances they need.
Enchantments
This build’s Primary Enchantments are Firebolt and Chain Lighting. Other options provide interesting choices but just don’t replace these two in terms of damage and utility.
Firebolt Enchantment allows all of our damage to apply Burning. This makes the faster hit of ball Lighting stack Bruning up very quickly as well as enables the Devouring Blaze Passive for increased Critical Strike Damage.
Chain Lightning Enchantment provides a good bit of Mana Sustain when paired with a well-rolled Recharging Aspect. Additionally, when we get into the Paragon Boards, we get further Mana Sustain and a fairly regular Vulnerable trigger as well from Static Surge. It’ll also be the main way we trigger Accelerating Aspect as well, for the rare times Unstable Currents isn’t active.
Aspects
We’ll cover the Aspects recommended for maximizing the build’s potential. We’ll also suggest which gear slot you should look to place them in.
All Aspects listed with an asterisk (*) next to them are temporary Aspects to round out the build until the desired Uniques are gotten.
 Gravitational Aspect
Gravitational boosts the damage of Ball Lightning, while also making it more reliable by having it orbit us instead of traveling in a straight line. This grant us far more control over its damage and drastically improves its DPS.
We’ll place this on our Amulet, as its the most consistent boost of damage we have.
Accelerating Aspect
Accelerating increases our Attack Speed when we Critically Strike with a Core Skill. Thankfully we’ll have two different Core Skills going off during Unstable Currents. Additionally, we’ll also trigger this with the Chain Lightning Enchantment often as well.
We’ll place this on one of our weapons, as we don’t need to boost it and it won’t be something we have 100% uptime on outside of Unstable Currents.
Conceited Aspect
Conceited boosts our damage when we have a Barrier. This makes Ice Armor an on-demand damage boost, on top of any barrier we get through Lightning Spear triggering Protection during unstable Currents.
We’ll place this on one of our weapons, as we don’t need to boost it and we also won’t have high uptime on.
Aspect of Control
The Aspect of Control is an aspect we can use for some extra damage that works well in combination with the Raiment of the Infinite Unique Chest.
We’ll place this on our Gloves, with out non-unique ring slot being claimed by Recharging, this is the only place we have left to place this.
Recharging Aspect
Recharging Aspect restores Mana for each bounce of Chain Lightning. Through Unstable Currents and the Chain Lightning Aspect, this grants us plenty of extra Mana Sustain.
We’ll place this in one of our Rings, as Rings are the only slots that can support Resource Aspects.
Prodigy’s Aspect*
Prodigy’s Aspect restores mana each time we use a Cooldown. You’d think with similar wording to Protection that Lightning Spears would just be constantly filling our Mana up during unstable, but sadly they don’t. It does however add more utility to Flame Shield, Ice Armor, Ice Blades, and Teleport.
We’ll temporarily place this in one of our Rings, as only Rings can support Resource Aspects. We’ll drop it once we get Tal Rasha’s Iridescent Loop.
Charged Aspect
Charged Aspect increases our Movement Speed when we collect a Crackling Energy. Since we use Crackling Energy to help with Mana Sustain already, this fits well into the build. Alternatively, you can opt for Ghostwalker which offers a bit more consistency when not fighting enemies.
We’ll place this in our Boots, as it’s the only remaining slot that can hold Mobility Aspects.
Aspect of Concentration
The Aspect of Concentration grants us Damage Reduction when we cast any Conjuration. Since we use Ice Blades to manage our Cooldowns already,
We’ll place this in our Helmet or Pants. This keeps us from having to move it later. You could also use it in your Chest until we get Raiment of the Infinite.
Mage-Lord’s Aspect
Mage-Lord’s adds additional Damage reduction for each close enemy when we have Vyr’s Mastery as a Key Passive. This results in a great defensive boost when we dive into a pack with Teleport combined with the Charged effect offered by Vyr’s Mastery.
We’ll place this in our Helmet or Pants, just so we don’t need to move it later. It could be placed in your Chest of Pants if you don’t mind swapping it around later.
Wildbolt Aspect*
Wildbolt Will periodically pull enemies close to us, almost like a discount Raiment of the Infinite. Instead of a Stun, however, they take slightly increased damage.
We’ll temporarily place this in our Chest, as the Unique effects we gain from Raiment of the Infinite outweighs the bonus this grants.
Unique Items
We’re only going to talk about the few that offer the strongest effects on the build. While others help, these are the ones you want to slot into your build if you get the chance. These can drop as early as World Tier 1, but some are restricted to only drop in World Tiers 3 and 4 respectively.
Raiment of the Infinite
The Raiment of the Infinite is a Unique Chest Armor that grants a ton of damage bonuses. It also has the Unique Effect that using Teleport will group enemies on top of you and Stuns them, which supports Ball Lightning very well.
Tibault’s Will
Added in Season 2, Tibault’s Will is a pair of Unique Pants that increase our damage while Unstoppable and a short duration after. They additionally restore our mana when we gain Unstoppable (does not count if we reapply it while it’s still active), which helps to alleviate most of our Mana concerns thanks to Teleport.
Tal Rasha’s Iridescent Loop
Added in Season 2, Tal Rasha’s Iridescent Loop is a Unique Ring that has many valuable stats for the build, including Cooldown Reduction which normally is not found on rings. It’s Unique effect also increases our damage for each type of Elemental damage we deal, which we deal a minimum of three between Ball Lightning, the Firebolt Enchantment, and Ice Blades.
Crown of Lucion
Added in Season 5, the Crown of Lucion is an exceptionally powerful Helmet that will grant a significant portion of Resource Cost Reduction. In addition to this, each time we cast any skill that spends our Mana, it will gain x25% Damage, however, the Cost Reduction will also be reduced by 25%, and this effect can stack up to 5 times.
Additionally, all of the stat are great for us, as even though we’re not focused on a Core Skill, Unstable Currents will cast them for us.
Paragon Boards and Glyphs
These two endgame options are part of the Paragon System which is available starting at level 50.
Paragon Boards
Paragon Boards are a feature that becomes available at level 50. These boards allow us to spend the Paragon points we earn for leveling and Renown to strengthen our character. Each of these has a single Glyph Slot to place a glyph of our Choice.
Starter Board
Like all starter boards, this one offers generic damage and defenses.
As usual, we’ll path up the right side through Elementalist to our Glyph Node, then continue up the left side through Elemental Balance and head to the next board. We’ll also want to grab the Dexterity next to the Glyph Node, and path through the four Dexterity nodes on the left side for our Glyph. We can also spend a couple of extra points to grab Erudite as well.
Static Surge
Static Surge allows us to gain a way to apply Vulnerable and some extra Mana Sustain by using the Chain Lightning Enchantment and Unstable Currents. We’ll additionally grab some Elite Damage here as well.
Rotate the board so that Overwhelming is in the bottom right. We’ll path straight up to the Incapacitate cluster for its damage and Dexterity bonuses. Then we’ll grab our Glyph Node and the nearby Dexterity for for out Glyph. From our previous path, we’ll path over and up to Static Surge, then path through the Overwhelming Cluster as we head to the right side gate.
Burning Instincts
Burning Instincts only offers us a Glyph Node, but we can take advantage of the Damage to Burning and Damage Reduction from Burning thanks to the Firebolt Enchantment.
We’ll rotate the board so that out Glyph Node is in the upper left. We’ll path straight up to the Glyph Node, taking the Dexterity along the way. Then we’ll grab the Smoldering Embers cluster before wrapping under the Glyph Node to grab a bunch of Dexterity on our way to Cinders before heading to the upper gate.
Later on, we can come back to pick up Kindling but only the Rare node and Elite Damage. We can also grab the Safeguard cluster for added defenses against Elites.
Frigid Fate
Frigid Fate offers us some nice bonuses against Vulnerable Enemies, both dealing more Vulnerable Damage and taking less damage from them.
We’ll rotate this board so that Oppressive is in the lower left. We’ll path straight up to our Glyph Node, pathing through as much Dexterity as we can for our Glyph. We’ll also grab Chilling as well for access to its Dexterity nodes and Weakness as it’s on our way out to the left gate. We can also grab the Damage Reduction of the Guarded cluster on our way out as well as the defensive nodes of Oppressive at a later time.
Enchantment Master
Enchantment Master is primarily just a Glyph Node, but we also get some generic Damage and Defenses from it as well.
Rotate the board so that the Glyph Node is in the upper right. We’ll path through the Elemental Balance cluster on our way to the Glyph Node itself. Then we’ll take the Erudite cluster and some extra Willpower nodes below it for our Glyph. Then head out the upper gate.
Searing Heat
Searing Heat is another Glyph Node, but we can squeeze a bit of extra Fire REsistance out of it as well.
Rotate the board so that the Glyph Node is in the lower right. We’ll path through the Ashes cluster to our Glyph Node, taking one of the Dexterity nodes in the cluster as well. Then we’ll head up and grab the three Dexterity nodes directly above our Glpyh Node before heading to the right side gate.
Elemental Summoner
Elemental Summoner is just another Glyph Node, but we get some generic defenses and a bit of extra damage for Ice Blades and Lightning Spear as well.
Rotate the board so that Keeper of the Elements is in the top right. We’ll path along the top side toward our Glyph Node, taking every Intelligence node along the way. From our Glyph Node, we’ll quickly just grab the rare nodes Erudite and Conjurer for their Intelligence as well. Then we’ll also grab the four Intelligence nodes just to the right of the Glyph Node to better support our Glyph.
Glyphs
Each of our Paragon Boards has a Glyph Slot, where we can socket one of our Glyphs. These Glyphs provide powerful bonuses that can be leveled up by completing Nightmare Dungeons to increase their power. Below are the Glyphs we recommend and what board to place them on.
Unless stated otherwise, all glyphs below will be required to be Level 15 to activate their effects with our Paragon setup.
Control
Control increases our damage dealt to Crowd Controlled Enemies for every 5 Dexterity allocated in range. With 25 Dexterity allocated in range, we’ll deal increased damage to enemie that are Slowed or Chilled, or a larger bonus to Stunned or Frozen Enemies.
We’ll place this on our Starter Board, as it has a lot of conveniently placed Dexterity to easily activate this glyph fully.
Flamefeeder
Flamefeeder increases our damage against Burning Enemies for every 5 Dexterity allocated in Range. With 25 Dexterity allocated in range, we gain a further multiplicative damage bonus against Burning Enemies.
We’ll place this in Static Surge, as the Glyph Node has plenty of convenient Dexterity thanks to the Incapacitate cluster.
Destruction
Destruction increases our Critical Strike Damage for every 5 Dexterity allocated in range. With 25 Dexterity allocated in range, Critical Strikes against an enemy grant a stacking multiplicative damage increase to that enemy.
We’ll place this in Burning Instincts, as it has the most Dexterity of any of our boards and we’ll take every bit of it to boost our damage.
Exploit
Exploit increases our Vulnerable Dmage for every 5 Dexterity allocated in range. With 25 Dexterity Allocated in range hits against a Vulnerable enemy apply a stacking multiplicative Damage increase to that enemy.
We’ll place this in Frigid Fate, as our pathing through the glyph area in combination with th Chilling Cluster gives us more than enough Dexterity to activate the glyph fully.
Reinforced
Reinforced increase the effects of allocated Rare Nodes in range, in this case granting us increases to Non-Physical Damage and Resistance. With 25 Willpower allocated in range, we’ll gain 15% Damage Reduction while we have an active Barrier.
We’ll place this Enchantment Master, as the base effect provides a nice bonus to generic damage and defenses, while the Erudite Cluster and the nearby Willpwoer make it very easy to active the bonus effect.
Territorial
Territorial increases our damage against Close Enemies for every 5 Dexterity allocated in range. With 25 Dexterity allocated in range, we gain additional Damage Reduction against Close Enemies.
We’ll place this in Searing Heat, as the Ashes cluster and the small cluster of Dexterity above our Glyph Node make this easy to activate.
Adept
Adept increases the damage of our Mastery Skills for every 5 Intelligence allocated in Range. With 40 Intelligence allocated in range, It increases the AoE of our Mastery Skills.
We’ll place this in Elemental Summoner, as it has plenty of Intelligence in range to boost the glyph and the clusters don’t offer much worth grabbing to allow further stacking.
Leveling Order
If you want to play this build from level 1, the next segment of this build guide is for you. Below you will see the exact leveling order in which you should acquire your skills and passives to maximize damage and overall performance.
| Levels | Icon | Skill | Purpose |
|---|---|---|---|
| 2-3 | | Firebolt | Basic Skill taken to progress further into the tree. Used as an Enchantment in final build. |
| 4-6 | | Chain Lightning | Upgraded to Greater Chain Lightning and used as main skill until Ball Lightning. Also used as an Enchantment in final build. |
| 7 | | Devastation | Taken for access to Elemental Dominance later. |
| 8-10 | | Teleport | Early Mobility, Upgraded to Shimmering Teleport for Damage Reduction. |
| 11-12 | | Ice Armor | Upgraded to Enhanced for Mana Regeneration. |
| 13-15 | | Flame Shield | Upgraded to Shimmering for Movement Speed and Life Recovery. Apply Chain Lightning Enchantment |
| 16 | | Align the Elements | Great single-point passive for reducing Elite damage. |
| 17-19 | | Protection | Grants Barrier when using any Cooldown. |
| 20-22 | | Ball Lightning | Upgrade to Wizard’s Ball Lightning for Crackling Energy. |
| 23-25 | | Mana Shield | Increased Damage Reduction from spending Mana. |
| 26-27 | | Unstable Currents | Ultimate Skill, upgraded to Prime Unstable Currents for Attack Speed. |
| 28 | | Coursing Currents | A great single-point passive that allows for more consistent Critical Strikes. |
| 29-31 | | Electrocution | Reduces incoming damage from enemies we Critically Strike. Apply Firebolt Enchantment |
| 32 | | Static Discharge | Helps generate additional Crackling Energy for invigorating Conduit. |
| 33-35 | | Invigorating Conduit | Restores Mana when collecting Crackling Energy. |
| 36 | | Vyr’s Mastery | Key Passive, Increases our damage to Close Enemies as well as reduces damage taken from Close Enemies. |
| 37-39 | | Elemental Dominance | Increased Damage with Ball Lightning |
| Respec | | Chain Lightning | Remove Chain Lightning’s Upgrades to be placed in Ball Lightning. |
| 40-41 | | Ball Lightning | Finish maxing Ball Lightning. |
| 42-44 | | Glass Cannon | Increases Damage. |
| 45 | | Elemental Attunement | Critical Strikes can reset our Defensive skills like Ice Armor. |
| 46-48 | | Conjuration Mastery | Increases our damage during unstable Currents. |
| 49 | | Inner Flames | Taken to Reach Devouring Blaze. |
| R1-R3 | | Devouring Blaze | Huge Critical Strike Damage Boost. |
| R4-R6 | | Ice Blades | Upgrade to Summoned Ice Blades for Cooldown Reduction. |
| R7-R10 | | Teleport | Max Teleport for heavily reduced Cooldown. |
To learn how to maximize your damage in Diablo 4, consult with our guide on that topic. Learning how to deal the highest possible damage with your build is crucial to succeeding in the Endgame and highest tiers.
This concludes our Diablo 4 Sorcerer Build focusing on the Ball Lightning skill. You can find more leveling and endgame Diablo 4 builds here on VULKK.com to try new things with your characters and spice up your gameplay.


