
Seneschal Constructs are a new companion that will aid us in Season 3 of Diablo 4. This guide breaks down their abilities and the best way to use them.
Unlocking Seneschal Companions
Seneschal Companions are unlocked during the Seasonal Storyline. This means our seasonal character will need to be in a Post-Campaign state to gain access to them. This can be done by either completing the Campaign if it’s our first character or by Skipping it if we have another character that has at least finished the game’s Prologue.
The Seneschal Companion is earned during the ‘The Ennead’ quest, as part of the Seasonal Storyline. This is fairly early into the quest line and can be reached quickly. This will give you access to the Seneschal Cnstruct for most of your adventure.
What is a Seneschal Companion
Seneschal Companions are part of Diablo 4’s seasonal mechanics for Season 3. Once unlocked we’ll have a companion that will aid you in battle. This highly customizable companion can provide various effects to us or deal damage to our enemies. This is done through the use of Governing and Tuning Stones.
Governing Stones
Governing Stones control what abilities our Seneschal Construct can use. There are a total of 12 Governing Stones, which fall into three rough categories: Melee, Ranged, or Support. Below is a list of their effects.
| Name | Type | Effect |
|---|---|---|
| Autodefense | Support | Creates an Antimaterial Field around the Construct, blocking all Non-Boss and Non-Player Projectiles. |
| Bushwhack | Melee | Quickly Amushes multiple targets. May Strike the same target multiple times. |
| Firefly | Ranged | Deploys an explosive construct that explodes 3 times, dealing damage in an area. |
| Flash of Adrenaline | Support | Grants us bonus damage for a short duration. |
| Focus Fire | Ranged | Channels a ray of fire at targets, dealing damage over time. |
| Gyrate | Melee | Whirls its legs around dealing damage in an area around it. |
| Impale | Melee | Performs a line attack in the direction its facing. |
| Lightning Bolt | Ranged | Launches a Bolt of Lightning at a target. Arcs to nearby targets, dealing less damage to secondary targets. |
| Protect | Support | Materializes a protective Barrier on you, equal to a portion of your Maximum Life. |
| Reconstruct | Support | Channels a healing beam on you, Healing your for a portion of your Maximum Life over time. |
| Slash | Melee | Strikes enemies in front of the Companion. |
| Tempest | Ranged | Electrically charges an enemy, dealing damage to it and surrounding enemies each second. Tempest spreads on death and increases in duration as well as damage each time it spreads |
Tuning Stones
Tuning Stones modify the skills granted by Governing Stones. These can change their damage type, make them be used more frequently, or even add powerful supportive effects to them. There are a total of 27 Tuning Stones, including two incredibly rare and powerful ones referred to as Fabled Tuning Stones. Their effects are listed below.
| Name | Effect |
|---|---|
| Arcing Support | Supported Skills can hit additional enemies. |
| Bleeding Support | A portion of the supported skill’s damage is dealt as Bleeding Damage over Time. Bleeding Enemies take increased damage from all sources while moving. |
| Breaking Support | Damage from the supported Skill instantly destroys barriers. Has a Chance to also apply Vulnerable for 2 seconds. |
| Burning Support | A portion of the supported skill’s damage is dealt as Burning Damage over Time. The Companion deal bonus Critical Strike Damage to Burning enemies. |
| Devastation Support | Increases Critical Strike Damage of the supported skill. |
| Duration Support | Increased the duration of the Supported Skill. |
| Dusk Support | A portion of the supported skill’s damage is dealt as Shadow Damage over Time. Non-Boss Enemies afflicted with this DoT have a chance to have their attacks interrupted. |
| Efficiency Support | You gain Critical Strike Chance when hitting enemies targeted by the supported skill. |
| Electrocution Support | A portion of the supported skill’s damage is dealt as Lightning Damage over Time and has a chance to Stun. |
| Fortify Support | You gain Fortify when the supported Skill is used. Slower Abilities grant more Fortify. |
| Frigid Support | A portion of the supported skill’s damage is dealt as Cold Damage over Time and Chills. |
| Gripping Support | Damage and effect applied to distance enemies will pull; them to the construct. This effect has a cooldown per enemy |
| Initiative Support | The Companion will teleport to its target if out of attack range. This effect has a cooldown. |
| Mockery Support | Damage done by the support Skill Taunts enemies for a short duration. This effect has a cooldown per enemy. |
| Multishot Support | Supported Projectile Skill have additional Projectiles. |
| Piercing Support | Supported Projectile Skill will pierce multiple enemies. |
| Poison Support | A portion of the supported skill’s damage is dealt as poison Damage over Time. This poison has a chance to spread to nearby enemies each second. |
| Registered Damage Support | All damage dealt by the supported Skill is stored and released a Fire Damage when the target dies. |
| Resource Support | You recover Primary Resource when the support Skill first deals damage. |
| Safeguard Support | Gain Damage Reduction when the support skill is used on you. |
| Seeking Support | Supported Projectile Skills will home in on targets for a short duration. |
| Slowing Support | Damage from the support skill will Slow enemies for a short duration. The Slow is stronger the closer the construct is to the target. |
| Swift Support | Increases Attack Speed of the supported skill. |
| Tactical Support | Decreases the cooldown of the supported skill. |
| Voluminous Support | Increases the Area of Effect of the supported skill. |
| Evernight | Grants +4 to all Skill Levels for 2 seconds when supported skill is used. |
| Genesis | Increases the effect of the supported Skill by 150%. |
How to Equip Your Seneschal Companion
The Seneschal Companion UI can be accessed from the Character menu (Default: C). With the Character menu open, click the Seneschal Companion section under your Equipment.

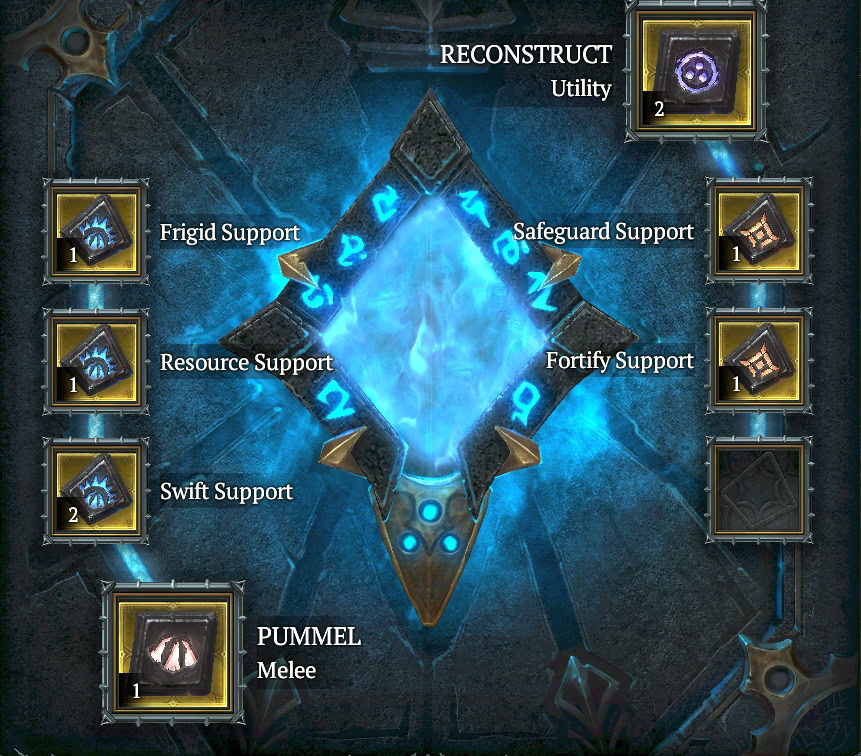
This opens the Seneschal UI, replacing your Equipment with the current equipped Governing and Tuning Stones. This is split in half between each skill, with one Governing and Tuning Stone set in the lower left, and the second in the upper right.
Here you can move your Governing and Tuning Stones from the lower section of the Seneschal UI to the slot you want to place them in. You can also instantly equip the Governing and Tuning Stone with the Right Mouse Button (RMB), and they’ll fill the first open slot available. Selecting an already equipped option will unequip it instead, but will not replace another equipped stone.

Keep in mind, that you only get one copy of each Governing and Tuning Stone. Any duplicates are automatically converted to EXP for the existing copy, even when maxed.
This means you’ll need to plan out your Governing and Tuning Stone for maximum effectiveness. This is especially important for Tuning Stones, as many skills of the same category will want to use to same Tuning Stone Combinations
Companion Skill Combos
With hundreds of thousands of combinations available, there are options to support every build. We’ll be able to customize the setups to our needs, but some more general options immediately stand out and can support a variety of builds. Below are those combinations and how they broadly apply to various builds.
Support Combos
These combos aren’t focused on dealing damage, but instead buffing or protecting us. As such, these are more broadly applicable to the Support category of Governing Stones.
Duration + Safeguard + Tactical
The combination of Duration, Safeguard, and Tactical does two things for us, Maxmizes the uptime of the supporting Skill, while also granting damage reduction. We expect this to be the go-to setup for the Flash of Adrenaline, Protect, and Reconstruct skills. These skills effects have a low duration but very useful effects, so having more uptime on them and making them stronger will always be a safe bet.
Duration + Tactical + Voluminous
Much like the previous Combination, this increases the skill’s overall uptime, while Voluminous increases its Area of Effect. This is a great setup for Autodefense, as it’ll create a wider safe zone that protects us from ranged attacks. This will be a great supportive choice for melee builds to let them safely close the distance, or for ranged builds to have a safe zone to take out ranged enemies from.
Fortify + Safeguard + Tactical
This combination sacrifices a bit of uptime by dropping Duration in favor of Fortify. However, this creates a powerful defensive boost. When paired with Protect you get three different layers of protection on just one skill.
Tactical + Duration + Genesis
This option drop Safegaurd in favor of the late-game option of Genesis, making the supported skill even stronger. This allows for a very powerful supportive skill with high uptime. It’ll work best with Flash of Adrenaline, Protect, and Reconstruct. This allows for a high boost of damage, high consistent healing, or a highly protective Barrier. It cna also support Auto Defense, but the benefit of that is much lower.
Breaking + Fortify + Swift
This setup is directed more at damage skills. This makes it so that each time your Seneschal Companion hits enemies, it’ll remove Barriers and grant you Fortify. This applies to every damage skill, but works best for Lightning Bolt and Gyrate.
Resource + Initiative + Swift
This combination turns our choice of Melee attack into a Primary Resource battery. The combination of Initiative and Swift makes the Construct Attack faster and teleport to its target if it is out of range. This allows it to remain on its target and keep supplying us with our Primary resource. This works best with Gyrate and Slash as they are the fastest. This is less effective for Bushwack, as it can be a lengthy attack.
Evernight + Initiative + Swift
This is another setup for damage skills, particularly the melee options. This aims to maintain the effect of the Evernight Tuning Stone, so we have that bonus to our Skill levels constantly. Initiative removes the need for the Seneschal Companion to walk to a target to start the attack, while Swift makes it faster. This will be a good option for Gyrate, Impale, and Slash. Bushwhack can also use this but likely may need to swap Initiative for Tactical.
Offensive Combos
These focus more on offensive utility, either weakening enemies or increasing our damage directly or indirectly. These will only work for damaging skills.
Arcing/Voluminous + Swift + Any Element
These combinations are meant to spread the various DoT effects that builds can use to increase their overall DPS. This primarily will use Bleeding, Burning, Dusk, Frigid, and Poison as many builds can gain boosts from these ailments.
Which skill you use will determine the first support choice, but the goal is to hit as many enemies as possible as often as possible. This makes it easy to apply and maintain these effects that not only deal damage but can boost our damage. This works best with Gyrate and Lightning Bolt, and a similar setup is featured in our Alchemical Blades Flurry Rogue Build Guide, which instead uses two Elements.
Multishot + Registered Damage + Seeking
This is a combination for Ranged Skills that allows them to quickly build up damage resulting in high-damage explosions when we defeat the enemies it hits. Multishot and Seeking work together to ensure more of the projectiles hit the same target when there are fewer, or hit more targets when there are many. This will be a strong option for Focus Fire and Lightning Bolt.
Arcing + Swift + Burning
Burning is one of the better damage options for supports, regardless of skill as it will consistently boost the damage dealt by the construct. This works well for any Ranged or Melee Governing Stone.
Swift + Efficiency + Burning
This combination allows for quick attacks that have a higher Critical Strike Chance, as well as Burns the enemy, allowing for the Seneschal Companion to deal increased damage. Much like the other DPS combinations
Swift/Burning/Genesis + Efficiency + Devastation
This combination is another that works for both Melee and Ranged skills, increasing their damage through Critical Strikes. Efficiency increases the enemy’s chance to take Critical Strikes, while Devastation increases the Construct’s Critical Damage.
Swift allows the Seneschal Companion to hit faster, but you can opt for Burning instead, for even more damage. Genesis is a late-game option that will heavily increase the Seneschal Companion’s damage output
That’s all we have on the Seneschal Companions currently. This guide may be expanded and updated with further testing later on.


