This Last Epoch Mage Build focuses on the Fireball Skill, utilizing a high cast speed and multiple projectiles for high damage output regardless of the Mastery chosen.
The build will be shown below with the skills and passives for a Level 50+ character but will include detailed leveling and passive choices for each mastery
As a Cycle Starter Build, this has a very low reliance on Unique, Legendary, or Set items and can easily get away with just Exalted Items in the endgame. However, it can be made stronger with the addition of those items. This makes it a great option as a first character in a new Cycle, Last Epoch’s term for Season.
Build Overview
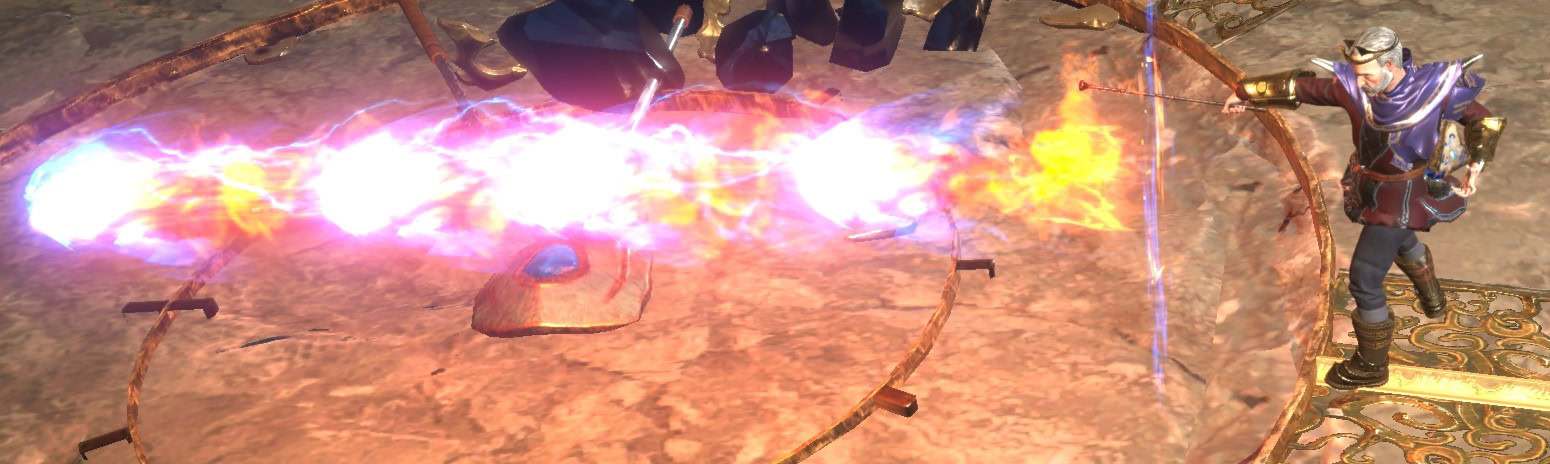
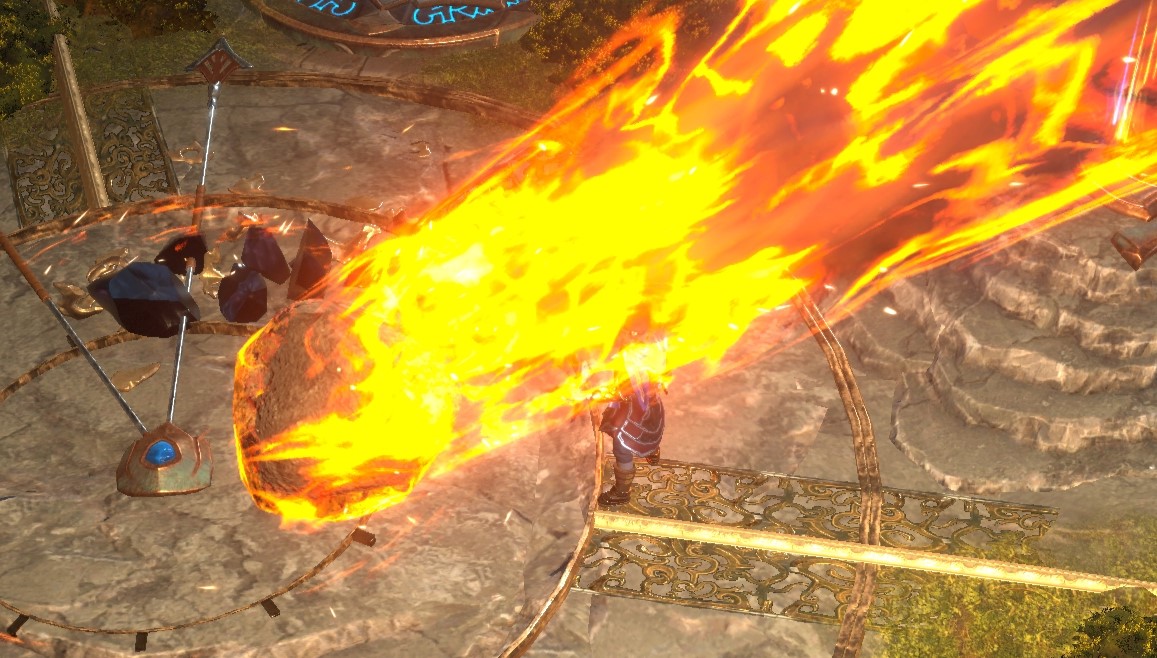
Fireball is a fantastic spell that deals great damage in most situations, as well as handling the campaign with ease. It’ll be our main damage source unless we decide to transition to a different build. We’ll still have Volcanic Orb for very high burst damage as a second damage skill.
These two core offensive skills will be backed by the defensive power of Flame Ward and the utility of Teleport. Flame Ward is set up to not only be a huge defensive window but also give us huge burst damage during its effect. Teleport is mainly used for mobility, but will also provide a good amount of Resistances, Armour, and Damage as well.
Our final Skill and Specialization can vary, depending on our Mastery choice. The prime candidates for this slot are Meteor and Flame Reave. Of these two, only Meteor is restricted to any one Mastery, while any Mastery can use Flame Reave.
Skills and Specializations Breakdown
In this section, we’ll cover the Skills as well as the Specializations used in the build. Occasionally, more skills than the specialization limit are shown. If a Skill doesn’t have a Specialization Tree shown, then it is used as an Active Skill without one. This typically happens most with Utility skills.
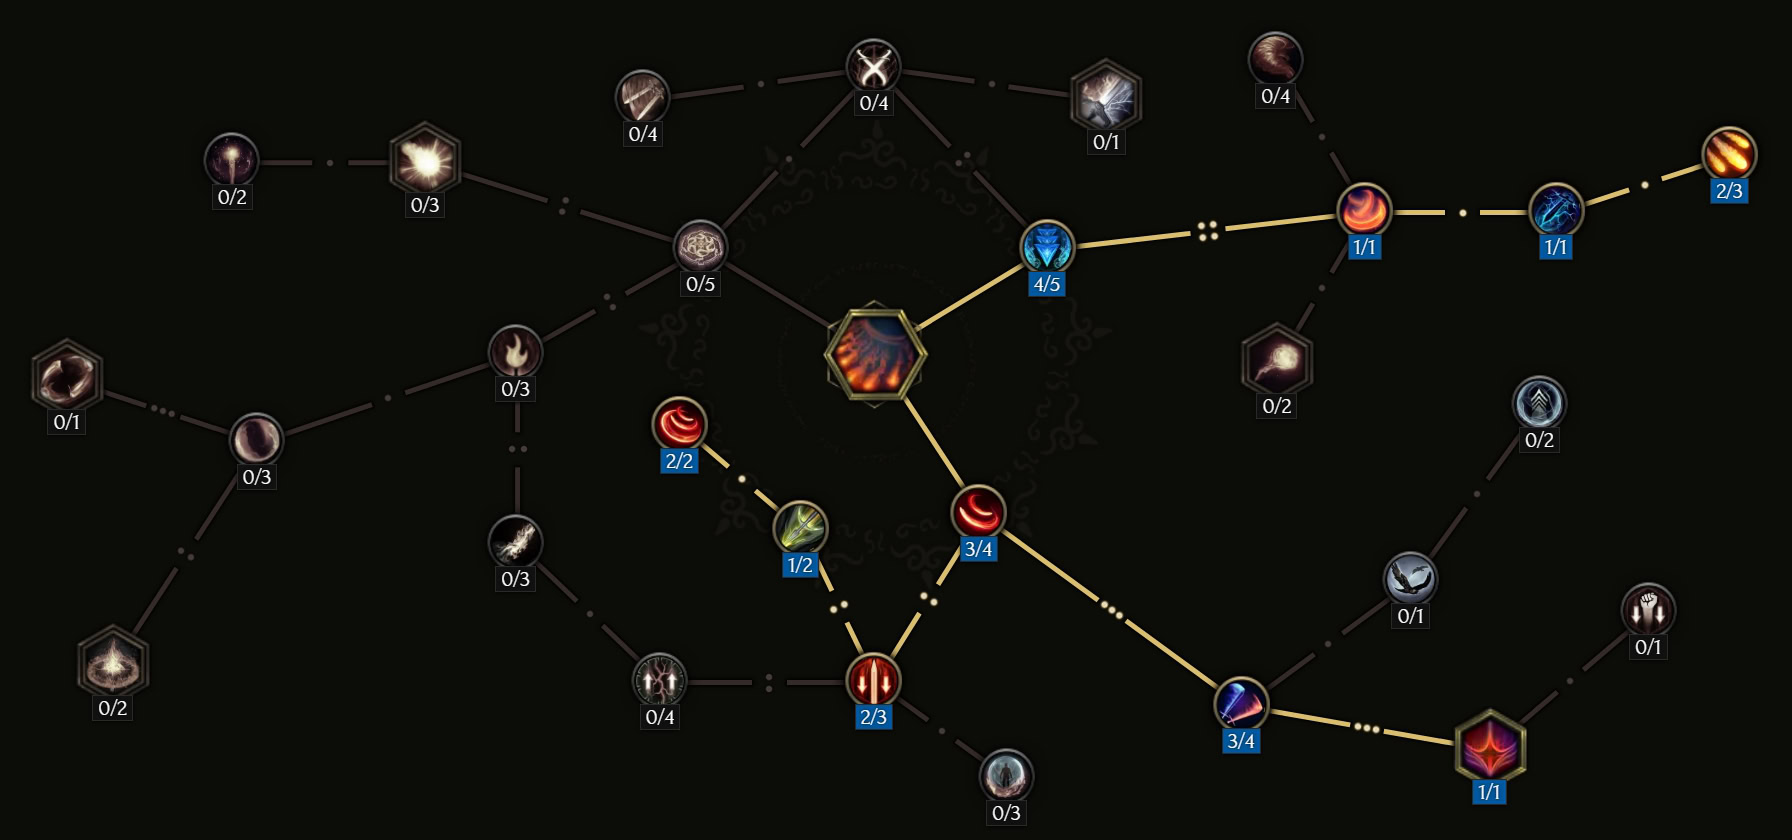
 Fireball
Fireball is our main damage skill, which we’ll upgrade to be effective at both Single-Target and AoE damage. This is achieved through a combination of the Embers, Piercing Heat, and Flame Burst upgrades.
When the base 20 Skill points are allocated as shown below, Fireball will deal four instances of damage that can reduce Fire Resistance. Each Fireball can pierce, while the whole line hitting a target will trigger Flame Burst for extra damage and AoE.
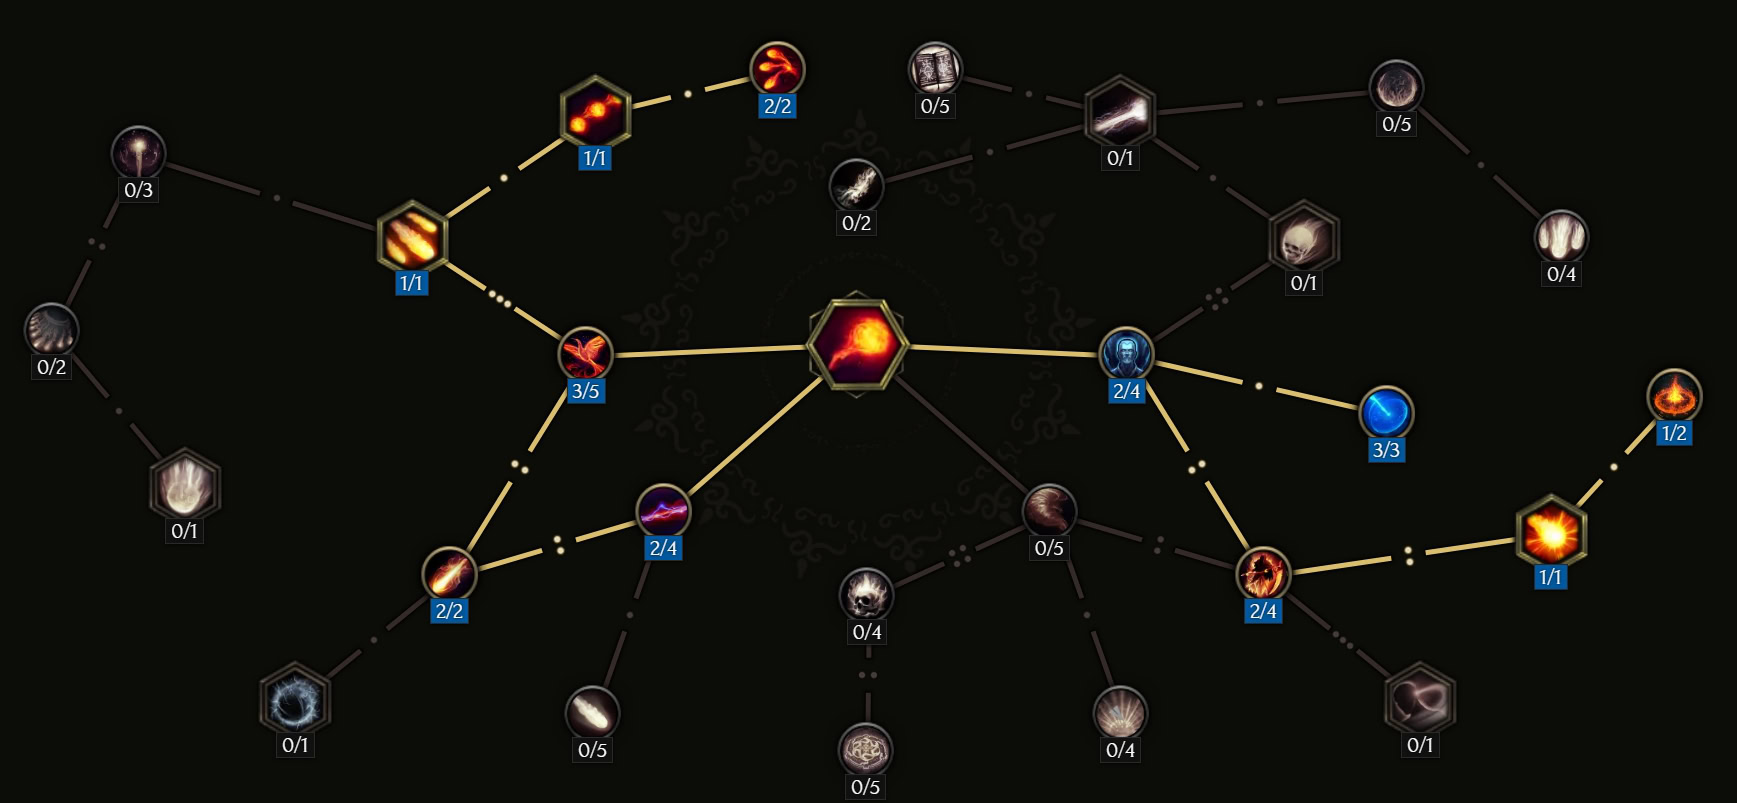
We want to prioritize maxing Mana Sphere early on, it will keep Fireball’s mana cost and make it free for a good part of the early game.
Next, we’ll grab two points in Piercing Heat, so we’ll have a decent chance to pierce for some AoE. Then we’ll take the minimum points in Winged Fire to pick up Fire Spray.
Next, we’ll make our way down to Flame Burst, taking one point in Volatile Flames so it will trigger more consistently. Then we’ll grab Embers and max Dancing Fire so Flame Burst will trigger every cast if an enemy survives all four fireballs. Then we can spend the remaining points on Orb of Destruction for the base Critical Chance increase.
When we get items that allow for extra levels, we’ll want to max Immolated Core. This offers the greatest damage potential in combination with Flammability due to the combination of Fire Penetration and Fire Resistance Shred.
Level
Passive
Points
Current/Max
1
2-4
5-6
7-9
10
11
12-13
14
15
16
17-18
19-20
21-25
Adept
Mana Sphere
Piercing Heat
Winged Fire
Fire Spray
Adept
Flammability
Flame Burst
Volatile Flames
Embers
Dancing Fire
Orb of Destruction
Immolated Core
1/5
3/4
2/4
3/5
1/1
2/5
2/4
1/1
1/2
1/1
2/2
2/2
5/5
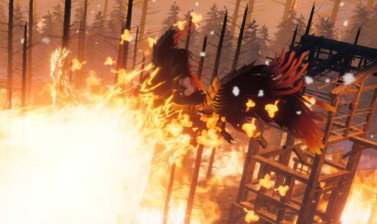
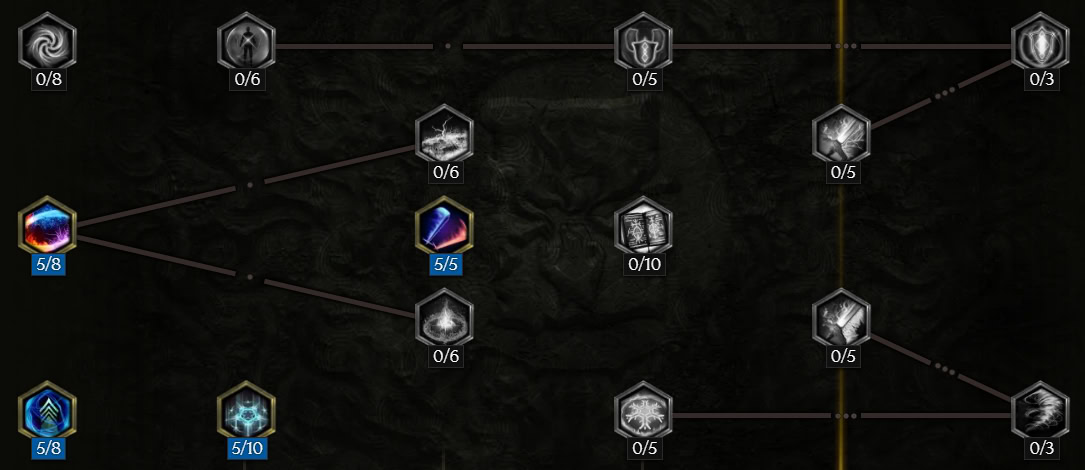
Volcanic Orb
Volcanic Orb is a powerful skill that we use to quickly stack any ailments or trigger other on-hit effects. We’ll be aiming to increase the damage it deals as it passes through enemies, rather than focusing on a single large burst at the end of its travel. This is done by putting focus into boosting the damage of the core and shrapnel components of the skill.
When the base 20 Skill Points are allocated as shown below, Volcanic Orb will be a low-cost option for high burst damage and an easy way to apply ailments via its Shrapnel.
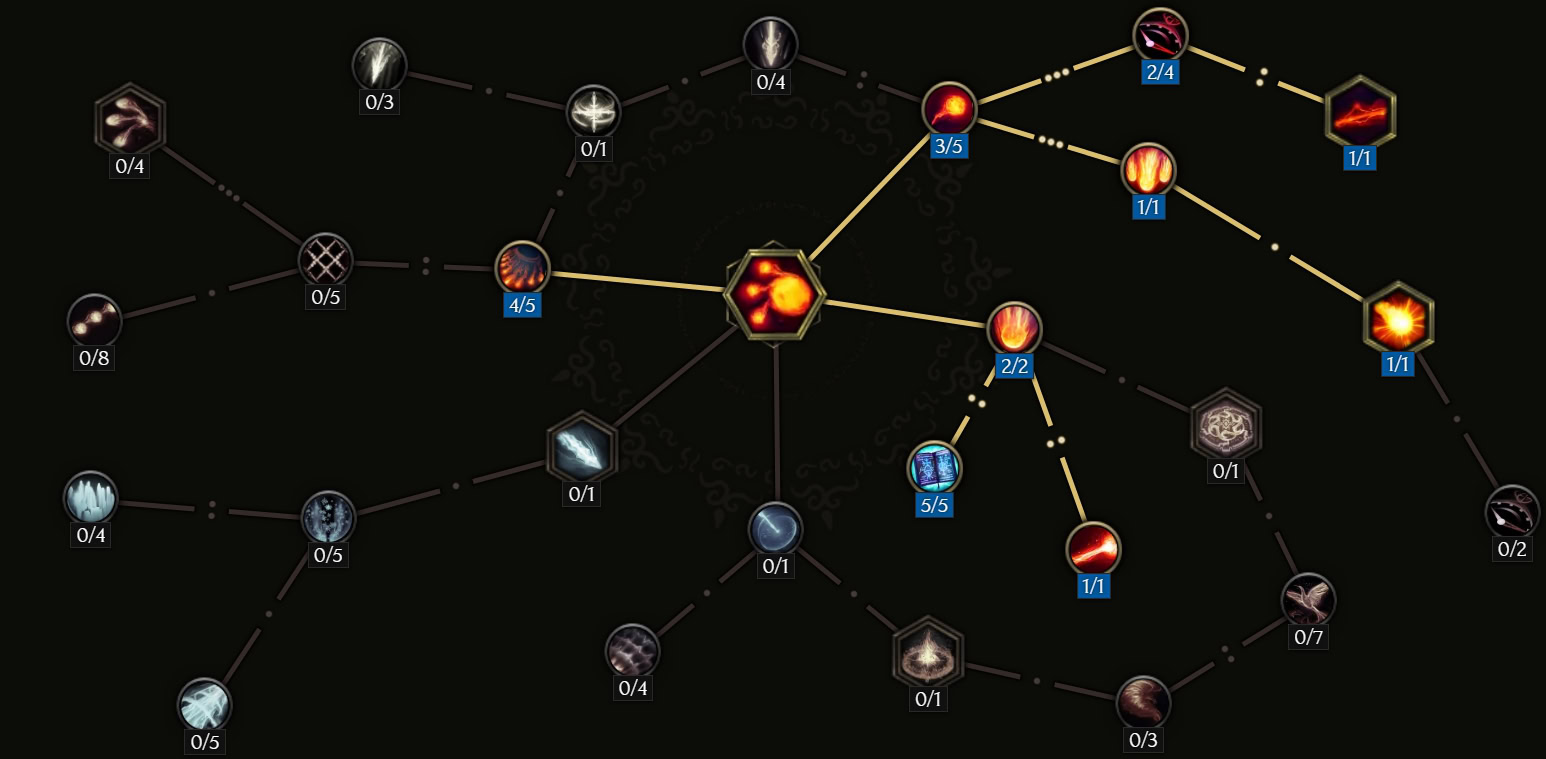
We’ll start by maxing out Monolithic Eruption to boost damage and grant us access to Lava Flow. We max Lava Flow, which lets us drastically reduce its cost freeing up our mana pool for Fireball casts. Then we’ll grab Piercing Embers, so all Shrapnel will always pierce for some AoE power and points in Volatile Emission for more Shrapnel. We’ll then take a few points in Molten Core to access other nodes and make our way to Concentrated Effect. Following this we’ll round it off by taking Infernal Caster and Explosive Ground which unfortunately increases our mana cost back to normal.
With optional extra levels from Affixes, we can drop Concentrated Effect, Volcanic Frenzy, Infernal Caster, and Explosive Ground to move the points towards Eruption and Dense Orb. This enables us to get greater damage from the Shrapnel in addition to its main benefits and stronger burst if we can detonate the orb on top of a large enemy.
Levels
Passive
Points
Current/Max
1-2
Monolithic Eruption
2/2
3-7
Lava Flow
5/5
8
Piercing Embers
1/1
9-12
Volatile Emissions
4/5
13-15
Molten Core
3/5
16-17
Volcanic Frenzy
2/4
18
Concentrated Effect
1/1
19
Infernal Caster
1/1
20
Explosive Ground
1/1
Respec
Ash Pelting
1/5
Respec
Eruption
4/8
21-24
Dense Orb
4/4
25
Eruption
5/8
Teleport
Teleport offers great mobility and utility through lingering effects on its Specialization Tree. We’ll use those lingering effects to improve our damage and defenses.

The Specialization Tree for Teleport enables and extends the bonus for using Teleport. As a result, we’ll have 8 seconds with increased Armor, Stun Avoidance, Elemental Resistances, and Elemental Damage.
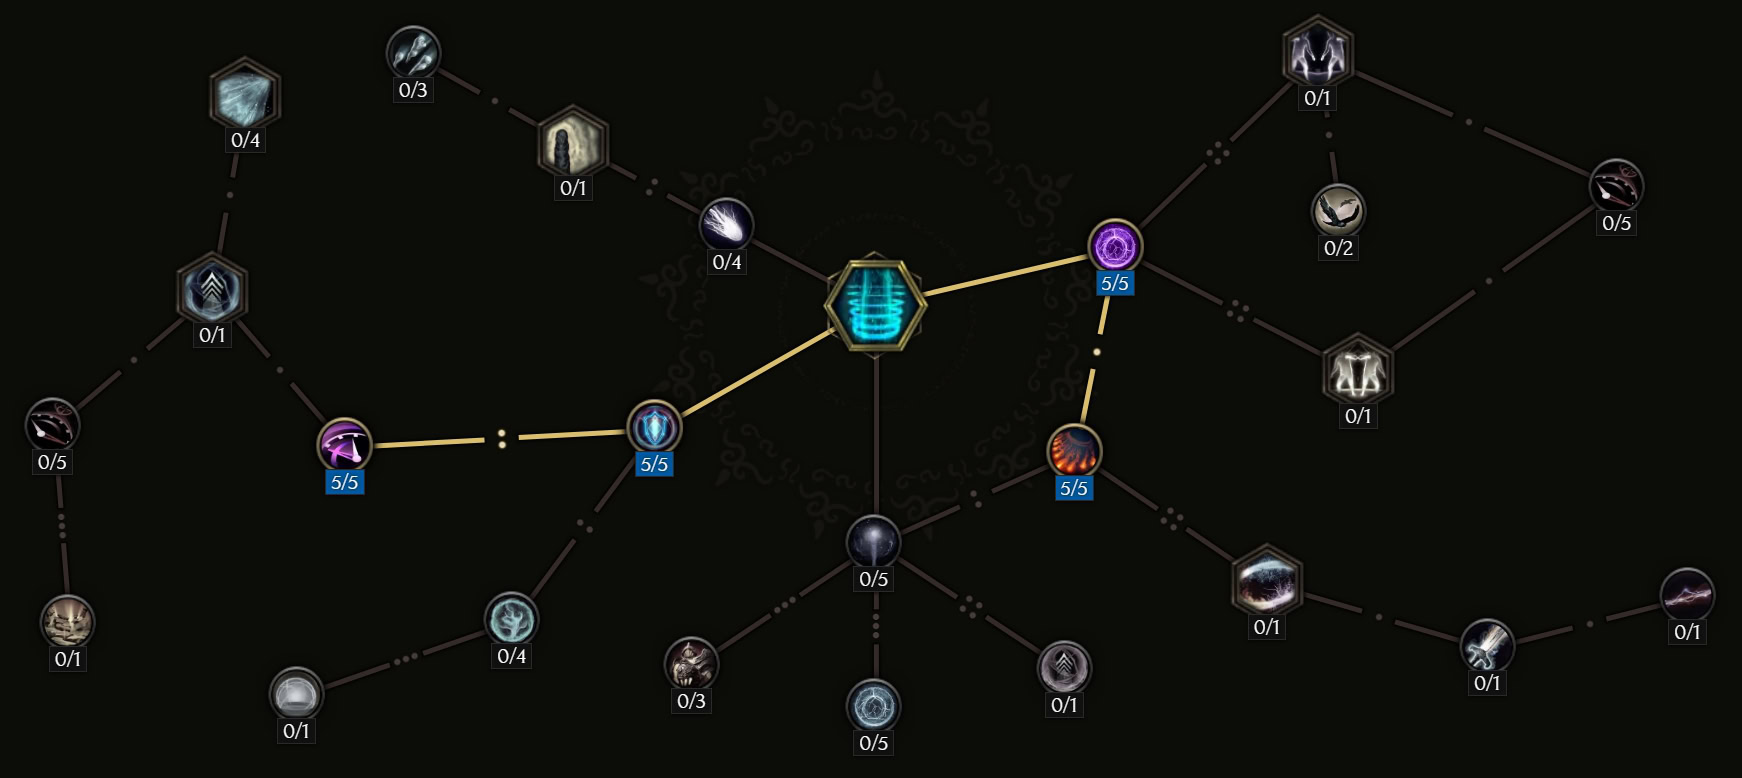
We’ll want to make our way to Time Dilation and max it first, taking the minimum points in Crystalline Passage to reach it. Next, we’ll take a point in Resonant Plasma to each Elemental Affinity and max that. Then we’ll round off by maxing Crystalline passage and Resonant Plasma. There’s no need to get additional levels for this skill.
Levels
Passive
Points
Current/Max
1-2
3-7
8
9-13
14-16
17-20
Crystalline Passage
Time Dilation
Resonant Plasma
Elemental Affinity
Crystalline Passage
Resonant Plasma
2/5
5/5
1/5
5/5
5/5
5/5
Flame Ward
Flame Ward is a strong defensive skill that will heavily reduce incoming damage while granting a huge chunk of Ward each time we use it. We’ll even be able to use it offensively as well, increasing our burst damage potential.

Flame Ward becomes an extremely potent defensive skill with Specialization granting a ton of mitigation to both Hit and Elemental Damage. Combined with our other defenses, most attacks will barely break the Ward granted by the skill, let alone our Health.
We’ll want to start by going for and maxing out Barrier and Prismatic Buffer, these powerful defensive buffs allow you to shrug off a lot of damage. Next, we’ll make our way up to Dual Aegis, which allows us a second use of the skill while the nodes leading up to it improve the Ward it provides. Then we’ll round the skill off by taking Dilation to increase its duration and Infusion to increase our Fire Damage even more.
Any further points we may get from Item Affixes can be put towards increasing the Ward the skill grants. Fortification would be ideal to reach, as it provides a flat bonus to the Ward granted by Flame Ward.
Levels
Passive
Points
Current/Max
1
Stalwart
1/5
2-6
Barrier
5/5
47-9
Prismatic Buffer
3/3
10
Concentrated Shielding
1/5
11
Desperate Defense
1/3
12-13
Fuel the Flames
2/3
14
Dual Aegis
1/1
15-16
Dilation
2/3
17-20
Infusion
4/5
21-22
Concentrated Shielding
3/5
23
Fortification
1/1
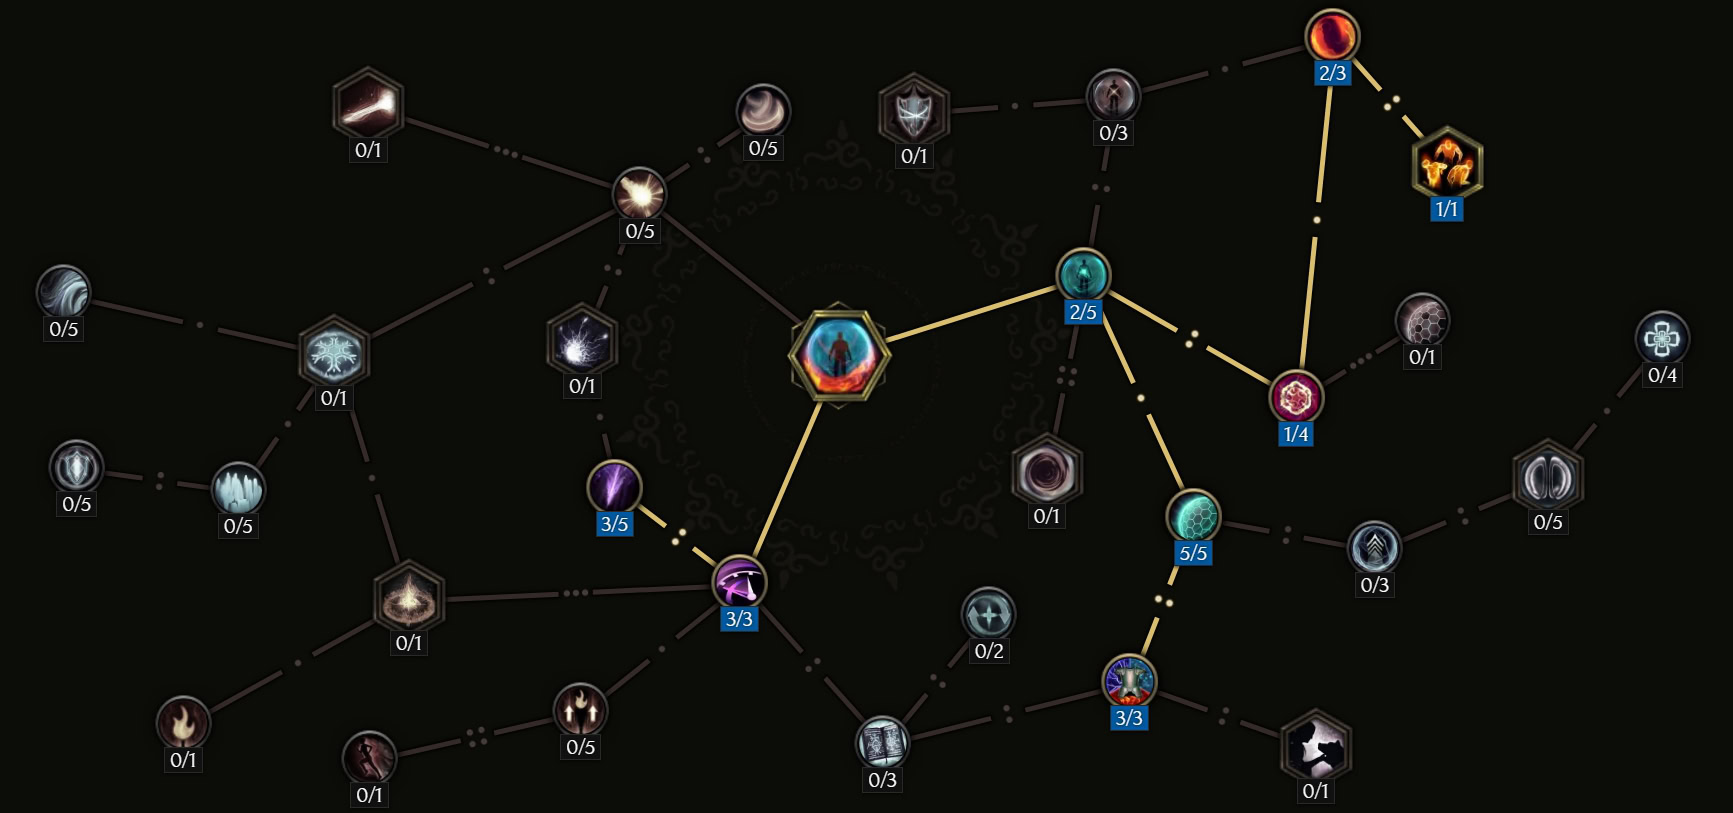
Meteor
Meteor is a skill we can use for damage, but the Sorcerer version of the build uses it for the Powerful Craterborn buff. This buff takes care of most of our Fire Penetration needs. With the addition of the Cycle of Fire buff on top, it allows us to sustain Fireball’s mana costs easily and allows it to generate Ward very easily.
The Specialization Tree for Meteor will make it a powerful buffing tool. We’ll still deal a good bit of damage so we’re not just dumping its huge mana cost just for the buffs it provides.
We’ll want to immediately pick up and max both Craterborn and Cycle of Fire. They provide a ton of power and utility to the build. Then we’ll go for Aftermath and max that as well, to reduce Meteor’s heft cost. Then we can round the skill off by investing into the Critical Stike section of the tree to give it more firepower.
If we happen to pick up additional points via Gear Affixes, we can dump them into Rapid Descent, so it’ll be more consistent for damage, but this is generally not necessary.
Levels
Passive
Points
Current/Max
1-5
6-8
9
10-12
13-16
17-19
20
21-25
Craterborn
Cycle of Fire
Force of Impact
Aftermath
Extinction
Astral Cataclysm
World Ender
Rapid Descent
5/5
3/3
1/5
3/3
4/4
3/3
1/1
5/5
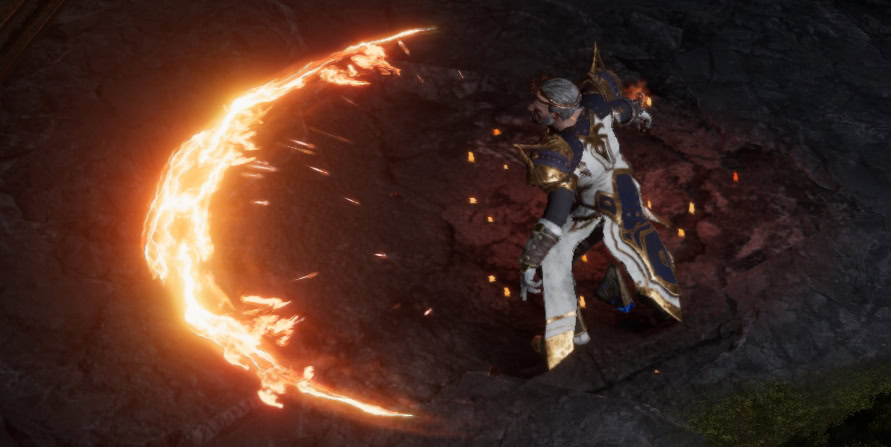
 Flame Reave
Flame Reave will fill a similar role as Meteor, though instead of providing buffs, it functions as an additional burst damage skill. However, we’ll need to place some early points in the Spellblade Passive Tree to gain access to this skill.
A big part of the synergy that Flame Reave has with Fireball is the Rhythm of Fire passive, which allows Fireball to increase the damage of Flame Reave dramatically.
We’ll want to start by putting points into Dancing Flames to reach Rhythm of Fire. Then we take Versatility to allow Fireball to stack Rhythm of Fire and two points in Accelerando allows it to fully stack off two Fireball casts.
Passive Trees
This section will cover each of the Passive Trees used by the build and the passives that benefits the build the most. We’ll list the rough leveling order here as well, in addition to the full leveling order in the leveling section at the end.
Mage Passives
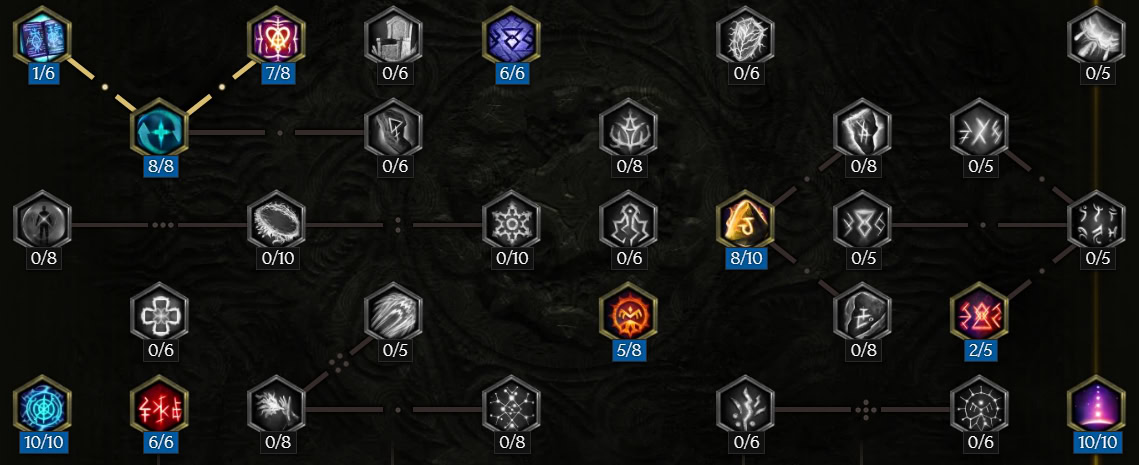
Below are the passives we get the most value out of from the Mage’s base Passive Tree.
Arcanist
Effect: +1 Intelligence and +3% Fire and Lightning Resistance per point.
Arcanist is a great all-rounder passive, giving us Intelligence for added damage and some Resistances to smooth out the early game.
Elementalist
Effect: 7% Increased Cold, Fire, and Lightning Damage per point.
Elementalist is a great passive, because it will always Fireball, even if we use Uniques or passives to change its base damage type.
Preparation
Effect: Every 3 seconds your next Elemental Spell deals increased damage and has a chance to slow. +20% Damage and Chance to Slow per point.
Preparation is great passive, as it tends to align very well with the timing of our burst damage spells. The added chance to Slow is a nice bonus as well, but not the main draw of the passive here.
Mage Flurry
Effect: +3% Attack and Cast Speed per point. At 3 Points, Teleport and Snap Freeze gain +9% Cooldown Recovery Speed.
Regardless of the Mage build, this passive is almost always good, as Attack and Cast Speed tend to be harder to fit on gear.
Point Order
We’ll want to start with Arcanist, taking at least 5 points to start. Many enemies and Bosses in the early chapters use Fire or Electric Damage, so this makes things overall safer. 5 points into Preparation is next, as since we cast at a slower speed, we’ll feel the effects every few casts and it makes a much larger difference to our early damage. Then we’ll take 5 points in both Mage Flurry and Elementalist to unlock our Mastery Trees.
Eventually, we’ll want to come back and max out Arcanist, as well as pick up Elementalist, Sun and Storms, and Silver Rune.
Passive
Points
Current/Max
Arcanist
5/8
Elementalist
5/8
Preparation
5/8
Mage Flurry
5/5
Sorcerer Passives
Sorcerer easily has some of the best passives to use with Fireball, being a caster-focused tree. The Passives marked with an asterisk (*) are only available if the Mastery is Primary Mastery.
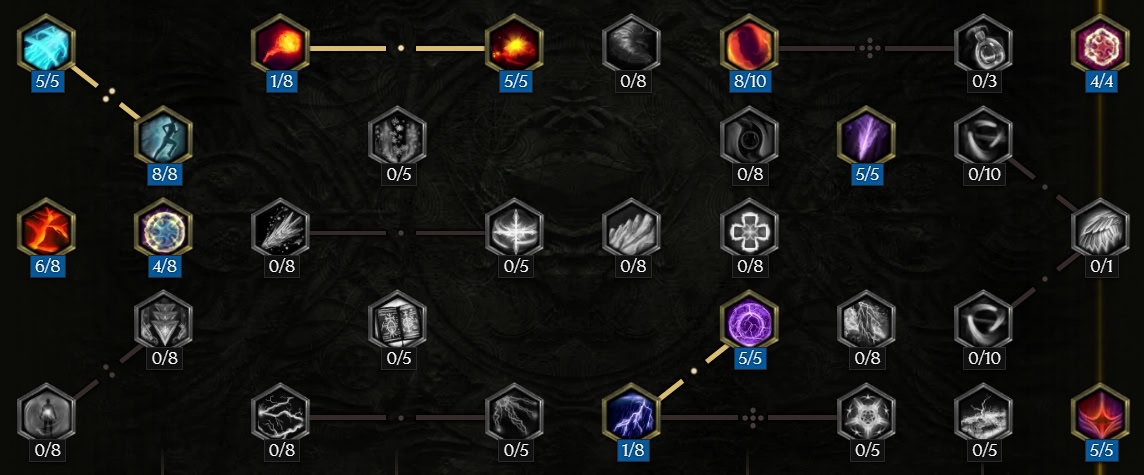
Arcane Momentum
Effect: +1 Maximum Stack of Arcane Momentum per point.
Arcane Momentum is a crazy powerful passive for a caster build like this one, giving a lot of ramping Cast Speed. Each Stack grants you an additional 5% Cast Speed as a base effect, and Essence of Celerity adds to the effects of each stack.
Calculated Destruction
Effect: +1 Intelligence per point. With 5 points, gain 3% Spell Critical Strike Chance per Intelligence.
Even as a base effect, Intelligence is a great way to improve our damage. Getting the bonus effect makes this passive exceptionally strong for caster builds. Gaining Increased Spell Critical Strike Chance for each point of Intelligence is insanely good.
Essence of Celerity
Effect: +10% Arcane Momentum Duration and +2% Spell Damage per stack of Arcane Momentum per point. With 6 points, grants 10% Movement Speed at max stacks of Arcane Momentum.
This heavily boosts the value of Arcane Momentum, as in addition to ramping Cast Speed, it now provides ramping damage as well. Combined with the stacks falling off slower, it greatly improves our damage.
Afterglow
Effect: +3% Increased Spell Damage and +3% Ward Retention per point. Effect doubled if a recently used skill (in the past 4 seconds) costs at least 40 Mana or started channeling and costs at least 8 mana a second.
Afterglow as a base effect is pretty great. Considering we’ll be able to trigger the doubling effect with Volcanic Orb, it’s great for windows of high burst damage.
Pyromancer
Effect: +6% Fire Damage and 3% Fire Skill Ignite Chance per point.
This passive can help a lot early on in the leveling and gearing process, but there are passives with much greater impact that do this job better. We’ll still always need a point in it to reach Lavamacer which is a much more noticeable impact on our damage and survivability.
Lavamancer
Effect: +3% Fire Penetration and +0.3% Fire Damage Leech per point.
Lavamancer is very helpful, as not only does it boost our damage, but the Leech also makes it significantly easier to survive. Since it’s Fire Damage Leech, we’ll also be able to leech from Ignites as well.
Crackling Precision*
Effect: +10% increased Critical Strike Chance per point, doubled for Lightning Skills.
Crackling Precision is a great passive to take as a Sorcerer, though is slightly outshone as a means of increasing Critical Strike Chance without the use of the Unique Gloves Liath’s Machination or the Plasma Ball passive granting the Lightning tag.
Arcane Obliteration*
Effect: +10% Critical Strike Multiplier per point.
As a crit-based build, this will always be useful for the extra damage it provides.
Arcane Insight*
Effect: +1 Intelligence and +5% chance to trigger Insight on hit.
Insight is a really solid buff for the build, providing increased damage and ward retention. We don’t need to max this, but the Intelligence makes it a great node to dump spare points into.
Spell Slinger*
Effect: +1 Spell Damage and +3% Mana Regen per point.
While the number doesn’t seem impressive, all flat damage gets scaled by our other damage bonuses, making it much stronger than you’d first expect. The Mana Regen is a nice bonus on top.
Archmage*
Effect: +1 Spell Damage per point, tripled with at least 200 Maximum Mana.
This node will make a similar impact on our damage to Spellslinger, then skyrocket our damage once we get over 200 Maximum Mana.
Recollection*
Effect: +5% Cooldown Recovery Speed per point.
This can be helpful for Flame Ward, giving us more frequent use of its effects. At max, it’ll knock around 3.5 seconds off the charge time of our fully upgraded Flame Ward.
Point Order
Below is the order in which the Sorcerer Passives should be allocated. All Passive after Lavamancer cannot be allocated unless you’re chosen mastery is Sorcerer.
Passive
Points
Current/Max
Arcane Momentum
5/5
Essence of Celerity
8/8
Calculated Destruction
8/8
Pyromancer
1/8
Lavamancer
5/5
Crackling Precision*
5/8
Arcane Obliteration*
5/5
Arcane Insight*
5/8
Spell Slinger*
5/5
Archmage*
5/5
Recollection*
4/4
Calculated Destruction
8/8
Arcane Insight
8/10
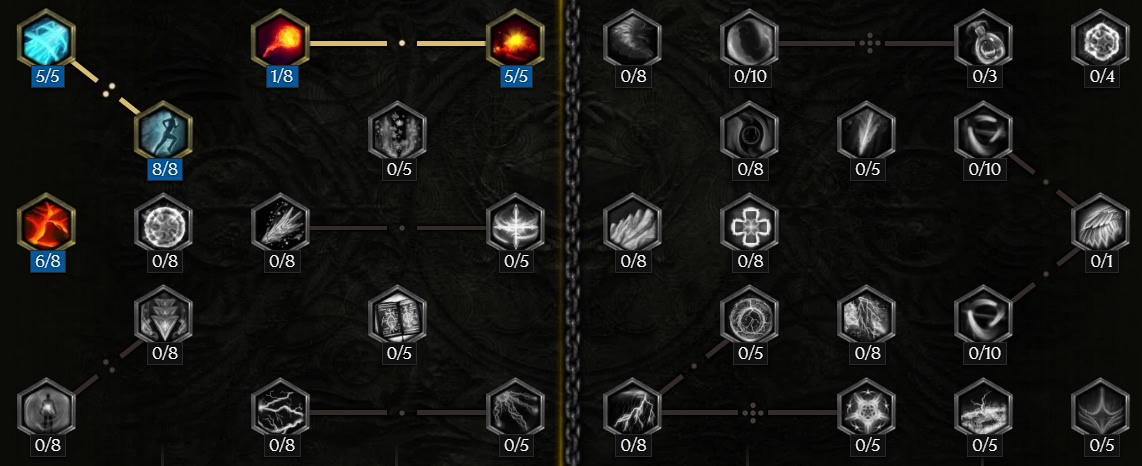
Runemaster Passives
Runemaster has a lot of exceptional passives that work for the build since Runemaster itself is also highly focused on casting. The Passives marked with an asterisk (*) are only available if the Mastery is Primary Mastery.
Quintessence of Triumph
Effect: +7% Increased Spell Damage per rank. With 7 points, 7% More Spell Damage when your Ward exceeds an enemy’s current Health.
This passive offers a ton of extra damage very early into your progression. The more multiplier included as a bonus won’t come online until endgame.
Arcane Focus
Effect: +1 intelligence per point and +4 Ward gain per cast per point.
Arcane Focus is a great node as it grants Intelligence which helps with damage and Ward Retention. It’s also a great source of Ward generation, whether you have Craterborn offered by Meteor to stack with it or not.
Runeword: Cataclysm
Effect: +12% Increased Critical Strike Chance. With 5 Points, trigger Runeword: Cataclysm on crit.
This is the highest Critical Strike Chance per point for the Mage class, unless you’re a Sorcerer using a Lightning Skill. The Runeword Effect grants a very nice damage bonus to help finish off low health enemies.
Transcendence
Effect: +12 Max Health per point. With 6 points, it grants 12 Ward per second or 36 per second if you have at least 60 Intelligence.
Health is always great for almost any build. The bonus Ward generation helps a lot for also triggering the bonus from Quintessence of Triumph.
Inscribed Instruments
Effect: +12% Critical Strike Damage with a Wand, +12% Ward Retention with a Sceptre, or +4% Cast Speed with a Staff per point.
With a Wand equipped, this becomes the best source of Critical Strike Multiplier for the build. This is on par with a high-tier Exalted affix for just a few Passive Points.
Decree of the Burning Ward*
Effect: +1% More Damage to Bosses and Rares per point. With 5 Points, this effect is doubled with an active Rah Rune or after passing through a Frost Wall.
At a base level this isn’t a bad bonus. In fact it’s very good as it’ll apply after your other sources of Increased Damage. If you’re playing as a Runemaster, you can double it just for having Runic Invocation on your bar.
Ancient Inscriptions*
Effect: +1 Intelligence per point. With 8 points, gain 1% Cooldown Recovery Speed per 4 Intelligence.
Intelligence is already good by itself, but layering additional bonuses on top of it just makes it all the better.
Runeword: Inferno*
Effect: +20% Chance to trigger Runeword: Inferno per point.
Runeword: Inferno is a pretty powerful buff to have available and is the Runemaster’s best answer to match Sorcerer’s Archmage passive. Just a couple of points get you a consistent uptime on a buff that grants +10 Spell Fire Damage.
Celestial Doom*
Effect: +1 Spell Damage per point. With 7 points, grain 7% More Spell damage and 28 Ward on hit when targeting a branded Boss or Rare enemy.
The Spell Damage alone makes this useful. however, the only brand we can reliably trigger without heavy investment is Brand of Deception from the passive tree, which simply requires us to use a Lightning skill in our final skill slot over the options.
Point Order
Regardless if we’re starting with Runemaster or another tree, we’ll want to max out Quintessence of Triumph first. Then we’ll max out Runeword: Cataclysm for the huge Critical Strike Chance bonus. Next, we’ll take a point in Unsealed Mana to reach and max out Arcane Focus. If this is a secondary tree, we’ll finish off by maxing Inscribed Instruments.
If you’re playing the build as a Runemaster, we’ll continue on to grab 5 points in Decree of Burning Wind for the added Boss Damage. We’ll move on to pick upAncient Inscriptions, taking 8 points to activate the bonus. Next we’ll grab 2 points in Runeword: Inferno to give a reasonable chance to trigger its effect. Finally, we’ll cap off by maxing out Celestial Doom for the base spell damage it proivides.
Passive
Points
Current/Max
Quintessence of Triumph
10/10
Runeword: Cataclysm
6/6
Unsealed Mana
1/6
Arcane Focus
8/8
Inscribed Instruments
6/6
Decree of Burning Wind*
5/8
Ancient Inscriptions*
8/10
Runeword: Inferno*
2/5
Celestial Doom*
10/10
Spellblade Passives
Spellblade is by far the worst option for Fireball, being more specialized toward melee skills. It does however grant easy Elemental Resistances, which takes pressure of your gear to cover it.
Elemental Affinity
Effect: +5% Elemental Damage and 3% Elemental Resistance per point.
This is great for the Elemental Resistances as it takes a not of pressure off of your gear in terms of trying to cap out your resistances. The Damage is just a bonus on top here.
Gearing and Affixes
In this section, we’ll cover the gear you’ll want to look out for, as well as the ideal affixes you want on them. The Affixes listed below are for non-unique and non-legendary Items, however, the ideal affixes are just as valuable when crafted onto a Legendary item of the same type.
Ideal Gear and Affixes
This section provides the ideal Item Bases and respective Affixes for the build. Be on the lookout for gear with two or more of the stats below. Ideal Exalted Affixes will be listed in CAPS. We’ll provide a loot filter below that will make this easier.
These affixes are valuable not only as individual Exalted items, but also as Legendary Potential for Unique Items.
Item Base
Crystal Wand
Prefix 1
Crit Multiplier
Prefix 2
Spell Crit Chance
Suffix 1
Shared Fire Penetration
Suffix 2
Cast Speed
Item Base
Crystal Skull
Prefix 1
Fire Damage
PREFIX 2
Spell Crit Chance
Suffix 1
Any Resist
Suffix 2
Any Resistance
(or Chance to Shock for Runemaster)
Item Base
Scrying Eye
Prefix 1
Levels to volcanic orb
Prefix 2
Spell Crit Chance
Suffix 1
Chance to Apply Fraility
Suffix 2
Any Resist
Item Base
Mystic Helmet
Prefix 1
Fireball Pierce Chance and Spell Damage
Prefix 2
Intelligence
Suffix 1
% Health
Suffix 2
Health
Item Base
Mystic Plate
Prefix 1
Levels to Fireball
Prefix 2
Flame Ward Charge
Suffix 1
% Health
Suffix 2
Health
Item Base
Eternal Gauntlets
Prefix 1
Speed
Prefix 2
Intelligence
Suffix 1
Hybrid Health
Suffix 2
Chance to Shred Armor
Item Base
Solarum Greaves
Prefix 1
Movement Speed
Prefix 2
Intelligence
Suffix 1
Hybrid Health
Suffix 2
Cooldown Recovery
Item Base
Spiderslik Sash
Prefix 1
Fire Damage
Prefix 2
Ward and Potion Cleanse
Suffix 1
Hybrid Health
Suffix 2
Health
Item Base
Coral, Opal, or Celestial
Prefix 1
Fire Damage
Prefix 2
Intelligence
Suffix 1
Health
Suffix 2
Any Resist
Item Base
Bone Amulet
Prefix 1
Crit Multiplier
Prefix 2
Crit Chance
Suffix 1
Chance to Shred Armor
Suffix 2
Any Resist or Health
Idol Affixes
This section will list the highest value Idol affixes for the build, as well as the Idol type(s) they can be found on.
Afix
Found On
Increased Fire Damage (Doubled >300 Mana)
Grand, Ornate, Adorned – Suffix
Spell Fire Damage
Huge – Suffix
Critical Strike Chance
Stout – Prefix
Mana
Grand – Prefix
Shared Fire Damage
Stout – Suffix
Any Resist
Any – Suffix
Armor
Any – Suffix
% Health
Any – Suffix
Unique and Legendary Items
Many endgame builds for Last Epoch will use one or several Unique or Legendary Items. The ones this build can get the most use out of are listed below alongside when they are the most useful.
Liath’s Machinations
These are great for the additional levels of Fireball, but they work even better when paired with the Plasma Ball passive to fully cover the skill to Lightning. This has even high damage potential than the base Fireball, but requires all Fire related affxies to be swapped to lightning.
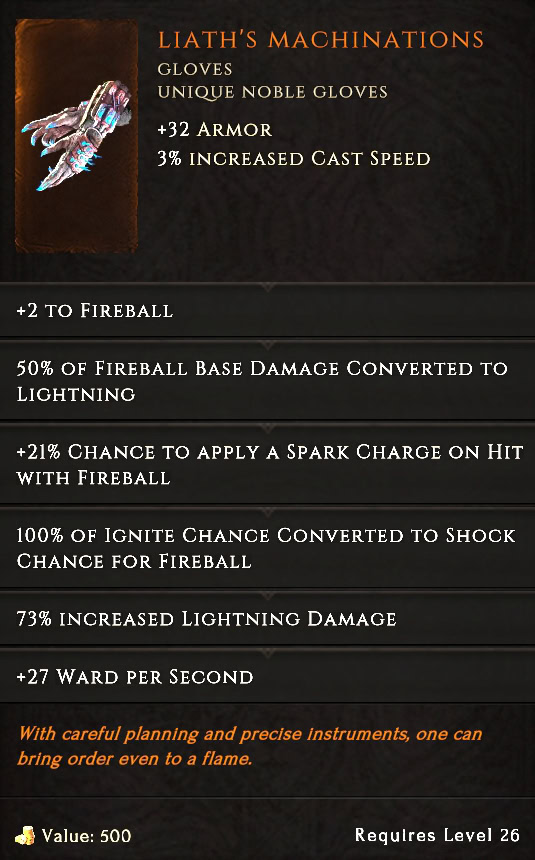
These shouldn’t be used until end game, and even then you’ll still want to get Legedary Potential on them. This would ideally let you pass on Cast Speed and Hybrid Health if you’re lucky
Cinder Song
Cinder Song offers a good boost of power for Fireball as it grant a ton of flat and increased damage. With Embers it will only gant one additional projectile, but that’s still an extra hit that deals full damage. The big upside to using this Wand is that it can free up the points spent on Mana Reduction for Fireball, or just make it entirely free.
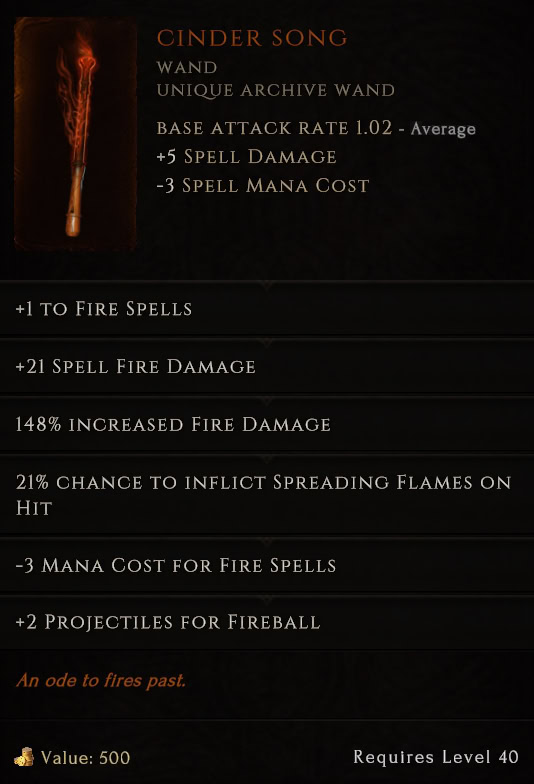
This can be used without Legendary Potential, but being able to move over the Critical Strike Chance for Spells, Critical Strike Multiplier, or Shard Fire Penetration affixes can make it absolutely insane, so long as you’re not also using Liath’s Machinations.
Calamity
Calamity is a great Unique Helmet for Leveling but falls off very quickly compared to what an Exalted Helmet would offer. For the early game though, it’s a nice boost of damage and cast speed.
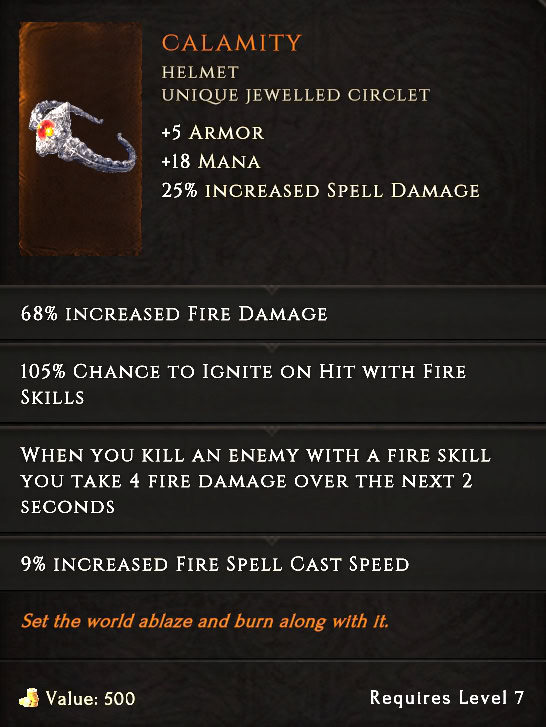
Do not bother trying to make this legendary. Replace it with a decent Rare or Exalted Helmet ASAP.
Prism Wraps
Prism Wraps are a great Leveling Body Armour that can last a good while before it starts to fall off. It offers the build a lot of useful stats, including reduced damage taken from Elemental hits, Elemental leech on Crit, and Increased Elemental Damage as well as Critical Strike Chance.
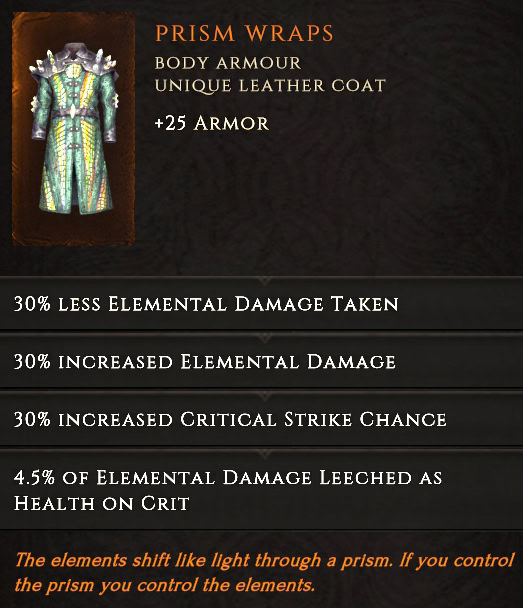
You’ll want to get a Body Armour with levels to Fireball and extra defensive stats ASAP. Don’t bother trying to make this legendary.
Avarice
These are perfect for leveling, giving you decent resistances as well as early leech. You’ll want to use these at least until you pick up the Lavamancer passive to have a source of easy leech.
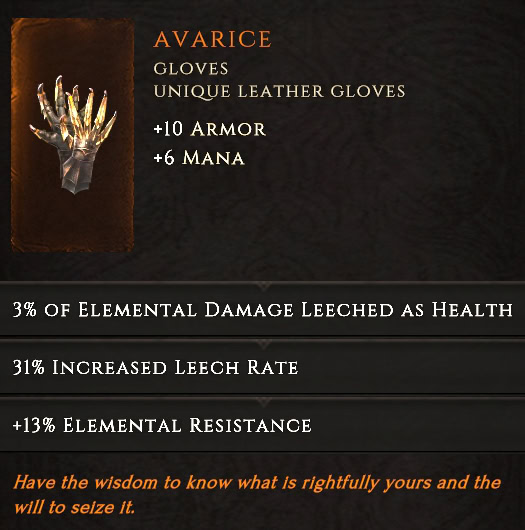
These cannot be gotten as Legendary, and should be replaced with decent Rare or Exalted Gloves after picking up Lavamancer.
Loot Filter
Below is a custom Loot Filter, designed to help you gear up this build from Level 1. This Loot Filter will make it much easier to identify great items without much thought. Below is quick rundown of what gets filtered and when.
You can download our Custom Loot Filter for this build by Clicking This Link.
- Items Always Shown
- Unique/Set/Exalted Items
- All Idols
- All items with Mage-specific Affixes
- Gear with 3+ of the Affixes listed in the Gearing section
- Preferred Exalted Affixes are EMPHASIZED
- Items Hidden
- All Normal/Magic/Rare not included in above filters
- Low Level gear, as better ones become available
- Toggle Options
- Hide all Normal/Magic/Rare items, to filter genetic items in the later stages
- Recolor options to show Class-Specifc drops for other classes, for Alts
Leveling Order
If you want to play this build from Level 1, this section is for you. Below is our recommended leveling order for the Passive Trees. The recommended leveling path for each skill is included above for each skill’s respective section.
Passive Points
| Passive | Tree | Sorcerer Points | Runemaster Points |
|---|---|---|---|
| Arcanist | Mage | 5/8 | 5/8 |
| Preparation | Mage | 5/10 | 5/10 |
| Mage Flurry | Mage | 5/5 | 5/5 |
| Elementalist | Mage | 5/8 | 5/8 |
| Elemental Affinity | Spellblade | 5/6 | 5/6 |
| Arcane Momentum | Sorcerer | 5/5 | 5/5 |
| Essence of Celerity | Sorcerer | 8/8 | 8/8 |
| Calculated Destruction | Sorcerer | 5/8 | 6/8 |
| Pyromancer | Sorcerer | 1/8 | 1/8 |
| Lavamancer | Sorcerer | 5/5 | 5/5 |
| Quintessence of Triumph | Runemaster | 10/10 | 10/10 |
| Runeword: Cataclysm | Runemaster | 6/6 | 6/6 |
| Unsealed Mana | Runemaster | 1/6 | 1/6 |
| Arcane Focus | Runemaster | 8/8 | 8/8 |
| Inscribed Instruments | Runemaster | 6/6 | 6/6 |
| Afterglow | Sorcerer | 4/8 | 0/8 |
| Crackling Precision* | Sorcerer | 1/8 | N/A |
| Arcane Obliteration* | Sorcerer | 5/5 | N/A |
| Spellslinger* | Sorcerer | 5/5 | N/A |
| Arcane Insight | Sorcerer | 8/10 | N/A |
| Archmage* | Sorcerer | 5/5 | N/A |
| Recollection* | Sorcerer | 4/4 | N/A |
| Decree of the Burning Wind* | Runemaster | N/A | 5/8 |
| Ancient Inscriptions* | Runemaster | N/A | 8/10 |
| Runeword: Inferno | Runemaster | N/A | 2/5 |
| Celestial Doom | Runemaster | N/A | 10/10 |
| Transcendence* | Runemaster | N/A | 7/8 |
All Skill Icons in this guide are sourced from Last Epoch Tools, a Last Epoch Database.
Last Epoch Starter Builds
This is a collection of builds for Last Epoch suitable for new characters and new players. These builds will show you how to start a new character from level 1 and develop it all the way to the endgame and beyond.
Last Epoch Chaos Bolts Warlock Starter Build
This Warlock Build focuses on the Chaos Bolts and Chthonic Fissure Skills, giving it a good mix of Damage over Time and direct hit damage.

Last Epoch Acid Flask Falconer Starter Build
This Last Epoch Falconer Build focuses on the Acid Flask Skill, which relies on dealing damage over time with Poison.
Last Epoch Javelin Paladin Starter Build
This Paladin Build for Last Epoch focuses on the Javelin Skill, utilizing its Holy Trail effect to create areas that deal high Damage Over Time.