This Paladin Build for Last Epoch focuses on the Javelin Skill, utilizing its Holy Trail effect to create areas that deal high Damage Over Time.
This Paladin build is made to take you from Level 1 to the endgame smoothly. It’s designed without Uniques in mind. Uniques, especially those with Legendary Potential can be used to push the build further and into endgame.
To show you how to play this build starting from Level 1, we have a leveling section at the end of this guide that details our recommended leveling path for Class and Mastery Passives.
Build Overview
Like many Leveling builds, this is a Damage Over Time centric build that utilizes Javelin’s Holy Trail upgrade for the bulk of our damage. We’ll be able to scale this fairly well with minimal investment, but it can also be made exceptionally strong with investment thanks to Path of Judgement.
We also Sigils of Hope which we use to scale the Holy Trail even farther via the Path of Judgement node. This will easily give us a high amount of Increased Healing Effectiveness alongside our passive tree to scale our damage up. We’ll be aiming to use Last Wish to maintain these passively, but we can manually cast them as needed, like when doing boss encounters.
We have Lunge as our main mobility, which will also be able to fire off additional Holy Trail Javelins on hit as well, so long as we use a spear. This allows us to ignore Javelin’s cooldown and get a second trail out for more damage. This also provides us with a nice Instant Kill Threshold to work with as well, speeding our time to kill a fair amount for bosses.
On the defensive side of things, we have Vengeance as a filler damage source. This is upgraded to provide substantial damage reduction, some Critical Strike blocking, and Fire Resistance Shred. It does a lot of work for how little we need to invest in it.
We’ll also be supported by Holy Aura, which will be providing a lot of our resistances for free, as well as some additional damage. The biggest thing we get is the high amount of Elemental Resistance, which makes it very easy to cap out on them with little investment. It also provides solid damage boosts, including some Fire Penetration which makes it easier for Holy Trail to deal more damage.
Skills and Specializations Breakdown
In this section, we’ll cover the Skills as well as the Specializations used in the build. Occasionally, more skills than the specialization limit are shown. If a Skill doesn’t have a Specialization Tree shown, then it is used as an Active Skill without one. This typically happens most with Utility skills.
 Javelin
This is our main damage skill, being scaled by the use of Holy Trail as the real main damage source.

Javelin’s Specialization Tree enables Holy Trail as well as buffs our Damage over Time. Path of Judgement allows us to scale Holy Trail through Increased Healing Effectiveness, which if we stack enough adds a ton of power to the DoT. The Specialization Tree also grants us a ton of free Lightning Penetration
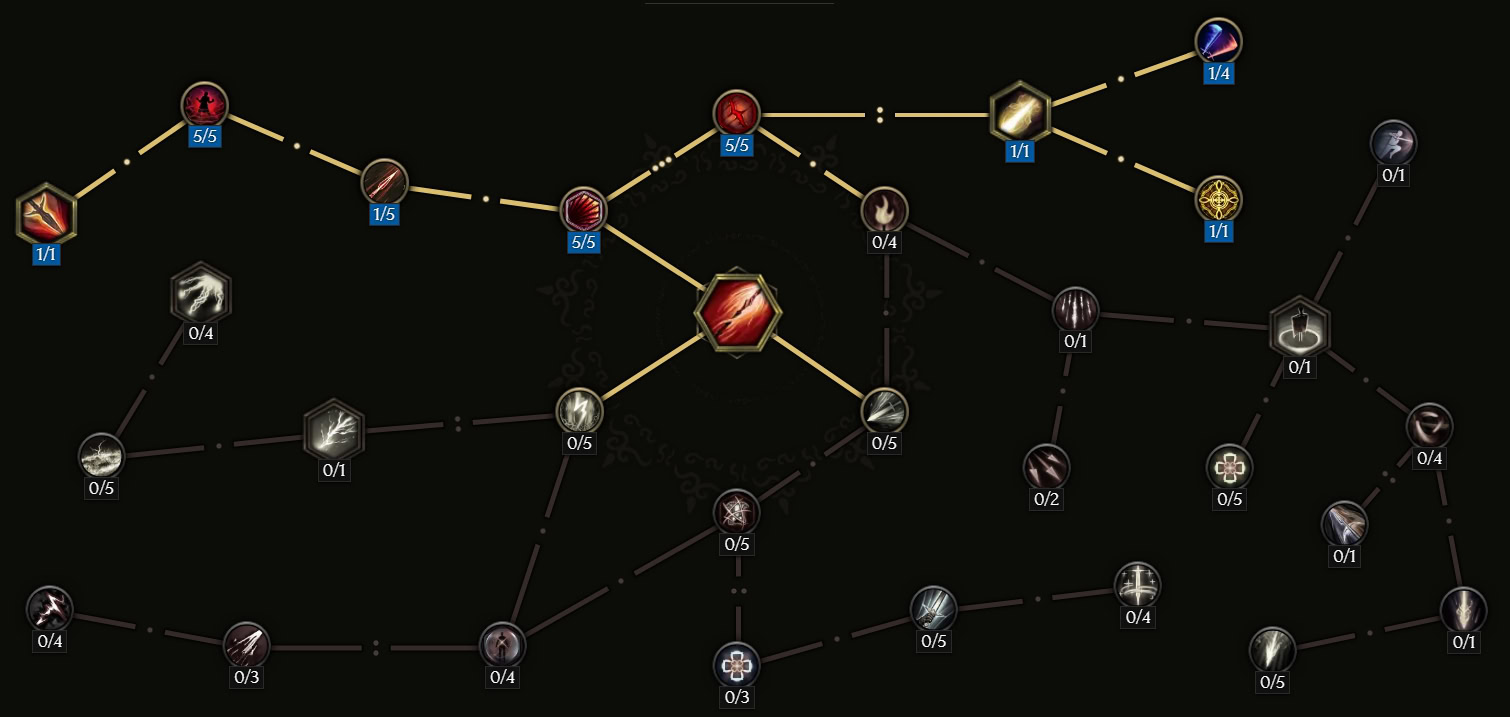
We’ll start by putting a point into Mighty Delivery and a point into Burning Strength. This lets us put two points into Spear to the Thigh sooner, which enables us to pick up Holy Trail and Path of Judgement sooner. We’ll take one point in Pilgrimage, so Vengeance can Ignite and Electrify between Javelins. Then we’ll max Spear to the Thigh for more damage out of Holy Trail. Next we’ll take 1 point in Go For The Legs, Keen Outlook, and Forceful Hurl. This gets us to Strategic Patience, another sizeable damage boost for our Holy Trail. Then we’ll round off the skill by maxing Forceful Hurl for the Lightning Penetration it provides and putting more points into Go for the Legs for the Slow effect to keep enemies inside the Holy Trail. We can also take the points out of Mighty Delivery and Burning Strength and move them into Go for the Legs.
Any points past 20 should be used to max out Pilgrimage for more DoT chance.
Level
Passive
Points
Current/Max
1
Mighty Delivery
1/5
2
Burning Strength
1/4
3-4
Spear to the Thigh
2/5
5
Holy Trail
1/1
6
Path of Judgement
1/1
7
Pilgrimage
1/4
8-10
Spear to the Thigh
5/5
11
Go for the Legs
1/5
12
Keen Outlook
1/5
13
Forceful Hurl
1/5
14
Strategic Patience
1/1
15-18
Forceful Hurl
5/5
19-20
Go for the Legs
3/5
Respec
Mighty Delivery, Burning Strength
0/5
Respec
Go for the Legs
5/5
21-23
Pilgrimage
4/4
 Lunge
Lunge
Lunge does three things for us: Mobility, Instant Kill Threshold, and more Javelins. While we’ll mainly use it to get around faster, it’ll throw javelins for as us we do making clearing content a breeze. The Instant Kill Threshold and extra Javelin cast are important for bosses early on, but we’ll only get the Extra Javelins while we use a Spear.

Since we’ll want to use a Spear early on, we’ll want to head to Pilum Assault as soon as possible to enable us to throw a second Javelin by using Lunge. Then we’ll want to get our Instant Kill Threshold and make our way to Unstoppable to avoid damage with it.
We’ll start by taking 1 point in Warrior’s Renewal and 2 points into Initiate’s Onslaught. Then we can take 1 point in Art of the Spear and Deadly Stab to take Pilum Assault. Now we’ll max Cull the Weak for that nice Instant Kill Threshold. Then we can move over and take 1 point in Dawn Charge and max Juggernaut Dash to pick up Unstoppable. From here, we can round off by maxing Endless Will before putting our remaining points into Dawn Charge.
When you swap a Staff later on, the three points spent in reaching Pilum Assault should be moved to max Dawn Charge and Warrior’s Renewal. This skill does not require additional Skill points.
Level
Passive
Points
Current/Max
1
Warrior’s Renewal
1/3
2-3
Initiate’s Onslaught
2/5
4
Art of the Spear
1/1
5
Deadly Stab
1/3
6
Pilum Assault
1/1
7-9
Cull the Weak
3/3
10
Dawn Charge
1/5
11-14
Juggernaut Dash
4/4
15
Unstoppable
1/1
16-17
Endless Will
2/2
18-20
Dawn Charge
4/5
Respec
Art of the Spear, Deadly Stab, Pilum Assault
0/1
Respec
Dawn Charge
5/5
Respec
Warrior’s Renewal
3/3
Holy Aura
Holy Aura provides us with a ton of passive bonuses like Resistances, Damage, and Health Regeneration. All of these can be doubled by activating the skill, and we almost reach 100% uptime on having them doubled if we get Increased cooldown Recovery where we can.
We’ll want to go for getting our defenses up first, since it’ll be a while until we can have high enough uptime to make the offensive nodes work well enough. This takes a ton of pressure off our gear as well, freeing up more Affixes for other useful rolls.
We’ll start by maxing out Shelter from the Storm, as elemental damage tends to be common early on. Next, we’ll put 2 points into Vital Boon so we can pick up Purification for the Poison Resistance and Clease on activation. Then we’ll max out Redemption for the extra Holy Trail Damage and healing. We’ll round off the skill by taking 1 point in Rahyeh’s Devotion which allows us to max Rahyeh’s Fury and max Burning Blows.
This Skill doesn’t require additional Skill Points. If you happen to have them, they can be spent in maxing Vital Boon and picking up Hope.
Level
Passive
Points
Current/Max
1-5
Shelter from the Storm
5/5
6-7
Vital Boon
2/4
8
Purification
1/1
9-12
Redemption
4/4
13
Rahyeh’s Devotion
1/3
14-18
Burning Blows
5/5
19-20
Rahyeh’s Fury
2/2
21-22
Vital Boon
4/4
23
Hope
1/1
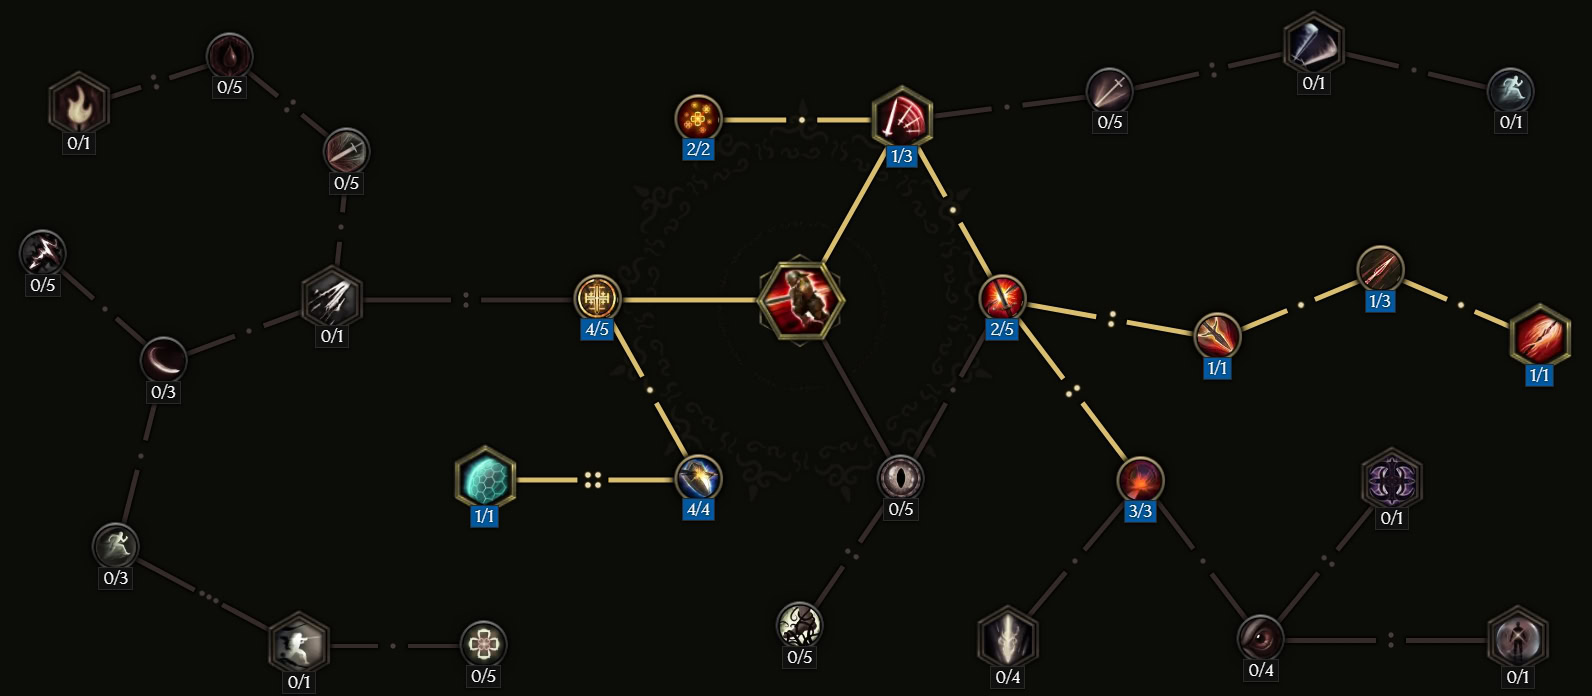
Sigils of Hope
Sgils of Hope give us a good bit of flat damage and some health regeneration by default. We’ll stack this with way more damage and extra Sigils to really push how much we get out of this skill.

Since we don’t pick up or use Cast Speed, getting Last Wish so we can generate and maintain our Sigils by defeating enemies is important. After that we’ll be increasing our maximum Sigil count to 5, getting Increased Healing Effectiveness and more duration for our Sigils along the way.

We’ll start by putting 4 points into Empowering Sigils so we can pick up Last Wish. Then we’ll grab 2 points into Invigorate for the Increased Healing Effectiveness, then 3 points into Quiet Mind to pick up Polygram. Next we’ll take 2 points in Iron Sigils, which provides us some extra Endurance Threshold. Then we’ll take 4 points in Enduring Hope to extend our Sigils’ duration and let us pick up Tetragram. Finally, we can put the remaining points into Invigorate.
We don’t require extra levels in this skill, however if we get them they should be used to max Invigorate and make our way to Exigency to make it easier to self-cast them in combat as needed. Alternatively the points toward Exigency could be put into Decree of Flame for more damage.
Level
Passive
Points
Current/Max
1-4
Empowering Sigils
4/5
5
Last Wish
1/1
6-7
Invigorate
2/5
8-10
Quiet Mind
3/5
11
Polygram
1/1
12-13
Iron Sigils
2/5
14-17
Enduring Hope
4/5
18
Tetragram
1/1
19-20
Invigorate
4/5
21
Invigorate
5/5
22-23
Word of Alacrity
2/2
24
Exigency
1/1
22-24*
Decree of Flame
3/3
Vengeance
Vengence is mainly used as filler DPS between Javelin casts, but offers us a lot of defensive benefits, while still managing to squeeze more DPS out of Holy Trail.

Vengeance’s Specialization Tree ends up making it a great defensive tool for just using it as filler DPS. It’ll reduce our incoming damage, give us more Armor, and even make it so the hits we Riposte after can’t Crtically strike. To boot, it’ll even be able to Shred Fire Resistance.

We’ll start off by placing 2 points into Executioner, so we can access both paths we’ll need. We’ll go the defensive side first, maxing out Bolster and taking Perfect Riposte. Then we’ll max Rapid Strikes so we can Riposte more often and Shred Fire Resistance faster after we enable it. Then we’ll take 1 point in Faint Strike to reach Smelter’s Vengeance. Then rounding off the skill, We’ll max Smelter’s Vengeance and pick up Molten Riposte so it can also shred resistances. The final point we can just place into Executioner.
This Skill doesn’t require additional Skill Points. However should you happen to have them, it may be worth considering taking Double Riposte and Dark Duelist instead. This trades some defensive power for more offensive power. Our 20th point can also go toward this if you do opt for keeping this, to get the most out of it.
Level
Passive
Points
Current/Max
1-2
Executioner
2/5
3-7
Bolster
5/5
8
Perfect Riposte
1/1
9-13
Rapid Strikes
5/5
14
Faint Strike
1/3
15-18
Smelter’s Vengeance
4/4
19
Molten Riposte
1/1
20
Executioner
3/5
21
Double Riposte
1/1
22-24
Dark Duelist
4/5
Respec
Executioner
2/5
Respec
Dark Duelist
5/5
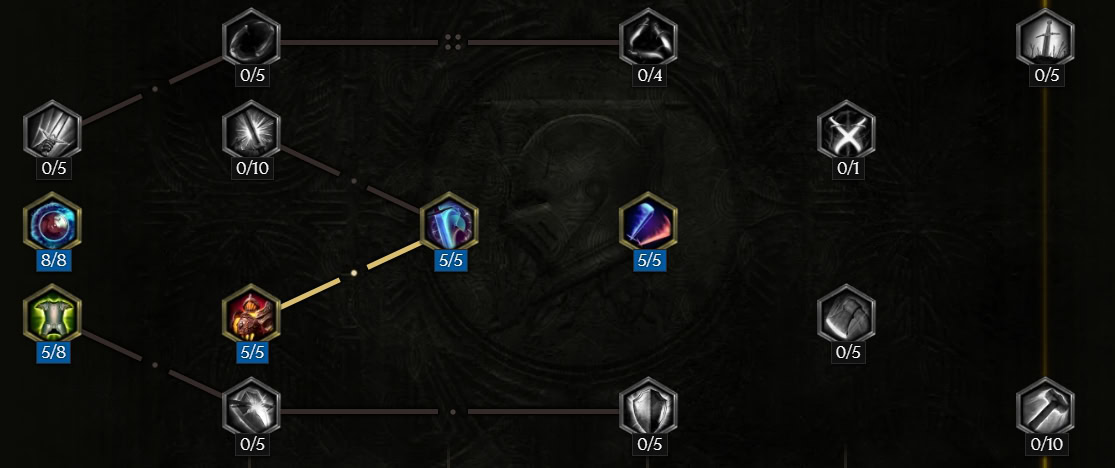
Hammer Throw
Hammer Throw is THE go-to early leveling skill for any Sentinel. We’ll only be using it until we get access to Javelin, but until then it’s easily our best DPS thanks to Guardian’s Zeal.

By the time we’re able to swap over to Javelin, we’ll only have around 9-10 points into Hammer Throw. We’ll be combining Guardian’s Zeal with Hammer Vortex for an effective single target and AoE clear all in one skill.

We’ll start by taking 2 points into Rapid Throw, followed by 2 points into Guardian’s Zeal. We don’t want to max this, as we’re only using the skill for a short time and this provides more than enough. Then we’ll take 1 point into Winged hammers and pick up Steadfast Path. We’ll want to max Catapult next, because Iron Spiral and Hammer Vortext don’t feel great without the additional hammers. Then we’ll take Iron Spiral followed by Hammer Vortex and by this point we should be nearing a point we can safely transition over to Holy Trail Javelin.
Level
Passive
Points
Current/Max
1-2
Rapid Throw
2/5
2-4
Guardian’s Zeal
2/3
5
Winged Hammers
1/3
6
Steadfast Path
1/1
7-8
Catapult
2/2
9
Iron Spiral
1/1
10
Hammer Vortex
1/1
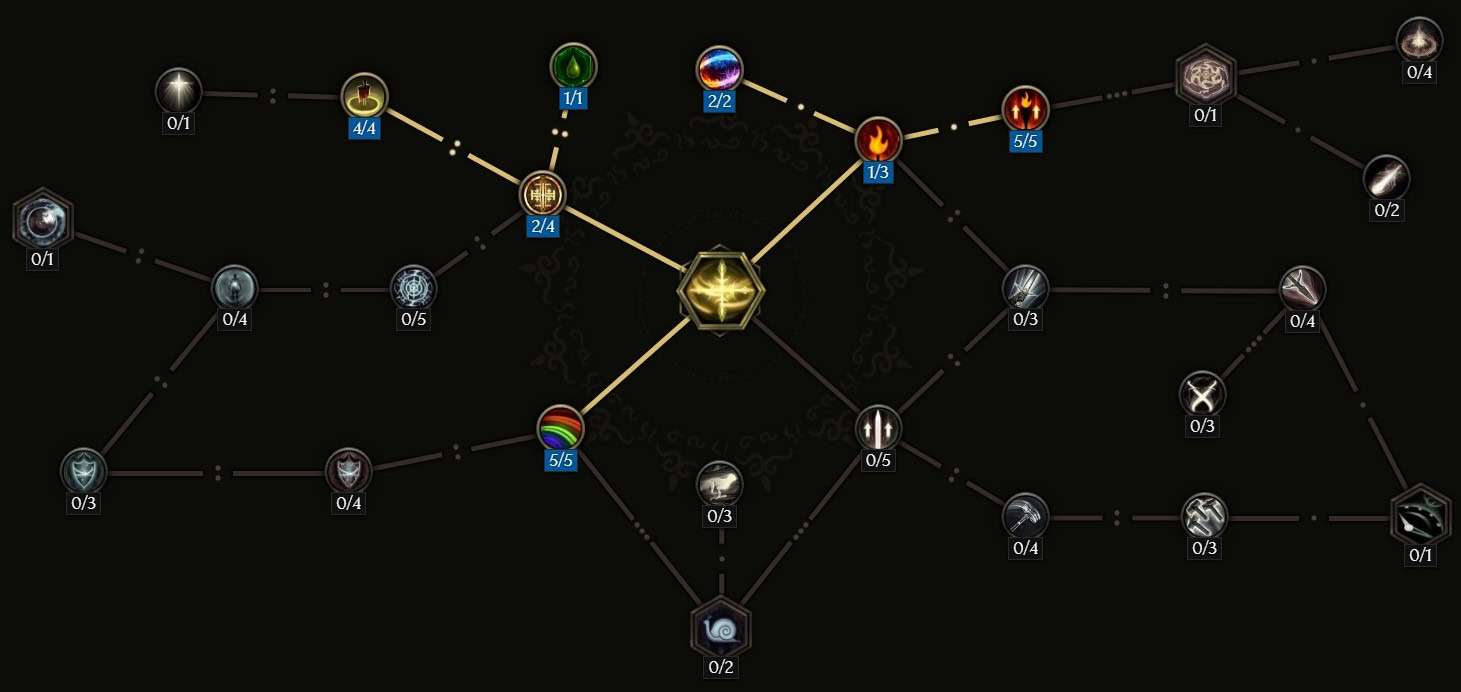
Passive Trees
This section will cover each of the Passive Trees used by the build and the passives that benefits the build the most. We’ll list the rough leveling order here as well, in addition to the full leveling order in the leveling section at the end.
Sentinel Passives
The Sentinel Passives are packed with a lot of good defensive nodes. There are some decent defensive nodes as well, but nothing that fits particularly well with this build.
Juggernaut
Juggernaut is good for basic leveling, but we don’t grab it super early since the Strength doesn’t have much benefit early on. If we leveled with a Melee skill, it’d be far more impactful.
Fearless
Fearless is a good all-round node for leveling. It gives us Vitality which means some Health as well as Necrotic and Poison Resistance. In addition to this, it also gives a nice amount of health regeneration, making it easier to sustain through any damage we take.
Armour Clad
Armour Clad is an excellent passive, one that no Sentinel should every skip out on. It gives a good amount of flat Armor as well as taking less damage from nearby enemies.
Valiant Charge
Valiant Charge is another must-have passive skill. It gives a massive amount of Cooldown Recovery Speed for just a few points, which is often hard to get early. It even comes with more Health on top of this.
Time and Faith
Time and Faith is another exceptional passive node, which gives you a lot of early Health and Mana sustain from either Rive, Vengeance, Multistrike, or Smite. In a lot of cases, you’re able to sustain through most early bosses with these skills and just face tank most of their damage.
Point Order
For progressing through the Sentinel Tree, we’ll start with 5 points in Fearless. Then we’ll max Armour Clad, Valiant Charge, and then Time and Faith in that order. We’ll come back a bit later for the free resistances offered by Juggernaut.
Passive
points
Current/Max
Fearless
5/8
Armour Clad
5/5
Valiant Charge
5/5
Time and Faith
5/5
Juggernaut*
8/8
Paladin Passives
The Paladin Tree let’s us stack up a ton of damage for Holy Trail, either as generic damage, Elemental Damage, or more importantly Increased Healing Effectiveness.
Defiance
Defiance gives us some Attunement, which isn’t going to do much for us but increase our mana. It also comes a good chunk of Elemental Resistance, taking some pressure off our gear.
Divine Bolt
Divine Bolt is a nice one point passive, and gives us a chance to cast Divine Bolt any time we use a melee skill. This will give us more damage out of Vengeance later on when we get it. At least it’ll get some extra damage from our Attunement.
Valor
Valor grants us flat Health and Increased Healing Effectiveness. This is a great node for us, giving us offensive and defensive power at the same time. This will boost the damage and healing of Holy Trail.
Holy Icon
Holy Icon is just a second Valor, granting us Health and Increased Healing Effectiveness. This time it also comes with a substantial chunk of our Necrotic Resistance. While it give less Health, the Necrotic Resistance is a welcomed trade-off.
Prayer
Prayer is almost pure damage for us, granting us a buff that increases our Damage and Healing Effectiveness if we’ve healed ourselves or an ally recently. Since we’ll be fighting on or near a Holy Trail at all times, we’ll almost always have this.
Faith Armour
Faith Armour grants us a lot of Increased Armor as well as a nice Chunk of Critical Strike Avoidance. This Crit Avoidance is often enough that if we can get the Empowered Blessing of the same effect from the Empowered Reign of Dragons Timeline later on, we can cap it out without a single Affix.
Prayer Aegis
Prayer Aegis is nice for extra health. We’ll have a ton of health, so the smaller amounts of Endurance Threshold aren’t too great, especially this deep into the passive tree.
Reverence of Duality
This passive has everything we could want from a node. Health, Damage, HEaling Effectiveness, and Mana. It boosts them all by a percentage, so it’s a pretty significant increase in Health and Mana at the very least.
Light of Rahyeh
Light of Rahyeh is a nice bump in damage for us, giving a pretty high amount of Fire and Lightning Damage. It even comes with Movement Speed, which is always welcome.
Point Order
Given everything flows well enough here, we don’t need to partially level any node as we go through and it just works out better. For the full leveling process, we’d take a detour early on for some extra resistance. Otherwise, the order here is as follows.
We’ll start by maxing Defiance for the Resistances. Next, we’ll max Valor followed by maxing Holy Symbol to get a ton of Health and Healing Effectiveness, in addition to more Resistances. Then we’ll max Prayer for the huge damage boost it’ll provide us. After that, we’ll max Faith Armour for the defensive bonuses. At this point we’ll want to go back and grab Divine Bolt. Now we’re into the big damage nodes, maxing Reverence of Duality followed by maxing Light of Rahyeh. Then finally we can wrap up the Paladin tree by taking 7 points into Prayer Aegis for more health.
Passive
points
Current/Max
Defiance
8/8
Valor
10/10
Holy Icon
7/7
Prayer
10/10
Faith Armour
8/8
Divine Bolt
1/1
Reverence of Duality
12/12
Light of Rahyeh
12/12
Prayer Aegis
7/12
Void Knight Passives
Void Knight only has one passive we care about, Abyssal Endurance.
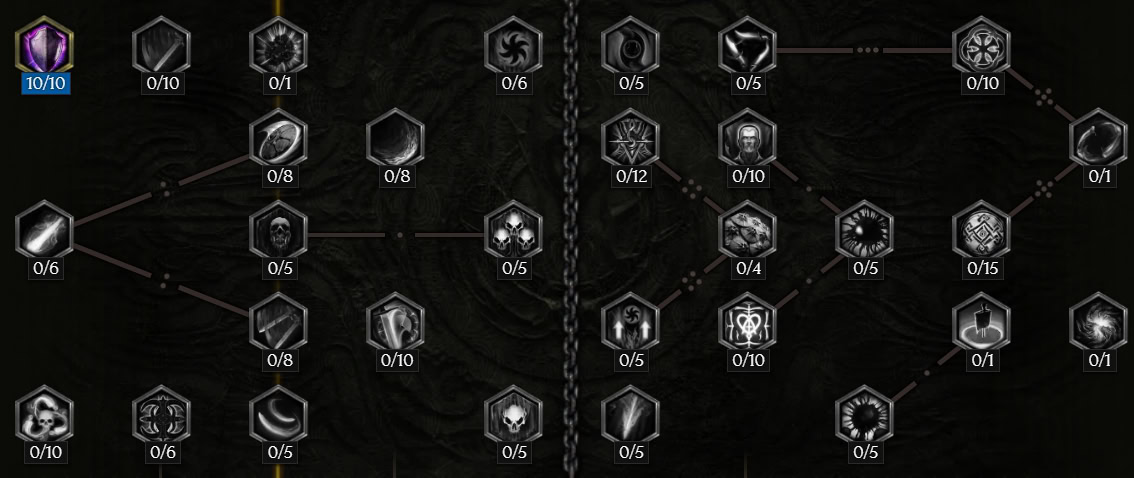
Abyssal Endurance
Abyssal Endurance not only gives us a decent amount of Health, it also gives a ton of Void and Physical Resistance and takes heaps of pressure off our gear.
Point Order
It’s only one node, but we’ll be grabbing it just before we get into the big block of damage nodes normally, right around the time we get into Empowered Monoliths.
passive
points
Current/Max
Abyssal Endurance
10/10
Gearing and Affixes
In this section, we’ll cover the gear you’ll want to look out for, as well as the ideal affixes you want on them. The Affixes listed below are for non-unique and non-legendary Items, however, the ideal affixes are just as valuable when crafted onto a Legendary item of the same type.
Ideal Gear and Affixes
This section provides the ideal Item Bases and respective Affixes for the build. Be on the lookout for gear that have two or more of the stats shown below. Ideal Exalted Affixes will be listed in CAPS. We’ll provide a loot filter below that will make this easier.
Item Base
Deicide Lance or Gate Staff
Prefix 1
INCREASED DAMAGE OVER TIME
Prefix 2
Increased Lightning Damage
Suffix 1
Chance to Slow on Hit
Suffix 2
SHARED LIGHTNING PENETRATION
Item Base
Solar Commandment
Prefix 1
INCREASED HEALING EFFECTIVENESS
Prefix 2
Elemental Damage Over Time OR
Levels to Javelin
Suffix 1
Fraility on Hit
Suffix 2
Health or Any Resistance
Item Base
Leonine Greathelm
Prefix 1
Void Taken as Physical
Prefix 2
Poison Taken as Physical
Suffix 1
% HEALTH
Suffix 2
Increased Armor
Item Base
Champion Regalia
Prefix 1
VOID DAMAGE TAKEN AS PHYSICAL
Prefix 2
Increased Fire Damage over Time
Suffix 1
% HEALTH
Suffix 2
Any Resistance or Armor
Item Base
Ascetic Gloves or Eternal Gauntlets
Prefix 1
Melee Attack Speed
Prefix 2
Damage over Time
Suffix 1
HYBRID HEALTH
Suffix 2
Armor or any Rsistance
Item Base
Citadel Boots
Prefix 1
INCREASED MOVEMENT SPEED
Prefix 2
Vitality
Suffix 1
HYBRID HEALTH
Suffix 2
Increased Cooldown Recovery Speed
Item Base
Spidersilk Sash
Prefix 1
Elemental Damage Over Time
Prefix 2
Potion Cleanse
Suffix 1
HYBRID HEALTH
Suffix 2
INCREASED COOLDOWN RECOVERY SPEED
Item Base
Opal Ring
Prefix 1
INCREASED HEALING EFFECTIVENESS
Prefix 2
Elemental Damage Over Time
Suffix 1
HEALTH
Suffix 2
Any Resistance
Item Base
Bone, Astrology, or Oracle Amulet
Prefix 1
FIRE OR LIGHTNING PENETRATION
Prefix 2
Elemental Damage over Time
Suffix 1
HEALTH
Suffix 2
Frailty On Hit
Item Base
Prefix 1
Prefix 2
Suffix 1
Suffix 2
Idol Affixes
This section will list the highest value Idol affixes for the build, as well as the Idol type(s) they can be found on.
Affix Name
Affix Type
idol types
Increased Healing Effectiveness
Prefix
Adorned or Small
Shared Lightning Damage
Suffix
Stout
Shared Fire Damage
Suffix
Stout
% Health
Prefix
Stout
Any Resistance
Suffix
Any
Armor
Prefix
Any
Health
Suffix
Any
Unique and Legendary Items
Many endgame builds for Last Epoch will use one or several Unique or Legendary Items. The ones this build can get the most use out of are listed below alongside when they are the most useful.
Avarice
While Avarice is a pair of Unique Gloves commonly used for leveling, the Elemental Damage Leeched As Health gives us plenty of extra sustain. Ideally this can be replaced with the Monolith Blessing of similar effect.
The Judicator
The Judicator is a Unique Spear that comes with a ton of flat Fire Spell Damage, extra Levels to Javelin, and a ton of Increased Healing Effectiveness. While you’d lose out on a lot of the raw damage that a staff provides, the extra level for Javelin and increased Cooldown REcovery Speed for it can make up for this to some extent.
You’ll need Legendary Potential to make it shine though, which makes it a rougher option, but a decent one come endgame if you want to double up on Holy Trail.
Plague Bearer’s Staff
Compared to an exalted Staff, this unique Staff may appear to fall short at first. However, since it always applies Plague to enemies and that Plague also grants us another More Damage Multiplier, it’s worth considering.
Much like The Judicator, it’ll need Legendary Potential and a high roll on that More Damage Multiplier to shine. Thanks to the Flat Spell Damage and Damage Over Time that comes on it by default, it has a much easier time slotting into the build if you find a good one.
Loot Filter
Below is a custom Loot Filter, designed to help you gear up this build from Level 1. This Loot Filter will make it much easier to identify great items without much thought.
You can click Here to download our Loot Filter for this Build. Below is quick rundown of what gets filtered and when.
- Items Always Shown
- Unique/Set/Exalted Items
- All Idols
- All Items with Class-Specific Affixes (+Level Affixes are EMPHASIZED)
- Gear with 3+ of the Affixes Listed in the Gearing Section
- Ideal Exalted Affixes are EMPHASIZED
- Items Hidden
- Low-Level Gear, to ensure items that do show up are good for your level
- Toggle Options
- Hide all Normal, Magic, and Rare items that don’t meet the criteria above.
- Recolor options to show Class-Specific items for other classes, for Alts.
- Hide All Exalted Items that don’t meet criteria, endgame Circle of Fortune option.
Leveling Order
If you want to play this build from Level 1, this section is for you. Below is our recommended leveling order for Passive Points. All Skill Leveling orders are listed under their respective sections.
Passive Points
Passive
Points
Tree
Fearless
5/8
Sentinel
Armour Clad
5/5
Sentinel
Valiance Charge
5/5
Sentinel
Time and Faith
5/5
Sentinel
Defiance
8/8
Paladin
Valor
10/10
Paladin
Holy Icon
7/7
Paladin
Prayer
10/10
Paladin
Faith Armour
8/8
Paladin
Divine Bolt
1/1
Paladin
Abyssal Endurance
10/10
Void Knight
Juggernaut
8/8
Sentinel
Reverence of Duality
12/12
Paladin
Light of Rahyeh
12/12
Paladin
Prayer Aegis
7/12
Paladin
All Skill Icons in this guide are sourced from Last Epoch Tools, a Last Epoch Database.
Last Epoch Starter Builds
This is a collection of builds for Last Epoch suitable for new characters and new players. These builds will show you how to start a new character from level 1 and develop it all the way to the endgame and beyond.

Last Epoch Fireball Mage Starter Build
This Last Epoch Mage Build focuses on the Fireball Skill, utilizing a high cast speed and multiple projectiles for high damage output!

Last Epoch Chaos Bolts Warlock Starter Build
This Warlock Build focuses on the Chaos Bolts and Chthonic Fissure Skills, giving it a good mix of Damage over Time and direct hit damage.

Last Epoch Acid Flask Falconer Starter Build
This Last Epoch Falconer Build focuses on the Acid Flask Skill, which relies on dealing damage over time with Poison.