With the release of Diablo 4’s Vessel of Hatred Expansion, Runes and the Runeword System are being added to the game. This guide explains how these systems work in detail.
Added with the Vessel of Hatred expansion, Runewords are making a return to Diablo. Though, if the phrase ‘Runewords’ invokes memories of Diablo 2’s Lord of Destruction Expansion, know that this system is the same in name only.
What are Runes and Runewords
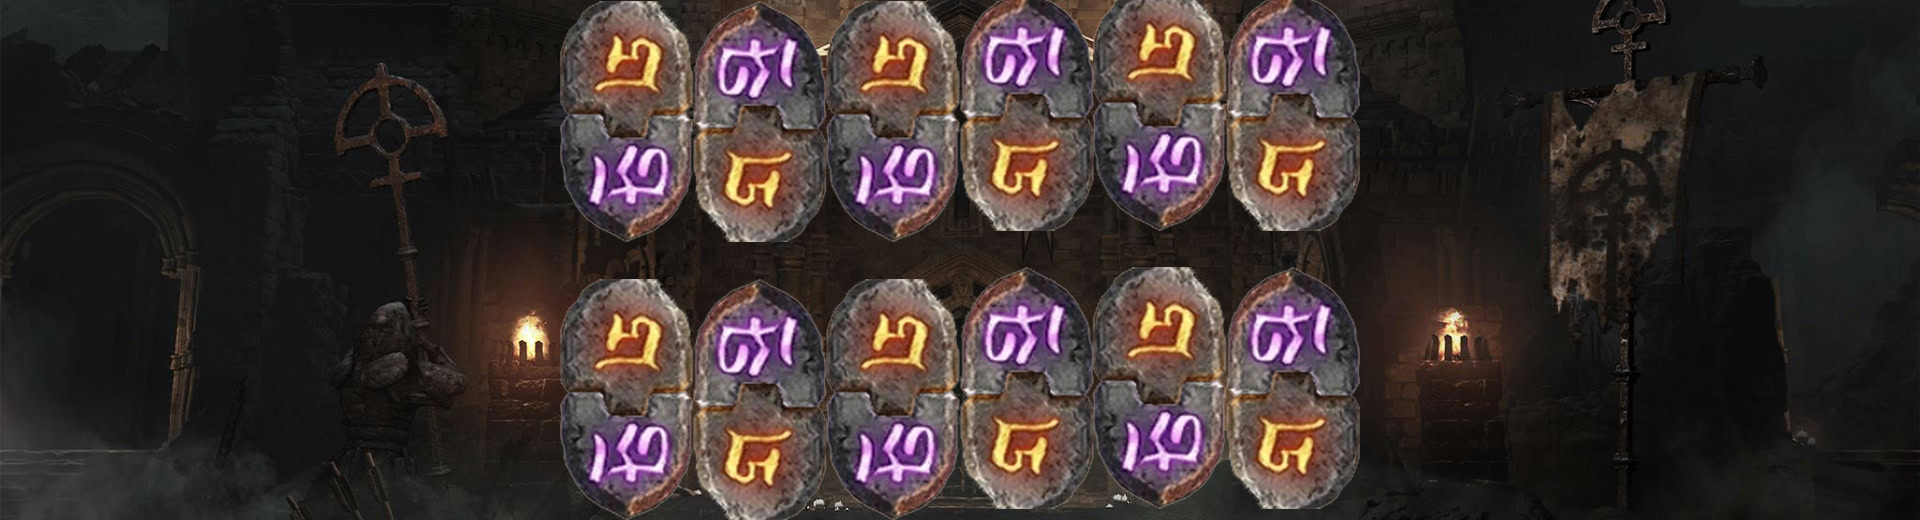
Runes are special socketable items that can be placed into gear instead of the standard gems. Runes will drop in two different variations, Ritual Runes and Invocation Runes.
A Ritual Rune and an Invocation rune together in the same item make up a Runeword. Unlike Diablo 2’s system, these aren’t hidden, powerful effects from specific combinations of runes being socketed. They’re still powerful, but much more deterministic and not hidden.
Remember that you can use only two Runewords and one copy of any Rune at a time. While we could potentially have had up to four for most 2H builds, this keeps them limited and prevents the situation where they take over every available 2-socket item.
Preventing a Rune from being used more than once also prevents doubling up on some of the easier-to-fulfill conditions, like Lith.
Ritual Runes
Ritual Runes are effectively the generator of a full Runeword. Each has a specific condition that needs to be met to generate the Offerings spent on activating Invocation Runes.
Most Ritual Runes do not have a cooldown, save for a few. This allows them to build up Offerings, even while an Invocation is on cooldown.
Below is a list of all Ritual Runes, their condition, and the amount of offerings they generate. This list is sorted by Highest Rarity first, then alphabetically.
| Name | Condition* | Offering** |
|---|---|---|
| Ahu | Lucky Hit: Up to 100% Chance vs Non-healthy | 15 |
| Bac | Travel 5 Meters | 50 |
| Igni | Store offering every 0.3 seconds. Cast a Non-Basic skill to gain the Stored Offering | 25 |
| Lith | Stand still while fighting for 0.3 seconds | 25 |
| Nagu | Maintain at least one Active Summon for 5 seconds, gaining offering for each, up to 6 Summons. | 100 |
| Tam | Cast a Non-Channeled Core Skill | 25 |
| Xol | Evoke a Power from another class | 150 |
| Yul | Cast a Skill with a Cooldown | 50 |
| Feo | Become Injured or Crowd Controlled (10s cooldown) | 1000 |
| Neo | Deal Damage after not taking damage for 2 seconds. (Resets if Invulnerable) | 200 |
| Noc | Inflict a Crowd Control effect. Slow and Chill provide 50% of the Offering amount. | 10 |
| Poc | Spend 5% Max Resource | 5 |
| Cem | Cast Evade | 75 |
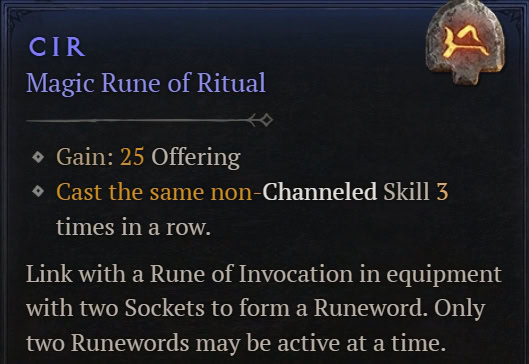
| Cir | Cast 5 skills, then become exhausted for 3 seconds | 300 |
| Moni | Cast 2 Mobility to Macabre Skills | 100 |
| Yax | Use a Healing Potion | 200 |
| Zan | Cast an Ultimate Skill | 150 |
** How much is generated
Now, looking at the list of Ritual Runes there is a general trend occurring; the harder a condition is to meet, the more Offering it generates. There are a few exceptions to this, particularly among the rarer Ritual Runes at the top. We’ll go deeper into this later in this guide when we talk about making Runewords.
Invocation Runes
Where Ritual Runes are the Generators for Runewords, Invocation Runes are the Spenders. Each Invocation Rune requires a specific number of Offerings to activate. The required offering does not need to be generated all at once, however, it will take longer to trigger their effects based on the Ritual Rune it’s paired with.
All Invocation Runes have a minimum of a one-second cooldown, save for a handful of effects that trigger skills of other classes. This means most effects can only occur once per second, regardless of the required Offering is generated.
Invocation Runes also have an effect called Overflow, which boosts the Invocation Rune’s effect in some way. This makes it so that any excess Offering generated isn’t lost, for most runes at least.
Below is a table of all Invocation Runes, their effects, and the amount of Offerings required to activate them. This list is sorted by Highest Rarity first, then alphabetically.
| Name | Effect & Overflow* | Offering** |
|---|---|---|
| Eom | Reduce Active Cooldowns by 0.1 Overflow: Increased Cooldown Reduction | 100 |
| Jah | Replace your Next Evade with Sorcerer’s Teleport (2s Cooldown) Overflow: Excess is stored | 400 |
| Ohm | Cast Barbarian’s Warcry (2s Cooldown) Overflow: Increased Duration | 600 |
| Vex | Increase All Skill Ranks by 1 for 10 seconds Overflow: More Skill Ranks, up to 3 | 150 |
| Xan | Next Attack will cause hits to Critically Strike and Overpower for 0.35 seconds Overflow: Increased Duration | 300 |
| Yom | Cast Druid’s Petrify, granting 100 Resource and Stunning enemies (5s Cooldown) Overflow: Increased Duration | 500 |
| Chac | Invoke Druid’s Lightning Bolts. (1s cooldown) Overflow: Incresed Bolt Count | 20 |
| Kry | Cast Spiritborn’s Vortex (3s Cooldown) Overflow: Larger Area of Effect | 300 |
| Lac | Cast Barbarian’s Challenging Shout for 3 seconds Overflow: Increased Duration | 400 |
| Mot | Gain a Shadow from Rogue’s Dark Shroud Overflow: Additional Shrouds | 150 |
| Ner | Cast Rogue’s Countering Concealment (6s Cooldown) Overflow: Increased Duration | 600 |
| Qax | Next Non-Basic or non-Defensive Skill consumes all Resources and deals up to x100% Damage Overflow: Increased Damage | 400 |
| Que | Cast Druid Earthen Bulwark Overflow: Increased Duration | 300 |
| Thul | Cast Sorcerer’s Mystical Frost Nova (2s Cooldown) Overflow: Increased AoE | 300 |
| Tzic | Cast Spiritborn’s Concussive Stomp Overflow: Increased Damage | 250 |
| Wat | Cast Necromancer’s Horrid Decrepify Overflow: Increased Duration | 100 |
| Xal | Gain 20% Max Life for 6 seconds Overflow: Increased Duration | 200 |
| Zec | Reduce Ultimate Cooldown by 2s (2s Cooldown) Overflow: Increased Cooldown Reduction | 200 |
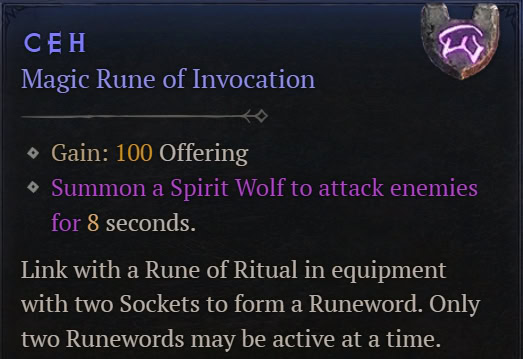
| Ceh | Summon a Spirit Wolf for 8s Overflow: Additional Wolves | 100 |
| Gar | Gain 2.5% Critical Chance for 5s, up to 25% Overflow: Additional Stacks | 25 |
| Lum | Restore 1 Primary Resource Overflow: Additional Resource | 5 |
| Tal | Cast Spiritborn’s Pestilent Swarm Overflow: Additional Swarms | 30 |
| Teb | Cast Necro’s Abhorrent Iron Maiden, dealing 300% Damage | 100 |
| Tec | Create Barbarian’s Earthquake Overflow: Increased Area of Effect | 50 |
| Ton | Create Sorc’s Meteorites, dealing 216% Damage Overflow: Additional Meteorites | 20 |
| Tun | Create Rogue’s Stun Grenades, dealing Normal Damage Overflow: Additional Stun Grenades | 100 |
| Qua | Gain 7% Movement Speed for 5s, up to 30% Overflow: Increased Duration | 50 |
** Amount needed to trigger
Similar to Ritual Runes, Invocations also follow a similar trend of having a higher cost for more powerful effects. Though, unlike Ritual Runes, there are many good low-cost Invocations.
How to use Runewords
To create a Runeword, we’ll need to socket a Ritual Rune and an Invocation Rune into the same piece of gear. This will typically be a piece of armor but works with any item that has two sockets available. Whether or not we want to make the trade-off to use them in a weapon rather than armor is a personal choice.
With the process of creating Runewords being straightforward, let’s cover a few notable combinations that are useful at different stages of the game.
Early-Mid Game Runewords
Early on, we’ll want to use Runewords to alleviate common build issues. Thankfully, the Magic and Rare Runes we can get early on do exactly that for us.
The three Invocation Runes that are often exceptionally good for the early game are Lum, Gar, and Qua. Lum can help us solve any early issues with Primary Resources. Gar can help us Crit more often. Qua gives plenty of movement speed.
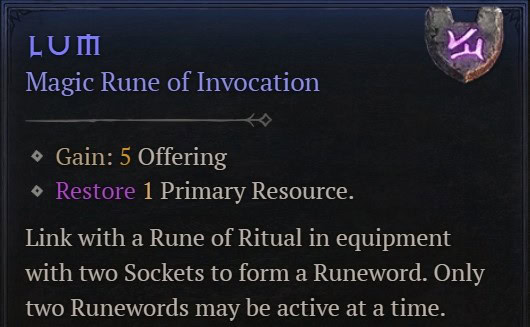
Lum is great paired with Yax, Cem, or Cir, at least out of the Magic rarity options. This results in 40 Resource when we Use a Potion with Yax, 15 when Evading with Cem, or 50 for casting any 5 skills with Cir.
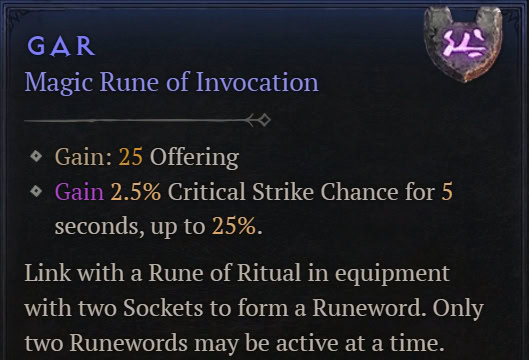
Gar works with just about any Magic Ritual Rune and will grant 2.5% Critical Strike Chance for every 25 Offering generated. Combined with +Evade Charge or Evade CDR boots, it’s quite potent paired with Cem, allowing more consistent boosts if we don’t mind Evading often.
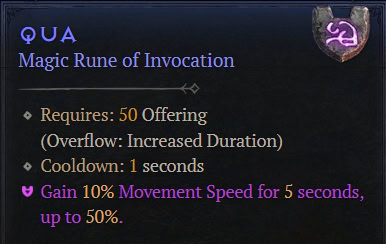
Qua works well with the Cem Ritual Rune, granting movement speed after evading. If we luck into Bac, Tam, or Yul those are also good options. Movement Speed is often at a premium in the early game, as getting around quicker also means doing everything quicker too, including Leveling.
Late Game Runewords
Going into Mid-game we’ll look more into the Legendary Runes, as they’ll be more common to see. This opens a whole host of build-specific combos, from passive mobbing, or even semi-AFK builds with enough gear.
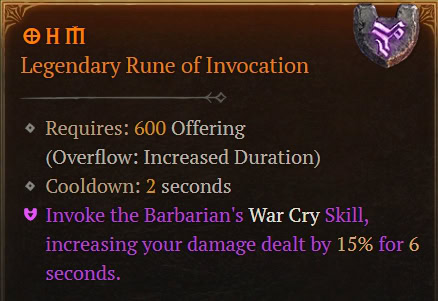
The Ohm Invocation Rune is easily one of the better Invocations available, granting a Multiplicative damage bonus to any build via Barbarian’s Warcry. It’s quite potent, but also expensive as a result. The best Ritual to pair with it will highly depend on the build we’re using; but Yul, Tam, and Bac are good options for most builds.
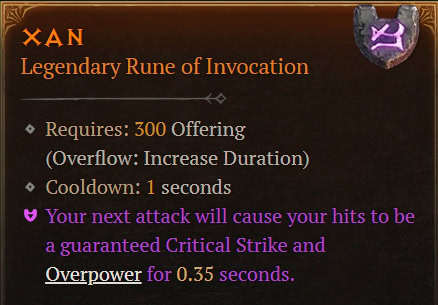
Just behind Ohm is Xan. Xan will cause our next attack to make all attacks after it Critically Strike and Overpower for a short duration. This is exceptionally powerful for builds that can quickly and reliably overflow this effect and bring it closer to 100% uptime.
Now, if we’re looking for passive Mobbing or even Semi-Afk type of builds, the Bac and Lith Ritual Runes are great for enabling this.
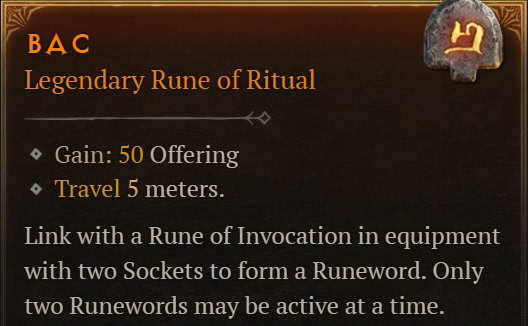
Bac grants 50 Offering for every 5 Meters we travel, making it exceptionally good for highly mobile builds that want to trigger lower-cost Invocations. Depending on the class and build, this can passively fire off different effects that can be scaled via Legendary Aspects or our stats. This includes Necromancer’s Curses, Druid’s Dancing Bolts, and Spiritborn’s Pestilent Swarms.
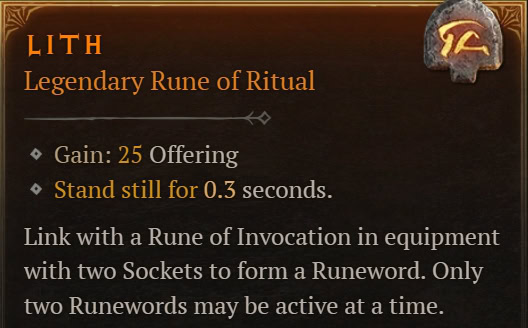
Lith is very similar, but instead of requiring us to move we’re standing still and will get 25 Offering every 0.3 seconds while in combat. These line up almost perfectly with any 100-cost Invocation to consistently trigger it almost every second. This makes it great for many of the same Invocations as Bac, but enables them to be used in a semi-AFK fashion. This in particular was very notable on the PTR for being paired with Barbarian’s Earthquakes and their new Paragon board that enabled Earthquakes to also spawn Dust Devils.
Beyond these generically good options, what’s useful to a build will vary a lot in the later stages of the game. Refer to our Diablo 4 Build Catalog for information on what we recommend using for each build.
Crafting With Runes
Runes can be used with two different crafting Methods. One allows us to exchange runes at a 3-to-1 ratio, which allows us to re-roll them with a chance to upgrade. The other allows us to craft Mythic Items, alongside the use of Resplendent Sparks.
Rune Exchange
Runes can be combined at the Jeweler to re-roll and potentially upgrade them. The process requires 3 of the same rune, and can result in any other rune of the same tier or higher.
This process is helpful to re-roll more common runes, in hopes of getting rarer or more powerful runes. It’s not guaranteed to upgrade, but if luck goes our way, it can lead to getting early Rare or even Legendary Runes.
Mythic Crafting
Outside of empowering builds directly, Runes can also be used to craft specific Mythic items. This can also be done by visiting the Jeweler NPC located in major cities in Sanctuary.
This requires two Resplendent Sparks, awarded from Season Journey (seasonal only) or salvaged from Mythic items. In addition, each Mythic requires a specific set of runes consisting of 6 Legendary, 6 Rare, and 6 Magic Runes. Below is a table of each Mythic and its required Runes.
| Mythic Name | Legendary Rune | Rare Rune | Magic Rune |
|---|---|---|---|
| Andariel’s Visage | 6x Tam | 6x Qax | 6x Zan |
| Doombringer | 6x Ahu | 6x Neo | 6x Lum |
| Harlequin Crest | 6x Eom | 6x Lac | 6x Ton |
| Heir of Perdition | 6x Jah | 6x Que | 6x Gar |
| Melted Heart of Selig | 6x Vex | 6x Thul | 6x Tun |
| Ring of Starless Skies | 6x Ohm | 6x Tzic | 6x Cem |
| Shroud of False Death | 6x Bac | 6x Kry | 6x Moni |
| Tyrael’s Might | 6x Lith | 6x Feo | 6x Tec |
| Shattered Vow | 6x Xan | 6x Ner | 6x Teb |
| Nesekem, the Herald | 6x Yul | 6x Wat | 6x Tal |
| The Grandfather | 6x Xol | 6x Mot | 6x Yax |
| Ahavarion, Spear of Lycander | 6x Yom | 6x Poc | 6x Cir |
Typically, the best use of this specific crafting method, and by extension our Resplendent Sparks, is to pick up Heir of Perdition, The Ring of Starless Skies, or Shroud of False Death. All of these Mythics are generically powerful and can offer a lot to most builds.
As a secret hunter, we may even want to consider Ahavarion, Spear of Lycander. Shrines have proven themselves to be a trigger in multiple Secrets, including the Lucky Coin and the Ring of Misfortune, as well as the Luckier Coin and the Ring of the Jinx.


