Everything you need to know about playing through Avowed with a pure Wizard build, including recommended gear, skill tree choices, attribute allocation, and best Grimoires across each region in the Living Lands.
Wizard Build Playstyle
Wizards cast powerful spells against groups of enemies from range by expending Essence (mana). When their spells are unavailable or unsuitable, they rely on magic Wands to dispatch their enemies.
Wizards wear Light Armor and use Grimoires instead of Shields, so they rely on range defensive spells, and dodging to survive. They can’t take as many hits as a Fighter, so Companions like Kai and Giatta are more valuable.
Damage dealing Companions like Yatzli and Maurius are less helpful because Wizards are capable of reliably deal damage to multiple enemies at the same time, thanks to their spells.
Attribute Point Allocation
Wizards benefit more from Perception and Intellect and less from Resolve, but due to ridiculous diminishing returns and the usefulness of all stats to everyone, it’s beneficial for every build to get 5 of every Attribute and then bump the 2-3 most important Attributes up to 10.
Once you go beyond 5 points in a given Attribute, you’re only getting half, yes, half as much value per point. After 10 points, the value gets halved again, so it’s really not worth going beyond 10 points ever.
| Attribute | Level 10 | Level 15 | Level 20 | Level 25 | Level 30 |
|---|---|---|---|---|---|
| Might | 5 | 5 | 5 | 5+ | 10 |
| Constitution | 1 | (3) | 5 | 5 | 5 |
| Dexterity | 2 | (5) | 5 | 7+ | 10 |
| Perception | 5 | 5 | (5) | (10) | 10 |
| Intellect | (3) | 5 | (5) | (5) | 5 |
| Resolve | (2) | 0 | 5 | 5 | 5 |
I do not recommend picking specialized training dialogue options with any of your Companions, especially not Yatzli and Giatta, which both give +2 Intellect, forcing you to have 6 Intellect with Wael’s Totem.
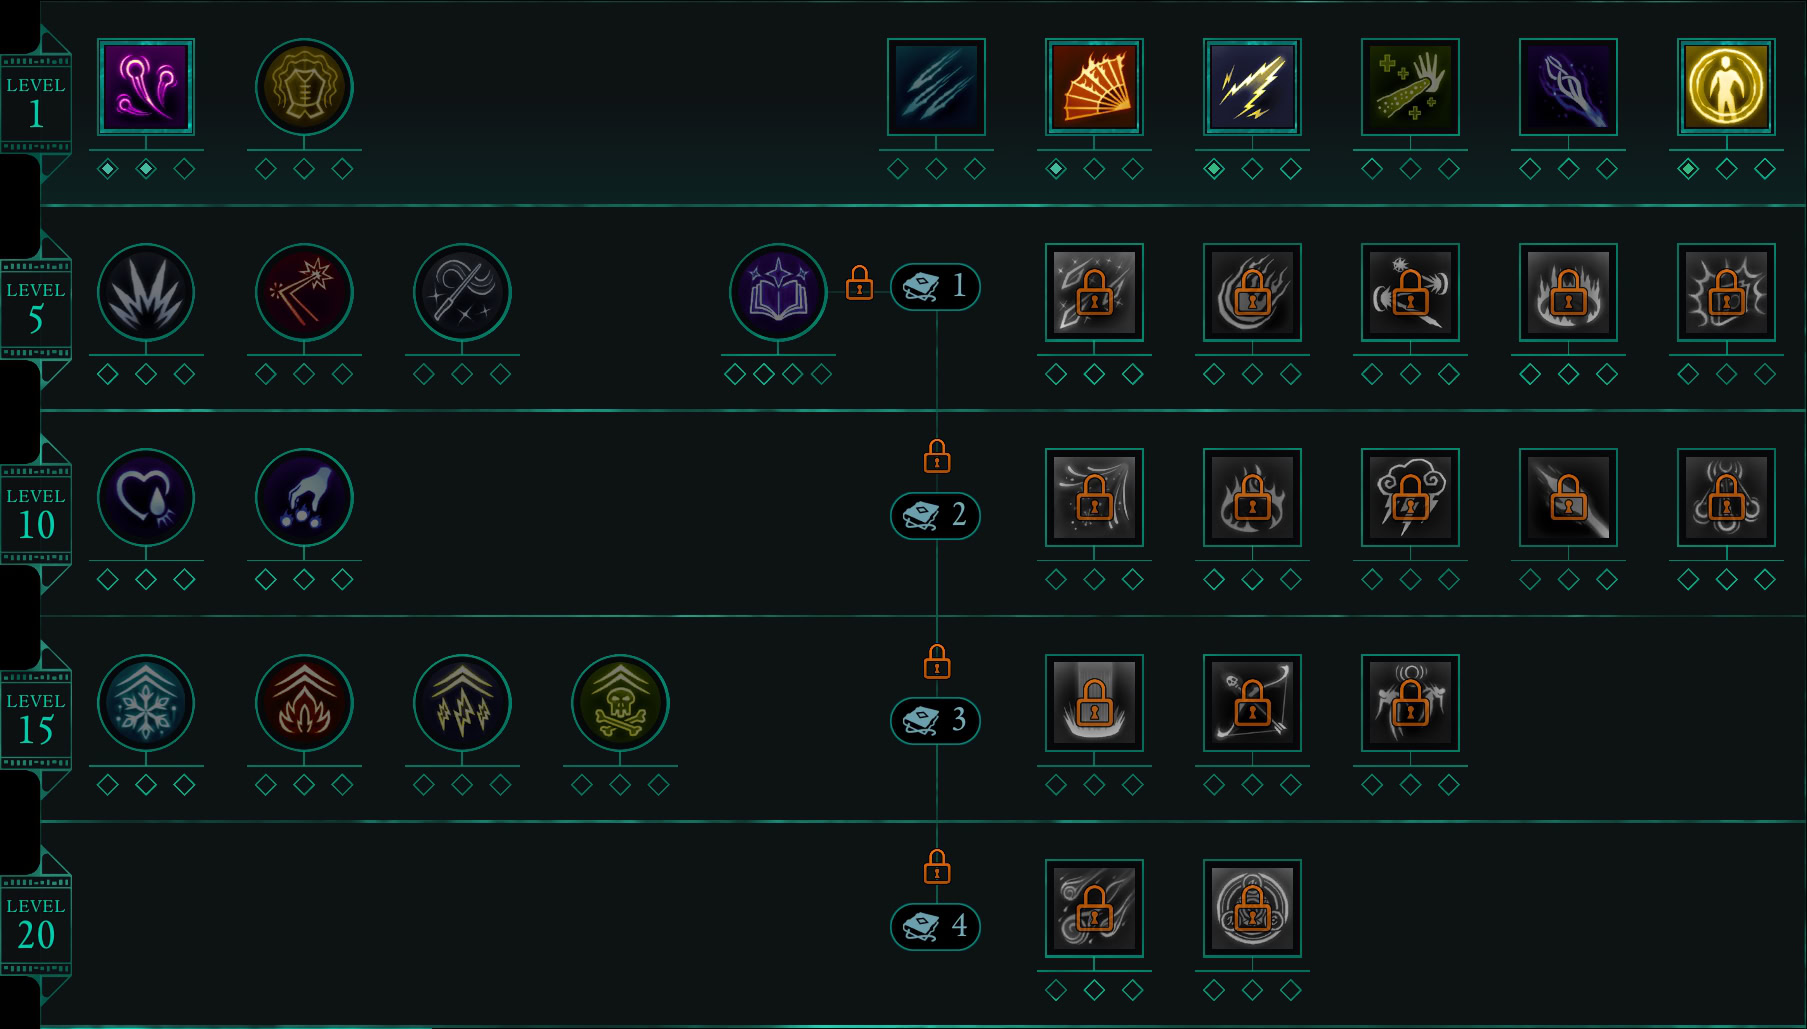
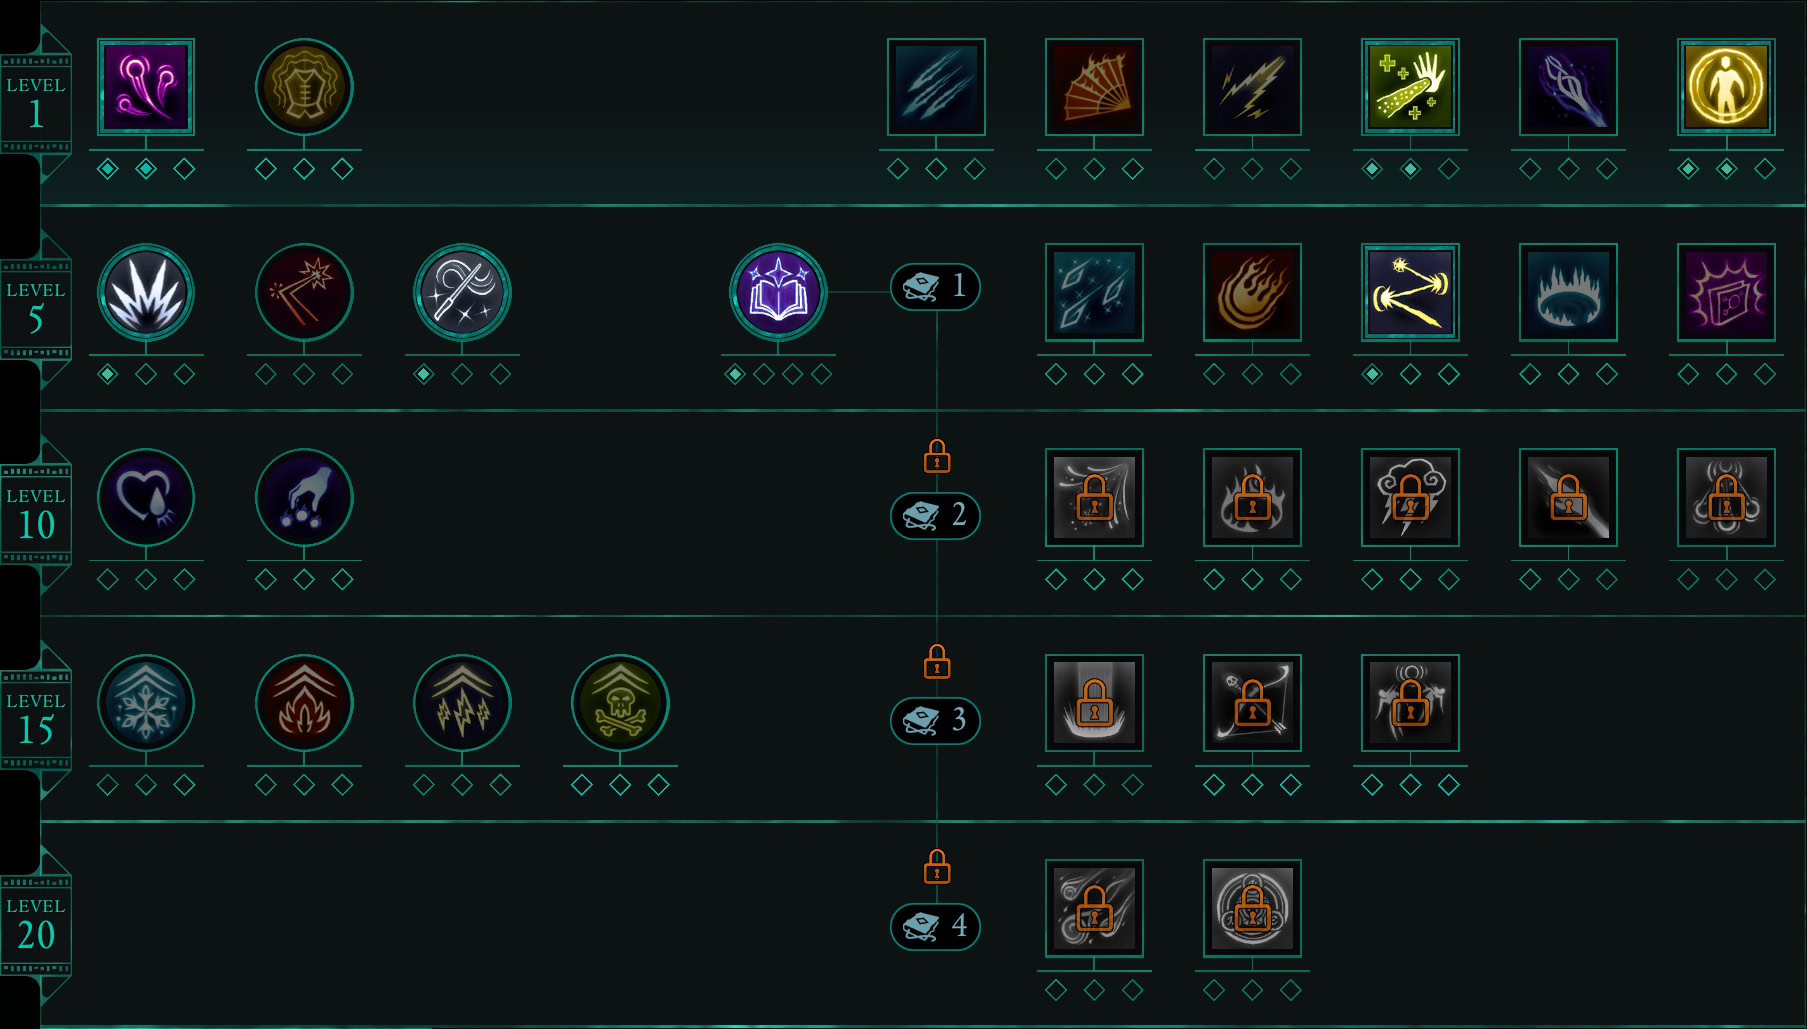
Wizard Tree Overview
Since this is a Wizard build, you will be allocating practically all of your Ability Points to the Wizard skill tree, though many of those points will change over the course of the game.
The right half of the tree is all the different spells in the game. Since you only get 30 Points by the end of the game, you will be moving those points around depending on the Grimoires you use to cast spells.
The left half of the tree is everything else, including Wand buffs, Grimoire Mastery, Accumulations, and Essence management. These points won’t be changing too much, but you’ll add to them over time.
Below, you can see the perks that won’t be getting shuffled around.

I don’t ever recommend taking the Accumulation boost passives at level 15, at least as a Wizard. They just don’t make sense.
If you have a bunch of spells that apply a single type of accumulation, you won’t have any trouble building it up, but they aren’t valuable if they’re only buffing a component of one or maybe two spells.
Grimoires and Grimoire Mastery
Grimoires are spellbooks. Each lets you cast 4 specific spells of compliled around a certain theme. Spells inscribed in your equipped Grimoires count as having already been unlocked in the tree, so it only takes 2 Attribute Points to fully empower a spell rather than 3.
Upgrading the Quality of a Grimoire reduces the cooldown and Essence Cost of needed to cast its spells. Damage, Accumulation, and overall usefulness are primarily determined by the level requirement of the spell, so higher-level spells are typically better than lower-level spells. Might and effects from your gear also play a role in spell damage output and Accumulation.
Your ability to cast spells from Grimoires is determined entirely by whether or not you have invested the required number of points in Grimoire Mastery, not your level, though you can’t upgrade your spells until you meet the regular level requirement.
Unfortunately, this isn’t a two-way street. You still need to keep those points in Grimoire Mastery even after you meet the regular level requirement. This creates a small incentive to for Wizards to equip a second Grimoire, but I suspect the convolution comes from Abilities not having Attribute requirements.
Dawnshore Wizard Build
Dawnshore is your orientation to the arcane. You’ll get a sense of how elemental Damage and Accumulation work as well as ranged spellcasting and Essence management.
This equipment will be your foundation, but you’ll replace all of it by the end of the game.
| Icon | Dawnshore Wizard Equipment |
|---|---|
| Arcanist’s Gambeson | |
| Arcanist’s Gloves | |
| Arcanist’s Boots | |
| Arcanist’s Ring | |
| Ring of Slow Essence | |
| Night-Mistress’ Favor | |
| Wand | |
| Grimoire of Elements | |
| Woedica’s Totem |
Dawnshore Grimoires
You’ll start out with just one spellbook, the Grimoire of Elements. Your secondary weapons loadout will remain empty or be other stuff you want to try out.
Grimoire of Elements
The Grimiore of Elements introduces you to the joys of spellcasting. It offers 3 offensive spells each corresponding to a different element, along with Arcane Veil, a powerful defensive spell. Against bosses, make sure you fill up all relevant Accumulation as often as possible.
Fan of Flames
Level 1 Fire Spell
Chill Blades
Level 1 Frost Spell
Jolting Touch
Level 1 Shock Spell
Arcane Veil
Level 1 Defensive Spell
On your way out of Dawnshore, pick up Beothel’s Grimoire. You may come across a Grimoire of Greater Elements as well, but you won’t have a high enough level to cast them. Hold onto it for Emerald Stair.
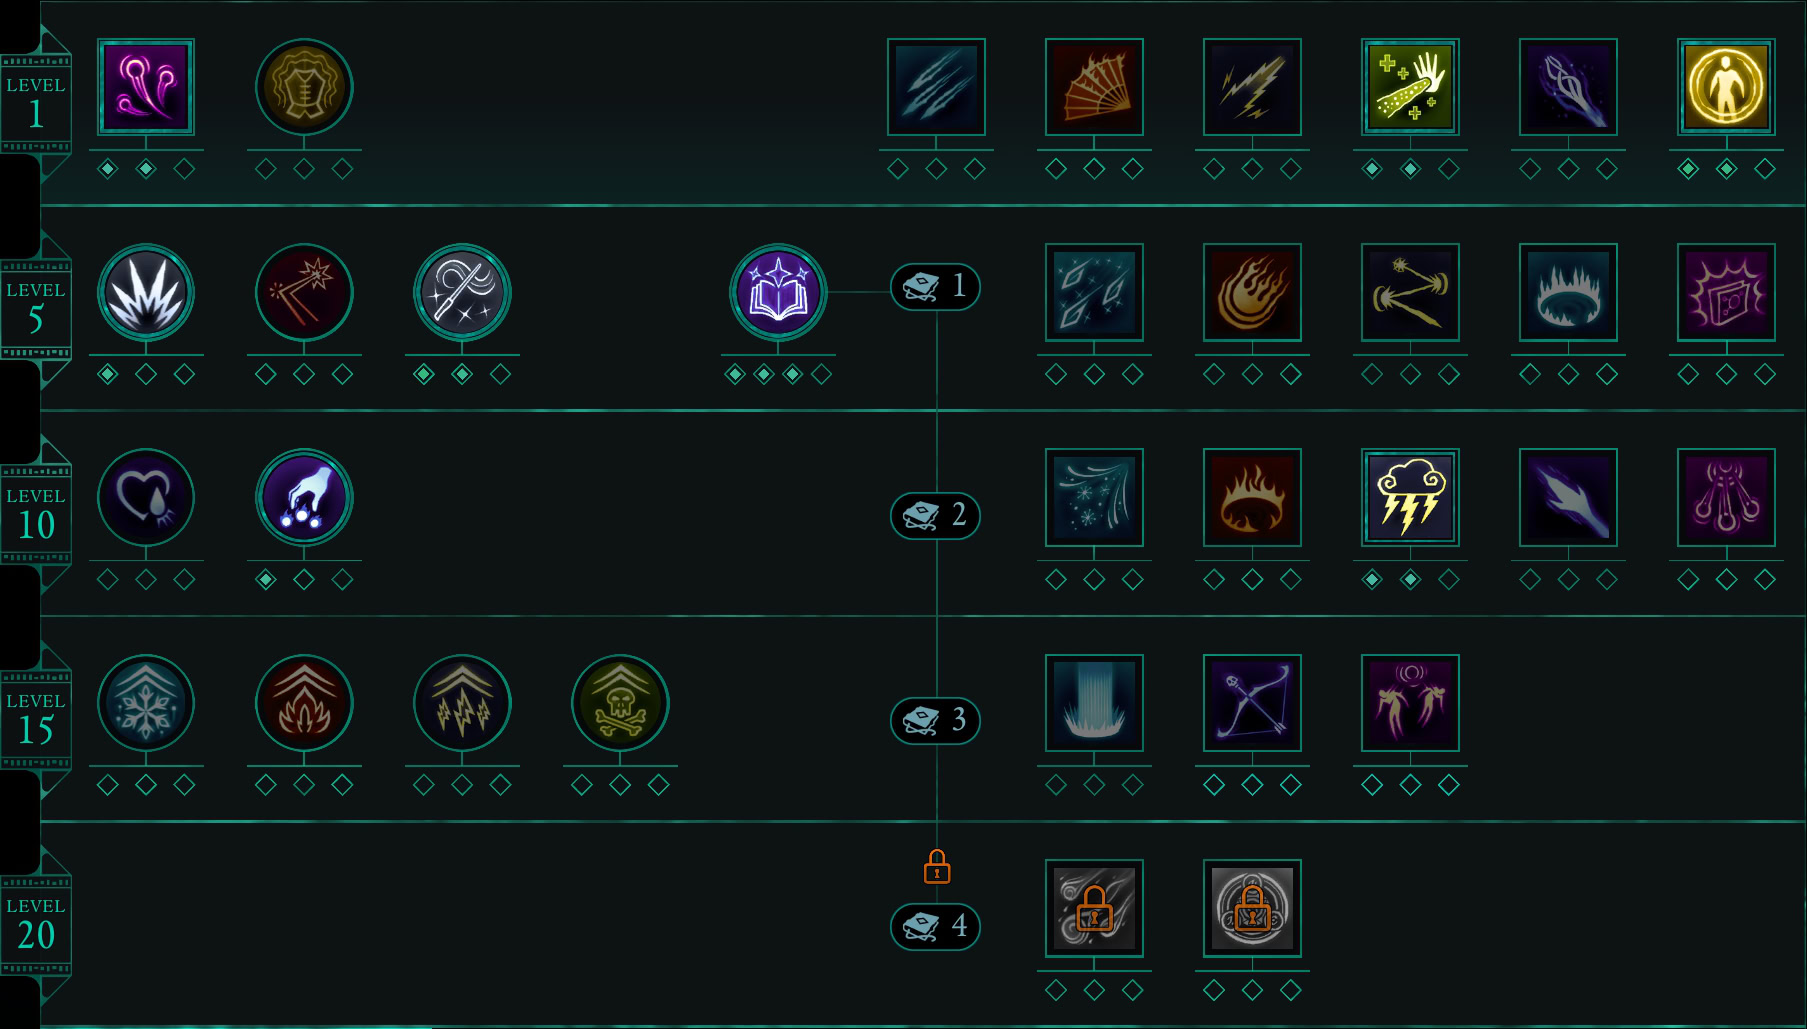
Recommended Wizard Abilities by Level 5
At the beginning of the game, pretty much all you’re allowed to do is unlock your spells, but doing so with your Grimoire spells gives you access to their rank 2 perk.
As you head towards level 10, you can start to get some of those rank 3 perks and improve your Wand.
Emerald Stair Wizard Build
You really become a proper Wizard at Emerald Stair, you’ll swap out your entire armor set, get a Unique Wand, new spellbooks, get a couple new accessories.
| Icon | Old Equipment ▶ | Icon | ▶ New Equipment |
|---|---|---|---|
| Arcanist’s Gambeson | Warmage’s Robe | ||
| Arcanist’s Gloves | Warmage’s Bracers | ||
| Arcanist’s Boots | Warmage’s Boots | ||
| Arcanist’s Ring | Ring of the Peerless Marksman | ||
| Night-Mistress’ Favor | Tranton Family Talisman | ||
| Wand | Minoletta’s Conduit | ||
| Grimoire of Elements | Grimoire of Greater Elements | ||
| Empty Mainhand 2 | Wand | ||
| Empty Offhand 2 | Beothel’s Grimoire | ||
| Woedica’s Totem | Skaen’s Totem |
You’ll also switch to using the Grimoire of Greater Elements with Minoletta’s Conduit and use Beothel’s Grimoire with your regular Wand.
Emerald Stair Grimoires
By the time you reach Emerald Stair, you should be high enough level to afford spells from the Grimoire of Greater Elements and have enough money to buy Beothel’s Grimoire.
If you come across a Grimoire of Storms, you might want to consider taking that for a spin with Minoletta’s Conduit instead.
Grimoire of Greater Elements
The Grimoire of Greater Elements is a flat upgrade over the Grimoire of Elements, giving you the level 5 version of each spell you used before.
Fireball
Level 5 Fire Spell
Blizzard
Level 5 Frost Spell
Crackling Bolt
Level 5 Shock Spell
Bristling Frost
Level 5 Frost Spell
Bristling Frost deserves a little more detail. It doesn’t provide as much protection as Arcane Veil, but it’s enough, especially alongside Beothel’s Grimoire. Furthermore, it also allows you to walk on water by freezing the water in front of you.
When you can put a third point in Grimoire Mastery, you’ll use Od Caura’s Grimoire instead of the Grimoire of Greater Elements, but that won’t be until you’re practically finished with Emerald Stair.
Beothel’s Grimoire
Beothel’s Grimoire combines some vampiric spells with ones that will protect you while you drain the Health and Essence from your victims.
Corrosive Siphon
Level 1 Poison Spell
Arcane Veil
Level 1 Defensive Spell
Parasitic Staff
Level 1 Conjuration Spell
Blizzard
Level 5 Frost Spell
Don’t rely on Beothel’s Grimoire to deal damage; just put the spells on cooldown and swap back to the Grimoire of Greater Elements.
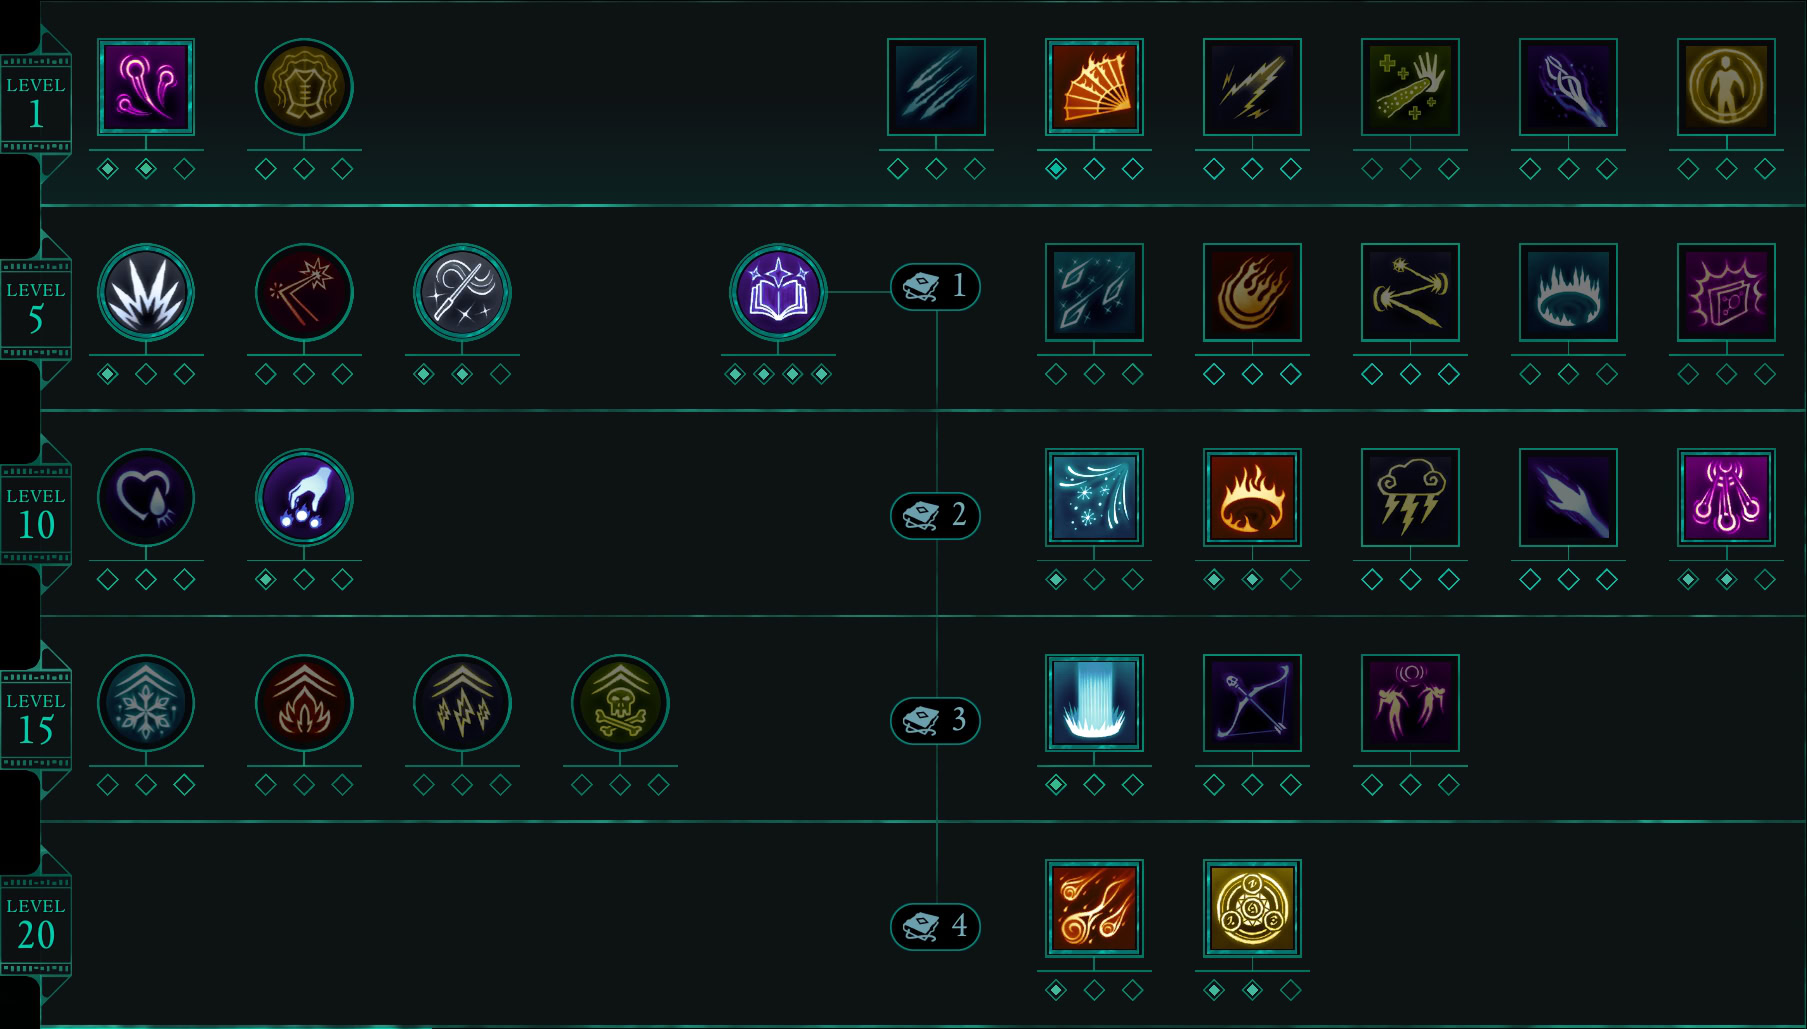
Recommended Wizard Abilities by Level 10
At level 10, you can only spare a few points and really need to be taking points that expanding your capabilities thereby allowing you to handle more situations or roughly doubling spell damage.
As you head towards level 15 and 20, you’ll be making a bunch of changes to your build. Nothing is set in stone. I also recommend picking up Quick Switch, a level 10 Ranger passive, to make swapping books and Wands faster.
Shatterscarp Wizard Build
Shatterscarp has many of the strongest items in the game for Wizards, including a Wand, a Grimoire, Armor, and a Ring.
| Icon | Old Equipment ▶ | Icon | ▶ New Equipment |
|---|---|---|---|
| Warmage’s Armor | Robes of Surpassing Brilliance | ||
| Warmage’s Boots | Wavebinder’s Boots | ||
| Ring of Slow Essence | Sigil of the Arcane | ||
| Wand | Whisper of Exiles | ||
| Beothel’s Grimoire | Aurochs-Skin Grimoire | ||
| Grimoire of Greater Elements | Od Caura’s Grimoire | ||
| Skaen’s Totem | Wael’s Totem |
It’s not surprising that the Archmage of Terror has the best spellbook in the game, the Aurochs-Skin Grimoire, which you can get from Ryngrim’s Domain. You’ll want to use it alongside a frosty Wand she that cast aside (pun intended), the Whisper of Exiles.
Shatterscarp also features one of the best Rings in the game, the Sigil of the Arcane, which reduces your Essence costs and casting time by 20%.
Grimoires
You’ll be swapping out both of your Grimoires throughout the course of your visit to Shatterscarp. The dividing line between offense and defense becomes blurry.
Od Caura’s Grimoire
Od Caura’s Grimoire combines multiple levels worth of spells ranging from 1-15, each of a different element. You’ll need to be at least level 15 and have Grimoire Mastery III to cast all spells from this Grimoire.
Chill Blades
Level 1 Frost Spell
Ring of Fire
Level 10 Fire Spell
Returning Storm
Level 10 Shock Spell
Pull of Eora
Level 15 Arcane Spell
They fullfil a similar role as the Grimoire of Greater Elements, but come together to summon a calamity, and that’s just more fun. Make sure to use Od Caura’s Grimoire with Minoletta’s Conduit.
Aurochs-Skin Grimoire
The Aurochs-Skin Grimoire offers a powerful set of high-level spells that work well together and emphasize Frost. It feels like Ryngrim had a second copy of her spellbook lying around so you wouldn’t have to share with Yatzli.
Blast of Frost
Level 10 Frost Spell
Missile Salvo
Level 10 Arcane Spell
Freezing Pillar
Level 15 Frost Spell
Arcane Seal
Level 20 Abjuration Spell
The stunning effects of Frost Accumulation and slowing buff to Arcane Seal offer enough protection that you can forego the more direct survivability boosts provided by Beothel’s Grimoire.
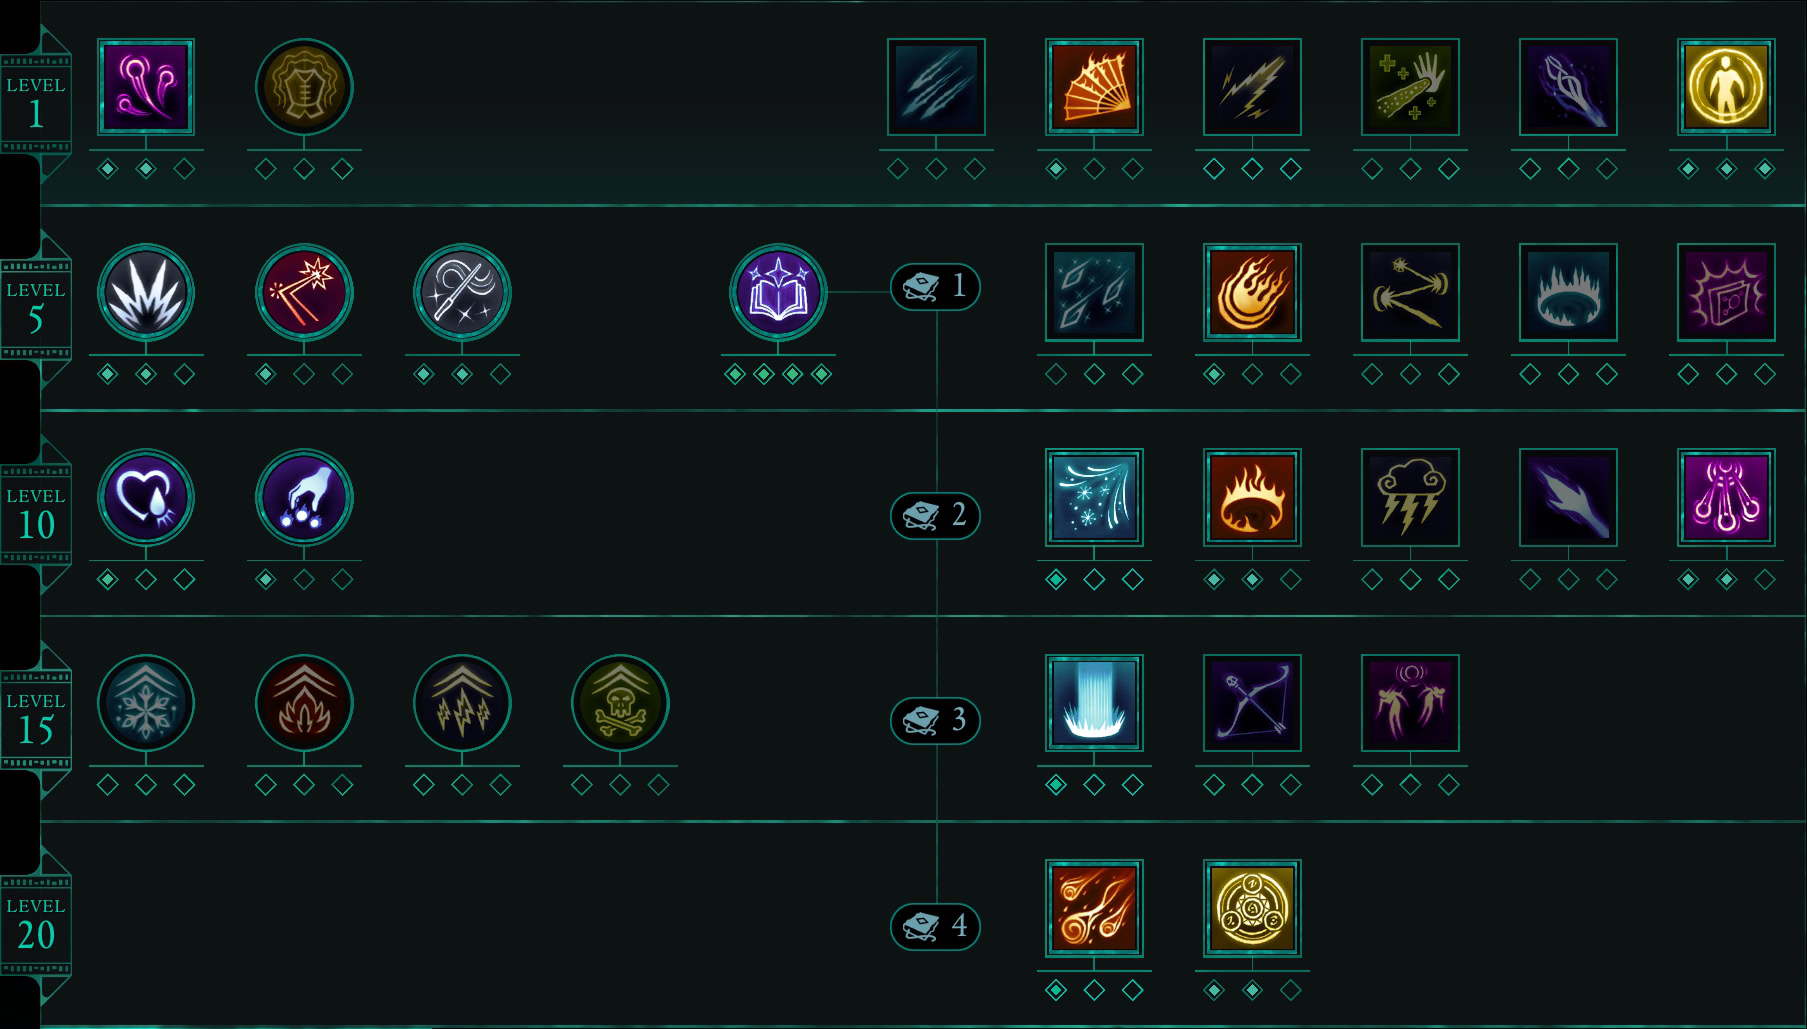
Recommended Wizard Abilities by Level 15
You can’t really afford to fully buff 2 Grimoires and your Wand at level 15, so you have to be selective about what gives you the most value per point. I believe that is accomplished by fully buffing Returning Storm, Arcane Veil, and Corrosive Siphon.
As you head towards level 20, you can start upgrading your other spells like Ring of Fire, or transition over to using the Aurochs-Skin Grimoire and upgrade those spells.
I also highly recommend picking up Critical Strike, a level 20 Ranger passive that boosts your critical chance by 10%. It’s a pretty significant damage boost.
Galawain’s Tusks Wizard Build
Your build is practically finished by the time you reach Galawain’s Tusks, but there are still a couple of accessories and clothing to pick up. You’ll also be switching out one of your Grimoires, and possibly a Wand depending on what you choose.
| Icon | Old Equipment ▶ | Icon | ▶ New Equipment |
|---|---|---|---|
| Robes of Surpassing Brilliance | Threads of the Faithful (Optional) | ||
| Warmage’s Bracers | Ninagauth’s Gruesome Grasp | ||
| Wavebinder’s Boots | Your Choice | ||
| Ring of the Peerless Marksman | Ring of Greater Overseeing | ||
| Tranton Family Talisman | Mortal Haven | ||
| Minoletta’s Conduit | Cruel Command | ||
| Od Caura’s Grimoire | Grimoire of Embers |
I recommend sticking with Minoletta’s Conduit if you plan to use Eilara’s Grimoire, but use Cruel Command if you want to use a Grimoire of Embers. You can also swap out the Robes of Surpassing Brilliance for the Threads of the Faithful, but it’s more of a lateral move than a proper upgrade.
You’re getting a touch more survivability from it being a Cuirass as opposed to a Robe (the sub-50 healing is irrelevant). Your Wand damage will also be a bit stronger at the expense of your spells being a bit weaker.
If you don’t have access to Mortal Haven, use the Cartographer’s Companion instead.
Best Wizard Boots
The Warmage’s Boots are decent when you get them, but their effects pale in comparison to what you can get in Shatterscarp and Galawain’s Tusks. Still, none of the late-game Boots offer truly great benefits to Wizards. I recommend considering the following:
| Icon | Item | Use Case |
|---|---|---|
| Berserker’s Boots | If you frequently run out of Stamina from swinging your Wand around | |
| Councilor’s Shoes | If you want a good all-rounder | |
| Shadowdancer’s Boots | If you want to maximize your dodge distance, but it’s hard to stay inside Arcane Seal | |
| Stormdancer Boots | If you’re using Minoletta’s Conduit + Eilara’s Grimoire | |
| Wavebinder Boots | If you want to stick with less interruptible casts |
Grimoires
The Aurochs-Skin Grimoire is the best spellbook in the game, but Od Caura’s Grimoire can’t put out as much damage as the Grimoire of Embers or Eilara’s Grimoire, so it’s a toss-up.
Grimoire of Embers
The Grimoire of Embers is just all of the Fire spells put together in one spellbook. Fan of Flames is a bit weak, but Fireball, Ring of Fire, and Meteor Shower are all quite powerful. Be sure to use it with Cruel Command for extra firepower (pun intended, again).
Fan of Flames
Level 1 Fire Spell
Fireball
Level 5 Fire Spell
Ring of Fire
Level 10 Fire Spell
Meteor Shower
Level 20 Fire Spell
The Grimoire of Rime, the Frost version of this spellbook, would be a contender to pair with the Whisper of Exiles, but you already get the 2 best Frost spells with the Aurochs-Skin Grimorie, so there’s no point.
Eilara’s Grimoire
Eilara’s Grimoire offers a collection of some of the highest-level offensive spells in the game and the only way to get the strongest Fire and Frost spells in the same spellbook.
Spirit Lance
Level 10 Conjuration Spell
Pull of Eora
Level 15 Arcane Spell
Freezing Pillar
Level 15 Frost Spell
Meteor Shower
Level 20 Fire Spell
Unfortunately, Obsidian decided to give us Spirit Lance instead of Returning Storm, meaning Pull of Eora turns enemies into piñatas rather than trapping them in the ultimate magical cataclysm.
I prefer the Grimoire of Embers because it also has Meteor Shower, Spirit Lance is too weak and irrelevant, the Aurochs-Skin Grimoire already has Freezing Pillar, and Pull of Eora (rightfully) isn’t good enough to make up for all that.
Recommended Wizard Abilities by Level 20
At Level 20, the focus is on getting access to Wand necessities, maximizing expanded spell functionality, grabbing the high impact damage boosts. You have a bit more flexibility if you use Eilara’s Grimoire instead of the Grimoire of Embers, but it comes at the cost of reduced functionality.
As you head towards level 25, begin upgrading Arcane Veil for use with Mortal Haven and adding a point to Critical Strike and Quick Switch in the Ranger tree.
The Garden Wizard Build
There are potentially 2 pieces of useful equipment you’ll find as a Wizard in the Garden, a new piece of Armor and a Trinket. Don’t feel obligated to change up your build. Your existing equipment works great.
| Icon | Old Equipment ▶ | Icon | ▶ New Equipment |
|---|---|---|---|
| Robes of Surpassing Brilliance | Spiritmender | ||
| Mortal Haven | Brooch of the Spreading Flame* |
Recommended Wizard Abilities by Level 25 and Beyond
At this stage, you have everything necessary for a full build that includes both the Grimoire of Embers and Aurochs-Skin Grimoire. If you aren’t using Mortal Haven, you can reallocate those points to whatever you think will be most helpful to you.
I also highly recommend putting a point in both Quick Switch and Critical Strike in the Ranger tree, as well as 1 point in Toughness (lvl 1), 3 points in Constant Recovery (lvl 1), and 2 points in Retribution (lvl 15) in the Fighter tree.