Learn everything about the Mastery Paths in Assassin’s Creed Shadows. We will give you a full ability breakdown, how to unlock the locked abilities, tell you which are the recommended abilities, and explain the pros and cons of every Mastery Path.
Table of contents
What are Mastery Trees
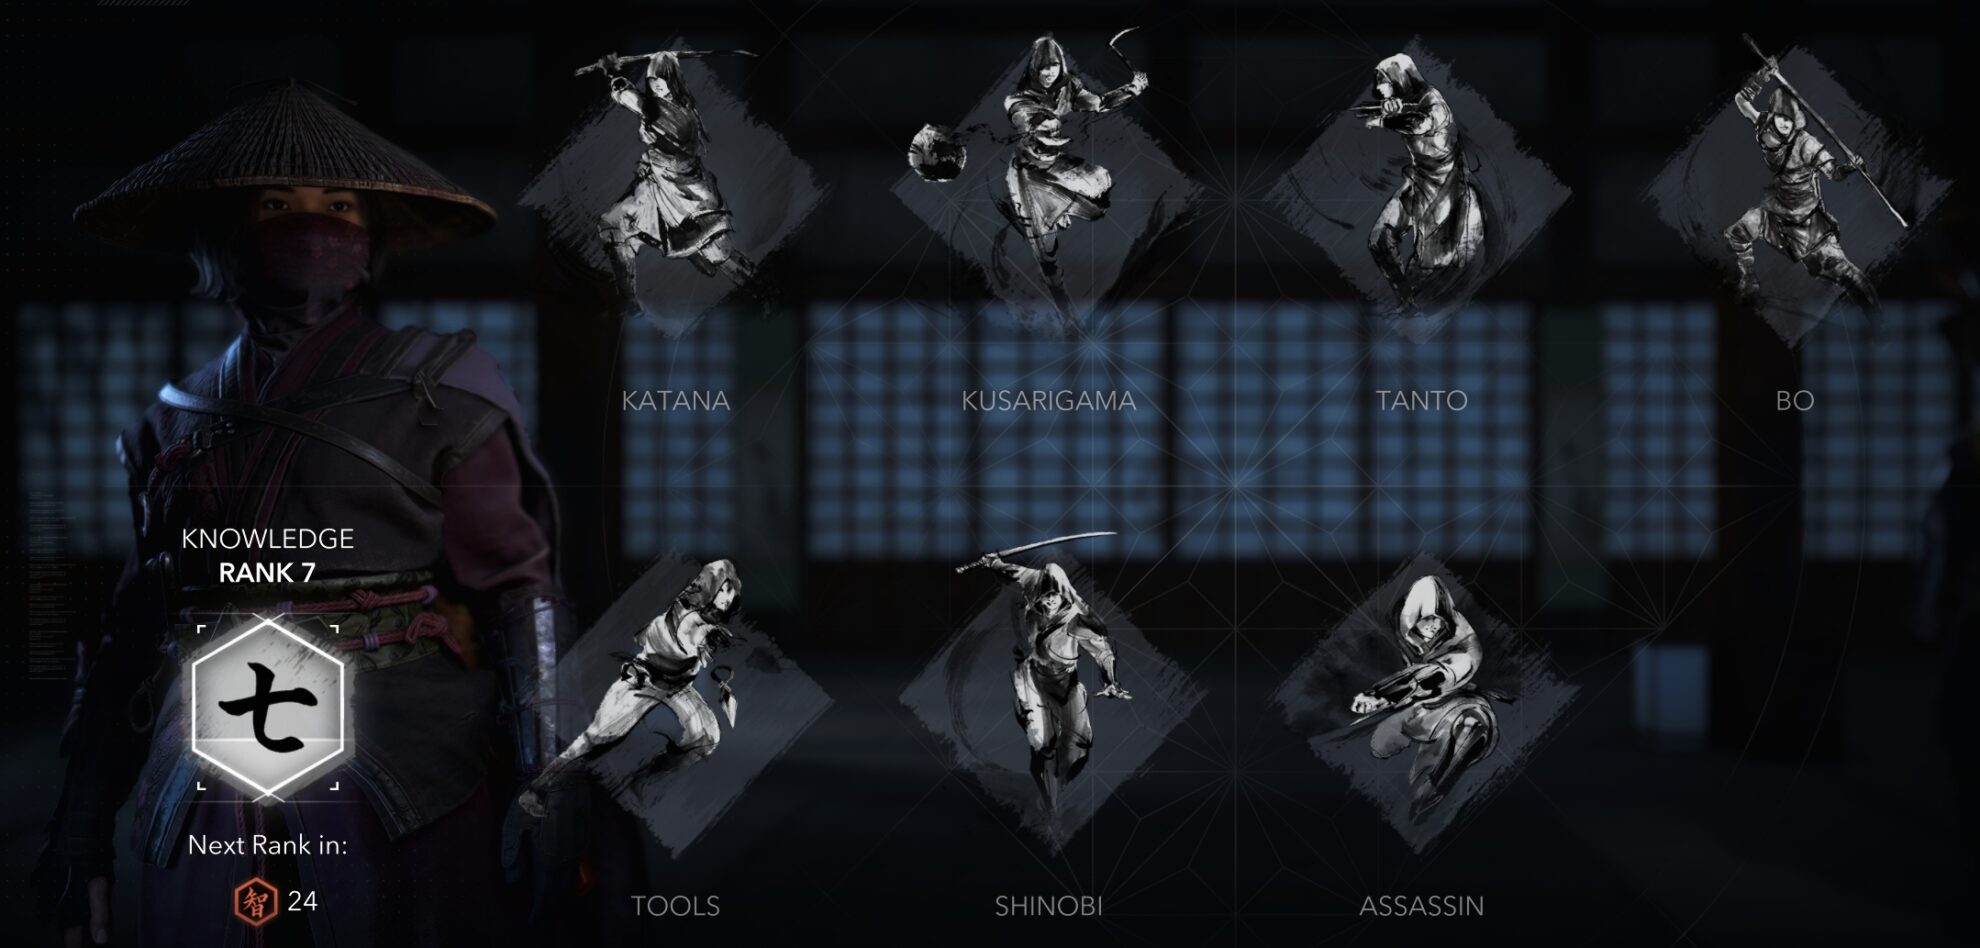
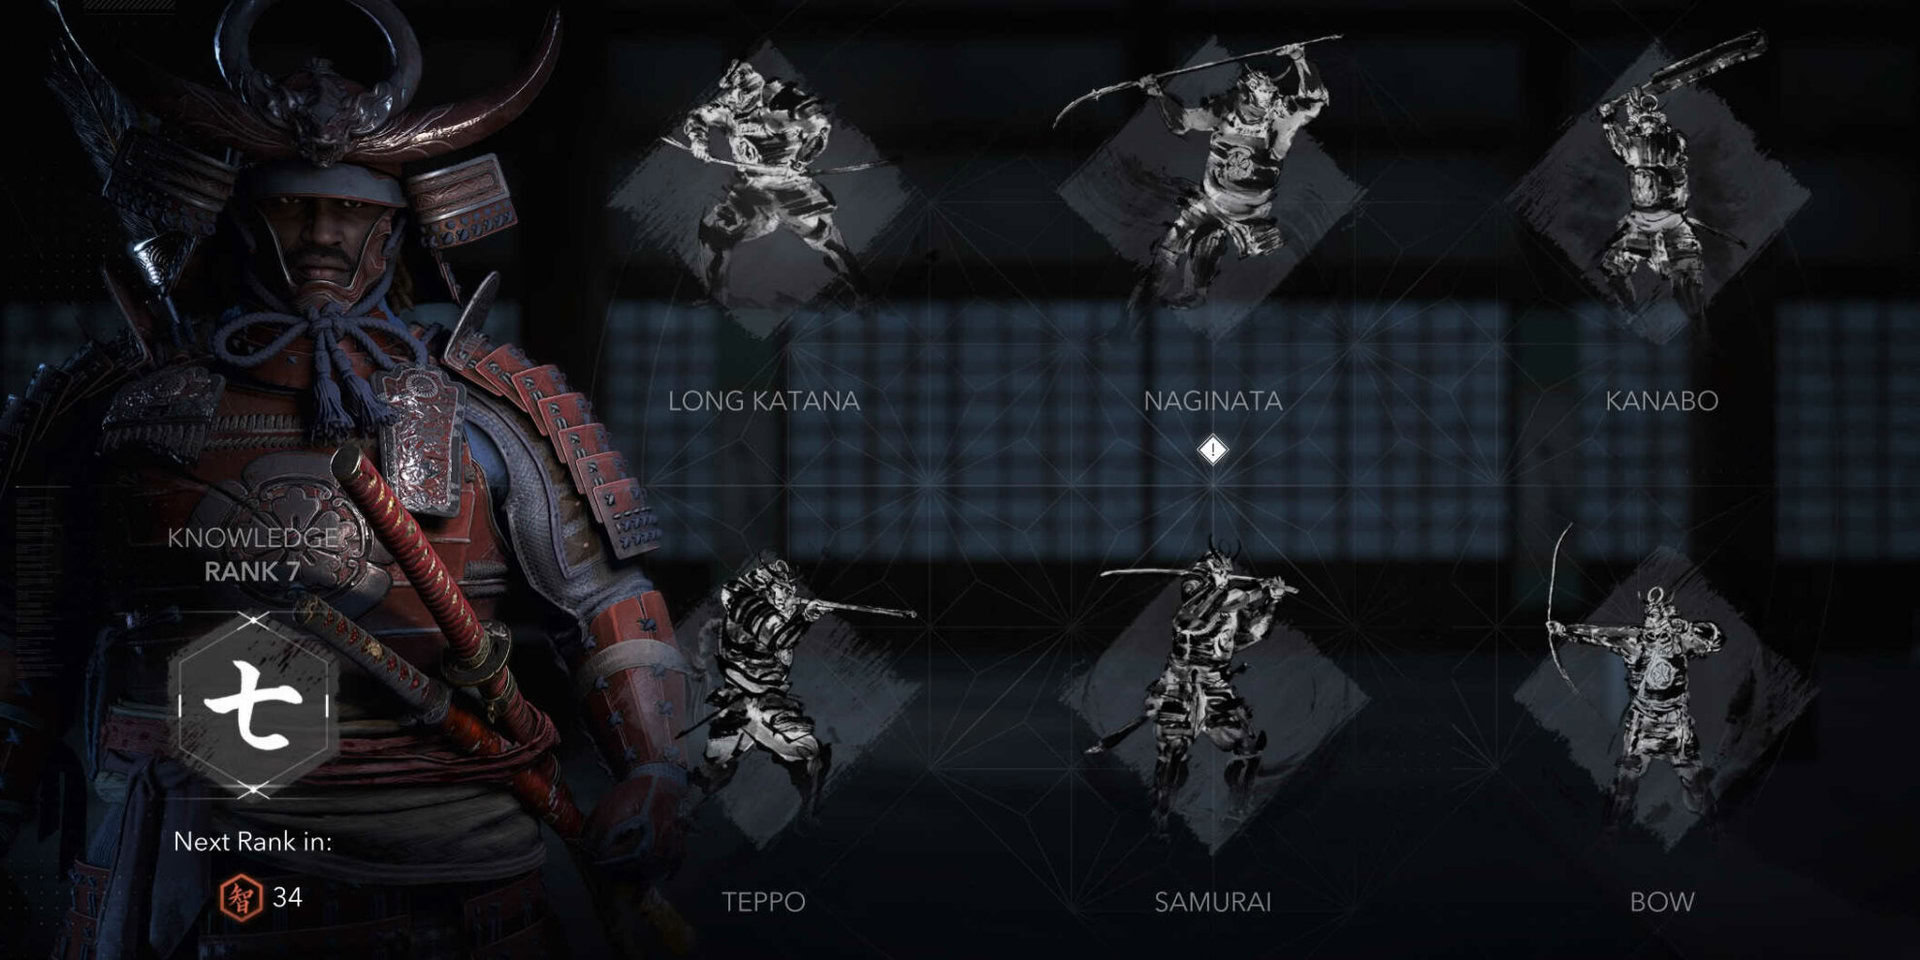
Mastery Trees are how you unlock new abilities and strengthen your martial prowess and utility. Yasuke and Naoe each have six Mastery Trees that can be upgraded to fit your playstyle.
The top row for both characters can be broken down as a Balanced Weapon (Katana/Long Katana), Area of Effect Weapon (Kusarigama/Naginata), and a DPS Weapon (Tanto/Kanabo). Naoe’s bottom row focuses on utility while Yasuke’s has a bigger emphasis on ranged weaponry.
You can reset your masteries for free while you’re out of combat if you want to reassign points or put them somewhere else.
Knowledge Points and Mastery Points
When you select a tree, you’ll see how it branches off into numerous passive and active abilities. Many of these abilities are blocked off by your Knowledge Rank or they require specific tasks to be complete such as clearing one of the many objective circles.
We have guides on all the various activities you can do to gain knowledge points. These often involve mini-games, quick time events, platforming, or locating hidden objects.
| Temples | |
| Shrines | |
| Kuji-kiri (for Naoe only) | |
| Kata (for Yasuke only) | |
| Horse Archery (for Yasuke only) | |
| Kofun | |
| Hidden Trail (for Naoe only) |
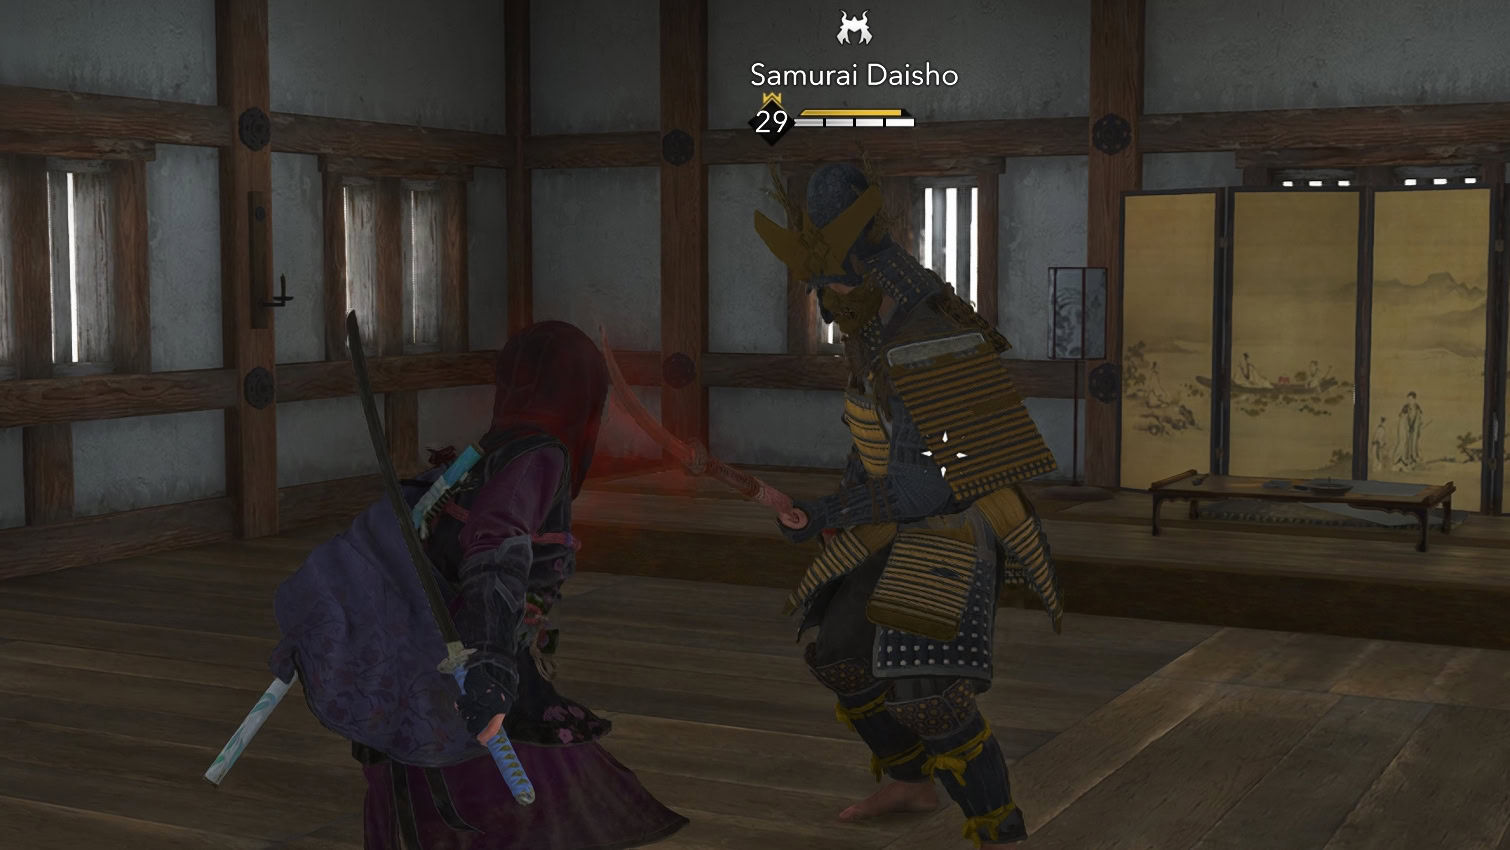
Mastery Points act as the currency needed to fill out passive and active abilities. You’ll gain one mastery point as you level up but you can also obtain them by killing Samurai Daisho and Objective Board targets.
Taking down Samurai Daisho is one of the best ways to get mastery points, but sneaking into a castle and tracking them down can be tricky and time consuming, but is worth the time and effort.
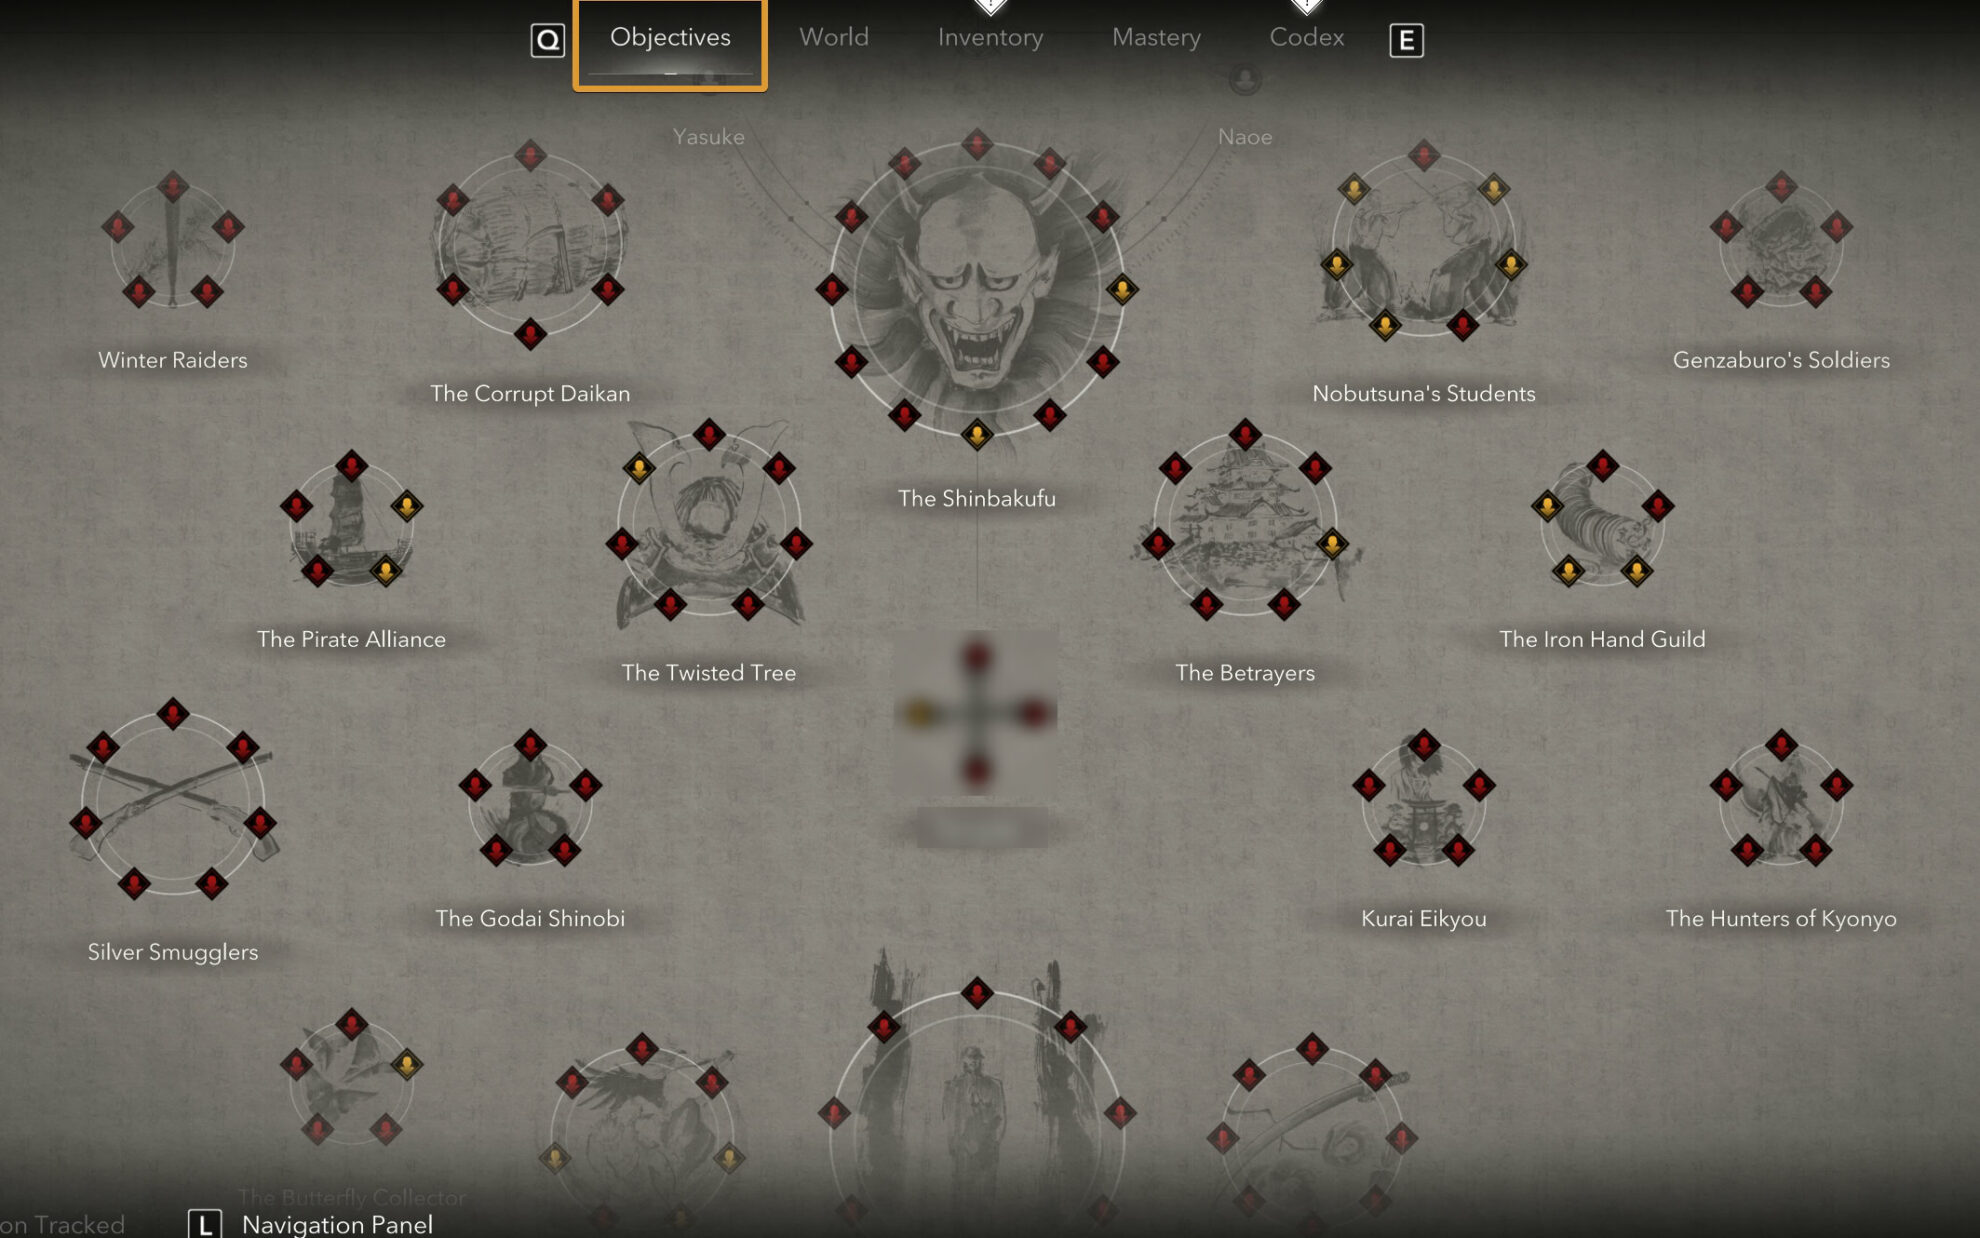
Objective Board targets are found under the Objectives Menu and include groups such as the Shinbakufu, Twisted Tree, Pirate Alliance, and more.
Active and Passive Abilities
You can equip up to three active abilities at a time. Two of these are weapon abilities, while the other comes from the Samurai or Shinobi tree.
Each weapon tree has three active abilities, so you’ll need to pick two that you favor or need for your current situation.
You can assign abilities to one of you keys or button inputs. Some builds favor unfilled ability slots, so you also have the ability to unassign your inputs as well. You cannot swap active abilities while in combat.
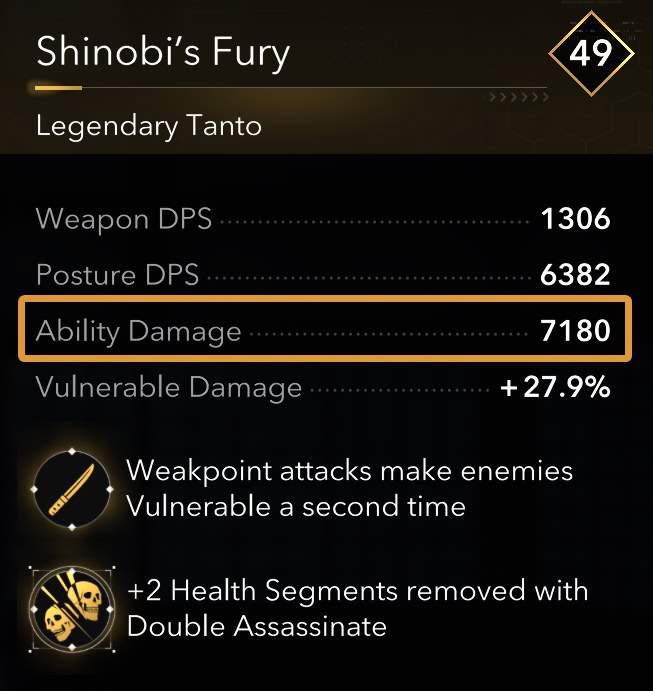
When an active ability says it deals a percentage of ability damage, this means that it’ll deal damage equal to your weapon’s Ability Damage value. For example, if you use a weapon ability with 25% ability damage with a weapon that has 1,000 ability damage, the ability will deal 250 damage.
A good time to use active abilities is when you’re surrounded by numerous attackers. Activating an active ability grants you temporary invulnerability, allowing you some breathing room and sometimes the chance to reposition.
The passive abilities are broken down between Global Passives and Weapon-specific Passives. Weapon-specific passive abilities only apply when you have that weapon equipped.
If you gain stats from a global passive from one tree, you’ll gain this bonus while using any other qualifying weapon (ranged bonuses can’t apply to melee weapons for example). The global passives are always found in the left column, but there may be weapon-specific passives in this left column.
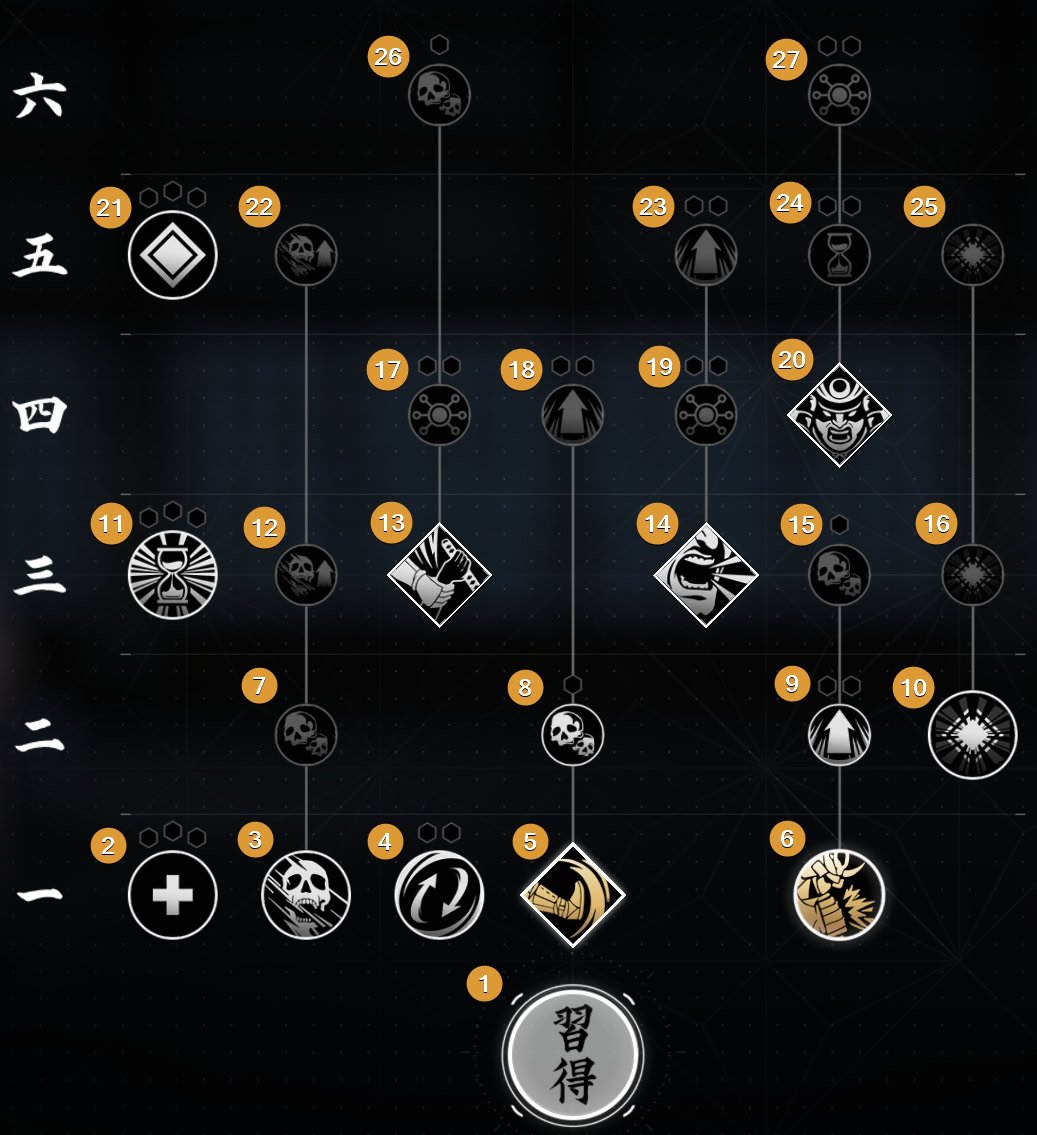
Naoe’s Mastery Trees
Naoe’s talents are more in-line with traditional Assassin’s Creed style gameplay. What she lacks in ranged weaponry, she makes up for with great tools and numerous utility passives.
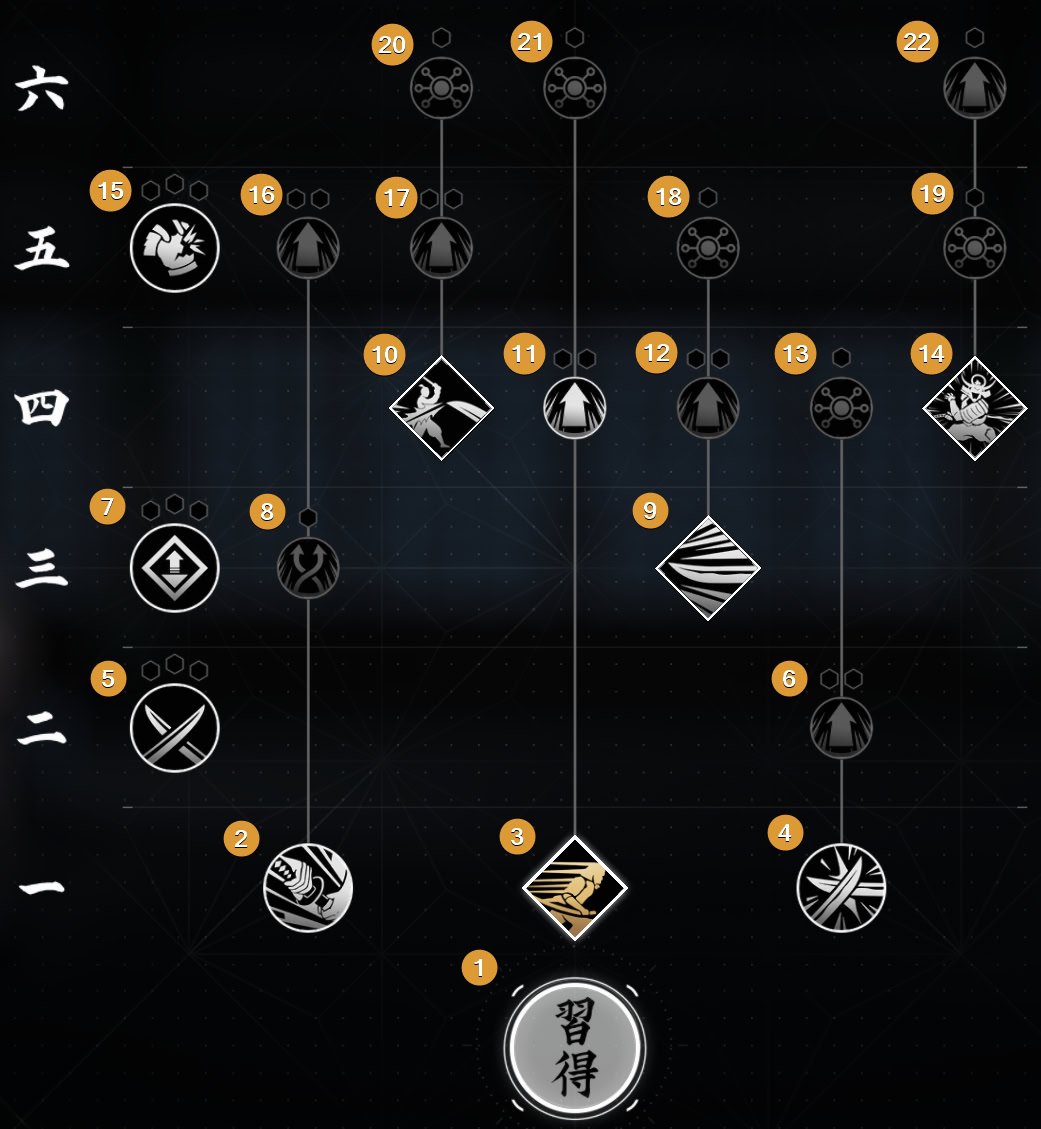
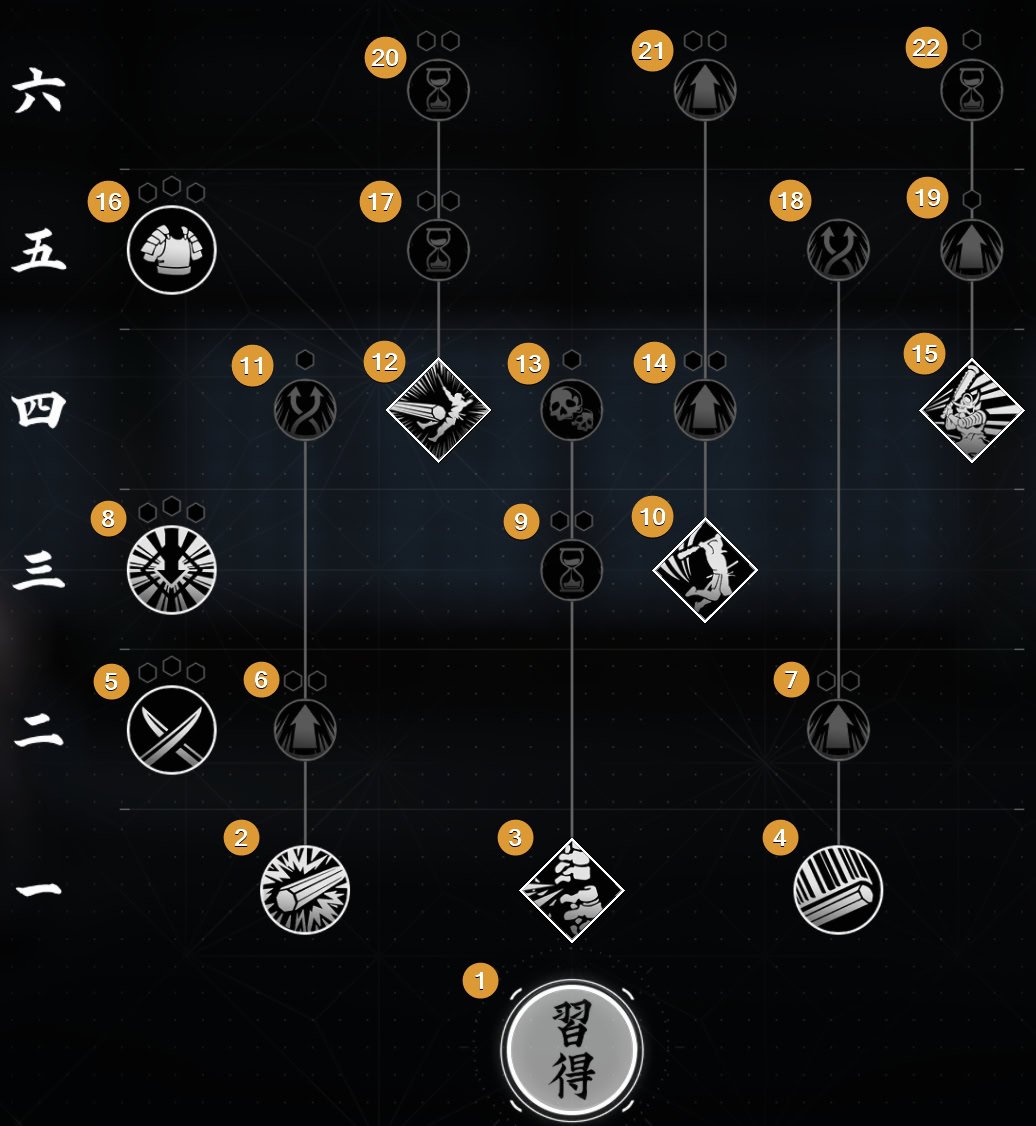
Katana
The katana is a solid choice for any situation. It rewards good parries and dodges, can provide an armor shred, give minor crowd control, and allows you numerous ways to make an enemy vulnerable.
| № | Ability Name | Description |
|---|---|---|
| 1 | Katana Mastery | Katana Passive: Increase Katana damage by 3-120% for mastery points spent in the Katana tree. |
| 2 | Melee Expert | Global Passive: Increase damage with Melee Weapons by 2/5/9/13% |
| 3 | Dodge Attack | Katana Passive: Use a light attack after a dodge to launch a fast counter-attack and quickly get back to the enemy. |
| 4 | Tidal Wave | Katana Ability: An extremely fast strike dealing 25% ability damage and making the enemy vulnerable. |
| 5 | Affliction Effectiveness | Global Passive: Increase damage on Afflicted Enemies by 2/6/12/18%. An enemy is Afflicted when suffering from Bleed, Poison, or Daze. |
| 6 | Generator | Katana Passive: Dodge Attacks generate 10% of an Adrenaline Chunk on hit. At rank 2, Dodge Attack’s damage is increased by 40%. At Rank 3, Dodge Attacks generate 15% of an Adrenaline Chunk on hit. |
| 7 | Counter Attack | Katana Passive: Parry at the last moment to turn your Deflect into a counter-attack. |
| 8 | Second Wave | Katana Passive: Tidal Wave can now be chained 2 times in a row. At rank 2, Tidal Wave’s damage is increased by 40%. At rank 3, targets are left Vulnerable for an extra 2 seconds. |
| 9 | Eviscerate | Katana Ability: Strike an enemy, dealing 75% ability damage and pushing them away. Half as effective on large enemies. |
| 10 | Momentum Builder | Global Passive: Increase damage with consecutive hits by 1/3/6/9% |
| 11 | No Mercy | Katana Passive: Successful Dodge Attacks make the target Vulnerable. At rank 2, Dodge Attack damage increases by 60%. At rank 3, dodged attacks make enemies vulnerable for an extra 3 seconds. |
| 12 | Guard Breaker | Katana Ability: Unleash 9 strikes, each dealing 10% ability damage and breaking armor. Half as effective on large enemies. |
| 13 | Outclass | Eviscerate now has its full effect on large enemies. At rank 2, increase Eviscerate damage by 40%. |
| 14 | Swift Step | Katana Passive: Counter Attack can now be performed on flurry attacks. At rank 2, Counter Attack’s damage is increased by 40%. |
| 15 | No Quarter | Katana Passive: Guard Breaker now has its full effect on large enemies. At rank 2, Guard Breaker’s damage is increased by 40%. |
| 16 | Smokescreen | You can now drop a smoke bomb after Eviscerate’s push. At rank 2, Eviscerate’s damage increases by 60%. |
| 17 | Unstoppable | Katana Passive: Guard Breaker can no longer be blocked or parried. At rank 2, Guard Breaker’s damage increases by 60%. |
| 18 | Third Wave | Katana Passive: Tidal Wave can now be chained 3 times in a row. At rank 2, Tidal Wave’s damage increases by 60%. At rank 3, targets are left vulnerable for an extra 2 seconds. Unlocked after completing The Kabukimono |
| 19 | Hardened | Katana Passive: Counter Attack can now be performed on unstoppable attacks. At rank 2, Counter Attack’s damage is increased by 60%. |
Recommended Abilities
Tidal Wave
Tidal wave is easily one of the best abilities in the game as it can make up to 3 separate targets vulnerable on demand.
This works great as an opener, to reset your attack combos, or to interrupt flurry and unlockable attacks. It also acts as a gap-closer for chasing down ranged enemies.
Guard Breaker
I recommend this over Eviscerate in most situations. You’ll often run into armored opponents which can be a hassle to deal with. The ability to shred their armor entirely means they’ll die that much quicker when followed up by Tidal Wave.
The upgrades are necessary as without the full effects or damage boost, you might not shred through all of an enemy’s armor.
Counter Attack
Early on the extra damage is nice, but it’s the Swift Step and Hardened upgrades you’re after. Being able to interrupt flurry attacks and block previously unblockable attacks is too useful to turn down. When you get good at parrying, there isn’t anyone who can stop you in a combat scenario.
When to use the Katana
The katana is good in any situation. While it lacks significant area damage, you can chip away at multiple enemies by parrying with Counter Attack. With the katana, you’ll be ready for ANY situation whether you’re fighting squishy, armored, melee, or ranged opponents.
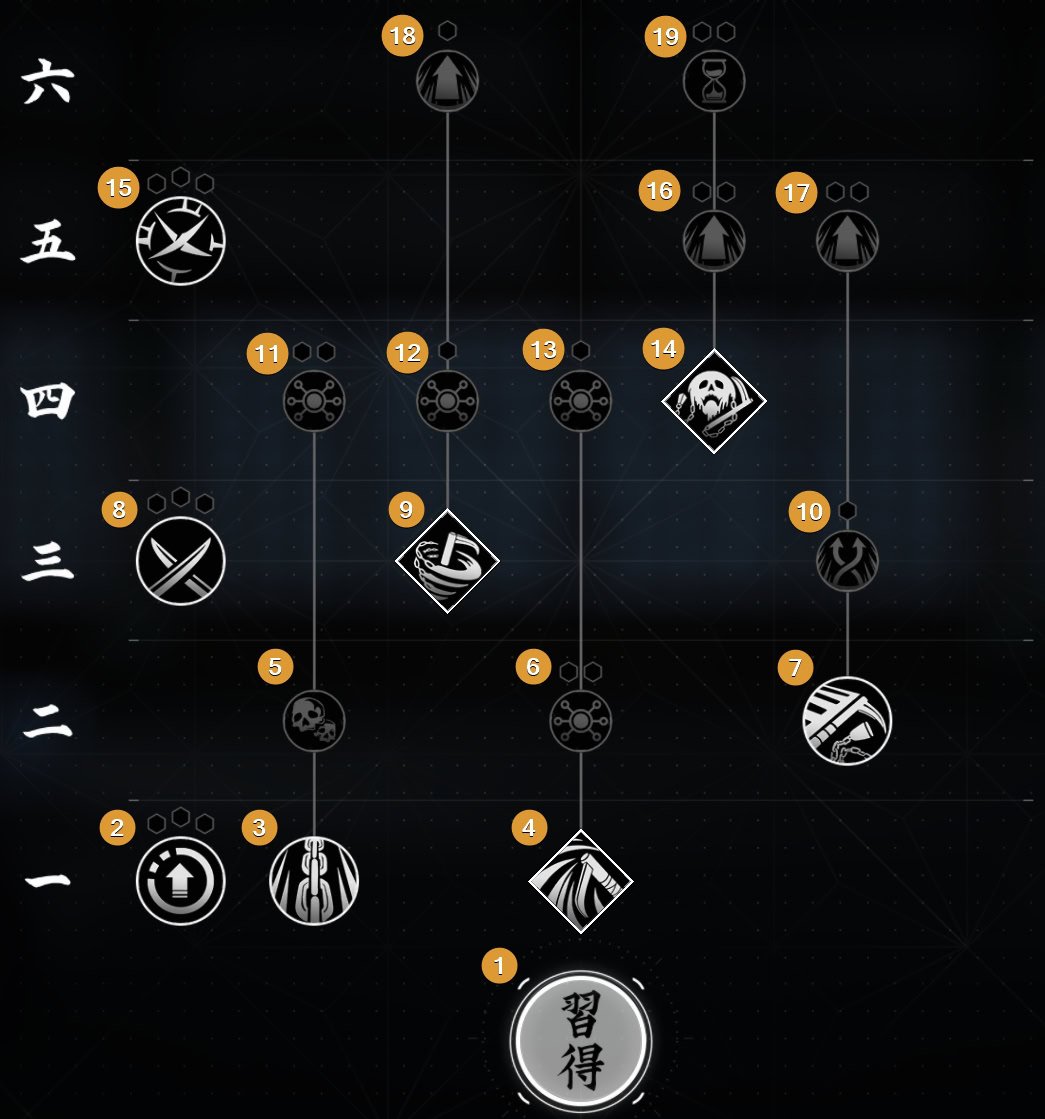
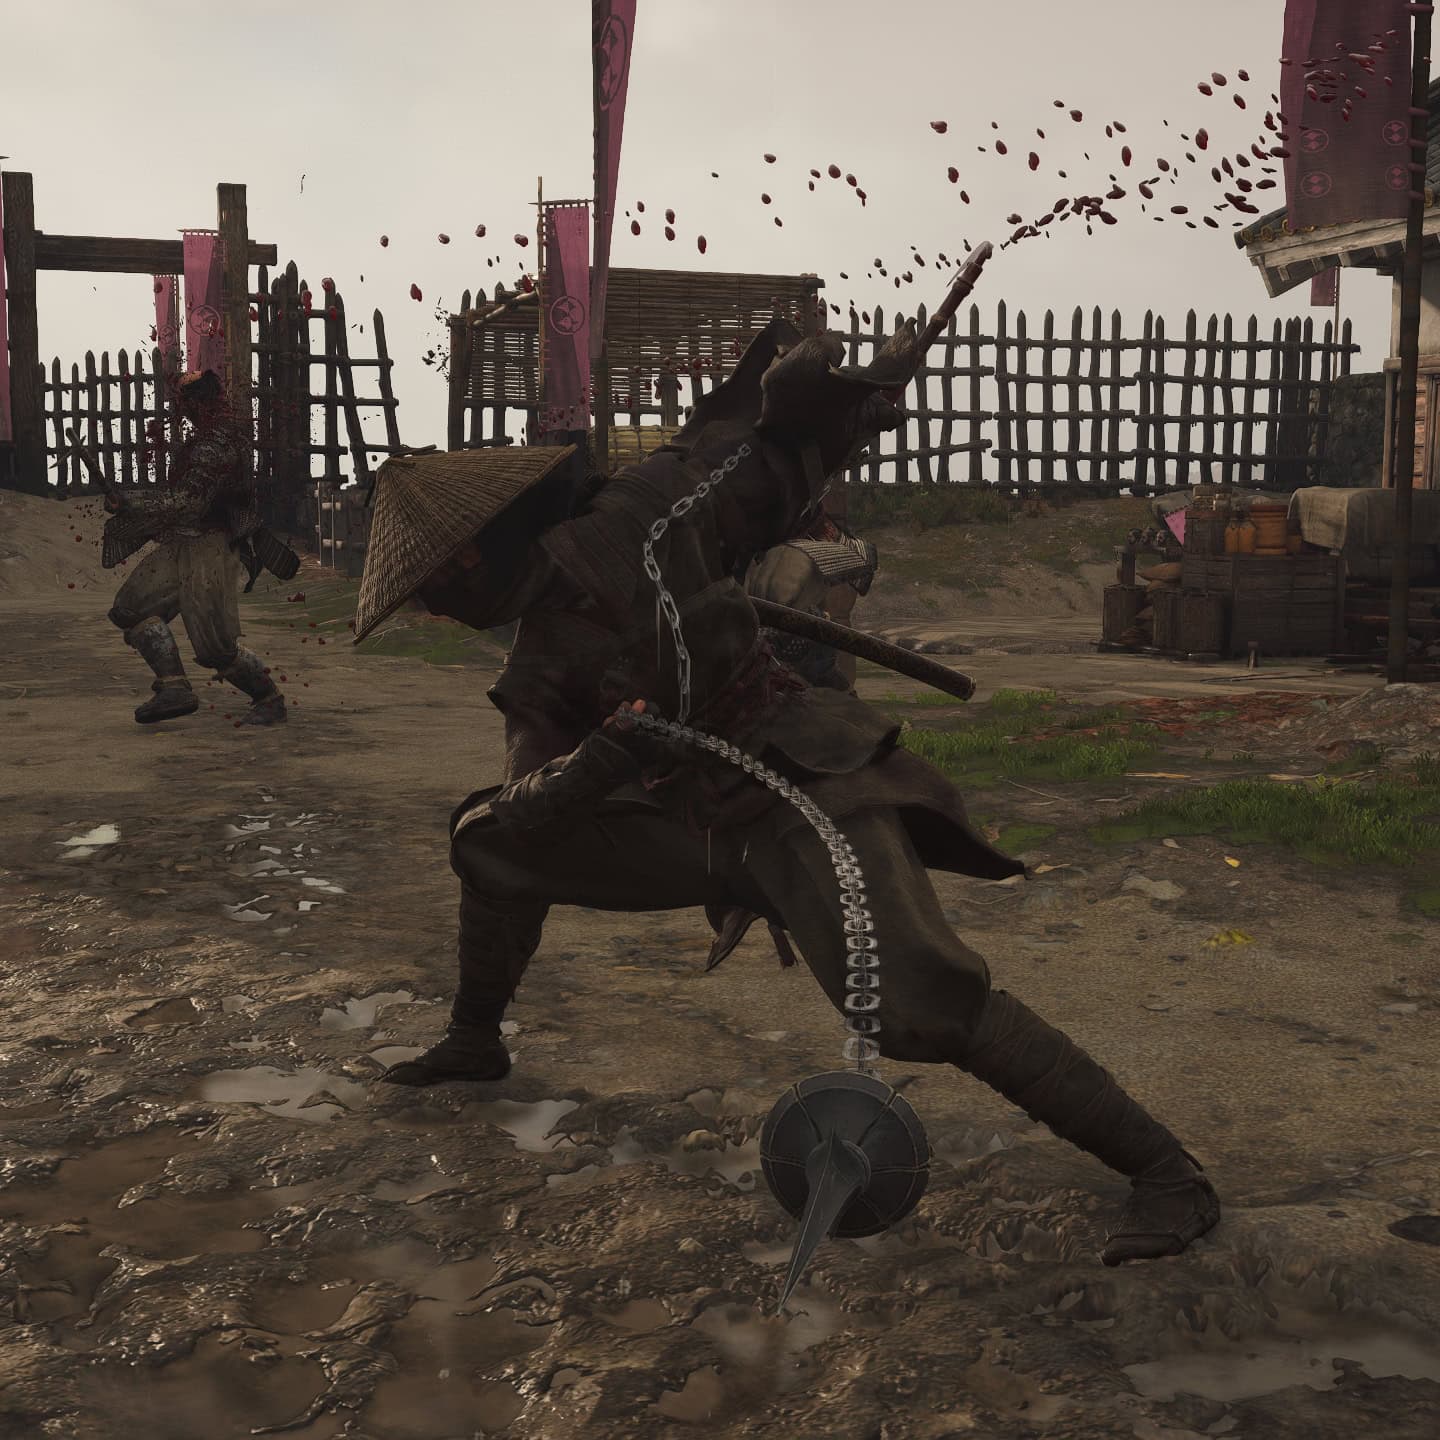
Kusarigama
The Kusarigama is Naoe’s Area of Effect weapon. It’s heavy attack will hit anyone in a wide circle around Naoe while its light attack uses the sickle for single targets. If you’re looking to keep your distance from your enemies, you’ll want to use the Kusarigama.
| № | Ability Name | Description |
|---|---|---|
| 1 | Kusarigama Mastery | Katana Passive: Increase Katana damage by 3-120% for mastery points spent in the Katana tree. |
| 2 | Affliction Builder | Global Passive: Increase Affliction building up 1/3/6/9%. |
| 3 | Entanglement | Kusarigama Passive: Before hitting an enemy with a Posture attack, hold down a light or heavy attack to entangle them. Throw regular enemies in any direction. |
| 4 | Feral Outburst | Kusarigama Ability: Launch Naoe towards a single enemy and unleash a flurry of 4 strikes dealing 16% ability damage to each. |
| 5 | Big Catch | Kusarigama Passive: Entanglement now has its full effect on large enemies. |
| 6 | Exposed Wound | Passive/Active: Feral Outburst’s final strike makes the target Vulnerable. At rank 2, increases Feral Outburst’s damage by 40%. At rank 3, the target is Vulnerable for an extra 3 seconds. |
| 7 | Quick Strike | Kusarigama Passive: After any attack, momentarily pause and then use a light or heavy attack to launch 2 extra strikes. |
| 8 | Multi-Target Expert | Global Passive: Increase damage when hitting people by 3/8/15/22%. |
| 9 | Cyclone Blast | Kusarigama Ability: Swing the Kusarigama in large circles around Naoe, dealing 8% ability damage per hit and pushing back struck enemies. |
| 10 | Catalyst | Kusarigama Passive: After a combo ender, use a light or heavy attack to extend the combo with a Quick Strike. At rank 2, increase Quick Strike’s damage by 40%. |
| 11 | Tug of War | Kusarigama Passive: When pulling an enemy towards Naoe, perform a powerful attack that deals 50/75/100% ability damage and knocks them down. |
| 12 | Lasting Storm | Kusarigama Passive: Cyclone Blast now performs 4 additional swings. At rank 2, increase Cyclone Blast damage by 40%. |
| 13 | Feral Frenzy | Kusarigama Passive: Feral Outburst now unleashes 2 extra strikes. At rank 2, Feral Outburst’s damage is increased by 60%. Unlocks after completing The Winter Raiders |
| 14 | Snake Bite | Kusarigama Ability: Wrap the chain of the Kusarigama around a single enemy’s foot to knock them out and deal 40% ability damage. |
| 15 | Critical Proficiency | Global Passive: Increase Critical Damage by 2/6/12/18%. |
| 16 | Hard Fall | Kusarigama Passive: After getting up, the enemy is afflicted by Daze. At rank 2, Snake Bit damage is increased by 40%. At rank 3, Daze on affected targets lasts an extra 2 seconds. |
| 17 | Dazed | Kusarigama Passive: Quick Strike now inflicts 15% Daze buildup with each strike. At rank 2, Quick Strike damage is increased by 60%. At rank 3, Daze buildup is now 20%. |
| 18 | Enhanced Impact | Kusarigama Passive: Cyclone Blast’s last hit pushes back the enemies significantly further. At rank 2, Cyclone Blast damage is increased by 60%. Unlocked after completing The Hunters of Kyonyo |
| 19 | Knock Out | Kusarigama Passive: Increase knockdown duration by 10 seconds. At rank 2, Snake Bite’s damage is increased by 60%. At rank 3, the knockdown duration is increased by 15 seconds. |
Recommended Abilities
Feral Outburst
You’ll want this to get the Exposed Wound passive that allows you to get on-demand vulnerability on a target.
Cyclone Blast
This is must-have especially with Lasting Storm upgrade. With all those swings, you will easily apply Affliction on a large group of enemies around you. What type of affliction you’ll want depends on your playstyle:
For a defensive playstyle, use a daze kusarigama. Afflicting multiple enemies with Daze will make them miss their attacks while allowing you to use heavy Quick Strikes without interruption.
For more crowd control, use a poison kusarigama. The small ticks of damage are nice and the occasional pause to vomit on opponents helps keep them still for further attacks.
For more DPS, use a bleed kusarigama to make a large group of enemies take bleed damage.
Multi-Target Expert
The kusarigama is Naoe’s best area of effect weapon, this is a must if you wish to use this weapon a lot.
When to use the Kusarigama
The kusarigama works best in tight areas filled with enemies. It shines in forts and castles, but I wouldn’t recommend it for combat near civilians. With the large area attacks, you could hit civilians and force a desynchronization, causing you to reload.
If you enjoy combat over stealth, this would pair well with the katana. The katana would be your go-to for single targets while the kusarigama makes up for the katana’s lack of area damage.
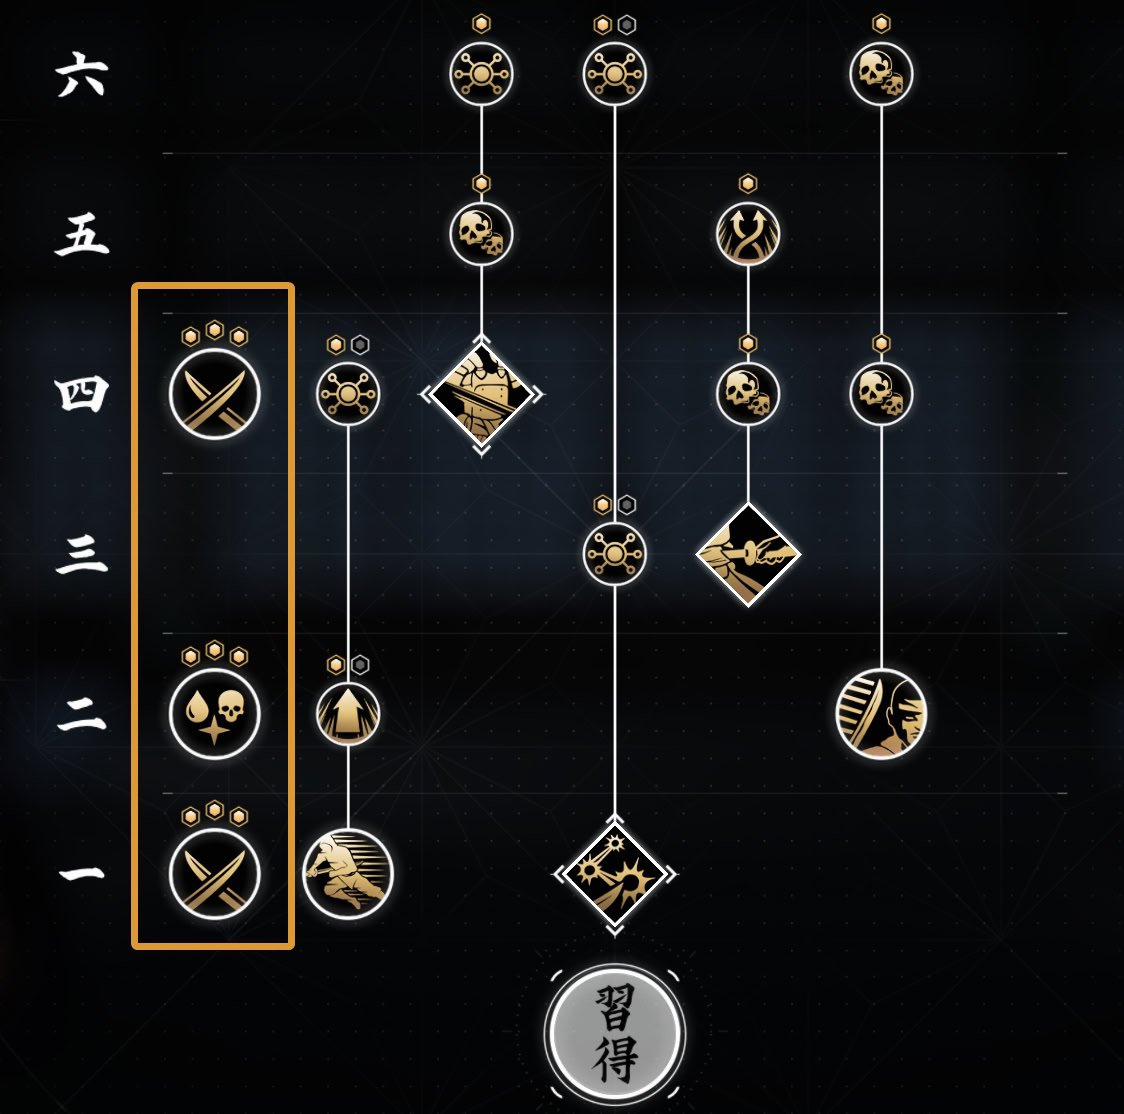
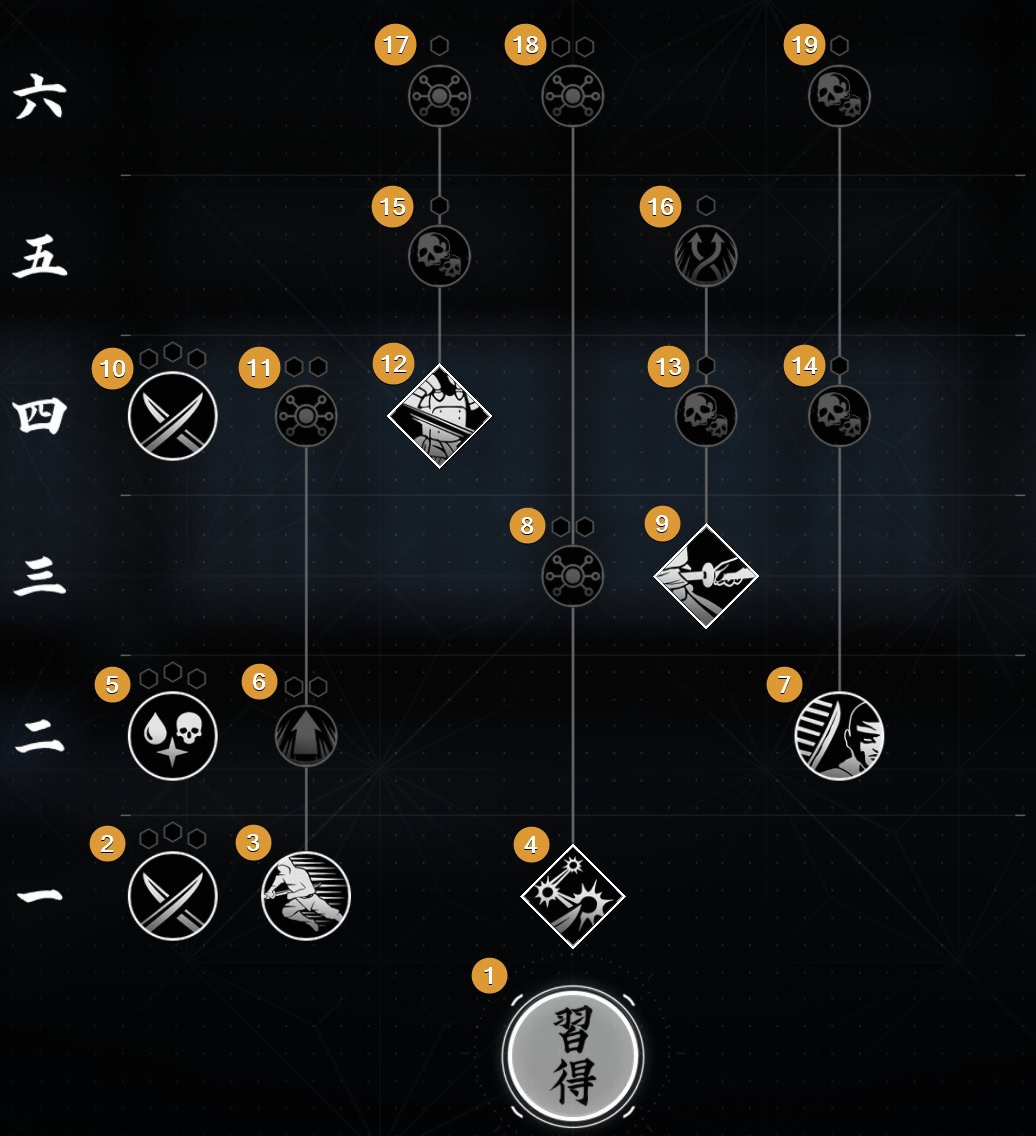
Tanto
The Tanto is for those who want an energetic, dual-wielding experience. While wielding the tanto, Naoe also draws out her hidden blade and has the option to assassinate targets while in combat.
| № | Ability Name | Description |
|---|---|---|
| 1 | Hidden Blade & Tanto Mastery | Tanto Passive: Increase Kusarigama damage by 3-120% for mastery points spent in the Tanto tree. |
| 2 | Gap Seeker | Global Passive: Increase Armor Piercing by 3/9/18/27%. |
| 3 | Leap Strike | Tanto Passive: While holding down a light of heavy attack, press Dodge and a direction to leap toward the target and strike. |
| 4 | Shadow Piercer | Tanto Ability: Throw the Tanto, then dash forward to stab the target and make them Vulnerable, dealing 40% ability damage with each strike. |
| 5 | Backstabber | Global Passive: Increase damage from behind by 2/6/12/18%. |
| 6 | Escape Strike | Tanto Passive: While holding down a light or heavy attack, press Dodge to perform a strike and backward dodge. At rank 2, increase Leap Strike and Escape Strike damage by 40%. |
| 7 | Shadow Barrage | Tanto Ability: Naoe will automatically perform a quick evade before getting hit, lasting 20 seconds and up to 7 hits. Does not work on Grab attacks. |
| 8 | Backstab | Tanto Passive: Light Posture attacks that hit an enemy’s back trigger Weak Point attacks. |
| 9 | Blood Rush | Tanto Passive: Leap Strike and Escape Strike generate 10% of an Adrenaline Chunk on hit. At rank 2, increase Leap Strike and Escape Strike damage by 60%. At rank 3, Leap Strike and Escape Strike generate 15% of an Adrenaline Chunk on hit. |
| 10 | Invigorating Kill | Tanto Passive: Shadow Piercer generates 50% of an Adrenaline Chunk on kill. At rank 2, increase Shadow Piercer damage by 40%. At rank 3, Shadow Piercer generates 75% of an Adrenaline Chunk on kill. |
| 11 | Back Breaker | Tanto Passive: Posture attacks performed behind an enemy now have 100/120/150% Armor Piercing. |
| 12 | Hidden Hand | Tanto Ability: Sheath your Tanto and extend the Hidden Blade in its classic form to perform an Assassination while in combat. |
| 13 | Shadow Reach | Tanto Passive: Increase Shadow Piercer throw distance by 10 meters. At rank 2, increase Shadow Piercer damage by 60%. At rank 3, increases Shadow Piercer’s throw distance by 15 meters. |
| 14 | Endless Barrage | Tanto Passive: Each kill while Shadow Barrage is active increases all damage by 5%. At rank 2, increase Shadow Barrage duration by 5 seconds or up to 1 additional hit. At rank 3, each kill while Shadow Barrage is active increases all damage by 8%. |
| 15 | Critical Thinker | Global Passive: Increase Critical Chance by 1/2/4/6%. |
| 16 | Hidden Onslaught | Tanto Passive: +1 Health Segment removed when used against unaware enemies. At rank 2, Hidden Hand cooldown decreased by 5%. At rank 3, Hidden Hand cooldown decreased by 7%. |
| 17 | Contemplation | Tanto Passive: Increase Shadow Barrage duration by 10 seconds or up to 3 additional hits. At rank 2, increases Shadow Barrage damage by 10%. At rank 3, damage increases by 15%. Unlocked after completing Yamabushi Imposters |
| 18 | Broken Spirit | Tanto Passive: Hidden Hand cannot be blocked or parried. Bosses reduce damage to 3 Health Segments with Hidden Hand. At rank 2, Hidden Hand cooldown decreased by 10%. At rank 3, cooldown is decreased by 13%. |
| 19 | Healthy Sting | Tanto Passive: Weakpoint Attacks triggered from behind an enemy restore 5/7/10% Health. |
Recommended Abilities
Shadow Piercer
Use this to close the gap between you and a ranged enemy. Alternatively, use it as a finisher as you’ll get 80% of your Adrenaline Chunk back with the Invigorating Kill passive.
Hidden Hand
This is your instant-kill ability. The ability to perform a mid-combat Assassination is too good to pass up as the damage it does scales with your Assassination Damage.
Backstab
Backstab requires you to be good with positioning and dodging to make good use of it. The 100% armor piercing with a heal on top of a weak point attack is great for fighting enemies like Samurai Daisho.
When to use the Tanto
The tanto works best when fighting a single or a few targets at a time. It’s easy to get overwhelmed by multiple opponents as this weapon favors dodging over parrying. It’s an excellent weapon to apply afflictions with due to the speed it applies them via light attacks.
It may seem weak at first due to the small hits, but these are fast small hits that’ll quickly add up. If you take some time to increase your mastery with it, it’ll reward you with armor piercing and instant kills with mid-combat assassinations.
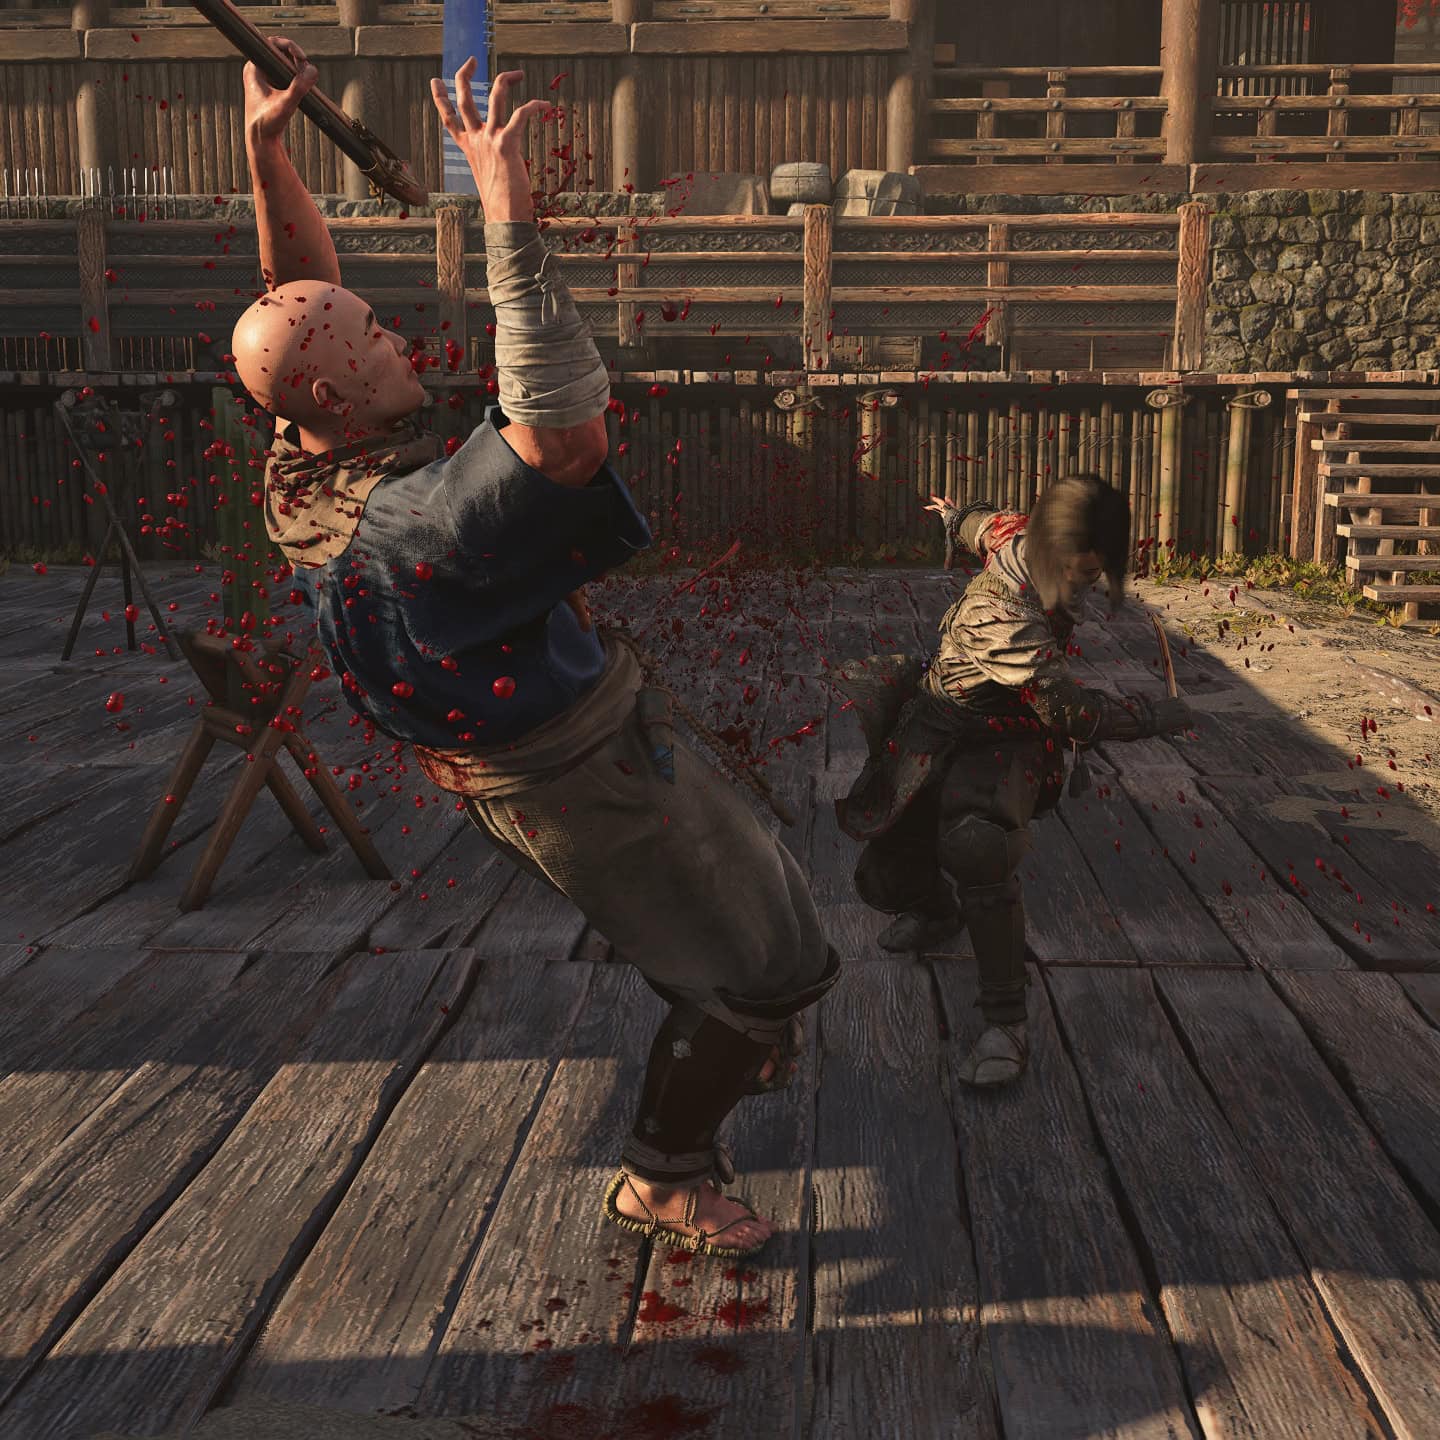
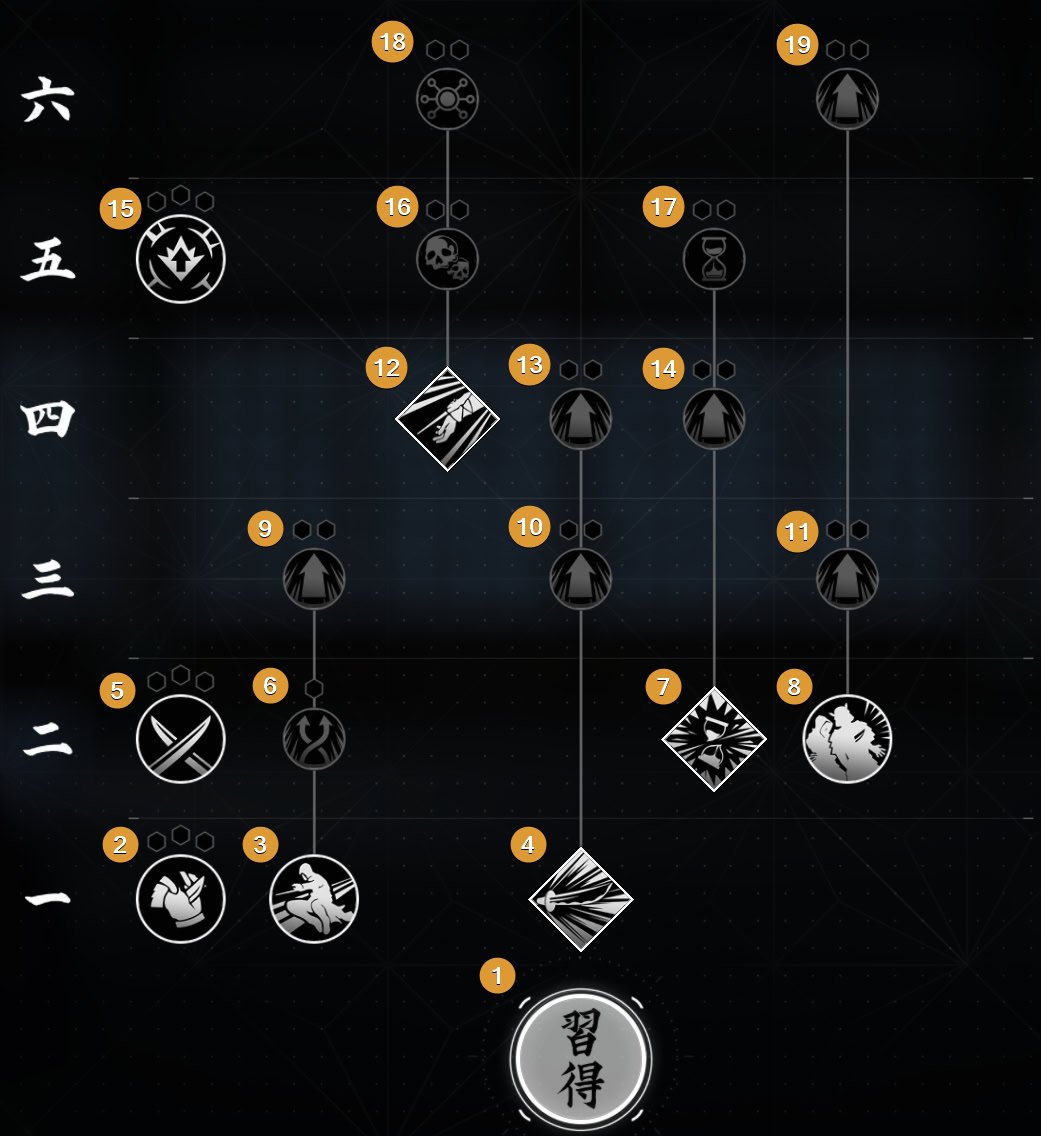
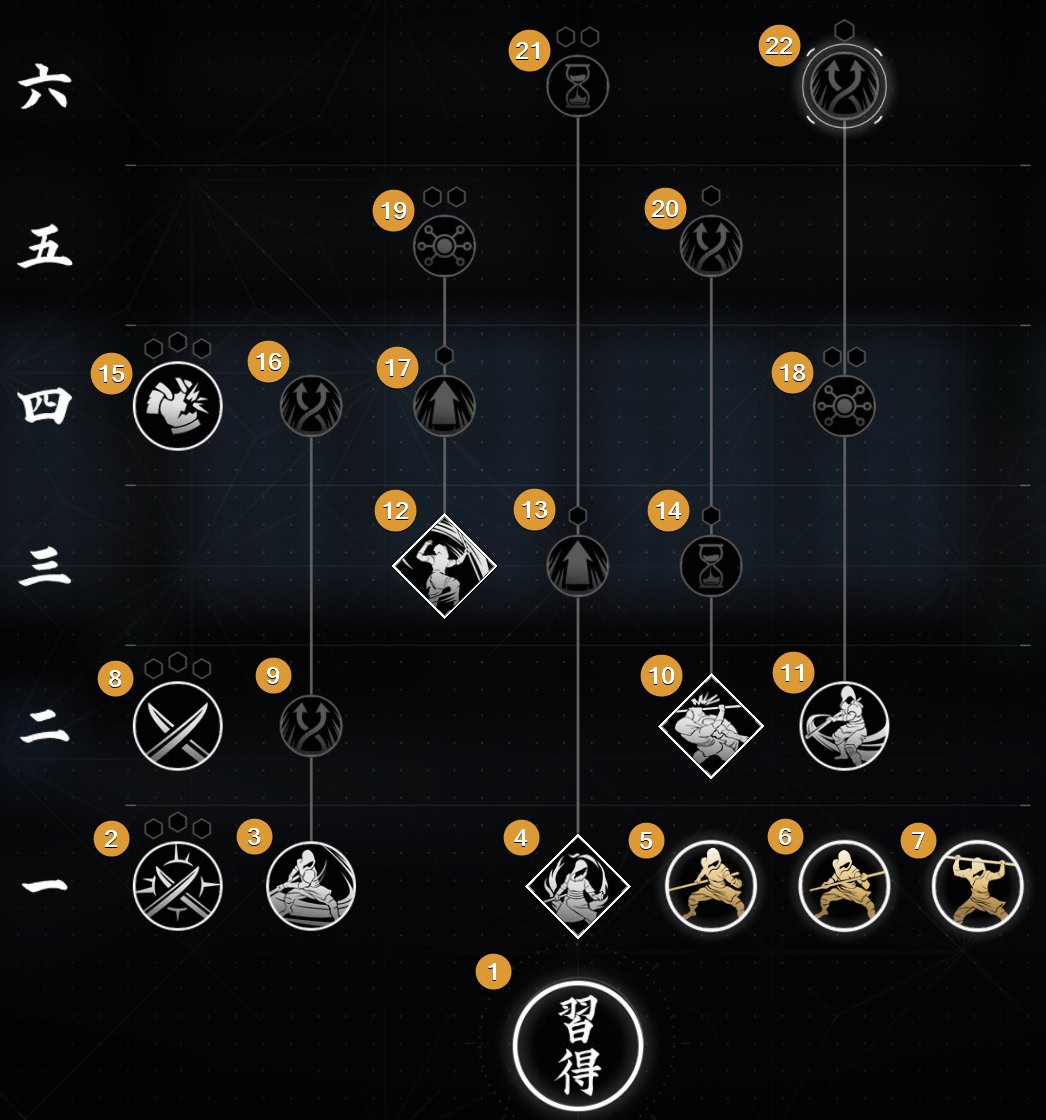
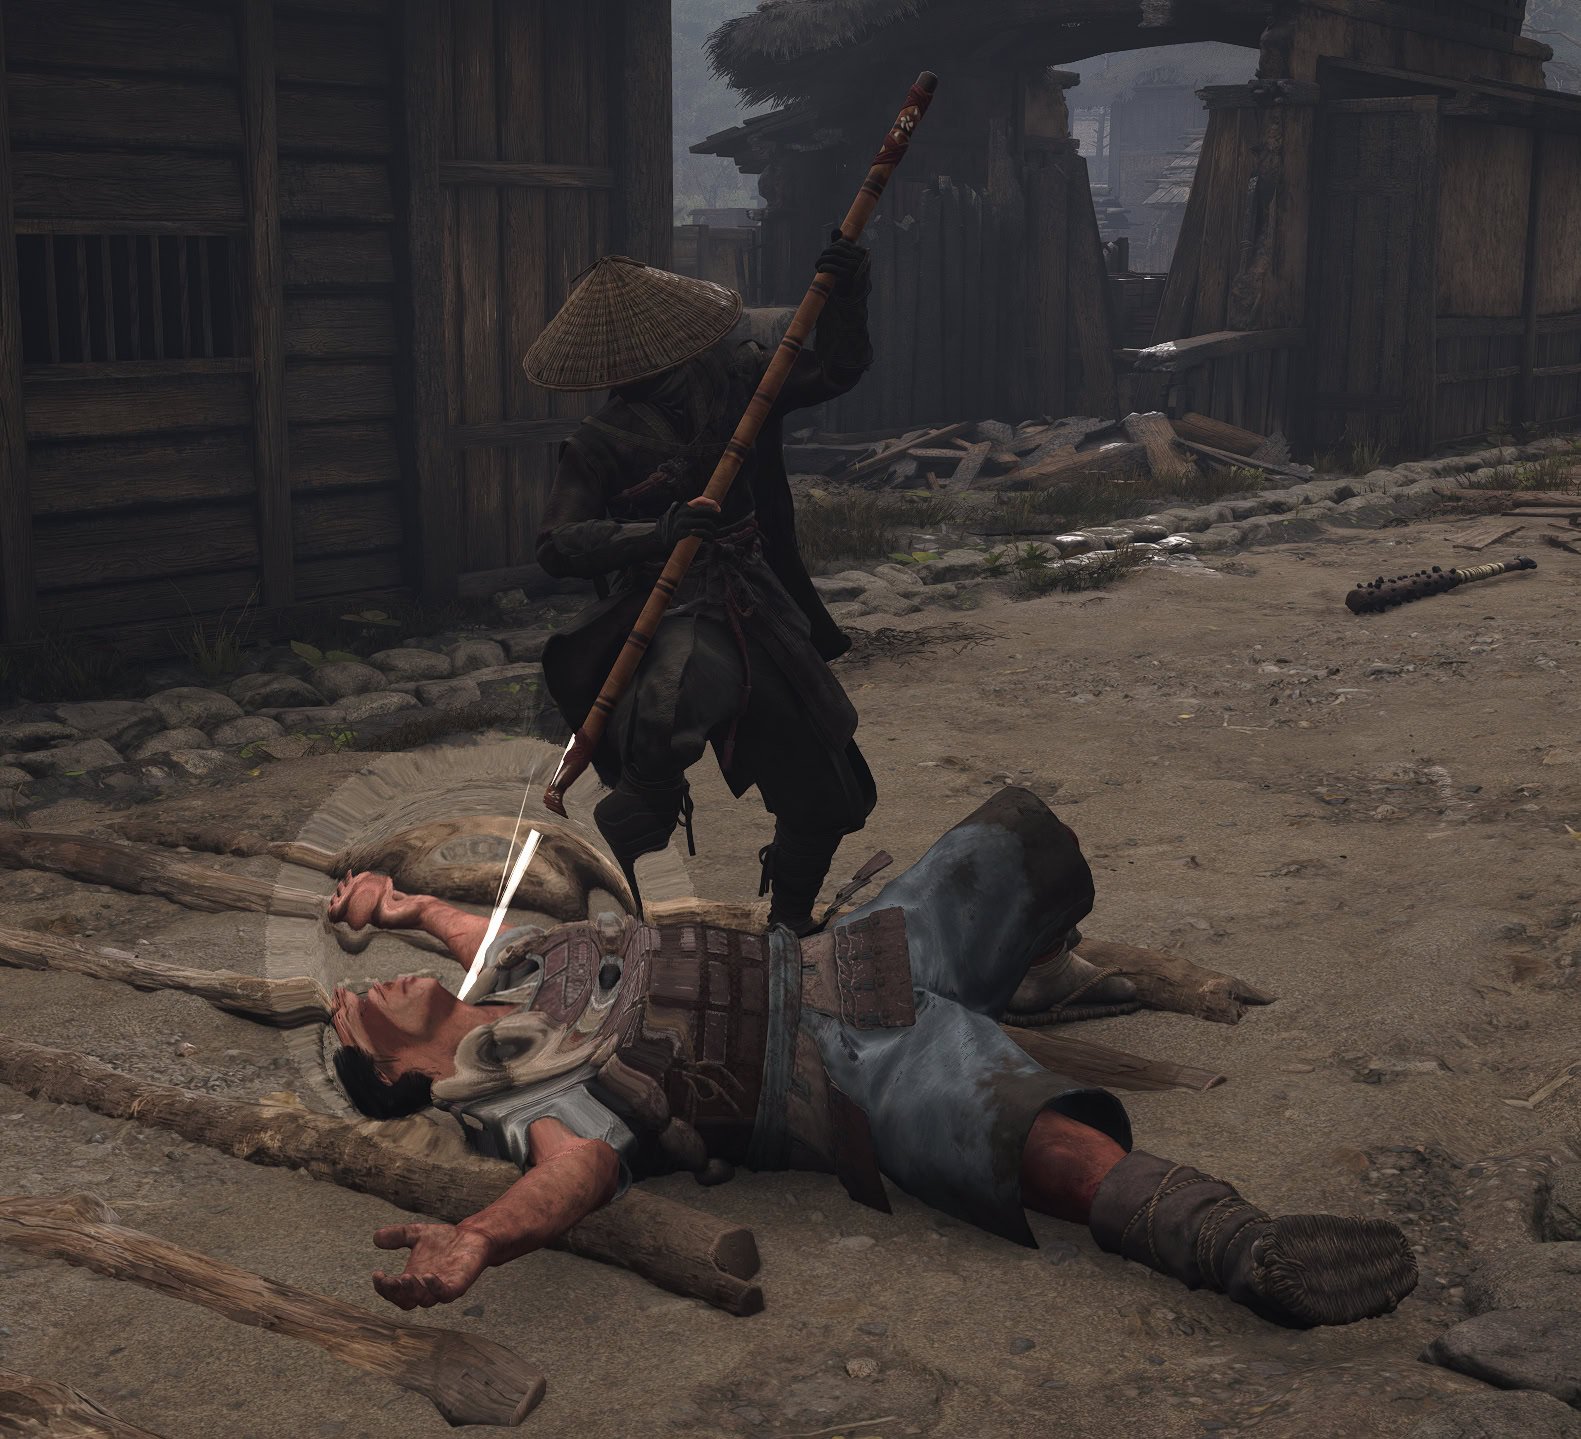
Bo
The Bo is a simple wooden staff that’s used to bludgeon enemies into submission. It offers a good amount of versatility as it grants offense, defense, and various debilitating effects to targets.
| № | Ability Name | Description |
|---|---|---|
| 1 | Bo Mastery | Bo Passive: Increase Bo damage by 3-120%. |
| 2 | Posture Damage | Global Passive: Increase Posture Damage by 3/9/18/27%. |
| 3 | Mastered Posture | Bo Passive: Bo Posture Attacks now retain their full effects on large and armored enemies. |
| 4 | Windstep | Bo Ability: Greatly extend the reach, speed, and impact of Naoe’s attacks for 15 seconds. |
| 5 | Low Posture | Bo Passive: Release to trigger an ankle swipe, knocking down regular enemies. |
| 6 | Neutral Posture | Bo Passive: Release to trigger a powerful jab, pushing the enemy back. |
| 7 | High Posture | Bo Passive: Release to trigger a head strike, staggering attacking enemies. |
| 8 | Unseizable | Global Passive: Increase damage by 3/9/18/27% if not hit by enemies for 8 seconds. |
| 9 | Counterstrike | Bo Passive: Landing a High Posture Attack during an enemy attack triggers a Weakpoint Attack. |
| 10 | Grab and Throw | Bo Ability: Seize an enemy and rotate and launch them at the closest target, pushing enemies back and dealing 70% ability damage. |
| 11 | Perfect Flow | Bo Passive: After each attack, use a light or heavy attack at the right moment to increase the damage of the next attack by 10%. |
| 12 | Flurry of Blows | Bo Ability: Unleash 5 strikes, each dealing 20% ability damage. |
| 13 | Tactical Shift | Bo Passive: During Windstep, increase the next attack’s damage by 50% when switching to a different target. At rank 2, increase damage during Windstep by 15%. |
| 14 | Hard Landing | Bo Passive: Increase Grab and Throw knockdown duration by 7 seconds. At rank 2, increase Grab and Throw damage by 40%. |
| 15 | Armor Breaker | Global Passive: Increase Armor Damage by 2/6/12/18%. |
| 16 | Hardened | Bo Passive: Weaker enemy attacks no longer interrupt Naoe when holding a Posture Attack while using the Bo. |
| 17 | Armor Breaker | Bo Passive: Flurry of Blows always breaks armor. The final strike makes the target Vulnerable. At rank 2, increase Flurry of Blows damage by 40%. |
| 18 | Adrenaline Generation | Bo Passive: Perfect Flow attacks generate 50% additional Adrenaline. At rank 2, increase Perfect Flow damage by 20%. At rank 3, Perfect Flow attacks generate 75% additional Adrenaline. |
| 19 | Reinvigorating Strikes | Bo Passive: Press light or heavy attack at the right moment when a strike lands to restore 10% Health. At rank 2, increase Flurry of Blows damage by 60%. At rank 3, attacking at the right moment when a strike lands restore 15% Health. |
| 20 | Armor Breaker | Bo Passive: Grab and Throw always breaks armor. At rank 2, increase Grab and Throw damage by 60%. |
| 21 | Momentum | Bo Passive: Parrying an attack or killing an enemy extends the duration of Windstep by 3 seconds, up to 3 times. At rank 2, increase damage during Windstep by 25%. At rank 3, parries and kills extends the duration of Windstep by 5 seconds, up to 3 times. |
| 22 | Guard Break | Bo Passive: Attacking at the right moment during combo enders will also break the enemy’s guard. |
Recommended Abilities
Mastered Posture
Without the ability to trip, push, or stagger opponents, the Bo loses a lot of its power. Investing in this passive is necessary to ensure you can fully utilize the Bo against all opponents.
Flurry of Blows
It’s always useful to have an ability that damages a tough opponent. With the armor breaking, you can more quickly beat down tough opponents while offering increased survivability with up to 75% Health restoration.
Windstep
While the Bo is versatile, it can also be rigid and immobile. Windstep helps with that by offering durability and the ability to close gaps very quickly. It’ll require some practice to fully utilize as you’ll be unable to lock onto a specific target while this ability is active.
When to use the Bo
The Bo is good to use in any scenario. It has some area damage with its sweeping attacks, solid single target damage, and the ability to stagger, push, or trip an opponent.
If you prefer a more defensive playstyle for Naoe, the Bo is a good choice as it can be used to restore 75% of your health if used correctly. While simple to learn, it will not be easy to master as it requires good timing to use the health restoration from Invigorating Strikes, and increased damage from Perfect Flow.
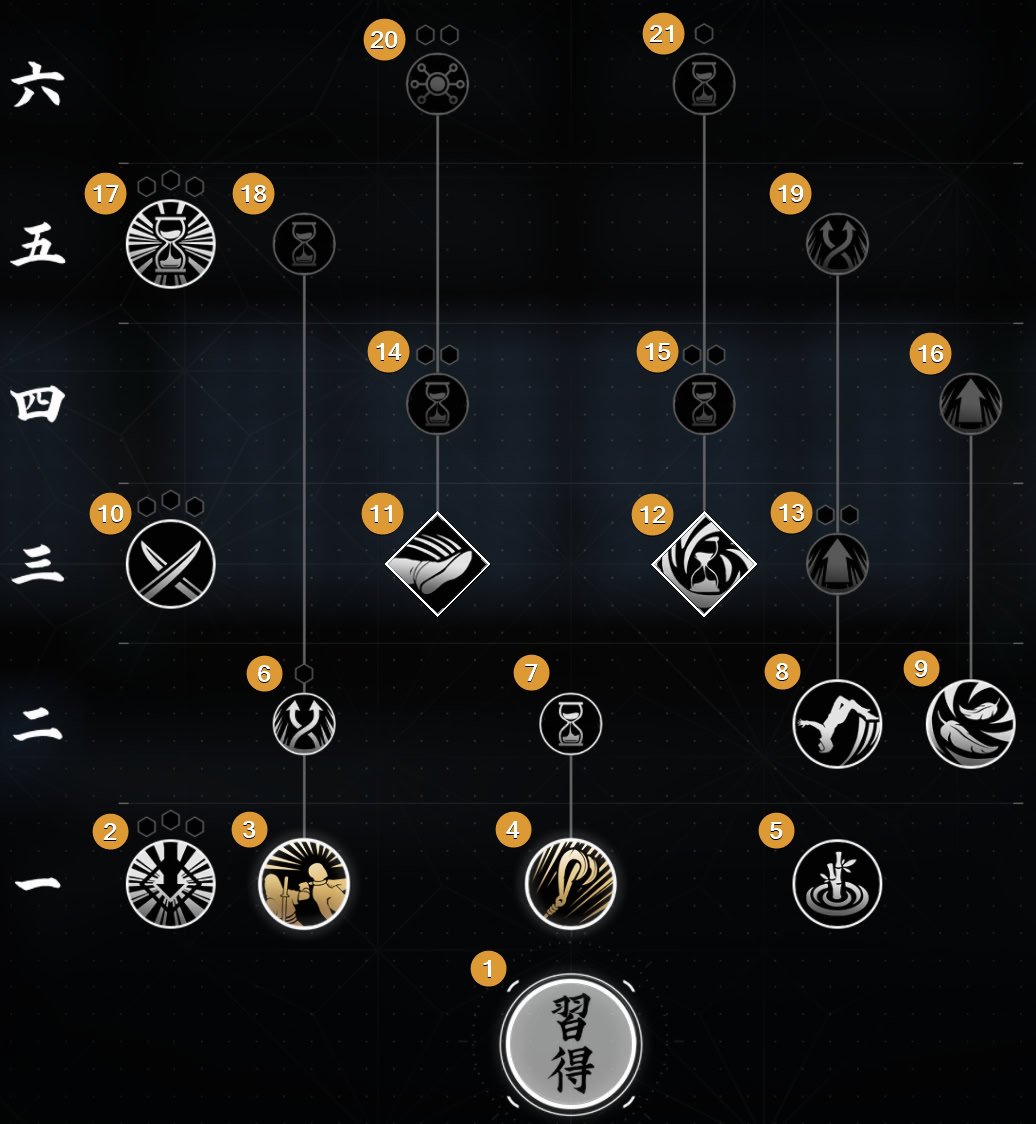
Tools
Naoe’s tools allow her to actively sabotage the environment or enemies quietly. Whether you’re using this branch for stealth or combat, it’s incredibly useful and is one of Naoe’s best skill trees to invest in.

| № | Ability Name | Description |
|---|---|---|
| 1 | Tools Mastery | Tools Passive: +1-15% chance to refill a Tool on use with mastery points spent in the Tool Tree. |
| 2 | Tool Professional | Tools Passive: Increase damage with Tools by 3/9/18/27%. |
| 3 | Smoke Bomb | Tools Passive: Aim and throw a smoke bomb that breaks all lines of sight. |
| 4 | Kunai | Tools Passive: Aim and throw a Kunai that deals 400% damage. Headshots on unsuspecting enemies will remove 1 Health Segments. |
| 5 | Quick Throw | Tools Passive: Aim and throw the equipped tool at the closest enemy or object. |
| 6 | Larger Tool Bag I | Tools Passive: Increase maximum capacity for all tools. +1 Kunai, +1 Shuriken, +1 Smoke Bomb, +1 Shinobi Bell. |
| 7 | Shinobi Bell | Tools Passive: Aim and throw a Shinobi Bell that distracts nearby enemies. |
| 8 | Enduring Haze | Tools Passive: Smoke Bomb has its duration increased to 10/14 seconds. |
| 9 | Kunai Assassination Damage I | Tools Passive: Naoe removes 1 additional Health Segment with Kunai. |
| 10 | Shuriken | Tools Passive: Aim and throw a Shuriken that deals 100% damage. Staggers enemies and can be used on the environment. |
| 11 | Adrenaline Generator | Global Passive: Increase Adrenaline Gain by 3/8/15/22%. |
| 12 | Golden Bell | Tools Passive: Shinobi Bell is now golden, and its shine can attract enemies from afar. |
| 13 | Armor Piercing | Tools Passive: Kunai now have 50% Armor Piercing. At rank 2, increase Kunai damage by 10%. At rank 3, Kunai have 75% armor piercing. |
| 14 | Larger Tool Bag II | Tools Passive: Increase maximum capacity for all tools. +1 Kunai, +2 Shuriken, +1 Smoke Bomb, +2 Shinobi Bell. |
| 15 | Widespread | Tools Passive: Smoke Bomb has its radius increased to 5 meters. At rank 2, increases Smoke Bomb radius to 7 meters. Increased after completing The Pirate Alliance |
| 16 | Kunai Assassination Damage II | Tools Passive: Naoe removes 1 additional Health Segment with Kunai. |
| 17 | Bank Shot | Tools Passive: Shuriken can now bounce between targets. At rank 2, increase Shuriken damage by 10%. At rank 3, Shuriken damage is increased by 20%. |
| 18 | Tool Affliction Proficiency | Tools Passive: Increase Affliction buildup with tools by 2/5/9/13%. An enemy is Afflicted when suffering from Bleed, Poison, or Daze. |
| 19 | Louder Chimes | Tools Passive: Shinobi Bell has its radius increased to 5 meters. |
| 20 | Triple Threat | Tools Passive: Naoe can now throw 3 Shurikens at the same time for the cost of 1. At rank 2, increase Shuriken damage by 15%. At rank 3, Shuriken damage is increased by 30%. Unlocked after completing The Tournament |
| 21 | Larger Tool Bag III | Tools Passive: Increase maximum capacity for all tools. +1 Kunai, +2 Shuriken, +1 Smoke Bomb, +2 Shinobi Bell. |
| 22 | Everlast | Tools Passive: Kunai have a 50% chance to not break on hard impacts. At rank 2, increase Kunai damage by 15%. At rank 3, Kunai have a 75% chance to not break on hard impacts. |
| 23 | Kunai Assassination Damage III | Tools Passive: Naoe removes 1 additional Health Segment with Kunai. Unlocked after completing Kurai Eikyou |
Recommended Abilities
Pretty much every option in the Tools tree is extremely useful, but here are some options that you must have:
Kunai Assassination Damage I, II, III
While not as powerful as your Hidden Blade, it’s worth investing in your kunai damage for better ranged assassinations. Save it for squishier enemies until you can get armor or the passive that prevents kunai from breaking on hard impact.
Smoke Bomb
This is great if you’re surrounded by enemies in combat. Pop one of these to disappear and you can get the option to assassinate so long as you’re hidden with the smoke. Pair this with the Double Assassination with a tanto and you can wipe out large groups easily.
Shuriken
These are good for one of three things:
- Destroying light source
- Destroying an alarm bell
- Applying afflictions
If you’re sneaking at night, it’s important to destroy light sources quietly. You want to save your kunai for ranged assassinations, so throwing shurikens is the best way to snuff out any lights.
With Bank Shot and Triple Threat, you can use these to easily spread afflictions against groups of enemies. Remember to use armor that has tool affliction buildup to achieve this effect.
Larger Tool Bag I, II, III
The more tools you have, the more times you can assassinate at range, destroy lights, disappear with smoke bombs, etc.
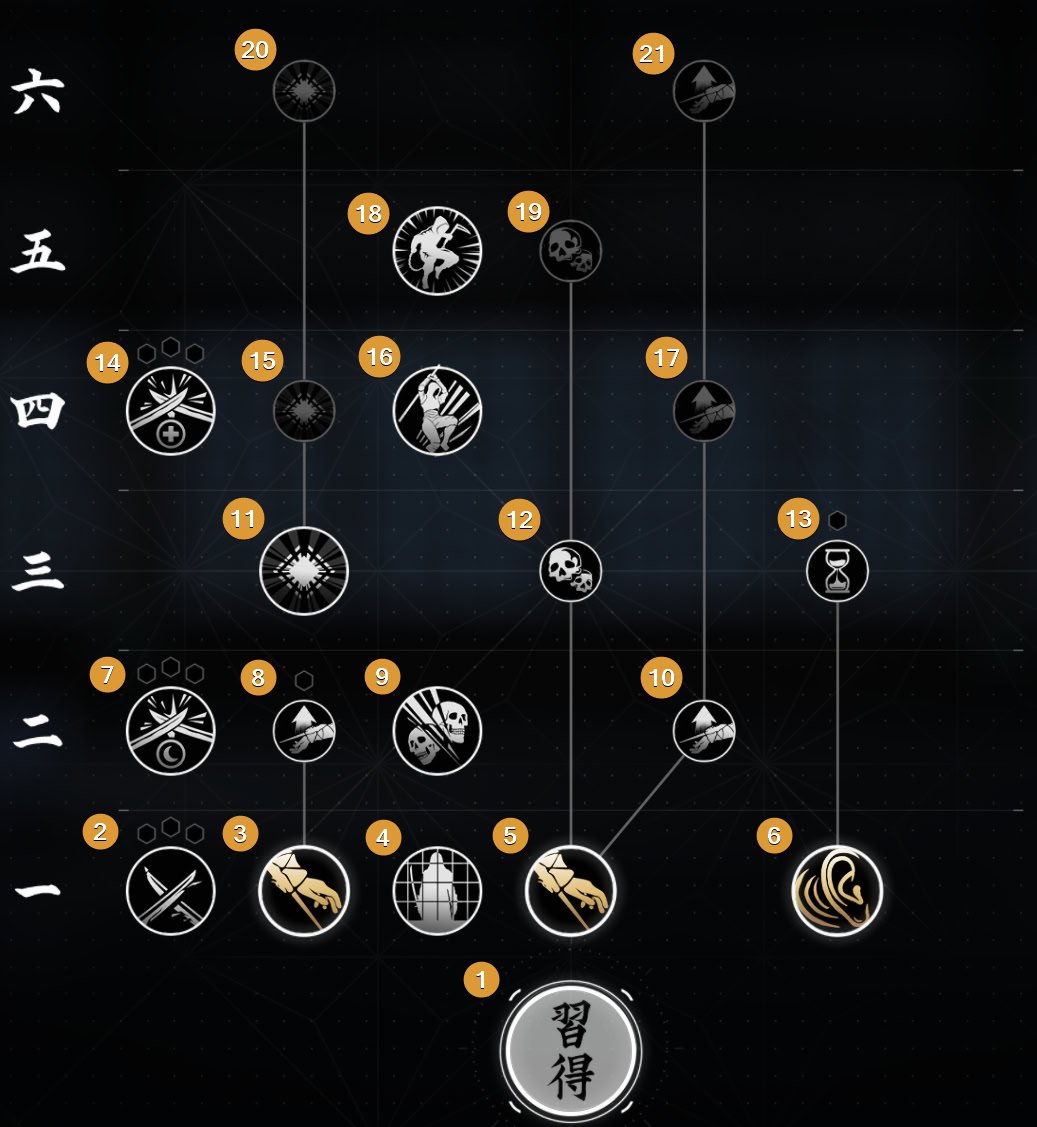
Shinobi
The Shinobi tree is primarily comprised of utility options to make sneaking around far more efficient. If you love stealth gameplay and becoming one with the shadows, you’ll want to invest in this tree.
| № | Ability Name | Description |
|---|---|---|
| 1 | Shinobi Mastery | Shinobi Passive: Increase health by 2-50% with mastery points spent in the Shinobi Tree. |
| 2 | Prodigy | Global Passive: Increase damage with Abilities by 2/5/9/13%. |
| 3 | Grab | Shinobi Passive: Grab an enemy while undetected. Once grabbed, you can move with them and knock them out. |
| 4 | Grappling Hook | Shinobi Passive: Allows you to use the Grappling Hook. |
| 5 | Shallow Water Breathing | Shinobi Passive: Allows Naoe to breathe through a reed while remaining still in shallow water. |
| 6 | Grab Assassinate | Shinobi Passive: After grabbing an enemy, you can Assassinate them. At rank 2, removes 1 additional Health Segments with Grab Assassinations. |
| 7 | Ascension Boost | Shinobi Passive: While using the Grappling Hook, Naoe can climb much faster. |
| 8 | Vault | Shinobi Passive: After deflecting an attack, press Dodge jump over an enemy and make them Vulnerable. |
| 9 | Igan Roll | Shinobi Passive: Press Dodge before hitting the ground to reduce fall damage. |
| 10 | Evasive | Global Passive: Increase damage after a Vault by 2/6/12/18%. |
| 11 | Lightning Kicks | Shinobi Ability: Knock down the 2 closest enemies and deal 15% ability damage to each. |
| 12 | Heighten Senses | Shinobi Ability: While undetected, time slows down around Naoe for 8 seconds. Aborts on enemy contact. |
| 13 | Destabilizing Vault | Shinobi Passive: Increase Critical Chance by 25/27/30% over 10 seconds after using Vault. |
| 14 | Immobilized | Shinobi Passive: Increase the knockdown duration by 5 seconds. At rank 2, increase Lightning Kicks damage by 40%. At rank 3, increases the knockdown duration by 6 seconds. |
| 15 | Extended Perception | Shinobi Passive: Increase Heightened Senses duration by 4 seconds. At rank 2 and 3, increase damage with Tools during Heightened Senses by 10/15%. |
| 16 | Ninja Fall | Shinobi Passive: Igan Roll now negates all fall damage. |
| 17 | Efficient | Global Passive: +3/8/15/20% less Cooldown with abilities. |
| 18 | Quick Knock Out | Shinobi Passive: Knock out after Grab can now be performed faster. |
| 19 | High Vault | Shinobi Passive: Throw a Shuriken mid-air on a successful Vault. |
| 20 | Sweep the Leg | Shinobi Passive: Lightning Kicks can now perform 1 additional leg sweep on a nearby target that is not already knocked down. At rank 2, increases Lightning Kicks damage by 60%. At rank 3, Lightning Kicks now performs 2 additional leg sweeps. Unlocked after completing Fallen Soldiers |
| 21 | Critical Insight | Shinobi Passive: Duration of Heightened Senses is reset on a successful assassination. Can only be reset once per activation. At rank 2, +1 Health Segments removed on Assassinations during Heightened Senses. Unlocked after completing The Yokai |
Recommended Abilities
Igan Roll
Get Igan Roll and its upgrade Ninja Fall as soon as you can. Since Naoe has a higher emphasis on platforming, you’ll need the damage reduction on falls.
This ability becomes overpowered when you get Ninja Fall. So long as you time your roll right, you can survive any height without any damage. You will no longer need Leaps of Faith to scale down high elevations.
Vault
Aside from being fun to use, the Destabilizing Vault upgrade is a great addition for Critical Chance builds. Even if you’re not stacking Critical Chance, the bonus to it is useful for any of Naoe’s weapons.
Ascension Boost
Naoe spends a lot of time scaling up walls with the Grappling Hook. It’s also when she’s the most vulnerable or easily seen. The sooner you can climb up a roof and go prone to hide, the better.
Assassin
The Assassin tree will provide you options to live out the classic Assassin’s Creed experience. This primarily affects your assassinations and adds buffs to your Eagle Vision. It’s also the only way to increase Naoe’s Adrenaline Chunks.
| № | Ability Name | Description |
|---|---|---|
| 1 | Assassin Mastery | Assassin Passive: Increase Adrenaline Gain on Assassination by 5-50% with mastery points spent in the Assassin tree. |
| 2 | Executioner | Global Passive: Increase damage on vulnerable enemies by 2/6/12/18%. |
| 3 | Ground Assassinate | Assassin Passive: Assassinate regular enemies while they are on the ground and remove health segments. |
| 4 | Shoji Door Assassination | Assassin Passive: While using a Katana, Naoe can Assassinate a target through a shoji panel. |
| 5 | Hidden Blade | Assassin Passive: Assassinate regular enemies and remove 2 Health Segments. |
| 6 | Eagle Vision | Assassin Passive: Highlight enemies around you. |
| 7 | Night Crawler | Global Passive: Increase damage during the night by 2/6/12/18%. |
| 8 | Improved Ground Assassinate | Assassin Passive: Naoe removes 1 additional Health Segments with Ground Assassinations. At rank 2, removes 2 additional Health Segments on Ground Assassinations. |
| 9 | Double Assassinate | Assassin Passive: While using a Tanto, Naoe can Assassinate two targets standing close together with a single attack. |
| 10 | Assassination Damage I | Assassin Passive: Naoe removes 1 additional Health Segment with Assassinations. |
| 11 | Vigor I | Assassin Passive: Increase Naoe’s Adrenaline Chunks by 1. |
| 12 | Reinforced Blade | Assassin Passive: Hidden Blade can now be used against large enemies. |
| 13 | Improved Sense | Assassin Passive: Eagle Vision now lasts an extra 10 seconds after deactivation. At rank 2, lasts an extra 15 seconds. |
| 14 | Frontrunner | Global Passive: Increase damage while Health is full by 2/6/12/18%. |
| 15 | Vigor II | Assassin Passive: Increase Naoe’s Adrenaline Chunks by 1. |
| 16 | Chain Assassination: | Bo Passive: While using a Bo, Naoe can assassinate up to three surrounding enemies in rapid succession. |
| 17 | Assassination Damage II | Assassin Passive: Naoe removes 1 additional Health Segment with Assassinations. |
| 18 | Rush Assassinate | Assassin Passive: While using a Kusarigama, Naoe can close the distance and deal Assassination Damage to a single target. |
| 19 | Hand of the Creed | Assassin Passive: Hidden Blade can no longer be denied when enemies see Naoe coming. |
| 20 | Vigor III | Assassin Passive: Increase Naoe’s Adrenaline Chunks by 1. |
| 21 | Assassination Damage III | Assassin Passive: Naoe removes 1 additional Health Segment with Assassinations. Unlocked after completing The Godai Shinobi |
Recommended Abilities
Assassination Damage I, II, III
How could one not invest in the series’ iconic weapon? There are many occasions where it’s far simpler to assassinate durable enemies than fighting them in combat,
Shoji Door Assassination
This is great for infiltrating castles as they’ll never see you coming. Lure in enemies with your whistle while behind a shoji door. This allows you to easily clear out areas while remaining hidden behind the door as they’ll ignore the pile of bodies in front of the door.
Double Assassinate
If you like assassinating over prolonged combat, Double Assassinate is a necessary passive to have. Even if you don’t like using a tanto, having one equipped is great for clearing out groups of enemies. Try double assassinating groups while hidden with a smoke bomb!
Vigor I, II, III
Having more than one Adrenaline Chunk is great for any weapon. You can pull off fun combos such as using the Katana’s Tidal Wave, Eviscerate, then another Tidal Wave.
Yasuke’s Mastery Trees
Yasuke’s talents are more combat heavy which makes for some energetic and visceral combat. What he lacks in universal passive abilities, he makes up for with having a weapon for any combat situation.
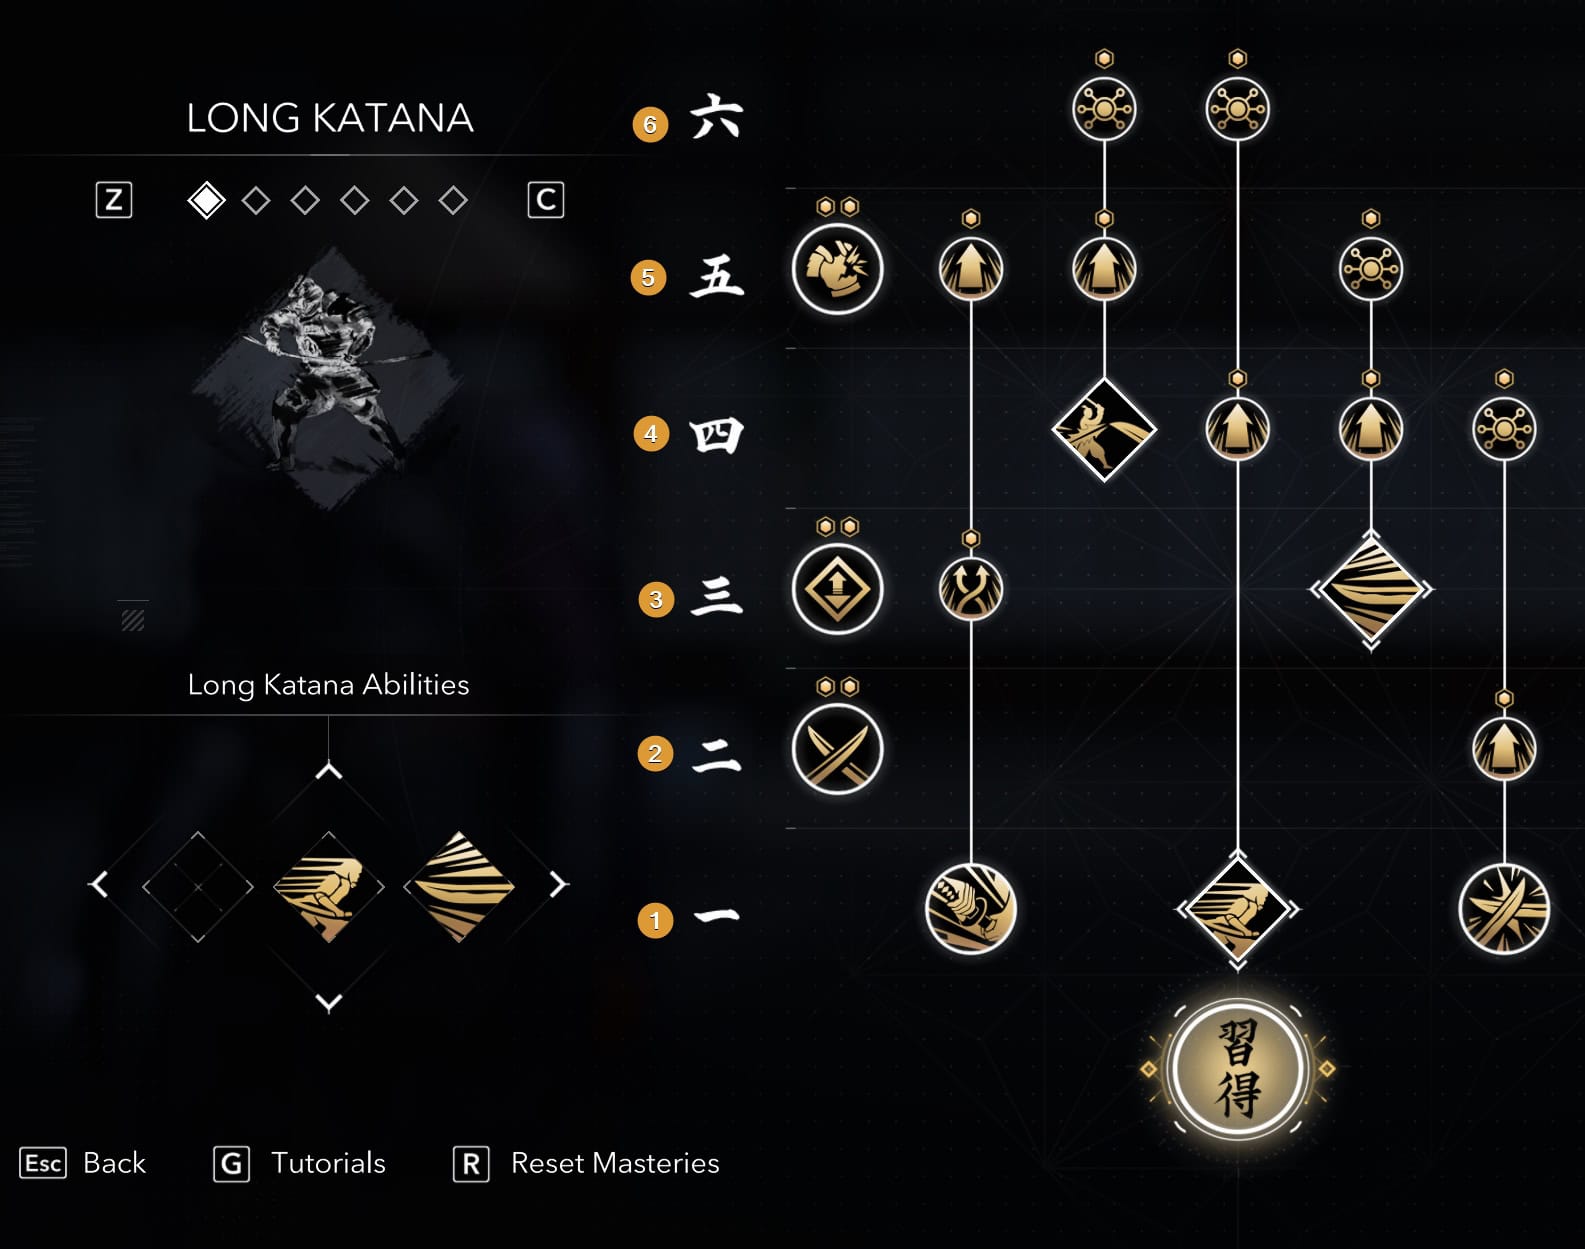
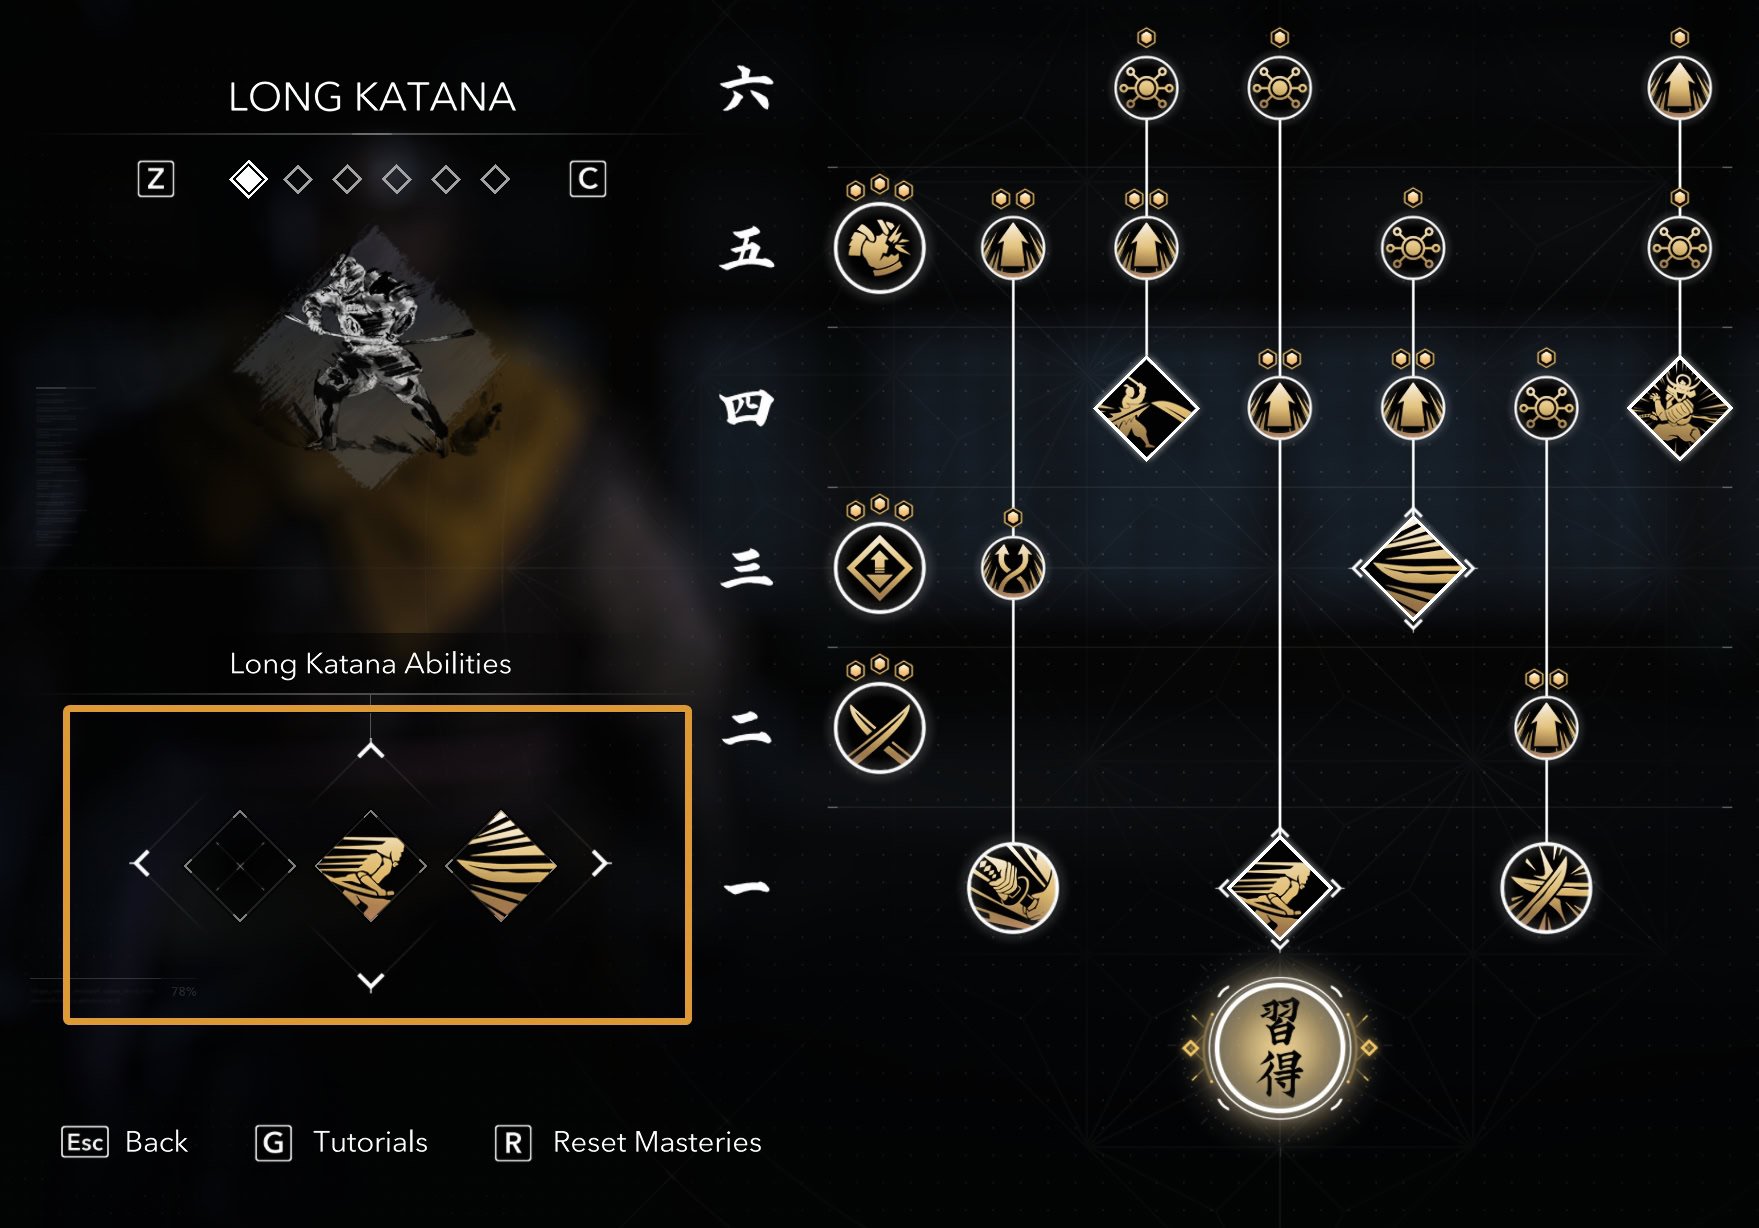
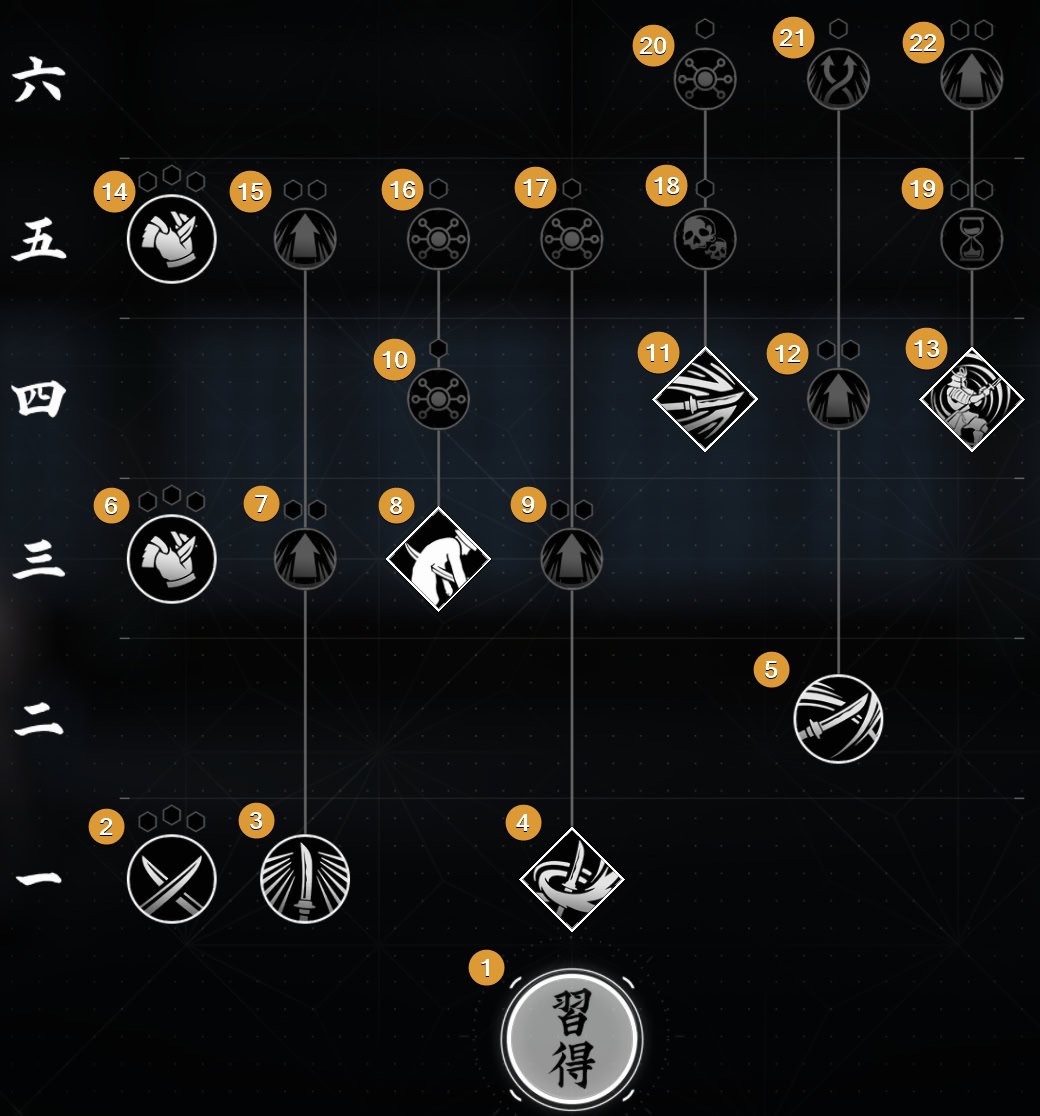
Long Katana
The Long Katana is a solid weapon of choice and typically has twice the damage output of Naoe’s katana. If you like combat that rewards parrying with the added chance to decapitate your foes, you should use the Long Katana.
| № | Ability Name | Description |
|---|---|---|
| 1 | Long Katana Mastery | Long Katana Passive: Increase Long Katana damage by 3-120% with points spent in the Long Katana tree. |
| 2 | Sheathed Attack | Long Katana Passive: Hold Guard and use a light or heavy attack to sheathe the Katana and launch a stronger strike that can break the target’s guard. |
| 3 | Power Dash | Long Katana Ability: Dash to a single enemy, dealing 50% ability damage, then move behind them to make them Vulnerable. |
| 4 | Riposte | Long Katana Passive: Release Parry right after blocking a hit to perform an immediate Riposte. |
| 5 | Combat Expert | Global Passive: Increase damage with Melee Weapons by 2/5/9/13%. |
| 6 | Energizing Defense | Long Katana Passive: Riposte now restores 5% Health. At rank 2, increase Riposte damage by 40%. At rank, restores 8% health. |
| 7 | Adrenaline Builder | Global Passive: Increase Adrenaline Gain by 3/8/15/22%. |
| 8 | Sheathed Posture | Long Katana Passive: Sheathed Attack can now become a Posture attack by holding the light or heavy attack buttons. At rank 2, increase Sheathed Attack damage by 20%. |
| 9 | Payback | Long Katana Ability: Deal 3 powerful strikes to a single enemy, dealing 35% ability damage and restoring 10% health. |
| 10 | Samurai Showdown | Long Katana Ability: Taunt up to 3 different enemies and attack them, dealing 15% ability damage to each. |
| 11 | Armor Avoidance | Long Katana Passive: Power Dash now has 100% Armor Piercing. At rank 2, increase Power Dash damage by 40%. At rank 3, Power Dash has 75% Armor Piercing. |
| 12 | Overrun | Long Katana Passive: Increase Payback damage by 1% per 1% Health missing. At rank 2, increase Payback damage by 40%. At rank 3, increases Payback damage by 2% per 1% Health missing. |
| 13 | Defensive Strike | Long Katana Passive: Riposte now has 100% Critical Chance when performed against a Flurry Attack. At rank 2, increase Riposte damage by 60%. |
| 14 | Wind Slash | Long Katana Ability: Hold an attack to charge a devastating wide attack, dealing up to 70% ability damage upon release. The longer the charge, the wider the attack. |
| 15 | Melee Weapon Armor Damage | Global Passive: Increase Armor Damage with Melee Weapons by 3/9/18/27%. |
| 16 | Adrenaline Boost | Long Katana Passive: Sheathed Attack generates 10% of an Adrenaline Chunk on hit. At rank 2, increase Sheathed Attack damage by 30%. At rank 3, Sheathed Attack generates 15% of an Adrenaline Chunk on hit. |
| 17 | Shatter | Long Katana Passive: Increase Samurai Showdown Armor Damage by 50%. At rank 2, increase Samurai Showdown by 40%. At rank 3, increase Samurai Showdown Armor Damage by 75%. |
| 18 | Unstoppable | Long Katana Passive: Payback can no longer be blocked or parried. At rank 2, increase Payback damage by 60%. |
| 19 | Wind Burst | Long Katana Passive: While charging a Wind Slash, press Q/LB/L1 to release a powerful burst that staggers enemies within a 4 meter radius. At rank 2, increase Wind Slash Damage by 40%. |
| 20 | Call of Honor | Long Katana Passive: Samurai Showdown can now taunt up to 4 different enemies. At rank 2, increase Samurai Showdown damage by 60%. |
| 21 | Chained Power Dash | Long Katana Passive: Power Dash can now be chained a second time. At rank 2, increase Power Dash damage by 60%. Unlocked after completing The Kabukimono |
| 21 | Extended Reach | Long Katana Passive: Wind Slash and Wind Burst’s reach are extended by 33%. At rank 2, increase Wind Slash damage by 60%. |
Recommended Abilities
Power Dash
This is your gap closer and on-demand Vulnerability option. What makes it very useful is the distance you cover with this ability. If you’re surrounded, dash to a far away enemy to reposition yourself as you’re invincible during the animation.
Payback
This ability is great for 1 on 1 combat as you’ll prevent them from acting for a moment while healing 10% of your health. With the Overrun and Unstoppable upgrades, it makes an excellent finisher against durable opponents such as Samurai Daisho, Guardians, and Bosses.
Riposte
Riposte with Energizing Defense is a great way to heal yourself if you’re low on rations. You can minimize your need for rations when you combine this with Payback and the Samurai tree’s Regeneration passive.
When to use the Long Katana
There is no combat scenario where the Long Katana isn’t useful. It has great single target and area damage with versatile abilities. It may lack the raw power of the kanabo or the range of the teppo and bow, but it’s a weapon that’ll never disappoint you if you take the time to practice your parries.
Naginata
The Naginata is Yasuke’s area of effect and crowd control weapon. It rewards keeping your distance from opponents and if needed, it will create said distance. If you want to be a one-man army, the Naginata is an excellent choice for that goal.
| № | Ability Name | Description |
|---|---|---|
| 1 | Naginata Mastery | Naginata Passive: Increase Naginata damage by 3-120% for mastery points spent in the Naginata tree. |
| 2 | One Man Army | Global Passive: Increase damage when hitting multiple enemies by 3/8/15/22%. |
| 3 | Far Reach | Naginata Passive: Enemies hit by the tip of a Naginata take 15% more damage. |
| 4 | Crescent Strike | Naginata Ability: Jump to an enemy and swing the Naginata in a large arc in front of you, dealing 25% ability damage and pushing them back. |
| 5 | Whirlwind | Naginata Passive: Hold Parry and press light attack, heavy attack, heavy attack, light attack, heavy attack for a powerful combo dealing 5% more damage with each strike. |
| 6 | Combo Ender Armor Piercing | Global Passive: Increase Armor Piercing with Combo Enders by 4/12/24/36%. |
| 7 | Lethal Reach | Naginata Passive: Increase Critical Chance with Far Reach by 15/17/20%. |
| 8 | Impale | Naginata Ability: Impale an enemy, dealing 15% ability damage and moving with them up to 13 meters. On release, they become Vulnerable. |
| 9 | Deep Cut | Naginata Passive: Crescent Strike now inflicts 35% Bleed buildup. At rank 2, increase Crescent Strike damage by 40%. At rank 3, Crescent Strike now inflicts 40% Bleed buildup. |
| 10 | Lethal Charge | Naginata Passive: Impale now moves further with the impaled enemy. At rank 2, increase Impale damage by 40%. |
| 11 | Onslaught | Naginata Ability: Unleash a flurry of 8 strikes on a single enemy, dealing 15% ability damage each. Half as effective on large enemies. |
| 12 | Rising Storm | Naginata Passive: Whirlwind generates 10% of an Adrenaline Chunk on hit. At rank 2, increase Whirlwind damage by 40%. At rank 3, Whirlwind generates 8% of an Adrenaline Chunk on hit. |
| 13 | Hurricane Stance | Naginata Ability: A flurry of slashes that parry incoming strikes for 10 seconds. |
| 14 | Piercing Momentum | Global Passive: Increase Armor Piercing with consecutive hits by 2/6/12/18%. |
| 15 | Fatal Reach | Naginata Passive: Far Reach generates 5/7/10% of an Adrenaline Chunk on hit. |
| 16 | Stampeding Charge | Naginata Passive: Impale now pushes back enemies on the path. At rank 2, increase Impale damage by 60%. |
| 17 | Disabling Strike | Naginata Passive: Crescent Strike now knocks down enemies. At rank 2, increases Crescent Strike damage by 60%. Unlocked after completing The Hunters of Kyonyo |
| 18 | Broader Onslaught | Naginata Passive: Onslaught now has its full effect on large enemies. At rank 2, increases Onslaught damage by 40%. |
| 19 | Momentum | Naginata Passive: Parry or Kill to extend the Hurricane Stance by 3 seconds, up to 5 times. At rank 2, increase Hurricane Stance damage by 40%. At rank 3, parries and kills extend Hurricane Stance by 5 seconds, up to 5 times. |
| 20 | Ultimate Onslaught | Naginata Passive: Onslaught can no longer be blocked or parried. At rank 2, increases Onslaught damage by 60%. Unlocked after completing The Winter Raiders |
| 21 | Persistent Storm | Naginata Passive: After performing the first strike, use a light attack or heavy attack in any order to keep the Whirlwind going. At rank 2, increases Whirlwind damage by 60%. |
| 22 | Killing Blow | Naginata Passive: Each time an enemy is killed during Hurricane Stance, its final strike’s damage will increase by 15%. |
Recommended Abilities
Crescent Strike
Crescent Strike is excellent for giving yourself some breathing room. With the enemies pushed away, you can make better use of the Far Reach passive. This pairs very well with Bleed buildup naginatas, allowing you to trigger bleed on numerous opponents at once with enough skill.
Onslaught
The naginata has great area damage, but sometimes you run into that particularly tough enemy with a lot of armor and health. Onslaught is good to have for occasional single-target damage.
Hurricane Stance
Hurricane Stance is a great defensive and offensive ability to use. You can parry normal attacks while acting as a mobile meat grinder. This is very good within tight environment where enemies don’t have the space to run away.
Whirlwind
The naginata’s basic attacks are in an arc or semicircle in front of Yasuke. With Whirlwind, you can have a wider area of effect by attacking in a short radius around you.
One Man Army
Increasing damage when hitting multiple enemies is necessary for the naginata if you want to make the most use of it.
When to use the Naginata
The best case scenario for the naginata is to use it in tight quarters with multiple enemies. If the area is too open, it only allows enemies to more easily evade your swings.
The naginata is also great for those who favor a defensive playstyle. This is seen with some naginatas such as the Celestial Blade or Sage’s Reach. These particular naginatas favor blocking over parrying and dodging, emphasizing the naginata’s defensive nature.
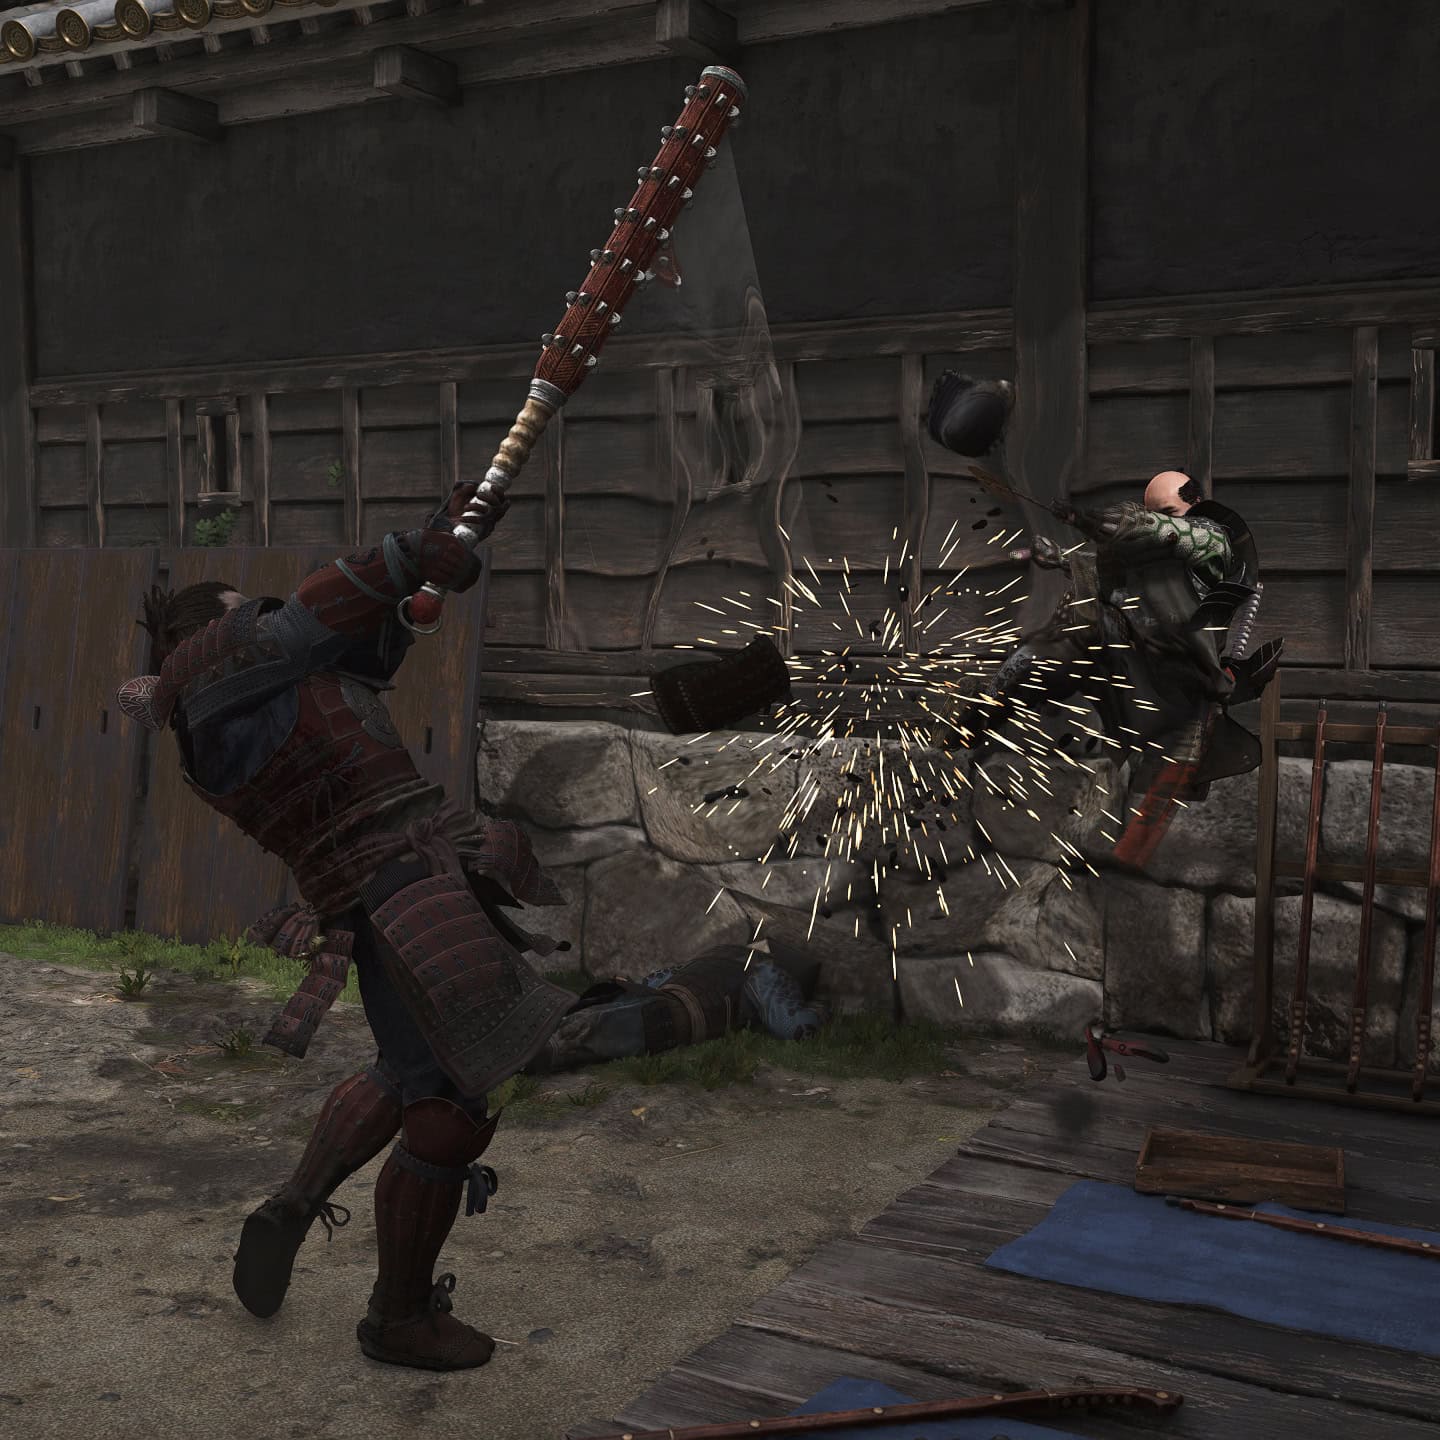
Kanabo
The Kanabo is Yasuke’s high DPS weapon. It’s slow but it’ll hit like a truck with their high Posture DPS and Ability Damage. It lacks great defenses, but who needs defense when you can kill opponents in a couple hits?
| № | Ability Name | Description |
|---|---|---|
| 1 | Kanabo Mastery | Kanabo Passive: Increase Kanabo damage by 3-120% for mastery points spent in the Kanabo tree. |
| 2 | Devastation | Kanabo Passive: Switch attack type at the end of a combo to trigger an additional combo ender. |
| 3 | Spine Breaker | Kanabo Ability: Grab an enemy with the Kanabo, dealing 50% ability damage and knocking out regular enemies. Half as effective on large enemies. |
| 4 | Forward Momentum | Kanabo Passive: When you hit an enemy, press light attack or heavy attack to chain your next attack faster. |
| 5 | Combo Ender Damage | Global Passive: Increase damage with Combo Enders by 2/6/12/18%. |
| 6 | Turmoil | Kanabo Passive: Devastation combo enders generates 50% of an Adrenaline Chunk on hit. At rank 2, increase Devastation damage by 40%. At rank 3, Devestation combo enders generate 35% of an Adrenaline Chunk on hit. |
| 7 | Power Surge | Kanabo Passive: Each successful Forward Momentum before a Combo Ender increases its damage by 15/20/25%. |
| 8 | Ability Master | Global Passive: Increase damage with Abilities by 2/5/9/13%. |
| 9 | Irresistible Force | Kanabo Passive: Increase Spine Breaker knockout duration by 10 seconds. At rank 2, increase Spine Breaker damage by 40%. At rank 3, knockdown duration increases by 15 seconds. |
| 10 | Crushing Shockwave | Kanabo Ability: A downward strike that deals 90% ability damage, disables the targets, and staggers all enemies in a 3 meter radius. |
| 11 | Infinite Devastation | Kanabo Passive: Press the opposite attack input after a Devastation to perform a second one. At rank 2, increase Devastation damage by 60%. |
| 12 | Slugging Rampage | Kanabo Ability: A series of spinning strikes that deal 20% ability damage each and sends everyone nearby flying backwards. |
| 13 | Unstoppable Strength | Kanabo Passive: Spine Breaker now has its full effect against large enemies. At rank 2, increase Spine Breaker damage by 60%. |
| 14 | Greater Shockwave | Kanabo Passive: Crushing Shockwave now afflicts enemies with Daze. At rank 2, increase Crushing Shockwave Damage by 40%. At rank 3, Daze lasts an extra 2 seconds. |
| 15 | Kanabo Throw | Kanabo Ability: Throw the Kanabo at an enemy, knocking down the target and deaing 75% ability damage. |
| 16 | Damage Reduction | Global Passive: Increase Damage Reduction by 1/3/6/9%. |
| 17 | Slugging Torrent | Kanabo Passive: Slugging Rampage now lasts longer. At rank 2, increase Slugging Rampage damage by 40%. At rank 3, Slugging Rampage has 15% increased reach. |
| 18 | Constant Pressure | Forward Momentum no longer requires hit confirmation. Press light attack or heavy attack at any time to chain your attack quicker. |
| 19 | Armor Breaker | Kanabo Passive: Kanabo Throw will always break the enemy’s armor. At rank 2, increase Kanabo Throw damage by 40%. |
| 20 | Slugging Fury | Kanabo Passive: Slugging Rampage now lasts even longer. At rank 2, increase Slugging Rampage damage by 60%. At rank 3, Slugging Rampage nhas 15% increased reach. |
| 21 | Absolute Shockwave | Kanabo Passive: Increase Crushing Shockwave size by 67%. At rank 2, increase Crushing Shockwave damage by 60%. At rank 3, Crushing Shockwave’s size increases by 100%. |
| 22 | Aftershock | Kanabo Passive: Upon impact, Kanabo Throw pushes enemies back in a 4 meter radius, dealing 42% ability damage. At rank 2, increase Kanabo Throw damage by 60%. |
Recommended Abilities
Spine Breaker
Spine Breaker is a great way to put down tougher opponents. When they’re knocked out, you can follow up with a ground attack for a large chunk of damage.
Crushing Shockwave
You’ll want Crushing Shockwave as it has the highest ability damage scaling out of all the kanabo abilities. It’s also necessary to deal with group fights as it’ll give you some room when you need it.
Get the Greater Shockwave upgrade to daze enemies hit by Crushing Shockwave. When they come to attack you, they’ll end up missing and make themselves sitting ducks against your kanabo.
Forward Momentum
The kanabo is one of the slowest weapons in the game, so any boost to its rate of attack is a welcome addition.
Ability Master
While ability master only increases ability damage by 9% at max rank, keep in mind you’re using a kanabo. The kanabo’s ability damage easily goes into the thousands, so you’re adding hundreds of extra damage to your abilities.
When to use the Kanabo
The kanabo can be used in any combat situation if you have the skill. Otherwise, it’s best against small groups, single targets, and combat encounters with little to no ranged enemies.
It’s glaring weakness is how easy it is for you to be interrupted mid-swing. This can be fixed by dazing your enemies or using the engraving from Boulder Fall.
With its lack of defensive potential, a great Samurai ability to pair this with is Battle Cry with Healing Shout. This will allow you to focus on attacking as you regenerate health.
If you really want to be an absolute beast in combat, the Samurai Stand ability is great as it’ll turn all your swings into Posture attacks.
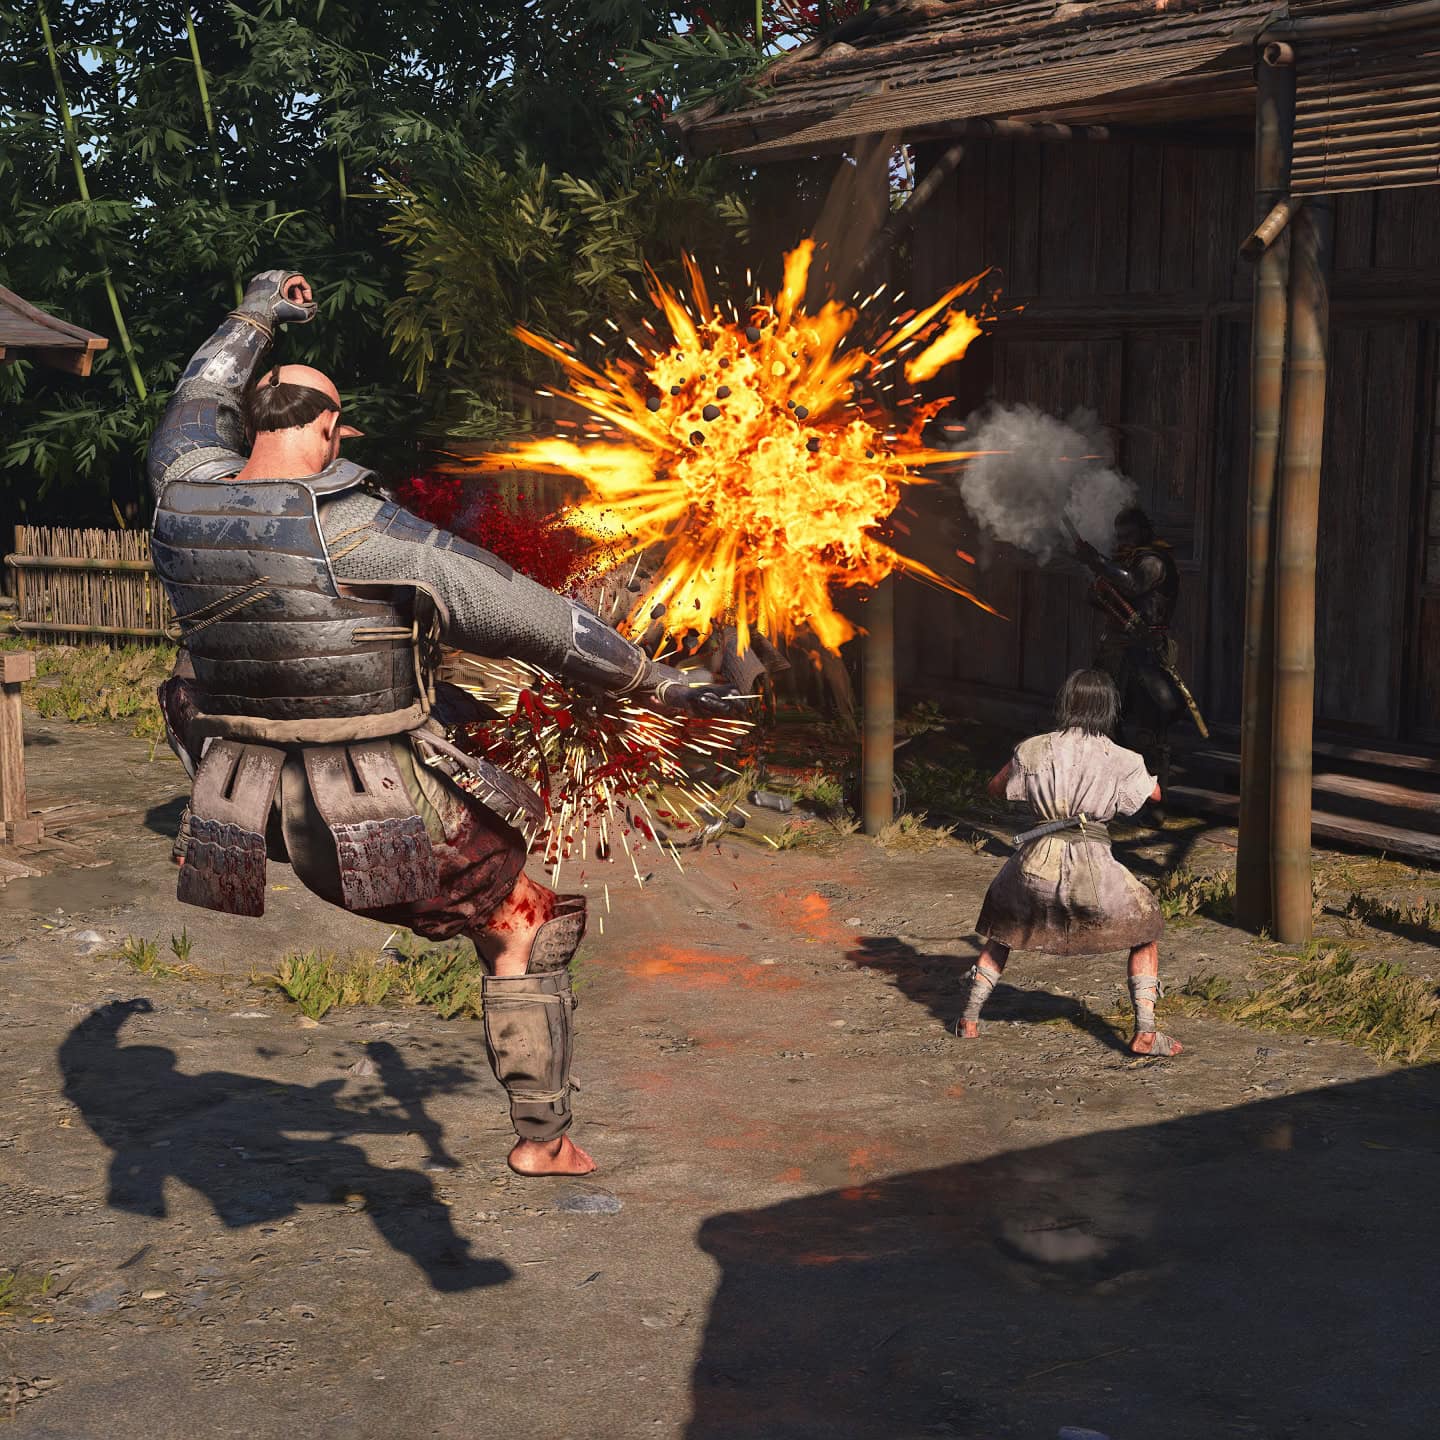
Teppo
The world advances and firearms are being introduced into warfare. The Teppo is a matchlock firearm that offers insane damage at a distance. This comes with the tradeoff of having a slow rate of fire.
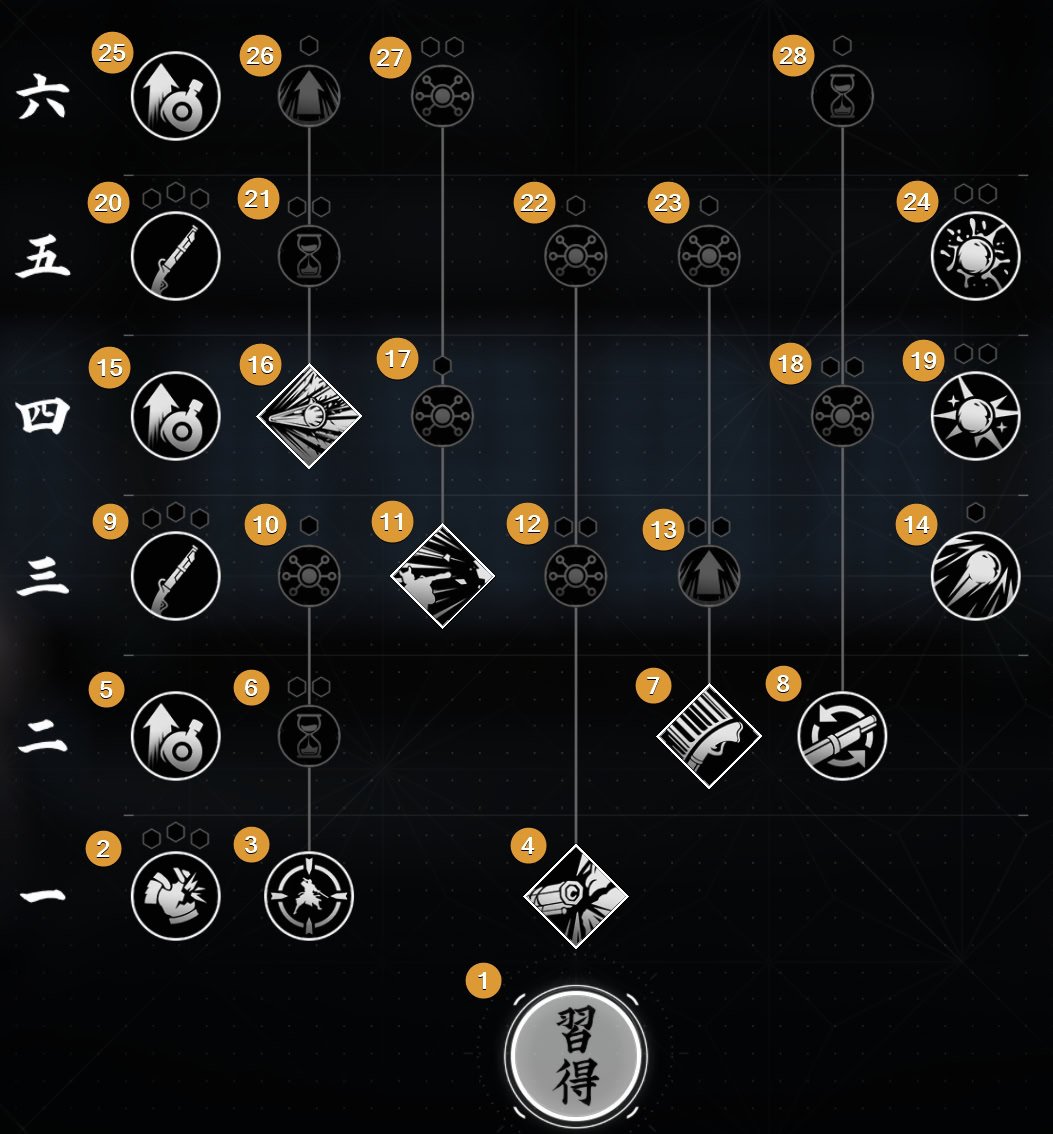
| № | Ability Name | Description |
|---|---|---|
| 1 | Teppo Mastery | Teppo Passive: Increase Teppo damage by 3-120% with with mastery points spent in the Teppo tree. |
| 2 | Armor Damage | Global Passive: Increase Armor Damage by 3/9/18/30%. |
| 3 | Steady Hand | Teppo Passive: While aiming, remain still for a short time to zoom in further and increase damage by 10%. |
| 4 | Armor Buster | Teppo Ability: Reload the Teppo and follow up with a shot that deals 100% ability damage and breaks the target’s armor. |
| 5 | Larger Pouch I | Teppo Passive: Increase maximum capacity for all ammo. +4 ammo, +2 Special Ammo. |
| 6 | Concentration | Teppo Passive: Steady Hand now also slows down time for 5 seconds. At rank 2, increase Steady Hand damage bonus by 40%. At rank 3, Steady Hand slows down time for 8 seconds. |
| 7 | Close Quarters | Teppo Ability: Swing the Teppo at an enemy, dealing 60% ability damage, knocking them down and automatically shooting them. |
| 8 | Teppo Tempo | Teppo Passive: After a successful dodge, hold the heavy attack button at the end of the dodge to shoot the attacker. |
| 9 | Reload Speed | Teppo Passive: Increase Teppo Reload Speed by 2/5/9/13%. |
| 10 | Locked In | Teppo Passive: Steady hand can no longer be interrupted. At rank 2, increase Steady Hand damage bonus by 60%. |
| 11 | Explosive Surprise | Teppo Ability: Throw a gunpowder pouch and automatically shoot it to create an explosion that deals 35% ability damage. |
| 12 | Radial Effect | Teppo Passive: Armor Buster sends fragments of armor flying in every direction, dealing 50% ability damage in a 4 meter radius. At rank 2, increase Armor Buster damage by 40%. At rank 3, deals 105% ability damage. |
| 13 | Teppo’s Might | Teppo Passive: Close Quarters now has 25% Armor Piercing. At rank 2, increase Close Quarters damage by 40%. At rank 3, Close Quarters has 35% Armor Piercing. |
| 14 | Steel Bullets | Teppo Passive: Unlock a new Bullet type that makes the target Vulnerable. At rank 2, targets are Vulnerable for an extra 3 seconds. |
| 15 | Larger Pouch II | Teppo Passive: Increase maximum capacity for all ammo. +4 ammo, +2 Special Ammo. |
| 16 | Tezutsu Burst | Teppo Ability: Light a firework device, pushing back surrounding enemies and dealing 5% ability damage for 8 seconds. Attack to make the device explode, dealing 40% ability damage. |
| 17 | Explosive Barrage | Teppo Passive: Explosive Surprise is chained a second time. At rank 2, increase Explosive Surprise damage by 40%. |
| 18 | Target Vulnerability | Teppo Passive: Teppo Tempo now makes the enemy Vulnerable. At rank 2, increase Teppo Tempo damage by 40%. At rank 3, Teppo Tempo makes targets Vulnerable an extra 3 seconds. |
| 19 | Concussion Bullets | Teppo Passive: Unlock a new Bullet type that builds up the Daze affliction. At rank 2, increase Daze buildup with Concussion Bullets by 2%. At rank 3, increase Daze buildup by 5%. |
| 20 | Range Weapon Expertise | Global Passive: Increase damage with Ranged Weapons by 1/3/6/9%. |
| 21 | Extended Duration | Teppo Passive: Increase Tezutsu Burst duration by 4 seconds. At rank 2, increase Tezutsu Burst damage by 40%. At rank 3, increase Tezutsu Burst duration by 6 seconds. |
| 22 | Deep Impact | Teppo Passive: On hit, Armor Buster now pushes enemies away. At rank 2, increase Armor Buster damage by 60%. |
| 23 | Brutal Takedown | Teppo Passive: Close Quarters now automatically knocks out the target. At rank 2, increase Close Quarters damage by 60%. |
| 24 | Shrapnel Bullets | Teppo Passive: Unlock a new Bullet type that builds up the Bleed affliction. At rank 2, increase Bleed buildup with Shrapnel Bullets by 2%. At rank 3, increase Bleed buildup by 5%. |
| 25 | Larger Pouch III | Teppo Passive: Increase maximum capacity for all ammo. +4 ammo, +2 Special Ammo. |
| 26 | Hawkeye | Teppo Passive: Increase Teppo damage by 50% after the device’s explosion. At rank 2, increase Tezutsu Burst damage by 60%. |
| 27 | Explosive Warfare | Teppo Passive: The explosion from Explosive Surprise now knocks down anyone caught in the blast. At rank 2, increase Explosive Surprise damage by 60%. At rank 3, targets knocked down by Explosive Surprise are afflicted with Daze. |
| 28 | Quick Aim | Teppo Passive: Teppo Temple uses a faster reloading technique. At rank 2, increase Teppo Tempo damage by 60%. Unlocked after completing The Pirate Alliance |
Recommended Abilities
Armor Buster
The more you invest into Armor Buster, the better it gets. It’s not enough to destroy armor, but you can turn it into a weapon by turning it into shrapnel.
Explosive Surprise
The teppo’s basic attack is great single target damage, so you’ll want some area damage in case you’re fighting groups. The Explosive Barrage is necessary for more damage. A good thing to note is that Explosive Barrage only consumes one bullet despite firing two shots.
Steady Hand
Steady Hand allows you to use one strength the teppo has over the bow, the ability to zoom in further on a target. Concentration is good to have for mid-range combat so you have more time to line up a headshot.
Larger Pouch I, II, III
The more ammo you have, the longer you can use your teppo. It doesn’t need explanation beyond that.
Reload Speed
This is necessary to help remedy the teppo’s primary weakness, its slow reload speed.
When to use the Teppo
While the teppo has range that exceeds the bow, it’s best suited for mid-range combat. A great combo to use is to fire your teppo, use Explosive Surprise with Explosive Barrage, fire your teppo again, then use Armor Buster to reload and take one last shot.
You must use your shots wisely as you won’t find a lot of ammo out in the field. You’ll typically want to restock at vendors or a kakurega. The teppo is a great weapon, but you will run out of ammo eventually. Be sure to practice your melee weapons so you can keep up the fight when you’re out of bullets.
A fun way to use the teppo is to fast travel to a castle or fort and fire upon all the helpless enemies below. Just be sure to take out any alarm bells before you do this.
Samurai
The Samurai Tree will provide Yasuke with various defensive and utility options. If you’re looking to increase your durability, you can’t pass on the Samurai tree. It also has some great active abilities that compliment any of Yasuke’s weapons.
| № | Ability Name | Description |
|---|---|---|
| 1 | Samurai Mastery | Samurai Passive: Increase Health by 2-50% with mastery points spend in the Samurai tree. |
| 2 | Regeneration | Global Passive: Restore 1/3/6/9% of Yasuke’s maximum Health when killing an enemy. |
| 3 | Brutal Assassination | Samurai Passive: Perform Yasuke’s own version of an Assassination and remove 4 Health Segments. |
| 4 | Link Attack | Samurai Passive: Swap weapons during a combo to transition into a quick attack while switching to your alternate weapon, extending your combo. Ranks 2 and 3 increase Link Attack damage by 20% and 50% respectively. |
| 5 | War Kick | Samurai Ability: Perform a powerful kick on an enemy dealing 20% ability damage and pushing them away. Half as effective on large enemies. |
| 6 | Bull Rush | Samurai Passive: While Sprinting, regular enemies will be knocked back and some doors will break on impact. Half as effective on large enemies. |
| 7 | Improved Brutal Assassination | Samurai Passive: Yasuke can now perform his Brutal Assassination against large enemies. |
| 8 | Heavy Impact | Samurai Passive: War Kick now has its full effect on large enemies. At rank 2, increase War Kick damage by 40%. |
| 9 | Crash Collision | Samurai Passive: Bull Rush can now deal 15% ability damage on contact. At rank 2, increase Bull Rush damage by 40%. At rank 3, Bull Rush can now deal 42% ability damage on contact. |
| 10 | Vigor I | Samurai Passive: Increase Yasuke’s Adrenaline Chunks by 1. |
| 11 | Stronger, Smarter… | Global Passive: +3/8/15/20% less Cooldown with Abilities. |
| 12 | Assassination Damage I | Samurai Passive: Yasuke removes 2 additional Health Segments with Assassinations. |
| 13 | Impenetrable Defense | Samurai Ability: Immediately counter every attack received for 20 seconds and up to 5 hits. |
| 14 | Battle Cry | Samurai Ability: Stagger all enemies within 10 meters of you. |
| 15 | Big Impact | Samurai Passive: Bull Rush now has its full effects on large enemies. At rank 2, increase Bull Rush damage by 60%. |
| 16 | Vigor II | Samurai Passive: Increase Yasuke’s Adrenaline Chunks by 1. |
| 17 | Unbreakable Guard | Samurai Passive: Impenetrable Defense now makes attackers Vulnerable. At rank 2, increase Impenetrable Defense damage by 40%. At rank 3, Impenetrable Defense makes attackers Vulnerable for an extra 3 seconds. |
| 18 | Defensive Breach | Samurai Passive: +100% damage on enemy collisions. At rank 2, increases War Kick damage by 60%. At rank 3, +150% damage on enemy collisions. Unlocked after completing Fallen Soldiers |
| 19 | Outnumbered | Samurai Passive: For each enemy affected by Battle Cry, increase damage by 4% for 10 seconds. At rank 2, increase Damage Reduction during Battle Cry by 5%. At rank 3, increase damage by 6% for 10 seconds for each enemy affected by Battle Cry. |
| 20 | Samurai Stand | Samurai Ability: Enter a frenzy, turning all your attacks into Posture attacks for 10 seconds. Unlocked after completing Nobutsuna’s Students |
| 21 | Strength Builder | Global Passive: Increase damage per filled Adrenaline Chunk by 1/3/6/9%. |
| 22 | Assassination Damage II | Samurai Passive: Yasuke removes 2 additional Health Segments with Assassinations. Unlocked after completing The Godai Shinobi |
| 23 | Healing Shout | Samurai Passive: Battle Cry now restores 50% of maximum health over 10 seconds. At rank 2, increase Damage Reduction during Battle Cry by 10%. At rank 3, Battle Cry now restores 65% of maximum health over 10 seconds. |
| 24 | Samurai Frenzy | Samurai Passive: When killing an enemy, Samurai Stand duration is increased by 3 seconds. At rank 2, increase damage during Samurai stand by 5%. At rank 3, increases damage during Samurai Stand by 10%. |
| 25 | Vigor III | Samurai Passive: Increase Yasuke’s Adrenaline Chunks by 1. |
| 26 | Absolute Protection | Samurai Passive: Impenetrable Defense can now work against all Unstoppable Attacks, except Grab attacks. At rank 2, increases Impenetrable Defense damage by 60%. Unlocked after completing Yamabushi Imposters |
| 27 | Eternal Samurai | Samurai Passive: While in Samurai Stand, Health is locked at 10%, causing all enemy attacks to be non-lethal. At rank 2, increase damage during Samurai Stand by 10%. At level 3, increases damage during Samurai Stand by 20%. |
Recommended Abilities
Impenetrable Defense
Impenetrable Defense will provide you a moment of invulnerability. The guaranteed parries are just the cherry on top and allow you to focus solely on attacking. Do note that you can’t use other abilities while Impenetrable Defense is active.
Regeneration
Yasuke is made for combat, so take advantage of that by gaining back some health with each kill.
Brutal Assassination
While Yasuke isn’t very stealthy at close range, it’s good to have the option to assassinate a lone enemy. It’s also a great way to open combat if you use it on a beefy enemy such as a guardian.
Vigor I, II, III
You’ll want to get this when you can to pull off ability combos with any of your other weapons.
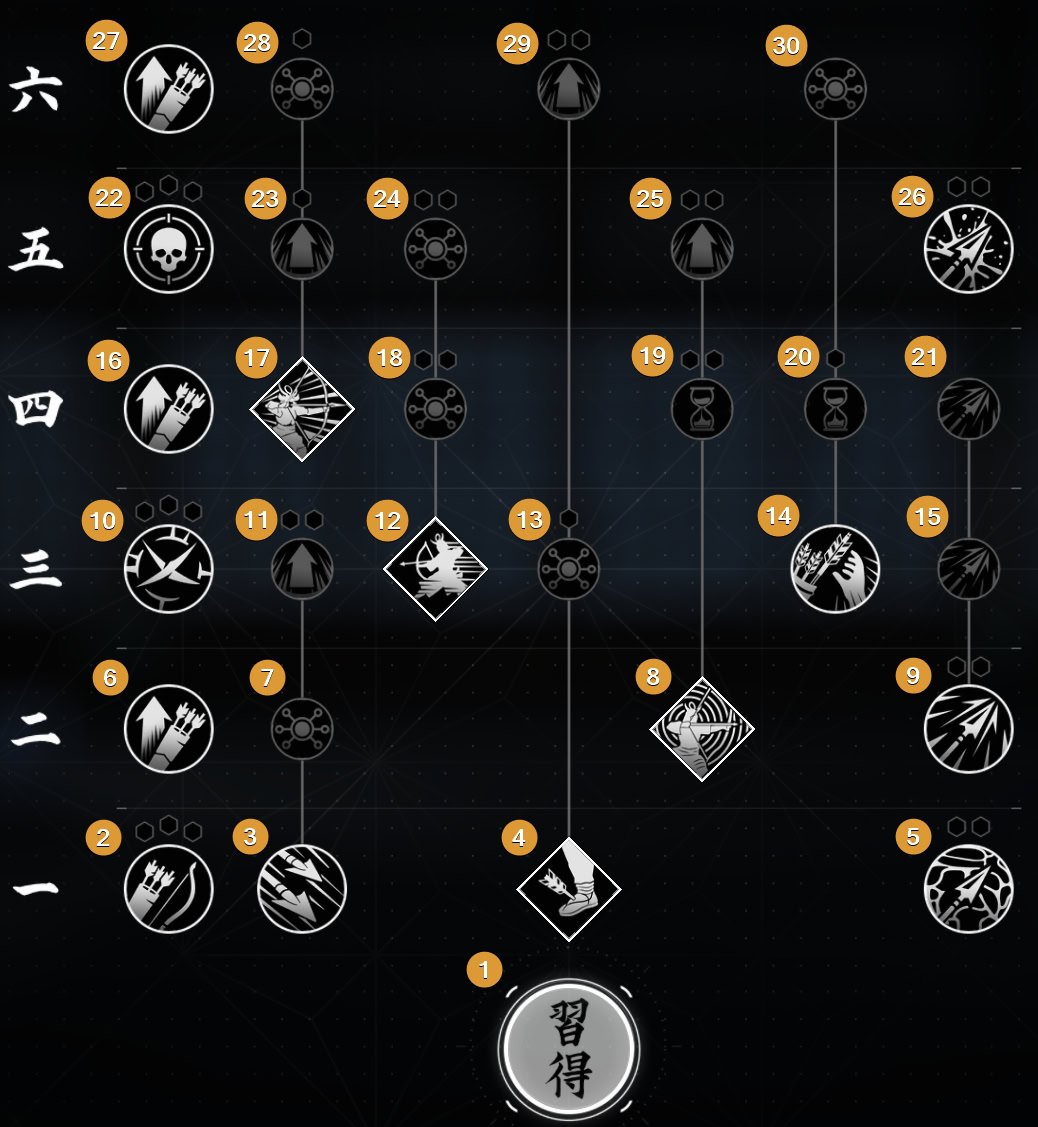
Bow
Bow proficiency is just as important to samurai as katana proficiency. The bow in Assassin’s Creed Shadows helps Yasuke by providing him a stealthy way to take out enemies from a distance.
| № | Ability Name | Description |
|---|---|---|
| 1 | Yumi Bow Mastery | Increase Bow damage by 3-80% with mastery points spent in the Bow tree. |
| 2 | Swift Hand | Bow Passive: Increase Draw Speed by 3/8/15/22%. |
| 3 | Marksman’s Shot | Bow Passive: When hitting the target’s head with a Posture Shot, fire a second arrow. |
| 4 | Staggering Blast | Bow Ability: Shoot a powerful arrow at the target, dealing 60% ability damage and pushing them back. |
| 5 | Poison Arrows | Bow Passive: Unlock a new Arrow type that builds up the Poison affliction. At rank 2 and 3, increase Poison buildup with Poison Arrows by 2% and 5% respectively. |
| 6 | Larger Quiver I | Bow Passive: Increase maximum capacity for all arrows. +10 Arrow, +3 Special Arrow. |
| 7 | Marksman’s Stance | Bow Passive: Marksman’s Shot is now a Posture Shot |
| 8 | Clear Mind | Bow Ability: Time slows down around you for 10 seconds while aiming. |
| 9 | Silent Arrows | Bow Passive: Unlock a new Arrow that has 50/60/75% Armor Piercing and removes 3 Health Segments with headshots on unsuspecting enemies. |
| 10 | Critical Damage | Global Passive: Increase Critical Damage by 2/6/12/18%. |
| 11 | Marksman’s Touch | Bow Passive: Marksman’s Shot now has 50/70/100% Armor Piercing. |
| 12 | Retreating Shot | Bow Ability: Shoot 4 arrows at the closest enemy, dealing 10% ability damage each time while evading incoming attacks. |
| 13 | Headshot Lock | Bow Passive: Staggering Blast now automatically aims at the head. At rank 2, increase Staggering Blast damage by 40%. |
| 14 | Kyudo Master | Bow Passive: Release when the Bow flashes to trigger Kyudo Master, enabling a longer Posture Window and a faster Reload Time for 5 seconds. |
| 15 | Silent Arrows II | Bow Passive: Yasuke removes 2 additional Health Segments with Silent Arrows. |
| 16 | Larger Quiver II | Bow Passive: Bow Passive: Increase maximum capacity for all arrows. +10 Arrow, +3 Special Arrow. |
| 17 | Spread Shot | Bow Ability: Swing the bow as a melee weapon, then attack to release a wide spread of arrows in front of you, dealing 5% abilty damage. |
| 18 | Retreating Barrage | Bow Passive: Retreating Shot now fires more arrows: +1. At rank 2, increase Retreating Shot damage by 40%. At rank 2, fires +2 more arrows. |
| 19 | Effective Mindset | Bow Passive: While Clear Mind is active, each kill increases damage by 15%. At rank 2, increase damage during Clear Mind by 5%. At rank 3, each kill increases damage by 20% while Clear Mind is active. |
| 20 | Temporal Mastery | Bow Passive: Kyudo Master now slows down time for 2 seconds on the next shot. At rank 2, this becomes 3 seconds. |
| 21 | Silent Arrows III | Bow Passive: Yasuke removes 2 additional Health Segments with Silent Arrows. Unlocked after completing Kurai Eikyou |
| 22 | Headshot Damage | Global Passive: Increase damage with Headshots by 2/5/9/13%. |
| 23 | Extended Spread | Bow Passive: Spread Shot’s angle is wider and shoots additional arrows. At rank 2, increase Spread Shot Damage by 40%. |
| 24 | Retreating Arsenal | Bow Passive: Retreating Shot now fires more arrows: +1. At rank 2, increase Retreating Shot damage by 60%. At rank 3, Retreating Shot now fires +2 more arrows. |
| 25 | Level-Headed | Bow Passive: While Clear Mind is active, Headshots increase the duration by 0.75 seconds. At rank 2, increase damage during Clear Mind by 10%. At rank 3, headshots increase the duration by 1 second. Unlocked after completing The Yokai |
| 26 | Serrated Arrows | Bow Passive: Unlock a new Arrow type that builds up the Bleed affliction. At rank 2 and 3, increase Bleed Buildup with Serrated Arrows by 2% and 5% respectively. |
| 27 | Larger Quiver III | Bow Passive: Bow Passive: Increase maximum capacity for all arrows. +10 Arrow, +3 Special Arrow. |
| 28 | Stopping Power | Bow Passive: Spread Shot arrows have greater impact. At rank 2, increase Spread Shot damage by 60%. |
| 29 | Hunter’s Mark | Bow Passive: Staggering Blast now automatically applies the Daze affliction. At rank 2, increase Staggering Blast damage by 60%. At rank 3, the Daze affliction applied by Staggering Blast lasts an extra 3 seconds. |
| 30 | Reflexive Poise | Bow Passive: Kyudo Master now automatically makes all shots Posture Shots. |
Recommended Abilities
Clear Mind
When you’re firing arrows at a group of enemies while hidden, they’ll be coming your way as they search for you. Clear Mind is a great ability to take down enemies before they find you thanks to time being slowed.
Larger Quiver I, II, III
When fully upgraded, you can have 40 arrows, 15 poison and serrated arrows, and 5 silent arrows. With 75 arrows at your disposal, clearing out castles and forts quietly should be no issue.
Silent Arrows I, II, III
These arrows are the best arrows you can get. As your ranged assassination option, save these for durable enemies such as Samurai Daisho, Guardians, and Objective Targets.
Kyudo Master
The bow requires time to deal its full damage. This is gained through posture shots and Kyudo Master’s Reflexive Poise upgrade can turn all your shots into Posture Shots instantly for 5 seconds.
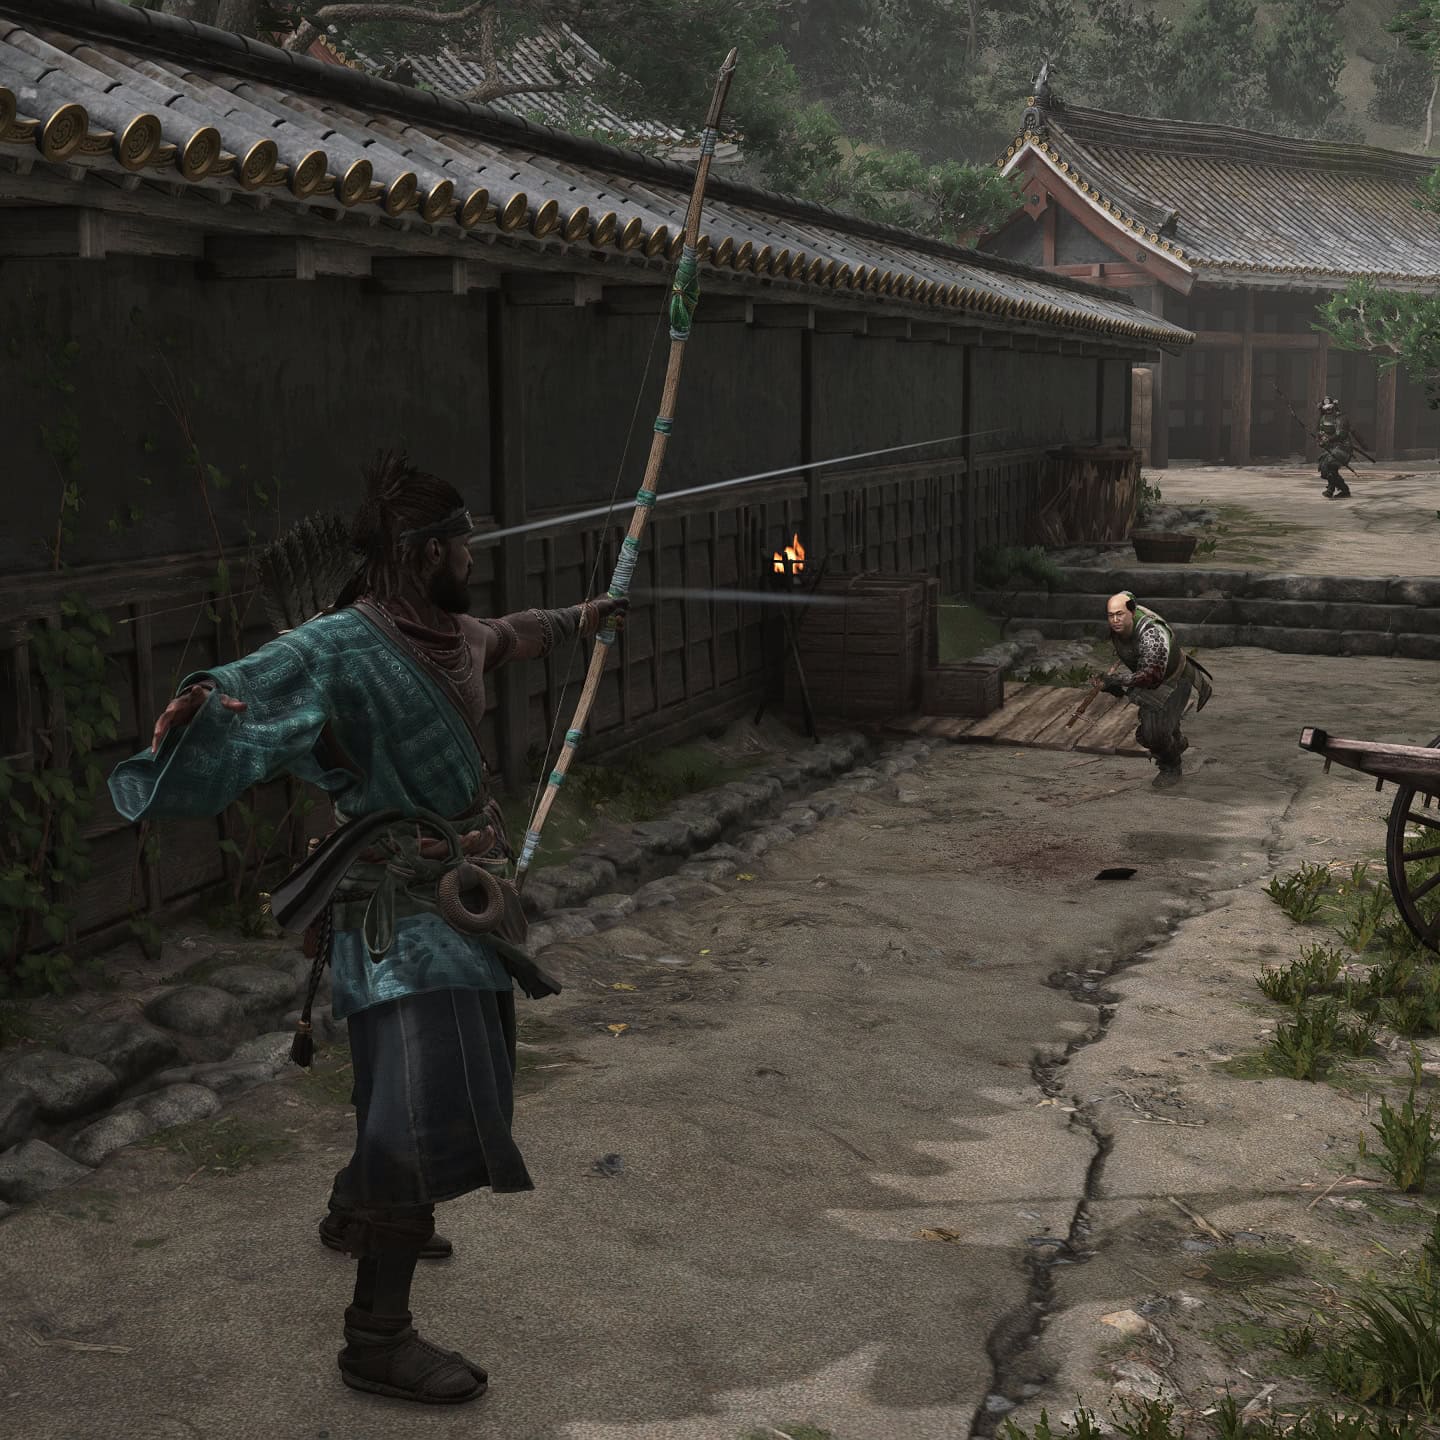
When to use the Bow
The bow is best used from a distance to quietly take out enemies. Try to find a good vantage point a good distance away from the place you’re trying to infiltrate. Save your regular arrows for enemies without armor and take out the ones you can instantly kill first.
From there, take down the durable enemies with your Silent Arrows. The bow is also a solid option for mid-range combat but it lacks in area damage. Unlike the teppo, it’s very easy to find ammo for the bow. Look for arrow boxes near the perimeter of forts, or atop castle walls.
Unlockable Abilities
Many of the final abilities at the end of a branch are locked behind a quest. When you complete these quests, these unlock and you’re able to invest Mastery points into them. Here are the unlockable abilities and which quests you get them from:
Naoe’s Locked Abilities
| Naoe Ability | Mastery Path | Quest that unlocks it |
|---|---|---|
| Third Wave | Katana | The Kabukimono |
| Feral Frenzy | Kusarigama | The Winter Raiders |
| Enhanced Impact | Kusarigama | The Hunters of Kyonyo |
| Contemplation | Tanto | Yamabushi Imposters |
| Widespread | Tools | The Pirate Alliance |
| Triple Threat | Tools | The Tournament |
| Kunai Assassination Damage III | Tools | Kurai Eikyou |
| Sweep the Leg | Shinobi | Fallen Soldiers |
| Critical Insight | Shinobi | The Yokai |
| Assassination Damage III | Assassin | The Godai Shinobi |
Yasuke’s Locked Abilities
| Yasuke’s Ability | Mastery Path | Quest that unlocks it |
|---|---|---|
| Chained Power Dash | Long Katana | The Kabukimono |
| Ultimate Onslaught | Naginata | The Winter Raiders |
| Disabling Strike | Naginata | The Hunters of Kyonyo |
| Quick Aim | Teppo | The Pirate Alliance |
| Samurai Stand | Samurai | Nobutsuna’s Students |
| Absolute Protection | Samurai | Yamabushi Imposters |
| Silent Arrows III | Bow | Kurai Eikyou |
| Level-Headed | Bow | The Yokai |
Advanced High-tier Mastery Passives
After Mastery Rank 6, you will be able to spend additional Mastery Points on new passives for each character from the newly opened Ranks 7 through 9. They follow a familiar formula from previous Assassin’s Creed Shadows where each Mastery Point spent increases the given bonus by a small percent.
You can Reset the Mastery Points spent in these advanced grids also for free and at any time. The grids offer identical bonuses, but you still have to spend Mastery Points for each character. They are not shared.
This means that you can decide to invest in Stealth perks and Assassinations for Naoe, while boosting Open Combat performance for Yasuke.
Below you can read the full list of Passives available for unlocking. The values listed are per Mastery Point spent. There is a limit of 20 points you can spend on an individual passive.
Rank 6
- Increase Posture attack damage by +1.50%
- Increase Headshot damage by +1.50%
- Increase Armor Damage by +1.50%
- Increase damage with Afflictions by +2%
- Increase damage when hitting vulnerable enemies by +1.50%
Rank 7
- Increase damage with Melee Weapons by +1.50%
- Increase damage with Ranged Weapons / Tools by +1.50%
- Increase Armor Piercing by +1.50%
- Increase damage with Abilities by +1.50%
- Increase Critical Damage by +3%
Rank 8
- Increase damage by +1%
- +1% less Cooldown with Abilities
- Increase Maximum health by +1.20%
- Increase Adrenaline Gain by +2.50%
- Increase Critical Chance by +0.20%
Rank 9
- Increase damage when hitting multiple enemies by 2.50%
- Increase damage with combo enders by 2%
- Increase damage on Afflicted enemies by 1.50%
- Increase damage during the night by 2%/Increase damage reduction from melee hits by 0.50%
- Gain 1.50% Adrenaline when detected/Increase damage reduction from ranged hits by 0.80%
Rank 10
- Increase damage with consecutive hits by 0.30%
- Increase damage on next hit after a kill by 5%
- Increase damage on next hit after using an ability by 5%
- Increase damage on next hit after a Dodge by 1.60%. Increase damage on next hit after a Parry by 2.40%
- Increase damage on next hit after hitting an enemy with a tool by 2.40%/Increases damage on next hit after breaking armor by 5%
We have a comprehensive guide to how gear works in Assassin’s Creed Shadows, which ties in with the Mastery Paths to weapons and how to use abilities in the game.
Mastery Level
After you reach the current level cap 60, you will continue to earn XP, but it will be towards a new Mastery Level system. Mastery Levels work in a similar way to previous modern Assassin’s Creed games.
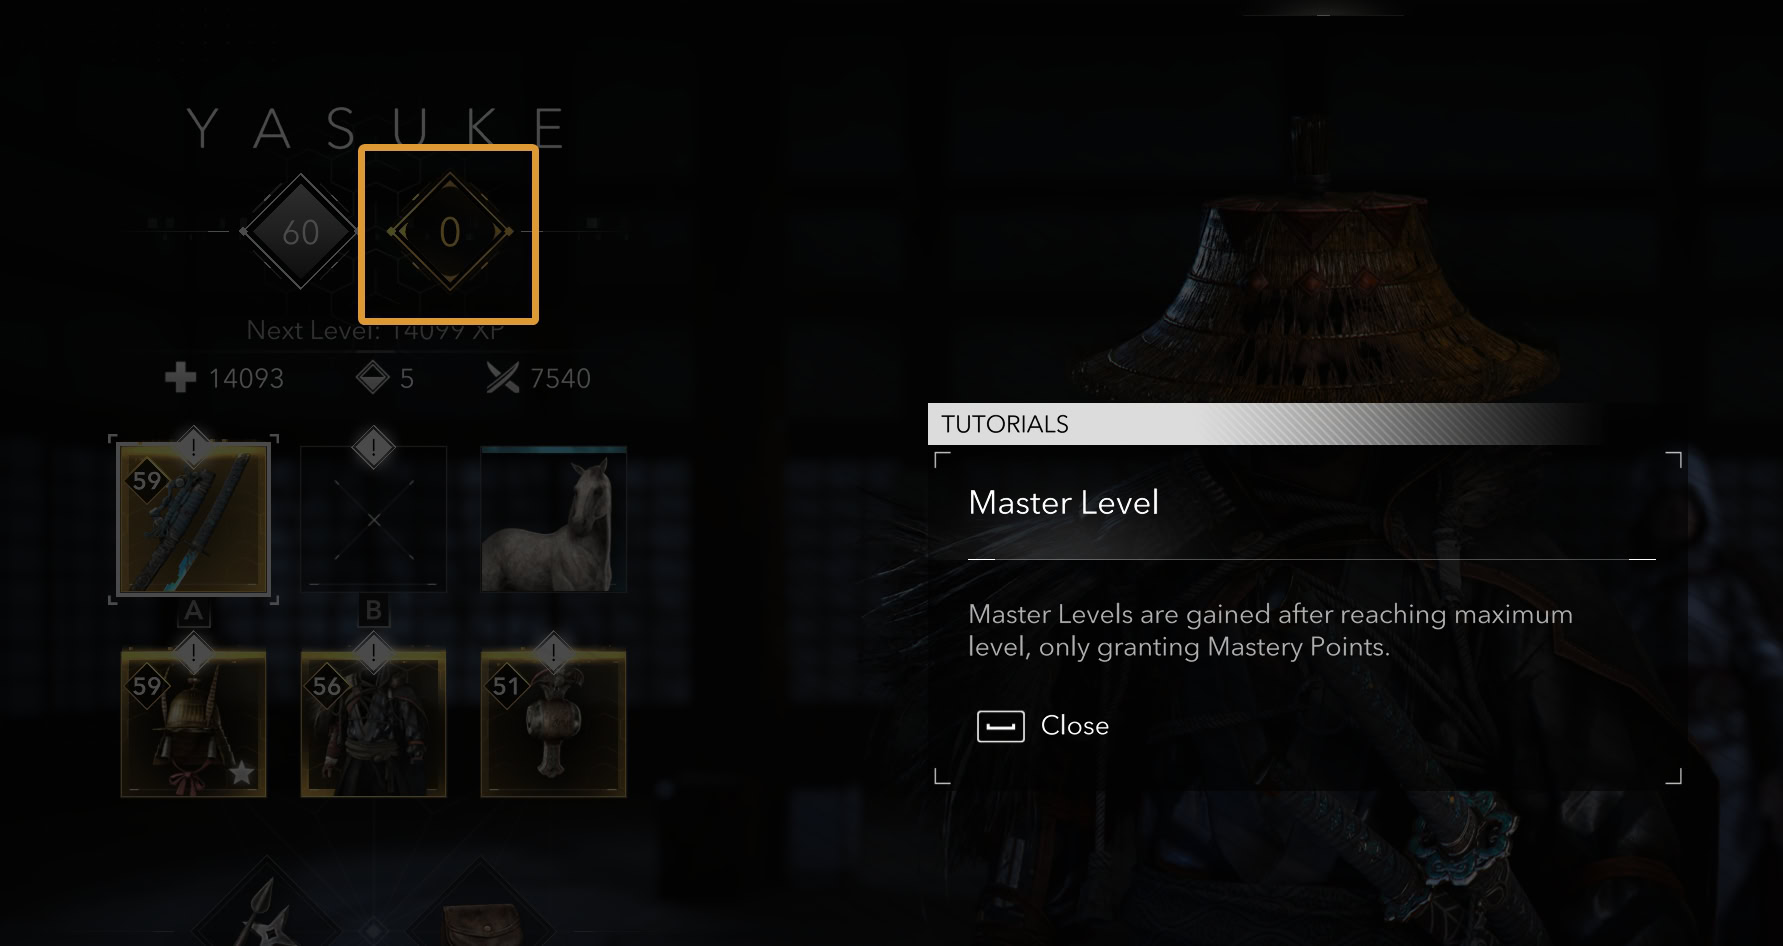
You will continue to earn the same XP from quests and activities, but it will build up Mastery Levels. One Mastery level grants you one Mastery Point, this opening an endless flow of Mastery Points if you are willing to farm XP.