Everything about the new Engraving in the Claws of Awaji DLC for Assassin’s Creed Shadows. Learn their effects, how to get them, and which gear type they’re compatible with.
The Claws of Awaji expansion added a good chunk of content such as 10-12 hours of story content, and new legendary gear. This guide will condense the 20+ new engravings and explain the more esoteric ones. It does not detail any of the Engravings in the base game of Assassin’s Creed Shadows.
Full List
Throughout this catalog, there will be various icons to indicate which gear is compatible with which slot, and which character can use it.
The icons of Legendary Engravings will be gold. There are no new Base Engravings that were introduced in Claws of Awaji.
| Name | Effect | Equipment | Source | Equipment | Rarity | Character | Type | Source | |
|---|---|---|---|---|---|---|---|---|---|
| Bullets Inflict Poison | Bullets build up 35% Poison affliction | Complete Turning the Tables | Teppo | Legendary | Yasuke | Afflictions | Quest | ||
| Counter Attack Heal | Counter Attacks heal 10% health | Complete Trouble with the Regalia | Katana | Legendary | Naoe | Constitution | Quest | ||
| Damage on Full Health | +50% damage to enemies at full Health |  | Samurai Daisho Chest in Yura Castle | Light Armor | Legendary | Naoe | Damage | Castle Chest | |
| Damage Reduction on Kill | +30% damage reduction for 5 seconds on kill | Complete The Final Assault | Headgear | Legendary | Naoe | Constitution | Quest | ||
| Damage Reduction while Climbing | +50% damage reduction while climbing | Complete Dismantling One by One | Amulet | Legendary | Yasuke | Constitution | Quest | ||
| Damage Reduction while Climbing | +50% damage reduction while climbing | Complete Nowaki’s Ambushers | Trinket | Legendary | Naoe | Constitution | Quest | ||
| Damage Reduction While Surrounded | 25% damage reduction when surrounded by 4 or more enemies |  | Find the Master Fisherman Outfit | Armor | Legendary | Yasuke | Constitution | Exploration | |
| Damage to Nearby Enemy | +10% damage per meter below 12 meters. | | Samurai Residence in Sumoto, Awaji | Armor | Legendary | Yasuke | Damage | Exploration | |
| Extra Chain Assassination Target | Extra target on Bo Chain Assassination | Chest in the Atakebune in Yura | Headgear | Legendary | Naoe | Damage | Exploration | ||
| Headshot Damage on Low Health | +50% headshot damage when below 30% health | Samurai Daisho Chest in Sumoto Castle | Bow | Legendary | Yasuke | Damage | Castle Chest | ||
| Knockdown on Combo Ender | Alternate Combo Ender knocks down large and armored enemies | Complete A Garrison to Dismantle | Kanabo | Legendary | Yasuke | Damage | Quest | ||
| Last Stand | Avoid death but lose health until killing an enemy | Yura Castle storage room, in the Winter | Helmet | Legendary | Yasuke | Constitution | Exploration | ||
| Last Stand | Avoid death but lose health until killing an enemy | | Complete The Final Assault | Light Armor | Legendary | Naoe | Constitution | Quest | |
| Poison and Bleed | Attacks build up both Poison and Bleed | Complete Prison Break | Bo | Legendary | Naoe | Afflictions | Quest | ||
| Posture Attacks Apply Bleed | Hitting enemies with 3 Posture attacks within 10 seconds applies Bleed | Complete A Snake in the Shrine | Tanto | Legendary | Naoe | Afflictions | Quest | ||
| Posture Damage with Bo Mastery | +1% Posture damage per Mastery Point in the Bo Tree | Complete Way of the Bo | Trinket | Legendary | Naoe | Damage | Quest | ||
| Push Back on Perfect Flow | Perfect Flow attacks push back and damage surrounding enemies | Legendary Chest in the Bandit Camp in Eshima Coast | Bo | Legendary | Naoe | Damage | Exploration | ||
| Slow Motion While Aiming | Slow down time for 5 seconds when aiming at nearby enemies | Legedary Chest in the Fukura Camp | Helmet | Legendary | Yasuke | Constitution | Exploration | ||
| Slow down after Rush Assassination | Rush Assassination triggers a slowdown effect | Find the Ophidian Feeder Kusarigama | Kusarigama | Legendary | Naoe | Damage | Exploration | ||
| Slowdown while AIming at Full Health | Slow down time for 5 seconds while aiming at full health | Complete Yasuhira’s Spies | Amulet | Legendary | Yasuke | Ranged | Quest | ||
| Temporary Damage After Parrying | +15% Damage for 5 seconds after Parrying, up to 30% | Complete The Old Ashigaru | Naginata | Legendary | Yasuke | Damage | Quest | ||
| Wind Slash Charge Speed | Increase Wind Slash charge speed by 25% | Samurai Daisho Chest in Iwaya Castle | Long Katana | Legendary | Yasuke | Constitution | Castle Chest | ||
Notable Engravings Explained
Many of these engraving descriptions are fairly straight-forward. Unfortunately, some of them poorly convey what they do and their limitations. This section will clear up any confusion of the more esoteric engravings introduced with Claws of Awaji.
Last Stand
The Last Stand engraving comes from Yukari’s Armor (Naoe) and the Master Fisherman’s Kasa (Yasuke). It’s description reads “Avoid death but lose health until killing an enemy“, but this is worded poorly.
What this engraving does is if you would take fatal damage, you’ll regain all of your hit points. This new health will drain over time until you kill an enemy. Failing tokill an enemy in time means you’ll die.
When this effect activates, the background will take on a red hue. You can only activate this effect once per combat, so you’ll need to exit combat to reset it. Any remaining health you’ll get to keep, so kill an enemy quickly!
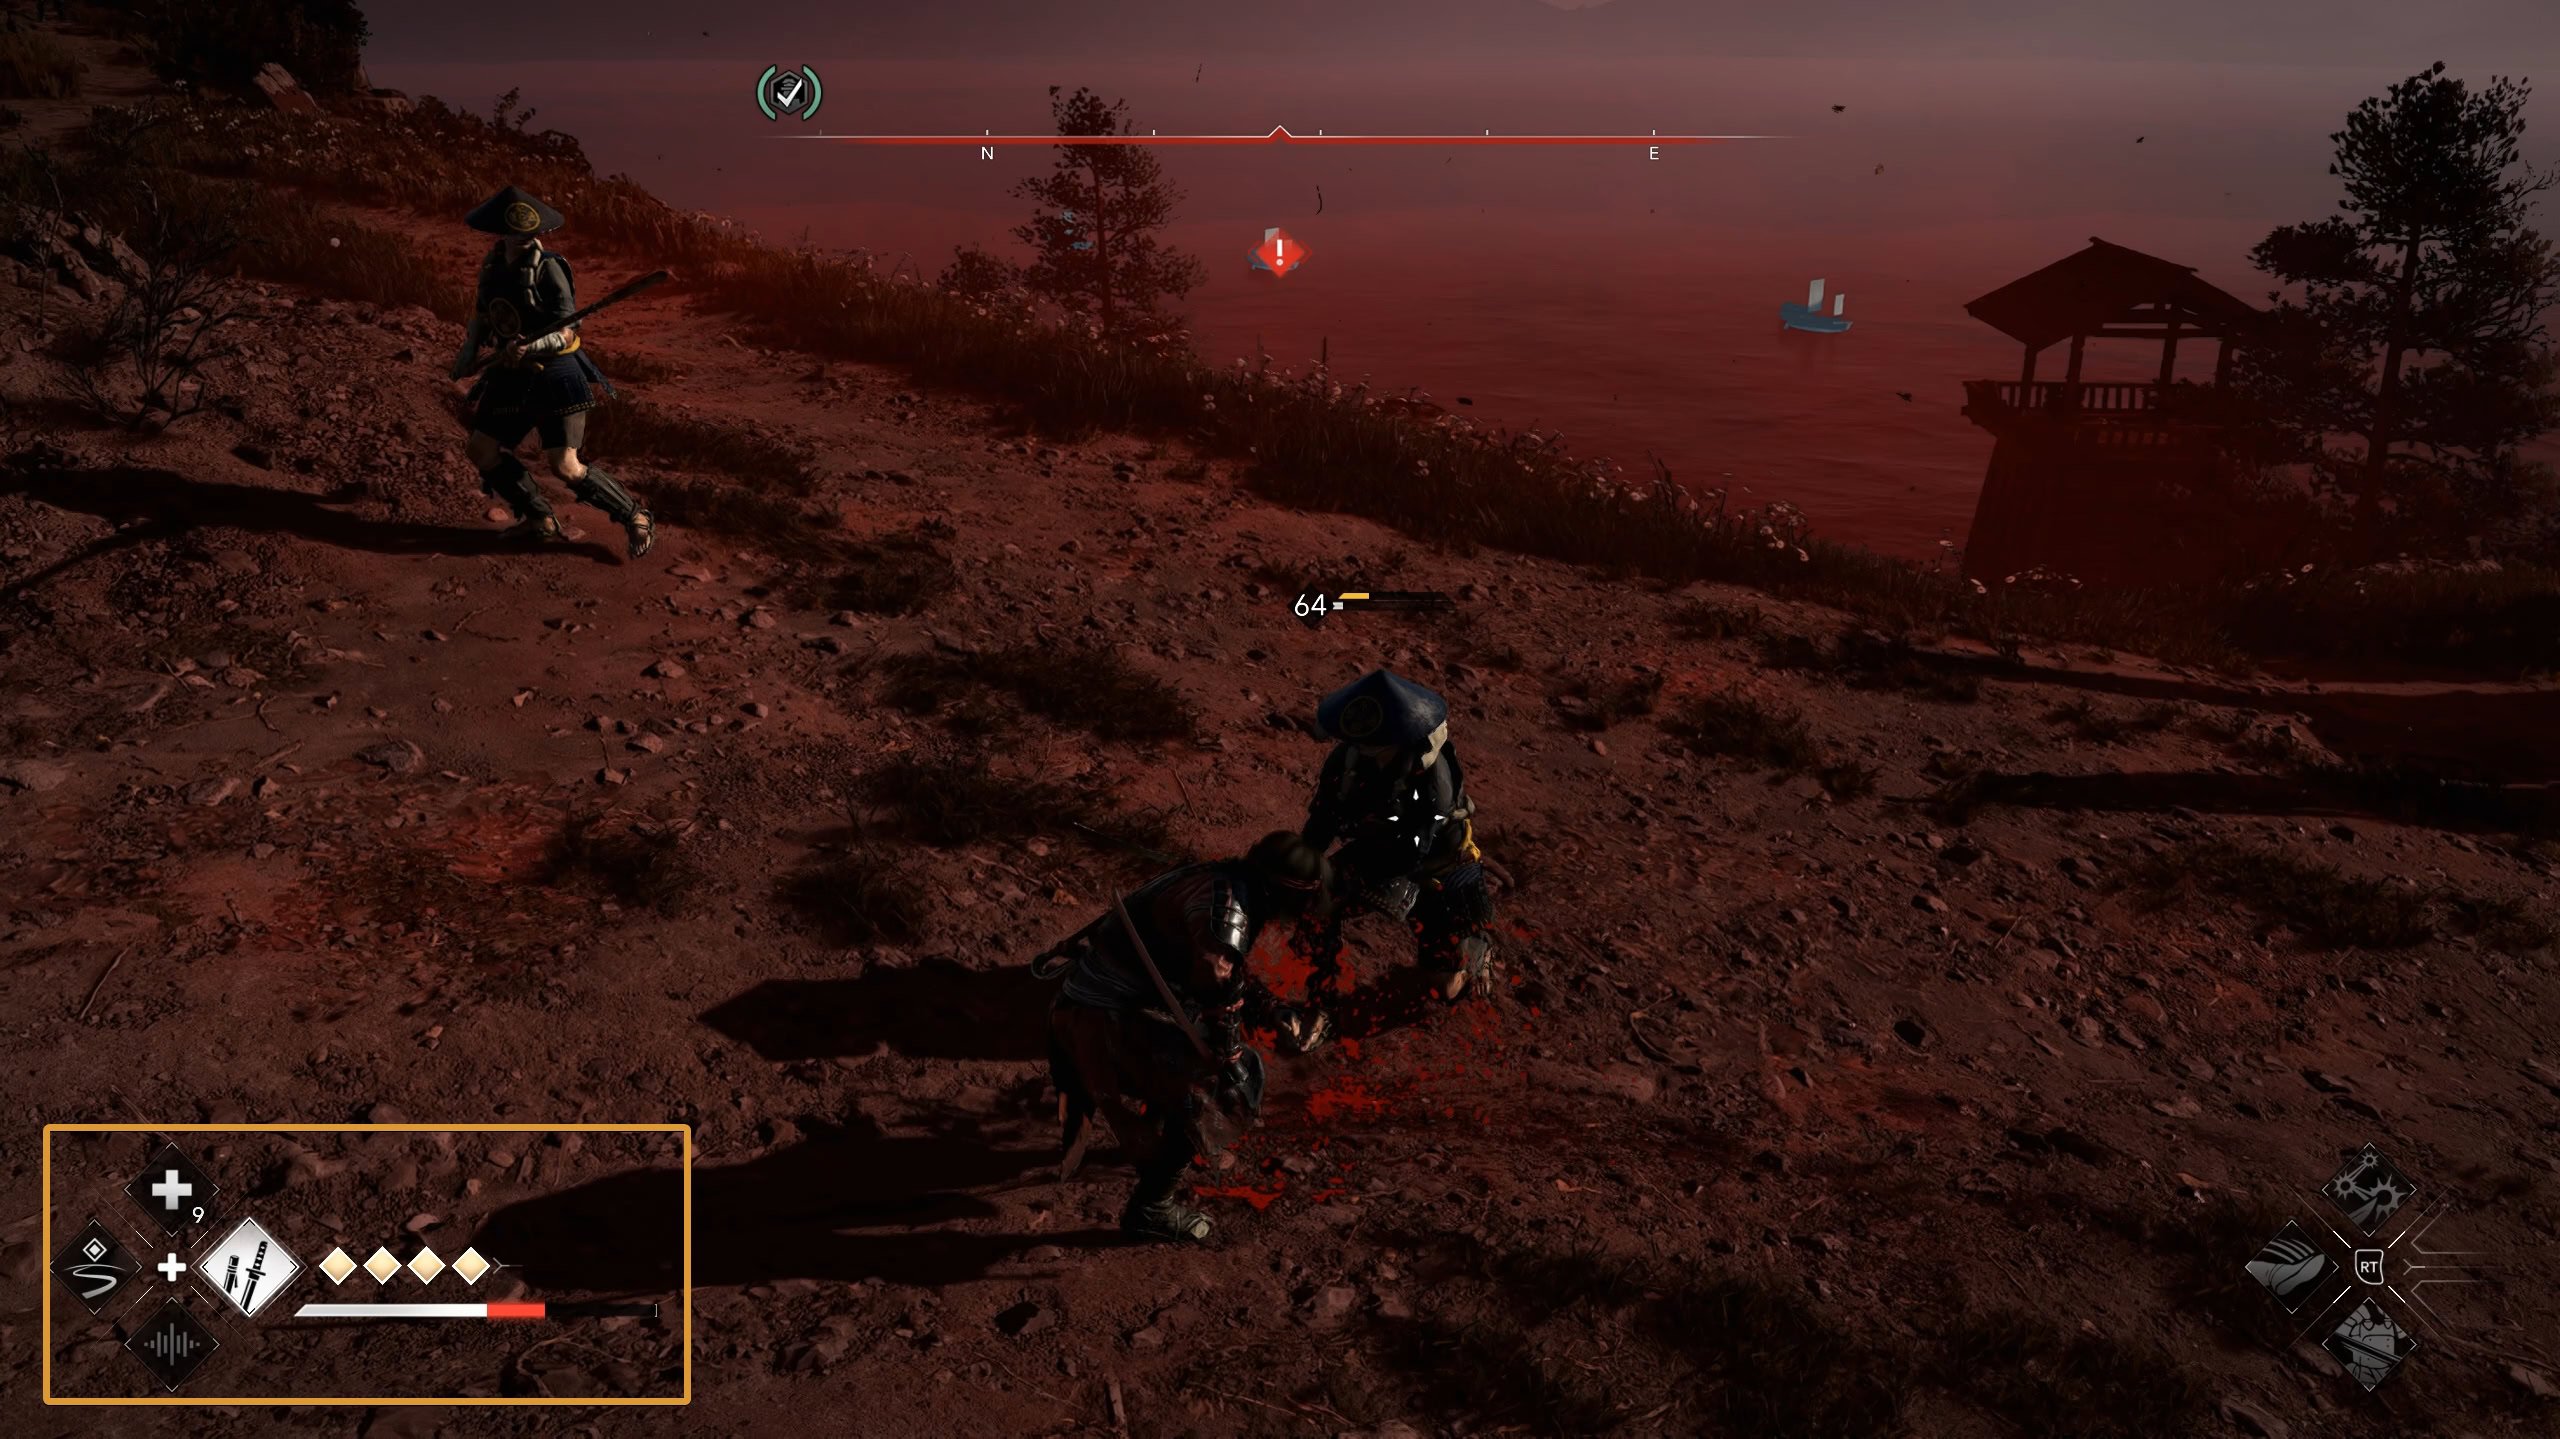
Damage to Nearby Enemy
This engraving is from the Fishscale Berserker Armor. It’s exclusive to Yasuke and its effects are designed for Bows and Teppos.
Its description reads “+10% damage per meter below 12 meters”. With your bow or teppo, your damage will increase the closer you are to your enemy. The following images compare potential damage done with a body shot:
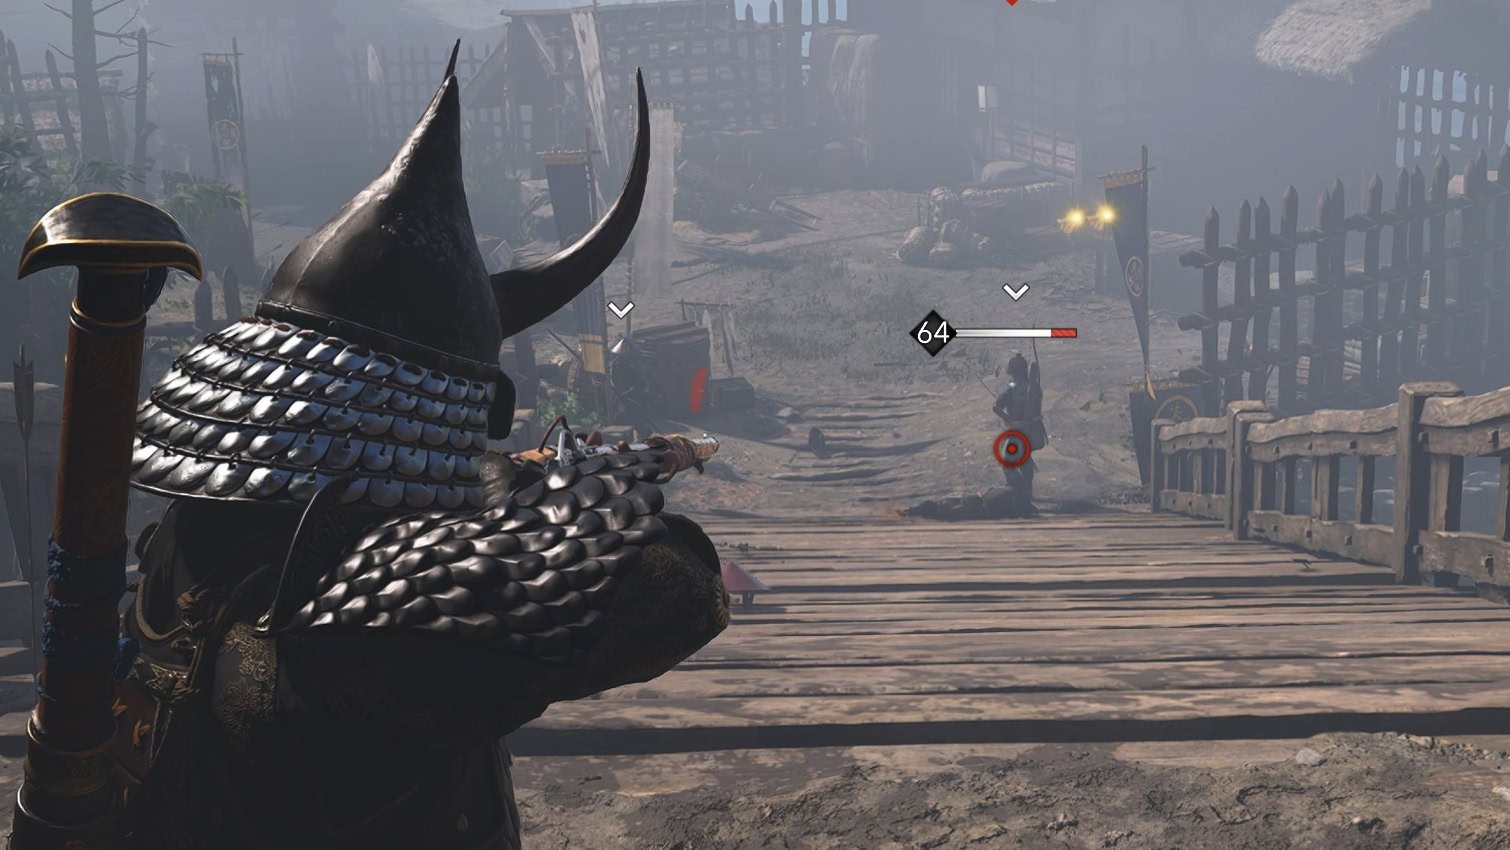
As you can see, the damage is nearly doubled as you’ll be dealing 110% increased damage with a bow or teppo at point blank range.
Knockdown on Combo Ender
Gained from the Boneshaker Kanabo, this allows you to knock down enemies by finishing off your combo with a different type of non-postured attack.
This works most consistently if you use a light, light, then heavy attack. This will knock down an enemy who’s large and armored.
The description states “Alternate Combo Ender knocks down large and armored enemies“. This doesn’t mean that this works on armored enemies and large enemies, it only works on large and armored targets.
This makes the engraving far too situational for most cases. Unless you pair it with the Uninterruptible engraving, you won’t get any use out of this in group combat scenarios as every stray hit will stop you from finishing your combo.