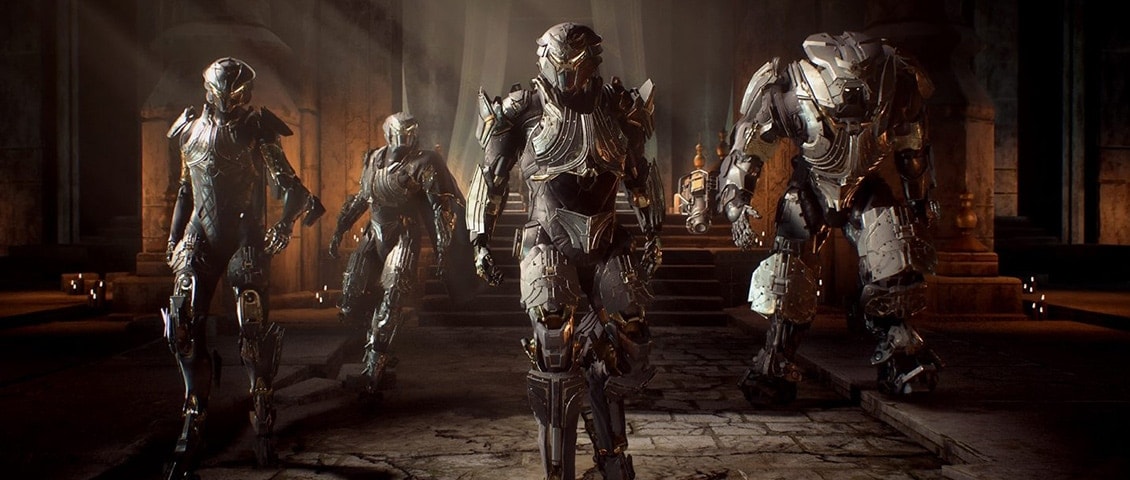
This guide is dedicated to the The Sunken Cell Stronghold – one of Anthem’s end-game re-playable instanced group-based missions. Here you will learn everything you need to know to perform a smooth run – objectives, places, items. And, of course – the final boss tactics!
RELATED ► ANTHEM Icetide Sunken Cell Guide to all secrets and puzzles
In this article I have done my best to show and explain everything you need to know about the Stronghold – how to unlock it, how to solve the puzzles inside and how to defeat the final Fury boss. I hope you find it useful. If you have a different approach or strategy to one or more than one of the segments, share it in the comments below. These are the methods I found to be best in my opinion.
At the end of the article you will find video playthroughs from different javelins perspectives, starting with my favorite – The Ranger!
HOW TO ACCESS THE SUNKEN CELL STRONGHOLD
The fourth Anthem Stronghold, called The Sunken Cell, was added with game update 1.1.0 on April 23, 2019. It is available to all players who have completed the main storyline, also known as the “Crit Path” (as the devs call it).
The Stronghold can be started from Fort Tarsis or the Launch Bay via the Mission starter screen (quick access: press and hold the button “R” on PC). From the Summary screen select “Strongholds” and then navigate to the north-eastern corner of the map to find the purple icon for this Stronghold. If you do not see it, you have probably not completed all of your main missions still.
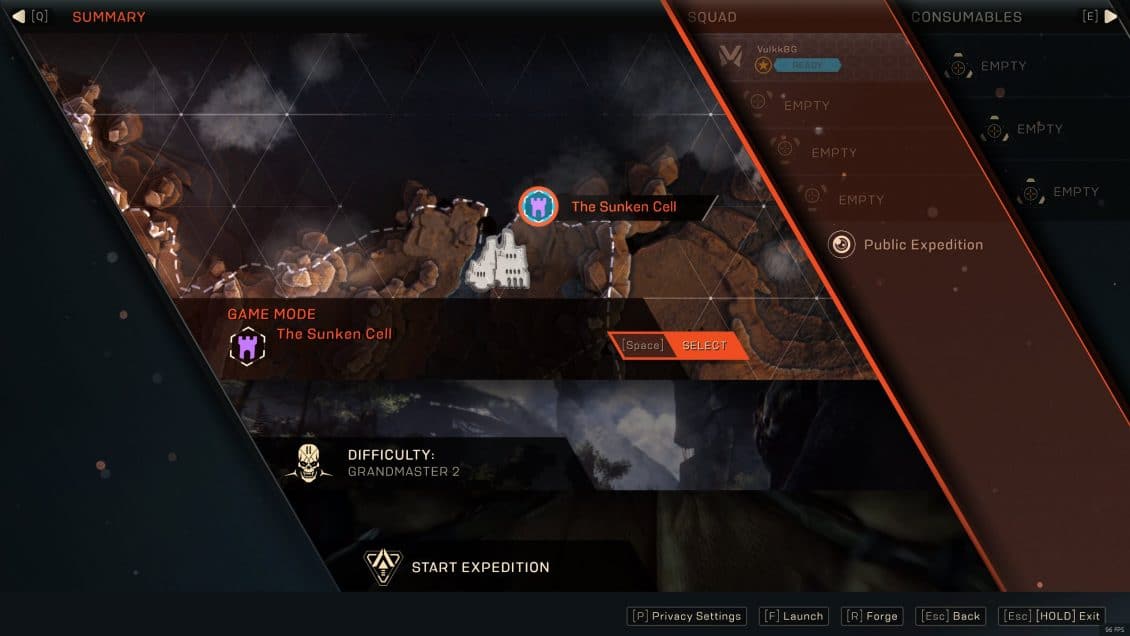
The Stronghold is available in all difficulties with no visual differences to the encounters and the final boss in terms of tactics. Of course, on lower difficulties you may be able to skip some of the mechanics and simply eat up more damage while you perform the puzzles and kill the final boss.
The Stronghold is on par with the other three in terms of duration. It also features three Treasure chests and after you defeat the final boss, you get to unlock up to four Elysian caches.
WALKTHROUGH – HOW TO SOLVE THE PUZZLES
There are several quick and not too complicated puzzles that you must solve as a team or one person alone in order to unlock the progress to the next area. The Stronghold is quite narrow in general. Most of the time your playthrough is about clearing up a room of all enemy NPCs or unlocking a door via a puzzle while your team clears up spawning waves of enemies.
The new thing in The Sunken Cell is that you travel upwards. Usually you go down into a cave and progress deeper. Here the path is unorthodox – you are starting at the bottom of this facility and make your way up towards the highest level, where the final boss is – a giant mutated (even more than usual) Fury.
Note, the next few paragraphs and images will detail the more interesting and challenging areas and objectives from this stronghold mission. Most of the time you will be traveling only in one direction, so this is not a full walkthrough of the expedition.
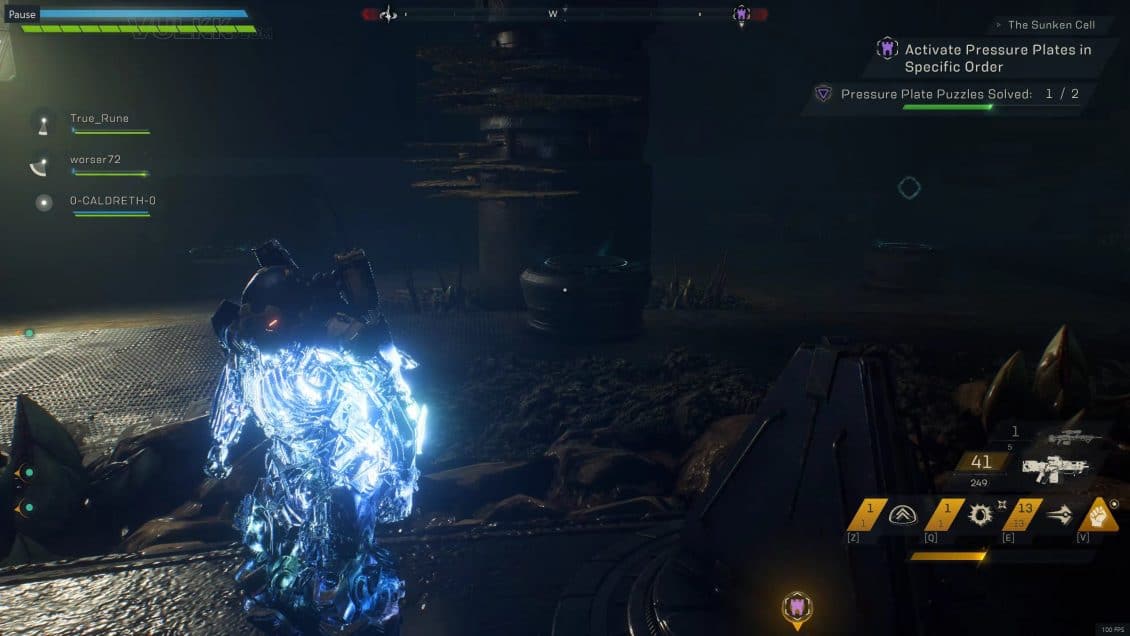
THE FIRST ENCOUNTER AND THE GROUNDER
The first room as you spawn will ground you and block your thrusters for the better part of the duration of this first encounter. You need to stand in the middle of the area, inside the green-ish marked zone, while clearing off spawned and new incoming waves of Dominion creatures.
In the top right you will see the meters for stats and progress. The more you and your teammates stay inside the marked area in the middle, the quicker the progress tracker will move towards completion.
There are quite a lot of Brutes, Elementalists and Beasts in this fight. Stay on the move and always dodge like mad the freezing attacks from the Brutes and Beasts.
PRESSURE PLATE PUZZLES GUIDE
The first puzzle you have to solve is quite quick and easy one. There are two objects around the center of the room. They can be clicked. Click one of them and torn your eyes towards the outer side of the room to watch for the spawning symbols on the platforms.
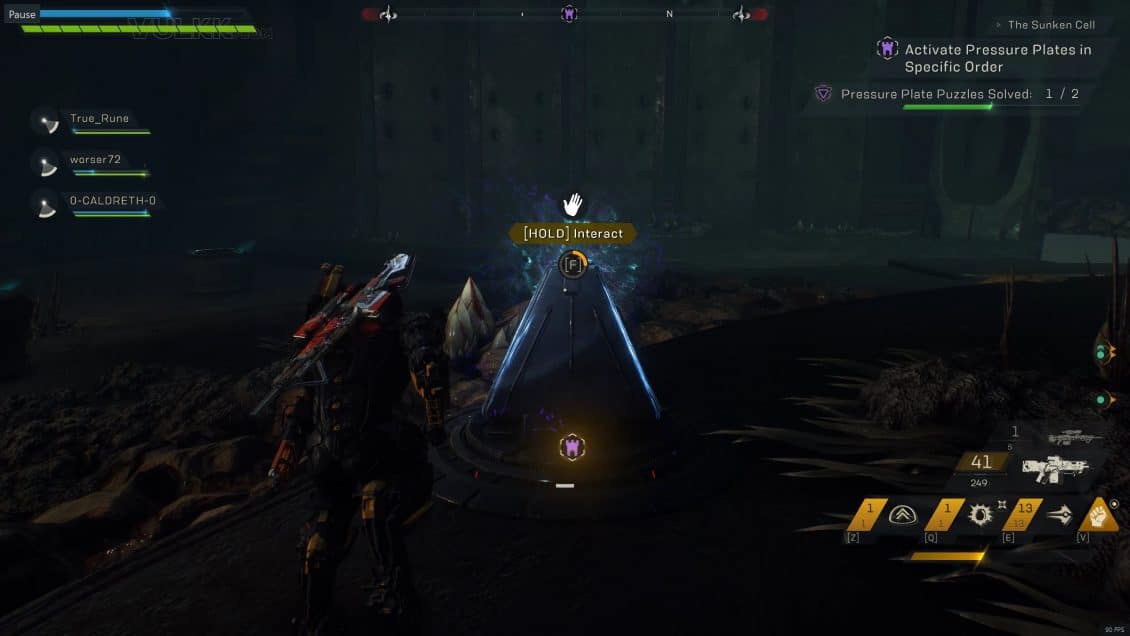
To solve the puzzle you must stand for a moment on all three platforms in the appropriate order. After you have clicked on the terminal to start the sequence, watch for the appearing symbols. The three of them will flash for a moment on each platform. Step on the platforms in the same order as the symbols appear on them.
It doesn’t matter who steps onto the platforms as long as it is in the right order after the sequence has been activated. Once you are done with one side, move onto the other side and do the same – activate the terminal and watch the symbols for the order of the platforms.
If the written explanation is confusing, believe me, it is not so complicated. Check out the video section at the end to see how things go.
THE CONTROL RODS PUZZLE
This one is quite simple, but can cause headaches if not done properly with all of the group members participating. Your task is to “stabilize” (click on) seven rods spread in a circle around an unstable center area, which is causing a Cataclysm in the area.
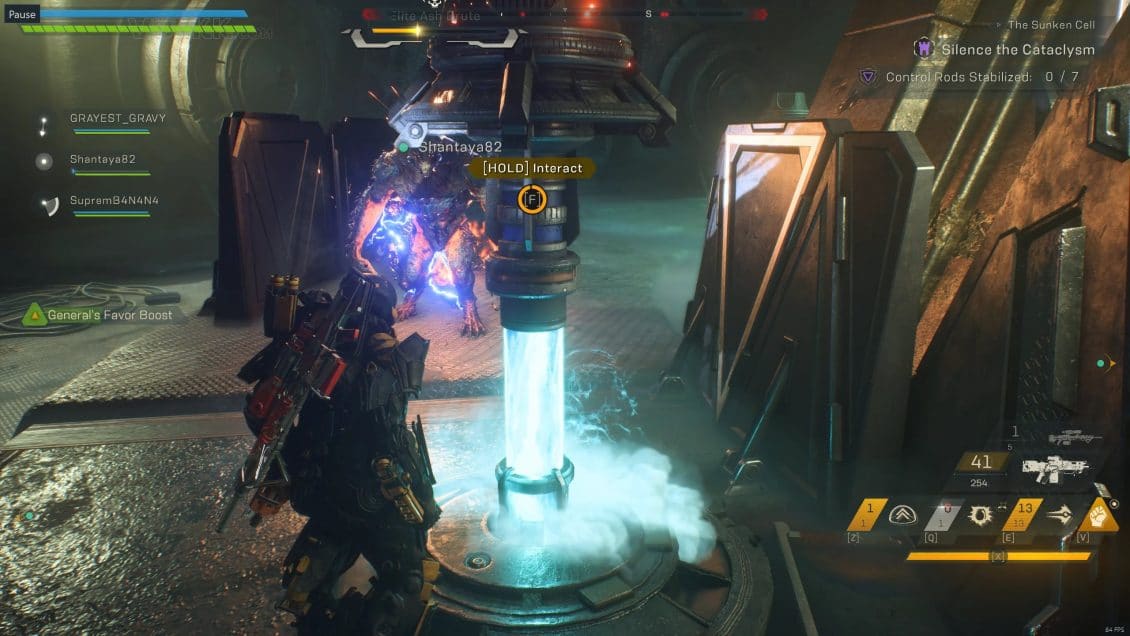
The trick is that you have to click on these rods quickly as they reset after a few seconds (might be a minute, not sure). It is probably easiest if all players rush to click on as many of the rods as possible to complete this mini puzzle and then deal with whatever has spawned around.
There is no point in killing the enemies that will continue to spawn. Best focus on stabilizing the seven rods. When you click on them, you must actually hold the button for a couple of seconds for the interaction to complete. If a rod resets, simply find it and click on it again until this is done fast enough so no rods would have time to reset meanwhile.
COMBINATIONS SOLVED – ROTATING SYMBOLS PUZZLES
This has been one of my favorite puzzles from the early game. If you have been paying attention and doing your main missions solo, you know how to solve these, no doubt.
In the room you will have to combine three symbols in a line from three different rotating mechanisms, located on three different floors in the room, starting from the bottom floor.
To solve the puzzle, you must click and hold shortly before the center symbol aligns with the same symbol from the next circle on the outer side. Just see the image below :)
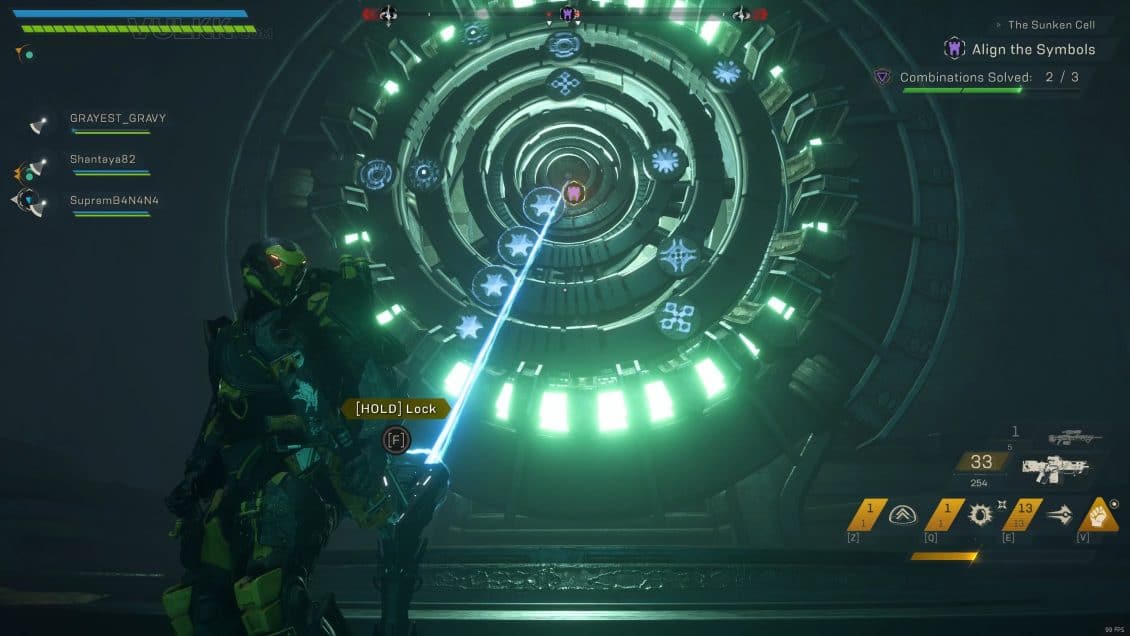
This puzzle is best to be left to be completed by one person, while the rest help clear the room and guard the puzzle-solver on the platform. If you are the one solving it, watch for the freezing effects from the Brutes. When you see one targeting you up on the platform, jump to dodge it.
Once all three circle combinations are completed, you can continue deeper into the Construct.
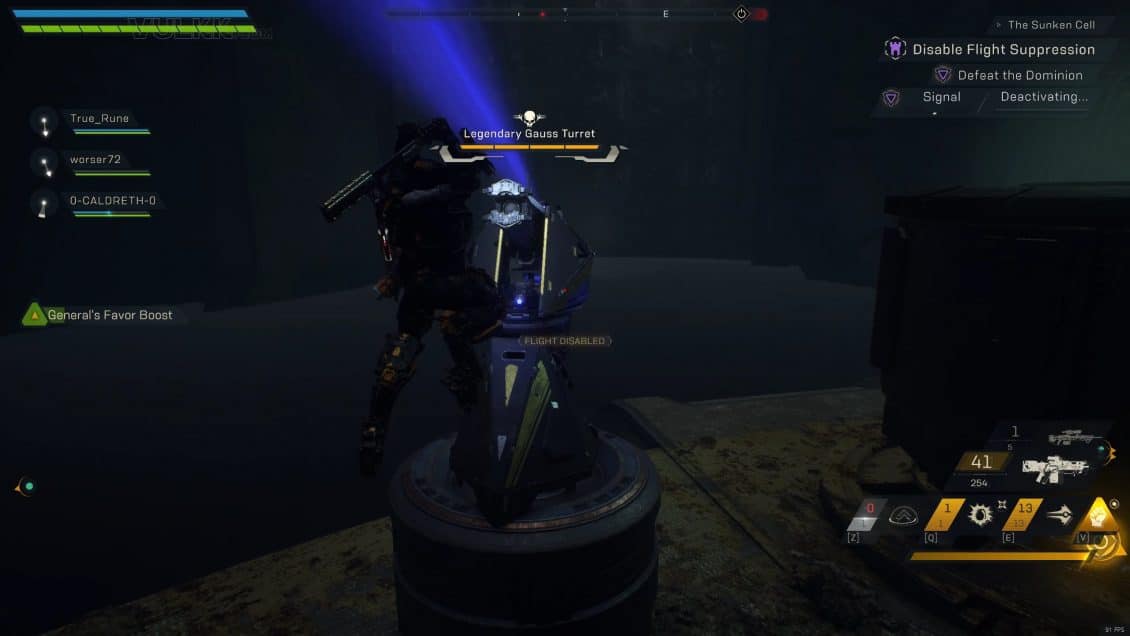
GETTING THROUGH THE CONDUIT GRID
When you reach the blue electrical grids, all you have to do is fly through the tunnel, but stop after every two grids and wait for them to move. The electrical grids do change their form every few seconds. If you get hit, you will lose your shield (GM2) and potentially some of your Armor if you play on GM3.
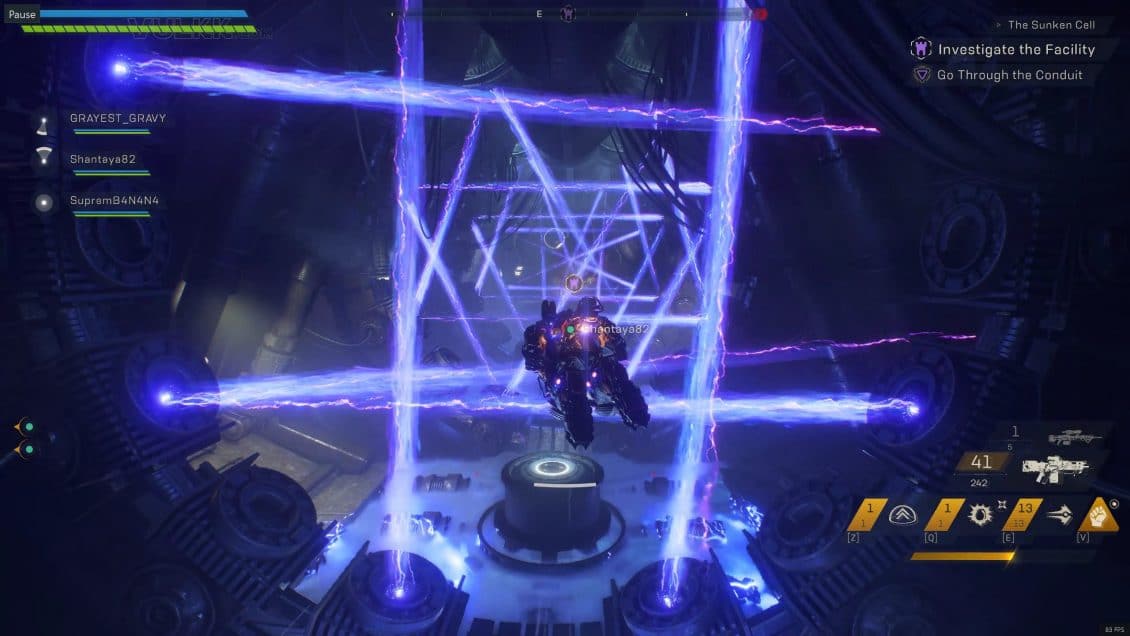
After you reach the other end of the tunnel, there is a lever you can pull to shut down the electrical grids and let all other players fly through to your location freely.
ECHOES DELIVERED PUZZLE
Ok, this one is not really a puzzle. It’s similar to the Freeplay events you have completed thousands of by now most likely. The Relic is at the top floor of the room. Be careful with the turrets. If you lose flight capabilities (by getting hit, for example) and you drop all the way down, get up quickly. The liquid on the ground is deadly. I wouldn’t even call it water… whatever it is.
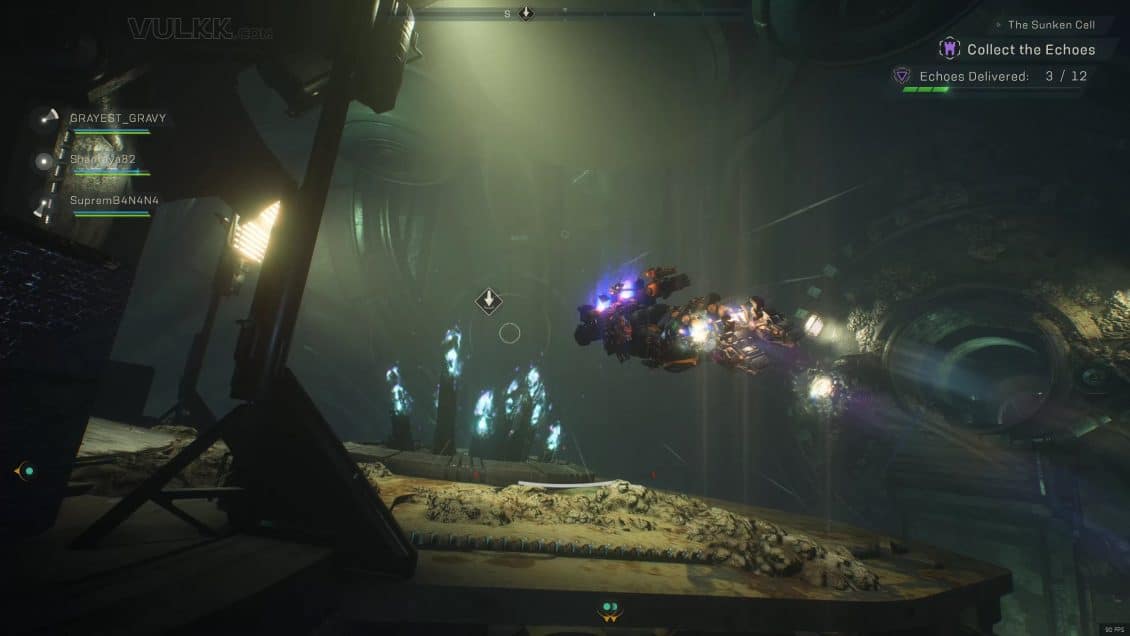
You have twelve Echoes to collect. There are quite a bit more spread in the air all over the room. You can fly quickly and pick them up, then deliver them or you can take your time and clear off the turrets on the lower platforms below the Relic.
This is the final room before you head up to meet the Final Boss!
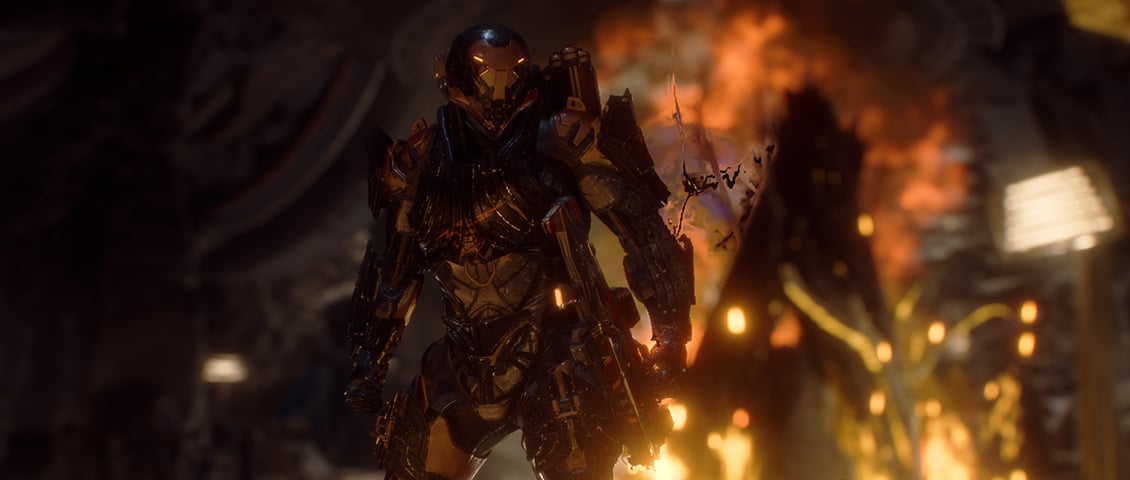
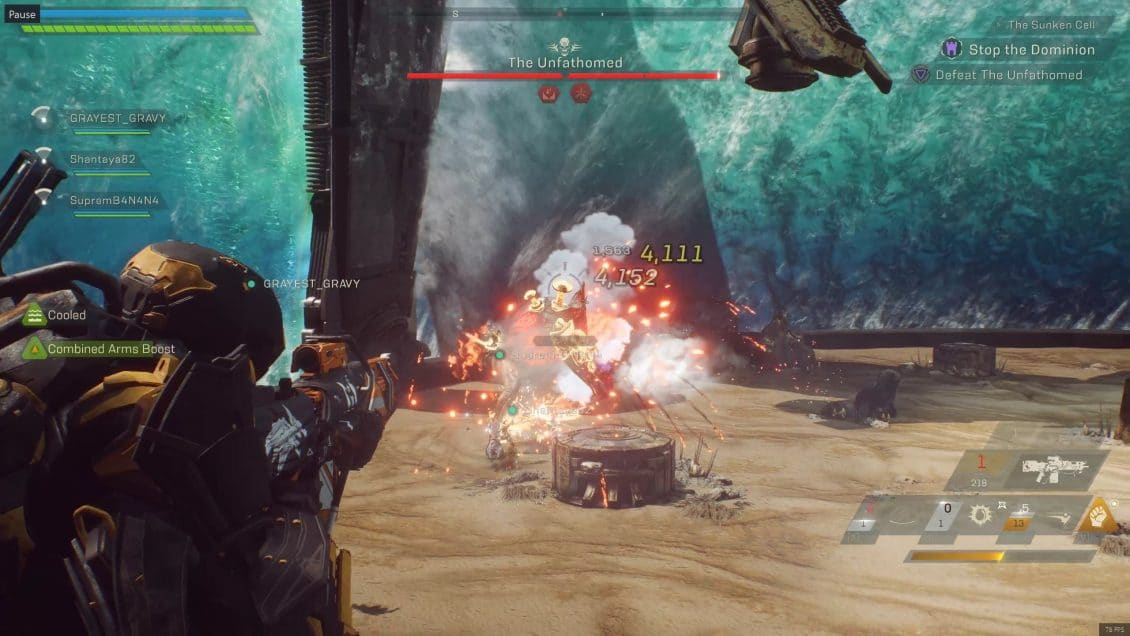
FINAL BOSS GUIDE – THE UNFATHOMED FURY
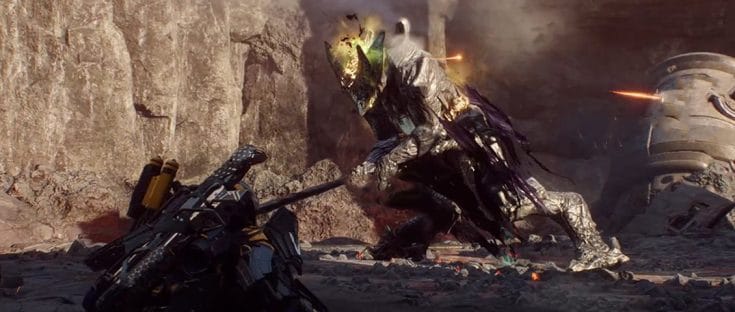
I don’t know why Anthem’s Strongholds only have one boss and it is at the very end. I personally could use more special fights like these, but nevermind. The final boss here in The Sunken Cell is a big and nasty mutated fury called The Unfathomed.
The boss arrives from the southern side of the round platform. It has most of the standard abilities of a regular Fury, but more powerful, of course. Below is a breakdown of the boss’ special attacks you need to pay attention to.
There are several objects round the arena that you can use to defend yourself and break line-of-sight. However, keep in mind that the boss uses exploding attacks and most of his spheres and orbs that fly around will hurt you more or less even if you are hiding behind one of the objects on the ground.
I highly recommend you learn how to avoid the incoming attacks instead of hiding from them. The Fury’s melee attack is also quite powerful. I recommend that you keep your distance when possible.
Tips are shared for each one of the abilities below. I hope you find them useful and easy to implement.
WEAK SPOTS
As every other enemy in Anthem, the Unfathomed has weak spots you should try to hit as much as possible. They are located up on the right arm (the long one) of the boss and on its back.
The one closest to the neck is the best spot to aim for as it is weaker than the arm, meaning you will do more damage hitting it. However, it is well guarded and the boss will turn around and spawn in a different places of the arena, so you wont always be able to hit the best weak spot.
The Unfathomed is least resistant to Ice elementals and most resistant to Electricity. The difference seems to be about 50%, but more testing would be required to confirm it and I don’t exactly play my Storm so often (their Ultimate ability is great to test the enemy’s resistances).
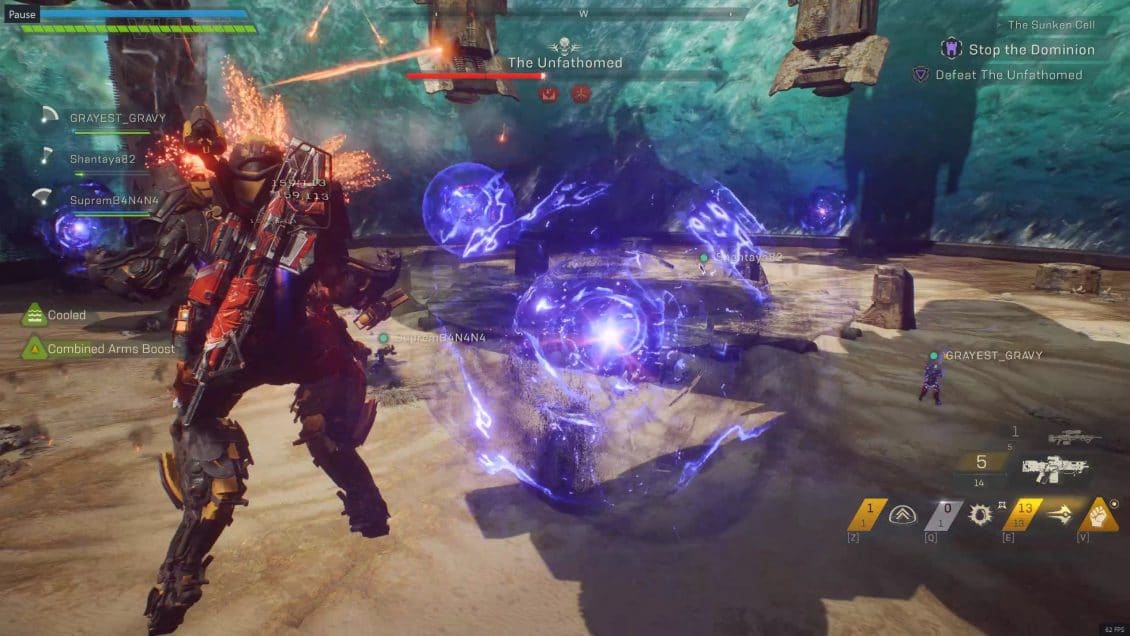
PURPLE PROJECTILES AND ELECTRICAL SPHERES
When the Fury lifts its right arm up in the air, this is always a sign for incoming trouble. The Unfathomed can produce two different types of special attacks from this one animation.
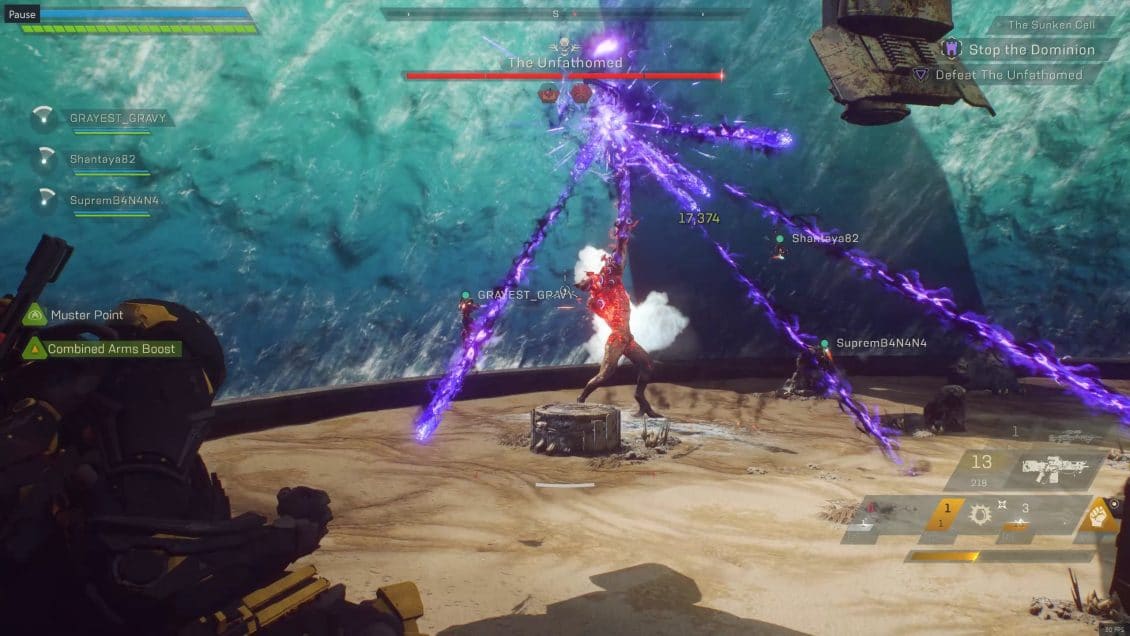
The purple projectiles are quite easy to avoid by dodging a few times. Just watch where the purple line is going and try not to be on its way. Always strive to be in the air during this attack. When the projectiles hit the ground, they create an AoE electrical explosion, which hurts a lot.
You don’t have to always dodge, whatever you do, just stay on the move during this attack. Usually two or three well-placed dodges will clear you off without a scratch from the attack. Don’t spam the dodge button. Colossus would have to use their shields to protect themselves as dodging is not an option for them.
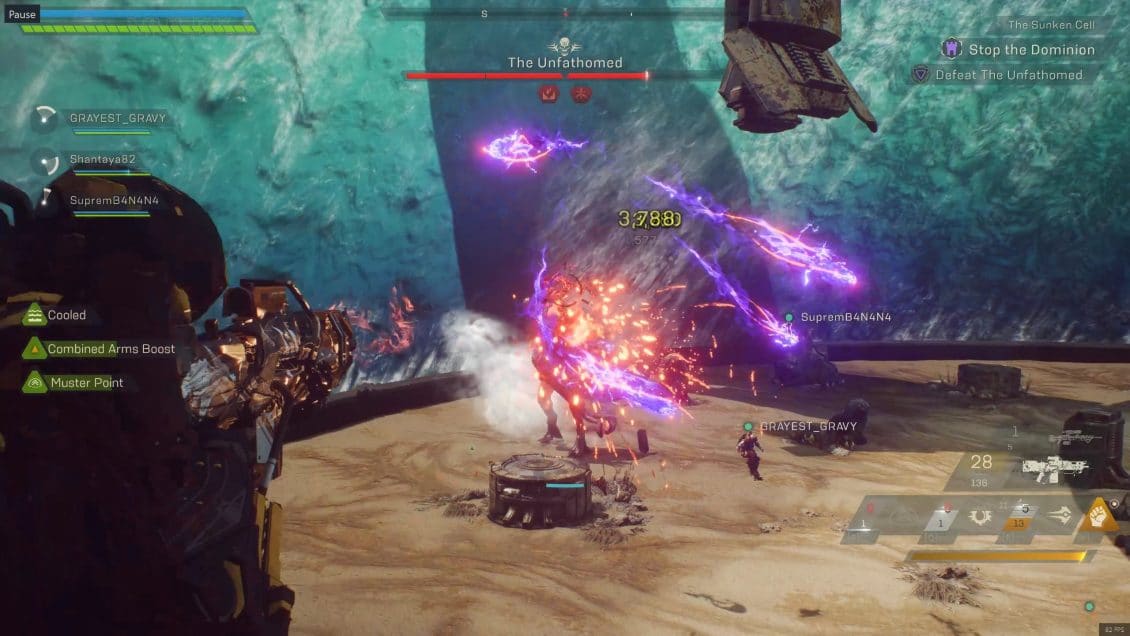
The electrical spheres are very similar to the fire spheres that Titans do. Here you will also get two targeting you. Dodge them one after another to avoid getting any damage. Stay in the air. These spheres explode for a huge electrical AoE damage on the ground and that effect remains active for a few seconds after the attack has completed.
GATES
When the boss spawns the purple Gates in the middle of the arena, focus all of your fire on them. Clear them off as quickly as possible to prevent unwanted elementals spawning and roaming around, causing needless trouble.
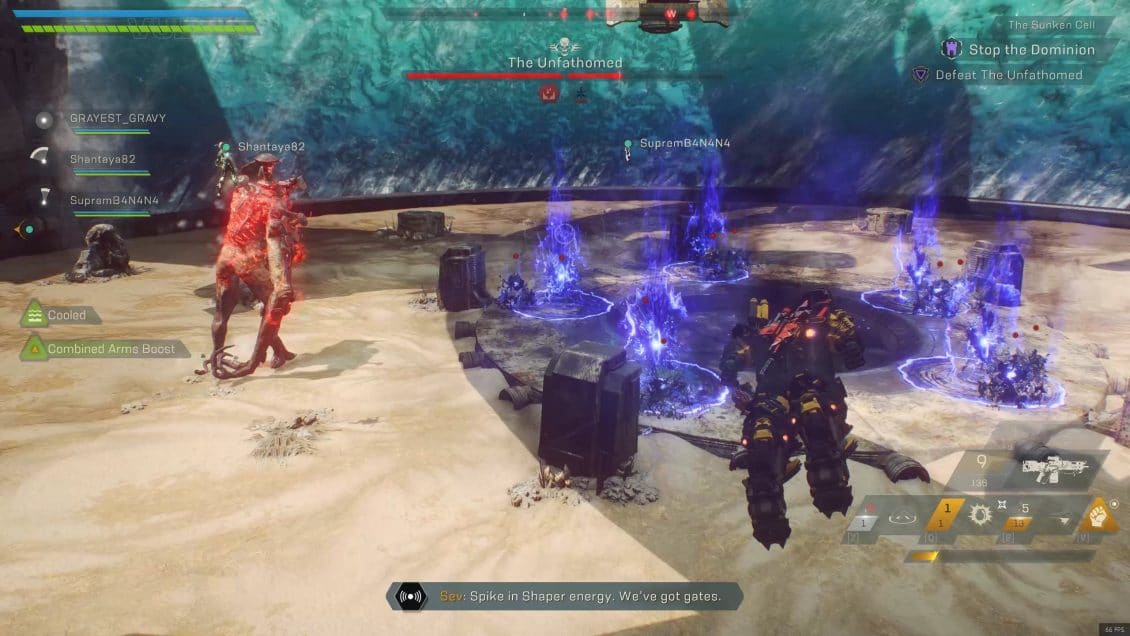
You can use melee attacks on the gates. They themselves do not cause any trouble, but the things that spawn from them do. The boss will engulf itself with a shield, which unlike the normal Fury enemies, you cannot damage this time. You need to deal with the Gates.
ELECTRICAL ORBS
The Electrical Orbs, like the Gates, will not hurt you if you go close to them. They do, however, have ranged attacks. You will hear the warning that is typical for an incoming missile when an Orb is about to shot at you. The Orbs’ ranged attacks look kind of like the energy spheres that the Fury throws at you.
As soon as you see the line on your screen and hear the audio que, dodge or fly away sideways. This will help you avoid receiving damage from the Orbs. Clear them as quickly as possible. They have no weak spots as far as I can tell or if they do, it’s insanely hard to find it. Simply use gear and abilities to take them down ASAP before you turn your attention to the boss again.
If you happen to destroy the Gates and/or Orbs too soon, the boss will lose its shield, but remain for a bit longer in a kneeling position. During this short period of time, all of its body is a “weak spot”. (tip shared by Despector_TCM in the comments below)
THE FOUR PHASES OF THE BOSS FIGHT
- At around 75% HP the boss will spawn a set of Gates and start using its Purple Spheres attack.
- At around 50% HP mark the boss will increase the number of projectiles and spheres thrown at you with its two special attacks and it will spawn the Electrical Orbs (the stationary turret-like ones).
- At around 25% HP the boss will spawn both the Spheres and the Gates. It will also start using all of its other attacks more frequently until you defeat it. The Fury may also teleport in greater distances now, be aware of its melee Slash attack.

At the end, all I can wish you is to be at least as lucky as I was in this case. The images used in this guide are from several of my Grandmaster 2 runs in the first days after the patch with the Stronghold was released. I used my 788 Ranger Blast Build.
It is possible that in time and with newer patches some things may be changed. I will do my best to keep this guide up to date with at least the major changes to the Stronghold, if there are any.
VIDEO PLAYTHROUGHS
ANTHEM Strongholds Guides

This guide is dedicated to the Tyrant Mine Stronghold – one of Anthem’s end-game re-playable instanced group-based missions. Here you will learn everything you need to know to perform a smooth run – objectives, places, items. And, of course – the final boss tactics!

This guide is dedicated to the Temple of Scar Stronghold – one of Anthem’s end-game re-playable instanced group-based missions. Here you will learn everything you need to know to perform a smooth run – objectives, places, items. And, of course – the final boss tactics!
This guide is dedicated to the The Heart of Rage Stronghold – one of Anthem’s end-game re-playable instanced group-based missions. Here you will learn everything you need to know to perform a smooth run – objectives, places, items. And, of course – the final boss tactics!