Guide explaining how gear works in Outriders, what types and rarites are there, how mods work and how to effectively gear up your character!
Gearing up a character in Outriders can be a daunting task for some. This guide is made to break the process down and help you understand gear and the role it plays in the game.
Here you’ll find a breakdown of how Gear works, everything from getting it to upgrading it and making your own builds with the armor, weapons and mods you acquire while playing!
We have a detailed overview of how mods work as well as full lists of armor and weapon mods. We’ll also give you tips on how to prioritize your gearing process and answer the most important question – what gear you should level first. Let’s get started!
Table of contents
When is Gear Important in Outriders?
Let’s first address what is probably the biggest question that could be answered by this guide. To get straight to the point, Gear is important at all stages of the game. There’s a lot of reasons for this, however one of the biggest is to not slow your progression down.
While leveling, the main thing you should care about is just maintaining stats relevant to the play style you opt for. There’s little reason to farm at this stage, as your gear will easily keep pace with your progression. However having your gear be the highest level it can be will provide a fair bit of power on its own.
If you do farm early on though, the best reason to do so is to gather mods for early skills. This is because mods will only drop for skills you have access to, so it can be good to farm early if you have plans to use those skills. A lot of early skills do have good mods that can carry you through the campaign pretty smoothly.
At later stages of the game, farming will play a much larger role. Not only will you need gear, but you’ll also want to chase after gear that has desirable stats as well as Legendary Gear for use or for the mods. Gear will last much longer at this stage, mostly only increasing with Expedition Tiers, as your leveling and World Tier progression will be done.
Gear Inventory Overview
Here we’ll be covering the basics of your Outriders inventory. Check out our Outriders UI Guide for a more detailed overview. Your Inventory is pretty limited, but also very simple. We’ll very quickly cover your stats, how to view them and what they all mean.
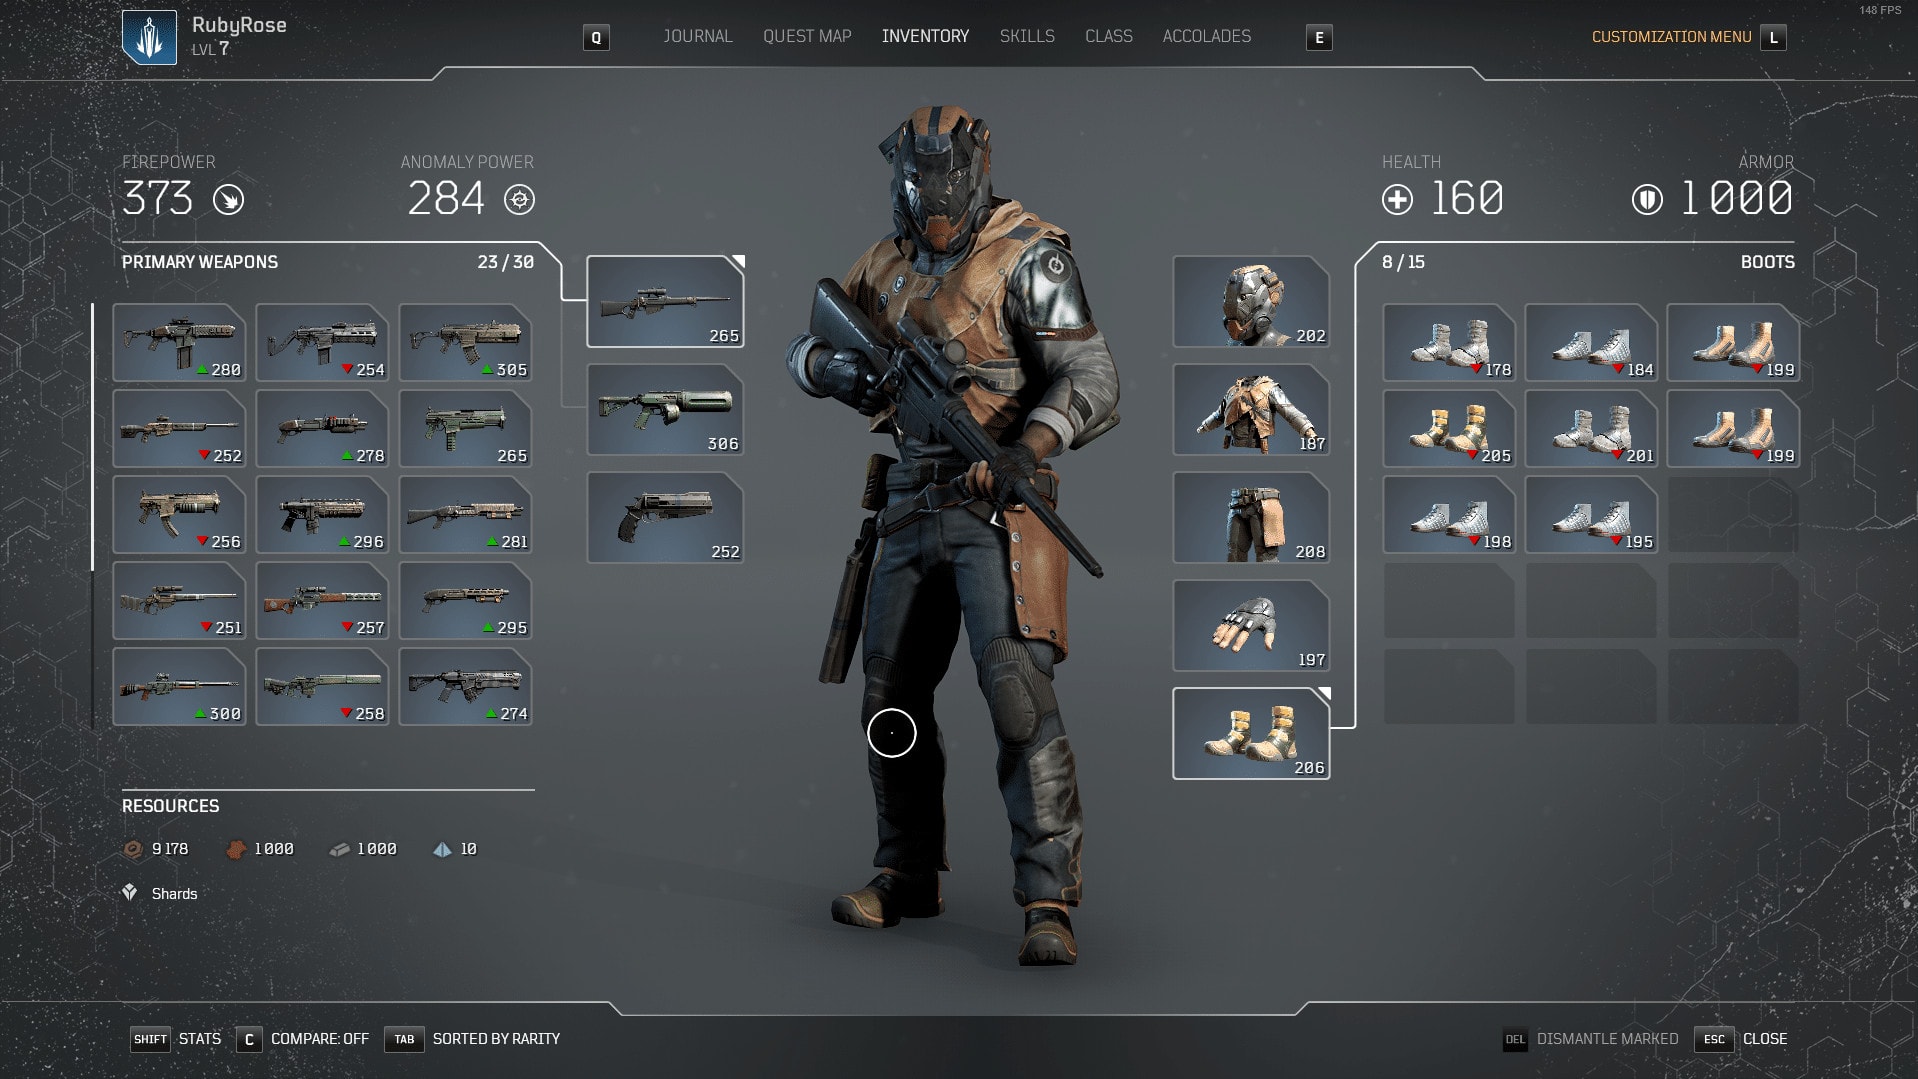
The first thing you’re likely to notice is your Appearance. Each piece of gear in Outriders has a unique look to it. While Outriders doesn’t currently have a Transmog option to be able to customize your appearance to your liking, People Can Fly have stated it may be a possible option in the future.
Another thing you may happen to notice is that most gear will have a green or red indicator next to them. This indicates that the primary stat (Firepower for Guns or Armor for.. well Armor) is either higher, using the green arrow; or red, using the red.
Usually higher is better, but mods and sub-stats can also play a part in the decisions for gear. It’s best to use the keybind shown in the lower left to activate the Comparison mode. This along side the breakdown of stat later into the guide, will help you make a better informed decision on if a weapon is truly better. Pressing the button a second time will also allow you to compare Primary and Secondary weapons which can be useful in some limited cases.
Player Stats and How Gear Affects Them
The next thing to take note of is the Large Stat numbers along the top. By pressing the button for Stats indicated in the lower right (default is Shift for PC) you can view the more detailed version of these stats and the sub stats that are closely related as shown below.
All of these stats are important to a varying degree, but which ones are dependent on the build and play style you enjoy. It’s good to know what each stat does, so you can focus on increasing the ones that matter most.
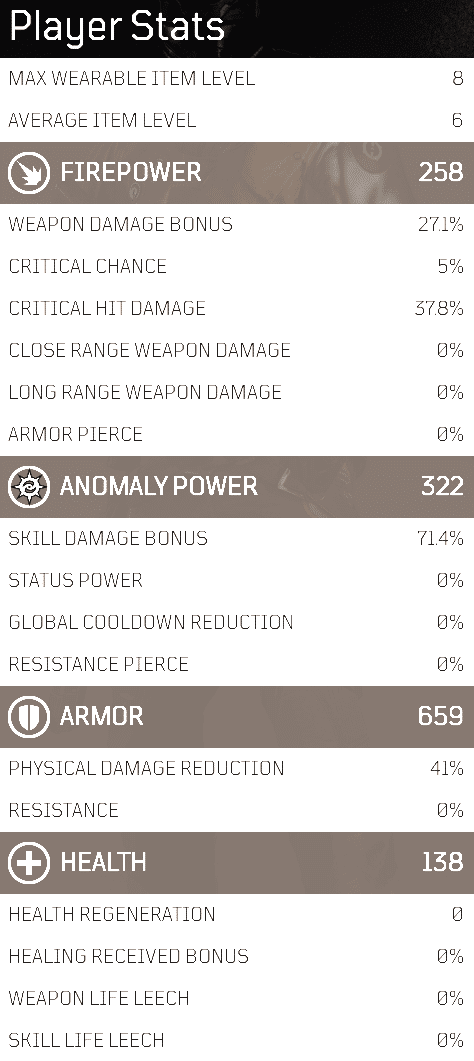
Item Level
Average Item Level is the the total level of your equipped gear, averaged out based on total gear slots. This average will also determine a bonus to both Firepower and Anomaly Power
Max Level Wearable Item Level displays the highest level of gear that can drop or be equipped currently. This is a value that is determined by Player Level, World Tier and Expedition Tier. Player Level caps at 30, and both World and Expedition tier can add an additional 10. This means in the post-game your gear can reach up to Level 50.
Firepower
Firepower largely affects only the Weapon damage bonus. Each weapon also has a unique modifier that scales this value, with lower damage weapons having a higher value. The other sub-stats in this section generally appear as weapon sub-stats or come from Skill Tree Nodes.
Critical Chance is the chance you will score a critical hit, even without targeting a an enemy’s weak point. Increasing this value will simply make those random critical hits happen more often.
Close Range and Long Range Weapon Damage are both distance-based modifiers to damage. Both bonuses can benefit all weapons. However it should be noted that all weapons have fall off, so weapons intended for close range, will have most of the Long Range Weapon Damage bonus diminished by this drop in damage.
Armor Pierce affects how effective your guns are against enemy armor. All enemies have some amount of Physical Resistance, reducing the damage from basic weapon fire. Armor Pierce reduces how much of that resistance is actually used when determining damage.
Anomaly Power
Anomaly Power directly affects Skill Damage Bonus, scaling their base damage up. The base damage also scales with level, slowly getting stronger as you level. Much the same as the Firepower section, the other stats come from Gear and the Skill Tree.
Status Power This stat affects the strength of certain status ailments, like Burn and Poison. Some skills also use this stat to increase their damage through mods.
Global Cooldown Reduction reduces the cooldown timer of all of your skills, letting you use them more often.
Armor
Armor directly affects your Physical Damage Reduction. The exact scaling isn’t know at this time. The only sources of Armor are from the base values of Gear and bonuses on the Skill Tree.
Resistance only shows up as a Stat on High Level gear, as well as being gained through the Skill Tree. This reduces incoming damage from other sources, like Skills and other non-physical attacks.
Health
Health can be found on gear as a bonus stat, and increased through leveling as well as bonuses on the Skill Tree.
Health Regeneration displays your health recovery per second. However this stat seems to be limited
Healing Received Bonus affects incoming healing from Mod effects or skills like the Technomancer’s Fixing Wave. It does not affect Health Regeneration nor Life Leech from Skills or Weapons.
Weapon and Skill Life Leech determine what percentage of damage dealt by Weapons or your Skills is received as healing.
Inventory Limits
The amount of Inventory space you get in Outriders may seem limited, but since most gear will be temporary until the very end game it’s manageable as long as you keep up with it. Outriders gives you 15 slots per Armor type and Weapon Slot, Since you have two Primary Weapons at any given time, they are pooled together for a limit of 30.
It’s highly recommended to keep any section of your inventory from becoming completely filled, as this will actually prevent you from picking up items for that slot.
Gear Rarity and Bonuses in Outriders
Outriders has five different rarities of gear that it uses:
- COMMON
- UNUSUAL
- RARE
- EPIC
- LEGENDARY
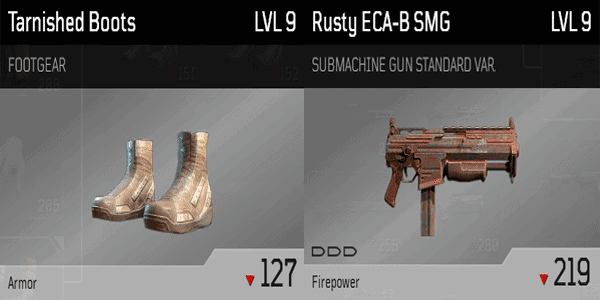
Common gear which appears as a grey name/background, will disappear quite quickly into the game, starting around World Tier 4-5, with them dropping very rarely compared to Unusual items. These items have no bonus stats usually, while also having the lowest Firepower or Armor ratings amongst the rarities.
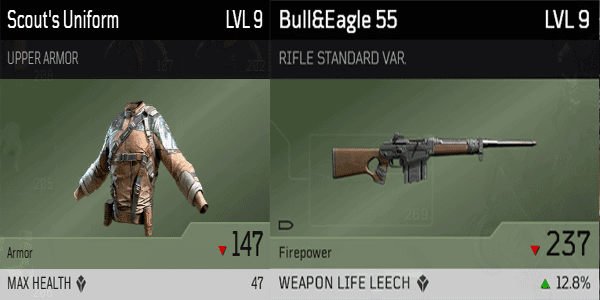
Unusual gear which appear as green names/backgrounds, introduce the first bonuses for gearing, bonus stats. When Unusual or higher gear is dismantled, you get these bonuses as Shards, which can be used to grant the bonus while crafting, or empowering it while upgrading.
On weapons, this bonus stat can be found under the Firepower Value and will be Critical Damage, Weapon Leech, or Armor Pierce. Critical Damage does exactly as you’d think, increasing the damage dealt by critical hits. Weapon Leech allows you to heal off weapon damage. Armor Piercing increases damage overall, by ignoring a portion of an Enemy’s armor value which can increase your damage against Elites and Bosses quite a bit.
For Armor, these bonuses can be Max Health, Anomaly Power or Bonus Firepower. Max Health does exactly as you’d think, increasing your total health. Anomaly Power affects the damage of your Skills. Firepower Increases damage dealt by weapons.
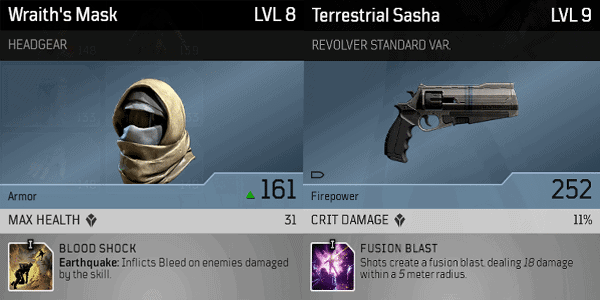
Rare gear, which appear as blue names/backgrounds add yet another bonus, Mods. These are in addition to the bonuses seen on Unusual items, which these also typically give more Shards for when dismantling. Higher level Rares may also roll a second bonus stat.
Mods grant bonus effects on weapons, usually inflicting a status like Burn, Freeze or Poison; they can also grant effects that deal Area of Effect damage, as shown above. On Armor they provide bonuses to your Class’s skills, granting effects like additional uses, bonus damage or even modifying how a skill works. Much like the Unusual bonuses, Mods can also be collected by dismantling Rare tier gear and higher.
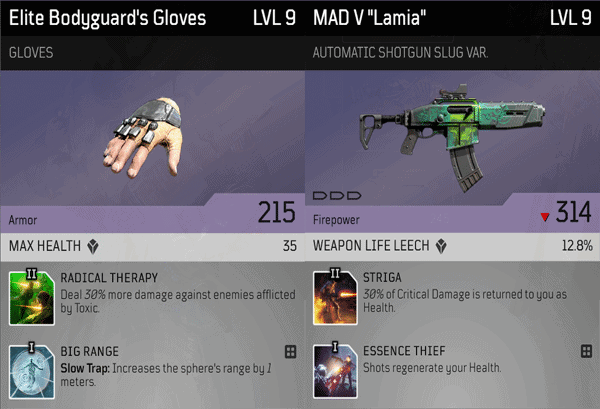
Epic gear which appear as purple names/backgrounds, expand on existing bonuses. Instead of a single mod, they will now have two, with one always being a Tier 2 Mod. These mods are typically stronger than their closest Tier 1 counterparts, if they have one.

Legendary Gear which appear as Gold names/backgrounds, expand bonuses even further. Legendaries introduce both unique stats as well as item specific Mods, which are exclusive to a given Legendary. However, like other bonus stats or mods, these can be claimed as Shard or Mods to be used in the crafting system.
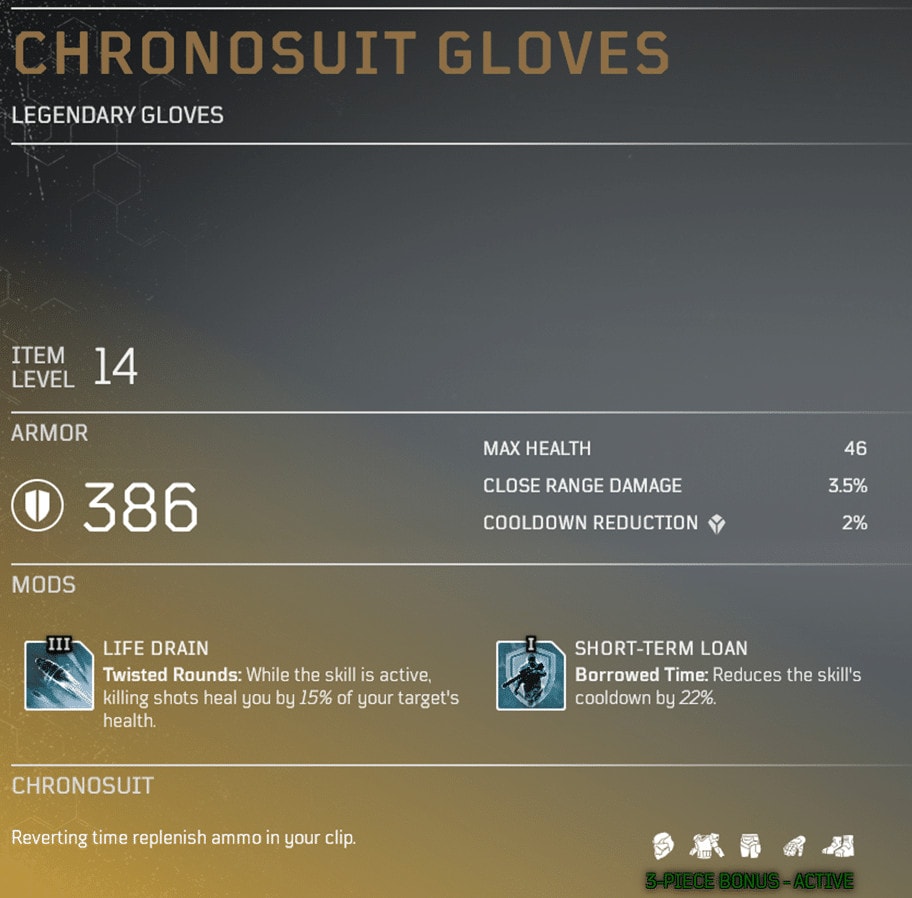
On top of Mods and bonus stats, Legendary Armor also have set bonuses. These bonuses are limited to these sets, so many of them will be considered best in slot for certain builds and very likely unavoidable.
Where and how to get Gear in Outriders
Like any looter shooter, Outriders has a number of ways to obtain gear. It can drop from enemies, be found in chests, rewards from quests and Accolades and World Tier progression, as well as purchased from Vendors. All gear found in these ways can be changed or modified via Crafting as well.
Get Gear as random World Drops
The majority of your gear is likely to come from Enemy drops and Chest loot. Currently, Normal enemies can drop any rarity from Common to Legendary, though with no guarantee to drop anything. Elites/Boss Enemies and Chests are guaranteed to drop at least one item, with minimum rarity being determined by World Tier. Using World Tier 5 as an example, the lowest rarity these source will drop is Unusual.
Get Gear from Quests and Sidequests
Quests specifically have two different variations of drops. All quests and side quests in the game can be repeated, either by re-accepting the quest if it’s a side quest, or setting the Story state for your Character in the lobby.
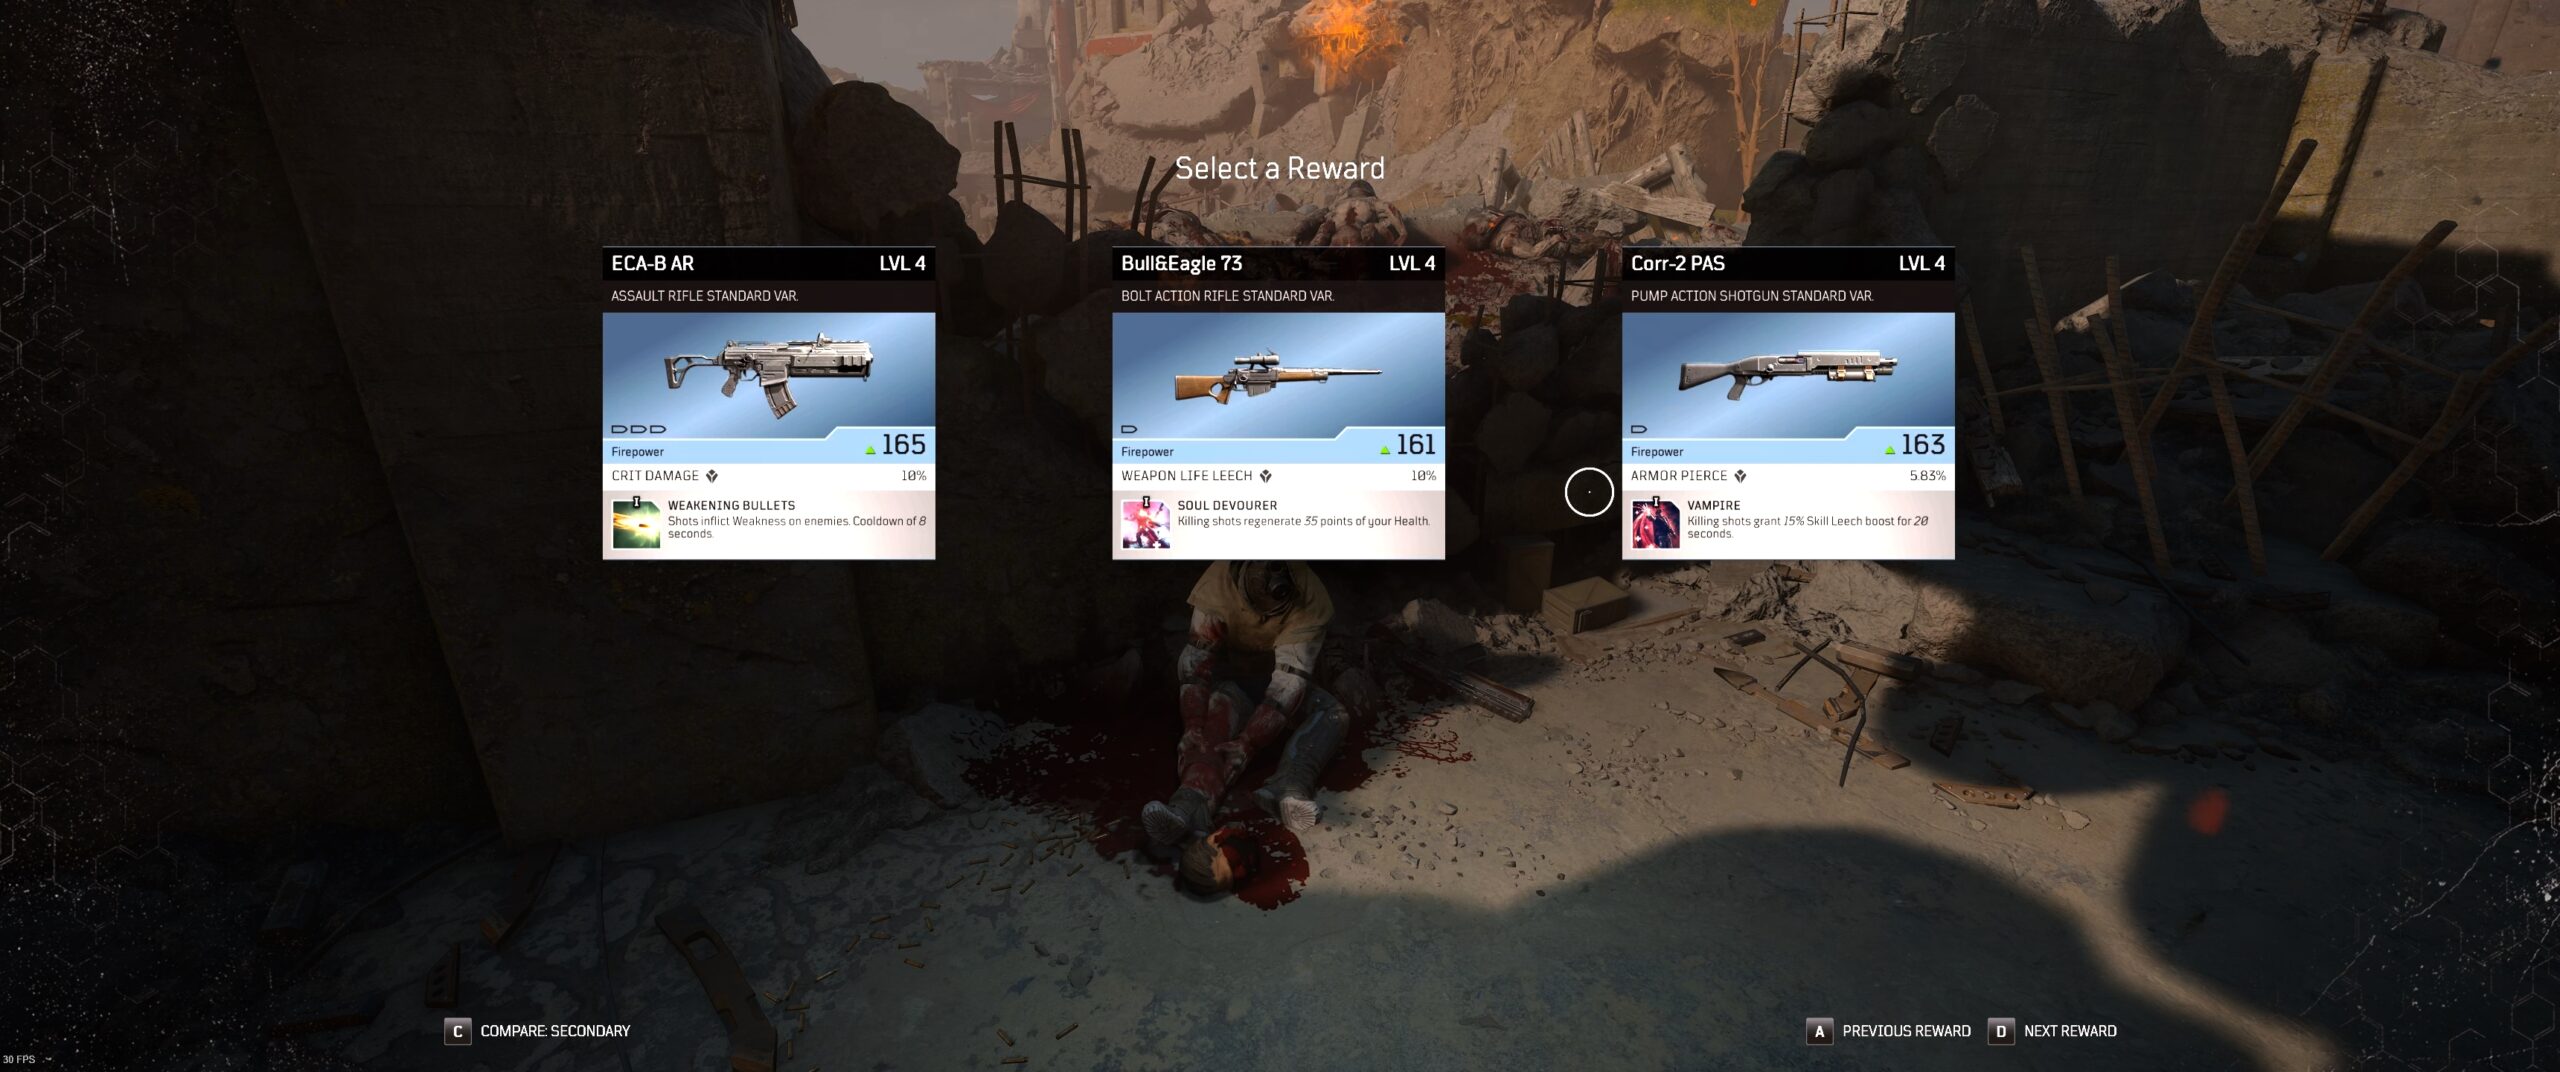
The first time through any quest that has an Item reward will typically be presented as a Reward Selection Screen. Here you get to pick one item from a set of three. Typically these choices are Rare and higher gear, so it’s best to grab ones that have a mod you want.
When repeating side quests, you still get rewards but they become random loot drops. Instead of a guaranteed Rare item, you’ll get two items of random rarity. These will range from Common to Legendary, being pretty much on par with drops from regular enemies.
How Accolade Level and World Tier affect gearing
While Accolade levels mostly reward cosmetics and emotes, a few do have item or scrap rewards as well so they need to be mentioned. This is by no means a reliable source of gear though.
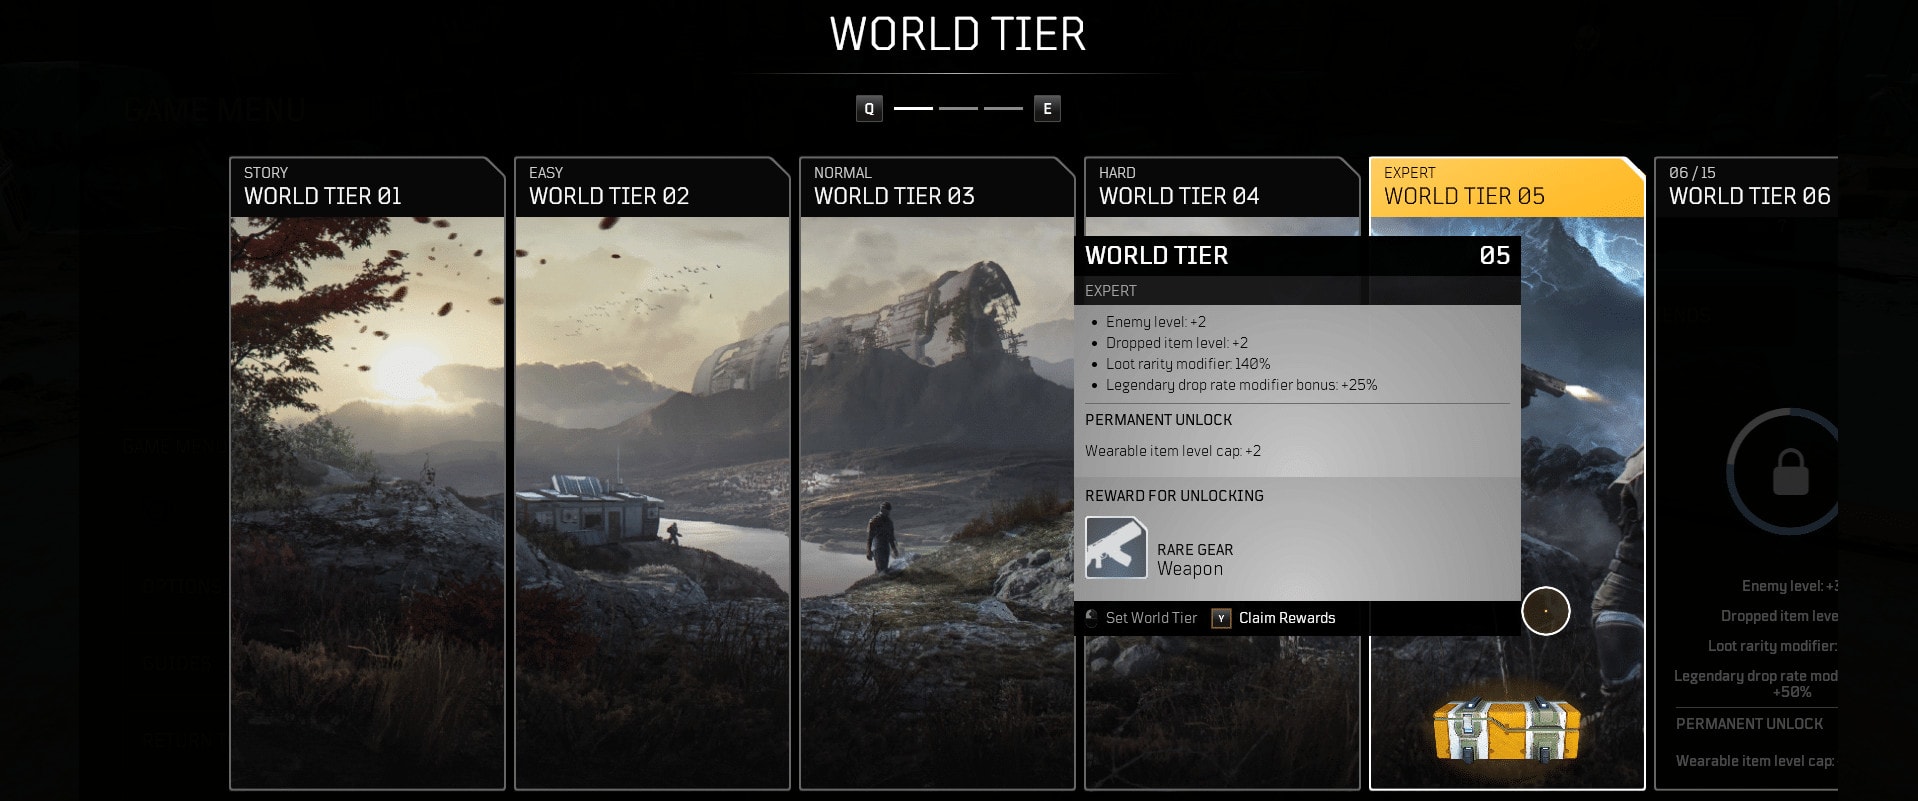
World Tiers however, will constantly reward you with gear, typically weapons, as you accept the rewards. It’s a thing to keep in mind while leveling if you’re not having a good time finding a decent upgrade. The rewards can be saved and claimed as wanted, rather than right as you tier up your world.
Using Crafting to Modify Gear in Outriders
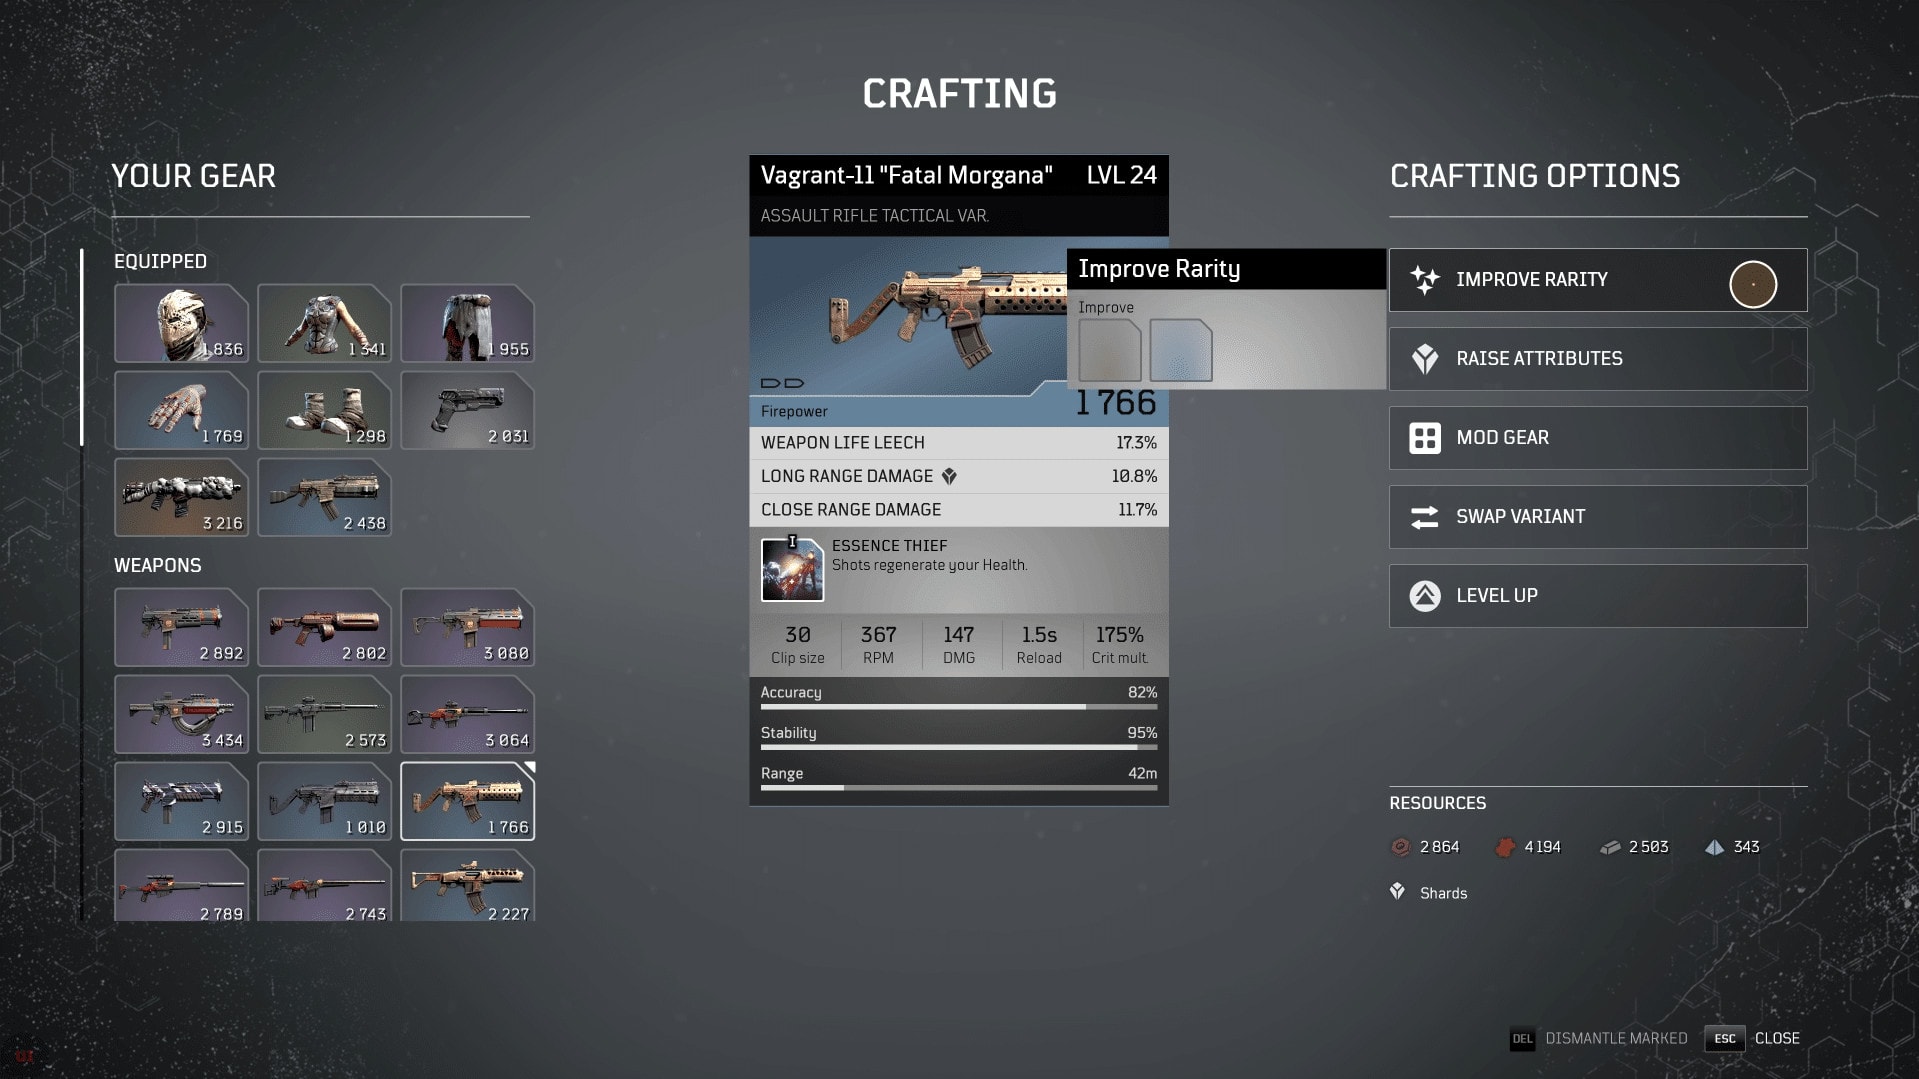
Crafting won’t be extensively covered here, but we’ll talk about the three major options that play a huge part in your gearing process in Outriders: Improving Quality, Improving Rarity and Modding.
How to Improve Gear Rarity
Improving Rarity allows you to take an Item that is Unusual or Rare and upgrade them to the next rarity. This won’t be as accessible early game, at least without some farming, as doing so requires Titanium, a Rare resource that can only drop from Elites or from dismantling Epics or Legendaries.
Improving a piece of gear’s rarity will boost its base attributes, and boost it’s secondary ones as well. More Armor and more Firepower can be very good for helping you progress, making fights that were previously hard, a little easier.
How to Level Up your gear
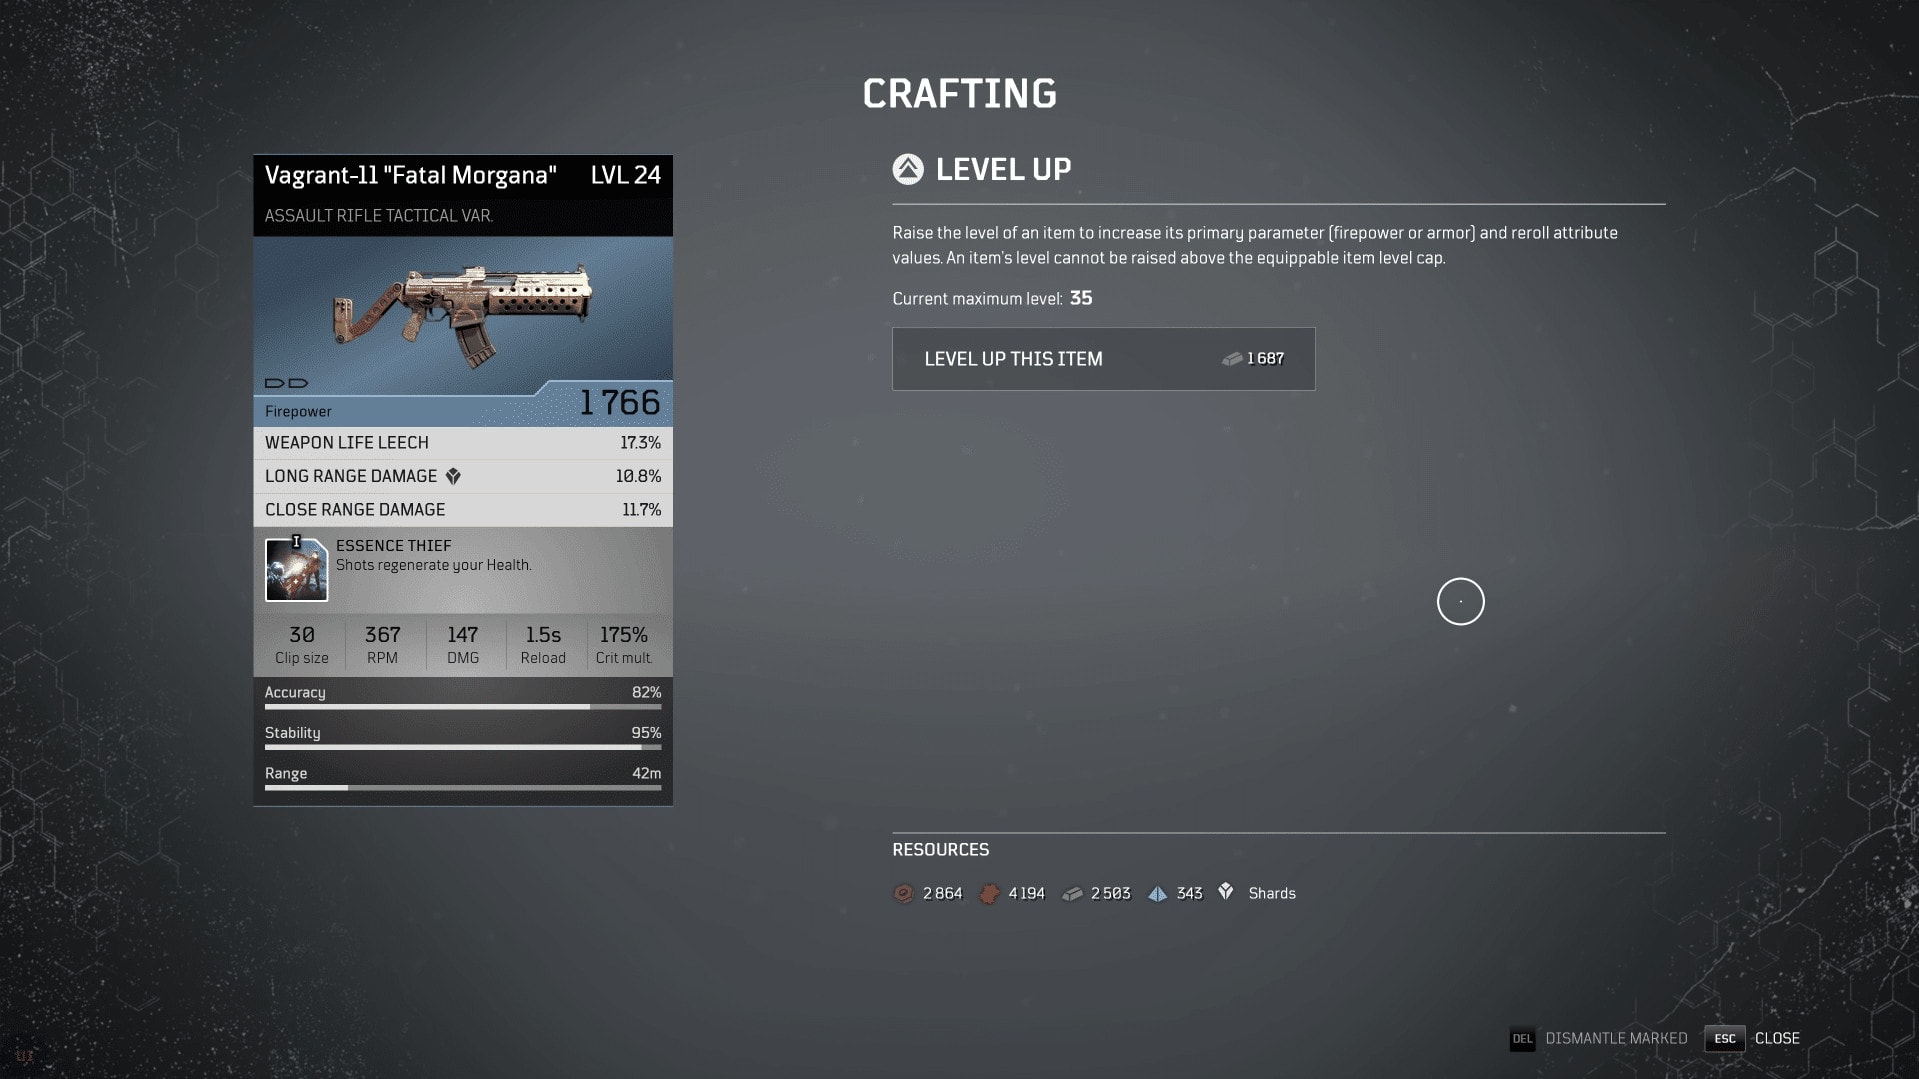
This crafting option will undoubtedly be the best to use early game as you progress, outside of Modding. Early game, it will save you a lot of hassle of hunting down a new gear piece with the same bonuses, and saving your from frequently moving mods. This option only requires Iron or Leather as a resource, making it fairly cheap and accessible through the main Campaign.
Leveling up your Gear may also add an additional bonus stat to the item, making them even stronger. Uncommon and Rare gear will get a second bonus stat at level 11, and their third at level 21.
Modding Gear
We’ll go into greater detail on modding later in this guide, for now we just want to cover the basic use and application of this system, most notably swapping mods on gear by applying new ones.
This Crafting option allows you to take a gear that has good rolls, but an undesirable mod and allows you to swap mods on your Gear. It can help you keep a similar build going while still allowing it to scale in power as your progress.
Crafting and Modding Gear
One of the first thing to make note of when modding gear is that all Epic and Legendary Gear have two Mod slots. Both of these slots can be changed depending on what you want out of your weapon. However, once you change one of the two mods, the other slot will become locked, so choose carefully.
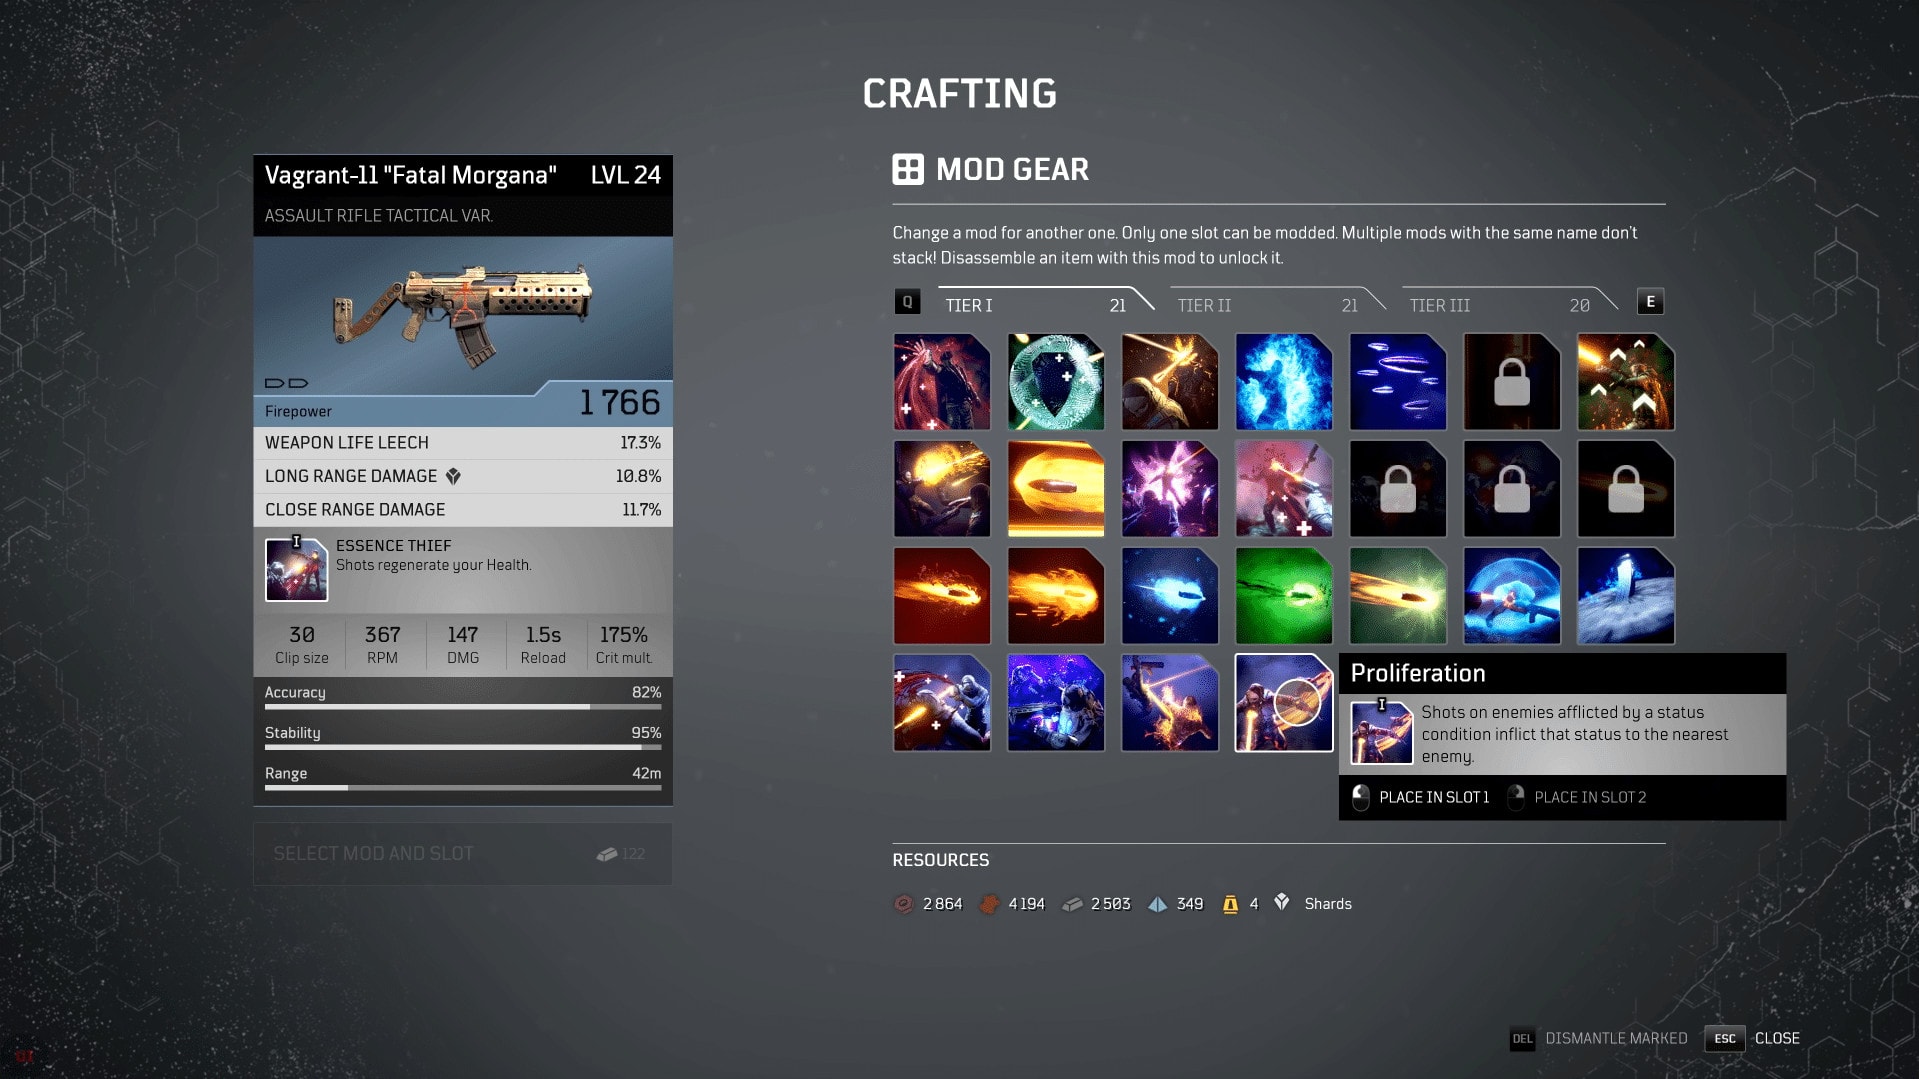
When adding or swapping a Mod, you can choose from the existing ones you’ve pulled from gear as you played. Once slotted in, it will likely be consumed even though you can change it later. So choose carefully when slotting or changing mods.
This will have potential for very powerful combinations, like combining two existing Tier 3 Mods from Legendaries. In this case, this is only possible on a Legendary item, which has a Tier 3 mod naturally. Otherwise, a Tier 3 and Tier 2 Mod will be the highest you can get. For Armor in particular, this will really change up how a build will work.
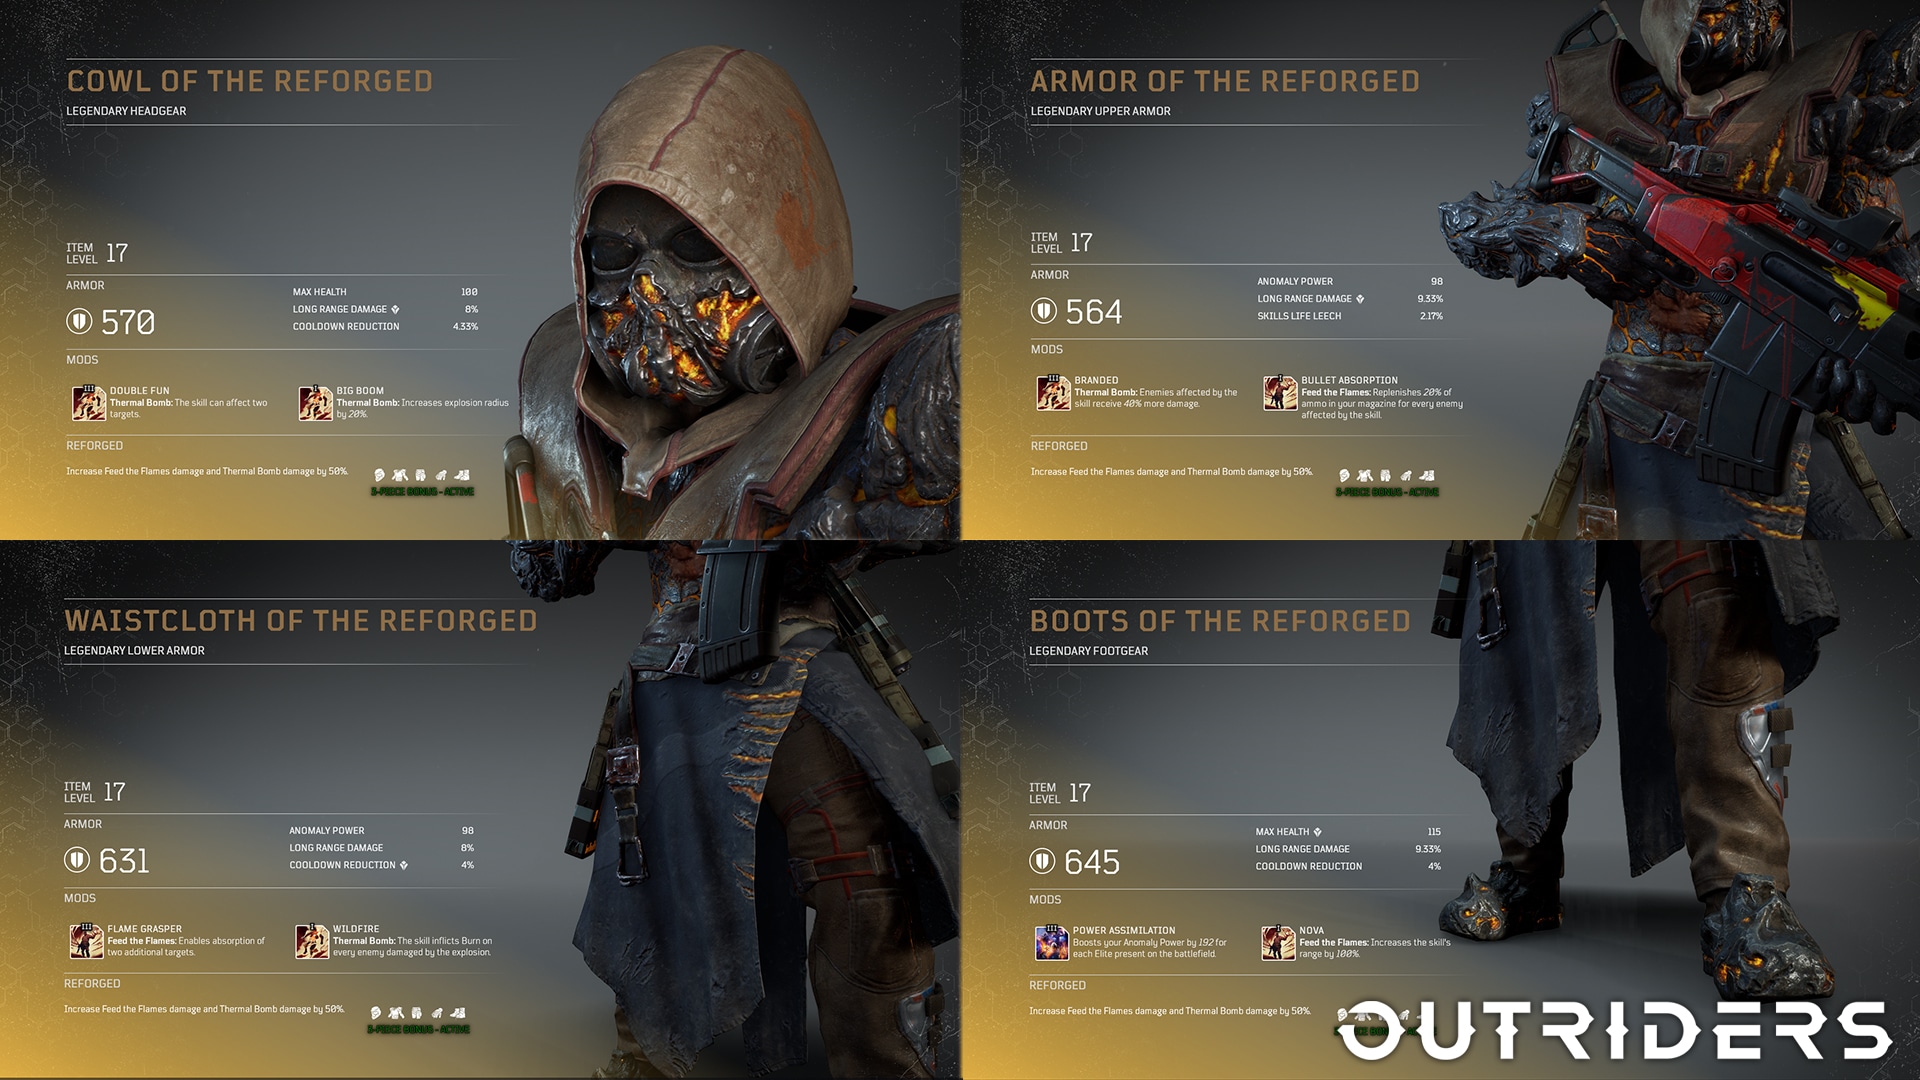
There haven’t been many details on Legendary Armors yet as they were not available in the demo. Through what has been shown in Class Trailers so far, Full Legendary Sets with pairs of Tier 3 mods seems like it might be the most ideal for some builds. This would let you get the strengths of the mods of one set, while using the set bonus of another. It depends on what sets do and how many actually exist.
For weapons however, this may or may not be impactful, as there are some lower tier mods that can really provide a bigger benefit compared to a small boost in damage, like reducing ammo consumption. It’s hard to say exactly how this will play out for sure though. It’ll be a few days at least before anyone gets to that point in the game.
Using Crafting and Modding to Your Advantage
Now, we come to our more in-depth Crafting and Modding. Here we’ll cover some of the practical uses of Crafting as means of progression. Then we’ll cover Modding in a more in-depth and practical sense.
Using Crafting for Progression
In the early game, you’ll want to focus on leveling up gear primarily. While it’s still capped by Level, it’s worth doing if you’re not having luck getting a mod to drop again or you can’t find a higher level item with similar bonus stats. This will keep you strong enough throughout the campaign with only a cost of common resources gotten from harvesting and dismantling gear.
For those mods you do find frequently though, dismantling them if you’re not currently using them is also an alternative. They can always be crafted onto something later and will scale based on the item they are slotted into. So if a good item base drops, say an armor with a good armor rating and Anomaly or Firepower bonuses on it, then you can slot in a more useful mod, assuming it doesn’t drop with one.
In the mid-game and even into post-game, Modding and Increasing Rarity will be very good crafting options to take advantage of. Both of these allow you to maintain and increase your power with relative ease, without having to break a build you’re enjoying. Keeping the bonuses that are relevant to your play style are important for progressing comfortably.
In the Post-game is where you’ll be using mostly everything, with the possible exception of the Level up options, as they may not work to push your Expedition gear to level 50. Everything else though, very useful.
Improving Attributes, Modding and even Increasing Rarity will all play a big part here. All those Shards and resources you built up on your journey through Enoch will be put to really good use as this stage. Attributes will play a bigger role, being one of the premiere crafting options alongside modding to stay geared to push deeper and deeper into Expedition Tiers. Rarity will play a part too, letting you boost any Unusual or Rare drops of a higher level to at least Epic, making what would usually be subpar loot, into usable loot at the very least.
Read our dedicated guide to Crafting in Outriders to learn not only the basics of how this system works, but how to squeeze the most out of your current gear to overcome any challenge.
Creating a Build
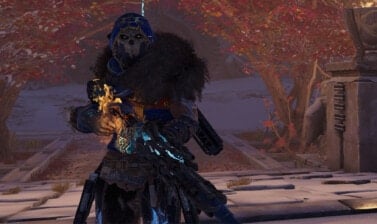
So now we can dive into the Modding itself, the last big part of the gearing process to cover. While this can be straightforward, we’ll be making use of an example build from our In-depth Trickster Class and Builds Guide to explain some of the nuances to consider when creating a build and choosing mods to use. While the Build in full will not be covered here, we will discuss some of the nodes used on the tree briefly.
This Trickster is focused on build and maintaining shield, while also leeching any health that goes missing from enemies though consistent damage. It uses Cyclone Slice, Twisted Rounds and Time Rift. The Tree is more offensively focused, despite its more durable nature, following the Reaver path.

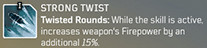
The Key Mods this build utilizes are Grand Bastion, Healing Slice, Ultimate Duration, Wind Slash and Rebound for Cyclone Slice. We also make use of Geiger’s Wave, Time Crack, Long Range and Double Time for Time Rift.
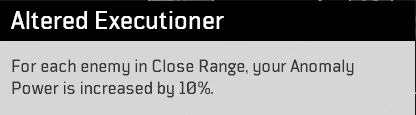
These mods make Time Rift a mass Debuff, reducing resistances, applying Vulnerable and linking damage between enemies. This paired with an Anomaly Power Bonus from the Countershield node make this skill a huge part of this build, despite the otherwise offensive focus.

The Mods for Cyclone Slice provide a good mix of offensive and defensive power and have synergy with Time Rift’s Mods. These mods along with nodes like Altered Executioner really add to this particular build’s lethality.
Since these mods are a mix of mods from all three tiers, these are the ones we’ll want to keep an eye out for. Since some may are limited to Legendary Gears, those may be the set pieces we want to focus on getting, and slotting in the rest of the mods for the build around that to start with.
While this setup is good for mobbing, there may be times we want to swap to a more single target setup as well, for bosses and other tough enemies. So mods like Healing Slice and Long Range should be paired together, as they will have limited or no effect in single target situations.
In which case we’d want to be able to swap them for a pair of Twisted Rounds mods like Strong Twist and Twisted Fate, with that left over slot from the original mods carrying Ammo Bargain. To be able to swap between Area Damage and Single Target Damage with a single gear swap.
This being just a rough example of the things to consider when putting together a build. Getting all the rights mods is good, but having yourself prepared for other situations is something you can prepare for. It will very likely be a big part of gearing up for the hardest content as well.
Complete List of Mods
Below you will find a complete list of mods you can find through your Journey on Enoch. This alongside the other information in this guide will allow you to plan out your own builds, beyond the ones provided in our In-depth Class and Build Guides.
Please note that due to its length and amount of contents, the following tables are best viewed on a larger screen such as a PC screen, TV or horizontally flipped mobile device.
All Armor Mods in Outriders
| Name | Tier | Class | Description |
|---|---|---|---|
| Anomaly Echo | III | All | Grants X firepower and Y anomaly power bonus on skill activation for Z seconds. |
| Brawl | III | All | Boosts your Melee skill damage by 100%. |
| Captain Hunter | III | All | Increases your damage against Elites by 20%. |
| Diffuse | II | All | Sprinting increases your Armor by X and Resistance by 50%. |
| Head of the Ward | III | All | Reviving an ally also fully restores their Health. |
| Introvert | III | All | Increases the range at which enemies are considered to be in Close Range by X meters. |
| Life of the Party | III | All | Incoming damage is reduced by 5% for each enemy in Close Range. Stacks up to 8 times. |
| Move Groove | II | All | Moving increases your Anomaly Power by X and Firepower by Y. |
| Not Impressed | III | All | Reduces the damage taken from Elites by 20%. |
| Personal Space | II | All | Grants you a 25% bonus to close range weapon damage. |
| Phantom Dash | II | All | During combat your default roll is replaced with Phantom Dash which enables you to quickly pass through enemies. |
| Power From The Ashes | II | All | Killing shots on enemies afflicted with Ash increase your Anomaly Power by X for 20 seconds. Stacks up to 4 times. |
| Sharp Eye | III | All | Killing enemies while aiming down sights grants you X Firepower for 20 seconds. Stacks up to 3 times. |
| Shield Zap | II | All | When your Shield is active it spawns an electric shock around you dealing damage to a random enemy within a 5-meter radius. Ricochets to another target on a successful hit. Cooldown of 3 seconds. |
| Stare Into the Barrel | I | All | Grants a moderate Firepower increase for each enemy in Close Range. |
| What Goes Around | II | All | Incoming bullets have 20% chance of being deflected towards an enemy dealing X damage. |
| Armor Boost | I | Devstator | Earthquake: Grants you X points of Armor for each enemy affected by the skill. Effect lasts for 10 seconds. Stacks up to 10 times. |
| Auto Reflect | I | Devstator | Reflect Bullets: You can now fight while the skill is active, but you cannot manually deactivate the skill. It only negates 50% of the damage. |
| Bleeding Impulse | I | Devstator | Golem: When the skill is active, spawn radial impulses that inflict bleed on nearby enemies within a 6 meter radius. Frequency of 2 seconds. |
| Blood Primer | I | Devstator | Reflect Bullets: All the reflected bullets apply Bleed status. |
| Blood Shock | I | Devstator | Earthquake: Inflicts Bleed on enemies affected by the skill. |
| Bloody Crush | I | Devstator | Gravity Leap: Inflicts Bleed on enemies damaged by the skill. |
| Bullet Acceleration | I | Devstator | Reflect Bullets: Increases the damage of reflected bullets by 306. |
| Despair | I | Devstator | Gravity Leap: Enemies within the damage radius of Gravity Leap will receive double Anomaly damage for 5 seconds. |
| Earth’s Legacy | I | Devstator | Earthquake: Increases the skills range by 60%. |
| Extra Quake | I | Devstator | Earthquake: The skill can be activated 1 more time before triggering the cooldown. |
| Extra Time | I | Devstator | Reflect Bullets: Increases the skill’s duration by 20%. |
| Give Me More | I | Devstator | Tremor: Receive 1 additional explosion. |
| Golem Of Death | I | Devstator | Golem: When the skill is active, extend it’s duration by 1.5 seconds for each enemy killed. |
| Ground Crush | I | Devstator | Earthquake: Increases the skill’s base damage by 65. |
| Heal Per Kill | I | Devstator | Earthquake: Each enemy killed with the skill restores 10% of Health to all allies in a 20 meter radius around you. |
| Hollow Point | I | Devstator | Reflect Bullets: All the reflected bullets apply Vulnerable status. |
| Human Comet | II | Devstator | Gravity Leap: Increase the skill’s damage by X. |
| Impaler | I | Devstator | Impale: The skill can be activated 1 more time before triggering the cooldown. |
| Increase Duration | III | Devstator | Reflect Bullets: Increases the skill’s duration by 40%. |
| Life Absorption | I | Devstator | Gravity Leap: Heal for 100% of the damage dealt. If your target dies, heal for 200% damage dealt. |
| Mosh Pit | I | Devstator | Endless Mass: Inflicts Vulnerable on all the enemies pulled by the skill. |
| Palisade | III | Devstator | Impale: The skill can strike 2 additional targets. |
| Panzer Drain | I | Devstator | Earthquake: Damaging enemies with the skill steals 33% of their Armor. Effect lasts for 5 seconds. |
| Perseverance | I | Devstator | Golem: Increases the skills duration by 50%. |
| Primal Armor | I | Devstator | Boulderdash: Double your Armor when the skill ends for 10 seconds. |
| Primal Chaingun | III | Devstator | Boulderdash: Every enemy damaged by the skill increased your Weapon Damage by 20% for 5 seconds. Stacks up to 5 times. |
| Primal Constitution | I | Devstator | Boulderdash: Each enemy you damage increases your maximum health by X for 10 seconds. Stacks up to 5 times. |
| Primal Gutting | I | Devstator | Primal Charge (Running Melee Strike): Inflicts Bleed on all affected enemies. |
| Primal Rage | I | Devstator | Boulderdash: Reduces the skill’s cooldown by 50%. |
| Primal Weakness | I | Devstator | Primal Charge (Running Melee Strike): Permanently reduce the Resistant of all affected enemies. |
| Primal Weakness | III | Devstator | Primal Charge (Running Melee Strike): Permanently reduce the Resistant of all affected enemies. |
| Resistance | I | Devstator | Golem: When the skill is active, increase your Resistance by 33%. |
| Restoration | I | Devstator | Impale: Increases the Health Regeneration bonus for players near impaled enemies. |
| Rivers of Blood | I | Devstator | Impale: Increases the skill damage by 50% to enemies afflicted with Bleed. |
| Sharpened Spike | I | Devstator | Impale: The skill deals X more damage. |
| Shattered Armor | I | Devstator | Endless Mass: Increases Weapon Damage against affected enemies by 10% for 10 seconds |
| Spike Forest | I | Devstator | Impale: The skill can strike 1 additional target. |
| Stolen Life | I | Devstator | Tremor: Increases the percentage healed per affected enemy by 6% |
| The Strongest First | I | Devstator | Reflect Bullets: The enemy with the most health takes 50% more damage. |
| Ultimate Impaler | III | Devstator | Impale: The skill can be activated 2 more times before triggering the cooldown. |
| Vlad’s Grasp | I | Devstator | Impale: Increases the skill’s range by 25%. |
| Wide Horizons | III | Devstator | Endless Mass: Increases the skill’s radius by 25%. |
| Anomaly Hunger | I | Pyromancer | Feed the Flames: Increases the skill’s damage by the value of your Skill Leech. |
| Armor Melting | I | Pyromancer | Volcanic Rounds: Decreases the target’s Armor by 20% for 10 seconds. |
| Ash Grasp | I | Pyromancer | Thermal Bomb: Inflict Ash on enemies within a 5 meter radius of an enemy that is about to explode from Thermal Bomb. |
| Ashes and Leeches | III | Pyromancer | Ash Blast: Using the skill increases your Weapon Leech bonus by X% for Y seconds. |
| Big Boom | I | Pyromancer | Thermal Bomb: Increases the explosion radius by 20%. |
| Blacksmith | I | Pyromancer | Overheat: Each status condition consumed by the skill grants 46 armor bonus for 8 seconds. |
| Branded | III | Pyromancer | Thermal Bomb: Enemies affected by the skill receive 40% more damage. |
| Bullet Absorption | I | Pyromancer | Feed the Flames: Replenishes 20% of ammo in your magazine for every enemy affected by the skill. |
| Burning Ground | I | Pyromancer | Thermal Bomb: Exploding targets leave behind a patch of burning ground. All enemies within this area are afflicted with Burn and will receive X damage over 10 seconds. |
| Burnt-Out | I | Pyromancer | Heatwave: Damaged enemies take 35% more damage for 8 seconds. |
| Cinders | I | Pyromancer | Overheat: The skill consumes ash instead of Burn. |
| Death Sentence | III | Pyromancer | Ash Blast: Your Weapon Damage and Anomaly Damage against enemies affected by the skill are increased respectively by X% and Y% for Z seconds. |
| Detonator | III | Pyromancer | Overheat: Decrease the skill’s cooldown by 50%. |
| Double Fun | III | Pyromancer | Thermal Bomb: The skill can affect two targets. |
| Ember Shield | I | Pyromancer | Overheat: Each status consumed by the skill increases your Resistance by 10% for 10 seconds. Stacks up to 5 times. |
| Empowerment | I | Pyromancer | Ash Blast: Skill deals X additional damage. |
| Etna | I | Pyromancer | Eruption: The skill can be activated 1 more time before triggering the cooldown. |
| Extinguisher | I | Pyromancer | Ash Blast: Apply X damage to an enemy afflicted with Burn and consume the status. |
| Extra Mag | I | Pyromancer | Volcanic Rounds: The skill is effective for one additional magazine before triggering the cooldown. |
| Final Breath | I | Pyromancer | Feed the Flames: Health drain efficiency is increased by 25%. |
| Fire Eater | I | Pyromancer | Feed the Flames: Increases Health drain efficiency against targets afflicted with Burn by 150%. |
| Fire Frenzy | I | Pyromancer | Thermal Bomb: You can use the skill twice before triggering the cooldown. |
| Flame Grasper | III | Pyromancer | Feed the Flames: Enables absorption of two additional targets. |
| Heat Leech | I | Pyromancer | Heatwave: Increase Skill Leech by 10% for 5 seconds after using this skill. |
| Hellfire | I | Pyromancer | Heatwave: If the skill damages 3 enemies, all subsequent enemies will receive additional 25 damage. |
| Inferno Wave | I | Pyromancer | Heatwave: Increases damage dealt to enemies from Heatwave. |
| Irradiation Wave | I | Pyromancer | Heatwave: Inflicts Weakness on enemies affected by the skill. |
| Lasting Fire | I | Pyromancer | Thermal Bomb: Increase the time in which killing an affected enemy will cause an explosion by 3 seconds.. |
| Nova | I | Pyromancer | Feed the Flames: Increases the skill’s range by 100%. |
| Pants On Fire | I | Pyromancer | Overheat: Increase by 46 the damage to enemies who were damaged by the skill, but did not have their status consumed. |
| Phoenix Force | I | Pyromancer | Overheat: Earn additional 25 Anomaly Power per status consumed by the skill for 8 seconds. Stacks up to 10 times. |
| Pompeii | I | Pyromancer | Eruption: The skill can be activated 1 more time before triggering the cooldown. |
| Power Assimilation | III | Pyromancer | Boosts your Anomaly Power by X for each Elite present on the battlefield. |
| Pure Power | I | Pyromancer | F.A.S.E.R Beam: Increases the skill’s damage by X. |
| Radiation Flames | I | Pyromancer | Volcanic Rounds: Enemies damaged with the skill are afflicted with Weakness. |
| Reload Boost | I | Pyromancer | Volcanic Rounds: A powerful, 50% Weapon Power bonus is granted after the skill ends for 5 seconds. |
| Ride The Wave | I | Pyromancer | Heatwave: The skill can be activated 1 more time before triggering the cooldown. |
| Sunburnt | I | Pyromancer | Overheat: Increase by X the damage to enemies that have their statuses consumed by the skill. |
| Susceptibility | III | Pyromancer | Volcanic Rounds: Decreases the Resistance of enemies damaged by the skill by X%. |
| Third Degree | I | Pyromancer | Overheat: Increase Weapon Damage against enemies damaged by the skill by 25% for 8 seconds. |
| Tidal Wave | I | Pyromancer | Heatwave: The skill can be activated 1 more time before triggering the cooldown. |
| True Blast | I | Pyromancer | Thermal Bomb: Increases explosion damage by X. |
| Volcanic Armor | I | Pyromancer | F.A.S.E.R Beam: Reduces incoming Anomaly Damage by 25% and Weapon Damage by 25% when the skill is active. |
| Wide Grip | I | Pyromancer | Feed the Flames: Enables absorption of one additional target. |
| Wildfire | I | Pyromancer | Thermal Bomb: The skill inflicts Burn on every enemy damaged by the explosion. |
| Advanced Rockets | I | Technomancer | Pain Launcher: Every rocket deals X more damage. |
| Armor Reduction | I | Technomancer | Blighted Turret: The turret reduces the Armor of each enemy it hits by 20%. Effect lasts for 5 seconds. |
| Bang for your Buck | I | Technomancer | Tool of Destruction: Activating the skill grants a 100% base ammo increase for the selected tool. |
| Better Parts | I | Technomancer | Blighted Turret: Increases the turret’s duration by 50%. |
| Bonus Duration | I | Technomancer | Cryo Turret: Extend the turret’s duration by 30%. |
| Breathe In | III | Technomancer | Fixing Wave: Reduces the skill’s cooldown by 20% |
| Cannonade | III | Technomancer | Pain Launcher: Increases the number of rockets launched by 10. |
| Cleansing Wind | I | Technomancer | Fixing Wave: Activating the skill removes negative statuses from allies and grants 5 seconds immunity from them. |
| Cold Purification | I | Technomancer | Cold Snap: Skill activation removes negative statuses from you and all your allies in range and receives negative status immunity for 5 seconds |
| Critical Analysis | I | Technomancer | Blighted Rounds: Increases Critical Damage by 30%. |
| Demolition Man | I | Technomancer | Tool of Destruction: Each rocket deals X more damage. |
| Feedback | I | Technomancer | Tool of Destruction: 3% of the damage dealt using the Minigun heals you after the ability ends. |
| Fine-Tuned | I | Technomancer | Scrapnel: Increases the detection and explosion radius by 33%. |
| Fortify | I | Technomancer | Tool of Destruction: Activate skill grants 18,424 Armor bonus. |
| Freeze Barrage | I | Technomancer | Pain Launcher: Inflict Freeze on enemies affected by each rocket explosion. |
| Hail Shot | I | Technomancer | Cryo Turret: Increase the turret’s damage based on your Status Power. |
| Ice Component | I | Technomancer | Blighted Turret: The turret now inflicts Freeze instead of Toxic. |
| Ice Pack | I | Technomancer | Cryo Turret: The turret heals allies by 30% Max Health within a 4 meter radius when the ability ends. |
| Increase Damage | I | Technomancer | Cryo Turret: Every turret’s shot deals extra X damage. |
| Initial Blast | I | Technomancer | Pain Launcher: Causes a small explosion, dealing X damage in a 5 meter radius when the skill is activated. |
| More Damage | I | Technomancer | Scrapnel: Increases the skill’s damage by X. |
| More Traps | I | Technomancer | Scrapnel: 1 additional mine can be thrown before triggering the cooldown. |
| No Pain, No Gain | I | Technomancer | Blighted Rounds: When the skill ends, 40% of damage dealt by the skill is turned into healing and spread equally among allies. |
| Portable Armory | I | Technomancer | Tool of Destruction: You can fire 1 additional rockets. |
| Quartermaster | III | Technomancer | Fixing Wave: Activating the skill replenishes one weapon magazine for each ally. Cooldown of 45 seconds. |
| Rain of Pain | I | Technomancer | Pain Launcher: Decreases the skill’s cooldown by 34%. |
| Rocket Man | III | Technomancer | Tool of Destruction: You can shoot 3 additional rockets. |
| Spare Mag | I | Technomancer | Blighted Rounds: The skill is effective for one additional magazine before triggering the cooldown. |
| Supplies | I | Technomancer | Scrapnel: 1 additional mine can be thrown before triggering the cooldown. |
| Surprise | I | Technomancer | Cryo Turret: The turret explodes before being destroyed, dealing X damage in 6 meter radius. |
| Trap Cluster | III | Technomancer | Doubles the number of mines that can be thrown before triggering the cooldown. |
| Trick Up The Sleeve | I | Technomancer | Blighted Rounds: While the skill is active, killing shots grant you 30% extra bullets in your mag. |
| Untouchable | I | Technomancer | Tool of Destruction: Activating the Minigun grants 15% Resistance bonus. |
| Additional Mag | I | Trickster | Twisted Rounds: The skill is effective for 2 magazines before triggering the cooldown. |
| Aggressive Teleportation | III | Trickster | Reverting time creates an explosion around you. |
| Ammo Bargain | III | Trickster | Twisted Rounds: While the skill is active, killing shots replenish 20% of ammo in your magazine. |
| Anomalic Caliber | I | Trickster | Twisted Rounds: Receive 30% Resistance Piercing bonus while the skill is active. |
| Anomaly Cut | I | Trickster | Venator’s Knife: Shots on enemies marked by the knife receive X Anomaly damage. |
| Apply Shield | I | Trickster | Temporal Blade: Killing enemies with Temporal Blade grants 5% of Shield. |
| Armor of Eons | I | Trickster | Borrowed Time: Activating the skill increases your Armor by 100% for 10 seconds. |
| Backstabber | I | Trickster | Hunt the Prey: Using the skill deals X damage to the enemy you teleported behind. |
| Big Range | I | Trickster | Slow Trap: Increases the sphere’s range by 1 meters. |
| Blue Blood | I | Trickster | Twisted Rounds: Receive 10% Weapon Leech bonus while the skill is active. |
| Cut Loose | I | Trickster | Temporal Blade: Reduces the skill’s cooldown by 20%. |
| Damage Mitigation | I | Trickster | Slow Trap: Allies within the sphere receive 20% less damage. |
| Dance of Death | I | Trickster | Hunt the Prey: Decreases Hunt the Prey’s cooldown. |
| Death Shell | III | Trickster | Borrowed Time: Killing enemies while Borrowed Time is active reduces incoming Weapon Damage by 10% and Anomaly Damage by 10 % for 10 seconds, Buff is removed at the end of the skill. Stacks up to 4 times. |
| Delivery on Time | I | Trickster | Slow Trap: Activating the skill replenishes ammo for the current weapon of all allies in range. |
| Double Stop | I | Trickster | Temporal Blade: Increases the duration of the inflicted paralysis by 100%. |
| Duration | I | Trickster | Cyclone Slice: Adds 5 seconds to the skill’s duration. |
| Grand Bastion | I | Trickster | Cyclone Slice: Using the skill reduces incoming weapon damage and Anomaly damage by 35%. |
| Healing Slice | I | Trickster | Cyclone Slice: Receive 47 Health for each enemy killed with the skill. |
| No Escape | I | Trickster | Venator’s Knife: Increases the skill’s effective range between targets by 25%. |
| Pain Transfer | II | Trickster | Time Rift: Damage dealt to one affected enemy will be transferred to another affected enemy. |
| Radiation Jump | I | Trickster | Hunt the Prey: Inflict Vulnerable to the enemy you teleport behind. |
| Sharpening | I | Trickster | Venator’s Knife: Increases the skill’s damage by X. |
| Shield Evoker | I | Trickster | Cyclone Slice: Killing enemies with the skill grants 5% Shield. |
| Shield of the Fallen | III | Trickster | Twisted Rounds: When the skill ends, add 15% of your Maximum Health as Shields for each enemy killed by the skill. |
| Slasher | I | Trickster | Temporal Blade: The skill can be activated 1 more time before triggering the cooldown. |
| Speed Boost | I | Trickster | Slow Trap: Allies within the sphere receive 2% movement speed bonus. |
| Speed Up | I | Trickster | Cyclone Slice: Allows 25% faster movement while the skill is active. |
| Strong Slice | I | Trickster | Temporal Blade: Increases the skill’s damage by X. |
| Strong Twist | I | Trickster | Twisted Rounds: While the skill is active, increases the weapon’s Firepower by an additional 15%. |
| Thunder Dome | I | Trickster | Slow Trap: Receive 100% Shield when the skill ends. |
| Time Blast | I | Trickster | Hunt the Prey: Applying Slow in 5 meter radius around the enemy you teleport behind. |
| Time Crack | I | Trickster | Time Rift: Enemies affected by the skill have both their Armor and Resistance decreased by 25% for 5 seconds. |
| Time Space Protection | I | Trickster | Borrowed Time: Receive X Armor and 30% Resistance bonus while the skill is active. |
| Twisted Fate | I | Trickster | Twisted Rounds: Receive 30% Critical Damage bonus while the skill is active. |
| Ultimate Big Range | I | Trickster | Slow Trap: Increases the sphere range by 2 meters. |
| Weakening The Prey | I | Trickster | Hunt the Prey: Interrupt and inflict Weakness to the enemy you teleport behind. |
| Weakening Zone | I | Trickster | Slow Trap: Enemies entering the sphere are afflicted with Weakness. |
| Weaklings | I | Trickster | Cyclone Slice: Inflicts Weakness on enemies hit by the skill. |
All Weapon Mods in Outriders
| Name | Tier | Weapon | Description |
|---|---|---|---|
| Anomaly Enhancement | I | Rare+ | Receive bonus firepower equal to 5% of your ability power. |
| Anomaly Surge | I | Rare+ | Critical shots spawn an Anomaly energy blast that deals X damage in 1.5 meter radius. |
| Ashen Bullets | I | Rare+ | Successful shots inflict Ash on enemies. Cooldown of 8 seconds. |
| Bleeding Bullets | I | Rare+ | Shots inflict Bleed on an enemy. Cooldown of 8 seconds. |
| Burning Bullets | I | Rare+ | Successful shots may inflict Burn on enemies. Cooldown 8 seconds. |
| Clip Combustion | I | Rare+ | Reloading weapon creates a shockwave, dealing X damage to enemies within a 5 meter radius. |
| Clip of Amalthea | I | Rare+ | There is a 20% chance that a critical shot will not consume ammo. |
| Critical Point | I | Rare+ | Increases the chance of scoring a critical shot by 15%. |
| Embalmer’s Rage | I | Rare+ | After a killing shot all following shots will inflict critical damage for a few seconds. |
| Essence Thief | I | Rare+ | Shots regenerate your Health. |
| Fireworks | I | Rare+ | Shots create an explosion that deals X damage to enemies within a 6 meter radius. Cooldown of 3 seconds. |
| First Things First | I | Rare+ | The first shot after every reload hits with Armor Piercing increased by 30%. |
| Freezing Bullets | I | Rare+ | Shots inflict Freezing on an enemy. Cooldown of 8 seconds. |
| Fusion Blast | I | Rare+ | Shots created a fusion blast, dealing X damage within a 5 meter radius. |
| Hot Blood | I | Rare+ | Shots pass through enemies whose Health is below 50%, ricocheting to 3 enemies within a 5 meter radius and inflicting Burn. |
| Killer Medic | I | Rare+ | Killing shots replenish 35 points of Health to allies within a 5 meter radius of the target. |
| Life Stock | I | Rare+ | Reloading restores 72 points of Health for each enemy killed since your last reload without changing your weapon. |
| Proliferation | I | Rare+ | Shots on enemies afflicted by a status condition inflict that status to the nearest enemy. |
| Ricochet | I | Rare+ | Shots ricochet to another enemy within a 5 meter radius of the initial target. |
| Ruler Of Leeches | I | Rare+ | Killing shots increase Weapon Leech by 20% for 20 seconds. |
| Shield Maiden | I | Rare+ | Shots add a small amount of shield. |
| Snowsquall | I | Rare+ | Reloading weapon inflicts Freeze on enemies previously wounded by this weapon without changing it. |
| Soul Devourer | I | Rare+ | Killing shots regenerate some of your health. |
| Stiffening | I | Rare+ | Shots inflict Slow on an enemy. Cooldown of 8 seconds. |
| Toxic Bullets | I | Rare+ | Successful shots inflict Toxic on enemies. |
| Vampire | I | Rare+ | Killing shots grant 15% Skill Leech boost for 20 seconds. |
| Vulnerability Bullets | I | Rare+ | Shots inflict Vulnerable on enemies. Cooldown of 8 seconds. |
| Weakening Bullets | I | Rare+ | Shots inflict Weakness on enemies. Cooldown of 8 seconds. |
| Bomb’s Ahead | II | Rare+ | Killing shots turn enemies into an Anomaly bomb, dealing damage. Cooldown of 3 seconds. |
| Bone Shrapnel | II | Rare+ | Killing shots detonate the enemy’s bones and turn them into shrapnel that deals X damage and inflicts Bleed on enemies within a 5 meter radius. Cooldown of 1 second. |
| Brain-eater | II | Rare+ | Critical shots do not consume ammo. |
| Claymore | II | Rare+ | Successful shots damage an enemy with an Anomaly blade. |
| Clip Roller | II | Rare+ | When your magazine has 50% or less ammo left you can roll to quickly reload all your equipped weapons. |
| Crematorium | II | Rare+ | Killing shots create an explosion that inflicts Ash on enemies within a 7 meter radius. |
| Damage Link | II | Rare+ | Shots link up to 2 enemies, sharing 30% of their Weapon damage dealt and 10% of their Anomaly damage dealt. Cooldown of 4 seconds. |
| Death Chains | II | Rare+ | Successful shots entangle an enemy with chains dealing X damage over 3 seconds. Cooldown of 2 seconds. |
| Gale of Protection | II | Rare+ | Killing shots grant you a bullet-stopping gale for 5 seconds. |
| Icebreaker | II | Rare+ | Killing shots against frozen enemies make them explode, dealing damage. |
| Improved Ashen Bullets | II | Rare+ | Shots inflict Ash on enemies. Cooldown of 4 seconds. |
| Improved Bleeding Bullets | II | Rare+ | Successful shots inflict Bleed on enemies. Cooldown of 4 seconds. |
| Improved Burning Bullets | II | Rare+ | Successful shots inflict Burn on enemies. Cooldown of 4 seconds. |
| Improved Freezing Bullets | II | Rare+ | Successful shots inflict Freeze on enemies. Cooldown of 4 seconds. |
| Improved Stiffening | II | Rare+ | Shots inflict Slow on enemies. Cooldown of 4 seconds. |
| Improved Toxic Bullets | II | Rare+ | Successful shots inflict Toxic on enemies. Cooldown of 4 seconds. |
| Improved Vulnerability Bullets | II | Rare+ | Shots inflict Vulnerable on enemies. Cooldown of 4 seconds. |
| Improved Weakening Bullets | II | Rare+ | Shots inflict Weakness on enemies. Cooldown of 4 seconds. |
| Mark of the Stake | II | Rare+ | Reloading a weapon inflicts Burn on enemies previously wounded by this weapon without changing it. |
| Minefield | II | Rare+ | Weapon kills spawn explosives around your target, each deals damage in a 3-meter radius. Cooldown of 6 seconds. |
| Perpetuum Mobile | II | Rare+ | You instantly replenish your mag if you kill an enemy with 30% or less ammo remaining in your mag. |
| Resistance Breaker | II | Rare+ | Shots decrease your target’s Resistance by 35% for 6 seconds. |
| Storm Whip | II | Rare+ | Shots bring down lightning on an enemy dealing X damage. Cooldown of 2 seconds. |
| Striga | II | Rare+ | 30% of critical damage is returned to you as health. |
| The Cycle | II | Rare+ | Increase your weapon Damage by X%. The bonus is proportional to your Health Regeneration. |
| Ultimate Toxic Bullets | II | Rare+ | Successful shots inflict Toxic on enemies. |
| Vortex Chamber | II | Rare+ | Reloading a weapon inflicts Slow on enemies previously wounded by this weapon without changing it. |
| Body Snatcher (Mod) | III | Body Snatcher | Killing shots teleport another enemy to the place where the previous one died. Works within a 25 meter radius of the target. |
| Golem Rising | III | Golem’s Limb | Killing shots grant you a protective Golem effect for 3 seconds. |
| Killing Spree | III | Amber Vault | Killing shots increase damage by 30% for this weapon for 30 seconds. Bonus deteriorates with time and stacks up to 5 kills. |
| Judgement Enforcer | III | Rare+ | Shots mark enemies. When reloading, deal 5 times your weapon’s damage to every marked enemy. Marks are removed when you change weapons. |
| Moaning Winds | III | Rare+ | Reloading creates a strong blast around you, dealing X damage to enemies in range of 8 meters. Cooldown of 2 seconds. |
| Ravenous Locust | III | Molten Eidola | Shots create a swarm of locusts, dealing X damage over 15 seconds and inflicting Weakness to enemies remaining within a 6 meter radius of the target. Cooldown of 2 seconds. |
| Sandstorm | III | Rare+ | Shots conjure a sandstorm dealing damage over time. |
| Scrap Grenade | III | Rare+ | First shot after reload becomes an Anomaly projectile, dealing damage in a 5-meter radius. Cooldown 1 second. |
| Singularity | III | Grim Marrow | Killing shots create an Anomaly singularity. When destroyed, the singularity explodes dealing damage to enemies within a 6.5 meter radius. |
| Ultimate Bleeding Bullets | III | The Migraine | Shots inflict Bleed on enemies. |
| Ultimate Damage Link | III | Voodoo Matchmaker | Shots link up to 3 enemies, sharing 30% of their Weapon Damage dealt and 10% of their Anomaly Damage dealt. |
| Ultimate Freezing Bullets | III | Absolute Zero | Shots inflict Freeze on enemies. |
| Ultimate Storm Whip | III | Thunderbird | Shots bring down lightning on an enemy dealing X damage. |
| Weakness Trap | III | Rarog’s Gaze | Shots cause explosions, dealing X damage and inflicting Weakness on enemies within a 5 meter radius of the target. Cooldown of 3 seconds. |
| Weightlessness | III | Aerie Master | Shots inflict Time Rift on enemies. Time Rift raises the enemy into the air for 5 seconds. |
| Winter Blast | III | The Iceberg | Critical shots create an icy blast that inflicts Freeze on enemies within a 4 meter radius. |
Gear Upgrade Priorities
Before we close out the guide, we want to cover one last important topic that goes hand in hand with Crafting and Modding.
We’re going to help you answer the question “What Gear Should I Level First?”. Armor. This is because the bonuses from Armor can contribute to every build. Bonuses to Anomaly Power, Firepower and Health all contribute to builds in different ways, but all of them are important to the majority of builds. There is however some nuance to this, and depending on the build, Weapons can take priority.
In general, we recommend focusing on leveling and upgrading Armor that has Anomaly Power as a bonus stat, or Weapons that have Armor Piercing as a bonus stat.
Early on your Abilities tend to be your quickest and most reliable way of killing large groups of enemies. This will change as you get further into gearing, and you may want to focus on other stats based on your build and play style.
You will find a lot more specific info for each class and build in our in-depth Outriders Class Guides!
Conclusion
Gear is a big part of Outriders, and there’s a lot to consider as you play. Ultimately, how you choose to interact and engage with the Crafting systems are up to you, but this guide should at least help you make better use of it.
And last, but not least, if you have the Outriders Hells Rangers content pack, use it. It will give you a very nice boost in the early levels and make your progression smoother, allowing you to jump a couple World Tiers at least.
Check out our full Outriders Guides and News coverage here on VULKK.com. In the game’s category you will find a number of beginner friendly guides as well as content that is more suitable for the more advanced players, the completionist and the hard-core farmer as well!
We’ve got an excellent collection of Outriders Beginners Tips and Tricks in our DOs and DONTs guide – things that will greatly improve your adventures on Enoch in your first steps after you start the game.
Outriders Class Guides and Best Builds
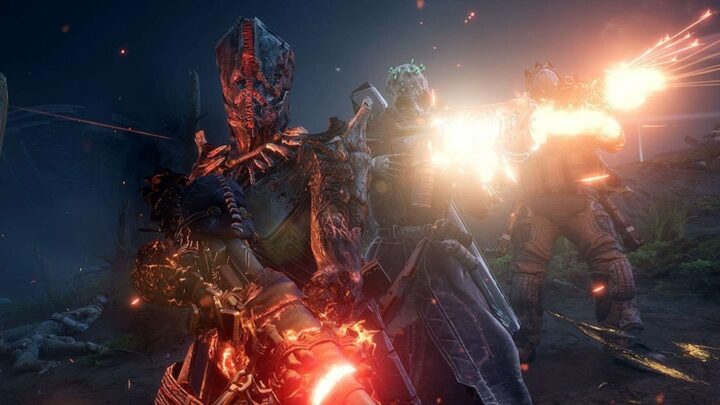
This is a list of individual Outriders Class Guides. Each guide goes far beyond the normal and generic overview of the class you would see anywhere else. RubyRose has done a lot of work, research and testing so that we can offer you here on VULKK.com the most detailed and informative guides for all four classes in Outriders.
Learn how to play the class, get the basics, build upon them as you level up and master your role and gameplay style to be ready for the EndGame. FInd out what the best and most useful builds are for each class and be ready for any situation and combat scenario People Can Fly and Square Enix have designed for you in the game.

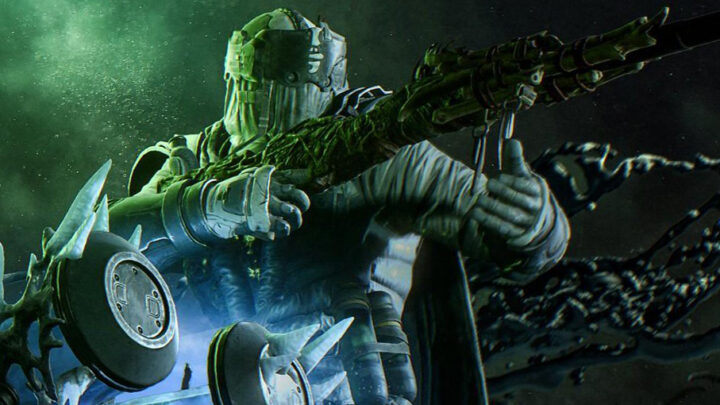
Outriders Devastator Class Guide and Best Builds
Complete Outriders Devastator Guide explaining the basics of the class and sharing builds for early game as well as EndGame at level cap!

Outriders Pyromancer Class Guide and Best Builds
Complete Outriders Pyromancer Guide explaining the basics of the class and sharing builds for early game as well as the EndGame at level cap!
Outriders Technomancer Class Guide and Best Builds
Complete Outriders Technomancer Guide explaining the basics of the class and sharing builds for early game as well as EndGame at level cap!
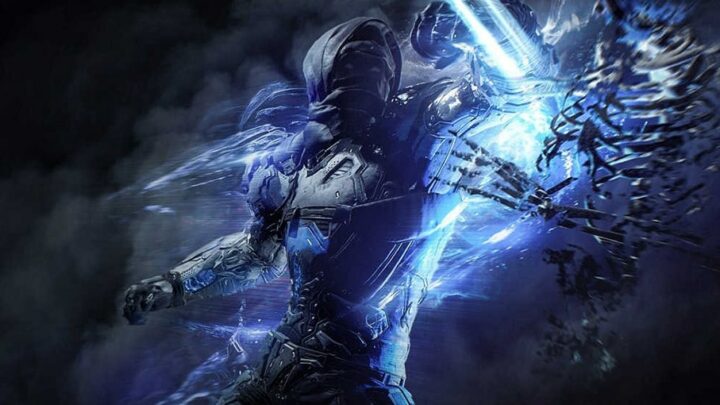
Outriders Trickster Class Guide and Best Builds
Complete Outriders Trickster Guide explaining the basics of the class and sharing builds for early game as well as the EndGame at level cap!
Outriders Essential Beginners Guides
This list showcases some of our top Outriders Beginners Guides - instructional content to help you get into the game, learn the basics and get a nice smooth start with your adventures on Enoch.
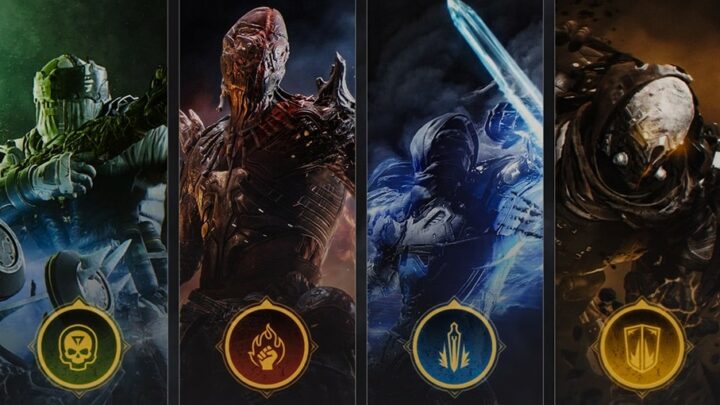
Outriders Classes and Roles: A Beginners Guide
Beginners friendly guide to Outriders Classes. What Devastator, Pyromancer, Trickster and Technomancer can do and which role best fits you.
Outriders User Interface Guide: Everything You Should Know
Guide explaining how the Outriders User Interface works. What each little detail in each window and tab means and how to create your own HUDs.
Outriders DOs and DONTs Guide: Beginner Tips and Tricks
This Outriders DOs and DONTs guide is a large collection of tips to help you get a smooth start in the game and teach you helpful tricks!
Outriders Crafting Guide: make your gear stronger
Crafting in Outriders is different to other RPGs or Looter games. This guide will show you how to use the system to make your gear awesome!
Outriders Expeditions Preparation Guide and Tips
This Outriders Expeditions Guide will help you best prepare for the Endgame content with tips on how to fast climb Challenge Tiers and more!