This Outriders User Interface Guide is for newer players. It covers all of the UI features and HUD settings so you can play your class more effectively while reducing potential screen clutter. It also describes all screens, tabs and pages you may see as part of your experience so you can be familiar with them.
Table of contents
Change/Create Character Menu
This menu will let you swap between classes, or even start a new Outrider. When starting the game for the first time, you’ll see this screen. Once you create an Outrider, you’ll typically be put into a the Game Lobby UI instead on launch, with this being accessible via a button press.
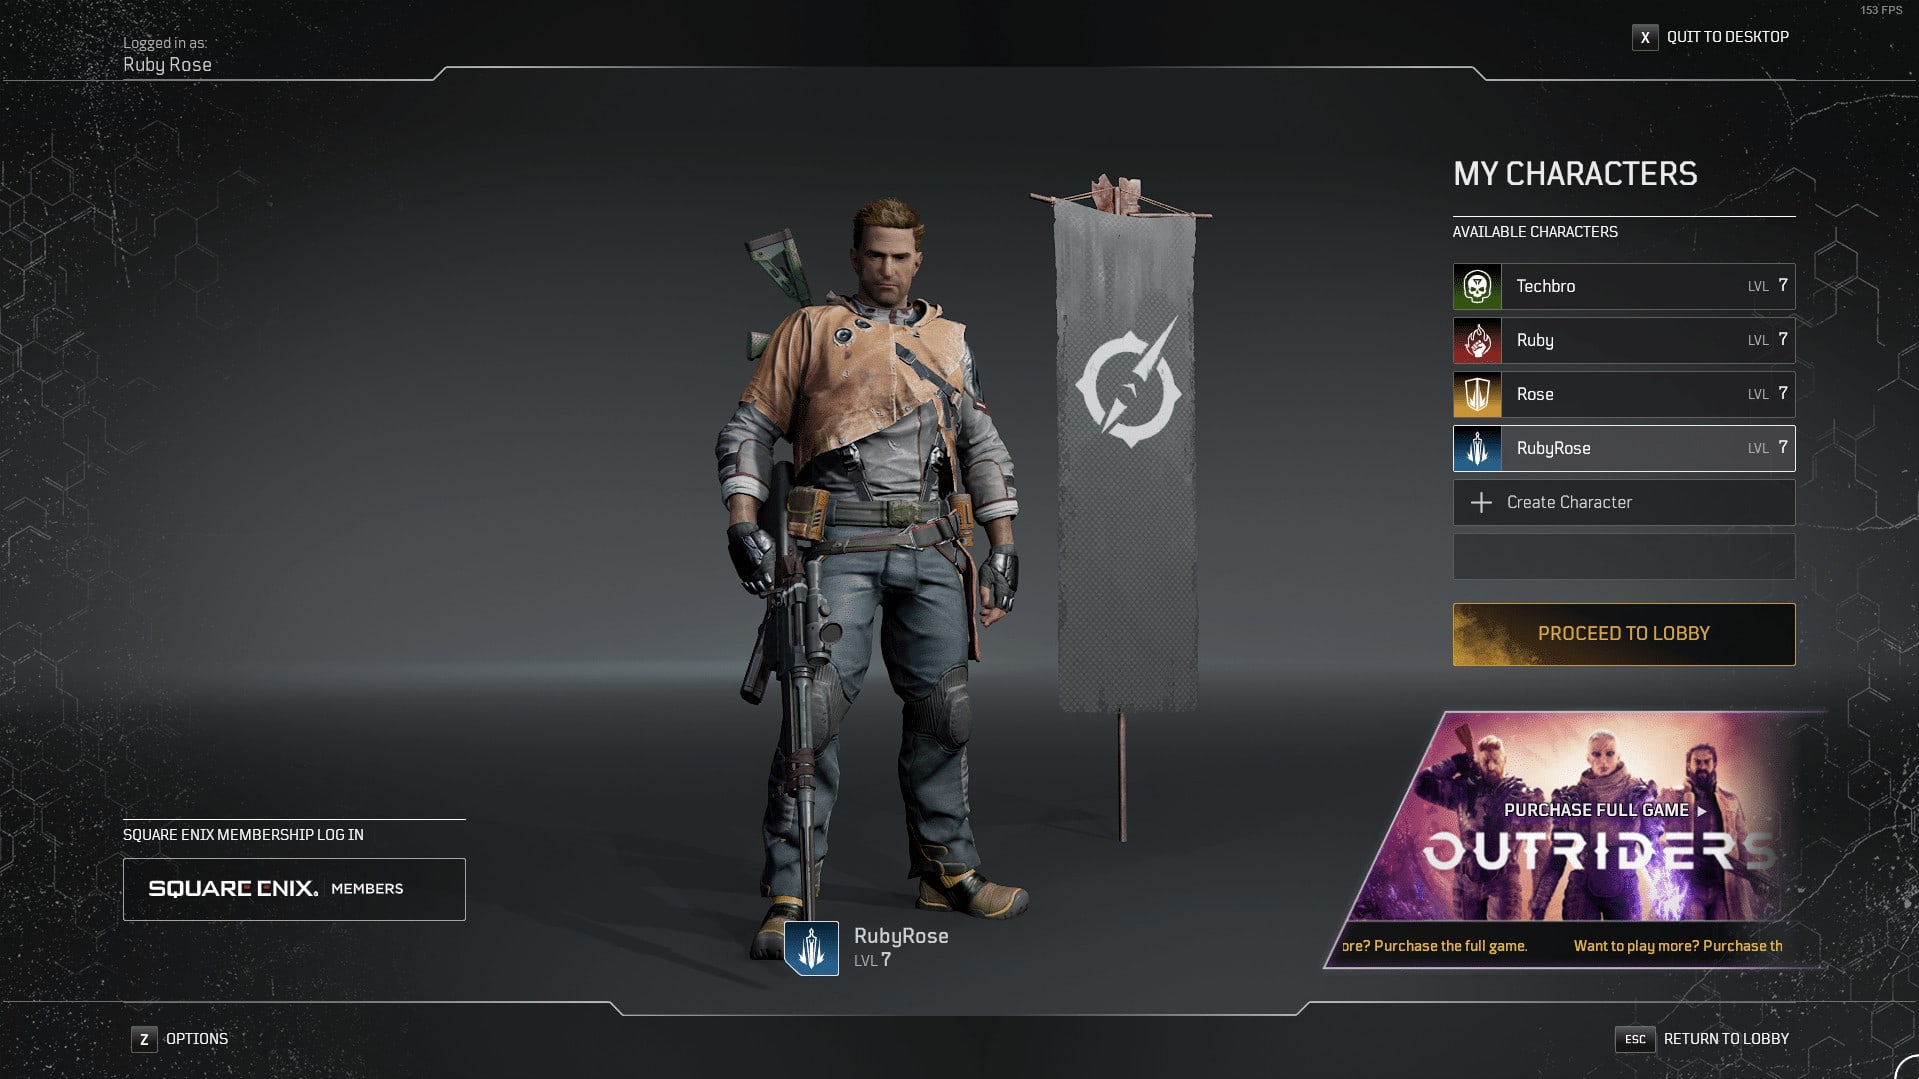
You can create a new Outrider by clicking an open Character slot. This will open a new UI that will let you customize your new Outrider before setting out.
Character Creation
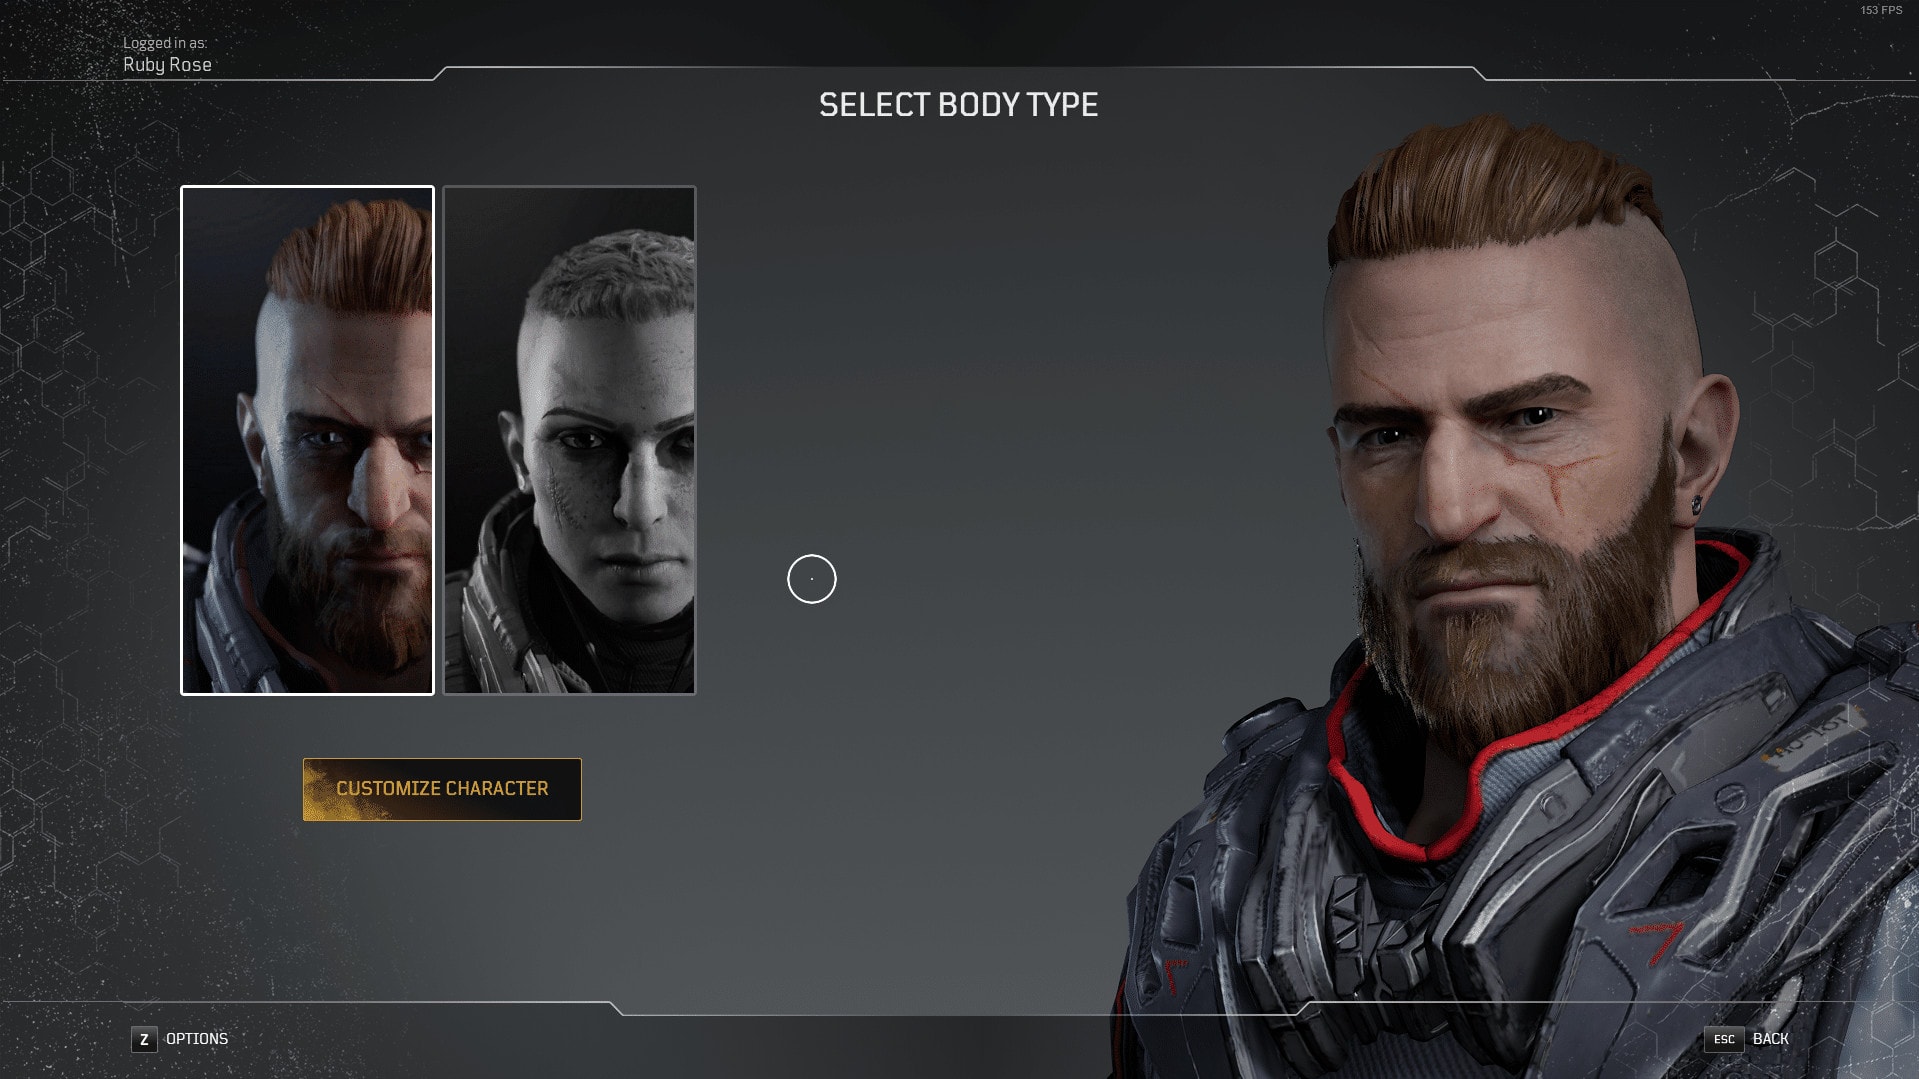
Upon selecting the option to create a character you’ll be taken to a UI that looks like the one above. This is where you select a body type, with Masculine and Feminine identity options. This choice will also affect your voice, and there are some options added or removed based on your choice as well in the later menus.
Choosing Your Outrider’s Appearance
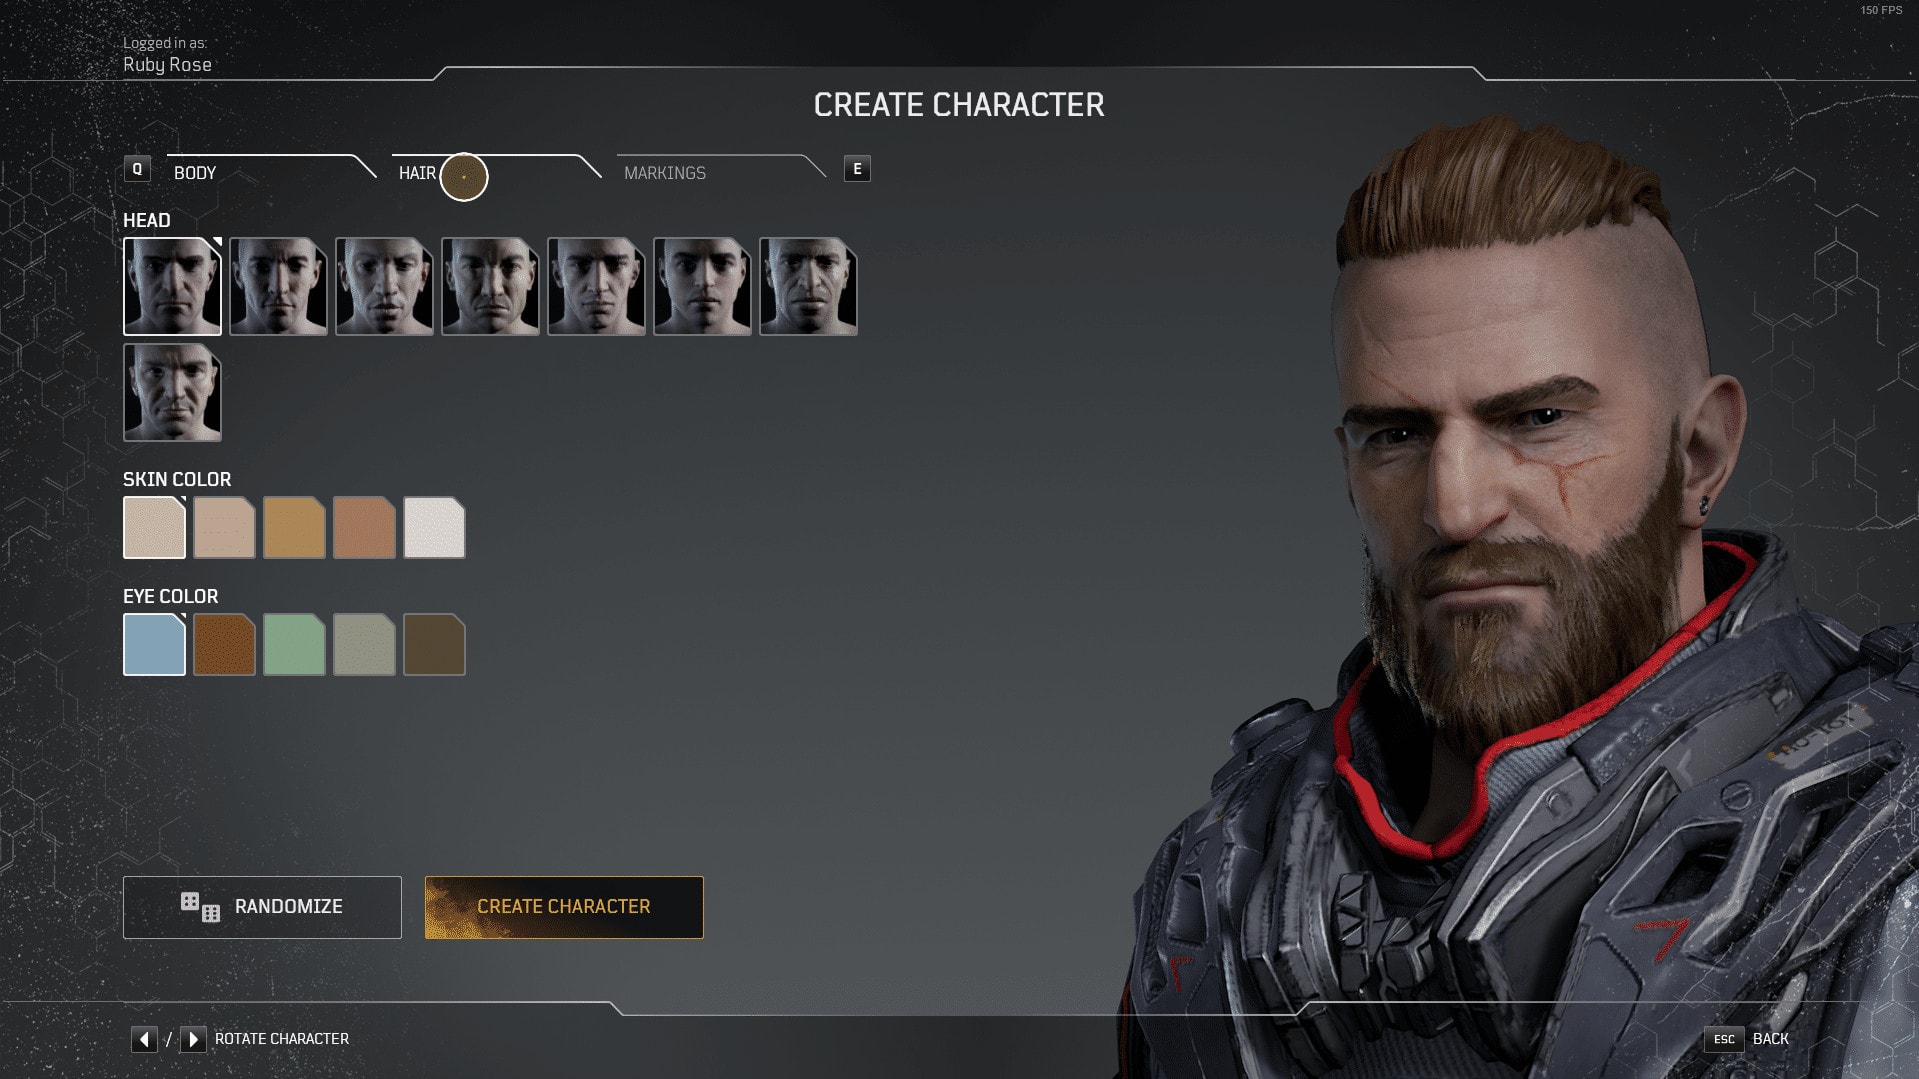
Upon choosing your Outrider’s body type and voice, you’ll be greeted with the above customization screen with three tabs of options to customize your outrider’s face. This first set of options let you choose the shape of your Face, your Skin Color and Eye Color. There’s also a Randomize Button, which will randomize all options, not just the ones in the current tab.
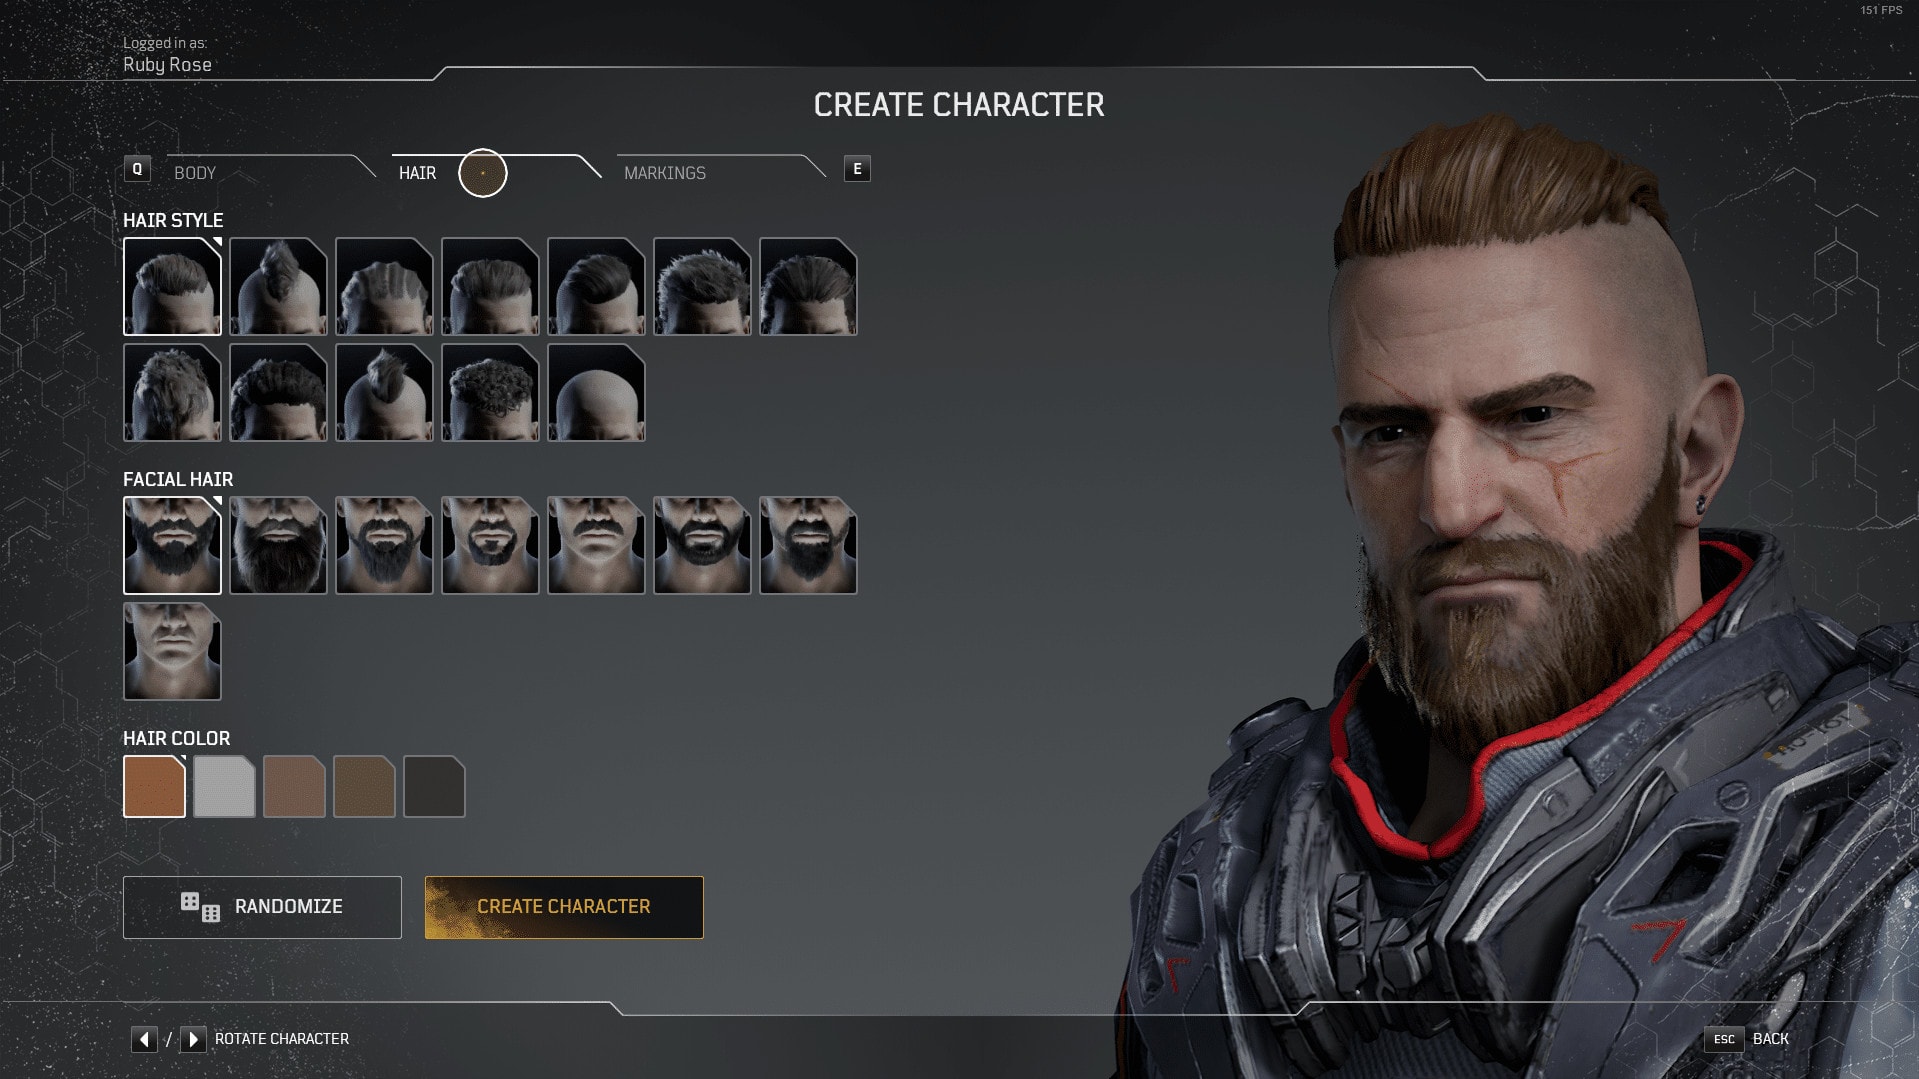
Next is the Hair tab. This set of options let’s your choose your Hair Style and Hair Color. If you selected the Masculine option, you’ll also have access to Facial Hair options as well. Both Gender Identity options will have a few styles the other don’t so be sure to play around with what ones you like best.
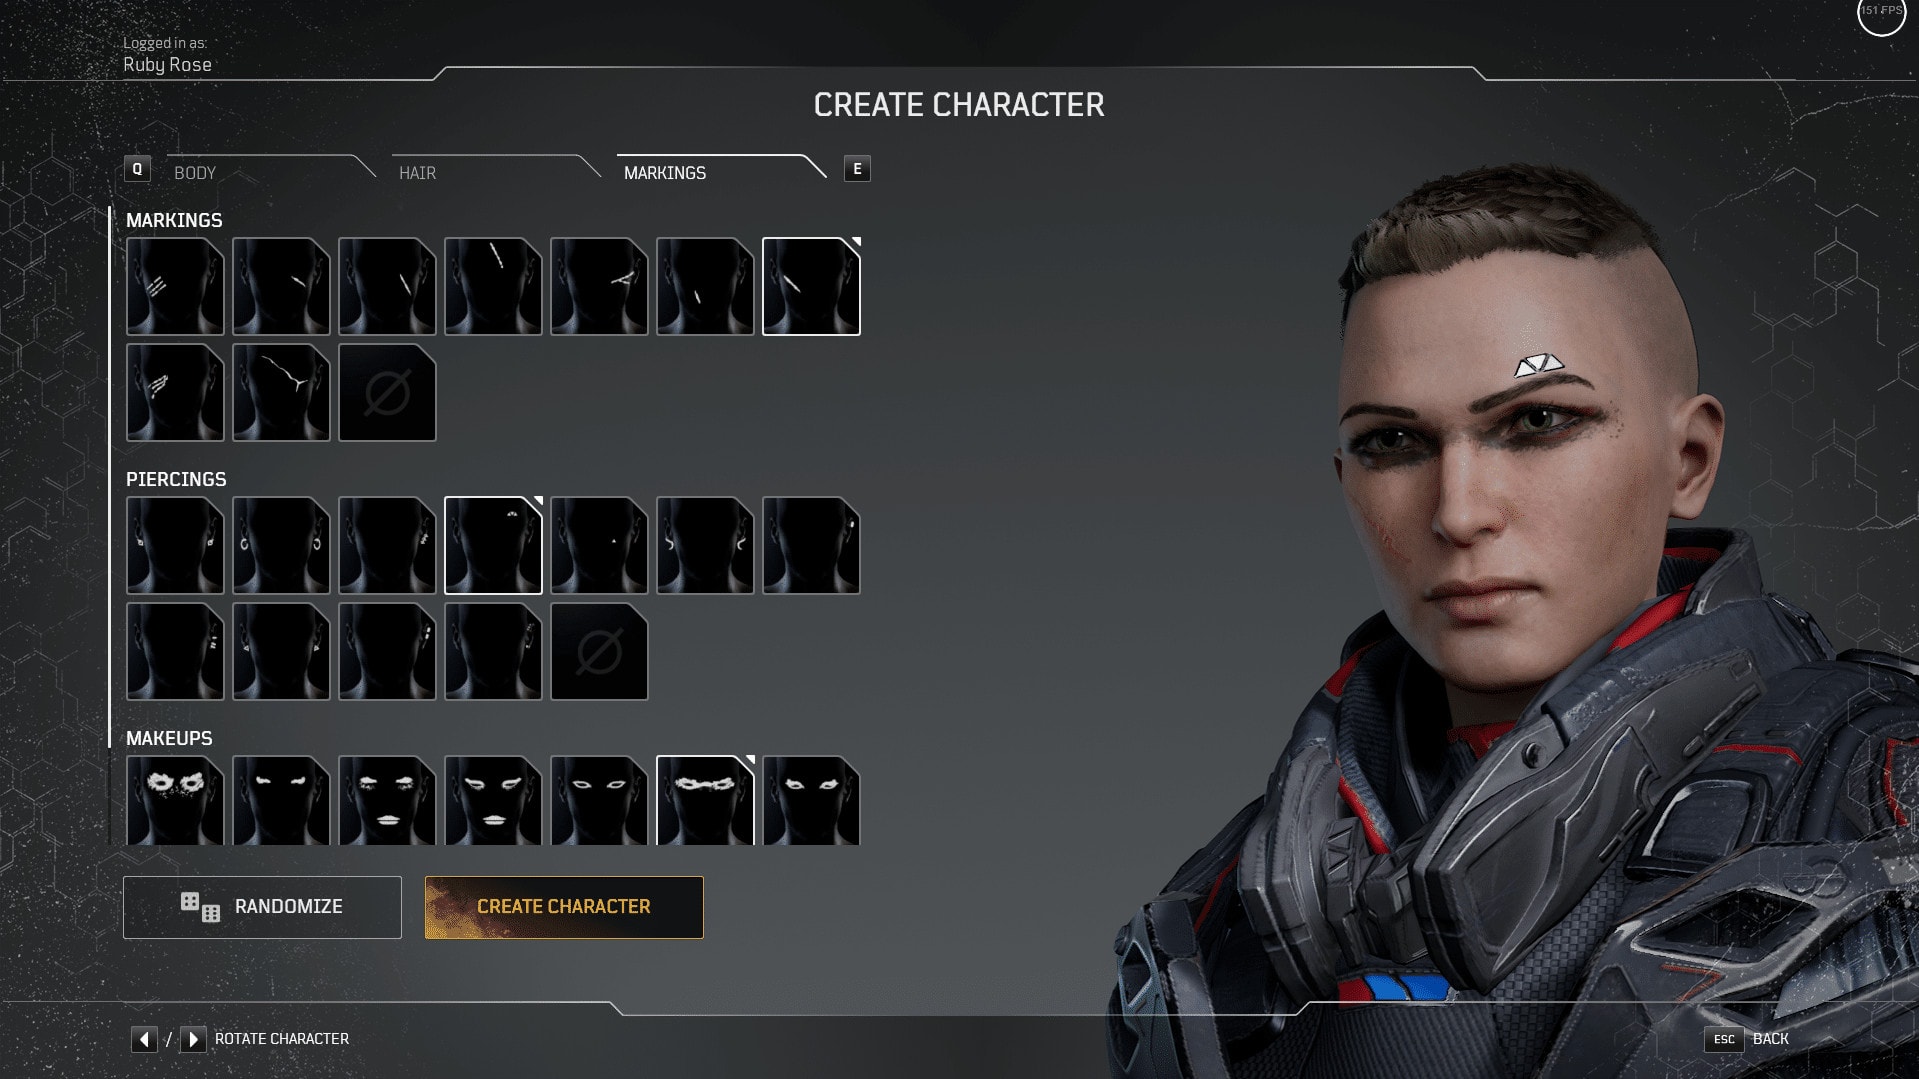
There’s the last physical customization options, Markings. This section will let you change your Markings and Piercings. Additionally, if you chose the Feminine Identity option to start with, this section allows your to change your Makeup. Though, the Makeup is closer to War Paint if anything.
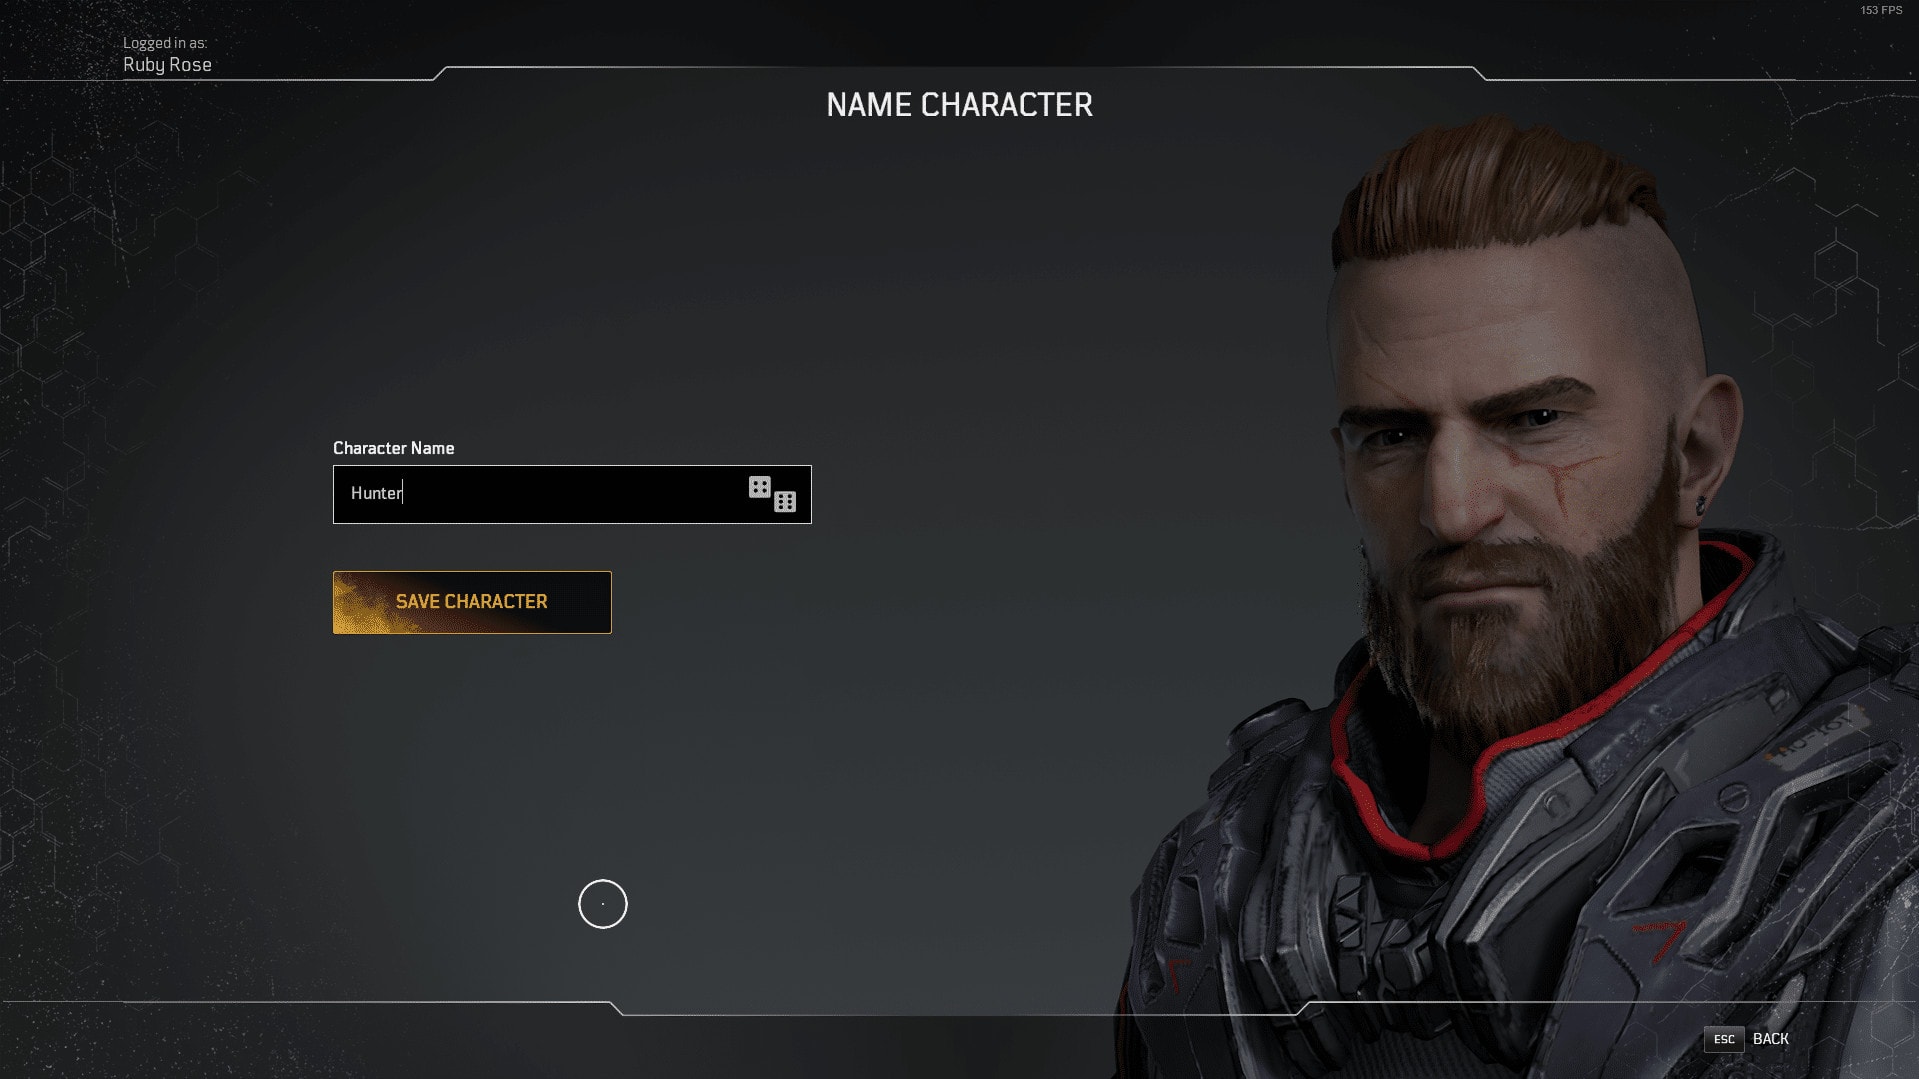
Finally, you get to name your Outrider. This also has a random option and will randomly suggest a name for your Outrider, based on your Gender Identity that was chosen. In this case, since I chose Masculine in this example above, it suggested the name Hunter.
Game Lobby UI
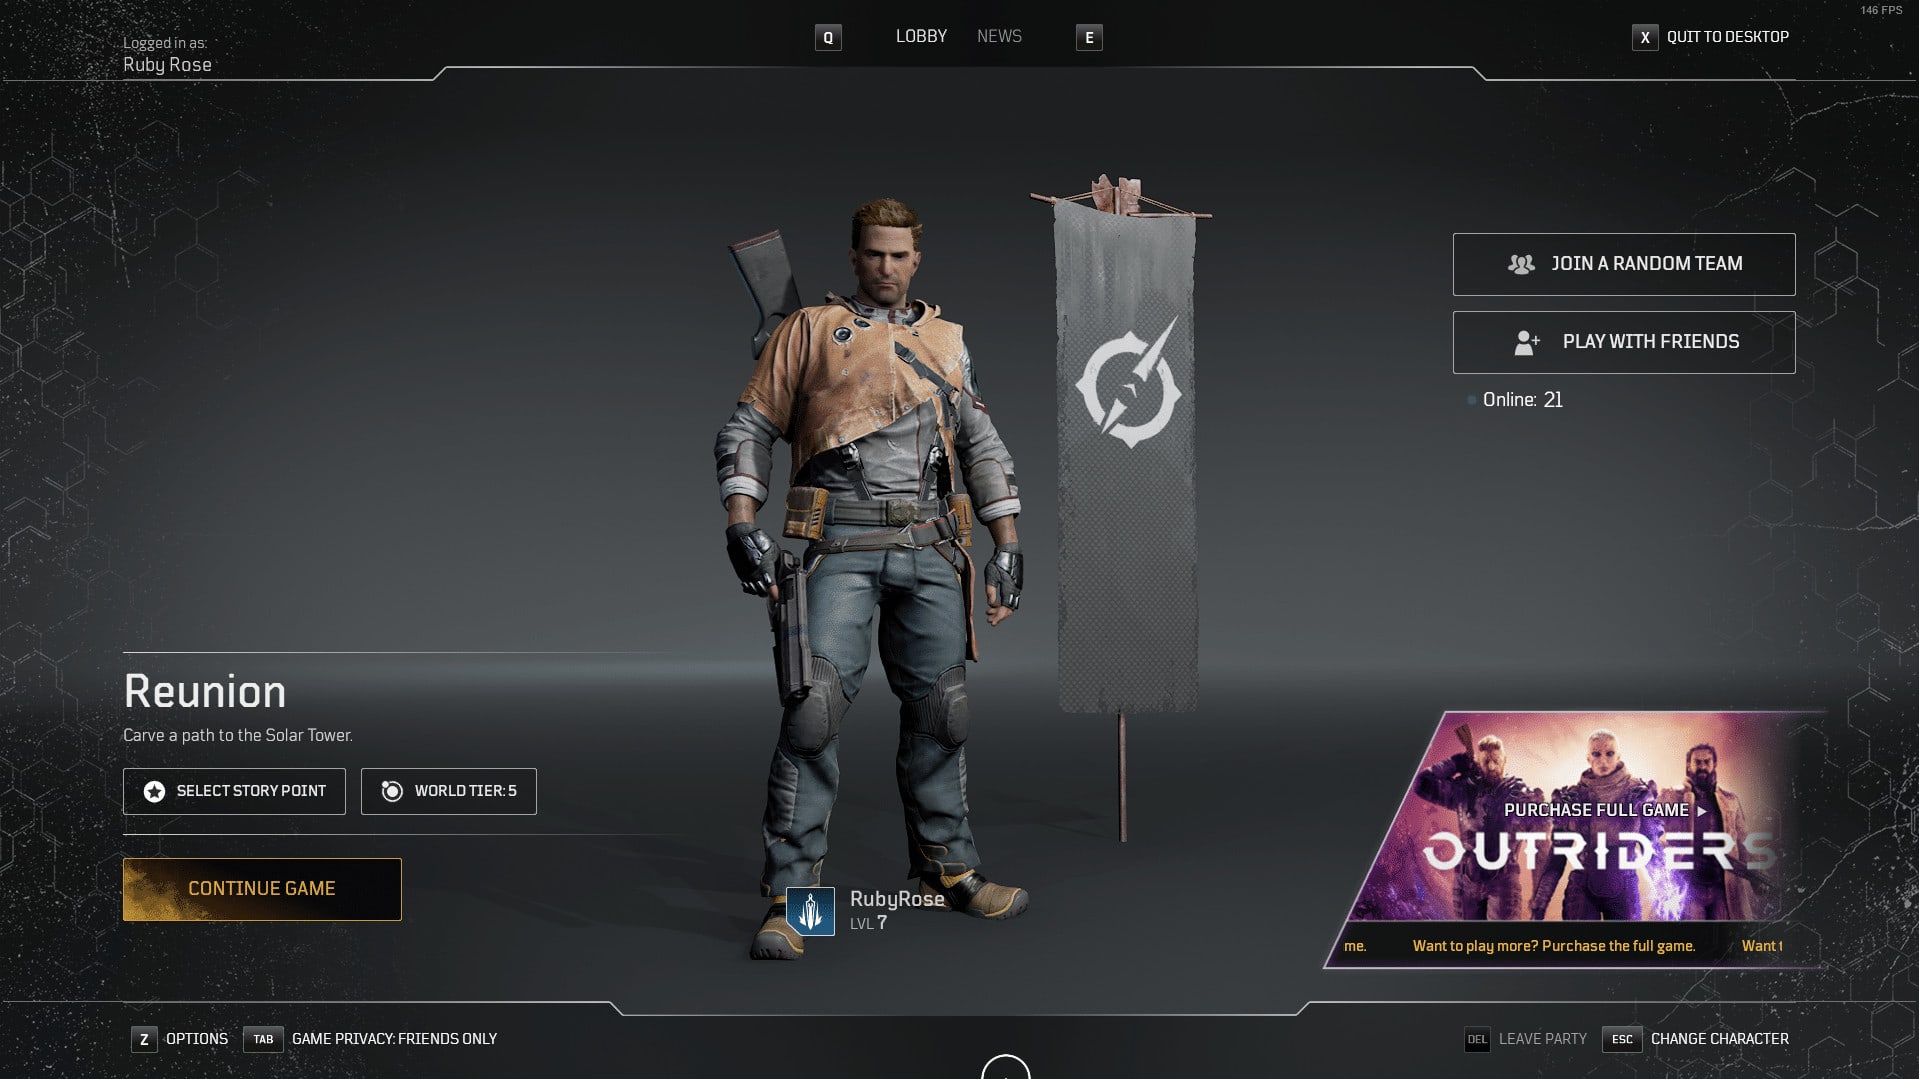
There’s nothing too fancy on this screen itself to talk about, but this is the UI for the Game Lobby. You’ll see this every time you login to Outriders after making your first character.
Matchmaking Options
In the upper right, you’ll notice two options here. Join a Random Team and Play with Friends. These are your matchmaking options. There’s also a lobby option in the lower left for Game Privacy, which determines who can join your party while you play through the matchmaking options.
Join a Random Team will just matchmake you with people, It should typically match you with players of similar story progression, but I haven’t used it personally.
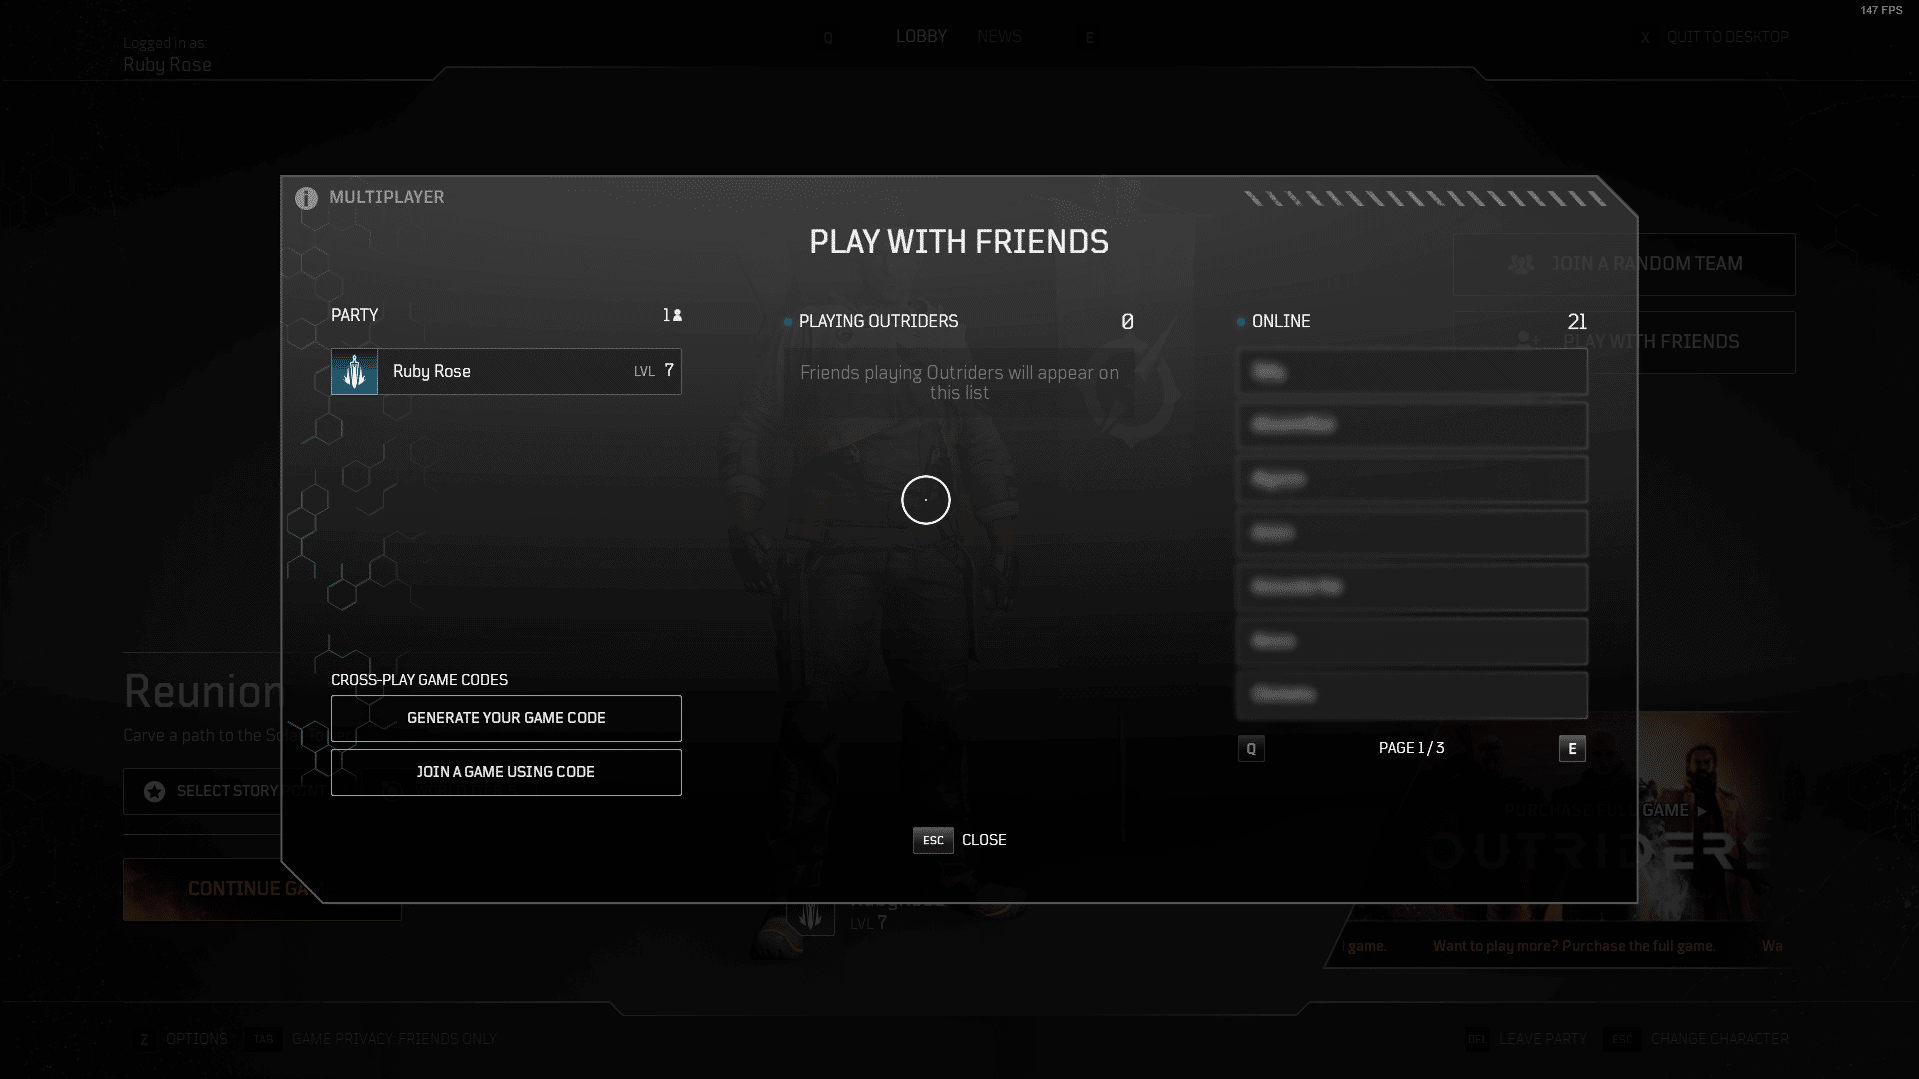
Play with Friends actually has it’s own UI, as shown above. Here you can see a few things. Your Party, Friends Playing Outriders and Online Friends are the main things, but there’s also Cross-play Game Code options.
Party displays the players currently in your party, which has a max of three including yourself. Playing Outriders and Online show you if you friends are online or playing on your platform, in my case Steam.
Cross-Play Game Codes also have it’s own UI, but it’s very simple. Mostly displaying a copyable game code when selecting Generate a Game Code, or a prompt to input a game code when selecting Join a Game Using Code.
Switching Story Point

When clicking the Select Story Point option in the Game Lobby, you will be taken to the above UI. Each part of the Outriders Story is broken into Chapters. Chapters are then broken down into Story Missions. This UI let’s you replay the story without having to sacrifice your levels and World Tiers by committing to making a new character.
Chapters are the sections of the timeline shown across the top of the UI. The Chapters can be changed by hovering and selecting them, or by pressing the corresponding buttons next to the Select a Story Point text.
Story Missions are the list of Story Points shown on the right. Similarly, these can be hovered and selected to choose the Story Point you wish to start at when loading in.
Selecting World Tiers
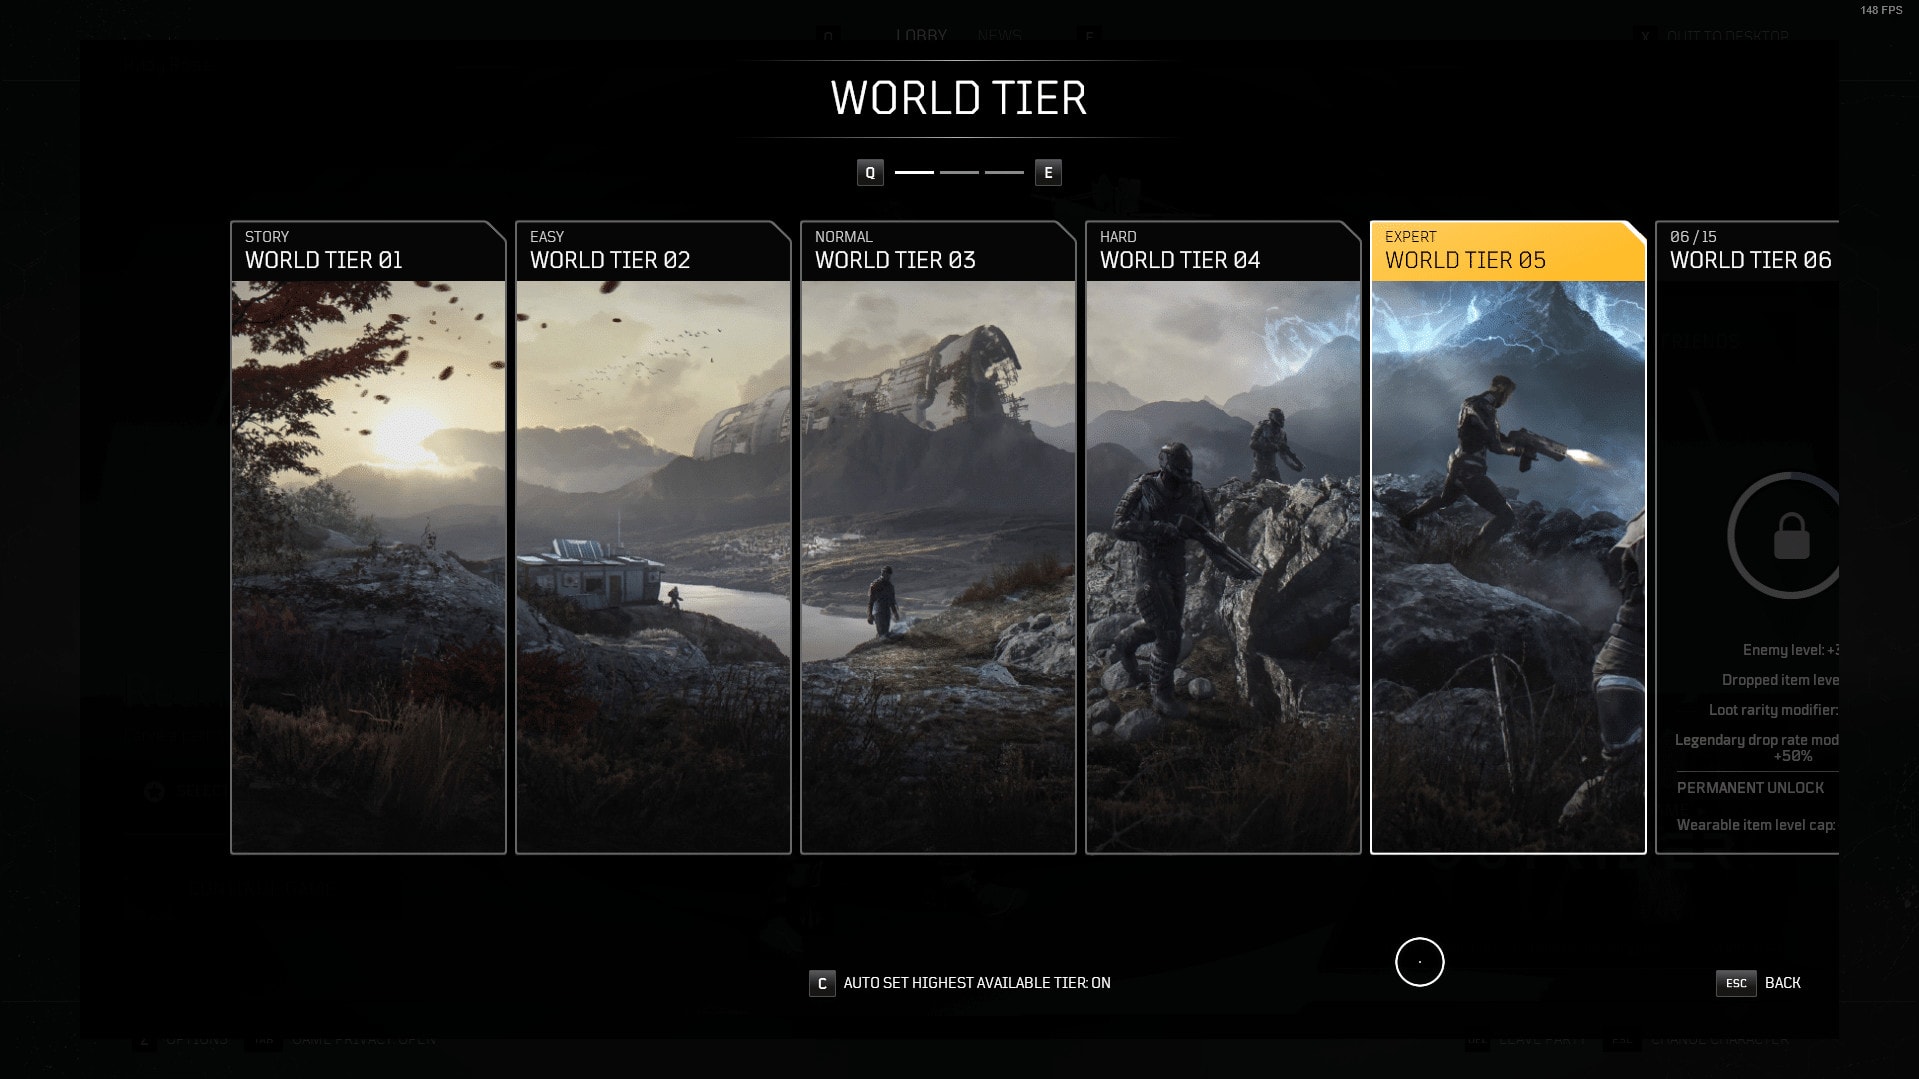
When selecting the option to change your World Tier, either from Game Lobby or the Options Menu in-game, you will be taken to the Above UI. World Tiers are your Difficulty options in Outriders and being able to change them at will is a pretty nice feature. They affect Enemy Level, Item Level, Drop Rarity and even give a bonus chance for Legendary items to drop.
On this UI you can hover and select your World Tier. Selecting the Furthest Right option (World Tier 6 in the above example) will scroll to the next set of 5. You can also scroll this menu using the corresponding buttons shown at the top of the UI.
Finally this menu, as well as the option menu, have the Option to automatically set your Highest Available World Tier. This is enabled by default, and is very handy. As you progress through the Story and unlock World Tiers, they switch as soon as they become unlocked, even in the middle of combat. This will allow the difficulty to jump, but also allow you to get more powerful drops as well.
Outriders Top Menu Bar Navigation
The bulk of the menus and interactive screens are all collected in the top menu bar that appears when you open either of the screens described below. This main top bar navigation is the best and shortest way for you to manage your character’s stats, skills and customizations to your banner and emotes. The top menu bar navigation is also known as the Hero Menu.

Crafting Menu
The Crafting system in Outriders is quite an unusual one. You are not actually crafting new items from raw materials, like you would in other games, specifically Looters and RPGs.
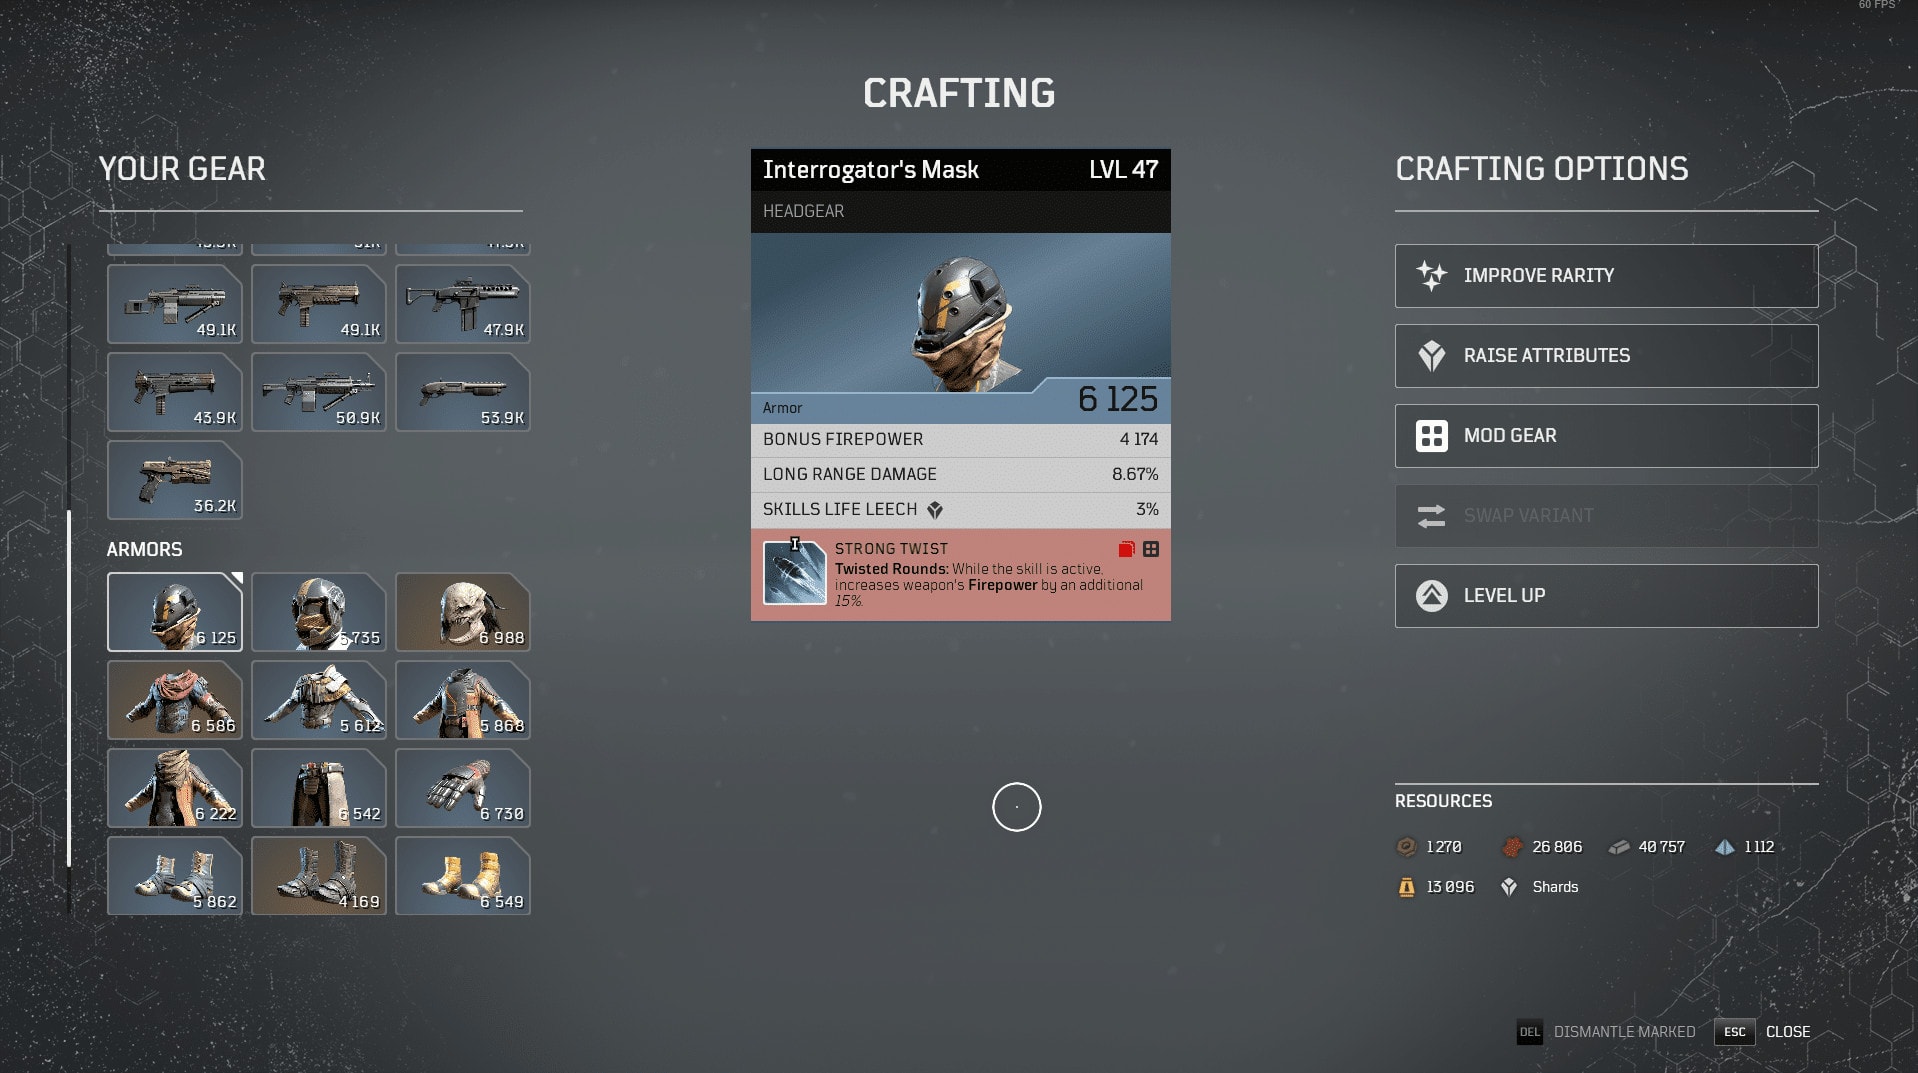
In Outriders crafting is only used to upgrade, tweak and level up items you loot or earn through missions.
To get access to crafting, you will need to speak to a certain NPC. To meet this character and be able to use their services, you need to progress into your main storyline. I will not reveal how and when exactly this happens, but this moment is baked into the game, so you cannot miss it.
There are a lot of elements to discuss in the Crafting window, so we have a full separate guide to how crafting works in Outriders for that.
Journal Page
Every time you learn a new piece of lore or interact with a lore object in the world of Outriders, a new entry will be logged on this page. Here you can learn new and interesting details about the characters you interact with, piece together the puzzle of all past events on Earth that forced humanity to search shelter on this foreign dangerous world and more.
Each time you receive a new entry in your journal, a notification will be displayed on your screen as you play and you can always check out the new entry right on the spot.
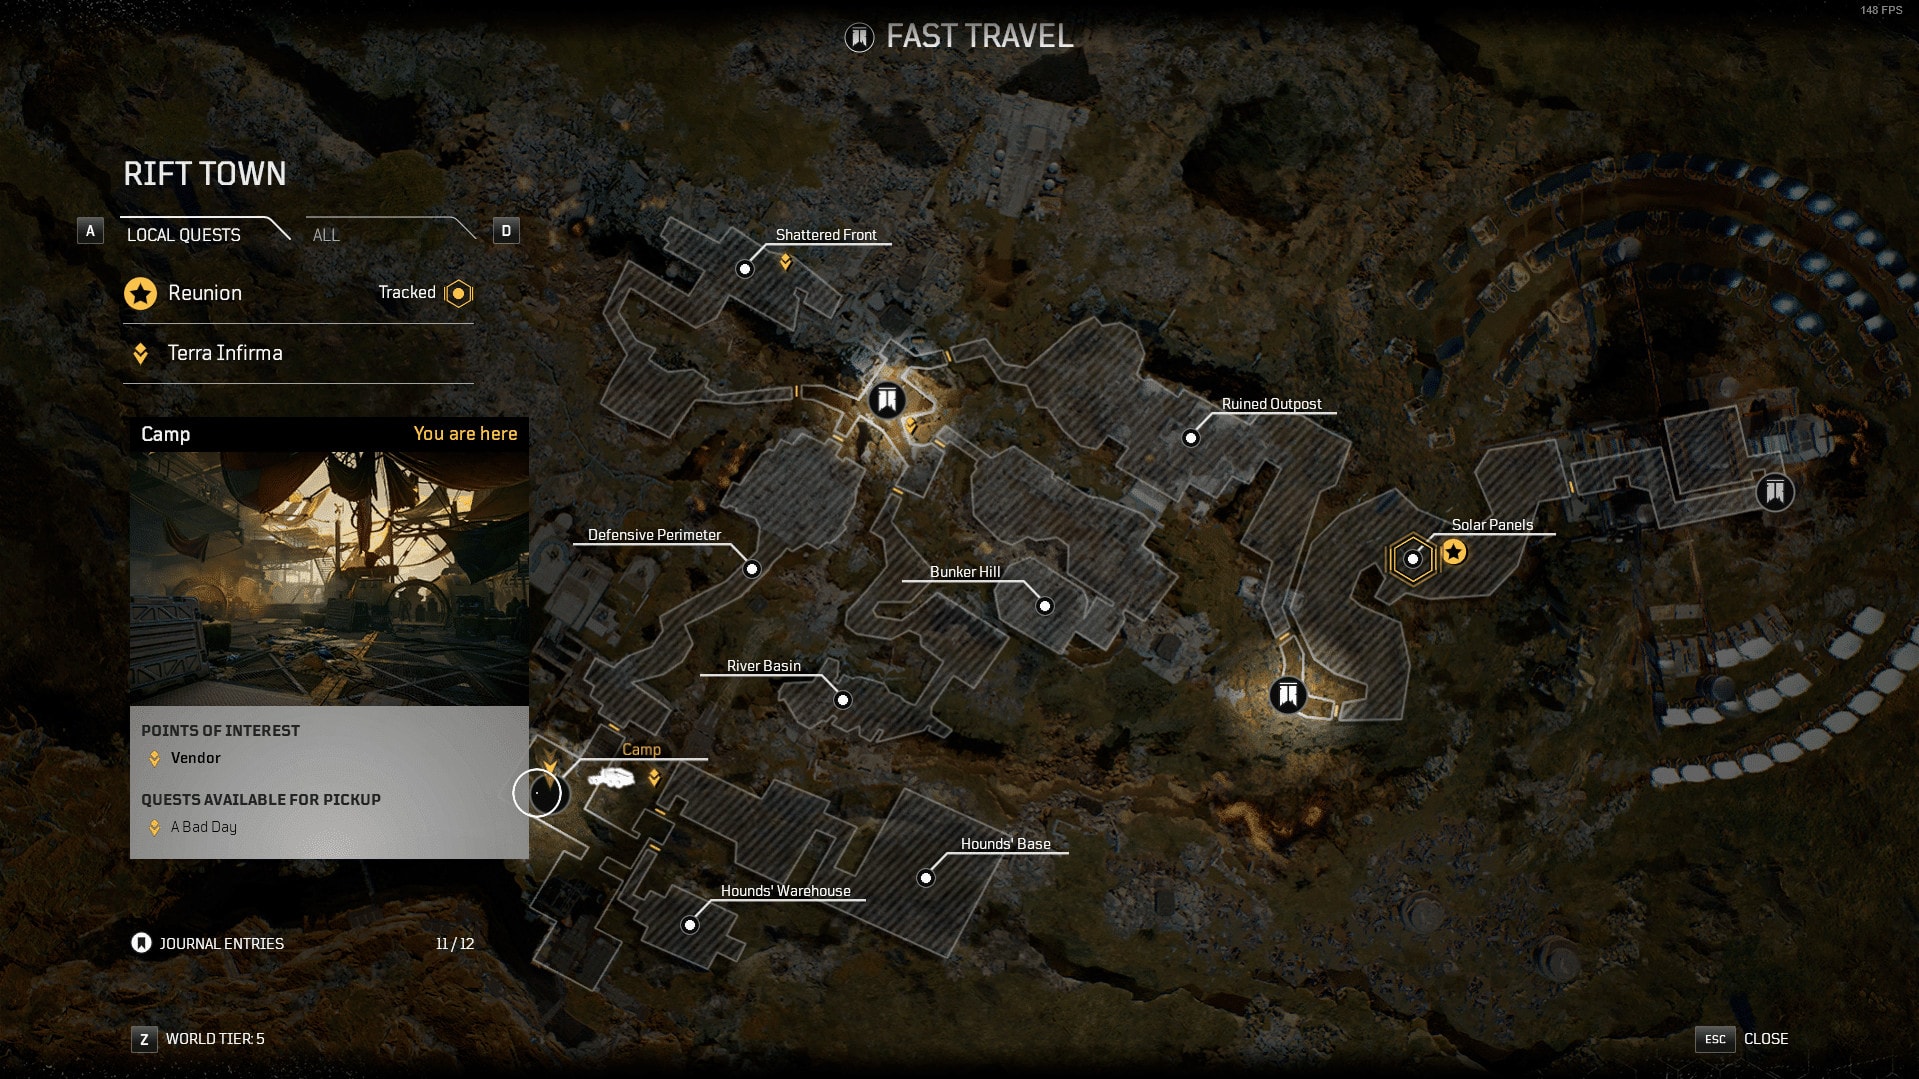
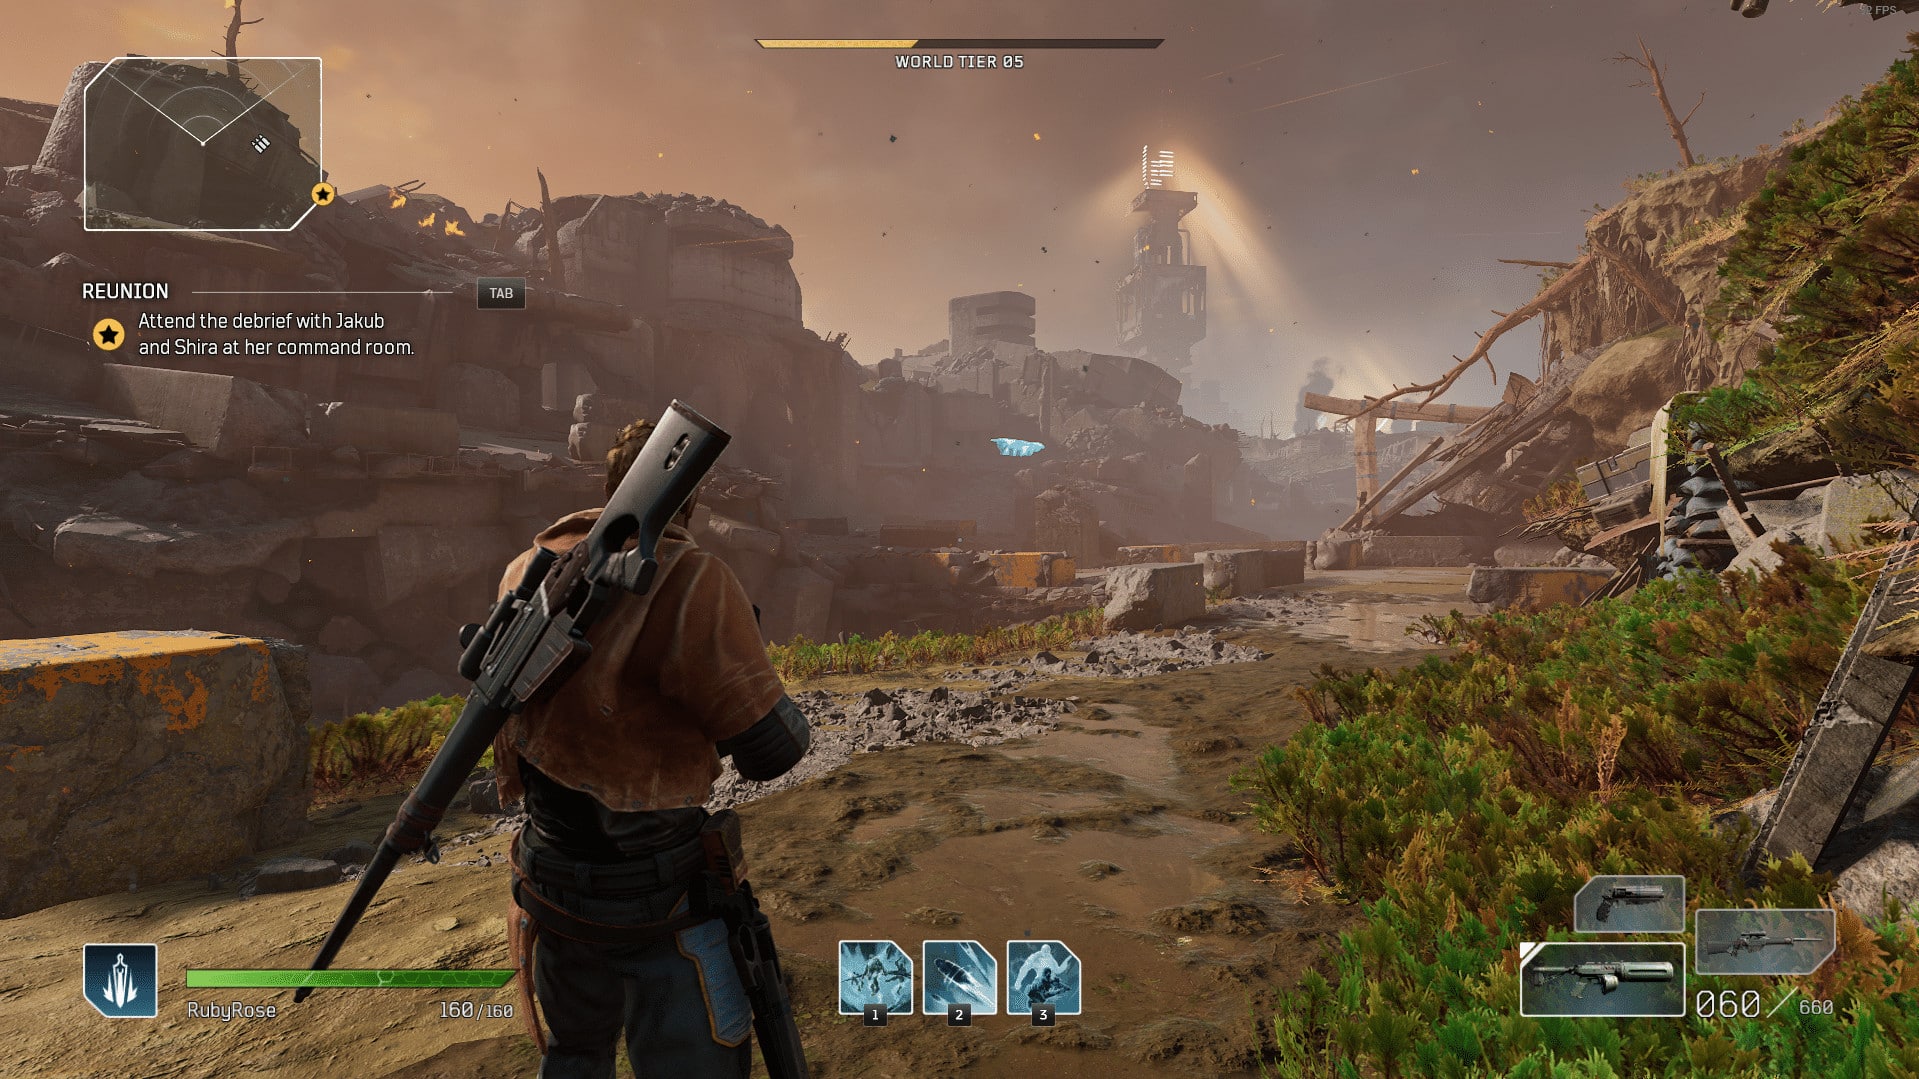
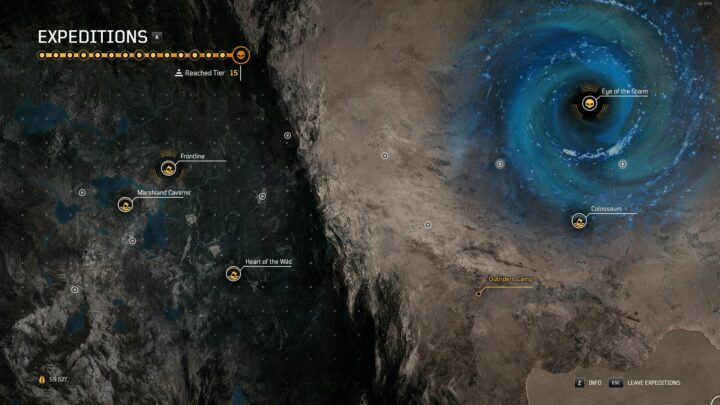
Quest Map
All of your main and side quests will be listed on the world map. This makes it very easy for you to navigate through the world. All of the spawn/teleport locations will also be listed on the map alongside any names of new areas and sections as you explore Enoch.
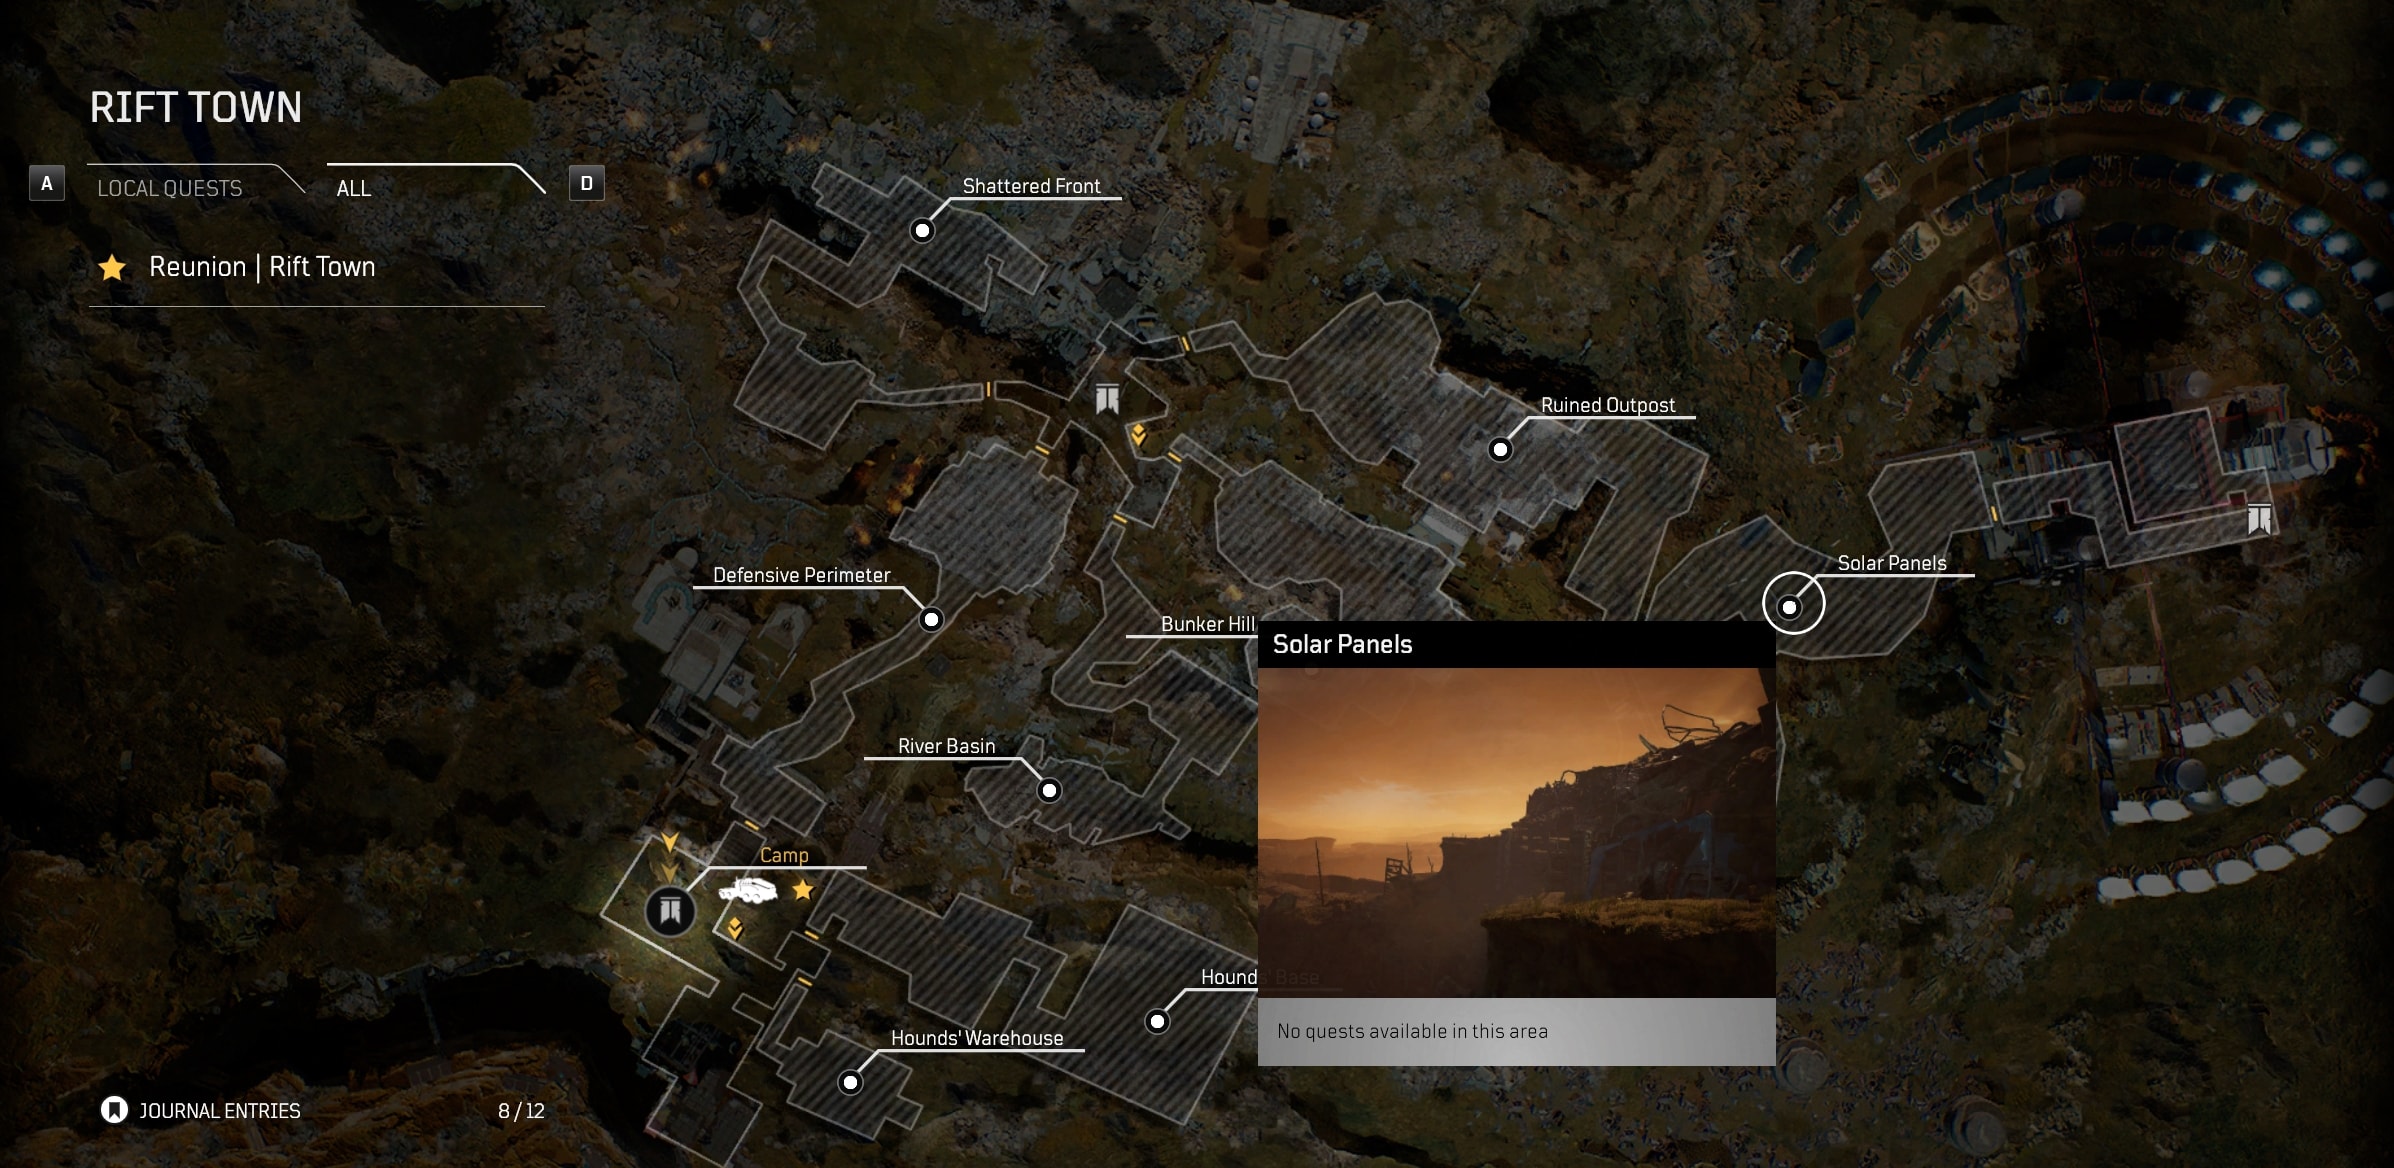
Most of the side-quests in Outriders are repeatable and they will all be marked on your world map to show you where to go to pick them up if you decide that farming this or that encounter is your favorite thing to do today.
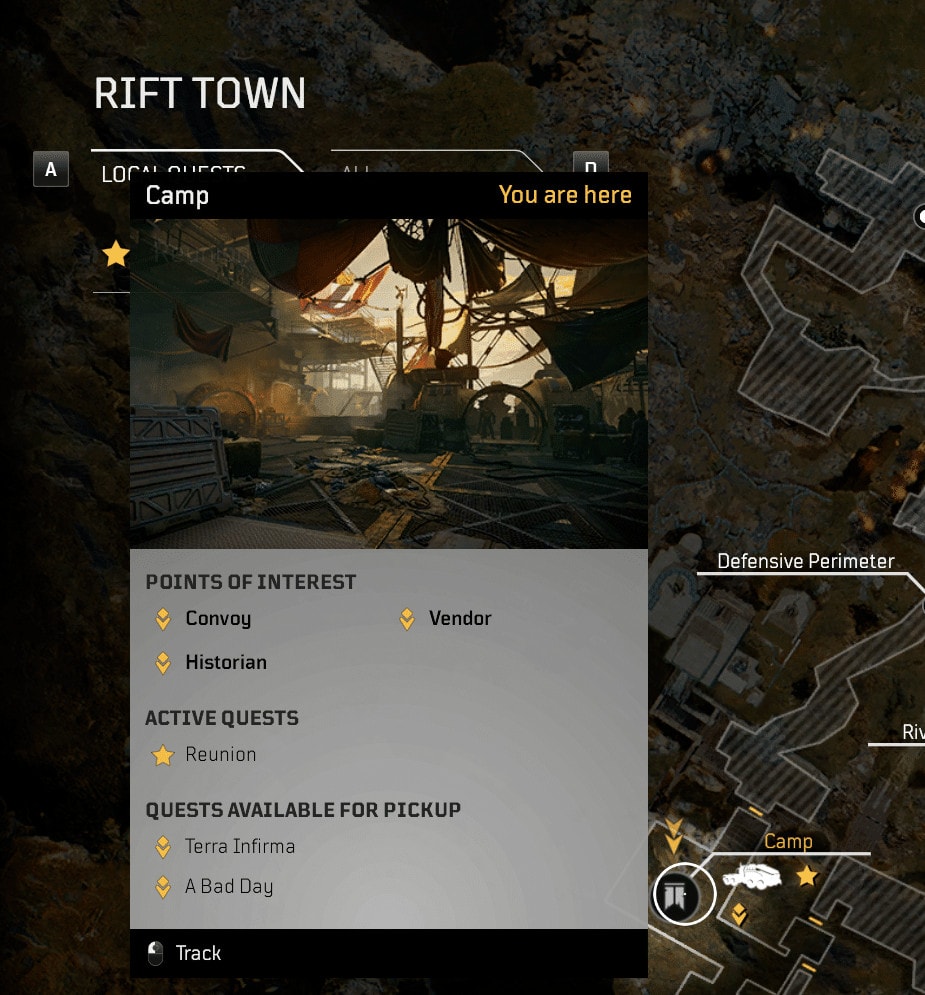
If you mouse-over an object on the map, a pop-up window will appear with a brief information what this area and all of the activities you can do in it. This is especially useful for camps and bases, such as the started camp shown in the image above.
One of the ways to change your World Tier (the difficulty of the game and the rewards you gain for completing quests and defeating enemies) is from the bottom left corner of the world map screen.
Inventory Screen
The inventory screen is arguably the one you will use most often, especially while leveling up and in early EndGame gearing progress. This is the place that shows all of your stats and how they interact with each other, what gear you have selected and detailed info about each gear piece.

The Inventory is split into three segments:
Left side – weapons and materials
Here are the slots for your main, secondary weapons, side arms. Below them you see the crafting materials and resources you have gathered.
Middle Area – appearance and stats
In the middle you will see the current appearance of your character. This is the place where you can also check out all of your character’s stats (by pressing SHIFT on PC or corresponding button for consoles)
Right Side – Armor
On the right side you have five slots: Helmets, Body Armors, Pants, Gloves and Boots. Each one of those represent an individual piece of gear you can collect or craft and place into that slot to gain the specific benefits the gear piece offers you.
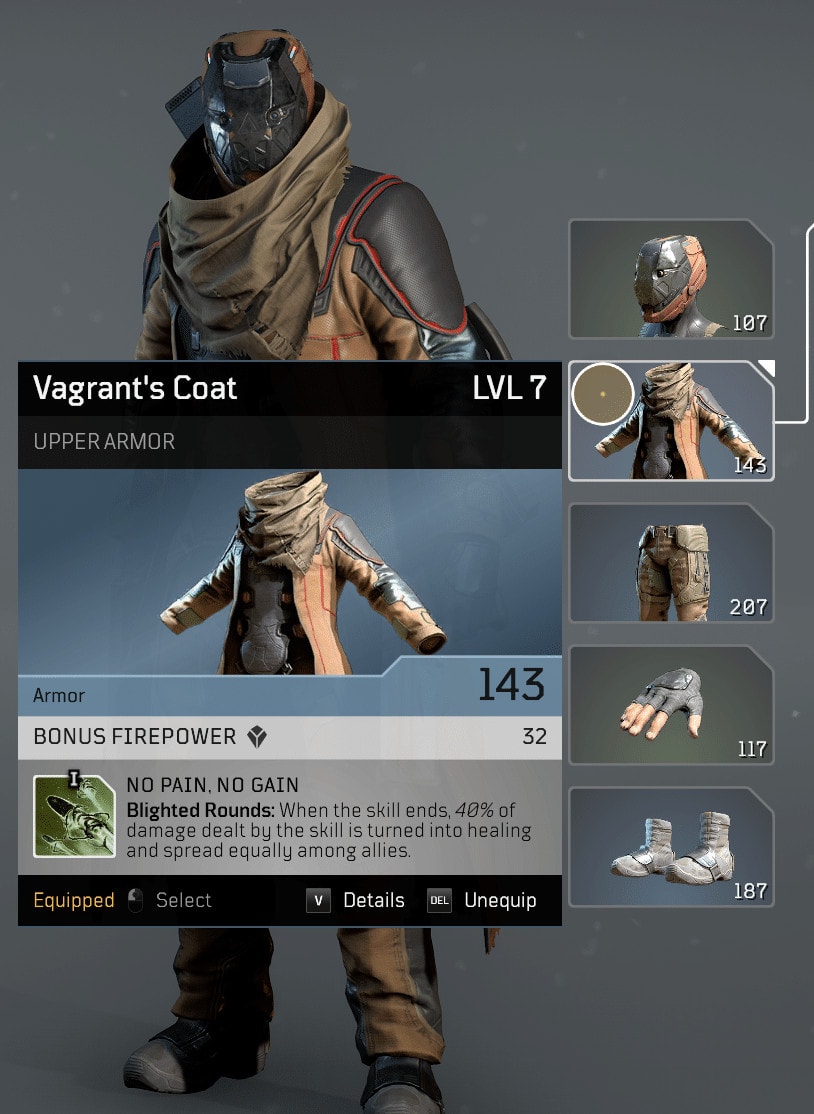
When it comes to Gear, we have a very detailed and helpful guide on how gear works in Outriders. You should check it out to learn what gear means for you, how to get it, why you should get better gear and when does your gear matter the most.
Skills
The Skills Screen is the best place to review and choose your currently active skills for your character. You will always have only three Skill Slots and you can learn up to eight different and unique skills on every one of the four characters.
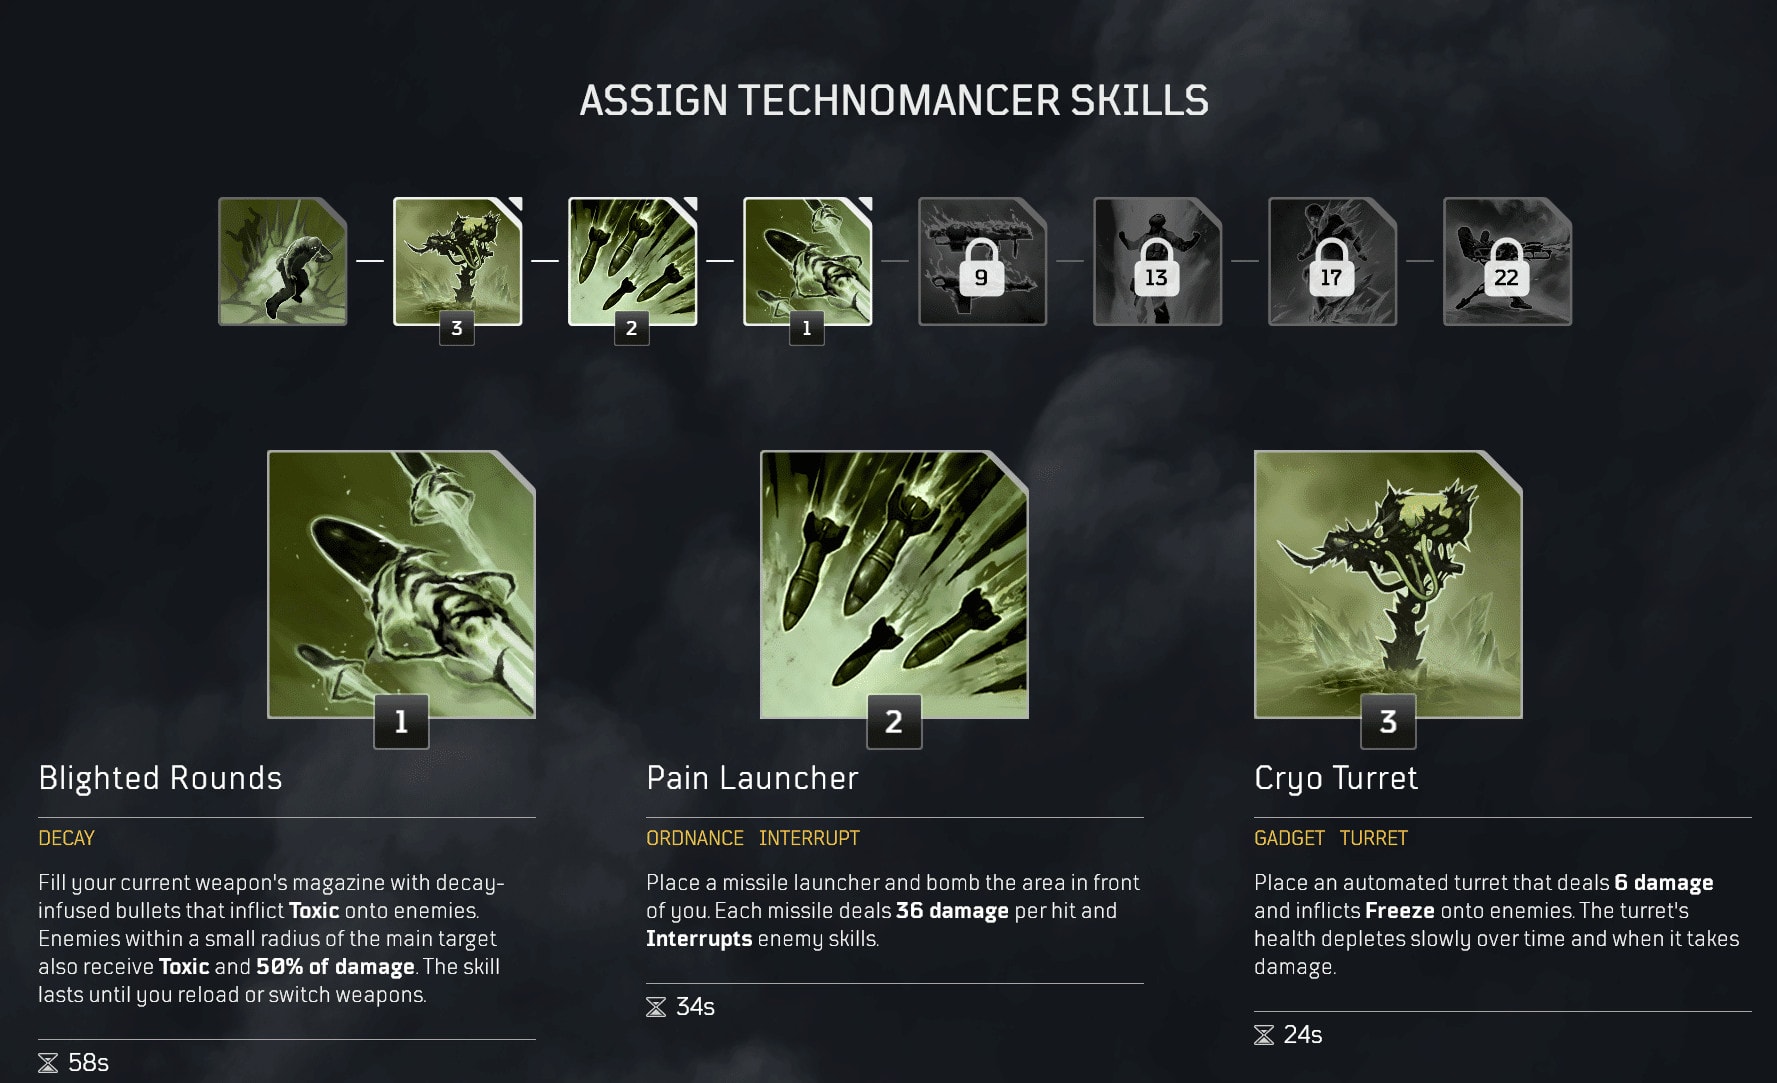
On this screen you can compare skills’ effects, duration, cooldown and more. Mouse over a skill to get a brief animation preview of how this skill works in combat and visual demo of what it looks like.
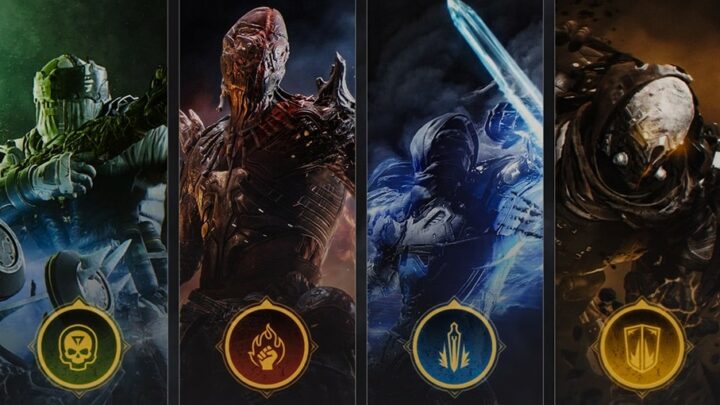
I strongly suggest you take a moment to read the Outriders Classes and Roles Guide I have written earlier. It’s the perfect place to learn which class does what, how they differ from each other and how to choose your own one.
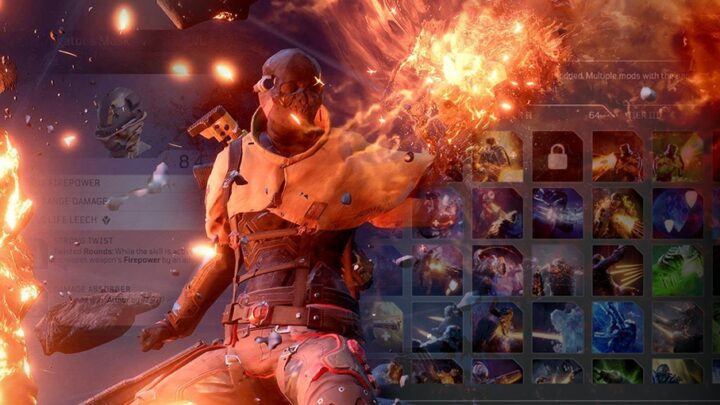
Class Tree
The Class Tree screen is where you will create your own personalized builds. Each class has three different paths with a number of smaller and bigger nodes that you can activate as you level up and gain Class Points (displayed in the lower left corner)
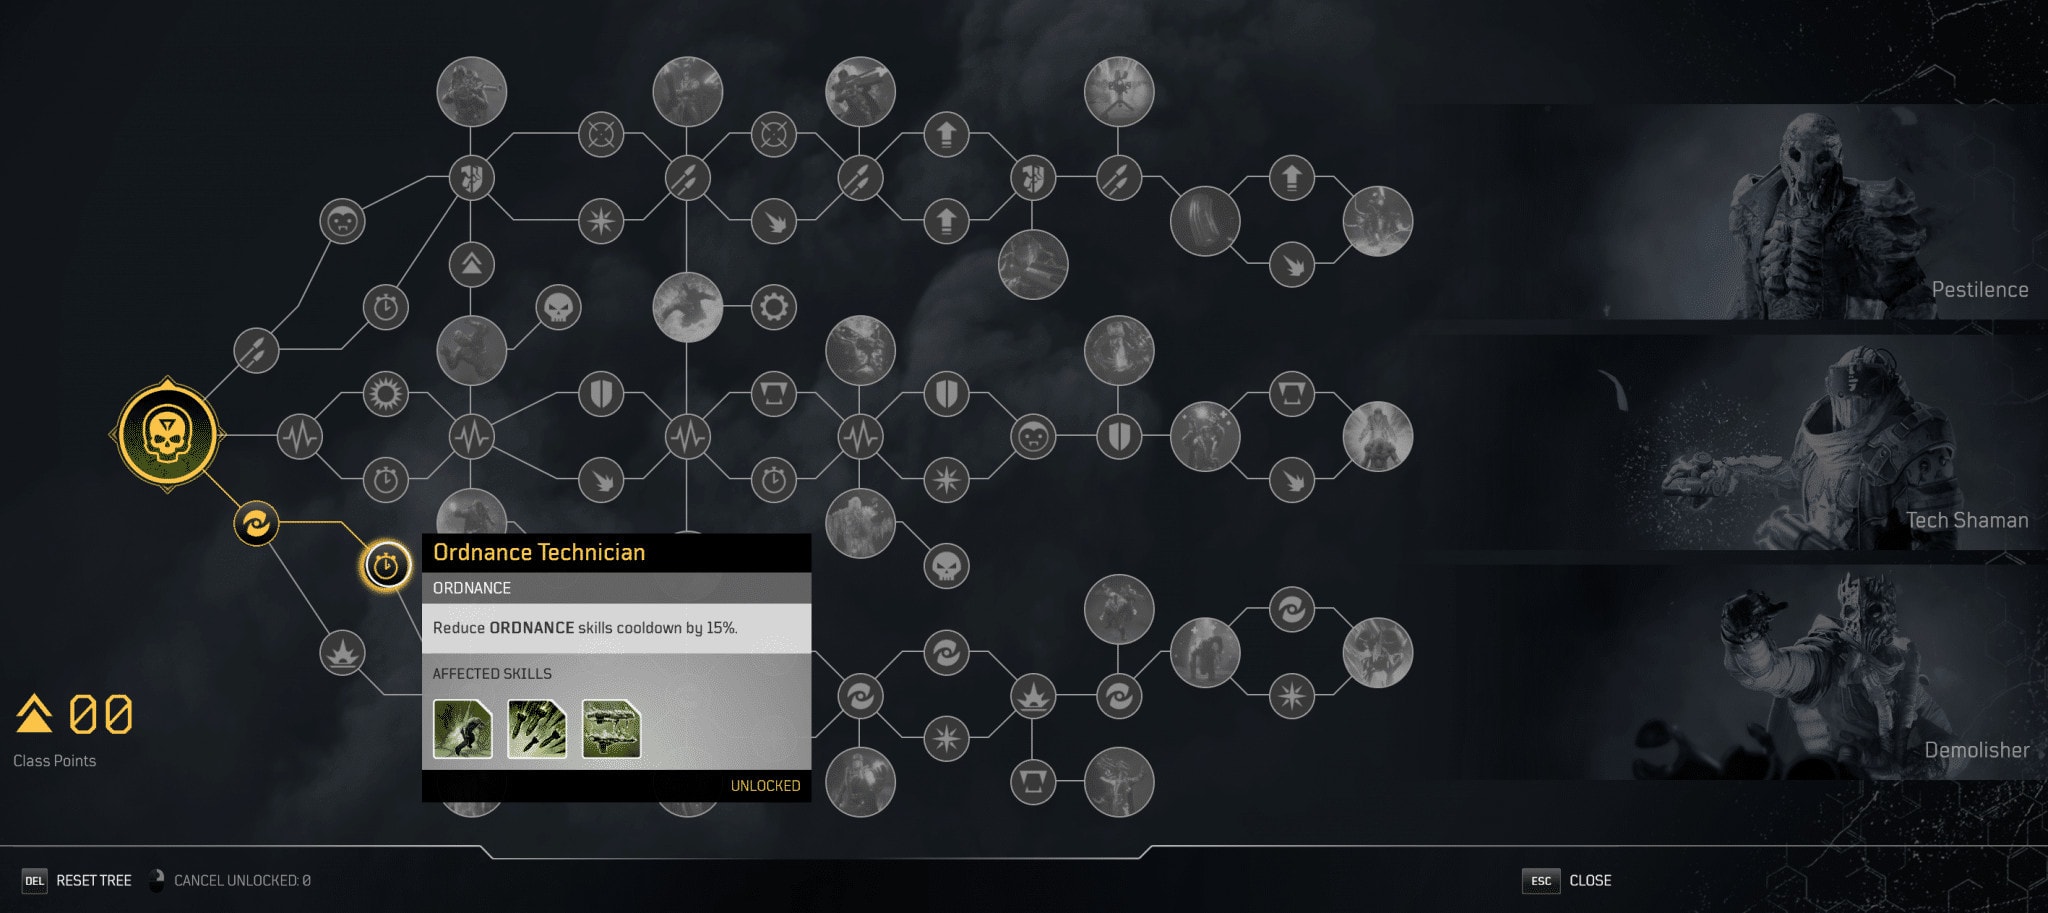
When you mouse over a node, you will get a pop-up window with more detailed information what bonuses you will gain from spending a Class Point to activate it.
People Can Fly want you to experiment with your builds. That’s why there is no penalty for resetting your Class Tree progress. You can reset your points, get them all back and spend them in a different way.
To find out which tree does what exactly and how to properly build your character in Outriders, check out one of the four in-depth Outriders Class Guides:
- Outriders Devastator Class Guide and Best Builds
- Outriders Pyromancer Class Guide and Best Builds
- Outriders Technomancer Class Guide and Best Builds
- Outriders Trickster Class Guide and Best Builds
Accolades
For the completionists among you the Accolades screen is where you can track your progress on any achievements you have left and rewards you still haven’t earned.
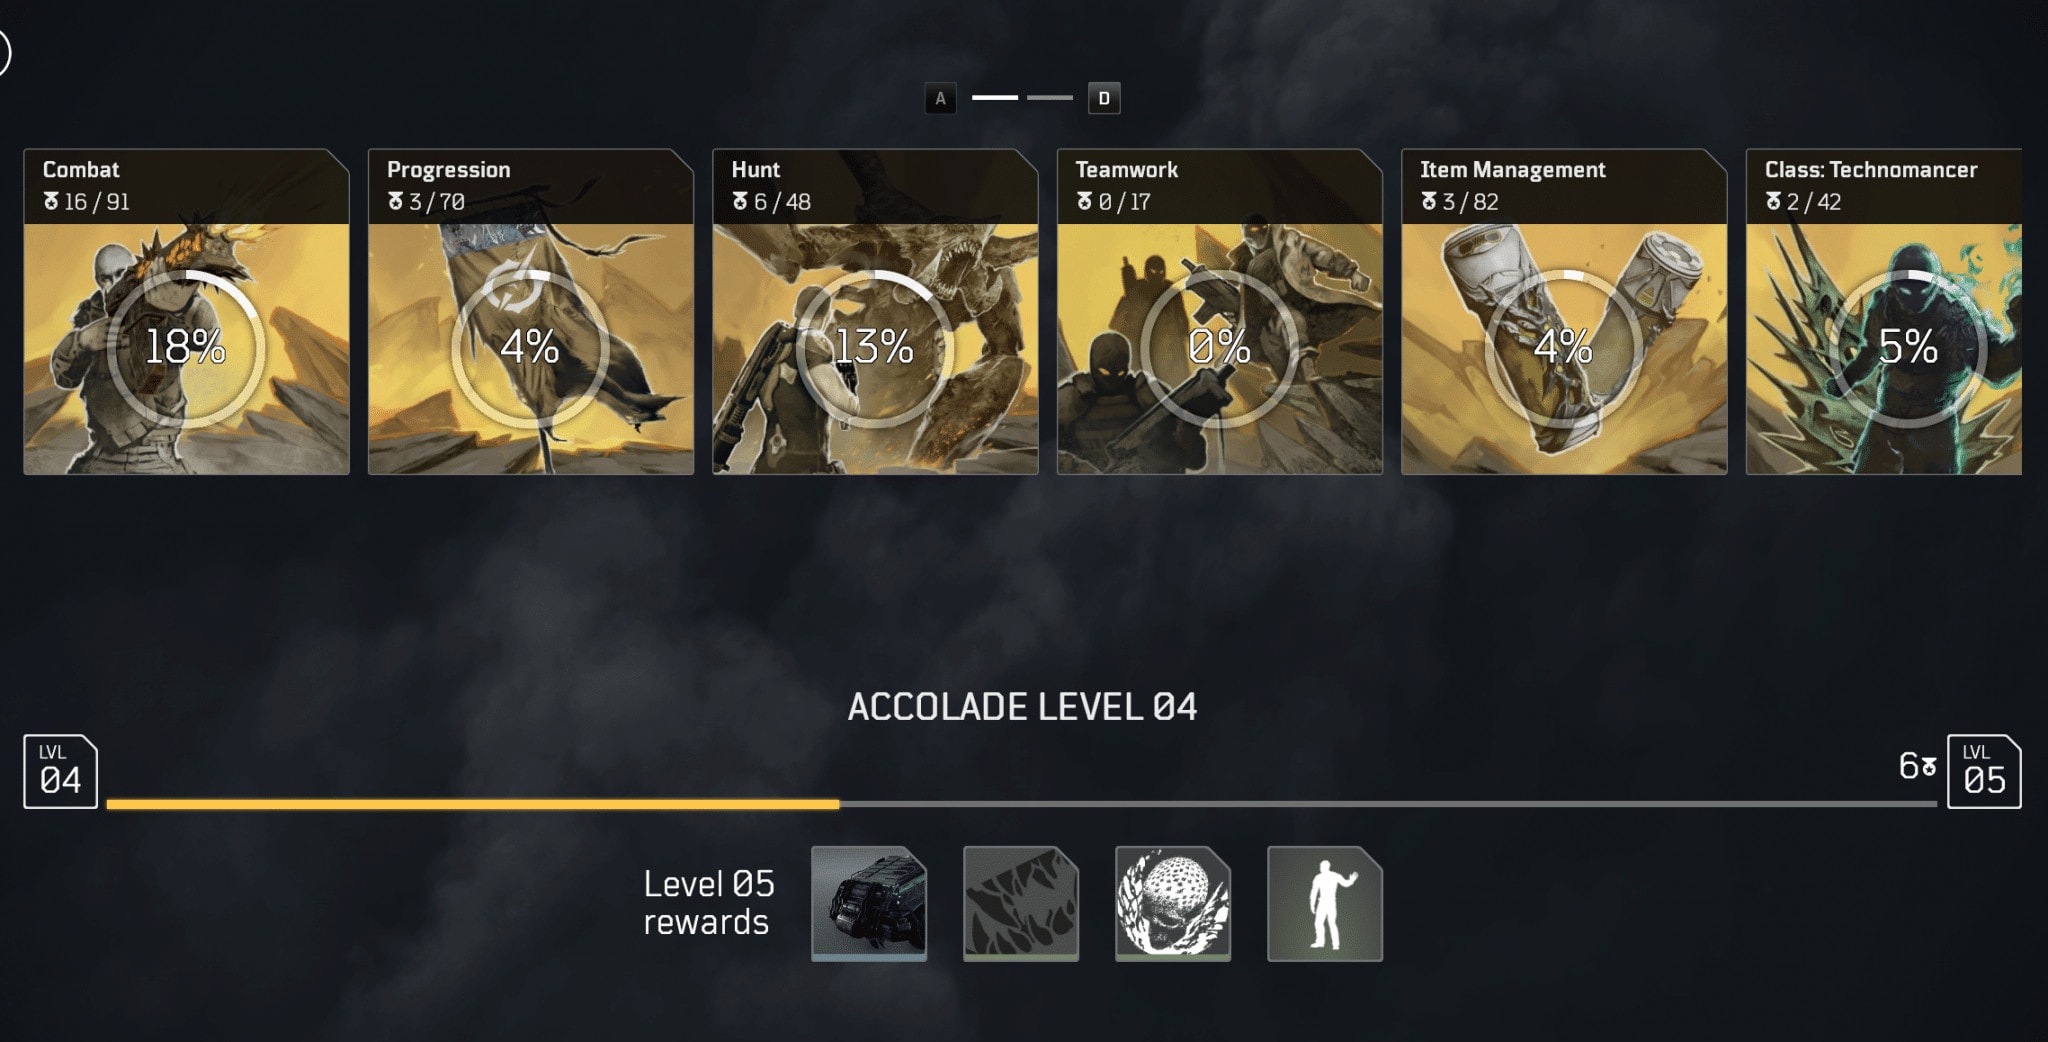
We will have a more in-depth Accolades Guide very soon. This is only your brief introduction to the screen, part of the top bar menu navigation.
Customization Menu
The final element in the top menu navigation is the Customization Menu. This opens up a page, where you can customize your banner.

When you enter the Customization Menu, you will then see on the top right a yellow button to get you back to the “Hero Menu”, which is the above-described top menu bar navigation.
There are three tabs with customizations available:
- Locked – to be revealed later
- Banner – customize your personal banner
- Emotes – unlock various emotes to use in gameplay
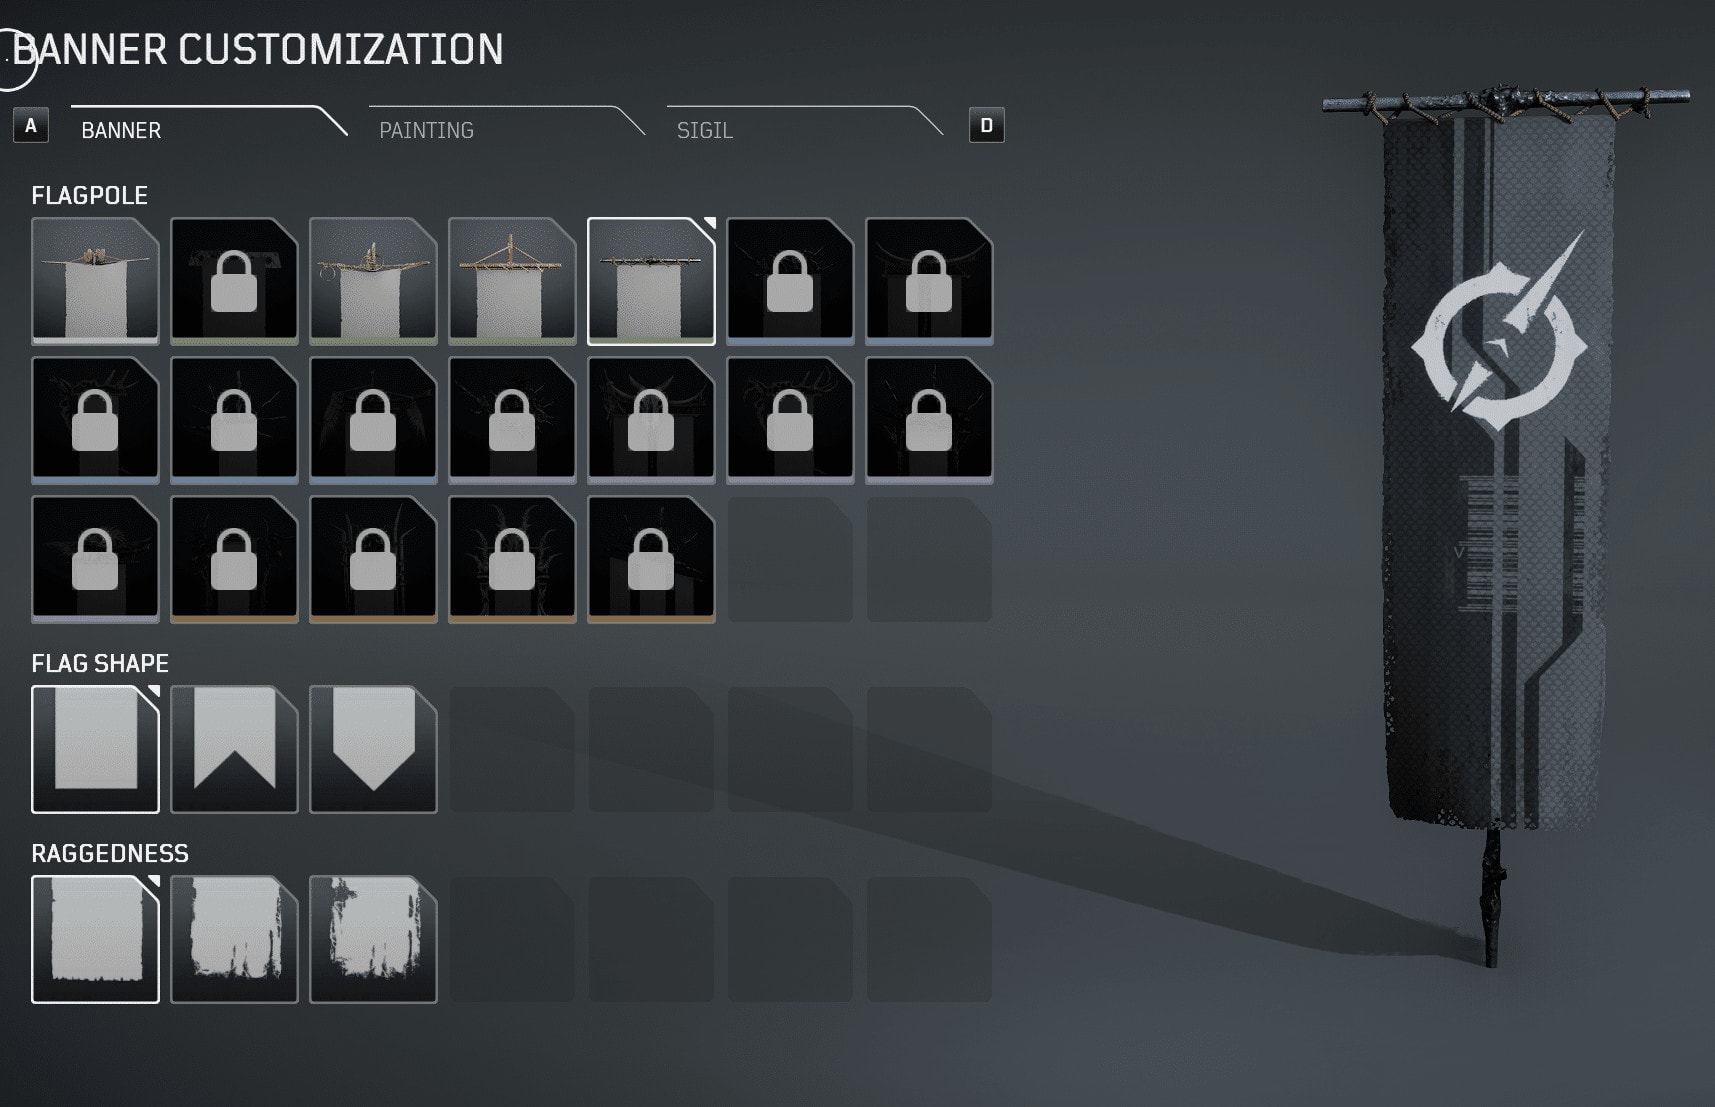
Banner Screen
The banner sub-menu has the following three tabs:
Banner
Here you can change the visual appearance of the frame that supports your personal banner and the shape of the cloth piece itself.
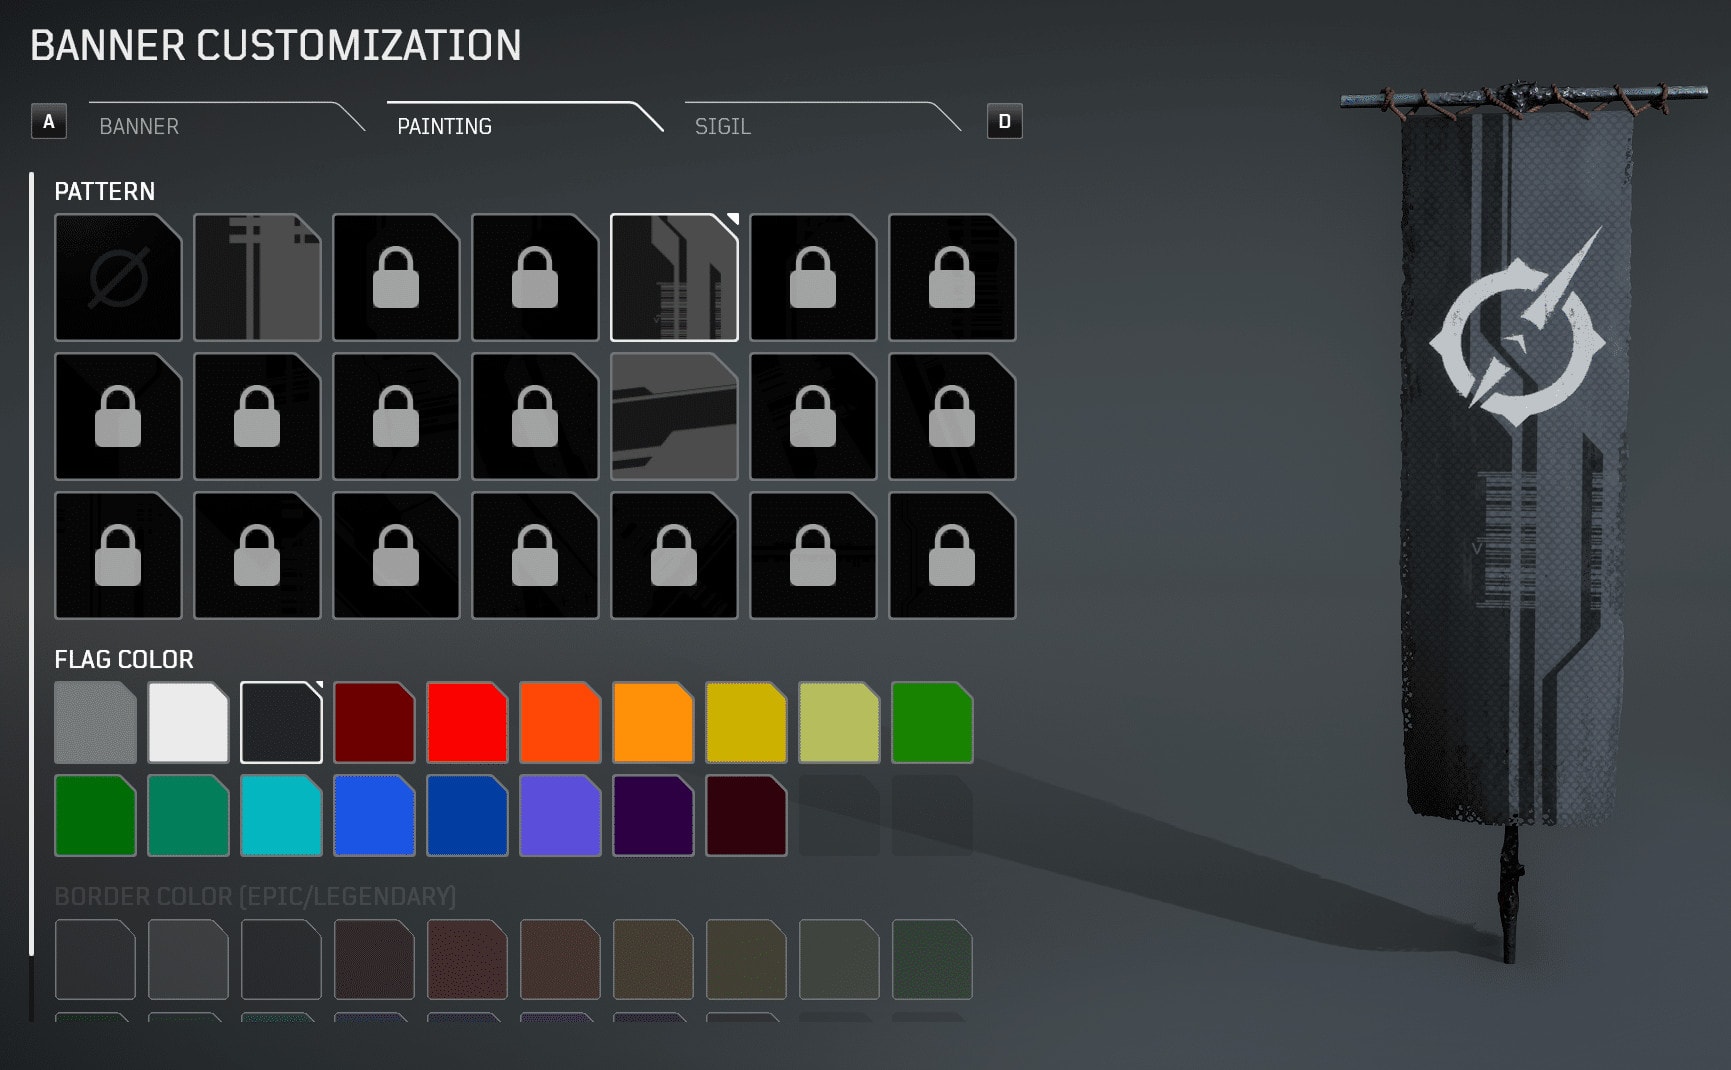
Paintings
Allows you to change the background style and format of the banner itself
Sigil
Change the sigil on your banner. You start with the Outriders Logo available only by default, but will unlock a lot more and much cooler ones later.
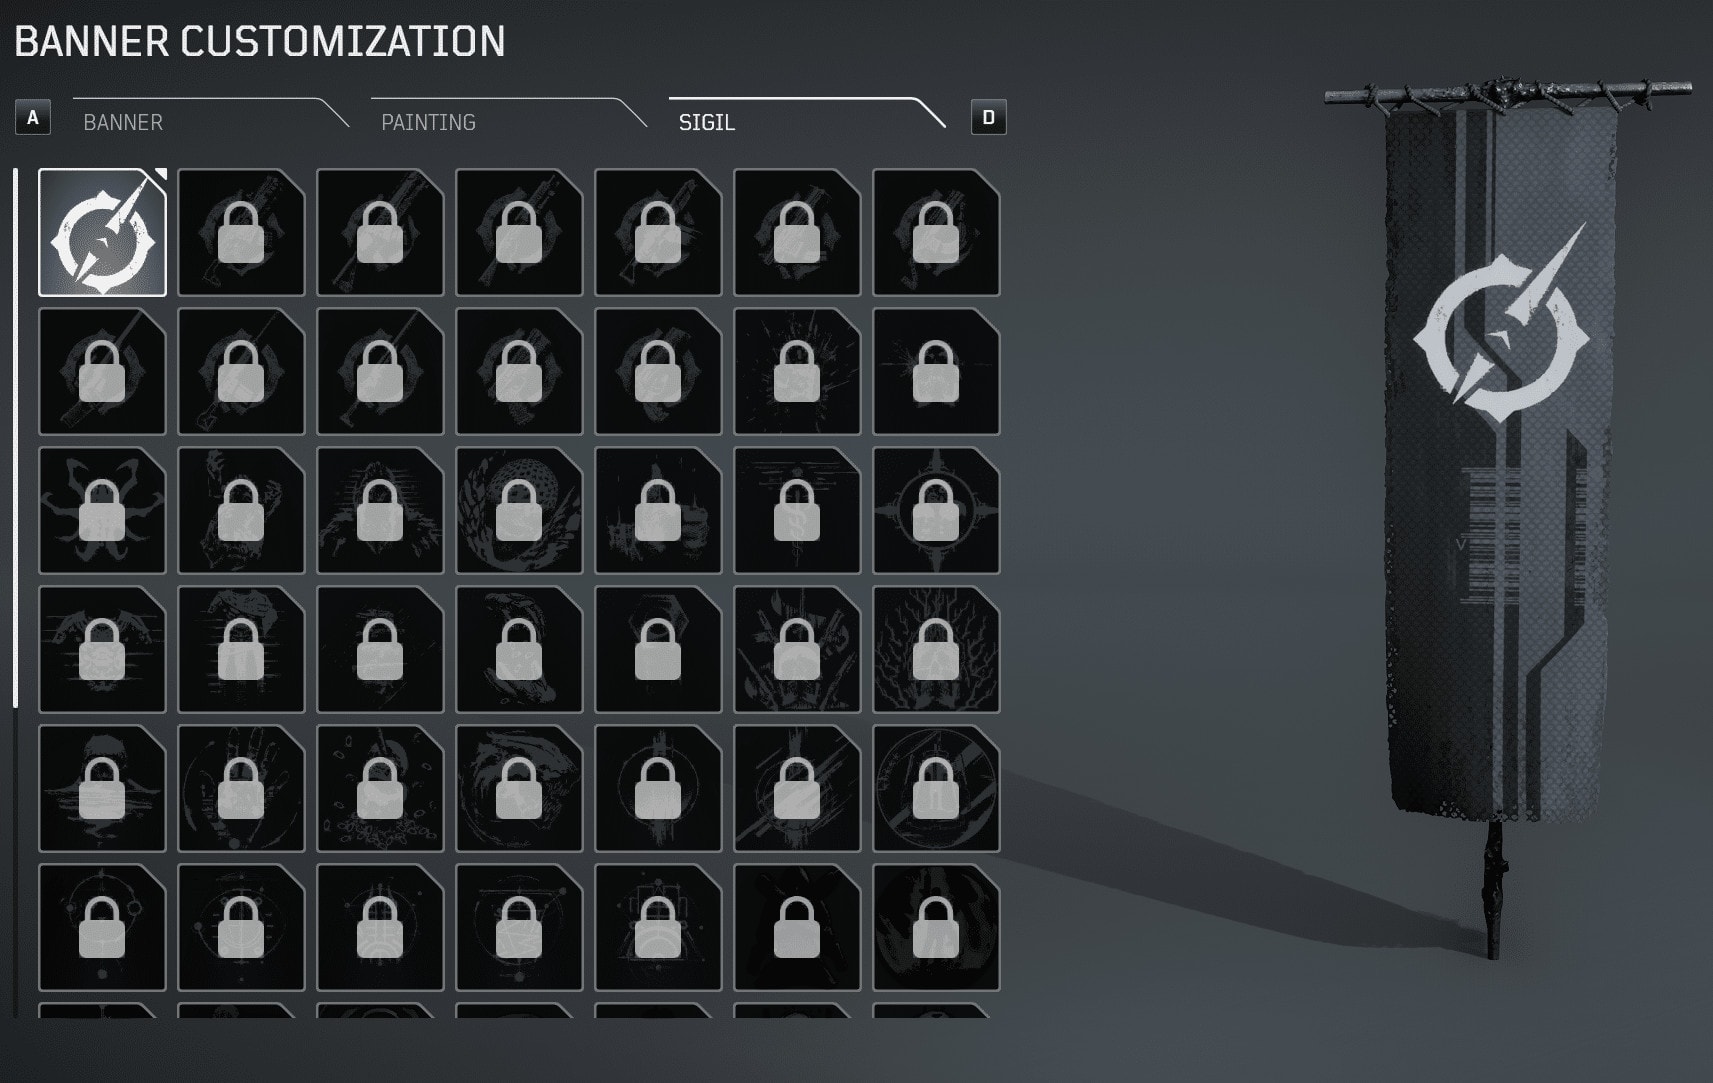
All of these are locked initially and unlocking them is directly tied to your Accolades page. Playing the game, earning accolades, completing challenges/achievements (or however else you might name them from other games you have played), these are your gateway to your Customizations.
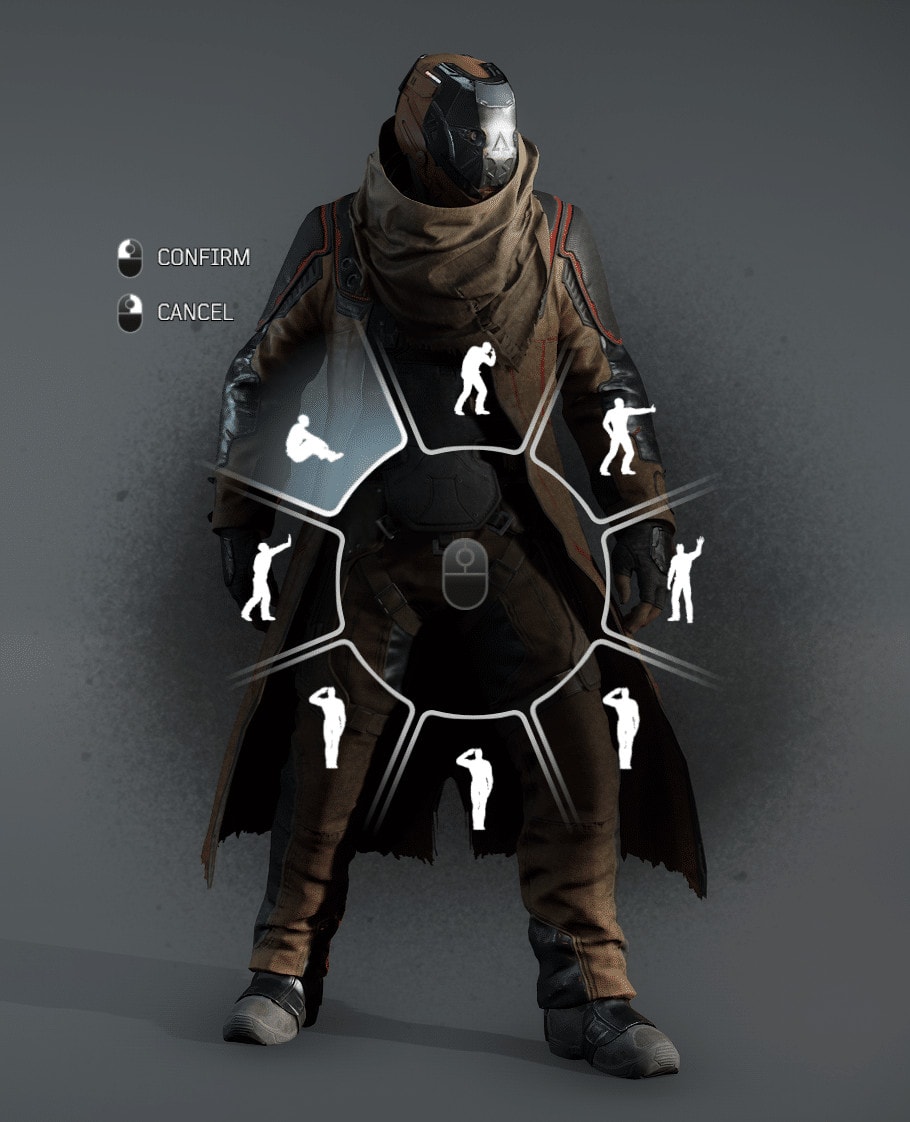
Emotes
In the Emotes Customization screen you can select which of the available emotes you will slot into the Emotes Wheel, which houses up to eight emotes in total.
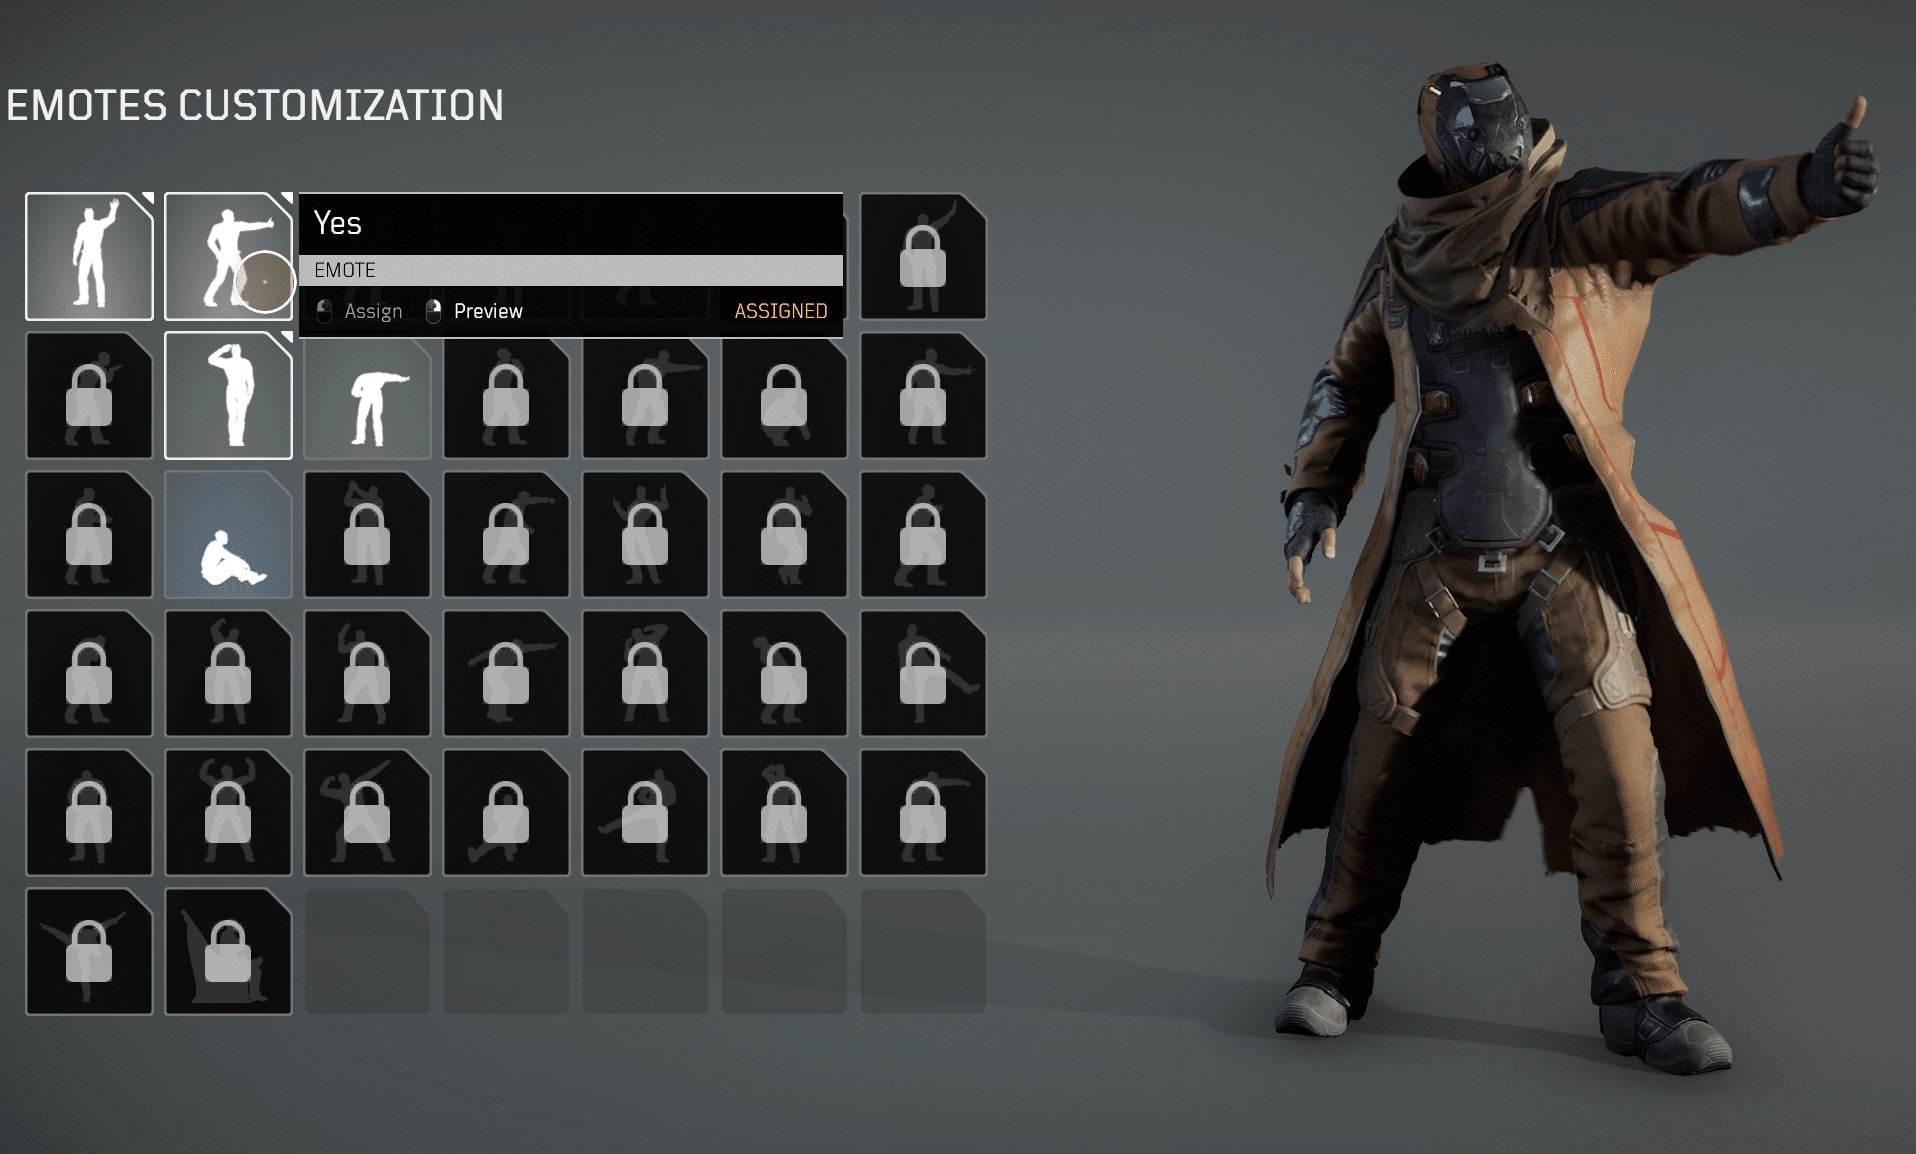
To unlock them, yeah, you guessed it, you need to earn accolades. You can preview the unlocked emotes here and assign them wherever you like on the Emotes Wheel.
Non-Combat HUD Effects
There’s a few things that are quite important for combat but are still important to recognize, especially with the Minimap. There’s a number of icons shown in the minimap below, but what do they mean?
First, since it’s visible on the screen and not just the minimap we’ll talk about the Matchmaking Icon. This is only available in towns, and allows you to make use of the Matchmaking options, without needing to be in the Game Lobby.
Directly to the left is the Banner Icon. This Icon represents a Banner Point, which can be used to Fast Travel. Interacting with a banner will open your map, and allow you to Fast Travel between Banner Points by hovering and selecting a point for Fast Travel.
Further Left is the Stash Icon. This indicates a location where you can use your Stash. The Stash is a shared storage between characters, useful for transferring weapons and armor between characters.
Above this are Customize and Resupply Icons. The scissors Icon is for Customization, which will open the Character creator where you can change everything about your Outriders, except their Gender Identity. The Ammo icon is for Resupply Crates, which can also be found else where. Interacting with these chests will refill all of your ammo.
At the very top, there’s the gold Main Quest Icon. This points you in the relevant direction of your current Story Quest, or another active quest.
At the middle of the minimap above is the Vendor Icon. This icon directs you to a Vendor, whether they sell armor or Weapons.
In between the two Vendor Icons is the Side Quest Icon. This exclamation mark icon indicates you can start a Side Quest there. Side quests are smaller quests that can be taken and can grant you various bonus rewards and can be repeated.
Vendor UI
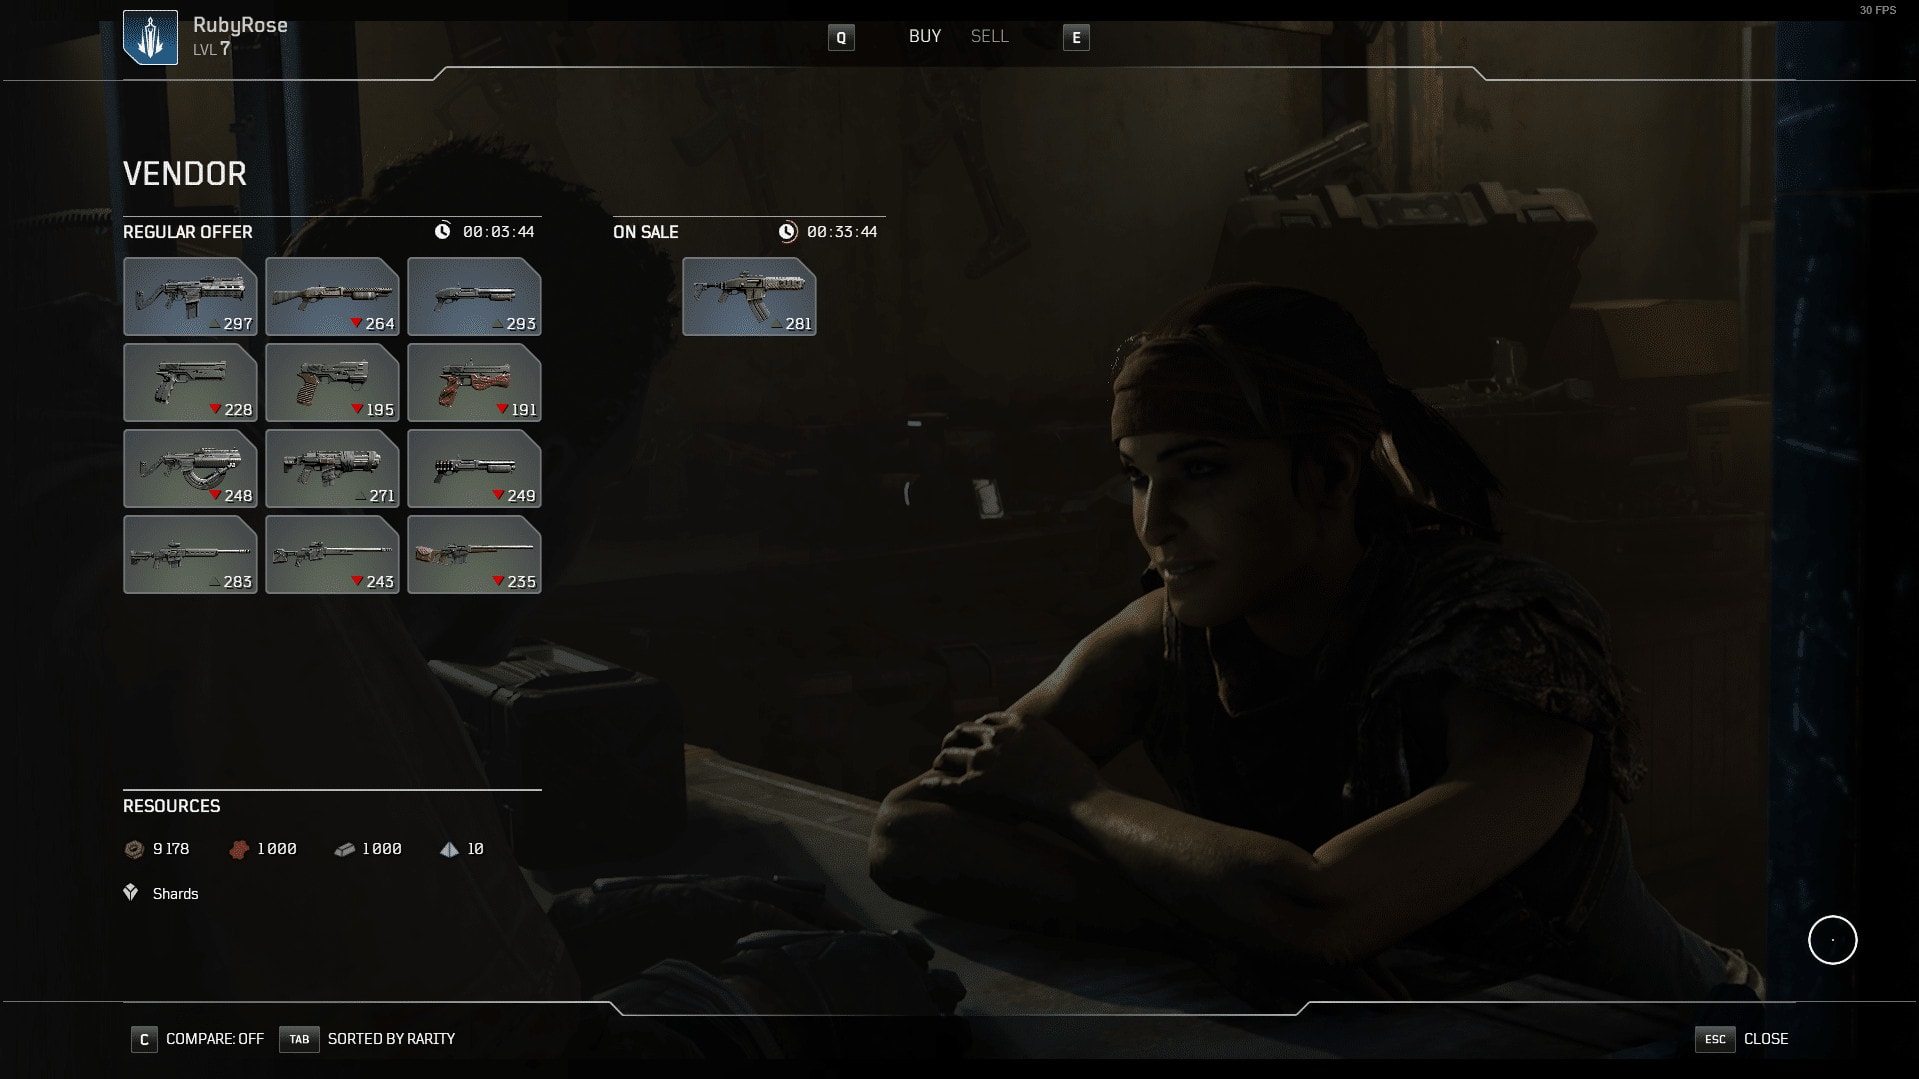
Since we mentioned the icon for Vendors already, let’s take a quick look at their UI as well. Vendors will hold 13 items of various rarities, which scales with World Tier. Their stock rotates hourly, which is good to keep in mind as you play so you know when to check for new items.
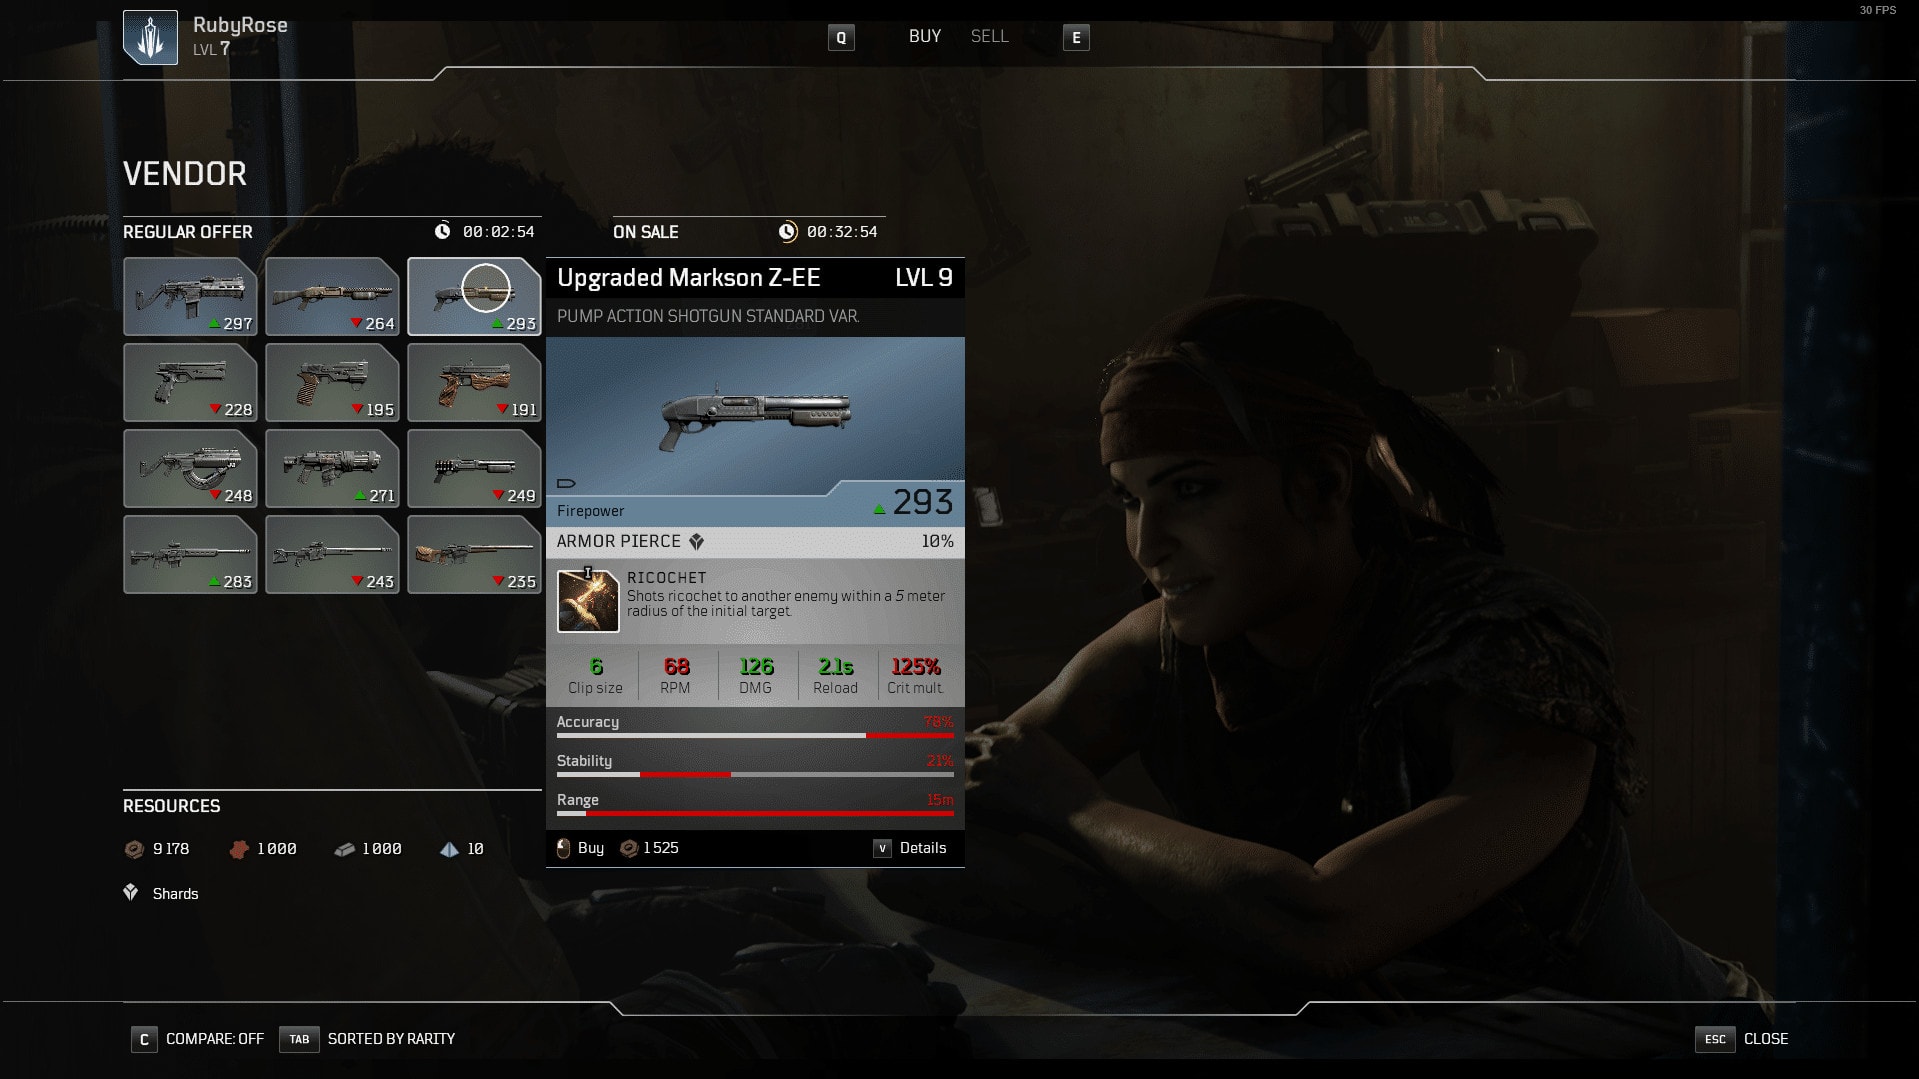
Regular Offers are the Vendor’s normal stock, which will typically be lower in rarity and have commonly found Mods. It’s still worth browsing these items, as you can still find mods you might want here and are a good option for hunting specific mods.
When you hover any of a Vendor’s selections, you will see the usual item preview as if you had it in your inventory, with the price in Scrap being shown at the very Bottom.
Sale Offers are a one per vendor deal. They often feature a slightly lower price, but also have a higher chance of being a higher rarity or having stronger mods compared to the Regular Offers. This is the most important slot to check when browsing the Vendor at any given point.
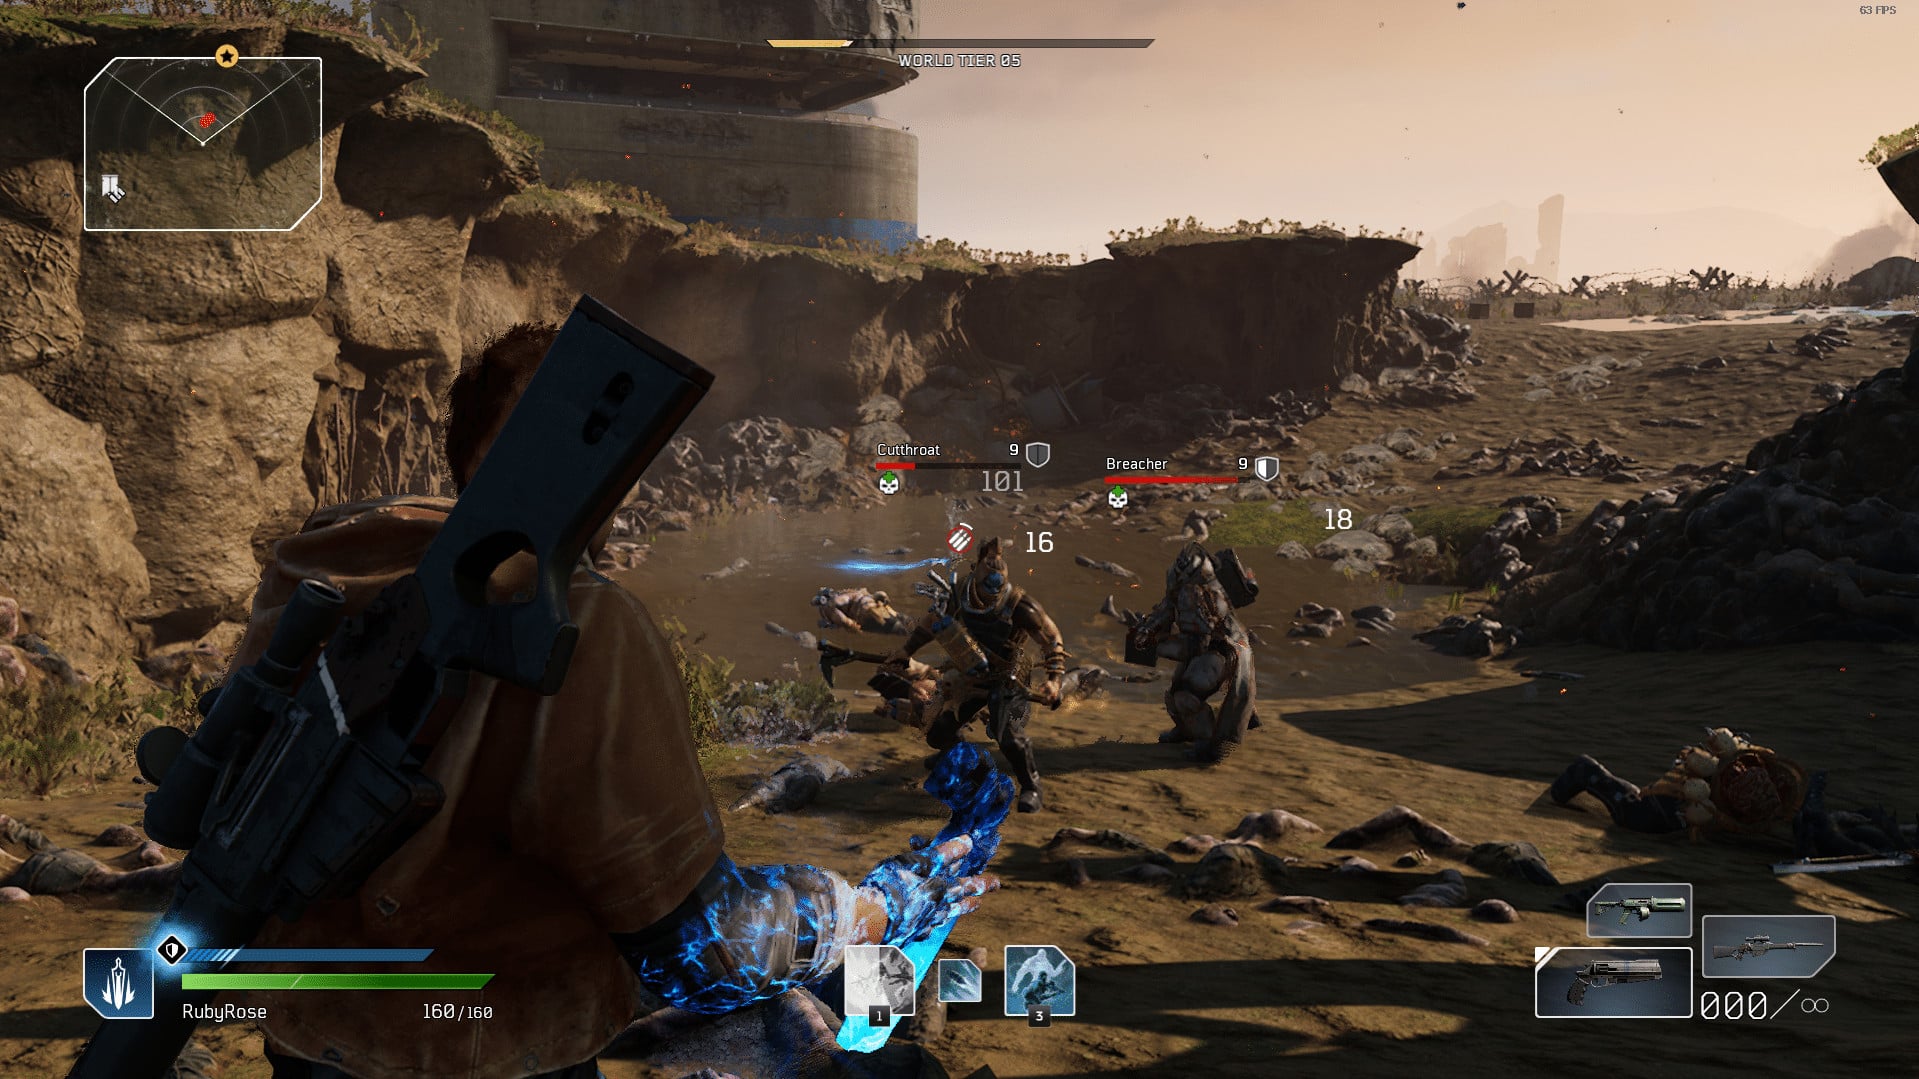
Outriders HUD Effects and What They Mean
For this, we’ll be referencing the image below, which is a screen shot that covers a lot of the various and helpful UI elements, while nothing is turned off.
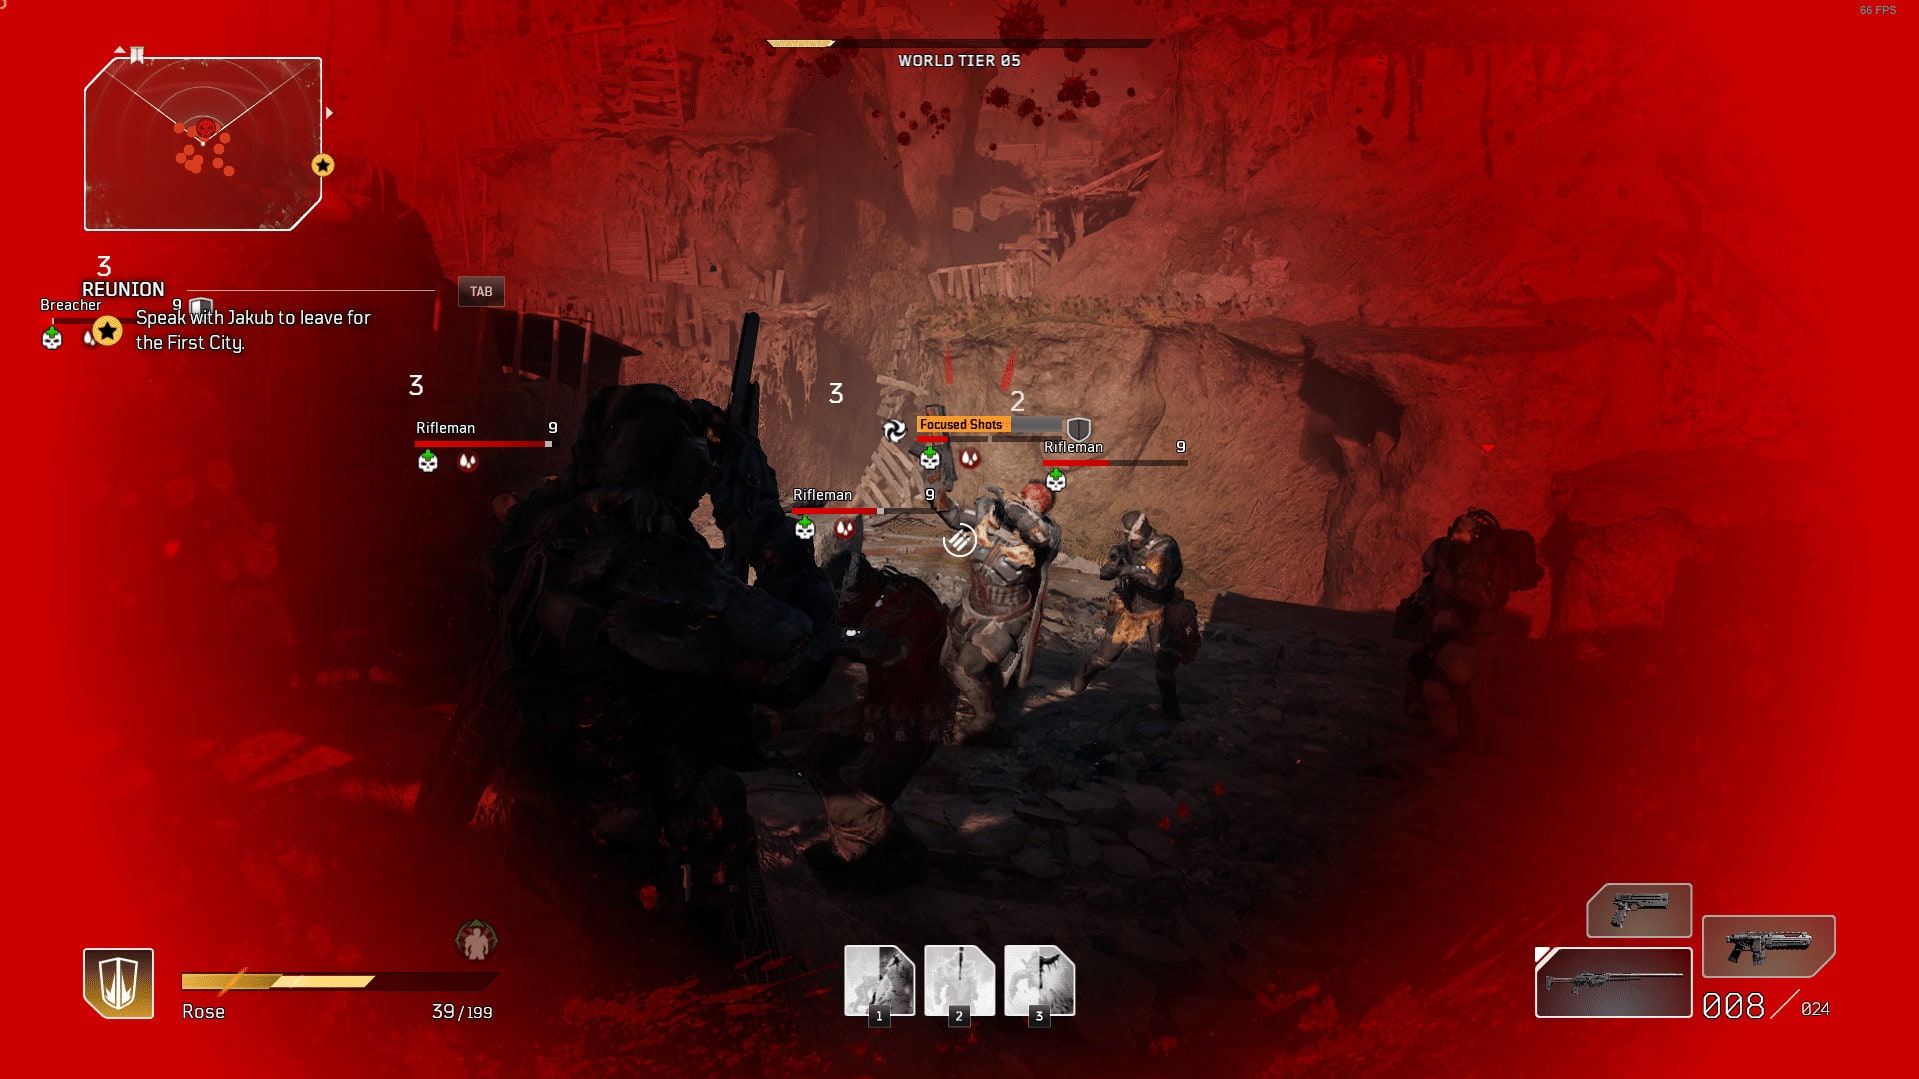
Class Healing Indicator 

The Icon shown above indicates the enemy meets the Conditions to trigger your Class Healing Mechanic. It will tell you if you’re in range for Devastator and Trickster, or if an enemy is still marked as Pyromancer. This will not be shown for Technomancer, as they heal based on damage dealt without condition.
Status Indicator

These Icons indicate status effects, the one above is for Bleed. These exist for all status conditions, and will be present based on what statuses are inflicted, including special statuses like Thermal Bomb for Pyromancer indicating they will explode on death.
Elite/Boss Effect Resistance

This UI element is unique to Elite and Boss type enemies, showing their build up of resistance to various effects, typically crowd control effects that can interrupt them. By default this will not glow Blue, indicating they are vulnerable to statuses. Once triggered, the icon will glow blue and enemies will get a Blue Aura around them, indicating their temporary immunity to Some effects. During this they also are resistant to being interrupted, so be careful when you trigger this mechanic in a boss fight or you may not be able to interrupt a lethal attack.
Enemy Skill Channel Bar 

This bar will show up when an enemy begins casting a skill. You can successfully interrupt an enemy by hitting them with certain skills, or in the case of Ammo skills, a strong enough hit can do so on occasion. These are typical stronger, harder to avoid attacks, so interrupting them is the best thing you can do.
Class Icon / Melee Cooldown
In the bottom left of the screen is your Class Icon. This is there as both a reminder of your class, but also when your melee attack is available. When you use your melee, you’ll see an effect similar to the Cooldown effect when you use Skills, indicating the time left before it is available again.
How to Tweak the Outriders HUD
There’s quite a few HUD options available in Outrider, and almost everything can be turned off. This can be good in some cases, but awful in most situations. So let’s talk about the UI options and what each setting affects.
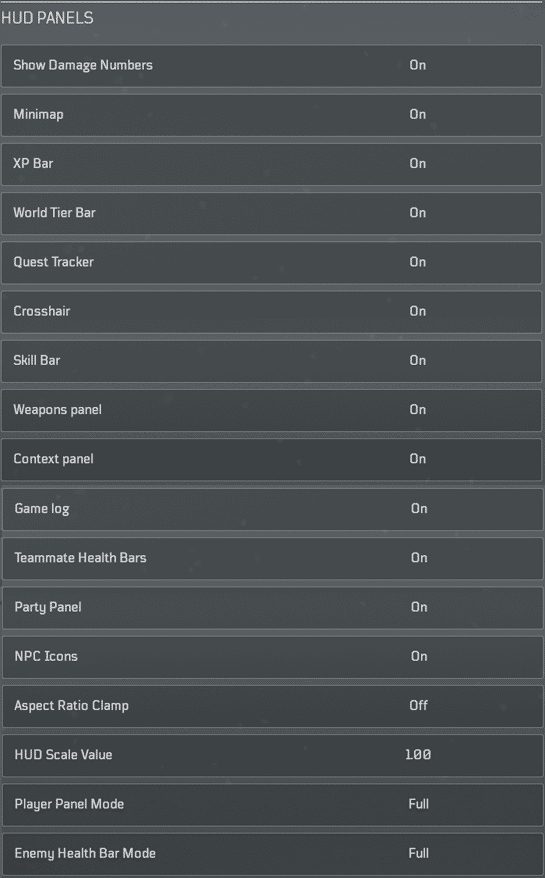
Show Damage Numbers
This option is very straightforward. Toggling this will let you see your damage numbers or not. There’s not much of a reason to turn this off unless you’re playing Pyromancer or Technomancer. The only time damage numbers become invasive to your screen is when you’re inflicting Damage over Time effects constantly. Outside of that, there’s no harm in keeping it on.
Minimap, XP Bar, and World Tier Bar
These elements are being grouped together for a couple of reasons. The first is that they’re really only useful the first time through the game, or at least until you’ve capped out. Once you hit level cap, max world tier or even complete story, these elements just take up screen space when it’s not needed. As such, once you no longer need them, they should be turned off.
Quest Tracker
While you think this would likely be useless past the campaign, you’d be wrong. This is likely what will display your progress and Timer in Expeditions as well. Which while not 100% useful or necessary, still gives it some use and a reason to keep it on, at least the first few times through an Expedition.
Crosshair, Skills, Weapons and Context
These are generally must haves. While context can arguably be dropped later, it still has its uses. Crosshair is mandatory for basically all players, Unless you’re comfortable aiming without them, keep them on. Skills and Weapon Panels are also useful to keep on, as these also track your ammo and cooldowns. It’s worth keeping these all on and just simply scaling the UI down if you want more screen space.
Game Log
This one will typically be very invasive early on. Denoting things like Accolade levels and. There’s little reason for it to be off, as once you get past early game it will show less prompts. If it gets to be too much of a hassle, there’s no harm in turn it off either. Post-game it basically only handles the occasional accolade.
Teammate Health Bars, Enemy Health Bars and Party Panel
Teammate Health Bars and Party Panel achieve the same effect, letting you check your teammate health and status at a glance. It may not be super important for post-game content, but can help if you plan to run a supportive type build.
Personally, I’d keep both of them on, but set Teammate Health Bars to “No Status Effects” under Player Panel Mode. This makes it easier to find your teammate in combat situations, while still having easier access to their health and status information while not looking at them.
Enemy Health Bars should ALWAYS be set to “Full”. Hiding status effects by using “No Status Effects” will also remove your ability to see if they meet the condition for your Class Healing Mechanics, or when key statuses like Vulnerability wear off. Turning the Health Bars off entirely will hide their Effect Resistance and Skill Channel bars as well.
NPC Icons
This will be helpful to leave on if you opt to turn the minimap off. It will let you find your quest givers, vendors and other NPCs by simply looking for their respective icons. Even with the minimap on, it can help with find an NPC that may be above or below you, giving you an Icon you can follow on screen.
Aspect Ratio Clamp and HUD Scale
Aspect Ratio Clamp will lock the UI elements to 16:9 scale, which means you’ll likely want this off if you’re playing on an Ultrawide monitor. It could help in some cases still, like preventing UI stretching if it happens to have issues scaling.
HUD Scale is a setting that’s very heavily personal choice. It would be nice to scale certain elements individually, but scaling all of them isn’t the worst option either. In a lot of cases, you may want a default or smaller UI, unless you have issues seeing some UI elements. The smaller you can tolerate the UI, the more screen space you get for combat. Personally I set this value to 75% , which minimizes the space these elements take up, without them being too small to be useful.
Outriders HUD Configs Templates
We’ll provide a few basic setups that can be used here. These will be very simple, but focus on the aspects and elements we feel are important for the general types of players we’d expect to use them.
Beginner Friendly / Casual HUD
This is going to be basically the stock standard UI. The only modification we’ll be making for these settings are a slight adjustment to scale, increasing it slightly to 110%. The default UI size is okay, but making it slightly bigger can help you learn your cooldowns and keep an better eye on your health.
Nothing is being removed from the UI, because starting out and until you get really into the game, it’s best to have the full UI to help you track things easier. That said, the final setup looks like this:
- HUD Scale Value: 110%
- All other HUD Options: On
- (Display Settings) Motion Blur: Off
- (Display Settings) Field of View: 90
Immersive Experience HUD

While not everyone may prefer to use setting like this, we understand there are some that desire a more cinematic experience with the game. That’s what this aims to do, by removing most of the UI elements leaving only what’s absolutely necessary for smooth gameplay. The few things left are made as small as possible, since total clarity isn’t why they are there. They can also be turned off if desired as well.
- Crosshair: On
- Skill Bar: On
- NPC Icons: On
- Player Panel: Full
- HUD Scale: 50%
- Other HUD Options: Off
- Field of View: 90
- Motion Blur: Off, unless you prefer it.
Hardcore / Farming HUD
This one will actually be somewhere in between the previous two. Keeping only useful Elements, and reducing the size of what’s left. It’s meant so your screen isn’t cluttered while in a fight, minimizing a lot of the noise. Damage Numbers and player health bars are totally optional. We recommend them off, but if you like seeing a lot of numbers go for it.
- Damage Numbers: Off (optional)
- Minimap: Off (optional)
- XP Bar: Off
- World Tier Bar: Off
- Quest Tracker: Off
- Crosshair: On
- Skill Bar: On
- Weapon Panel: On
- Context Panel: Off
- Game Log: Off
- Teammate Health Bars: Off (optional)
- Party Panel: On
- NPC Icons: On
- HUD Scale: 75%
- Player Panel / Enemy Health Bar: Full
- Field of View: 90
- Motion Blur: Off
Conclusion
Outriders has a moderately customizable HUD, but not fully customizable to where it’s closer to an MMORPG. It does however let you disable elements independently and scale the UI elements that you leave active. Given the UI doesn’t have the general complexity of an MMORPG, this is pretty fair for what it does offer.
I hope this guide is able to help some of you Outriders as you make your way through Enoch. Letting you see more of the battlefield, or even letting you take in the sights around Enoch.
Check out our full Outriders Guides and News coverage here on VULKK.com. In the game’s category you will find a number of beginner friendly guides as well as content that is more suitable for the more advanced players, the completionist and the hard-core farmer as well!
Outriders Essential Beginners Guides
This list showcases some of our top Outriders Beginners Guides - instructional content to help you get into the game, learn the basics and get a nice smooth start with your adventures on Enoch.
Outriders Classes and Roles: A Beginners Guide
Beginners friendly guide to Outriders Classes. What Devastator, Pyromancer, Trickster and Technomancer can do and which role best fits you.
How Gear and Mods Work in Outriders: A Complete Guide
Guide explaining how gear works in Outriders, what types and rarites are there, how mods work and how to effectively gear up your character.
Outriders DOs and DONTs Guide: Beginner Tips and Tricks
This Outriders DOs and DONTs guide is a large collection of tips to help you get a smooth start in the game and teach you helpful tricks!
Outriders Crafting Guide: make your gear stronger
Crafting in Outriders is different to other RPGs or Looter games. This guide will show you how to use the system to make your gear awesome!
Outriders Expeditions Preparation Guide and Tips
This Outriders Expeditions Guide will help you best prepare for the Endgame content with tips on how to fast climb Challenge Tiers and more!