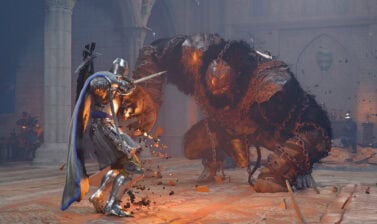
This Ratchet and Clank Rift Apart gear guide will detail every gadget, weapon and upgrade available in this game. We’ll cover when and where you get them, as well as their upgrades and uses.
This guide is spoiler-free. There are no story-related reveals below and except for the occasional mentions of a few simple details, you should feel safe to continue. Also note that the guide will be updated further in the next few days with a few more bits and pieces. Don’t forget to check back later!
Ratchet and Clank is known for its diverse sets of weapons and gadgets available in each game. There’s usually a few staple gadgets and weapons that come from previous titles, as well as new ones to mix things up and introduce new mechanics to keep things fresh.
Character Upgrades and Gadgets
There’s a couple new and several of the staple items returning here, both passively and as upgrades.
Box Breaker

A returning Gadget, this melee upgrade allows Ground Slam attacks to break nearby boxes without hitting them directly.
This upgrade can be earned at Zurkie’s by completing the Freezer Pop arena in the Silver Tier. Access and completion of this arena does not require you to own the Cold Snap weapon, though is made easier by having and upgrading it.
Glide Boots

A returning classic, the Glide Boots are used in Ratchet’s segments, and is shown as the Heli-Pack for Rivet’s segments.
These allow Ratchet or Rivet to slowly Glide and get some extra air time when jumping from ledges, though not much.
Grind Boots

Another returning classic, the Grind Boots allow Ratchet and Rivet to ride Grind Rails by simply jumping on to them. They can also use Square to hit any trigger-able or breakable objects with their melee weapon, X to jump of obstacles in the way or X and a Direction on Left Stick to switch rails when available.
Hover Boots

Another returning Classic, the Hover boots allow both Ratchet and Rivet to be able to speed along the ground after a series of button presses to get up to full speed. The accessibility options can also make this an easier task if you need or choose to do so.
Hurlshot
A new gadget for this title, The Hurlshot is an upgrade added to the Omniglove. This gadget let’s Ratchet and Rivet swing on grapple points to build speed before launching themselves an incredibly far distance. The Grapple Points for this Gadget are indicated by their Orange color.
This Gadget is obtained on the planet Torren IV.
Map-O-Matic
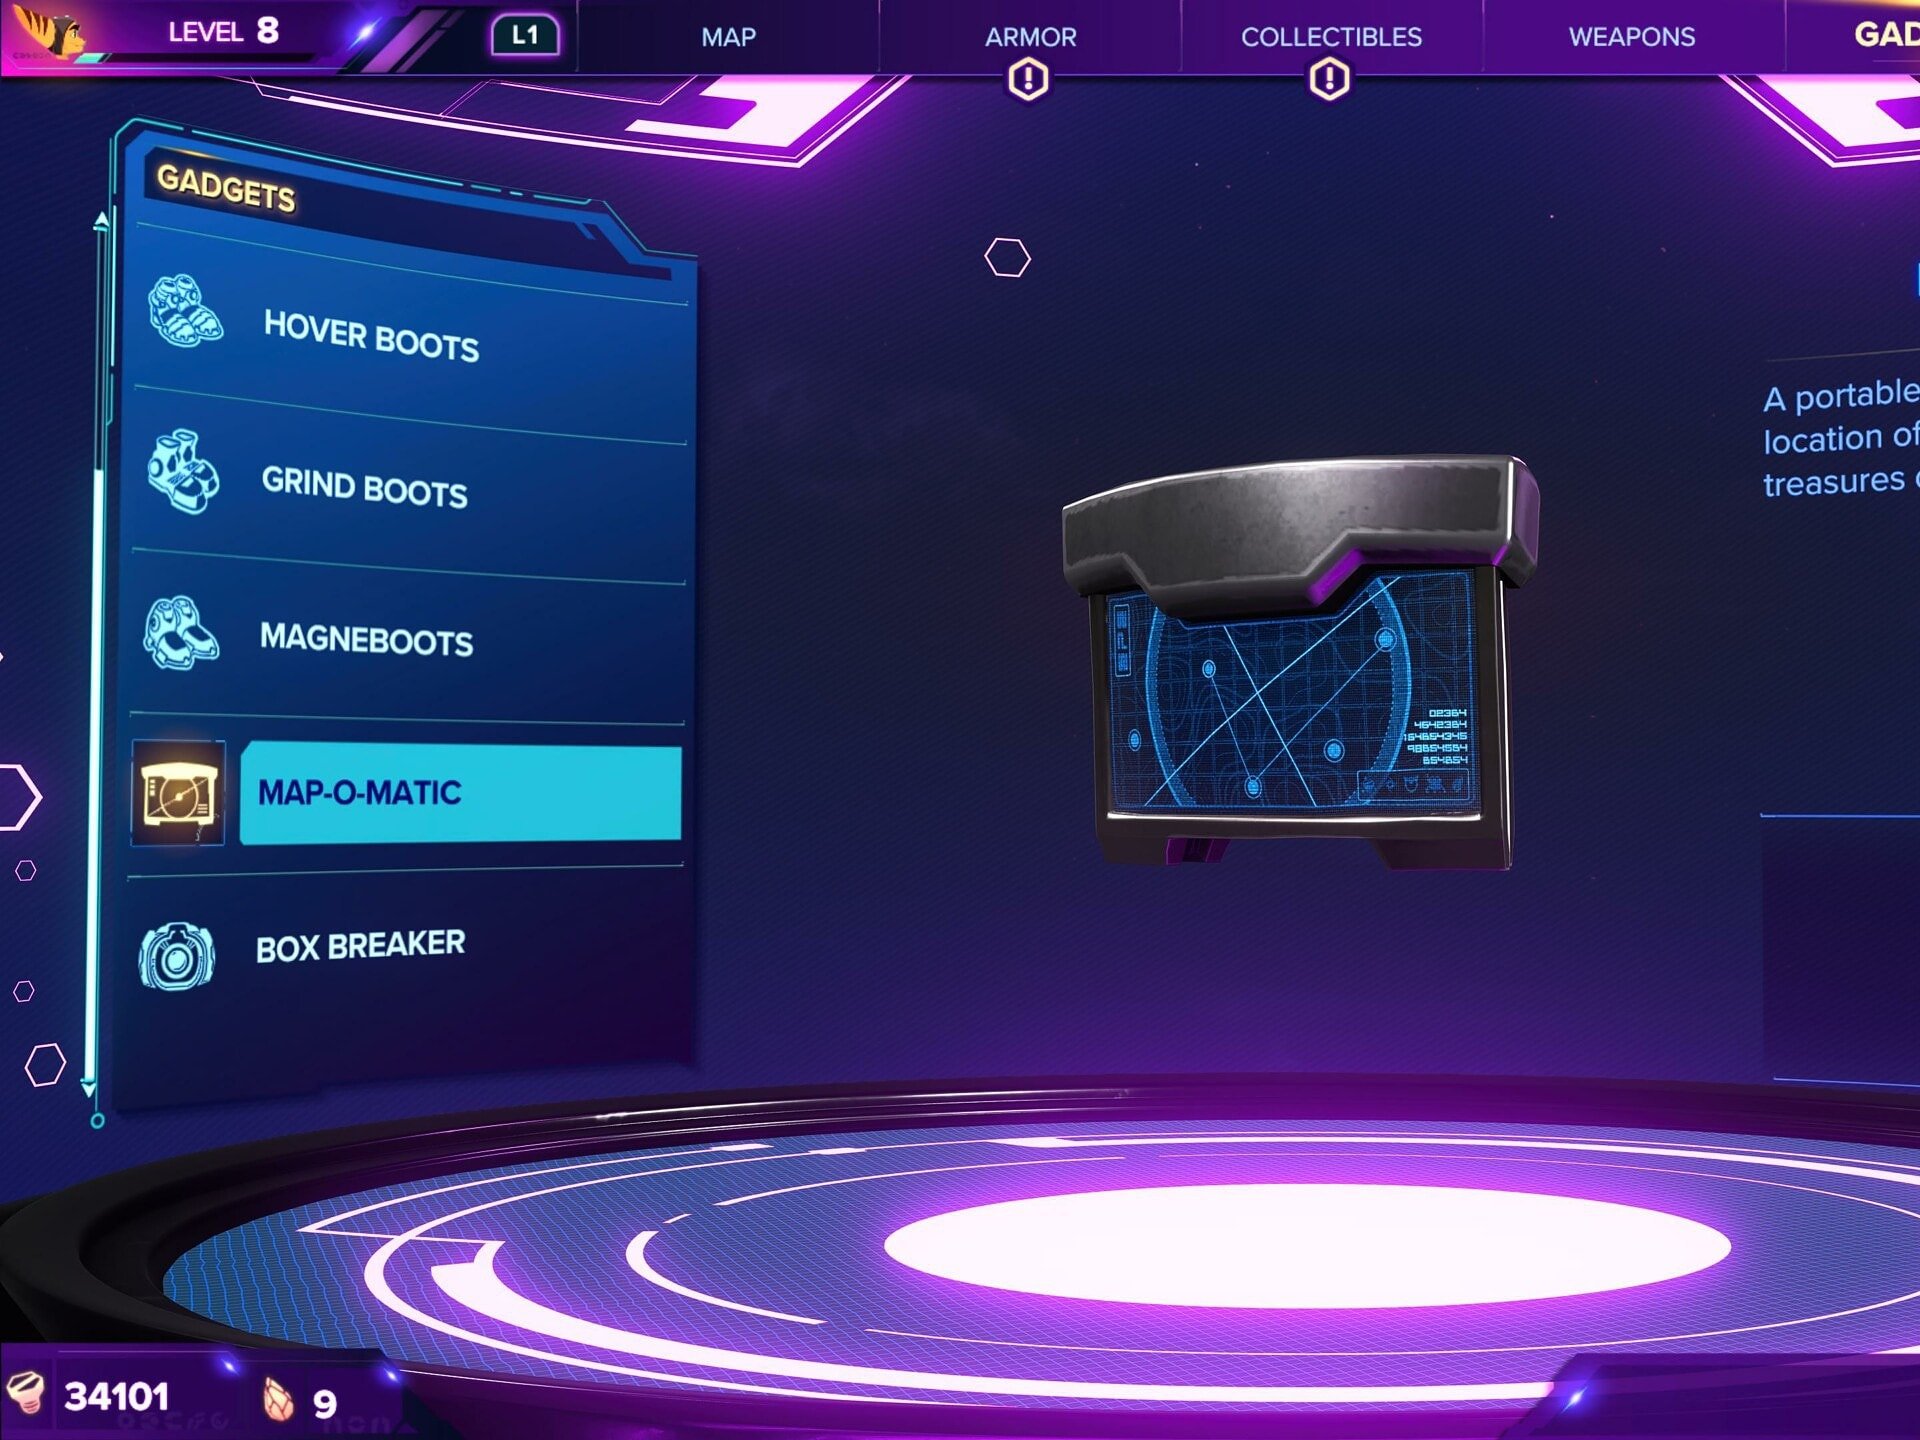
A returning Gadget, which expands the functionality of the map, helping you locate collectibles like Gold Bolts and Spybots by marking them. If collecting diligently as you progress, you’ll find less use in it overall because it’s gotten in the later stages of the story.
This gadget can be obtained from the optional mission on planet Ardolis.
Onmiglove
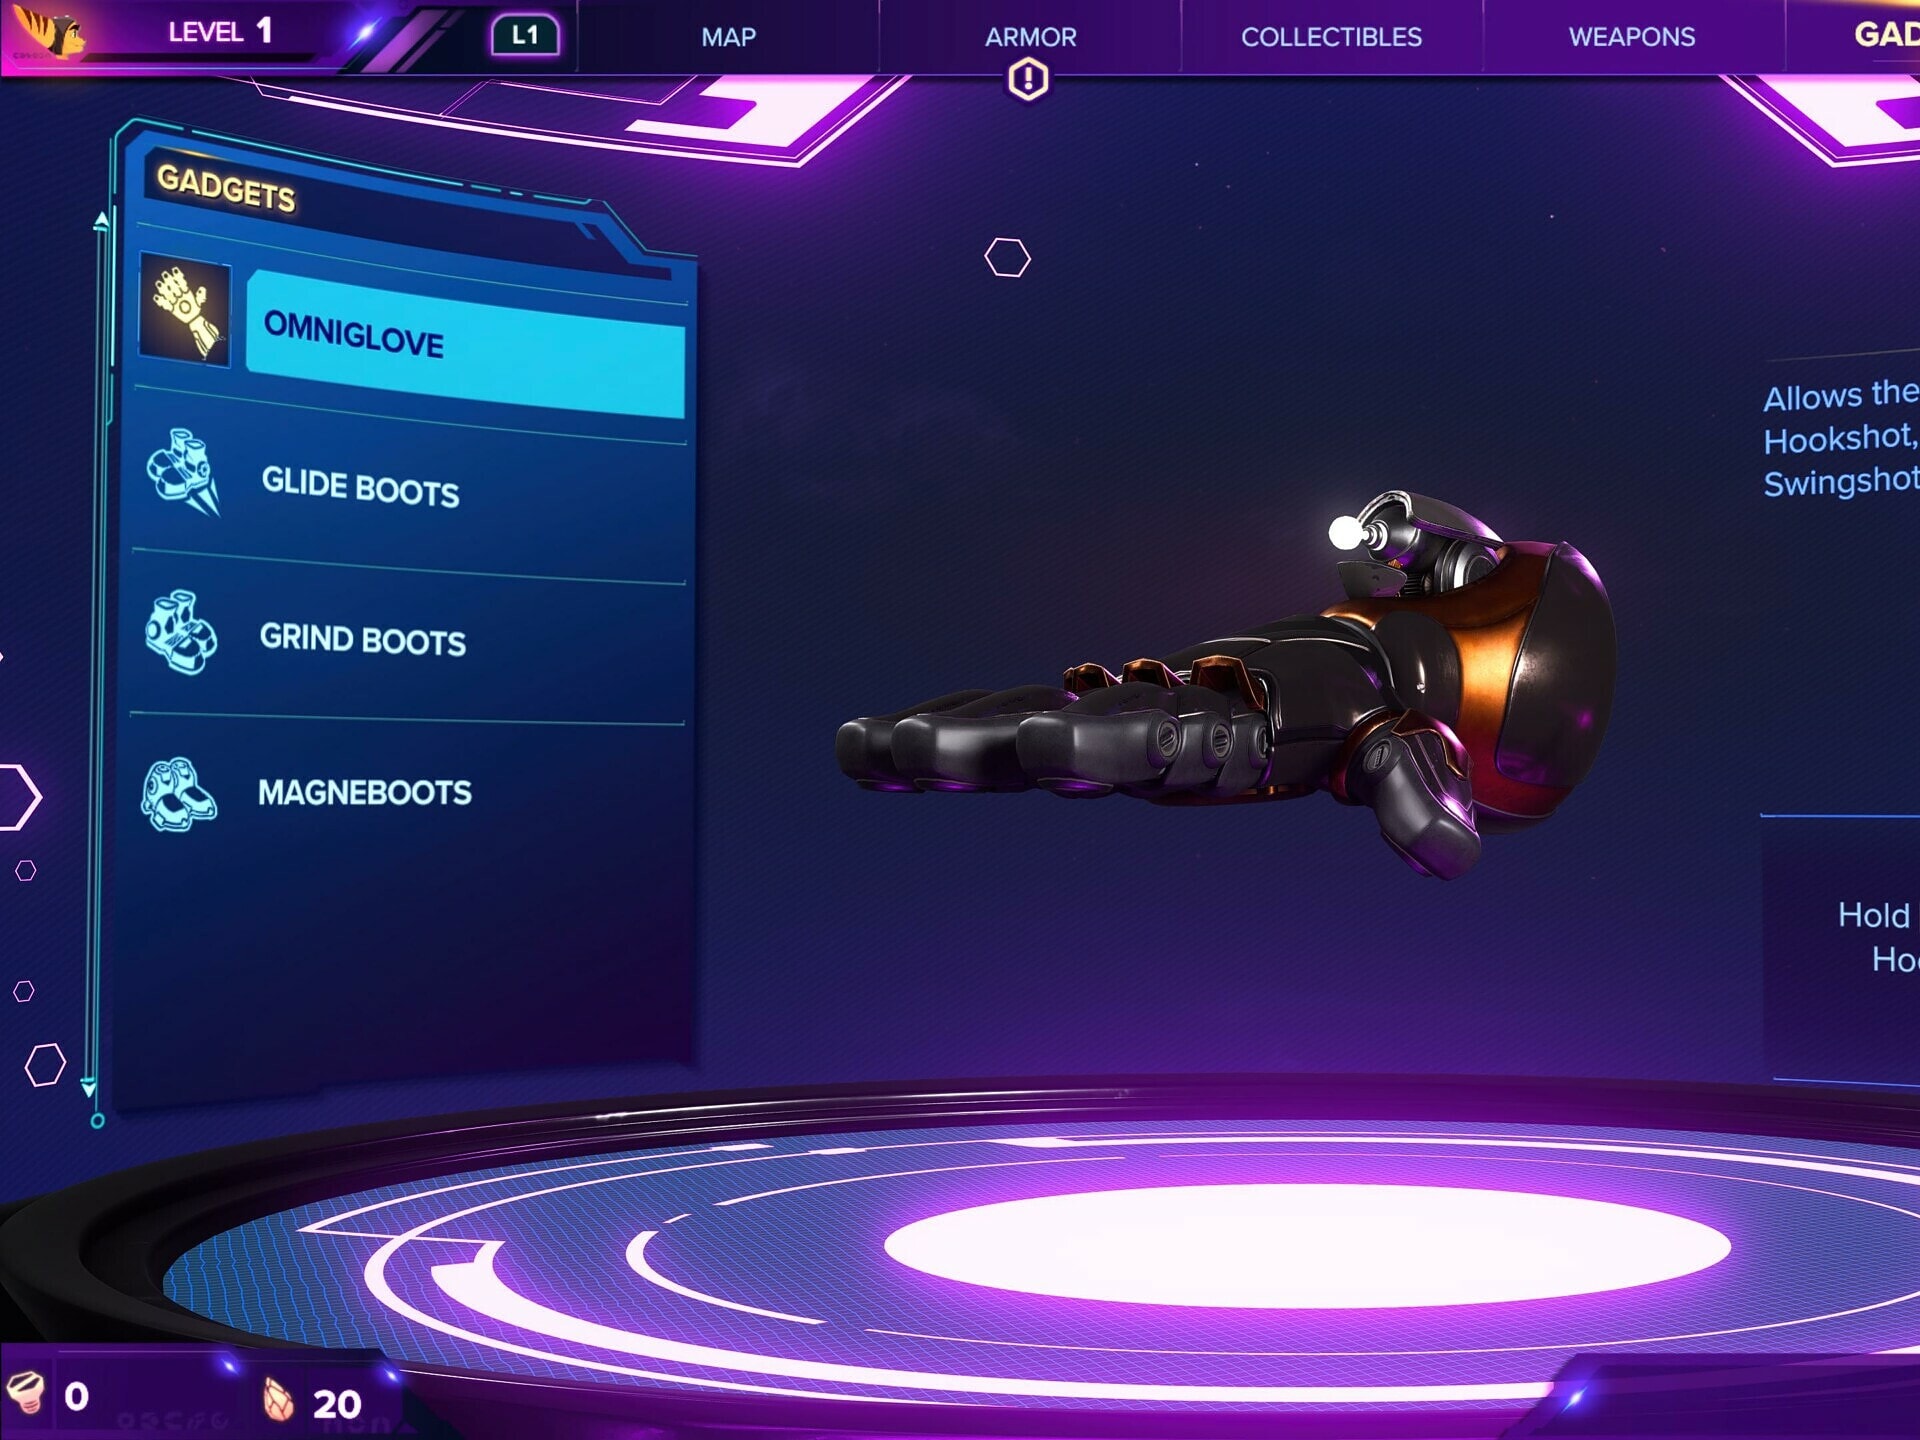
A returning classic with some new abilties the Omniglove allows Ratchet and River to attach to various grapple points. These grapple points include classics like the Hookshot and Swingshot points and the new Rift Tethering mechanic.
Swingshot target are shown as Green Orbs. These let you swing between two or more areas depending on their placement.
Rifts come in two colors, Orange and Purple. Orange Rifts work similarly to the previously mentioned Hookshot used, pulling you in one direction. Purple Rift however open paths to Pocket Dimensions.
Phantom Dash
A new tool, the Phantom Dash is given by The Phantom shortly after meeting them in Nefarious City. This allows Ratchet and Rivet to Perform a Phantom Dash. The Phantom Dash has a variety of uses, in and out of combat.
In combat, the Phantom Dash functions as a dodge, letting you avoid damage from a projectile that would have hit you.
Outside of combat, it can be used to bypass “Organic Detection Barriers” which otherwise prevent you from entering an area. In addition to this it can be a powerful mobility tool extending the range of your jumps.
Weapons
The Ratchet and Clank series is well-known for the vast arsenals in each title. Everything ranging from somewhat basic Pistols and Rifles, to drones and many other extravagant weapons.
Ratchet and Clank: Rift Apart makes use of the Dualsense functionality, providing most of these weapons with alternate uses or firing modes based on how far the R2 trigger is pulled. These will be detailed in their respective images.
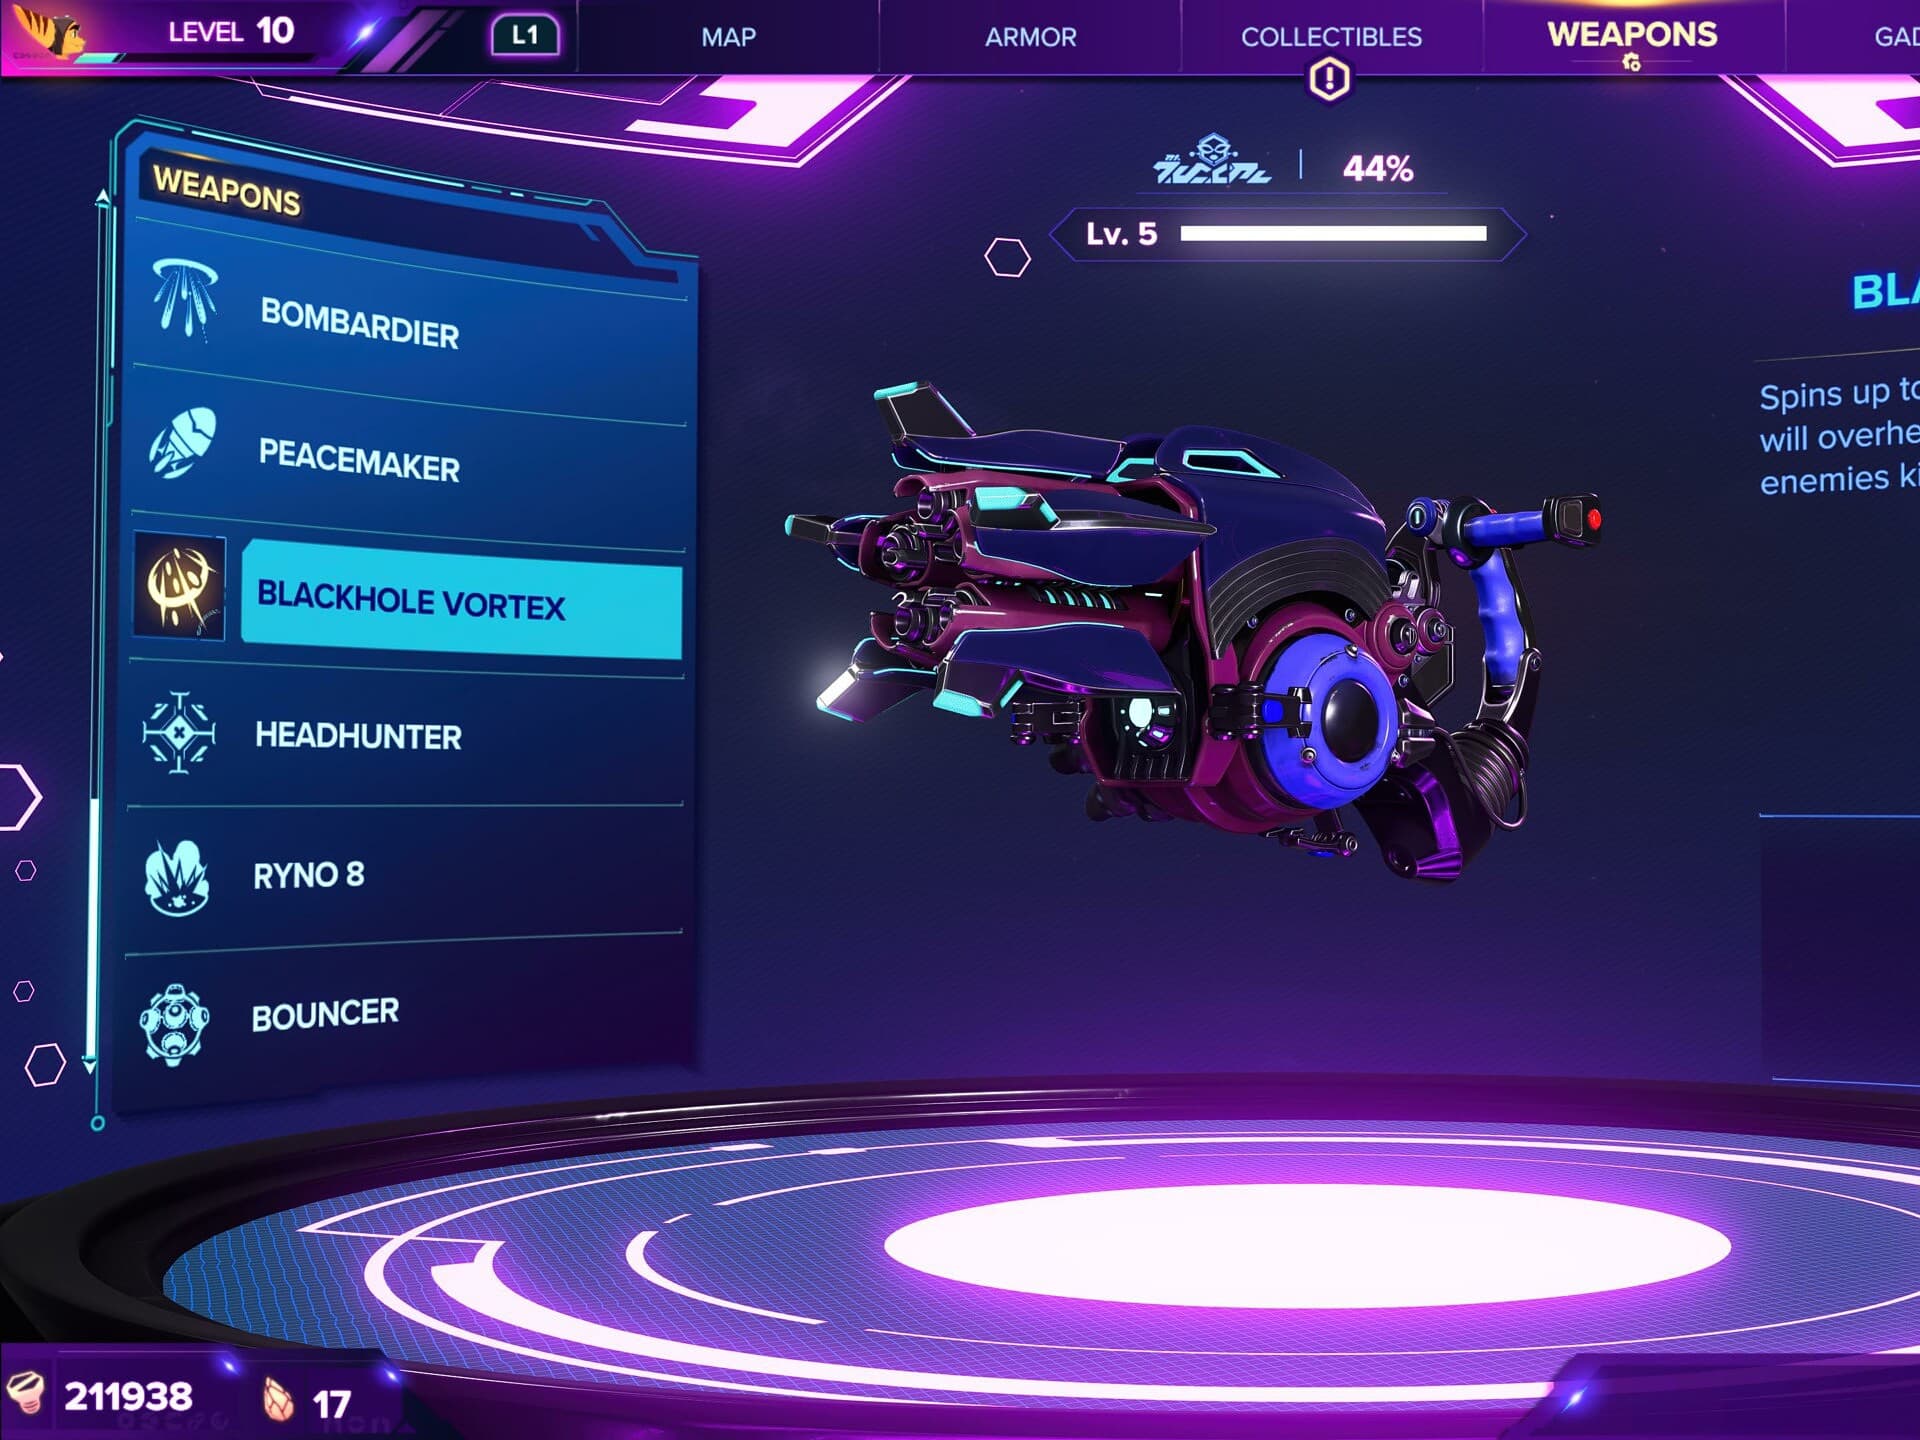
Blackhole Storm
A new weapon for the series, the Blackhole Storm is a light machine gun style of weapon. It has a spool-up time, but once it start firing it deals high damage per second, through a very high rate.
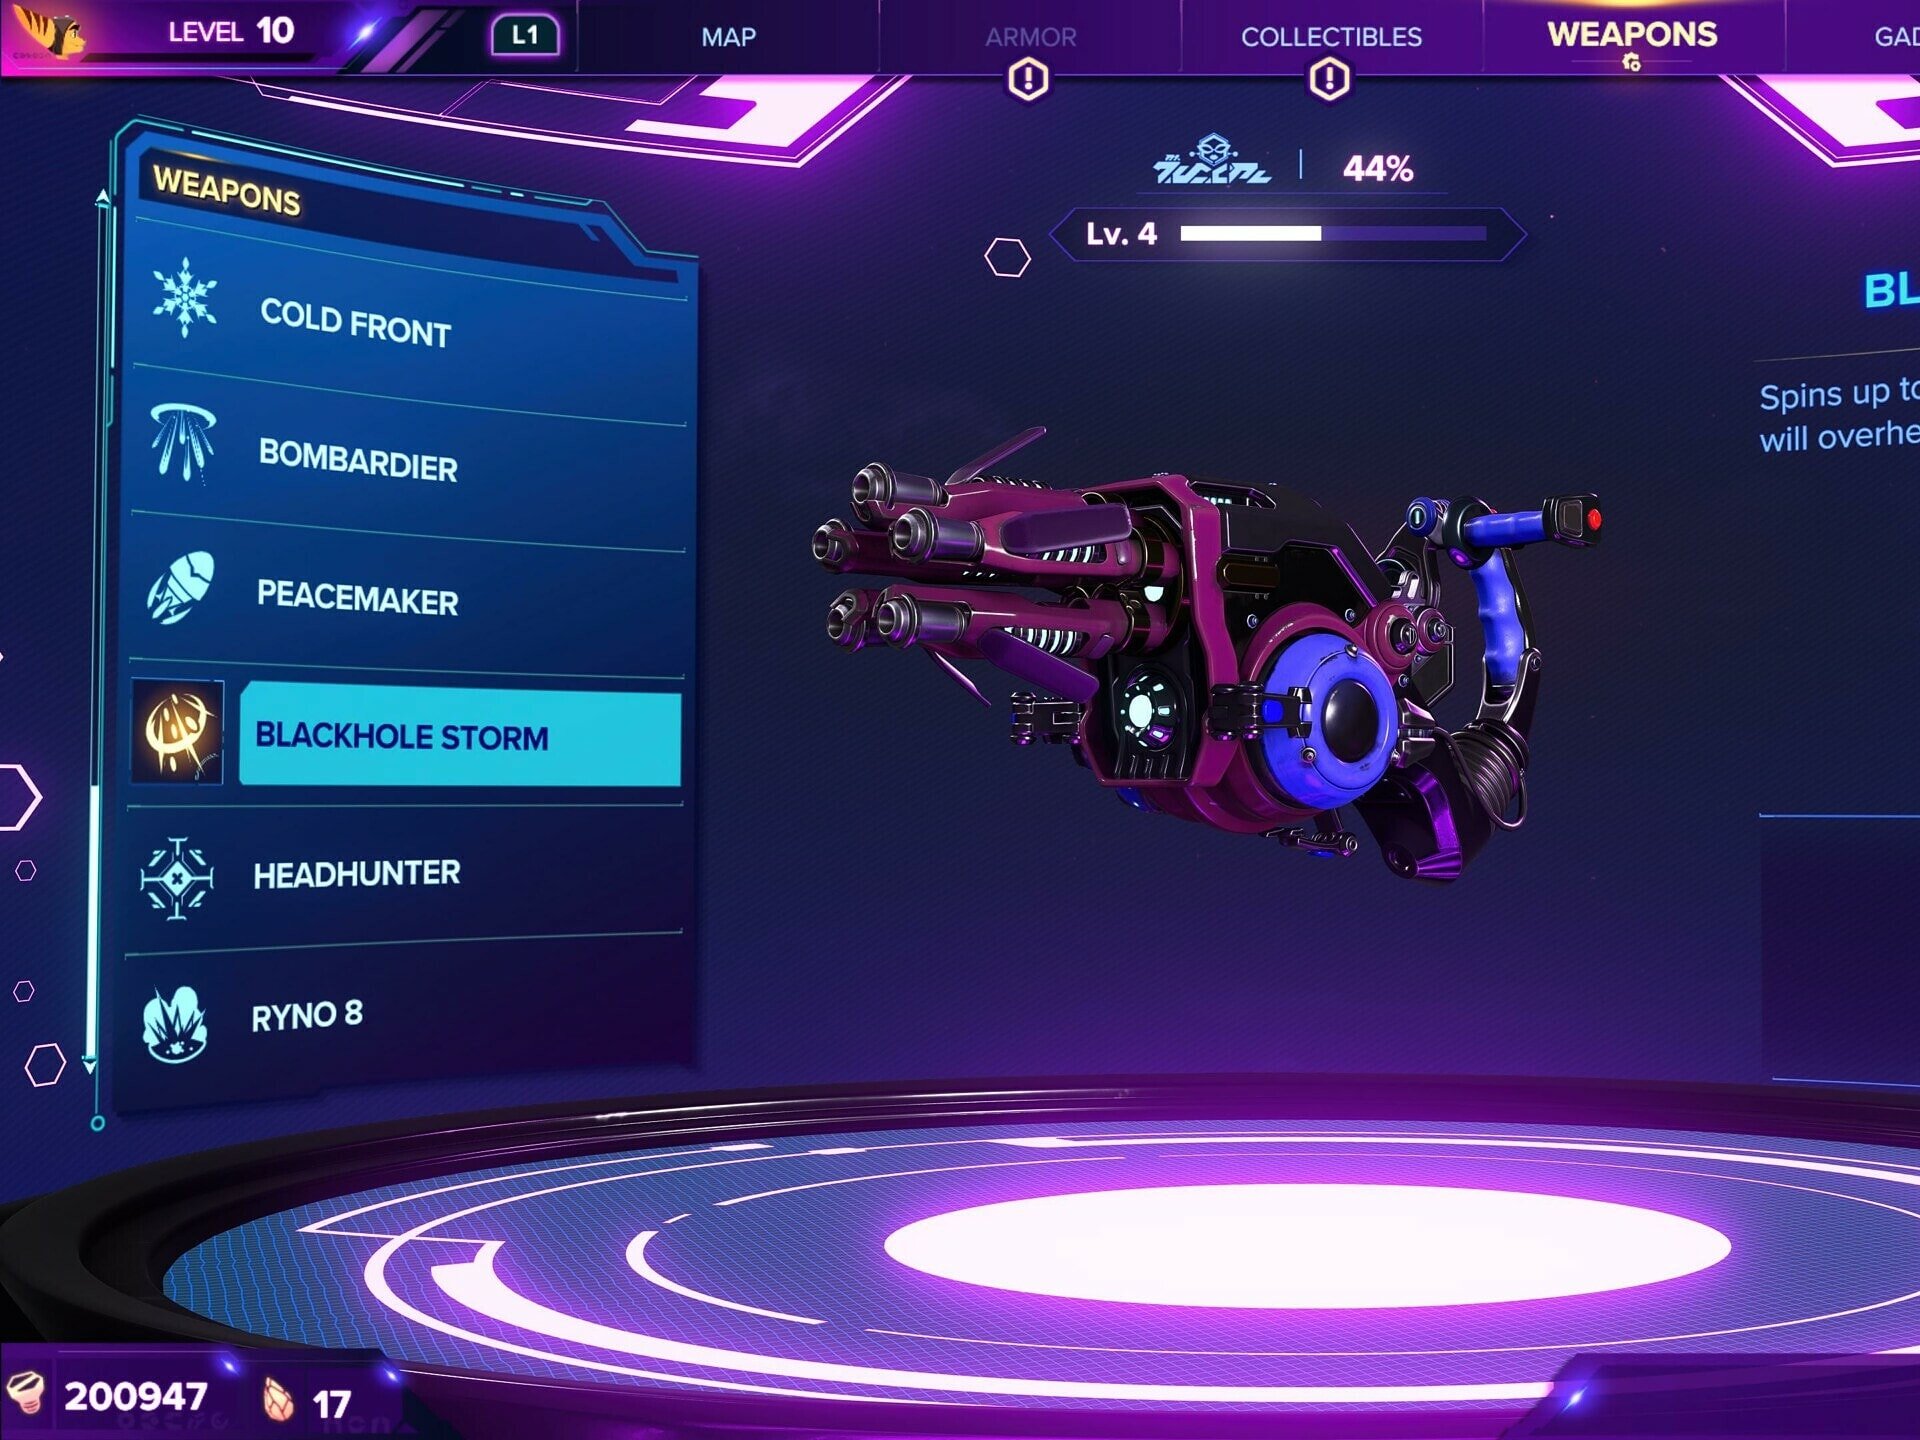
Once unlocking the Superheated Slugs upgrade, the most effective way to use this weapon is to keep the weapon spooled and fire in burst while maintaining over 50% heat for the bonus damage. This is tricky to get used to doing, especially in combat with bosses which demand a lot of dodging.
This weapon is available during your second visit to Sargasso for 35,000 Bolts.
Upgrades
At Level 5 the Blackhole Storm becomes the Blackhole Vortex. This upgrades makes enemies killed by the weapon explode for additional damage.
In Challenge Mode, the Blackhole Vortex can be upgraded to the Omega Blackhole Vortex for a cost of 700,000 Bolts.
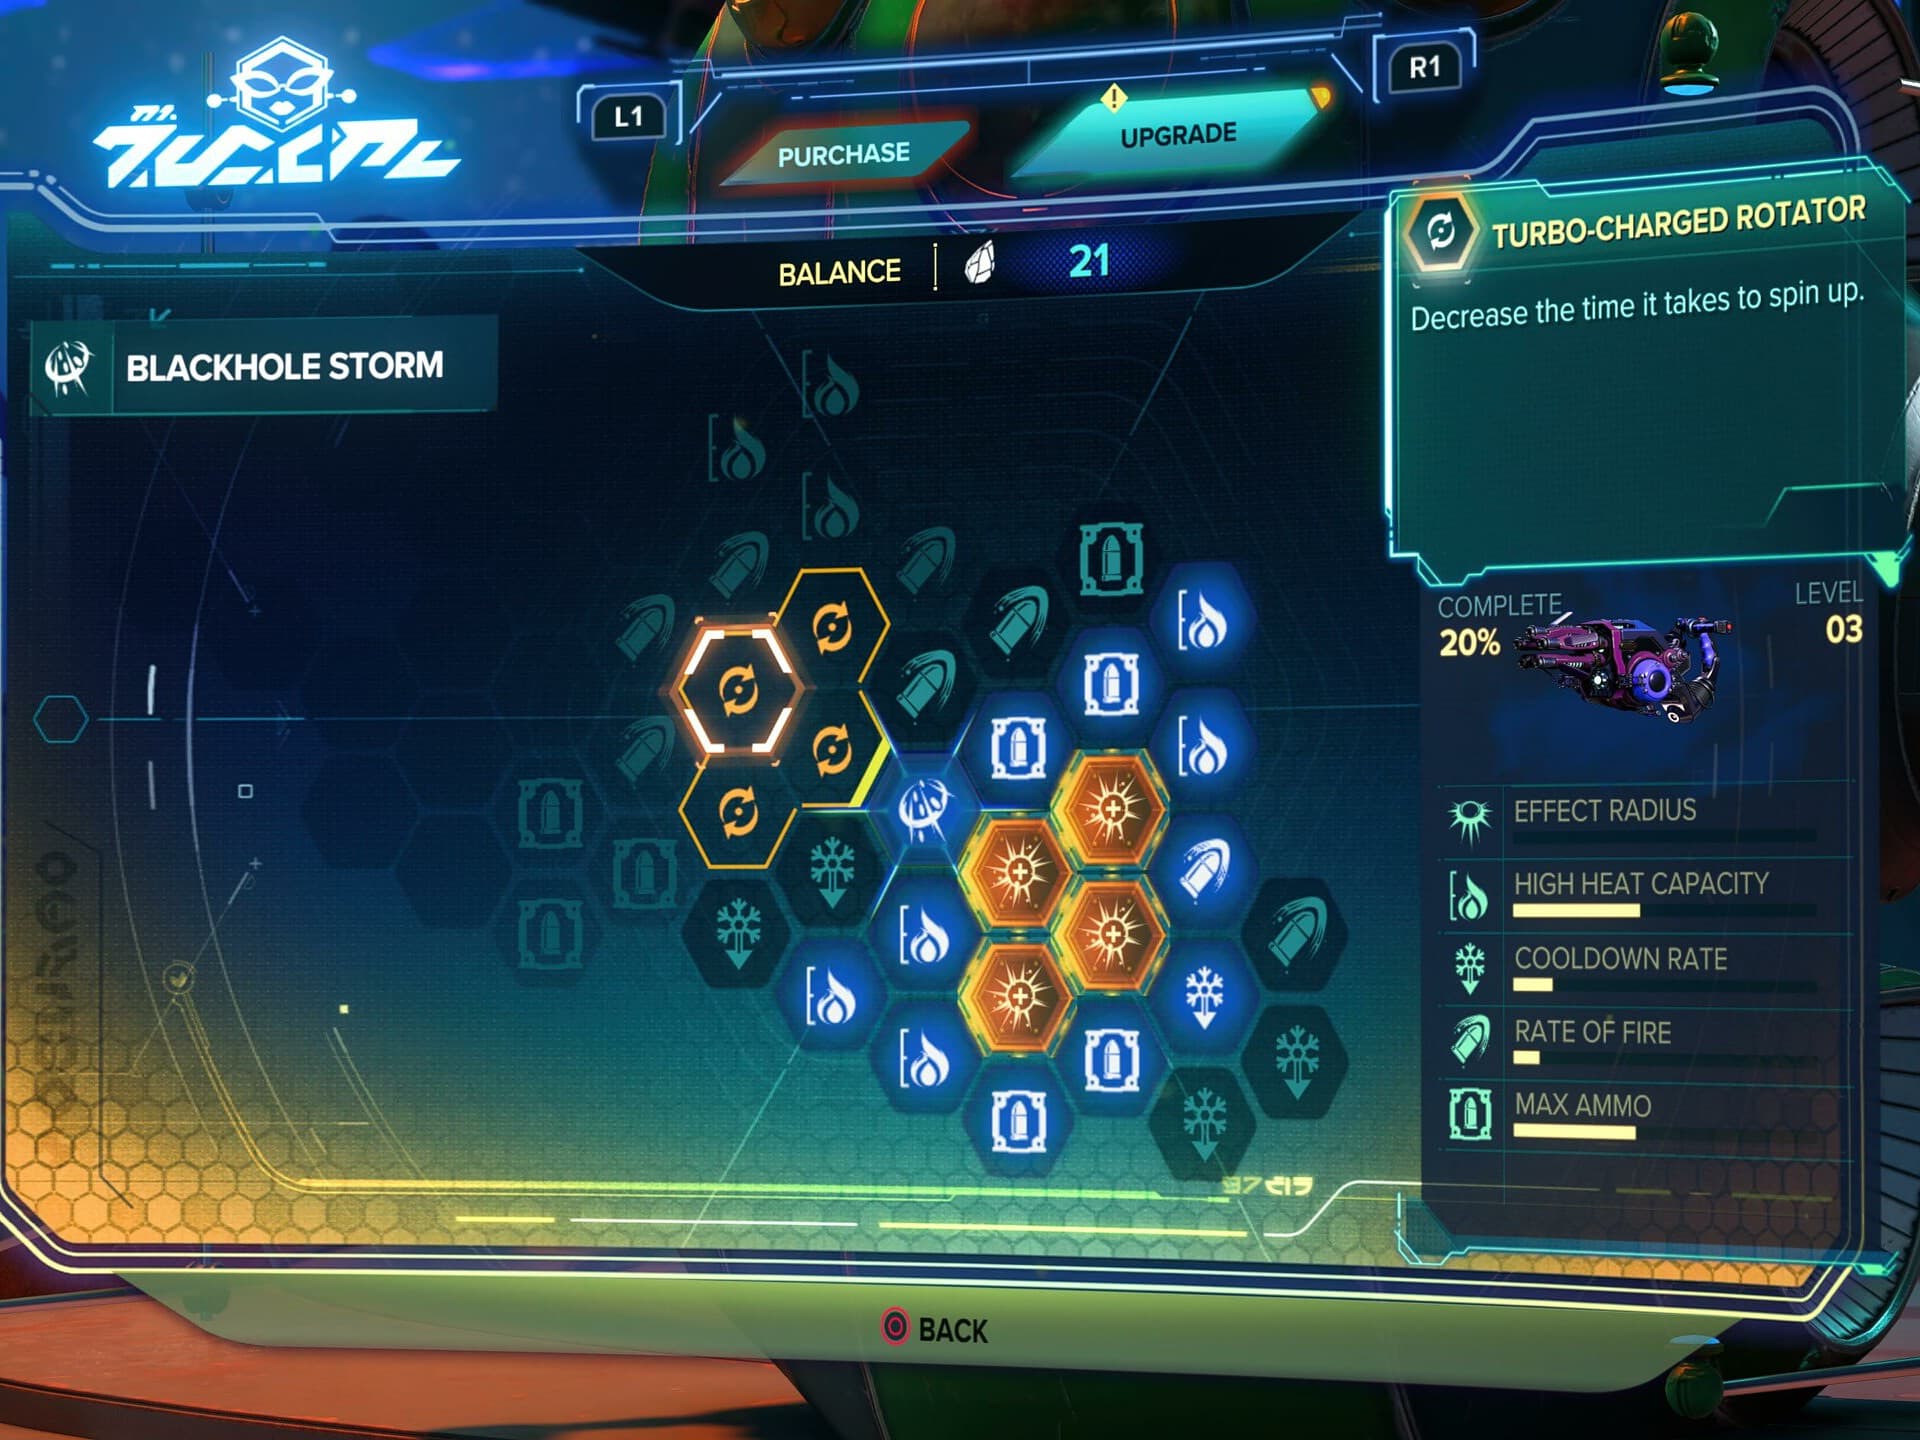
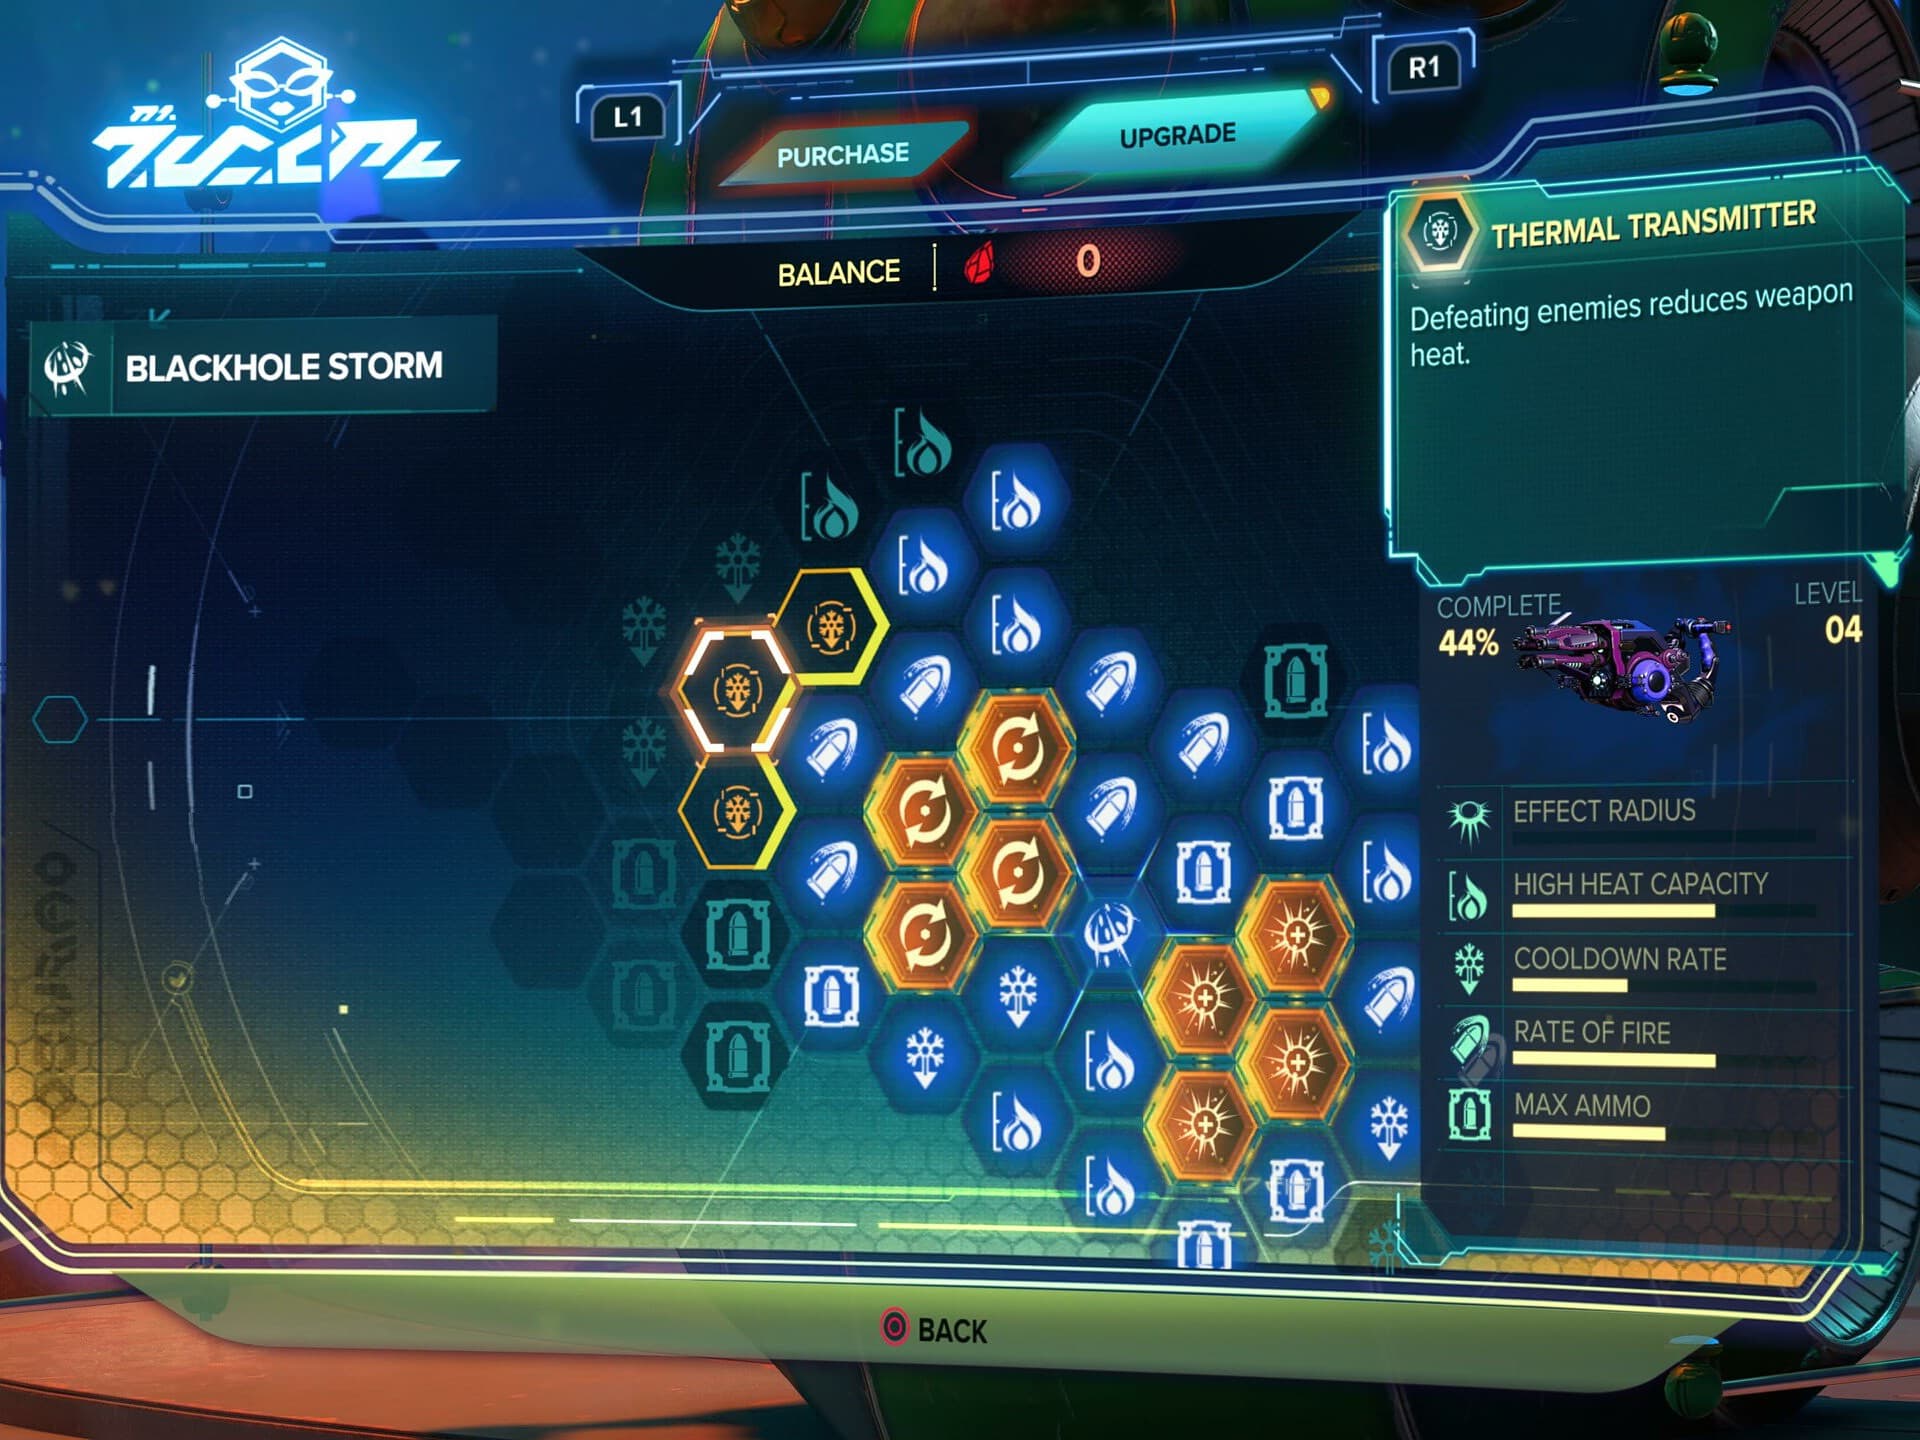
Through use of Raritanium, The Blackhole Storm / Blackhole Vortex gets the following upgrades from its Upgrade Tree:
High Heat Capacity, which increases the amount of time the weapon can fire before overheating. This should be the highest priority stat to pick up,as this weapon getting to fire longer helps at all stages of the game.
Cooldown Rate, which increases the rate as which the weapon recovers from overheating. This stat is the second highest priority, as it’s a helpful bonus if you’re having trouble managing the heat of the weapon.
Rate of Fire, which increases the weapon’s firing speed. This stat is third in line to be prioritized, because it needs High Heat Capacity and Cooldown Rate to actually be fully useful, otherwise you’ll overheat very quickly and go into a long cooldown often.
Max Ammo, which increases the maximum amount of ammo the weapon can hold. This is honestly the lowest priority as the base ammo count for this weapon is decently high already, and the stats that increase DPS are more beneficial.
Effect Radius, which becomes available once upgrading to the Blackhole Vortex, will increase the explosion radius of killed enemies.
In addition to these basic stat upgrades, the Blackhole Storm / Blackhole Vortex also have a set of Gold Cell upgrades which empower the weapon in various way.
At Level 2, the Blackhole Storm will have access to Superheated Slugs. This Gold Cell upgrade will increase damage by 25% if the heat gauge is at 50% or higher.

At Level 3, the Blackhole Storm will have access to Turbo-Charged Rotator. This Gold Cell Upgrade increases the speed at which the weapon spools up, making it a very short spool time.
At level 4, the Blackhole Storm will have access to Thermal Transmitter. This Gold Cell Upgrade reduces the weapon’s heat when killing an enemy. Alongside Superheated Slugs, this can help make this a formidable weapon against weaker enemies.
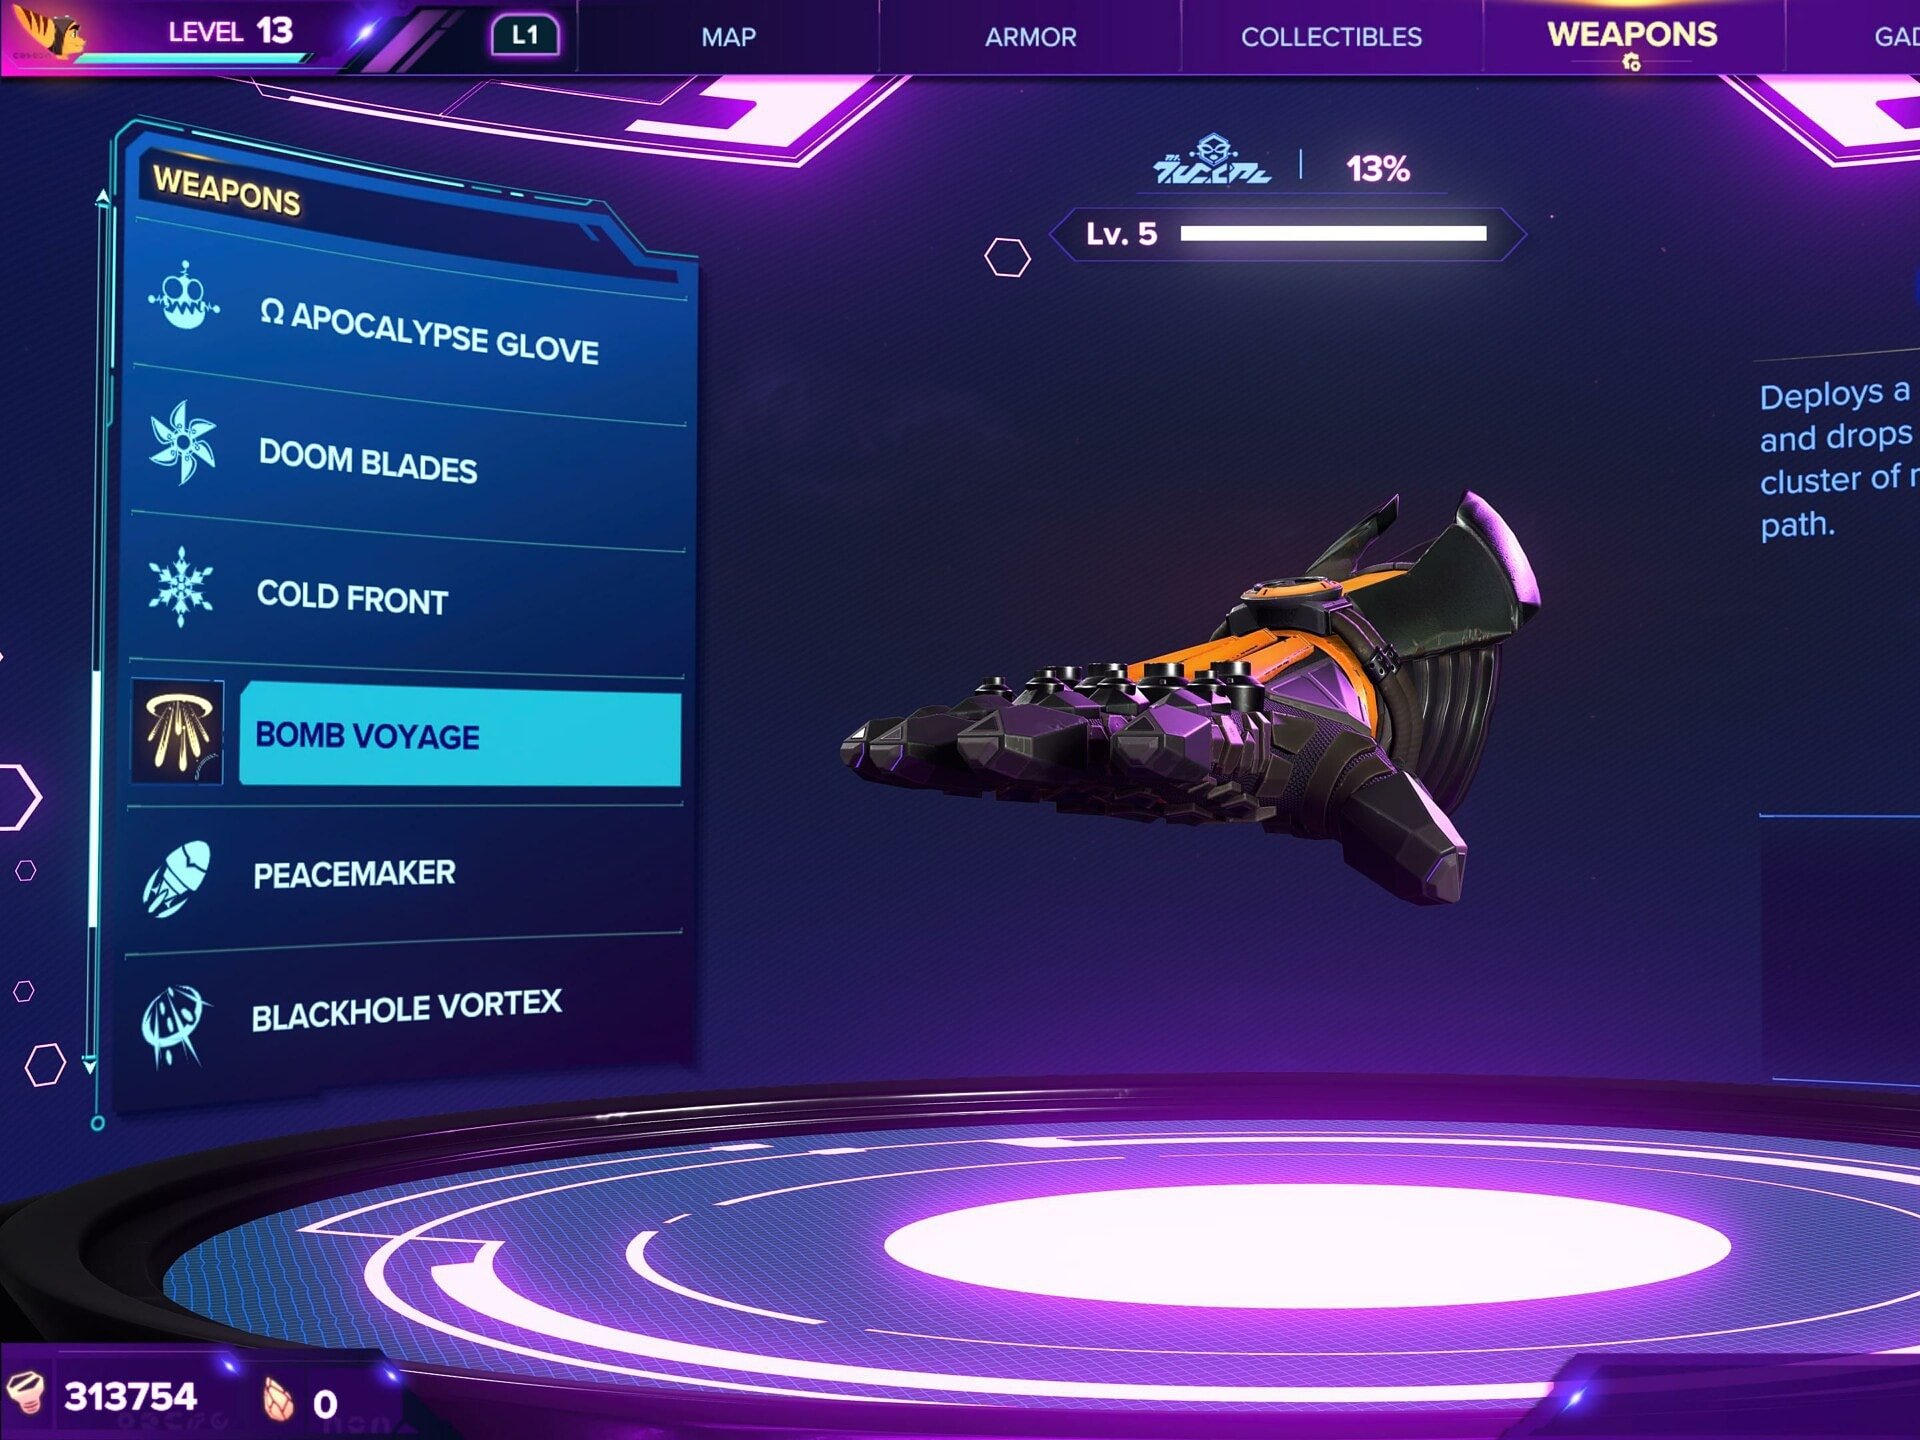
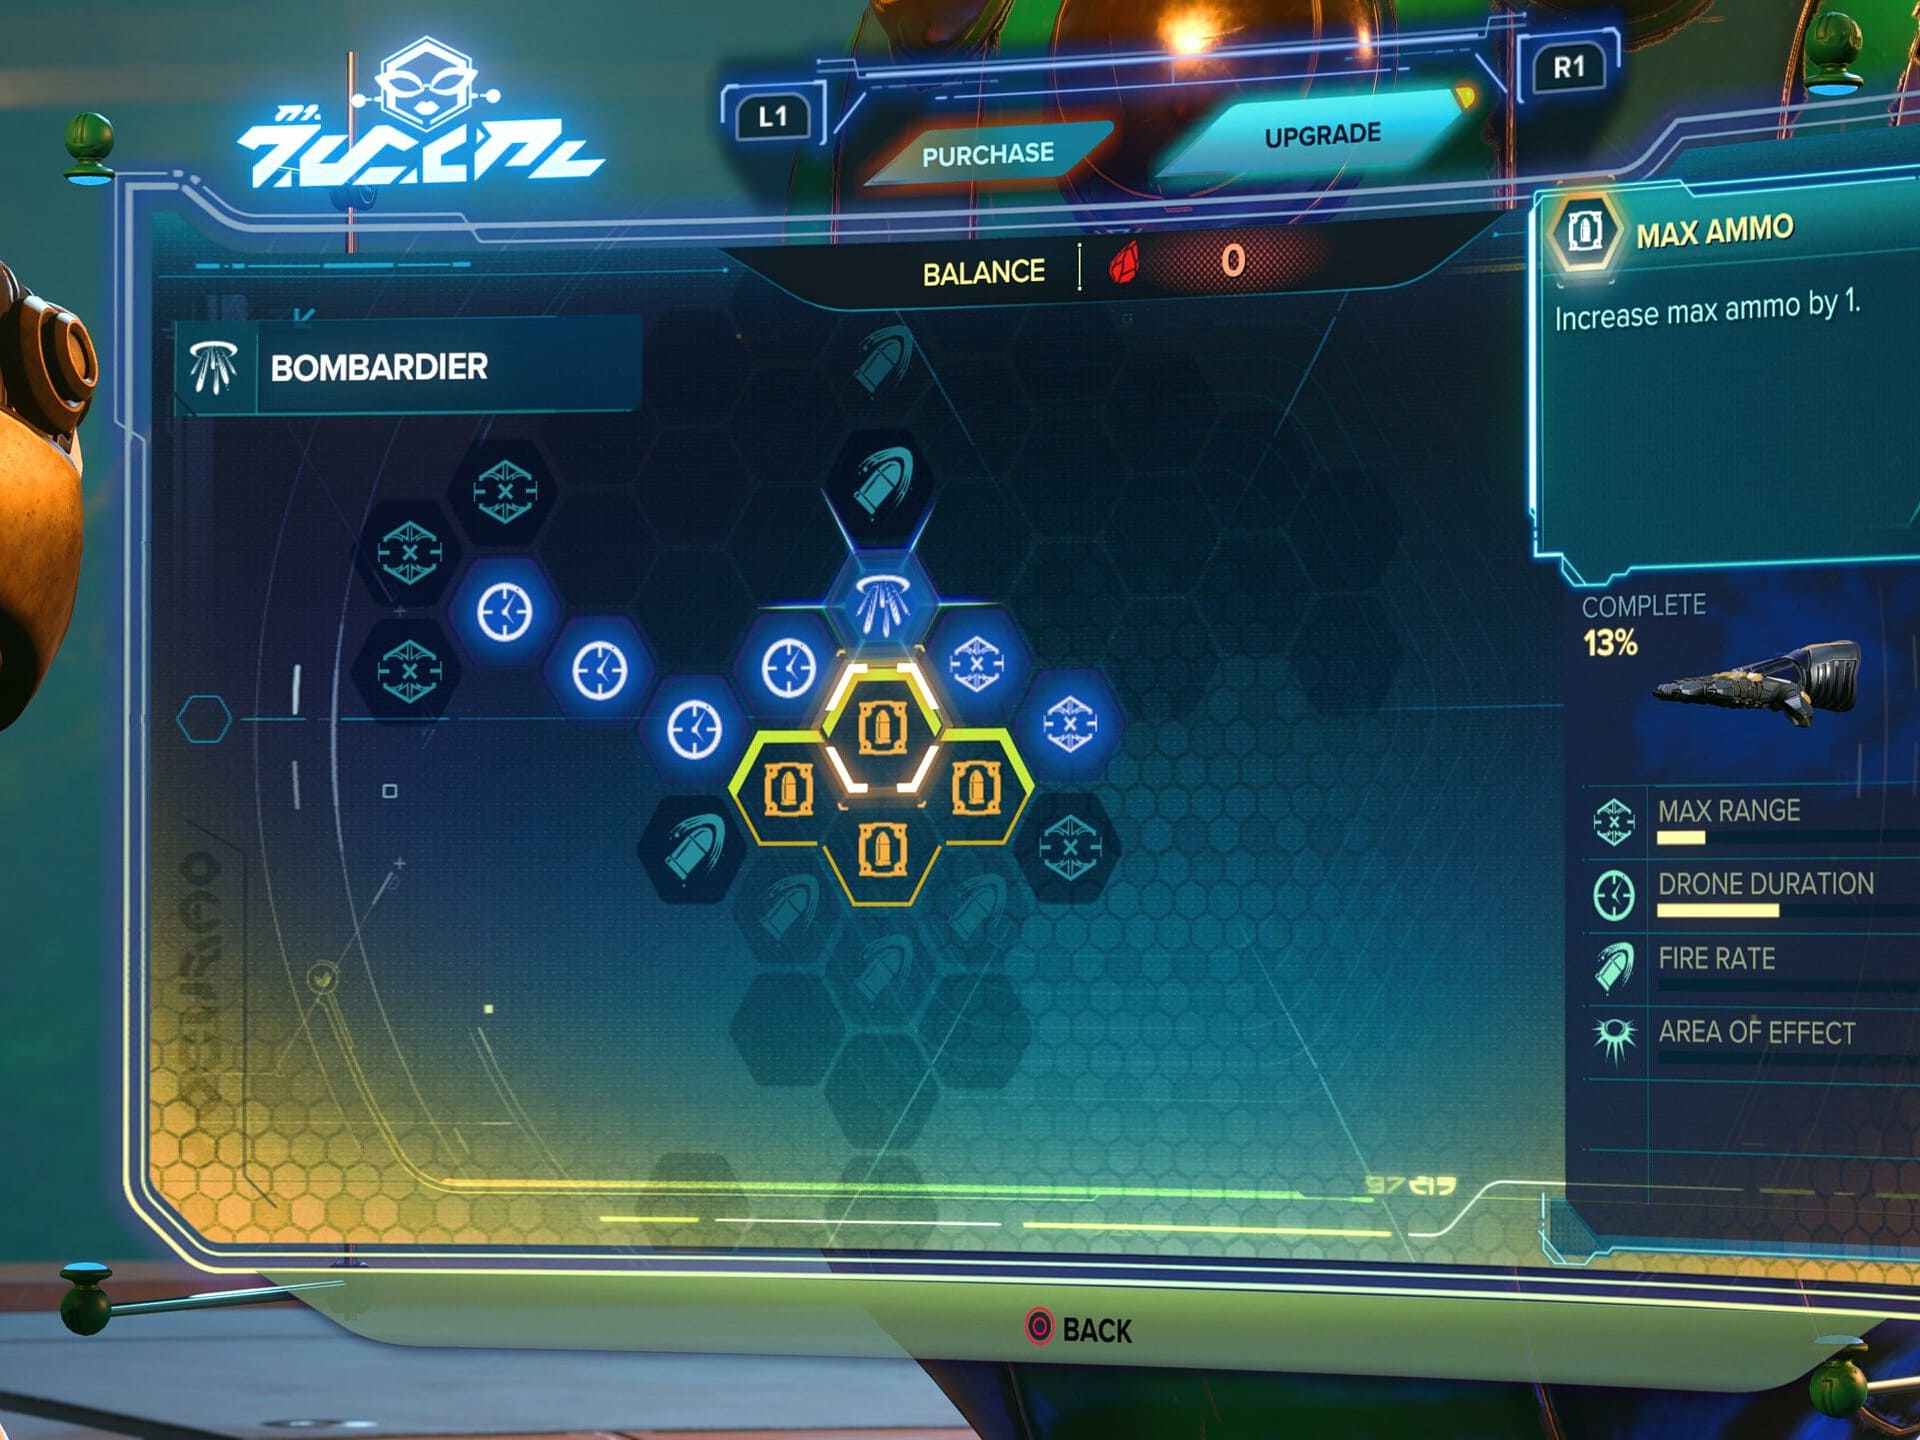
Bombardier
A new weapon for the series, the Bombardier releases a drone that slowly fires missiles at targets in range. It works similarly to the Mr. Fungi weapon on this list, but attacks slower, while having harder hitting attacks.

The Bombardier is great against weaker enemies, killing most of them with ease. Against larger enemies it does still offer extra damage on top of firing anther weapons, similarly to the Glove of Doom and Mr. Fungi.
The Bombardier becomes available starting at Ardolis for 25,000 Bolts.
Upgrades
At Level 5, the Bombardier becomes the Bomb Voyage. This upgrade makes the drone explode into a cluster of mini-bombs at the end of its flight path, or when it expires.
In Challenge Mode, the Bomb Voyage can be upgraded to the Omega Bomb Voyage for 400,000 Bolts.
Through use of Raritanium, The Bombardier / Bomb Voyage gets the following upgrades from its Upgrade Tree:
Drone Duration, Which makes the drone stay out and fire longer. This should be the highest priority stat as it makes it easier to level and allows it to deal more damage.
Fire Rate, which increases the rate at which the drone fires. This increases the Total damage the drone can deal in its duration and and a very good second priority for stats.
Max Range, which increases the range at which the drone will auto-target enemies. This is mostly a quality of life stat and can also help the weapon level easier.
The Bomb Voyage also gets the Area of Effect stat, which increases the area which the mini-bombs deal damage. This is a very low priority stat, as often times enemies can or will be dispatched by other weapons before the Bomb Voyage drone finishes its travel path.
In addition to these basic stat upgrades, the Bombardier / Bomb Voyage also have a set of Gold Cell upgrades which empower the weapon in various way.
At Levels 2 and 4, the Bombardier get the Max Ammo Gold Cell Upgrade. Each of these upgrades increases the Bombardier’s Max ammo by one.
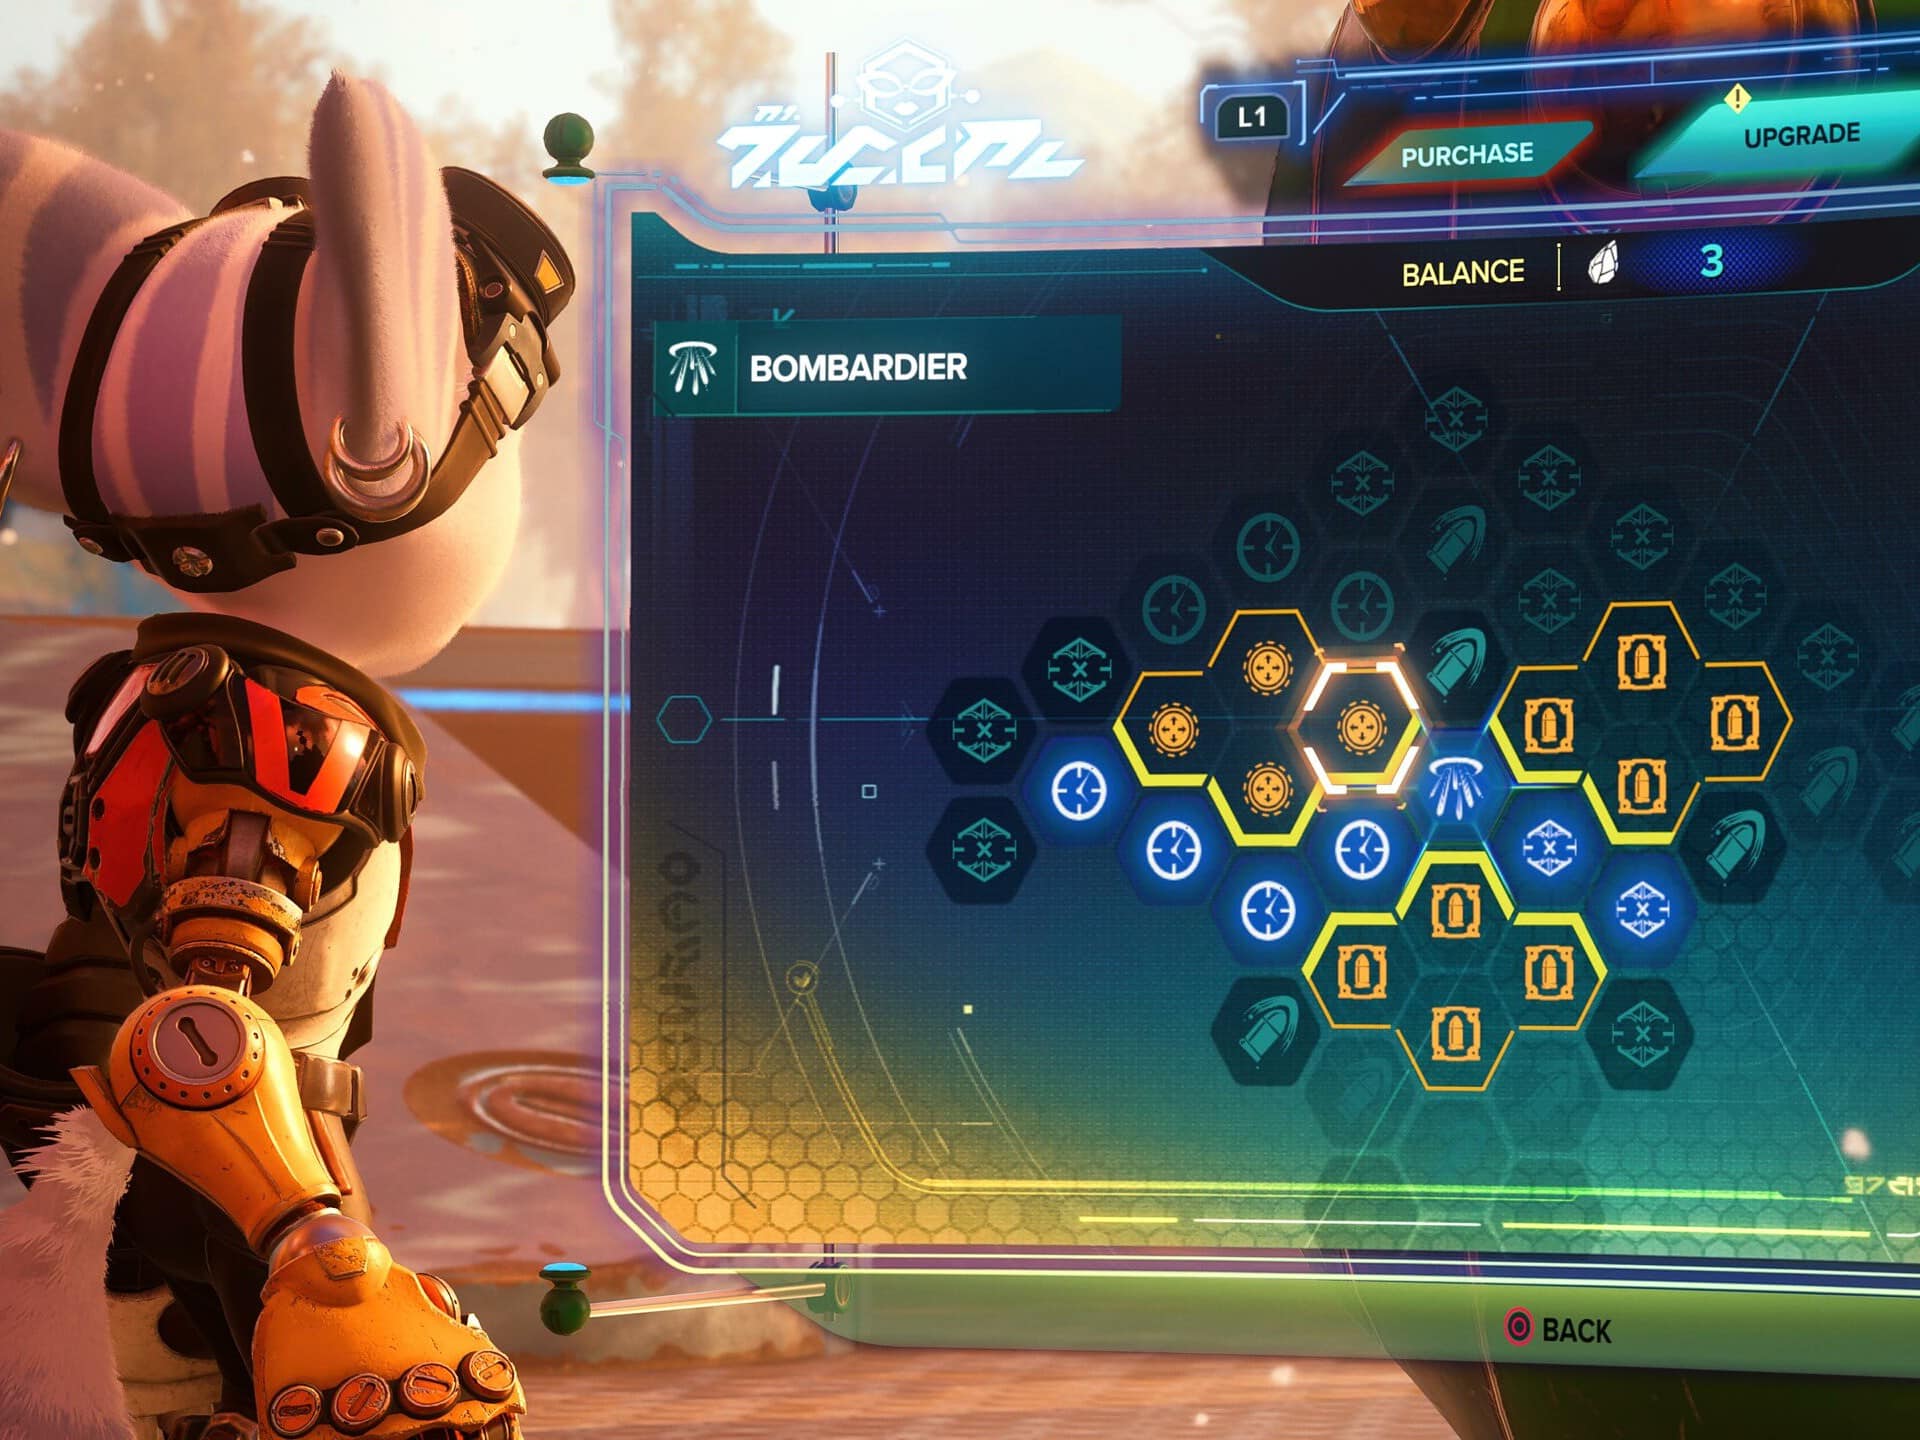
At Level 3, the Bombardier gets the Drone Squadron Gold Cell Upgrade. This upgrade allows you to deploy two drones simultaneously.
Bouncer
A returning weapon to the series, the Bouncer releases a large cluster bomb that can home in on an enemy and explode into mini-bombs which will also home in on enemies.
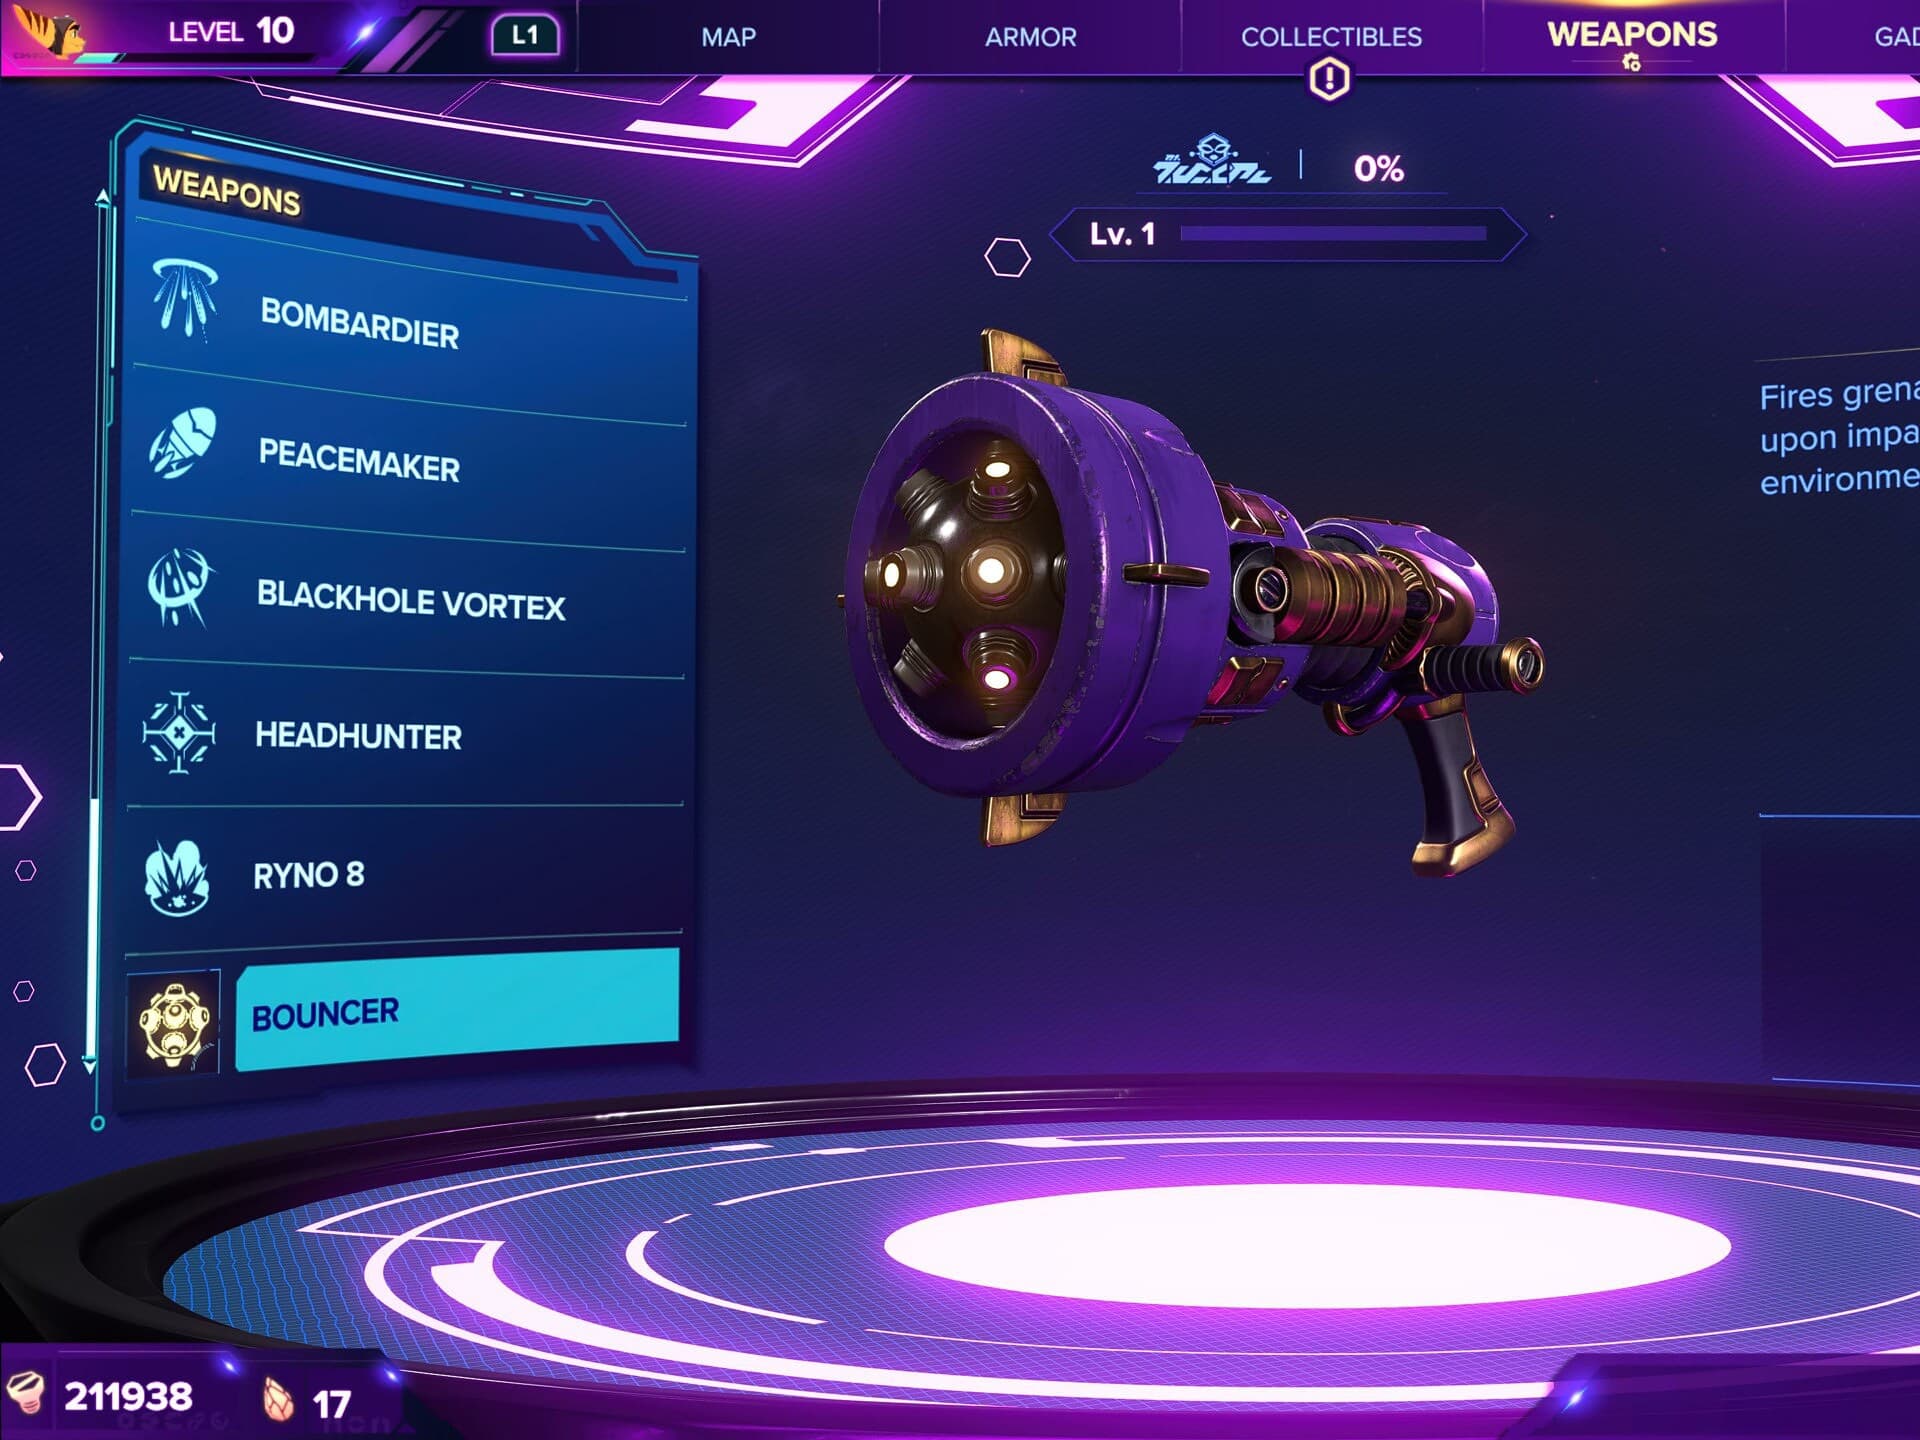
Even for the stage of the game it becomes available, the Bouncer is immediately a very powerful weapon. It’s high in damage and very reliable for bursting down Bosses.
The Bouncer is available for a single bolt alongside the Pixelizer at the very start of Challenge Mode.
Upgrades
At Level 5 the Bouncer becomes the Heavy Bouncer. This upgrade makes the initial Bouncer and the subsequent micro-grenades explode with every bounce, which can drastically increase the damage it deals to single target wile also significantly increasing its ability to defeat groups of enemies.
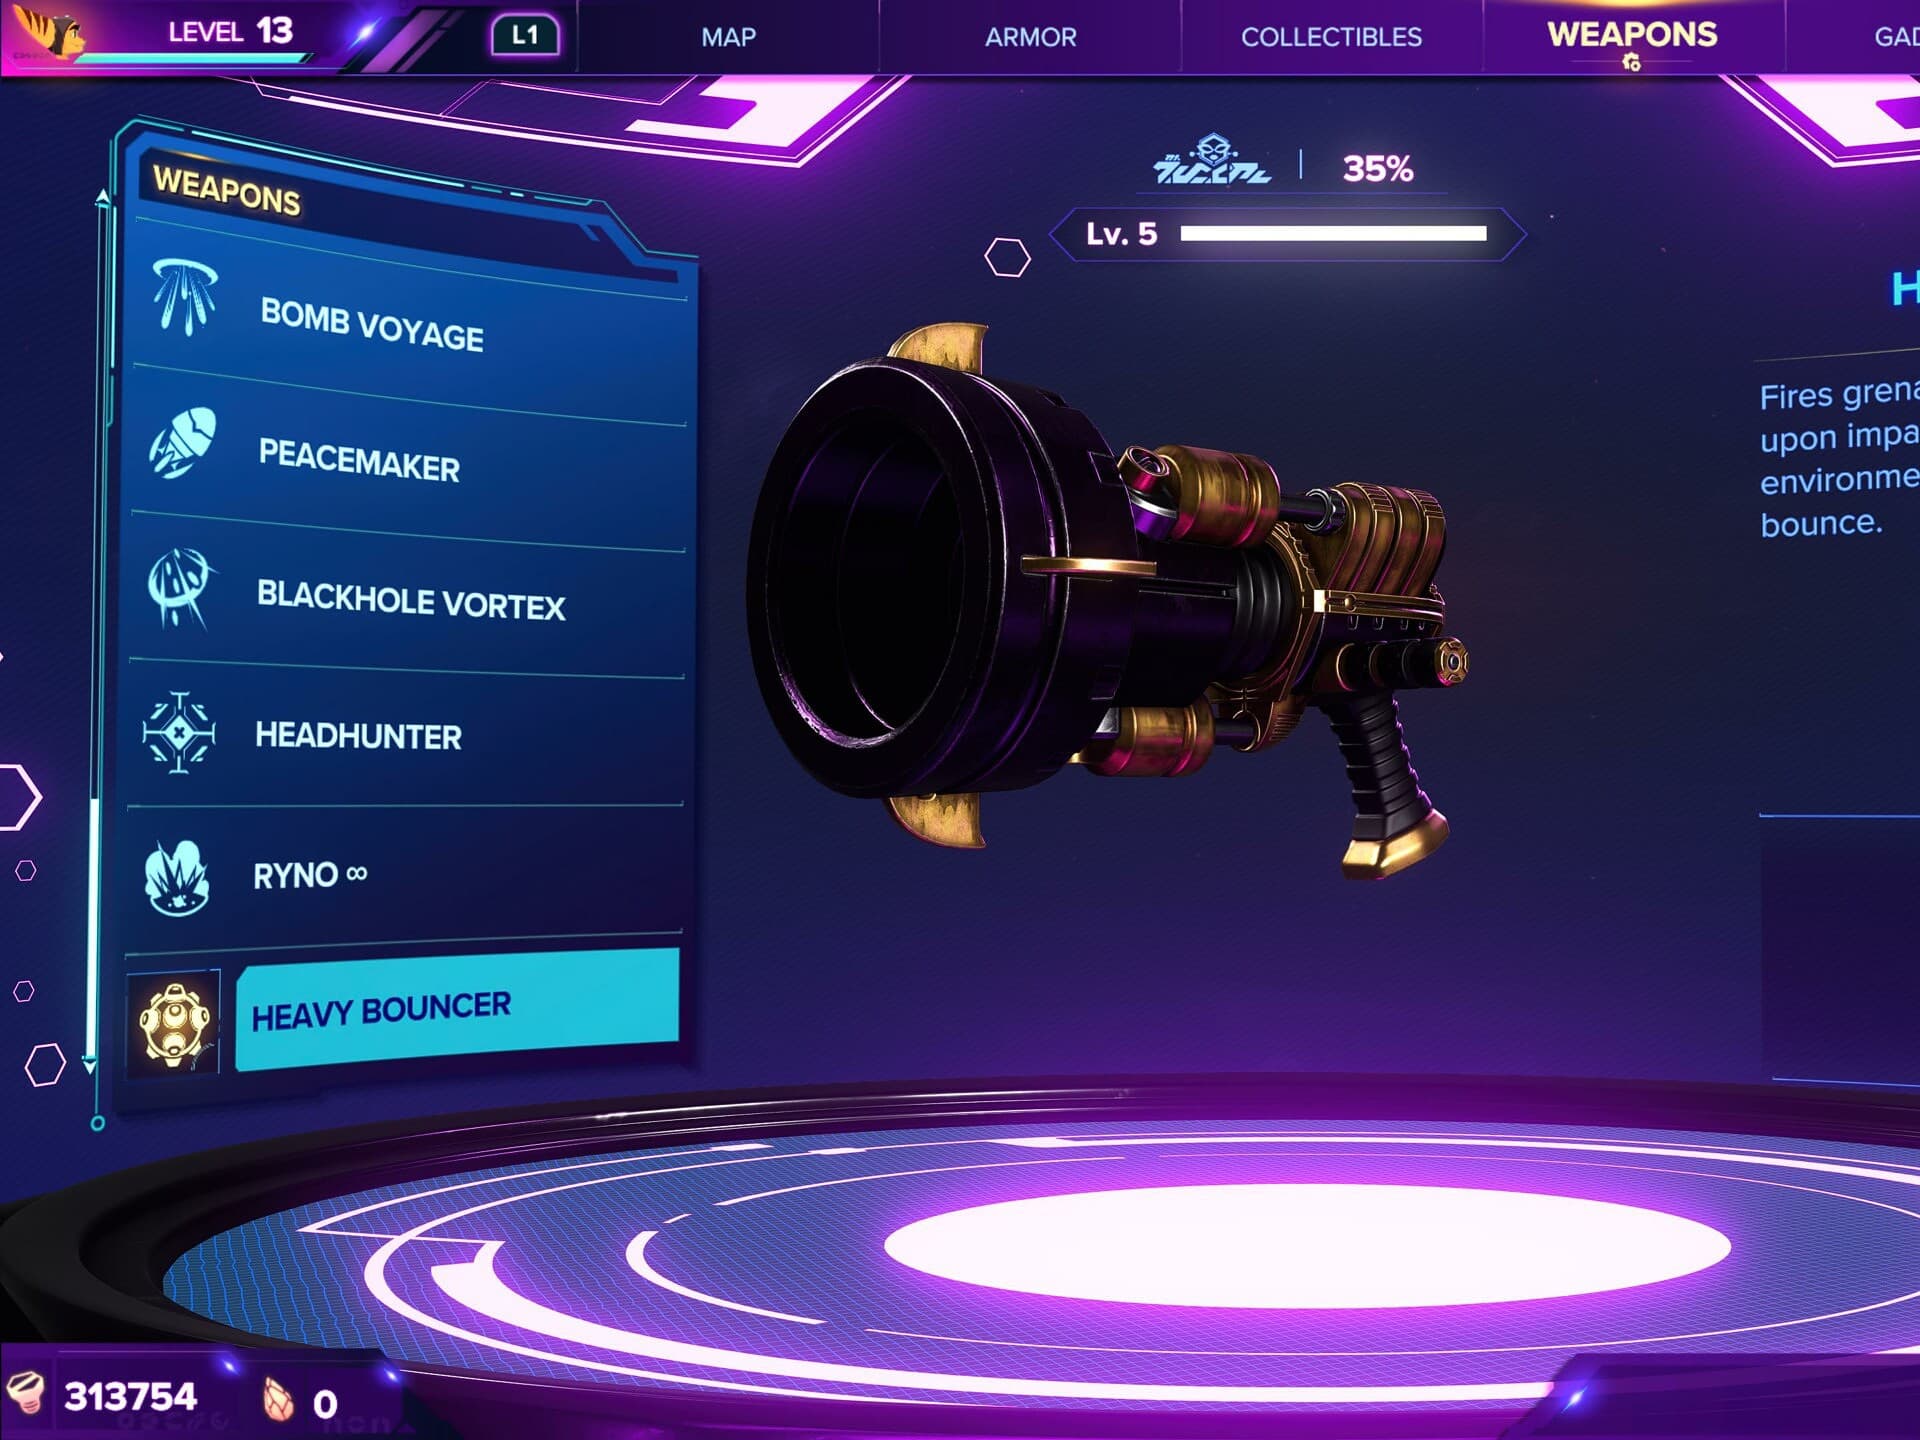
In Challenge Mode, after this weapon upgrades to the Heavy Bouncer, you can purchase the Omega Heavy Bouncer for 55,000 Bolts.
Through use of Raritanium, The Bouncer / Heavy Bouncer gets the following upgrades from its Upgrade Tree:
Area of Effect, which increases the explosion radius of the main grenade as well as the micro-grenades. This is a low priority stat until the weapon upgrades to the Heavy Bouncer, where it becomes a more impactful upgrade.
Fuse Timer, which increase the amount of time the initial grenade can bounce or home towards an enemy before automatically detonating. This is very much a quality of life bonus early, but similarly to Area of Effect becomes more powerful with the Heavy Bouncer.
Homing Range, which increases the range at which the grenade and micro-grenades will home in on enemies. This one should be the highest priority stat as it increases the weapon’s consistency significantly.
Initial Damage, which increases the damage of the initial grenade’s explosion. This is the second highest priority stat as the extra damage is very helpful for stronger enemies, including bosses.
In addition to these basic stat upgrades, the Bouncer / Heavy Bouncer also have a set of Gold Cell upgrades which empower the weapon in various way.
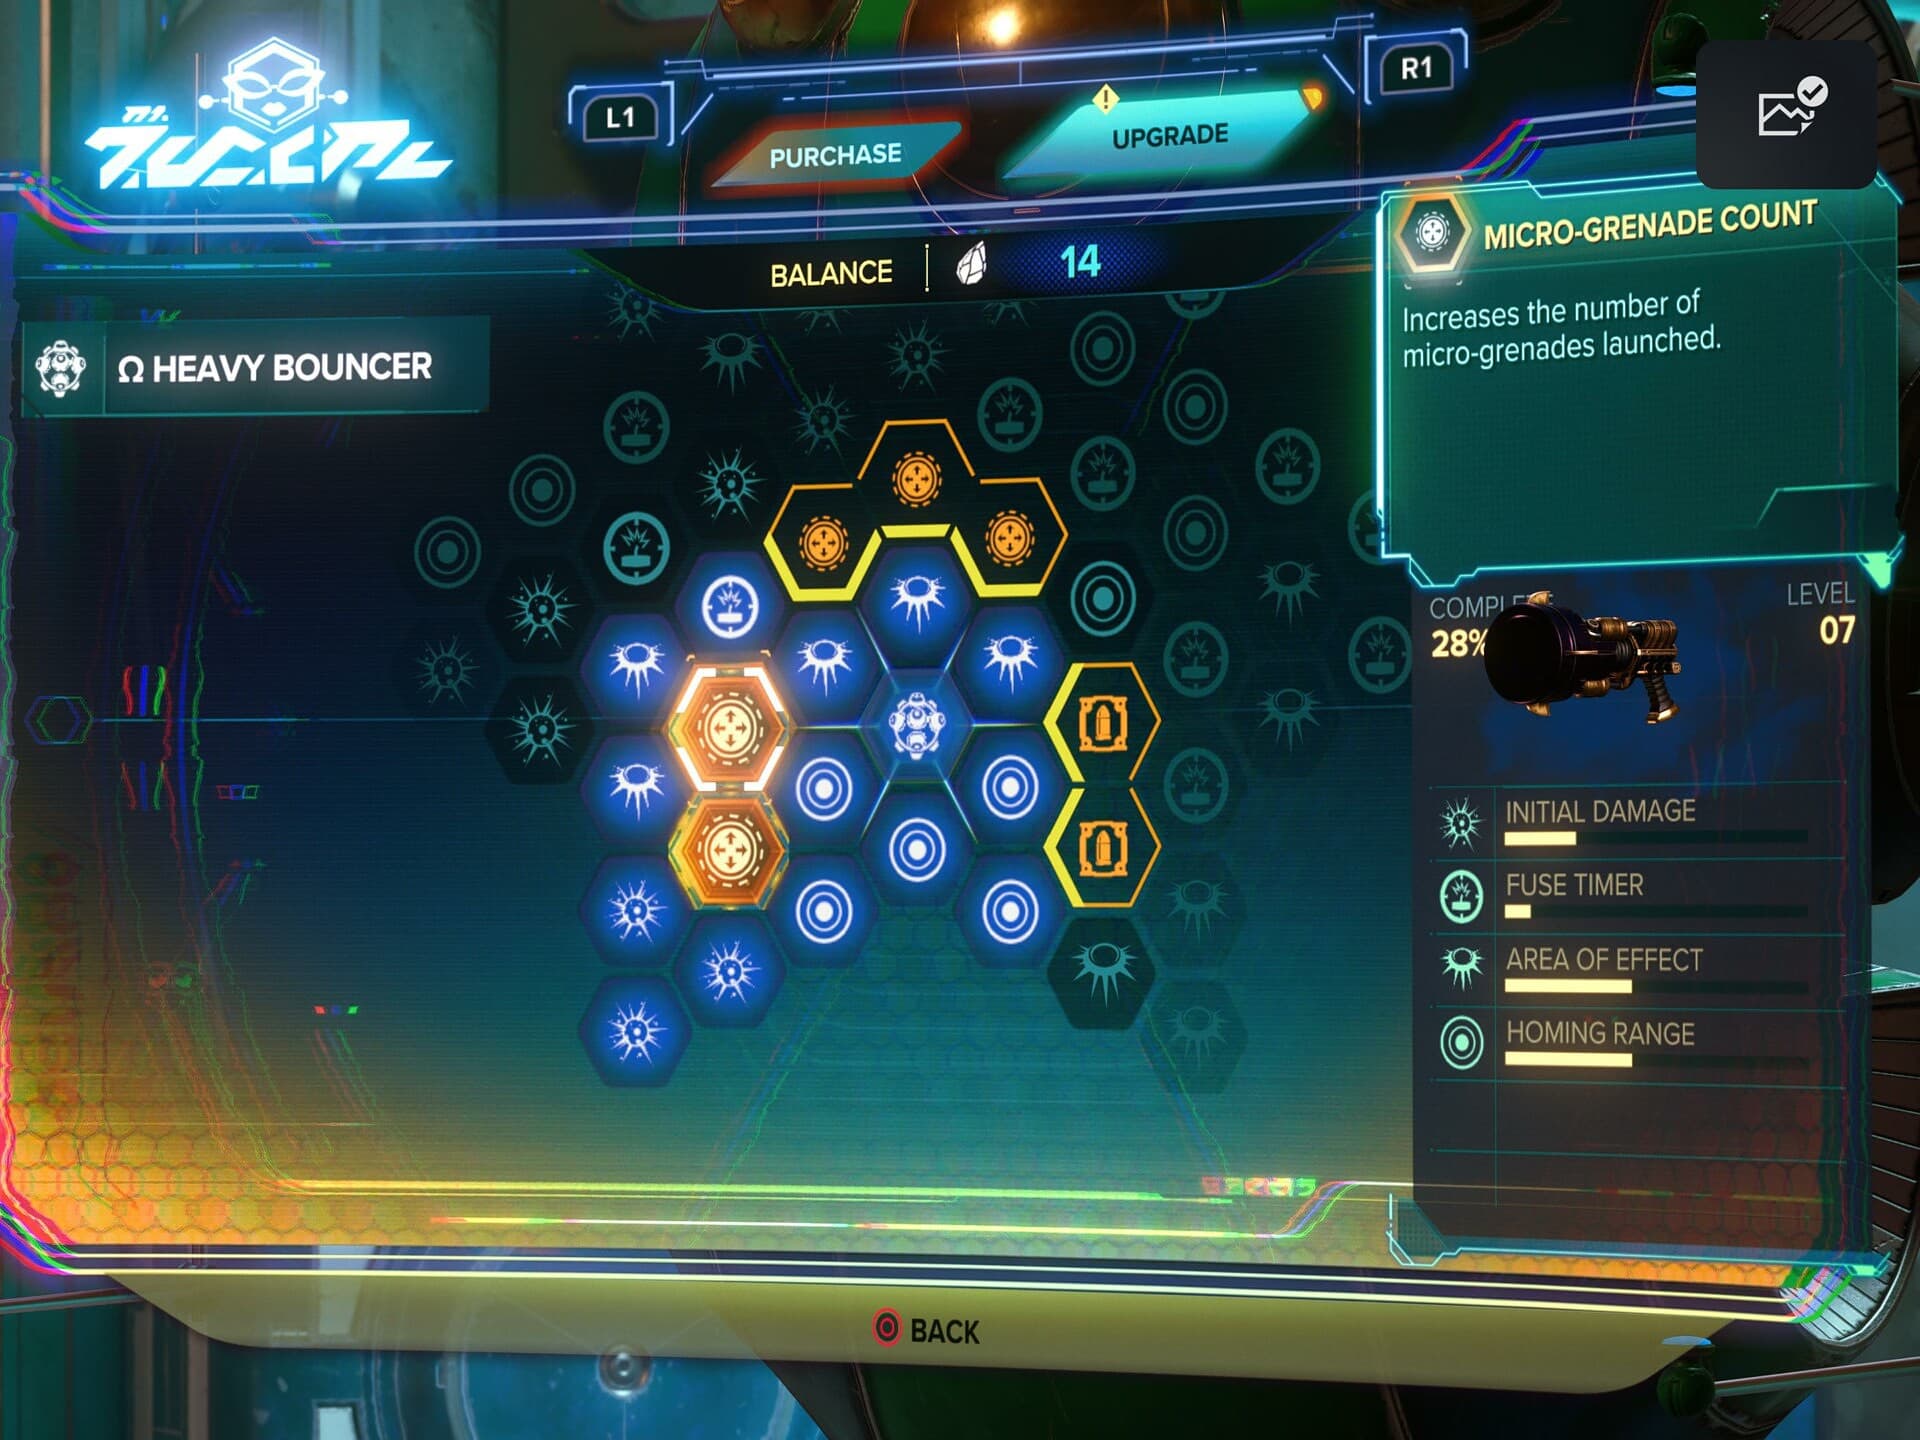
At Level 2 and 4, the Bouncer gets access to Micro-grenade Count. This increases the number of micro-grenades released from the initial grenade.
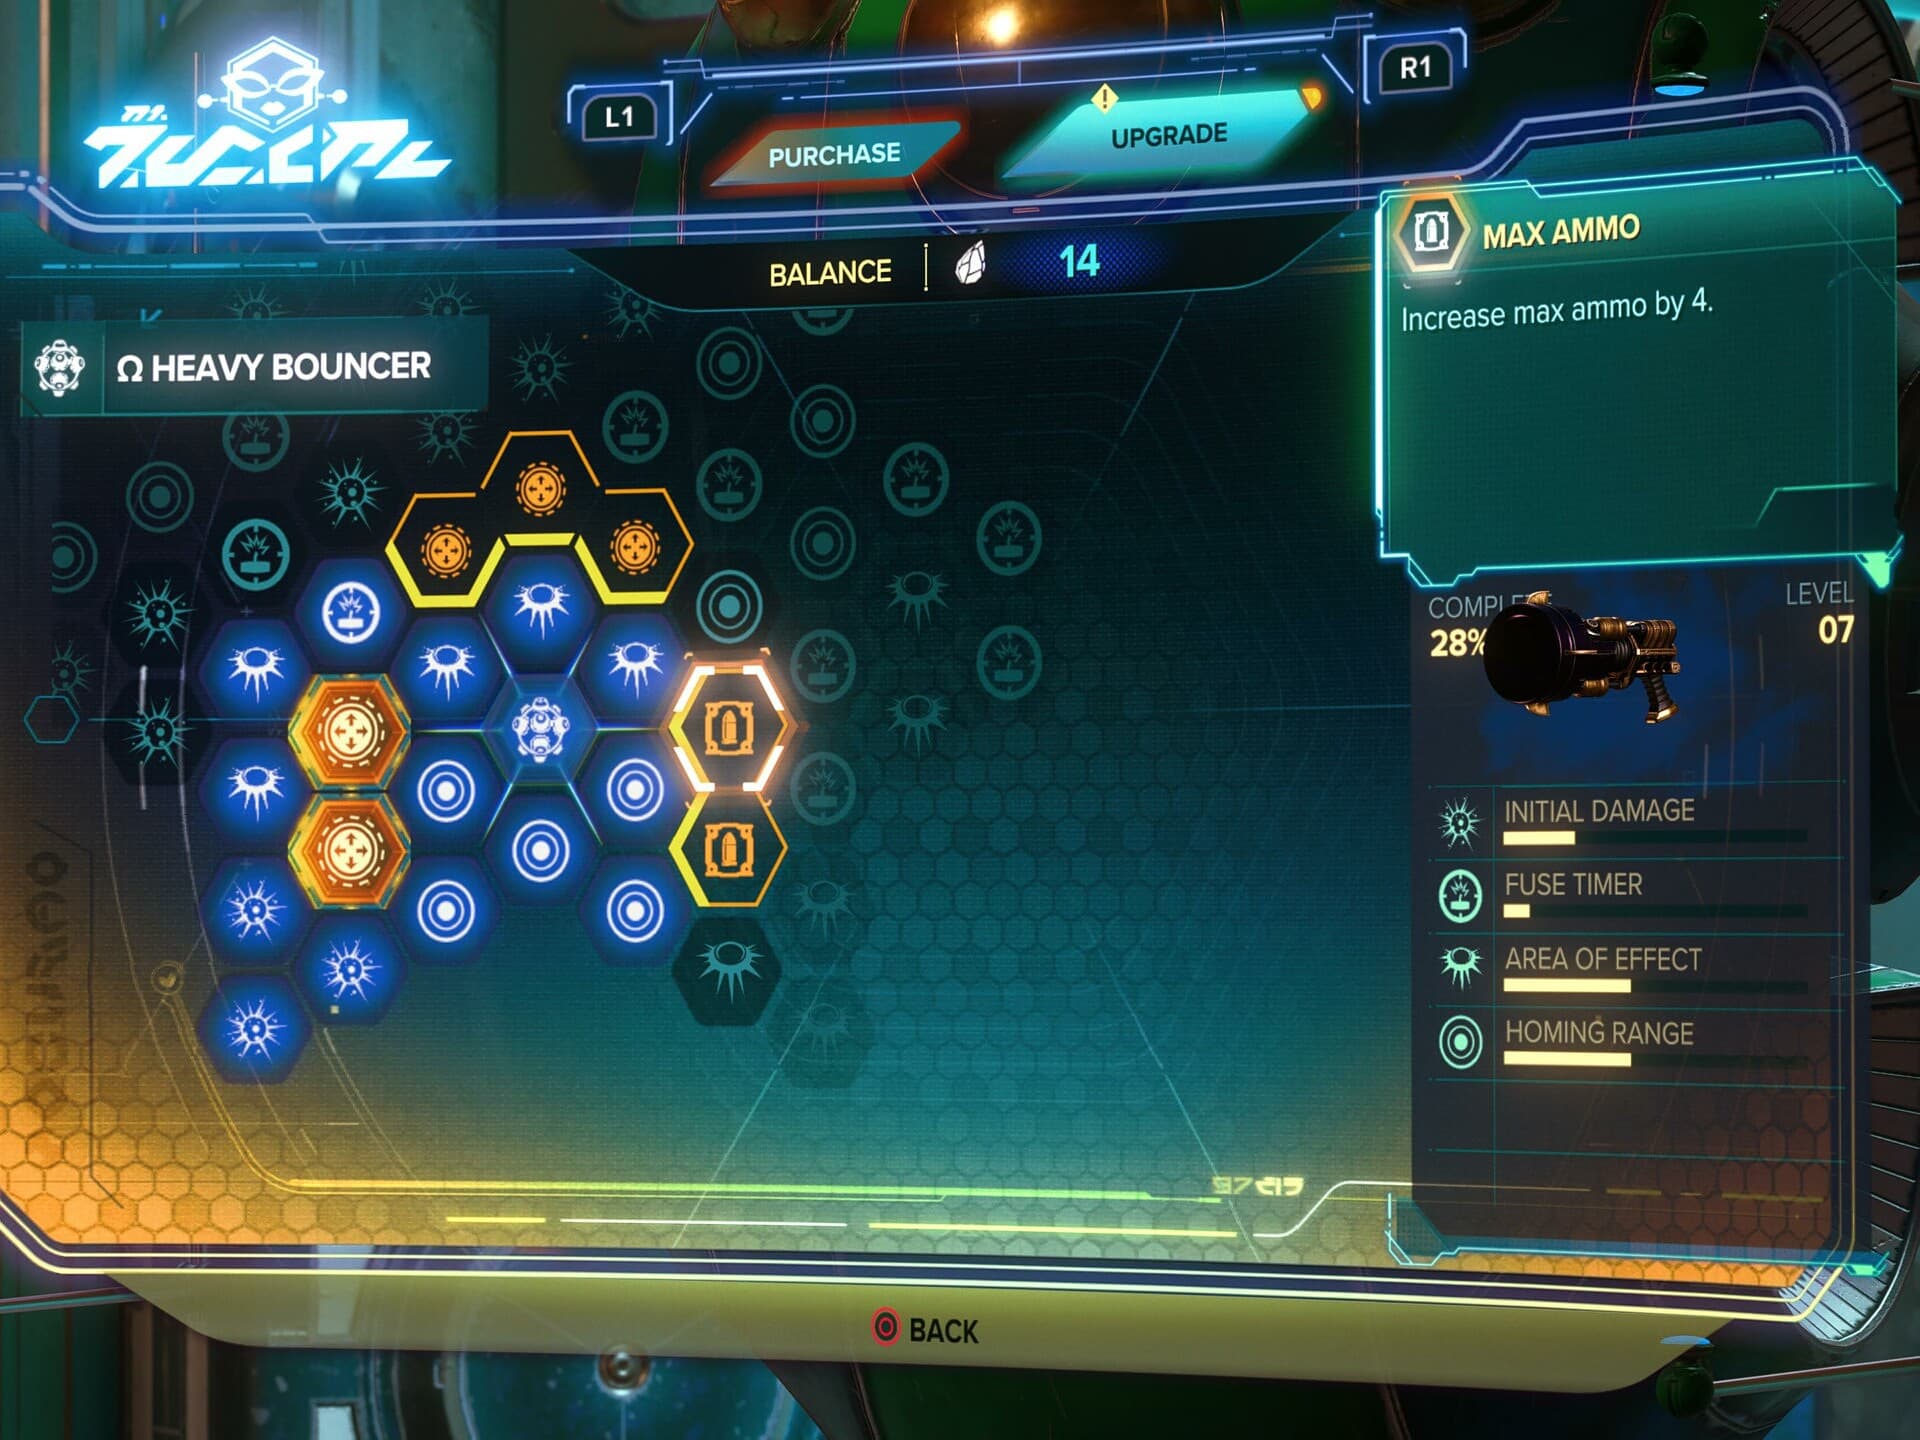
At Level 3, the Bouncer gets access to Max Ammo. This increases the Bouncer’s ammo count by four. Four ammo may not seem like much, but for the power of this weapon it’s a really solid second upgrade
Burst Pistol
The Burst Pistol, or at least this style of weapon is your standard starting weapon. It fire basic projectiles that move decently quick. You will often start most Ratchet and Clank titles with a very similar weapon.
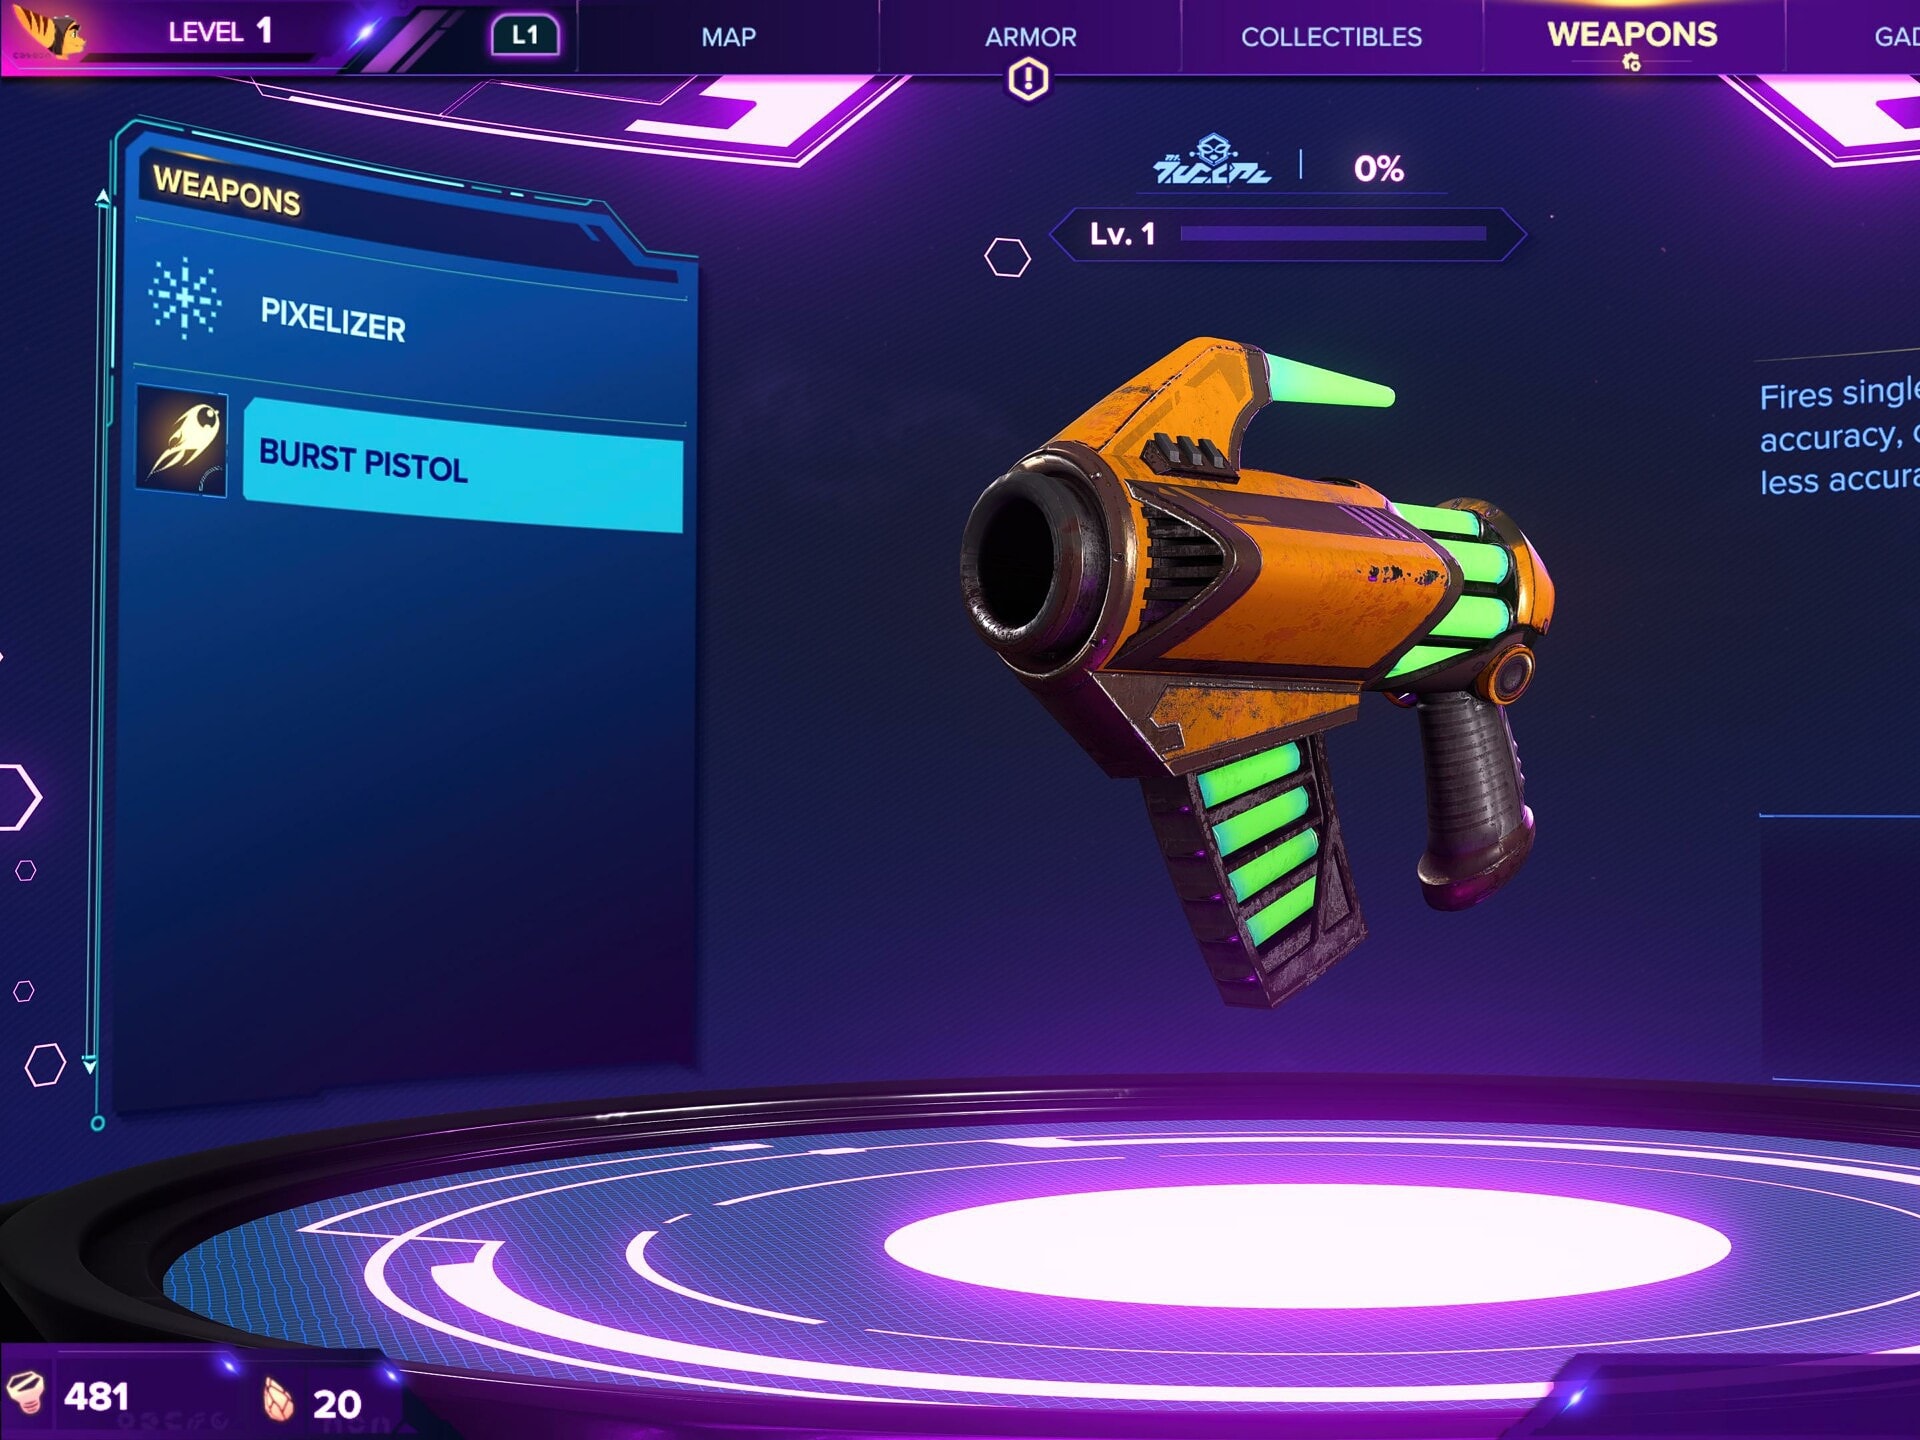
For the early stages of the game, this weapon will be your consistent DPS weapon. It’ll end up doing a fair share of damage against early bosses, but will quickly be replaced by a few heavy hitters in combination with supportive weapons like the Topiary Sprinkler.
You obtain this weapon during the tutorial on Megalopolis at no cost.
Upgrades
At Level 5 the Burst Pistol becomes the Blast Pistol, capable of firing three rounds at a time instead of just one. Which with the other upgrades really amps its damage output.
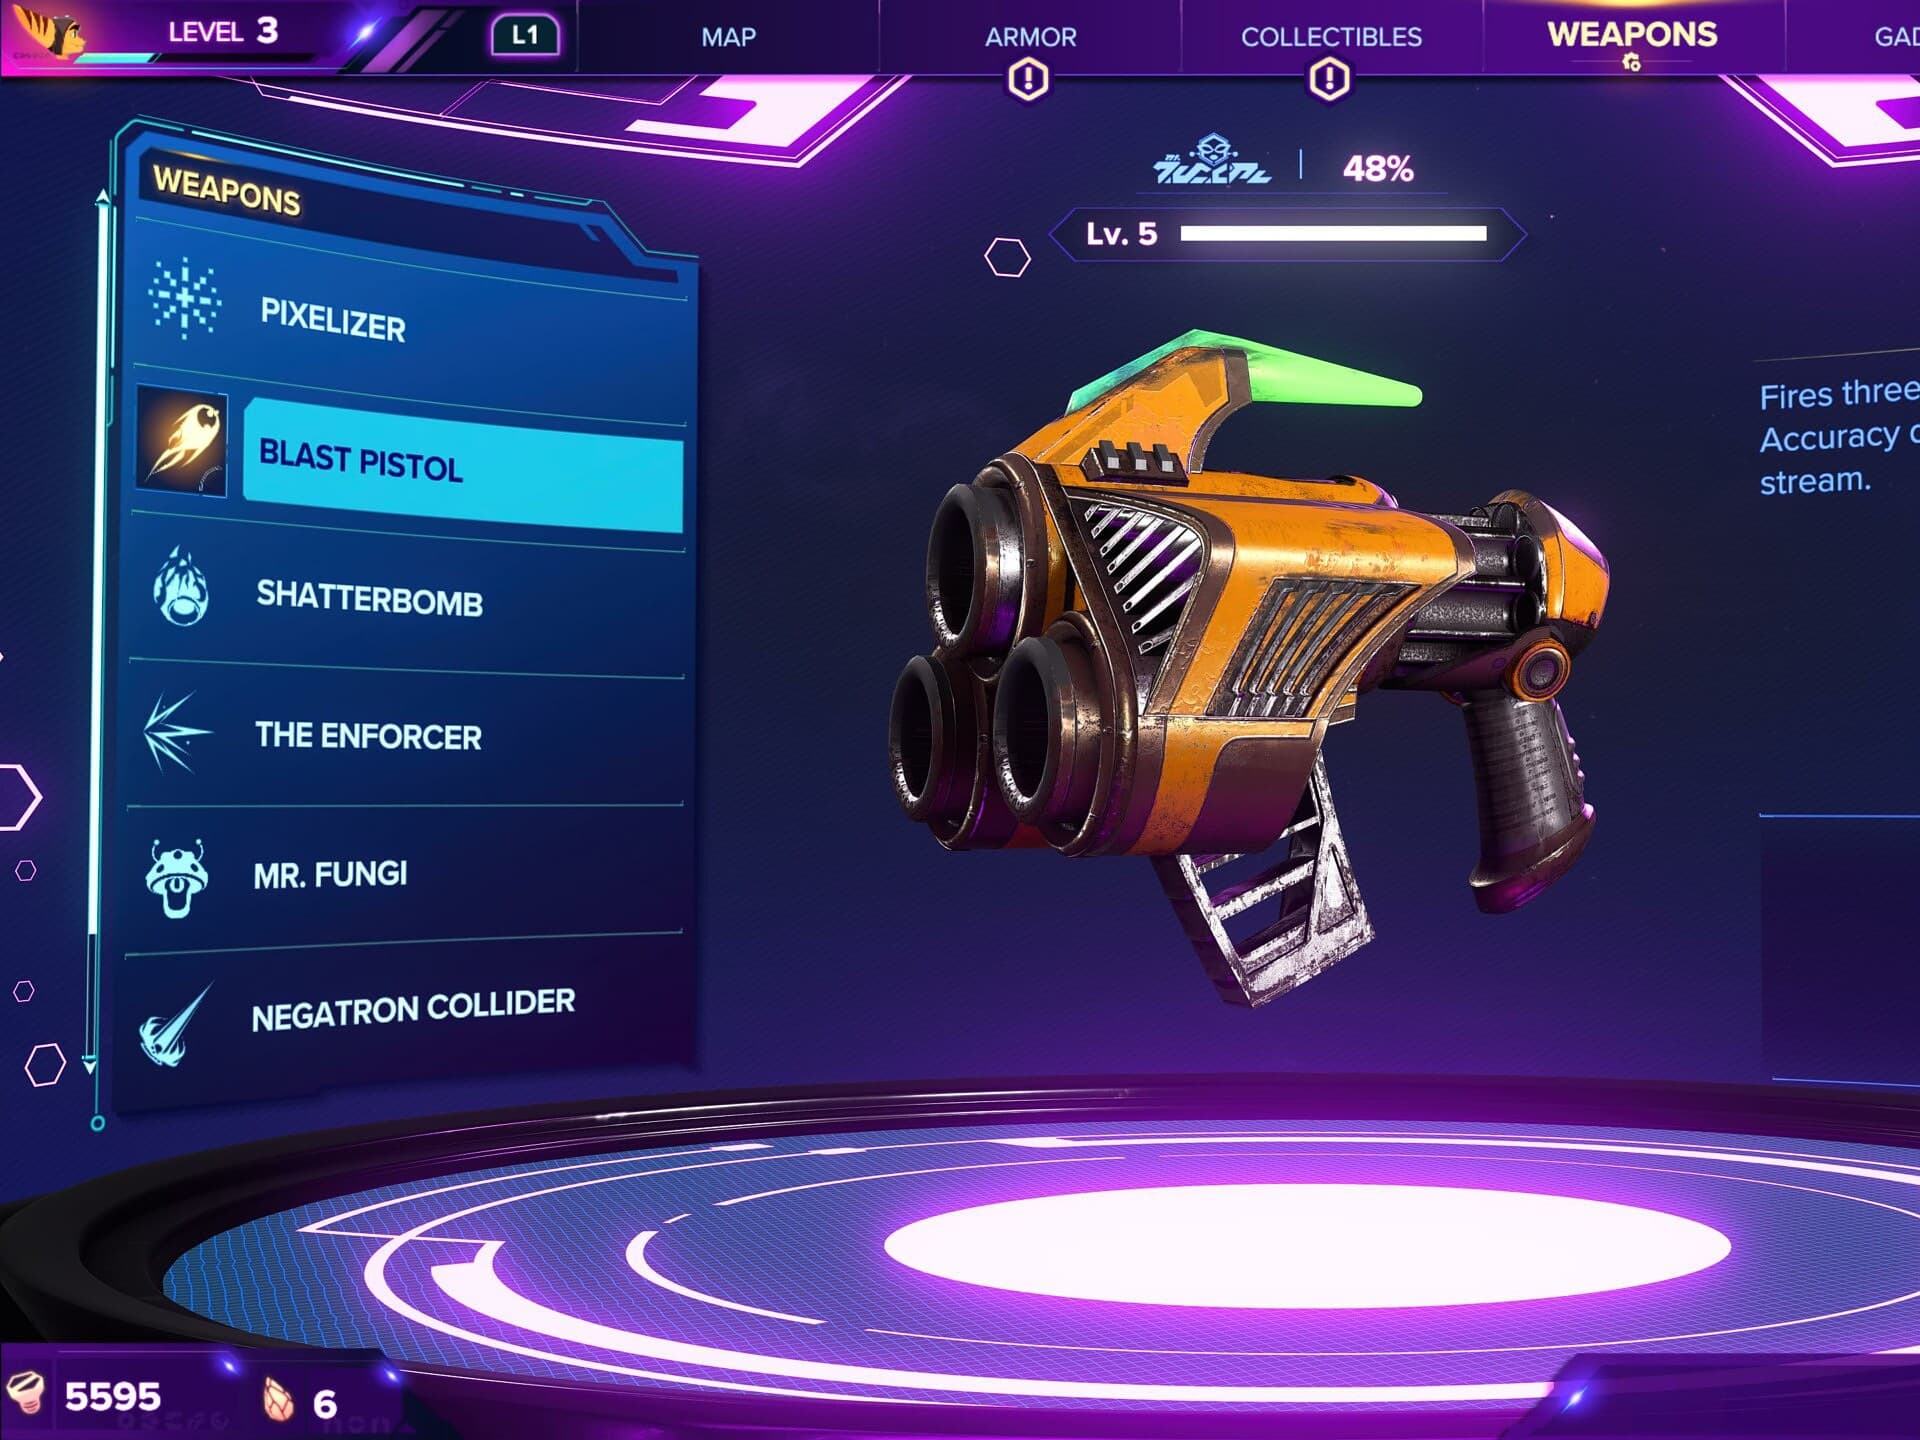
In Challenge Mode, the Blast Pistol can be upgraded to the Omega Blast Pistol for 45,000 Bolts.
Through use of Raritanium, the Burst Pistol or Blast Pistol have access to the following bonuses on its Upgrade Tree:
Rate of Fire (Accurate) and Rate of Fire (Full) , which increase the Rate of fire for each respective firing mode of the weapons. While leveling, the Full Auto Rate of Fire is more helpful. When the weapon becomes the Blast Pistol the Accurate Mode Rate of Fire becomes a little more relevant.
Accuracy, which increases the accuracy of shots in Full Auto Firing mode. This is a highly effective and useful stat, and should be the highest priority, alongside Rate of Fire (Full).
Max Ammo, which increases the maximum amount of ammo you can hold at one time with the weapons. A simple quality of life bonus.
The Blast Pistol also gains access to the Spread Stat, which reduces the spread of the shots, centering them much more. This is more of a Quality of Life upgrade, but does effectively increase the damage of the weapon allowing all three projectiles to hit instead of just one or two.
In addition to these basic stat upgrades, the Burst Pistol / Blast Pistol also have a set of Gold Cell upgrades which empower the weapon in various way.
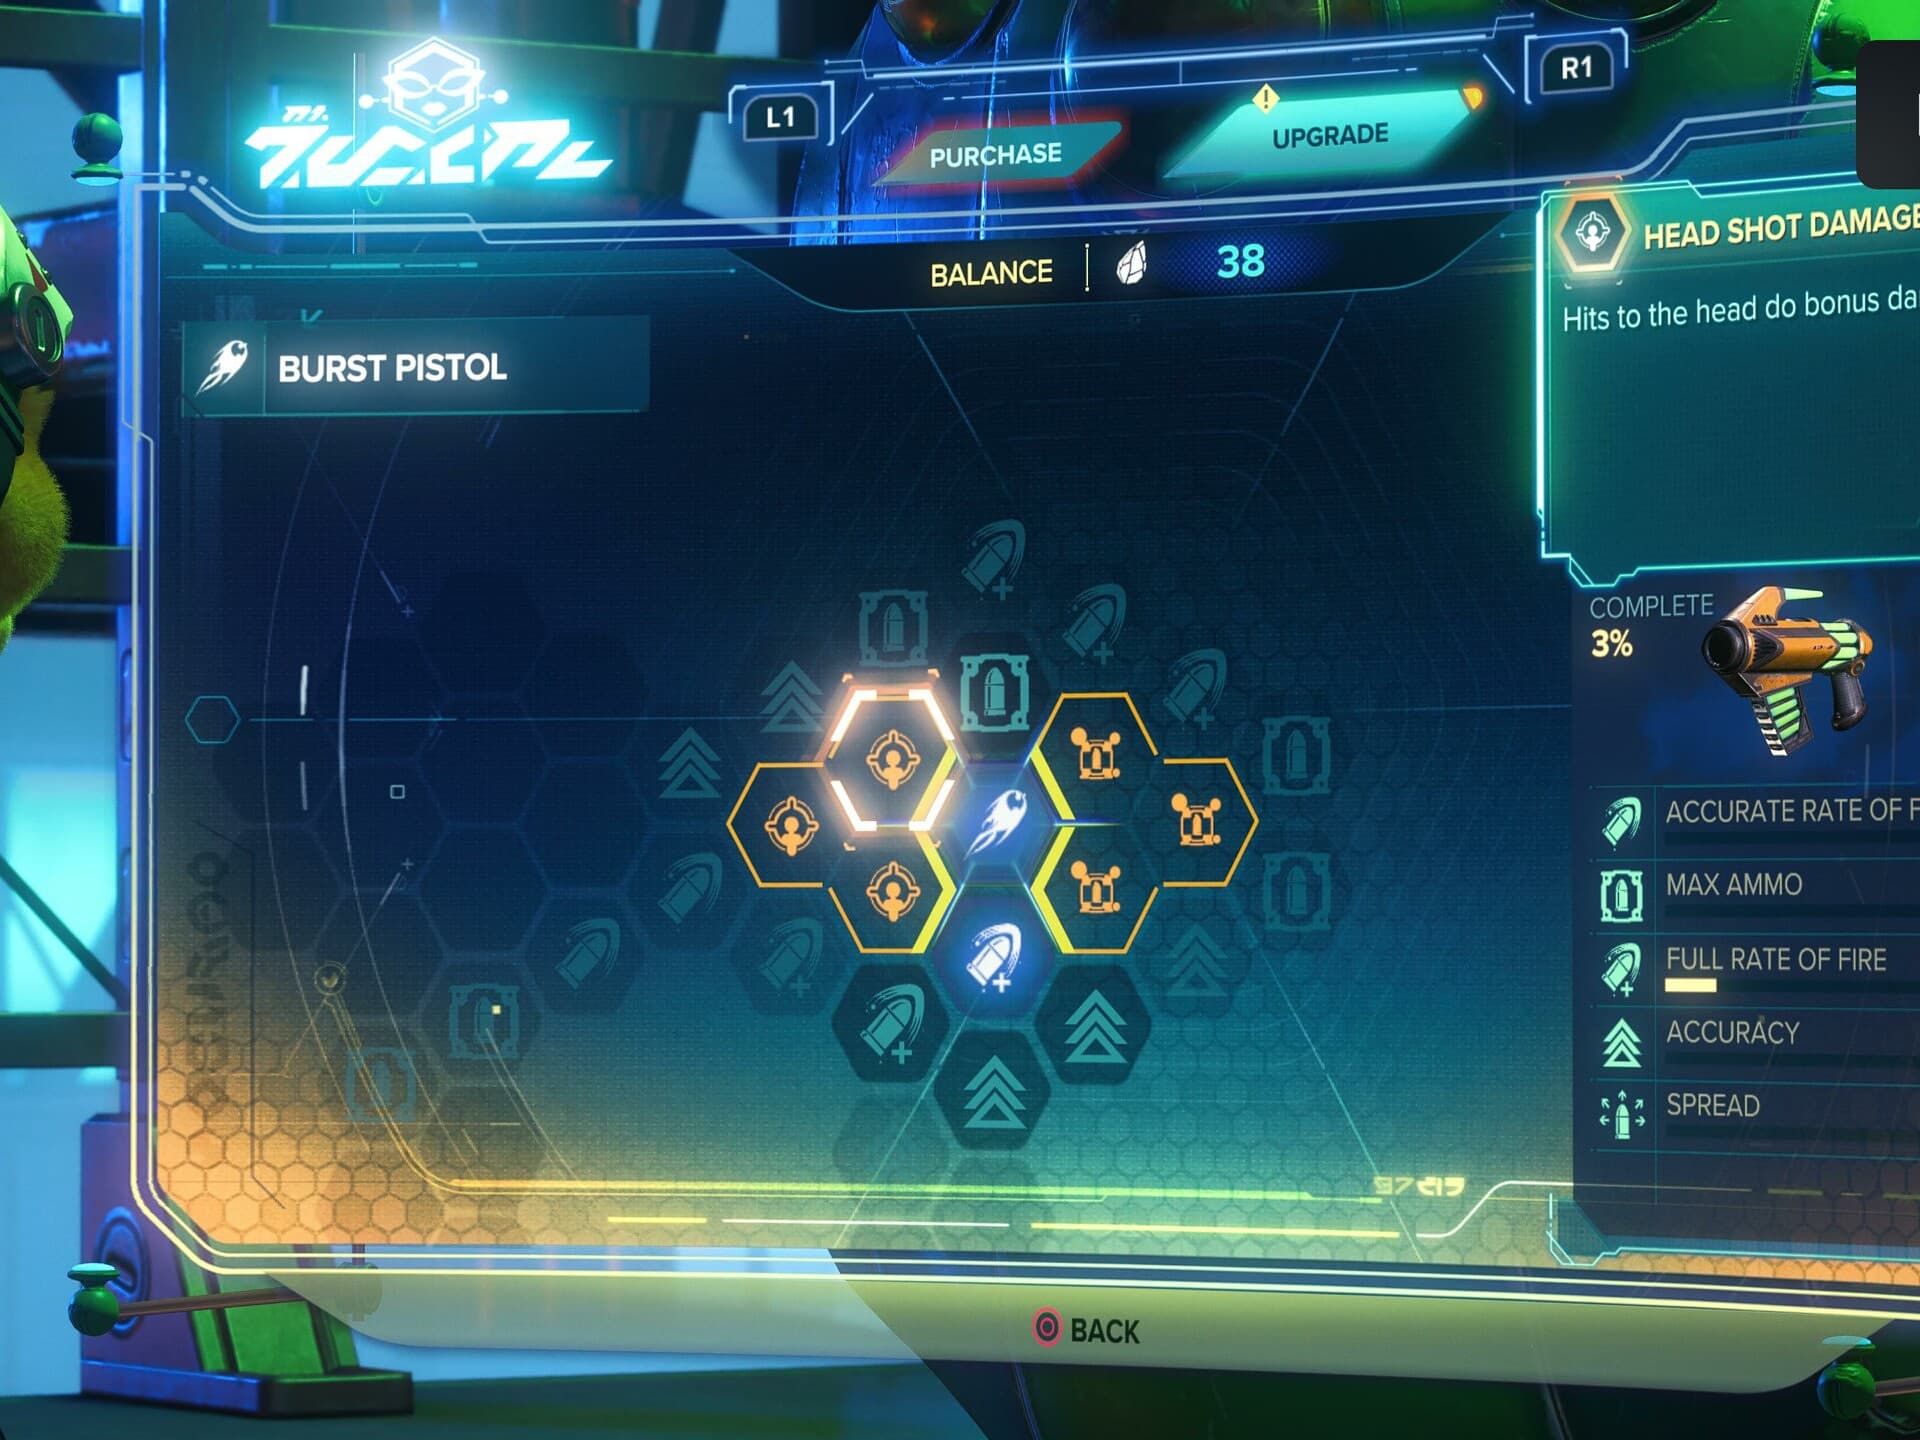
At Level 2, the Burst Pistol gets access to the Headshot Damage Gold Cell Upgrade. This upgrade increases the damage dealt when hitting enemies in the head. With this being one of the primary weapons you can use for consistent DPS on a boss, this bonus is incredibly impactful.
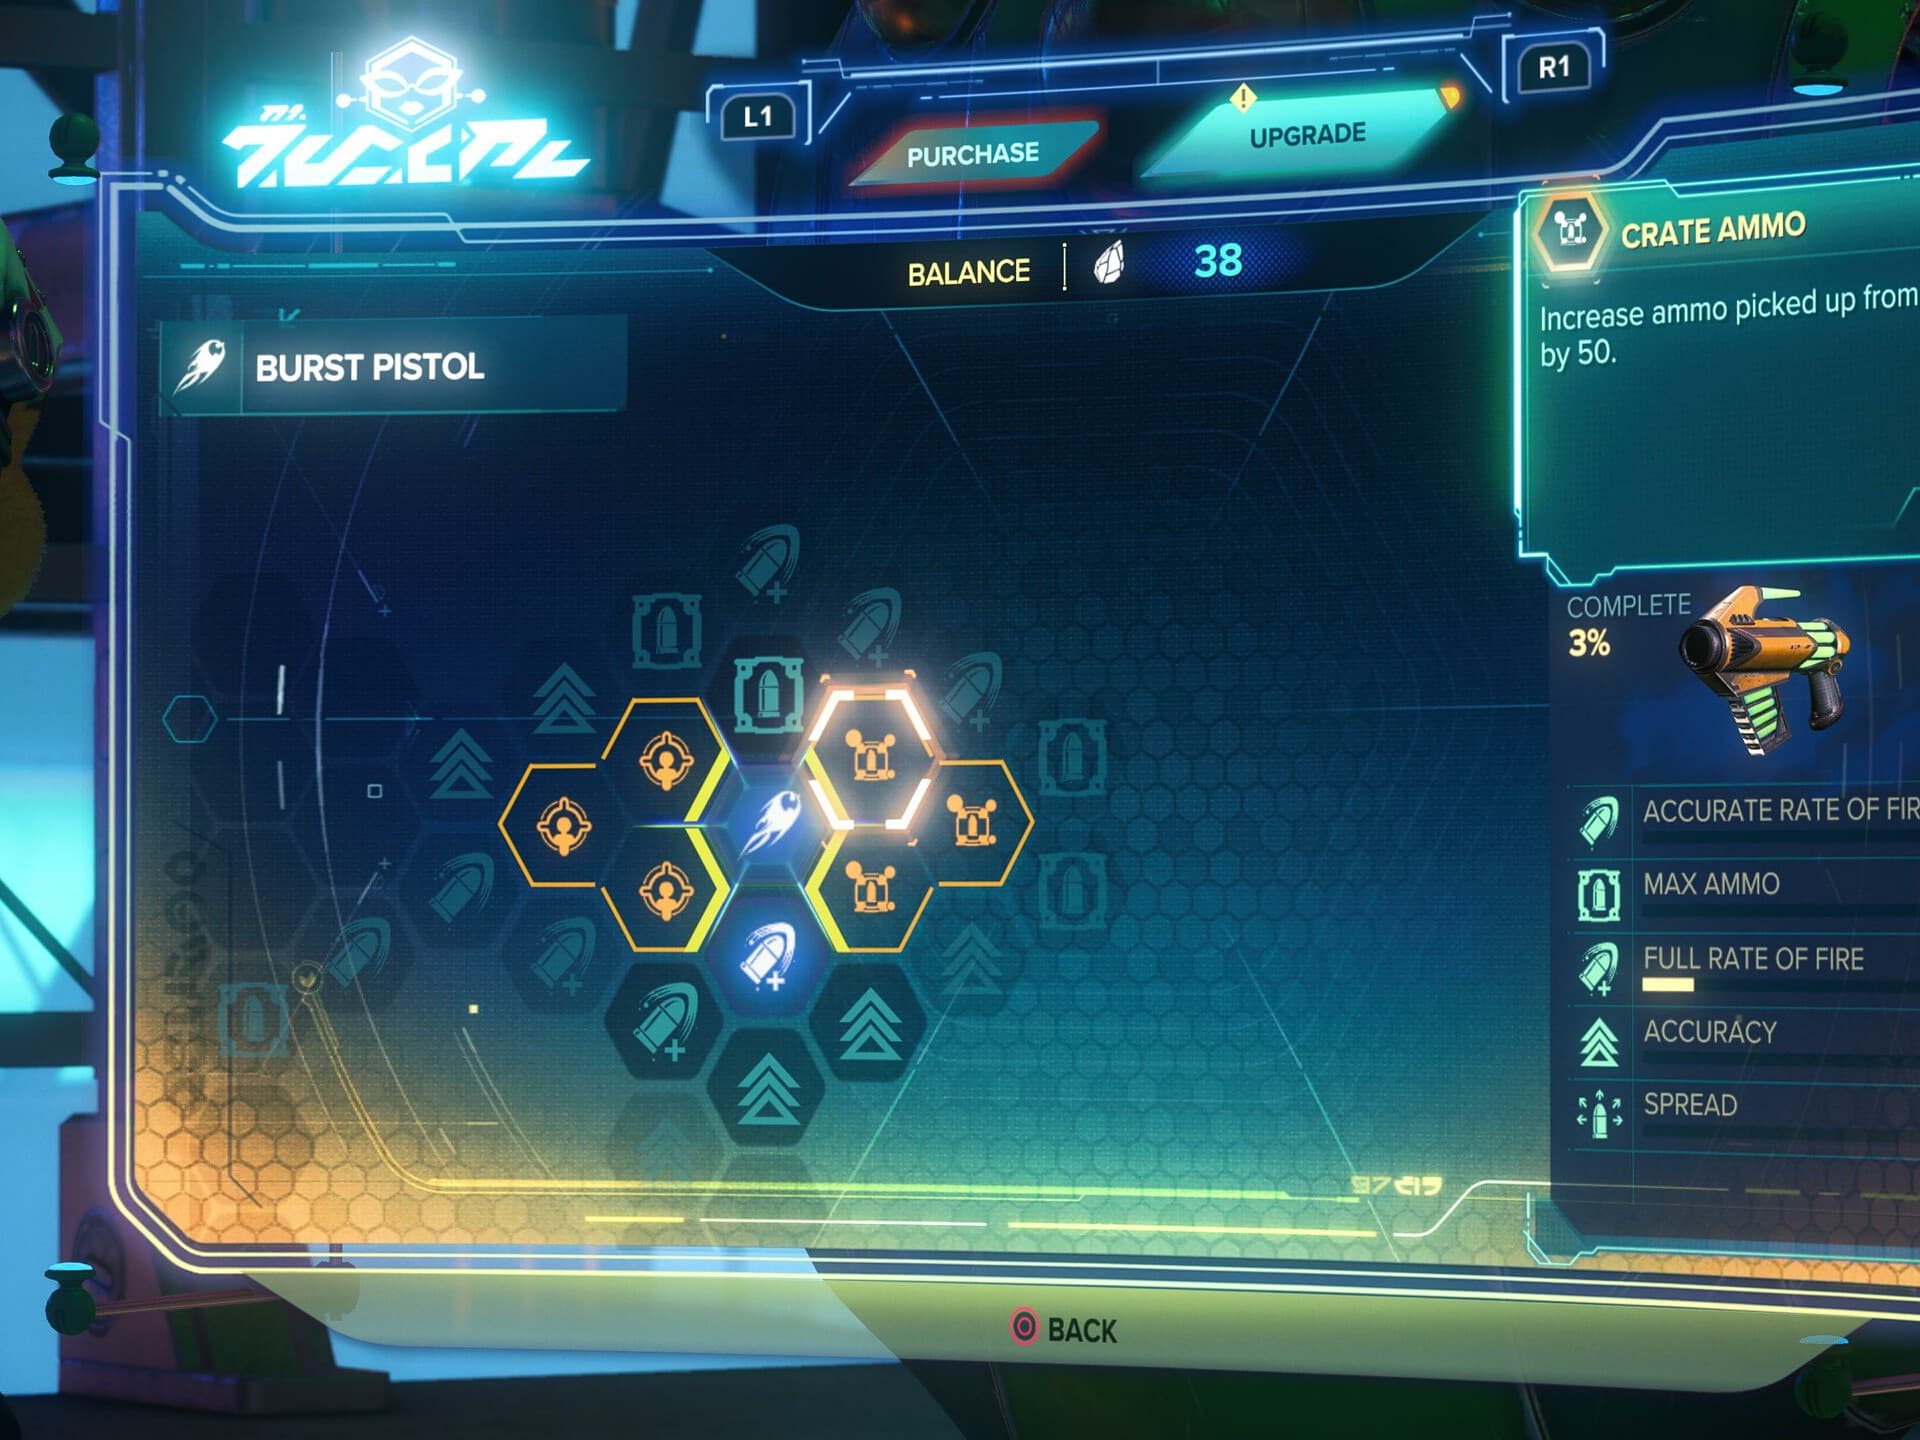
At Level 3, the Blast Pistol gets access to the Crate Ammo Gold Cell Upgrade. This increases the ammo gained from ammo crates by 50. This weapon cna eat through ammo quickly, so this helps balance that out a bit.
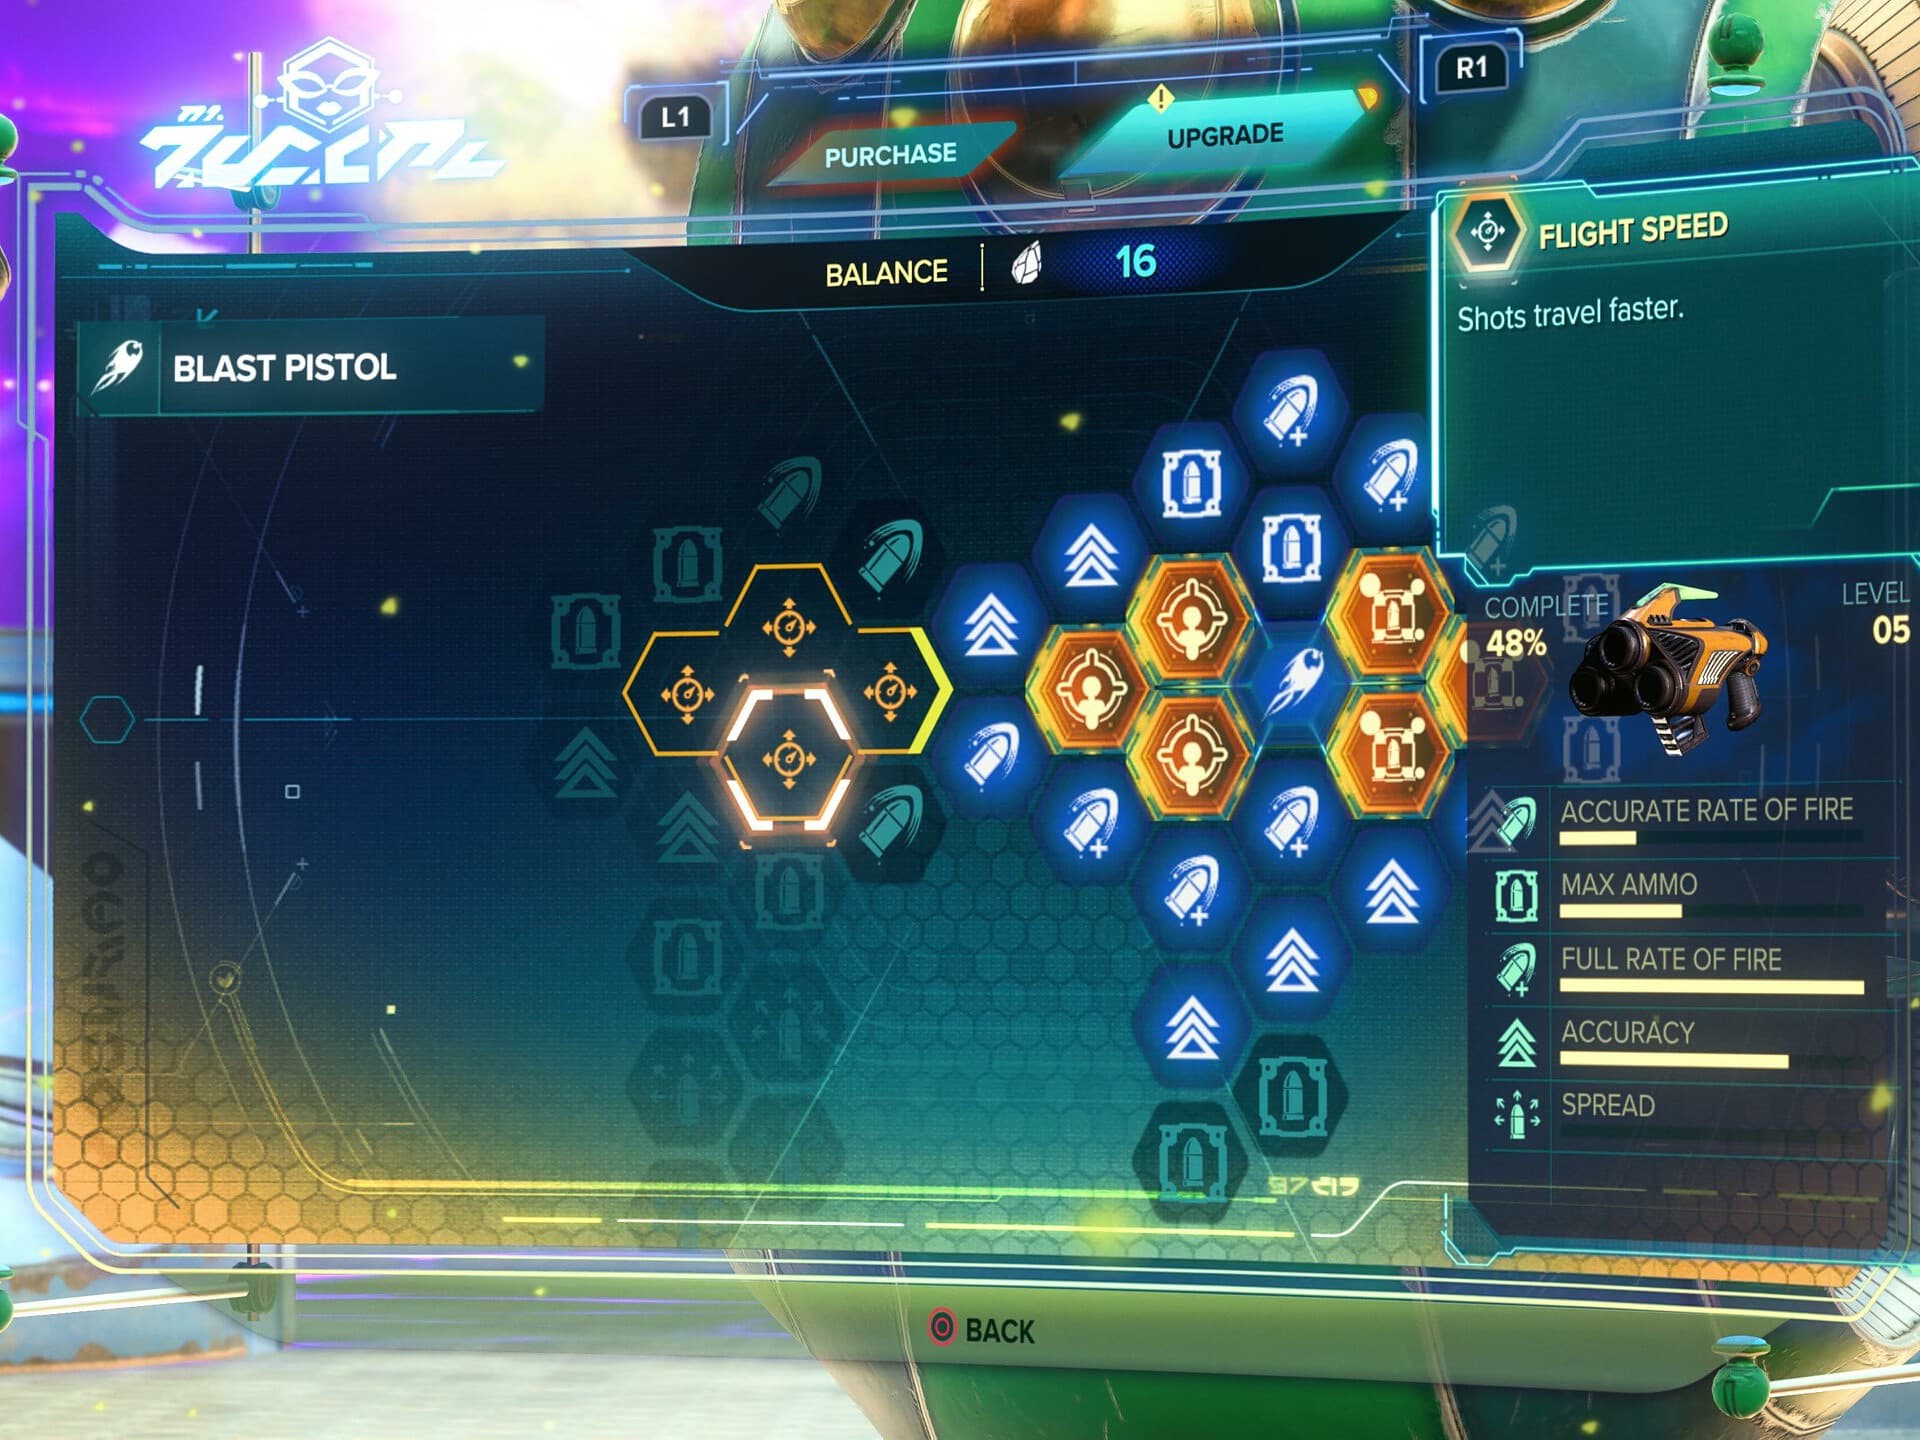
At Level 4, the Burst Pistol gets access to the Flight Speed Gold Cell Upgrade. This increases its effective range, letting you land longer range shots easier.
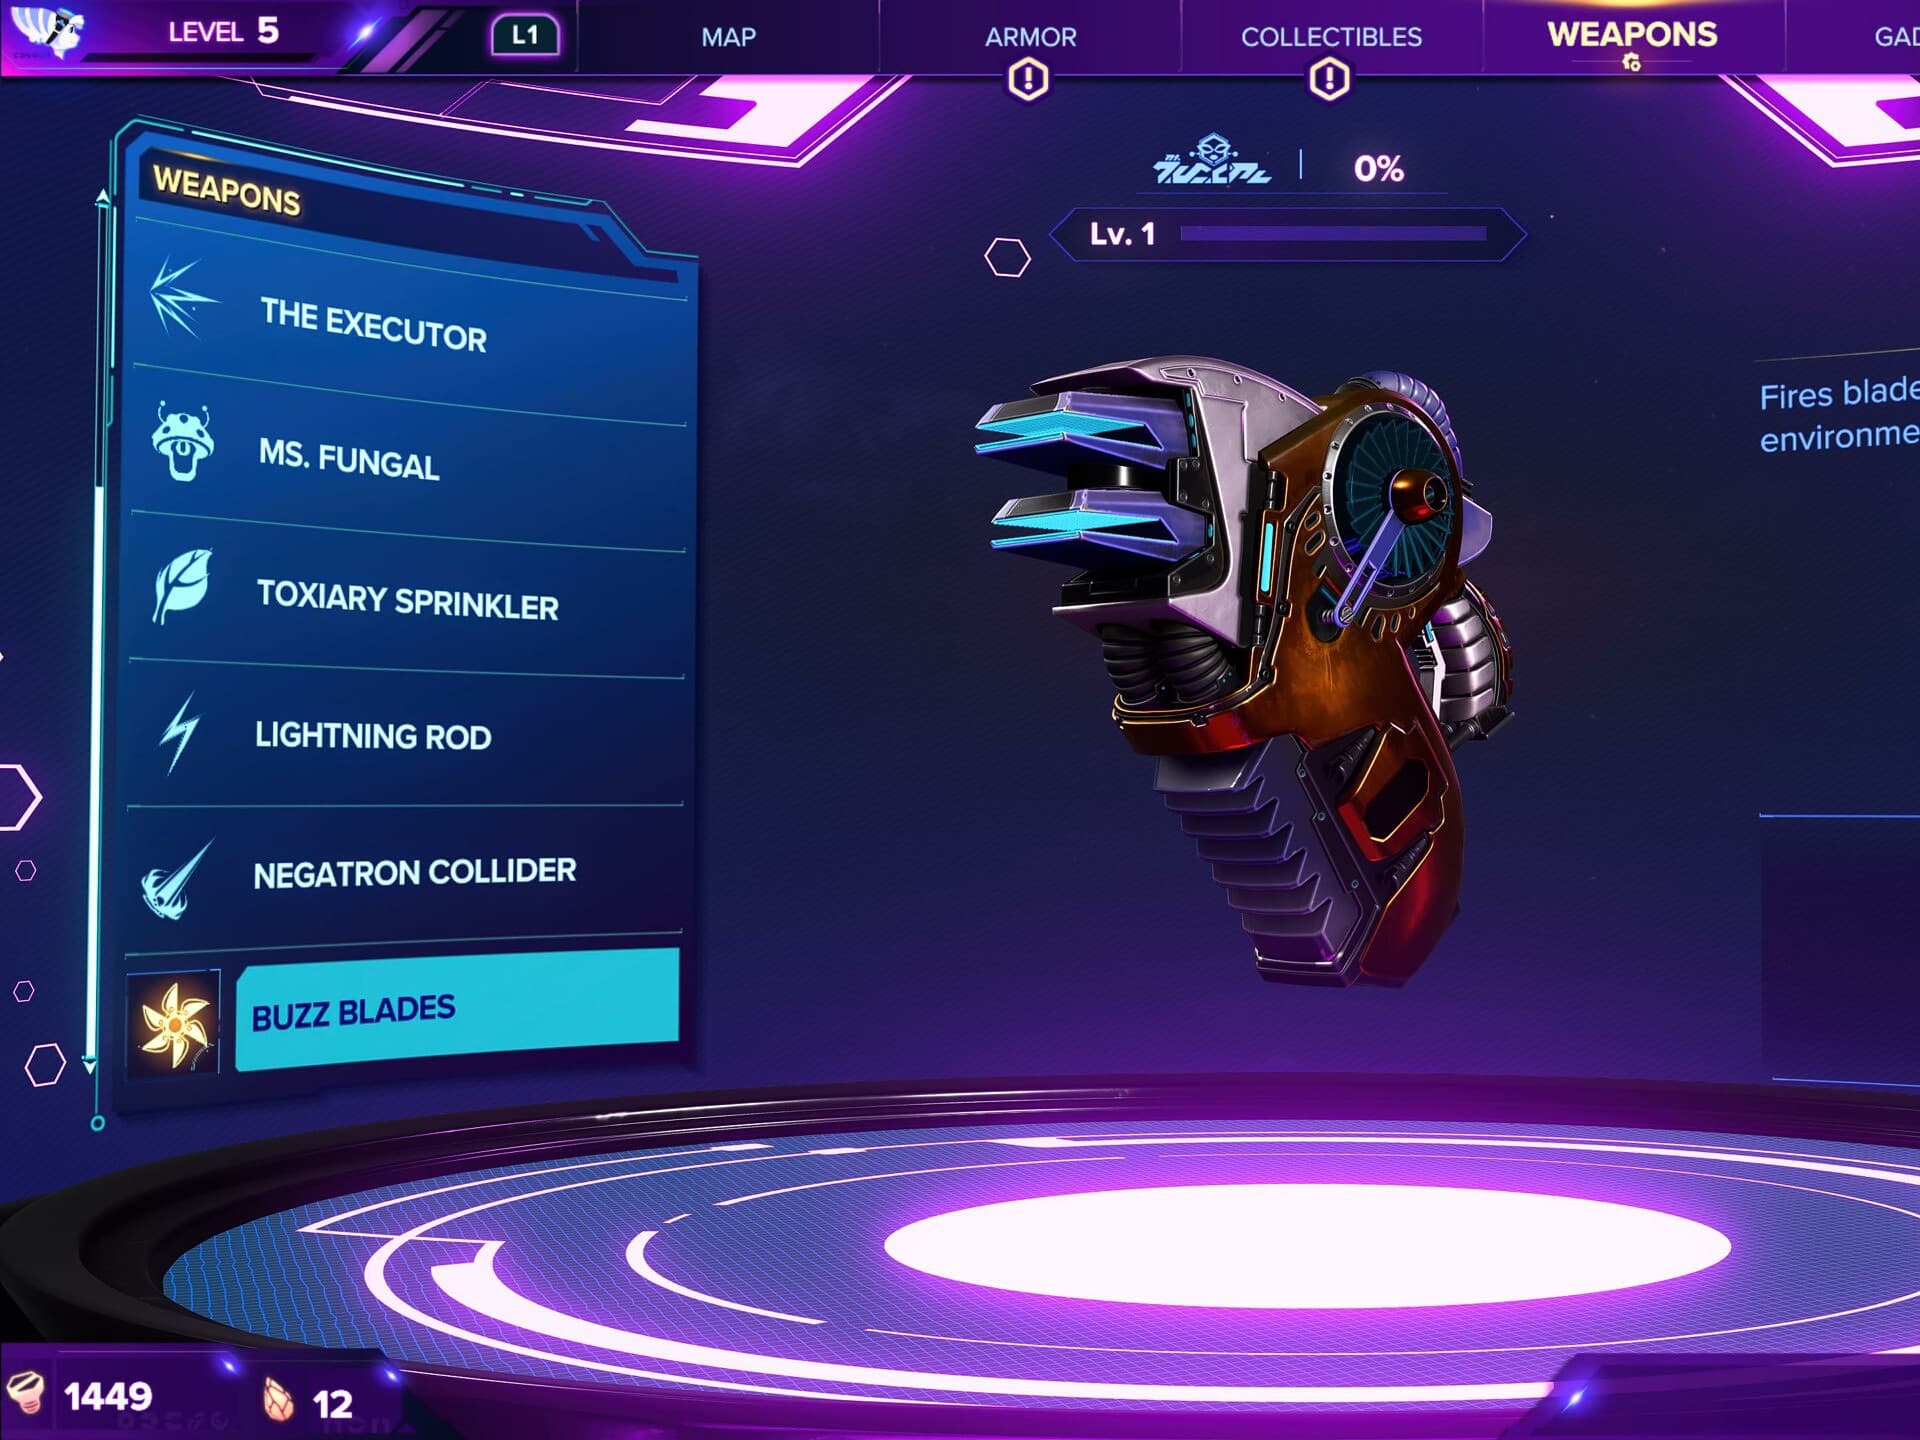
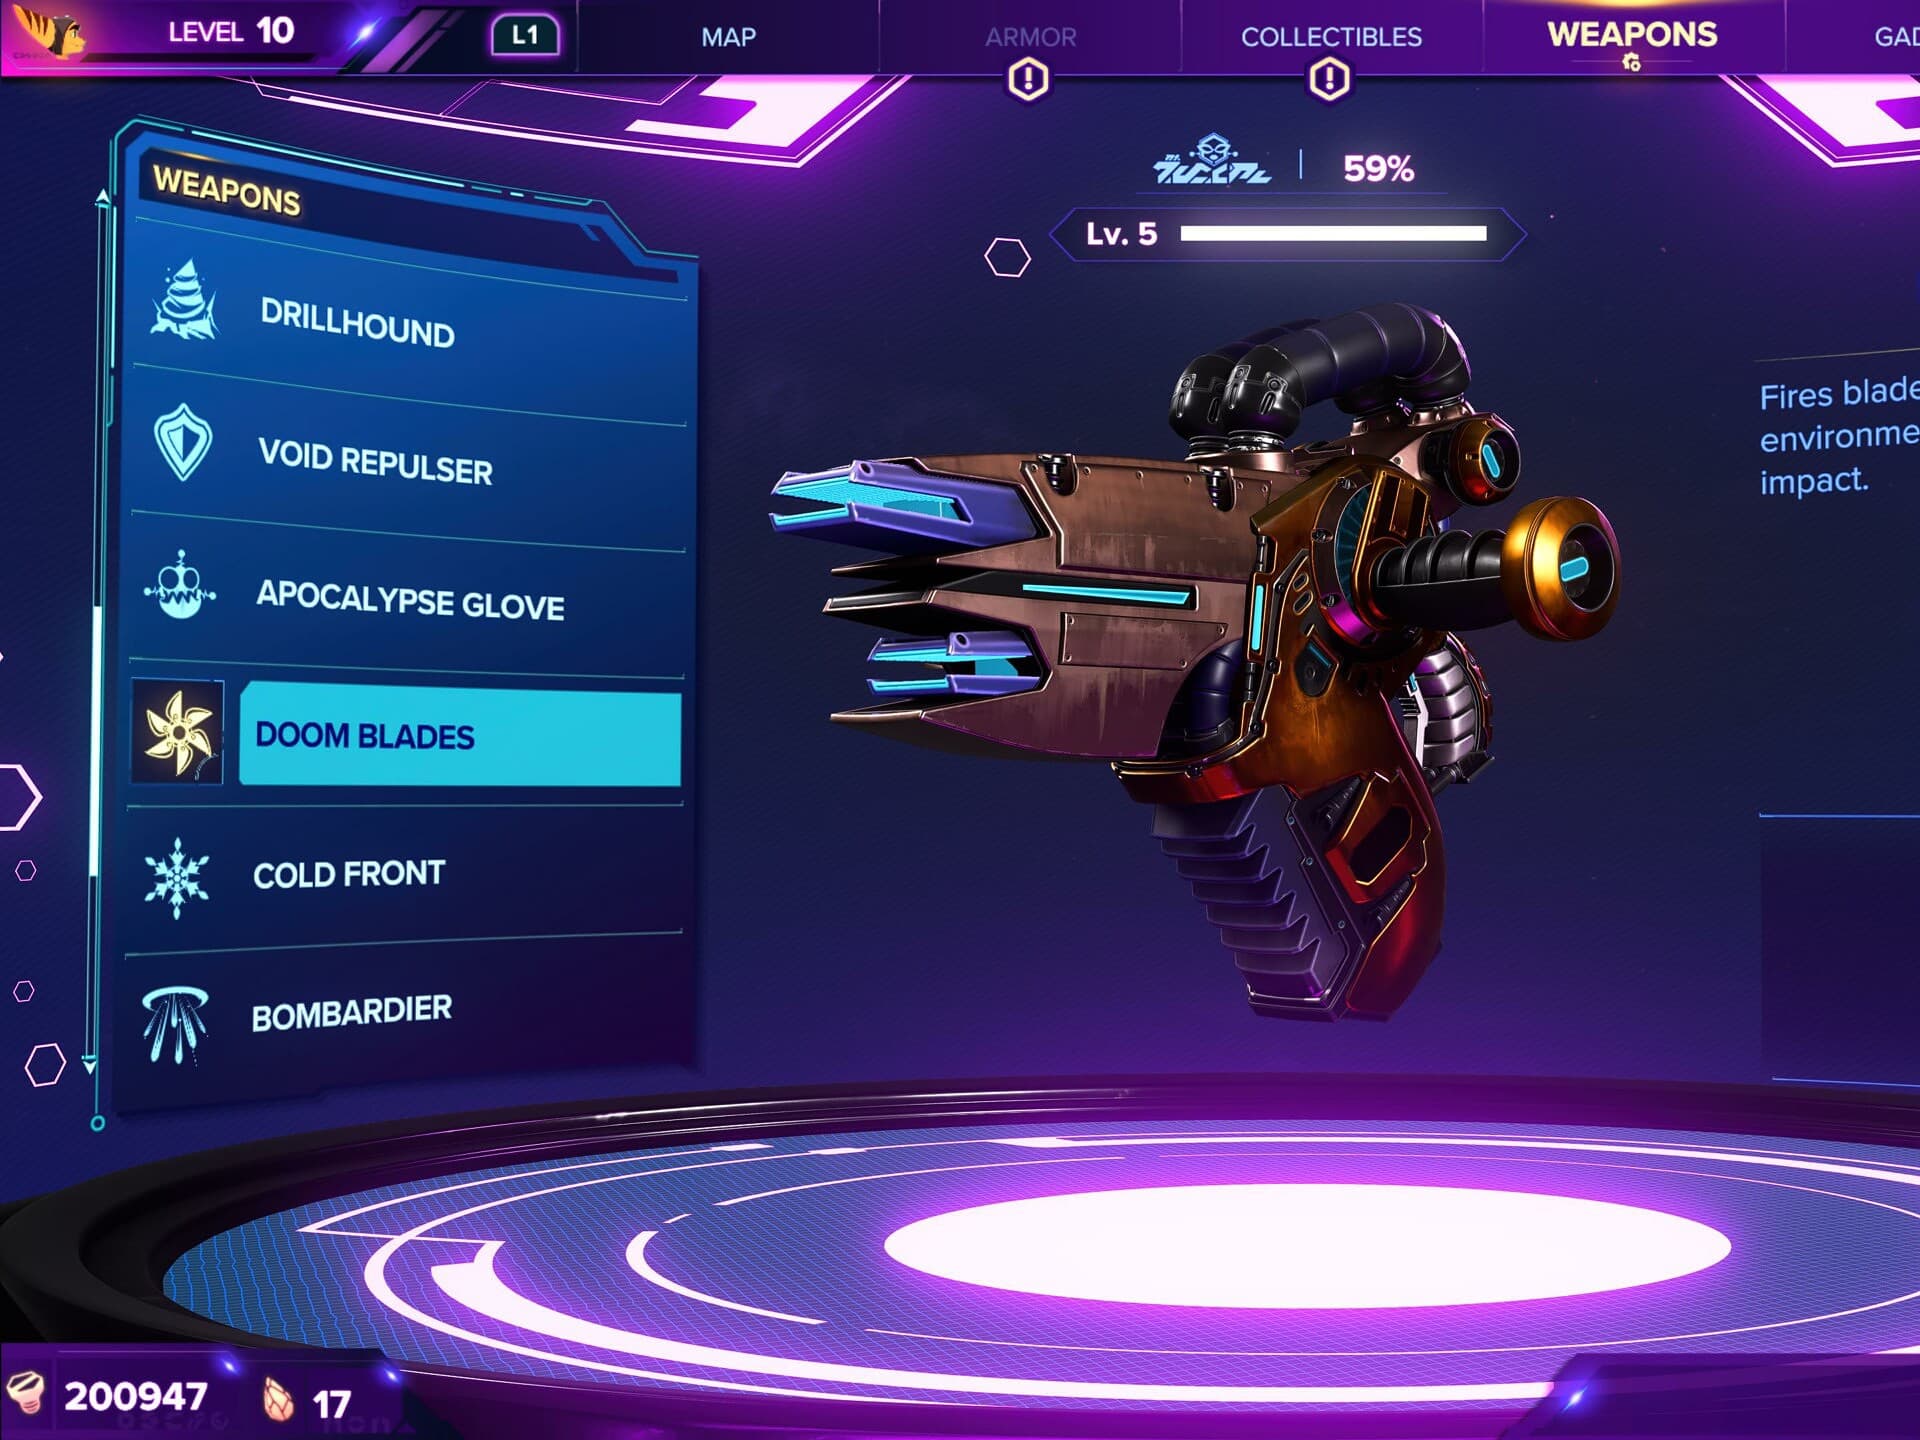
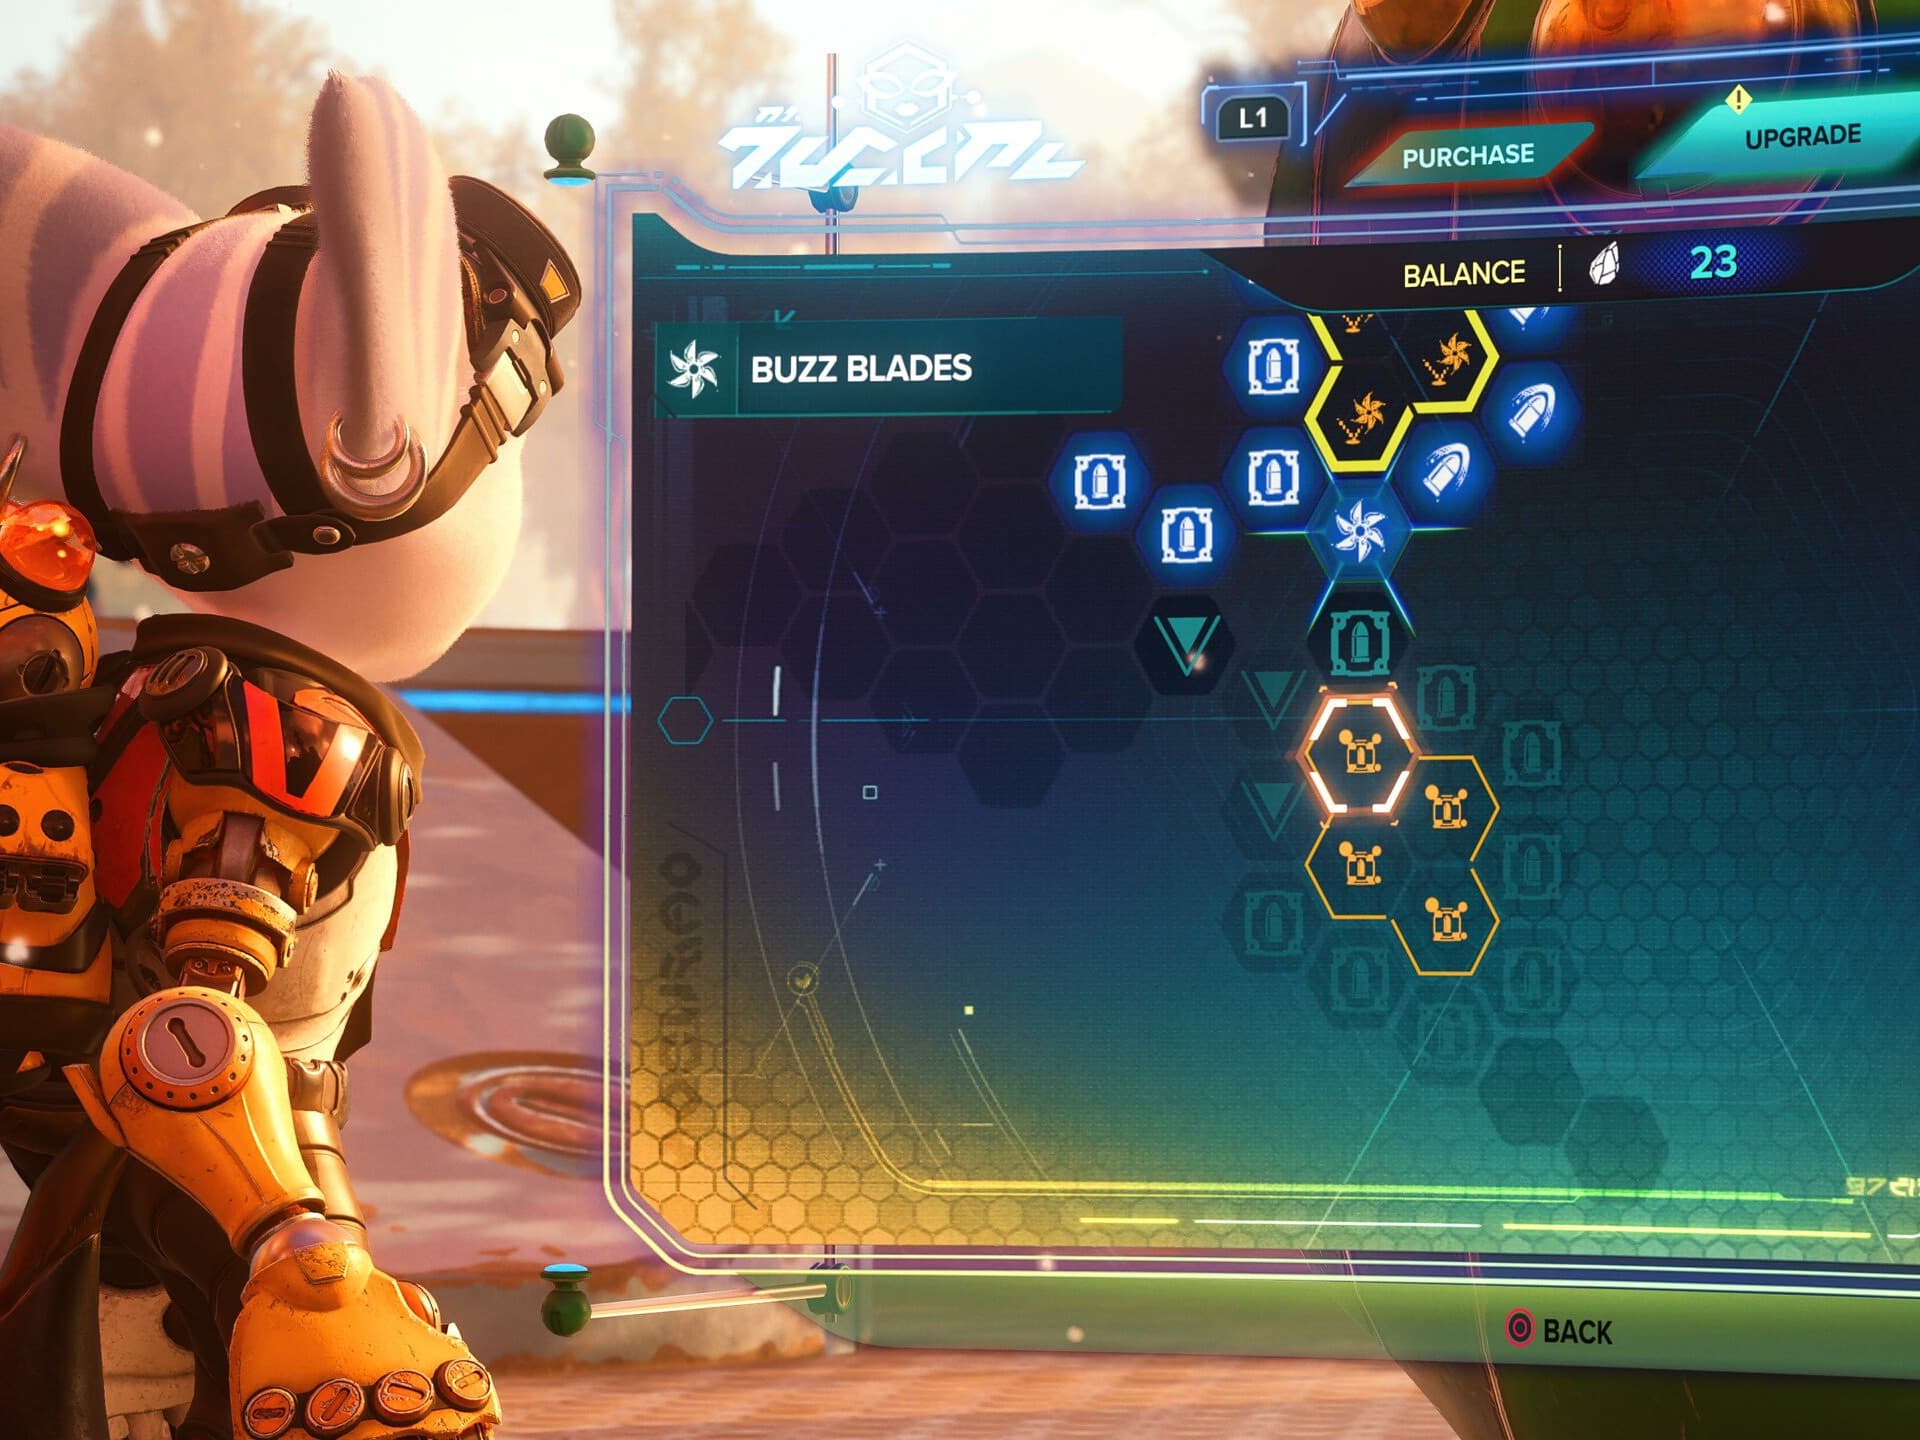
Buzz Blades
A returning weapon and a personal favorite of mine, the Buzz Blades release homing sawblades that “swarm” and enemy and bounce of them dealing multiple instances of damage.
This weapon is great at eliminating weaker enemies, and can provide consistent DPS against bosses after some upgrades. Since the blades lock-on and you rarely have to aim them after further upgrades, it can output a ton of damage to groups as well.
This weapon is available at the start of Torren IV, for 27,500 Bolts
Upgrades
At level 5 the Buzz Blades become Doom Blades. This upgrade effectively doubles it’s damage output, as each blade will split into two after connecting with an enemy. This improves both single target and area damage.
In Challenge Mode the Doom Blades cna be upgraded to the Omega Doom Blades for a cost of 360,000 Bolts.
Through the use of Raritanium the Buzz Blades / Doom Blades have access to the following bonuses on its Upgrade Tree:
Auto-Hit Cone, which increases the size of the cone where the blades will home in on enemies when fired. This is mostly a consistency upgrade, and a significant one at that. Most of these nodes are near the Gold Cell Upgrades, so you won’t have to go out of your way to pick them up.
Fire Rate, which increases the rate of fire. This is the only DPS upgrade you get. Similarly to Auto-hit Cone it’s mostly around the Gold Cell Upgrades so you won’t have to spend extra to get it. However if not getting a Gold Cell, this stat should still take priority while leveling.
Max Ammo, which increase the maximum amount of ammo you can carry. Like the other upgrades, it’s mostly around the Gold Cell Upgrades, but has more at the very edges of the tree.
In addition to these basic stat upgrades, the Buzz Blades / Doom Blades also have a set of Gold Cell upgrades which empower the weapon in various way.

At Level 2, the Buzz Blade get access to Bounce Count Gold Cell Upgrade. This upgrade increases the number of times each blade will bounce by one. This is the only Gold Cell that increases DPS even slightly.
At Level 3, the Buzz Blade get access to the Crate Ammo Gold Cell Upgrade. This upgrade increases the amount of ammo you pick up from ammo drops by 20. This means you’ll be picking up roughly 50 per ammo drop. Since this is surrounded by Max Ammo upgrades, this means you’ll end up maintaining getting 33% of your ammo back per pickup.
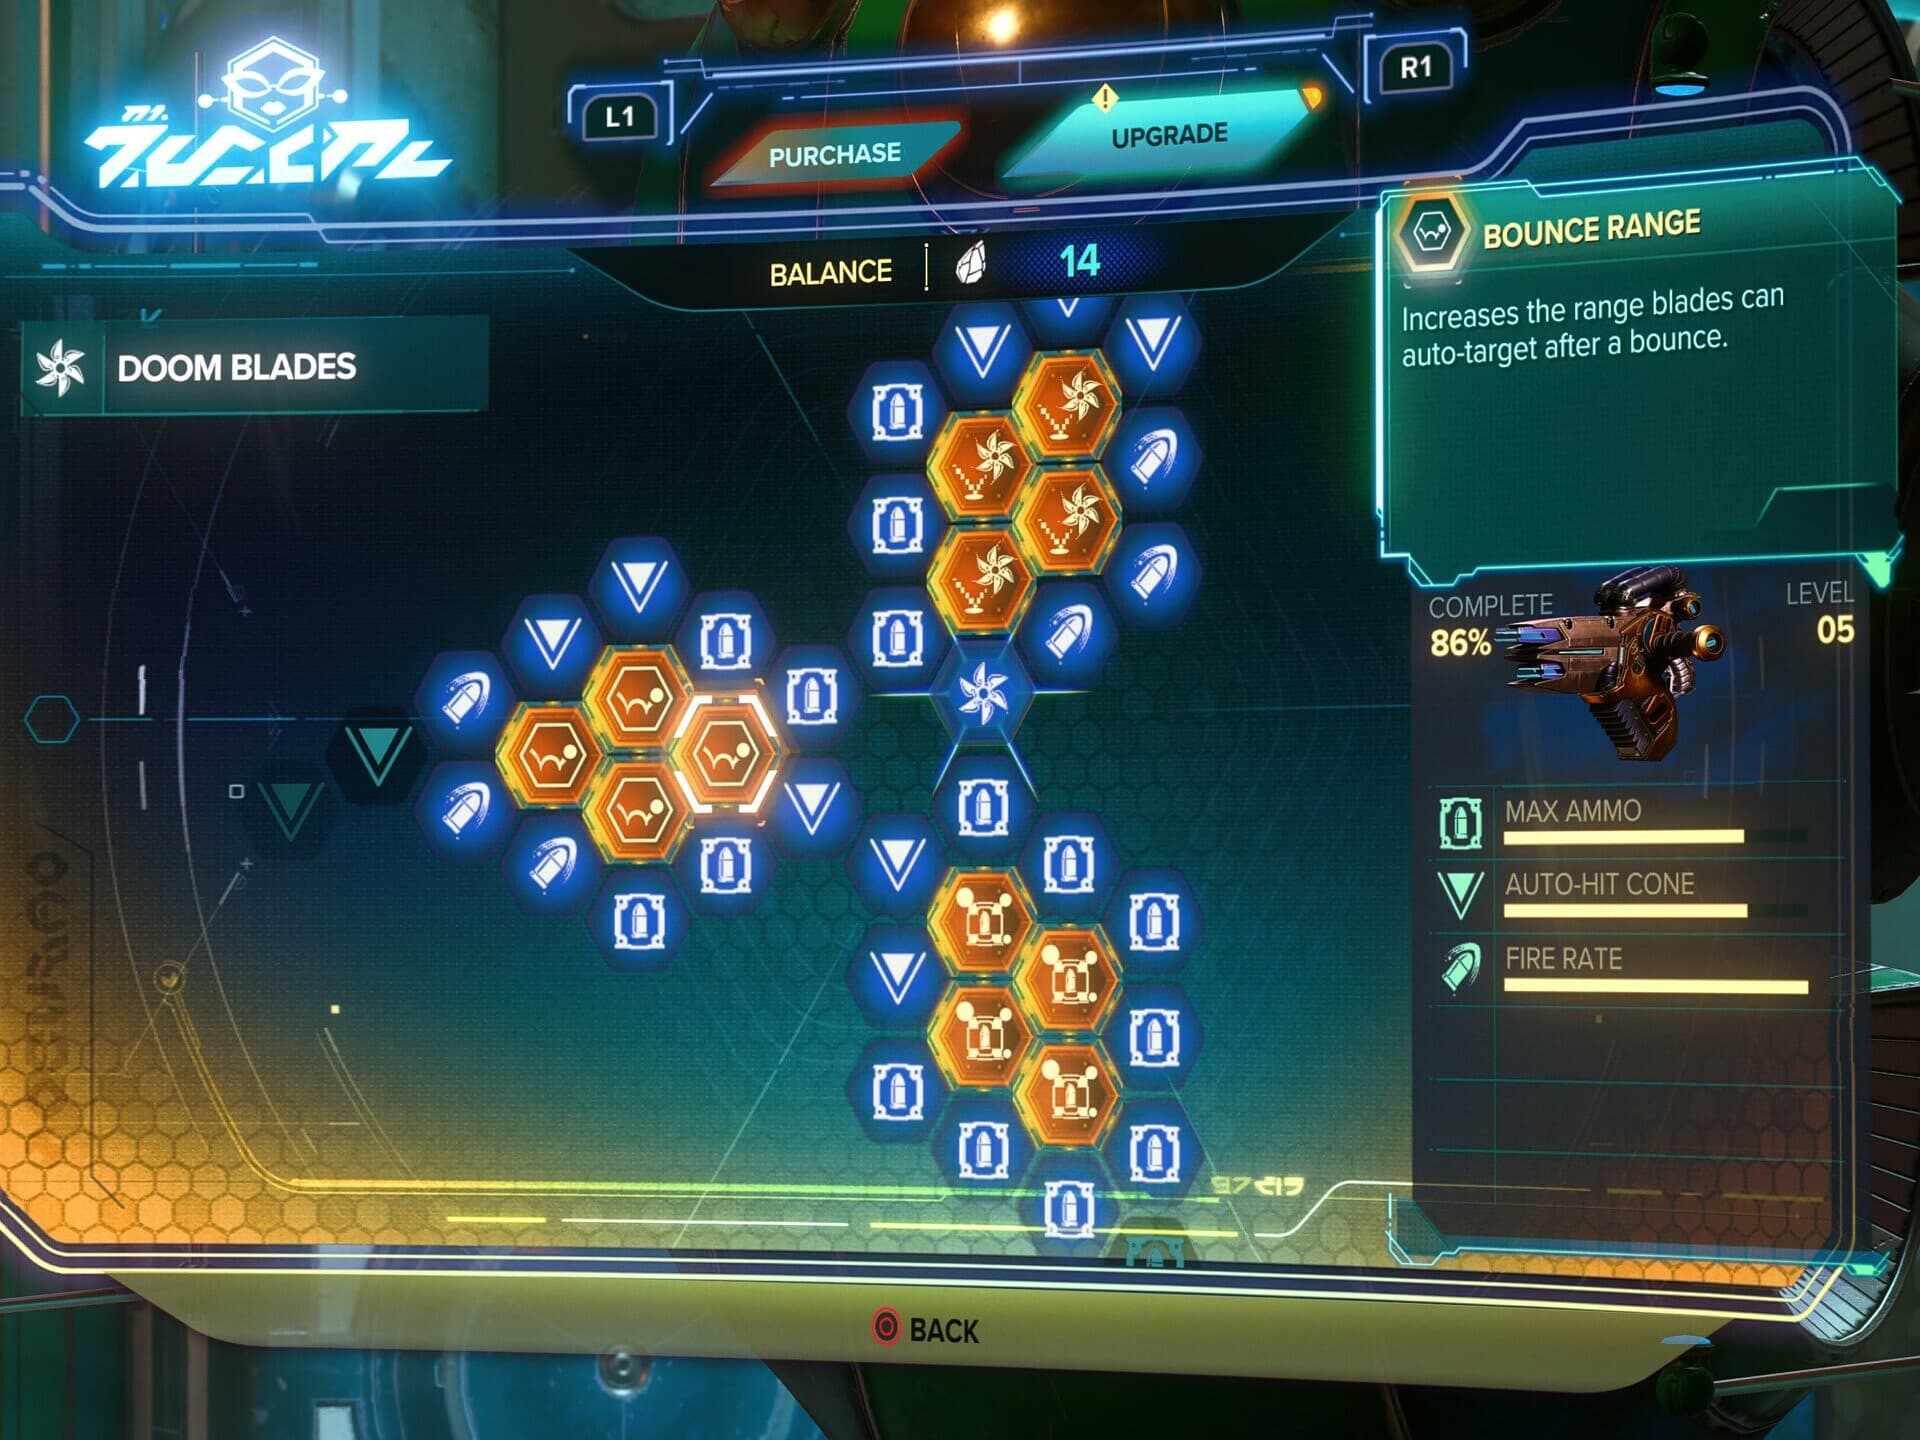
At Level 4, the Buzz Blades get access to the Bounce Range Gold Cell Upgrade. This upgrade increases the range for each bounce to re-target an enemy. This is helpful to it’s ability to dispatch groups of weaker enemies, but does nothing for single target as they will re-target without issue.
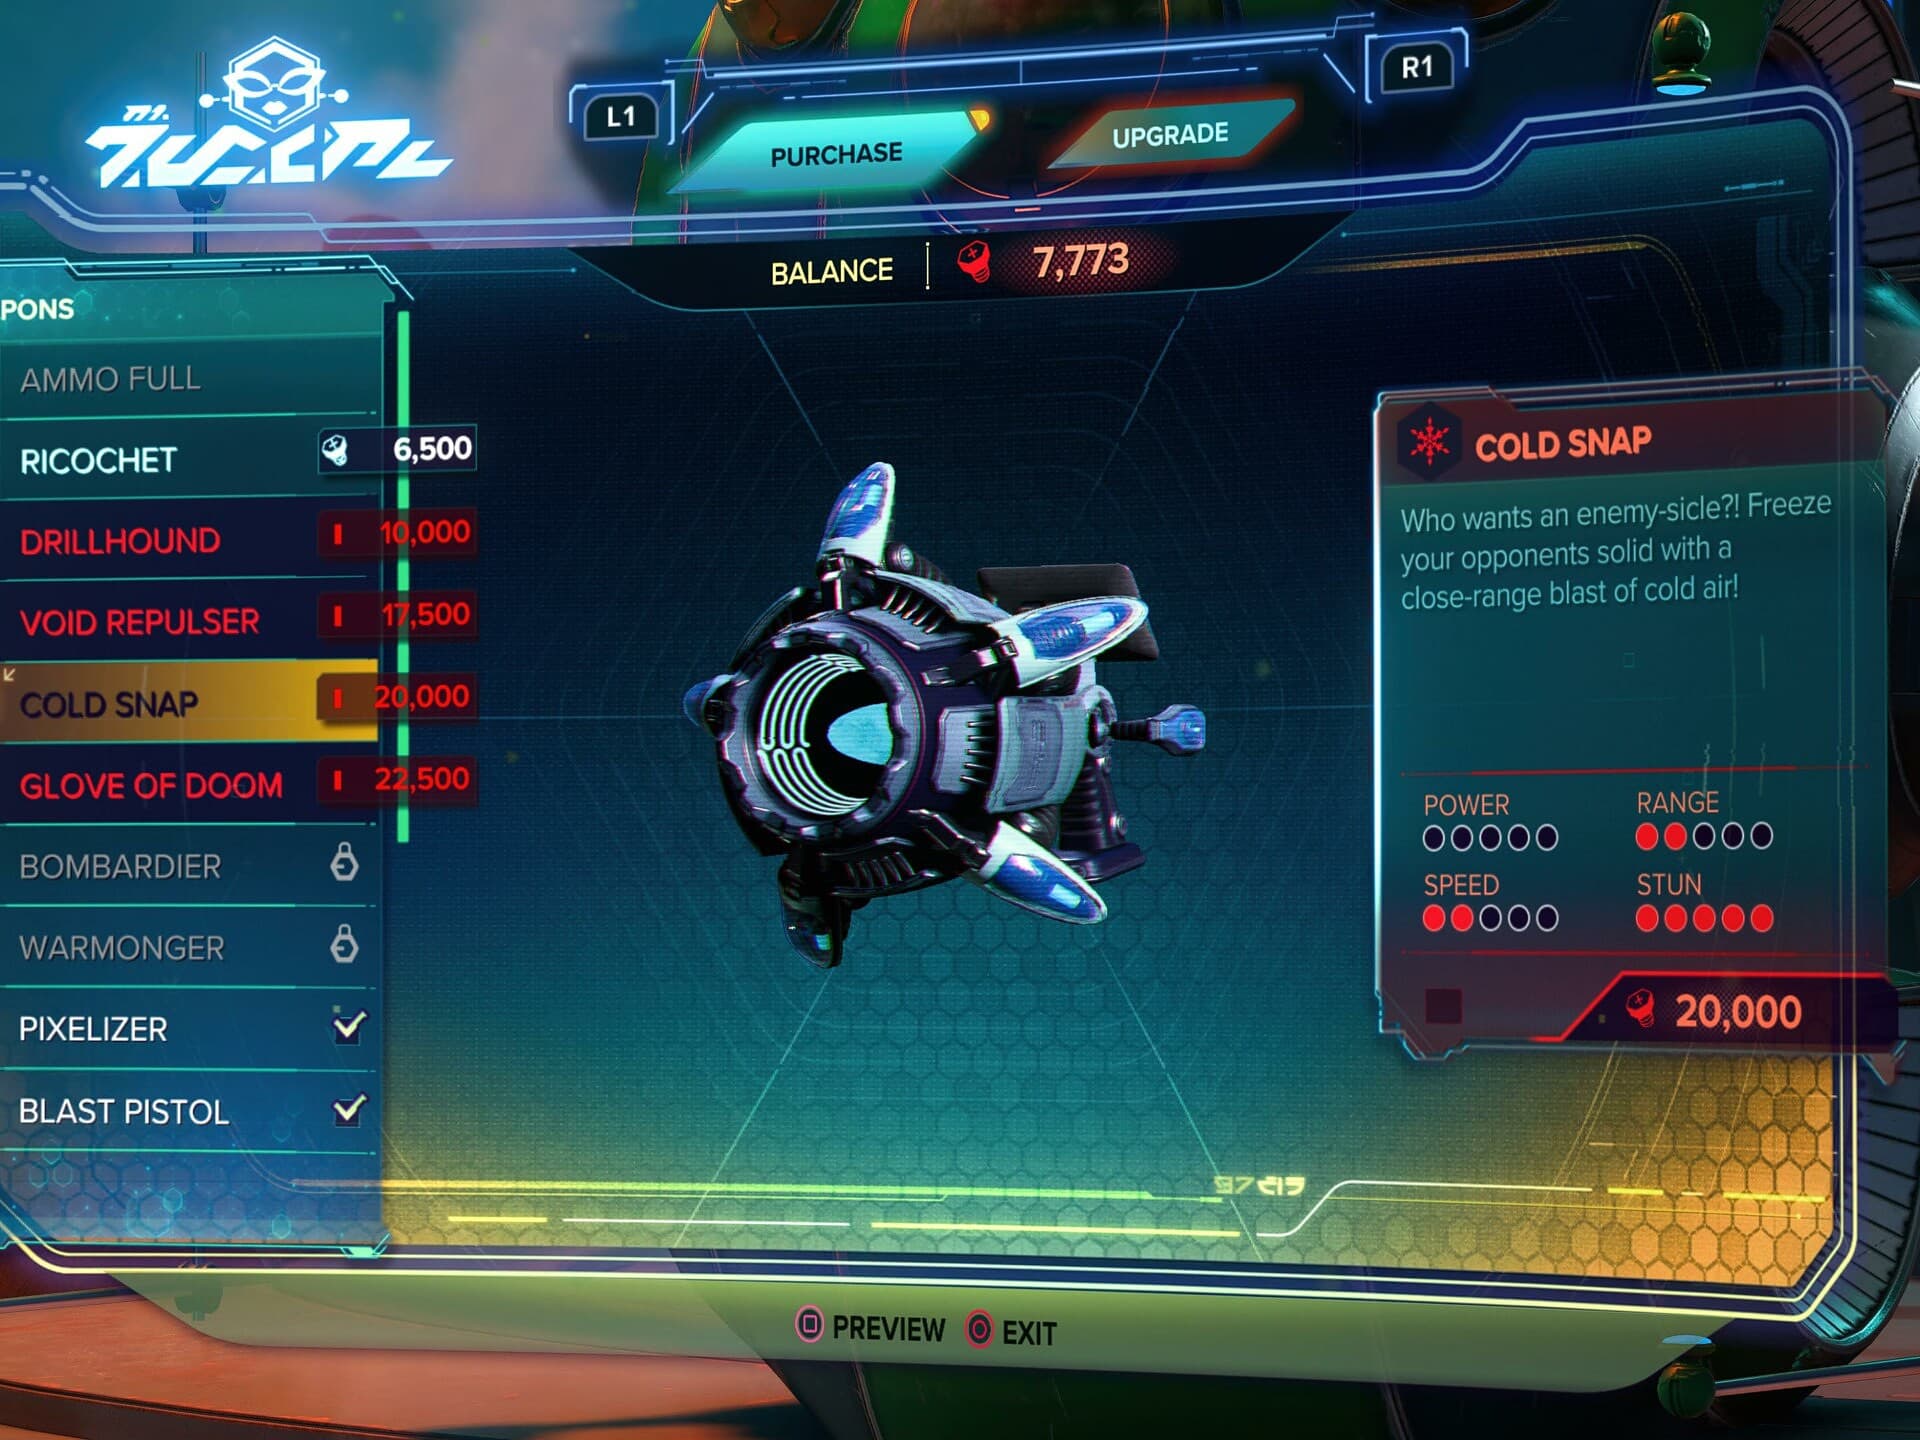
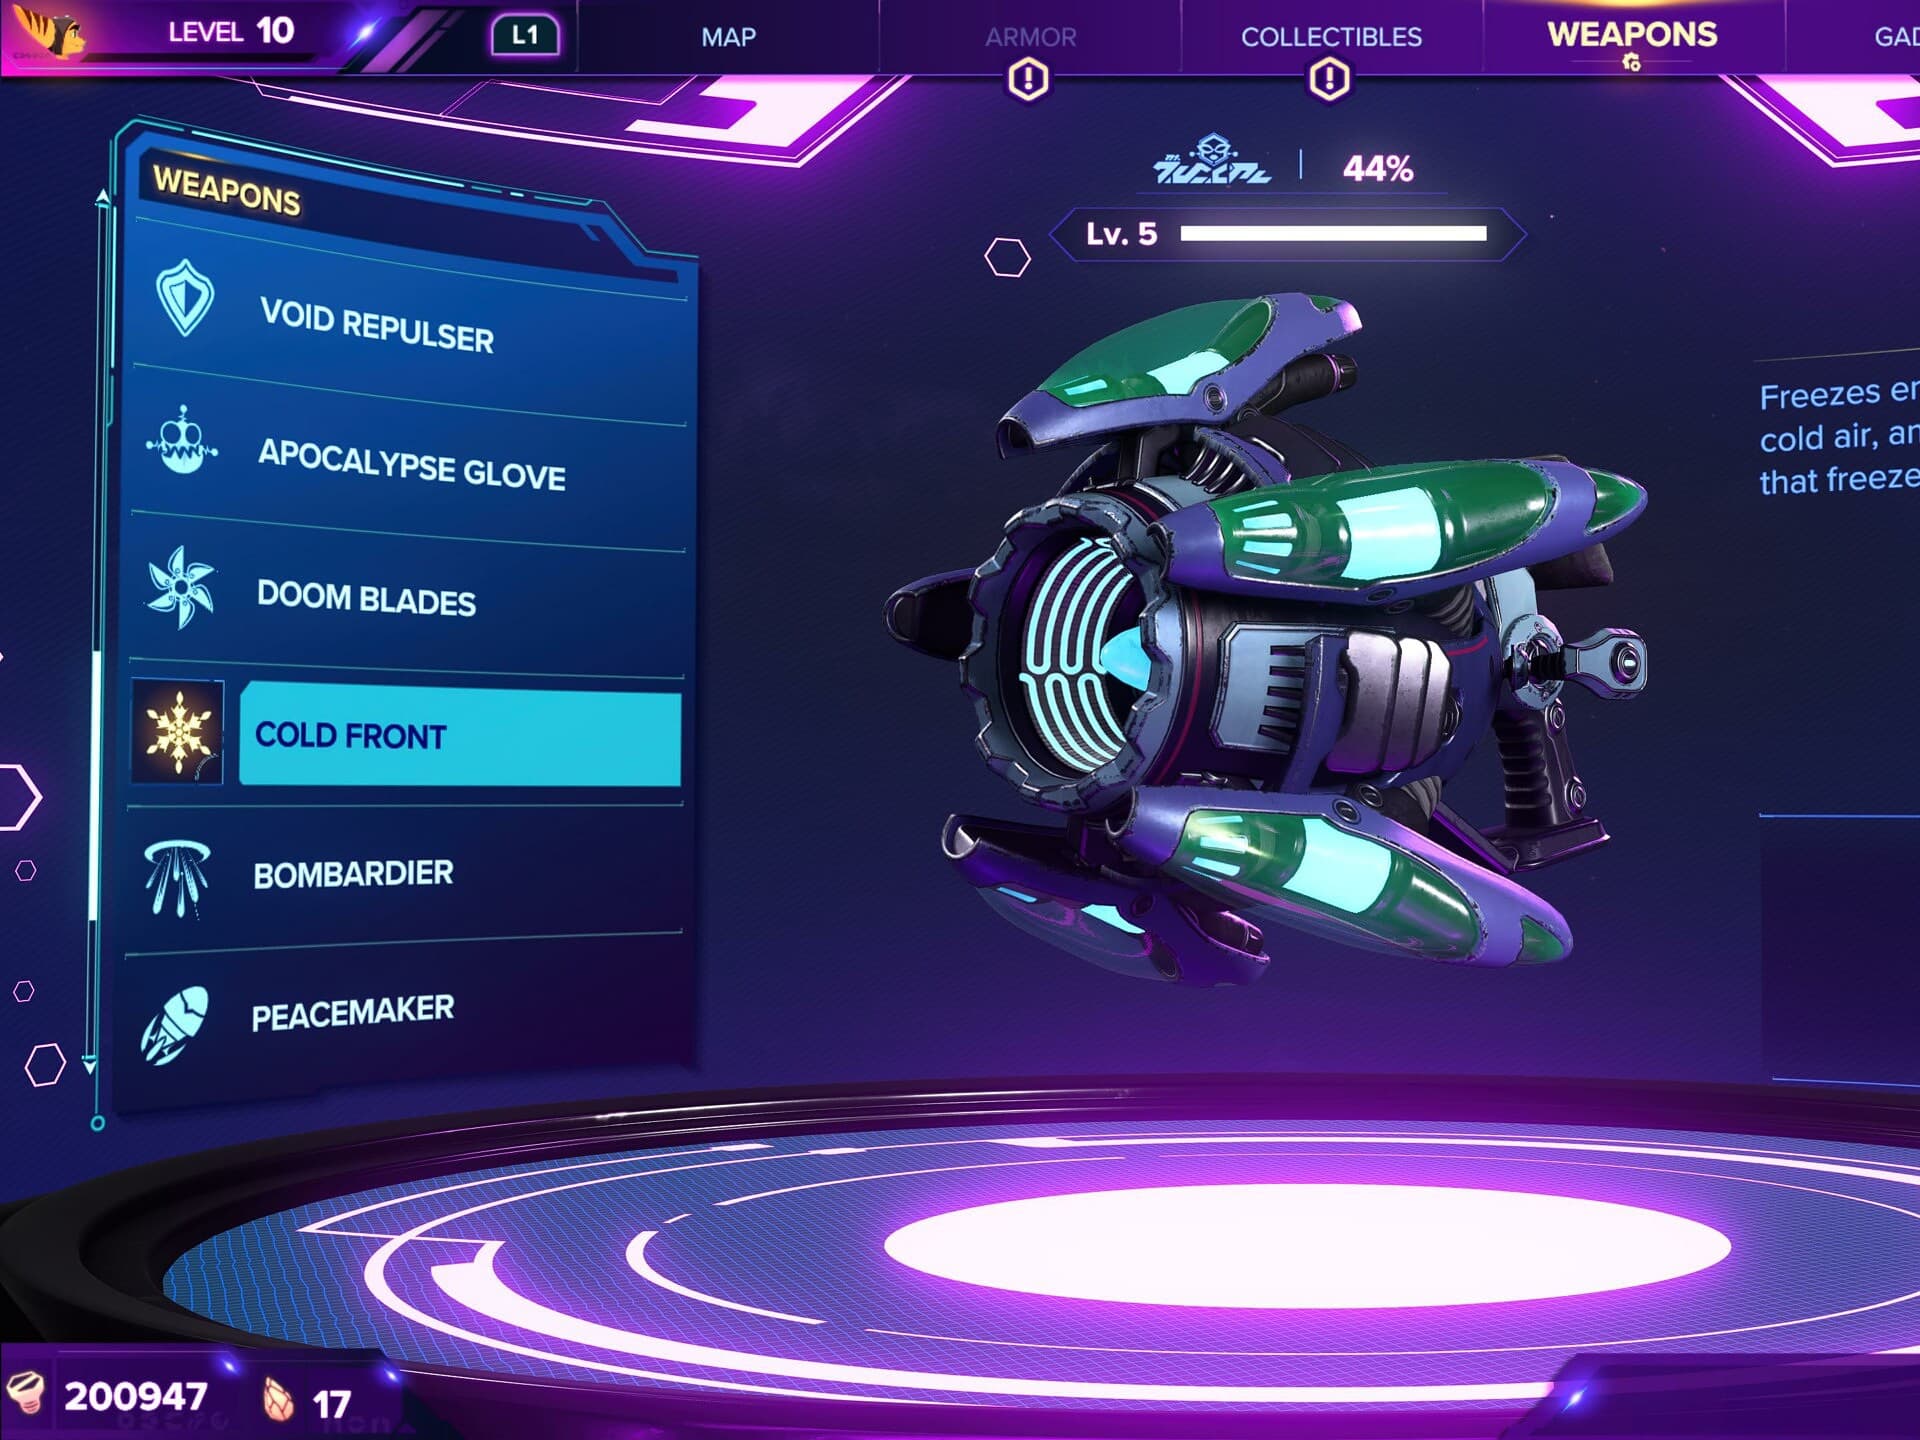
Cold Snap
A new weapon to the series, the Cold Snap toss out a bomb that can freeze enemies in a large radius, preventing movement and increasing damage dealt to them. While it does little to no damage on it’s own the damage amplification it can give can make enemies go down much faster when supporting other weapons.
This weapon is a very potent damage and income booster thanks to its passive upgrades. With one of it’s Gold Cell Upgrades and having upgraded to the Cold Front, it become very capable of taking out large groups of weak enemies with just a little assistance.
This weapon becomes available available starting in Cordelion for 20,000 Bolts.
Upgrades
At Level 5 the Cold Snap becomes the Cold Front. This upgrade has the initial projectile create an icy could that freezes enemies as they enter it.
In Challenge Mode, this weapon can be upgrade to the Omega Cold Front for the cost of 340,000 Bolts.
Through the use of Raritanium the Cold Snap / Cold Front have access to the following bonuses on its Upgrade Tree:
Area of Effect, This increases the explosion radius of the freezing projectile and the Shatter Explosion effect. When upgraded to the Cold Front, this also affects the size of the cloud. Alongside Damage Multiplier, this should be a priority stat to pick up.
Bonus Bolts, This increased the amount of bolts dropped by frozen enemies when they are defeated. This is a nice bonus, but needs the priority stats to really be impactful.
Damage Multiplier, this increases the damage dealt to frozen enemies. This bonus combined with weapon like the Headhunter or Warmonger can deal incredibly high burst damage. This bonus should be the highest priority.
Freeze Duration, increases the duration that enemies are frozen. Since the freeze can often be broken by damage output, this becomes a lower priority bonus. It’s very helpful for bosses and tougher enemies still.
The Cold Front also can get the Cloud Duration bonus. This increases the duration of the lingering cloud that it leaves behind on impact. This can make this a powerful tool for some arena challenges or sections with waves of enemies that spawn.
In addition to these basic stat upgrades, the Cold Snap / Cold Front also have a set of Gold Cell upgrades which empower the weapon in various way.
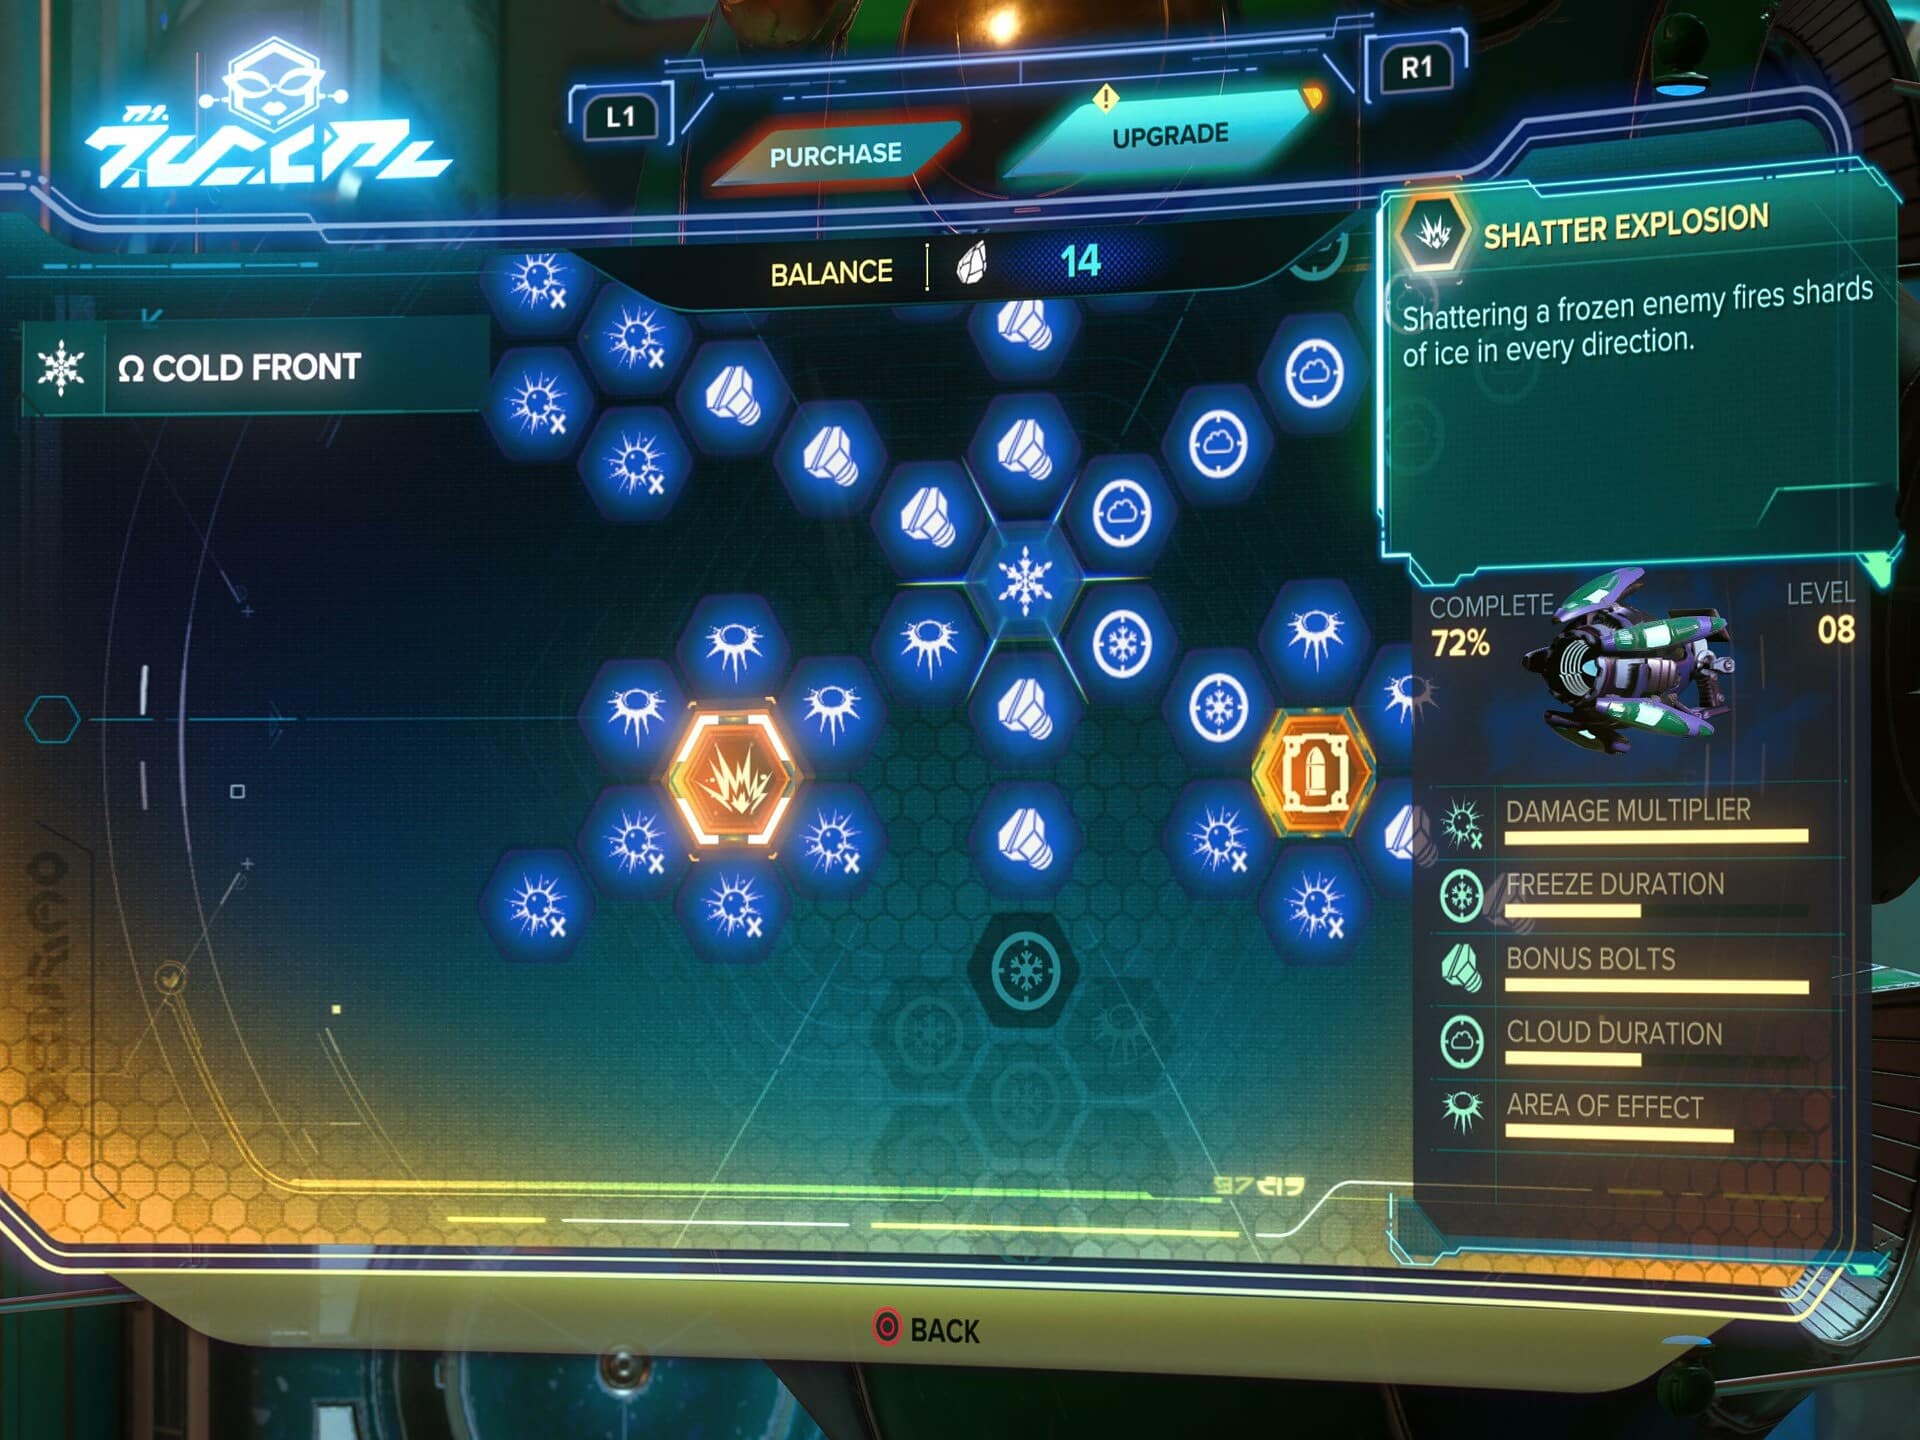
At level 2, Cold Snap gets access to the Shatter Explosion Gold Cell Upgrade. This powerful upgrade makes enemies that are defeated while frozen shatter into shard that deal damage in a wide area. This upgrade with just a little help can wipe out weak enemies almost by itself.
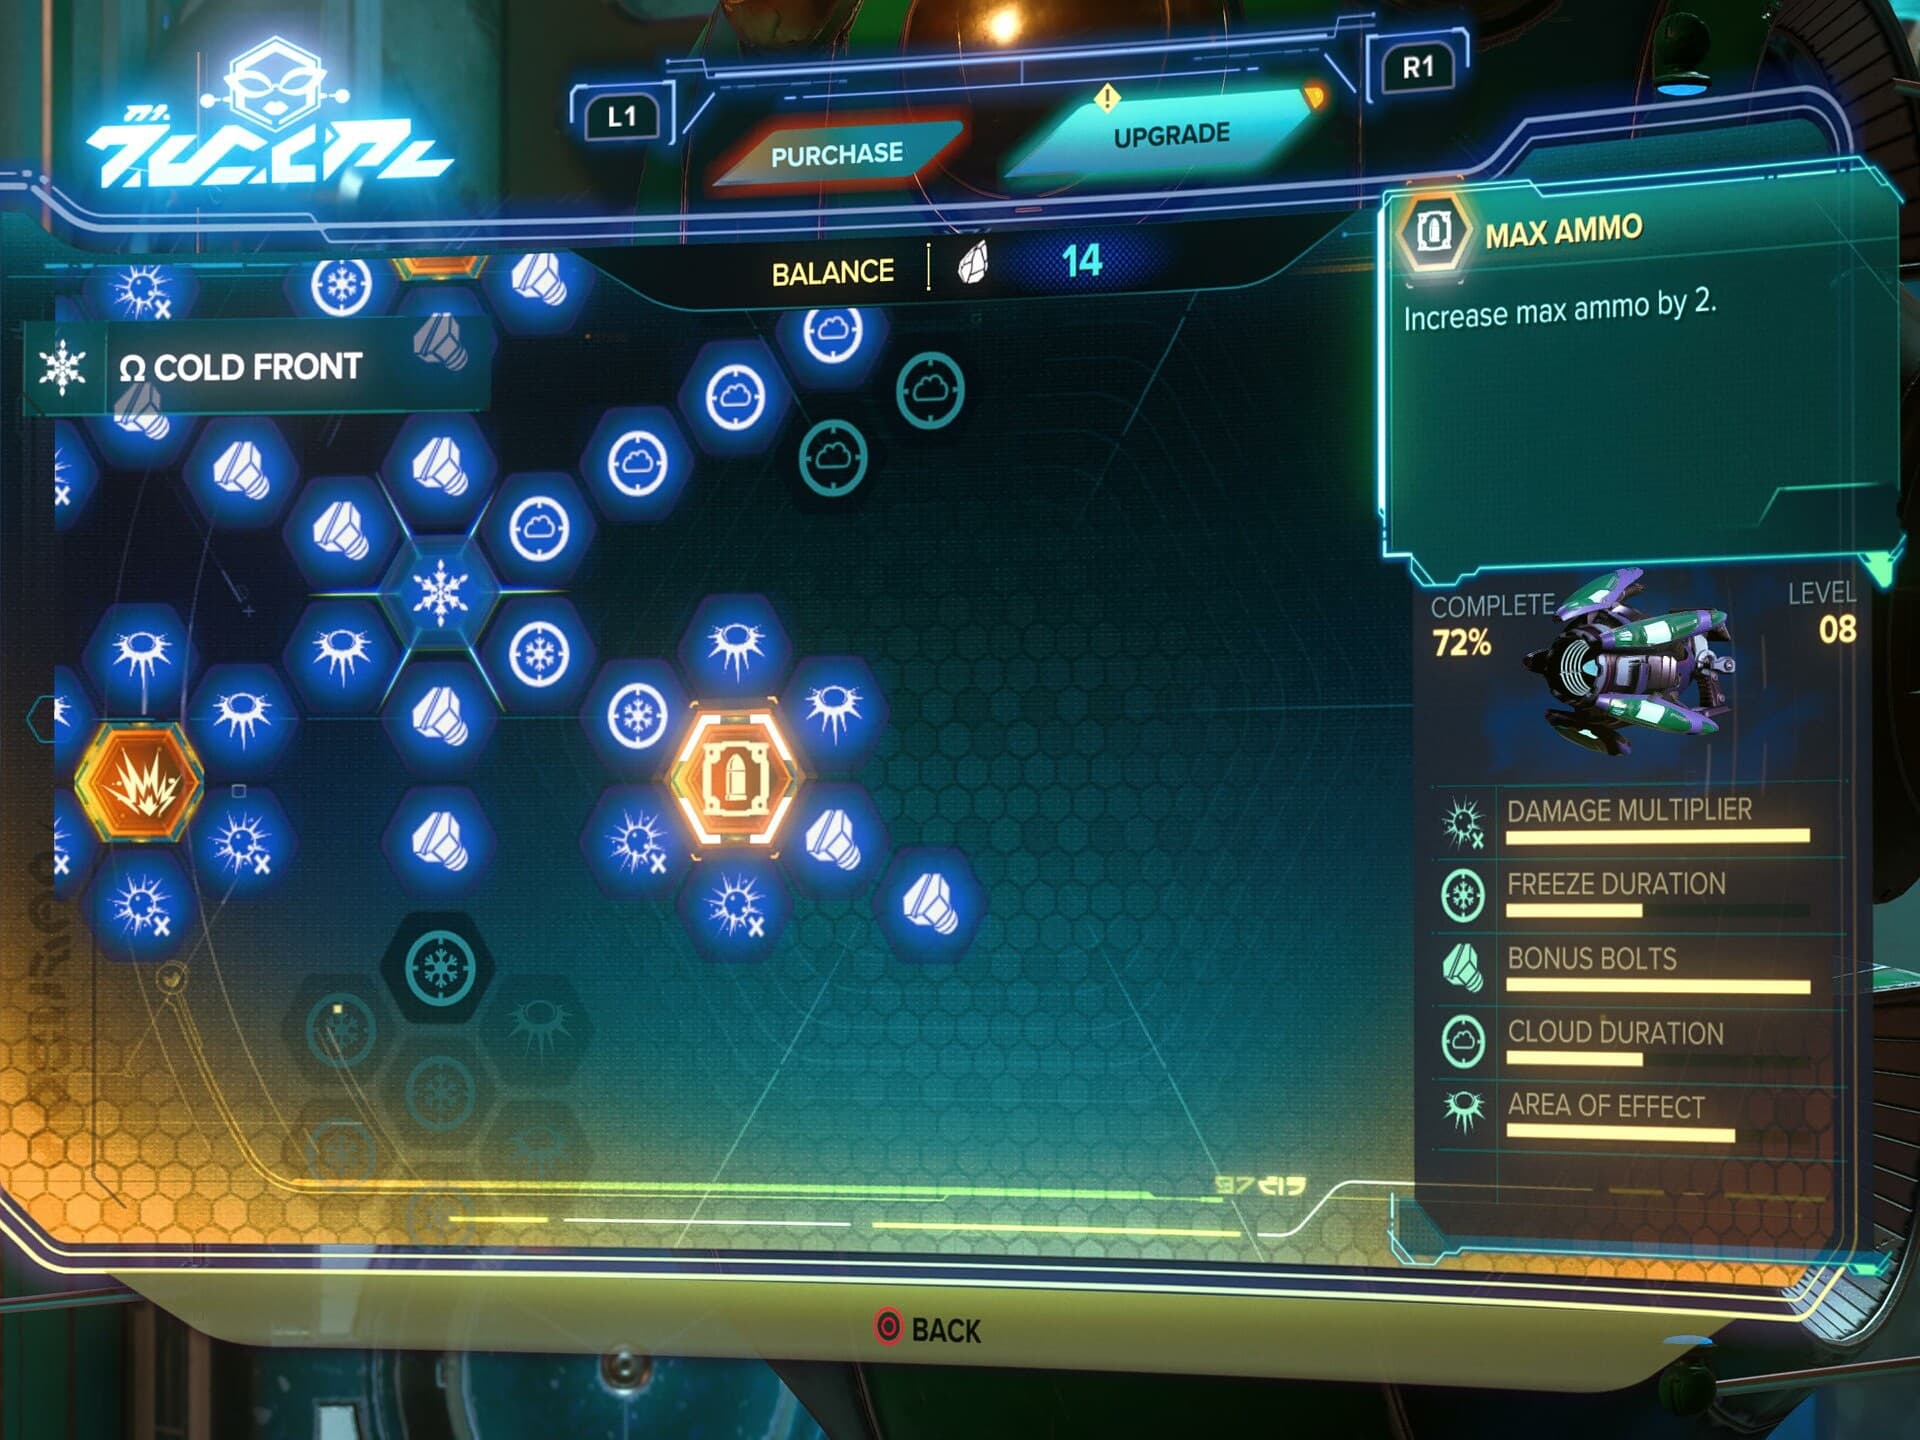
At Levels 3 and 4, Cold Snap get access to the Max Ammo Gold Cell Upgrade, which increases its maximum ammo count by a total of three between both upgrades. with how little ammo this weapon gets over all, this a a very welcomed upgrade.

Drillhound
A new weapon to the series, the Drillhound can lock-on and fire off a homing explosive that burrows and ignores terrain. Locking on will result in a faster projectile than firing without a lock-on.

This weapon isn’t really too spectacular. The biggest benefit it has is also what makes it more unique, the lock-on which will persist behind cover if you hold the button. This allows you to damage an enemy or groups of enemies which moving in and out of cover. The lock-on actually allows it to deal with airborne targets decently well.
This weapon becomes available during your first visit to Zurkie’s in the Scarstu Debris Field for 10,000 Bolts.
Upgrades
At level 5 the Drillhound becomes the Drillpack. This allows the weapon to lock-on to two additional targets, sending smaller Drillpups at them.
In Challenge mode the Drill Pack can be upgraded to the Omega Drillpack for the cost of X Bolts.
Through the use of Raritanium the Drillhound / Drillpack have access to the following bonuses on its Upgrade Tree:
Explosion Radius, which increases the area in which the Drillhounds deal damage. For leveling reasons alone, this should be an upgrade you prioritize when possible.
Lock-on Speed, which increases the speed which the the weapon will lock-on to targets. This is a Quality of Life thing, as you can just fire the weapon without locking-on. It does however help if you want to focus on a specific enemy instead of what’s closest. Locking-on does also improve the speed of the projectile.
Max Ammo, which increases the maximum ammo you can carry for this weapon. A good Quality of Life upgrade, as being a launcher/explosive-type weapon means it has less total ammo over other weapons to balance it’s higher damage and AoE potential.
Movement Speed, which increases the speed of the Drillhounds that have locked on to a target. This is purely quality of life, but does help with making the weapon more consistent against airborne enemies.
In addition to these basic stat upgrades, the Drillhound / Drillpack also have a set of Gold Cell upgrades which empower the weapon in various way.
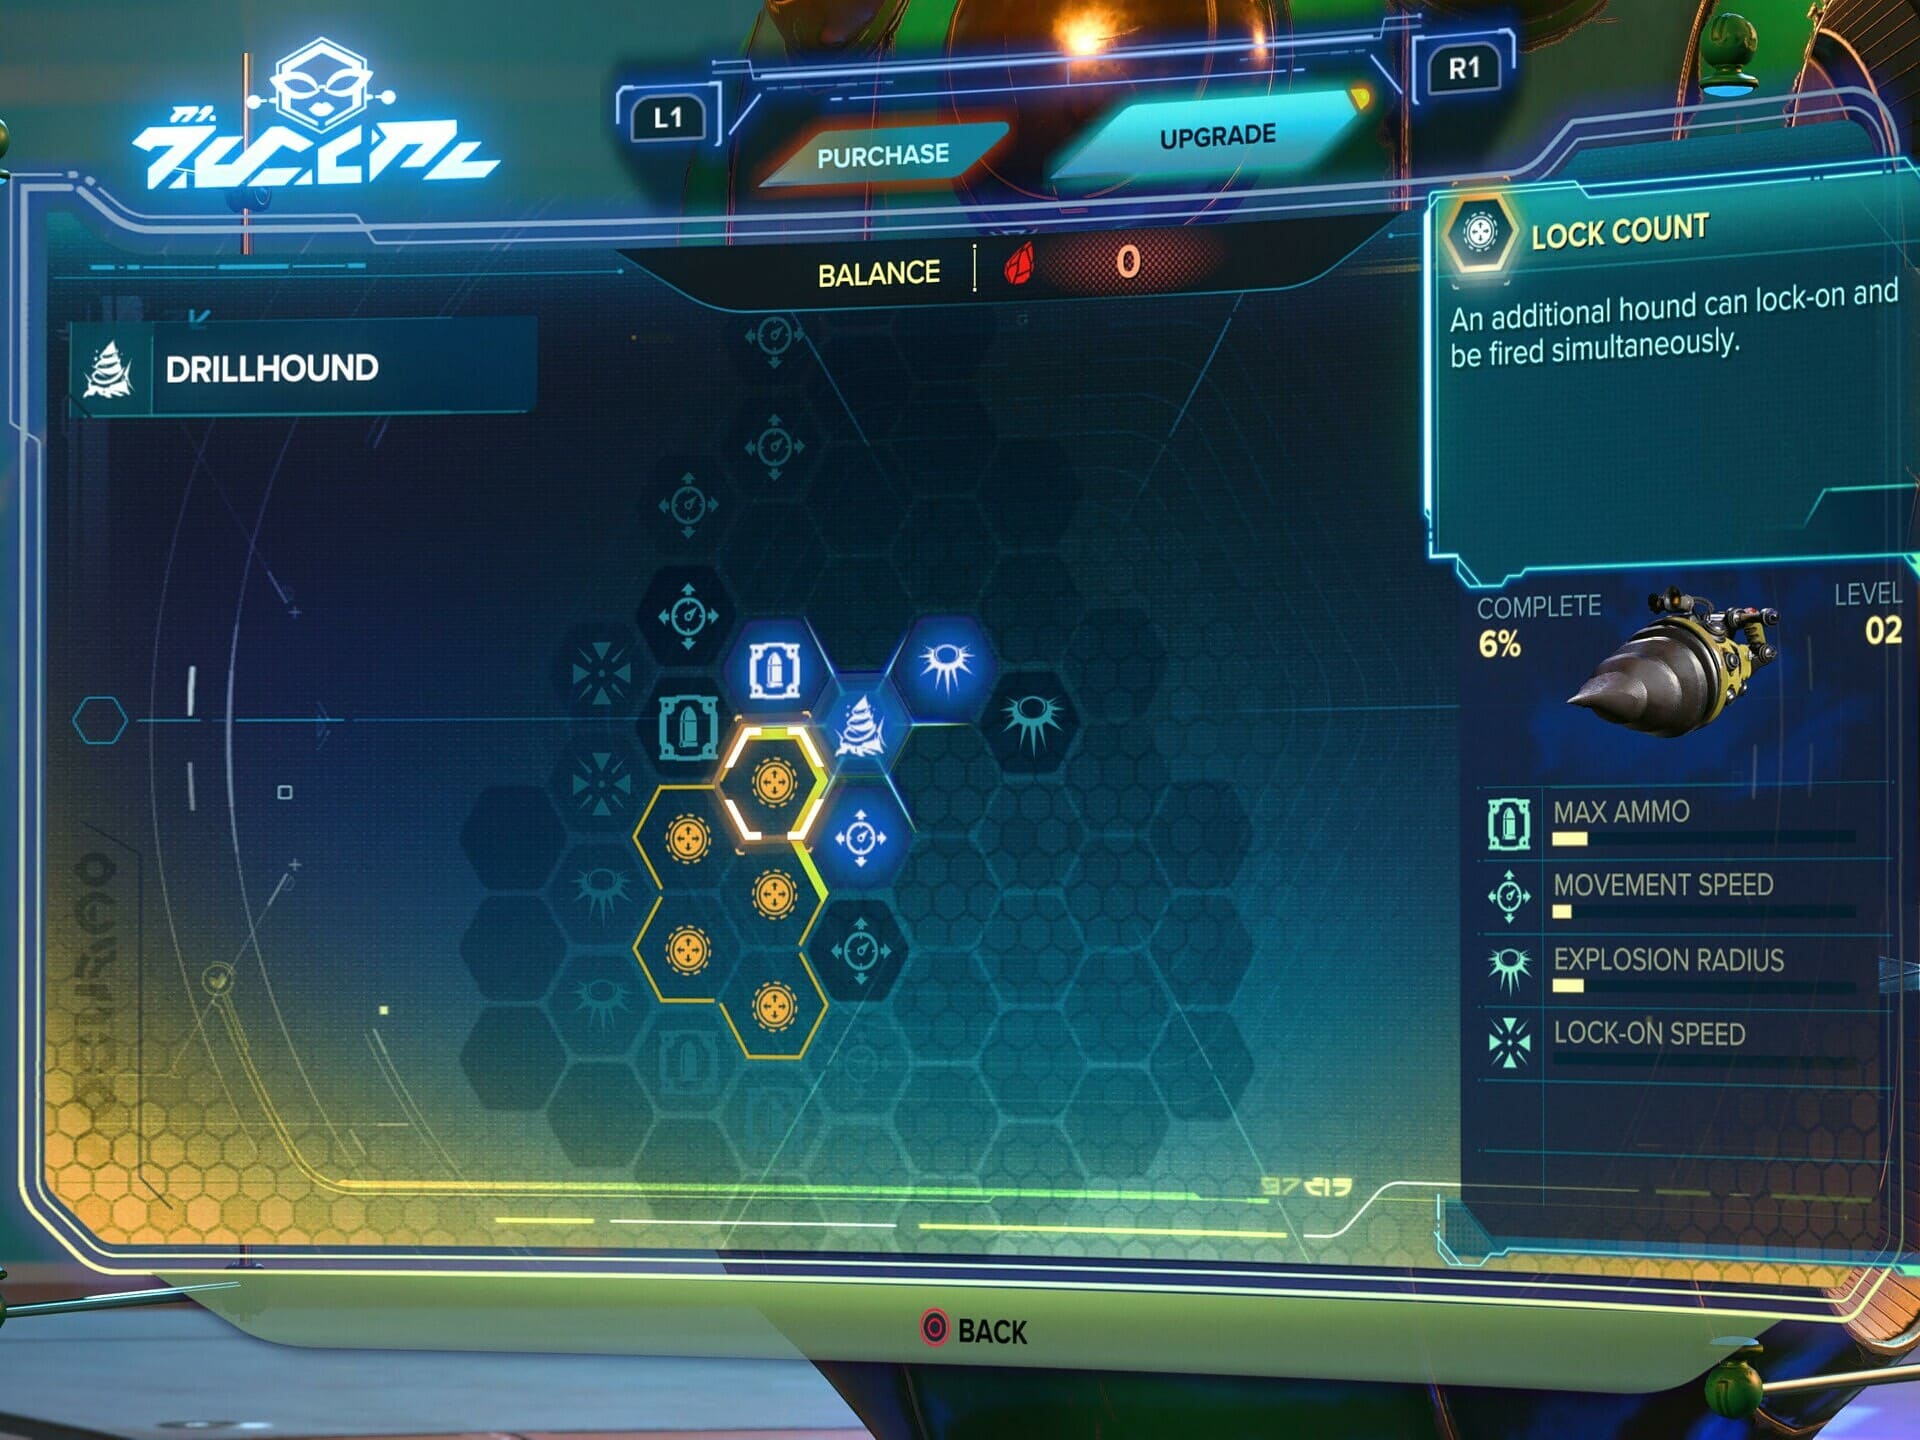
At levels 2 and 4, the Drillhound gets access to the Lock Count Gold Cell Upgrade. This upgrade allows it to lock-on to an additional target, letting you release a second hound (for no extra ammo cost at that). This upgrade helps a ton with ammo efficiency in doing so. With both the Drillpack cna lock-on to up to five targets.

At level 3, the Drillhound gets access to the Drillhound Direct Damage Gold Cell Upgrade. This upgrades does exactly as you’d think it does, increasing damage to the enemy it hits directly. This only real direct damage upgrade you get for this weapon, so it should take priority.
Glove of Doom
Another returning weapon and another of my favorites, the Glove of Doom tosses out a DoomEgg that releases a small number of Agents of Doom per toss. These little guys will run up to and melee attack any enemies in range and can distract them.
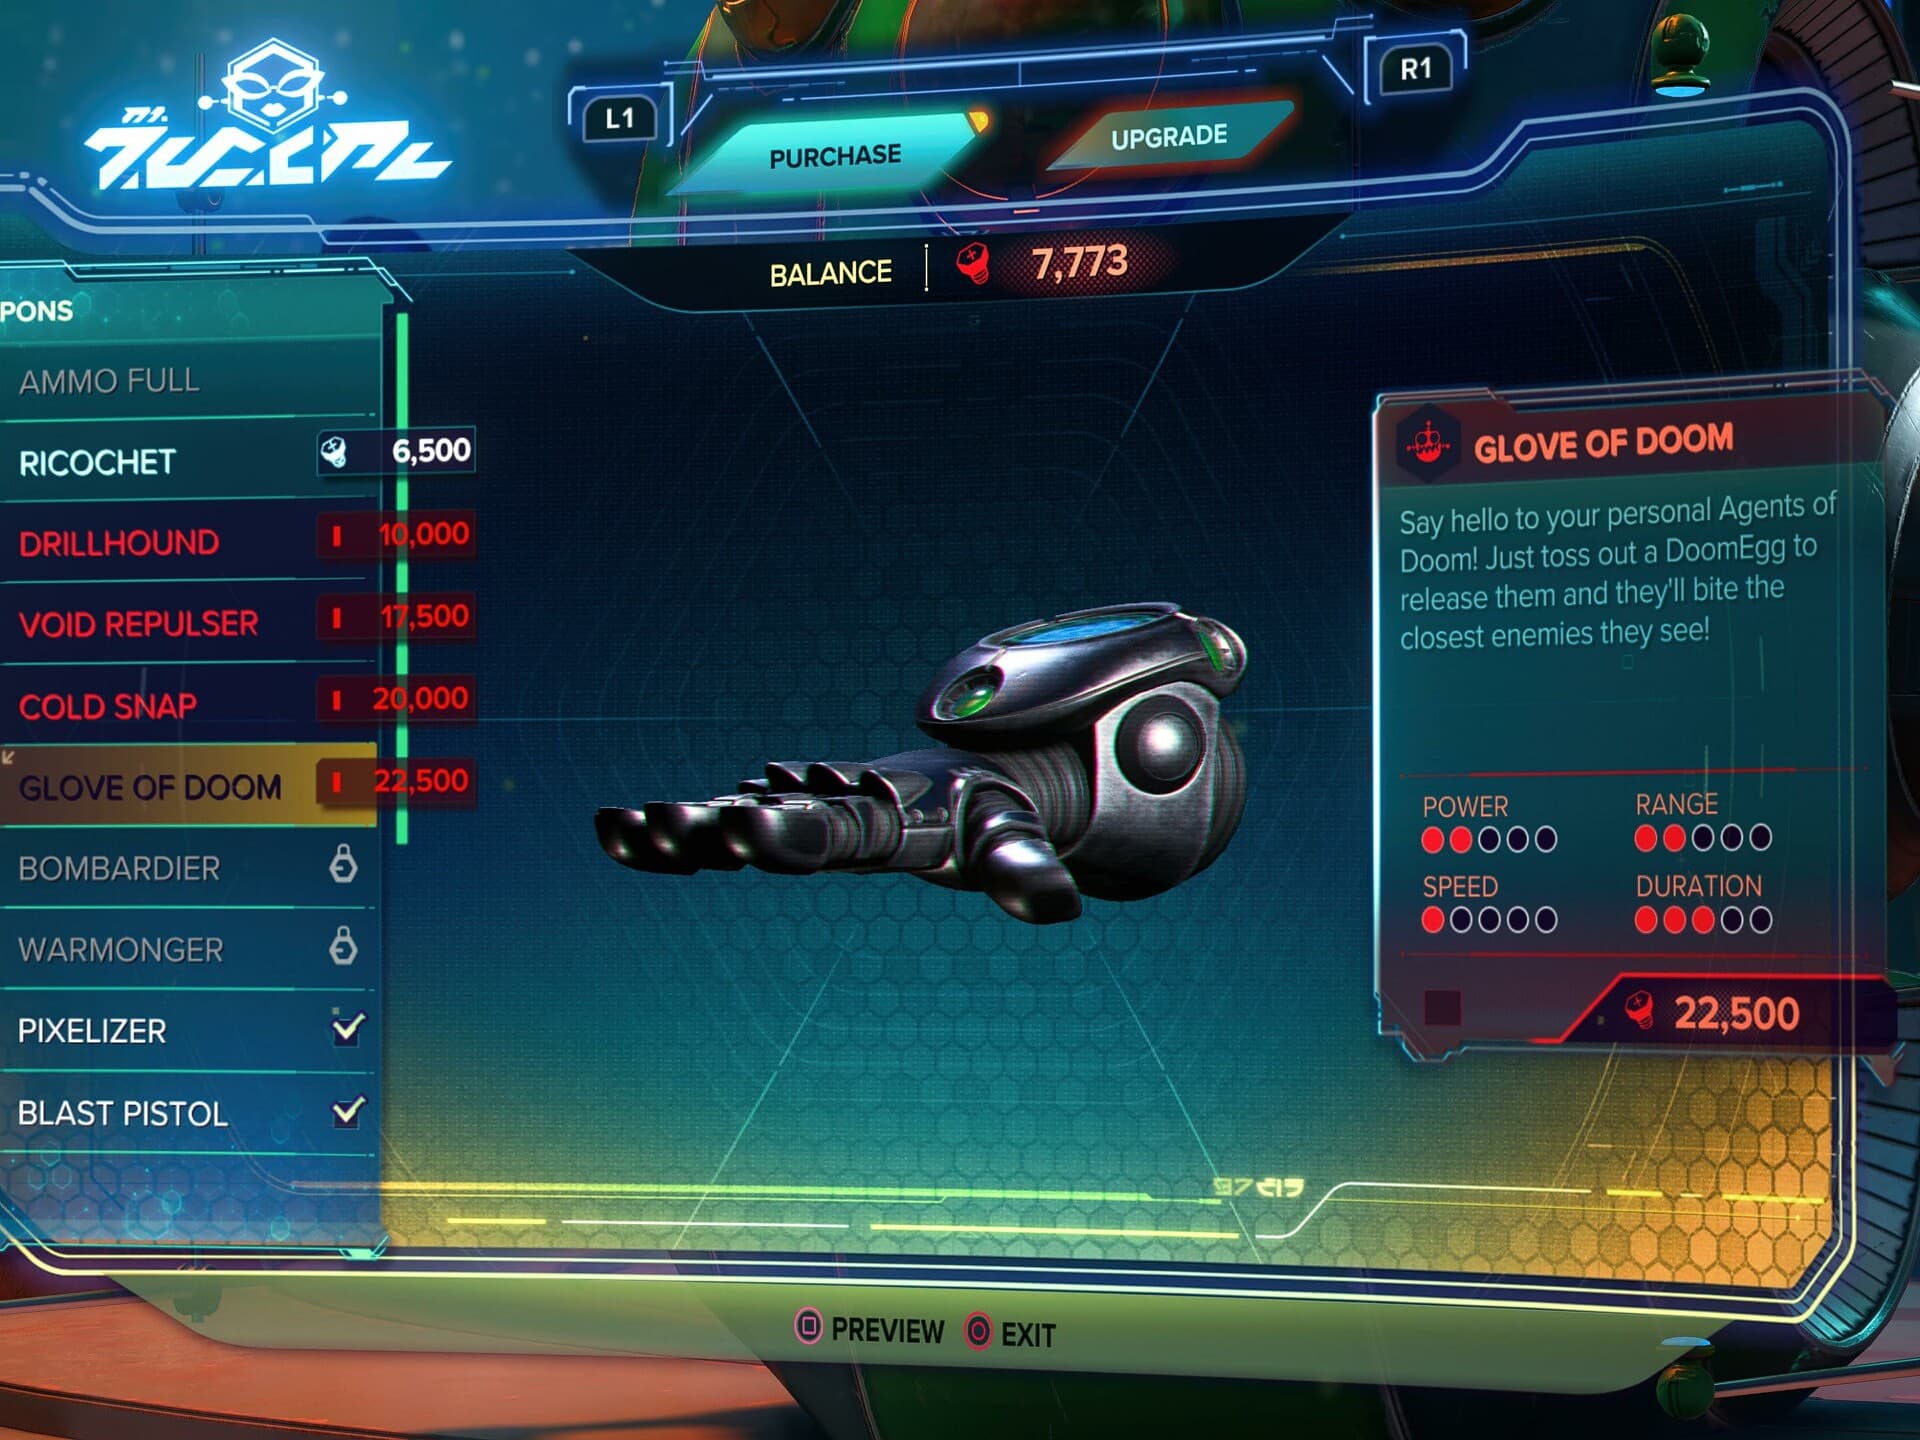
This weapon is really good in boss fights where the boss summons ground-based adds. These will do a decent job protecting you from the adds allowing you to focus your attention on the boss. For ground-based bosses or min-bosses these can also provide a ton of extra damage. They also happen to be fantastic against Shield Pirates, both doing damage and distracting them leaving them open to attack.
This weapon first becomes available in Cordelion for 22,500 Bolts
Upgrades
At level 5 the Glove of Doom becomes the Apocalypse Glove. This additional upgrade makes the Agents of Doom explode when they expire, adding a decently sized AoE effect to their damage output.
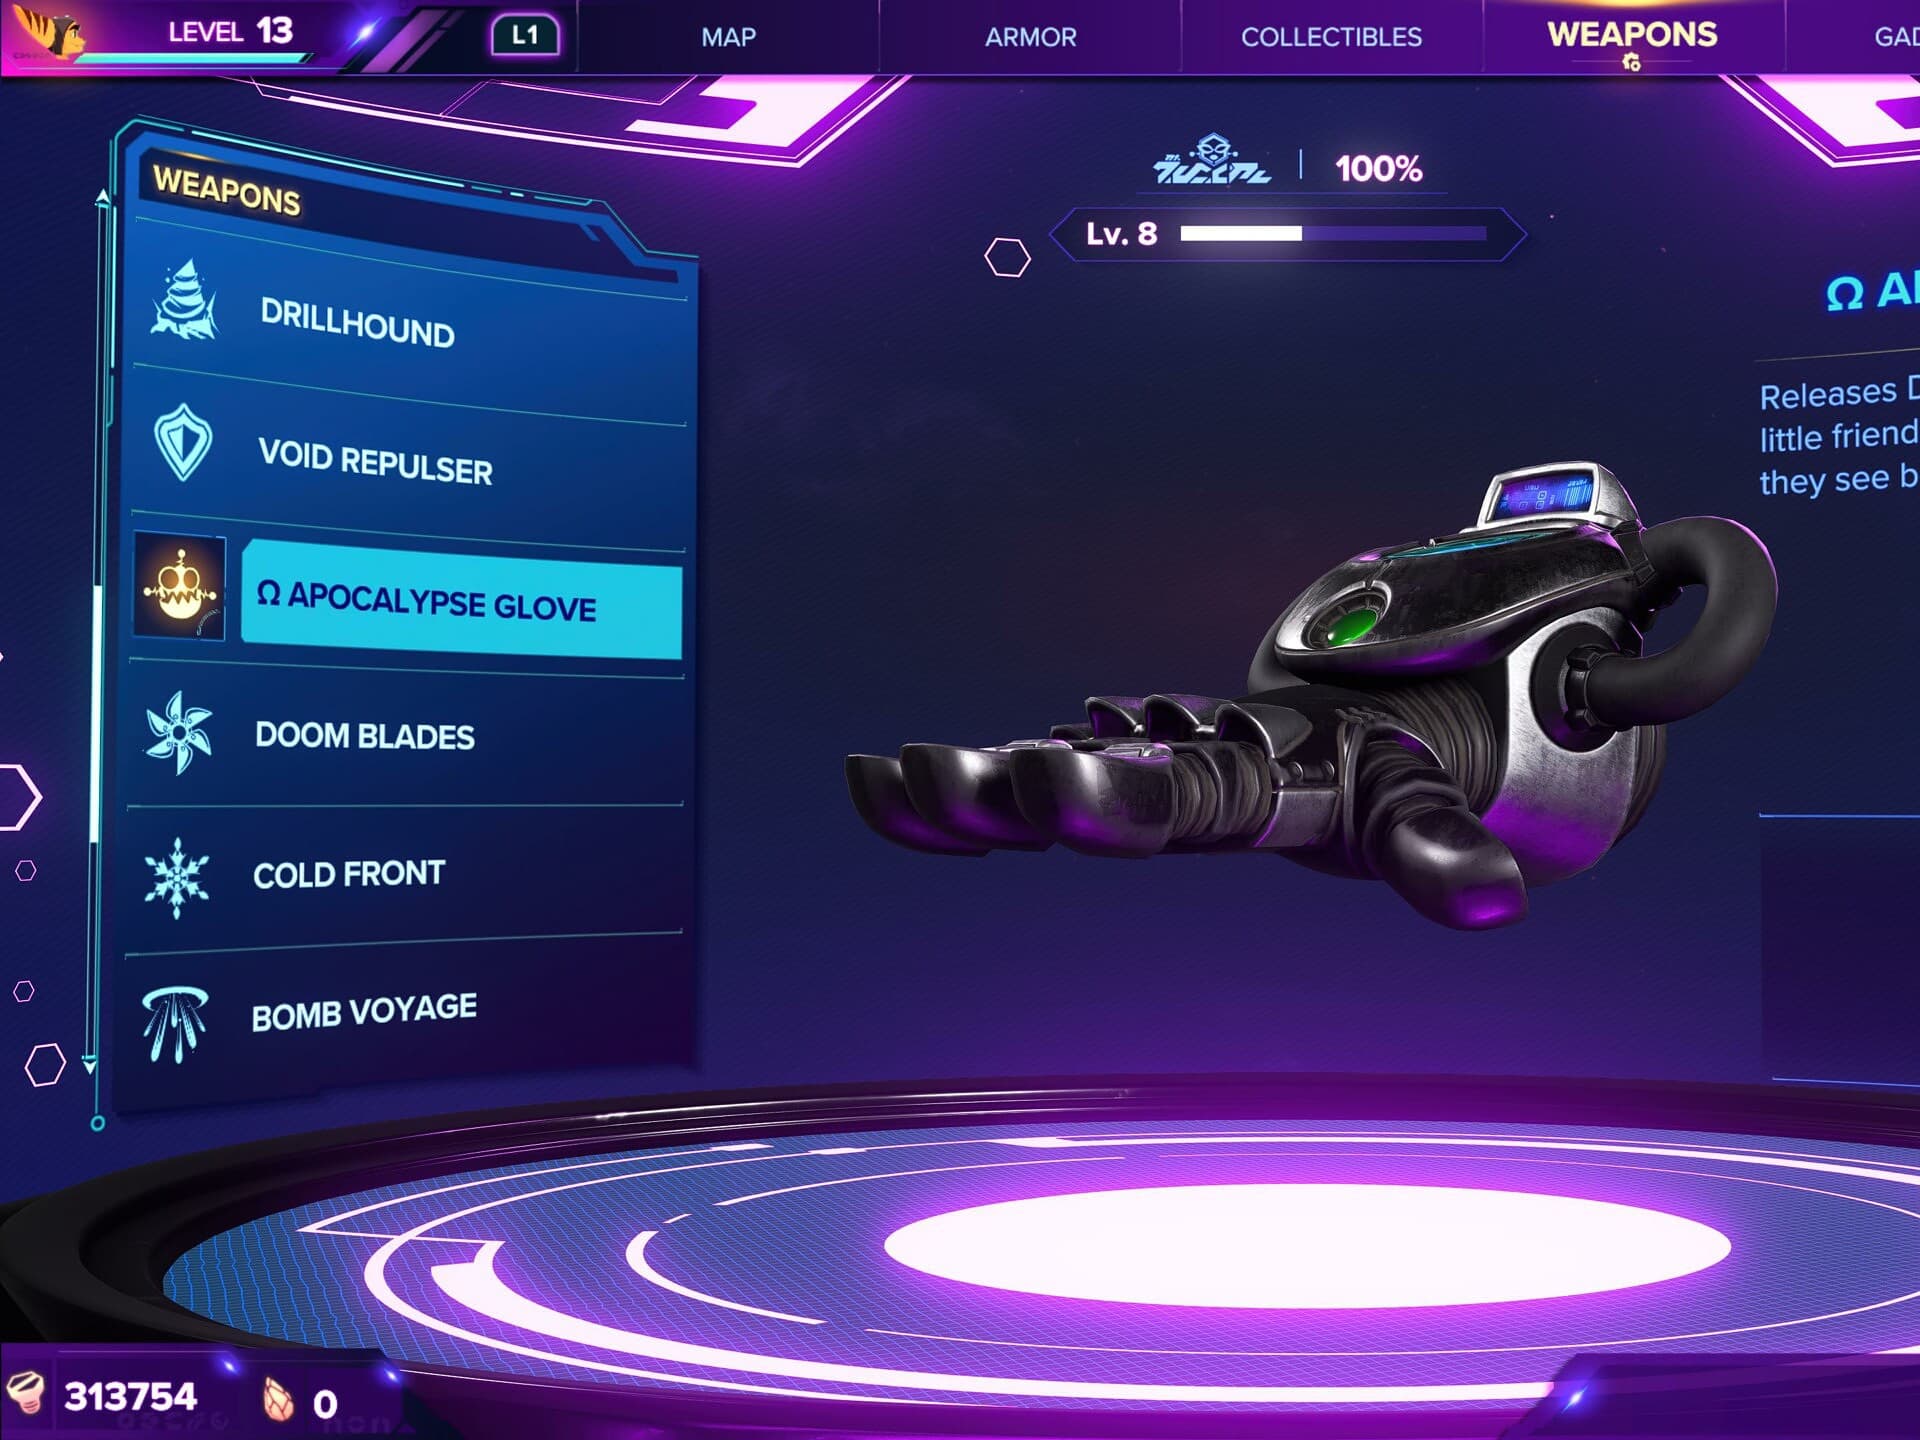
In Challenge Mode, the Apocalypse Glove can be upgrade to the Omega Apocalypse Glove for 300,000 Bolts.
Through the use of Raritanium the Glove of Doom / Apocalypse Glove have access to the following bonuses on its Upgrade Tree:
Agent Attacks, which increases the number of times each Agent of Doom can hit an enemy before expiring. This upgrade should take priority as it both extends Agent duration and increases the damage of the Agents of Doom.
Agent Awareness, This increases the range at which Agents of Doom will seek out enemies. This is mostly quality of life, but also makes them a more effective and reliable weapon.
Agent Speed, This increases the speed at which the Agents of Doom can move. This can help them stick to targets that may frequently move, live some bosses and mini-bosses do. It should be pretty high priority on the list of upgrades, if you have to choose.
Agent Explosion Damage is only available after the Glove of Doom becomes the Apocalypse Glove at level 5. This increases the damage of the explosion when Agents of Doom expire. This should be your second highest priority when the weapon hits Level 5, assuming Agents Attacks isn’t maxed.
Agent Explosion Radius is also only available after the upgrade to the Apocalypse Glove. This increases the radius of the explosion after an Agent of Doom expires. This is really just quality of life, as with Agent Attack maxed, they tend to out-live most non-boss enemies.
In addition to these basic stat upgrades, the Glove of Doom / Apocalypse Glove also have a set of Gold Cell upgrades which empower the weapon in various way.
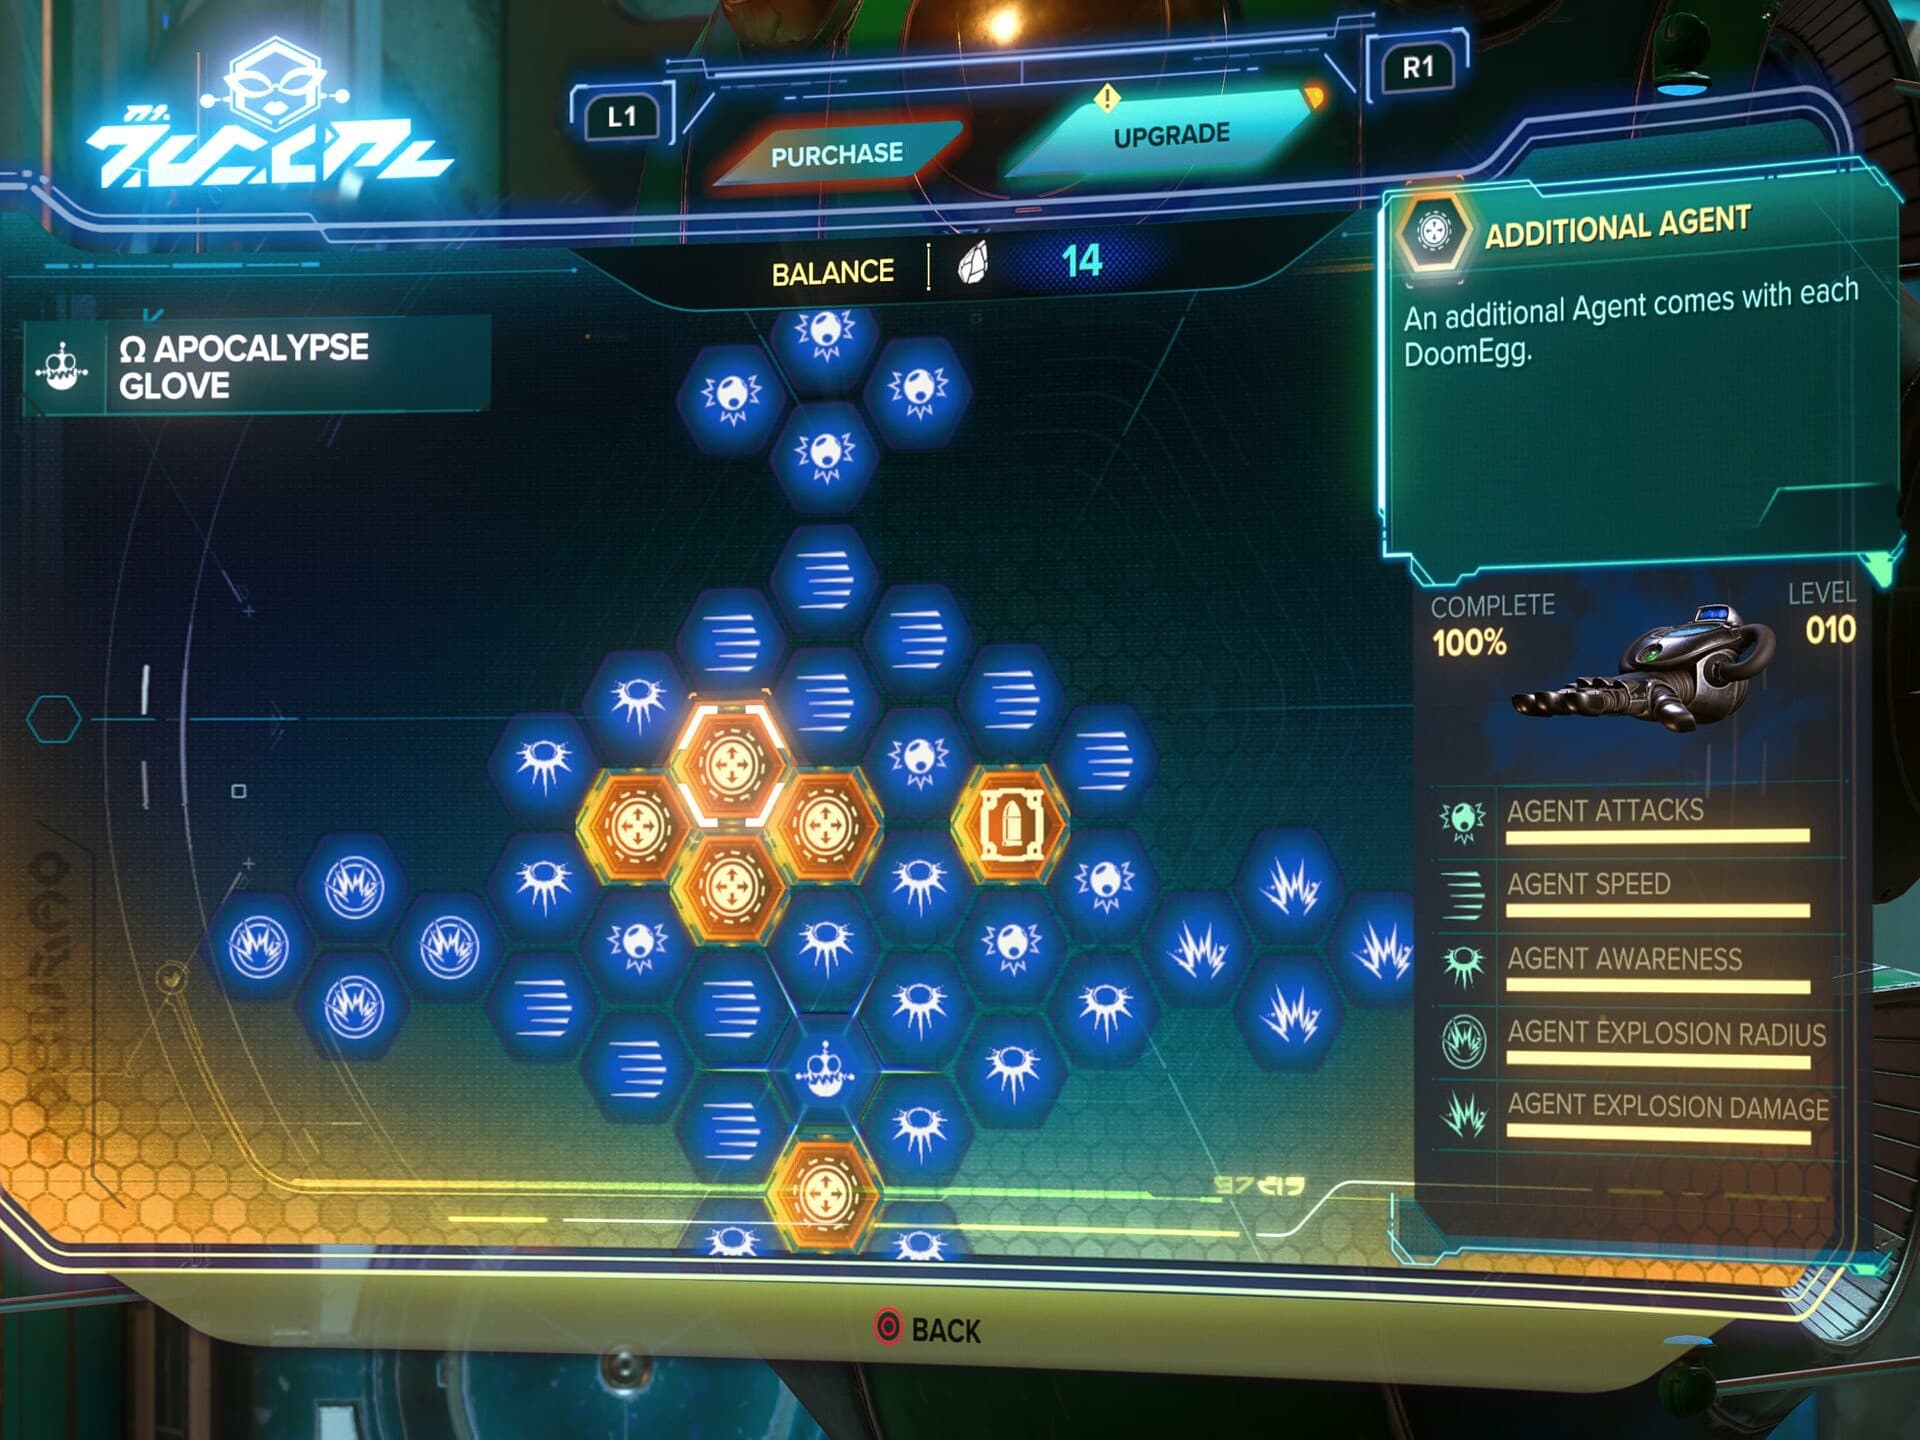
At levels 2 and 4, the Glove of Doom gets access to the Additional Agent Gold Cell Upgrades. Each of these upgrades increases the number of Agents of Doom released from each DoomEgg. With both upgrades each will release six Agents.
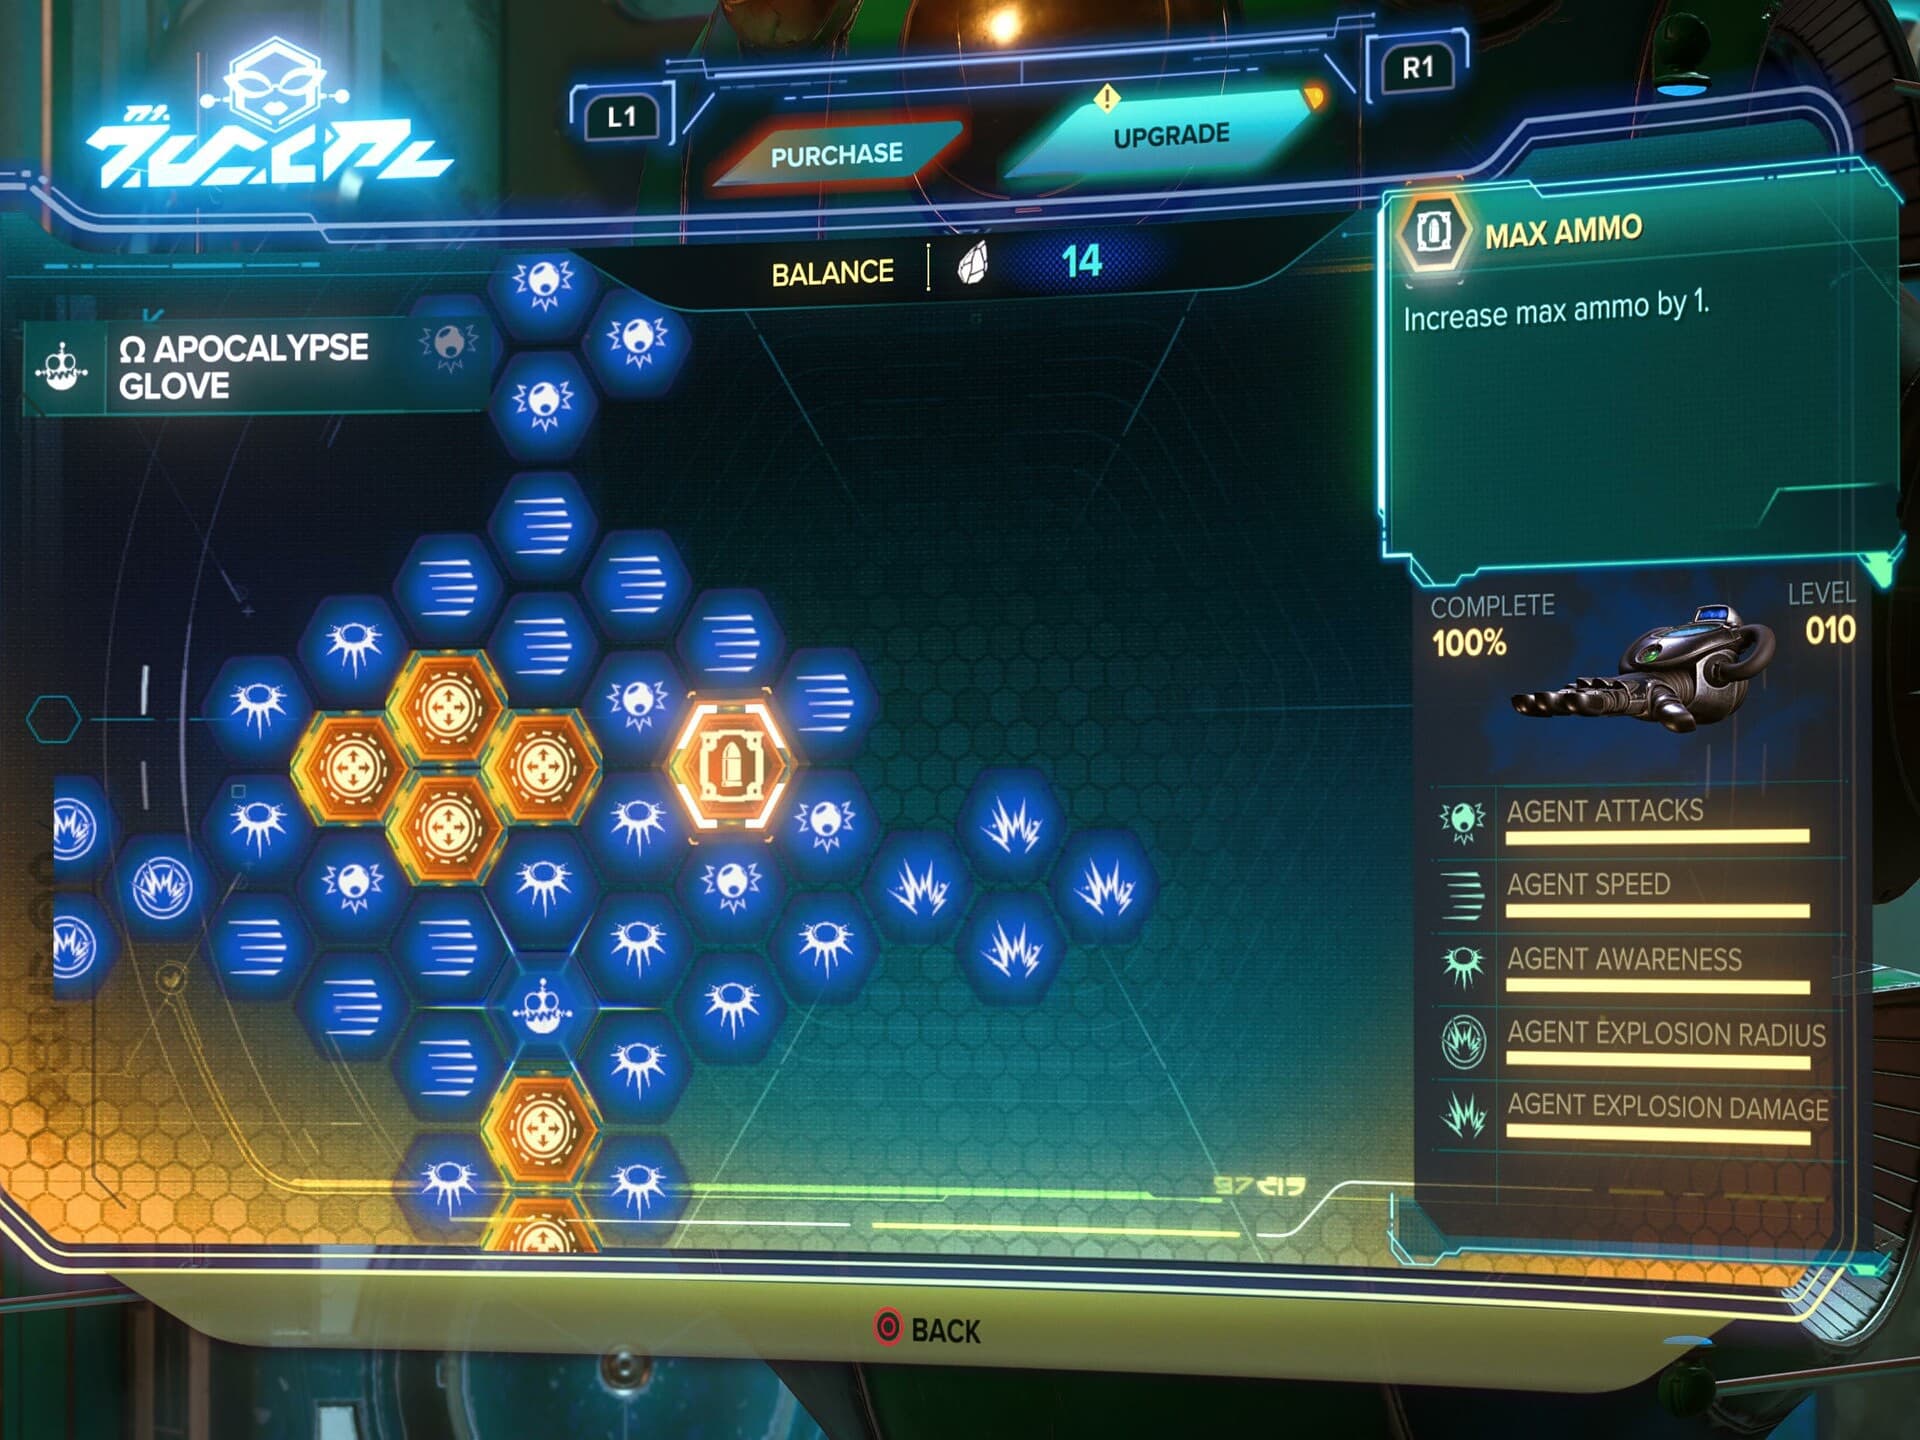
At Level 3, the Glove of Doom gets access to the Max Ammo Gold Cell Upgrade. This upgrade increases the weapon’s ammo by one, from four to five.
Headhunter
A returning classic, the Headhunter is a sniper with incredibly high damage on headshots. This weapon has the capacity to be one of the strongest single target focused sources of damage.
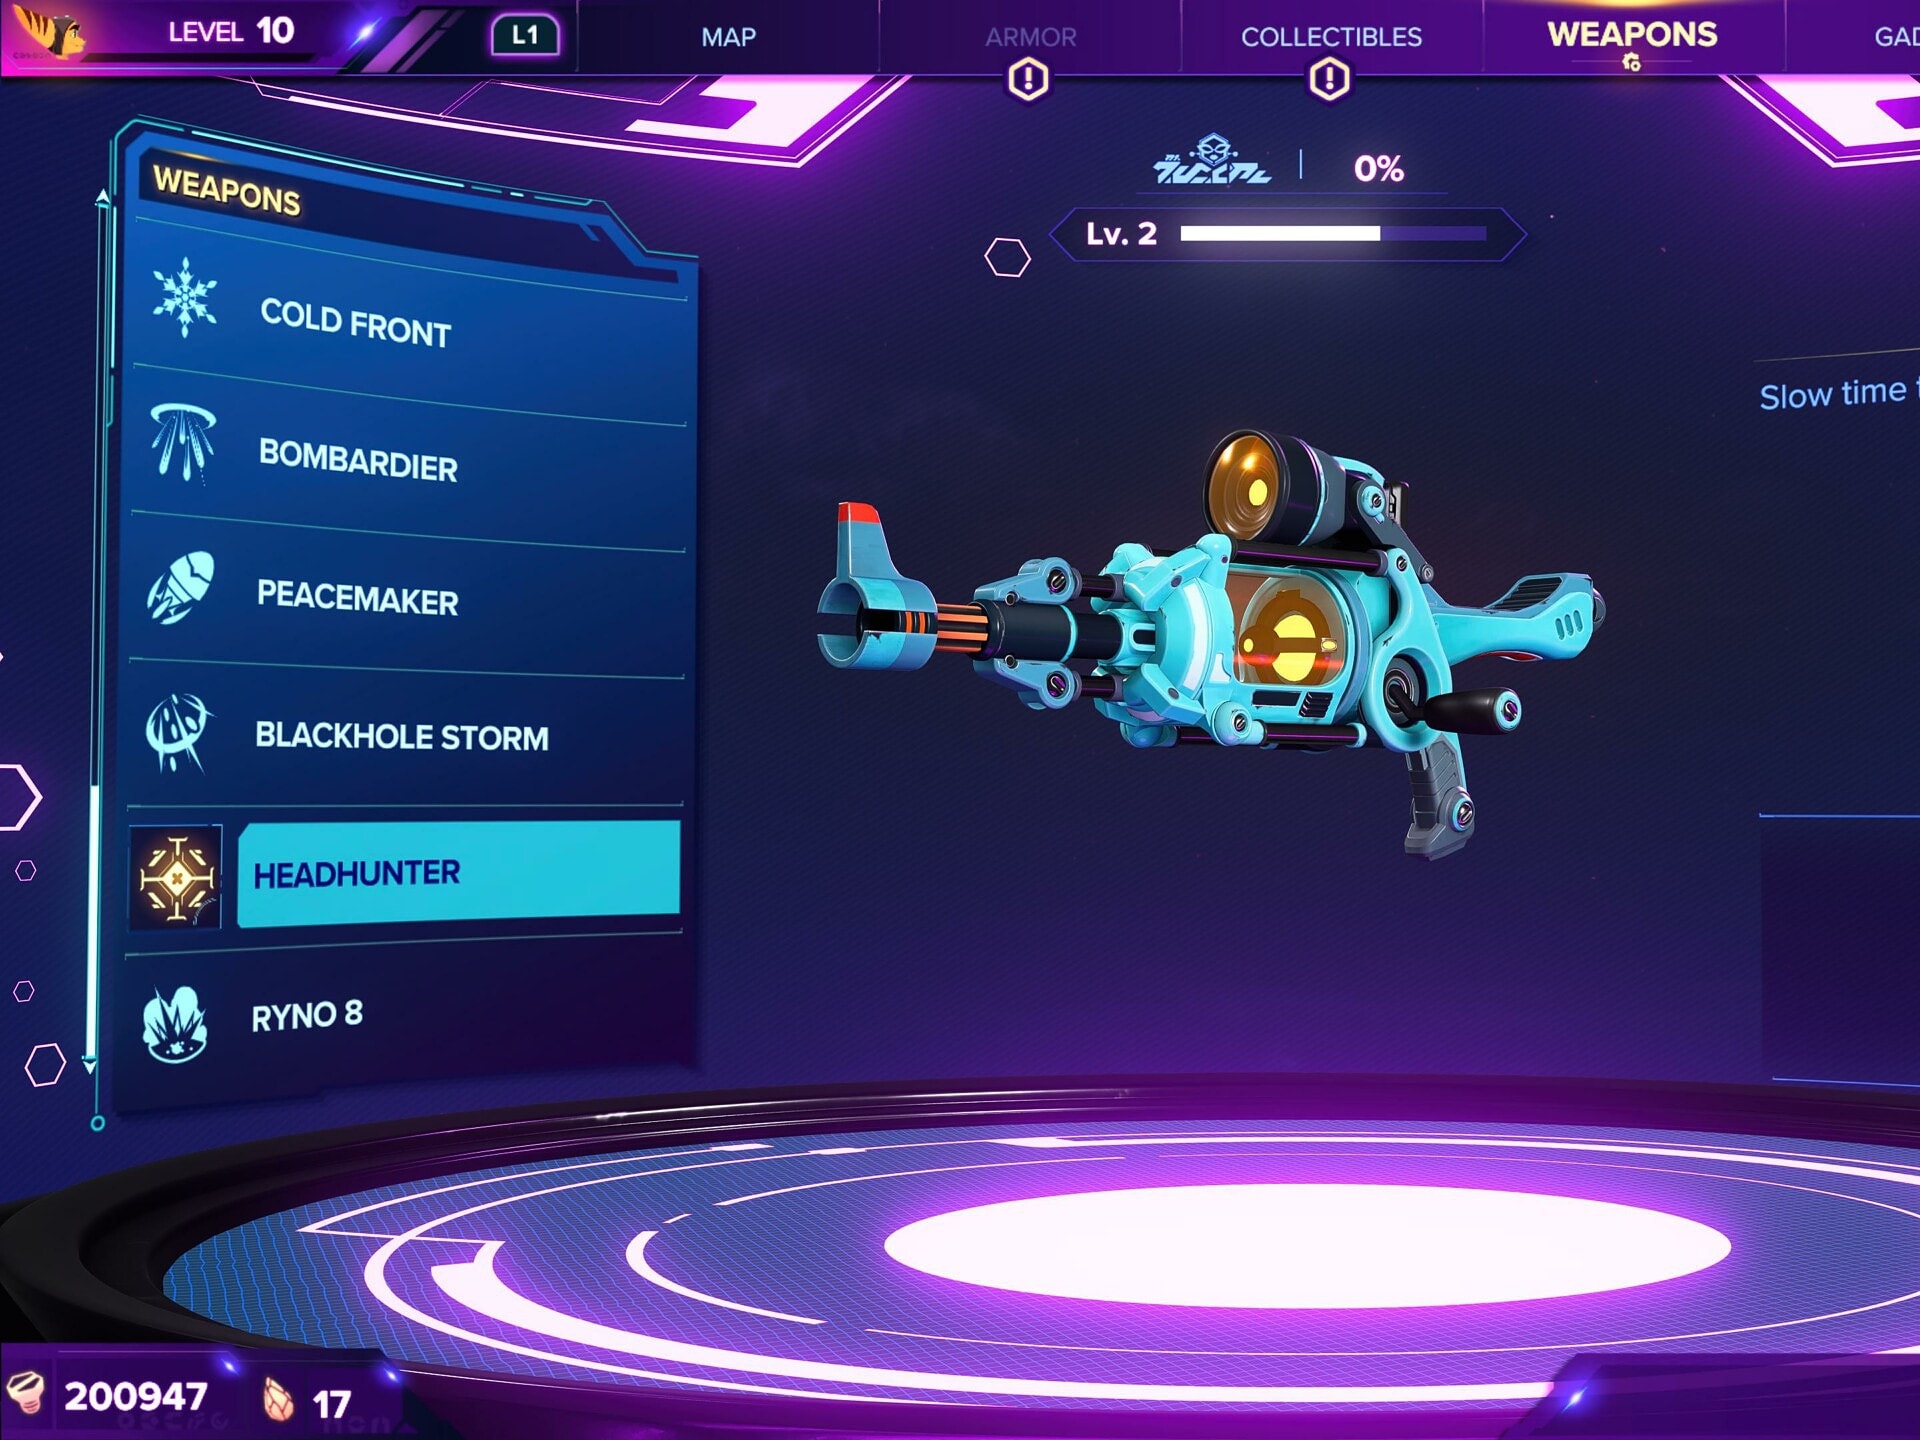
When Paired with the Topiary Sprinkler or Cold Snap, this weapon has incredibly high damage potential, out damaging most other weapons. Even on the highest difficulty, after a few of its damage upgrades it will one shot most-non bosses when supported by either of the previously mentioned weapons.
This weapon can be purchased for 40,000 Bolts from Ms. Zurkon, starting in Zordoom Prison.
Upgrades
At Level 5 the Headhunter becomes The Migraine. This upgrade deals significantly more damage.
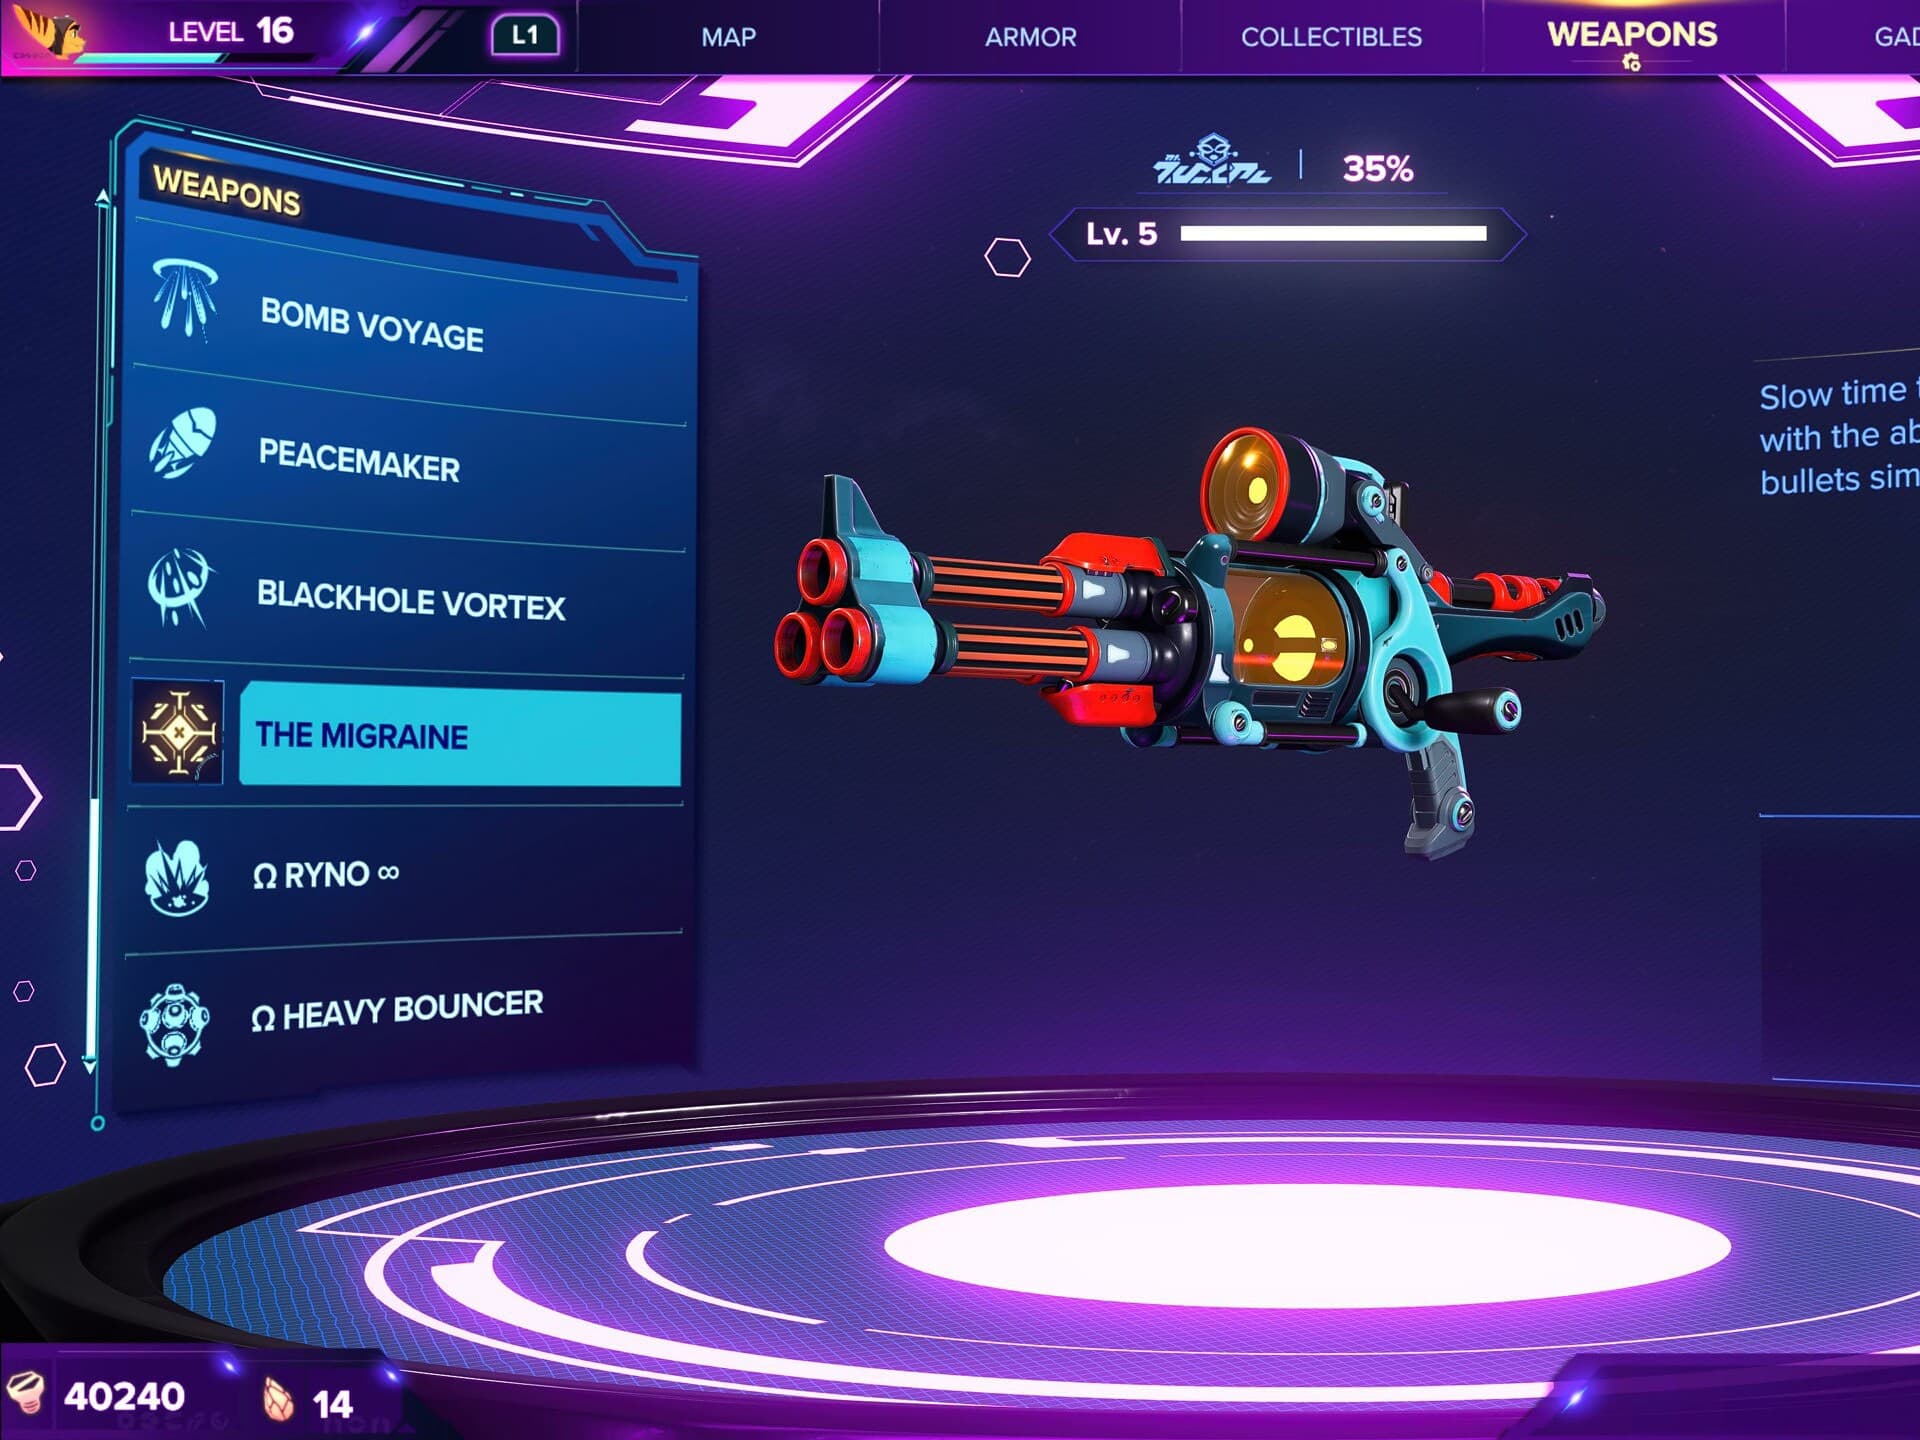
In Challenge Mode, The Migraine can be upgraded to the Omega Migraine for X Bolts.
Through the use of Raritanium the Headhunter / The Migraine have access to the following bonuses on its Upgrade Tree:
Fire Rate, which increases the rate at which the weapon fires. This is more of a quality of life for this weapon, as using it in most combat situations can be fairly rough to do.
Max Ammo, which increases the maximum amount of ammo you can carry for this weapon. This is a good upgrade to have for this weapon, due to its lower ammo count like other heavy hitting weapons.
Slow Duration, which increases the length of time that time will be slowed while aiming this weapon. Pretty quality of life, outside of certain boss fight where it can be useful. Outside of that, pretty low priority.
Slow Speed, which increases how much time in slowed while aiming with weapon. Again, useful in some boss situations, but not high priority.
Weakpoint Damage, which increases the damage dealt when landing headshots. With good aim, or even good setup from a support weapon, this is what gives the weapon the power is has.
Overload Speed, which is unique to The Migraine and increases the speed at which The Migraine loads additional shots to be fired. This becomes the second highest priority stat when it becomes available, assuming Weakpoint Damage is unfinished.
In addition to these basic stat upgrades, the Headhunter / The Migraine also have a set of Gold Cell upgrades which empower the weapon in various way.
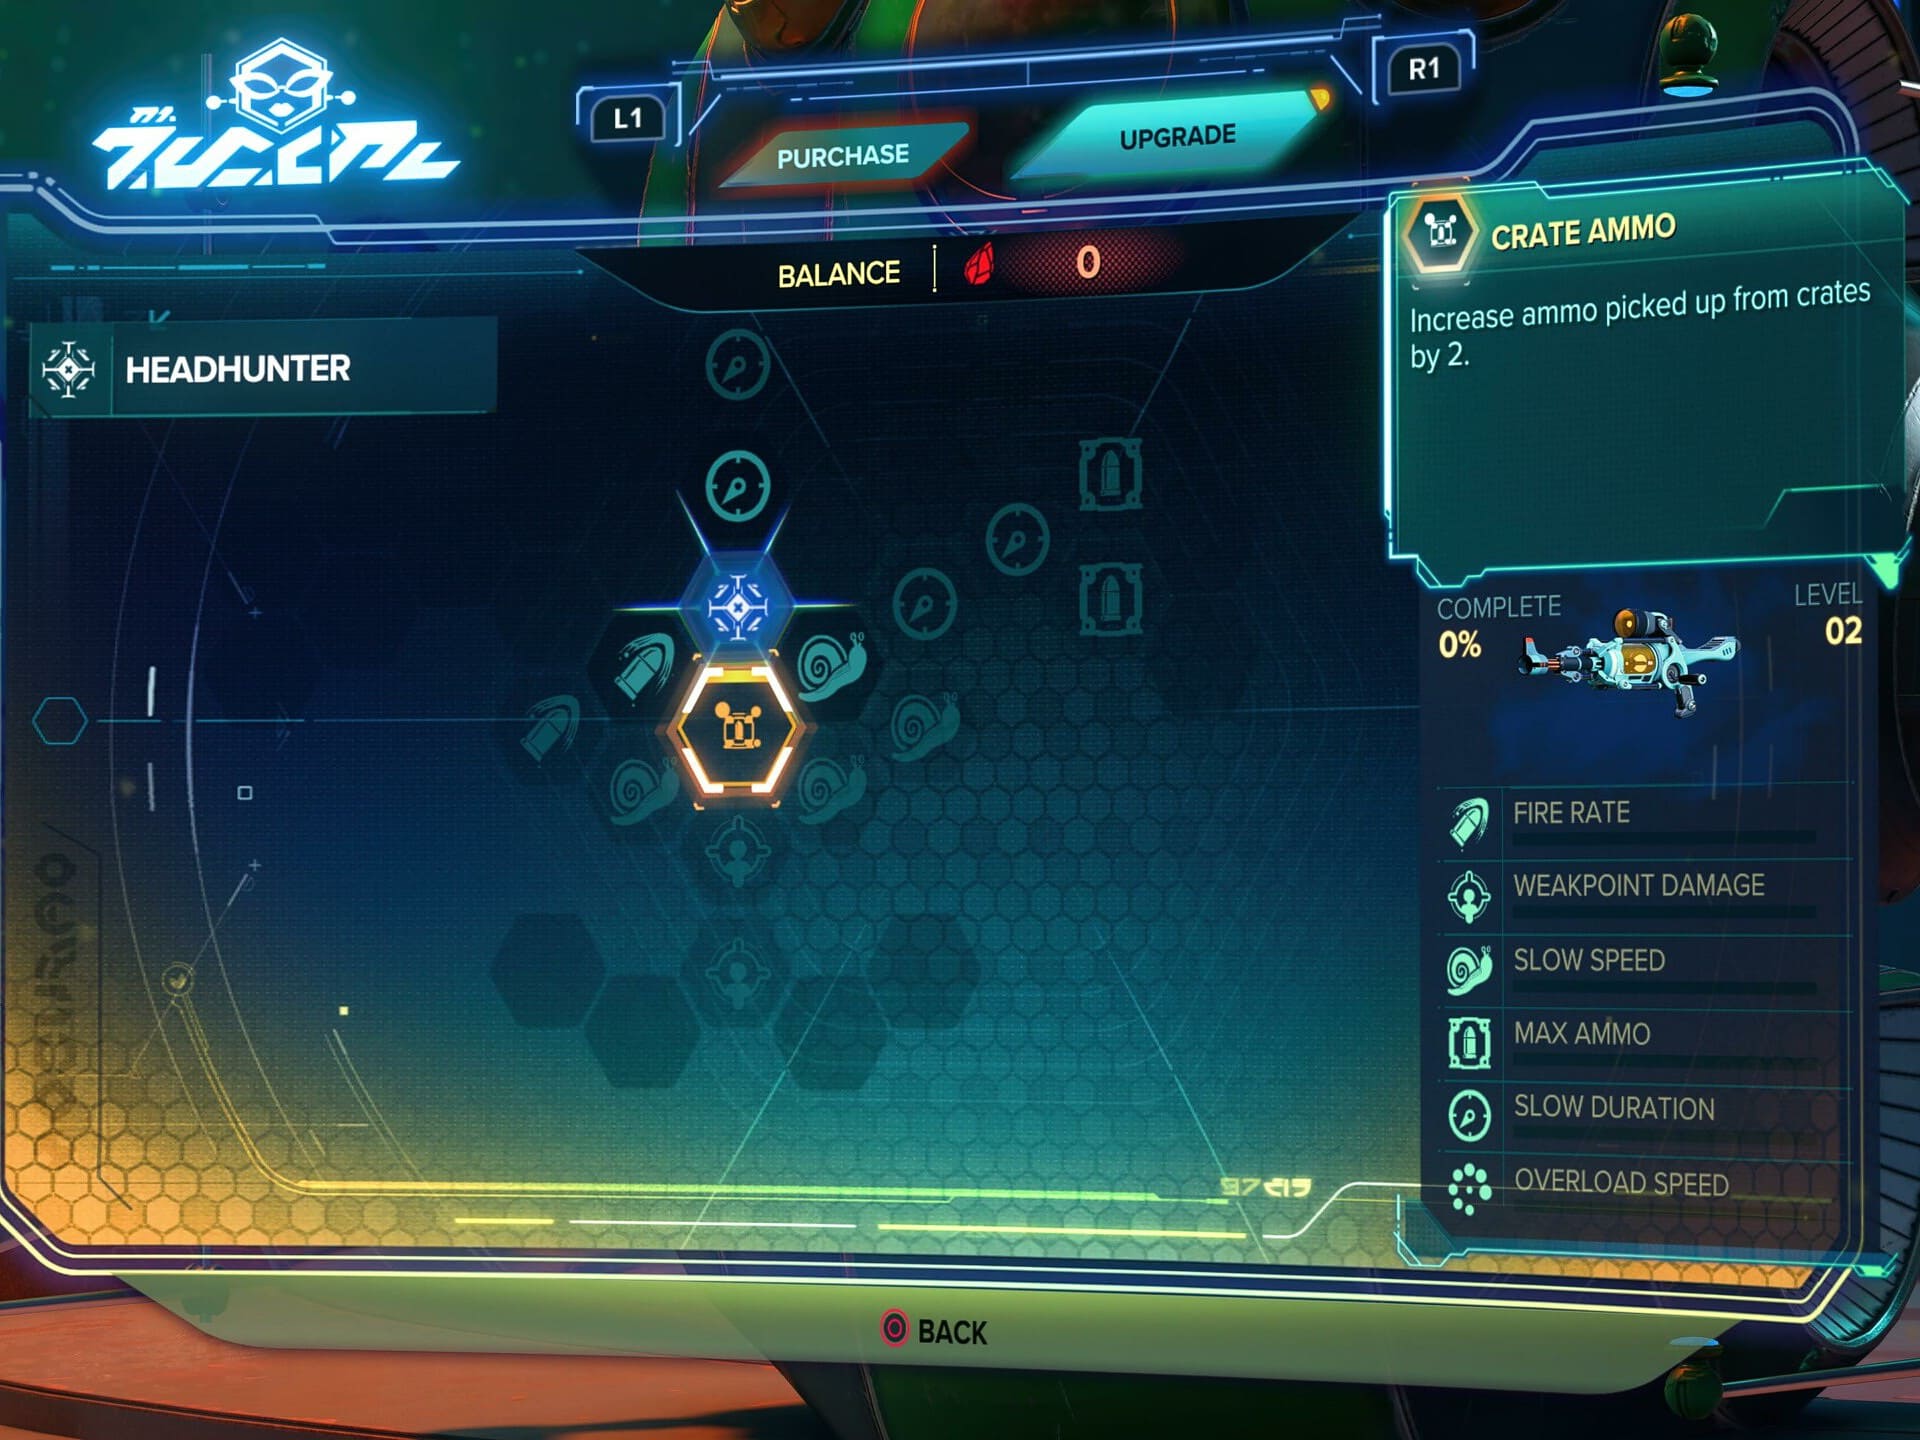
At Level 2, the Headhunter gets access to the Crate Ammo Gold Cell Upgrade. This upgrade allows you to recover ammo from crates in high amounts, increase pickups from one to three ammo.
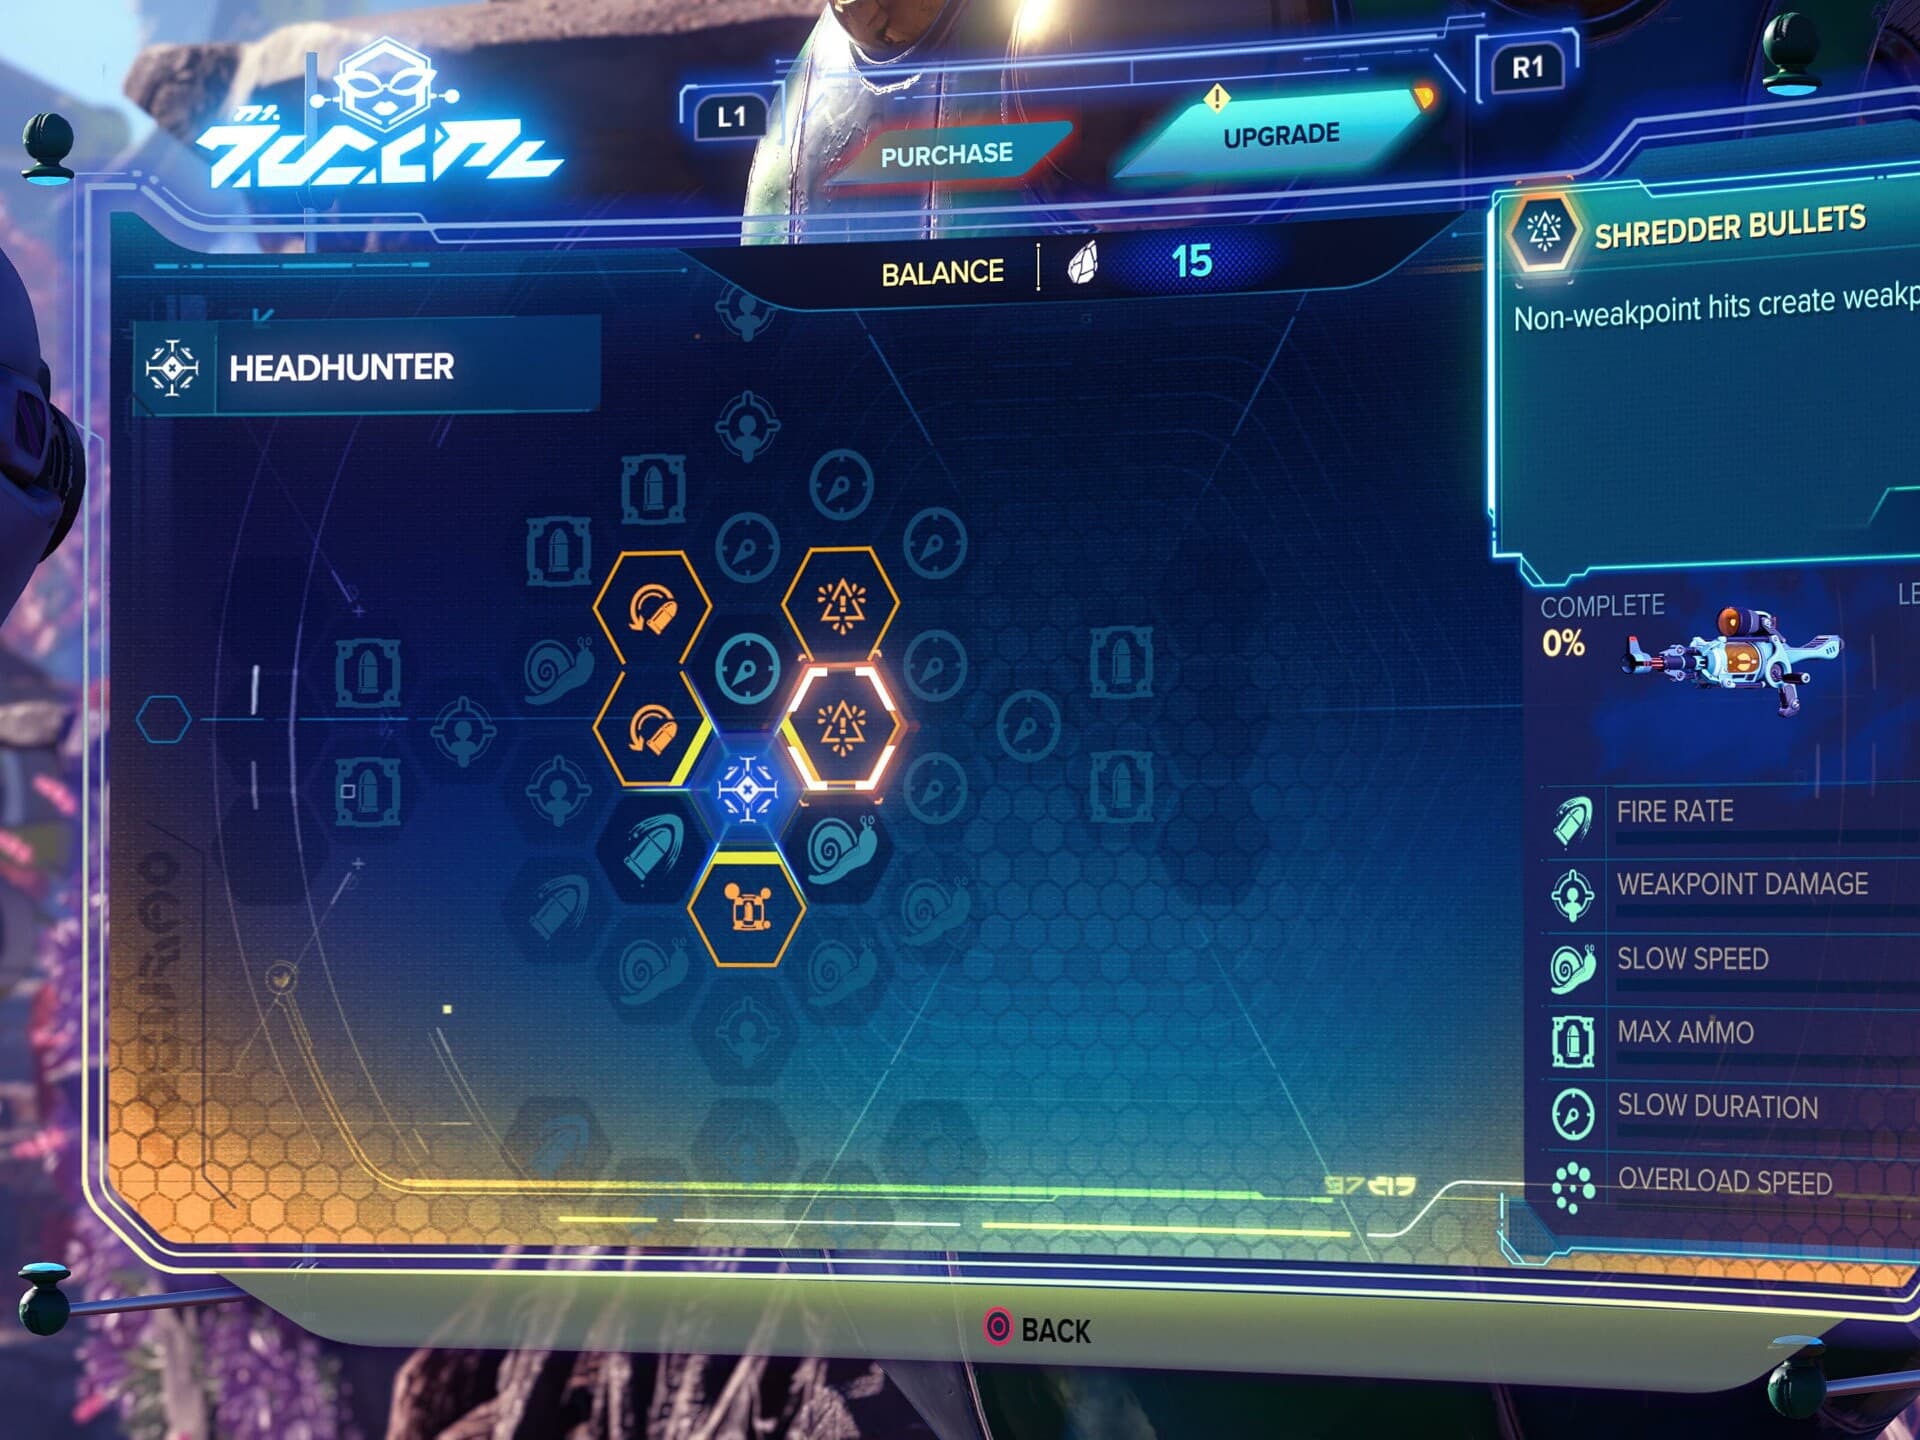
At Level 3, the Headhunter gets access to the Shredder Bullets Gold Cell Upgrade. This upgrade makes your initial non-weakpoint hits create a weakpoint, increasing damage on a follow-up shot. This is pretty much a quality of life bonus and can occasionally help with bosses, but otherwise less valuable thanks to the existing support weapons.
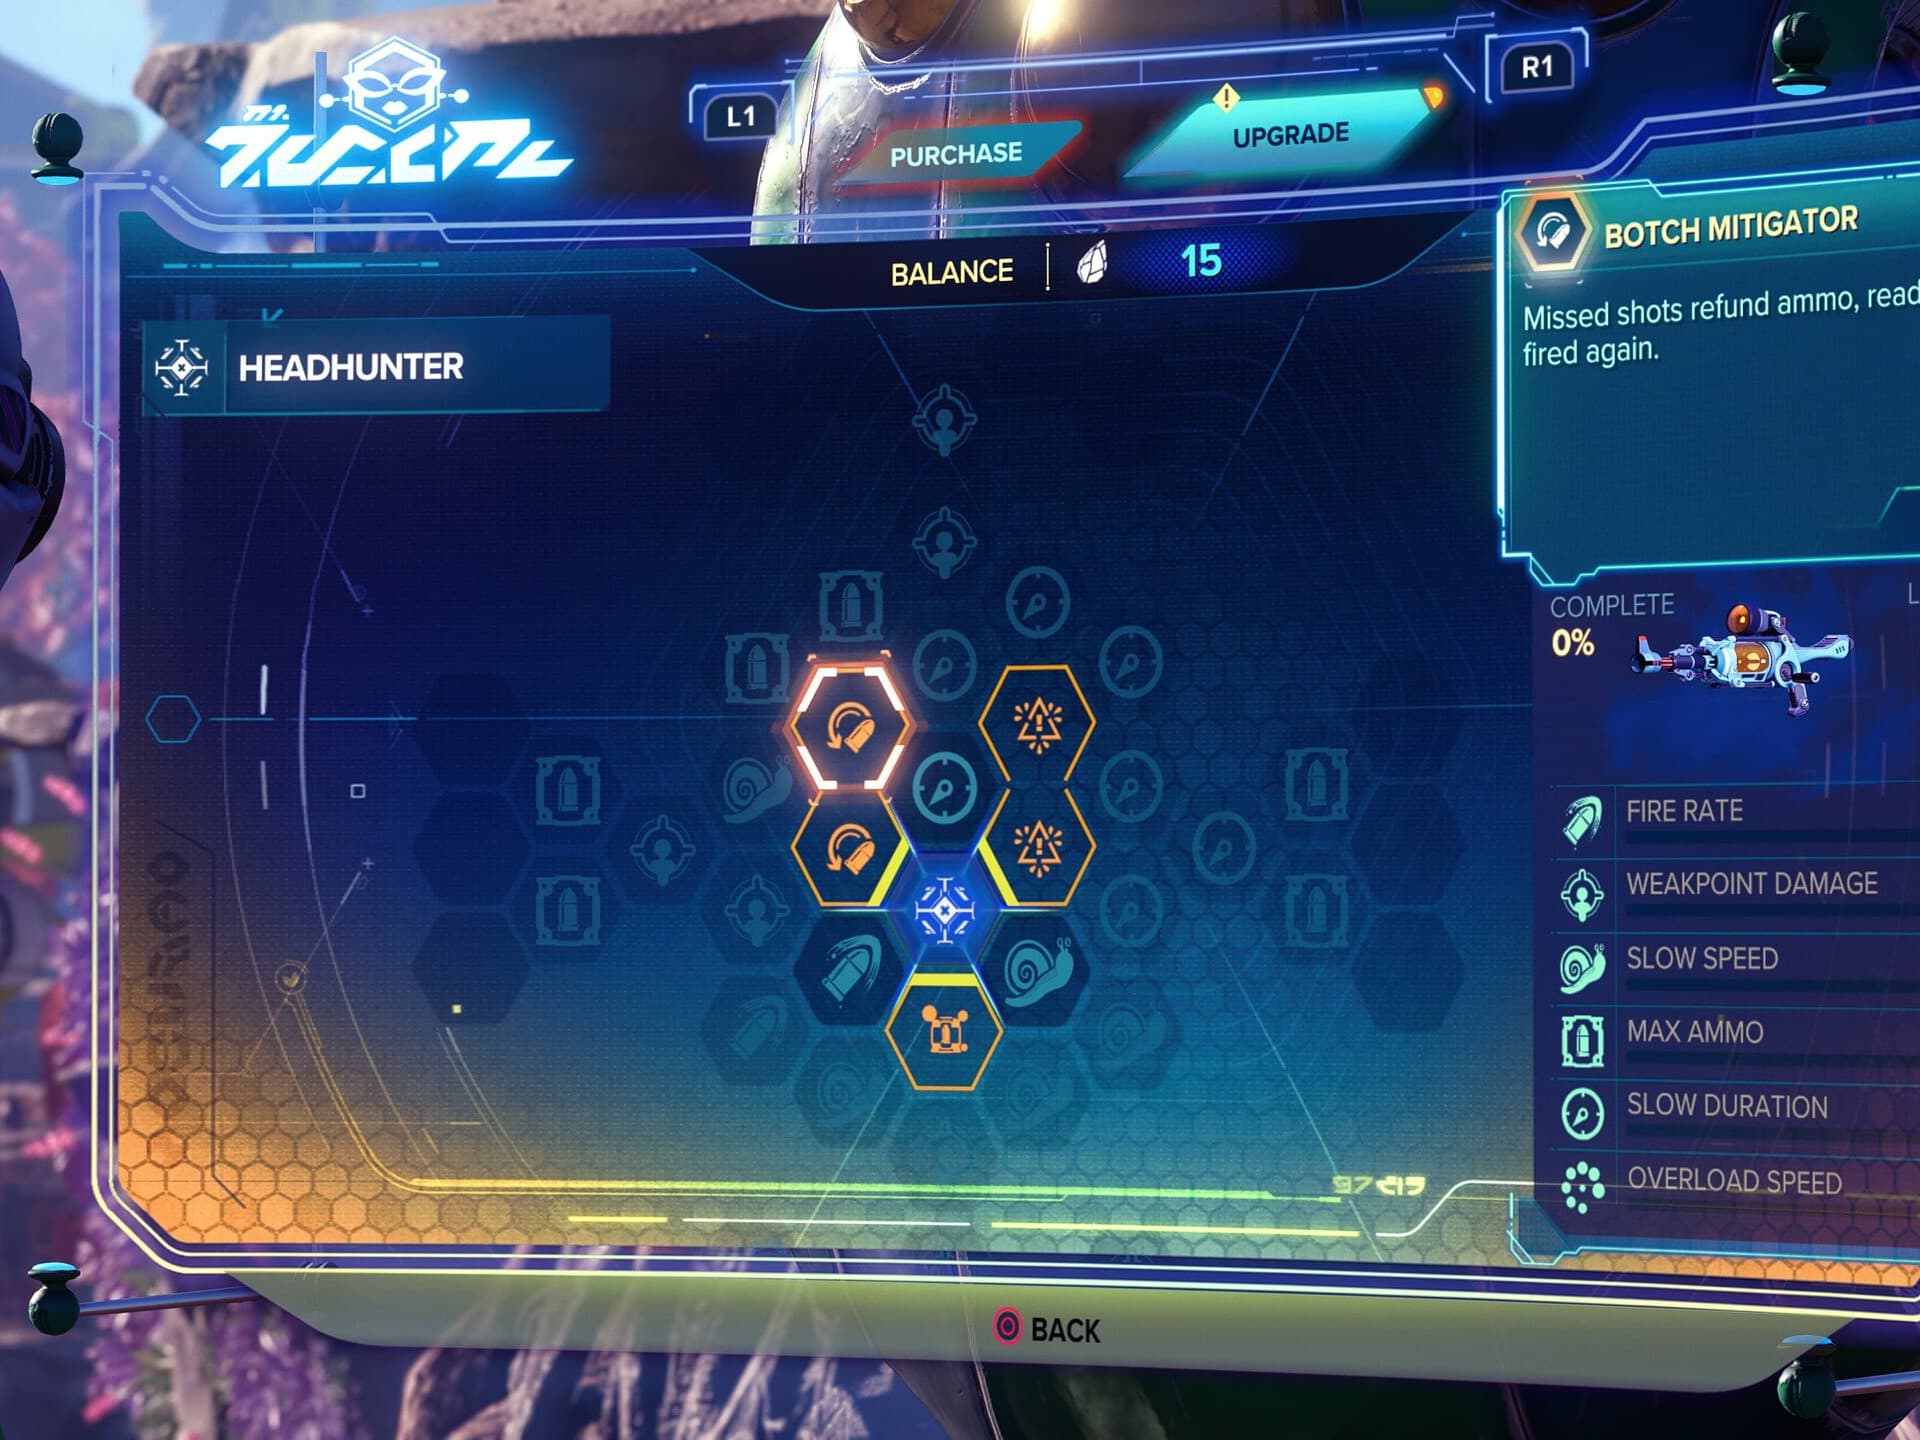
At Level 4, the Headhunter gets access to the Botch Mitigator Gold Cell Upgrade. This upgrade is a more practical quality of life upgrade, as it will refund missed shots.
Lightning Rod
A new weapon to the series, the Lightning Rod launches electrically charged Pylons that deal minor damage, but can stun foes after enough damage is dealt. When killing an enemy with this weapon, they will also release chain lightning, making it great at dealing with the very small enemies with low HP.

This weapon is exceedingly good at taking out large groups of weaker enemies, especially after a few upgrades. It’s also effective for taking down enemies like Shield Pirates, which block shots if they’re facing you. They can still block these, but will eventually be stunned by the weapon.
This weapon becomes available on your first visit to Zurkie’s in Scarstu Debris Field for 8,000 Bolts.
Upgrades
At Level 5 the Lightning Rod becomes the Lightning Strike. This weapon deals higher damage and also electrifies (stuns) enemies faster.
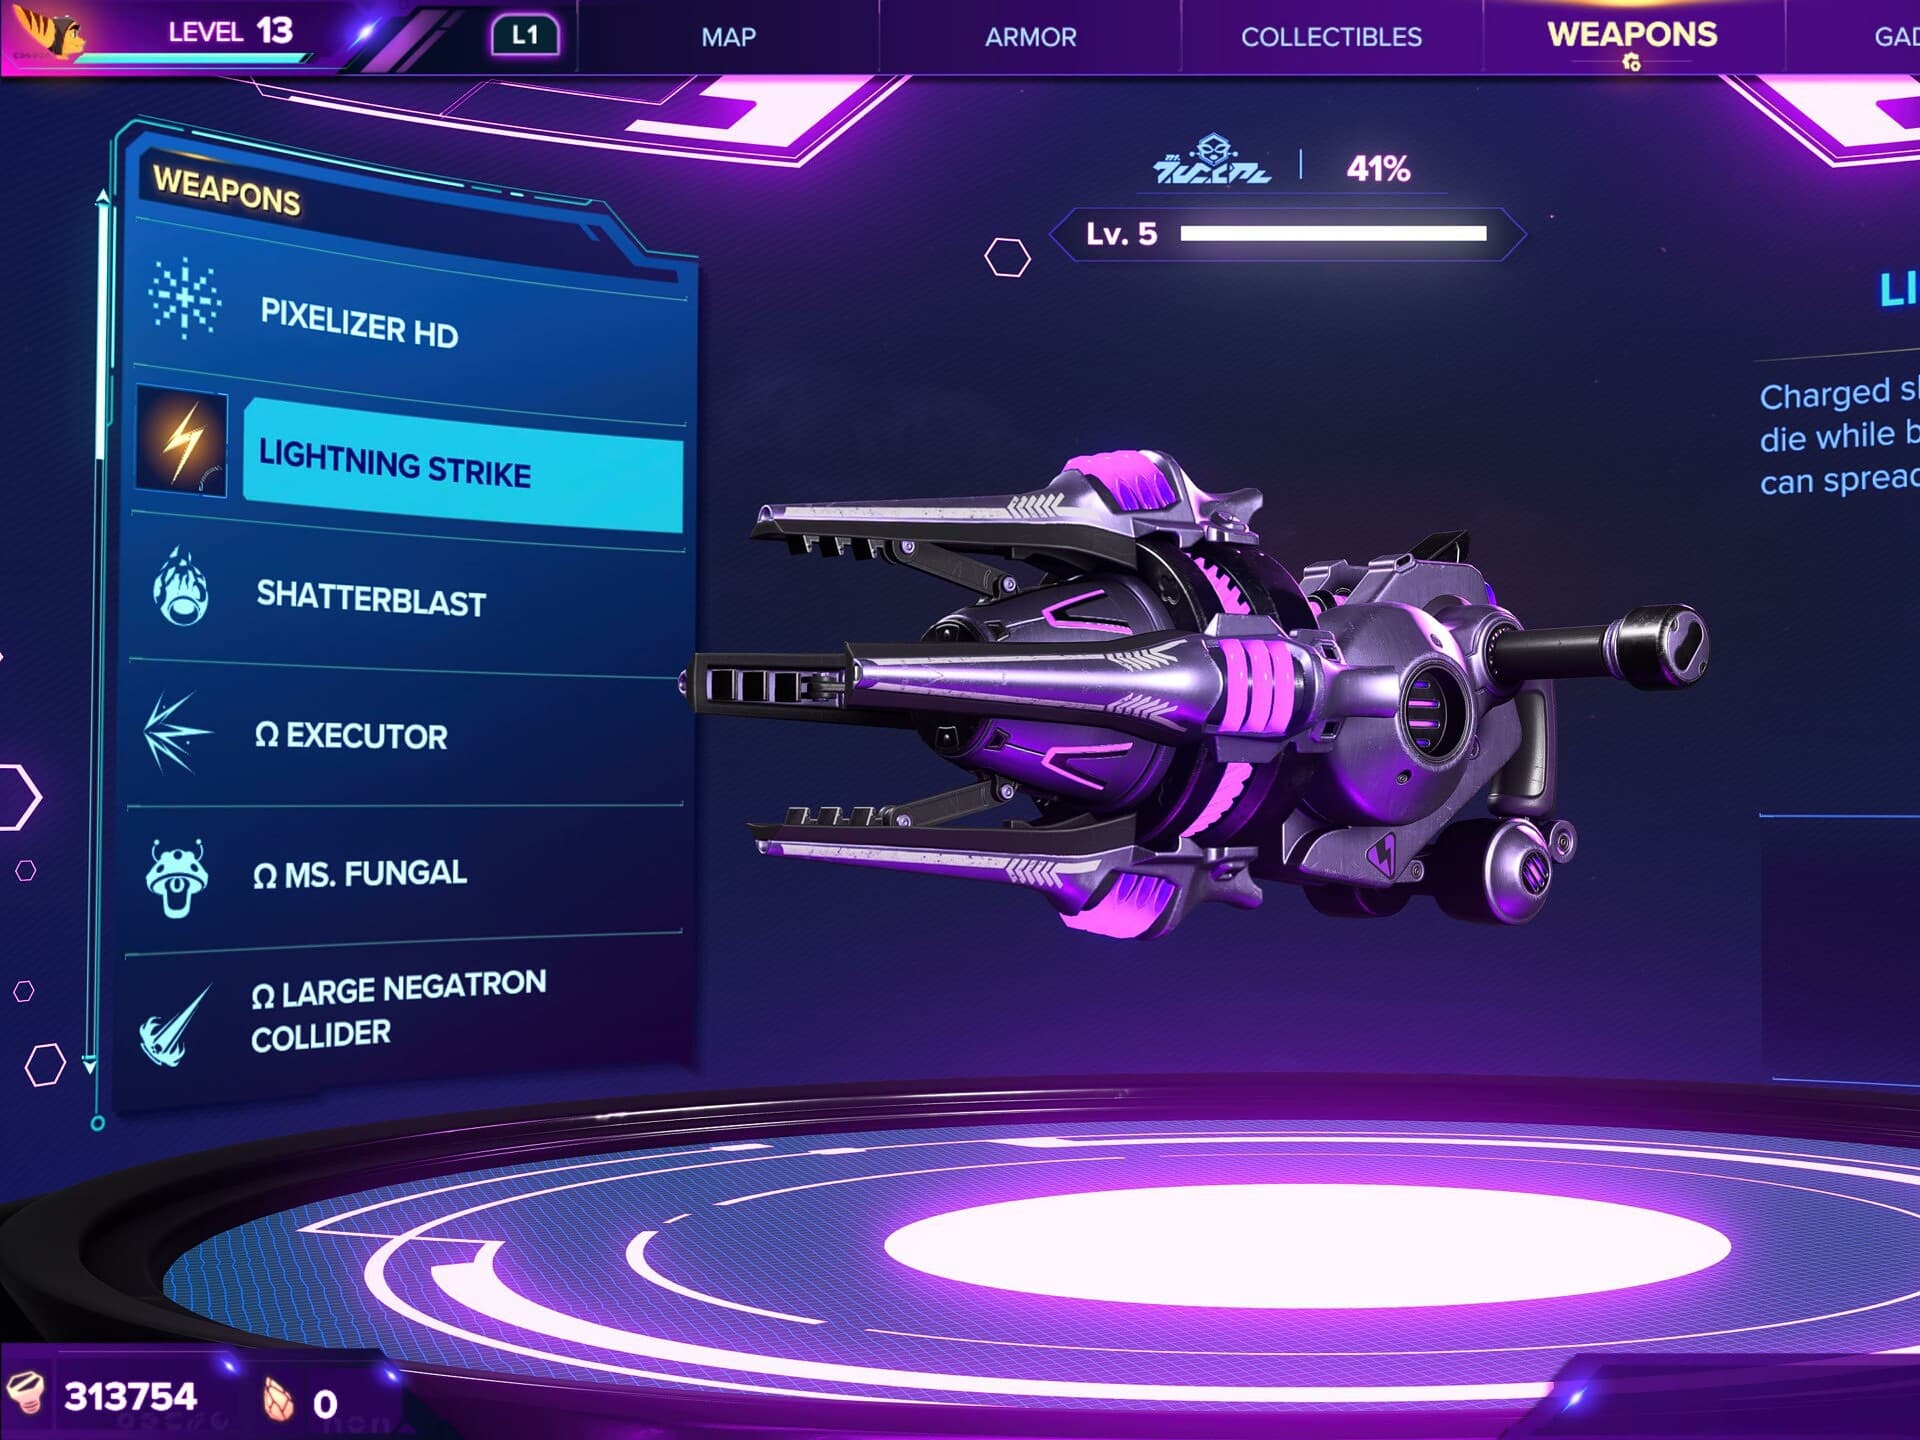
In Challenge Mode, the Lightning Strike can be upgraded to the Omega Lightning Strike for 100,000 Bolts.
Through the use of Raritanium the Lightning Rod / Lightning Strike have access to the following bonuses on its Upgrade Tree:
Fire Rate, which increases the rate of fire for the weapon. Prior to the upgrade to Lightning Strike this is the only way to stun enemies faster and increase the weapon’s DPS. This should be high priority until then.
Max Ammo, which increases the maximum amount of ammo you can carry for this weapon. This is a quality of life buff, but also can be very worthwhile on lower difficulties as enemies like bosses will get stunned faster and you can nearly keep them stun-locked in some circumstances.
Stun Duration, This increases the amount of time an enemy is stunned for. This should be your second priority after Fire Rate, due to the combination of these two allowing stun-locking of tougher enemies.
Charge Status, which is unique to the Lightning Strike, increases the stun power of charged shots. This charge happens over a duration and the time it takes is reduced by Charge Time
Charge Time, which is also unique to the Lightning Strike makes shots charged faster. This will boost its capability to stun and should take priority over Charge Status when they become available.
In addition to these basic stat upgrades, the Lightning Rod / Lightning Strike also have a set of Gold Cell upgrades which empower the weapon in various way.

At Level 2, the Lightning Rod gets access to the Max Arcs Gold Cell Upgrade. This upgrade increases the number of arcs created when defeating an electrified enemy. The upgrade increases it’s ability to AoE down groups of weak enemies and stun larger group of tougher enemies.
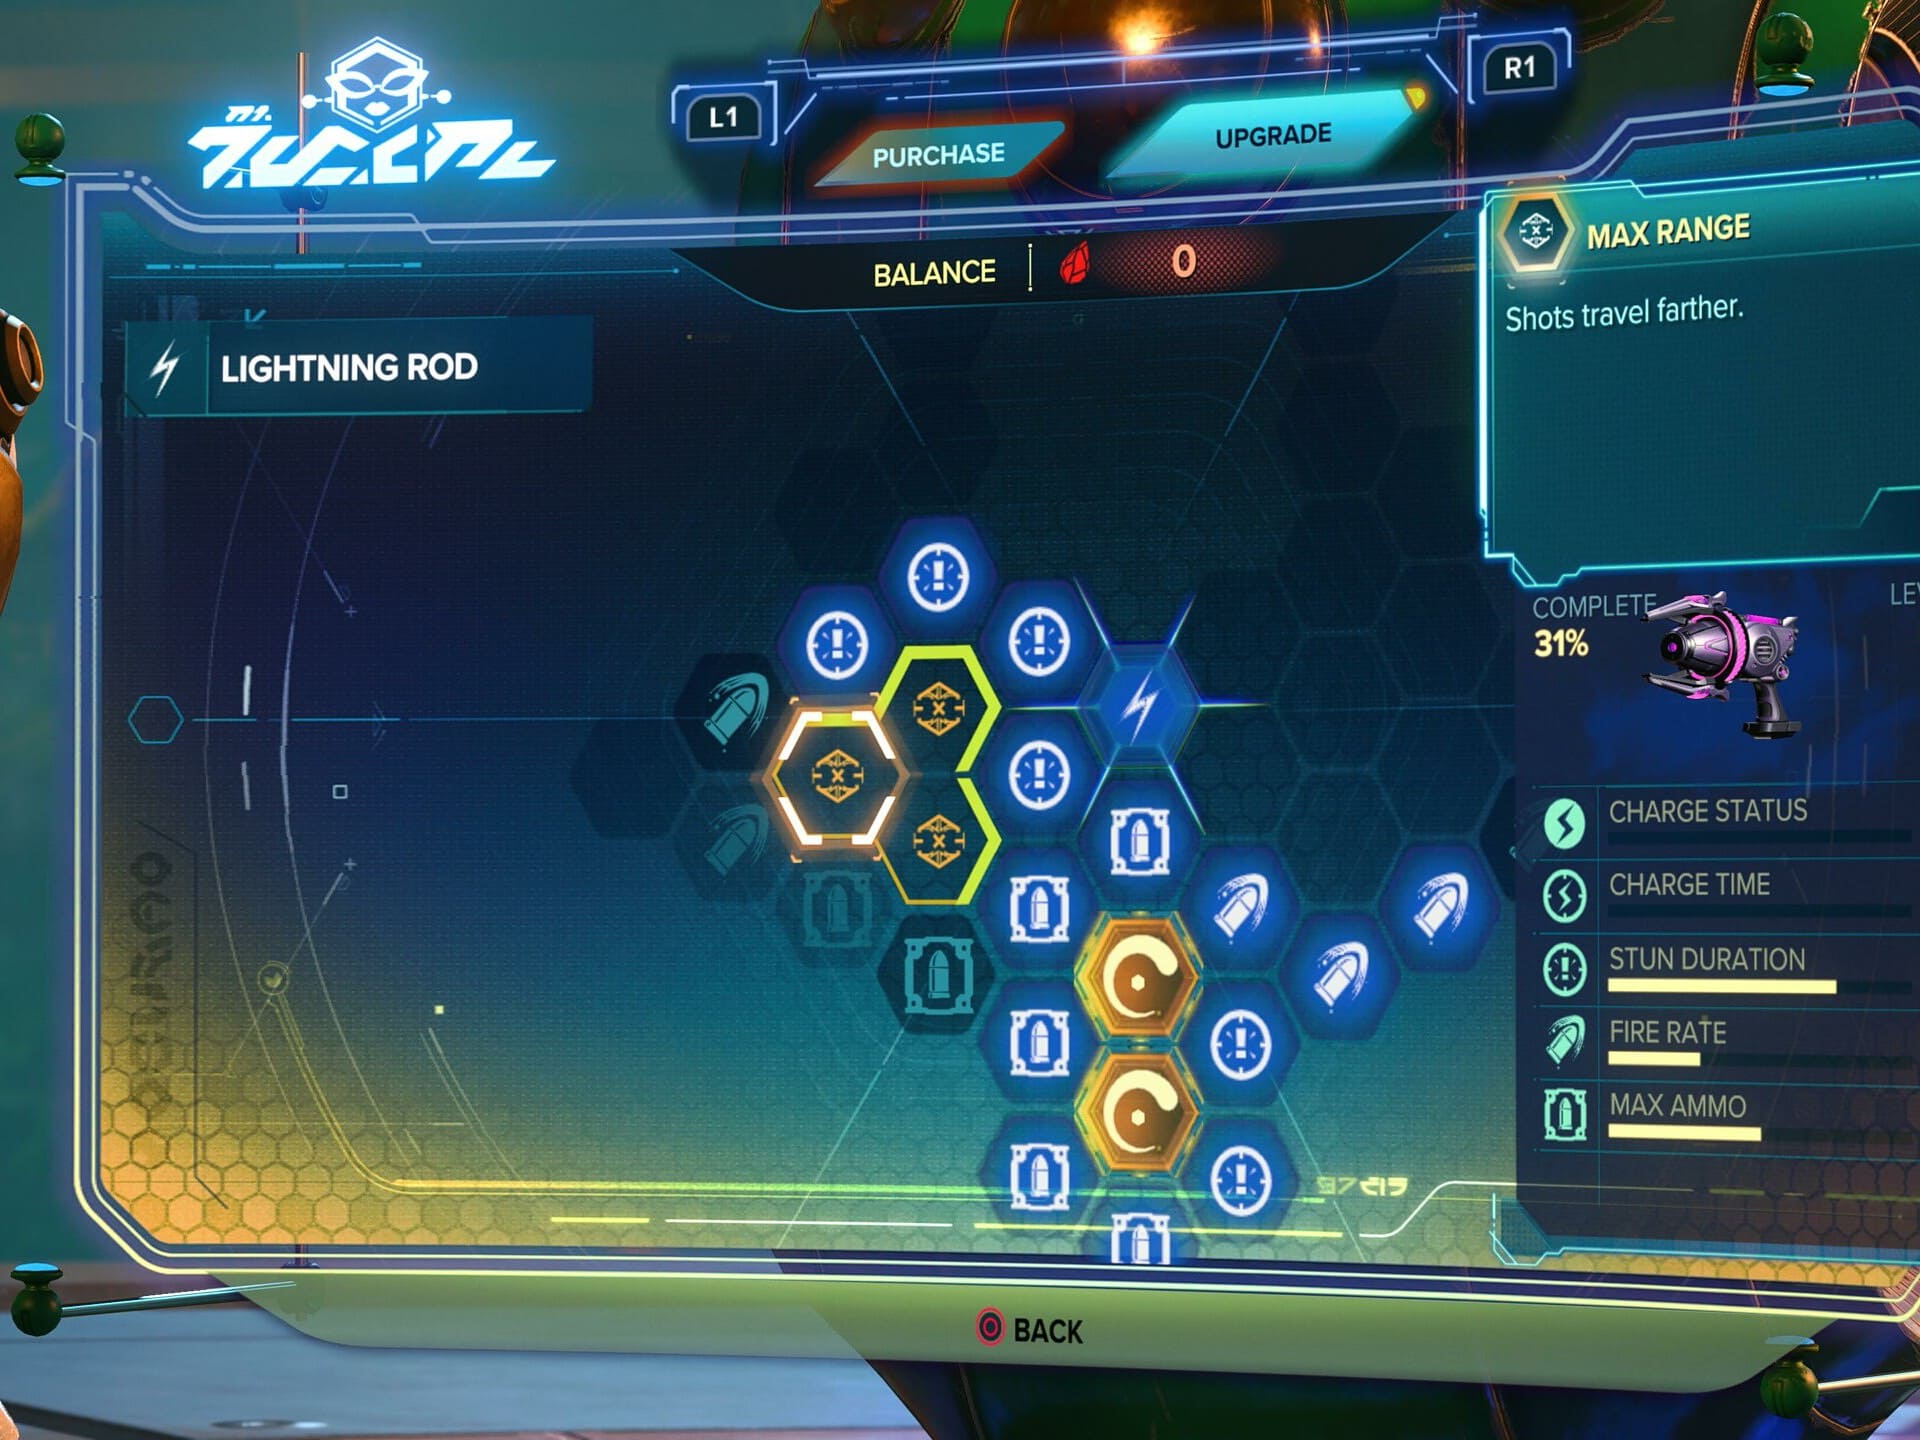
At Level 3, the Lightning Rod gets access to the Max Range Gold Cell Upgrade. This upgrade increases the max range which the needles can travel, allowing you to stun enemies from further away.
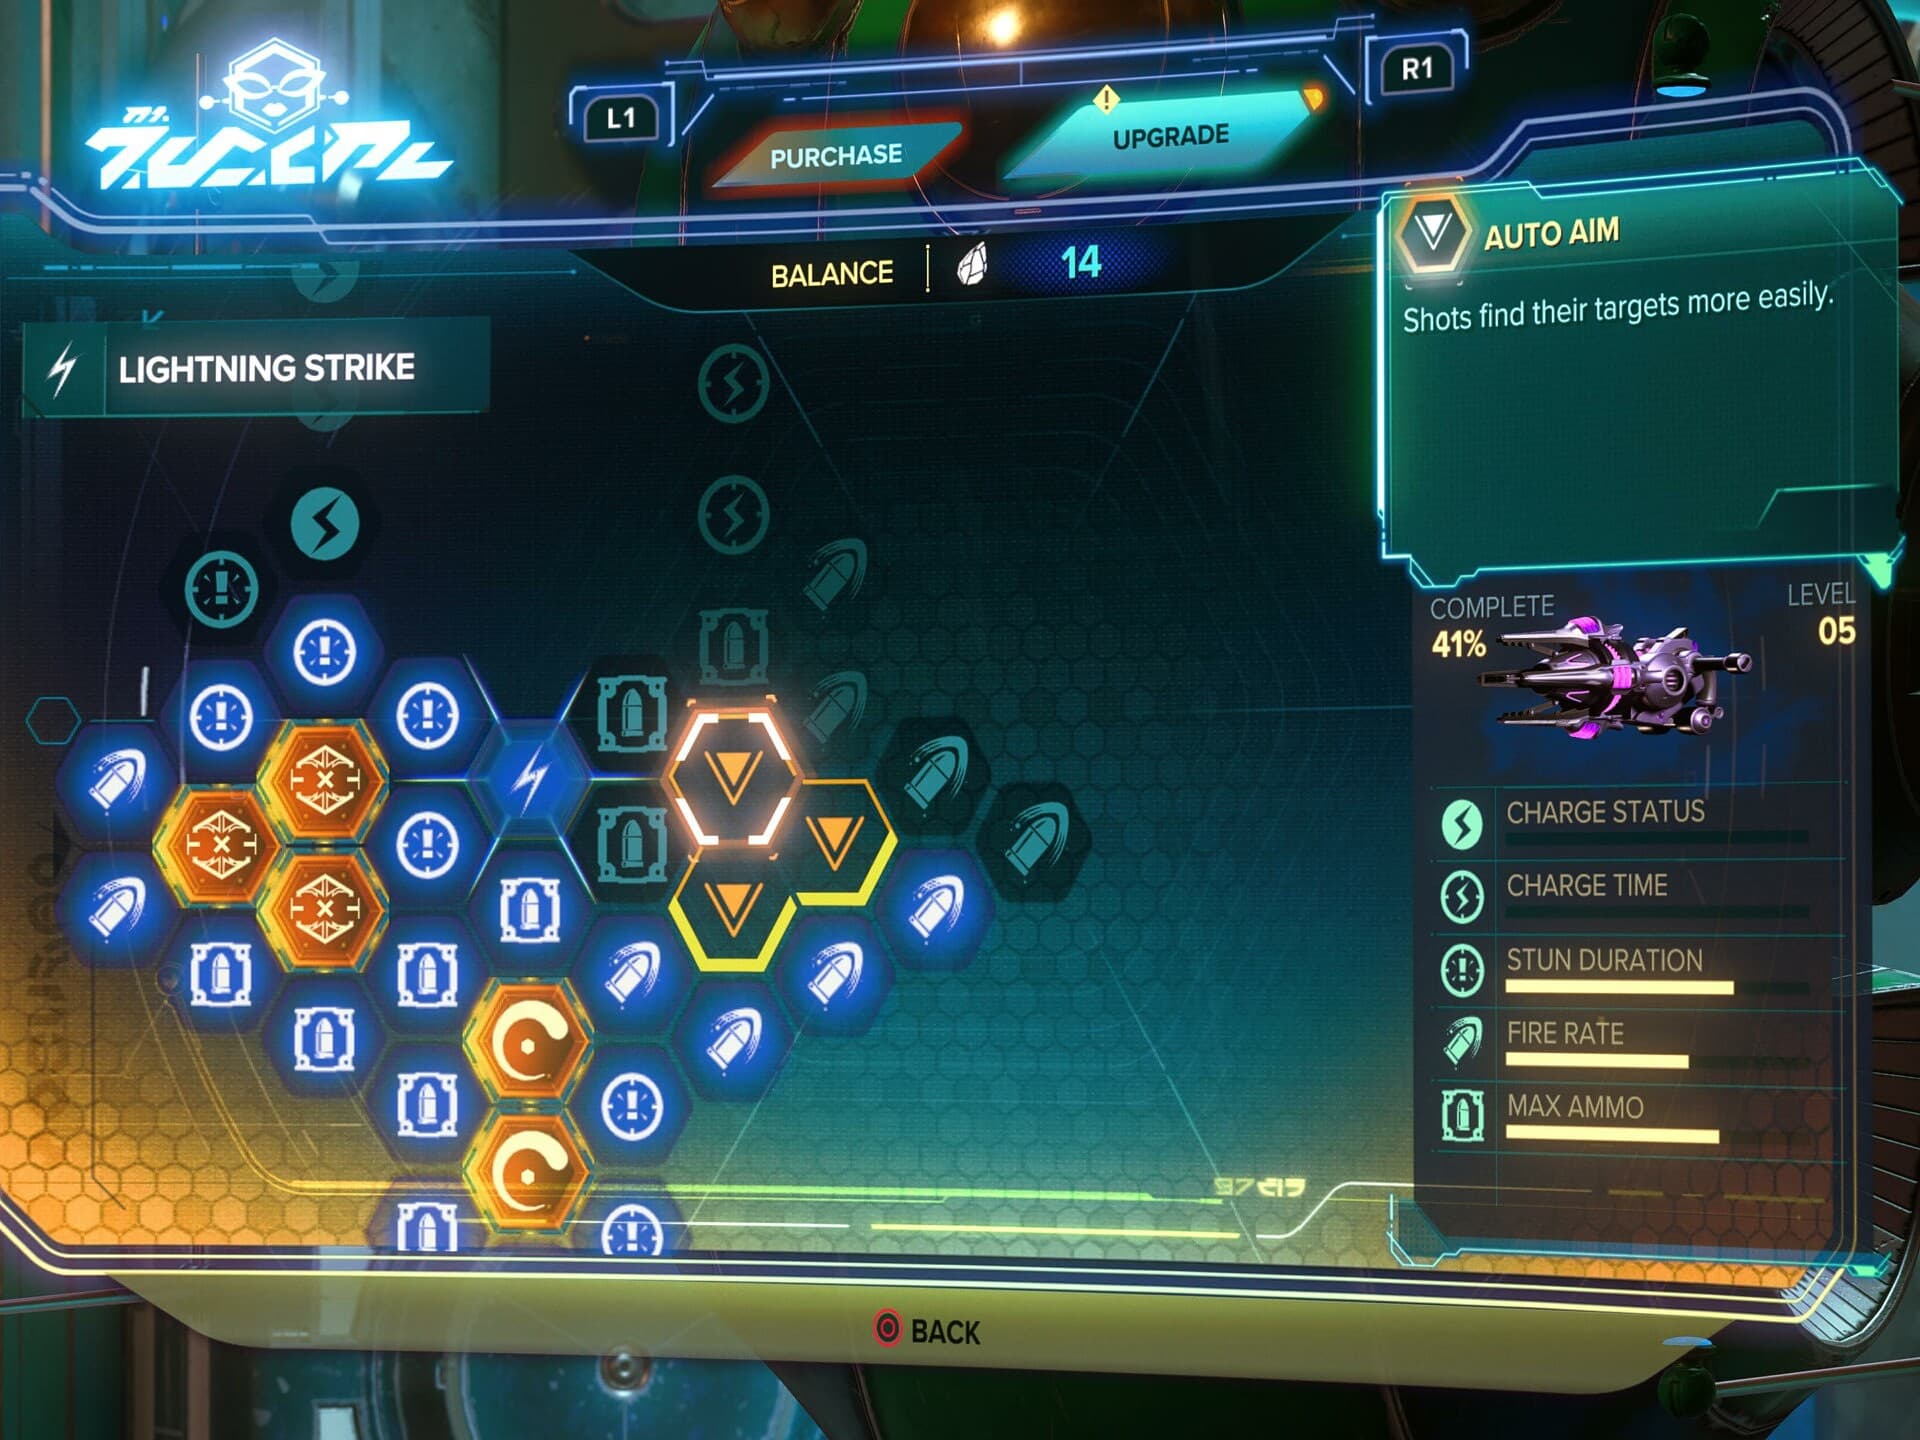
At Level 4, the Lightning Rod gets access to the Auto Aim Gold Cell Upgrade. This upgrade allows the needles to home in on enemies in a similar way to the Buzz Blades. It makes it a much more consistent weapon as direct aim is less required and you only need to face enemies.
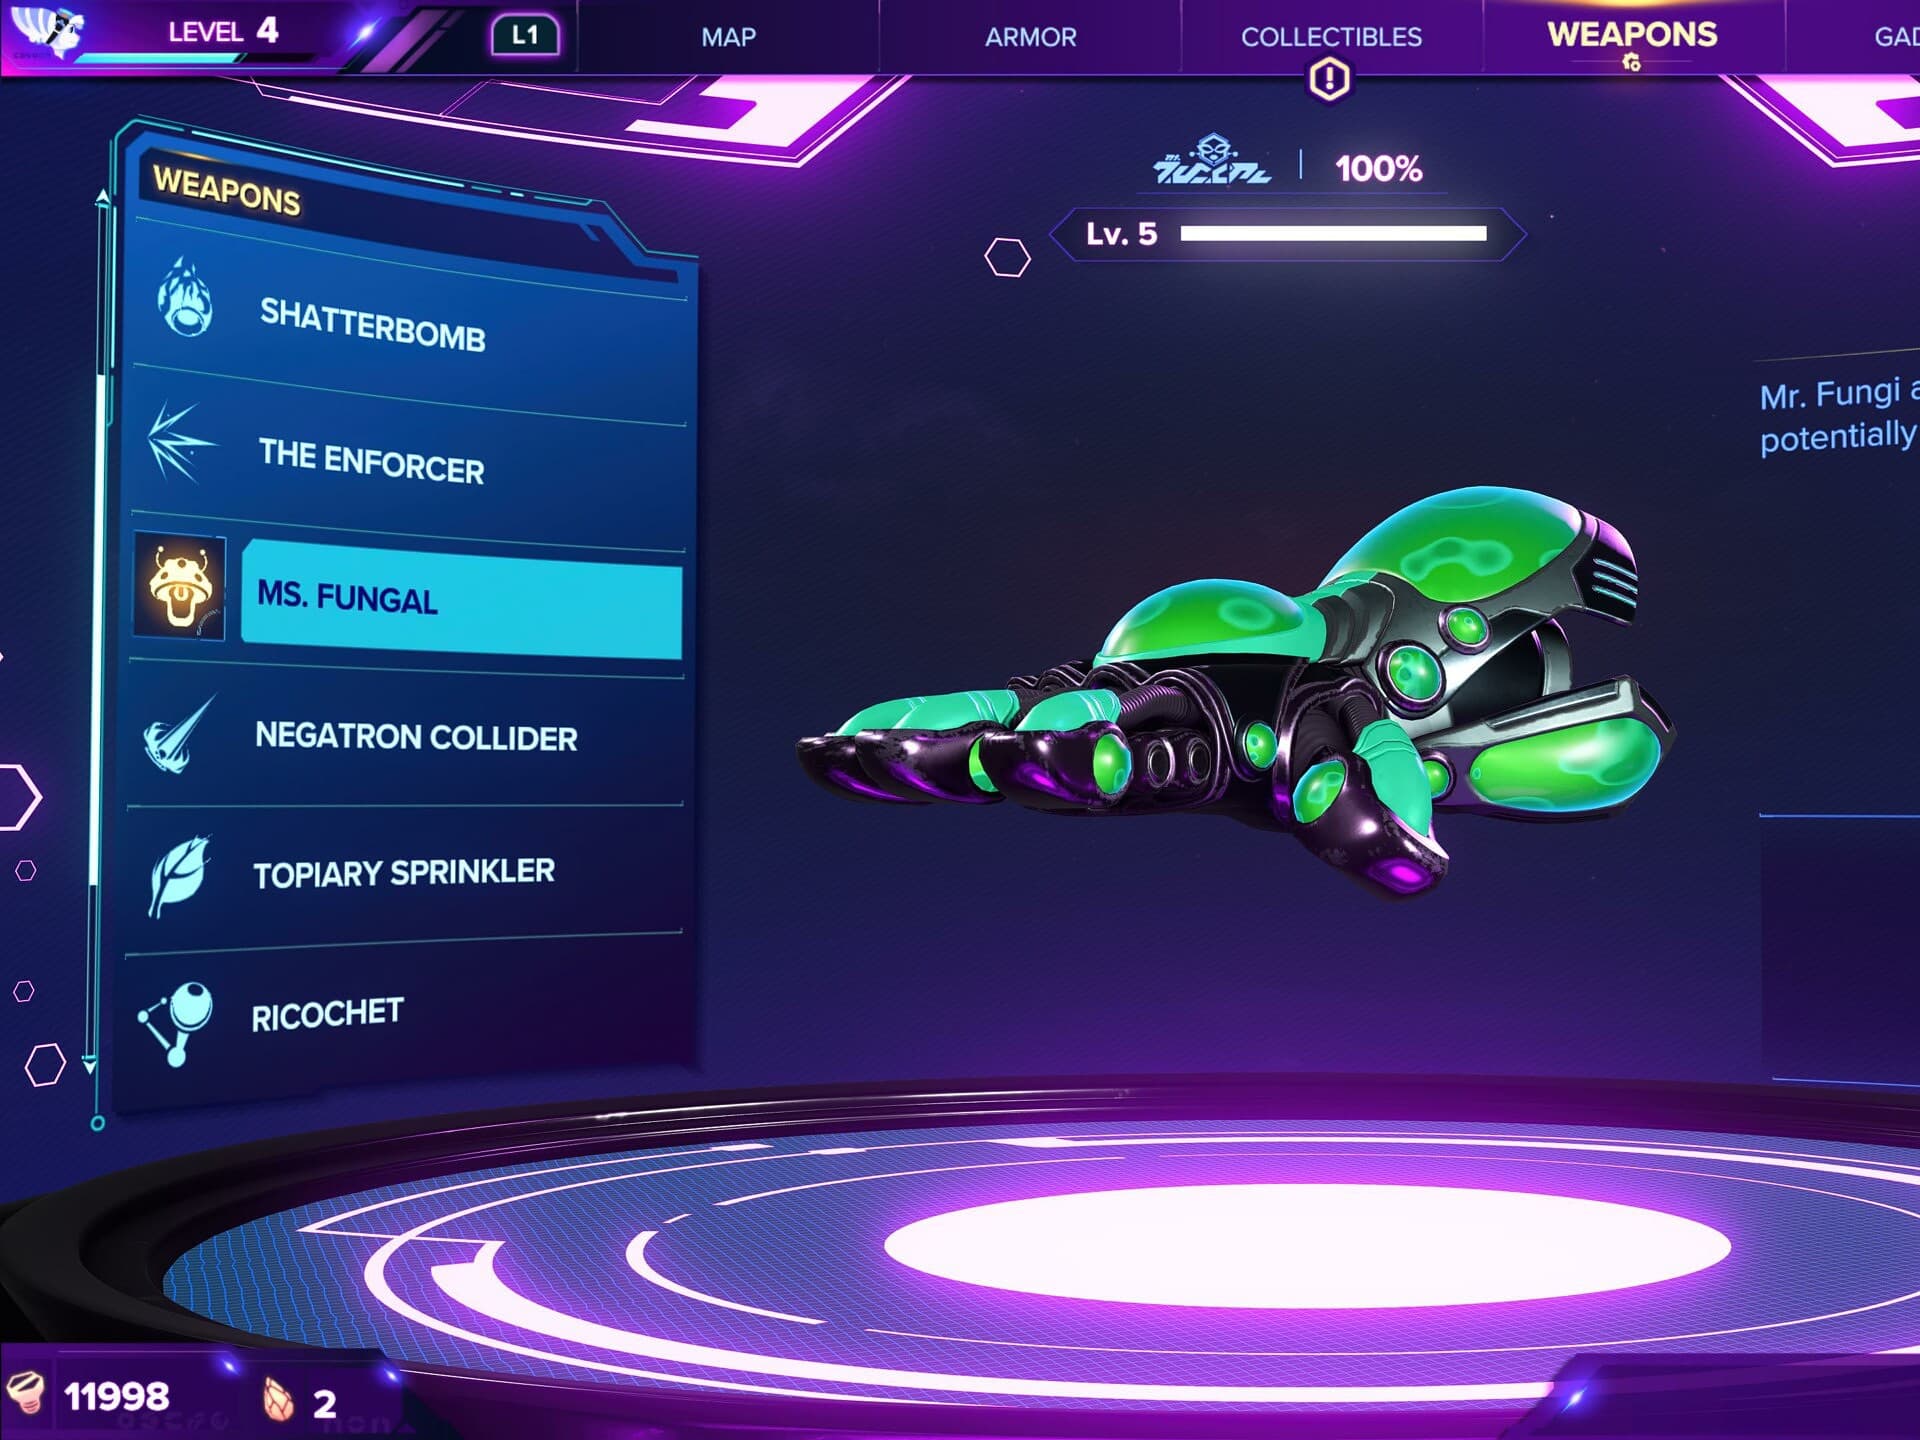
Mr. Fungi
A new spin on a classic weapon, Mr. Fungi will release a Mushroom drone that will fire at and occasionally distract enemies. This is similar to the Mr. Zurkon weapon from previous installments in the franchise.

This weapon helps a lot in general combat, increasing the total damage that can be dealt in a short time, while also taunting enemies, taking their focus off of you.
This weapon is available from Ms. Zurkon Nefarious City for 3,000 Bolts.
Upgrades
At level 5, this weapon become the Ms. Fungal, which launches two drones per ammo.
In Challenge Mode, Ms. Fungal can be upgrades to the Omega Ms. Fungal for a cost of 50,000 Bolts.
Through the use of Raritanium the Mr. Fungi / Ms. Fungal have access to the following bonuses on its Upgrade Tree:
Fungi Shot Count, increasing the number of projectile each drone can fire before they run out.
Fungi Fire Rate, which increases the rate of fire of the drones.
Fungi Annoyance, which increases the likelihood of them distracting an enemy and drawing their fire.
In addition to these basic stat upgrades, the Mr. Fungi / Ms. Fungal also have a set of Gold Cell upgrades which empower the weapon in various way.
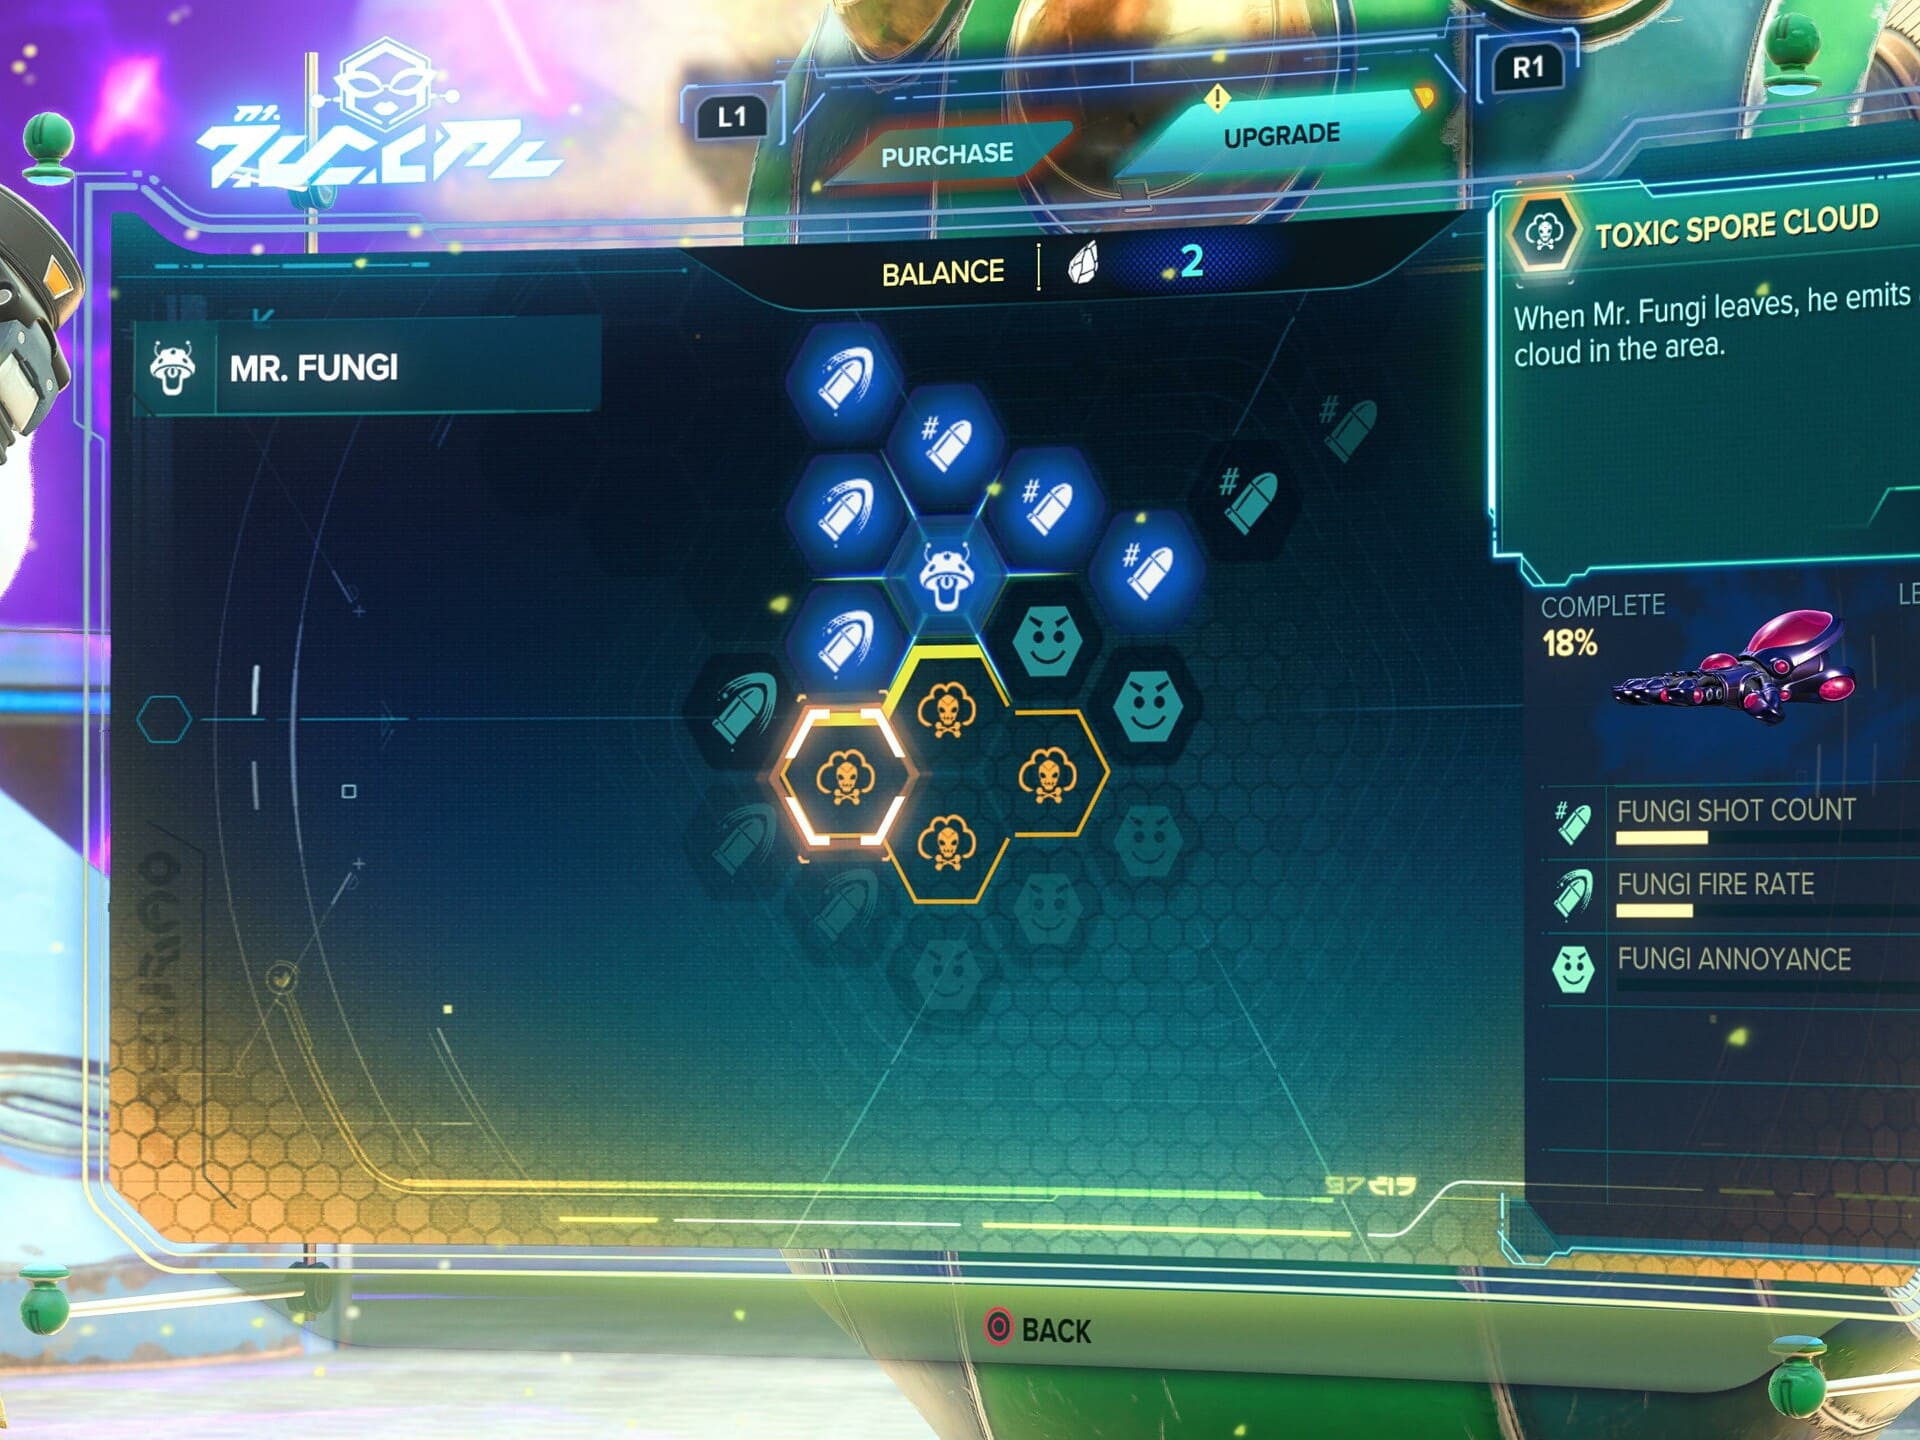
At level 2, Mr. Fungi gets access to the Toxic Spore Cloud Gold Cell Upgrade. This upgrade makes it so when drones expire, they leave behind a toxic cloud that does damage to enemies caught in it.
At Level 3, Mr. Fungi gets access to the Max Fungis Gold Cell Upgrade. This upgrade doubles the number of drones than can be active. For Mr. Fungi this means two can be active, and for Ms. Fungal four can be active.
At Level 4, Mr. Fungi gets access to the Max Ammo Gold Cell Upgrade. This increases its maximum ammo count by two. Similar to other deployable weapons, this ammo has a low ammo count so this can be very helpful for getting that last level done faster as well as the Omega.
Negatron Collider
A new weapon to the series, the Negatron Collider fires a high-powered particle Beam that deals high damage to all enemies caught in the beam..
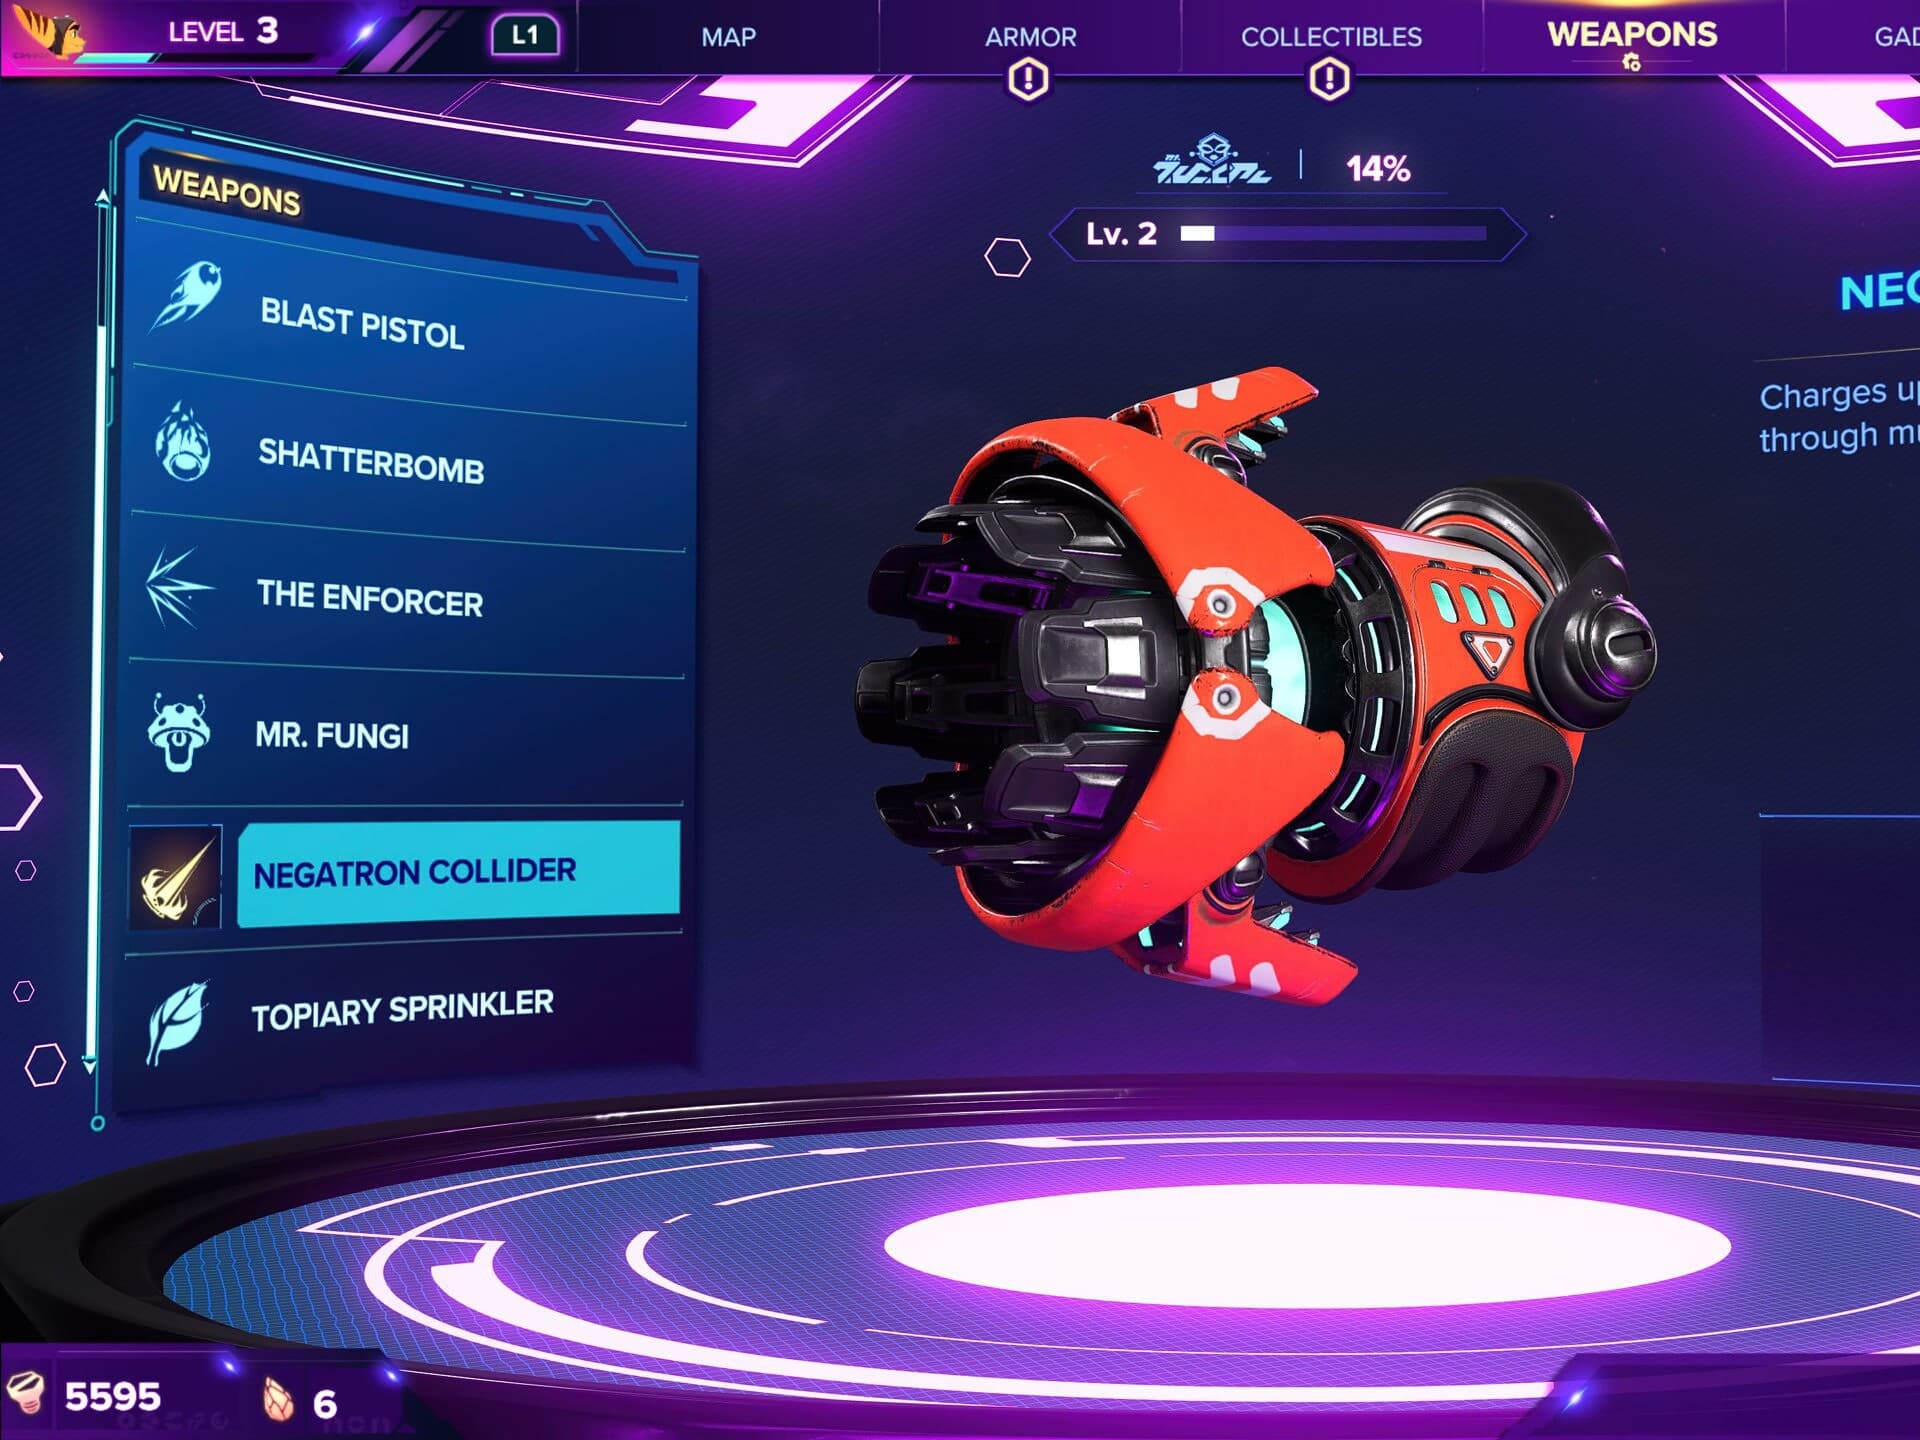
This weapon is a pretty heavy hitter for bosses, but its real strength is wiping out groups of enemies, especially after getting some basic upgrades for it.
This Weapon is available starting in Nefarious City, just prior to the blimp area, for 5,000 bolts.
Upgrades
At Level 5, the Negatron Collider becomes the Large Negatron Collider. This upgrade adds a powerful explosion to the end of the beam’s duration.
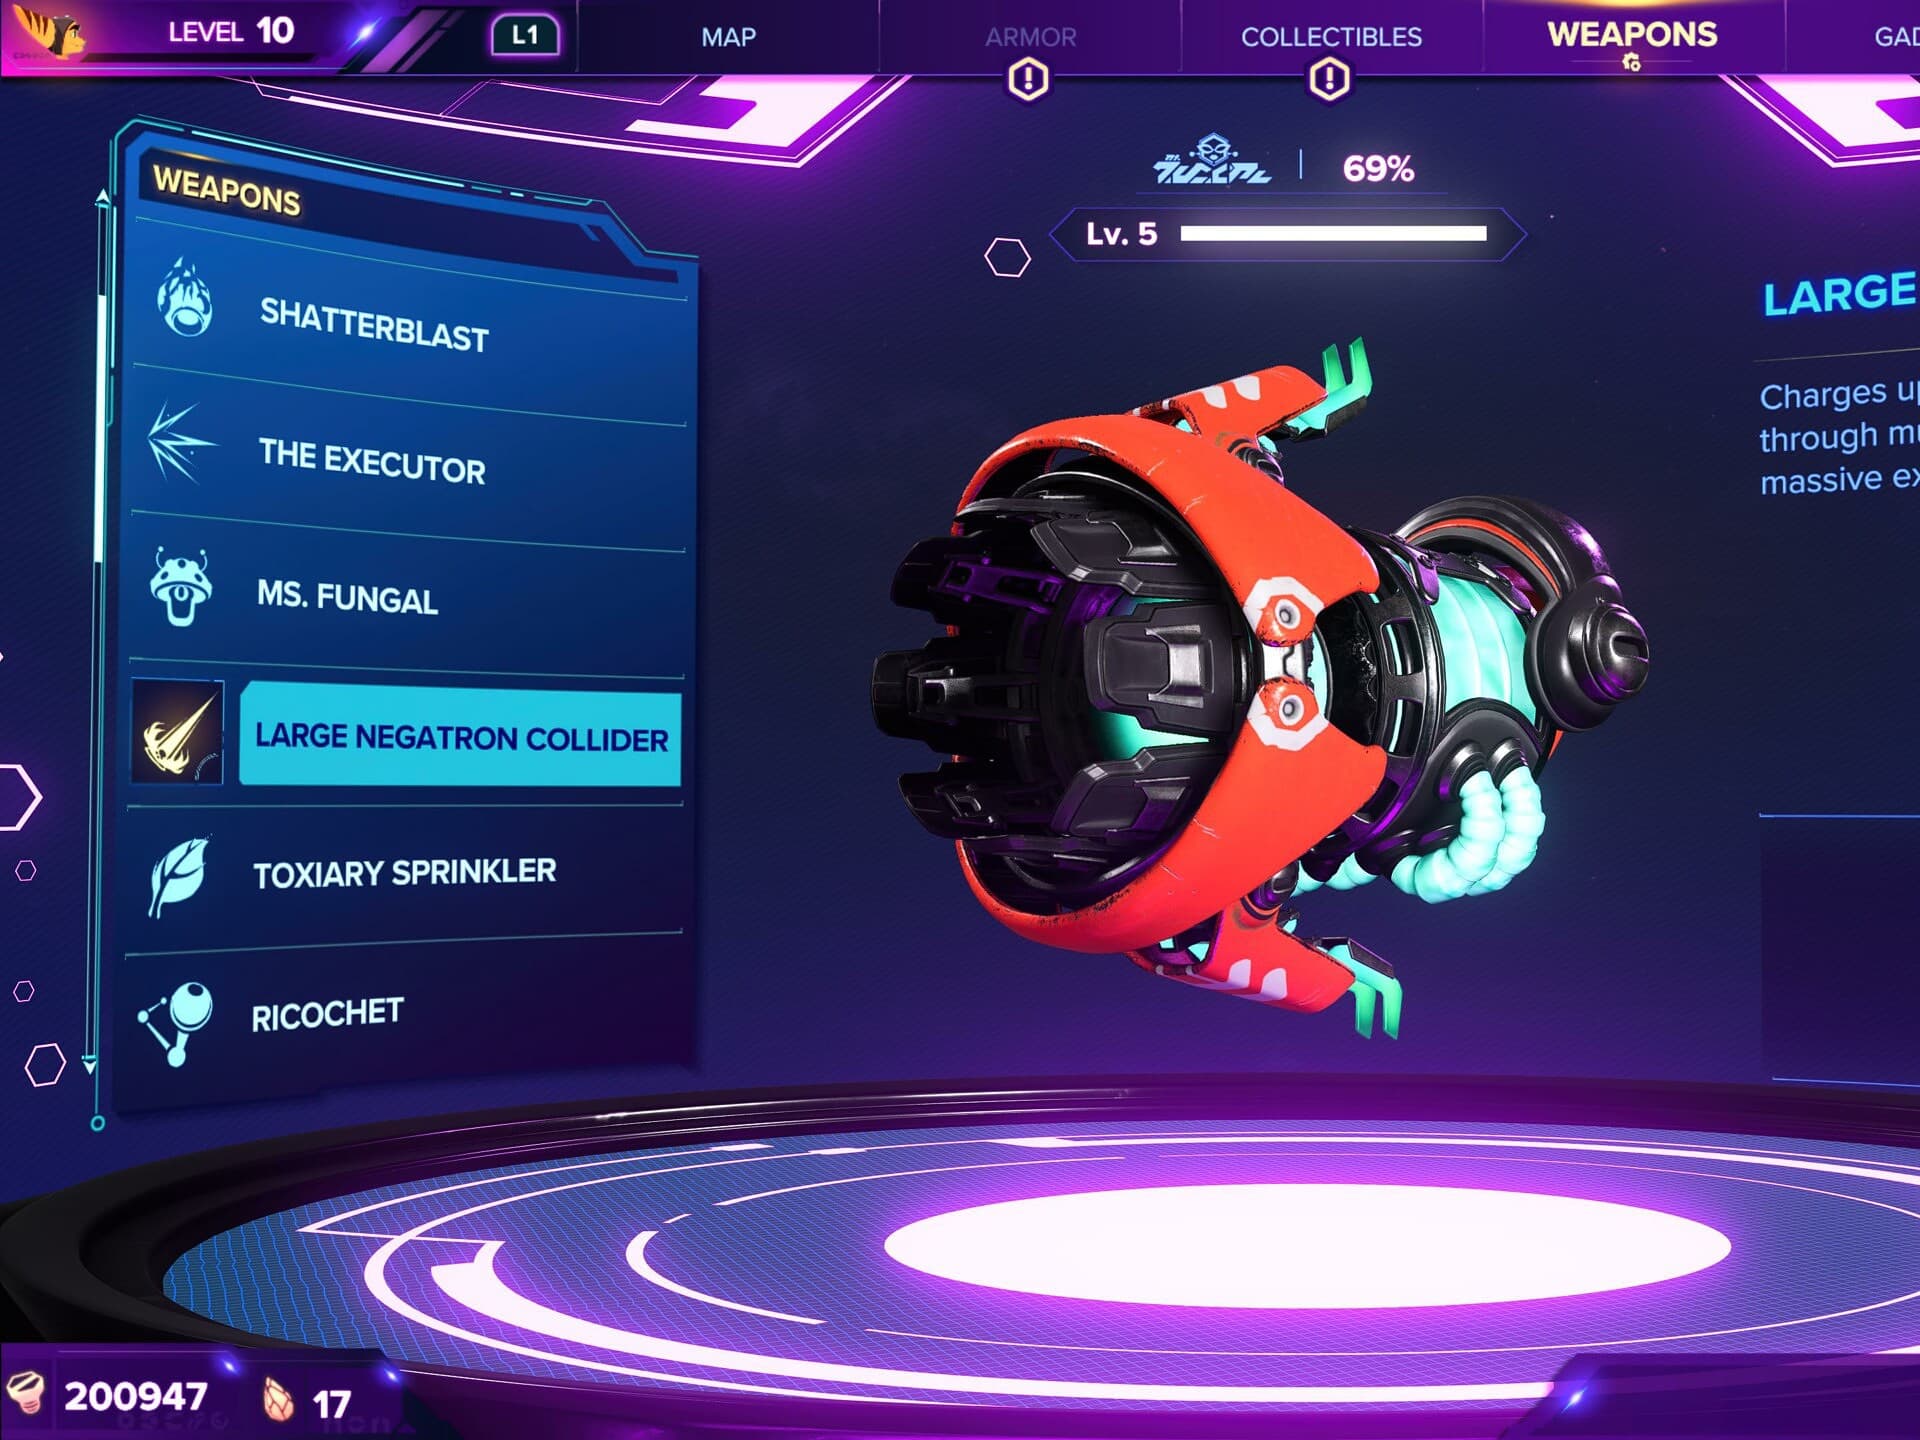
In Challenge Mode, the Large Negatron Collider can be upgraded to the Omega Large Negatron Collider for the cost of 60,000 Bolts.
Through the use of Raritanium the Negatron Collider / Large Negatron Collider have access to the following bonuses on its Upgrade Tree:
Charged Beam Duration, which increases the total damage of the beam per charge, through extending the duration is deals damage. This upgrade should take priority as it increases the weapon’s damage.
Collider Capacitor, which increases the speed at which the beam will fully charge. This is effectively the same as a Fire Rate upgrade, but the Negatron Collider’s charge can be held until ready to fire.
Max Ammo, which increases the number of shots you can fire in total. Like all the other heavy hitting weapons, the Negatron Collider suffers from a small ammo pool, so this will help level the weapon faster.
In addition to these basic stat upgrades, the Negatron Collider / Large Negatron Collider also have a set of Gold Cell upgrades which empower the weapon in various way.
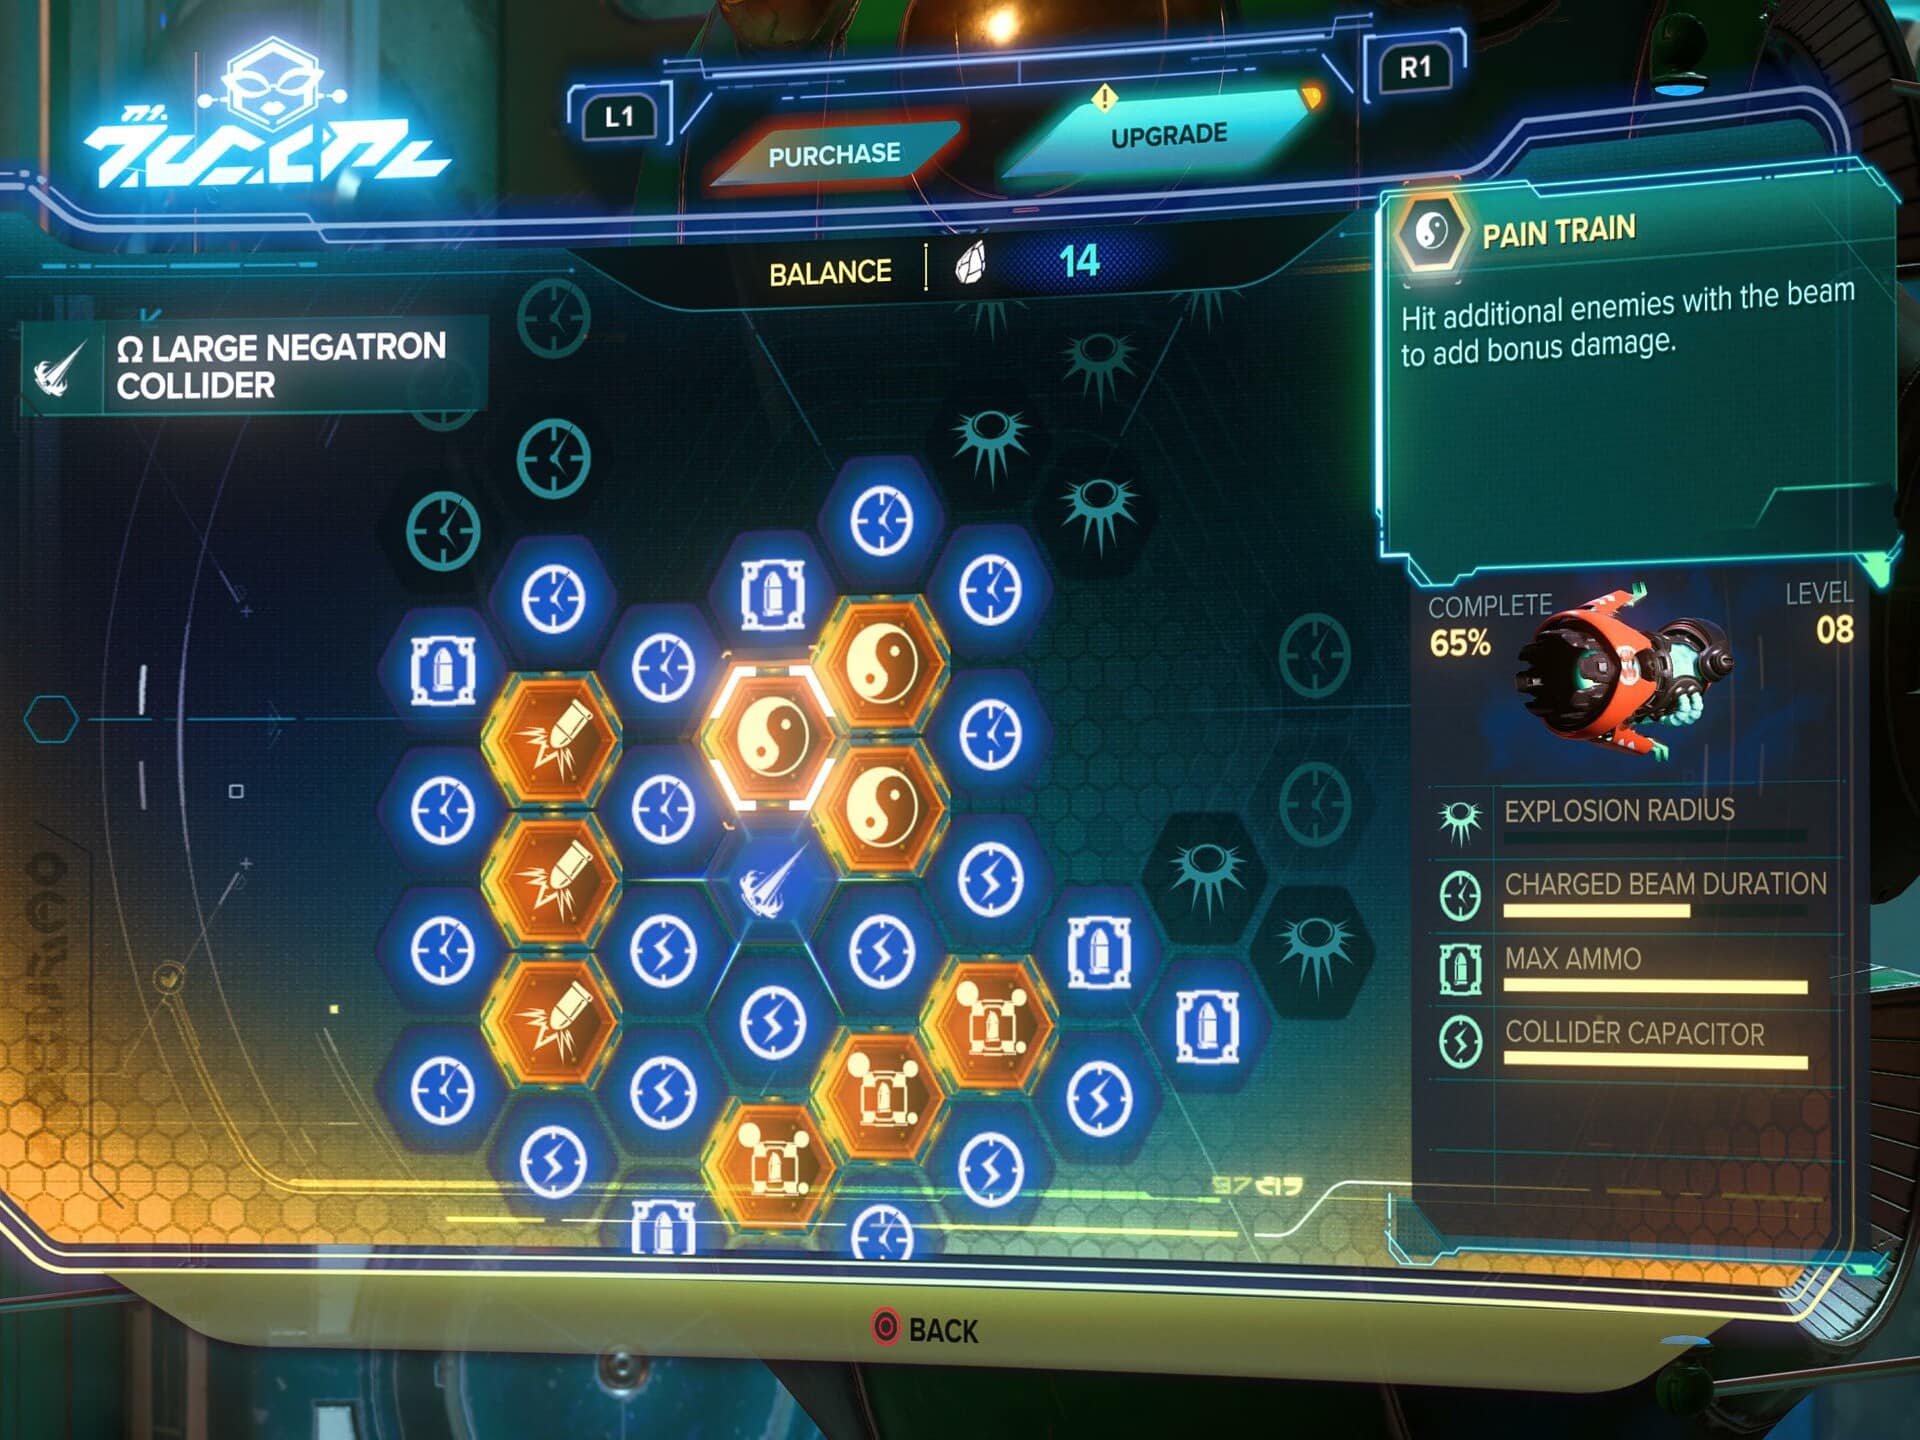
At Level 2, The Negatron Collider gets access to the of Pain Train Gold Core Upgrade. This Upgrade makes the Negatron Collider deal bonus damage while hitting multiple enemies.
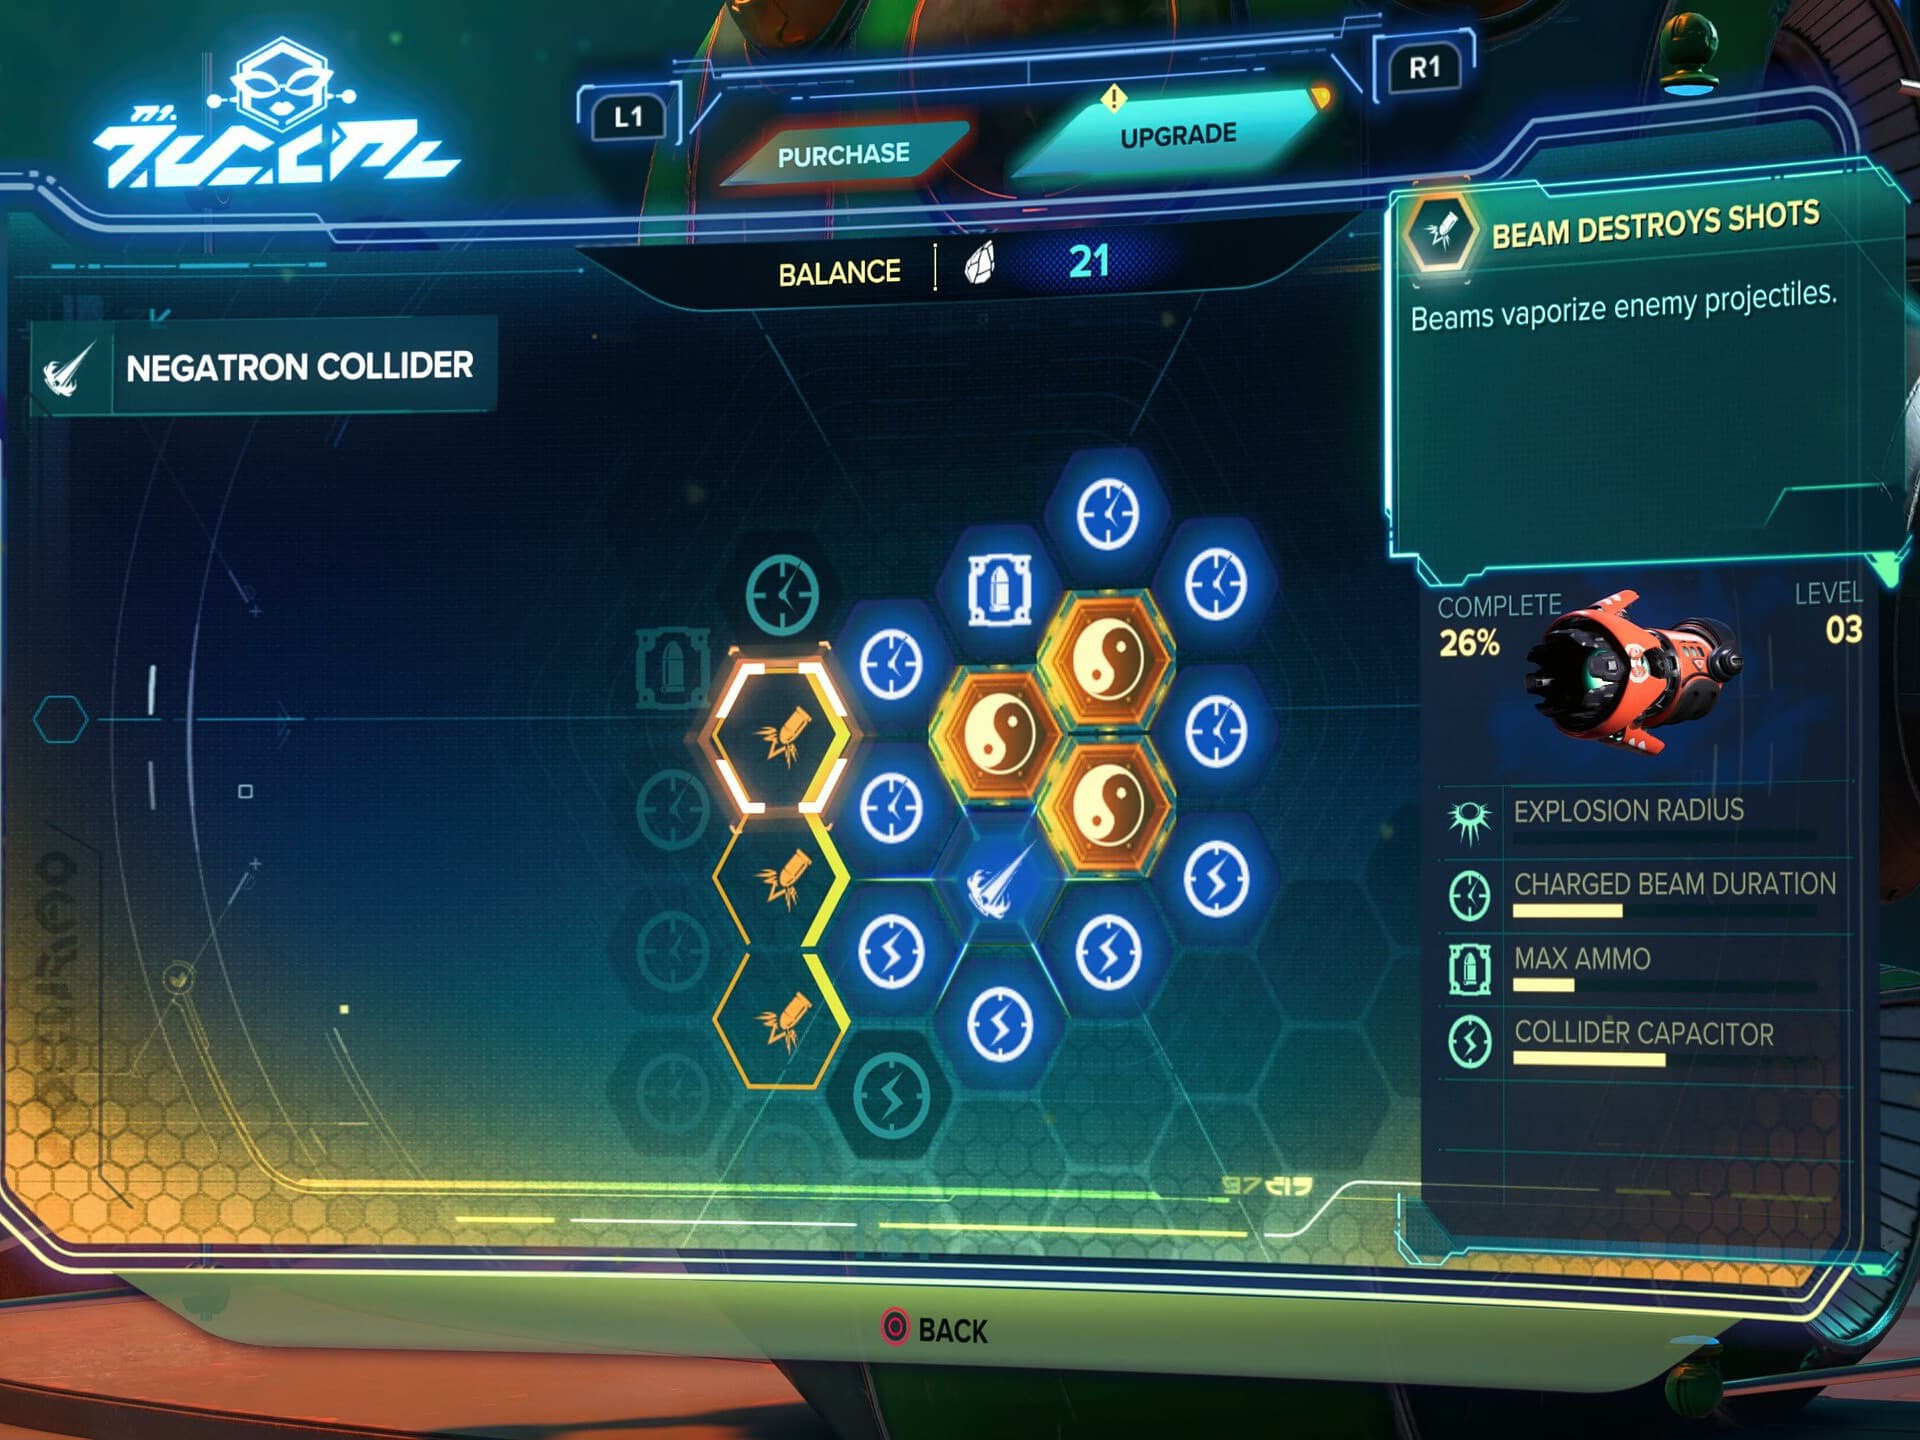
At level 3, the Negatron Collider also gets access to the Beam Destroys Shots Gold Core Upgrade. This upgrade destroys any projectiles in the path of the Negatron Collider’s beam making the weapon useful offensively and defensively.
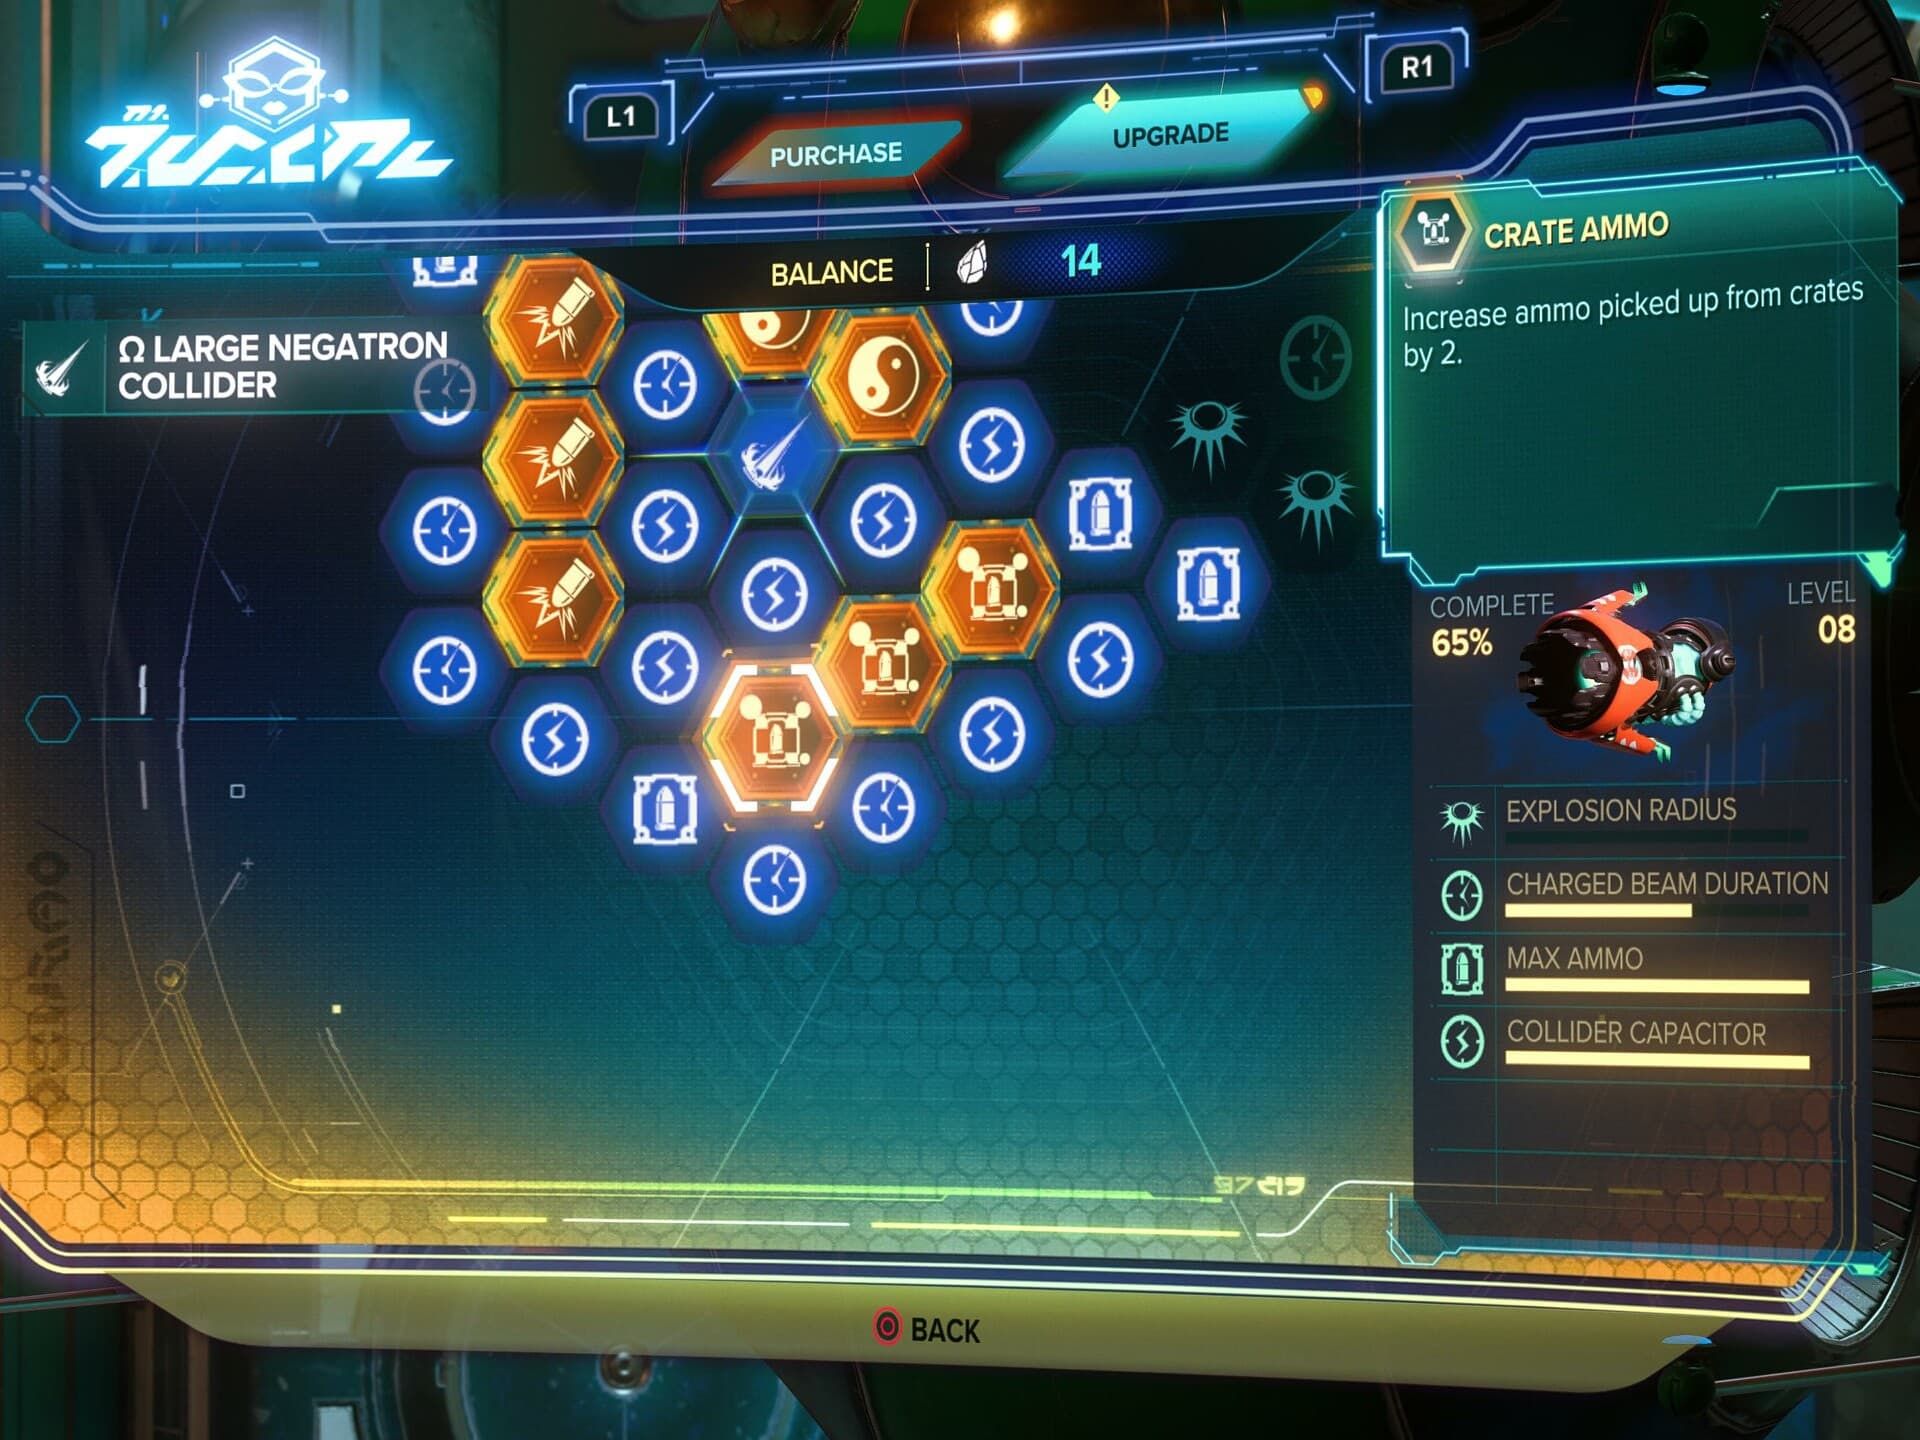
At Level 4, the Negatron Collider gets access to the Crate Ammo Gold Cell Upgrade. This upgrade lets you pick up ammo three at a time, instead of one at a time. This upgrade is nice for weapons like this that suffer from small ammo pools.
Pixelizer
A returning weapon; the Pixelizer fires a wide-area, shotgun-like blast of energy. Enemies damage by this gun get turned into 16-bit version of themselves, killing enemies in this state shatters them into individual pixel-like blocks, or leave them in their pixelated state to be shattered into individual pixels.
You can unlock this weapon from the start of the game if you had Pre-ordered the game, otherwise it won’t be available until you enter Challenge Mode, or New Game+.
This weapon is great at taking out groups of weaker enemies thanks to its high AoE. It doesn’t deal with high health threats that well without upgrades or when it becomes the Pixelizer HD at level 5.
It will be available starting in Megalopolis alongside the Bouncer for the cost of a single Bolt.
Upgrades
At Level 5, the Pixelizer upgrades to the Pixelizer HD. This upgraded variant allows you to charge shots for additional damage.
Through the use of Raritanium the Pixelizer / Pixelizer HD have access to the following bonuses on its Upgrade Tree:
Area of Effect, which increases the Width of the area the Pixelizer will hit. Alongside Max Range, this should be a priority stat until the weapon hit Level 5.
Max Ammo, Which increases the maximum number of rounds you can carry. This weapon doesn’t have too many ammo issues when used correctly, but this still helps as it doesn’t have he biggest ammo pool.
Max Range, which increases the distance which the Pixelizer’s AoE will hit. Alongside AoE, this should be a priority stat until Level 5.
Charge Rate, which is exclusive to the Pixelizer HD and increases the rate at which it can charge shots.
In addition to these basic stat upgrades, the Negatron Collider / Large Negatron Collider also have a set of Gold Cell upgrades which empower the weapon in various way.
At Level 2, the Pixelizer gets access to the Health Drop Gold Cell Upgrade. This upgrade can make defeated enemies drop Nanotech, or a Health pickup if you prefer to call it that. Its a useful but really niche upgrade, as it’s really only good a defeating weaker enemies. It can however be useful in boss fights with bosses that summon adds as adds are often low health enemies.
At Level 3, the Pixelizer gets access to the Ammo Spawner Gold Cell Upgrade. This upgrade works similarly to the Health Drop upgrade, just for ammo, allowing you to occasionally recover ammo from kills.
At Level 4, the Pixelizer gets access to the Rate of Fire Gold Cell Upgrade. This upgrade is the only direct DPS upgrade you get prior to upgrading to the Pixelizer HD at Level 5.
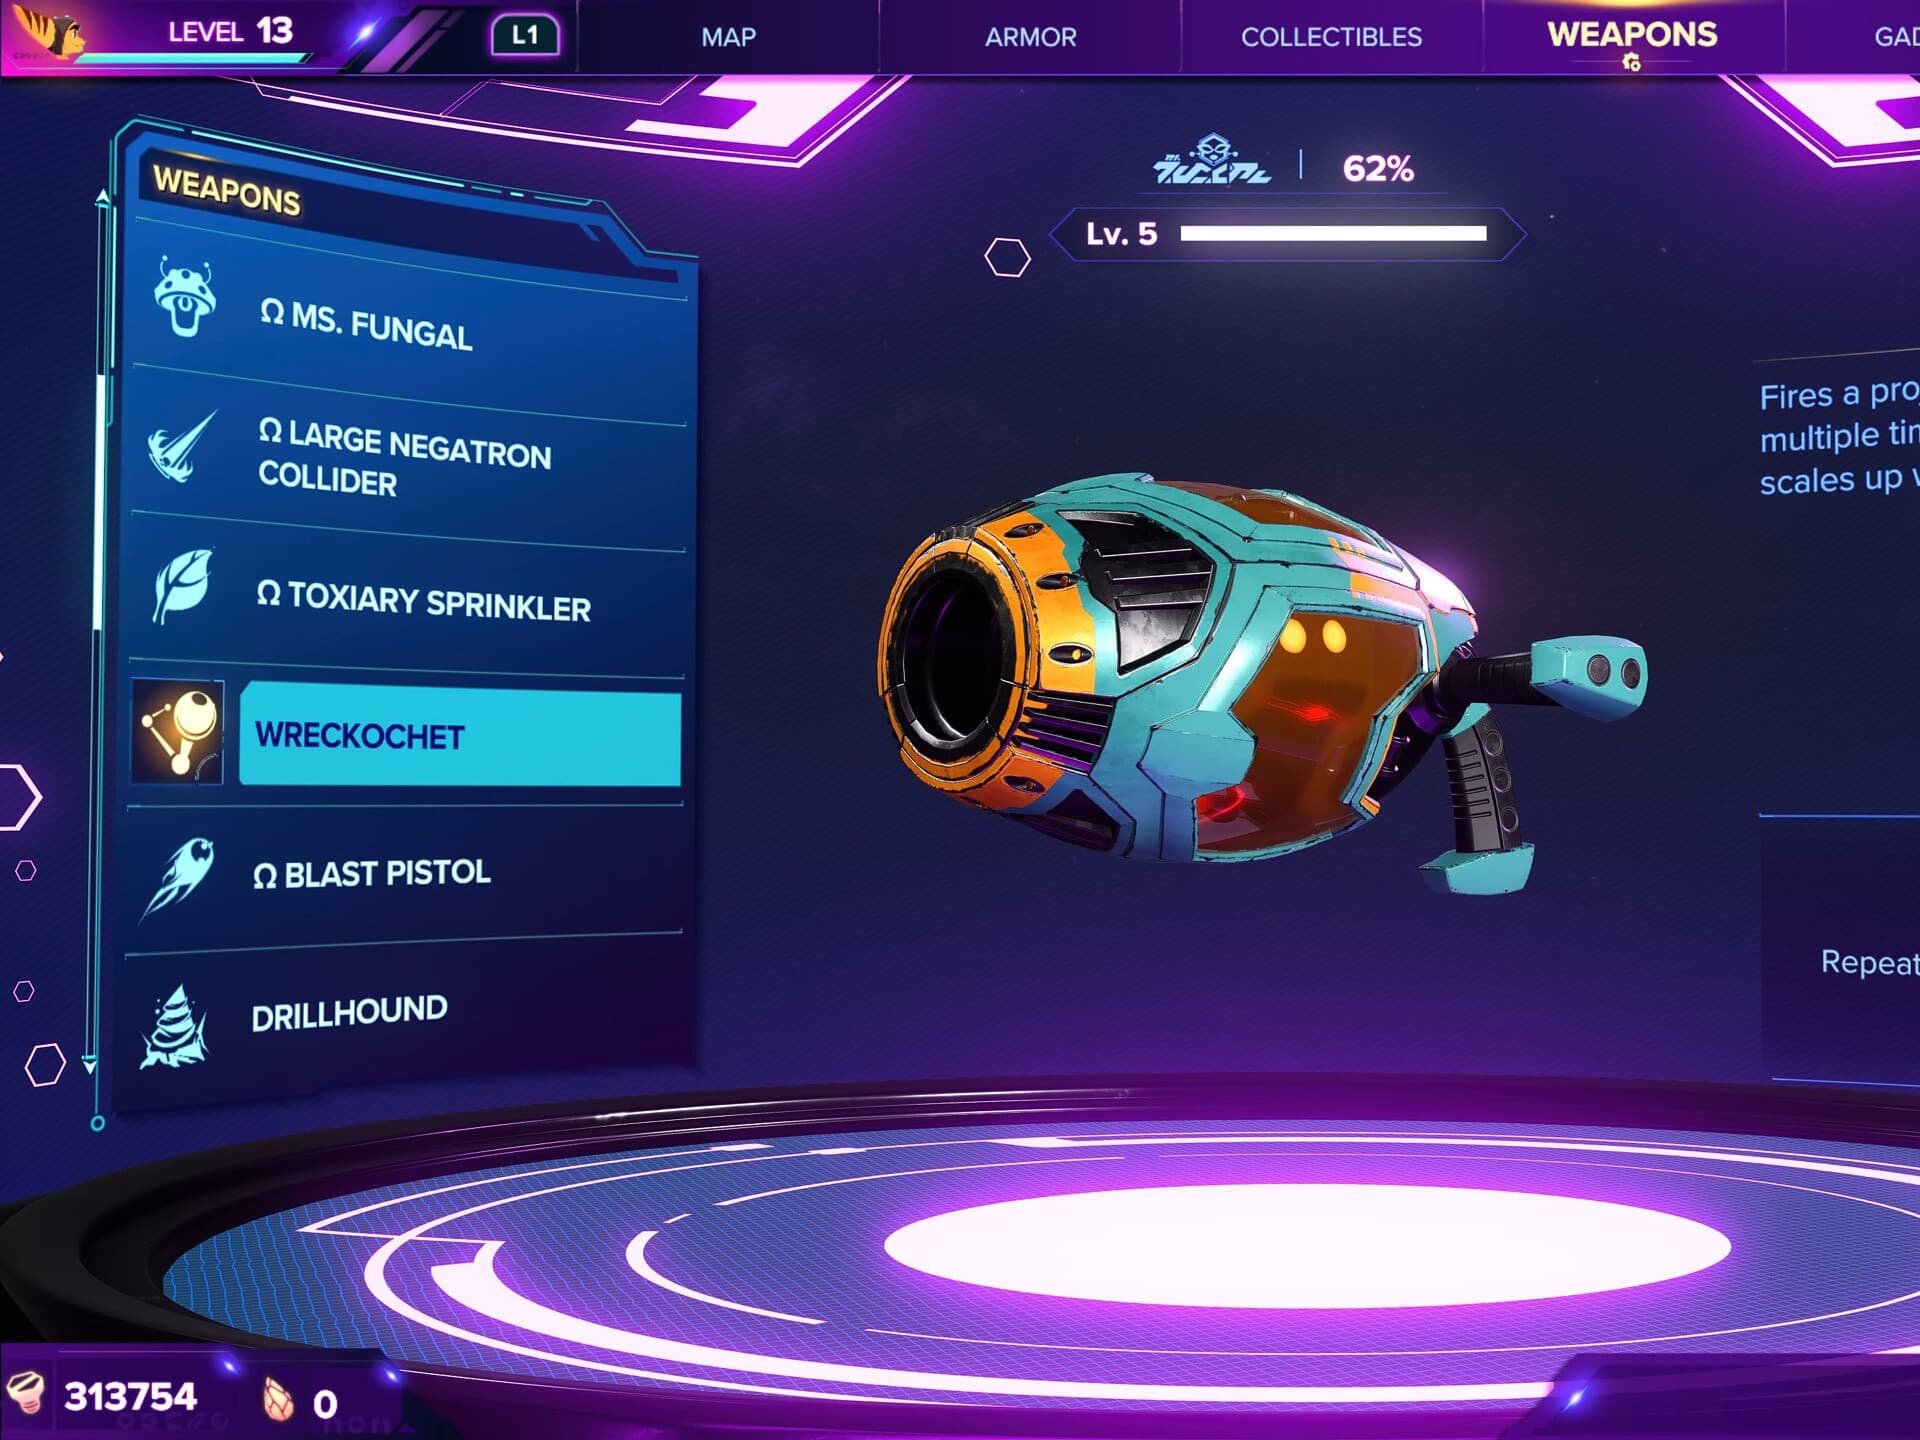
Ricochet
The Ricochet is a new weapon to the series. This weapon’s projectile will lock on to an enemy and allow for repeated, harder hits with good timing. Getting the timing down rewards you with higher damage output, though missing the timing won’t really punish you too much other than not increasing damage.
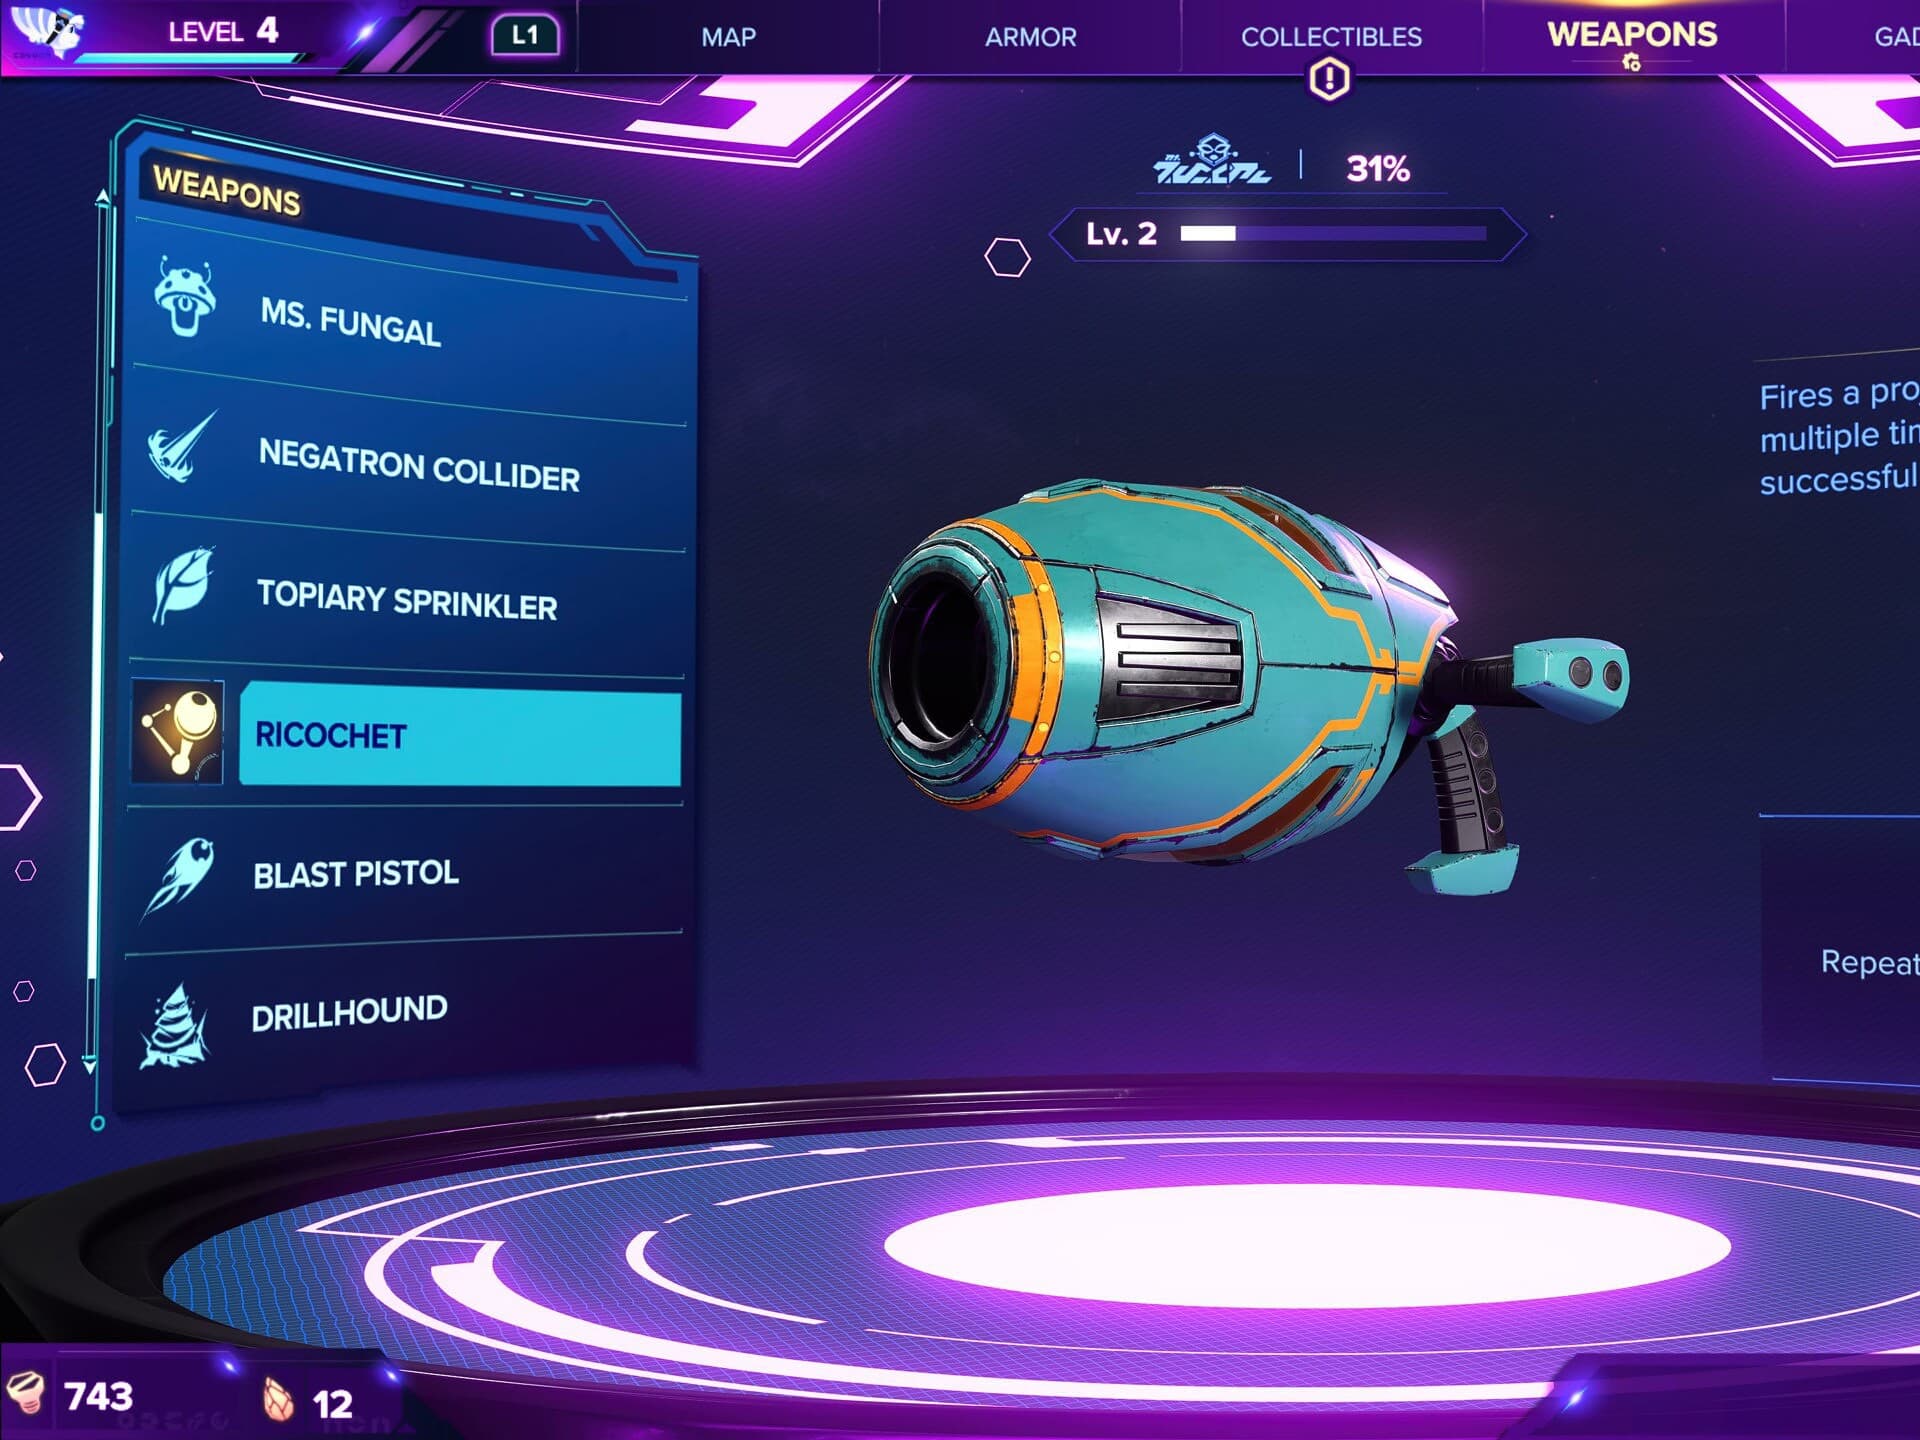
If you can micro-manage the timing as well as avoiding taking damage, this weapon has the potential for high damage. Maybe not quite to the level of the Headhunter or Warmonger can with a single shot, but still a very capable weapon. If you’re focusing on a sole target it also has the benefit of bouncing them around and making them unable to attack.
This weapon becomes available starting at your first visit to Sargasso for 6,500 Bolts.
Upgrades
At Level 5 the Ricochet upgrades to the Wreckochet. This upgrade increases the damage of each bounce as well as explodes on the final hit for additional damage.
In Challenge Mode the Wreckochet can be upgraded to the Omega Wreckochet for 85,000 Bolts.
Through the use of Raritanium the Ricochet / Wreckochet have access to the following bonuses on its Upgrade Tree:
Good Timing Damage, which increase the damage scaling for each timed hit. This should be the priority upgrade whenever possible as it is the only direct upgrade to damage.
Timing Window, which increases the window of time where you can successfully increase the damage. This makes the damage much more consistent. This is also up there in priority to pick up, as the consistency help this weapon a lot.
Max Ammo, which increases the ammo count of this weapon. While this weapon doesn’t have a ton of ammo, it also doesn’t punish you for missing the initial shots as they will return if they miss.
Effect Radius, which is exclusive to the Wreckochet, increases the explosion radius of the final hit. This is a nice bonus to get once you hit level 5, but not a priority.
In addition to these basic stat upgrades, the Negatron Collider / Large Negatron Collider also have a set of Gold Cell upgrades which empower the weapon in various way.
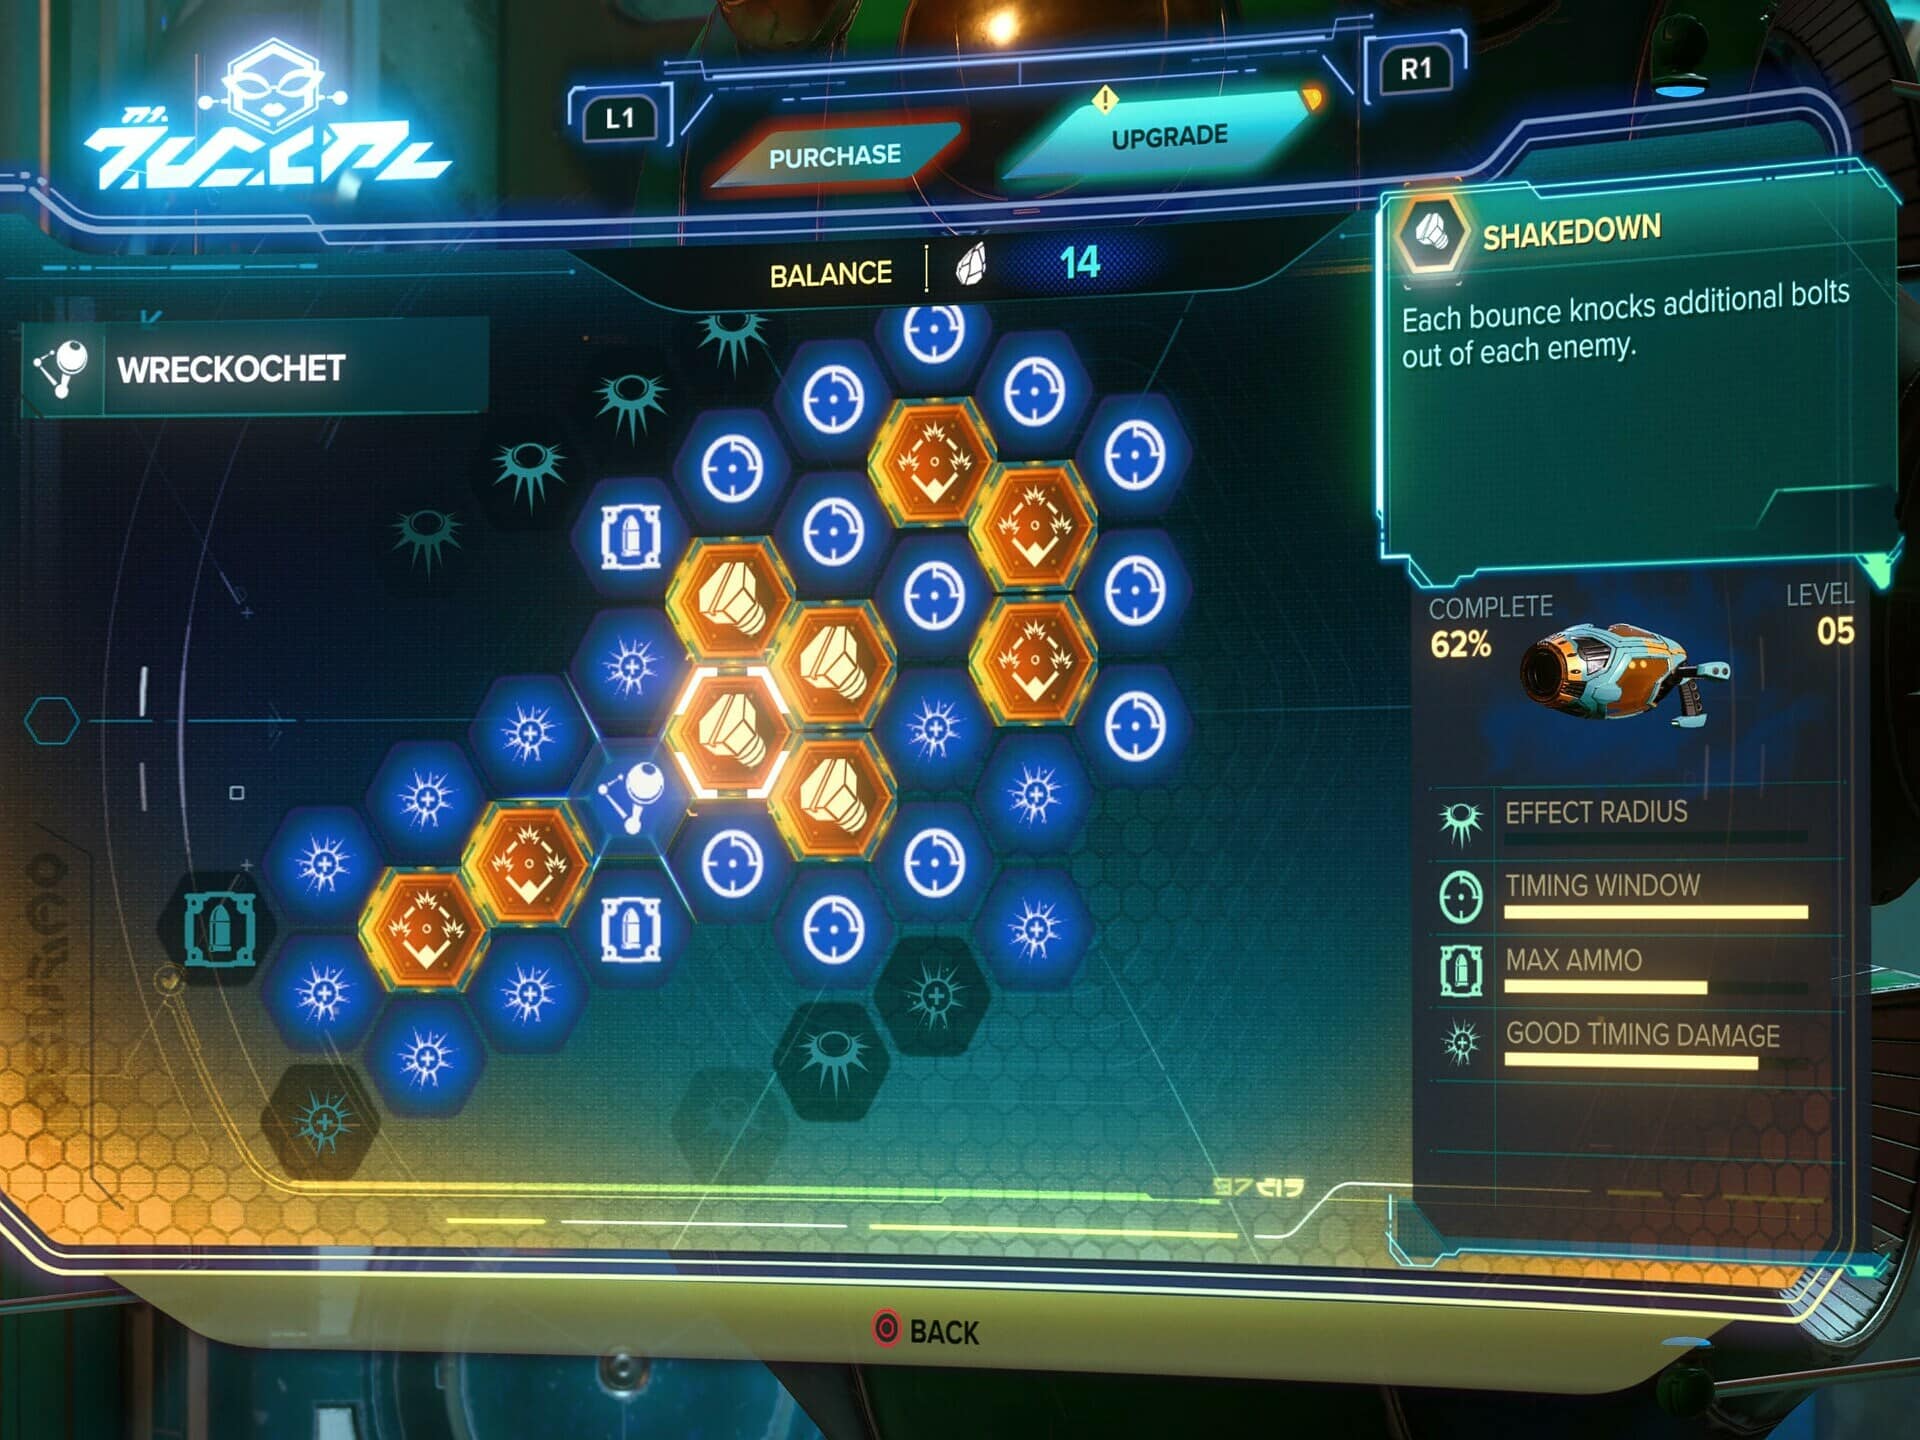
At Level 2, the Ricochet gets access to the Shakedown Gold Cell Upgrade. This upgrade makes each hit on an enemy drop Bolts. This can be helpful to have and make use of in the early game, where Bolts don’t add up quite as quickly.

At levels 3 and 4, the Ricochet gets access to the Extra Hits Gold Cell Upgrades. Each of these upgrades will add an additional hit, for a total of 7 when both are obtained. These additional hits will allow you to scale the damage higher and improve damage output quite a bit.
RYNO 8
The RYNO 8 is Rift Apart’s version of the RYNO line of weapons. This version of the RYNO opens a dimensional rift, dropping an explosive, or one of several cameo appearances from other Playstation titles. (after unlocking its first Gold Cell Upgrade).
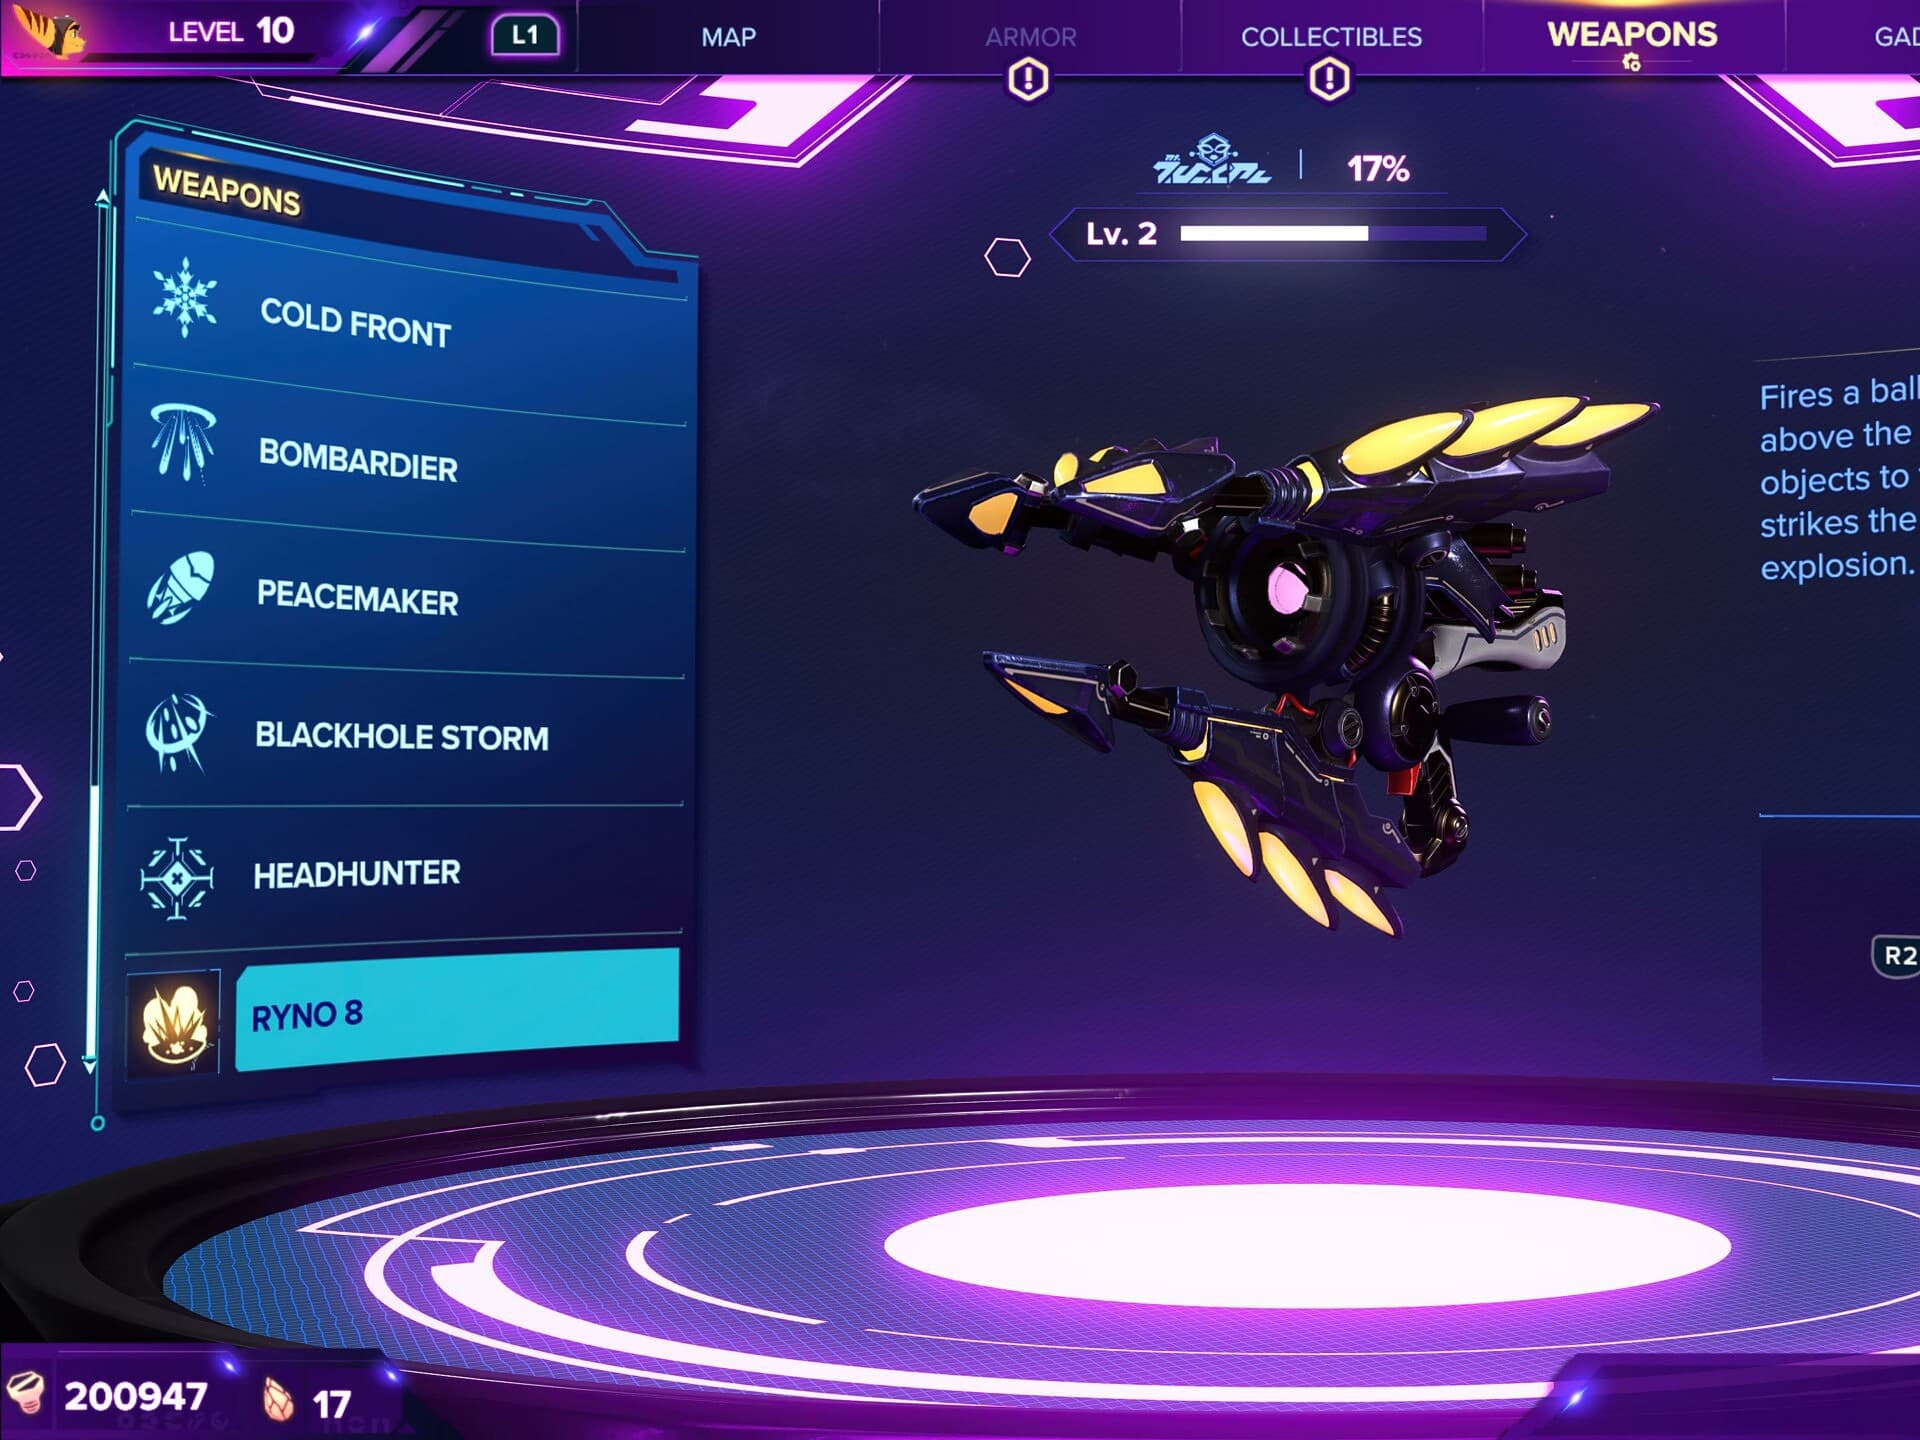
This weapon deals heavy damage in a very large area. It’s great for taking out groups of goons you just don’t want to deal with. It deals substantial damage to bosses as well but not as much as other weapons can even with support, as it seems intentionally capped.
This weapon is unlocked for purchase upon collecting all ten RYNO Spybots scatter throughout the game. It has no purchase cost though, so pick it up as soon as you get all of the spybots! This means the soonest you could get it is Viceron, aftet you have access to all the planets.
Upgrades
At Level 5, the RYNO 8 becomes the RYNO Inifite. This upgrade increases the damage of the weapon as well as its AoE by opening smaller portals alongside the main portal.
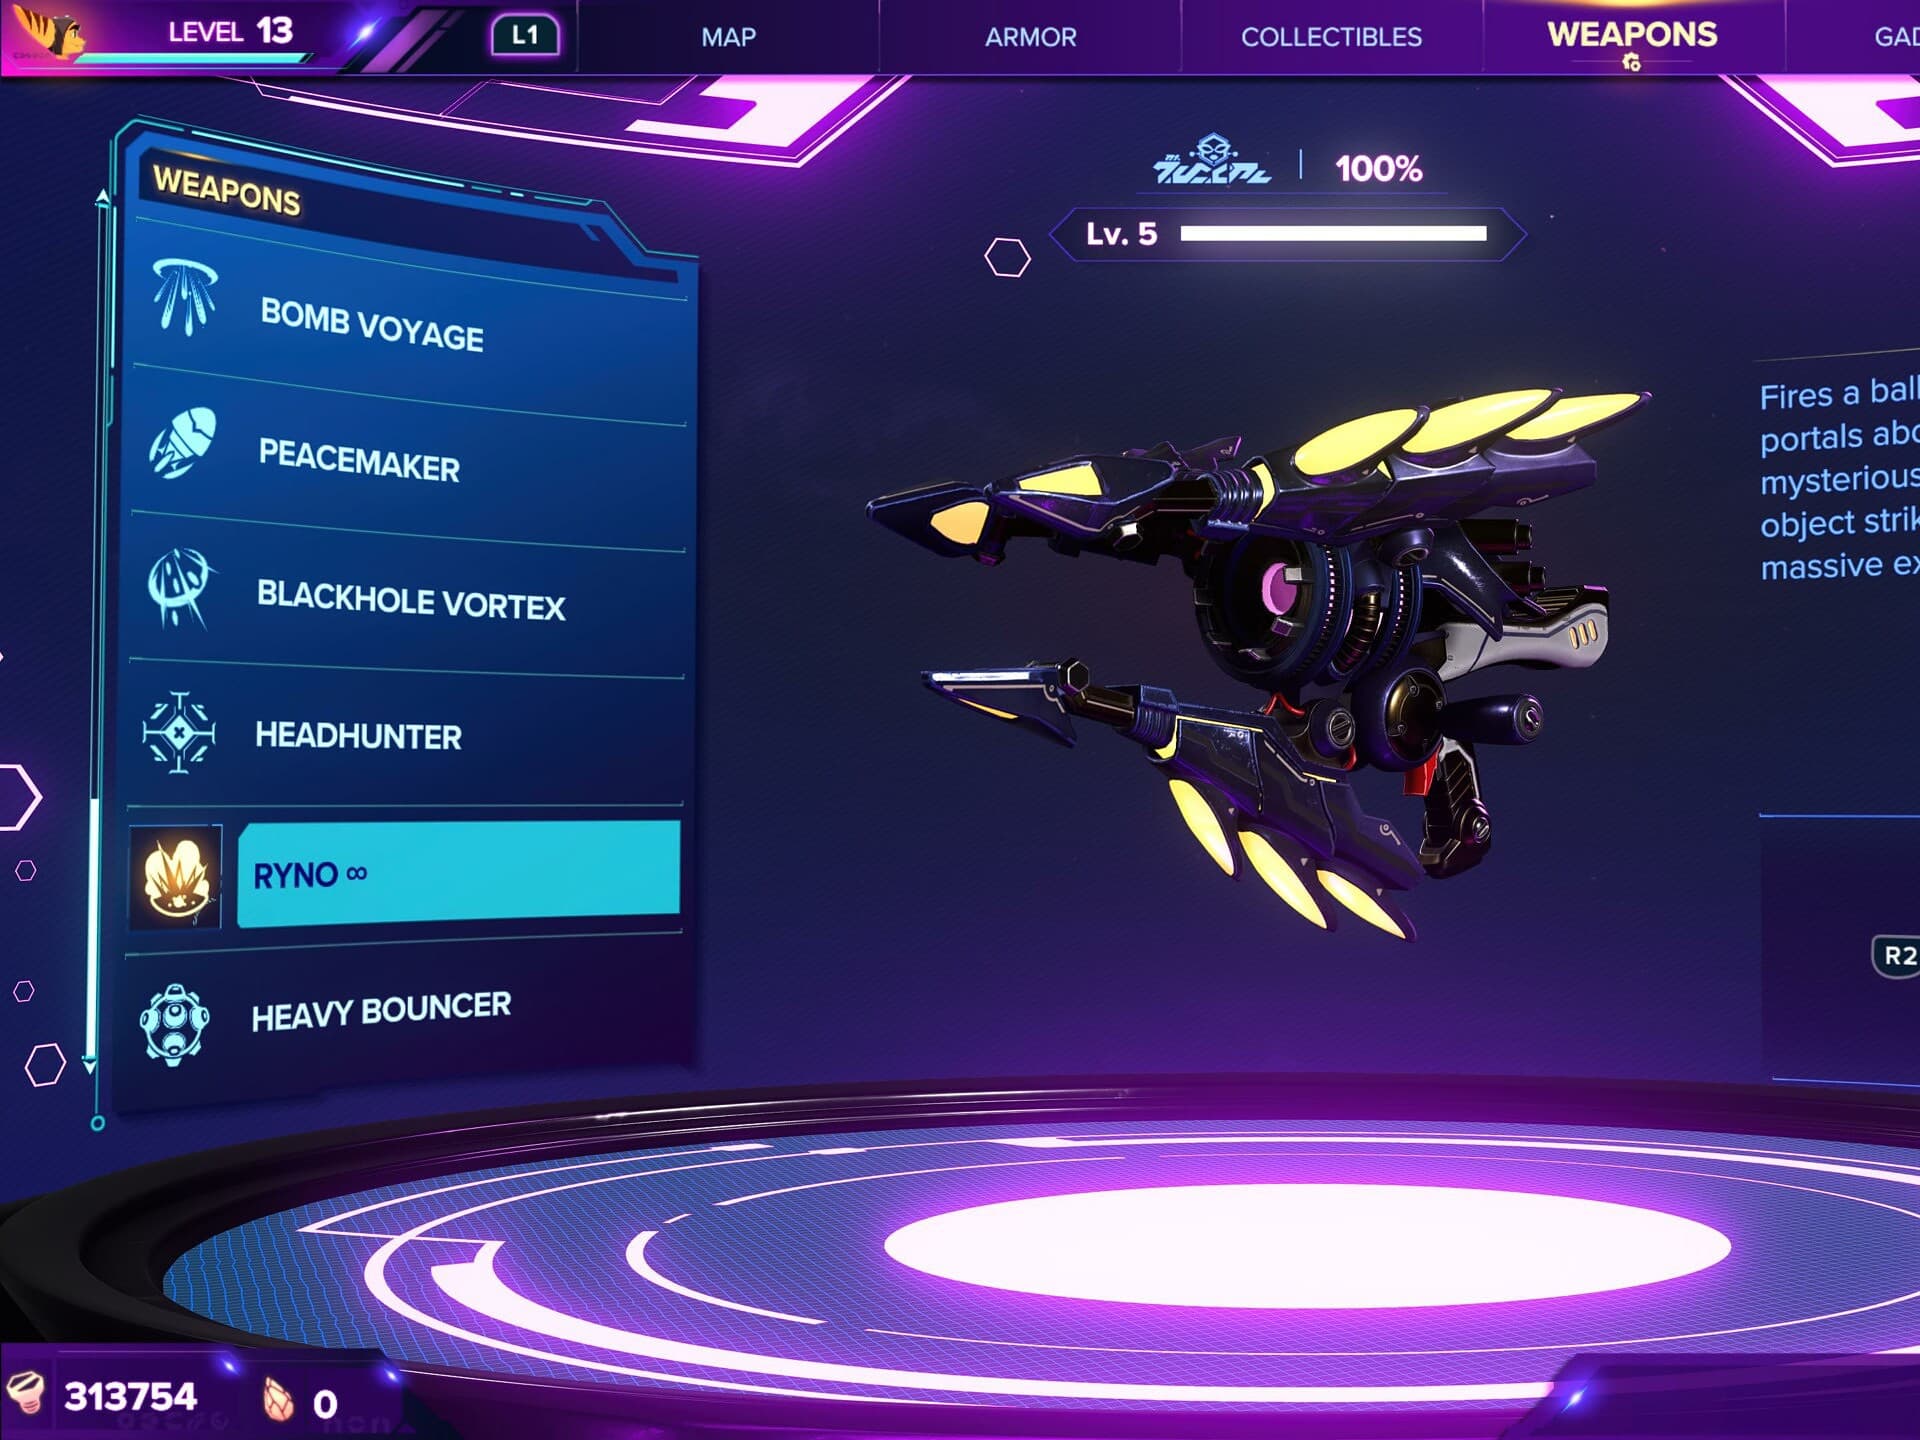
In Challenge Mode, the RYNO Infinite can be upgraded to the Omega RYNO Infinite for the cost of 1,000,000 Bolts.
Through the use of Raritanium the Ricochet / Wreckochet have access to the following bonuses on its Upgrade Tree:
The known cameo appearances are as follows: Thunderjaw from the Horizon series, A utility vehicle from Uncharted, Sly Cooper from well.. the Sly Cooper series. These were teased in a series of posts on Insomniac Games’ Twitter along with tweets from the cameos respective developers.
Shatterbomb
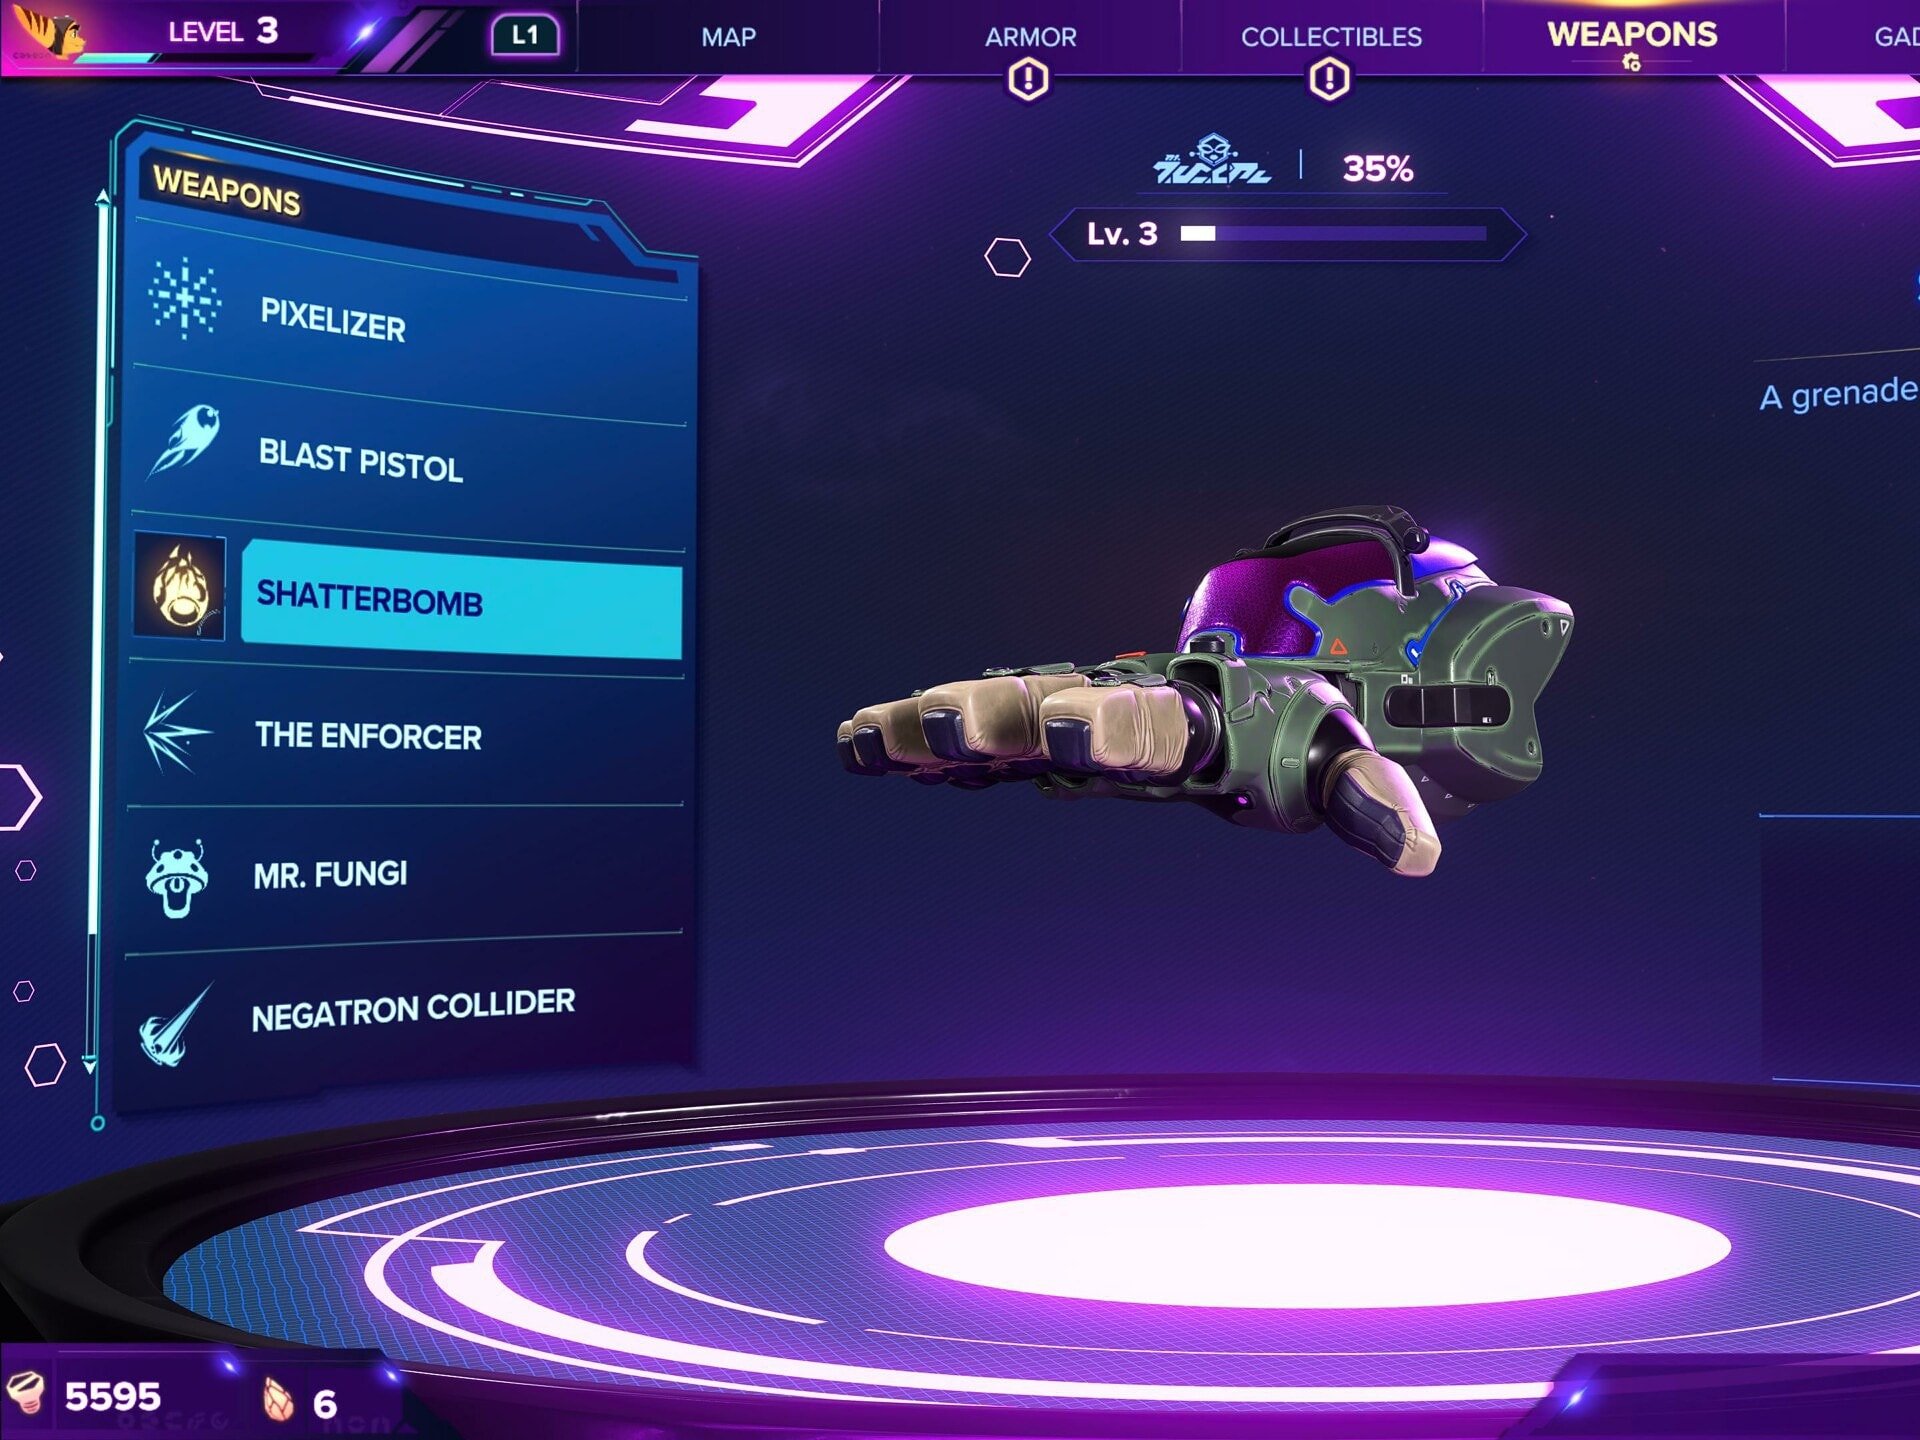
A revision of previous weapons like the Bomb Glove and Fusion Bomb, the Shatterbomb releases a projectile in a slow arc that explodes on contact with an enemy or surface.
This weapon is available from Ms Zurkon starting in Megalopolis, alongside the The Enforcer. Is has a cost of 4,000 Bolts.
Upgrades
At Level 5, the Shatterbomb becomes the Shatterblast. This upgrade increases the damage and AoE of the weapon.
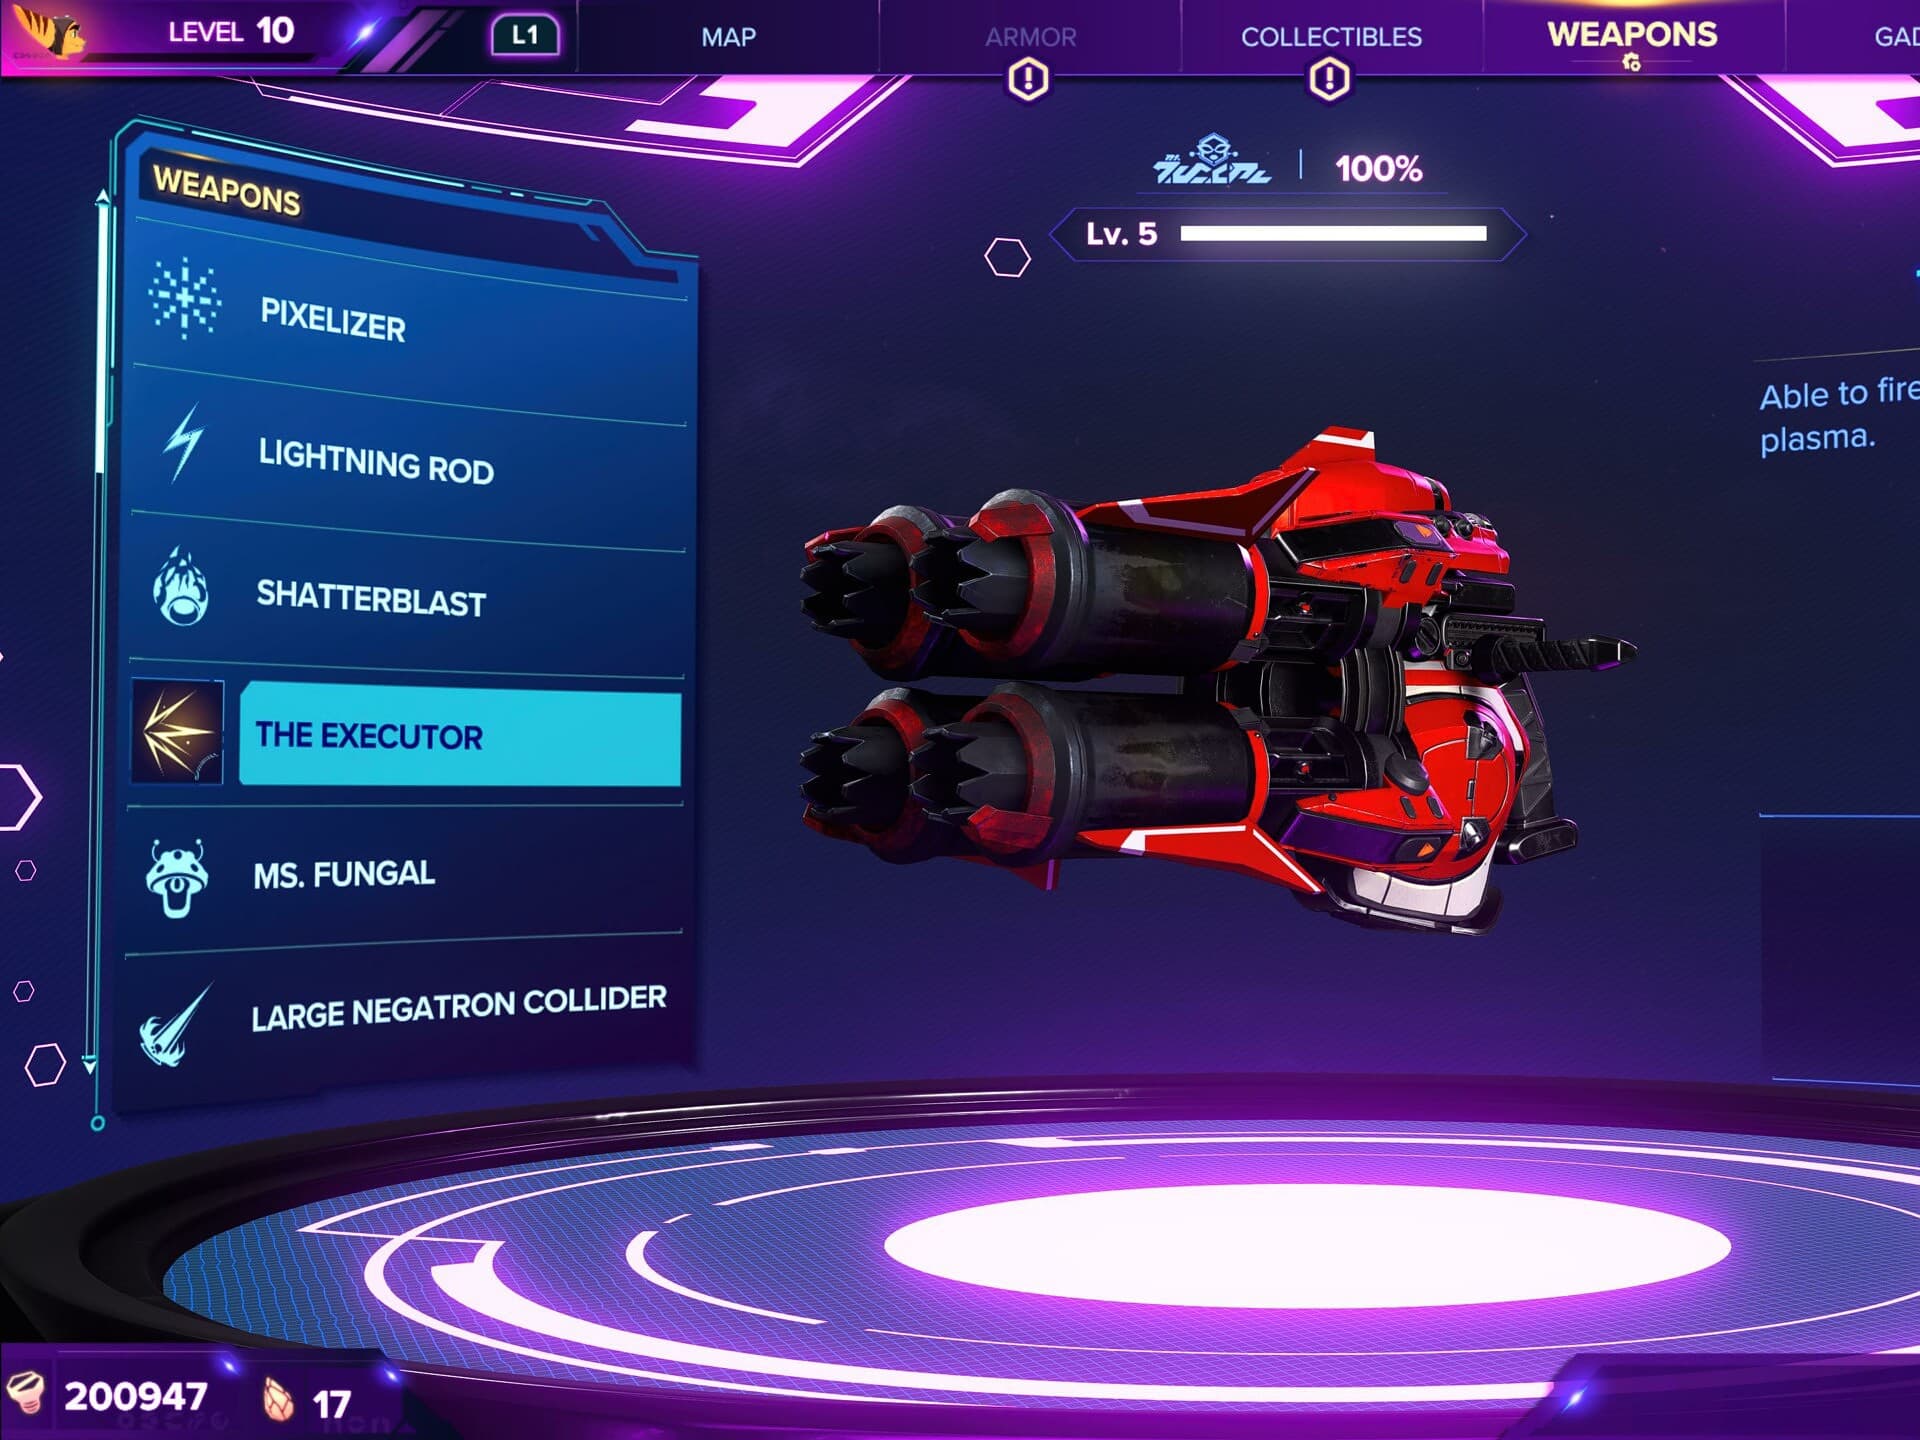
The Enforcer
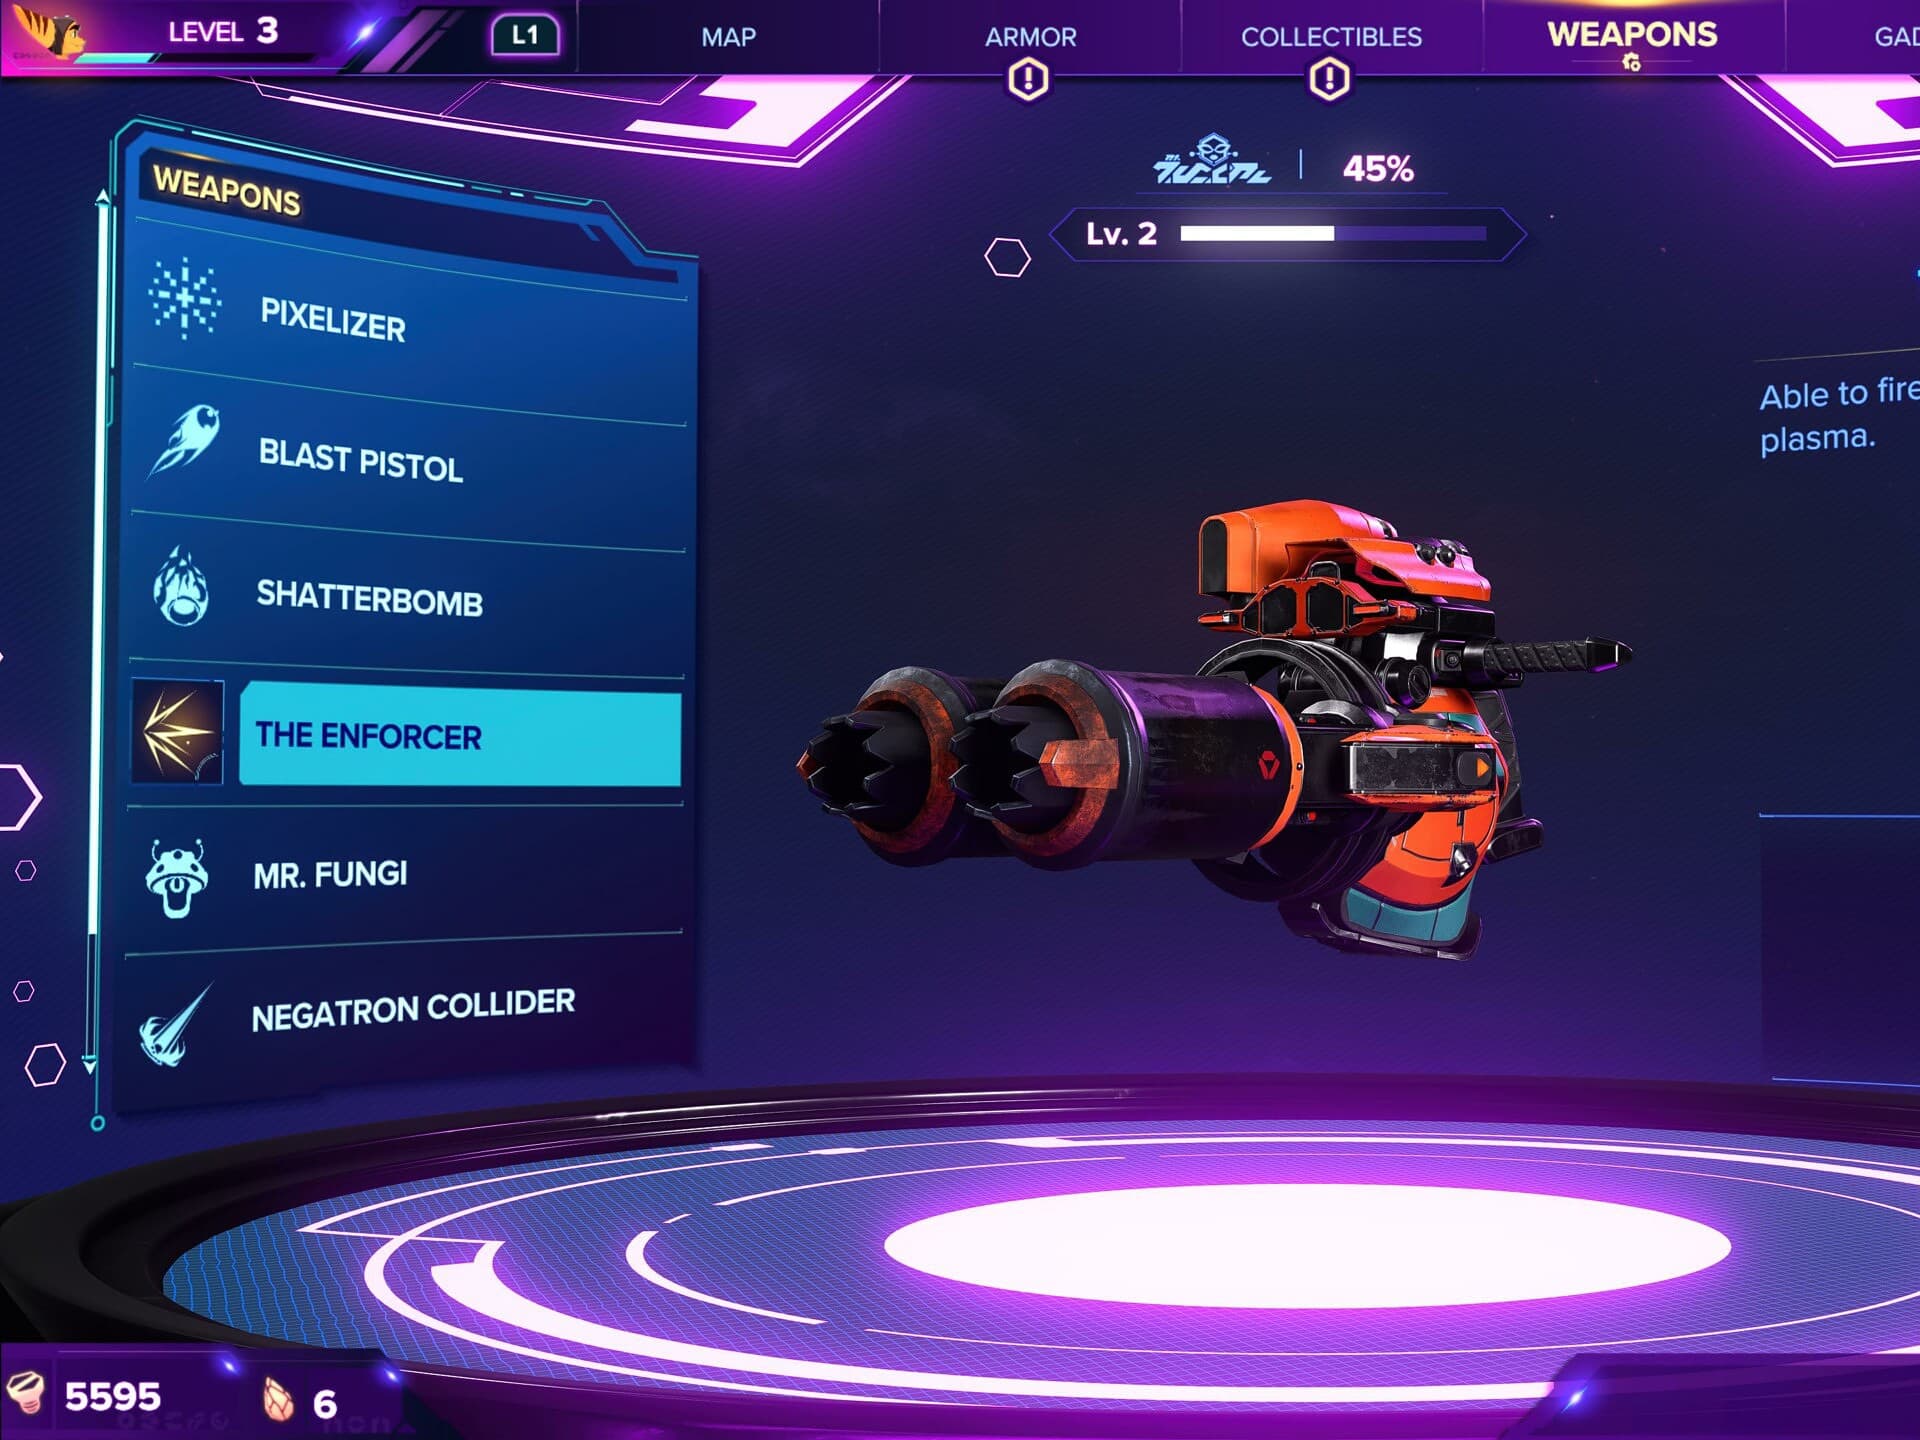
A new weapon to the series, The Enforcer is a double barreled shotgun. It acts like a standard shotgun in every way, similar to weapons like the Blitz Gun.
This weapon is available from Ms Zurkon starting in Megalopolis, alongside the Shatterbomb. It has a cost of 4,000 Bolts
Upgrades
At Level 5, The Enforcer becomes The Executor. This upgrade gives the weapons an additional two barrels, for a total of 4. Each half shot will fire 2 barrels, while a full shot will fire all four without any increase to ammo consumption.
This weapon gets the following upgrades from its upgrade tree:
Topiary Sprinkler
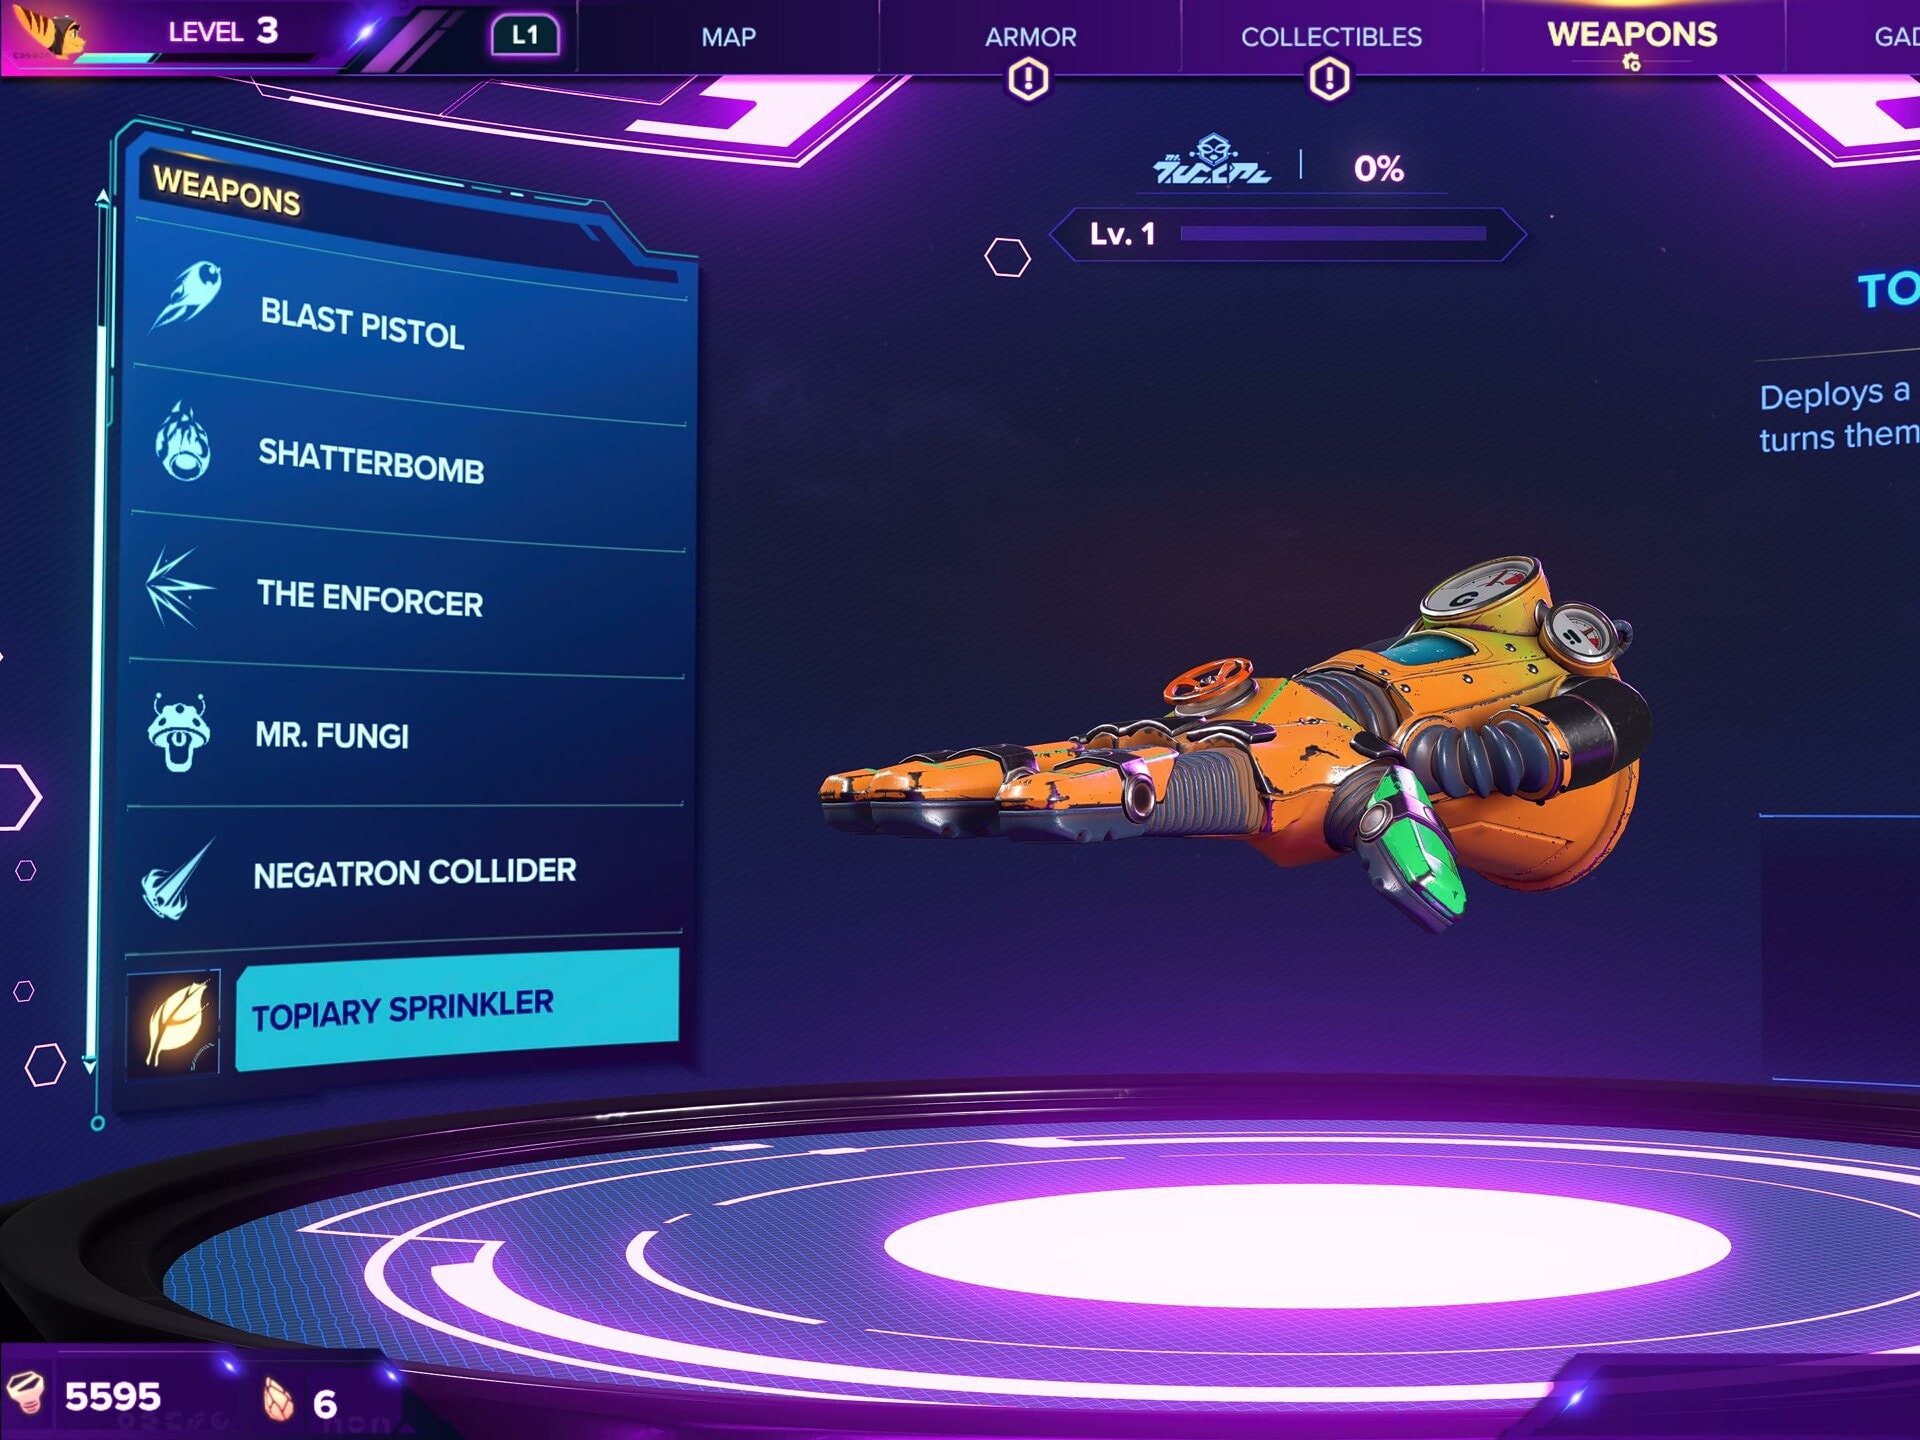
A new weapon to the series, the Topiary Sprinkler will slowly turn enemies into a topiary shrub version of themselves, preventing them from moving or attacking. While turned into a topiary, they take increased damage. This effect wears off after a short time or after a set amount of damage has been done.
Much like the Cold Snap, this weapon works well when paired with a high damage weapon like the Warmonger or Headhunter. This usually results in enough damage to one shot most non-boss enemies.
Upgrades
At Level 5 the Topiary Sprinkler becomes the Toxiary Sprinkler. This upgrade adds a small Damage over Time effect to the status effect.

This weapon gets the following Upgrades from its upgrade tree:
Void Repulser

A new weapon to the series, the Void Repulser projects a shield which can then be fired. Blocking projectiles and firing the shield blast will both consume energy.
When deciding how best to use its energy, I usually followed this guideline: Shield slower hits, Blast only if enemy can be knocked off a ledge or is a melee unit. It’s not a particularly strong weapon, but can be used if you find yourself overwhelmed by a lot of enemies firing at you.
Upgrades
This is our Ratchet and Clank Rift Apart Gear Guide. It still has a few more tweaks and things missing. Please check back later to see what additional items we have added as well as some great tips on how to get them and use them.
Ratchet and Clank Rift Apart is a Sony Playstation 5 exclusive title and it takes full advantage of all new technologies available to the next-gen console.
VULKK.com offers you an extensive coverage of Ratchet and Clank Rift Apart. Check out the rest of our guides and come back later for more!