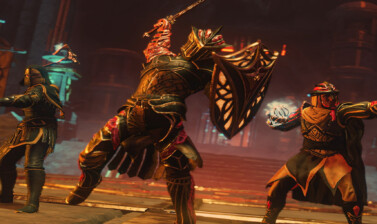
Want to learn how to hack your enemies to pieces in New World? This guide is an in-depth dive into all things hatchet in Amazon’s MMO!
This guide dives deep into the Skills, Passives, and some builds for the Hatchet in New World. This guide can be considered a more advanced version of our New World Guide to Weapons for Beginners. By the end of this guide, you should have a thorough understanding of the Hatchet and with practice be able to fully master it.
The Guide is up-to-date for Patch 1.9.2
At the end of the guide you will find a section that lists all changes to this weapon that AGS has implemented as they maintain and support the game in the long term.
Table of contents
Hatchet Overview
The Hatchet is a weapon capable of high DPS, while also being deceptively durable. It’s also highly capable of inflicting several different debuffs and statuses with both ranged and melee attacks, giving it plenty of tools for taking on most content.
The Primary use of this weapon is in the Damage category as a Melee DPS or Off-tank. Its melee skills and abilities lend a lot of power towards making you both durable and dealing high damage. Both of these qualities make it an exceptional weapon for new players.
The niche secondary role this weapon can take is in a more supportive role as a ranged debuffer. The Throwing Tree offers a wide variety of debuffs that you can apply which make the Hatchet a powerful debuffing tool.
Hatchet Skills, Passives and Perks
First we’ll lead off with the skills and passives. We’ll talk a bit about each, their uses and how effective they are. There’s a lot to cover here, so we’ll break it down per tree to keep things organized.
Alongside the general information, They’ll be given a Rating from C up to S tier for both PvE and PvP. C tier is exclusively for the passives that are not that great, either being forced by another upgrade or generally useless. A and B Tiers are middling tiers, putting them between the worst passives and the best, leaning one way or the other. S tier are the good passives, the ones you’re almost always going for if you pick up a skill or want to because it’s useful in many scenarios.
The Berserker Tree
The Berserker tree specializes on melee skills and bonuses, allowing it to dish out high damage and easily trade blows with any enemy. The active skills for the Berserker Tree consist of Berserk, Feral Rush and Raging Torrent.
 Berserk
While Berserk is active, gain 20% damage. Berserk lasts 12 Seconds, or until weapon swap. With a Carnelian Gem, Berserk will apply an 8 second Taunt to all enemies within 8 meters.
Berserk is both the star of the Berserker Tree and a staple skill for the Hatchet as a whole thanks to the damage steroid. It’s very often part of every Hatchet build because of this.
With A cooldown of 18 seconds, Berserk is one of the Hatchet’s longest Cooldowns. This cooldown does not start until the Berserk effect wears off, giving it an effective cooldown of 30 seconds, naming it one of the longest cooldowns in the game.
Berserk Rating: S – PvE and PvP
This skill is strong up front and only becomes more overloaded as you upgrade it. It should always be taken due to this.
On The Hunt
On the Hunt now additionally grants a 20% Haste while Berserk is active.
a 12 second, 20% Haste gives you a ton of mobility to both traverse the world and close the distance with your opponents.
On the Hunt Rating: S – PvE and PvP
The extra mobility helps you quite a bit in combat, given that most other Haste effects are on much shorter time than the duration of this skill. This mobility is more important for PvP, but can still be incredibly useful for getting around the world otherwise.
Berserking Refresh
Berserking Refresh grants you 5% Life Steal while Berserk is Active.
With the Changes made in Update 1.9, this passive got much weaker overall as the Life Steal isn’t quite as useful or valuable as the previous flat healing effect. It can still make you more durable than you’d expect, but also easier to take down if you don’t play carefully.
Berserking Refresh Rating: A – PvE and PvP
Life Steal in general is a pretty good effect, but the value given to this passive is quite low. Still, it allows you to play more aggressively and be rewarded for it. It also scales into the late game better where you’ll be able to deal more damge.
Berserking Purge
Berserking Purge cleanses crowd control effects (Roots, Slows, Stuns) when activating Berserk.
Being able to cleanse Roots, Slow, and especially Stuns is very powerful. While it harder to use due to it only triggering on activation, it can easily turn an encounter.
Berserking Purge Rating: A – PvE, S – PvP
While being able to purge stuns can help you clutch close fights in PvP by avoiding powerful follow-up options; it’s less useful in PvE unless you’re using hatchet as an off-hand weapon as a tank. Still a very strong option, as it gives you means to clear the debuff without the assistance of a Life Staff.
Uninterruptible Berserk
Uninterruptible Berserk makes your attacks uninterruptible and grants immune to staggers while Berserk is active.
Alongside all the previous upgrades, this is the passive that makes Berserk an absolute powerhouse of a skill and a nightmare for new PvP player to face.
Uninterruptible Berserk Rating: S – PvE and PvP
This seems like a simple effect, and it really is. While attacking you can’t be interrupted, meaning if you can stick to someone, none of their crowd control effects should work, or at least not as effectively. The Stagger prevention also prevent you from being kited as easily by ranged weapons.
Feral Rush
Feral Rush leaps forward up to 5 meters and hits a target twice. The first hit deals 80% Weapon Damage and staggers, while the second deals 130% Weapon Damage.
This skill makes for a solid gap closer and good damage if you land both hits. With the first hit staggering, it usually guarantees that the second hit will land if you adjust for it.
With a cooldown of 12 seconds, this is the Hatchet’s shortest Cooldown.
Feral Rush Rating: A – PvE and PvP
Feral Rush is the only actual gap closer the Hatchet has that isn’t running at someone with Berserk active. This makes it a decent initiation tool for PvE and PvP. When it get upgraded, it can also be a fairly strong ability for PvP in general.
Dispatch
Dispatch increases Feral Rush’s damage by 20% against targets below 30%.
Being a gap closer, having extra damage to a target that’s kiting or fleeing with low health can always be nice.
Dispatch Rating: A – PvE and PvP
While it’s a small threshold, you can often hold the skill if you’re near the threshold to capitalize on the bonus. Given the skill hits twice, this also means this effect will apply to each hit, letting you deal 40% more weapon damage in total.
Crippling Strikes
Crippling Strikes inflicts a 2 second Root if Feral Rush hits a target in the back.
This root will guarantee that if the first hit of Feral Rush connect to someone in the back, the second hit also will, giving this skill a ton of reliable damage against foes facing away from you.
Crippling Strikes Rating: A – PvE, S – PvP
While a Root by itself isn’t too impactful in PvE, the fact that it can still allow you get both hits of Feral Rush off before the enemy can turn makes it a decent boost of damage when combined with Dispatch.
In PvP a Root can be much more impactful, opening easy windows to land stuns and other impactful abilities. Depending on the follow-up you have, this can be incredibly valuable.
Raging Torrent
Raging Torrent performs four fast attacks dealing 90% Weapon Damage each.
Since these attacks come out faster than Light Attacks and still count as Light attacks, there’s a fair number of good ways to make use of this skill. Dealing a total of 360% Weapon damage is already good enough of a reason.
With a cooldown of 15 seconds, this is one of Hatchet shorter cooldowns.
Raging Torrent Rating: S – PvE, A – PvP
In PvE, the quick burst of damage this provides is quite good for increasing your DPS quite reliably. Since PvE enemies are rarely going to move out of range, being locked down for the duration of the skill won’t matter as much.
In PvP however, this lockdown effect can hinder this skill’s usage, limiting it to primary as a follow up to Feral Rush, assuming you get the Crippling Strike Root effect off. If a player dodges, they have a free window to punish this this skill very easily.
Aggressive Approach
Aggressive Approach grants a 20% Haste for 6 seconds when Raging Torrent successfully hits an enemy.
Given the Haste starts on first hit and doesn’t refresh with each hit, this is closer to a 4 second haste. Still a really good Haste tough for a weapon that’s generally lacking strong mobility options.
Aggressive Approach Rating: B – PvE, A – PvP
The movement speed is pretty nice for PvP, as even a single hit will trigger the effect. It’s a short duration, but helps make up for any distance created by your opponent. it helps the Hatchet stick to an enemy slightly better after this skill.
Though repositioning isn’t something you need to do often in PvE, it can still help you stick to a target. This is useful in situations where you might need to kite an enemy, or the enemy you’re focusing is being kited by someone else.
Final Blow
Final Blow adds a finishing blow to the end of Raging Torrent that can be used by pressing Light Attack at the end of Raging Torrent. This finisher deals 120% Weapon Damage.
This finisher adds an extra hit at the end of the chain of attacks, and can help a lot when it comes to the perk related to this skill.
Final Blow Rating: S – PvE, B – PvP
This is a nice and fairly consistent damage boost in PvE where your target isn’t going to be kiting you. It’s a free bonus hit that can trigger Refreshing Torrent, reducing your coldowns a bit more.
In PvP, the base skill itself requires strong setup; this requires a bit more. The main issue here being that this final hit is slower than the others, so it can still miss even if you land the Root from Feral Rush’s Crippling Strike passive.
Berserker Passives
Enraged Strikes
Enraged Strikes increases your damage with Light and Heavy Attacks by 20% against targets under 30% health.
Bonus damage to low health enemies can be pretty nice, especially if they’re a Life Staff user. This can help you almost rival their healing and out-damage it.
Enraged Strikes Rating: S – PvE and PvP
Even though it’s a low Threshold, it will help your overall damage. This can be more impactful in PvP than PvE, but still helps burn down Elites a little faster. Considering Raging Torrent can benefit from this, it makes it a very worthwhile pickup.
Against All Odds
Against all Odds increases your Damage by 10% for every enemy within 5 meters, up to a max of 50%.
This is just free damage, not only that it scales in situations where you may be outnumbered.
Against All Odds Rating: S – PvE and PvP
Even if it’s only granting 10% damage most times, that’s still worth the passive point alone. Since it can scale with how many enemies are on top of you, there’s even less reason to not take it.
Frenzied Purge
Frenzied Purge removes all Bleed, Burn and Poison DoT effects when you land a hit under 30% health. This can only be triggered once per minute.
This can be kind of niche, outside of cases where you’re facing a enemy that applies a high damage over time effect.
Frenzied Purge Rating: C – PvE, A – PvP
There’s not too many PvE enemies that deal high enough damage with any of these effects to really make you want to take this passive.
PvP is a different story, where Fire Staff, Musket and Bow can all apply or stack up these specific DoTs, and can typically contribute a ton to their damage. With the addition of Runeglass gems, more weapons can inflict these statuses, or Burn and Poison at least.
Accumulated Power
Accumulated Power grants Empower, increasing your damage by 20% on your next attack after three successful Light Attacks. This effect lasts for 3 seconds or ends after your next attack.
Out of all the damage increases the Hatchet gets, this is the most niche of them. Strong, but only lasts a single hit. It’s meant to pair with Relentless Fury.
Accumulated Power Rating: B – PvE, C – PvP
While most damage boosts are great, this one falls short due to the limited number of hits it applies to and needing a few hits to trigger it. The Hatchet lacks strong single hit attacks for it to benefit from.
Relentless Fury
Relentless Fury grants Empower, increasing your damage by 15% on a successful Heavy Attack. This lasts for 3 seconds or ends after 4 attacks.
Unlike Accumulated Power, this creates a rotation for even basic attacks, and is overall much more usable compared to it.
Relentless Fury Rating: S – PvE and PvP
This boost in damage is much more broadly applicable. You can burn it quickly with Raging Torrent in PvE for high burst, or Feral Rush into a few attacks in PvP for stronger hits and follow up. It was toned down, making it a little less effective, but still a strong option if you cna fit in Heavy Attacks
Fortifying Strikes
Fortifying Strikes grants Fortify, reducing damage by 15% after landing 3 consectutive Light Attacks. This effect lasts 3 seconds.
A free Fortify on your main damage output, sure why not.
Fortifying Strikes Rating: S – PvE, B – PvP
This passive is stronger in PvE where you can land attacks more consistently. It helps you to be more durable and be a more effective offtank.
In PvP it’s slightly weaker, as getting these hits in will be harder, let alone unblocked and consecutively. This reduces it’s uptime quite a bit, making it weaker overall.
Desperate Refresh
Desperate Refresh Reduces your cooldowns by 2% for every successful hit while under 30% Health.
With proper play, this can be a very strong passive, but requires more calculated usage of Berserk to get the most out of it with minimal risk.
Desperate Refresh Rating: A – PvE and PvP
A Pretty free cooldown reduction effect that’s easy to utilize and rewards risky play is quite nice. Compared to most of the Hatchet’s Berserker Tree which doesn’t quite reward this style and rather just encourages aggression in general, it’s an interesting effect to learn to use well. I imagine good usage of this passive will separate new hatchet players from experienced hatchet players.
Defy Death (Berserker Ultimate)
Defy Death allows you to avoid Fatal damage, instead granting 0.5 seconds of invulnerability and healing you for 500 plus an additional 50% Base Health. This effect has a 60-second cooldown.
This Ultimate is ridiculously powerful and contributes to the hatchet’s fame as a new player nightmare. The brief immortality gives you a pretty good chance of winning an otherwise close fight. With the heal being changed to a flat heal, this also gives you a higher effective health while it’s available
Defy Death Rating: S – PvE and PvP
Given this passives doesn’t prevent health regeneration or health recovery of any kind, you’d ideally want this to trigger when you have means you quickly recover your health. This makes this a very safe way to recover a ton of health.
While the Update 1.9 changes reduced the invulnerability window, it’s still exceptionally strong since you’ll always recover 50% of your max life, which makes this still exceptionally strong for the added effective health pool.
The Throwing Tree
The Throwing Tree focuses on the more ranged aspects of the Hatchet. This tree does still have some generally applicable passives which help the Hatchet, but not too many. The Active Skills of the Throwing Tree are Rending Throw, Social Distancing, and Infected Throw.
Rending Throw
Rending Throw will throw your hatchet up to 25 meters, dealing 110% Weapon Damage and inflicting a 10% Rend for 10 seconds.
Out of all the throwing skills, this one has the most useful debuff which can boost your damage as well as any allies.
With a Cooldown of 8 seconds, Rending Throw is one of the Hatchet’s shortest cooldowns.
Rending Throw Rating: S – PvE and PvP
Rend is a good debuff and can be impactful in most situations. However Fortify effects are just as common, making this solid but not overly strong. Its lkow cooldown allows it able to be applied frequently, it may even be possible to stack this effect, making it exceptionally strong. With the changes in 1.8 making it so you’re only slowed while casting instead of halted, this is much easier to use.
Targeted Impact
Targeted Impact increases the Rend duration to 14 seconds against enemies hit from at least 6 meters away.
Increasing the duration of the rend doesn’t do a ton overall for the weapon, or this skill. It’ll make it harder for certain PvP passives and effects to remove it, but that’s about it.
Targeted Impact Rating: B – PvE and PvP
While Rend is a good effect this small boost of duration is barely worth the point, and functions more as a stepping stone.
Opportunistic
Opportunistic increases Rending Throw’s Damage by 20% against targets with an active debuff.
This passive adds a lot of synergy to Rending Throw with the other skills in the Throwing Tree, which makes the tree more practical to use.
Opportunistic Rating: S – PvE and PvP
If you’re using Rending throw for any reason, this is fantastic to use as it doesn’t specifically have to be a debuff from the Hatchet to increase the damage.
Second Wind
Second Wind reduces Rending Throw’s cooldown by 20% when Rending Throw hits a target with an active Debuff.
Much like Opportunistic, this increases the skill’s synergy with the rest of the Throwing Tree.
Second Wind Rating: S – PvE and PvP
Much like Opportunistic, this will always be good to pick up if you’re using the skill for any reason. It has strong synergy with the rest of the Throwing Tree and many other weapons.
Social Distancing
Social Distancing throws your hatchet up to 25 meters while granting temporary invulnerabililty. This deals 115% Weapon Damage and applies a 30% Slow for 3 seconds on hit. If used while moving forward to sideways, this skill will just throw the skill normally. If used while moving backwards, a backward dodge will be performed with the throw.
Considering this skill applies a fairly strong Slow if it hits, while also having the option creating distance; it makes it have pretty good use for kiting out an opponent.
With a cooldown of 18 seconds, Social Distancing is one of the Hatchet’s longest cooldowns.
Social Distancing Rating: A – PvE and PvP
With changes to Hatchet Throwing Skill in 1.8, this skill became a fairly versatile option, as it longer interrupts movement and forces a backward dodge every time. This makes it a fairly strong option for both PvE and PvP due to the increased damage and combo potential it now provides. Additionally the Slow makes it exceptionally good for PvP, for both kiting and chasing your opponents.
Quick Power
Quick Power grants a 20% Haste for 6 second when Social Distancing hits a target with an active debuff.
A Haste on top of a dodge and a slow? This just makes the skill even better for kiting.
Quick Power Rating: B – PvE, S – PvP
If you’re focusing on the Throwing Tree, it’s a nice tool that made even better with this passive, especially in PvP. The combination of a creating a gap between you and an opponent, slowing them, and hasting yourself can make you incredibly slippery.
While the need to kite in PvE is rather limited, this will help in the time it is needed. It’s a pretty significant Haste
Stay Back
Stay Back applies a 1 second root when hitting foes that are at least 6 meters away.
The upgrade to a Root really sells this passive. It makes the skill extremely good at keeping single opponents at bay with lots of crowd control.
Stay Back Rating: A – PvE, S – PvP
The Root is more helpful in PvE over a slow for solo play. It makes it much easier to follow up with a quick hatchet throw
Given this skill is one of the Hatchet’s best kiting and spacing tools, a Root just make it better for PvP.
Infected Throw
Infected Throw throws your hatchet, dealing 120% Weapon Damage and inflicting Disease and Weaken for 10 seconds. Disease reduces healing on affect target by 30% , while Weaken reduces their outgoing damage by 10%.
One skill with two helpful effects and a decent damage ratio, which makes this a fairly useful and reliable skill.
With a cooldown of 15 seconds, Infected Throw is one of the Hatchet’s shorter cooldowns.
Infected Throw Rating: A – PvE, S – PvP
Both of these effects are pretty situational in PvE, being mostly limited to bosses. However since the skill does pack the hatchet’s highest damage ratio, it can still provide Weaken while hitting quite hard.
Disease and Weaken are both great in PvP, as reducing your opponents ability to heal and deal damage can turn a small skirmish or fight when used at the right time.
Mortal Power
Mortal Power Increases the duration of the Disease and Weaken effects to 10 seconds against targets with less than 50% Health.
Either the wording on this is incorrect, or it remains un-updated. As it reads, it does literally nothing. Though, extending an already lengthy pair of debuffs isn’t very worthwhile.
Mortal Power Rating: C – PvE and PvP (B in PvP with Aerial Transmission)
This is the actual definition of a dead passive. Unless the wording is just incorrect. Even if it is increasing the duration to 20 seconds, the only practical bonus of doing so it having 100% uptime, which isn’t that big of a deal in most cases.
If you add Aerial Transmission to the mix however, if it is indeed 20 seconds, then this can be a niche, but powerful area of denial tool.
Aerial Transmission
Aerial Transmission creates a 3 meter AoE when Infected Throw hits a target or surface. This AoE lasts for 6 seconds and will inflict both the Disease and Weaken debuffs on contact.
This makes Infected Throw behave similarly to the Bow’s Poison Shot does. Having it create an AoE where it impacts the ground or an enemy can be nice zoning.
Aerial Transmission Rating: C – PvE, B – PvP
Since this AoE applies both effects, it’s decent in PvE for the AoE Weaken. The Disease is much more limited to how useful it can be in PvE, as not many PvE enemies heal.
In PvP however the additional AoE can be nice and Disease can be the more impactful of the two debuffs, especially if you’re able to chunk down an opponent quickly before applying it. This will make an AoE they’ll want to avoid if they’re trying to chase but also heal while doing so.
Throwing Passives
The passives for the Throwing Tree are much more heavily focused on making the hatchet a ranged weapon, which can be fun but niche option to play with.
Aimed Throw
Aimed Throw replaces your ability to block with the ability to throw your Hatchet for 100% Weapon Damage while holding your block button. Each throw costs 20 Stamina.
If you’re going for more of a ranged, supportive style there’s no reason to not pick this up. This will let you consistently benefit from many of the passives on this side of the skill tree.
Aimed Throw Rating: S – PvE and PvP
Being able to much more consistently deal ranged damage with the Hatchet is always nice, even if you’re not going for a fully ranged style. Many other weapons provide strong blocking power, but none of the other melees weapons offer an option for consistent ranged damage.
Refreshing Throws
Refreshing Throws reduces all cooldown by 5% when landing thrown hatchets on enemies with an active Debuff.
Given how easy it can be to trigger this effect with a ranged focused playstyle, this gives you a ton of uptime on your debuffs, letting you consistently reduce their cooldown if you can land your throws.
Refreshing Throws: B – PvE and PvP (S with Throwing Build)
Given this applies to all skills and well as the basic Aimed Throws, this is a very strong utility passive. While it’s recovering a bit less than a second per hit, it adds up quickly, reducing the already low throwing cooldowns.
 Hurling Force
 Hurling Force
Hurling Force increases your thrown hatchet damage by up to 20%, scaling with distance. Max bonus is active at 20 meters.
This passive brings a good bit of extra viability to the Throwing Tree. Seeing as this allows your throwing skills to be your hardest-hitting attacks and skills, it has potential. However, the range requirement can make the Hatchet throws be a bit unwieldy, and only leaves a small 5-meter range at the end of skill ranges for maximum bonus.
Hurling Force Rating: S – PvE and PvP
This is a solid damage boost for the more ranged playstyle of the Hatchet. Even if you aren’t always getting the maximum bonus, it’s still a great boost in power and is worth picking up for Throwing Builds.
Critical Throw
Critical Throw increases your Crit Chance with Hatchet attacks, providing a 5% bonus for Melee hits and 10% bonus for ranged hits.
This passive was tuned up alongside the hatchet’s throwing setup, making it a great pickup. It can also be an easy pickup for melee too, as 5% Crit Chance for just a single passive point is still decent.,
Critical Throw Rating: S – PvE and PvP
Since it provides bonus critical chance, it can be hard to pass up. With it also being essential to making ranged attacks more effective, it’s even harder to pass up. If it didn’t provide the critical chance to all attacks, it’d be much weaker overall.
On Fire
On Fire makes every 3rd successful throwing attack a critical hit.
This gives you a solid way to boost throwing damage, as well as provides a consistent way to trigger Rejuvenating Crits.
On Fire Rating: A – PvE and PvP
Guaranteed critical hits can be really nice and this passive can reward both practice and patience. With there also appearing to be no timer on this, you could just build up a critical hit to use on someone as they’re trying to flee.
Rejuvenating Crits
Rejuvenating Crits grants 10 stamina on Critical hits with Light Attacks or Aimed Throws.
Similarly to Critical Throw, this passive ends up being strong due to applying to Light Attacks as well as throwing attacks. Any Headshots or Backstabs become sources of Stamina, and if you manage to get a high enough critical chance, you can also benefit from it frequently in melee range pretty reliably.
Rejuvenating Crits: A – PvE and PvP (S when paired with Critical Throw and/or On Fire)
While critical hits themselves are less reliable, there are ways to increase their frequency or even guarantee them. This can make Rejuvenating Crits an incredibly reliable passive. Boot and Rally also stacks with it making the stamina generation more reliable, as well as being a potent combo.
If this passive didn’t affect Light Attacks, it’d end up rated lower. Affecting both the Ranged and Melee style for the Hatchet makes it pretty versatile and easy to use.
Exploitation
Exploitation Increases your damage by 10% against targets with an active Debuff.
This is a pretty consistent damage buff for the Throwing side of the tree, while not being strong enough to necessarily be worth grabbing in a melee build unless you use one of the Throwing skills.
Exploitation Rating: A – PvE and PvP (S in Throwing Build)
On its own, this passive is pretty good. It’s a solid damage bonus can easily be applied for long periods of time by Rending Throw alone. However if you’re more focused on the throwing side of the tree, it will be a near-constant boost of damage. The Throwing Tree will often be cycling their skills and applying quite a few debuffs, so the odds of at least one being active are very high.
Adrenaline Rush
Adrenaline Rush reduces Stamina cost of dodging by 25% if an ability has landed in the last 2 seconds.
With all the potential the Throwing Tree has to reset skills, this can be used frequently to assist in kiting. It has the potential to be used in melee builds too, but would take a bit of work to get to.
Adrenaline Rush Rating: A – PvE, S – PvP
In PvE, while kiting isn’t as common, this can let you deal good damage and then quickly roll away to avoid damage with much less cost. Given this will reduce the cost of a dodge by 12.5 Stamina this can be very impactful over the course of a fight.
These reduced costs are even more helpful in PvP, and if you were to pair this with a Dex Weapon and stack Dex, you could end up with a very cheap Light Roll, which is incredibly powerful, as you could use an ability, roll twice, toss out another ability, and roll another 2-3 times.
Persistent Hindrance (Throwing Ultimate)
Persistent Hindrance extends the duration of all hatchet debuffs by 20% when landing an Aimed Throw or Throwing Skill. Additionally, foes take 3% additional damage from your attacks per debuff, up to a max of 12%.
This has some interesting implications and usage, though probably not as useful as they may seem. It’s much stronger on a Throwing Build, as a melee build would want Defy Death more often than not. However the added damage bonus can make it worth considering if you have other means of applying debuffs.
Persistent Hindrance Rating: B – PvE and PvP (A in Throwing Builds)
While not as overtly strong as Defy Death, this can let a practiced Throwing Build have almost have permanent uptime on their debuffs. Being able to keep a target permanently Rended, as well as having high uptime on Disease, Weaken and a strong Slow gives this very high potential when played well.
Hatchet Perks
Below is a list of the Skill perks available to the Hatchet. The range for the effect’s value is determined by the gear Score of the item it is on. The Minimum value is at Gear Score 100, while the Maximum is at Gear Score 625.
 Crippling Feral Rush
 Crippling Feral Rush
Crippling Feral Rush inflicts a Slow that lasts 3 seconds when you hit a foe with Feral Rush. On Weapons, this will provide a 20-29% Slow. For Armor, this perk will provide a 10-20% Slow instead.
Adding a Slow to a gap closing ability definitely makes it a very potent option. While its a bit short, it’s by no means a weak Slow either, so this can provide a fair bit of catch potential to Melee PvP builds.
Crippling Feral Rush Rating: C – PvE, A – PvP
A slow can provide some utility in PvE, though not a ton to really make it worth slotting.
However in PvP, it adds more catch power to the Hatchet, which makes it a very appealing and strong option. Though really you’d only want it on your armor if you have the max Gear Score.
Keen Berserk
 Keen Berserk
Keen Berserk increases your Critical Chance while Berserk is active and you are under 50% health. On Weapons, this perk grants 14-27% Additional Crit Chance. On Armors, this per only grants 1-14% Crit Chance instead.
Bonus critical chance during Berserk, with a threshold that encourages better usage of the skill? What’s not to want here.
Keen Berserk Rating: S – PvE and PvP
If you’re running Berserk, you should always take this perk if you can get your hands on it. It can even be a fairly good replacement for Keen, allowing for more unique options on your weapon.
Critical hits can very easily turn a fight. Critical Hits buffed up by Berserk will just be even more effective at doing so. The threshold gives the perk enough of a balance factor to where it’s not too overpowered. Make no mistake it’s a strong perk that only gets stronger as you get it on high Gear Score items.
Refreshing Torrent
 Refreshing Torrent
Raging Torrent makes each successful hit of Raging Torrent reduces all hatchet cooldowns. On Weapons this will reduce your cooldown by 4.6-8.5% per hit. On Armor it will only reduce cooldowns by 1-4.8% per hit.
Since Raging Torrent can hit a max of 4 times, or 5 when fully upgraded; this perk can be incredibly potent, though more so for PvE where these hits are easier to land. At max Gear Score, that means you could be cutting down 24- 42.5% of your cooldowns depending on Raging Torrent’s Upgrades, and where the perk is slotted.
Refreshing Torrent Rating: S – PvE, A – PvP
If you’re playing Hatchet as a Melee DPS and are using Raging Torrent, this perk should always be used. It’s very help for cutting down the cooldown of Berserk when it goes off cooldown
Despite being harder to land every hit in PvP, it’s still quite strong. Even a couple hits can be beneficial to bring Feral Rush or berserk back off cooldown. With setup from Feral Rush’s Root upgrade or another strong crowd control effect, it can pretty reliably land every hit.
Empowering Rending Throw
 Empowering Rending Throw
Empowering Rending Throw increases your damage dealt with ranged Hatchet Attacks on foes afflicted by Rending Throw. On Weapons, Ranged Hatchet attacks will deal 20-31% increased damage. On Armor, Ranged Hatchet Attackls will deal 10-21% increased damage.
This perk alone can make the Throwing Tree incredibly potent and deadly. Not only will you inflict Rend, you’ll also deal a ton more damage to the Rended target with this passive.
Energizing Rending Throw: S – PvE, A+ – PvP
If you’re running a Throwing Build, there’s no reason to not have this for PvE. It’ll help you get the most damage out of your kit.
It’s slightly more niche in PvP, as it will only be useful in Duels and maybe Arena. Anything thing small-scale really. The larger the scale of the combat is, the harder it can be to get value out of this. Still a great pickup, just a bit more situational.
Refreshing Distancing Throw
Refreshing Social Distancing reduces the cooldown of Social Distancing when it connects at a distance of 6 meters or less. On Weapons, the cooldown will be reduced by 29-49%. On Armor, the cooldown will be reduced by 10-30% instead.
Much like the old perk for Social Distancing, this perk rewards proper usage of the skill by encouraging you to use it a closer ranges.
Vorpal Distancing Throw: A – PvE and – PvP
With Social Distancing being one of your stronger debuffing tools, having more access to those debuffs can work wonders for the Hatchet. Being able to more frequently Root or Slow can be beneficial regardless of the situation.
This is however, one of those perks that’s a toss up between which slot to place it in. If you’re throwing focused build, you’ll either want this or Empowering Rending Throw on your weapon, and both are great options.
Exhausting Infected Throw
Exhausting Infected Throw adds the Exhaust debuff to foes that are hit directly by the skill which last 10 seconds. On Weapons, the Exhaust will reduce enemy stamina regeneration by 20-30%. On Armors it will reduce enemy stamina regeneration by 10-20% instead.
This has little use in PvE, but can be a decent option for PvP. This is mostly due to Exhaust not really being a super helpful status for PvE, but decent for PvP.
Mending Infected Throw Rating: C – PvE, A – PvP
This is essentially a waste of a perk slot for PvE. However, for PvP the added debuff potential can increase your damage as well as make it harder for enemies to avoid you or your damage.
Hatchet Builds
Starter Melee Berserker Build (16-19 Points)
This build is both beginner friendly and a fantastic leveling build. Its a strong option as a Melee DPS for PvE content and strong Melee build for PvP as well. It Focuses on making use of all the Berserker Tree Skills; Berserk, Feral Rush and Raging Torrent.
Leveling with his build is fairly straightforward and follows a mostly static path. You can however adjust it as you see fit if you’d prefer a different order.
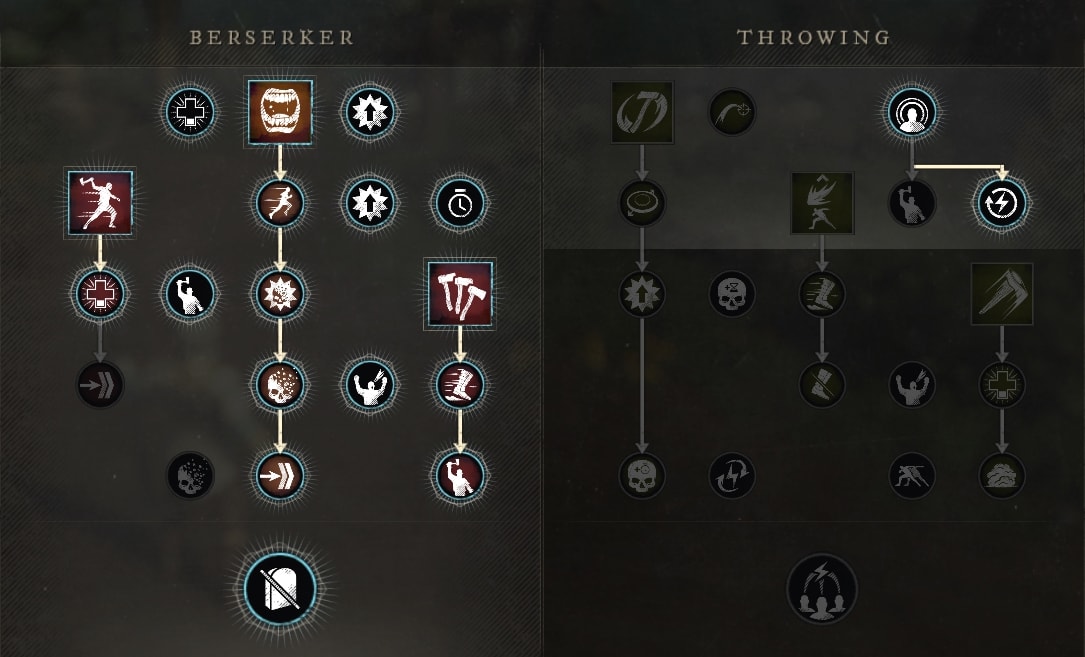
We start off by grabbing Berserk, and its upgrades up to Berserking Refresh; spending 3 points to do so. Then we pick up Relentless Fury for the reliable damage boost, followed by the other two abilities for the build; Feral Rush and Raging Torrent.
Next we finish maxing out Berserk, then pick up Against All Odds and Enraged Strikes. These give us another solid boost in damage. Then we grab Defy Death, which provides a ton of power and safety to the build.
After grabbing Defy Death, we pick up Desperate Refresh. This makes it so if we stay at lower health, we’ll get our cooldowns back faster by dealing damage. After this we finish capping off our skill upgrades, taking Dispatch for Feral Rush and both upgrades for Raging Torrent.
At this point, we’ve grabbed everything important and the last few points can be adjusted as desired. I’ve opted for Accumulated Power, Fortifying Strikes, Critical Throw and Rejuvenating Crits.
Accumulated Power works decently well with Raging Torrent, stacking with Relentless Fury for a strong fourth hit. Fortifying Strikes offers a bit of safety by giving us an easy fortify when using Light Attacks. Critical Throw gives us a little high chance to crit, while Rejuvenating Crits can help us regain Stamina on rare occasions.
If you wanted to go more towards PvP, I’d swap Accumulated Power for Feral Rush’s final upgrade, Crippling Strikes. Accumulated Power can be hard to take advantage of in PvP, where as the Root effect can be incredibly powerful when you land it.
Skill Perks, Usage, and Rotations
Berserk serves to create your burst window, giving you a long duration damage buff. It can also be used to recover health and remove CC thanks to its upgrades. CC Removal is important to remember in PvP, but not as useful in PvE.
Feral Rush is your gap closer and a tool for extra damage in PvE. Since it follows up with two decently strong hits after the leap, it can deal quite a bit of damage.
Raging Torrent is your main burst skill, and you’ll usually want to use this very early into Berserk, so it can be off cooldown by the time Berserk ends. This is because of its incredibly strong perk that reduce a significant portion of your cooldowns.
For Armor Perks, Refreshing and Refreshing Torrent are both incredibly good pickups. These help a ton with managing your cooldowns and making your general skill rotation work smoothly. Keen Berserk and Refreshing Torrent are both must haves for increasing your overall DPS. Keen Berserk helps you crit more often when solo where you can’t guarantee backstabs.
For your Hatchet, there’s no better perks than Refreshing Move, Rogue and Vicious. Rogue and Vicious increase your damage heavily, as you’ll almost always be dishing out backstabs in group play. Refreshing Move helps a great deal with getting more skill rotations out, which make up a good chunk of your damage. Alternatively, you can replace Refreshing Move with Enchanted or Keen and get plenty of damage that way as well.
Diamonds and Emeralds are your go-tos for Hatchet Gems. Between your sustain and decent DPS, you can make good use of either.
For your Amulet, Slash Protection and Thrust Protection cover most PvE and PvP incoming damage, but could be adjusted depending on what faction your facing or if you’re going more into PvP. Fortified Recovery can give you a nice fortify bonus if you start dipping into lower health.
For your Earring, Beloved and Evasive can both help you mitigate aggro making you less likely to pull aggro in expeditions. You can also grab Refreshing here as well if you don’t manage to get it on your armor.
For Rings, Slash Damage and Keen Awareness are always great options thanks to the damage they provide. Keen Awareness will help plenty in solo play, giving a nice chunk of critical chance. You can also go for Leeching, if you want to gain health back on hit, but this can also make it harder to benefit from the few threshold bonuses.
Skill Rotation
- Berserk
- Heavy Attack
- Feral Rush
- Heavy Attack
- Raging Torrent
- Heavy Attack
- 3x Light Attack
- Repeat 6-7 for cooldowns
- Raging Torrent after Berserk Ends
- Repeat 6-7 using Skills off cooldown
 Heavy Attack
 3x Light Attack
 Repeat 6-7 for cooldowns
This rotation starts with Berserk to get the damage bonus throughout the rotation. We start with a Heavy Attack to activate Relentless Fury, then use Feral Rush to put it on cooldown. Then, we use another Heavy Attack to refresh Relentless Fury to use with Raging Torrent. Raging Torrent will trigger Accumulated Power, making both the fourth hit hurt quite a bit, as well as the finisher dealing decent damage.
With Everything on cooldown, we continually rotate between doing a Heavy Attack to trigger Relentless Fury and three Light Attacks to Trigger Accumulated Power. The Next heavy Attack should hit with both Relentless Fury and Accumulated Power, for a huge chunk of damage.
Eventually your skill will come back up. Feral Rush can be used on Cooldown. Raging Torrent should only be used in Berserk to benefit from its damage bonus, or when Berserk is actively cooling down, so Refreshing Torrent can reduce that cooldown.
Support Hatchet
Seeing those words together probably scared you, didn’t it? Worry not, you’re supporting through ranged damage and debuffs. This Build uses the Throwing Tree to the fullest; Utilizing Rending Throw, Infected Throw and Social Distancing.
This is a bit of a niche way to play the Hatchet, but can also be quite fun. That said, leveling with this build may be difficult to do, but we’ll try to make it as comfortable as possible.
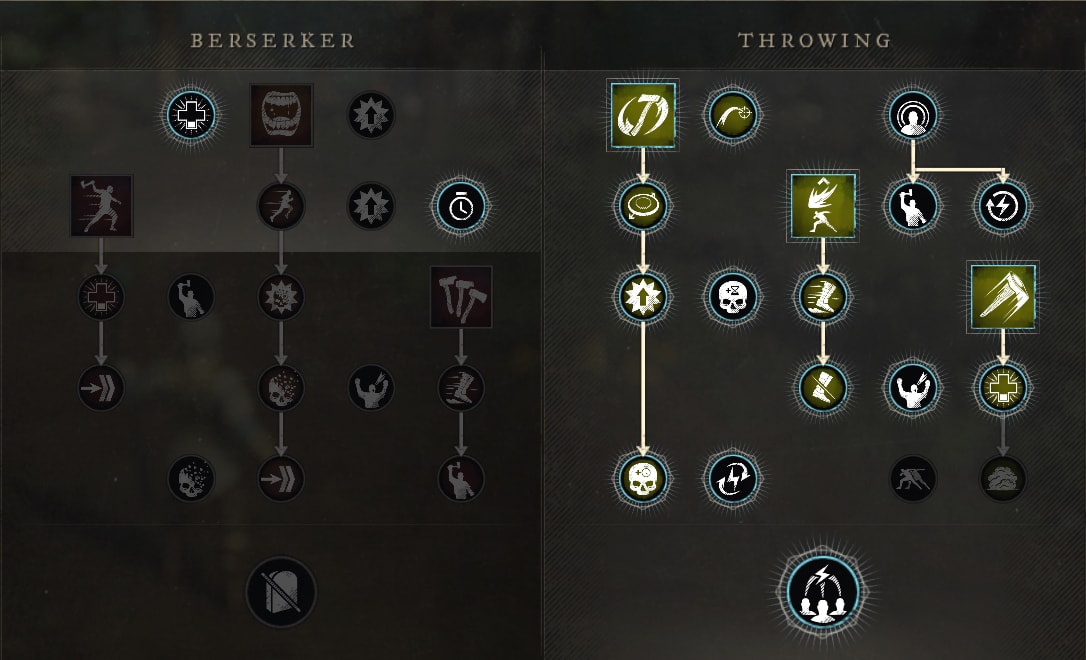
For Leveling this tree we start by grabbing Aimed Throws, which gives us the ability to consistently play at range. We then pick up Rending Throw for our first skill. This is then followed by Critical Throw for a fairly consistent damage boost though Headshots.
We then grab the two remaining skills, Social Distancing and Infected Throw. After this, we take Exploitation for the damage boost and to get to Hurling Force as soon as possible. This passive is a great damage boost, and make the playstyle much stronger overall.
Next, we go for On Fire and Rejuvenating Crits to further help with Stamina management and overall damage. We then pick up Refreshing Throws to gives use more use of our skills, which also help with Stamina management.
Now that we have enough point to do so, we pick up Persistent Hindrance. This will help us make better use of Rending Throws upgrades which we grab after. After maxing Rending Throw, the other two skills can be given their upgrades in any order.
The last two points we spend in the Berserker Tree, to grab Enraged Strikes and Desperate Refresh. Enraged Strikes gives us a nice little boost of damage. Desperate Refresh will stack with Refreshing Throw, making our cooldowns come back faster if our health drops low. If you wanted to run this in PvP, I’d recommend swapping these two points for the Aerial Transmission and Adrenaline Rush in the Throwing Tree.
Skill Perks, Usage, and Rotations
Rending Throw’s Rend will be the main debuff we’re looking to maintain. It’ll never be the first skill in the rotation as it needs a debuff to be active to benefit from its upgrades. With it’s shorter cooldown task to these upgrades, it’ll be our main damage tool.
Social Distancing is more of a PvP skill honestly, but helps the build kite if you’re playing it solo or trying to. Thanks to its perk, it can actually do pretty good damage, and end up slightly stronger than Infected Throw.
Infected Throw will our primary engage attack. It has high damage, and a decent length pair of statuses. Weaken in particular helps keep us slightly safer by reducing enemy damage.
For our Armor, Vorpal Distancing Throw and Mending Infected Throw are the ability perks we want to pick up. Vorpal Distancing Throw give it a nice boost of damage for PvE. Mending Infected Throw gives us a decently potent heal if we finish and enemy with Infected Throw. In addition to this, Refreshing remains a solid choice for helping with cooldown reduction.
For our Hatchet, Vorpal and Vicious make for a very potent damage combo. For the last slot, we have a few options. Keen can be helpful if you’re struggling to land headshots. Refreshing Move can help further reduce our cooldowns. Enchanted can be yet another damage increase.
Diamonds and Emeralds are your go-tos for Hatchet Gems. Between your sustain and decent DPS, you can make good use of either. This build can also use Malachite thanks to the extra bit of CC it has.
Our Amulet is going to be defensive, opting for Slash and Thrust Protection. The last slot here can be Refreshing if you don’t manage to get it anywhere else. Stamina Recovery can also be a good pickup if you wanted to PvP
For our Earring we’re going for reducing aggro, taking Beloved and Evasive. These two perks will help quite a bit when it comes to not being targeted by enemies. We also want to pickup Nimble here, as Hatchet Throwing is Stamina intensive.
Finally, our Ring will be a more offensive piece. We’re opting for Keen Awareness, Hearty and Slash Damage. Keen Awareness boosts our Critical Chance a fair bit, while Hearty gives us a Stamina increase. Slash Damage will just be a general damage increase.
Skill Rotation
- Aimed Throw x2
- Infected Throw
- Aimed Throw x2
- Rending Throw
- Aimed Throw x2
- Social Distancing
- Aimed Throw
- Repeat, using skills off cooldown.
This is a very basic and simple rotation. Starting off with two Aimed Throw to ensure you’re using stamina and allowing it to regen as well as preparing On Fire for Infected Throw. The goal is to cancel every second Aimed Throws with the throwing skills to hit two attacks at the same time, or near same time while making the skill crit. This can let you deal a lot of damage very quickly, should the game allow you to do these cancels. This weaving also helps maintain your debuffs as you apply more as they get a quick double extension.
Infected Throw is the skill used first because it’s the only one that doesn’t require an active debuff to benefit from it’s passive. Rending is second because of it’s longer duration, and to make sure Social Distancing benefit from the rend as the remaining strong hit.
Hatchet Hybrid PvP Build
This build mixes together an interest set of skills that work out to be an interesting mix of ranged and melee skills. It chooses to focus on Feral Rush, Rending Throw and Social Distancing.
Much like the previous build, this build may be rough to level with, unless you’re trying to level through PvP alone. This build has a bit of an interesting leveling path, as each skill has another passive before it that’s vital to the build in some way.
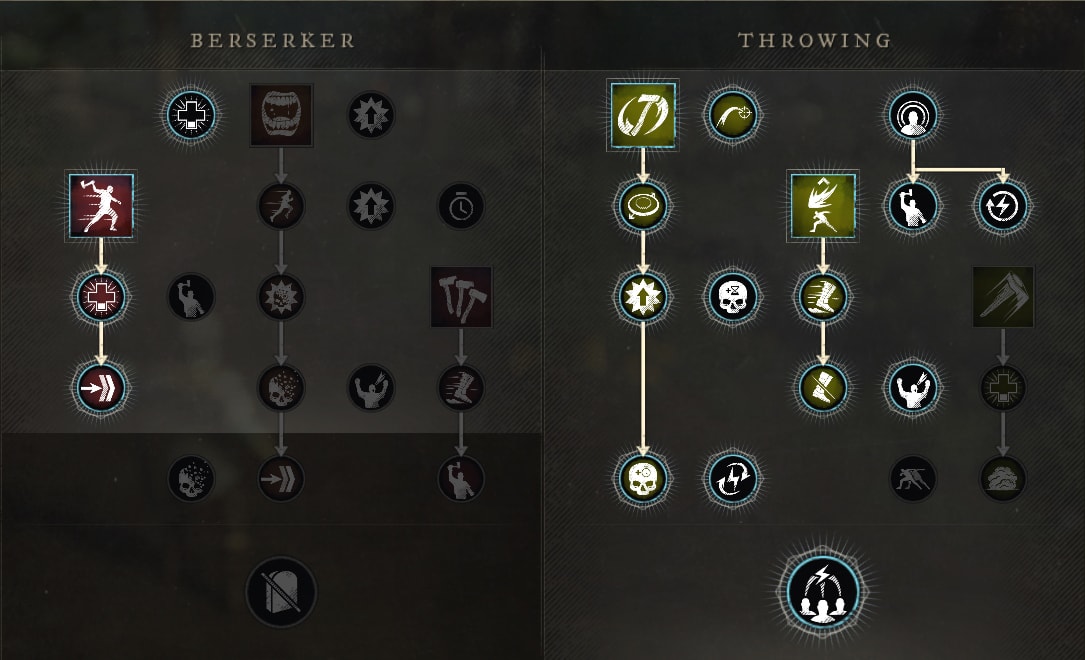
Leveling start off by taking Aimed Throws, for a consistent ranged option, as this is more of a ranged setup than a melee setup. This is followed by Rending Throw for our first skill, Critical Throws to enable Headshots and Social Distancing for our second skill. Then we hop over to Berserker, where we take Enraged Strikes to get access to Feral Rush.
With all three of our skills collected, it’s back to the Throwing tree to grab some useful passives. We upgrade Rending throw twice, to let us get to Exploitation as well as Hurling Force. After Hurling Force , we finish upgrading Rending Throw and also pick up Rejuvenating Crits to enable us to grab Persistent Hindrance.
With Persistent Hindrance collected, we grab Refreshing Throws for the utility then hop back over to the Berserker Tree to max out Feral Rush to allow it to root. This Root sets up our main rotation. After maxing Feral Rush we only need to grab On Fire and max out Social Distancing. This can be done in either order and is completely up to personal preference, I personally would prefer the slow and Haste upgrades for the PvP potential they have.
Skill Perks, Usage, and Rotations
Feral Rush will be used as a gap closer and if we’re lucky or well positioned, be the setup for our full combo. The Root is a strong effect that disables dodging, making it easier to land both Aimed Throws as well as Rending Throw and Social Distancing.
Rending Throw is primarily used to apply Rend, but will also deal quite a bit of damage when boosted by On Fire. With Persistent Hindrance, Rend should be applied for the majority of most fights, unless you miss a Rending Throw.
Social Distancing is both a damage tool itself, and a way to disengage after landing our main attacks. The combination of making space, Hasting yourself and Slowing your opponent make it harder for your opponent to return damage to you after your combo.
For our Armor Perks, Refreshing is always a good choice for a general purpose perk. Vorpal Distancing Throw is niche damage increase, but has pretty good potential against a rooted target. Refreshing Evasion can also be useful in combination with Adrenaline Rush, should you opt for that over On Fire.
For our Weapon Perks, Vorpal and Vicious are strong go-to options. With this being a PvP build, Keen is also excellent to make more consistent use of Vicious. Refreshing Move can also be a great option if you prefer more uptime on your skills as well.
Diamonds and Emeralds are your go-tos for Hatchet Gems. Both work well here, thanks to the hybrid play style.
Being a PvP build, this means our Amulet will be very defensive. We’ll take the standard Slash Ward and Thrust Ward to start with. Fortified Recovery is the best option, granting a nice fortify effect when we get hit under 50% health. Alternatively, another Ward perk of your choosing can be nice too, depends on what you’re most likely to face.
On our Earrings, we’d ideally want Refreshing Evasion, Nimble and Regenerating. Refreshing Evasion helps with cooldowns a bit more, even more so if you decide to take Adrenaline Rush. Nimble helps with Stamina Regen, with Throwing builds being pretty Stamina intensive. Regenerating adds a minor health recovery over time which over the course of a fight can heal your for quite a bit.
For our Ring, Slash Damage and Keen Awareness are strong go-to options. Slash Damage provide a small, general damage increase. Keen Awareness is a second Keen Effect, increasing Critical Chance by a fair amount. For the last slot, there’s a few decent options. Hearty can increase your Stamina, allowing an extra dodge or Aimed Throw. Leeching can help give you another source of minor health recovery. There’s also Infected, which can make the Disease from Infected Throw linger just a bit longer.
Skill Rotation
- Aimed Throw
- Feral Rush
- Aimed Throw
- Rending Throw
- Aimed Throw (2x If the Root lasts long enough)
- Social Distancing (Use before Root ends)
- Aimed Throw
- Repeat
This Rotation works similarly to that of the fully ranged build. You’re essentially weaving Aimed Throws with skills to makes the ranged skill hit while affected by On Fire, guaranteeing that they crit.
Leading with an Aimed Throw before Feral Rush make it so Rending Throw will crit further into the combo. After Rendign Throw you want to try and land 2 more aimed throws to allow Social Distancing to crit as well, but it’s not entirely necessary.
Executing this full rotation relies on getting a root with Crippling Strikes, and using the throwing attacks and skills to extend ti for the duration of the full rotation. Done correctly, it’ll deal heavy damage and end with your best space creating ability, making it hard to take return damage.
This leads to a more burst-oriented in-and-out style of play. This makes for an interesting and unique style of play compared to the Hatchet’s normal rushdown style.
Hatchet Weapon Pairings
The Hatchet primarily scale with Strength which lends itself to many melee pairings. However its secondary Dexterity scaling can be enough to allow it to be effectively paired with other weapons, just with slightly less output.
This makes my top 3 preferred pairings for it the Sword and Shield, the Blunderbuss, and the Spear.
Sword and Shield
The Sword and Shield is well known as one the game’s premiere Tank options. Its strong and defensive abilities lend themselves to the more offensive nature of the Hatchet. The Hatchet in turn, lends its stronger debuff and recovery power to help the Sword and Shield thrive.
To learn more about the Sword and Shield, you can check out our Sword and Shield Guide and Best Builds. This will help you plan out a strong build, should you opt for this pairing.
This pairing is covered in-depth in our Hatchet and Sword “Frontline Tank” Build Guide. Check it out to get a more in-depth look at how this build functions, its combos, and playstyle!
Blunderbuss
The Blunderbuss works well as a pairing, providing a bit more range and mobility to the Hatchet. Since the Blunderbuss is one of the only range weapons to scale with Strength it’s a great fit with the hatchet, so neither weapon is held back power-wise. You can even combine the Blunderbuss with a Throwing Hatchet setup for a strong mid-range DPS setup.
To learn more about the Blunderbuss, you can check out our Blunderbuss Guide and Best Builds. This will help you plan out a strong build, should you opt for this pairing.
Spear
The Spear is similar to the Sword and Shield in regard to crowd control. It’s a much more aggressive pairing though, as the Spear is a much more offensive weapon. This works in the hatchet’s favor though, as it can provide strong debuff potential in addition to crowd control and its damage.
To learn more about the Spear, you can check out our Spear Guide and Best Builds. This will help you plan out a strong build, should you opt for this pairing.
Other Pairings
Below is a list of builds that feature the Hatchet but are not part of the above pairings. Check them out for a variety of playstyles and options.
This is the end to this very in-depth guide to Hatchet in New World. We hope you have learned everything you need to know about these weapons, its usage, skills, perks, builds, combos and ability rotations. The icons used in this guide are pulled from newworldfans.com‘s database.
Patch Notes Changes
This segment will help you keep track of what has changed for this weapon with the patches as AGS maintains the game in the long-term.
Update 1.1 “Into the Void”
- General
- Fixed an issue where Aimed Throw could be used to cancel basic attacks at any time.
- Fixed an issue causing heavy attacks to not buffer properly, resulting in some attack transitions not functioning.
- Fixed an issue causing player’s homed in on a target, the player would be moved to a spot far enough away from the target that the hits could miss due to the hitbox sizes being a bit smaller than the distance the player would be from the target.
- Berserk
- Fixed an issue where activating Berserk would consume the Relentless Fury and Accumulated Power empower buffs.
- Feral Rush
- Fixed an issue where Feral Rush could be triggered without a cooldown in settlements.
- Raging Torrent
- Fixed an issue where some attacks could miss.
- Infected Throw
- Increased disease and weakness duration from 5s to 10s.
- Mortal Power: Increased bonus duration on low health targets from 8s to 15s.
- Aerial Transmission: Increased the duration of the AoE cloud from 3s to 6s.
- Rending Throw
- Reduced cooldown from 15s to 8s.
- Defy Death
- Fixed an issue where the Defy Death ultimate cooldown timer was removed when a player died.
You can find the full patch notes for New World Update 1.1 “Into the Void” in our New World Patches archives.
Update 1.2 “Winter Convergence Festival”
- Aimed Throw: Increased recovery before being able to cancel out from the first .1s of the attack to the first .45s of the attack
- Heavy Attack: Reduced recovery time by .15 seconds.
You can find the full patch notes for New World Update 1.2 “Winter Convergence Festival” in our New World Patches archives.
Update 1.3 “Expedition Mutators”
- Fixed an issue causing the Maker’s Mark Hatchet to incorrectly display as legendary with an extra perk in the crafting menu.
Update 1.4 “Heart of Madness”
- Stinky the Legendary Hunter can be found wandering around the swamps of Weaver’s Fen throughout the day, while at night he retreats to his humble abode. Stinky can drop three named items for level 30 players: Stinky’s Keepsake, Stinky’s Sharpshooter, and Stinky’s Hatchet.
- For the starting beach experience in Windsward, the Watcher now offers players a choice of 4 weapons from a weapon rack to better suit their playstyle.
- Players can choose between a Warhammer, Fire Staff, Bow, or Hatchet.
- Raging Torrent
- Refreshing Torrent (Item Perk): Fixed an issue where the final attack of Raging Torrent was not triggering the cooldown reduction from this perk.
- Feral Rush
- Energizing Feral Rush (Item Perk): Fixed an issue where this perk would not apply the stamina gain on both hits of Feral Rush.
- Feral Rush now ends early if it traverses into deep water.
- Berserking Purge: Fixed an issue where this upgrade would not correctly purge stun debuffs.
Update 1.5 “Arenas”
- Berserking Purge: Fixed an issue where this upgrade would not properly remove stuns if used too soon after the stun was applied.
Update 1.6 “Summer Medleyfaire”
- Reduced Hatchet base stamina damage based on weapon tier from a range of 36 to 42 to a range of 24 to 30.
- Fixed an issue that caused the hatchet aimed throw to speed up when animation cancelling.
- Fixed an issue that caused Hatchet light attacks to generate desyncs.
- Extended the subsequent Hatchet light attack hitboxes to make them more in line with the first hit. The light attack chain is now more consistent.
- Fixed incorrect values in the “Infected Throw Mortal Power” tooltip.
- Made a number of Hatchet Throwing skill tree updates:
- General
- All throws no longer need a passive unlocked to be able to critical hit.
- Slightly reduced block stamina damage on all thrown attacks.
- Adjusted placement of the hatchets as they are thrown to be more in line with the player character and reticle.
- Rending Throw
- Damage reduced from 120% to 110%.
- Targeted Impact upgrade
- Updated functionality to extend the duration of the rend by 4s instead of increasing power.
- Decreased the distance required to trigger from 8m to 6m.
- Social Distancing
- Increased dodge back distance.
- Added a stagger to Distancing Throw.
- Reduced damage from 130% to 100%.
- Slightly Increased invulnerability frames during backwards dodge.
- Updated tooltip to show the ability has invulnerability frames.
- Increased base slow effectiveness from 15% for 3s to 25% for 5s.
- Quick Power upgrade
- Previously granting 30% Haste for 3s when Social Distancing hits a target with an active debuff. Now it grants 20% for 6s.
- Stay Back upgrade
- Updated functionality to root players for 1s if their target is farther than 6m away.
- Infected Throw
- Sped up Infected Throw attack animation.
- Reduced damage from 165% to 120%.
- Increased the speed of the thrown projectile.
- Mortal Power Upgrade
- Increased the HP requirement to trigger from 30% to 50%
- Aimed Throw
- Updated to not interfere with movement when throwing.
- Increased movement speed while aiming from 1.65 to 2.25. It now matches the throw move speed.
- Improved cancel windows when transitioning from throw into abilities to match the timing of standard light attack cancels. (3 frames after throw fragment starts).
- Increased damage from 95% to 100%.
- Removed the stamina cost of throws.
- Increased the speed of the thrown projectile.
- Passives
- Critical Throws
- All throws can now perform critical hits by default, meaning this passive is no longer required.
- This now grants a 5% critical hit chance on all melee attacks, and 10% critical hit chance on all ranged attacks.
- On Fire
- No longer requires Critical Throw to unlock.
- Rejuvenating Crits
- No longer requires Critical Throw to unlock.
- Exploitation
- Reduced passive damage bonus from 15% to 10%.
- “Boot and Rally” renamed to “Hurling Force”
- Reworked to increase damage of all throws based on how far away the target is from the player.
- Deals up to a max of 20% damage at 20 meters and beyond.
- Persistent Hindrance
- Reduced debuff extension time from 30% to 20%
- Updated to also deal 3% additional damage per debuff on the target, up to a max of four debuffs.
- Adrenaline Rush
- Now triggers off a hit with an ability instead of on ability activation.
- Accumulated Power
- Power reduced from 30% to 20% but now also triggers off throws.
- Relentless Fury
- Reduced power from 30% to 10% but increased duration of the effect from 3s to 5s.
- Critical Throws
- General
- Changed a hatchet skill perk to “Refreshing” and removed the Gem Slot from the Quest Reward Lightstorm’s Protector.
- Empowering Rending Throw: Ranged hatchet attacks now deals more damage vs Rending Throw targets:
- On armor: 10% to 21% based on Gear Score.
- On weapon: 10% to 31% based on Gear Score.
- Vorpal Distancing Throw: Renamed to Refreshing Distance Throw and now reduces cooldown if you’re within 6m of your target. Cooldown reduced:
- On armor: 10% to 30% based on Gear Score.
- On weapon: 10% to 49% based on Gear Score.
- Mending Infected Throw: Now triggers when a target with Infected throw dies and heals for:
- On armor: 10% to 21% max health based on Gear Score.
- On weapon: 10% to 31% max health based on Gear Score.
- Energizing Feral Rush: Renamed to Crippling Feral Rush. Can now cause slow for 3s on hit:
- On armor: 10% to 20% chance based on Gear Score.
- On weapon: 10% to 30% chance based on Gear Score.
- Refreshing Torrent: Recharge increased while on a hatchet.
- On armor: 1% to 4.8% based on Gear Score.
- On weapon: 1% to 8.5%. based on Gear Score.
- Keen Berserk: Now has increased critical chance while on a hatchet:
- On armor: 1% to 14% based on Gear Score.
- On weapon: 1% to 27% based on Gear Score.
Update 1.7 “Brimstone Sands”
- Fixed an issue with sheathed weapons activating their gem visual effects in certain situations (e.g. when throwing a hatchet or spear).
- Fixed an issue that caused the Hatchet’s Rejuvenating Crits passive to not trigger on headshots.
- Separated the Infected Throw Disease and Weaken status effects into two different effects.
- Aerial Transmission: Weaken and Disease debuffs now persist correctly on affected targets when disease cloud disappears.
- Fixed an issue that caused Hatchets to not naturally roll the Vorpal Perk.
- Refreshing Distancing Throw: Fixed an issue that caused the Perk to reduce the cooldown of all Hatchet abilities instead of just Social Distancing.
- Fixed the missing textures for the Hatchet “Blood and Flesh”.
You can find the full patch notes for New World Update 1.7 “Brimstone Sands” in our New World Patches archives.
Update 1.8 “Winter Convergence Festival 2022”
- Added clarity to the Hatchet Feral Rush tooltip to indicate which attack staggers.
- Added clarity to the Hatchet’s Persistent Hindrance ability description.
- Fixed an issue that allowed Defy Death to trigger while down.
- Fixed an issue that caused Hatchet Aimed Throw animations to deform the player’s face.
- Updated Rending Throw to not interrupt player movement during the throw. Adjusted some timing of the attack and cancel windows to better fit with the new functionality.
- Updated Social Distancing to not interrupt player movement during the throw, if the player is moving forward/sideways, but if they are strafing backwards or standing idle, they will perform the backwards dodge.
- Adjusted the timing of the attack and cancel windows to better fit with the new functionality while moving. Removed the Stagger from Social Distancing to compensate for the added versatility and ensure the ability remains mainly focused on zoning. Also increased the damage from 100% to 115% weapon damage and increased the Slow from 25% to 30%.
You can find the full patch notes for New World Update 1.8 “Winter Convergence Festival 2022” in our New World Patches archives.
Update 1.9 “Season 1: Fellowship and Fire”
- Ability Updates
- Feral Rush’s first attack damage reduced from 115% to 80%.
- Reduced invincibility of Defy Death Ultimate to 0.5s. Changed health gain from 50% of Max HP to 50% of Base HP (Health value before it is modified by CON or any other bonuses)
- Fixed an issue where Heartgem abilities would ignore the Defy Death Hatchet Ability.
- Changed activation condition of Fortifying Strikes from three consecutive light attacks to one heavy attack.
- Changed activation condition of Enraged Strikes from all basic attacks to both Heavy attacks and Abilities.
- Updated Berserking Refresh Upgrade to be 5% Life Steal while Berserk is active instead of granting a flat amount of HP while active.
- Set up a cap of 5 activations per attack for cooldown reduction of Desperate Refresh, to match similar passives for other weapons.
- Notable Fixes
- Fixed an issue where the Relentless Fury and Accumulated Power passive durations could not be extended.
- Fixed an issue where the Relentless Fury and Accumulated Power passive damage bonuses from the Empower would not be applied to non-slash damage.
- Fixed an issue where the Desperate Refresh passive was not working with thrown Hatchets.
- Fixed an animation issue when pressing prone or crouch at the same time as Aim Throw.
- Fixed an issue where the Critical Throw passive for the Hatchet did not differentiate between melee and ranged throws.
- Fixed an issue where the Hatchet ability Infected Throw’s upgrade, Mortal Power didn’t properly portray the upgrade’s extended duration.
You can find the full patch notes for New World Update 1.9 “Season 1: Fellowship and Fire” in our New World Patches archives.
Here at VULKK.com we have a ton of useful New World Guides and more and more are being published regularly. We also have all of the news and updates covered to keep you up-to-date with all things New World!
In-Depth New World Weapons Guides and Best Builds
Each one of the guides below is dedicated to one of the weapons available in New World and goes very in-depth from initial overview of each individual ability and passives all the way to the best builds you can use while leveling or in the EndGame.
New World SWORD and SHIELD Weapon Guide and Best Builds
Want to learn how to slice and bash your enemies in New World? This guide is an in-depth dive to all things Sword and Shield in Amazon's MMO!
New World RAPIER Weapon Guide and Best Builds
Want to learn how to carve your enemies to pieces in New World? An in-depth guide for all things Rapier - abilities, rotations, best builds!
New World FIRE STAFF Weapon Guide and Best Builds
Want to learn how to turn your enemies to smoldering piles of ash in New World? This guide is in-depth dive into all things Fire Staff weapon
New World WAR HAMMER Weapon Guide and Best Builds
Want to learn how to proficiently pummel your enemies in New World? This guide is an in-depth dive to all things War Hammer in Amazon's MMO!
New World LIFE STAFF Weapon Guide and Best Builds
Want to learn how to utilize the power of light in New World? This guide is an in-depth dive into all things Life Staff in Amazon’s MMORPG!
New World GREAT AXE Weapon Guide and Best Builds
Want to learn how to cleave your enemies in two in New World? This guide is an in-depth dive into all things Great Axe in Amazon’s MMORPG!
New World SPEAR Weapon Guide and Best Builds
Want to learn how to perfectly puncture your foes in New World? This guide is an in-depth dive into all things Spear in Amazon’s MMO!

New World ICE GAUNTLET Weapon Guide and Best Builds
Want to learn how to freeze your foes in New World? This guide is an in-depth dive into all things Ice Gauntlet in Amazon’s MMO!

New World BOW Weapon Guide and Best Builds
Want to learn how to pierce your targets with arrows in New World? This guide is an in-depth dive into all things BOW in Amazon’s MMORPG!