Want to learn how to slice and bash your enemies in New World? This guide is an in-depth dive to all things Sword and Shield in Amazon’s MMO!
This guide dives deep into the Skills, Passives, and some of the best builds for the Sword and Shield in New World. This guide can be considered a more advanced version of our New World Guide to Weapons for Beginners. By the end of this guide, you should have a thorough understanding of the Sword and Shield and with practice be able to fully master it.
The Guide is up-to-date for Patch 1.9.2
At the end of the guide you will find a section that lists all changes to this weapon that AGS has implemented as they maintain and support the game in the long term.
Table of contents
Sword and Shield Overview
The Sword and Shield are a pair of flexible weapons that offer a good mix of offense and defense. The Sword and Shield are very easily to make just about any combination of skills work. It has the tools for most any encounter, it’s hard to make this weapon not-viable.
The Sword and Shield is primarily played in a more defensive oriented Tank play style. Between plenty of cleave damage, crowd control and defensive buffs, the Sword and Shield end up being a very well rounded weapon overall.
If you choose to focus on Sword Skills, the Sword and Shield can be an effective DPS as well. You end up sacrificing the utility of at least one Shield skill, and gain a second damage skill usually.
Sword and Shield Skills, Passives, and Perks
First we’ll lead off with the skills and passives. We’ll talk a bit about each, their uses and how effective they are. There’s a lot to cover here, so we’ll break it down per tree to keep things organized.
Alongside the general information, They’ll be given a Rating from C up to S tier for both PvE and PvP. C tier is exclusively for the passives that are not that great, either being forced by another upgrade or generally useless. A and B Tiers are middling tiers, putting them between the worst passives and the best, leaning one way or the other. S tier are the good passives, the ones you’re almost always going for if you pick up a skill or want to because it’s useful in many scenarios.
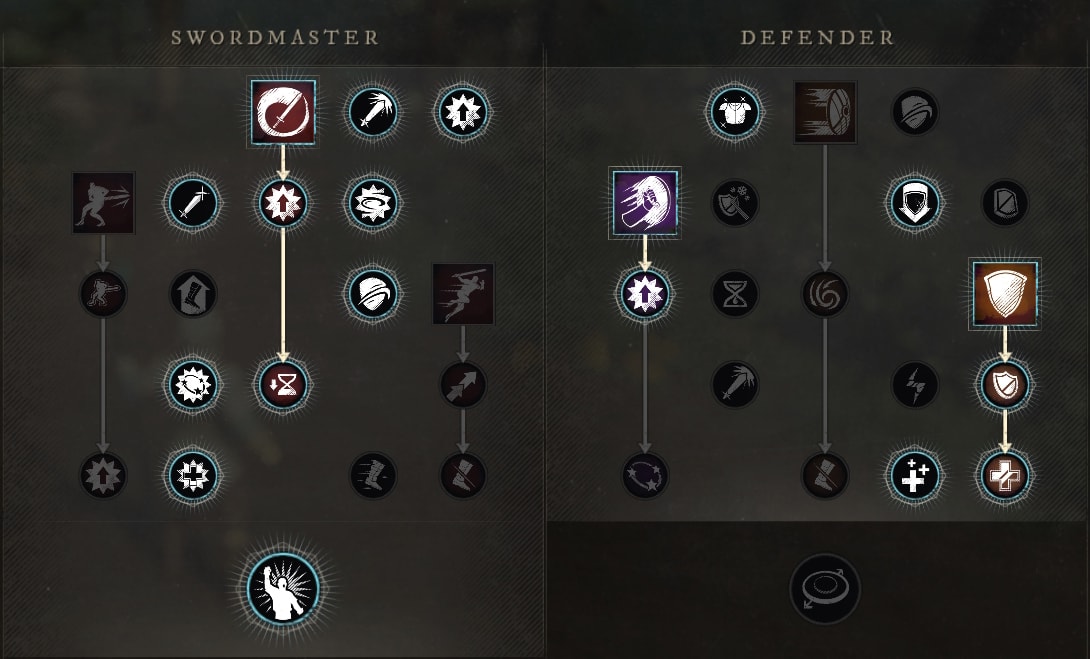
The Swordmaster Tree
The Swordmaster Tree is where all of our main damage options are. The Active skills for the Swordmaster Tree are Whirling Blade, Reverse Stab and Leaping Strike. Let’s cover these skills and their upgrades, then talk about the general passives available on this side of the tree.
 Whirling Blade
Whirling Blade swings your sword in a full circle, dealing 145% Weapon Damage to all foes within 2m.
This skill is generally valuable, thanks to its quick animation, damage and AoE making it a versatile skill.
With a cooldown of 15 Seconds, Whirling Blade is the shortest cooldown for the Sword and Shield.
Whirling Blade Rating: S – PvE, A+ – PvP
Whirling Blade’s damage ratio and AoE make it highly useful in PvE. It’s always going to be a highly used and worthwhile skill overall.
The quick animation helps it excel in PvP as well. Since it comes out fast, it’s harder to avoid without any setup.
Opportunity
Opportunity allows Whirling Blade to apply a 5% Rend for ten seconds.
This is a good effect, but it’s very weak for what it is and could be a bit stronger. It has a high uptime, which is what allows it to be worth picking up.
Opportunity Rating: A – PvE and PvP
It may be a weak Rend, but it’s easy to apply and can be applied to groups making to still pretty valuable. The fact that it’s a long duration with a relatively high uptime helps it quite a bit for PvP
Tactical Strike
Tactical Strike reduces Whirling Blade’s cooldown by 10% for each enemy it hits.
This lets the Sword quickly and easily deal a lot of AoE damage when against multiple enemies, which makes it good for PvE. It also gives more uptime to Opportunity, allowing it to have 100% uptime in some situations.
Tactical Strike Rating: S – PvE, A – PvP
Since Sword and Shield is mainly a tank, and this tends to be the damage skill of choice, this get a very high rating for PvE. The likelihood of not hitting multiple enemies is pretty low.
It’s a bit weaker in most PvP situations, typically only grant 10% cooldown reduction. However, this can still be enough to make a difference more often than not.
Reverse Stab
Reverse Stab is a powerful stab attack that deals 175% Weapon Damage.
The longer animation of this skill makes it harder to use in PvP, but can be a strong follow up to Shield Bash.
With a Cooldown of 20 seconds, Reverse Stab isn’t up all too often. With the amount of damage it can deal, this is a fair trade off.
Reverse Stab Rating: A+ – PvE (S in Solo play), A – PvP
Reverse Stab is the hardest-hitting skill for the Sword and Shield. Generally in PvE this would be welcomed. However when Tanking, it’s highly recommended to use Whirling Blade due to the AoE. As a tank, it also loses a bit of value with it’s final passive bit a bit weaker overall, due to only affect this skill itself.
In PvP, it’s fantastic follow up to any hard crowd control effect. Lock someone in place using something similar to the above mentioned Shield Bash, get behind them and hit them with this and it’ll hit like a truck.
Unstoppable Stab
Unstoppable Stab adds Grit to Reverse Stab, making it difficult to interrupt.
This is very nice, because missing this attack leaves you pretty vulnerable for awhile. This reduces this by at least letting you shrug off staggers from skill hits.
Unstoppable Grit Rating: A+ PvE and PvP
Staggers are fairly common in both PvE and PvP, so being able to ignore them and return damage can be pretty valuable.
Tactician
Tactician reduces all Sword cooldowns by 25%. This effect will also apply to Reverse Stab. Max of instance of cooldown reduction per use.
25% cooldown reduction is pretty good, especially with Sword and Shield having some of the longer cooldowns in the game.
Tactician Rating: S – PvE and PvP
It’s pretty good overall for PvE, as for most open world content or even content you play as a DPS, you’d be reducing at least two skills. If it affects Defender’s Resolve, or your main tanking cooldown, then it’s super valuable as it’d end up knocking off a large part of the longest cooldown in the game.
In PvP since this tends to be used in combination with Shield Bash, having access to that combo more often is great. Even if not, Reverse Stab is likely your only heavy damage skill and having it up more often is always good.
Leaping Strike
Leaping Strike has you leap forward six meters and slice downwards for 100% Weapon Damage, staggering the target.
While this skill would seem good on paper, it’s not the greatest option for Sword and Shield for really any content. The Upgrades can help a ton, but only really give it a bit of utility
With a cooldown of 18 seconds, it’s one of the Sword’s shorter offensive cooldowns.
Leaping Strike Rating: B – PvE and PvP (A when fully upgraded)
Leaping Strike by itself is pretty lackluster. It’s a short range to where you’d almost have to be on top of someone to land the hit. When upgraded it deals okay damage but the extra utility it gains in the form of a weak slow is questionable.
Final Strike
With Final Strike, Leaping Strike deals 50% more damage to enemies below 30% health.
This is the only upgrade worth taking if you use this skill. Though the damage boost will mostly only apply to stronger enemies and in PvP.
Final Strike Rating: B+ – PvE and PvP
The extra damage is very nice making it almost rival Reverse Stab for a damage option. However since it’s a threshold bonus and a very low threshold at that, it’s not going manage a high rank.
Cowardly Punishment
With Cowardly Punishment, you apply a 30% slow for 3 seconds when Leaping Strike hits an enemy in the back.
Since this setups Opportunist, this can be a very nice upgrade, though the skill itself is pretty niche. It’s also one of the strongest Slows in the game.
Cowardly Punishment Rating: B – PvE, A – PvP
While this does setup Opportunist, it will only do so for a short time. While this can have some use, it’s particularly limited. Opportunist is the only thing that really helps this to be viable in PvE.
In PvP however, this is a pretty impactful Slow, provided it doesn’t get cleansed. This gives you a good boost in sticking power and makes you harder to kite.
Sword Master Passives
Precision
Precision increases your Critical Strike Chance by 10%.
Overall, this is very beneficial to not only tanking but also setting up Critical Precision to work better and more reliably.
Precision Rating: S – PvE and PvP
Being able to crit more often will always be valuable, especially in PvE. Considering Critical Precision exists, and is both a decently long Haste for a moderate value, it becomes insanely valuable for PvP since the Sword lacks a lot of sticking power without it.
Mobility
Mobility allows you to move 33% faster while blocking.
With the changes to allow faster movement while blocking, this becomes a solid upgrade letting you walk at or near normal speed while blocking. Still a niche effect, but useful.
Mobility Rating: B – PvE and PvP
This is rarely ever going to be worth a point in PvE. If you need to reposition, you’re going to just stop blocking for the most part.
In PvP however, it can be useful to block an incoming shot from Bow or musket very quickly without losing as much speed. This would keep you from getting kited as easily, but it’s still a niche application.
Opportunist
Opportunist increases your damage against slowed targets by 10%.
Sword and Shield has multiple ways to apply slow, so this becomes a worthwhile damage boost, regardless of content.
Opportunist Rating: A – PvE and PvP
The only thing holding this back is the requirement of a slow. If it were any debuff, it’d be more broadly useful. Achilles Heel will apply this easily in PvE, but require constant reapplication. Where Shield Rush tends to be the easiest source in PvP.
Confidence
Confidence increases your damage by 15% while at full health.
This is a nice bonus if you have a good healer or Life Staff to help you maintain it. Otherwise, it’s not too great.
Confidence Rating: A – PvE, C+ – PvP
It’s stronger in PvE where you can manage your health more easily on your own if needed, even if it means carrying a Life Staff for Open World content. A Healer is still necessary for Expeditions, but can still work out very well.
In PvP, even with a healer it’s harder to maintain full health outside of a 1v1. If you’re in a 1v1 and are also using Life Staff to heal yourself, it can be pretty good, but outside of that it’s pretty much wasted.
Empowered Stab
Empowered Stabs allows successful Heavy Attacks to grant 30% Empower, increasing damage for five seconds.
This is one of the strongest and easiest to apply Empowers in the game. It’s a little slow, which can make it harder to use in some situations. Combined with the 300 Strength Grit perk, it can be fairly reliable.
Empowered Stab Rating: S – PvE, A+ – PvP
In PvE you should be able to maintain this bonus at nearly 100% uptime. As a tank, this will easily help you deal enough damage to hold aggro without relying on taunts.
In PvP, it can be a little tough to land a Heavy attack, but even a quick heavy attack can apply it with less warning or assistance. It’s very telegraphed still, but not to the same level as a charged heavy attack.
Freeing Justice
Freeing Justice allows Heavy Attacks to cleanse one Debuff from you.
This is one of the best utility passives in the game, which combined with Empowered Stab, making Heavy Attacks very worthwhile to do consistently.
Freeing Justice Rating: S – PvE and PvP
Given this frees you from anything that’s not a Stun or Freeze, there’s little reason to not take this passive. As a PvE tank, being able to cleanse debuffs on yourself instead of relying on a healer to do so is great. Removing Rend and Weaken effects pretty much on demand in PvP makes this highly versatile and useful.
Counter Attack
When you block with Counter Attack, you gain a stack of Empower, granting 3% damage for 5 seconds. Stacks up to 5 times to a max of 15%.
The shorter duration of this bonus makes it harder to use, especially when it relies on you blocking. Empowered Stab just provides much more value.
Counter Attack Rating: A+ – PvE, B – PvP
In PvE , it doesn’t take much to stack or maintain this buff against packs. Thankfully most bosses summon adds, which can help with maintaining this during boss encounters.
This is a very strong passive for Tanks in general, but the short duration makes it harder to both stack and maintain in PvP. This keeps it from being highly rated for PvP. However it’s still worth considering if you’re actively looking for attacks to block, especially in ranged matchups where the Sword and Shield can make the most of their ability to block.
Critical Precision
Critical Precision grants 20% Haste for 5 seconds after a crit.
This is more beneficial in PvP, but can help in PvE if you need to quickly reposition and have crit recently.
Critical Precision Rating: C+ PvE (A for DPS play), A in PvP
As a tank, a crit can be a steep requirement, as you won’t have access to backstabs. So they’ll be unreliable at best. Thanks to Precision they’re not totally unreliable. As a DPS though Backstabs are free and this will help you maintain good positioning.
Crits are pretty uncommon in PvP usually, but Precision helps make them more reliable outside of Shield Bash guaranteeing a Backstab. Since Shield Bash does guarantee a backstab, it’s pretty good overall. It lets you get that free backstab and quickly reposition without expending stamina.
Achilles Heel
Achilles Heel makes every third Light Attack apply a 20% Slow for 2 seconds.
This will be your primary source of activating Opportunist as a Tank, so it’s generally worth taking.
Achilles Heel Rating: A+ – PvE, C+ – PvP
In PvE you’ll be able to reliably and consistently get this third hit off and make use of Opportunist in some way, be it a Heavy Attack or a Skill.
In PvP, since its a loose requirement of just hitting the final attack in the Light Attack Chain, it’s not terrible. However for PvP you have access to both stronger and longer slows to make easier use of Opportunist with.
Leadership (Swordmaster Ultimate)
Leadership increases the damage of all group members by 10%.
This is free damage for you and your party. There’s very little reason to not go for this passive over the Defender Ultimate, short of not having the points to spare.
Leadership Rating: S – PvE and PvP
Compared to the limited range of Defensive Formation, this is the Ultimate to go for. It’s free damage, and while limited to just your group this is rarely ever a bad trade off even in open world content.
The Defender Tree
The Defender Tree is all about the shield as well the crowd control and durability it provides. The Active Skills for the Defender Tree are Shield Rush, Shield Bash and Defender’s Resolve. Let’s cover these skills and their upgrades, then talk about the general passives available on this side of the tree.
Shield Rush
Shield Rush has you charge forward 5 meters, knocking back foes while dealing 100% Weapon Damage. This skill also had Grit, meaning ti cannot be interrupted by Staggers.
Between this and Leaping Strike, this tends to be the more consistent gap closer as it provides meaningful setup potential.
With a cooldown of 20 seconds, it’s in the middle ground for skills. It also means it’s likely to be up more often than Leaping Strike for mobility purposes.
Shield Rush: B – PvE, A – PvP
This skill is often only used to close distance or to easily apply a couple of statuses that help in PvP. That said, it’s fairly reliable and goes slightly further than Leaping Strike. Those statuses come from upgrades.
Improved Rush
With Improved Rush, successful hits with Shield Rush inflict 20% Weaken for 10 seconds in a 5m AoE.
This is a fairly average Weaken, but being able to apply it to a group with a single hit is nice.
Improved Rush Rating: B – PvE, A – PvP
Weaken is unfortunately not super useful in PvE. It can help in Expeditions rarely, but that usually means giving up Whirling Blade as a tank.
In PvP however, especially in large scale where it can apply to a group, this Weaken gets pretty great value. Between the duration and AoE of the Weaken, it can be a valuable tool in PvP.
Intimidating Rush
With Intimidating Rush, successful hits with Shield Rush apply a 30% Slow for 4 seconds.
A 30% Slow can be pretty impactful overall, as it’s one of the stronger slows in the game.
Intimidating Rush Rating: C – PvE (B with Opportunist), A – PvP
In PvE Slows are only good for benefiting from Opportunist. Without it, they have very little actual function against most things you’d be tanking. Since your job is to hold them still, Shield Rush is among one of the last things you’d want to do, but it’s not a very far knockback.
In PvP however, this is a pretty potent slow and very easy to apply in most cases. It helps to make it much harder for your opponents to kite and space out effectively.
Shield Bash
Shield Bash swings your shield in a small arc, hitting enemies in front of you for 50% weapon Damage and stuns them for 2 seconds. This skill has Grit, meaning it cannot be interrupted by Staggers. With a Carnelian Gem, this skill becomes a taunt for 6 seconds on all enemies hit.
By itself it’s a pretty lackluster skill, but after upgrades, it’s your main aggro tool as a tank.
With a Cooldown of 25 seconds, it’s tied for the second-longest Sword and Shield cooldown, matched with Leaping Strike.
Shield Bash Rating: A – PvE and PvP (S when upgraded)
There’s almost no circumstance where you wouldn’t run this skill. It’s a very quick stun, which helps you set up for huge backstab damage in both solo PvE and PvP. It only gets stronger when upgraded.
Intimidating Bash
With Intimidating Bash, Shield Bash generates more Threat and deals 75% Weapon damage.
This upgrade makes the damage of shield bash more reasonable, by making it 75% Weapon Damage instead of 50%.
Intimidating Bash Rating: S – PvE and PvP
If you’re running shield Bash, you’ll always want to run this. It doubles the damage of Shield bash with no extra condition while also increasing the threat generated by the skill in PvE. The extra threat is minor as a Carnelian Gem provides more and make it a taunt.
Concussive Bash
Concussive Bash increases the stun duration of Shield Bash by 1 second, increasing it from 2 seconds to 3 seconds.
Longer stuns are situational and mostly only useful for PvP, but it does have value in solo PvE as well.
Concussive Bash Rating: B – PvE, S – PvP
As the usefulness of a longer stun is only help when solo, it makes no sense to rate this highly. Though it’s not entirely bad as a pickup if you want to kill things just a little faster.
In PvP, this greatly helps you by giving you a larger window to get a backstab attack off. With Reverse Stab and Heavy Attack being long animations, this makes getting backstabs with those damage options more reliable and practically guaranteed.
Defender’s Resolve
Defender’s Resolve reduces incoming damage by 30% for 8 seconds. With a Carnelian Gem, this becomes an 8m Aoe Taunt for 6 seconds.
This is THE defensive cooldown for the Sword and Shield.
With a cooldown of 45 seconds, this is the longest cooldown in the game.
Defender’s Resolve Rating: S – PvE, A – PvP
In PvE this skill let’s you do your job as a tank with little worry. You’ll get to shrug off a huge portion of incoming damage, which makes this ideal to use against large groups where that extra defense is necessary.
In PvP however, the short-ish duration combined with the insanely long cooldown make this great to use when you’re anticipating heavy damage, like a Hatchet rushing you with Berserk or other similar situations. Otherwise, it falls short as your opponent can just choose to not interact with you during this skill and then you have a long wait before it back up.
Final Count Down
Final Count Down increases the damage reduction effect by 20% while above 50% health.
If this works like most other passives do, this makes it grant an extra 6% damage reduction, for a total of 36%. If it’s a flat increase, it’s 50% in which case it’s the strongest damage reduction effect in the game.
Final Count Down: S – PvE, B+ – PvP
This skill is still great for tanking, so making you more durable is always welcomed. Whether the buff is small or large, every bit can matter for Expeditions or other group content.
In PvP however, this extra bit of defense is still nice. Your opponents can still also choose to just not interact with you and reduce the value this has.
Restoration
Restoration restores 15% of your maximum Health when Defender’s Resolve ends.
A solid, scaling heal when your defensive cooldown ends is very beneficial for tanking.
Restoration Rating: A+ PvE, B+ – PvP
The Healing is nice as a Tank, but your healers would still do a much better job. But since it’s a scaling health restore and not a flat one, it does still have pretty good value with it triggering at the end of defensive cooldown which is also a taunt.
In PvP, this passive is very double edged, as it will do one of two things. It will either make your opponent engage with you if you’re already low, trying to either kill you or make the heal at least net neutral. Or if you’re at high Health already, they will totally ignore you in a lot of cases as most damage they deal will be recovered when the skill ends. Either way, its main benefit often comes from using it to quickly heal by canceling the skill early with a weapon swap.
Defender Passives
Sturdy Shield
Sturdy Shield grants 15% increased Physical Armor.
This help your defenses early on, but also falls off later when the amount of armor it provides doesn’t boost your defenses much thanks to diminishing returns.
Sturdy Shield Rating: S – PvE and PvP
Despite it falling off later, since the majority of enemies in the game deal physical damage, this will almost always be worth picking up as a tank. The same also holds true in PvP, with only Magic Weapons or Gem-Melees will deal Elemental damage. At later levels, it can be considered an option, or as a tool for min-maxing.
Elemental Resistance
Elemental Resistance reducing incoming elemental damage by 10%.
Considering this is just damage reduction, on top of being for the defensive stat you’re often the least optimized for, it’s a nice tank pick up.
Elemental Resistance Rating: S – PvE, B+ PvP (A+ in large scale PvP)
While not many enemies deal elemental damage, the ones that do often hit pretty hard and have skills that cover large areas. So the bonus damage reduction this offers is pretty nice for helping to offset that.
In PvP since elemental damage is limited to Magic weapons and Gem-Melees, this isn’t as strong of a pickup. It is a bit stronger in large scale PvP, where Magic weapons tend to be more common due to their high AoE damage skills.
One with the Shield
While you have One with the Shield, blocking attacks reduce Sword and Shield Cooldowns by 1% per blocked attack.
This is pretty much PvE and maybe large-scale PvP exclusive, as blocking generally isn’t too viable in most PvP scenarios, nor is the small value worth taking.
One with the Shield Rating: C – PvE and PvP
Even in situations where it can be used, the low refresh of 1% can be gotten much easier through Perks than being forced to block for it. It’s incredibly niche, and just doesn’t hold up in the niche situations it could be useful.
Final Blow
Final Blow increases the final hit of the Light Attack chain to deal 15% more damage and generate more threat.
As a tank, this passive helps you hold aggro with less ability usage.
Final Blow Rating: S – PvE (C as a DPS), C – PvP
This passive will be a key part of your tanking strategies. It’ll most often be combined or alternated with activating Empowered Stab to deal both high damage and generate higher threat.
In PvP, this is next to useless as getting that third Light Attack off on an opponent will be a rarity outside of large Scale PvP, even then there are better options.
Sturdy Grip
Stamina Damage is reduced by 15% when blocking Melee attacks with a shield.
As the majority of enemies you’ll face are melee, this is a worthwhile pickup.
Sturdy Grip Rating: S – PvE and PvP
This can be harder to pass up in PvE, where blocking is useful and the majority of enemies tend to be melee until much later stages of the game. It applies to a high amount of enemies and makes your block less likely to be accidentally broken.
In PvP, it can be very helpful. Since Blocking with a shield can prevent a lot of crowd control effects from skills, this keeps a lot of harder hitting melee skills with those hard crowd control effects from breaking your block and punishing you even harder. If you want to incorporate blocking more into your PvP, this is worth picking up.
Defensive Training
Defensive Training grants a 20% Fortify effect for 5 seconds after blocking an attack.
This can make blocking a little more valuable in PvP, especially paired with Counter Attack from the Swordmaster Tree.
Defensive Training Rating: A – PvE and PvP
In PvE there’s both longer and better Fortify effects out there. It’s still insanely helpful though, as you may not also be able to trigger those due to cooldowns, and this is a nice bonus to have considering you should be blocking often enough to have relatively high uptime on this buff.
Paired with Counter Attack, this makes blocking a bit more of a viable strategy for PvP. One block and you get both an incredibly long Empower and a short Fortify effect. This encourages a pattern of blocking then following up with your own damage.
Invigorating Bulwark
Invigorating Bulwark grants 15 Stamina after a successful Shield Bash or Shield Rush.
This is a fairly nice bonus, which lends a bit of bonus tanking power through the stamina recovery it provides.
Invigorating Bulwark Rating: A – PvE and PvP
The Stamina recovery is a nice option for those just learning to tank, or in situations where getting that extra bit of stamina between heavier attacks can let you block a follow up attack. If there’s many targets nearby when you Shield Bash, it can restore quite a bit of Stamina leading to be able to block more frequently.
In PvP, it can be a niche way to keep yourself from running out of Stamina, given most PvP combos with Sword and Shield will use one or both shield attack skills. However, despite this, it’s still fairly niche and best used in PvE.
Recuperation
Recuperation increases the effects of all incoming healing and regeneration by 10%.
Regardless of how you play Sword and Shield, this will always be decently valuable.
Recuperation Rating: A+ – PvE and PvP
While it’s a strong effect, Sword doesn’t have a ton of healing itself. If you pair it with a Life Staff, or are just grouped with a healer this makes it easier to stay alive.
High Grip
High Grip reduces Stamina Damage by 15% when blocking ranged attacks with a shield.
This is Sturdy Grip’s ranged counterpart. I really don’t understand the design decision to separate the two other than to be a waste of points.
High Grip Rating: C – PvE and PvP
There’s honestly not much reason to take this ever. PvE currently lacks enough ranged enemies to make this worthwhile. Meanwhile ranged weapons are generally less common in most PvP scenarios.
Defensive Formation (Defender Ultimate)
Defensive formation grants 30% Damage reduction to all allies within 2m while blocking. This effect has a 1 second cooldown.
While this could be a neat thing to mess with in high level War strategies perhaps, overall it’s incredibly niche and borderline useless.
Defensive Formation Rating: C – PvE and PvP
Between the short range and the 1 second cooldown before it can reactivate again, I don’t see this being used often at all. It’s best use cases are all very niche, and also cases where Leadership provides more value. If it were not for the small range and cooldown, this could actually be insanely good for Expeditions or Field Boss or Elite Farming groups, as these enemies have AoE attacks and this could save an ally’s life in rare cases.
Sword and Shield Perks
The Sword and Shield have an interesting set of perks available. It’s worth noting that perks for Swordmaster Skills are found on Swords and Armor, while Defender Skill Perks are found on Shields and Armor. Since both parts of the weapon combo count as Weapons, you can stack a lot of really good perks between them.
For the skill perks that list a range for values, these are the minimum and maximum values based on Gear Score. The minimum is at or around 200, while the maximum is at 600.
 Contagious Reverse Stab
 Contagious Reverse Stab
Contagious Reverse Stab will make a successful hit with Reverse Stab transfer an active Debuff on you to your enemy. Additionally it increases the damage of Reverse Stab. On Weapons, it will increase Reverse Stab’s damage by 9.9-15%. On Armor, it increases Reverse Stab’s damage by 5-10%
While the debuff transfer is pretty niche, the perk can be generally useful when using Reverse Stab for the extra damage.
Contagious Reverse Stab Rating: B – PvE, A – PvP
Since most enemies in PvE don’t really debuff you too often outside of Disease or a DoT effect, this has very low value. You still get the damage but it’s not a lot, or really enough to consider it for a perk slot.
In PvP, using Reverse Stab alongside Shield Bash can be a great way to turn an opponent’s freshly applied debuff on them. In a lot of cases, even some DoTs can be valuable to transfer, as the Sword doesn’t have much damage on it’s own. But it can more potently be used to turn a debuff like a Rend or Weaken against your enemy if done right.
Empowering Whirling Blade
 Empowering Whirling Blade
Empowering Whirling Blades increases the base damage of Whirling Blade if 3 or more enemies are within the attack’s radius. On Weapons the damage is increased by 29-49%. On Armor, the damage is increased by 10-30% instead
This is one of the best perks to pick up as a tank. With Whirling Blade being your main AoE tool, this helps a lot with holding pack aggro.
Empowering Whirling Blade Rating: S – PvE, C+ – PvP
This is a must-have for anyone tanking with Sword and Shield. The value it provides when holding the aggro of a group of enemies is great to have. Even as a DPS, this lets you deal more damage to groups of enemies which is where the Sword generally excels.
For PvP, it’s mostly limited to large scale PvP. Even in those situations, it may be tough to consistently get 3 or more enemies caught in Whirling Blade.
Empowering Leaping Strike
Empowering Leaping Strike increases damage dealt to enemies affected by Leaping Strike’s Cowardly Punishment upgrade. On Weapons, sword attacks will deal 17-31% increased damage when the target is affected by Cowardly Punishment. On Armor, sword attacks will deal 3-17% increased damage when the target is affected by Cowardly Punishment instead.
With Cowardly Punishment lasting 8 seconds, this is a very nice utility boost for PvP.
Empowering Leaping Strike Rating: C – PvE (S as a DPS), S – PvP
It’ll be very rare to be able to use Cowardly Punishment in PvE, it’s next to useless there. You can make it work with Shield bash Setup though. When playing a more damage focused role, this becomes a very nice damage boost overall, especially when on your Sword.
PvP is where this can shine the most, assuming you’re running Leaping Strike. Using the same Shield Bash setup, you’ve made it easier to kill your enemy. If you manage to get this off, followed by Shield Bash and then a Damage skill as a back stab, this gets very high value.
Accelerated Resolve
Accelerated Resolve grants a movement speed and incoming healing buff for 6 seconds after using Defender’s Resolve. On Shields, this increases movement speed by 19-33% and healing by 7.5-13%. On Armor, this grants 5-19% Movement Speed and 2-7.7% increased healing.
This almost gives the Sword and Shield its own weaker version of Berserk. The only complaint here is that it doesn’t last the full duration of the skill and already loses roughly a second to the animation for the skill. The increased healing is a very nice effect in general, though a bit weak.
Accelerated Resolve Rating: C+ – PvE, A – PvP
The Haste effect is generally unnecessary in PvE as most enemies will be coming to you after using Defender’s Resolve. The Increased healing helps a bit, but not enough to really rate it higher.
In PvP however, where people may often try to kite you out after using Defender’s Resolve, this is a nice way to prevent them from being able to do so. It’s on par with a lot of other Haste effects at the low end, and one of the strongest Hastes available at the high end. The additional healing allows you to be an effective frontline when supported well.
Fortifying Shield Rush
 Fortifying Shield Rush Grants a Fortify effect for 6 seconds on a successful hit with Shield Rush. On Shields, this grants a 19-33% Fortify. On Armor, this grants a 5-19% Fortify instead.
This is a relatively easy-to-trigger Fortify effect. While at the low end it’s not a particularly strong effect, at the high end it’s on par or better than most fortify effects.
Fortifying Shield Rush: C+ – PvE, A – PvP
In PvE, even as a DPS, using Shield Rush generally means knocking most enemies out of your range. It’s a decent effect if you’re already using Shield Rush, but doesn’t make Shield Rush a particularly strong skill.
In PvP it has a bit more value, as any retaliation from an enemy will deal less damage. Being as powerful as a Fortify this is, it allows for ou to be much more aggressive with Shield Rush.
Diminishing Shield Bash
Diminishing Shield Bash reduces the duration of non-consumable buffs on opponents hit by Shield Bash. On Shields, this reduces buff durations by 30-45%. On Armor, this reduces buff duration by 15-30%
Diminishing Shield Bash has a lot of potential to be very powerful in PvP, but is a much weaker effect in PvE. There are some bosses that have buffs that will be huge to reduce, but outside of that it’s not going to be practical in PvE.
Diminishing Shield Bash Rating: C – PvE, A – PvP
In PvE, the actual uses of this are limited, as not many enemies actually buff themselves. Though it may have some niche application, it’s not worth taking for PvE specifically.
In PvP, this has a huge amount of power, reducing enemy buffs by up to half of their duration. Shield Bash tends to be a pretty common PvP skill, especially in small-scale.
Sword and Shield Builds
These builds focus specifically on the Sword and Shield, they do not account for other weapons. The use of other weapons can enable extended combos and other unique combinations.
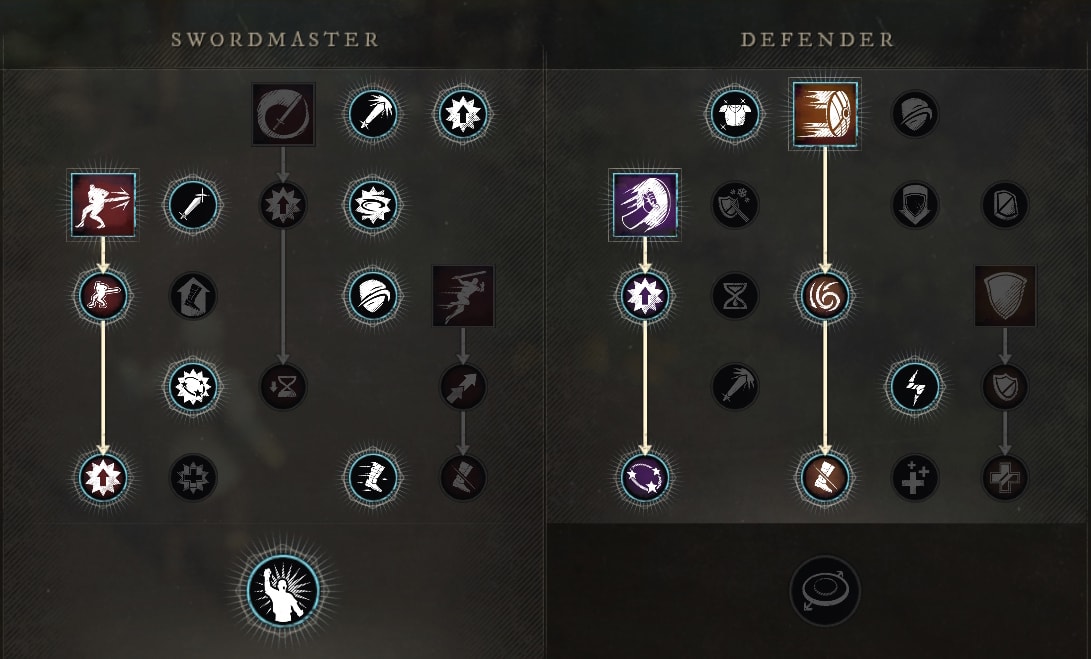
Tank Build
This is a fairly standard Sword and Shield Build that focuses on dealing great damage to solo with, while also being able to handle both PvP and Expeditions. It uses the Whirling Blade, Shield Bash, and Defender’s Resolve skills.
While the leveling direction is mostly static, you can adjust the order in which you grab certain passives, taking ones that have immediate value first or saving the more risky choices for last.
For leveling priority, we want to grab all three skills starting with Whirling Blade, which costs us 4 points. Following this, we take Counter Attack along with Whirling Blade’s Upgrades. Then we grab Shield Bash upgrade. At this point, we’ve allocated 8 points.
The order I found to work the best and be the most consistent for the remaining passives was as follows. Grab Empowered Stab, followed by Precision and Confidence. This gives us a pretty solid damage boost to helps us power through mobs. Finally we grab Achilles Heel, Opportunist, Freeing Justice, then cap off with Leadership for the first 15 points.
We opt to not upgrade Defenser’s Resolve early on as the base effect is more than enough to help in the situations it’d be used. We definitely want to go for Leadership, as it’s the more consistent and broadly applicable Ultimate, despite being a Tank.
The key things we pick up as we finish leveling here are the Defender’s Resolve Upgrades, Recuperation and Defensive Training. Playing a Tank Role in PvE, there’s no reason to not max Defender’s Resolve. It also makes it a much stronger option for PvP by maxing it as well.
We take Recuperation after these upgrades so we have a self heal that we can benefit from outside of consumables. It’ll also make it significantly easier to be healed by a healer.
Finally we grab Defensive Training. This one was a bit of a toss up, but I feel the Fortify effect is more valuable, especially in Open World or PvP compared to Sturdy Grip. Sturdy Grip will ultimately be more reliable in Group PvE for Tanking, but this tree is meant to balance the Solo PvE and PvP in it as well.
Skill Perks, Usage, and Rotations
Like many Leveling Trees, this build doesn’t really feature any complicated skill usages or rotations making it easier to use.
Whirling Blade is your main offensive aggro holding skill in PvE. The AoE and decent damage ratio make it an excellent tool for this purpose. This should almost always be used on cooldown. The two situations where it shouldn’t be used as it comes off cooldown are when a boss is about to spawn minions or when a boss is about to use a heavy attack. In these cases, Defender’s Resolve or Shield Bash are more appropriate to use.
In PvP, it will primarily be used as a follow up to Shield Bash for extra damage. When doing so, the highest potential damage you can get is a Full Heavy Attack followed immediately by Whirling Blade. It doesn’t always have to be saved for this purpose, especially in large scale PvP where the potential cooldown reduction is much higher and able to be used more often.
Shield Bash is best used on cooldown to keep aggro of a boss in PvE. The only time it shouldn’t be used on cooldown is if a predictable and interruptible attack is about to happen. It can also be used when Defender’s Resolve’s Taunt is about to end as well. Since the attack can hit everything in an arc in front of you, it can reapply a taunt to everything in front of you.
Defender’s Resolve is best used when expecting a Heavy hit, or tanking several smaller mobs. The defensive power it offers lets you survive most any heavy attack and longer series of weaker attacks. One if it’s best uses is to pull aggro of recently spawned adds during boss fights, as they’ll not all typically be in Shield Bash Range at first.
For Armor Perks; Empowering Whirling Blade, Refreshing, and Refreshing Ward are excellent pickups for these perk slots. These all help your damage and cooldowns considerably against groups of enemies. The ward perks like Angry Earth Ward, Ancient Ward, and Corrupted Ward are all great pickups as well for tanking. Resilient should be a strong consideration for PvP, as Sword and Shield are rather immobile, making stuns and such easier to set up on you.
On your Weapons, Enchanted and Refreshing Move are must haves for PvE Tanking. You can even opt for a Bane mod like Ancient Bane based on what content you’re doing to get the most damage out. The Chain Element Perks are also nice for holding aggro over a group as they’ll add extra damage that spreads between enemies. These can also be matched based on the faction you’re fighting for a solid damage boost. Keen also remains a strong option if you want to crit more often in PvE and is highly recommended for PvP.
For gems, You’ll always want a Carnelian in your weapon for PvE, the extra aggro generation is necessary for tanking. For your Armor, any damage reduction gems will generally work. When upgrading to Runeglass Gems, Punishing is generally the best option for all slots.
For your Shield, Keenly Empowered is a solid pickup in general, but is better slotted on armor. For PvE, Sturdy and Keenly Jagged are good general options. The offensive options are much more reliable in PvE, compared to the defensive options. In PvP, It’d be highly recommended to pick up Slash Shield Ward, Thrust Shield Ward and Fire Shield Ward. This combination of three perks gives you good defensive coverage against at least 8 different weapons, excluding the War Hammer, Life Staff and Shield skills of Sword and Shield.
For your Amulet, Slash Protection covers most PvP incoming damage. Fortified Recovery can give you a nice fortify bonus if you start dipping into lower health. Divine can be a great pickup for PvE or PvP which enables you to be healed easier by a healer.
For your Earring, Regenerating is an excellent option for all the health you’ll have. Despised can help you hold aggro in PvE, Where Nimble can make it easier to block more attacks when needed. Empowered and Crippling can both be extremely beneficial for more damage, as Empower effects and Slows both boost your damage.
For Rings, Slash Damage or Keen Awareness are always great options thanks to the damage they provide. Leeching can be a nice way to keep your own health topped off.
Maximum Taunt Combo
- Shield Bash
- Whirling Blade
- Light Attacks
- Defender’s Resolve
- Light Attacks
- Shield Bash
- Whirling Blade
 Light Attacks
You open with Shield Bash as it’s the Shorter cooldown and taunts for 6 seconds. This is immediately followed by Whirling Blade for the damage and one proc of Refreshing Move. Then you use Light Attacks to proc Refreshing Move another 6-7 times before the taunt Ends. You use Defender’s Resolve to continue the taunt and guarantee 12 seconds of taunt. You use more Light Attacks until Shield Bash comes off cooldown and use it immediately.
For tanking, whether it’s a single target or a few small targets, this is your bread-and-butter combo. With the right Perks, you’ll keep the aggro of enemies directly in front of you, to you and only you for a guaranteed 12 seconds minimum.
For it to be a nearly endless taunt without interruption, it requires Refreshing Move and Refreshing to be applied at their maximum values, which requires Gear Score 625 which barely makes the cooldown low enough. This also makes it so Defender’s Resolve will also be ready or nearly ready by the time this taunt ends. However, this is just in a perfect hypothetical scenario. For this to actually work seamlessly and with less risk, you’d also need to get One with the Shield instead of Defensive Training to block the incoming damage.
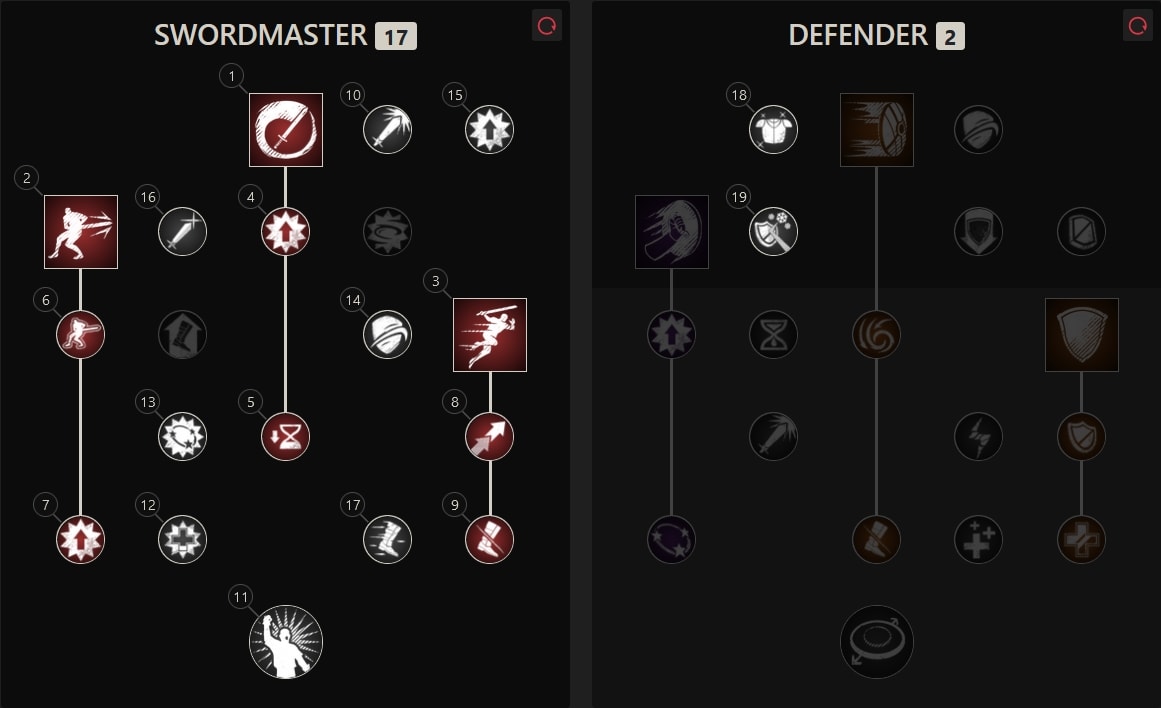
The Backstabber Build (19 Points)
This is a build aimed more specifically at PvP and utilizes the Sword and Shield’s strongest combo. It uses Reverse Stab, Shield Bash and Shield Rush for its active skills.
These three skills provide strong setup for a pretty reliable combo, as each skill will chain into the next. We’ll talk about that in the Rotations section.
For leveling this tree, we’re going to start by grabbing the skills first (which includes Empowered Stab passive), which costs 4 points. Then we max Shield Bash, including the necessary Invigorating Bulwark pickup to access the last upgrade. This is immediately followed by Shield Rush’s Upgrades. Finally, we upgrade Reverse Stab, picking up Opportunist along the way.
For the rest of the passives, we pick up Precision next, followed by Achilles Heel. Achilles Heel could be swapped for Confidence, if you want a stronger opening combo if you can get in range without taking damage. Precision is overall good, because crit chance only increases your effective damage.
Counter Attack is up next for the damage boost which can make regular blocking much more worth doing, or at least provides extra damage when blocking CC. Freeing Justice and Critical Precision can both be taken whenever, to enable access to Leadership and provide useful utility. Sturdy Shield can also be picked up at any point during the way to Level 20 for your Sword and Shield, but typically best saved for last where it grants the most effect since you’ll be a higher level, while also not delaying Leadership until the end.
Skill Perks, Usage, and Rotation
This particular build is made to punish with an extremely powerful combo that results in heavy damage. This is also a true combo, meaning that once you land the first part of it, the following parts are guaranteed.
Reverse Stab is saved and used exclusively after Shield Bash for maximum Damage. Since it’s also the last part of the combo, depending on how the Tactician upgrade applies, it could result in the full combo being up much more often. This means Tactician would reduce Reverse Stab and Shield Rush by 5 seconds, while reducing Shield Bash by 6.25 seconds. This leaves the cooldowns at 15, 15 and 18.75 seconds respectively.
Shield Bash can be used with or without Shield Rush being used prior. In the Combo it will always follow Shield Rush, but in Melee Range there’s a better combo that doesn’t use it. It is the setup skill for Reverse Stab and shouldn’t be used if Reverse Stab is on cooldown.
Shield Rush is primarily a Gap Closer. It’s very short knockback distance also makes it incredibly setup for Shield Bash, usually guaranteeing it when done right. You can use it to get closer, but if you manage to land it, it’s best to have Shield Bash and Reverse Stab available for the combo. With the Upgrades and perks, it’s also an incredibly strong utility skill overall.
For Perks, on our armor we want Refreshing and Fortifying Shield Rush. Refreshing gives us more access to our combo, while Fortifying Shield Rush adds additional Utility to the full Combo. Contagious Reverse Stab can also be a good pick, which also lets our combo turn Rends and other statuses against our opponent. Resilient and Refreshing Evasion can also be fantastic pickups, reducing crit damage and reducing cooldowns a bit after a dodge.
For our Sword, our perks are entirely focused on making the combo as strong as possible. So we take Refreshing Move, Vicious and Rogue. Refreshing Move helps make our other attacks bring our main combo back up faster. Rouge and Vicious serve the same purpose, making Reverse Stab hit like a truck by increasing both means of scaling for Backstabs. Alternatively, Keen and Enchanted both make viable alternatives to Refreshing Move if you want more damage from even basic attacks.
For gems, Malachite is really strong here. This build packs a lot of CC to make good use of this gem. Alternatively, Jasper can be a good option, as taking hits can be likely. When upgrading to Runeglass Gems, Punishing is generally the best option for all slots.
Our Shield should be focused on providing more defense. To that end, we take Slashing Shield Ward and Thrust Shield Ward. This covers all but the Warhammer and Magic Weapons. The last slot can be Nature Shield Ward, as the trend of Amber Gem Melee + Life Staff will likely remain a popular combo for a while. Otherwise, Keenly Jagged can help provide extra damage to our combo.
For your Amulet, Slash Protection covers most PvP incoming damage. Fortified Recovery can give you a nice fortify bonus if you start dipping into lower health. Divine can be a great pickup for PvE which enables you to be healed easier by a healer.
For your Earring, Empowered and Crippling can both be extremely beneficial for DPS, as Empower effects and Slows both boost your damage. Beloved and Evasive can both help you mitigate aggro making you less likely to pull aggro in PvE situations. For PvP Refreshing Toast and Nimble can serve you pretty well too.
For Rings, Slash Damage or Keen Awareness are always great options thanks to the damage they provide. Leeching can be a nice way to keep your own health topped off. You can also consider Bloodletting, which can let you maintain better uptime on the Bleed from Keenly Jagged for more damage if you opt for it.
The Simple Combo
- Shield Rush
- Shield Bash
- Reverse Stab
Shield Rush either connects, giving you a knockback that guarantees you land Shield Bash; OR it puts you in range to land Shield Bash. After Shield Bash, you walk/roll behind your opponent and use Reverse Stab straight into their back.
It’s as simple as that. Though this combo is particular won’t have Reverse Stab hitting the hardest it possibly can, it will however be the most reliable combo for this build. This results in a total of 467% Weapon damage if all hits connect, or 302.5% if Shield Rush doesn’t connect. This is also not factoring for any crits, including the backstab. Add in Counter Attack being active, and this becomes 508% damage if all hits connect, 330% if Shield Rush doesn’t connect.
The Full Combo
- Heavy Attack (does not have to be charged)
- Shield Rush
- Shield Bash
- Reverse Stab
 Heavy Attack (does not have to be charged)
This is the simple combo, with the damage amped up by Empowered Stab. Land one Heavy attack and you have just enough time to do The Simple Combo, as all three skills and the backstab repositioning can be done in less than 5 seconds.
The full combo, including the opening Heavy deals 720-760% Damage varying with which heavy you land. The Skill’s themselves will deal 588% Damage while Empowered. These damage amounts do not account for Crits, including the backstab. In the absolute perfect situation, where you have Counter Attack up as well, This full combo can deal 813-861% Weapon Damage.
The DPS Build
This less traditional Sword and Shield Build goes the way of the Sword and focuses on damage rather than any defensive options. It uses Whirling Blade, Reverse Stab, and Leaping Strike for active skills.
This build is tailored to Expeditions primarily, but could work in Open World content as well with or without a Tank. It uses Sword Master Tree to the fullest, pulling out every bit of damage it can.
For leveling this build, we start by taking all three skills, which only require 3 points. Next We fully upgrade Whirling Blade, followed by Reverse Stab, and then Leaping Strike. So we pick up Empowered Stab for 10 points and grab Leadership next, now that it’s available.
This is then followed by Confidence, Opportunist, and Counter Attack for the damage boosts they provide. We then pick up Achilles Heel, to be able to maintain a slow while chaining Light Attacks. We round out with Precision and Critical Precision for the Swordmaster Tree.
Finally we grab Sturdy Shield and Elemental Resistance to boost our defenses a bit, for the rare situations that we pull aggro in Expeditions or Open World. These defensive bonuses can also be grabbed before Freeing Justice and Critical precision if desired. If you’d rather block these hits, you can opt for Sturdy Grip and High Grip instead.
Skill Perks, Usage and Rotations
Whirling Blade is your AoE damage. It’ll be used more often when fighting packs than any other skill thanks to Tactical Strike. It provides solid damage, especially with previous setup from Achilles Heel.
Leaping Strike will typically be the first skill you use on a boss or large enemy. Assuming you land the back hit, you’re triggering both Opportunist as well as the Empowering Leaping Strike perk, which adds an additional debuff for the 8 second duration of Cowardly Punishment that increases damage.
Reverse Stab will always be your closer in a full rotation of skills, to maximize the damage as well as the benefit of Tactician. It’ll deal significant damage thanks to all the damage bonuses you can have stacked up for it.
For Armor Perks; Refreshing, Empowering Leaping Strike and Empowering Whirling Blade are all must haves. Empowering Leaping will heavily boost your single target damage, while Empowering Whirling Blade does the same for AoE. Refreshing just makes it so your skills are up a little more often.
For you Sword, there’s no better perks than Refreshing Move, Rogue and Vicious. Rogue and Vicious increase your damage heavily, as you’ll almost always be dishing out backstabs. Refreshing Move helps a great deal with getting more skill rotations out, which make up a good chunk of your damage. Alternatively, you can replace Refreshing Move with Enchanted and get plenty of damage that way as well.
For Gems, Diamonds are best here. This build doesn’t have much CC to make use of Malachite. The other option is Emeralds, but those have a threshold before they work. When upgrading to Runeglass Gems, Punishing is generally the best option for all slots.
For the Shield we’re also going purely offensive here. Keenly Empowered and Keenly Jagged are very strong pickups. These two perks increase your overall damage output and shields make them free, without having to sacrifice DPS perks on your sword. The last slot on your shield can go to Mortal Power or Kind, for whichever utility you think helps the best. Mortal Power will helps you deal with pack/adds easier, where Kind can help prevent you from ever pulling aggro.
For your Amulet, Slash Protection covers most PvP incoming damage. Fortified Recovery can give you a nice fortify bonus if you start dipping into lower health. Divine can be a great pickup for PvE or PvP which enables you to be healed easier by a healer.
For your Earring, Empowered and Crippling can both be extremely beneficial for DPS, as Empower effects and Slows both boost your damage. Beloved and Evasive can both help you mitigate aggro making you less likely to pull aggro.
For Rings, Slash Damage or Keen Awareness are always great options thanks to the damage they provide. Leeching can be a nice way to keep your own health topped off. You can also consider Bloodletting, which can let you maintain better uptime on the Bleed from Keenly Jagged for more damage.
The Full Rotation
- Heavy Attack
- Leaping Strike
- Whirling Blade
- Reverse Stab
- Heavy Attack
- Light Attacks
- Repeat
 Repeat
You open with a Heavy Attack, to activate Empowered Stab. This is followed by Leaping Strike to activate Opportunist and Empowering Leaping Strike for even more damage. Next is Whirling Blade, which in addition to dealing heavy damage, will also apply Rend to enemies hit. Then Reverse Stab hits like a truck and reduces all of your cooldowns. We then Heavy Attack attack again to refresh Empowering Stab, and use light attacks to maintain Opportunist. This cycle of Heavy Attack followed by Light Attacks continues until the full rotation is back up.
Much like the Backstabber Build above, this is a setup intended to get the most damage possible out of Reverse Stab, as well as every skill in the Swordmaster Tree. Reverse Stab is just one of the best closer skills for the set of three, since it reduces their cooldowns and does massive damage.
This is also the same rotation for Mobbing, though you may be able to get an extra Whirling Blade use in before Leaping Strike is back up, depending on how many enemies you hit.
Sword and Shield Weapon Pairings
With the Sword and Shield scaling with both Strength and Dexterity, it has some flexibility for weapon pairings.
The Top 3 recommended pairings for this weapon are the Greatsword, War Hammer, and Spear.
Greatsword
Regarding if you’re building as a DPS or Tank, the Greatsword is similarly flexible. It offers a lot of offensive power, defensive power, and debuffs to make it worth using. It’s honestly the perfect compliment to the Sword and Shield in every regard.
To learn more about the Greatsword, you can check out our Greatsword Guide and Best Builds. This will help you plan out a strong build, should you opt for this pairing.
War Hammer
As for the War Hammer, this is more of a PvP option, but can also provide a ton for AoE in all aspects. This helps the Sword and Shield immensely, as it generally lacks AoE, while the War Hammer has no shortage of it. In addition all of the crowd control it offers makes it a potent PvP option.
To learn more about the War Hammer, you can check out our War Hammer Guide and Best Builds. This will help you plan out a strong build, should you opt for this pairing.
Spear
The Spear is a more offensive-only choice, forced one on single target damage and debuffing. This provides a lot of things the Sword and Shield can’t, like a stronger Rend, and more attack range. It also a lot of extra crowd control for nice combo potential between the two weapons.
To learn more about the Spear, you can check out our Spear Guide and Best Builds. This will help you plan out a strong build, should you opt for this pairing.
Other Pairings
This section aims to share any future build guides created featuring the Sword and Shield.
The “Frontline Tank” combines the defensive power of the Sword and Shield with the offensive nature of the Hatchet. You can find out how to put together the build and how it works by reading our Hatchet and Sword “Frontline Tank” Build Guide, which cover the pairing in-depth.
This is the end to this very in-depth guide to Sword and Shield in New World. We hope you have learned everything you need to know about these weapons, their usage, skills, perks, builds, combos and ability rotations. The icons used in this guide are pulled from newworldfans.com‘s database.
Patch Notes Changes
This segment will help you keep track of what has changed for this weapon with the patches as AGS maintains the game in the long-term.
Update 1.1 “Into the Void”
- Fixed an issue where basic attack buffers and cancels weren’t working properly during the Sword heavy attack.
- Fixed an issue where the fully-charged Sword heavy attack had different timings than the regular heavy attack.
- Shield Rush
- Improved Rush: Increased Weaken duration from 4s to 10s.
- Leaping Strike
- Reduced cooldown from 25s to 18s.
- Increased damage scaling from 135% to 150%.
- Sped up the recovery after using Leaping Strike to make it easier to transition into other attacks.
- Cowardly Punishment: Updated the description to include the slow percentage value.
You can find the full patch notes for New World Update 1.1 “Into the Void” in our New World Patches archives.
Update 1.2 “Winter Convergence Festival”
- Heavy Attack
- Reduced recovery time by .15s.
You can find the full patch notes for New World Update 1.2 “Winter Convergence Festival” in our New World Patches archives.
Update 1.3 “Expedition Mutators”
- Fixed an issue causing desyncs when using shield bash while moving.
Update 1.4 “Heart of Madness”
- Leadership: Fixed an issue which caused this passive to deal durability damage to the equipped weapon when swapping.
- Leaping Strike: This ability now ends early if it traverses into deep water.
- Counter Attack: Fixed an issue that caused this ability to stop functioning and display 0s for all of its values.
Update 1.5 “Arenas”
- Leaping Strike: Fixed an issue where the this ability triggered two stacks of the “Blood Offering” mutator effect.
- Removed Gem Sockets from Invasion Shields. Shields are not supposed to have gem sockets, and this brings Invasion Shields back in line with other shields.
Update 1.6 “Summer Medleyfaire”
Updated descriptions for several weapon abilities to specify that they grant Grit:
- Sword/Shield: Defiant Stance, Shield Bash, Shield Rush
- Fixed an issue that caused Defensive Formation to not trigger when you blocked immediately after dodging.
- Fixed an issue that caused sword heavy attacks to not obtain Grit from the 300 Strength Attribute bonus throughout the duration of the attack.
- Updated Defiance Stance ability description to correctly match the 8s taunt duration.
- Fixed an issue that caused the longsword’s Empowered Whirling Blade to not provide any more bonuses until the weapon is re-equipped after failing to hit 3 targets at the same time.
- Fixed an issue that caused the sheathing Sword/Shield animation to pause when players started to run.
- Fixed an issue that caused players to gain an armor bonus from the Shield without having a Sword equipped.
- Leaping Strike: Adjusted hitstun and recovery so that it is longer a guaranteed combo with other attacks.
- Cowardly Punishment: Removed backstab condition and reduced Slow from 50% for 8s to 30% for 3s.
- The sword “Occult’s Razor” previously had a non-functional perk. This has been replaced with the “Chain Void” perk instead.
- Empowering Whirling Blade: Now deals more damage:
- On armor: 10% to 30% based on Gear Score.
- On weapon: 10% to 50% based on Gear Score.
- Repulsing Shield Bash: Renamed to Diminishing Shield Bash and reduced buff duration:
- On armor: 15% to 30% based on Gear Score.
- On weapon: 15% to 45% based on Gear Score.
- Fortifying Shield Rush: Increased fortify while on a shield and the duration increased from 4s to 6s:
- On armor: 5% to 19% based on Gear Score.
- On weapon: 5% to 33% based on Gear Score.
- Accelerated Defiant Stance: Duration has been increased from 5s to 6s.
- Movement speed has been updated from a range of 5% to 30% to a new range:
- On armor: 5% to 20% based on Gear Score.
- On weapon: 5% to 33% based on Gear Score.
- Incoming healing was increased while on shield:
- On armor: 2% to 7.7% based on Gear Score.
- On weapon: 2% to 13% based on Gear Score.
- Movement speed has been updated from a range of 5% to 30% to a new range:
- Contagious stab: Now also increases Reverse Stab damage:
- On armor: 5% to 10% based on Gear Score.
- On weapon: 5% to 15% based on Gear Score.
- Empowering Leaping Strike: Now only increases sword damage and increases damage while on a sword.
- On armor: 3% to 17% based on Gear Score.
- On weapon: 3% to 31% based on Gear Score.
Update 1.7 “Brimstone Sands”
- Changed the name of Defiant Stance to Defender’s Resolve in order to address a conflict with Greatsword stances.
- Fixed an issue that caused the Grit to end before the active frames on the Sword’s Shield Bash ability.
- Fixed some issues with the Sword and Shield ability’s homing not functioning as smoothly and consistently as intended.
- Fixed an issue that caused the Sword and Shield’s defensive formation upgrade to persist outside of combat.
- Increased the Gear Score of the item “Captain’s Command Longsword” to its intended 350 Gear Score.
- Increased the Gear Score of the item “Swordbound Balikor Longsword” to its intended 350 Gear Score.
- Increased the Gear Score of the item “Vile Longsword” to its intended 350 Gear Score.
You can find the full patch notes for New World Update 1.7 “Brimstone Sands” in our New World Patches archives.
Update 1.8 “Winter Convergence Festival 2022”
- Updated Sword and Shield Mastery images to include a Shield.
You can find the full patch notes for New World Update 1.8 “Winter Convergence Festival 2022” in our New World Patches archives.
Update 1.9 “Season 1: Fellowship and Fire”
- Ability Changes
- Shield Bash intimidating bash upgrade damage reduced from 100% to 75% weapon damage.
- Shield Rush damage reduced from 125% to 100%.
- Shield Rush’s Improved Rush Weaken increased from 10% to 20%.
- Leaping Strike damage reduced from 150% to 100%.
- Reverse Stab no longer staggers.
- Notable Fixes
- Fixed an issue where the Sword and Shield’s defensive formation ultimate showed the incorrect value for its radius. Incorrectly showed 2m instead of 3m.
- Fixed an issue where Sword and Shield’s Defender ability visual effects would not display when used by other players.
- Fixed an issue that considered players “In Combat” when activating Defender’s Resolve without taunting an enemy.
You can find the full patch notes for New World Update 1.9 “Season 1: Fellowship and Fire” in our New World Patches archives.
Here at VULKK.com we have a ton of useful New World Guides and more and more are being published regularly. We also have all of the news and updates covered to keep you up-to-date with all things New World!
In-Depth New World Weapons Guides and Best Builds
Each one of the guides below is dedicated to one of the weapons available in New World and goes very in-depth from initial overview of each individual ability and passives all the way to the best builds you can use while leveling or in the EndGame.
New World HATCHET Weapon Guide and Best Builds
Want to learn how to hack your enemies to pieces in New World? This guide is an in-depth dive into all things hatchet in Amazon’s MMO!
New World RAPIER Weapon Guide and Best Builds
Want to learn how to carve your enemies to pieces in New World? An in-depth guide for all things Rapier - abilities, rotations, best builds!
New World FIRE STAFF Weapon Guide and Best Builds
Want to learn how to turn your enemies to smoldering piles of ash in New World? This guide is in-depth dive into all things Fire Staff weapon
New World WAR HAMMER Weapon Guide and Best Builds
Want to learn how to proficiently pummel your enemies in New World? This guide is an in-depth dive to all things War Hammer in Amazon's MMO!
New World LIFE STAFF Weapon Guide and Best Builds
Want to learn how to utilize the power of light in New World? This guide is an in-depth dive into all things Life Staff in Amazon’s MMORPG!
New World GREAT AXE Weapon Guide and Best Builds
Want to learn how to cleave your enemies in two in New World? This guide is an in-depth dive into all things Great Axe in Amazon’s MMORPG!
New World SPEAR Weapon Guide and Best Builds
Want to learn how to perfectly puncture your foes in New World? This guide is an in-depth dive into all things Spear in Amazon’s MMO!

New World ICE GAUNTLET Weapon Guide and Best Builds
Want to learn how to freeze your foes in New World? This guide is an in-depth dive into all things Ice Gauntlet in Amazon’s MMO!

New World BOW Weapon Guide and Best Builds
Want to learn how to pierce your targets with arrows in New World? This guide is an in-depth dive into all things BOW in Amazon’s MMORPG!