Want to learn how to utilize the power of light in New World? This guide is an in-depth dive into all things Life Staff, including Builds!
This guide can be considered a more advanced version of our New World Guide to Weapons for Beginners. By the end of this guide, you should have a thorough understanding of the Life Staff and with practice be able to fully master it.
The Guide is up-to-date for Patch 1.9.2
At the end of the guide you will find a section that lists all changes to this weapon that AGS has implemented as they maintain and support the game in the long term.
Table of contents
Life Staff Overview
The Life Staff is New World’s primary Healing and Support Weapon. It offers a variety of ways to heal and support your allies via buffs. It does however lack damage compared to many other weapons, but the healing effects allow it to manage itself well.
One side of the Life Staff goes all in on healing, playing the role of your standard MMORPG healer that can quickly heal for huge bursts. The Other side focuses more on Healing over Time, opting to buff allies to help them mitigate or avoid damage rather than heal through it.
Life Staff Skills, Passives, and Perks
First we’ll lead off with the skills and passives. We’ll talk a bit about each, their uses and how effective they are. There’s a lot to cover here, so we’ll break it down per tree to keep things organized.
Alongside the general information, They’ll be given a Rating from C up to S tier for both PvE and PvP. C tier is exclusively for the passives that are not that great, either being forced by another upgrade or generally useless. A and B Tiers are middling tiers, putting them between the worst passives and the best, leaning one way or the other. S tier are the good passives, the ones you’re almost always going for if you pick up a skill or want to because it’s useful in many scenarios.
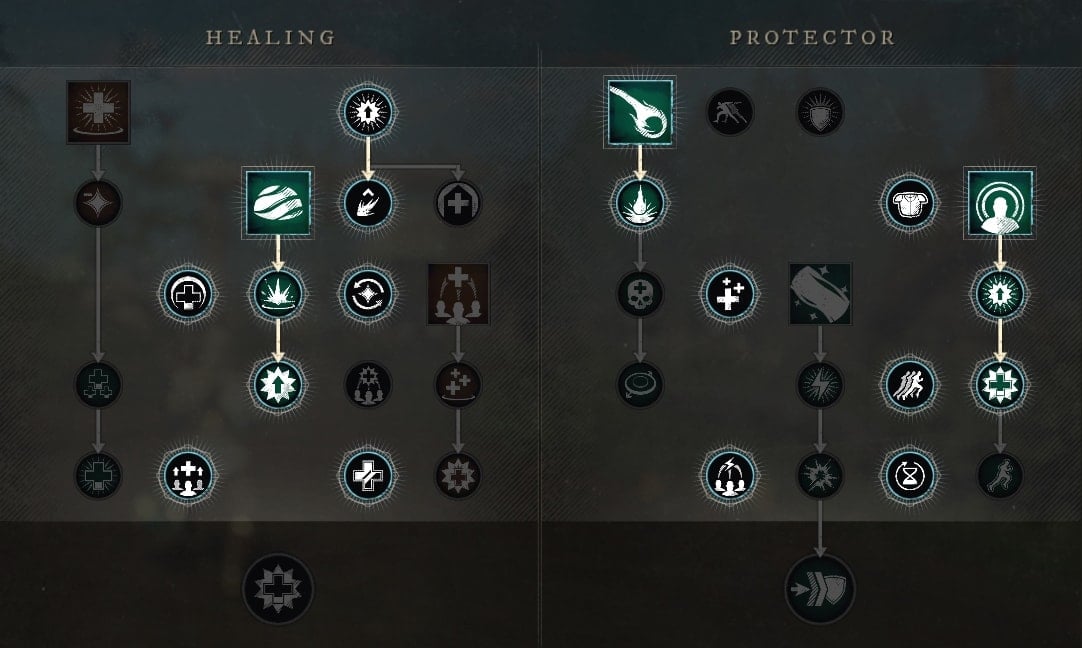
The Healing Tree
As the name implies, this tree focuses on purely healing. While it has some utility in some of the passives and skill upgrades in the tree, it is the tree capable of providing the strongest healing. The Active Skills for this tree consist of Divine Embrace, Sacred Ground and Splash of Light.
 Divine Embrace
Divine Embrace is a potent heal with a short cast duration and a small half-meter AoE that heals for 150% Weapon Damage.
A very simple, but potent healing skill with very high potential for healing in the right situations.
With a Mana Cost of 25 and a Cooldown of 6 seconds, Divine Embrace is one of the Life Staff’s most expensive skills and one of its shortest cooldowns.
Divine Embrace Rating: A – PvE, B – PvP
In PvE this skill can be good for healing, but often goes unused due to the cast time and high mana cost overall.
This can be used in PvP, but is not anywhere near as practical or useful as its counterpart in the Protector Tree.
Privilege
Privilege reduces Divine Embrace’s Mana cost to 20.
Given this upgrade still leaves it as the most expensive skill, it’s only saving a little bit of mana, but will allow a 5th cast if being used back to back from full mana.
Privilege Rating: C – PvE and PvP
It reduces the mana cost by 5, which still leaves it as the most expensive skill to use. It’s not really enough to justify spending a point on this for anything other than the last passives.
Shared Struggle
Shared Struggle allows Divine Embrace to heal a second target within 8 meters if the first target is below 50% health.
This upgrade is niche, but also what gives Divine Embrace its high healing potential.
Shared Struggle Rating: C – PvE, B+ – PvP
This bonus healing is very situational in PvE, as only your tank should ever be taking heavy enough damage that they need to be healed in most Expeditions.
This upgrade can make the skill a little more practical in PvP however, giving you high healing power for PvP, if you can safely cast it.
Rebound
Rebound allows Divine Embrace to heal a third target within 8 meter of the second target, if the target healed by Shared Struggle was also below 50% health.
This works the same way as Shared Struggle, but even more niche, requiring two people to be under 50% health.
Rebound Rating: C – PvE, B+ – PvP
Functionally the same as Shared Struggle, just another chain. Terrible for PvE, Slightly more practical in PvP
Scared Ground
Sacred Ground creates a healing field that heals for 16% Weapon Damage per second and lasts 12 seconds.
By itself, this skill is solid and reliable healing. Once upgraded, it becomes an absolute must-have for any content. Good usage of this skill can alter the tides of just about any encounter.
With a Mana cost of 15 and a Cooldown of 20 seconds, Sacred Ground is one of the Life Staff’s cheapest mana costs but one of it’s higher cooldowns.
Sacred Ground Rating: A – PvE and PvP (S when upgraded)
Sacred Ground is one of those skills that ends up with a lot of utility, and the AoE healing helps a lot in a lot of large scale PvP situations, or even small skirmishes. In PvE the upgrades help your Tank to be able to block much more reliably and with less risk overall.
This skill was reduced in power slightly in the 1.1 “Into the Void” Update, but however left it’s Blessed Sacred Ground upgrade untouched, which is what makes it a strong healing skill in the first place.
Holy Ground
Holy Ground increases Stamina regeneration by 25% and Mana regeneration of all allies by 50% while in Scared Ground.
This gives the skill some much-needed utility, which keeps it from being a purely healing ability like the others in the Healing Tree.
Holy Ground Rating: A – PvE and PvP
The Increase Stamina is the most important part of this honestly. It allows your tanks to take much more punishment in PvE and PvP. The Mana regen is nice if you wanted to use it for self-healing as well, as it’d act as a mana refund in a sense.
Blessed
Blessed increases incoming healing by 50% to allies in Sacred Ground.
This easily makes this one of the most impactful abilities of the Life Staff, increasing its own healing output, as well as those of other skills and weapons significantly.
Blessed Rating: S – PvE and PvP
This is a huge boost to all of your healing. It’s a good way to keep your frontline alive and fighting in PvP, and keep your tank standing much easier in PvE. Nothing else in the Life Staff Trees provides nearly as much of a boost by itself.
Splash of Light
Splash of Light is a heal with a short cast time that heals all allies in your group within 100 meters for 60% Weapon Damage.
A nice reliable heal for partying, but not effective enough without stacking healing buffs.
With a Mana cost of 15 and a cooldown of 15 seconds, Splash of Light is one of the Life Staff’s cheapest spells, with a moderate cooldown.
Splash of Light Rating: B – PvE and PvP
The cast time is equal to that of Divine Embrace, but heals for much less. Can be useful in more chaotic situations where you want to get a quick heal on everyone, but the cooldown is pretty lengthy compared to using even Divine Embrace.
This received a slight buff in the 1.1 “Into the Void” Update which makes it slightly better overall. It’s still not the greatest skill, but has a chance to be extremely cheap to cast and refunds a bit more mana with the Shared Recovery upgrade.
Shared Recovery
Shared Recovery restores 5% of your max mana for each target under 50% Health that is healed by Splash of Light.
In a perfect scenario, this fully refunds the mana cost of this skill. In most situations, it’ll result in reduced cost, which isn’t too bad either.
Shared Recovery Rating: B – PvE and PvP
This is just meant to be paired with some of the healing tree passives, but is rarely useful. If it didn’t have as low of a threshold, it could be more useful. Couple that with its cast time and cooldown and it becomes a waste skill slot for most situations.
Purify
Purify allows Splash of Light to remove a single debuff from all allies healed by the skill.
This is a nice bonus to the utility of this skill, making it a pretty reliable cleanse if multiple people get debuffed at the same time.
Purify Rating: B+ – PvE and PvP
Being a teamwide debuff removal is pretty nice in most situations. However it’s not really enough to justify it, considering Absolved allows you to do this with a Heavy Attack to everyone in the projectile’s path.
Healing Tree Passives
Desperate Speed
Desperate Speed reduces all Life Staff cooldowns by 10% when healing an ally under 50% Health. This effect can only trigger once every 5 seconds.
Combined with any of the Life Staff’s Healing over Time skills, this helps reduces your cooldowns by quite a bit. However Revitalize outclasses it heavily.
Desperate Speed Rating: B – PvE and PvP
While this can be a nice bonus to a heal over time, where you’re potentially triggering this 2-3 times with a single cast. The health threshold and cooldown set this back quite a bit though, making it unreliable unless you deliberately keep an ally at 50% or less health.
Sacred Protection
Sacred protection increases the party’s incoming healing by 5% while the Life Staff is your equipped weapon.
It’s a free bonus to healing, there’s no reason to not take it. Unless you’re using it as a off-hand weapon for self heals, every bit of healing helps.
Sacred Protection Rating: S – PvE and PvP
It’s a weak bonus, so not one to prioritize, but when you’re trying to squeeze out as much healing as possible, it’s a free increase with no requirement unlike a lot of bonuses in this tree.
 Absolved
Absolved removes the mana cost of Heavy Attacks for the Life Staff.
With the changes in Update 1.9 to remove mana costs from all Light Attacks and this only applying to heavy Attacks, this passive is no longer nearly as mandatory. It’s still great to offset the cost of any Heavy Attacks you may use for Medning Touch or other effects, but much less of a must-have.
Absolved Rating: A – PvE and PvP
While not something that needs to be highly prioritized, it can be really helpful early on if you want to use the Life Staff for combat. This reduces the drain on your Mana by quite a bit and lets you take full advantage of so many other passives for the Life Staff.
Mending Touch
Mending Touch allows Life Staff Heavy Attacks to cleanse one debuff when it passes through an ally.
This serves as a free way to remove debuffs from your tanks, which can be a little on the niche side, but good when you have to deal with a lot of the more annoying ones like Disease or Rend.
As of Update 1.9 this passive doesn’t require Absolved to also be taken for, which can make this a more viable option thanks to its much lower investment needed.
Mending Touch Rating: A – PvE and PvP
This is great for removing all kinds of debuffs, but the Heavy Attack use can slow down your healing output if overused. Since it can affect multiple targets at once, it’s pretty great for large-scale PvP as well.
Blissful Touch
Blissful Touch allows Life Staff Light Attacks to heal allies for 16% Weapon Damage when it passes though an ally.
Given how much you should be spamming Light Attack to trigger Revitalize and the fact this lets you heal and DPS at the same time makes it an excellent pickup. Be warned that you will need a ton of reduced aggro modifiers to make this work in PvE early on.
As of Update 1.9, this also no longer requires a second passive point, by no longer being linked to Absolved, making it exceptionally effective healing for its cost.
Blissful Touch Rating: S – PvE and PvP
It’s a free spammable heal, that can almost do the same amount of healing work as Beacon. It’s not a strong heal, but using it to get damage in and heal can make it quite good.
Revitalize
Revitalize reduces Life Staff cooldowns by 5% when hitting with a Light Attack.
This allows you to have permanent or near permanent uptime on your duration based skills, and makes your quick healing skills much more spammable.
Revitalize Rating: A – PvE and PvP (S with Absolved)
Without Absolved this isn’t nearly as good, but when you have both, it’s a potent duo of points that can result in Beacon and Sacred Ground having little to no Downtime. The only downside is you may not be able to keep up with mana costs overall. Thankfully Mana Rations and Mana potions exist.
Enchanted Justice
Enchanted Justice creates a Healing Aura around you when you get hit with 50% or less health. The Aura heals you and allies within 4 meters for 8% Weapon Damage per second for 6 seconds. This effect has a two minute cooldown.
A nice little effect if you’re in danger, to heal off stray damage from AoE attacks and also heal the DPS that should be near you.
Enchanted Justice Rating: C – PvE and PvP
While this may have some niche use in PvP, the odds are that if you’re below 50% in PvP, you’re unprotected and likely to die easily. The healing it provides will never be enough to save you or any allies either. The long cooldown is what kills it the most, waiting two minutes for a minor heal, where you can cast much stronger heals every 10 seconds or less is confusing.
Intensify
Intensify grants a Stacking Buff on successful heavy attacks that increase your healing by 10% for 10 seconds. (Max of 3 stacks, for 30% increased healing)
This passives is one of those that’s very good, and will make great healers that can maintain the buff even better while adding slightly to the skill ceiling for the weapon.
Intensify Rating: S – PvE and PvP
If you can consistently land Heavy Attacks, this passive can really pay off. Once it’s fully stacked, it only takes one heavy Attack to maintain all the stacks. It’s definitely a passive that rewards skill by giving a sizable bonus to healing.
Divine Blessing (Healing Tree Ultimate)
Divine Blessing increases healing effects by 30% on targets under 50% health.
This Ultimate will help you keep people alive so much easier. 30% increased healing is quite a potent buff and will affect all of your healing over time skills as well as your burst healing skills.
Divine Blessing Rating: S – PvE and PvP
If you want raw healing power and want to keep your allies alive easily, this is a great passive for enabling that. Though it works best when using the burst healing of Divine Embrace, Splash of Light, or Light’s Embrace, it cna still be impactful when it comes to Heal over Time effects too.
The Protector Tree
This tree is focused on providing and maintaining buffs, along with a heavier focus on Heal over Time effects. While it does have a potent burst healing skill, it requires buff effects to be stacked on a target for its maximum potential.
Orb of Protection
Orb of Protection releases a projectile that heals for 8% Weapon Damage and applies a 10% Fortify buff for 20 seconds as it passes though allies. When it hits an enemy, it deals 146% Weapon Damage.
Easily one of the Life Staff’s most important skills for applying buffs. Once upgraded, it will apply a Heal over time in addition to the fortify that can affect both you and your target.
With a Mana cost of 16 and a cooldown of 10 seconds, this is one of the Life Staffs least expensive spells with an equally low cooldown.
Orb of Protection Rating: S – PvE and PvP
While it does offer strong healing or damage, it does however a great set of buffs when upgraded. It becomes great setup for Light’s Embrace and overall all a reliable skill to use in a variety of situations.
Protector’s Blessing
Protector’s Blessing grants Recovery for 10 seconds to allies hit by Orb of Protection. Recovery heals for 6% Weapon damage per second.
While the recovery in itself isn’t a potent healing effect, combined with Fortify it’s a pretty good combo for a single skill. It also counts as a buff for Life Staff Passives.
Protector’s Blessing Rating: S – PvE and PvP
This adds more healing to Orb of Protection, making it a pretty reliable source of healing too. Recovery and Fortify make for a pretty nice combo of buffs.
Shared Protection
Shared Protection applies Orb of Protection’s Fortify and Recovery effects when you hit an ally with Orb of Protection.
This is a pretty nice buff as a healer, letting you manage your own health easier when healing and buffing allies.
Shared Protection Rating: S – PvE and PvP (C while Solo)
This is a pretty nice bonus to have, letting you heal yourself while healing an ally. Fair warning, if this passive hasn’t changed at all: You will lose Fortify and Recovery on yourself when you weapon swap if you have this passive. This makes it a terrible choice to grab while playing solo as not only do you benefit from it already, it disables the benefits you can get on weapon swap
Aegis
Aegis applies the healing, Fortify, and Recovery effects to allies within 3 meters of allies hit by Orb of Protection.
This is almost a wasted point, but there are some more niche situations it’s really good in. It’s an absolutely necessary pick up for War situations.
Aegis Rating: C – PvE, S – PvP
Since this skill isn’t a targeted ability, in large scale PvP situations this can be fairly potent. One cast can you can apply Fortify and Recover to a large number of people. With it also passing through allies until it hits an enemy you can also get damage in addition to this mass buffing if used well.
However in PvE, this is a wasted point 100% of the time. The Range is far too small and you really only need to ever use this on your tank.
Beacon
Beacon releases a projectile that sticks to the first entity or surface it hits, dealing 146% Weapon Damage if it’s an enemy. The projectile will heal all allies in its 3-meter area of effect for 16% Weapon Damage per second for 10 seconds.
Considering this is a healing effect that’s almost a sticky Sacred Ground and can be stuck to an ally to consistently heal them and provide buffs when upgraded, it’s pretty good.
With a Mana cost of 16 and a cooldown of 35 seconds, Beacon is one of the Life Staff’s lowest mana costs while also being its longest cooldown.
Beacon Rating: A – PvE and PvP (S when upgraded)
While Beacon by itself isn’t bad and can provide a good amount of value for just a single point alone, its upgrades are what make it great. If you can consistently land it on a target you want to heal, you can very easily keep people topped off.
Infused Light
Infused Light increases Beacon’s AoE by 50%, to 4.5 meters.
This is actually super nice, and makes it a more reliable way to heal your tank if you can only stick it on a boss and can’t quite get it on your tank for one reason or another.
Infused Light Rating: S – PvE and PvP
This makes the healing radius huge, and really increases the effectiveness of the skill in group content of any kind.
Radiance’s Blessing
Radiance’s Blessing increases Beacon’s duration by 5 seconds, making it last 15 seconds.
This 15 second duration couple with Revitalize allows you to maintain a 100% uptime on this skill.
Radiance’s Blessing: S – PvE and PvP
An extra 5 seconds means another 100% Weapon Damage as healing over that time. This roughly means you’re increase the skill’s healing potential by 50% while also reducing the healing’s actual downtime.
Speed of Light
Speed of Light applies a 20% Haste for 3 second to allies healed by Beacon.
With the buff to make this a 20% Haste, this is a very potent buff to have access too.
Speed of Light: A – PvE and PvP
This is a nice bonus, and I can see it being used often in PvP and Speed Clearing PvE group. If your group stays together, it’s basically as if everyone used Hatchet’s Berserk. Even in a duo, it can help you and your duo get around quicker if you’re doing strictly PvE.
Light’s Embrace
Light’s Embrace is healing spell with a short cast time that heals for 80% plus an additional 15% for each buff on the target.
This skill has the potential to provide the strongest single target healing out of all of the Life Staff’s abilities. It requires good skill usage to maximize, but easily one of the most impactful healing abilities.
With a Mana Cost of 18 and a cooldown of 4 seconds, Light’s Embrace is one of the Life Staff’s lower cost spells and its shortest cooldown.
Light’s Embrace Rating: S – PvE and PvP
If you want to take a single target heal, this is the one. It’s incredibly potent with or without buffs, has a very short cooldown and a relatively low mana cost. It can also provide Stamina to your Tank, which can be important to keeping them alive and keep them from being guard broken.
Inspire
Inspire grants 25 Stamina to the target being healed by Light’s Embrace.
This is more or less the only incentive you to use this on your tank. Constantly healing them and supplying them with instant Stamina boosts will keep them from having to move from their position.
Inspire Rating: A – PvE and PvP
Considering this gives your target extra stamina to dodge or block with and a good amount of it at that, it’s a really solid passive overall.
Connection
Connection restores 2% of your mana per buff on the heal target of Light’s Embrace.
This is just more reason to use it on your tanks. Tanks will typically have multiple other buffs active, on top of the ones you’re applying. This heavily reduces the mana costs for this skill making it super reliable.
Connection Rating: S – PvE and PvP
This passive can heavily reduce the mana cost of healing an ally. Given an ally can have a good number of buffs on them at any time, it can easily reduce the mana cost by 10 or more; effectively reducing the cost of Light’s Embrace by 55% with skillful use.
Magnify (Protector Tree Ultimate)
Magnify extends the duration of all Life Staff buffs on Light’s Embrace’s target by 2 seconds when healing with Light’s Embrace.
While this seems like a lackluster Ultimate at first glance, it can be pretty impactful in the right situations. Given the Life Staff has access to Fortify, Haste, and Recovery among others, it can often be a decent pickup.
Magnify Rating: A – PvE and PvP
Since this only affects the heal target, which means it can’t extend some of your own buffs, it’s pretty good. It’s nothing that’s an absolute must-have, but if you can;t get Divine Blessing, it’s a strong option.
Protector Tree Passives
Bend Light
Bend Light increases your healing by 20% for 5 seconds after dodging.
Considering you should be free to dodge and under very little threat in PvE, this is a free healing boost.
Bend Light Rating: S – PvE and PvP
20% more healing for dodging is a pretty good bonus. It lasts long enough that you can refresh it without too much stamina concerns, though would require more careful use in PvP.
Protector’s Strength
Protector’s Strength increases your healing by 20% when you have a buff.
Since Bend Light and Protector’s Touch count as buffs, it’s even more free healing output on top of those. Orb or Protection can also reliably provide this bonus as well when upgraded.
Protector’s Strength Rating: S – PvE and PvP
There’s little reason to go without Bend Light, so having that alone makes this worth taking. It’s more healing on top of so many other passives and very versatile.
Spirits United
Spirits United increases the party’s mana regen by 3%
While 3% sounds like a small buff, and it is; there are also many other sources of mana regen, which could make this more impactful for you and other mages of your party.
Spirits United: B+ – PvE and PvP
This passive is okay, and can provide a decent amount of mana. Its real value comes from providing extra mana to your party though, which only makes it situationally useful.
Defensive Light
Defensive Light restores 5% of your maximum mana when blocking a melee attack.
You should almost never be blocking with the Life Staff outside of solo PvE, which makes this an effectively useless passive.
Defensive Light – C – PvE an PvP
While it can provide mana, it provides so little that it doesn’t help in most situations. Absolved just does a better job at reducing mana issues while solo.
Protector’s Touch
Protector’s Touch grants you a 15% Fortify for 3 seconds when landing Light or Heavy Attacks.
This, combined with Orb of Protection gives you a total of 25% Fortify, making you pretty durable for a healer. Given the requirement for it means it should be very near 100% uptime, there’s no reason not to take it.
Protector’s Touch Rating: S – PvE and PvP
This passive is pretty good for groups and solo play alike. It’s another Fortify that can stack with the others in your kit and make you deceptively durable as a Life Staff user. It’s easy to trigger, giving it a really high uptime as well if you’re landing your hits.
Balance
Balance grants a 10% Haste for 5 second when hit under 50% health. This effect has a 20 second cooldown.
If it weren’t for the cooldown, this would be nice buff to help you kite should you be solo or accidentally pull aggro while healing.
Balance Rating: C – PvE, B – PvP
This effect is basically useless in PvE. In PvP however, it can help you make a narrow escape to your team in larger fights. It’s a low value haste with a health threshold though, so it may not always save you.
Glowing Focus
Glowing Focus increases the duration of Life Staff buffs by 20%.
This is essentially just Magnify, but passively; at least for most buffs. There are shorter buffs that won’t benefit from this as much, but it’s still an okay passive if you’re focused more on providing buffs.
Glowing Focus Rating: A+ – PvE and PvP
Since Orb of Protection is a pretty commonly used spell for both PvE and PvP, this helps extend the duration of it’s buffs, making them much easier to maintain. Used in combination with Magnify, you can make some buffs last a really long time and save mana by reducing the overall cast frequency of your spells just to maintain buffs.
Life Staff Skill Perks
These perks can be found on armors and weapons. The perks modify skills beyond passives and can give them additional Utility These are often better slotted on Armor as Weapons have access to better perks overall.
It’s worth noting these perks also scale with Gear Score, so they will be weak early on, but are good at later stages of the game. The value Range shown is for Gearscore 200-600.
 Refreshing Divine Embrace
 Refreshing Divine Embrace
Divine Embrace’s Cooldown is reduced when healing an ally under 50% health, and recovers mana. On Weapons, the cooldown is reduced by 40-69% and it restores 3.4-5.8%. On Armor, reduce the cooldown is reduced by 12-41% and restores 1-3.5% mana.
For such a strong healing ability, reduced cooldown can be very impactful. The additional mana recovery also helps offset the really high cost of this skill.
Refreshing Divine Embrace Rating: A – PvE and PvP
When slotted on your weapon and making good use of this passive, this can make the skill much more reliable and less costly. While it’s not going to really cover enough of the mana cost initially, combined with other passives this does make it much more manageable.
Fortifying Sacred Ground
Sacred Ground applies Fortify, granting Damage reduction to allies healed by Sacred Ground for 5 seconds. On Weapons, this grants 9.4-16% Fortify. On Armors, this effect is reduced to 3-9.7% Fortify.
Given that Sacred Ground is a stationary AoE, it granting Fortify, even a minor one is very good. It makes your Tanks bulkier, allowing them to hold a position longer and soak more damage. In general Fortify is one of the game’s stronger buffs
Fortifying Sacred Ground Rating: S – PvE and PvP
This perk is broadly applicable and useful in every situation. If you’re running Sacred Ground, you’ll want this. It has very high uptime, and no longer forces you to stand in Sacred Ground constnatly to benefit
Purity of Light
When Splash of Light removes a debuff with Purity, Splash of Light will heal for an additional amount. On Weapons, Purity of Light will heal for an additional 46-85% Weapon Damage. On Armor, Purity of Light heals for an additional 10-48% weapon damage.
The requirement of removing a debuff cna make this kind of niche, but being able to more than double the healing output of the skill even if its only for one target is incredibly powerful.
Purity of Light Rating: A – PvE and PvP
While in PvE you’ll likely only be able to get this effect for your tank, this generally helps to keep this a relevant skill. In PvP though, this makes the skill very powerful for maintaining your whole party.
Mending Protection
Mending Protection increases your healing power for 3 seconds when Orb of Protection heals an ally under 50% Health. On Weapons, this increases heal power by 23-42%. On Armor, this increases healing power by 5-24% instead.
This perk is quite good for your overall healing output, and highly recommended for a build focused on Healing over time, rather than burst healing. While it will help burst healing skills to heal more, those skill don’t really need the extra power nearly as much.
Mending Protection Rating: S – PvE and PvP
This is easily a perk with picking up and including into your builds if you run Orb of Protection. The general increase in healing power is very hard to pass up.
Accelerating Light’s Embrace
Accelerating Light’s Embrace grants Haste for 5 seconds when healing an ally under full health. On Weapons, this provides a 17-30% Haste. On Armor, this grants a 5-18% Haste instead.
With how often this can be cast, this is actually a solid perk.
Accelerating Light’s Embrace Rating: A – PvE and PvP
This is a useful perk, especially with Buff duration, as it allows you to apply Haste without spending a point on Speed of Light. It won’t last nearly as long as Speed of Light, but can also be much more potent. This allows Light’s Embrace to boost its own healing when using it off cooldown.
Keen Beacon
Keen Beacon increases the Crit Chance for a Player healed by Beacon for 6 seconds. For Weapons, this increases the Crit Chance of healed players by 5.9-10%. On Armor, this effect is 2-6.1% instad.
This passive can be really strong when used well. If you can stick the Beacon on a player, it’ll allow them to be much more aggressive and deal more damage. Using it early on, you’ll probably want to use it on a weapon, but switch it to your armor later on.
Keen Beacon Rating: S – PvE and PvP
Free Critical Chance for everyone in a 4.5-meter AoE is a pretty big thing. It doesn’t sound like much, but combined with other sources of Crit Chance, some weapons will start critically striking more often than not.
Life Staff Builds
Life Staff really only currently has three builds it will commonly use, focused on Solo, and PvE or PvP group content. There’s a bit of skill overlap, but how they are used differs is what separates how each build plays.
Solo/DPS Build
This setup focuses on creating a zone of strong healing that can let you face tank mobs as you hit them with your Life Staff or another weapon. It focuses making use of Orb of Protection, Beacon and Sacred Ground
This set of abilities gives you plenty of offensive and defensive power. This lets you dispatch enemies fairly quickly and safely with or without a weapon swap.
Leveling Starts off by taking Absolved. This lets you freely use Light and Heavy Attacks for a consistent damage output without mana concerns. Then we grab Orb of Protection for the extra damage mostly, it’s more important to defeat enemies quicker than to get the Forty effect early on. Then Sacred Ground for sustain, followed by Beacon for damage and sustain.
Now we start working on passives and upgrades. We only put one extra point into Orb of Protection, so we can keep self buffs with it active if we weapon swap and also allow it to heal. The other two passives are also only useful for grouping. We pick up Revitalize to help push more DPS out of Orb of Protection by using light attack to shorten its cooldown. This also lets you keep both Sacred Ground and Beacon active at all times.
Then we max Sacred Ground. The first upgrades helps with mana sustain while solo, while the second boosts all healing. Then Beacon is upgraded to extend its range and duration.
After this, we focus on grabbing healing and defensive passives. Bend Light and Protector’s Strength are given priority as they’ll provide the most consistent and strongest bonuses. Then we grab Spirits United and Glowing Focus to help with mana regen and keeping buffs active respectively.
After grabbing our passives in the Protector Tree, we move to the Healing Tree and grab anything that could be of use there. Sacred Protection boosts healing very slightly; Intensify helps boost healing greatly, but also ask you to make more use of Heavy Attacks, which this setup will do less of to trigger Revitalize as much as possible. Though, points 13-19 can really be taken in any order you fancy.
Skill Perks, Usage, and Rotations
This Build doesn’t have any kind of set rotation, mostly using spells off cooldown or as they wear off, whichever takes longer.
Orb of Protection is mostly used for damage, but will also grant Fortify and Recovery when you hit something that’s on top of you. It’ll be up frequently enough that using it early isn’t a bad option at all, but using it later will also give benefits of its own in granting the buffs.
Sacred Ground is going to always be used at your feet at the end of your first round of spells. This maximize the Mana regeneration you get out of it, and keeps you healed up while you spam for cooldowns.
Beacon is more or less the first skill you want to use to get extra early damage, the healing will stick to the enemy and they’ll bring it to you if they’re a melee enemy, so you only miss out on a small bit of healing which you don’t need initially anyways.
For Weapon Perks, we absolutely want Blessed, even if it’s for self healing primarily. This is a very helpful and flexible perk over all. Other than that, we’re looking mostly for Enchanted and Refreshing Move, so we can use your damage spells more often.
For Weapon Gem, due to the amount of self-sustain the Life Staff has, Diamonds will typically always be the best option for both increased healing and damage. When upgrading to Runeglass Gems, You’ll want Siphoning for your weapon, then you armor can be Siphoning for additional Mana or Arboreal to increase your damage.
For Armor Perks, Refreshing is a solid perk in general. Mending Protection is easily a best in slot perk, giving you better sustain and a bit stronger healing in general..Revitalizing Beacon and Fortifying Sacred Ground are also fantastic pickups if you can get them as well. Beyond those is mostly preference for whichever defenses you want to gain.
For Amulets, the best three you can get would be Divine, Slash Protection, and Thrust Protection. This will help overall with keeping your on your feet. Divine will boost your self healing, and much like Blessed is a very flexible perk. The Protection perks cover the majority of your general defenses.
For Earrings, Focused and Regenerating offer a lot to this setup. Focused is incredibly helpful to mitigating any potential mana issue. Regenerating offers some of the same but for extra healing.
For Rings, Sacred and Keen Awareness are great pickups. Sacred is like a lesser version of Blessed, offering roughly half the healing bonus. Keen Awareness gives a bit of crit chance to help get damage out.
Skill Rotation
- Heavy Attack
- Beacon
- Light Attack
- Orb of Protection
- Light Attack
- Sacred Ground
- Light Attack
- Repeat
 Heavy Attack
 Light Attack
Much like Fire Staff does, Life Staff also wants to weave spells between attacks. If you use an attack and immediately cast Beacon or Orb of Protection, you’ll hit two attacks at almost the same time. We lead with Beacon for the reasons stated above, specifically because it’s a longer cooldown.
We lead with a Heavy attack so we get one stack of Intensify and for a bit heavier damage with the initial hit, but this isn’t necessary. We continue to use Light attacks after we exhaust our spells because they’re better DPS overall and trigger Revitalize.
After this, it’s mostly using Orb of Protection and Beacon as they come off cooldown. This will generally be more than enough to keep you standing, but keeping Sacred Ground active is also good.
Expedition (PvE) Build
This build is one that’s more focused on keeping your tank alive, but you can still freely heal up other allies as well. It focuses on Light’s Embrace, Orb of Protection and Sacred Ground.
If you’re playing with a group, this can also be a great build to use for other PvE content, but works the best in expeditions.
Like with other builds, we start with Absolved so we get consistent damage without mana concerns. Then we grab Sacred Ground for Healing, Orb of Protection for damage and sustain then Light’s Embrace for big healing power early. We also grab an upgrade for Orb of Protection to make also able to heal early.
After this, we grab Bend Light, Shared Protection then Protector’s Strength to get strong healing boosts really early. Then we fully upgrade Sacred Ground for it’s potent boost to healing.
Next we grab Revitalize and Intensify to help with cooldowns and further boost healing potential. Then we finally max out Light’s Embrace, save for the final passive which we need to grab Glowing Focus and Spirits United to get to.
Sacred Protection can be grabbed either before or after maxing out the Protector side of the tree. It’s only a 5% healing bonus, so it’s pretty minor overall.
Skill Perks, Usage, and Rotations
This build doesn’t have set rotations, since you’re healing as needed. Though there is a way to quickly setup a strong Light’s Embrace cast.
Orb of Protection is mostly used to apply Fortify and Recovery to your tank. It’s a very minor amount of healing overall, but the fortify helps your tank be able to soak up more damage.
Sacred Ground should be used whenever a tank pulls a group and has chosen where they want to hold them. Casting this on a moving or kiting target is a waste, so calling out when you use it can be helpful.
Light’s Embrace is your big burst healing skill. It shouldn’t be spammed off cooldown and should primarily be focused on your tank unless someone else has dropped very low.
For Weapon perks, Blessed is an absolute must have for the increased healing power. Siphoning Blow can both be a decent pickup as well to help with mana. You could also go with Refreshing Move to get even more cooldown reduction out of Light Attacks. Kind will also be helpful for reducing the aggro generated by your healing and damage.
For Weapon Gem, due to the amount of self-sustain the Life Staff has, Diamonds will typically always be the best option for both increased healing and damage. When upgrading to Runeglass Gems, You’ll want Siphoning for your weapon, then you armor can be Siphoning for additional Mana or Arboreal to increase your damage.
For Armor perks Refreshing alongside all of your skill perks (Mending Protection, Fortifying Sacred Ground, and Accelerating Light’s Embrace) are among the best you can get. Refreshing helps reduce your base cooldowns, making Sacred ground come up more often, but isn’t totally necessary here. Mending Protection provides a sizable boost to healing power, with the other ability perks allow you to apply buffs.
Out Amulet is going to be a defensive piece, Opting for Health, Fortified and Fortified Recovery. Health just gives us a percentage bonus to our total health pool, which most cases CON will be the secondary stat for Life Staff. Fortified boost our Orb of Protection to have the fortify last slightly longer as well as slightly extend the bonus from Fortified Recovery.
For our Earring; Beloved, Focused and Regenerating are all great options here. Beloved reduces your aggro generation, much like Kind does for weapon. Focused gives you better mana regeneration to help keep your mana up more often. Regenerating helps out survive stray hits, without having to necessarily focus on self healing.
For our Ring, we want Sacred and Siphoning. Scared boosts our healing, whereas Siphoning help with our mana sustain. For the last slot, it could be Brilliant for the extra mana, Hearty for extra Stamina or Nature Damage to increase your own DPS in fights.
Skill Rotation
This quick rotation helps get a maximum power Light’s Embrace off.
- Heavy Attack
- Sacred Ground
- Heavy Attack
- Orb of Protection
- Heavy Attack
- Light’s Embrace
The concept here is to use a heavy attack, then a spell, starting with the longest duration spell Sacred Ground. By the time you do all these heavy attacks, and stack all these buffs up from other, you should be nearly tripling the power of Light’s Embrace through the number of buffs and perks you’re making use of.
War/Skirmish PvP Build
This build focuses on the skills that can affect several allies at once, opting for potent AoE Heals over the bust healing options. It focuses on using Sacred Ground, Splash of Light and Orb of Protection.
This works because in War situations you won’t need a single target heal, because you often won’t be the only healer. In smaller skirmishes though, you’re free to adjust another skill to incorporate one if it’s a small skirmish.
As per usual, we start with Absolved for easier and more consistent damage while leveling. Then we pick up Sacred Ground, Orb of Protection, and Splash of Light for more healing and damage output. You can alternatively pick up Beacon to start for extra DPS while leveling, then swap to Splash of Light later.
Then we’re gonna pick up Blissful Touch to be able to heal and trigger Revitalize at the same time. Then we focus on upgrading Sacred Ground to amp our healing output, and Splash of Light to makes it cost less and provide a cleanse effect.
Then we grab Revitalize and Intensify to be able to get access to Divine Blessing as soon as possible. Revitalize is important for being able to maintain uptime on our skills an keep our allies healed. Intensify and Divine Blessing help to massive boost our healing output, though Intensify will require maintenance to keep it going. While Divine Blessing requires an ally to be under 50% health to trigger, this can be quite often when a fighting in a war or skirmish.
We pick up Desperate Speed to boost your cooldown recovery in these clutch situations letting us get off more casts of Splash of Light sooner helping with mass recovery. Then we swap over to the Protector tree to grab our important passives here, Bend Light and Protector’s Strength.
The final point is a toss up between Spirit United and Sacred Protection. Sacred protection is generally the more useful of the two and works better in more situations. Spirit United can be helpful if you’re in a squad of mages, boosting their mana regen as well as your own.
Skill Perks, Usage, and Rotations
Splash of Light is one of those skills that while not super useful in most places, actually can earn it’s place in PvP, mostly due to other skills being harder to use overall in War or other PvP situations. Beacon could replace it in some situations like Skirmishes, or practiced used in Wars; but otherwise is much more reliable. for healing your whole squad at once. Splash of Light also doubles as Cleanse, helping to reduce damage from burns and such.
Orb of Protection is great in Wars, because it’s not targeted so you can send it flying through a bunch of your own melee teammates granting them all Fortify and Recovery. Both of these effects help make Sacred Ground much stronger overall by providing additional healing and damage reduction.
Sacred Ground on a well equipped healer can make the difference between a tank living or dying on a point for Wars. It heals for so much by itself, on top of any other healing effects you toss in as well.
For Weapon perks, Blessed is an absolute must have for the increased healing power. Siphoning Blow can both be a decent pickup as well to help with mana. You could also go with Refreshing Move to get even more cooldown reduction out of Light Attacks. Keen could be a consideration if you’re looking to squeeze a little extra damage out as well in PvP. Purity of Light is another amazing perk here, as the likelihood of your group member being debuffed in PvP is much higher.
For Weapon Gem, due to the amount of self-sustain the Life Staff has, Diamonds will typically always be the best option for both increased healing and damage. When upgrading to Runeglass Gems, You’ll want Siphoning for your weapon, then you armor can be Siphoning for additional Mana or Arboreal to increase your damage.
For Armor perks Refreshing, Energizing Splash of Light, Fortifying Sacred Ground, Mending Protection are among the best you can get. Refreshing helps reduce your base cooldowns, making Sacred ground come up more often, but isn’t totally necessary here. Energizing Splash of Light adds more utility to Splash of Light, letting it also replenish Stamina. Mending Protection will have a high chance of being useful in Wars, as you’ll be hitting several people at the same time compared to just a few.
Out Amulet is going to be a defensive piece, Opting for Health, Fortified and Fortified Recovery. Health just gives us a percentage bonus to our total health pool, which most cases CON will be the secondary stat for Life Staff. Fortified boost our Orb of Protection to have the fortify last slightly longer as well as slightly extend the bonus from Fortified Recovery.
For our Earring; Focused and Regenerating are great options here. Focused gives you better mana regeneration to help keep your mana up more often. Regenerating helps out survive stray hits, without having to necessarily focus on self healing. Nimble can help here with giving you the ability to dodge more frequently, but chances are if you get jumped on you won’t last too long.
For our Ring, we want Sacred and Siphoning. Scared boosts our healing, whereas Siphoning help with our mana sustain. For the last slot, it could be Brilliant for the extra mana, Hearty for extra Stamina or Nature Damage to increase your own DPS in fights.
Skill Rotation
There’s no set rotation here, mostly using things off cooldown and trying to keep Sacred Ground on your frontliner(s). So long as you’re keeping sacred Ground active and maintaining your buffs, you’ll be healing just fine.
Life Staff Weapon Pairings
Since the Life Staff scales exclusively with Focus, you would think this severely limits its weapon pairings, having only one that it even shares a second stat with. However, thanks to the Life Staff’s ability to be an off-hand recovery tool, it could be paired with anything.
This makes the top weapon pairings difficult to properly list out, other than the Void Gauntlet.
Void Gauntlet
The Void Gauntlet brings additional healing capabilities, making it the premiere support pairing option. In addition, it’s also able to supply multiple buffs and debuffs which really amps up its supportive capabilities.
To learn more about the Void Gauntlet, you can check out our Void Gauntlet Guide and Best Builds. This will help you plan out a strong build, should you opt for this pairing.
Other Pairings
Beyond the Void Gauntlet, it’s an excellent pairing for bulkier weapons, like the Sword and Shield, Greatsword, Great Axe, and War Hammer. These weapons all, are plenty durable, but the Life Staff pushes that further, offering a ton of additional self-buffing and recovery. If you’re looking to pair with one of those weapons, be sure to check out their respective Weapon Guides!
This is the end to this very in-depth guide to Life Staff in New World. We hope you have learned everything you need to know about this weapon, its usage, skills, perks, builds, combos and ability rotations. The icons used in this guide are pulled from newworldfans.com‘s database.
Patch Notes Changes
This segment will help you keep track of what has changed for this weapon with the patches as AGS maintains the game in the long-term.
Update 1.1 “Into the Void”
- Reduced base healing by 20% across the board to account for the increase in healing from equip load
- Targeting Adjustments
- Normalized all targeted healing spells (and target lock-on) to have a max range of 25 meters.
- Added out of range targeted healing functionality:
- Group UI will change color when the target is out of range.
- If the target moves out of range, the spell will cancel instead of casting targeting yourself.
- Trying to cast a targeted heal on an out of range target will display a “target is out of range” notification.
- Fixed an issue where targeted heals activated by using the ability key would not perform a direct heal on the intended target.
- Sacred Ground
- Fixed an issue where the Life Staff Sacred Ground VFX and tooltip stated it lasted longer than the actual duration.
- Reduced the effectiveness of the Sacred Ground fortify perk from 3% – 15% to 3% – 10%.
- Reduced Holy Ground stamina and mana regeneration from 100% to 50%.
- Fixed an issue that allowed the healing from this skill to be stacked from multiple sources if they were using different ability upgrades.
- Splash of Light
- Increased the efficiency of Life Staff’s Splash of Light ability from 40% to 60%.
- Increased the efficiency of Splash of Light’s Shared Recovery Upgrade from 3% to 5%.
- Orb of Protection
- Fixed an issue where the Shared Protection effect was being refreshed by the healing applied by Protector’s Blessing.
- Mending Protection (Item Perk): This perk’s functionality has been changed. Instead of triggering if the target does not have any active buffs, it now triggers if the target healed by Orb of Protection is under 50% health.
- Light’s Embrace
- Increased the efficiency of Light’s Embrace Connection Upgrade from 1% to 2%.
- Passives
- Blessed (Item Perk): Reduced healing bonus effectiveness from a range of 10% – 30% to a range of 5% – 20%.
You can find the full patch notes for New World Update 1.1 “Into the Void” in our New World Patches archives.
Update 1.2 “Winter Convergence Festival”
- Splash of Light:
- Purify: Updated description to specify that the target must be healed for debuffs to be removed.
- Beacon: Fixed an issue where the healing buff would persist on the caster after leaving the circle.
You can find the full patch notes for New World Update 1.2 “Winter Convergence Festival” in our New World Patches archives.
Update 1.3 “Expedition Mutators”
No significant changes.
Update 1.4 “Heart of Madness”
- Orb of Protection: Fixed a text error with the tooltip that stated it healed for 10% weapon damage when it actually healed for 8%. Actual healing values were not changed, only text was corrected.
- Sacred Protection: Fixed an issue which caused this passive to deal durability damage to the equipped weapon when swapping.
- Spirits United: Fixed an issue which caused this passive to deal durability damage to the equipped weapon when swapping.
- Sacred Ground:
- Blessed (Upgrade):
- Changed the name of this upgrade to be “Anointed” so as not to be confused with the item perk of the same name.
- Fixed an issue where this upgrade provided healing through Ice Gauntlet’s Entombed ability.
- Blessed (Upgrade):
- Basic Attacks:
- Light and heavy attacks can now be canceled by self-targeted heals.
- Fixed an issue that allowed light attacks to fire at a faster rate while holding the block button.
- Divine Embrace: Fixed an issue where the channeling UI element did not match the actual casting time of the ability.
- Divine Embrace: Fixed a visual misalignment between casting timer and animation effects.
Update 1.5 “Arenas”
- Fixed an issue where light attacks cancelled targeted healing when Stickylock was enabled.
- Fixed an issue that caused targeted healing to attempt to lock on to targets beyond the range of healing spells.
- Cleaned up animations and fixed missing visuals and sounds when self-healing.
- Targeted Heals: These abilities now allow movement while casting.
- Light’s Embrace: Increased cast time to 1s.
- Light’s Embrace: Reduced bonus healing per buff from 30% to 15%.
- Added a UI element to indicate whether or not group mode healing is enabled. This indicator will only be shown when group mode healing is on, the player has their life staff active, and they are a member of a group. This also fixed an issue that caused the Targeted Healing out of range highlight to not function when activating target lock with MMW or target Hotkeys.
- Targeted healing spells are now limited by line of sight, except in Expeditions.
Update 1.6 “Summer Medleyfaire”
- Fixed an issue that caused dodging to not cancel Light’s Embrace and Divine Embrace casts.
- Fixed an issue that caused other hotkeys to be assigned to Targeted Healing hotkeys.
- Fixed an issue that caused the Protector’s Strength passive to incorrectly show 10% in the tooltip instead of 20%.
- Fixed an issue that caused Sacred Ground cooldown to trigger before the spell was cast.
- Fixed an issue that destroyed the Beacon AOE when hitting neutral targets.
- Refreshing Divine Embrace: Fixed an issue that caused this to not function.
- It now grants the following recharge when triggered:
- On armor: 12% to 41% based on Gear Score.
- On weapon: 12% to 69% based on Gear Score.
- It now grants the following mana when triggered:
- On armor: 1% to 3.5% based on Gear Score.
- On weapon: 1% to 5.8% based on Gear Score.
- It now grants the following recharge when triggered:
- Energizing Splash of Light: Renamed to Purity of Light. Now heals a certain percentage of weapon damage when it removes a condition. Allies will also heal an additional percentage of the weapon damage regardless if any debuff is cleansed.
- On armor: 10% to 48% of weapon damage based on Gear Score.
- On weapon: 10% to 85% of weapon damage based on Gear Score.
- Accelerating Light’s Embrace: Increase the duration of this buff from 3s to 5s and modifier now scales higher when on a Life Staff:
- On armor: 5% to 18% based on Gear Score.
- On weapon: 5% to 30% based on Gear Score.
- Revitalizing Beacon: Renamed to Vicious Beacon. When Vicious Beacon heals a player, they will now receive a critical chance for 6s:
- On armor: 2% to 6.1% based on Gear Score.
- On weapon: 2% to 10% based on Gear Score.
- Fortifying Sacred Ground: Increased fortify while on a Life Staff:
- On armor: 3% to 9.7% based on Gear Score.
- On weapon: 3% to 16% based on Gear Score.
- Mending Protection: Increased the healing effectiveness while on a Life Staff:
- On armor: 5% to 24% based on Gear Score.
- On weapon: 5% to 42% based on Gear Score.
Update 1.7 “Brimstone Sands”
- Fixed an issue that caused the Beacon AOE to get destroyed when hitting neutral targets.
- Fixed several line of sight issues with targeted abilities.
- Targeted Healing group member hotkeys will no longer trigger casts when not in a group, except for hotkey 1. Hotkey 1 will self-cast.
- Updated the Divine Embrace and Light’s Embrace tooltips to be clearer about functionality.
- Fixed issue where Combining Splash of Light’s Purify upgrade with the Purity of Light perk would cleanse additional debuffs.
You can find the full patch notes for New World Update 1.7 “Brimstone Sands” in our New World Patches archives.
Update 1.8 “Winter Convergence Festival 2022”
- Fixed an issue that caused the Divine Embrace upgrades Shared Struggle and Rebound to not consistently bounce to nearby targets when activated.
- Fixed an issue that caused the Life Staff Intensity passive to trigger off of DoTs from Runeglass Gems.
- The Life Staff Petra Ataraxia has had its Plagued Strikes perk swapped for Refreshing.
You can find the full patch notes for New World Update 1.8 “Winter Convergence Festival 2022” in our New World Patches archives.
Update 1.9 “Season 1: Fellowship and Fire”
- Ability Updates
- Updated Absolved passive to be for heavy attacks only. Since all magic weapons no longer cost Mana on light attacks.
- Removed the required connection between the Absolved, Mending Touch, and Blissful Touch passives in the Healing Life Staff tree.
- Reduced increased stamina regen rate of Sacred Ground upgrade and Holy Ground from 50% to 25%.
- Notable Fixes
- Fixed an issue where the spell cast target indicator was not moving smoothly.
- Fixed an issue where players using the Life Staff in specific situations could unintentionally ping by pressing the key bind at a specific interval while running forwards or strafing.
- Fixed an issue where players using the Life Staff in specific situations could not ping on the map.
- Fixed an issue where players using the Life Staff in specific situations could not ping on the map.
You can find the full patch notes for New World Update 1.9 “Season 1: Fellowship and Fire” in our New World Patches archives.
Here at VULKK.com we have a ton of useful New World Guides and more and more are being published regularly. We also have all of the news and updates covered to keep you up-to-date with all things New World!
In-Depth New World Weapons Guides and Best Builds
Each one of the guides below is dedicated to one of the weapons available in New World and goes very in-depth from initial overview of each individual ability and passives all the way to the best builds you can use while leveling or in the EndGame.

New World SWORD and SHIELD Weapon Guide and Best Builds
Want to learn how to slice and bash your enemies in New World? This guide is an in-depth dive to all things Sword and Shield in Amazon's MMO!

New World HATCHET Weapon Guide and Best Builds
Want to learn how to hack your enemies to pieces in New World? This guide is an in-depth dive into all things hatchet in Amazon’s MMO!

New World RAPIER Weapon Guide and Best Builds
Want to learn how to carve your enemies to pieces in New World? An in-depth guide for all things Rapier - abilities, rotations, best builds!

New World FIRE STAFF Weapon Guide and Best Builds
Want to learn how to turn your enemies to smoldering piles of ash in New World? This guide is in-depth dive into all things Fire Staff weapon

New World WAR HAMMER Weapon Guide and Best Builds
Want to learn how to proficiently pummel your enemies in New World? This guide is an in-depth dive to all things War Hammer in Amazon's MMO!

New World GREAT AXE Weapon Guide and Best Builds
Want to learn how to cleave your enemies in two in New World? This guide is an in-depth dive into all things Great Axe in Amazon’s MMORPG!

New World SPEAR Weapon Guide and Best Builds
Want to learn how to perfectly puncture your foes in New World? This guide is an in-depth dive into all things Spear in Amazon’s MMO!

New World ICE GAUNTLET Weapon Guide and Best Builds
Want to learn how to freeze your foes in New World? This guide is an in-depth dive into all things Ice Gauntlet in Amazon’s MMO!


New World BOW Weapon Guide and Best Builds
Want to learn how to pierce your targets with arrows in New World? This guide is an in-depth dive into all things BOW in Amazon’s MMORPG!