Want to learn how to proficiently flatten your enemies in New World? This guide is an in-depth dive to all things War Hammer in Amazon’s MMO!
This guide dives deep into the Skills, Passives, and some builds for the War Hammer in New World. This guide can be considered a more advanced version of our New World Guide to Weapons for Beginners. By the end of this guide, you should have a thorough understanding of the War Hammer and with practice be able to fully master it.
The Guide is up-to-date for Patch 1.9.2
At the end of the guide you will find a section that lists all changes to this weapon that AGS has implemented as they maintain and support the game in the long term.
Table of contents
War Hammer Overview
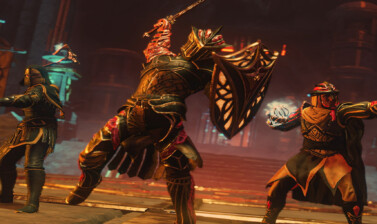
The War Hammer is everything you’d expect of a heavy weapon. Slow Attacks, Huge Damage, Lots of AoE, and Overwhelming amounts of crowd control. It’s far from the best 1v1 weapon, but 1vX? It’s ready to take on all comers.
It’s Primary role in the game is Tank. However unlike the Sword and Shield, it cannot block Ranged attacks. It’s a very formidable weapon, capable of high damage and crowd control. It’s on the weaker side of Tanks though, due to the lack of a high range Taunt option.
It’s secondary role is Damage. With plenty of hard hitting skills and plenty of AoE, the War Hammer can hold its own against one or several foes. With access to Rend and other armor reducing or ignoring effects, it’s a strong option for giving big threats a bonk they’ll never forget.
War Hammer Skills, Passives and Perks
First we’ll lead off with the skills and passives. We’ll talk a bit about each, their uses and how effective they are. There’s a lot to cover here, so we’ll break it down per tree to keep things organized.
Alongside the general information, They’ll be given a Rating from C up to S tier for both PvE and PvP. C tier is exclusively for the passives that are not that great, either being forced by another upgrade or generally useless. A and B Tiers are middling tiers, putting them between the worst passives and the best, leaning one way or the other. S tier are the good passives, the ones you’re almost always going for if you pick up a skill or want to because it’s useful in many scenarios.
Juggernaut Tree
Despite the name, the Juggernaut Tree isn’t the ideal tanking tree. It is however the source of all of our single target damage options and plenty of damage passives. The Active skills for the Juggernaut Tree consist of Armor Breaker, Mighty Gavel, and Wrecking Ball.
 Armor Breaker
Armor Breaker is a powerful attack that deals 140% Weapon damage, while penetrating 35% of enemy Armor.
This skill ends up being a hard hitting single target attack, thanks to the armor penetration. It also happens to be a bit faster compared to a Heavy Attack which makes it easier to use in more situations.
With a cooldown of 12 seconds, Armor Breaker is the War Hammer’s shortest cooldown.
Armor Breaker Rating: S – PvE and PvP
Being high single target damage with armor penetration makes it excellent for holding boss aggro if you decide to tank with the War Hammer or use it as a supporting weapon. Otherwise, it’s still a fantastic skill for PvE, especially after being upgraded.
In PvP, it’s quick animation and armor penetration helps it do well. However the short range of the ability makes it harder to use properly.
Indomitable
Indomitable adds Grit to Armor Breaker, giving you resistance to Staggers.
Grit is nice on the War Hammer in general and this gives you an offensive way to trade with an attack that would otherwise stagger you or knock you down.
Indomitable Rating: A – PvE and PvP
The situations where you can use this to counter a stagger are really nice. Can be really helpful for countering certain abilities in PvP, but requires timing as it’s one of the War Hammer’s fastest skills.
Lasting Trauma
Lasting Trauma allows Armor Breaker to apply a 20% Rend for 10 seconds on hit.
Having access to Rend on a weapon commonly used by Tanks is actually really good. This particular Rend isn’t a weak one either, only being beaten by a few other Rend options.
Lasting Trauma Rating: S – PvE and PvP
Provided you can use and land the skill consistently, having Rend on one of your primary Damage skills which also has Grit that makes it harder to interrupt is a great thing. While maybe not as impactful in PvP without a second weapon to fully take advantage of the Rend, it’s still potent enough to be able to turn a fight very easily with the War Hammer’s access to crowd control.
Opening Act
Opening Act increases Armor Breaker’s damage against full health targets by 25%.
This is great for tanking in PvE as it allows you to use this skill for opening bursts and apply Rend at the same time. Though the Full health requirement can mean you’ll possibly never benefit from it. It’s still a fantastic option when soloing.
Opening Act Rating: B – PvE, A – PvP
In PvE this is a nice benefit in a coordinated group. Without a Coordinated group however, this passive may never actually see much use unless you’re playing solo. In a solo content is a nice bump in damage, but not big enough to warrant always taking it when you take this skill.
In PvP it’s a bit more common to be fighting someone at full health, due to healing. This can make this a really impactful first skill to use in those situations. Though it’s rarer in 1v1s.
Mighty Gavel
Mighty Gavel is a potent overhead attack that deals 170% Weapon Damage. With a Carnelian Gem slotted, this skill will also taunt all foes hit for 4 seconds.
This skill can be an absolute monster in the right situations. Most of those situations are using the War Hammer for purely single target DPS.
With a cooldown of 20 seconds, Mighty Gavel is one of the War Hammer’s longest cooldowns.
Mighty Gavel Rating: S – PvE, A – PvE (A+ when fully upgraded)
While it’s not always an optimal choice for PvE or PvP given that the War Hammer is more specialized towards area damage, it’s a strong enough ability, especially when upgraded that it can earn its place with good usage.
In PvE it’s a very high damage output skill, making it a viable choice as a DPS weapon. In PvP it’s more a dedicated Block Breaker, as the first hit can very easily break someone’s block, coupled with a strong, immediate follow-up to punish your opponent’s break which can prove to be lethal at low health.
Summary Judgement
Summary Judgement increases Mighty Gavel’s damage by 20% against targets with less than 30% health.
This kind of bonus tends to be better suited for PvE than most PvP, due to the low threshold. It’s still a solid bonus to damage for hitting that mark though.
Summary Judgement Rating: A – PvE, B – PvP
Landing the bonus damage against a PvE enemy is easy, but won’t be too impactful outside of bosses or elites. In those contexts though, it adds a lot of damage over most encounters.
The Threshold being low in PvP does make it a bit weaker, but not entirely unusable. If someone tries to use blocking as means of getting more time to use a potion or such to get out of that threshold, this plus the other passives will allow for a strong punish.
Impact Fracture
Impact Fracture increases Mighty Gavel’s Stamina Damage dealt by 25%
This is what helps Mighty Gavel be a Block breaker. It also makes it really good for bigger elite mobs, which use the Enemy Stamina system.
Impact Fracture Rating: A – PvE and PvP
Increased Stamina damage has good uses in both PvE and PvP contexts. For PvE it helps push those bigger mobs into their vulnerable state even faster than normal, opening a huge window for burst damage. In PvP it helps you break blocks much easier, allowing you to easily punish a lot of other weapon types.
Expedite
Expedite grants 30% Haste for 3 seconds on a successful hit with Mighty Gavel.
Since this also triggered by Justice For All, you’ll be able to benefit from this passive pretty well. In PvP it’s a big enough haste to help you stick on someone.
Expedite Rating: B – PvE, A – PvP
While its a decent Haste, you won’t need it too often in PvE, which reduces its value.
In lot of PvP cases, you wouldn’t be taking Justice for All and instead opting for the stronger PvP ultimate in Aftershock. This means this would provide more value, if you run the skill at all.
Justice For All (Juggernaut Ultimate)
Justice For All allows you to perform a second, follow-up attack to Might Gavel that deals 220% Weapon Damage. This is performed by pressing your attack button during Mighty Gavel.
This is the PvE DPS go-to for Ultimates. It makes one of your hardest hitting skills hit a second time, while also hitting harder than the first.
Justice For All Rating: S – PvE, B – PvP (A for some 1v1 PvP situations)
This is hands down the best skill to take for damage in PvE. While Aftershock can provide a consistent bonus, it requires a Malachite Gem to benefit from the Cruel Perk that would actually allow it to match this. This has no requirement and can still let you use a Carnelian if you’re tanking.
In PvP its use is a bit more limited, as Aftershock’s consistent crowd control and sticking power make the War Hammer a much bigger PvP threat, especially in large scale PvP. However in 1v1s, if you’re using Mighty Gavel as a Block Breaker, this can allow for a simple follow-up to punish block breaks.
Wrecking Ball
Wrecking Ball strikes the ground around a target, dealing 90% Weapon Damage and knocking them down them.
A decently hit and a crowd control effect that can’t be reduced can make this an ideal combo starter if you can land it.
With a cooldown of 15 seconds, Wrecking Ball is one of the War Hammer’s shorter cooldowns.
Wrecking Ball Rating: A – PvE and PvP
In PvE this skill can deal decent damage, and the Flatten can provide a little extra safety or interrupt enemy attacks. In PvP, the extra crowd control can be nice, but this skill’s long windup can make it easier to evade. It’s not the best skill out there by any means, and the War Hammer definitely has better options.
Safety Measures
Safety Measures grants a 20% Fortify effect for 7 seconds on successful hits with Wrecking Ball.
A strong fortify can reward good usage of this skill, but really doesn’t do much for the War Hammer in the grand scheme of this weapon.
Safety Measures Rating: B – PvE and PvP
While the fortify is nice for PvE, unless you’re tanking you won’t often need or use its effects. In PvP it’s a very minor bonus, as the Flatten from the skill can reduce the duration where Fortify would be necessary.
Breathing Room
Breathing Room allows Wrecking ball to also hit targets within 1.5m of the skill’s impact area.
While this adds a tiny bit of AoE, it mostly end up just providing consistency to an otherwise slow skill. This makes it harder to miss, while also giving some potential to knockdown a crowd of people all at once.
Breathing Room Rating: B+ – PvE and PvP
This upgrade is still pretty situational, but in situations where you want the extra bit of AoE, it can help. In PvP it does make it more consistent as a setup tool, by making it harder to avoid.
Juggernaut Passives
Epitome of Bonk!
Epitome of Bonk! grants 10% Armor Penetration for all War Hammer Light and Heavy Attacks.
This is a small bump up in damage, especially against Elites and higher-level enemies where it becomes a little more noticeable.
Epitome of Bonk! Rating: S – PvE and PvP
This does a fairly good job increasing your damage overall. It comes in handy against Elites and just higher leveled enemies in general for PvE. In PvP it also helps you get more damage against the armor stacking front liners that you’d likely be smacking anyways.
Exhaustive Attacks
Exhaustive Attacks allows all War Hammer abilities to apply Exhaust, reducing enemy stamina regeneration by 20% for 5 seconds.
This is purely a PvP passive, as Enemy Stamina functions entirely differently which this will not affect.
Exhaustive Attacks Rating: C – PvE, A – PvP
In PvE there’s not much stamina recovery to reduce. Unless this similarly slows shield recovery for enemies or keeps larges enemies vulnerable longer, it just won’t have any value.
In PvP, a 20% reduction to Stamina Regen may not be a huge thing, but the biggest thing it does is reduces how often the opposing front liners can block attacks or dodge. This gives it a bit of value in Wars or Outpost Rush, but not too much overall.
Quick Recovery
Quick Recovery reduces all cooldowns by 7% for successful hits with Heavy Attacks.
Paired with Hardened Steel, this can be a reliable way to increase your DPS, the only problem becomes consistently landing the hits. Given this is one of the War Hammer’s only means of reducing cooldowns outside of gear perks, this is quite good.
Quick Recovery Rating: S – PvE and PvP
With this being a solid way to reduce your cooldowns and the amount of Heavy Attack bonuses you get from this tree in general, there’s no reason to not take this passive. While slightly less reliable in PvP, any hits you do get will still contribute to the general damage output of this weapon.
Hammer Time
Hammer Time grants a 20% Empower Effect for 4 seconds on Successful Heavy Attacks.
A 20% Empower to add to the pile of bonuses you get for Heavy Attacks. What’s not to like here.
Hammer Time Rating: S – PvE and PvP
Being right at the top of the tree, this node is easy to access and can actually often be one of the best nodes to start with while leveling. Even in PvP it can be fairly reliable with practice.
Contemption
Contemption increases damage of Heavy Attacks by 15% against targets under 30% Health.
Despite the threshold, this actually tends to be a better bonus overall. It’s restricted to Heavy Attacks, but you have so many bonuses going for Heavy Attacks that there’s little reason to not take it.
Contemption Rating: S – PvE and PvP
The biggest thing is that this improves what you’ll already be doing a lot of to reach this threshold. A lot of the Heavy Attack focused bonuses on War Hammer are great, and make them a strong source of overall DPS.
 Power Through Pain
Power Through Pain grants a 35% Empower effect for 1 second after being hit.
This is yet another bonus you’ll trigger often during Heavy Attacks, especially if you take Hardened Steel to be punished less for doing so.
Power Through Pain Rating: A – PvE, C – PvP (S in Wars)
While this is a good bonus, it’s a bit unreliable even in PvE. It requires you to be hit and lasts for such a short time that only Light Attacks and Armor Breaker will often be able to benefit from it as a Tank. As a DPS, forget taking this as unless you’re letting a minion beat you up, you’ll never get to use it consistently.
The Duration makes it super unreliable in PvP outside of Wars. In Wars this bonus will often be up constantly due to the near constant barrage of attacks. This makes it incredibly strong there
Hardened Steel
Hardened Steel adds Grit to Heavy Attacks and grants 12% Fortify while the Heavy Attack Grit is Active.
Grit AND Fortify while just using Heavy Attacks is a nice combo. This makes them harder to interrupt while also reducing your incoming damage while doing so.
Hardened Steel Rating: S – PvE and PvP
More rewards for your most often used attack is pretty great. Especially ones that make it both safer and more consistent.
The Crowd Crusher Tree
The Crowd Crusher Tree is where almost all of our Crowd Control and AoE Damage can be found. The Active Skills for the Crowd Crusher Tree are Clear Out, Shockwave, and Path of Destiny.
Clear Out
Clear Out performs a wide swing that deals 100% Weapon Damage and knocks enemies back 4 meters. This ability has Grit, preventing it from being interrupted by staggers.
Being completely honest, this really only has some slight niche use in Wars to knock people off capture points. Beyond that it doesn’t offer much in terms of damage or decent utility.
With a Cooldown of 15 Seconds, Clear Out is one of the War Hammer’s shorter cooldowns.
Clear Out Rating: C – PvE and PvP (B in Wars with Perk)
This skill just doesn’t offer enough to really justify taking it in most cases. However in Wars alongside its perk, it can shove people a considerable distance away. Assuming it doesn’t just get blocked, you can push people clear off points from any angle.
Power Cleaner
Power Cleaner grants a 20% Fortify Effect to all allies within 4 meter after a successful hit with Clear Out.
This adds to Clear Out’s niche War applications, as you’ll likely have a ton of Melee fighters near you when you use this skill. Fortifying your entire front line or at least a good majority of them is a good bonus
Power Cleaner Rating: C – PvE and PvP (A in Wars)
Despite being a small Fortify, every bit of extra damage that you and your allies can take in a War is a good bonus to have. While the skill itself is really niche, this bonus does grant a lot of merit to taking it.
Clean and Refreshed
Clean and Refreshed reduces Clear Out’s cooldown by 5% for each enemy hit by the skill.
Yet another War-specific bonus. While this is a little more broadly applicable and can be used against groups of PvE enemies as well, it also just pushes most PvE enemies away making it harder to follow up on.
Clean and Refreshed Rating: B – PvE, C – PvE (A in Wars)
This bonus is pretty nice for Wars, given that any given use of the skill could be hitting 5+ people. It can really add up in Wars.
However most PvE and PvP situations will not have you hitting as many enemies, nor would you want to knock them away as a Tank or DPS. This leaves this with a lot to be desired.
Swing Away
Swing Away grants 30% Haste for 3 seconds upon a successful hit with Clear Out.
This can at least help you follow up after knocking someone away, though not super well. It does however do exactly what you’d need for you guessed it, Wars.
Swing Away Rating: B – PvE and PvP (A in Wars)
Being able to shove people away then immediately claim the created space with the Haste granted is really nice in Wars.
Shockwave
Shockwave slams your War Hammer into the ground, dealing 60% Weapon Damage in a 3 meter radius. Enemies hit by Shockwave are stunned for 2 seconds. With a Carnelian Gem, this skill will taunt enemies on hit for 6 seconds.
This is easily one of the quickest mass stuns any weapon has available to it. It makes it great if you get outnumbered and just need space to single people out or to set up for another skill.
With a cooldown of 20 seconds, Shockwave is one of the War Hammer’s longer cooldowns.
Shockwave Rating: S – PvE and PvP
Honestly, the AoE stun and taunt make it great for what you want to do as a tank. The same Stun can also give it quite a bit of impact in PvP as well. Add in the utility of the first upgrade and it’s great in situations where you get outnumbered. Add in its perk for applying Rend and it’s a great skill overall.
Frailty
Frailty applies a 10% Weaken that lasts 10 seconds to enemies hit by Shockwave.
The AoE Stun, followed by a long duration Weaken is a really strong combo of crowd control and debuffs for PvE and PvP alike.
Frailty Rating: S – PvE and PvP
Weaken helps make your job easier as a Tank or bruiser in both PvE and PvP. Given that it’s a long duration and you have access to Fortify as well, this will help really reduce the incoming damage you take.
Meteoric Crater
Meteoric Crater extends Shockwave’s radius to 4 meters.
This adds an extra meter to the radius for Shockwave. Not super important for PvE, but extremely helpful in PvP, especially Wars.
Meteoric Crater Rating: C – PvE, A+ – PvP
In PvE, it doesn’t matter if you’re the Tank or just have a Tank in general. Everything will be grouped up enough that the extra meter won’t matter.
In PvP and Wars Especially so, every bit of range helps make it more consistent and apply the Stun and Weaken to a much larger area. With the armor perk, this will also even be applying more Rends, making your targets take more damage as well.
Path of Destiny
Path of Destiny is a powerful ground attack that deals 70% Weapon Damage to enemies in its path. This skill creates three overlapping AoE that are roughly 3 – 4 meters across in a line in front of you, meaning this attack has a range of roughly 9 – 12 meters.
This skill is great, because for a lot of melee Weapons, they lack this large of an AoE in their skills. There’s even sweet spots where each AoE overlaps and it can deal double damage.
With a cooldown of 22 seconds, Path of Destiny is one of the War Hammer’s longest cooldowns.
Path of Destiny Rating: S – PvE and PvP
Short of Hatchet and Spears being thrown, this is one of the longest range skills across all melee weapons. It covers a massive area, which makes it incredibly potent in 1vX situations while also just generally giving you a wider range that you can threaten.
Seismic Waves
Seismic Waves staggers all enemies hit by Path of Destiny.
The stagger can be nice in PvE, helping to slow down groups of enemies slightly. Does a lot more in PvP, when you’re landing it on groups without Grit.
Seismic Waves Rating: B – PvE, A – PvP
This best thing this can do in PvE is Stagger an enemy on the edge of one of the shockwaves into the edge of another one, making it a bit easier to land the sweet spots. It also will generally result in a double stagger too, really keeping enemies in place for a bit.
Stimulated Reduction
Stimulated Reduction reduces Path of Destiny’s cooldown by 5% for each enemy it hits. This effect cna trigger a max of 5 times per use, for a max reduction of 25%
This can make Path of Destiny a really short cooldown in Wars, easily knocking off 25% of its cooldown.
Stimulated Reduction Rating: A+ – PvE and PvP
While the cooldown is nice, it can be a little tough to get the most out of in a lot of situations. Though, those situations can be forced and let you get a ton of extra damage out of this skill by using it more often. You’re basically guaranteed value out of this skill in Wars and large skirmishes.
Crowd Crusher Passives
Outnumbered
Outnumbered grants a 20% Fortify effect when at least 2 enemies are within 3 meters of you.
Given all of this tree benefits from having many enemies nearby to hit with various skills, this helps a ton with allowing you to do exactly that.
Outnumbered Rating: S – PvE and PvP
With a two enemy minimum, this is pretty easy to benefit from in most situations outside of 1v1s. While it’s a small Fortify, it’s pretty free and a really reliable pick up.
Facilitated Expedition
Facilitated Expedition grants a 15% Haste for 3 seconds after any hit on a debuffed target.
Especially in a PvP scenario where you have Aftershock, this will be active nearly every time you hit someone.
Facilitated Expedition Rating: S – PvE and PvP
With the high amount of long lasting crowd control and debuffs, this is a super reliable haste. Its great for both kiting in solo PvE and catching enemies in PvP.
Resurgence
Resurgence reduces debuff duration on you by 25% after two successful Light Attacks. This can only trigger once every 5 seconds.
With as many bonuses you have for Heavy Attacks and how often you’ll want to use those instead this is a pretty dead passive. It can still rarely help Tanks, but the cooldown timer in combination with partial reduction for it makes it very unreliable
Resurgence Rating: C – PvE and PvP
Most Debuffs don’t last long enough for this to be practical. Even against another War Hammer, at most you’d be knocking 2.5 seconds of your longer debuffs like Frailty. In reality, you’ll usually only be knocking off 0.5 seconds or less off most debuffs.
I Can Do This All Day
I Can Do This All Day reduces Stamina Damage by 30% when blocking Melee Attacks.
As a Tank, you need this. This lets you more easily block melee attacks and properly Tank with the War Hammer.
I Can Do This All Day Rating: S – PvE and PvP
Whether you’re a Tank, Bruiser, or even a DPS this will always be useful. This makes it so matter the situation in PvE or PvP, if something is hitting you with melee attacks, you can more easily block their attacks. In Expeditions and PvP this is especially important as enemy players as well as Expedition Bosses can very easily break your Block without this passive.
Guarded Sprint
Guarded Sprint grants a 10% Fortify effect while Sprinting.
Sprinting is your default form of movement, so this is a free Fortify while moving.
Guarded Sprint Rating: A – PvE and PvP
It’s a small Fortify that will help you more safely reach your opponent. It’s not a significant bonus, but it does help as the weapon itself lacks an actual gap closer ability.
Concussive Impact
Concussive Impacts increases your damage by 15% against targets with War Hammer Debuffs.
Free damage for doing what the War Hammer does best? Absolutely worth taking.
Concussive Impact Rating: S – PvE and PvP
Given how frequently and reliably the War Hammer can apply debuffs, this is incredibly valuable. In every context it’s super easy to keep a debuff on one or several targets for extended periods of time.
Prevailing Spirit
Prevailing Spirit grants 35% Life Steal to Crowd Crusher Abilities.
This lets you recover health by landing abilities from the Crowd Crusher Tree. This in particular makes Path of Destiny and Shockwave really great in general.
Prevailing Spirit Rating: S – PvE and PvP
This passive really helps keep you standing. In Wars or other situations where there’s plenty of targets, this can heal you for quite a bit. Compared to most other Life Steal effects, 35% is definitely not something to pass up on, especially when it’s being applied to AoE attacks.
Acceleration
Acceleration reduces all cooldowns by 7% for successful Light Attacks on debuffed enemies. This can trigger up to 5 times per attack.
This gives a bit of utility to Light Attacks and is usually pretty good to take alongside Quick Recovery. This makes it so regardless of which attack type you use, you’ll be reducing your cooldowns. With many of your light attacks having cleave, you can often get multiple hits when swinging into groups and reduce your cooldowns even more.
Acceleration Rating: S – PvE and PvP
While this does have the requirement of the target being debuffed as well, it doesn’t hold it back much, as you can typically apply debuffs fairly frequently using both this and Quick Recovery. It won’t be the primary form of attack while you’re under a lot of threat, but can still be useful most times regardless.
Aftershock (Crowd Crusher Ultimate)
Aftershock applies an additional 20% Slow for 4 seconds when applying any crowd control effect.
This right here is what makes the War Hammer great in PvP, Wars especially. You’re able to consistently apply this Slow with most skills. Given in War contexts you won’t be the only War Hammer out there, this will be going nearly constantly.
Aftershock Rating: A – PvE, S – PvP
Despite this being more PvP oriented, this passive still helps in PvE a fair bit too. It’ll be one of the main ways you can apply and maintain the Concussive Impact bonus. So while not directly adding damage, it is indirectly making it easier to apply that 15% bonus.
In addition to Concussive Impact, this also gives you a lot of power to stick to a target in PvP as well as long as you land your abilities. It is by no means a weak Slow, even though it is a bit short, it’s in addition to the crowd control that applies it.
War Hammer Perks
 Empowering Armor Breaker
 Empowering Armor Breaker
Empowering Armor Breaker grants additional damage to your next attack after Armor Breaker breaks a Block. This effect applies only to your next hit within 5 seconds. On Weapons, this increases damage by 24-50%. On Armor, this will increase damage by 3-29% instead.
If you can consistently block-break an opponent, this can have a huge impact in a lot of situations. Pairing it with Mighty Gavel can be a very potent combo due to its higher stamina damage.
Empowering Armor Breaker Rating: C – PvE, A – PvP
In PvE, there are less chances to make use of this passive, though it cna still be useful in those rare cases.
In PvP, especially paired with Mighty Gavel, can lead to some absolutely devastating damage. If you’re able to consistently set up these breaks, you could even pair it with Fractured Rend for even stronger follow-up.
Refreshing Mighty Gavel
Refreshing Mighty Gavel reduces the cooldown of Mighty Gavel when hitting a target. This can trigger twice per swing, for a max of 4 triggers with Justice For All. On Weapons, this reduces the cooldown by 9.6-14% per trigger, for a maximum possible reduction of 56%. On Armors, this reduces the cooldown by 5-9.8%, for a maximum possible reduction of 39.2% instead.
With this only requiring hits, and rewarding you for hitting multiple targets, this is easily one of the single best DPS perks to take if you run Might Gavel. Using in on your weapon and cutting the cooldown by 28-56% can be very impactful and shave several seconds of cooldown off the skill.
Refreshing Mighty Gavel Rating: S – PvE, A – PvP
This makes the skill insanely strong for PvE, with the potential to halve its cooldown on each use. While you won’t always get that perfect scenario, even using it every 15 seconds will be more than enough in most cases.
If you want to use Mighty Gavel in PvP, this can be a great help to use it often. However, it will require set up to get one, let alone both hits in. Though this is one of the strongest attacks of the War Hammer, so it could be impactful in small-scale PvP situations.
Penetrating Wrecking Ball
Penetrating Wrecking Ball grants Armor Penetration when using Wrecking Ball. on Weapon, this will grant 19-33% Armor Penetration. On Armor, it will grant 5-19% Armor Penetration instead.
This is bonus damage to an attack that already hits hard and applies crowd control. If you’re using the ability, there’s no reason not to take it.
Penetrating Wrecking Ball Rating: S – PvE and PvP
This will typically be more effective in PvP against the Heavy Armor players, but can also have a good impact to how quickly you take down monsters in Elite Points of Interest as well. As the monsters there will have more stats from being Elite, potentially their modifiers and them being generally higher level than you.
Sundering Shockwave
Sundering Shockwave applies a Rend for 10 seconds to enemies hit by Shockwave. On Weapons, this will apply a 9.6-14% Rend. On Armor, this will apply a 5-9.8 Rend instead.
An AoE Rend on top of an AoE Stun and Taunt, is a dream for any Tank, especially in PvP. Even though it’s a weaker Rend than that of Armor Breaker, it has more AoE, making it ideal for situations with multiple targets.
Sundering Shockwave Rating: A – PvE and PvP
A Rend will always be useful as a Tank. This one in particular helps keep Shockwave super relevant for however you want to play War Hammer, and makes Shockwave an incredibly strong and versatile skill overall.
Repulsing Clear Out
Repulsing Clear Out increases the knockback distance of Clear Out. On Weapons, this increases the knockback by 112-209%, knocking foes back 8.5-12 meters. On Armors, this increases the knockback by 50-146%, knocking foes back by 6-10 meters instead.
This cna be insane for PvP modes where you absolutely want to shove players away, like a Capture Point for Wars or similar. If you sacrifice a weapon slot, you can push them up to 12 meters away, which is a considerable distance, all things considered. Even on Armor, shoving them 10 meters away is still a considerable distance.
Repulsing Clear Out Rating: C – PvE and PvP (A+ in Wars)
Most times you won’t want to take this skill or this perk. It can be used to force someone off a point, but this only matters in situations where you actually need to keep someone off an objective. For that specific Situation, however, it is quite good.
Leeching Path of Destiny
Leeching Path of Destiny grants Life Steal for damage dealt by Path of Destiny. On Weapons, this grants 28-47% of damage dealt as Health. On Armors, this grants 10-29% of damage dealt as health instead.
This stacks with Prevailing Spirit, giving Path of Destiny the ability to easily recover 50% or more of the damage it deals. Against any decent-sized group of enemies, this can almost be a more offensive option over a potion.
Leeching Path of Destiny Rating: S – PvE and PvP
This would be a good pick up even without Prevailing Spirit. However since Prevailing Spirit does exist and this stacks with it, it can make Path of Destiny recover a ton of health in a short span of time. In Wars and large Skirmishes, this can very easily keep you standing while dealing a fair bit of damage.
War Hammer Builds
The Tank Build
This is a purely PvE focused setup, focusing on using taking and holding aggro through both raw damage output and careful use of your taunt. This build uses Armor Breaker, Mighty Gavel and Shockwave for Active Skills.
Due to the skills used, this build will actually level very smoothly. It has more than enough damage to carry itself, while still being a durable tank. Using the War Hammer’s two best Single Target Skills makes it pretty lethal overall.
We start leveling by grabbing Hammer Time for the consistent damage it offers over a skill. Then we grab Armor Breaker, Mighty Gavel, I Can Do This All Day, and Shockwave. We pick up I Can Do This All Day here as it’s necessary to the build and needed to get access to Shockwave.
Next we grab Hardened Steel and Epitome of Bonk! to further boost the effectiveness of our Heavy Attacks. Hardened Steel in particular takes away a lot of the risk of using fully charged Heavy Attacks, while Epitome of Bonk! increases their damage slightly. Epitome of Bonk! can also be replaced with Quick Recovery if you’d rather just enable skill usage more often instead of more damage to Heavy Attacks.
Following these passives, we upgrade our two Juggernaut skills. These can be done in any order, however if you’re leveling the weapon or yourself in an Elite Point of Interest, Mighty Gavel’s Impact Fracture upgrade can help stagger larger enemies like Ravagers and others that use the Enemy Stamina System. If you’re not facing many of those types of enemies, then feel free to upgrade Armor Breaker first for the Rend.
After we finish upgrading both skills, we’ll have access to Justice For All, increasing Mighty Gavel’s damage output. With Justice for All taken now, we pick up Quick Recovery or Epitome of Bonk!, whichever you didn’t pick up earlier.
Next we upgrade Shockwave to pick up Frailty then clean up the rest of the useful passives and whichever order we desire. Since the War Hammer functions better as a second weapon for a Tank, we skip Meteoric Crater. The extra 1 meter isn’t worth the point in a lot of cases
Skill Perks, Usage, and Rotations
Armor Breaker is both a heavy hitter against bosses, while serving as setup for Mighty Gavel. Since it’s able to apply Rend while having Armor Penetration itself, it’s able to hit hard without prior setup and set up a rend so the follow up will deal more damage.
Mighty Gavel is THE hard hitter, dealing two instances of incredibly high damage. You’ll need to be careful of when you time your usage of this skill due to the slower animation. The will usually be used after Armor Breaker, so that way it’s hitting with Rend active.
Shockwave is used primarily to apply Weaken, Rend, as well as Stun. While it will have the ability to Taunt with a Carnelian Gem, it won’t be able to taunt nearly as easily or readily as another tank weapon could.
For Weapon Perks, we’ll definitely want to aim for Keen and Vicious to boost our damage output by landing more consistent Critical Hits and boosting Critical Damage. The last slot has a few options. Refreshing Move can be a nice bonus, making every attack you do reduce your cooldowns by nearly 10%. Keenly Empowered can provide an extra boost damage after we crit. Keenly Fortified can make us more durable.
For weapon Gems, we’ll definitely want to go after Carnelian as a tank. The massive boost to threat generation will help you hold aggro much easier. For Runeglass Upgrades, we’ll want to take Punishing or an Elemental option on our Weapon for greater damage output. Our Armor should always take Punishing, to increase damage further.
For Armor perks, we definitely want Sundering Shockwave and Refreshing Mighty Gavel. Both of these perks help our abilities quite a bit. To add on to this, We’ll also want to go for Refreshing, and a mix of the various Ward perks for different enemy factions. Refreshing helps reduce our cooldowns, while the Ward perks reduce incoming damage. Luck is something you will also want until you get perfect gear as well, as it will help you find upgrades a little faster.
For our Amulet we’d want to get Refreshing, Divine, and Health. Refreshing helps with cooldowns. Divine helps our healer(s) keep us topped off. Health provides a percentage bonus to our max health. Luck can also be taken here as well to help find better gear.
For our Earring we’d want to get Refreshing and Nimble. It’ll never be a huge bonus of healing but enough to heal off little bits of chip damage. Nimble increases our Stamina Regeneration. Faster Stamina Regeneration means a more reliable block.
For our Ring we’d want Keen Awareness and Hearty. Keen Awareness will help gives us a little more consistency with Critical Hits. Hearty boosts our Stamina a bit giving us more Stamina to work with.
Skill Rotation
This build doesn’t really have a specific rotation of skills, mostly just using them as they come off cooldown after an initial roation.
- Heavy Attack
- Armor Breaker
- Heavy Attack x2
- Mighty Gavel
- Heavy Attack x2
- Shockwave
- Heavy Attack
- Light Attack x2
- Repeat
 Heavy Attack
 Light Attack x2
 Repeat
We open with a Heavy Attack to trigger Hammer Time. We use Armor Breaker to get a heavy hit in while applying Rend. We then do two Heavy attacks followed by Mighty Gavel and two more Heavy attacks. This lets us get in several hard hits while the Rend is Active and helps bring Armor Breaker back up sooner.
Then our first Rend should be expiring, so we reapply it with Sundering Shockwave while applying Weaken in the process. During this Rend application, we’ll be doing a Heavy Attack, followed by two Light Attacks to increase our overall DPS during the downtime of our skills. Hammer Time lasts long enough for two Light Attacks and another half charged Heavy attack in the provided 4 second window.
The reason we don’t do this during the rotation of skills is because of the longer animation of Mighty Gavel and Shockwave. If we try to fit in two light attacks, we’d have to just add an extra Heavy attack as well to refresh Hammer Time for the next skill. Doing two Heavy attacks is simpler and keeps everything within the initial Rend window.
The Bruiser Build
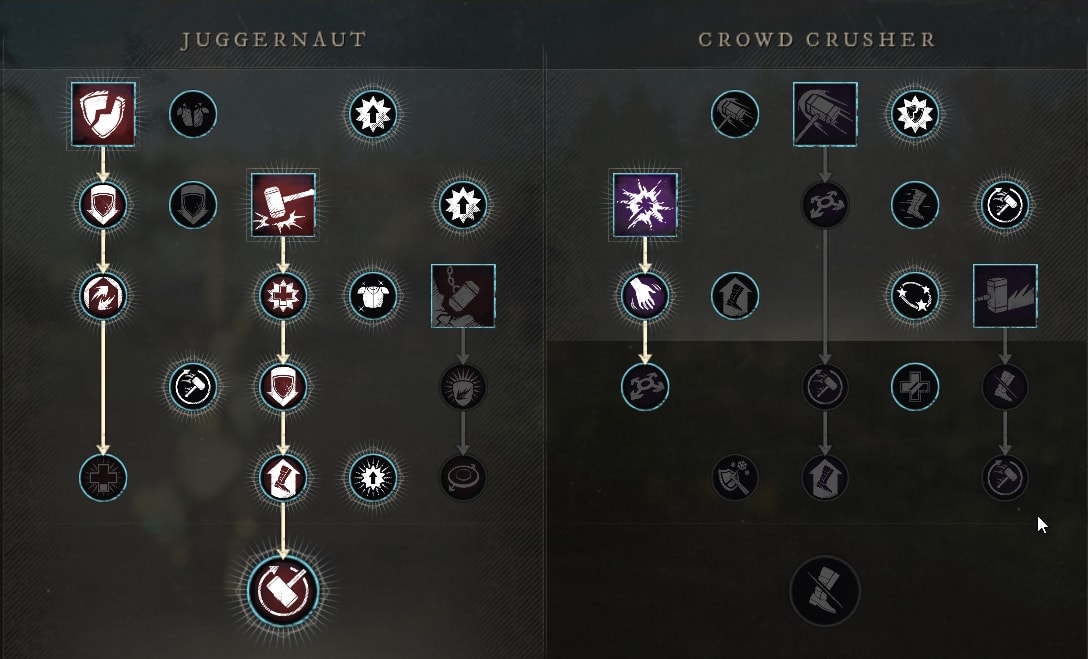
This is the build commonly used in War, or the general PvP build. It focuses on Shockwave and Path of Destiny Primarily, with Armor Breaker often being the choice for the third skill.
This build can level pretty decently, but is set up around being a weapon you swap to, fire off the skills and swap back to your primary weapon of choice. In a lot of cases, this tends to be the Great Axe.

Just like with the other build above, we start our leveling with Hammer Time. This provides a lot of early and consistent damage. Then we Grab Armor Breaker before moving into the Crowd Crusher Tree. Here we pick up I Can Do This All Day, Shockwave and Path of Destiny.
Then we upgrade Shockwave and Path of Destiny. You can follow the order in the image above for simplicity. But if you want to maximize every point, Meteoric Crater can be delayed until after Path of Destiny is fully upgraded. This is because the Weaken is highly valuable, but the Cooldown reduction on Path of Destiny is a better pick up to rush over the extra 1 meter for Shockwave.
Now, we have to grab a few more passives to unlock Aftershock. So We take Prevailing Spirit, since between Shockwave and Path of Destiny, we’ll be dealing a lot of damage with Crowd Crusher abilities to heal from. Since we’ll be fairly consistently debuffing with the War Hammer as well, we take Concussive Impact for extra damage. Finally we take Outnumbered for free Fortify while we’re in the fray. Then we finally get Aftershock.
After getting Aftershock, it’s back to the other tree, this time to upgrade Armor Breaker to get its Rend effect. Then we grab Epitome of Bonk! for the damage bonus. Quick Recovery is used for access to both Armor Breaker’s final upgrade and Power Through Pain which we take both for our final upgrades.
Skill Perks, Usage, and Rotations
Shockwave is primarily used to Stun the front line enemies and reduce their damage output by applying Weaken. With the Perk, we’ll also be applying a Rend here. All of these contribute to sufficiently debuffing the enemy front line and making them fall easier to coordinated attacks.
Path of Destiny is our Primary damage skill. It’ll end up dealing plenty of damage with all the passives we use. This will generally be held to be combined with other AoE skills to try and take down as many enemies in one burst as possible.
Armor Breaker is a damage dealer and primarily setup for Shockwave, rending enemies and potentially breaking their guard so they can’t attempt to block Shockwave. Keeping the front line rended will make it harder to keep them alive in coordinated AoE bursts.
For our Weapon Perks we’re going to want Keen, Vicious, and Keely Empowered. Keen and Vicious boost our Critical Chance and Damage respectively, helping our attacks abilities to hit harder. Keenly Empowered helps extend that bonus damage beyond just the initial critical hit, giving a small window where we can benefit from increased damage on everything. Alternatively, you can substitute Vicious with Trenchant Crits, giving you the extra crit power of Rogue, but only applying it to Charged Heavy Attacks.
With both Shockwave and Aftershock, Malachite is our best gem option. With near constant slows it’ll be up most of the time. Alternatively, Emeralds can also work but not as reliably. For out Runeglass Gems, Punishing is the most consistent option overall.
For our Armor, we absolutely want to grab all of our ability perks this time. Empowering Armor Breaker is usually an unlikely bonus, but it will help boost one of our AoE Skills if we happen to break a block while using it. Leeching Path of Destiny may not be necessary, but extra healing from it will be really good in a pinch. Sundering Shockwave is an absolute must for the additional Rend. In addition to these three perks, we’ll also be looking for Refreshing, Freedom, and Resilient. These help lower our cooldowns and also take less Critical Damage while also heavily reducing incoming crowd control.
For our Amulet we’re going to want to go after Slash Protection, Flame Protection, and Frozen Protection. This is a purely defensive amulet that will mitigate a lot of the incoming AoE damage in Wars. There’s very few weapons that won’t be affected by these damage reductions.
For our Earring we’re going to look to get Regenerating, Refreshing, and Purifying Toast. This is a simple set of three flexible and useful perks that will be able to be used by both of your weapons. Optionally, you can also go for Nimble if you want to do more blocking.
For our Ring, we’ll want to get Keen Awareness or Strike Damage, and Refreshing. Keen Awareness helps with Critical Hit consistency. Strike Damage is less general, but will help with the War Hammer’s damage output if you’re going to use it for more than just dumping skills and swapping. Leeching is a great filler option, unless you want to boost your Slowing power by picking up Crippling to abuse Aftershock.
Skill Rotation
This build does not have a rotation, as it’s normally a weapon where you use your skills and swap off.
The DPS Build
This build is focused more around group play in Expeditions, but more focused on damage rather than tanking. This build uses Armor Breaker, Mighty Gavel and Path of Destiny for Active Skills.
This build will level exceptionally well, as you have two strong single target attacks and a solid AoE skill to help you along. There’s no shortage of damage between all these skills.
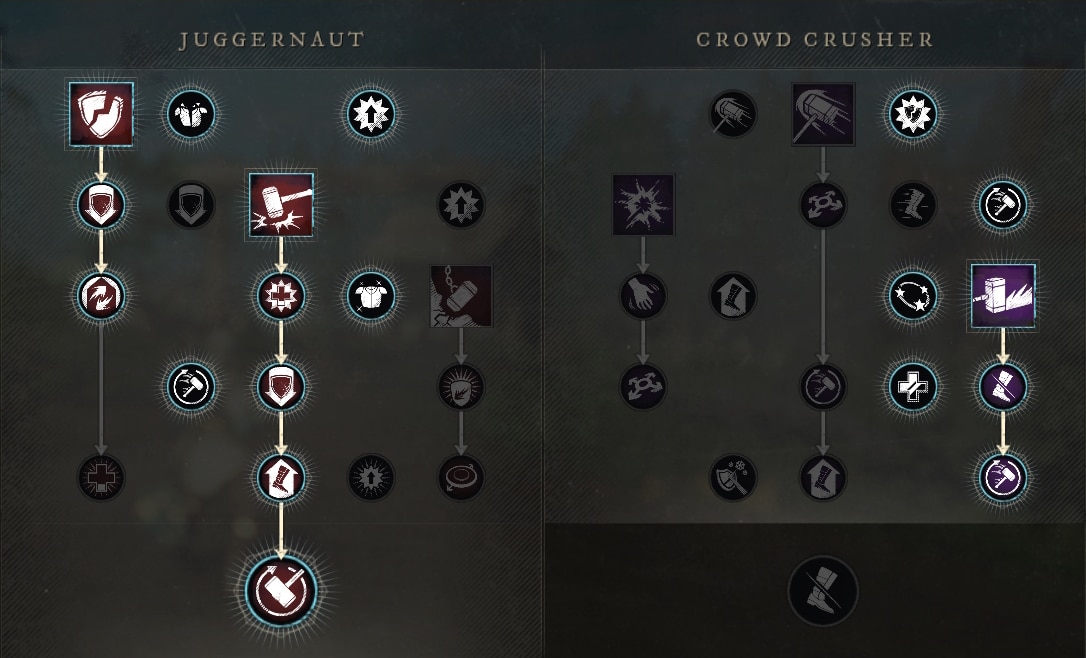
As usual, we start with Hammer Time for the consistent damage it offers. Then we go for our three skills. This means picking up I Can Do This All Day and Acceleration to reach Path of Destiny. We take I Can Do This All Day to help us block more damage when we’re solo, and Acceleration is generally a good pick up.
After grabbing our Skills, we upgrade Armor Breaker to give it Rend. We skip out on the first hit damage bonus, as it’s not going to be often we get to use it outside of solo. Following this we immediately grab Concussive Impact now that we have a consistent way to trigger it.
Then we grab Contemption to boost our Heavy Attack damage against low health targets. Next we grab Quick Recovery for the extra means of getting cooldown reduction. Then we upgrade Mighty Gavel all the way to Justice for All.
Now that we’ve gotten Justice for All, we’ll pick up Epitome of Bonk! and fully upgrade Path of Destiny. The last point I opted for is Prevailing Spirit to allow path of Destiny to heal for more alongside its perk that we’ll be taking. You can also swap this for Hardened Steel to be able to make more consistent use of Heavy Attack while solo too.
Skill Perks, Usage, and Rotations
Armor Breaker is our dedicated opening skill. The Rend it applies will boost the damage of all the attacks that follow as well as hit the hardest without much extra support.
Mighty Gavel is our powerhouse skill, being our hardest hitting skill. This will always be used during the burst windows created by Armor Breaker for maximum damage.
Path of Destiny is our main AoE skill, to deal damage to large groups of monsters consistently. While it won’t deal more than most attacks will, it does hit a much larger area than either of our basic attacks or other skills.
For Weapon Perks, we want the standard DPS perks of Refreshing Move, Keen and Rogue/Trenchant Crits. Keen and Rogue both serve to boost critical chance and especially boost our Backstab damage. Trenchant Crits focus a bit more on Heavy Attacks specifically, but can be a more flexible option over Rogue for consistent DPS even when solo. Refreshing Move allows for a cooldown recovery closer to 10% per hit between this perk and our passives.
For your weapon Gem slot, Emeralds are typically strongest here. This particular hammer build doesn’t have Shockwave, so we don’t have access to our main stun to use Malachite. Diamonds are also really good in PvE for the consistent bonus. For Runeglass Gems, We’ll want to use Punishing or an Elemental option for increased damage in our weapon. On armor, we’ll just want Punishing.
For Armor Perks we want our skill perks for Mighty Gavel and Path of Destiny again. Refreshing Mighty Gavel will be even more likely to trigger as our focus is purely on damage rather than tanking. Leeching Path of Destiny will heal us for quite a bit against large groups, letting our healer put more focus on the tank. In addition to these Refreshing, Refreshing Evasion and Luck are all good picks.
For our Amulet, the most useful stand-out option we can get is Empowered. This will extend Hammer Time by an extra second, allowing for a stronger rotation. Beyond this, the usual Refreshing, Refreshing Evasion, and Luck are the good options to go for.
For our Earring, we want Beloved to reduce any amount of aggro we pull. Regenerating is still good here as well, despite not being a tank. Otherwise, the usual Refreshing or Refreshing Evasion are also good here too.
For our Ring, we’ll want Strike Damage or Keen Awareness alongside Refreshing, Leeching, and Luck. Strike Damage boosts our overall damage, which helps more than Keen Awareness often does due to the inherently low crit rate of the War Hammer. Keen Awareness can still be good if you get Keen on your weapon
Skill Rotation
This is the basic rotation of skills, this however will change slightly depending on whether or not you were able to get Empowered on your amulet. A high level of Empowered will allow for a slightly stronger rotation.
- Heavy Attack
- Armor Breaker
- Heavy Attack x2
- Mighty Gavel
- Heavy Attack x2
- Path of Destiny
- Heavy Attack
- Light Attack x2
- Repeat
This is very similar to the one used for the tank play, except without having to block and interrupt it nearly as often. We open with a Heavy Attack to trigger Hammer Time and immediately follow that with Armor Breaker. We do two Heavy attacks before going into Mighty Gavel and Path of Destiny to add as much damage into the burst window as we can.
After the initial rotation we use the pattern of Heavy Attack followed by two Light Attacks until our skills are back up again. Mostly, we’re only looking for Armor Breaker and Mighty Gavel to be back up.
With Empowered, we’re able to more consistently use the rotation of Heavy Attack into two Light Attacks between skills. This lets us get even more damage in the burst window, and subsequently bring our cooldowns back faster to keep them cycling much more consistently.
War Hammer Weapon Pairings
The War Hammer, being the heavy weapon it is, scales purely with Strength. This can limit it’s options for pairings, by restricting them to melee.
This makes the top 3 Pairings for the War Hammer the Greatsword, Great Axe, or Sword and Shield.
Greatsword
The Greatsword’s flexible nature can allow it to the be more offensive or defensive of the pair, allowing both weapons to be flexible. With both scaling with strength fairly well, both can be damage dealing threats with great AoE. Both or also solidly capable of tanking, though the Greatsword is slightly better equipped to handle that role.
To learn more about the Greatsword, you can check out our Greatsword Guide and Best Builds. This will help you plan out a strong build, should you opt for this pairing.
Great Axe
The Great Axe is a much more offensive and PvP-focused option. Since it scaled purely with Strength like the War Hammer, both weapons will have high damage output, making both incredibly threatening. Since both of these weapons carry a ton of AoE as well, you’re capable of devastating groups of mobs or players alike.
To learn more about the Great Axe, you can check out our Great Axe Guide and Best Builds. This will help you plan out a strong build, should you opt for this pairing.
This build is covered in-depth in our Great Axe and War Hammer “Warring Bruiser” Build Guide. This guide covers the playstyle and gear in-depth, giving you all the information you need to succeed with it.
Sword and Shield
The Sword and Shield are more of a purely defensive pairing, often being the premiere weapon for tanking with. This makes the War Hammer a strong off-hand damage option that also provides a lot of AoE, as well as additional Taunts for PvE.
To learn more about the Sword and Shield, you can check out our Sword and Shield Guide and Best Builds. This will help you plan out a strong build, should you opt for this pairing.
This is the end to this very in-depth guide to the War Hammer in New World. We hope you have learned everything you need to know about this weapon, its usage, skills, perks, builds, combos, and ability rotations. The icons used in this guide are pulled from newworldfans.com‘s database.
Patch Notes Changes
This segment will help you keep track of what has changed for this weapon with the patches as AGS maintains the game in the long-term.
Update 1.1 “Into the Void”
- Armor Breaker
- Lasting Trauma: Increased Rend effectiveness from 15% to 20%
- Opening Act: Increased bonus damage from 15% to 25%
- Adjusted Armor Breaker’s hit box to make it easier to hit enemies on inclines or that have been knocked down.
- Mighty Gavel
- Increased damage scaling from 160% to 170%.
- Reduced the cooldown from 22s to 20s.
- Justice For All: Increased damage scaling from 200% to 220%.
- Wrecking Ball
- Increased damage from 120% to 130%.
- Safety Measures: Increased Fortify buff duration from 4s to 7s.
- Clear Out
- Swing Away: Fixed an issue where this upgrade was less efficient when striking multiple targets.
- Shockwave
- Sundering Shockwave (Item Perk): Reduced the maximum Rend effectiveness from 20% to 10%.
- Path of Destiny
- Leeching Path Of Destiny (Item Perk): Fixed a bug that prevented this perk from working when the Stimulated Reduction modifier was equipped.
- Passives
- Exhaustive Attacks: Increased stamina regeneration penalty applied by the Exhausted debuff from 15% to 20%
You can find the full patch notes for New World Update 1.1 “Into the Void” in our New World Patches archives.
Update 1.2 “Winter Convergence Festival”
- Path of Destiny
- Reduced hit stun from 1s to .33s.
You can find the full patch notes for New World Update 1.2 “Winter Convergence Festival” in our New World Patches archives.
Update 1.3 “Expedition Mutators”
No significant changes.
Update 1.4 “Heart of Madness”
- For the starting beach experience in Windsward, the Watcher now offers players a choice of 4 weapons from a weapon rack to better suit their playstyle.
- Players can choose between a Warhammer, Fire Staff, Bow, or Hatchet.
- Path of Destiny
- Stimulated Reduction: Updated description to specify that the cooldown reduction only occurs on the first 4 enemies hit by this skill.
- Mighty Gavel
- Justice For All: Fixed an issue that caused the second hit to refresh the cooldown of the ability.
- Outnumbered: Fixed an issue that prevented this passive from functioning when its conditions were met.
Update 1.5 “Arenas”
- Path of Destiny: Fixed an issue where Crits were not dealing increased damage. Reduced damage of non-Crits from 110% to 100% to account for additional Crit damage.
Update 1.6 “Summer Medleyfaire”
- Updated descriptions for several weapon abilities to specify that they grant Grit:
- Warhammer: Clear Out, Shockwave, Wrecking Ball
- Refreshing Mighty Gravel: Now recharges on hit (max 3 targets).
- On armor: 5% to 9.8% based on Gear Score.
- On weapon: 5% to 14% based on Gear Score.
- Repulsing Clear Out: Now has increased effectiveness while on a Hammer.
- On armor: 50% to 146% based on Gear Score.
- On weapon: 50% to 209% based on Gear Score.
- Penetrating Wrecking Ball: Now has increased effectiveness while on a Hammer.
- On armor: 5% to 19% based on Gear Score.
- On weapon: 5% to 33% based on Gear Score.
- Sundering Shockwave: Now has increased effectiveness while on a Hammer.
- On armor: 5% to 9.8% based on Gear Score.
- On weapon: 5% to 14% based on Gear Score.
- Leeching Path of Destiny: Now has increased effectiveness while on a Hammer.
- On armor: 10% to 29% based on Gear Score.
- On weapon: 10% to 47% based on Gear Score.
- Empowered Armor Breaker: Now has increased effectiveness while on a Hammer.
- On armor: 3% to 29% based on Gear Score.
- On weapon: 3% to 50% based on Gear Score.
Update 1.7 “Brimstone Sands”
- Fixed an issue that caused the War Hammer Shockwave attack to be unblockable and stun through blocks.
You can find the full patch notes for New World Update 1.7 “Brimstone Sands” in our New World Patches archives.
Update 1.8 “Winter Convergence Festival 2022”
No significant changes made in this update.
You can find the full patch notes for New World Update 1.8 “Winter Convergence Festival 2022” in our New World Patches archives.
Update 1.9 “Fellowship and Fire”
Reviewed all weapons to make more clear differentiations between attacks that are intended to be for Crowd Control and Damage. Removed Stagger from damage-focused abilities, and reduced damage for stagger-focused abilities.
- Shockwave damage reduced from 80% to 60%.
- Wrecking Ball damage reduced from 130% to 90%.
- Clear Out damage reduced from 115% to 100%.
- Path of Destiny damage reduced from 100% to 70%
Added in Taunt Gem compatibility to several weapons and abilities to create additional choices when tanking:
- Mighty Gavel (4s on hit taunt)
You can find the full patch notes for New World Update 1.9 “Season 1: Fellowship and Fire” in our New World Patches archives.
Here at VULKK.com we have a ton of useful New World Guides and more and more are being published regularly. We also have all of the news and updates covered to keep you up-to-date with all things New World!
In-Depth New World Weapons Guides and Best Builds
Each one of the guides below is dedicated to one of the weapons available in New World and goes very in-depth from initial overview of each individual ability and passives all the way to the best builds you can use while leveling or in the EndGame.
New World SWORD and SHIELD Weapon Guide and Best Builds
Want to learn how to slice and bash your enemies in New World? This guide is an in-depth dive to all things Sword and Shield in Amazon's MMO!
New World HATCHET Weapon Guide and Best Builds
Want to learn how to hack your enemies to pieces in New World? This guide is an in-depth dive into all things hatchet in Amazon’s MMO!
New World RAPIER Weapon Guide and Best Builds
Want to learn how to carve your enemies to pieces in New World? An in-depth guide for all things Rapier - abilities, rotations, best builds!
New World FIRE STAFF Weapon Guide and Best Builds
Want to learn how to turn your enemies to smoldering piles of ash in New World? This guide is in-depth dive into all things Fire Staff weapon
New World LIFE STAFF Weapon Guide and Best Builds
Want to learn how to utilize the power of light in New World? This guide is an in-depth dive into all things Life Staff in Amazon’s MMORPG!
New World GREAT AXE Weapon Guide and Best Builds
Want to learn how to cleave your enemies in two in New World? This guide is an in-depth dive into all things Great Axe in Amazon’s MMORPG!
New World SPEAR Weapon Guide and Best Builds
Want to learn how to perfectly puncture your foes in New World? This guide is an in-depth dive into all things Spear in Amazon’s MMO!

New World ICE GAUNTLET Weapon Guide and Best Builds
Want to learn how to freeze your foes in New World? This guide is an in-depth dive into all things Ice Gauntlet in Amazon’s MMO!

New World BOW Weapon Guide and Best Builds
Want to learn how to pierce your targets with arrows in New World? This guide is an in-depth dive into all things BOW in Amazon’s MMORPG!