Want to learn how to snipe your foes in New World? This guide is an in-depth dive into all things Musket in Amazon’s MMO!
This guide dives deep into the Skills, Passives, and some builds for the Musket in New World. This guide can be considered a more advanced version of our New World Guide to Weapons for Beginners. By the end of this guide, you should have a thorough understanding of the Musket and with practice be able to fully master it.
The Guide is up-to-date for Patch 1.9.2
At the end of the guide you will find a section that lists all changes to this weapon that AGS has implemented as they maintain and support the game in the long term.
Table of contents
Musket Overview
In New World, the Musket is a very strong and reliable ranged weapon. It has a long reload period which can make it feel clunky to play at times, but thankfully, there’s ways to get around this with skills and passives that make it feel much better overall.
The Musket is a great option in the Damage category, as DPS is the only role it actually has. While it has some utility and crowd control, only the musket really benefits from the effects.
Musket Skills, Passives, and Perks
First we’ll lead off with the skills and passives. We’ll talk a bit about each, their uses and how effective they are. There’s a lot to cover here, so we’ll break it down per tree to keep things organized.
Alongside the general information, They’ll be given a Rating from C up to S tier for both PvE and PvP. C tier is exclusively for the passives that are not that great, either being forced by another upgrade or generally useless. A and B Tiers are middling tiers, putting them between the worst passives and the best, leaning one way or the other. S tier are the good passives, the ones you’re almost always going for if you pick up a skill or want to because it’s useful in many scenarios.
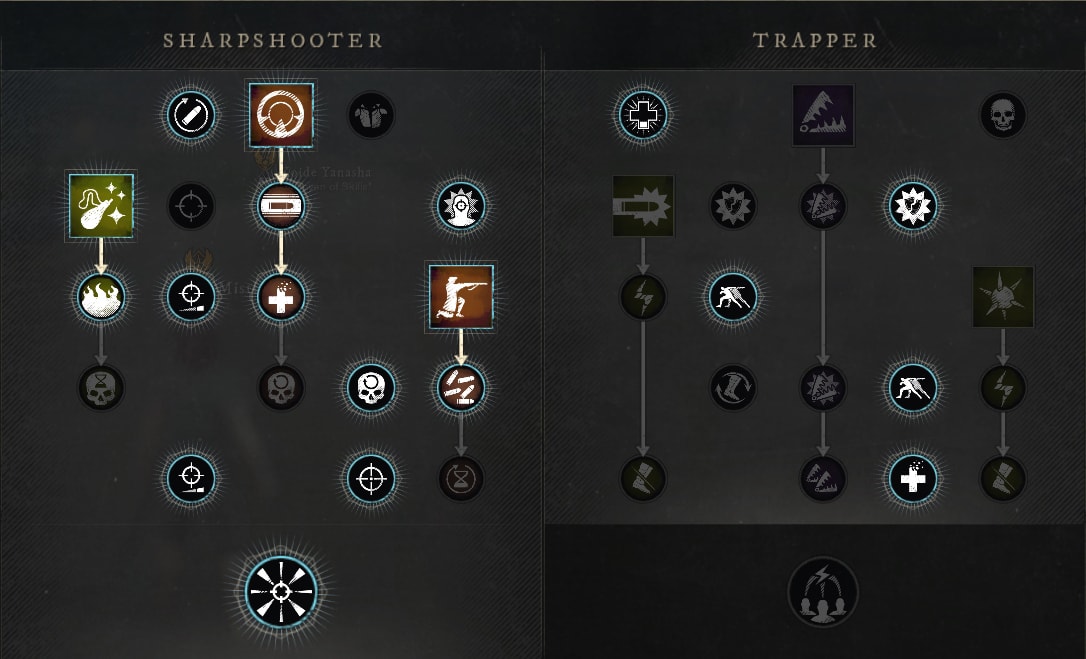
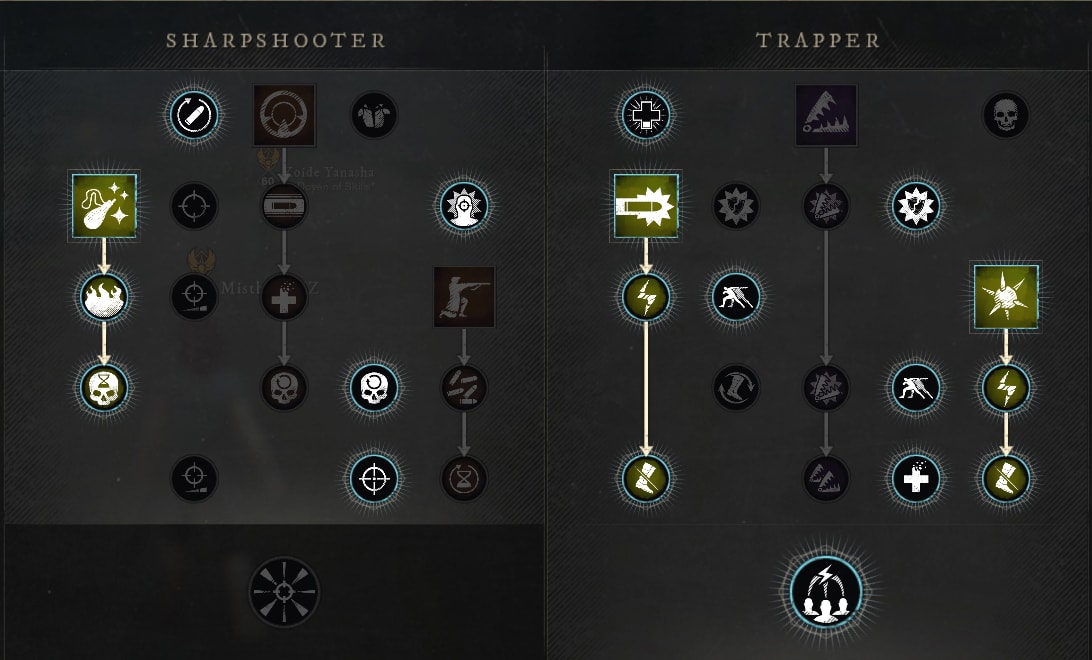
Sharpshooter Tree
The Musket’s Sharpshooter Tree is all about rewarding precision and accuracy, while trying to force you to stay aimed down sights for long periods of time. It has two of the most frequently used skill which you’ll probably see in most builds. It has the Active Skills of Power Shot, Powder Burn and Shooter’s Stance.
 Power Shot
Power Shot overloads the musket with extra gunpowder, increasing the damage of your next shot to 150% Weapon Damage. This cannot used simultaneously on the same shot with Powder Burn or Stopping Power.
As one of the highest single target damage options the Musket has, this makes it very good skill. However, there’s not really enough support for it to make it super worthwhile overall.
With a cooldown of 12 seconds, Power Shot is one of the Musket’s lower cooldowns.
Power Shot Rating: A – PvE and PvP
While it’s a solid skill on it’s own, upgrading tends to feel lackluster until it’s fully upgraded. It tends to be a bit more favored in PvP where First Blood can be used more often. It’s a strong PvE option as well, but there’s better options for raw damage.
With its cooldown being shortened slightly in the 1.1 “Into the Void” Update, it’s a bit more reliable for general use, even when not taking advantage of the bonus damage it gets as a powerful first hit.
Initial Engagement
Initial Engagement grants a 10% Empower for 5 seconds when you land Power Shot.
This is a nice bonus that can make Power Shot really useful when paired with Shooter’s Stance, but without it or other passives, it’s only going to apply to two or three shots at most.
Initial Engagement Rating: A – PvE and PvP
Thankfully since Shooter’s Stance is an absolute must-use skill for DPS in any situation, that support will always be there. It’s still not a huge power boost though, which isn’t really worth much overall. That biggest thing holding it back is that it’s a very short duration.
First Blood
First Blood Increases the damage of Power Shot by 10% against full health targets.
First Blood is in a weird spot, because while the extra 10% ratio on Power Shot is good, the full health restriction only makes it good for Wars and Skirmishes where there’s many targets. Even then it’s pretty lackluster as most won’t be at full health.
First Blood Rating: C – PvE, B – PvP
In PvE outside of solo play, it’ll be rare to get the first hit on anything due to the long animation of preparing Power Shot. You can always load it before the next combat, but it’s still less effective if it’s not a headshot.
In PvP it’s a bit stronger as it’s more likely for a target to be at full health due to the amount of healing that tends to be present. The situations where there’s no healing present is where it shines the most, easily chunking a target down before they reach you.
Bullseye
Bullseye reduces the cooldown of Power Shot by 15% when Power Shot lands as a Headshot.
This is a nice bonus, as the Musket already has decent cooldown recovery, but this initial bonus can push it a bit further and have the skill on a pretty low cooldown overall.
Bullseye Rating: A – PvE and PvP
With practice, Headshots become fairly reliable in most situations. This means this cooldown reduction also becomes pretty consistent. Having this up more often can help make Initial Engagement feel like a much more impactful bonus.
Powder Burn
Powder Burn overload the Musket with gunpowder to make the next shot deal 110% damage while inflicting a Burn for 20% Weapon damage. This Burn lasts for 9 seconds, dealing 180% Weapon damage over those 9 seconds. This effect cannot stack with Power Shot or Stopping Power.
Powder Burn is easily the Musket’s strongest single target damage option, dealing both 110% up front damage as well as another 180% over 9 seconds.
With a cooldown of 15 seconds, Powder Burn is one of the Musket’s shorter cooldowns.
Powder Burn Rating: S – PvE and PvP
While not the strongest immediate burst of damage, the Damage over Time is one of the strongest single instances of Damage over Time in the game. This DoT does quite a bit for your overall damage in PvE as well as prevents your target from reliably benefiting from thing that require them to be full health, like the Rally perk or similar passives.
Backdraft
Backdraft increases your damage by with the Musket by 12% while Powder Burn is applied.
A Damage boost while your DoT is applied is just free damage. While it won’t affect the burn itself it’s still a stronger and longer lasting alternative to the Initial Engagement perk for Power Shot.
Backdraft Rating: S – PvE and PvP
Backdraft is a really solid bonus as it’s a damage buff that’s reliant on a Debuff, rather than counting towards the Empower limit. This leaves it able to be used alongside other Empower bonuses freely.
Chronic Trauma
Chronic Trauma increases Powder Burn’s duration to 13 seconds when Powder Burn connects as a Headshot.
This boost the total damage of Powder Burn to 260% Weapon Damage over 13 seconds as well as extends Backdraft to 13 seconds. This makes it valuable on two fronts.
Chronic Trauma Rating: S+ – PvE and PvP
When you can consistently land headshots against targets, this makes Powder Burn far and away the strongest skill that the Musket has for single target damage. Extending the burn can even allow your other shots to help you maintain this damage buff and DoT effect going all the time much easier.
Shooter’s Stance
Shooter’s Stance roots you in place, increasing your Reload Speed by 75% for the next 3 shots. Shots fired in Shooter’s Stance deal 100% Weapon Damage. This skill can be canceled early or will end when shots are exhausted.
This reduces your shot reload time down to 0.5 seconds per shot. This is a much nicer damage option for both more consistent DPS as well as increased burst.
With a cooldown of 18 seconds, Shooter’s Stance is one of the Musket’s longest cooldowns.
Shooter’s Stance Rating: S – PvE and PvP (S+ when fully upgraded)
There’s never a reason to not take this skill. While it’s a pretty basic skill for what it does, the rapid fire rounds makes it surprisingly powerful. Once it gets upgraded, it gets even stronger providing a lot of potential to reset your other cooldowns when used correctly.
Shoot More
Shoot More increases the number of shots fired in Shooter’s Stance to 5.
Being able to deal 500% Weapon Damage in 3 seconds if you land all the shots is actually really strong. With all the damage bonuses we can get, this can also end up much higher.
Shoot More Rating: S+ – PvE and PvP
This perk extends what was already good about Shooter’s Stance, and is effectively an increase of 200% Weapon Damage over the base skill. There’s so many perks that rely on landing multiple shots or headshots and this lets you activate them all quickly and reliably.
Marksman
Marksman reduces the cooldown of all Musket skills by 25% when you land three consecutive shots in Shooter’s Stance on the same target.
Even more Cooldown reduction for a weapon that already has a decent and consistent way to reduce cooldowns is actually a really nice bonus, given this is in one large chunk. This combined with Called Shot Resupply can very quickly reset your other skills, and even this skill if it’s the last three shots that trigger this effect.
Marksman Rating: S+ – PvE and PvP
With the musket being a hitscan weapon, or rather an instant hitting ranged weapon; this makes the task of landing three shots on the same target pretty reliable. This is made even more reliable by the fact that you often won’t be the focus of an enemy’s attention.
Sharpshooter Tree Passives
The Sharpshooter passives mostly carry the context of rewarding your accuracy or aiming for long period of time.
Critical Reload
Critical Reload grants you an instant reload when you land three headshots within 5 seconds of each other.
Between Skill usage and other passive, this will trigger fairly often in a damage rotation if you’re accurate with the Musket.
Critical Reload Rating: A – PvE and PvP
While the instant reload is incredibly powerful, there’s a timer limiting how often you can activate this ability, which can make it unreliable if your aim isn’t very quick. While there’s plenty of leeway, it’s not always going to be worth specifically going for the headshots to trigger this often.
Greater Accuracy
Greater accuracy removes the accuracy penalty for hip-firing the musket.
While having higher accuracy while hipfiring is nice on some occasions, the only time this tends to be useful is in 1v1s against a fleeing opponent. As this prevents you from being slowed down until you shoot, without having to zoom then quickly shoot.
Greater Accuracy Rating: C – PvE, A – PvP
This is going to be useless in PvE, as anything you hit solo will run towards you. In groups, the enemies should be focused on the tank and you should be aiming anyways.
This is still really niche in PvP, but can be useful for Open World PvP, where you may need to actually chase someone down. Outside of that though, it’s a very weak passive.
Steady Hand
Increases musket Accuracy when Aiming Down Sights for 1.5 seconds. This increased Accuracy resets after firing. This effect triggers after 0.75 seconds during the use of Shooter’s Stance.
With the Musket Accuracy changes in Update 1.9, this can be a very important passive toward keeping your accuracy high. However this often is only needed for much longer-range shots.
Ballistic Advantage Rating: B – PvE, S – PvP
In PvE it’s very rare to play at a range where this passive becomes important. It can still have some use in Solo Open World content, but much more limited.
For PvP however, this passive is nearly mandatory for being able to take longer-range shots. While you can manage shots at shorter ranges without it, past a certain distance it becomes harder and harder to land your shots without this.
Hit Your Mark
Hit Your Mark increases your Headshot and Critical hit damage the further away your target is, up to 15% at 100 meters. This means it’s roughly 0.15% per meter of distance.
Oftentimes you’ll never be maxing this bonus out. The only opportunity it has is in PvP where you can often fight at these ranges in Wars or OPR.
Hit Your Mark Rating: A – PvE, S – PvE
In PvE you’ll always be hovering around the 3-5% bonus range, which isn’t too bad for an entirely passive and non-restrictive bonus. Is it worth the passive point, not usually as there are better passives available.
In PvP and Wars especially, you have more opportunities to fight at this range. So this becomes much more valuable and honestly a must take for PvP.
Called Shot
Called Shot increases your damage by 5% if you’ve aimed down sights for more than 3 seconds.
A measly 5% bonus that will frequently be reset when using any overload skill. If not for that forced reset, it might actually be decent, but since half of our skills are a forced reset for this bonus, it’s not worth the point.
Called Shot Rating: C – PvE and PvP
With every overload shot canceling this bonus, it’s generally not worth it. Especially given that we’ll always have at at least one of these in every build.
Called Shot Resupply
Called Shot Resupply reduces all musket cooldowns by 10% when landing a Headshot.
This is the Musket’s only consistent way of reducing cooldowns, so it’s a definite must have.
Called Shot Resupply Rating: S – PvE and PvP
The consistent and relatively high cooldown reduction from this perk is fantastic. Once you get good at landing headshots, it really helps push more DPS out of this weapon. As it’s also the only cooldown reduction that’s not tied to a skill, it’s also very valuable. The fact that it triggers while in Shooter’s Stance is also a great bonus.
Heightened Precision
Heightened Precision increases your damage by 2.5% for each successful shot while aiming down sights. This effect can stack up to 6 times for 15% bonus damage. This effect ends when you stop aiming or more than 5 second passes between successful shots.
This is effectively a damage boost for Shooter’s Stance and makes it a really strong PvP skill. You can use it in a similar way in PvE which can make it useful, but due to the frequent need to reposition in PvE when solo, it’s a bit less effective there.
Heightened Precision Rating: A – PvE (S in group play), S – PvP
This is incredibly strong in any group activity where you’re able to sit back and freely snipe a target without much risk. However when you’re solo and need to swap weapons or reposition you won’t be able to maintain it nearly as easily.
Empowering Headshot
Empowering Headshot grants a 10% Empower for 5 second when landing a Headshot.
Most of the Musket’s damage comes from Headshots, and this is no exception.
Empowering Headshot Rating: S – PvE and PvP
If you can consistently land headshots, this leads to a consistent DPS increase. Having an Empower that’s up constantly is a super nice bonus. This one also happens to be one of the stronger DPS increases you can get as a passive.
Sniper (Sharpshooter Ultimate)
Sniper grants an option 3x Zoom while aiming with the Musket. The Zoom level is controlled by the Mouse Wheel. Sniper also grants 15% increased damage with headshots.
The zoom can be super nice in PvP, as well as the Headshot bonus. In PvE there’s easier and more consistent damage to be had in the alternative Ultimate. It’s still stronger if you’re super consistent with Headshots, but getting to that point can take a a lot of practice.
Sniper Rating: S – PvE and PvP
The zoom can make getting headshots more consistent at most ranges, but helps the most with farther ranges and also end up hindering closer ranges slightly. The thing that makes this more potent than the other Ultimate is that fact that it’s essentially an increase to Critical Damage, which acts as a multiplier to other damage increases. Without other modifiers, we’re going to be increasing the crit modifier from 1.3x damage up to 1.45x
Trapper Tree
The Trapper Tree is all about slowing your opponents or stopping them in their tracks. It’s Active Skills are Traps, Stopping Power, and Sticky Bomb.
Traps
Traps throws a bear trap which roots an opponent for 3 seconds if they trigger it. These Traps last up to 20 seconds.
Traps are much easier to use in PvE as enemies will walk into them much more readily. In PvP they can be a nice zoning tool for 1v1 or small skirmishes, but outside of that not the greatest.
With a cooldown of 20 Second, Traps are one of the Musket’s Longest cooldowns.
Traps Rating: A – PvE (S when upgraded), B – PvP
With the small radius which Traps cover, they’re strongest against enemies that will follow you into them, or rather PvE enemies. The Root helps you get another shot or two off before they can even reach you. Once you upgrade Traps, you also get additional sustain and damage which makes this ability great for leading faster or more annoying mobs into.
In PvP they’re not entirely reliable for anything other than giving you a bit of area to work with. The Root can often be ignored by Grit, which tends to be common for a lot of melee abilties, especially those with a dash.
Trapped Damage
Trapped Damage applies a 20% Rend to trapped targets for 3 seconds.
A 20% Rend is quite good for a weapon with already high single target burst damage. Get this one a target and combine with all your first hit bonuses for massive damage.
Trapped Damage Rating: S – PvE, A – PvP
Whether it’s PvE or PvP, if an enemy steps on a trap after picking this up, you’re going to do a lot of damage to them. Since the skill remains highly reliable in PvE and less so in PvP it’s bumped up a bit.
Scent of Blood
Scent of Blood heals you for 100% of the damage dealt to trapped targets.
Healing for all the damage you do, when you can do upwards of 1k damage hits as you get towards the endgame is pretty nice.
Scent of Blood Rating: S – PvE and PvP
This will always be really good, and provide a ton of easy sustain for PvE. Against Corrupted especially, you can recover a large portion of your health off just a couple shots.
While traps aren’t insanely reliable in PvP, on the off chance one gets stepped on, this alongside the Rend can make for a lot of unexpected healing in the middle of a fight.
Double Trap
Double Trap allows for two uses of Traps simultaneously, and gives you two charges of the ability. Traps’ cooldown will start after both charges are used.
This bonus can feel really hit or miss. While it doesn’t give you any means of shortening your cooldown, getting two charges can be useful for some of the more particularly aggressive enemies.
Double Trap Rating: B – PvE and PvP
In PvE, this can help with some aggressive enemies like Wolves and Dryad Fighters, but outside of them, it tends to be limited as most enemies are quite slow. With it not being able to apply to bosses to even give the ability to setup a burst window for you and your team, it’s value is very diminished.
In PvP, a second trap gives you a larger zone of influence, but in a very limited way. They’re still very avoidable if you’re not using cover to mask their activation. If someone gets on top of you, a Trap won’t do much to save you.
Stopping Power
Stopping Power overloads the musket with gunpowder, making your next shot deal 120% Weapon Damage while staggering and knocking back your target 3 meters. The effect cannot be used simultaneously on a single shot with Power Shot or Powder Burn.
By itself, this skill is pretty unimpressive even after upgrades. A lot of its strength lies in being an amazingly easy way to setup Lethal Combo, the Trapper’s Ultimate Passive.
With a cooldown of 12 seconds, Stopping Power is one of the Musket’s Longer Cooldowns.
Stopping Power Rating: B – PvE and PvP (S with Trapper Bonuses)
Without damage increases provided by both Lethal Combo and Kick ‘Em When They’re Down, this skill has no really impressive showing at all. However when paired with both, it becomes a super reliable 30% damage boost which can make it worth carrying in both PvE and PvP.
Lasting Impression
Lasting Impressions allow Stopping Power to inflict Exhaust for 8 seconds on hit. Exhaust reduces the target’s Stamina regeneration by 10%.
This weak of a Stamina Regeneration reduction is extremely worthless. However, Exhaust can still trigger Lethal Combo, and that’s fantastic. It’s still a pass-through to the much more practical status effect.
Lasting Impressions Rating: B – PvE and PvP (A with Trapper bonuses)
Exhaust in its current state is one of the weakest debuffs in the game. Stamina Regeneration is already quite high and between bonuses that can easily negate this decrease, it’s never a thing you really want. In our case though it has some minor value, being able to trigger the Trapper’s Ultimate, Lethal Combo.
Supplementary Repulsion
Supplementary Repulsion allows Stopping Power to inflict a 10% Slow for 8 seconds on hit.
While not a strong slow, it’s a longer slow and that’s exactly what we need out of this ability to make it incredibly useful.
Supplementary Repulsion Rating: B – PvE and PvP (S with Trapper Bonuses)
Compared to the other skills on the Trapper Tree, this provides us the longest and strongest damage boost when combined with the Trapper Passives. Without those though, it becomes just a slow, which can be good for consistent headshots, but nowhere near as valuable.
Sticky Bomb
Sticky Bomb is a small explosive that when thrown can stick to any player or surface. It will detonate 3 seconds after impact staggering and dealing 210% Weapon Damage to all enemies within 3 meters of it.
With the limited range this skill has compared to the rest of the musket’s kit, it feels very out of place. It can be slow and clunky to use, and is unfortunately our only AoE tool. Thankfully AoE isn’t what anyone expects out of the Musket, because this is hardly impressive.
With a cooldown of 12 seconds, Sticky Bomb is the Musket’s shortest cooldown.
Sticky Bomb Rating: B – PvE, A – PvP
In PvE these are much less valuable then your more potent single target damage and debuffs. While it can be fun to use, it’s typically not worth it unless you have a really good tank and you’re getting insane value from each use by throwing it into large packs.
In PvP it has a few niche uses, which if you manage to make use of either is pure luck. One is against target behind cover, where it can force them out into the open again. The other is lobbing it into a group contesting a point, which is where it gets the most value.
Unflinching Walk
Unflinching Walk restores 40 Stamina when Sticky Bomb deals damage with its explosion.
Unless you dodge often or do so right before the explosion occurs, you’ll never feel this bonus.
Unflinching Walk Rating: C+ – PvE and PvP
The only single situation/combination of events this makes sense in is when using Tactical Reload for maximum value. In which case, it’d be tossing the Sticky Bomb at something, loading and firing an overload shot, then immediately rolling to fire another shot. Which is a strong burst combo for sure, but not one that’d be used often. We’ll cover that more in-depth in the Builds section though if you want to try it as a play style.
Sticky Slow
Sticky Slow inflicts a 15% Slow for 3 second when landing a direct hit with Sticky Bomb.
That short of a slow isn’t going to be too impactful, especially considering the slow arc of the projectile makes direct hits on anything not running straight at you very difficult.
Sticky Slow Rating: C+ – PvE and PvP
Typically this would be a C rating just due to the low strength and duration alone. However, since it can play a part in the combo we mentioned for Unflinching Walk, it has a niche application where it does well. If not for this, it’d never have a reason to be taken.
Trapper Tree Passives
The Trapper Tree Passives are all about taking advantage of your Debuffs, providing bonuses against both debuffed and low health targets.
Salt On The Wounds
Salt On The Wounds increases your damage by 10% against targets under 30% health.
While 30% is a bit of a low threshold, the Musket packs enough power to quickly reach this bonus and take advantage of it.
Salt On The Wounds Rating: S – PvE and PvP
Normally this low of a threshold wouldn’t be all that great to deal with. However for most targets, the musket will get them to that threshold in just a couple shots. Having the extra power to finish off enemies, especially in PvP can be very impactful for this weapon.
Weakened Defense
Weakened Defense increases the Stamina damage of musket shot by 50 against blocking shields and grants 10% Armor Penetration against targets not blocking with a shield.
Without this, shields will give you a hell of a time. This lets you break most blocks in 2-3 hits, depending on the target. Since it also has the extra Armor Penetration effect, it’s much more applicable and less niche.
Weakened Defense: C+ – PvE, B – PvP
In PvE it helps you break shields, which can be helpful at times. However, it’s also entirely possible to get around this with enough damage as not many enemies are shielded. If the 50 stamina damage was at all times instead of against just shield, it may have value in Elite Farming. Outside of shielded enemies, there aren’t many that will block, making the other half of the passive worthless.
It’s a bit less niche in PvP, as getting shield breaks will set you up to deal some devastating damage to punish. Even if they don’t have a shield, it still punishes them for blocking by increasing your damage which has some interesting uses cases.
Hustle
Hustle grants a 10% Haste for 3 seconds after a dodge.
Considering we’ll be using Tactical Reload often, this will be a nice bonus alongside it, but not entirely necessary.
Hustle Rating: C – PvE and PvP (A with Tactical Reload)
Considering it’s a low value Haste and a short one at that, without a reason to roll, it’s not very practical. However Tactical Reload is a must have, so you can get more use out of it if you like it.
Energy Burst
Energy Burst restores 5 Stamina when attacking an enemy with an active Debuff.
Unlike Unflinching Walk, this is a waste of a passive point. 5 Stamina on hit isn’t going to do much when you already regen so fast.
Energy Burst Rating: C – PvE and PvP
With such a low amount of stamina being returned, it’s just not worth it. Considering rolling is most of your mobility, and this doesn’t even help you kite given that rolling interrupts reloads it has no value in the Musket’s kit.
Empowering Weakness
Empowering Weakness grants a 5% Empower for 5 Seconds when attacking an enemy with an active debuff.
Since this doesn’t specifically state it has to be your debuff, this is a nice pick up for group play. But it does also stack with Lethal Combo and Kick ‘Em When They’re Down for extra damage against debuffed targets.
Empowering Weakness Rating: S – PvE and PvP
With so many easy options to supply your own debuffs and debuffs being a big part of PvP this will always put in enough work to be worth picking up. With it also being an Empower, albeit a weak one, it does mean it’ll be a multiplicative bonus on top of the additive damage bonuses due to where it applies.
Tactical Reload
Tactical Reload instantly reloads your Musket when dodging. This effect has a 6 second cooldown.
Getting a second shot by rolling is a pretty big DPS boost for the Musket. While it does have a cooldown, it’s cooldown means it can be done after every 3rd shot once activated.
Tactical Reload Rating: S – PvE and PvP
While dodging can throw off your aim a bit, after a bit of practice this will become less of an issue. The fact that you’re also not required to use the musket during the cooldown means you can trigger this, weapon swap, use other skills, then swap back and have it ready to do another two shots.
Kick ‘Em When They’re Down
Kick ‘Em When They’re Down increases your damage by 10% against targets with an active crowd control effect (Root, Slow, Stun)
Given the Musket has a couple of easy to apply Slows, much like Lethal Combo, this can be a very powerful option. It’s also not restricted to your crowd control, so will likely be active during most large scale PvP.
Kick ‘Em When They’re Down Rating: S – PvE and PvP
Since crowd control is always present and useful in both PvE and PvP, there’s never a reason to not take this for the extra damage. While it may not consistently provide its bonuses against some beefier PvE enemies, it’s still plenty valuable when it can.
Back It Up
Back It Up increases your walking/strafing speed by 10% when an enemy is within 8 meters.
If an enemy is within 8 meters, you’ve either done something wrong or were caught off guard. This will only increase your speed while aiming, and not sprinting as well, so it’s really not going to do much for you.
Back It Up Rating: C – PvE and PvP
At best, it’s a semi-limited radar when PvPing, as you’ll be able to see it active if someone is within 8 meters. Unless you’re hidden inside cover, 8 meters isn’t going to be enough advanced notice for you to act on, other than swapping weapons to one that may handle close range better.
Lethal Combo (Trapper Ultimate)
Lethal Combo increases Musket Damage by 20% against targets affected by status effects inflicted by Trapper Skills (Traps, Stopping Power, Sticky Bomb).
This is hands down the most reliable damage perk the Musket has, even often being comparable to Sniper in terms of raw damage, but with much less skill and accuracy required.
Lethal Combo Rating: S – PvE and PvP
This Ultimate is really solid all around, often its on par with Sniper in most cases, but without the restriction of needing headshots. Definitely a go-to for PvE, since it doesn’t require being at high range to fully benefit from its intended use case. Still amazing for PvP, but Sniper can be stronger there.
Musket Skill Perks
Below is a list of the Skill perks available to the Musket. The range for the effect value is determined by gear Score. The Minimum value is at Gear Score 200, while the Maximum is at Gear Score 600.
 Crippling Powder Burn
Crippling Powder Burn inflicts a Slow for 5 seconds when hitting a target with Powder Burn. On Weapons, this is a 23-42% Slow. On Armor, this is a 5-24% Slow.
Given this let us set up passives like Kick ‘Em When they’re down without the need for Stopping Power, this is a pivotal perk for PvP. It’s a bit less impactful in PvE as it’s a much shorter bonus than Stopping Power, but you’ll be using Powder Burn plenty enough to benefit from it.
Crippling Powder Burn Rating: A – PvE, S – PvP
In PvE, since you can run Stopping Power and have more success with it there, this reduces the value of Crippling Powder Burn. While it can help you maintain a slow for much longer, you’ll often not want to wait too long on using Stopping Power, as this does not trigger Lethal Combo.
Refreshing Power Shot
Refreshing Power Shot reduces Power Shot’s cooldown when defeating an enemy. on Weapons, this reduces the cooldown by 52-98%. On Armor, this reduced the cooldown by 8.5-54%.
Power Shot is unfortunately designed as a burst skill, specifically an opening burst skill. This gives it merit to being used as a finishing skill, as you’ll have immediately available again on your next target at the high end on a weapon.
Refreshing Power Shot Rating: C+ – PvE, A – PvP
As this skill is aimed more at PvP than any PvE, it has significantly less value in PvE. While it’s one of the Musket’s strongest abilities by a long shot, using it to reliably take down enemies is much harder and typically a waste of potential damage.
In PvP where it’s easier to make use of it as an opening Attack and a general damage ability with this, it can be useful. Since the combination of passives you’d use in PvP can lead to high damage on top of this skill’s high ratio, there’s a good chance you will down someone in PvP.
Empowering Shooter’s Stance
Empowering Shooter’s Stance grants Empower for 3 seconds when hitting a target with Shooter’s Stance active. On Weapons, this will increases damage by 22-41%. On Armor, this will increase damage by 4-23% instead.
Shooter’s Stance is a pretty good ability and getting this strong of an Empower for 5-6 shots is definitely worth having if you want to run the ability.
Empowering Shooter’s Stance Rating: S – PvE and PvP
While it’s not a super strong empower early on, it definitely has some value. As you get a stronger and stronger level of it, it’ll remain useful and even be a best in slot perk for PvP. Despite being a typically PvP focused skill, this can make it worth running in PvE as well.
Repulsing Stopping Power
Repulsing Stopping Power increases the Knockback effect of Stopping Power. on Weapons, this increases Stopping Power’s knockback by 80-151%, for up to a max of 7.5 meter knockback. On Armor, This increases the knockback effect by 25-97%, for up to a 6 meter knockback..
This gives a bit of utility to Stopping Power, though I;m no so sure you really want to displace a target you hit with Stopping Power, outside of using it to push an enemy off an ally or objective.
Repulsing Stopping Power Rating: C – PvE and PvP
While this perk may have some very niche uses, they’re not common enough to warrant wasting a perk slot.
Accelerating Traps
Accelerating Traps grants a Haste for 3 seconds when deploying Traps. This effect does not stack. On Weapons, this grants a 19-33% Haste. On Armor, this grants a 5-19% Haste instead.
If you’re using Traps in an attempt to get away from someone, combining this with Hustle and Roll Canceling can give you plenty of speed to escape a pursuer.
Accelerating Traps Rating: C – PvE, B – PvP
They have a very niche use, but can be practical in open world PvP at least and not unusable. Using them in PvE is generally just a waste of a perk slot, unless you really want the option to use Traps as a speed boost.
Mending Sticky Bombs
Mending Sticky Bombs heals you for a percentage of the damage dealt by Sticky Bomb. On Weapons, this heals for 20-31% of the damage dealt by Sticky Bomb. On Armor, this heals for 10-21% of the damage dealt instead.
This has some high potential against cluster groups of enemies since it’s based entirely on the damage dealt. It’ll also be decent in 1v1 situations, though with less total healing potential.
Mending Sticky Bombs Rating: A+ – PvE and PvP
While not the most reliable damage skill, it’s backed by high enough damage to make an impact on this perk’s usefulness. If not for the high base damage, this perk may not be highly worth it. It is still leagues better than the previous version that required takedowns.
Musket Builds
The Musket really only has two really strong builds, but we’ll also be providing a more niche combo build that has very high burst potential but can be difficult to pull off in some situations.
Lethal Combo DPS Build
This is your standard PvE build, packing high total damage, but less burst compared to the other builds. This build focuses on the use of Powder Burn, Stopping Power and Traps as your active skills.
This build is great to level the Musket with, as it has plenty of damage from all skills and extra safety thanks to Traps. While you could also PvP with this build, it may not be the best option for anything other than some mid-range open world fights.

To start off with this Build, we’ll be focusing on getting our skills first, which will delay our Ultimate a few levels. We’ll start by grabbing Traps, their Trapped Damage upgrade, and Stopping Power from the Trapper Tree. We’ll also grab Stopping Power’s Lasting Impressions upgrade so we can also pick up Tactical Reload fairly early.
After grabbing Tactical Reload, we’ll hop over to the Sharpshooter Tree to pick up Critical Reload as well as Powder Burn. Alongside Powder Burn, we’ll also want to grab its upgrades, as both will help with early DPS.
With Powder Burn picked up, it’s back to the Trapper Tree to grab Scent of Blood for Traps and Supplementary Repulsion for Stopping Power. We need Supplementary Repulsion before we grab Lethal Combo later, as it’ll be our primary way of setting it up.
To finally have access to Lethal Combo, we’ll be picking up Kick ‘Em When They’re Down, Empowering Weakness and Weakened Defense. Empowering Weakness and Kick ‘Em When They’re down will stack up with Lethal Combo to give us even more damage after we debuff a target.
Now that we can pick up Lethal Combo, we’ll do just that. This leaves us with just the passives in the Sharpshooter Tree. We’ll prioritize Called Shot Resupply for the cooldown reduction it gives. Then we’ll grab Empowering Headshot for the extra damage after a headshot. Finally we round off with Ballistic Advantage and Hit Your Mark. These make it so when we have a Tank, we’re able to get more damage by staying further back and potentially getting the full 15% bonus from Hit Your Mark on rare occasions, with no damage drop off penalty.
Skill Perks, Usage, and Rotations
Traps will be used as an extra damage boost, as well as a sustain tool. With the 20% Rend and 100% Lifesteal it’s upgrade apply, they’re fantastic tools when fighting enemies one at a time. Even if they don’t Root, they should always apply the Rend, so they can be helpful to taking down Elites too.
Stopping Power will be our way of setting up all of our debuff related passives. Since it will reliably be able to trigger two different debuffs on anything we’d want to deal damage to. While the amount doesn’t matter, it covers for instances where one might not apply to certain enemies.
Finally we have Powder Burn, which is our main damage tool. We’ll be looking to land this last, after we get all of our damage bonuses set up. We can also open with it due to the long duration of the DoT, as the increased initial damage isn’t exactly what we’re concerned with as it’ll also boost the rest of our damage with Backdraft.
For our Weapon, we’ll be looking to pick up Keen, Enchanted, and Vicious. Keen helps us Crit more often, for when we can’t reliably headshot for maximum damage. Enchanted boosts our damage with basic attacks, which is what deals the majority of our damage with this build. Then we take Vicious over Vorpal, because while Vorpal is stronger, Vicious will boost random crits we get and isn’t limited to headshots.
For your weapons Gem slot, Diamonds are typically the more consistent and reliable option. Emeralds are an okay substitute, but their effect doesn’t kick in until the target is below 30% health. with a potential 2 slows in this build, Malachite can also provide a fair bit of damage too.
When upgrading to Runeglass Gems, You’ll want either an Elemental effect or Sighted on your weapon. Both are solid damage options. On Armor, you’ll always want Sighted to boost damage.
For our Armor Perks, we’ll want to pick up Crippling Powder Burn in at least one slot. For the more general perks, we’ll be looking to get Refreshing for the cooldown reduction alongside a mix of the PvE defense perks or Luck. Crippling Powder Burn gives us another slow that can trigger a couple of our Debuff perks, just not Lethal Combo. It’s also a shorter slow, but becomes a potent slow that helps with headshots as we progress.
For our Amulet Perks we’ll be looking to pick up Refreshing, Empowered and Fortified Recovery. Refreshing gives us a nice bit of cooldown reduction which helps a lot, since the Musket is slower to attack and can’t easily use Refreshing Move. Empowered extends our Empowered effects slightly, which can let us get an extra shot during our short Empowers. Fortified Recovery is a super nice defensive bonus, giving us a 10% fortify if we get hit while under 50% health.
For our Earring Perks we’ll be looking to pick up Refreshing, Evasive, and Regenerating. Refreshing is again to help us with our cooldowns. Evasive makes it so when we trigger Tactical Reload, we’re also reducing our aggro, which helps our tank do their job easier. Regenerating is a nice little passive regen. Luck can be swapped in over regeneration if you’d prefer that instead.
For our Ring we’ll be looking to pick up Refreshing, Thrust Damage, and Crippling. Refreshing is always nice for the cooldown reduction. Thrust Damage boost our primary Damage type, but can be substituted if using an INT build with a gem, where it should match the Gem instead. Crippling extends our slows a bit longer than they usually are, usually allowing for enough time to get another quick shot in. We take Damage over Keen Awareness, as we have a way to get guaranteed crits; but if you struggle to land consistent headshots Keen Awareness is a better overall option. We Take Crippling specifically because we can’t take both Keen Awareness and a Damage boost. Crippling can also be substituted for Luck if desired as well.
Skill Rotation
In this rotation, you’re stacking up your damage while triggering both Critical Reload and making use of Tactical Reload for quick bursts of damage.
- Powder Burn
- Dodge
- Light Attack
- Traps
- Light Attack x2
- Stopping Power
- Dodge
- Light Attack
- Repeat
 Light Attack
 Repeat
We start by loading and firing Powder Burn. While solo this will draw aggro to us allowing for an easy Trap after. Getting Powder Burn applied will also buff the attacks for the rest of the rotation while steadily dealing damage. Immediately after firing Powder Burn, we dodge to trigger Tactical Reload and fire the loaded round.
After we fire the extra shot, we toss down a trap and let our target step on it. When they do, if both previous attacks were a headshot, Critical Reload will trigger letting us get two shots real quick.
After the second shot, we immediately use Stopping Power and quickly fire it off while they’re still rooted. We should be able to roll immediately (or shortly) after this to trigger Tactical Reload once again.
Going through the second time, you’ll have to manage when to use each skill again as there’s likely to be very little downtime.
All said and done, this quick rotation should take about 9 seconds to complete. Between all the buffs and debuffs that should be active, this combo should deal over 1000% Weapon Damage, not accounting for critical damage or perks. By the time it’s complete, Powder Burn should be nearly off cooldown if every shot was a headshot.
Sniper PvP Build
This setup is built to deal high damage per shot, while also providing reliable DPS from range. We’ll be sniping our opponents with Powder Burn, Power Shot and Shooter’s Stance.
Given the high damage output of this setup, if you can level with this build fairly easily. It doesn’t offer the safety of Traps, but instead brings more raw damage to cover for it.
We’ll start by taking our three skills for the build, which since they’re all from the same tree will take just 3 levels. Getting all of our skills early is important for PvP, as the more options we have access to in terms of combat, the more damage we can deal.
After grabbing our Skills, we’ll want to upgrade Powder Burn a bit by picking up Backdraft. Immediately after this, we’re going for Called Shot Resupply for the consistent cooldown reduction followed by Shoot More for Shooter’s Stance. This gives us a way to reset a large chunk of our overload ability cooldowns.
Next. we’ll upgrade Power Shot taking Initial Engagement and First Blood. These will bolster our first hit damage substantially. Following this, we take Ballistic Advantage and Hit Your Mark to remove our damage fall off and give us increased Critical Damage at further ranges.
Now we have access to Sniper, which gives us a really solid damage boost when we can consistently land headshots. We’ll be taking this followed by Heightened Precision and Empowering Headshot to give us a huge increase to our overall damage.
We’re left with another point we’ll be able to spend in Sharpshooter which has a few places it can be put, so we’ll cover this real quick before moving over to the Trapper Tree to grab the rest of our passives. We can optionally get the last upgrade of any of our three skills, or put it into the Trapper Tree to pick up Weakened Defense.
Spending it on Powder Burn’s upgrade is a fairly consistent increase in damage, as it extends the duration of Backdraft as well as the overall Burn DPS. Upgrading Power Shot will allow us to use Power Shot a little more often if we’re accurate while using it, knocking a solid 2.25 seconds off the cooldown. Shooter’s Stance can give us nearly 4 seconds off each of our other cooldowns, assuming we’re accurate with it and can land at least three shots in a row. Finally, Weakened Defense would help us do a little extra damage to Tanks, but Tanks generally aren’t our priority targets in PvP.
Moving to the Trapper Tree, we’ll be grabbing Salt On The Wounds, Empowering Weakness, Hustle, Tactical Reload, and Kick ‘Em When They’re Down. Tactical Reload is what we want the most from this Tree, as it gives us an instant reload every 6 seconds if we can dodge. Hustle provides a nice movement buff whenever we dodge, pairing nicely with Tactical Reload. The other passives all contribute to damage, giving more damage against debuffed targets and even more against low health targets.
Skill Perks, Usage, and Rotations
Power Shot is our opening Skill. With a high Weapon Damage ratio and several perks to boost you when hitting a full health target, it makes for a very strong opener. It also won’t benefit from Powder Burn’s Backdraft, so it’s better to use it first so we’re more focused on normal shots after applying Powder Burn for the higher DPS.
Powder Burn is a strong follow up, giving solid on hit damage and boosting every shot of Shooter’s Stance for a very quick finishing burst of DPS. This will also keep any tanks you do decide to hit from benefiting from the reduced damage taken while a full health buff from Constitution.
Shooter’s Stance is a very strong finisher, as it’s 5 quick shots that can be fired off in about 3 seconds at the quickest. With your opponent heavily chunked, and slowly burning away they’ll be looking to close the distance or run. Either way, they’ll be running from someone primed to finish them with several quick hits. If you land every shot as a headshot, you’ll also be getting high value out of Called Shot Resupply, reducing your overload shots’ cooldown by 50%, acting like a quick reset before moving onto the next target or going for another rotation.
For our Weapon Perks, we’d Ideally want Keen or Enchanted, Keenly Jagged and Vicious or Vorpal. Keen would be paired with Vicious, giving a higher chance to crit even with out headshots. While the Enchanted and Vorpal combo gives the absolute best damage, but requires high headshot consistency. Keenly Jagged is a solid bonus, which gives us another DoT to pair with Powder Burn, leading to a lot of damage over time that will bring the enemy’s health lower even quicker.
For your weapon Gem slot, Diamonds are typically the more consistent and reliable option. Emeralds are an okay substitute, but their effect doesn’t kick in until the target is below 30% health.
When upgrading to Runeglass Gems, You’ll want either an Elemental effect or Sighted on your weapon. Both are solid damage options. On Armor, you’ll always want Sighted to boost damage.
On our Armor, we’ll absolutely want to pick up Crippling Powder Burn and Empowering Shooter’s Stance once across all our armor. These two skill perks boost our damage by allowing Powder Burn to trigger Kick ‘Em When They’re Down and Empowering Weakness more reliably. Gaining Empower on our already potent finisher is a nice bonus to pick up, making it even more viable to go for tanks on some occasions.
Alongside these skill perks, we’ll also be looking to stack Refreshing so we have even lower cooldowns. We’ll also want Resilient so we don’t get burst down by other DPS crit damage. Outside of these, it’s personal preference. Freedom tends to be a solid choice to reduce crowd Control, while Vigor tends to be great if you find yourself dying from DoT effects often.
For our Amulet we’ll be looking to pick up Refreshing, Health, and Fortified Recovery. Health will gives us an extra bit of health, which at the higher ends acts like a few dozen points into Constitution and also scales off any Constitution we do pick up. Fortified Recovery helps with mitigating any heavy burst we may take by granting Fortify when we drop below 50% health. Alternatively, you can take Thrust Protection over Health, which will mitigate damage of opposing Muskets or Bows, as you’ll often be out of the reach of most mages.
On our Earring we’re going for Refreshing and Regenerating. Regenerating gives us a small bit of extra passive health regen, which can help us slowly recover from stray hits from opposing ranged DPS. The final slot should be Purifying Toast, as the quick cleanse can help get rid of any Slows when you heal with a potion.
For our Ring we have a few options to work with. We can take Thrust Damage for the raw damage boost it will provide or we can pick up Keen Awareness to make Critical Hits more reliable. Hearty is a Solid bonus, allowing us to quickly roll twice without a pause or depleting our stamina, which can help us get away from any melee that manages to get to us. Our last slot is best off being Crippling or Empowered. Crippling extends our slow from Powder Burn, letting us squeeze any quick shots into it’s already short window. Empowered will extend our multiple Empowered effects, effectively letting us get extra hits into these short windows, but for the slightly stronger Empower bonus.
Skill Rotation
As this build is intended for PvP, it only has an opening rotation, which won’t always loop perfectly well.
- Power Shot
- Dodge
- Light Attack
- Powder Burn
- Shooter’ Stance
- Dodge
- Light Attack
- Repeat
We open with Power Shot to make use of Initial Engagement and First Blood for huge damage. After this we immediately roll to trigger Tactical Reload and fire another shot.
Then we load and fire Powder Burn, followed by immediately going into Shooter’s Stance. Going into Shooter’s Stance loads our next shot faster, and lasts long enough to stall for Tactical Reload to be ready again, even if all shots are fired immediately as they are loaded. When Shooter’s Stance ends, we immediately roll to activate Tactical Reload once again. This gives us a very quick 60% cooldown reduction for our overload shots, which by the time we get all of these 6 shots off, should mean Power Shot is available again.
The biggest thing to pay attention to for multiple rotations is the cooldown for Tactical Reload, as that’s mostly what determines what should get used as when. If it’s nearly off cooldown, avoid using Shooter’s Stance until it ‘s been used. You’ll often end up using it after an overload shot.
Burst Combo Build
This niche build actually uses one of the harder to use skills, to pack a ton of damage in a very short time. To do this, we’ll be using Powder Burn, Stopping Power, and Sticky Bomb.
Initially this sounds like an odd combo, but will make more sense when we cover the combo. Being the odd combo it is, it can be weird to level with, but not terrible as the initial burst can take down PvE enemies quite quickly.
For this build, we’ll be picking up Stopping Power and Sticky Bomb as our first skills. We’ll also be picking up Salt On The Wounds to reach them and taking Tactical Reload immediately after. Following this we’ll hop over to the Sharpshooter Tree to pick up Critical Reload, as well as Powder Burn and it’s Backdraft upgrade.
After picking this up, it’s back to the Trapper Tree to upgrade both Stopping Power and Sticky Bombs completely. This gives them both a Slow, which will be key to getting the most Damage out of this build. This is due to the next passives we’re grabbing; Empowering Weakness, Kick ‘Em When They’re Down, and Lethal Combo . These will all add a strong boost of damage to our combo as they’ll be debuffed for the entirety of it.
After picking up Lethal Combo, we’ll be headed back to the Sharpshooter Tree. Here we’ll finish upgrading Powder Burn, pick up Called Shot Resupply, as well as grab Empowering Headshot. After this we have two points we can flex towards whichever options we want.
I personally prefer to put these two points into Heightened Precision and Hustle. Heightened Precision won’t stack up over our full Combo, but will boost damage until it is back on cooldown if we continue to aim. Hustle is a nice movement speed bonus that we’ll get during and after our combo.
The other option is Ballistic Advantage and Hit Your Mark, letting you sit back while you wait for cooldowns and still deal a ton of damage. The only downside here is that we’ll still need to be closer again to do our combo once again, so we’ll be unable to get full value from the combo ever.
Skill Perks, Usage, and Rotations
Powder Burn will get used early in the combo, as the DoT lasts a long time and also boost the damage of standard shots through Backdraft. Since some of the mid-combo and most of the post-combo is primarily standard shots, we’ll have plenty of time to make use of this bonus.
Sticky Bomb is the opener, as it sets up a short slow along with a delayed burst. It’ll also let us recover Stamina in the middle of our combo when making use of Tactical Reload. With its high damage ratio, it’ll be the highest instance of damage in this combo.
Stopping Power gets used last in the combo so it extends the Lethal Combo and Kick ‘Em When They’re Down passives to be used alongside Backdrafted standard shots to fill the time between combo.
For Weapon perks we’ll absolutely want Keen, Vicious and Keenly Empowered. We’re taking Keen and Vicious to increase our odds of having Sticky Bomb deal a Critical Hit, while also boosting all the critical damage we deal. We’re also taking Keenly Empowered as we’re looking to burst, and this gives us a perfect window of time to get our full combo off when done correctly.
For your weapon Gem slot, Diamonds are typically the more consistent and reliable option. Emeralds are an okay substitute, but their effect doesn’t kick in until the target is below 30% health. With plenty of Slows, Malachite can also be useful here.
When upgrading to Runeglass Gems, You’ll want either an Elemental effect or Sighted on your weapon. Both are solid damage options. On Armor, you’ll always want Sighted to boost damage.
For Armor perks we’ll absolutely want Crippling Powder Burn as an ability perk. The extra slow to keep some of our passive active though Sticky Bomb’s explosion is great. Mending Sticky Bomb is an optional pick up, as this combo can see it being activated fairly often in PvE. In addition to this, we’ll be looking to also pick up Refreshing for cooldown reduction as a priority. Luck, Resilient, and all the Ward perks make great, flexible slot fillers depending on what you want.
For our Amulet perks we’ll want Refreshing, Health, and Fortified Recovery. Health becomes a nice way to get a bit of extra health as a DPS, even with relatively low Constitution and is boosted by the bit of Constitution you’ll often have. Fortified Recovery is a nice and reliable protection from sudden burst damage.
For our Earring perks we’ll be looking to get Refreshing, Regenerating, and Purifying Toast. Regenerating provides a small amount of health regeneration letting us shrug off stray, smaller hits without a consumable. Purifying helps us break out of Slows and Roots if we get affected by them.
On our Ring we’ll be taking Keen Awareness, Hearty, and Crippling. Keen Awareness helps with general critical hit consistency, which helps Sticky Bomb a ton. Hearty gives us the option of a quick double roll to escape danger if we get jumped on or just need a bit of distance to properly combo. Crippling extends our Slows, which lets us have them active throughout the full combo.
Skill Rotation
- Load Powder Burn
- Sticky Bomb
- Fire Powder Burn
- Dodge
- Light Attack
- Stopping Power
- Light Attack
- Repeat
We start by loading Powder burn, which starts its cooldown and lets the combo work smoothly. Then we throw our Sticky Bomb, aiming to land a direct hit to ensure the damage lands and trigger Sticky Slow for the brief Slow to boost Powder Burn.
Then we Fire Powder Burn as soon as Sticky Bomb connects. This is followed by a roll to trigger Tactical Reload and get another quick shot off. Then we’re immediately loading and firing Stopping Power, which ensures we have Lethal Combo and other passives active for the Sticky Bomb explosion. If all shots were critical hits up to this point, Critical Reload will also trigger and give us another quick shot after Stopping Power.
Done correctly, this whole combo should deal around 775% Weapon Damage in about the 3 seconds it takes for Sticky Bomb to Detonate. This value is also not accounting for any crits, which can easily push this value past 1000% Weapon Damage. There’s also the lingering burn that will continue to deal damage after this initial burst.
Musket Weapon Pairings
The Musket is a weapon that scale Primarily with Dexterity, and uses Intelligence as a secondary stat. This can give it some interesting pairings.
This makes the top-recommended pairings for the Musket the Bow, Rapier, and Spear.
Bow
The Bow allows for a lot of extra damage over time, and can match the Musket’s Range, though handles differently due to gravity. It gives you a stronger mid-range option that has a lot of power to keeping foes at bay. Overall, you get a strong build that plays entirely at range.
To learn more about the Bow you can check out our Bow Guide and Best Builds. This will help you plan out a strong build, should you opt for this pairing.
Rapier
The Rapier is an aggressive melee pairing, which allows you to quickly and swiftly deal with foes that think you’re unprepared for close-range combat. The Rapier offers a lot of sustained and Burst damage potential making it threatening in its own right. It also scales the exact same way as the Musket, allowing you to scale both weapon with both stats, opening some unique build possibilities.
To learn more about the Rapier, you can check out our Rapier Guide and Best Builds. This will help you plan out a strong build, should you opt for this pairing.
Spear
The Spear is a more defensive melee choice that offer a lot of crowd control and zoning potential. This makes it a great fall back option, should opponents get too close for comfort, as you’ll be able to quickly make space for yourself.
To learn more about the Spear, you can check out our Spear Guide and Best Builds. This will help you plan out a strong build, should you opt for this pairing.
This is the end to this very in-depth guide to Musket in New World. We hope you have learned everything you need to know about this weapon, its usage, skills, perks, builds, combos and ability rotations. The icons used in this guide are pulled from newworldfans.com‘s database.
Patch Notes Changes
This segment will help you keep track of what has changed for this weapon with the patches as AGS maintains the game in the long-term.
Update 1.1 “Into the Void”
- Increased Musket base damage by 2.5%
- Fixed an issue where the Musket could not be reloaded after dodge rolling then triggering autorun.
- Fixed an issue where reloading would not automatically resume after an interruption when the player was aiming.
- Fixed an issue where musket overcharged shots were not being consumed while hip-firing when crouched.
- Traps
- Traps can no longer can be triggered by players in Death’s Door.
- Sticky Bomb
- Increased damage from 175% to 235%.
- Stopping Power
- Reduced cooldown from 18s to 15s.
- Power Shot
- Reduced cooldown from 15s to 12s.
- Shooter’s Stance
- Reduced cooldown from 20s to 18s.
- Players can now exit Shooter’s Stance by pressing sprint, the ability key, dodge, Esc, or releasing RMB.
- Critical Reload
- Fixed an issue that caused this passive to function inconsistently.
You can find the full patch notes for New World Update 1.1 “Into the Void” in our New World Patches archives.
Update 1.2 “Winter Convergence Festival”
- Fixed an issue where the musket would reload slower when stamina was depleted.
- Fixed an issue where the player’s back warped unnaturally while sheathing the musket in the prone position.
- Fixed an issue where the shoot animation could be skipped, which unintentionally increased the Musket’s rate of fire.
- Fixed an issue that caused Musket charged shots to not be expended while firing from the crouched position.
You can find the full patch notes for New World Update 1.2 “Winter Convergence Festival” in our New World Patches archives.
Update 1.3 “Expedition Mutators”
- Fixed an issue that allowed Musket and Bow light attacks to be activated underwater.
- Fixed an issue that blocked Bow from entering aim down sights if swapping to Bow while in Musket Sniper Zoom.
- Fixed issue where if shift was being held while aiming down sights with a bow or musket, or if a player used any navigation action, the animations would stutter.
Update 1.4 “Heart of Madness”
- Infinite Ammo: T1 Flint ammo is being replaced by an infinite resource. Players can now fire ranged weapons (Musket, Bow and Blunderbuss) without equipping ammo.
- If no ammo is equipped, an ammo counter will not be displayed on the reticle and the weapon will still be allowed to fire.
- If players have a higher tier ammo equipped in a game mode that provides infinite ammo (such as Outpost Rush) an infinity icon will appear on the reticle instead to distinguish it from having no ammo equipped.
- Ammo rarity/damage tiers have been updated as follows:
- T1 Infinite (Previously Flint) = 1.00x damage.
- T2 Iron = 1.05x damage.
- T3 Steel = 1.10x damage.
- T4 Starmetal = 1.15x damage.
- T5 Orichalcum = 1.20x damage.
- Ammo weight has been removed.
- Increased maximum stack count for ammo from 500 to 1000.
- Shooter’s Stance
- Fixed an issue where Shooter’s Stance was increasing the meter for the “Censored” mutator if the player entered and exited the stance without ability going on cooldown. It will now only increment of the meter after the first shot is fired while in Shooter’s Stance.
- Marksman: Fixed an issue where this upgrade was not functioning properly.
- Back it Up: Fixed an issue where this passive was disabled while using Sticky Bomb.
- Critical Reload: Fixed an issue that caused the sound effects for this passive to play incorrectly. Improved reliability of hit counting.
Update 1.5 “Arenas”
- Fixed a bug where impact effects for the musket may have played even if the server invalidated a client’s shot.
- Fixed an issue that caused firing inputs to not buffer when entering ADS with the Musket.
- Hit your Mark Passive: Updated the description to clarify that this passive only works for standard musket shots and not overloaded shots (i.e. Power Shot and Powder Burn).
- Marksman Passive: Fixed an issue where overloaded shots would not count towards the number of consecutive hits.
- Shooter’s Stance: Fixed an issue where the musket would fire unintentionally in Shooter’s Stance with the Tactical Reload passive.
- Sticky Bomb: Fixed an issue where the bomb would disappear without detonating when it attached to destroyed objects.
- Sticky Bomb: Fixed an issue where the musket was not removed from the player’s hand for remote clients while holding a sticky bomb.
- Powder Burn: Fixed an issue where attempting to fire Powder Burn while prone would instead fire Power Shot.
- Trap: Cleaned up several visible aspects for better readability and effect matching.
- Increased the model size of traps in order to make them more visible and to match the size of the trigger volume.
- Updated animation timing to match trap appearance.
- Adjusted projectile arc and speed to make throwing feel smoother and to make the trap land closer to the reticle position.
Update 1.6 “Summer Medleyfaire”
- Fixed an issue that caused an additional delay before reloading when a player stood in place after dodging while a reload was pending for the Musket/Blunderbuss.
- Fixed a visual discrepancy that caused impact effects for the Musket to appear even if the server invalidated the shot.
- Fixed an issue that caused the Shooter Stance camera to not reset when entering an Arena.
- Fixed an issue that caused shots to fire too soon when entering Shooter Stance from a dodge.
- Fixed an incorrect idle animation when the character was exhausted.
- Updated Musket reload to not have to play through the first half of the reload if the reload was interrupted after that portion of the animation played. After being interrupted and completing the first half of a reload, only the second half of the reload animation will now play.
- Fixed an issue that caused the shooting animation to trigger earlier than intended after a reload.
- Refreshing Power Shot: Now has increased effectiveness while on a Musket. The cooldown was increased from a range of 3% to 20% to:
- On armor: 8.5% to 54% based on Gear Score.
- On weapon: 8.5% to 98% based on Gear Score.
- Energizing Stopping Power: Renamed to Repulsing Stopping Power. Now increases knockback distance:
- On armor: 25% to 97% based on Gear Score.
- On weapon: 25% to 151% based on Gear Score.
- Accelerating Traps: The duration was increased from 3s to 5s. Now has an increased effectiveness while on a Musket:
- On armor: 5% to 19% based on Gear Score.
- On weapon: 5% to 33% based on Gear Score.
- Mending Sticky Bombs: Now heals based on damage dealt. Also increased effectiveness while on a Musket:
- On armor: 10% to 21% based on Gear Score.
- On weapon: 10% to 31% based on Gear Score.
- Empowering Shooter Stance: Now has an increased effectiveness while on a Musket.
- On armor: 4% to 23% based on Gear Score.
- On weapon: 4% to 41% based on Gear Score.
- Crippling Powder Burn: Now has an increased effectiveness while on a Musket.
- On armor: 5% to 24% based on Gear Score.
- On weapon: 5% to 42% based on Gear Score.
Update 1.7 “Brimstone Sands”
- Added cancel windows for Stopping Power to trigger after the shot’s reload begins. This should be more in line with other weapon’s ability cancel windows.
- Fixed an issue that caused impact effects for the Musket to play even if the server invalidated a shot.
- Fixed an issue that caused ADS camera to remain active when exiting Shooter’s Stance.
- Fixed an issue that caused the Shooter’s Stance ability shot count to not count down properly.
- Fixed an issue that caused the bomb to get put away when holding the right mouse button while activating Sticky Bomb. Releasing the right mouse button with Sticky Bomb aimed will now pull the Musket back out.
- Separated the Traps Root and Rend status effects into 2 different effects.
You can find the full patch notes for New World Update 1.7 “Brimstone Sands” in our New World Patches archives.
Update 1.8 “Winter Convergence Festival 2022”
- Fixed an issue that caused the impact effects for the Musket to play even if the shot missed.
- Fixed an issue that caused the Musket’s Shooter’s Stance to not always go on cooldown.
- The player can now move while throwing Sticky Bomb.
- Removed the stagger from Sticky Bomb to compensate for increased usability.
- Allowed the loading of both Power Shot and Powder Burn to be performed while moving.
- Adjusted the Musket damage falloff to reduce the damage by 60% at the full 125m, and 30% with the Ballistic Advantage Passive. This is increased from the previous 37.5% and 18.75% with Ballistic Advantage.
- Ballistic Advantage Passive:
- Updated passive to no longer remove damage fall off entirely, but reduce damage fall off by 50% after 50m.
- Hit your Mark Passive:
- Updated passive to apply to all hits and not just headshots and critical hits.
- Updated the functionality of the Empowering Shooter’s Stance Perk. Previously it would give one powerful empower on every hit of Shooter’s Stance. This was incredibly strong in PvP. Updated effect to now grant a stack of 4%-15% empower (Depending on Gear Score and if on weapon/armor) for every hit while in Shooter’s Stance.
- Effect can stack up to 4 times.
- Extend the duration of the empower buff from 3s to 6s.
- Buff is now removed when exiting Shooter’s Stance.
You can find the full patch notes for New World Update 1.8 “Winter Convergence Festival 2022” in our New World Patches archives.
Update 1.9 “Season 1: Fellowship and Fire”
- Ability Updates
- Traps
- Adjusted the cooldown to only trigger after the start up of the attack, so that if the ability is interrupted prior to 1 frame before the toss occurs, the ability will not go on cooldown.
- Tuned Aim Down Sight accuracy to reduce effectiveness of rapid long range shots.
- Accuracy will be reduced when moving and aiming quickly.
- Replaced “Ballistic Advantage” passive with a new one: “Steady Hand”
- Increases Accuracy of any Musket shot when Aim Down Sight is maintained for 2s. Increased Accuracy will reset after a shot is fired.
- Steady Hand passive activates in 1s and resets on shot while in Shooter Stance.
- Greater Accuracy
- Updated to remove accuracy penalty from Hip Shot.
- Updated the Musket’s aiming reticle’s appearance to better function with the new Musket accuracy system.
- Reduced Musket’s camera rotation Accuracy penalty by ~20%.
- Traps
- Notable Fixes
- Fixed an issue with the reload animation repeatedly playing when spamming an ability key during a reload when Trap or Sticky Bomb is assigned to that key.
- Fixed a rare issue that occurred when transitioning into Musket abilities from prone.
- Fixed an issue where the player could sometimes move at a faster rate than intended for a few seconds while tossing the Sticky Bomb.
- Fixed a rare issue where players couldn’t move during the Sticky Bomb throw if they initiated the throw while idle.
- Fixed an issue where Sticky Bomb wouldn’t deactivate when teleporting.
- Fixed an issue where the Musket Trap’s Root was not consistent with the normal diminishing returns on Roots when applying the Root to a target with a trap while the Root is already active.
- Fixed an issue where throwing a Trap with the Musket sheathed would result in the cooldown being activated even though the Double Trap upgrade was unlocked.
You can find the full patch notes for New World Update 1.9 “Season 1: Fellowship and Fire” in our New World Patches archives.
Here at VULKK.com we have a ton of useful New World Guides and more and more are being published regularly. We also have all of the news and updates covered to keep you up-to-date with all things New World!
In-Depth New World Weapons Guides and Best Builds
Each one of the guides below is dedicated to one of the weapons available in New World and goes very in-depth from initial overview of each individual ability and passives all the way to the best builds you can use while leveling or in the EndGame.
New World SWORD and SHIELD Weapon Guide and Best Builds
Want to learn how to slice and bash your enemies in New World? This guide is an in-depth dive to all things Sword and Shield in Amazon's MMO!
New World HATCHET Weapon Guide and Best Builds
Want to learn how to hack your enemies to pieces in New World? This guide is an in-depth dive into all things hatchet in Amazon’s MMO!
New World RAPIER Weapon Guide and Best Builds
Want to learn how to carve your enemies to pieces in New World? An in-depth guide for all things Rapier - abilities, rotations, best builds!
New World FIRE STAFF Weapon Guide and Best Builds
Want to learn how to turn your enemies to smoldering piles of ash in New World? This guide is in-depth dive into all things Fire Staff weapon
New World WAR HAMMER Weapon Guide and Best Builds
Want to learn how to proficiently pummel your enemies in New World? This guide is an in-depth dive to all things War Hammer in Amazon's MMO!
New World LIFE STAFF Weapon Guide and Best Builds
Want to learn how to utilize the power of light in New World? This guide is an in-depth dive into all things Life Staff in Amazon’s MMORPG!
New World GREAT AXE Weapon Guide and Best Builds
Want to learn how to cleave your enemies in two in New World? This guide is an in-depth dive into all things Great Axe in Amazon’s MMORPG!
New World SPEAR Weapon Guide and Best Builds
Want to learn how to perfectly puncture your foes in New World? This guide is an in-depth dive into all things Spear in Amazon’s MMO!

New World ICE GAUNTLET Weapon Guide and Best Builds
Want to learn how to freeze your foes in New World? This guide is an in-depth dive into all things Ice Gauntlet in Amazon’s MMO!

New World BOW Weapon Guide and Best Builds
Want to learn how to pierce your targets with arrows in New World? This guide is an in-depth dive into all things BOW in Amazon’s MMORPG!