Learn what Mutated Expeditions are, how to access them, what rewards you can get as well as Mutators types and best strategies to use them!
Introduced in Update 1.3, Mutated Expeditions are an endgame activity that have you facing down Expeditions once again. This time, however, they have additional modifiers to increase the challenges within for even greater rewards.
Please note that the Table of Contents below only lists the major segments of the guide. We have a lot of smaller sub-sections in each major one.
Table of contents
What are Mutated Expeditions?
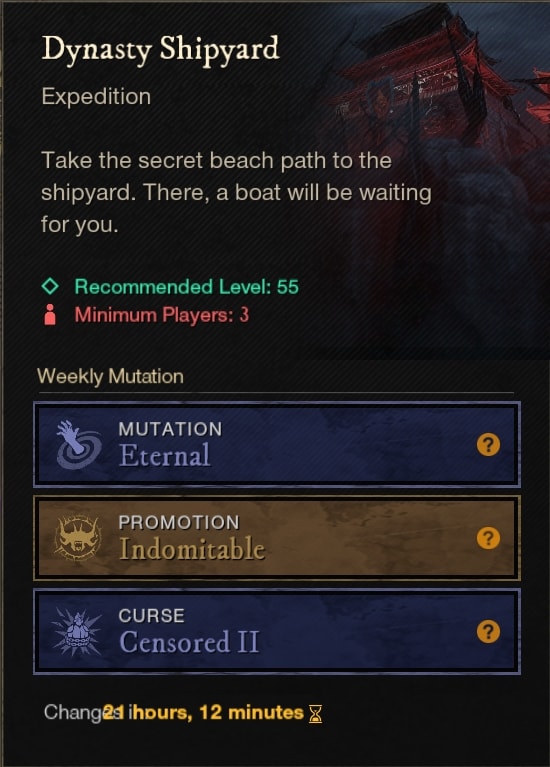
Mutated Expeditions are more difficult and challenging version of existing Expeditions. Currently, this only extend to the Expeditions that are at or near Level 60; or Dynasty Shipyard, Garden of Genesis, and Lazarus Instrumentality.
Every Mutated Expedition will have 10 difficulties, ranging from only having a single set of mutation at level one, up to have three fully upgraded sets of mutations at level 10. We’ll be covering how these scale in a later section along with ways to deal with each.
To quickly find or recruit for these Expeditions, most will use the the following message: “LFG (or LFM for recruiting) MX (Expedition Name).” In this, X is replaced by the difficulty number you are running or looking to run. For example “LFG M3 Lazarus” would mean you looking to run Difficulty 3.
Hovering a Mutated Expedition on the minimap will display an overview of active mutations as shown above. This will allow you properly prepare any gear necessary for the mutators that are active without having to physically visit the Expedition entrance.
How To Access Mutated Expeditions
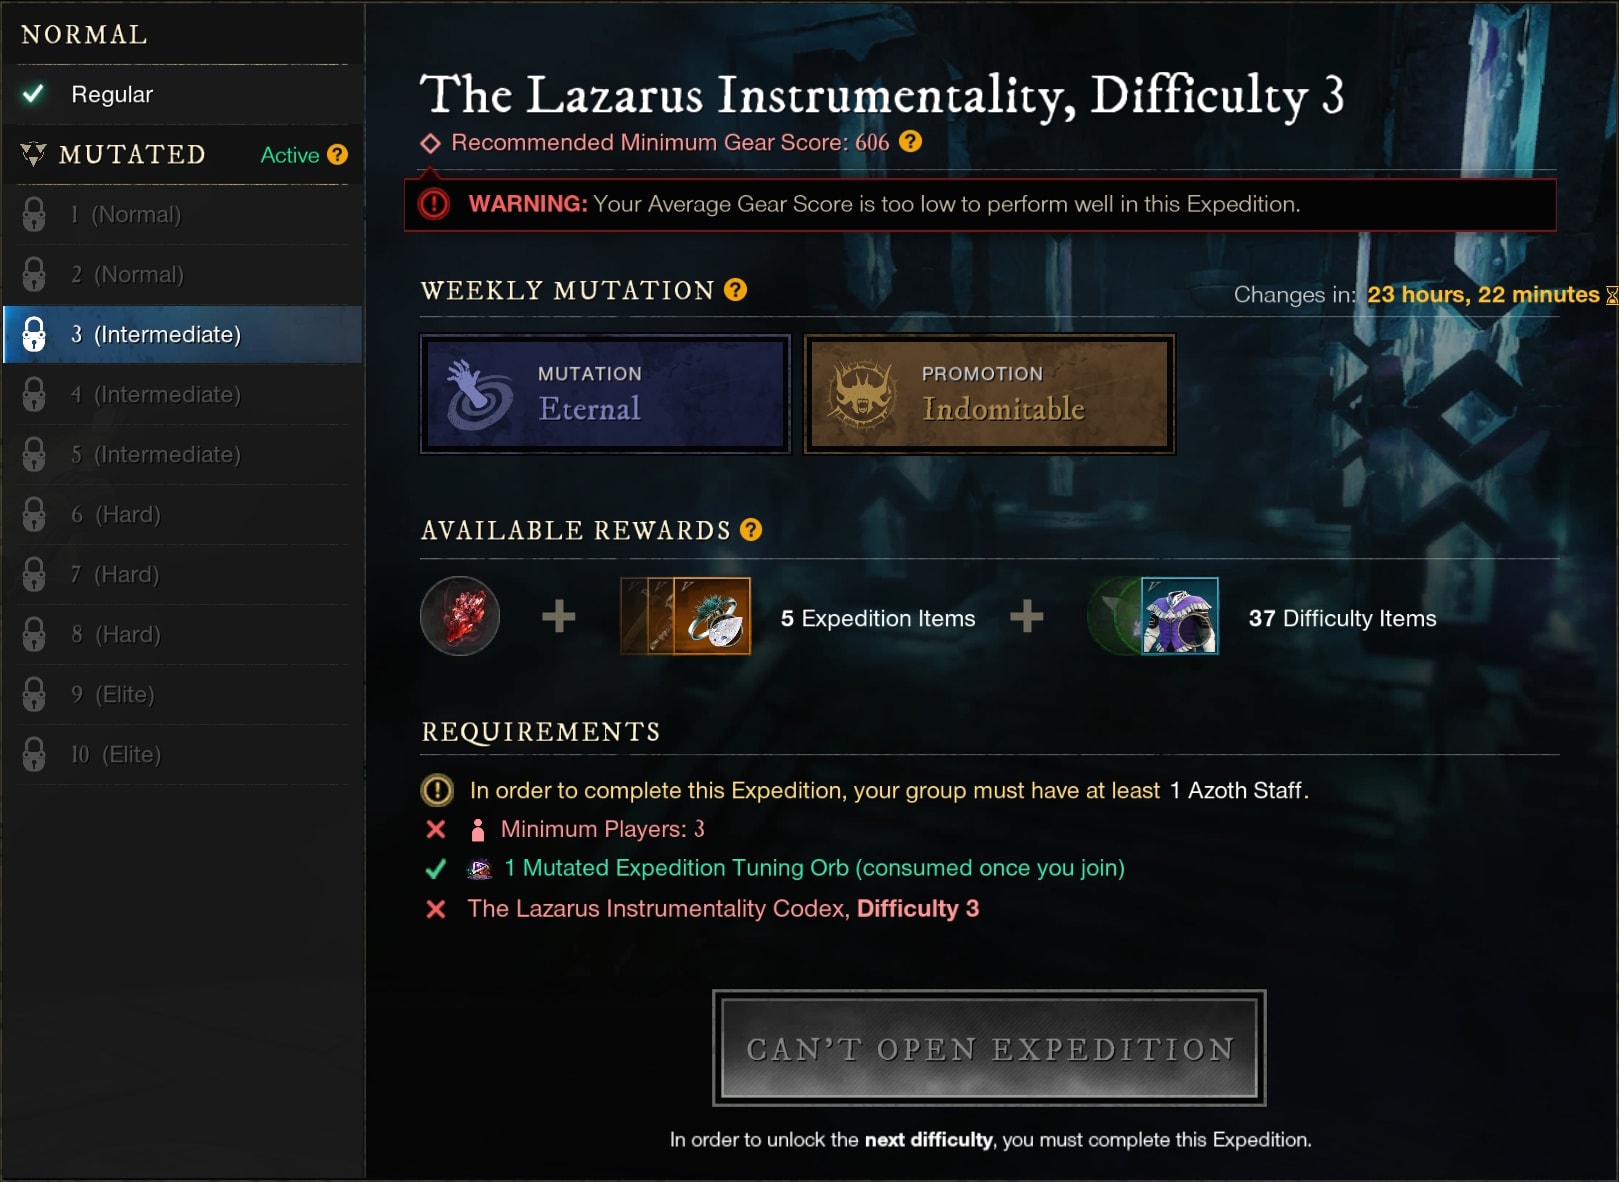
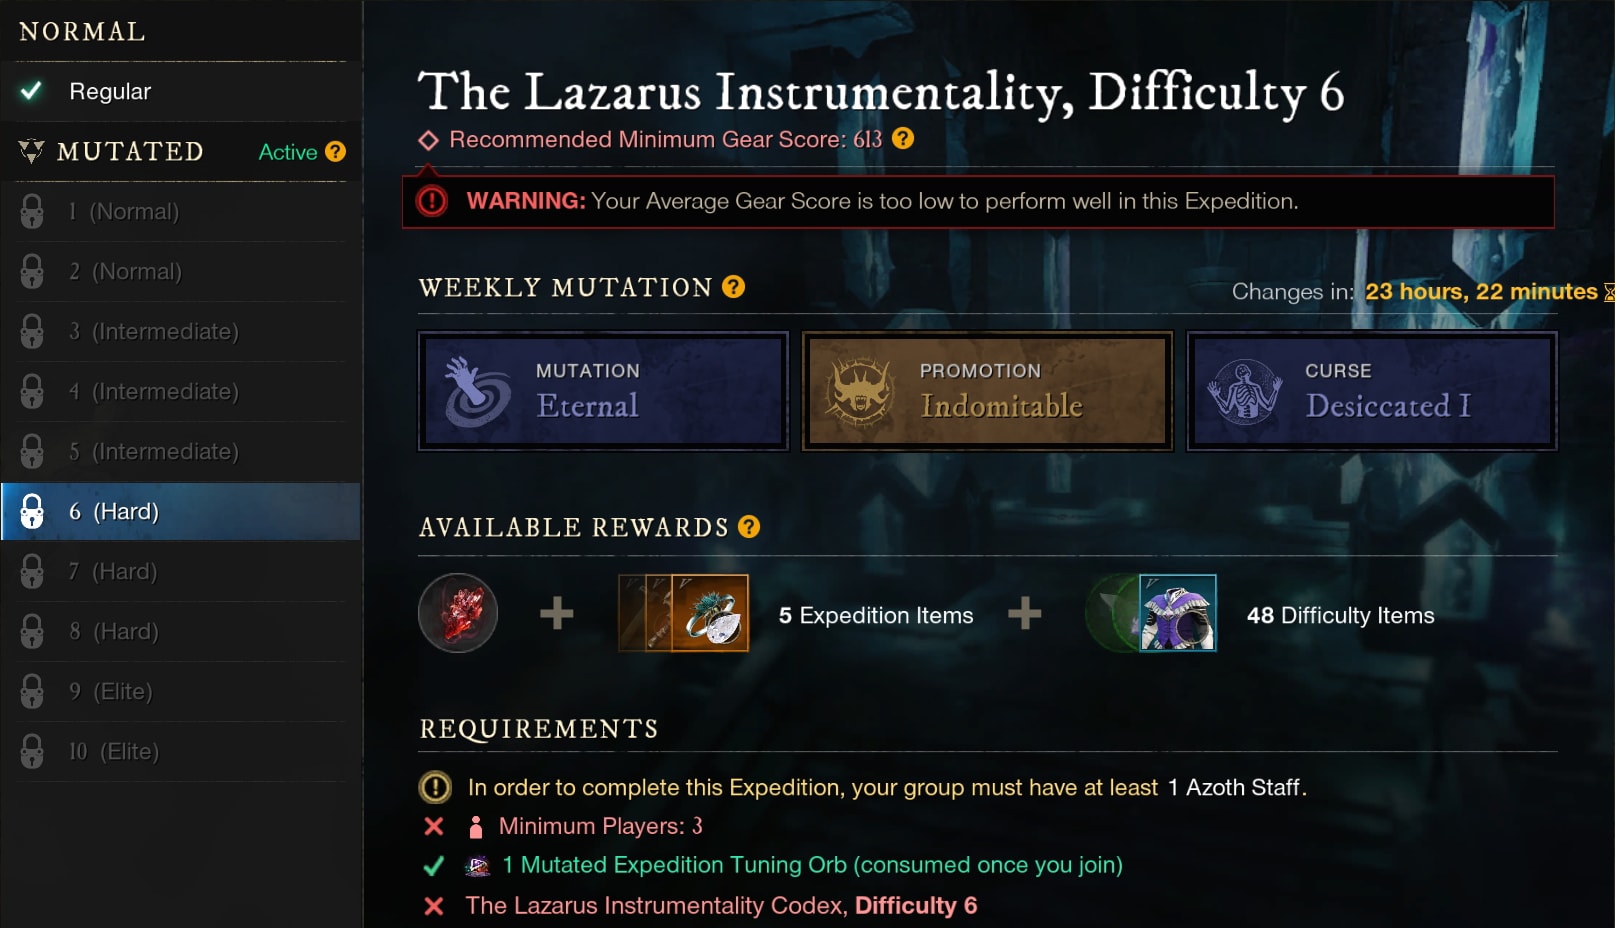
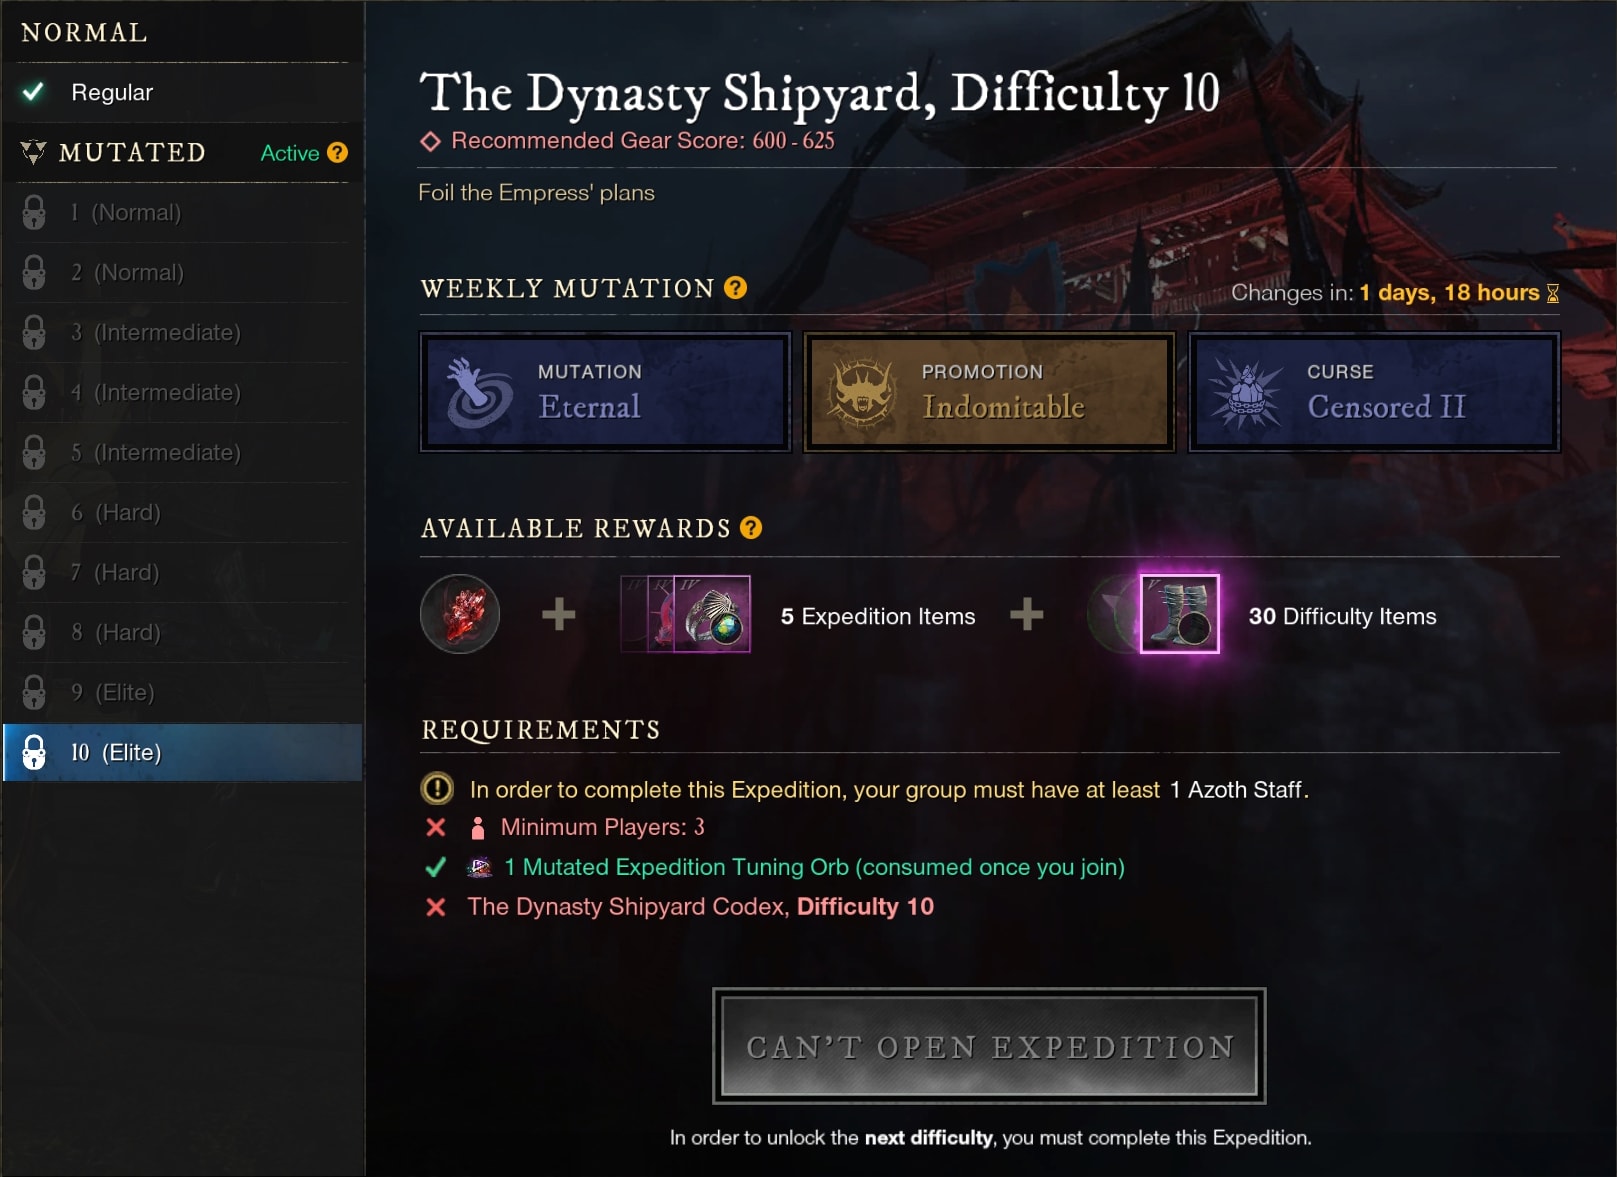
To access a Mutated Expedition, you must first complete the basic or Vanilla version of the Expedition to acquire a Codex. This Codex then allows you to enter a Difficulty 1 Mutated Expedition.
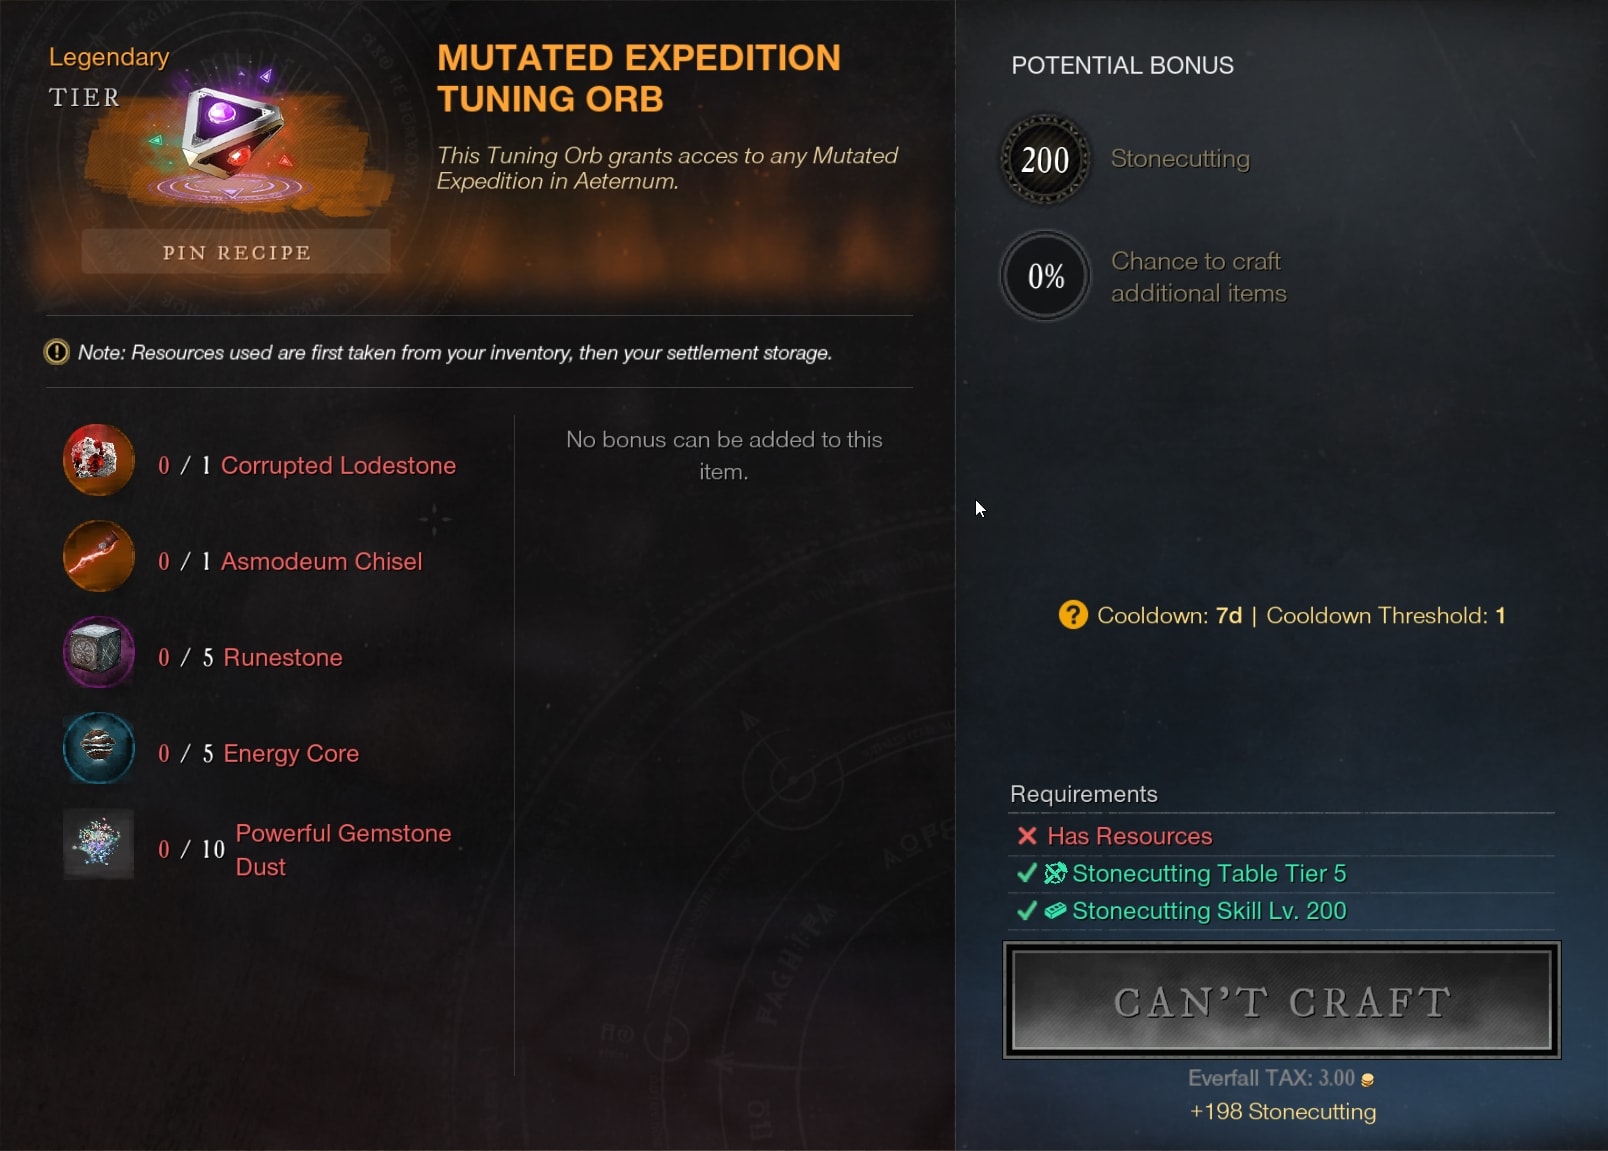
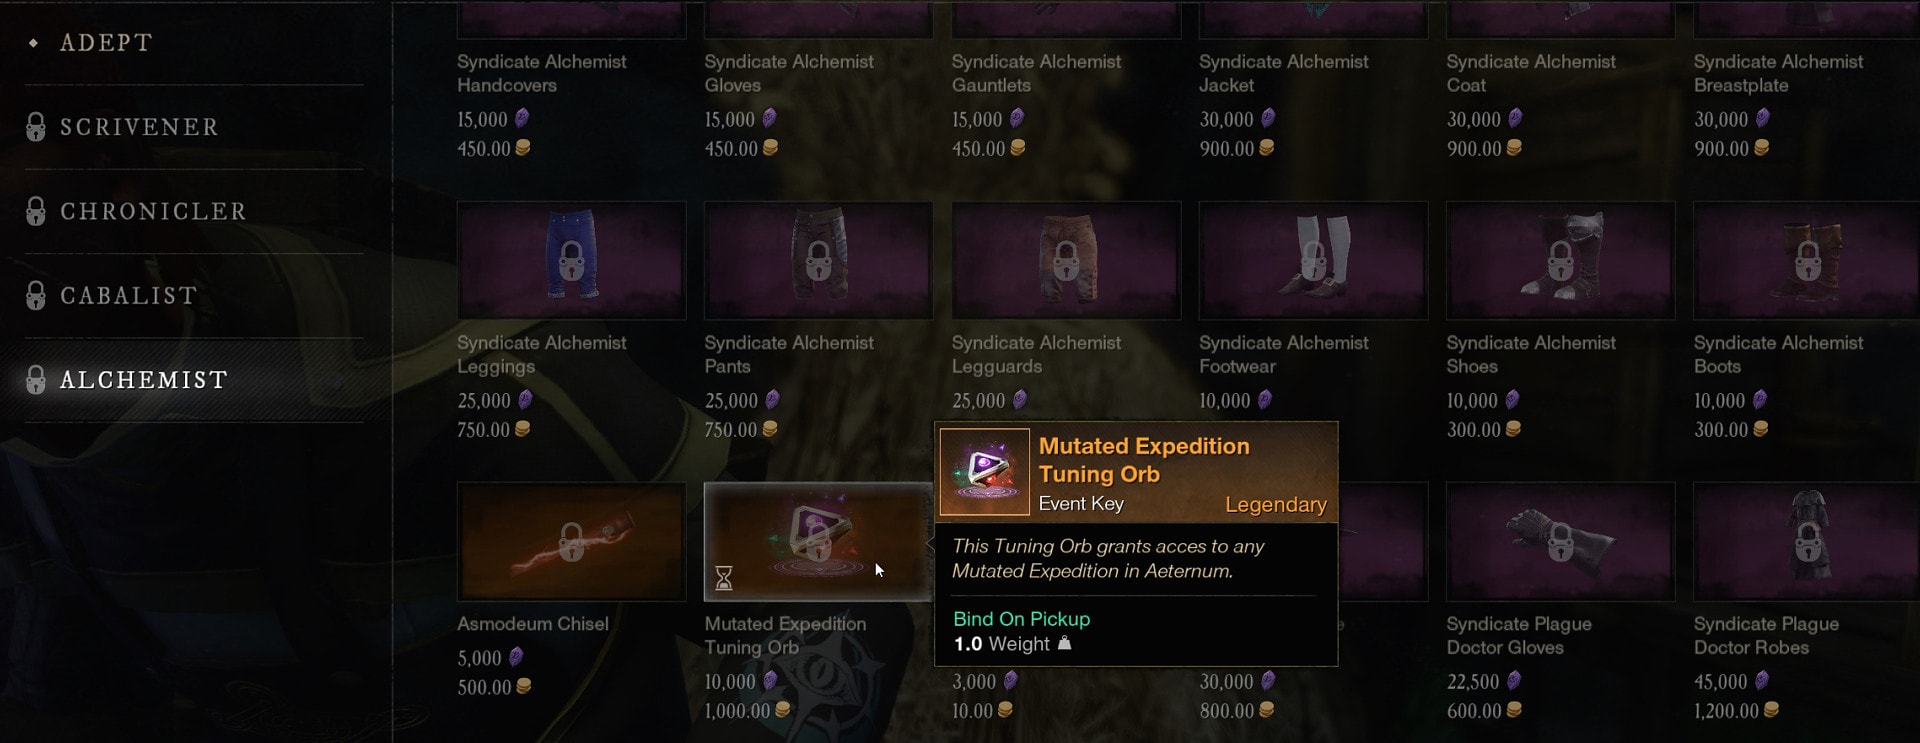
Entering a Mutated Expedition, regardless of which Expedition or difficulty you’re entering will require a Mutated Expedition Tuning Orb. These orbs can be crafted with Stonecutting, which is limited to once a week. They may also be purchased from a Faction Vendor at max Faction Level, which is limited to twice a week.
With the somewhat limited number of attempts you get per week at Mutated Expeditions, to get the most out of the system early on it’s highly advised to form a static group. If the group all has Level 200 Stonecutting, you can attempt a maximum of 15 Mutated Expeditions amongst your group. Without everyone having Stonecutting, you still get at least of 10 attempts per week.
Mutator Scaling
While there are 10 individual difficulties, these more or less simplify down to just four tiers: Normal, Intermediate, Hard, and Elite. Each one of these four steps will more heavily affect your ability to complete the Expedition over just the individual difficulties often will. You will need to meet the requirement of reaching a Silver Rating to unlock each new difficulty.
Below is what you can expect going into each of these Difficulty Brackets.
Difficulty 1-2: Normal
The Normal Bracket difficulties are the difficulties you can easily tackle without much preparation. You’ll only be facing just the Tier 1 variation of an Elemental Mutation. The Promotion and Curse Mutations are not active yet.
We’ll be covering them more in-depth shortly, but it’s good to be generally aware of the modifiers that will appear on enemies. In this case, it’s mostly bonus damage and resistances of the given element. Alongside these effects, there are also effects that occur on death and on-hit, usually dealing damage of the same element.
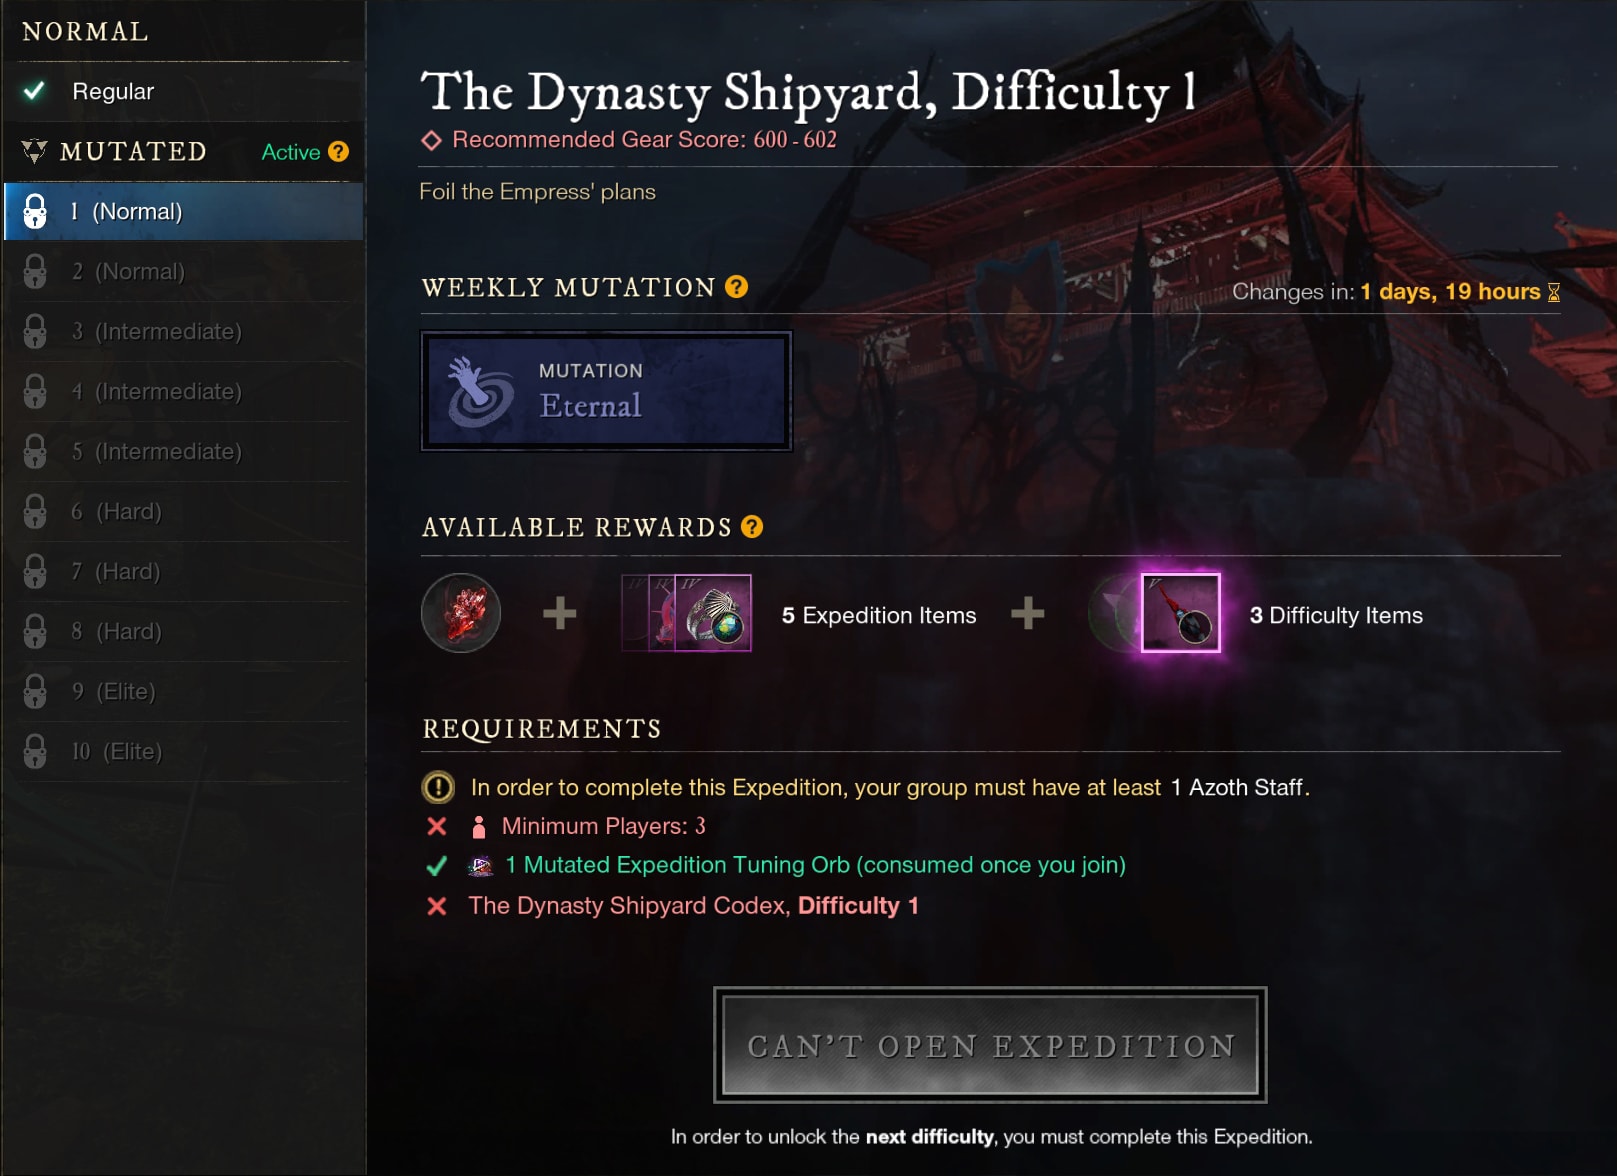
While it recommends Gear Score 600 – 602 for Difficulty 1, it is possible to complete this difficulty and Difficulty 2 if you’re a bit below this. Though, below 580, you may struggle to clear the content quickly and safely enough to progress further.
I also recommend being closer to the Gear Score recommendation for Dynasty Shipyard specifically, as this Expedition will very easily punish you for not being geared appropriately, especially with a couple of mini-bosses that appear. The others can go smoothly if you’re familiar with the fights, as they aren’t nearly as much of a gear check as Dynasty tends to be.
As far as Clear rewards go, you’ll be awarded up to 40 – 60 Umbral Shards based on Difficulty and Clear rating.
For Drops, there are the items to craft the Element appropriate Attunement (added damage) and Conditioning (temporary mitigation that stacks) perks. In addition, there’s also Blue gear that’s themed to the Elemental Mutation and comes with the matching Conditioning Perk, and a unique accessory based on the Expedition.
Difficulty 3-5: Intermediate
In the Intermediate Bracket range does two things for your Mutated Expedition experience: it upgrades the Elemental Mutation to Tier 2 and adds the Promotion Mutations. While there’s no immediate visual tell that the Elemental Mutation has upgraded, some of the effects do get bumped up to stronger versions. The recommended Gear Score range for this bracket is 606 – 612.
With Promotions, these are a smaller set of effects that can appear. However, these are stronger effects, which can make it harder to use certain weapons beyond just the element of damage they deal. Much like Elemental Mutations, we’ll cover these more in-depth later.
For Clear Rewards at this Tier, you’ll get 50-200 Umbral Shards depending on Difficulty and your rating while clearing.
You’ll also be able to drop Purple tier Gloves and Boots with the appropriate Ward perk to match the Expedition’s Enemy Faction. In addition, a selection of Purple Weapons with the faction-appropriate Bane perks as well as a second Expedition-Specific Accessory can drop. This is sadly in addition to the previous tiers of rewards, so you can still receive blue gear rewards.
Difficulty 6-8: Hard
Going into the Hard Difficulty Bracket, both Gear Score and the special perks begin to matter more to your progression. The Recommended Gear Score here is 613 – 620. This bracket adds Curse Mutations. It’s possible that later on, Promotion Mutations would also upgrade here if they have upgrades. For the time being, only Curses are added.
Curses Mutations add effects that periodically deal damage to your team, usually of the same element. This in particular is why the Conditioning especially perks begin to matter more as this damage can add up very quickly over an extended run.
As stated before, it’ll be more important to be at the recommended Gear Score now, not only for the general offensive and defensive power but to boost useful perks as well. Conditioning does wonders to mitigate the damage from curses as well as enemies, as the curse will often be the instance of damage that will trigger your Conditioning perk.
For Clear Rewards, you can earn 400 – 2000 Umbral Shards based on Difficulty and Clear Rating.
For Drops, this bracket further expands the selection of Purple gear, adding Legs, Chest, and most weapons to the pool of available items.
Difficulty 9-10: Elite
The Elite bracket is the hardest but most rewarding. The recommended Gear scores here are 622 for Difficulty 9 and 625 for Difficulty 10. The curse gets an additional effect that applies a debuff, which can only be cleansed by moving near the player that was targeted by the primary curse.
If you somehow managed to clear the Difficulties up to this point without needing the appropriate gear score or needing the Coniditoning perks,
For Clear rewards, you can earn 2000 – 6000 Umbral Shards based on the Difficulty and Clear Rating.
For Drops, this bracket allows for the full selection of purple gear to drop.
Expedition Mutators and Strategies
Now we’ll talk about each of the types of Mutators, their respective Mutator pools, and the effects you’ll see on various enemies due to them. Some of them are pretty basic, so the way to play around them is fairly straightforward.
Elemental Mutations
Elemental Mutations can grant enemies a variety of Elemental boons. There’s a few modifiers that are shared or common between these, like converting part of their damage to an element or resisting that element. On top of these, each element also has its own unique effects that can apply in a variety of ways.
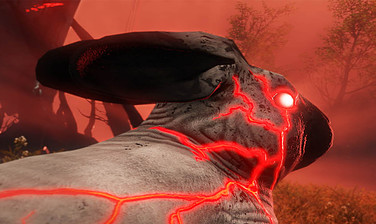
Eternal
Eternal is all about Void Damage, with a mix of empower and healing effects added in.
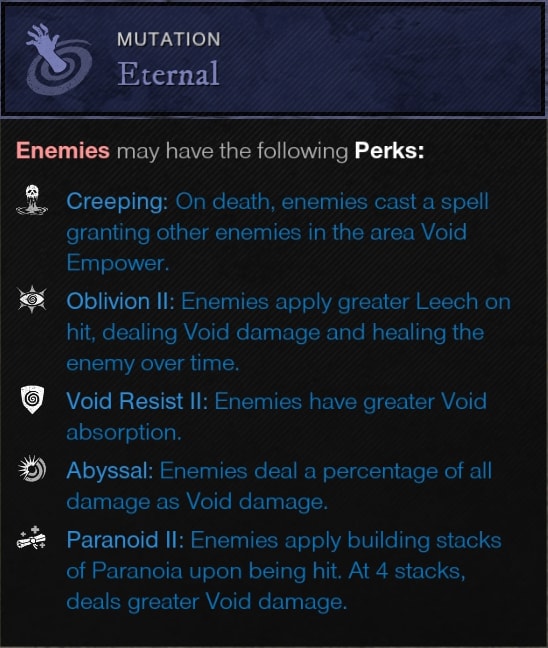
In general, you’ll want to avoid using the Void Gauntlet weapon, Amythyst Gems in your weapon, and the Chain Void or Void Attunement Perks for your weapons. The Void Conditioning perk can also go a long way towards mitigating the damage over time effects and other harmful effects.
Creeping
“On Death, enemies cast a spell granting other enemies in the area Void Empower.”
If you’re dealing with enemies, this shouldn’t be too much of an issue to deal with. This just adds Void damage to all enemies nearby. The only time this can be an issue is an area with multiple Elites, especially if it’s part of a boss or Mini-boss fight as they can empower the boss.
Oblivion
“Enemies apply Leech on hit, dealing Void damage and healing the enemy over time”
This is often only annoying on enemies that have AoE attacks, as the damage over time effects can potentially be applied to multiple member of your team. In turn, this also means the enemy has more healing over time as well.
Since this effect also has a tier two with even more healing, and will often be in the same set of Mutators as Indomitable and specifically the Vampiric buff, there’s potential for some enemies to be absolutely ridiculous to deal with if they get both effects. If that happens, they should be saved for last, if they’re not a priority threat, as without focusing on them, they can be tough to take down. If they end up on a boss, it’s going to take a while to knock them down.
Void Resist
“Enemies have Void Absorption”
This simply means they take reduced damage from Void-based damage. Void Gauntlet and Void related perks will be less than ideal here. They become even less ideal in the Intermediate or higher Difficulty Brackets, where this effect is stronger.
Abyssal
“Enemies deal a percentage of all damage as Void Damage.”
Since this is a conversion effect, using Diamonds in your armor can help to further reduce incoming damage as Onyx gems will not be as effective here. Diamonds will mitigate physical in addition to some elemental damage, allowing you to reduce a lot of incoming damage. The Void Conditioning perks can also cut down on the incoming damage.
Paranoia
“Enemies apply building stacks of paranoia upon being hit. At 4 stacks, Paranoia deals Void Damage.”
This acts much like a thorns ability would in most games, though for every fourth hit instead of every hit. Much Like Abyssal, Diamonds and the Void Conditioning perk can go a long way towards mitigating this damage.
In addition, it’s best to avoid using skills that ‘hit’ multiple times; making hard-hitting or damage over time skills the way to go to safely deal with these enemies. This becomes especially important in the Intermediate and higher Difficulty Brackets, where this deals increased damage.
Hellfire
Hellfire is all about Fire Damage, with lots of damage over time and area damage effects.
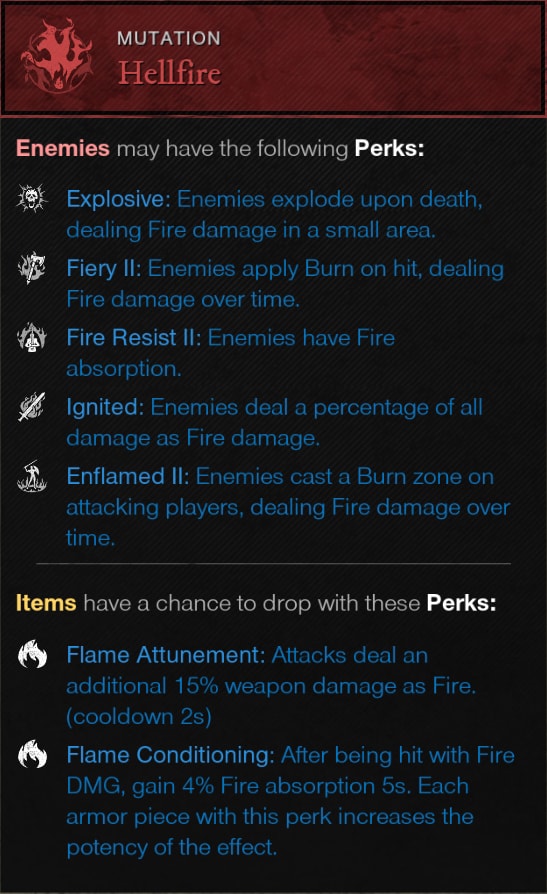
In general, you’ll want to avoid using the Fire Staff weapon, Ruby Gems in your weapon, and the Chain Fire or Flame Attunement Perks for your weapons. The Flame Conditioning perk can also go a long way towards mitigating the damage over time effects and other harmful effects.
Explosive
“Enemies deal Fire damage in a small area on death.”
Much like the standard Explosive Elite modifier, this can be avoided via dodging or leaving the area after defeating an enemy. It’s not a particularly hard modifier to deal with, so long as you pay attention to enemy modifiers.
Fiery
“Enemies apply Burn on hit, dealing Fire Damage over time.”
This effect can typically be mitigated by healing over time effects in addition to reducing the damage through gems and perks. The Flame Conditioning Perk works especially well against this modifier, as the initial hit will reduce most or all of the DoT damage as a result.
Fire Resist
“Enemies have Fire absorption.”
Similar to Void Resist, it’s mostly on avoiding the use of Fire Staff (Musket to a lesser degree), Rubies, and the Chain Fire and Flame Attunement perks that add Fire Damage. There’s nothing that really helps add to your ability to get through any Elemental resistance. With this also having an upgraded version, it becomes more important to avoid these weapons and perks in Intermediate tiers.
Ignited
“Enemies deal a percentage of all damage as Fire Damage.”
Very similarly to Abyssal, Diamonds can almost make this a more trivial thing to worry about until it gets upgraded in the Intermediate difficulty bracket. Flame Conditioning will also work wonders here. If you find yourself not being the focus of the enemy with Ignited, you may also get away with using Gemstone Dust to mitigate stray hits.
Enflamed
“Enemies cast a Burn zone on attacking players, dealing Fire Damage over time.”
This isn’t quite too bad, outside of forcing a lot of repositioning. It can be a bit punishing to melee attackers and tanks, but a bit less so as they typically use heavier armor classes and have higher health pools.
This modifier can also keep healers on their toes as well. While it’s not heavy damage, with other Mutations in play, it can disrupt any pre-planned strategies for dealing with certain curses.
Promotion Mutations
Promotion Mutations are more focused on defensive buffs and to some extent, they also force you to change how you play certain weapons.
Indomitable
Indomitable is often paired with Eternal, which can lead to some very durable enemies depending on what modifiers roll for each set.
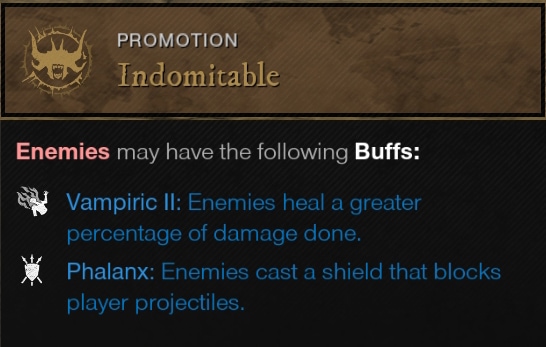
The best way to be prepared for this Mutator set is to carry a melee weapon you can swap to for Phalanx enemies.
Vampiric
“Enemies heal a greater percentage of damage dealt.”
On its own, this won’t ever have too much of an effect. The biggest worry is that this Promotion is applied to an enemy with the Oblivion from the Eternal Mutation. Outside of this combination, there’s very little healing to deal with in most cases.
Phalanx
“Enemies cast a shield that blocks player projectiles.”
This can be annoying at times, but very easy to work around with most melee weapons. Void Gauntlet would also be an option if this wasn’t more commonly paired with the Eternal modifiers. Even then, it can be pretty rare for Void Resist and Phalanx to exist on the same enemy. In the cases where it is, just use a different weapon.
Savage
Savage can make drawn-out fights incredibly hard to manage. Often being paired with Hellfire will often force you to reposition often.
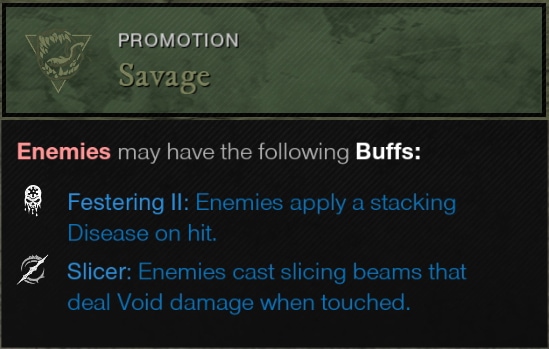
The best way to prepare for this mutation set is to simply be aware of what enemies have what modifiers. You’ll just have to manage your positioning and target priorities accordingly.
Festering
“Enemies apply a stacking Disease on hit.”
Enemies that receive this bonus should be prioritized when possible. While it takes a while for it to stack up, it can end up fully preventing healing, similar to Blight. Even while not stacked up, it still reduces healing, which will still be bad news for your tank.
Slicer
“Enemies cast slicing beams that deal Void Damage when touched.”
This works the same as Slicer does elsewhere. You can dance around it as it moves, or just stay out of its range after it spawns. It’s not too big of a detriment, as the previous casts should despawn as more appear.
Curse Mutations
Curse Mutations are a good reason to always have the respective conditioning perks. They often have two components to them, a damaging effect and a debuffing effect. While these vary a bit between the specific curse, they almost always have the bigger impact out of the Mutations.
Desiccated
Desiccated will periodically deal damage of a given element while it inflicts a special version of Weaken later on.
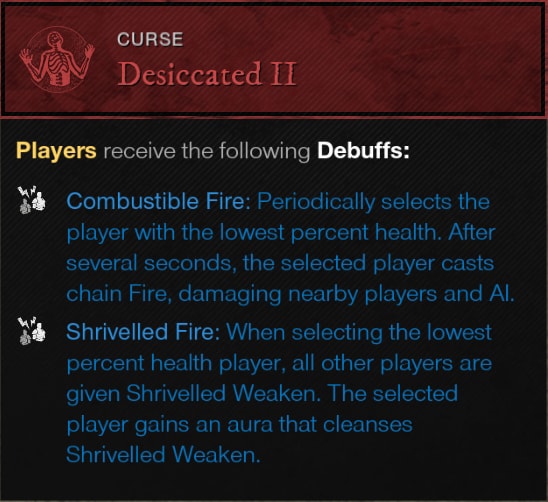
General elemental resistances help mitigate a lot of the damage from this curse variety. It’s often not a huge worry for most groups until it gets uprgaded in the Elite bracket.
Combustible Element
“Periodically selects the player with the lowest percent health. After several seconds, the selected player casts Chain Element, damaging nearby players and AI.”
This damage is unavoidable. However, prior to the Elite Difficulty Bracket, it can easily be mitigated by making the tank soak up the extra bit of damage and preventing it from chaining. You can also just use Gemstone Dust or other forms of temporary elemental mitigation to reduce the damage.
Shrivelled Element
“When selecting the lowest health player, all other players are afflicted with Shrivelled Weaken. The player targeted by Combustible Element will receive an Aura to cleanse this debuff.”
This effect of Desiccated is limited to only the Elite Bracket of Mutated Expeditions.
This is where you generally don’t want to have the tank be the start of the Chain anymore. It’s much easier for a single DPS or Healer to quickly cleanse the tank with the aura than it is to have everyone at risk by having to be near the tank, even for a moment. Since tanks hold the aggro for the group, it will often become rough for them to be the one with the aura, because it means they have to reposition or everyone else does for a moment.
In a group, it’s best to try to designate one person that will always be the target of the damage and the Aura. This wy, when the effects go off, everyone know exactly who to move to in Elite Difficulty.
Censored
Censored is more of a counter to Mages than anything else, but can still hinder melee players as well.
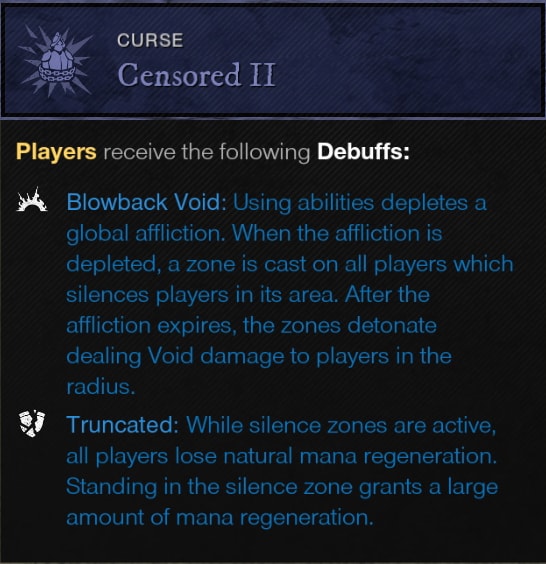
It relies heavily on adjusting your positioning around the zones, typically staying near the edges of them when possible in the Elite difficulty bracket.
Blowback Void
“Using abilities depletes a global affliction. When the affliction is depleted, a zone is cast which silences players in its area. After the affliction Expires, the zones detonate dealing Void Damage to players in the Radius.”
To simplify the wording a bit and add some clarity to it. This stacks up as you cast, shown as a meter under your score. Once it’s been cast, the meter slowly drains until until it fully resets, and it will not stack up again until the meter is depleted. Once depleted the process starts again.
This on its own isn’t too bad, similar to things like the Enflamed effect of the Hellfire Mutation, it just forces you to reposition. It’s when you get into Elite that it matters a lot more. Still, even then, it’s only a thing for Mages, Healers, or really anyone just using magic weapons needs to be mindful of.
Truncated
“While silence zones are active, all players lose natural mana regeneration. Standing in the silence zones grant a large amount of mana regen.”
For mages, this will mean you’ll have to play around using this effect as well as using mana potions to recover your mana as needed. In some situations, it’ll be easier to deal with using just mana pots. It depends on the weapons you use. In addition, this effect does also bring a bit of extra value to effects like Refreshing Toast and Duplicating Toast perks due to the reliance on mana potions.
The best way to play around this effect is to stay near the edge of the silence zones. This will let you move in and out of the zones to quickly regen and go back to casting without heavy potion use.
Mutated Expeditions Scoring and Rating Rewards
As a note, the scoring information below may not be fully accurate, as it does appear to vary from tier to tier. This is provided to give some understanding of how the scoring works and how you can set the highest scores possible.
Scoring Mechanics
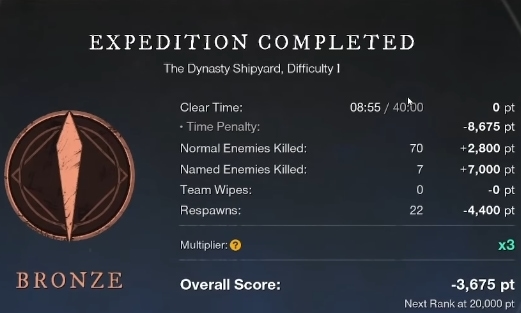
Just about everything you do in an Expedition can provide a bonus to score. Defeating enemies, defeating Named Enemies, clear speed, and deaths can all affect.
Naturally getting the most out of a Mutated Expedition can be tricky, especially on higher difficulties.
Time Bonuses and Penalty
This is the most complex part of the scoring and uses the most math behind it. As far as I’ve found so far, the time bonus appear to be a flat bonus or penalty with additional gain or loss depending on the time taken.
For a clear below the required clear time you gain a flat bonus of 2000 plus 1 point for every second below the required time. This has been the only way this end up making sense across multiple runs and scores being recorded.
For times that exceed the required time, you get no bonus and instead lose 5 points per second over the require time. The biggest set back here is losing the 2000 point bonus and the the extra multiplier. This penalty can add up if you end up taking 10+ additional minutes to clear, but otherwise won’t set ou back too hard if you narrowly miss the timing.
Defeating Enemies
Defeating non-elite enemies will net you ~40 points per takedown. While this is a small amount, it will add up over the course of an Expedition. This also is a good incentive to fully clear the expedition rather than rushing through it and skipping as much as possible. You will need to defeat a certain amount for a Multiplier bonus as well.
Defeating Named Enemies grants you 1000 points per takedown. Similarly to small enemies, while there’s fewer Named enemies, they’re rewarding enough to make up a large portion of the scoring. Due to this you should absolutely never skip named enemies, since taking them down will also contribute.
These two categories of scoring make up a large majority of the points you will gain in any Mutated Expedition.
Deaths and Wipes
Each Death, and subsequent Respawn will set you back 200 points. This isn’t a huge penalty by any means but it can add up. Similar Team Wipes will also set you back an additional 500 points. This makes a full wipe set you back a total 1500 points.
However, Team Wipes only trigger if all players are dead, meaning they can be avoided by respawning for the most part. You will have to be extra cautious with bosses that do have team wiping mechanic though.
It’s still best to avoid dying at all if it can be helped, as death count plays a factor in Multipliers as well.
Score Multiplier
With all the scoring detailed, let’s talk about the bonus multipliers you can earn in each expedition. You can never drop below the 1x multiplier you start at. In total you can end an expedition with a maximum of a 6x Multiplier.
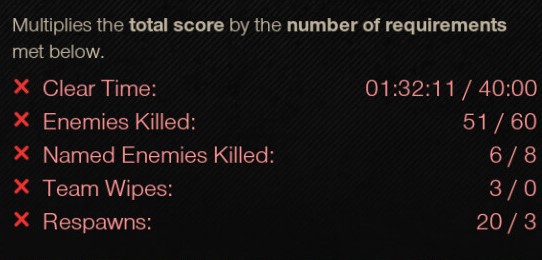
First is the Time Bonus. If you clear the Mutated Expedition under the required time, you’ll gain a +1 to your final score multiplier. This can be easy to get if you’re experienced with the Expedition and usually not a huge hassle to manage. Not completing this simply just does not reward a multiplier.
Next, are bonuses for Enemy Defeats. Both Regular and Named enemies will provide an additional multiplier, when you defeat a certain amount in the Expedition. Typically this will be most or all of each enemy type. Not meeting these will simply not add their multipliers.
Finally, if at any point your team wipes, or passes a certain amount of respawns, you will lose these multipliers at the end. However, keeping your deaths and wipes to a minumum will provide additional multipliers at the end of the run. These alone limit you to just a 4x bonus, but will often not be enough to prevent you from reaching a Silver or Gold score if they’re the only bonuses you miss out on.
Expedition Rating
The system for providing a final rating at the end of an Expedition is very straightforward, only being determined by final score alone.
Any completed run under 20,000 score will net you a Bronze Rating, which provides reduced Umbral Shards. At 20,000 – 40,000 score, your run will be Rated as Silver, which provides a moderate amount of Umbral Shards. Any run over 40,000 score will be rated as Gold, providing the most Umbral Shards.
While Completion Rating doesn’t affect item rewards beyond the Umbral Shards, Umbrals Shards are still a huge thing to keep in mind if you want to progress further into Mutated Expedtions.
Umbral Shard Rewards per Difficulty
Below is a table detailing the known values for Umbral Shard drops.
| Difficulty | Bronze | Silver | Gold |
|---|---|---|---|
| 1 | 27 | 33 | 40 |
| 2 | 40 | 50 | 60 |
| 3 | 53 | 67 | 80 |
| 4 | 80 | 100 | 120 |
| 5 | 133 | 167 | 200 |
| 6 | 533 | 667 | 800 |
| 7 | 1000 | 1250 | 1500 |
| 8 | 1333 | 1667 | 2000 |
| 9 | 2677 | 3333 | 4000 |
| 10 | 4000 | 5000 | 6000 |
With this chart, the big take aways to know is that the Gold Ratings give the most Umbral Shards. Assuming you’re starting at 600 Gear Score, getting a single gold run through the first 5 difficulties will give you enough to take a full set of gear to almost 607, or just your weapons to 613. I feel like both of these early strategies would be viable.
If you’re starting below 600 Gear Score for your gear, managing Gold through the first 5 difficulties will give you enough Umbral shards to bring yourself up to 594 across the board.
Here at VULKK.com we have a ton of useful New World Guides and more and more are being published regularly. We also have all of the news and updates covered to keep you up-to-date with all things New World!