Want to learn how to shred your foes with shrapnel in New World? This guide is an in-depth dive into all things Blunderbuss in Amazon’s MMO!
This guide dives deep into the Skills, Passives, and some builds for the Blunderbuss in New World. This guide can be considered a more advanced version of our New World Guide to Weapons for Beginners. By the end of this guide, you should have a thorough understanding of the Blunderbuss and with practice be able to fully master it.
The Guide is up-to-date for Patch 1.9.2
Table of contents
Blunderbuss Overview
The Blunderbuss is a versatile ranged weapon capable of both short-range engagements with its Containment Tree and farther ranges using its Chaos Tree. This mix of effective ranges and its utility from skills allows it to be both an effective weapon and a back pocket option for hindering your foes.
The Blunderbuss finds itself in the Damage Category but packs enough Utility to be considered an option for that reason alone. While most of its utility relates to mobility, it is just as capable at debuffing foes with the use of certain upgrades and perks.
Blunderbuss Skills, Passives, and Perks
First, we’ll lead off with the skills and passives. We’ll talk a bit about each, their uses and how effective they are. There’s a lot to cover here, so we’ll break it down per tree to keep things organized.
Alongside the general information, They’ll be given a Rating from C up to S tier for both PvE and PvP. C tier is exclusively for the passives that are not that great, either being forced by another upgrade or generally useless. A and B Tiers are middling tiers, putting them between the worst passives and the best, leaning one way or the other. S tier are the good passives, the ones you’re almost always going for if you pick up a skill or want to because it’s useful in many scenarios.
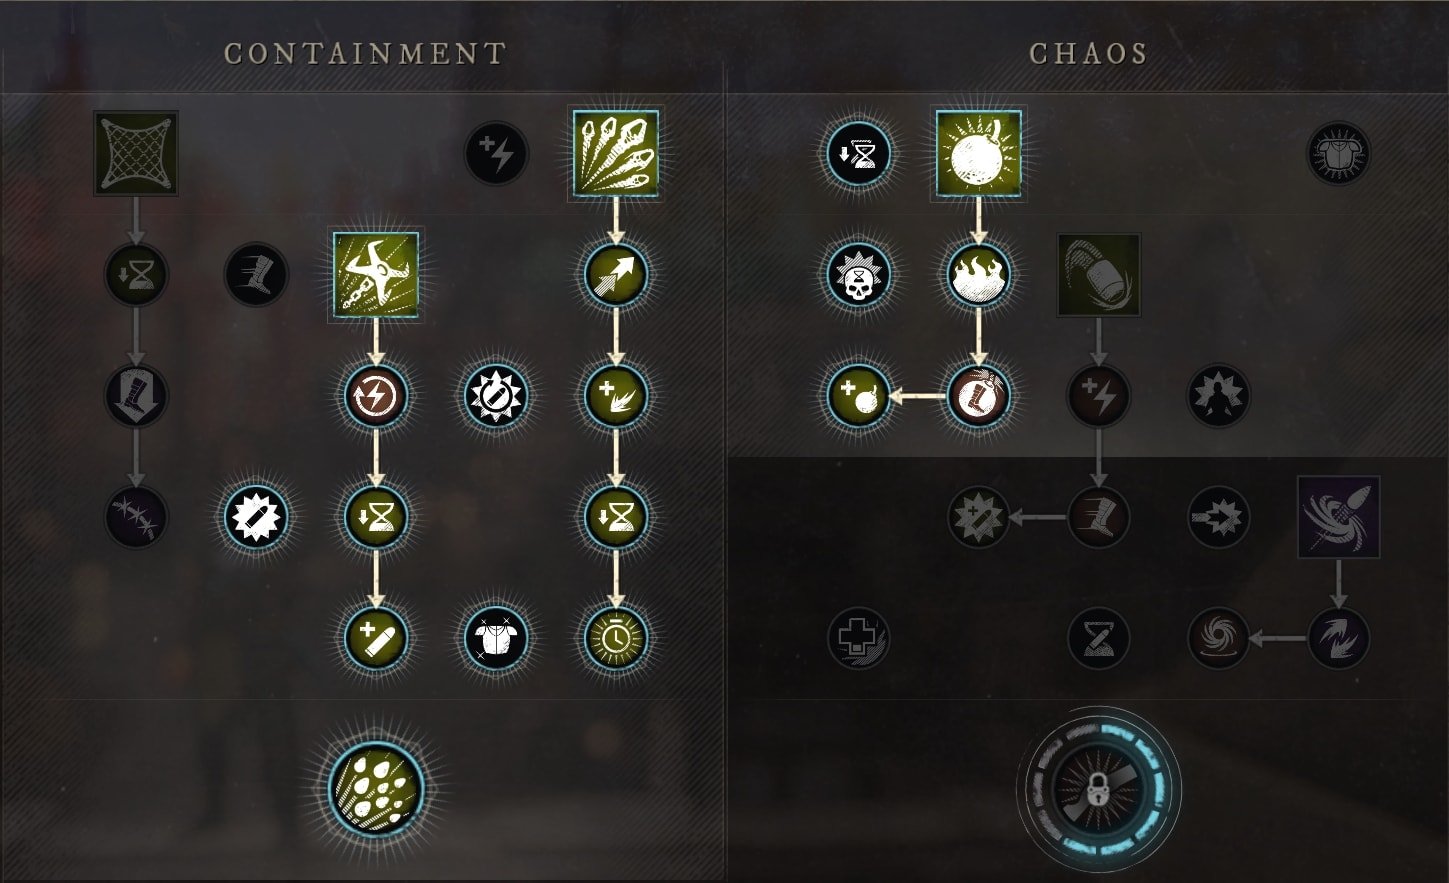
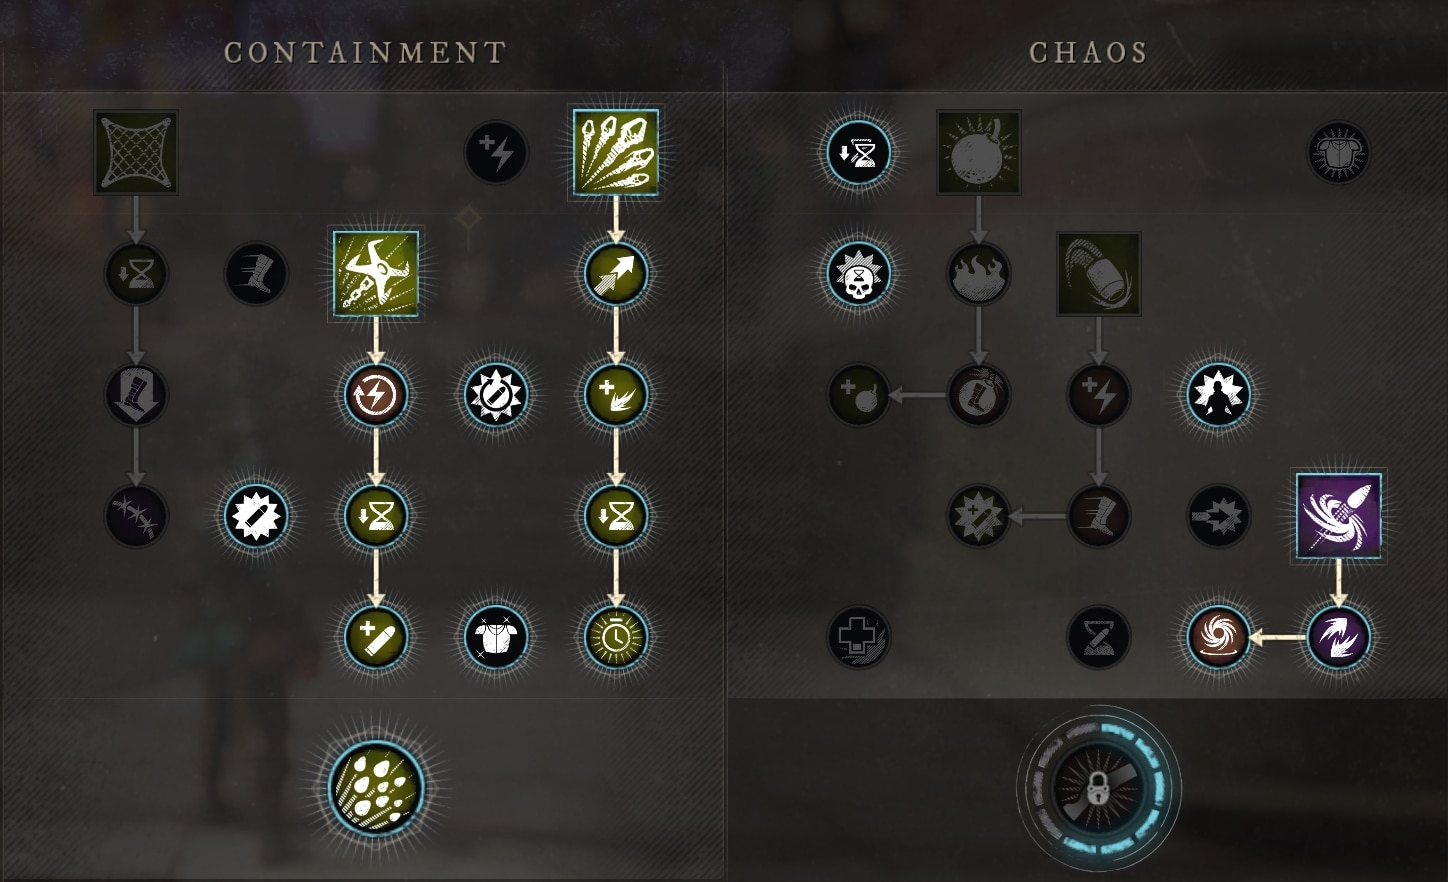
Containment Tree
The Containment Tree for the Blunderbuss is all about getting up close and personal with your foe, dealing some heavy burst damage, then promptly creating distance before going again. The Active Skills for the Containment Tree are Azoth Shrapnel Blast, Net Shot, and Claw Shot.
 Azoth Shrapnel Blast
 Azoth Shrapnel Blast
Azoth Shrapnel Blast fires a row of 5 pellets while pushing you backwards. Each Pellet does 50% Weapon Damage, but each pellet will deal 20% less damage when hitting the same target, dealing roughly 118% total weapon damage when applied to a single target. This skill also deals 50% less stamina damage.
This is your main close-range damage skill, which can deal more damage than a basic shot from your blunderbuss. The push on it isn’t too bad, but if you’re not using it at or near point-blank range, it’ll lack damage and make a follow-up shot potentially miss, unless you aim first. It can also be used at further ranges for decent AoE, though will deal less damage to each target.
With a cooldown of 14 seconds, Azoth Shrapnel Blast is the Blunderbuss’ shortest cooldown.
Azoth Shrapnel Blast Rating: S – PvE and PvP
Being your only close-range damage skill, Azoth Shrapnel Blast allows you to utilize the Blunderbuss to maximum effect when playing around it. It combos very well after an opening shot and does great damage making it reliable and powerful for close-range builds. The flexible usage it offers allows it to have great damage potential in both smaller and larger-scale PvP when used correctly.
Reach
 Reach
ReachReach extended the range of Azoth Shrapnel Blast from 12 meters, to 16 meters.
A 33% increase in range doesn’t mean too much when using this skill up close. However, it has a decent impact when trying to spread out the damage of the shot across multiple targets. While this means a target is likely to take less damage, the damage will be spread between targets easier and from further range.
Reach Rating: B+ – PvE and PvP (A- with Azoth Bomb)
While it won’t be too often you’ll want to spread the damage out, doing so can be beneficial for clearing multiple enemies out quickly. The added range is a nice little bonus, which can make the skill overall safer if you’re looking to just fire it off into a crowd. The biggest benefit is this extends the range which you can utilize the Azoth Bomb upgrade.
Discord
 Discord
Discord increases the pellet count of this skill by 4, for a total of 9 pellets.
This effectively increases the potential single target damage to roughly 245% Weapon Damage, from its previous 185%. This is a pretty sizeable damage boost, while also making it work better by also making it more likely that the skill will deal decent damage to multiple targets.
Discord Rating: S – PvE and PvP
Regardless if you use the skill as single target burst or a wide AoE attack, this increases the potency of its damage by quite a bit. If you’re running the skill, there’s never a reason to go without this upgrade.
Refresh
 Refresh
Refresh reduces the cooldown of Azoth Shrapnel Blast by 1.5% for each hit from this skill or the Blunderbuss Primary Fire.
While this sounds weak at first, you have to remember that both this attack and your primary fire are composed of several hits. This allows this skill to reduce its cooldown by 13.5% on its own, assuming you hit all pellets. Azoth Bomb increases the further for each hit dealt by the 3m AoE it adds. Your Primary fire will typically reduce this cooldown by 9%, increased to 12% if Unload is active.
Refresh Rating: S – PvE and PvP (S+ with Azoth Bomb and Unload)
This is yet another passive that’s effective regardless if the range you use the skill, being decently strong. Since you’ll often use this skill in PvE, there’s no reason to not reduce the cooldown on a reliable source of damage. The way you cna flexibly use it for AoE or single target damage make it a solid PvP pickup as well, as you can almost always get maximum effect out of it.
Azoth Bomb
 Azoth Bomb
Azoth Bomb adds the 10th shot in the middle of Azoth Shrapnel Blast in the form of a bomb that deals 100% Weapon Damage in a 3-meter area after a 1 second delay. This bomb will stick to the target or surface it hits.
This is another huge increase in single-target damage, bumping the total up to roughly 345% Weapon Damage total. This also bumps up the AoE potential and makes a couple of the previous upgrades even more valuable.
Azoth Bomb Rating: S – PvE and PvP
Between the huge increase in damage, consistency, and the additional hits for Refresh; this is hard to say no to as an upgrade. It makes your damage much more reliable, offering a large burst of damage in the direction you aim it, rather than forcing you to play at point-blank range for absolute maximum value.
Net Shot
 Net Shot
Net Shot fires a net from your blunderbuss that deals 70% Weapon Damage and applies a 40% Slow for 3 seconds. This skill also pushes you backwards, and the distance of this push can be increased by moving backward, or negated by moving forward or sideways.
Net Shot is very heavy on utility, and light on damage, but provides enough utility that it’s often worth taking. Despite its low damage, once upgraded, it can trade upfront damage for damage over time and deal a bit more damage overall.
With a cooldown of 20 seconds, Net Shot is one of the Blunderbuss’ shorter cooldowns.
Net Shot Rating: A – PvE, S – PvP
In PvE this doesn’t quite offer enough damage to really want to always take. It still works decently as a combo setup or additional mobility, but you’ll rarely use it for the damage.
In PvP the mobility and combo setup make this an incredibly valuable tool. It allows for additional consistency with many other skills, allowing for longer strings of combos. The combination of the slow and additional mobility it can provide allows it to flexibly be an engaging tool or disengaging tool for PvP.
Fast Hands
 Fast Hands
Fast Hands reduces the cooldown of Net Shot by 20% if it hits a foe.
This is a pretty solid cooldown reduction for one of your longer cooldowns, taking 4 seconds off the base cooldown. With it being a flexible skill, this makes the cooldown reduction more valuable, as you’ll be able to use it more often combined with other passives.
Fast Hands Rating: S – PvE and PvP
If you’re using Net Shot at all there’s no reason to not take this. Being able to use this skill more often for its utility or damage makes this a solid pickup.
Apparatus
 Apparatus
Apparatus changes the Slow from Net Shot to a 50% Slow that decays over 7 seconds.
This is a much stronger initial Slow, but the decaying effect reduces it below even the base slow much sooner. The initial boost in slowing power does make it more potent for combo setup, but at the cost of your opponents steadily recovering their movement speed.
Apparatus Rating: C – PvE, A – PvP
In PvE a Slow is already pretty weak and the decaying doesn’t help it be any better. Though the extended duration can make it useful for avoiding some PvE enemies that move quickly.
In PvP it’s a better option, as even as it decays, it’s still at least a 50-22% Slow for the first 4 seconds which is a strong enough Slow to still make a difference. Though it’s more of a preference if you want to take this hit to the slow for more total damage from the skill from Barbed Netting.
Barbed Netting
 Barbed Netting
Barbed netting reduces the initial impact damage to 30% Weapon Damage, but applies a 35% Weapon damage Bleed for 3 seconds.
This brings the total damage up to 135% Weapon Damage, putting it roughly on par with a basic shot when all pellets hit. Barbed Netting is a really solid damage boost overall, but is often a toss up choice whether or not you want to take the slight hit to the Slow to get to it.
Barbed Netting Rating: S – PvE, A – PvP
If you’re using Net Shot in PvE, this is one of the better upgrades to take. Since the Slow has much less impact in PvE, you might as well get the most damage you can out of it.
In PvP it’s a toss-up between the extra damage this provides or the more consistent Slow from the base skill you’d get by skipping both this and Apparatus for upgrades. Both options can be effective, but can vary based on the situation.
Claw Shot
 Claw Shot
Claw Shot fires a grappling hook from your Blunderbuss that travels up to 14 meters and pulls you to a hit target or surface, but cannot pull you more than 3 meters upwards. If it hits a foe, it will take 40% Weapon Damage and be rooted for 1 second. The pull can also be canceled by any other ability or primary fire. This skill can taunt the hit target for 4 seconds when using a Carnelian Gem.
This skill provides a fair bit of mobility, working on both enemies and surfaces. This can make it great for getting into or out of a fight, depending on what you need from it. The short root it provides can also setup for some of the other skills like Splitting Grenade, due to its short delay before the damage goes off.
Claw Shot Rating: A – PvE and PvP (S when upgraded)
The utility this kill provides is insane just at the base effect. As you get points to upgrade it, the potential of this skill just goes up. Between the stamina regen, cooldown reduction, and even loaded ammo recovery. This has a lot of useful tools that it gets that can make it a very worthwhile skill, even for PvE.
In-and-Out
 In-and-Out
In-And-Out restores 8 stamina per second for 10 seconds.
While this doesn’t sound like a lot of stamina, it can really add up in the middle of a fight. Combined with natural stamina regeneration, this can easily net you an extra dodge or two over its duration, making it easier to play up close to someone.
In-And-Out Rating: C – PvE, S – PvP
The added Stamina that you can use for dodging can really make the Blunderbuss a force to be reckoned with in the right hands. With dodging being a very strong option for avoiding damage and many perks working with it, it can provide a lot of extra benefits.
Combat Readiness
 Combat Readiness
Combat Readiness reduces the cooldown of Claw Shot by 2% for each pellet that hits, regardless if the pellets are blocked.
This is actually pretty decent For most basic shots, this is 12% cooldown reduction per primary fire, assuming you land all of the pellets. This increases to 16% with Unload active. This can also trigger off Azoth Shrapnel Blast granting 10% or 18% depending on its upgrade state.
Combat Readiness Rating: S – PvE and PvP
With the flexibility of this skill being fairly high, being able to use it more often can make it a very potent skill. This also shaves off a decent amount of its cooldown, though works best when you also use Azoth Shrapnel Blast.
Mobile Overload
 Mobile Overload
Mobile Overload grants you additional loaded ammo when you pull yourself to a target. This loaded ammo can exceed the normal capacity of 2.
This gives you an extra shot with your Blunderbuss before you’re forced to reload. This can also extend your rotation when used well. The only requirement is landing the hook on to an enemy, which can be tricky.
Mobile Overload Rating: S – PvE and PvP
While the Claw Shot itself lacks damage, this makes up for it quite well giving you another primary fire to use. While not direct damage, it does provide enough extra damage and ensure you’ll have a shot ready if you hit an enemy and pull yourself to them.
Containment Tree Passives
Future Endeavors
 Future Endeavors
Future Endeavors restores 1 Stamina per pellet from basic attacks.
This means you’ll restore up to 6 Stamina per shot, or 8 with Unload. This isn’t a ton of Stamina up front by itself but will add up over the course of an encounter.
Future Endeavors Rating: C – PvE, A – PvP
Since the Blunderbuss itself lacks any reason to dodge beyond general survival in PvE, there’s not a huge incentive for taking this passive. While it can allow you to more frequently trigger certain weapon and armor perks, that’s not always enough to justify taking this.
However, in PvP, it can absolutely make the difference between a won and lost fight, simply by virtue of being able to dodge more. It’s certainly not going to guarantee you a won fight, but makes getting there easier. Add in the previously mentioned perks that require dodging and you’ll end up in a much more advantageous position.
Run and Gun
 Run and Gun
Run and Gun grants 40% Haste for 1 second upon reloading.
While this is a powerful Haste, its short duration makes it overall lackluster. Despite reloading often, it doesn’t have very high uptime. The uptime only gets worse when considering weapon swaps.
Run and Gun Rating: B – PvE, C – PvP
Despite the low uptime, being able to use this often to kite out mobs in PvE can feel pretty useful. It’s really the best-use scenario for this passive.
Normally in PvP situations, Haste generally shines but this feels like a hard exception unless the BLunderbuss is most/all of your actual damage. The more often you’re likely to swap, the less value you actually get out of this passive, considering the Blunderbuss reloads passively from a weapon swap.
Ramp
 Ramp
RampRamp grants a stacking damage boost when you reload, granting a 4% damage increase per stack for 6 seconds. This effect stacks up to 4 times, for a maximum of 16% increased damage.
Unlike Run and Gun, Ramp actually gives you a good enough incentive to not swap your weapon. It still takes a bit to well… Ramp… but gives a considerable amount of damage if you allow it to.
Ramp Rating: A – PvE and PvP
If you’re using the Blunderbuss as your main weapon and by extension main source of damage Ramp is absolutely worth taking. It’s still fantastic even as a supporting weapon, as the damage buff can be stacked without having to deal damage, allowing you to stack it for little cost other than maybe some ammo.
Deep Load
 Deep Load
Deep Load increases the damage of the last shot loaded into the Blunderbuss by 15%.
This increases the damage of the last shot before you reload, which you’ll often use in a rotation of skills. It can be a little rough to use if you;re making active use of Claw Shot’s Mobile Overload passive, but you can definitely fit it into most rotations cleanly.
Deep Load Rating: A – PvE and PvP
Considering this only will affect a single shot per reload, this lowers its value a fair bit. it’s still a solid boost since it would at least apply to every other shot, barring weapon swaps. Given that it’s about as strong as Ramp without the actual ramp time makes it worth using despite not applying every shot.
Fortifying Aggression
 Fortifying Aggression
Fortifying Aggression grants 10% Fortify for 2 seconds when you successfully land shots within 3 meters.
Despite the low Fortify value, this gets plenty of use as you’ll typically be within range to make use of this while fighting. It helps to make the Blunderbuss a more consistent and less risky weapon overall.
Fortifying Aggression Rating: S – PvE and PvP
While it’s only a weak Fortify and a relatively short duration, it makes up for this with fairly high uptime in combat. Having this up consistently makes it much easier to play the Blunderbuss at closer ranges, especially in PvP.
Unload (Containment Ultimate)
 Unload (Containment Ultimate)
Unload increases the pellet count of your next shot within 6 seconds of using an ability to 8 pellets, instead of 6.
If you’re landing full basic shots with the Blunderbuss, this will contribute another 46% Weapon Damage. This bumps these empowered shots up from 138% Weapon Damage to a more substantial 184% Weapon Damage. It adds a lot of potential damage to well-executed damage rotations.
Unload Rating: S – PvE and PvP
For close-range and combo-focused builds, there’s really no reason to not take this Ultimate. Since two of the main skills in this rotation also reduce their cooldowns based on the number of pellets it, it also translates to shorter cooldowns for those skills and a more frequent rotation.
Chaos Tree
The Chaos tree is all about wreaking area of effect havoc on your enemies from a much safer distance, at the cost of close-range options leaving you more vulnerable to melee fighters. The Active Skills for the Chaos Tree are Splitting Grenade, Mortar Charge, and Blast Shot.
Splitting Grenade
 Splitting Grenade
Splitting Grenade launches a bounding grenade that can bounce up to 4 times before detonating after 1.5 seconds of being fired. This splits into 3 mini grenades that deal 85% weapon damage in a 3 meter area each after 1 second upon landing. Each successive hit be reduced by 40%.
At its absolute maximum, this skill will deal up to 167% Weapon damage, due to the damage reduction for multiple hits in a single use. This makes it far less useful on its own, functioning as a slightly strong basic attack with more range. Getting the maximum value out of the skill is also very inconsistent, due to how the grenades split.
Splitting Grenade Rating: B+ – PvE and PvP (A when upgraded)
While Splitting Grenade is inconsistent, there’s no doubt that the quick burst of AoE damage can be valuable in most situations. The strong majority of its damage is dealt in the first 2 hits, making about as consistent damage-wise as a basic attack. Situations where you can hit multiple targets allow this skill to shine and provide high value.
Soften
 Soften
Soften increases the damage of Splitting Grenade by 25% against targets above 50% Health.
A solid boost of damage that has a very lenient threshold for activation is pretty nice to have for an AoE skill like this. This increase the maximum damage to roughly 208% Weapon Damage for all three hits, or 170% for just the first two hits.
Soften Rating: S – PvE and PvP
If you find yourself using Splitting Grenade, this is a must-have passive that adds a ton of extra burst potential to the skill. The damage increase is certainly worth having, making the first two hits stronger than all three combined before the upgrade.
Delayed Escape
 Delayed Escape
Delayed Escape grants a 20% Haste for 3 seconds when any grenade deals damage.
While it’s tied to the cooldown of Splitting Grenade, this is often much more practical as a Haste, being able to use it to get into a fight or get away from an opponent by using the skill differently.
Delayed Escape Rating: B – PvE and PvP
While it’s a bit of a flexible Haste, its held back by being tied to one of the Blunderbuss’ longest cooldowns. Though that flexibility grants it enough utility to help you close or make distance based on how you want to use the skill. You can aim it at a foe when you’re looking to go in, or launch it at your feet as you escape to make use of the haste to create more distance.
Incendiary Bursts
 Incendiary Bursts
Incendiary Bursts applies a Burn for 10 seconds to any foe hit by Splitting grenade. This Burn deals 10% Weapon damage per second, for a total of 100% Weapon Damage over its duration. This effect can stack to 3 times, for a total of 30% per second or 300% over the duration.
This is another solid and consistent boost in damage to the skill, which significantly amps its AoE potential. Even with just two grenades, you’re dealing nearly a total of 400% weapon damage to a single target being almost equally half burst and half DoT.
Incendiary Bursts Rating: S – PvE and PvP
Given how stong of a Burn this can apply if all 3 grenades hit the same target, it’s very much worth using in all situations. Even if just used for general AoE purposes, this really boosts the overall potential for AoE damage considerably.
Mortar Charge
 Mortar Charge
Mortar Charge loads 3 mortar charges into your Blunderbuss, replacing your basic shots for up to 15 seconds or until all charges are expended. Instead of your normal Pellet based hits, you’ll now deal 100% Weapon damage in a 3-meter AoE. The damage is increased to 135% if the target is at least 10 meters away.
This deal roughly equal damage to your standard shots when at least 10 meters away, but also deals it without drop-off and in a small AoE. With this being a shorter cooldown, there’s potential to use this often and deal heavy AoE damage at farther ranges than the Blunderbuss typically allows.
Mortar Charge Rating: S – PvE and PvP
If used well, this skill can contribute significant damage, given it condenses the power of a single basic shot into a single hit, rather than several smaller hits. This makes it harder to mitigate the damage, and being AoE also makes it much harder to block for the few weapons that could. Hitting just two enemies already provides more value than you could get from a standard shot.
Steady
 Steady
Steady grants you 7 Stamina per hit with a Mortar Charge.
With this being an uncapped effect, there’s room for this to be a powerful passive when combined wither certain perks. Though if you’re only hitting just a couple of targets you won’t feel too much value out of it as it doesn’t have the same consistency as Future Endeavors.
Steady Rating: C – PvE, A – PvP
It’s rare you’ll actually need the stamina in PvE, since this skill lends itself well to keeping your distance and just taking enemies down with AoE from afar.
In PvP where you may more actively need the stamina to dodge a melee attacker that’s in your face, the extra stamina can help a lot. When hitting multiple targets it’s possible to recover a significant enough Stamina per hit that it allows for extra dodges. This in turn can allow you to take advantage of a melee attacker in larger-scale PvP to deal higher AoE damage to their clumped-up team.
Freedom
 Freedom
Freedom Grants you a 50% Haste for 2 second when you fire a canister.
This grants you up to 6 seconds of a max power Haste, or 8 seconds with Streak. This allows you to fire a mortar and very quickly reposition to safely continue your assault.
Freedom Rating: B – PvE, S – PvP
While an in-combat Haste won’t do too much in PvE, there are some boss mechanics that this can be beneficial for. If not, at the very least can be a powerful tool for kiting or general traversal.
In PvP, having this power Haste basically on-demand allows you to really easily and safely position yourself for maximum damage in combat. In larger scale combat when paired with Steady, you can really position aggressively and get away with it fairly easily with practice.
Streak
 Streak
Streak grants you a 4th shot with Mortar Charge.
This allows you to get more total damage out of the skill, while also allowing you to take more advantage of passives like Freedom at the same time.
Streak Rating: S – PvE and PvP
Considering it’s both extra damage and more utility from the skill as a whole, there’s little reason to not take it if you’re running this skill. The only case you would really argue against it is just using the base skill in PvE. Just getting the passive for the damage will cost you an additional 3 skill points which you could just invest elsewhere to reduce cooldown or increase damage to a similar effect if you don’t need the other passives.
Blast Shot
 Blast Shot
Blast Shot fires a blast of wind out of the Blunderbuss, dealing 50% Weapon Damage and knocking down targets in front of you. This ability has Grit, preventing staggers. With a Carnelian Gem slotted, this skill will taunt foes hit for 4 seconds.
Blast Shot is a very situational tool, which often does well in PvP, but not so much in PvE due to the low damage. Being a hard crowd control ability, it does still have some value in both aspects if used in the right situation. It’s a great defensive tool, but lacks offensive utility, at least to start with.
Blast Shot Rating: B – PvE, A – PvP
In PvE its usefulness is limited by most of the high-threat enemies being immune to the knockdown effect. However, once upgraded it does gain additional utility that can make it decently useful still, but not by much.
In PvP, the knockdown can be a powerful setup tool for other skills, like Splitting Grenade which would require an immobilized target to get maximum value out of. it can also serve a a combo extender of short as well for much the same reason.
Preparation
 Preparation
Preparation applies a 10% Rend for 6 seconds to enemies hit by Blast Shot.
This is a fairly weak Rend Effect, all things considered. It’s really low in potency and more critically, uptime. This makes it a very situational upgrade unless you intend to use it to open or extend combos or skill rotations.
Preparation Rating: B – PvE and PvP
The biggest thing holding this back from being useful is the extremely high cooldown on Blast Shot. This leaves it with little uptime, but also encourages the use of Blast Shot in a more offensive rather than defensive manner where it often works better.
Lingering Flow
 Lingering Flow
Lingering Flow create a 10-meter area in front of you after using Blast Shot that boost both you and youre allies movement sped inside it by 25%. This effect lasts for 8 seconds.
This is another decent bit of offensive utility, but despite its usefulness only creates a ground AoE that increases movement speed while in it. If it provided a lingering effect after entering the area it could be more practical and powerful, but this limits it as a hard engage tool, combined with the initial knockdown and Rend.
Lingering Flow Rating: C – PvE, A – PvP
YOu wouldn’t really want to use this skill in PvE, and this only adds a slight bit of mobility, which will often go under used in PvE, especially being tied to such a long cooldown.
In PvP, this contributes further to making this a more offensively-inclined skill, giving you and allied targets that a knocked down and Rended, while speeding you towards them while they’re immobilized. It’s pretty niche as-is and this doesn’t really give it much of a strong identity as a skill.
Chaos Tree Passives
Future Planning
 Future Planning
Future Planning reduces the cooldown of abilities by 4% when using other abilities.
For the limited number of times you can actually use this, it’s not insanely powerful. It is still however useful for builds that want to use skills in rapid succession, aligning it more with the Containment Tree rather than the Chaos Tree it resides in.
Future Planning Rating: S – PvE and PvP
Since the only requirement is skill use it is very easy to make consistent use of. Though as previously mentioned, it works better with the Containment Tree rather than the Chaos Tree.
On a Roll
 On a Roll
On A Roll grants a stacking Fotify that lasts for 10 seconds when using an ability. This grants 3% Fortify per stack; up to 15% at its maximum of 5 stacks.
On A Roll provides another fairly consistent Fortify effect for the Blunderbuss to make use of. This overall helps it more when playing at closer ranges. The long duration lends itself well to high uptime, making it fairly easy to stack and maintain with careful skill usage.
On A Roll Rating: A – PvE and PvP
Since the BLunderbuss often wants to be up close to deal its damage, the additional Fortify can be very helpful in doing so. While it can take a bit f time to stack up unlike Fortifying aggression, it has a stronger effect that lasts longer when it is stacked. Though, ideally you’d want most encounter to end before this ever stacks up, so getting maximum value out of this can be tough.
Bite Back
 Bite Back
Bite Back reduces skill cooldowns by 0.5% for every pellet that headshots.
This translates to roughly 3-4% cooldown reduction on basic attacks, assuming you can make all the pellets headshot. This is generally impossible to do outside of being at point-blank range.
Bite Back Rating: S – PvE, B – PvP
Bite back is strong in PvE, where it’ll be easier and more likely to lands more pellets as headshots. While you won’t often get the maximum value unless you’re hitting a larger target, its more consistent than PvP.
In PvP this can be rough to get maximum value from, as you’ll be playing at a range where getting staggered is more likely. You can still get decent use out of it by aiming at the upper body, but aiming just high enough that a couple pellets are likely to headshot.
Buckshot
 Buckshot
Buckshot increases the damage dealt by 10% to targets you haven’t damage in the last 8 seconds.
This can be a nice way to open a fight with a basic attack or Mortar Charge, but using anything else results in the effect going to waste. It can still be great if your goals is to just deal AoE damage, but if you’re using Splitting Grenade and its Incendiary Bursts upgrade, this may as well not exist.
Buckshot Rating: C – PvE and PvP (B in PvP without Incendiary Bursts)
This is rare to get value out of in PvE, as you’ll often be damaging foes until they go down, though it does contribute a bit to opening bursts on Expedition pulls for group play.
In PvP it’s easier to get value from, but only in large scale PvP. You can launch your mortars into large groups, and then use your basic attacks and other skills to hit the closest targets until the skill is off cooldown. However, Incendiary Bursts makes this harder, as the Burn will count as damage from you, making it much harder to get value from this.
Artillery
 Artillery
Artillery increases damage dealt by abilities hit if the target is at least 10 meters away.
This is a nice damage boost for Splitting Grenades, Mortar Charge, and Azoth Bomb, but not really much else. While pretty much all skills can hit at this range, they don’t pack as much damage as these skills and benefit far less.
Artillery Rating: S – PvE and PvP
If you’re using the mentioned skills above, then you’ll get great use out of this. If you’re not, you still can use it, but to a much lesser effect. However, if you’re not using any of these three major damaging abilities, you’ll get very little out of this comparatively. Thankfully, the odds of such should be low, as you should be using at least one of these skills.
Last Chance
 Last Chance
Last Chance grants 50% damage reduction for 4 seconds when hit at 50% health or less. This effect has a 30 second cooldown.
While this is a very powerful damage reduction perk, the short duration and low cooldown leave a lot to be desired. It can get you out of a sticky situation for sure, but you’ll have to play carefully until its back up. Combined with any kind of healing support though, it can absolutely turn a fight.
Last Chance Rating: A – PvE, S – PvP
In PvE, this can help you a lot while soloing. You make not get much use out of it in group play, but can be a stronger option there if you accidentally take aggro somehow.
In PvP, especially when backed by a healer this can give you an edge if it triggers at the right time. It will make you deceptively durable, and hard to take down.
Extended Chamber
 Extended Chamber
Extended Chamer loads a 3rd ammo if ammo isn’t used for 2 seconds after a reload.
The 2 seconds of waiting can be worth it, especially if you want extra ammo to use in a combo without relying on effects like Claw Shot’s Mobile Overload upgrade, which isn’t as consistent.
Extended Chamber Rating: S – PvE and PvP
While the waiting period can sometimes make this harder to take advantage of, the damage this provides is decent enough to make it worth it. In situations with limited healing, since you’ll often have to wait a bit before a second rotation, this passively provides some much-needed damage.
Double Down (Chaos Ultimate)
 Double Down (Chaos Ultimate)
Double Down halves the cooldown of the next skill after the effect activates. This effect will trigger every 30 seconds.
While this is a very high amount of cooldown reduction, the biggest problem lies in the fact that you have very little control over when the effect is applied. You still choose when to use it, but will line up well with Azoth Shrapnel Blast and Mortar Charge and their cooldowns that are under 20 seconds.
Double Down Rating: C – PvE and PvP (A with Shrapnel Blast or Mortar Charge)
If Azoth Shrapnel Blast or Mortar Charge aren’t main damage skill, don’t bother with this passive. With the two mentioned skills, you cna consistently use it every other cast with very little or any delay. Trying to use it with Splitting Grenade can be rough, as it won’t consistently make use of it, usually leaving a long delay before you use any skill.
Situationally, you can also use this in a combo build to use Claw Shot as an opener and an extender for a rotation. Due to other CDR effects, it’ll line up similarly, though will require you to invest skill points into a skill from the Chaos Tree which don’t pair nearly as well with the skill.
Blunderbuss Skill Perks
Below are a list of the Skill perks available to the Blunderbuss. The range for the effective value is determined by gear Score. The Minimum value is at Gear Score 100, while the Maximum is at Gear Score 625. Skill perks will only take effect once, favoring the strongest effect, regardless of where they are in your gear.
 Crippling Blast Shot
 Crippling Blast Shot
Crippling Blast Shot slows targets on hit, reducing their movement speed for 5 seconds. On Weapons, this applies a 19-33% Slow. On Armor, this applies a 5-19% Slow instead.
This is an okay effect, and lends itself decently well to the more offensive nature of the full upgraded Blast Shot skill. Though its worth noting that the full duration isn’t used, as part of it will be taken up by the knockdown effect.
Crippling Blast Shot Rating: C – PvE, A – PvP
Blast Shot itself is generally useless in PvE, and this does nothing to fix that. In PvP however, the Slow is generally impactful enough combined with the other effects of the skill that can make it quite useful.
Exhaustive Net Shot
Exhaustive Net Shot exhaust targets hit by Net Shot, reducing their stamina regeneration for 8 seconds. On Weapons, this applies a 33-57% Exhaust. On Armor, this applies a 10-34% Exhaust instead.
Exhaust is a very niche effect, but can be slightly useful for fighting against an Onslaught-oriented Greatsword, as they use a fair bit of stamina while attacking.
Exhaustive Net Shot Rating: C – PvE and PvP
The effect and its usefulness are pretty niche, which generally makes it a weak choice of perk. Even at 34%, this won’t do much as the affected target can just wait it out if needed.
Leeching Shrapnel Blast
Leeching Shrapnel blasts heals you for a portion of damage dealt by Azoth Shrapnel Blast. On Weapons, this heals for 14-25% of the damage dealt. On Armor, this heals for 5-15% of the damage dealt instead.
Leeching Shrapnel Blast is great for the Blunderbuss, which otherwise lacks sustain. When combined with a fully upgraded Azoth Shrapnel Blast, it can be lot of healing.
Leeching Shrapnel Blast Rating: S – PvE and PvP
For a weapon that otherwise lacks sustain to get the Leeching effect on a Skill that happens to deal a lot of damage as well as its shortest cooldown makes this really good. It’s definitely worth having, even as a weapon perk as it’ll make the Blunderbuss a far more stable and reliable weapon.
Plagued Splitting Grenade
Plagued Splitting Grenade inflicts Disease to foes hit by Splitting Grenade, reducing their healing efficiency for 8 seconds. On Weapons, this inflicts a 14-24% Disease. On Armor, this inflicts a 5-15% Disease instead.
While Disease is pretty much a PvP-focused debuff, it being put on an AoE burst skill that has a powerful DoT, which really adds to the value of the skill. You might not want to slap it on your weapon itself, but it’s not a terrible idea.
Plagued Splitting Grenade: C – PvE, S – PvP
Getting Disease on a high burst skill that also has a strong DoT effect is another combo worth having. If you;re running this skill in a PvP build, this is an absolute must-have unless you have a better source of Disease.
Resupplying Mortar Charge
Resupplying Mortar Charge grants an additional Mortar Charge shot when defeating a foe with Mortar Charge. Additionally, this will grant Empower for 5 seconds. Both effects will once occur once per charge. On Weapons, this will grant an 8.5-15% Empower. On Armor, this will apply a 3-8.7% Empower Instead.
This is more of a PvE perk, but can be useful in PvP in rare situations. The thing that hurts it the most with being a reliable perk is the requirement to defeat a target with a Mortar Charge.
Resupplying Mortar Charge Rating: A – PvE, B – PvP
In situations where you can get repeated takedowns with Mortar Charge, this can add a lot of extra damage and consistency to the skill. These situations tend to be more common in PvE, where there’s less healing on your targets to make the effect more consistent.
Venturing Claw Shot
Venturing Claw Shot grants Empower for 3 seconds if Claw Shot connects to a target at least 10 meters away. On Weapons, this applies a 19-33% Empower. On Armor, this applies a 5-19% Empower Instead.
Venturing Claw Shot is best used in close-range combo builds and contributes a significant amount of burst potential. This is decently effective on armor, but if you want that little bit of extra Empower, it’s not a bad weapon perk either.
Venturing Claw Shot Rating: S – PvE and PvP (C without Azoth Shrapnel Blast)
The impact this perk grants is directly tied to having the Azoth Shrapnel Blast and having it fully upgraded. While Blast Shot can set up a similar combo, it’s much less potential damage without ASB.
Blunderbuss Builds
The Blunderbuss really only has a couple of great builds. Both of these have a more flexible 3rd skill slot, meaning you can substitute it for another skill with little overall difference. So we’ll talk about those alternative skills and what they provide over the skill they’d replace.
Burst Combo Build
This build relies completely on the combo of Claw Shot and Azoth Shrapnel Blast to very quickly close the distance and deal a lot of damage in a short window. As such the skills used in this build will be Azoth Shrapnel Blast, Claw Shot, and Splitting Grenade or Blast Shot.
This skill setup lends itself quite well to leveling both the weapon and your character if necessary. It packs enough damage that even if you only have one damage skill for an extended period, it won’t set you back too much.
To start out with leveling, we’re going to pick up Azoth Shrapnel Blast and all of its upgrades. This significantly boosts its damage allowing it to carry early damage potential without any further setup. In addition to damage, you’ll also get consistent cooldown reduction by using basic shots alongside it.
Next we’ll grab Ramp and Deep Load, which helps to further boost our damage, especially when using the Blunderbuss for an extended period of time. Deep Load makes the last of our loaded ammo deal extra damage, while Ramp grants a stacking damage increase for a short time after a reload that will stack each time you reload.
Now we’ll grab Claw Shot But only upgrade it to Combat Readiness, as we won’t get much use out of Mobile Overload just yet without a third skill. Most importantly we’re still getting the cooldown reduction for it, which will make a huge difference in how often we get to use it early on. You cna pick up Mobile Overload at any point after grabbing your
Now that we have enough points to do so, we’ll grab Unload. Due to the nature of our skill rotation, Unload will provide way more value than the other Ultimate. This is due to weaving out basic attacks in after every skill, taking full advantage of Unload’s effect for bonus damage and cooldown reduction from our passives.
With Unload in hand, we’ll head over to the Chaos Tree. Here we’ll be getting our third skill and a few useful passives. If you want to take Splitting Grenade, you’ll want to take it and all of its upgrades first. If you’re opting to get Blast Shot and the upgrades, you’ll get that after the passives that are about to be mentioned.
The Passives we’ll be looking to get in the Chaos Tree are Future Planning, Bite Back, and Buckshot. Future Planning and Bite Back work really well in this build, as both will actively contribute to our cooldown reduction through basic shots and abilities. Buckshot can help a bit with our damage, but is only necessary if going for Blast Shot to get access to it. If taking Splitting Grenade, you’ll want to spend that point on Fortifying Aggression instead.
Skill Perks, Usage, and Rotations
Azoth Shrapnel Blast is our main damage in this setup. When used up close it can deal a significant amount of damage. It’ll also be used to animation cancel basic attacks, allowing for a quick shoot-skill-shoot combo.
Claw Shot will be our main way of getting in range for the mentioned weaving combo. When fully upgraded it’ll provide a 3rd shot before a reload allowing for a shot after each skill. Additionally, we can make use of its perk to empower this combo and amp its damage potential.
Splitting Grenade can be a viable choice for PvE or PvP, allowing for a high damage skill rotation with and without Claw Shot’s perk. It’ll also contribute to the AoE of the build, providing fairly powerful explosives and a high total damage Burn effect.
Blast Shot is more of a PvP option, but allows you to extend the combo further or more setup potential to be consistent. If you don’t use the Claw Shot perk, this can start a combo, starting off the skill rotation instead of ending it.
For our Weapon Perks, we’ll want to ideally get Enchanted, Keenly Empowered, and an Elemental Attunement of your choice. Enchanted and Elemental Attunement are just flat damage increases that the Blunderbuss can really benefit from. Keenly Empower will trigger if just a single pellet crits, giving us a fairly reliable damage boost. Keenly Empowered can be swapped with Venturing Claw Shot if you really want a stronger Empower for the initial burst combo.
For our choice of gem the Elemental Conversion Gems tend to do the best, as the converted damage isn’t affected by falloff, nor high Physical damage mitigation. As a secondary effect, it can also allow the Blunderbuss to scale with INT much better.
When upgrading to Runeglass Gems, Sighted is the best option for the Blunderbuss as all of our damage is ranged damage. You could opt for an elemental upgrade instead if you want a consistent DoT effect.
For Armor Perks, we’ll want to pick up Refreshing as well as the any skill perks you desire. None of them are entirely powerful enough to warrant being placed on your weapon, with exception of Leeching Shrapnel Blast at lower items levels or Venturing Claw Shot at high levels.
In PvE, you can fill the remaining armor slots with Luck, Faction Warding, or Elemental Conditioning depending on the content you’re playing. For PvP, the remaining slots Freedom or Resilient.
For our Amulet, We’ll want to get Refreshing, Health, and Empowered. Refreshing helps to further reduce our cooldowns. Health gives us a slight bump in health, making us slightly more durable. Empowering will extend the duration of the Empower(s) provided by Keenly Empowered or Venturing Claw Shot, extending each by roughly a second for a slightly longer burst window.
For our Earrings, we’ll want to take Refreshing and Regeneration. For PvE we can use Beloved or Evasive to reduce threat generation or Luck for farming. In PvP Purifying Toast is typically the most consistent option. Regeneration helps to shrug off chip damage, while Purifying Toast will cleanse a debuff on us when we use a Regeneration Potion.
For our Ring, We’ll want Refreshing and either Thrust Damage or Elemental Damage that matches our slotted Gem and Attunement perk. The last slot can be Leeching for general sustain, Burning for Splitting Grenade, or Crippling to pair with the Blast Shot Perk take have a longer window for the Malachite buff depending on if you want a general option to boost a status effect of either of our flexible skill options.
Splitting Rotation
- Splitting Grenade
 Light Attack
- Claw Shot
- Light Attack
- Azoth Shrapnel Blast
- Light Attack
- Repeat
 Light Attack
 Repeat
In this rotation, we lead with Splitting Grenade to get the skill out and under our enemy and follow this with a Light Attack for the damage. Then we Immediately Claw Shot for the Root effect to guarantee damage out of Splitting Grenade, while applying Venturing Claw Shot if possible. Then we’ll want to land a headshot to trigger Keenly Empowered and have both Empower effect active for the final Attack-Skill-Attack part of the rotation we do with Azoth Shrapnel Blast to maximize its damage.
Blast Rotation
- Blast Shot
- Light Attack
- Claw Shot
- Light Attack
- Azoth Shrapnel Blast
- Light Attack
- Repeat
In this rotation, we lead with Blast Shot to setup Claw Shot, while also applying our Rend. We fit in an a shot before immediately using Claw Shot as they recover which is then followed but the Attack-Skill-Attack combo while all the buffs and debuffs are still in place.
AoE Build
As the name implies, this build focuses on the more ranged AoE playstyle. This means we’ll be looking to make Splitting Grenade and Mortar Charge our main skills. Our final skill will be either Net Shot or Azoth Shrapnel Blast, depending on how we want to play.
This skill setup isn’t super great to level with, as it’s more PvP focused, but still does okay in PvE while in groups. You can still opt to level with it if you choose and want to focus on this playstyle.
We’ll start by grabbing both of our main damage skills in Splitting Grenade and Mortar Charge. We’ll leave Mortar Charge un-upgraded, but fully upgrade Splitting Grenade for maximum damage.
After this, we’ll want to pick up our passives from this tree. We’ll be taking Future Planning, Bite Back, Buck Shot, Artillery, and Last Chance. Future Planning will be our main cooldown reduction, with Bite Back being a secondary source of cooldown. Buckshot and Artillery both provide us fairly consistent damage boost that we can take advantage of. Last Chance will serve as a nice defensive layer, which helps make us more durable and prevent quick deaths.
Alternatively, you can take Extended Chamber instead of Last Chance if you want a more damage-orientated option. Regardless of your choice, we’ll be taking Double Down after this. Double Down will make it so Mortar Charges can serve are more of our primary fire on top of standard shots. This will allow every other cast to trigger Double Down and halve the cooldown of Mortar Charge.
After getting out Ultimate, we’ll head over to the Containment tree to round out our build with our final skill and passives. Regardless if you’re going for Net Shot or Azoth Shrapnel Blast, start by maxing the skill first. With Net Shot you can opt to not max it if you want a consistent 40% Slow and don’t want the damage, allowing you to get additional passives instead.
Alongside our Skill, we’ll be picking up Ramp and Deep Load to give us stable damage boosts. Then we can head over and pick up On a Roll or a consistent source of Fortify, protecting us if we get jumped on by a melee weapon.
If you’re opting for Net Shot and not upgrading it, I highly recommend spending the remaining points on maxing out Mortar Charge instead. If you wnt to upgrade both Net Shot and Mortar charge, drop On A Roll and Ramp to do so. Both of these passives are decent options to drop as they require stacking which you may not be able to do in most encounters.
Skill Perks, Usage, and Rotations
Splitting Grenade is our main burst skill, between its base damage and DoT effects it’ll deal significant damage. If we’re PvPing its perk can also be highly impactful for the Disease it can apply.
Mortar Charge is our consistent damage option. We’ll be looking to use mortar charges for our attacks nearly as much as our basic attacks. If we’re at least 10 meters away they’ll hit just as hard and deal damage to multiple targets.
Net Shot is a flexible mobility option, that can also be upgraded to do decent damage. It also provides a slow, making our other damage more reliable. Whether or not you use it for mobility depends on the situation.
Azoth Shrapnel Blast is another damage skill that can deal damage in a wide area. When it fully upgraded it contributes even more to the AoE potential, but provides a solid close range damage option.
For our Weapon Perks, we’ll want to ideally get Keen, Vicious, and Resupplying Mortar Charge or an Elemental Attunement of your choice. Keen and Vicious are the standard crit damage options, since AoE cannot headshot it can overall boost the damage of the weapon. Resupplying Mortar Charge grants us the possibility of gaining both extra ammo for Mortar Charge as well as an Empower to increase our overall damage. If you opt for an Elemental Attunement, it’s pretty much an elemental version of Enchanted, but can be run alongside the crit options.
For our choice of gem the Elemental Conversion Gems tend to do the best, as the converted damage isn’t affected by high Physical damage mitigation. As a secondary effect, it can also allow the Blunderbuss to scale with INT much better.
When upgrading to Runeglass Gems, Sighted is the best option for the Blunderbuss as all of our damage is ranged damage. You could opt for an elemental upgrade instead if you want a consistent DoT effect.
For Armor Perks, we’ll want to pick up Refreshing as well as any skill perks you desire. None of them are entirely powerful enough to warrant being placed on your weapon, with exception of Leeching Shrapnel Blast at lower items levels or Resupplying Mortar Charge at higher item levels.
In PvE, you can fill the remaining armor slots with Luck, Faction Warding, or Elemental Conditioning depending on the content you’re playing. For PvP, the remaining slots can use Freedom or Resilient.
For our Amulet, We’ll want to get Refreshing, Health, and Empowered. Refreshing helps to further reduce our cooldowns. Health gives us a slight bump in health, making us slightly more durable. Empowering will extend the duration of the Empower(s) provided by Resupplying Mortar Charge, extending it by roughly a second.
For our Earrings, we’ll want to take Refreshing and Regeneration. For PvE we can use Beloved or Evasive to reduce threat generation or Luck for farming. In PvP Purifying Toast is typically the most consistent option. Regeneration helps to shrug off chip damage, while Purifying Toast will cleanse a debuff on us when we use a Regeneration Potion.
For our Ring, We’ll want Refreshing and one of Keen Awarness, Thrust Damage, or Elemental Damage that matches our slotted Gem and Attunement perk. The last slot can be Leeching for general sustain or Burning for Splitting Grenade.
Skill Rotation
Unlike the previous build, this build doesn’t have a set rotation. As such, we’ll instead online when you should look to use each skill.
Mortar Charge should be used almost off cooldown, but aim to try and use it when Double Down is active. It should line up decently well with every second use of the skill after the first. Just make sure to not trigger Double Down on another skill.
Splitting Grenade should be used as often as need for both single target burst and AoE damage. It’ll work best in group play after your tank establishes aggro and has the mobs grouped up around them.
If you opt for Net Shot, you’ll mostly want to use it for its mobility if it’s not upgraded. If you upgrade it, you can treat it as another Blunderbuss shot. It’ll do decent damage, but nothing more than most of your other skills will in most cases.
If you opt for Azoth Shrapnel Blast, it’ll mostly be a close range damage option, but you can also optionally use it to trigger effects like Keenly Empowered without unloading your Mortar Charges since it can headshot.
Blunderbuss Weapon Pairings
The Blunderbuss scales primarily with Strength and uses Intelligence as a secondary stat. This pairing of attribute scalings stats lends itself well to a number of Melee and Magic options.
Our recommended weapons to pair with the Blunderbuss are the Hatchet, War Hammer, Ice Gauntlet, and Rapier.
Hatchet
The Hatchet scale decently with Strength, and the Blunderbuss can provide some powerful mobility options. Both and exception close-range focused weapons, which makes for a powerful combination between melee and ranged. This also allows you to focus primarily on Strength as a primary stat.
To learn more about the Hatchet, you can check out our Hatchet Guide and Best Builds. This will help you plan out a strong build, should you opt for this pairing.
War Hammer
The War Hammer is a powerful melee weapon that packs a ton of AoE potential but lacks gap close options. You can pair it with either of the builds above, either supplementing the AoE or providing a stronger single target depending on how you want to bring the two together. This also allows you to use Strength as a man stat and have two strong weapons as a result.
To learn more about the War Hammer, you can check out our War Hammer Guide and Best Builds. This will help you plan out a strong build, should you opt for this pairing.
Ice Gauntlet
The Ice Gauntlet offers a lot of crowd control potential as well as AoE Damage. While the Blunderbuss is supplemented by either the extra slowing areas or its strong single-target damage options it’s a phenomenal pairing that can make the best of most situations. This pairing gets even stronger if you use an Aquamarine to convert some of your Blunderbuss damage to Ice, allowing you to go for Frozen Runeglass to supplement both weapons.
To learn more about the Ice Gauntlet, you can check out our Ice Gauntlet Guide and Best Builds. This will help you plan out a strong build, should you opt for this pairing.
Rapier
The Rapier is a weird option to include, but a fun one. The Rapier can be used offensively or defensively, allowing for a very aggressive combo or a more balanced one. It’s a combination that’s highly reliant on socketed gems to boost the INT scaling of both weapons. You’ll ideal want to make both weapons the same element, and try to stack the same Elemental Attunement perk on both, but allows you to have a Ranged/Melee combo that scales off a single stat and Runeglass Gem upgrade.
To learn more about the Rapier, you can check out our Rapier Guide and Best Builds. This will help you plan out a strong build, should you opt for this pairing.
This pairing has been fully covered in our Blunderbuss and Rapier “Elemental Assassin” Build Guide. Check it out to get a more in-depth look at how this build functions, its combos and playstyle!
This is the end to this very in-depth guide to Blunderbuss in New World. We hope you have learned everything you need to know about this weapon, its usage, skills, perks, builds, combos and ability rotations.
Patch Note Changes
This segment will help you keep track of what has changed for this weapon with the patches as AGS maintains the game in the long-term.
Update 1.4 “Heart of Madness”
Introduced.
The Blunderbuss is a ranged weapon that offers high-mobility coupled with potent close-to-mid range damage. It’s the first weapon to scale on strength and intelligence, making it a good companion for bruiser or mage builds.
Adventurers will be able to progress through two weapon mastery trees, allowing the player to choose between two distinct playstyles.
- The Containment tree is all about closing the gap and unloading hot lead into your enemy’s face.
- Conversely, the Chaos tree focuses on keeping your distance and bombarding areas with explosive AoE damage.
Update 1.5 “Arenas”
- Adjusted the dodge buffer window for the ADS firing animation to be more consistent with other firing animations.
- Fixed an issue that caused firing inputs to not buffer when entering ADS with the Blunderbuss.
- Blunderbuss charges now show correctly when firing while obstructed, and return to the normal reticle.
- Fixed an issue where the player could become unresponsive if they tried to aim and go prone at the same time with a Blunderbuss in hand.
- Fixed basic attack having incorrect recovery when canceling an ability.
- Fixed basic attack cancels not working correctly if you move while using Splitting Grenade and Blast Shot.
- Fixed an issue that caused the Blunderbuss “Last Chance” passive effect to persist through weapon swaps.
- Fixed an issue that caused pellets to not fire when canceling an ability with a primary attack while aiming down the sights.
- Mortar Charge:
- Fixed an issue where this ability incremented the “Blood Offering” curse in mutators too many times in a single use.
- Fixed an issue where the VFX from this skill could disappear prematurely.
- Freedom: This upgrade’s speed bonus no longer decays over time. To compensate, its duration was reduced from 3s to 2s.
- Splitting Grenade:
- Fixed an issue which caused a desync when moving immediately after using the ability.
- Fixed an issue where critical hits from this ability would not deal additional damage.
- Azoth Shrapnel Blast:
- Delayed dodge cancel window to match the attack cancel window.
- Decreased damage per pellet from 58% to 50%.
- Azoth Bomb: Increased delay before bomb explosion from 0.5s to 1s. Fixed a typo in the upgrade description.
- Azoth Bomb
- Increased the delay before a bomb explosion from 0.5s to 1s.
- Fixed a typo in the upgrade description.
- Blast Shot:
- Delayed dodge cancel window to match the attack cancel window.
- Decreased damage from 70% to 50%.
- Net Shot:
- Increased damage from 40% to 70%.
- Increased slow duration from 2.5s to 3s.
- Apparatus: Increased slow duration from 5s to 7s. Reduced the slow the degradation over time from 10% reduction per second to 6% reduction per second.
- Barbed Netting: Increased damage per second from 5% to 30%. Updated this ability’s visuals and description to clearly indicate it inflicts Bleeding and not Poison.
- Future Planning: This passive now triggers per Mortar Charge shot, instead of on activation.
- Unload (Ultimate): Reduced number of additional pellets from 3 to 2.
Update 1.6 “Summer Medleyfaire”
- Increased the number of decimal places shown in a weapon’s Critical Damage Multiplier tooltip so that Fire Staff and Blunderbuss can display their correct multipliers. (Previously showed 1.2, but was actually 1.25)
- Updated descriptions for several weapon abilities to specify that they grant Grit:
- Blunderbuss: Blast Shot
- Fixed an issue that caused the Unload ultimate to trigger when activating and deactivating mortar charge without firing a shot. It will now only trigger the unload ultimate when exiting mortar charge after firing a shot.
- Fixed a text issue with the buff applied by Unload (Ultimate).
- Fixed an issue that caused the Blunderbuss’ mortar charge ability to have no cooldown when fired too quickly after loading.
- Resupplying Mortar Charge: Now also grants empower for the following percentages on kill:
- On armor: 3% to 8.7% based on Gear Score.
- On weapon: 3% to 14% based on Gear Score.
- Crippling Blast: Increased slow effectiveness while on a Blunderbuss:
- On armor: 5% to 19% based on Gear Score.
- On weapon: 19% to 33% based on Gear Score.
- Plague Splitting Grenade: Increased disease effectiveness while on a Blunderbuss:
- On armor: 5% to 15% based on Gear Score.
- On weapon: 5% to 24% based on Gear Score.
- Exhaustive Net: Increased exhaust effectiveness while on a Blunderbuss:
- On armor: 10% to 34% based on Gear Score.
- On weapon: 10% to 57% based on Gear Score.
- Venturing Claw Shot: Increased empower effectiveness while on a Blunderbuss:
- On armor: 5% to 19% based on Gear Score.
- On weapon: 5% to 33% based on Gear Score.
- Leeching Shrapnel Blast: Increased life steal effectiveness while on a Blunderbuss:
- On armor: 5% to 15% based on Gear Score.
- On weapon: 5% to 24% based on Gear Score.
Update 1.7 “Brimstone Sands”
- Players can now cancel Mortar Shot by clicking the right mouse button while the ability is active.
- Fixed an issue that caused Blunderbuss Double Down ultimate to go on cooldown when an ability was interrupted before its execution.
- Fixed an issue that caused the Blunderbuss to put enemies into Death’s Door and kill them in one shot.
- Removed the Decay on the Haste applied by Blunderbuss’ Run and Gun passive abilities.
- The Run and Gun passive abilities now grant a consistent 40% Haste for 1s after a reload has been initiated, so that movement speed is increased while reloading.
- Fixed an issue where Splitting Grenade would go on cooldown without firing when performed quickly after a weapon swap.
- Fixed an issue that caused the Blunderbuss’ Mortar Charge ability to display inconsistent ammo count when nearing an obstruction.
Update 1.8 “Winter Convergence Festival 2022”
- Fixed an issue that allowed players to Claw Shot to their own Ice Pylon.
- Fixed an issue that caused the effects from the Blunderbuss Ultimate “Unload” to persist through weapon swaps.
- Fixed an issue where Splitting Grenade Mini Grenades would not always detonate in sync with each other.
- Fixed an issue where the effects from the Blunderbuss Passive “On a Roll” persisted through weapon swaps.
You can find the full patch notes for New World Update 1.8 “Winter Convergence Festival 2022” in our New World Patches archives.
Update 1.9 “Season 1: Fellowship and Fire”
Added in Taunt Gem compatibility to several weapons and abilities to create additional choices when tanking:
- Blast Shot (4s on hit taunt)
Ability Changes
- Ability Changes
- Azoth Shrapnel Blast
- Reduced stamina damage dealt by each pellet by 50%.
- Increased how much the ASB damage is reduced per consecutive pellet hit from 15% to 20%.
- Claw Shot
- Adjusted cancel windows on Claw Shot to reduce burst damage potential when used in combos.
- Notable Fixes
- Fixed an issue that occurred when entering a menu with Mortar Charge active.
- Indicator for loaded shots now counts down correctly when ammunition left is equal to or less than the maximum number of loaded shots for a ranged weapon ability, such as Blunderbuss mortar.
- Fixed the Blunderbuss Blast Shot Preparation upgrade not stating new Rend functionality in the tooltip.
- Fixed an issue where additional shots could be fired when interrupting the Blunderbuss Mortar Charge ability.
- Fixed an issue where Activating Mortar Charge and swapping weapons gave the player an extra basic attack.
- Fixed an issue where Net Shot would sometimes shoot from the wrong location.
- You can find the full patch notes for New World Update 1.9 “Season 1: Fellowship and Fire” in our New World Patches archives.
Here at VULKK.com we have a ton of useful New World Guides and more and more are being published regularly. We also have all of the news and updates covered to keep you up-to-date with all things New World!