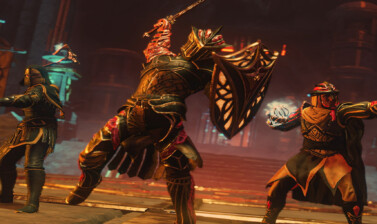
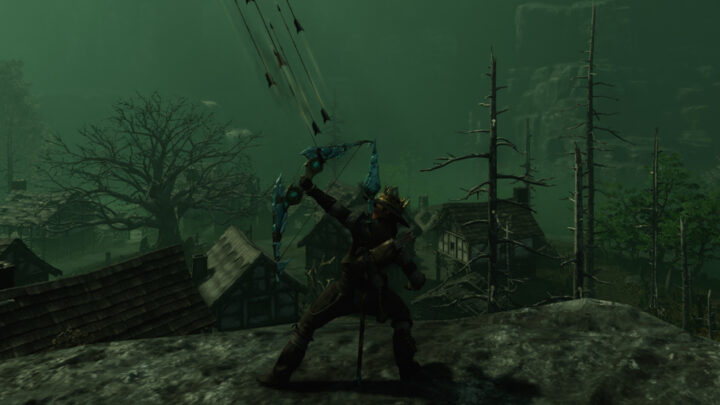
This New World build features the Blunderbuss and Rapier. The “Elemental Assassin” is a burst-oriented Damage Dealer build made to do fairly high elemental damage with its short burst rotations. It’s better suited to handling PvE but has PvP potential in the right hands.
The Guide is up-to-date for Patch 1.9.2
This weapon pairing, or “Build” is building off our other Weapon Guides, so if you’re not entirely sure why we are or aren’t recommending a certain passive, be sure to give those a look as they give a lot of context to the decisions made for these builds. For those that require additional context beyond those guides, it will be presented in this guide as needed.
Table of contents
How the “Elemental Assassin” Build Works
The Elemental Assassin build is all about getting up close and dealing consistent damage through DoT effects and incredibly strong burst damage from skill rotations. Due to how this build is set up, it will deal a good mix of both Physical and Elemental Damage, which can allow it to deal with some threats much easier.
All of our Elemental damage will come from Gems, which we’ll cover more heavily in the Gearing and Stats section of this guide. This allows us to change our elemental type to take on various content much easier. Doing so will also have the added benefit of ignoring an enemy’s armor value, which is particularly good for some enemies that often have high armor values like Elites.
Unlike a Mage build which will often suffer at closer ranges, this build thrives on being at those closer ranges for maximum damage potential. The Rapier is also quite flexible in what it can do, allowing it to function as either a damage or utility option depending on if you want to use the build for PvE or PvP.
Blunderbuss
The Blunderbuss ends up being more of a secondary weapon in group play but can easily be used as the primary weapon of this pairing, especially while solo or in PvP. It offers a lot of potent burst damage combos thanks to its ability to interrupt basic attack animations with skills that also have quick animations.
These quick combos generally have a pretty lengthy cooldown compared to those of the Rapier, which has a higher cooldown reduction potential in group play. On the opposite side, the Rapier lacks consistent cooldown reduction while soloing. This is due to a lack of access to reliable crits from backstab lowering that potential.
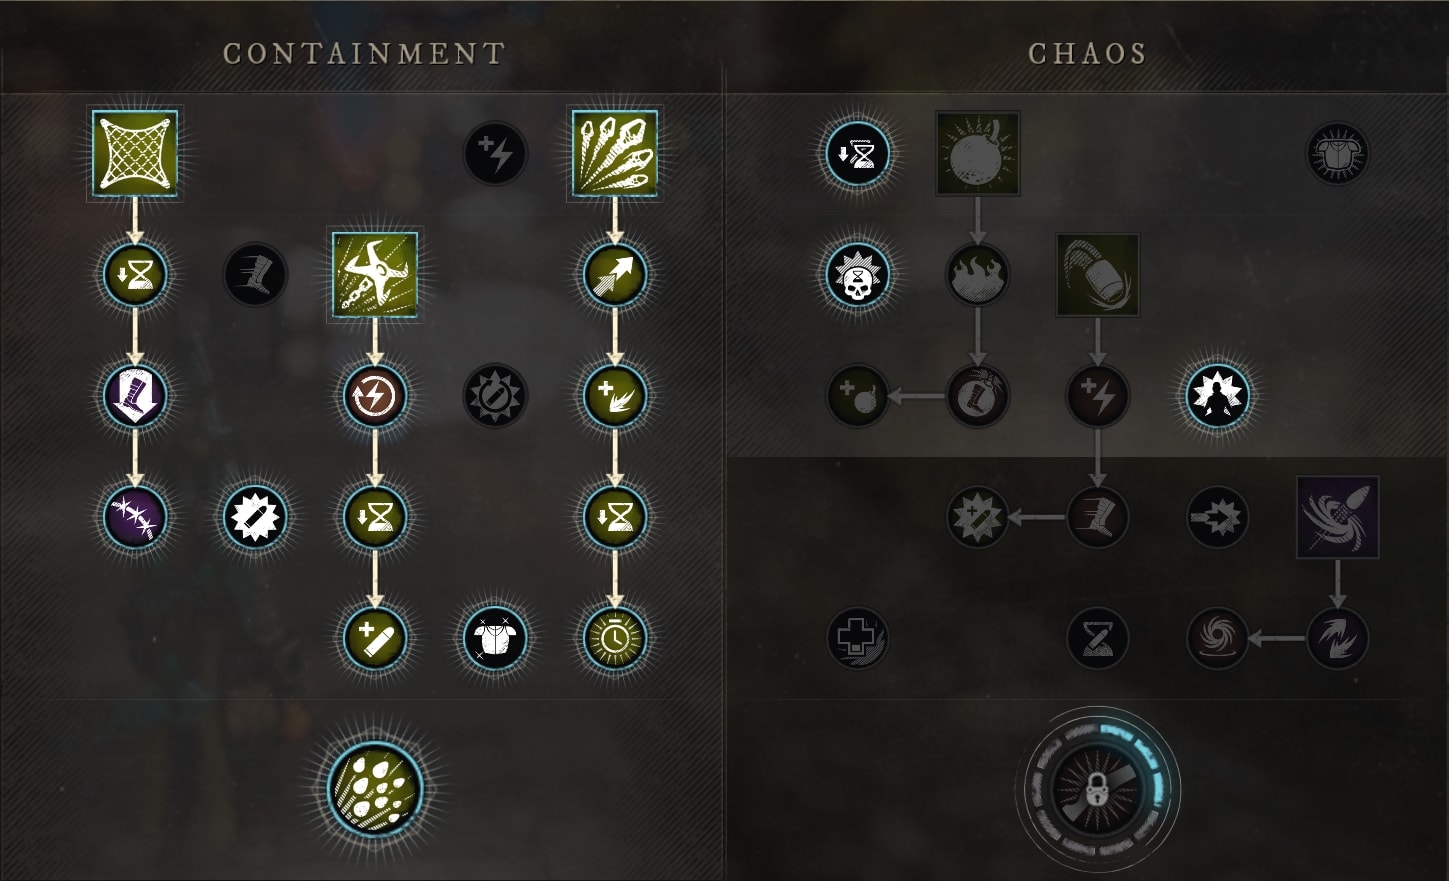
The main thing this skill tree looks to accomplish is to maximize the burst potential of the weapon. As such, we’ll be using a variation of the Burst Combo build from the Blunderbuss Weapon Guide. Specifically, we’ll be using the Containment-only setup of Azoth Shrapnel Blast, Net Shot and Claw Shot.
This setup allows us to very quickly gap close with Claw Shot, while also having both a powerful slow and escape option in Net Shot. Compared to Rapier’s Fleche, Net Shot offers more utility and less damage making it a better disengage tool and can allow the Rapier to focus a bit more on damage output.
Most notably with this setup, the Ramp passive is much more optional, unless we want the Blunderbuss to be the main damage source of the build. This is because we’ll want to go in, do our burst rotation and either get out or swap the Rapier for more consistent DPS output. For PvP situations, to get more use of perks like Refreshing Evasion, you can opt for Future Endeavors instead, further boosting your Stamina recovery.
Optionally, if PvE is your focus, feel free to swap Net Shot out for Splitting Grenade or Mortar Charge. Both are great AoE damage options, with Spitting Grenade being a solid option for bosses and Mortar Charge being great for weaker enemies. If desired, take the point that would be spent on Ramp and take either as an unupgraded skill for more damage output than Net Shot without a full respec.
If you opt into maxing either skill, Splitting Grenade can be a more substantial option if you push to 250 Intelligence. This is because the burn will be extended by 3 seconds, to 13 seconds, adding an additional 30% damage from the burn per stack it applies. On larger targets like PvE bosses, this can potentially result in a huge 90% increase in the total Burn Damage.
Rapier
The Rapier will be your consistent source of close-range damage and dueling power while the Blunderbuss is recovering its cooldowns. This build uses two different Skill Trees for the Rapier, one for PvE and another for PvP similar to those outlined in our Rapier Weapon Guide.
This is mostly due to the fact that the PvP-oriented skills of the Rapier tend to lack the PvE damage potential of the more PvE ones. They do share one skill though, being Flurry for the consistent damage it can provide.
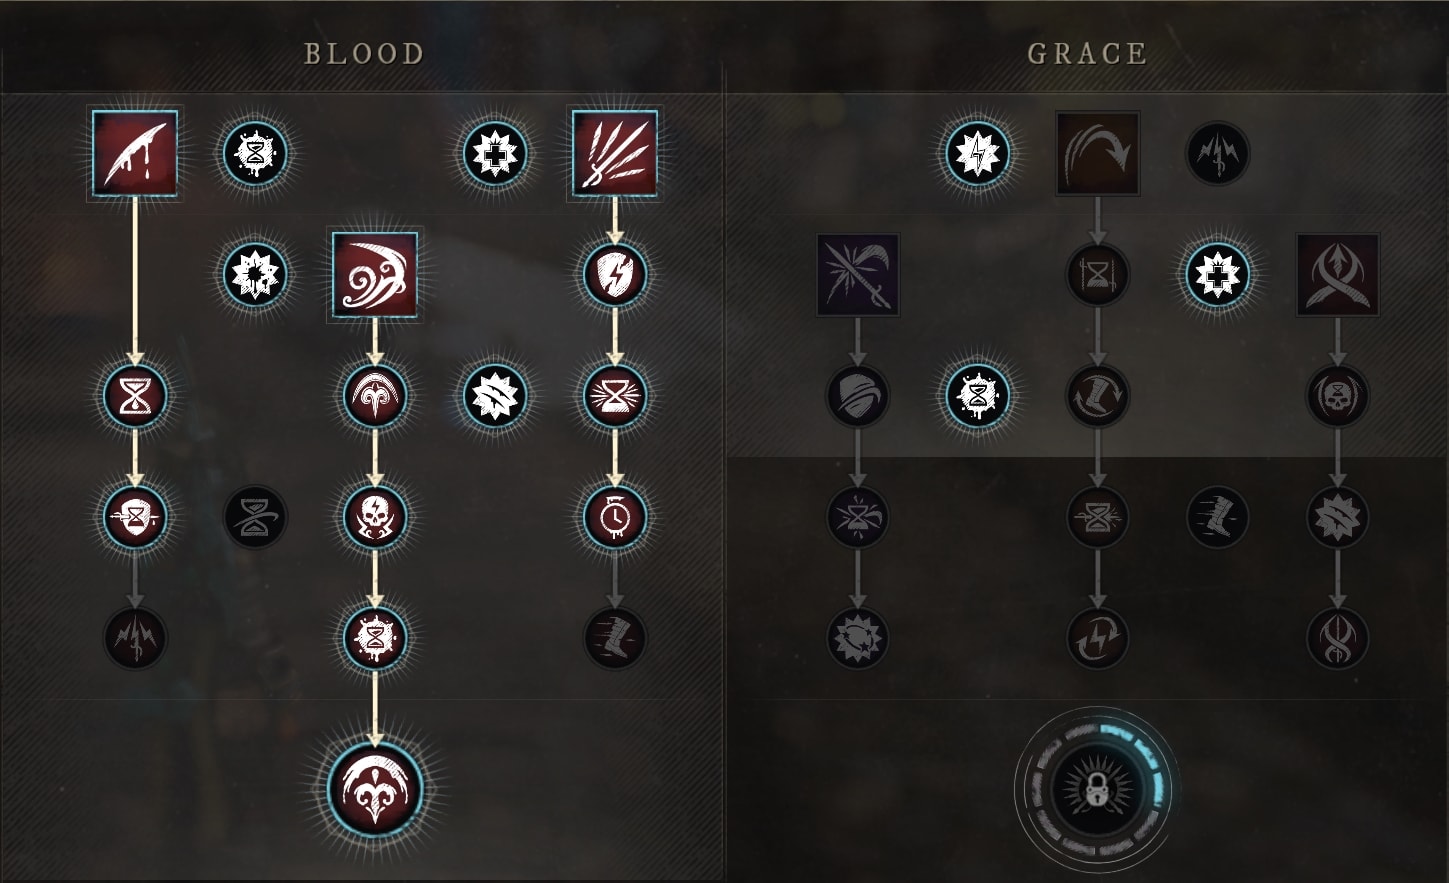
This first tree commits to the Blood Tree of the Rapier, for use with PvE primarily. While other skills like Evade and even Riposte can have their niche in PvE, they’re better suited to PvP. That being said, the PvE side focuses on the combo of Tondo plus Flourish and Finish in addition to Flurry.
This set of points gives us really high consistent damage, between Tondo’s Bleed and Flurry. We’ll also have decent burst damage when we stack up Tondo’s duration via Flurry’s To the Bone upgrade, then detonate this Bleed via Flourish and Finish.
There are a couple toss-up choices in this skill tree, the first being Light Edge vs Heavy Puncture. These both can be useful to the PvE side of things, but for very different reasons. Heavy Puncture reduces the reliance on Flurry for quickly building up to the max duration for Tondo’s Bleed, though results in overall less DPS. Light Edge gives overall higher DPS, but will leave you more reliant on Flurry for stacking Tondo’s duration; granted one solid Flurry will bring you close to that cap already and you will typically use it twice in the extended rotation.
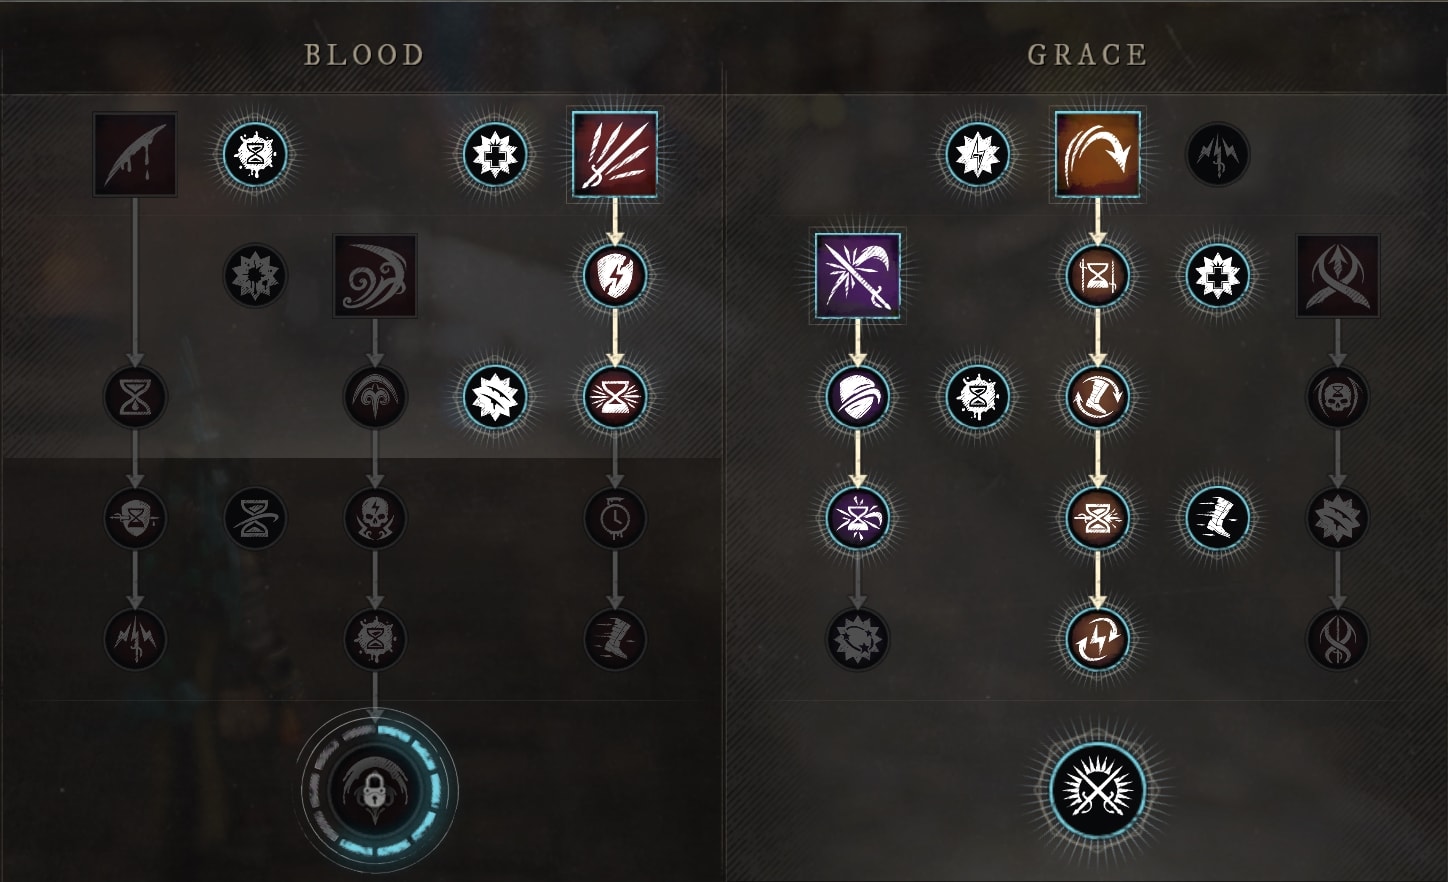
The second tree that can be utilized bring a good mix of offensive power and defensive utility. This makes it a much stronger option for PvP. It’s much harder to find value in the typical Bleed build, so we trade that core for Evade and Riposte instead.
Why Evade and Riposte, rather than taking Fleche over either skill? Evade is easily the best offensive option we can get from the Grace side of the tree, while Riposte is the best defensive option. With the Blunderbuss in our back pocket, we can easily use a combination of Claw Shot and Net Shot to give us the same flexible mobility options, but with a separate cooldown for going in and getting out.
Much like the other tree, there are a few points that can be flexed and placed elsewhere depending on playstyle and preferences. These are the points put into Desperation and Perfectionist (the passives in the first two rows of the Grace Tree) Both of these can be a great option when utilized well, but Perfectionist specifically can be hard to maintain for an extended period.
The only other places you can feasibly relocate them to if you’re not getting value out of them are Controlled Breathing, for the extra stamina recovery, or Lasting Consequence for a slightly longer stun in 1v1s. You could also opt for Fleche and its Quick Lunge upgrade as well. This lets you have the option of the 4 skills without a full swap, however, Fleche will not be quite as strong without additional investment.
Gearing and Stats
This section will go into detail on how to set up this build. We’ll be talking about armor, gems, and attributes here.
Armor Choices
This build is one you’ll want to run Medium Armor with, regardless of content. Since it’s a very close-range build, Medium armor really helps with your survival if you get clipped by an AoE attack or fight another player.
You can opt for Light Armor in PvE if you’re confident in your ability to avoid damage, as you will get more damage that way. You will have to be extra cautious around Elites though, as they can very quickly take you out in Light Armor. Light Armor tends to be incredibly risky to play in PvP. It can still be run, but requires much better play overall, especially since only one of your weapons has any defensive options.
Attribute Points
As for your attributes, we’ll be primarily going for Intelligence as the primary damage booster, with a little bit of Dexterity and Constitution. We’ll want to run at least 150 INT, 150 DEX, and 100 CON. This leaves roughly 100 attribute points that you can invest based on your desired playstyle for the build, whether you want to focus on the Blunderbuss, Rapier, PvE or PvP.
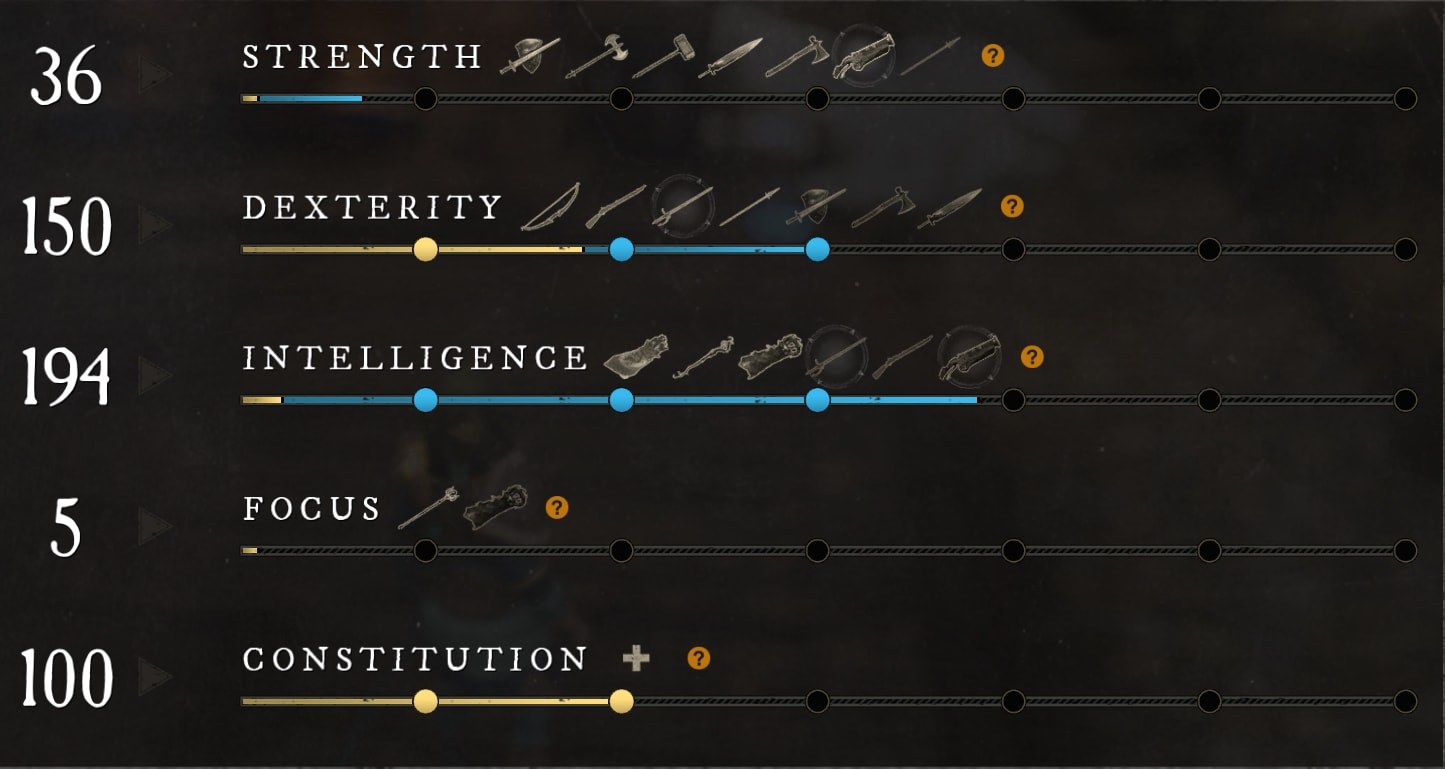
Those remaining 100 Attribute points could be put into any of the three stats for various bonuses and benefits. More points in INT will result in higher damage, and going to 250 INT will also extend the duration of various DoT effects. Adding 50 additional points to DEX will grant additional Backstab and headshot damage. Finally, adding 50 points to CON can be a strong option for PvP; not only for the extra health but the reduced incoming critical damage bonus as well.
Gems
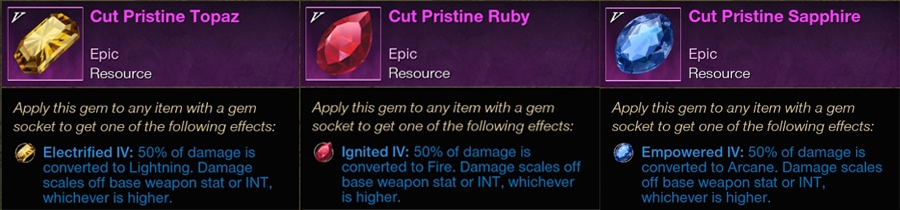
Since all of our elemental damage come from Gems in our weapons, we’ll want to swap them based on the content we’re doing fairly often. You’ll often want to use three main gems, Rubies, Sapphires, and Topaz.
Each corresponds to the main three factions you’ll fight in expeditions; with Rubies granting Fire for Angry Earth, Sapphires granting Arcane for Corrupted, and Topaz granting Lightning for Ancients. Of these, Sapphire isn’t as necessary unless you really need to min-max damage for Corrupted, as both weapons will still deal thrust damage regardless. Additional Gems can be useful in PvE Endgame as well, to counteract Expedition Mutations.
You could easily run a Ruby in one weapon and a Topaz in the other, but this also can cause some issues in the very late game, when you’re trying to optimize around Runeglass Gems. If both run the same element, it’s much easier to boost their damage equally through bonuses to that element. But that also means frequent swaps are necessary, which can make the initial gearing process a bit pricey.
As far as our armor gems go, you’ll mostly be using gems to reduce incoming damage. This largely means using a mix of Diamond, Malachite, Onyx, and Opals to balance our defenses as we desire. Typically in PvP Onyx/Diamonds tends to be the better option as there are fewer elemental options without gems playing a role. The few elemental options that are strong generally make us less overall damage, so natural mitigation and a couple of Opals or a full set of Diamonds can generally stave off enough damage.

Runeglass Gems are where we can really fine-tune our Physical and Elemental Damage to be the ratio we want. We’ll almost always want our weapon to run a DoT effect, as the damage it contributes, both short and long-term is pretty significant. For our armor, we can match the elemental bonus to bring up that elemental damage, letting us take full advantage of the conversion and DoT via weaknesses. The alternative is using a mix of Sighted and Punishing Runeglass to boost each weapon’s damage up a fair bit, making us more physical damage.
Perk Options
Perks are a big part of the weapons in New World, they take some of the more unimpressive skills and make them into much bigger threats. Which perks you take and where you place them can alter how a skill gets used.
There are also some rarer named gear that can be found in New World that can have perk combinations that makes them stronger than any gear you could craft, or at the very least give you an alternative way to get a great gear. These notable items will be listed in their respective sections after the general perk layout is covered.
Weapons
For the PvE side of things here, the Rapier has a couple useful perks for skills with the most impactful one being Leeching Flurry, which offers easy and reliable sustain for both build paths. If you’re leaning more on the Grace side of the tree, you can also use Omnidirectional Evade, but it’s better off being placed on your armor.
The Blunderbuss really only offers one perk that’s super useful to the build, Leeching Shrapnel Blast. This Perk does about the same thing as Leeching Flurry, but for Azothj Shrapnel Blast. Leeching Flurry will be able to be used more often and much more rapidly which makes this an okay, but not a great option.
Outside of that the standard perk combo of Faction Bane Perk, Elemental Attunement Perk, and Rogue or Vicious will generally be optimal for the Rapier. Depending on how much you want to use your Heartrune, Chain Element perks can also replace Elemental Attunement for slightly faster charging off packs, and for elements without an Attunement perk.
For the Blunderbuss, there are fewer overall options as it’s not a melee weapon. This leaves it taking Keen, A Faction Bane Perk, and an Elemental Attunement Perk.
On the PvP side, a couple more options open up for both weapons, being Exhaustive Net Shot for the Blunderbuss and Sundering Riposte for the Rapier. Exhaustive Net shot makes Net Shot an even better kiting tool, reducing your opponent’s Stamina regen. Sunder Riposte can make Riposte a very dangerous tool, rending your counter target by a large amount for a very reasonable and abusable amount of time.
For additional craftable options, you can potentially consider Fractured Rend on the Rapier as when upgraded Flurry does a pretty decent job and breaking lighter blocks. It’s probably not the most optimal use of a slot where you’re generally going to be better off with Enchanted, Elemental Attunement, and a skill perk anyways.
For the Blunderbuss, it can absolutely be worth picking up Plagued Crits. Since each shot with the Blunderbuss fires 6-8 pellets, that can each crit individually even if you’re not aiming for headshots so it can trigger quite frequently making it a very accessible option for Disease.
Notable Weapons
For Notable Weapons, there are a couple of PvE Rapiers. they are called Hopelessness and Forgotten Remnant.
Hopelessness is a Named Rapier that’s perfect for taking on Corrupted as it comes with Corrupted Bane, Rogue, and Chain Arcane while also coming with a Pristine Sapphire for Arcane damage conversion as well. Since Arcane Attunement doesn’t exist as a perk it’s quite good as what it does. Unfortunately, this one is a Global Named drop, so it can be harder to come across.
Forgotten Remnant is very similar, coming with Rogue, Ancient Bane, Leeching Flurry, and a Pristine Topaz already socketed. Sadly this one is also a Global Named Drop, so it can be tricky to get.
Accessories
Accessories are a bit complicated at times, but often there’s a small subset of useful perks that are really good.
For Amulets, Refreshing (or Refreshing Evasion) and Health are always a strong core pair of perks. Luck and Fortified Recovery are good general fillers for the third slot, especially in PvE. For PvP you can also consider Slash Protection to better protect yourself against the wider cast of melee weapons.
Earrings are similar, taking a core combination of a Cooldown Reduction (Refreshing) perk while also generally taking Regenerating for the bit of health recovery it offers. If desired you cna also go for Nible with this build, if you plan to make more use of refreshing evasion for PvP. In PvE the final slot can be Beloved, Evasive, or Luck depending on what you want. For PvP you’re often better off taking Purifying Toast for the self-cleanse option.
Rings are a little more interesting for this build, as you’ll likely need a few to make full use of the elemental swapping. While it’s a small nudge of damage, every bit helps and you should absolutely try to have a ring for each damage type of Arcane, Fire, and Ice. Keen Awareness often tends to be a great pickup as well, especially for the Blunderbuss. Keen Awareness alongside Keen on the Blunderbuss brings it up to a fairly high crit chance of around 25% while also helping the Rapier in situations you cna’t quite get consistent backstab. The last slot here will typically want to be either Blood Letting for PvE, or Infected for PvP (if you go for Plagued Crits anywhere). Both of these statuses are great for what they do, most noticeably maxing out Blood Letting will allow a single Short Bleed Combo to max out Bleed duration without an additional rotation.
Notable Accessories
Since Amulets and Earrings tend to be pretty static, there’s not much in the way of interesting drops. For Rings, however, there is the Heart of Anhurawak, which drops from an elite mob named Anhurawak the Proud in the Heliopolis area of Brimstone Sands.
This Named Ring comes with Thrust Damage, Keen Awareness and Blood Letting. While Thrust Damage isn’t going to consistently be your highest damage when accounting for weaknesses, it will however be always present for both weapons. it comes pre-socketed with a Moonstone, thankfully that cna be swapped to fit your needs.
Armor
For armor perks, it’s generally a lot more straightforward. For PvE content, you’ll almost always want Refreshing, Luck, and the relevant Bane perk for the content you’re running. In cases where you want to fit in Omnidirectional Evade or another skill perk, you can drop Luck or Refreshing with little impact.
On the PvP side of things, Resilient and Freedom are pretty highly valued for most builds. In place of Freedom, Invigorated could also be considered to mitigate Weakness and Rend. More stacks of Refreshing can also be added here as well, if desired, but the build works well with little to no CDR too. Outside of those, it’s usually just picking up which weapon perks you want or need for your build that aren’t great on weapons.
Skill Combos and Rotations
This section breaks down the individual weapon combos and full rotations from both weapons.
Combos
Blunderbuss Basic Attack Cancel
 Light Attack
 Azoth Shrapnel Blast (or any other skill)
 Light Attack
 Azoth Shrapnel Blast (or any other skill)
This combo can be performed with any of the skills of the Blunderbuss but is most commonly used with Azoth Shrapnel Blast. This is done by performing a basic attack and immediately using a skill to follow it up. This cuts the recovery time of the basic attack out and replaces it with more damage.
Rapier Short Bleed Combo
- Tondo
- Flurry
- Tondo
- Flourish and Finish
- Attack until Tondo is up
- Repeat
 Repeat
This quick combo allows the Rapier to deal a quick burst of damage with little build-up time. The main point is getting two stacks of Tondo Bleed up with relatively high duration, then detonation it with the Finish part of Flourish and Finish.
Rapier Extended Bleed Combo
- Tondo
- Flourish Only
- Flurry
- Light Attack(s)
- Tondo
- Flurry
- Light Attack(s)
- Tondo
- Flourish and Finish
- Repeat
The whole goal of this extended combo is to get the maximum value out of all your skills and finish off with a huge burst from Flourish and Finish. Despite its longer cooldown, we can fit in a Flourish early on as its upgrades, combined with the extra attacks will ensure it’s ready by the time you get Tondo fully stacked up.
Rapier Evade and Riposte Cancels
The Evade and Riposte skills are a bit special in that they can interrupt nearly every action of the Rapier, with the only notable exception being that Riposte cannot interrupt Fleche’s movement, but Evade still can.
This opens up a lot of interesting technical play like following a first hit of the Light Attack chain or a Heavy Attack with a Riposte immediately which masks the otherwise obvious stance change when the skill is used.
Rapier Evade Combo
- Heavy Attack
- Evade
- Light Attack
 Heavy Attack
This works similarly to the Blunderbuss Basic Attack Cancel, letting you do a quick burst of damage. Since the Heavy Attack typically has a fair bit of recovery time, this is the best way to remove most of it as well as fit in some extra damage.
Rapier Fleche Evade Burst Combo
- Fleche
- Light Attack
- Evade
- Light Attack
This combo has you Fleche through an enemy for damage, quickly spin your camera to face them and get the damage from the Interruption upgrade, then cancel that attack with Evade for a third quick hit. If this sounds tricky, that’s because it is; but it’s also incredibly satisfying to land. It’s an incredibly tight timing that will absolutely only work on lower ping so everything flows smoothly.
Rotations
This build doesn’t really have much for full rotations, especially in PvP. Instead, you’ll mostly want to focus on which combo fits your current situation and cooldowns.
Blunderbuss Opener
- Claw Shot
- Light Attack
- Azoth Shrapnel Blast
- Light Attack (optional)
- Remaining skill (optional)
 Claw Shot
This is the standard opening skill rotation for the Blunderbuss. Depending on what your third skill is you can squeeze it in or leave it out. This opening is great in the way that if you land the opening Claw Shot you’ll be in range for all of your damage, even for your Rapier. It’s great burst and has a bit of a lengthy cooldown making it a fantastic opener that allows you to easily transition into the rest of the full rotation.
PvE Full Rotation
- Light Attack (optional)
- Claw Shot
- Light Attack
- Azoth Shrapnel Blast
- Light Attack (optional)
- Remaining skill (optional)
- Tondo
- Flurry
- Tondo
- Flourish and Finish
- Repeat
This Rotation is a combination of the Blunderbuss Opener into the Short Bleed Combo. You could also use the Extended Bleed Combo too, but that’s only recommended for Expedition Bosses or powerful elite, as most other enemies won’t live long enough to perform it.
This is the end of this very in-depth build guide for New World. With everything from the stat breakdown, skill choices, and the provided combos; you have everything you need to make this build work. We hope you enjoy trying this unique weapon pairing.
Here at VULKK.com we have a ton of useful New World Guides and more and more are being published regularly. We also have all of the news and updates covered to keep you up-to-date with all things New World!
Best New World Builds and Weapons Pairings
This list houses the best builds for PvP and PvE in New World. Here you will learn how to master a weapon and how to pair it with a secondary weapon to create a unique and incredibly powerful and versatile build. Some builds are PvE only, others focus entirely on PvP. And some are flexible enough that you can play them in both game modes.
These Build Guides are a continuation and follow-up to the more beginner-friendly individual Weapons Guides which you should start with if you are new to the game. We also have one massive collective guide to the Weapons in New World if you are just starting now and need a bit of explanation of how each weapon behaves and how they determine your gameplay and which should fit your play style.
New World Weapons and Abilities Guide for Beginners
This guide’s focus are weapons in New World. We’ll cover the Weapons and their strengths, weaknesses, and what each of their skill trees do!

New World Hatchet and Sword Build Guide: The Frontline Tank (PvE)
The “Frontline Tank” is a Hatchet with Sword and Shielf build for New World that focuses on tanking in PvE content as its primary playstyle!
New World Great Axe and War Hammer Build Guide: The Warring Bruiser (PvP)
This New World build guide features the Great Axe and Warhammer weapons combo. It focuses on Damage-dealing in PvP as its primary playstyle!
New World Bow and Spear Build Guide: The Skirmisher (PvP)
This New World build guide features the Bow and Spear. The Skirmisher Build focuses on damage as its primary playstyle.