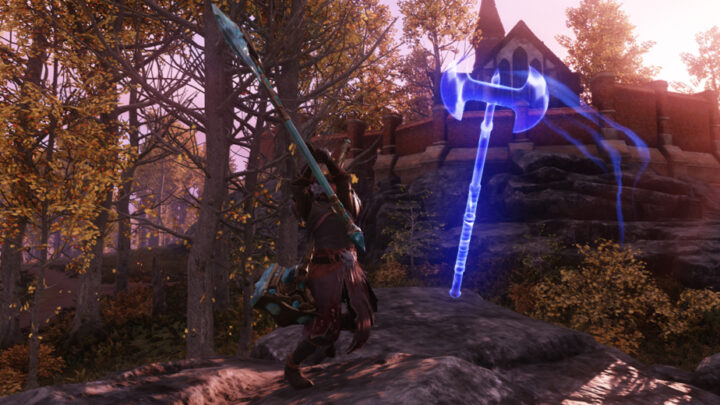
This New World build guide features the Hatchet and Sword and Shield combo. The “Frontline Tank” Build, as its name suggests, focuses on tanking in PvE content as its primary playstyle.
The Guide is up-to-date for Patch 1.9.2
These weapon pairings are building off our other Weapon Guides, so if you’re not entirely sure why we are or aren’t recommending a certain passive, be sure to give those a look as they give a lot of context to the decisions made for these builds.
Table of contents
“Frontline Tank” Build Playstyle
A weapon pairing as old as the game itself, the Frontline Tank pairs the incredible crowd control and defensive power of the Sword and Shield with the damage and sustain of the Hatchet. While both weapons work well on their own and are strong in their own right, the combination of the two brings them both to another level.
In this setup, the Sword carries all of our aggro management tools. While both weapons will ideally use Carnelian to enable taunts, you can get away with other options in the Hatchet. If you were to play this in PvP, this would also change as well.
The Hatchet provides a ton of utility, but will primarily be used for the sustain it provides from Berserk, as well as the Defy Death Ultimate. While taking enough damage to die it very rare with good Tank play, it does help to have the bonuses of the Hatchet to fall back on should something go wrong.
Hatchet
The Hatchet will be the weapon we swap to when there are opportunities to deal significant damage, or as a way to cheat death in critical moments. As such it plays a more secondary role in the build.
If desired, since there is only one skill we absolutely need, the Hatchet can also serve to debuff enemies as well with the use of its throwing skills. On the PvE side of things, Rending Throw would be the main utility we pick up from the Throwing Tree, whereas the other skills provide more benefit in PvP.
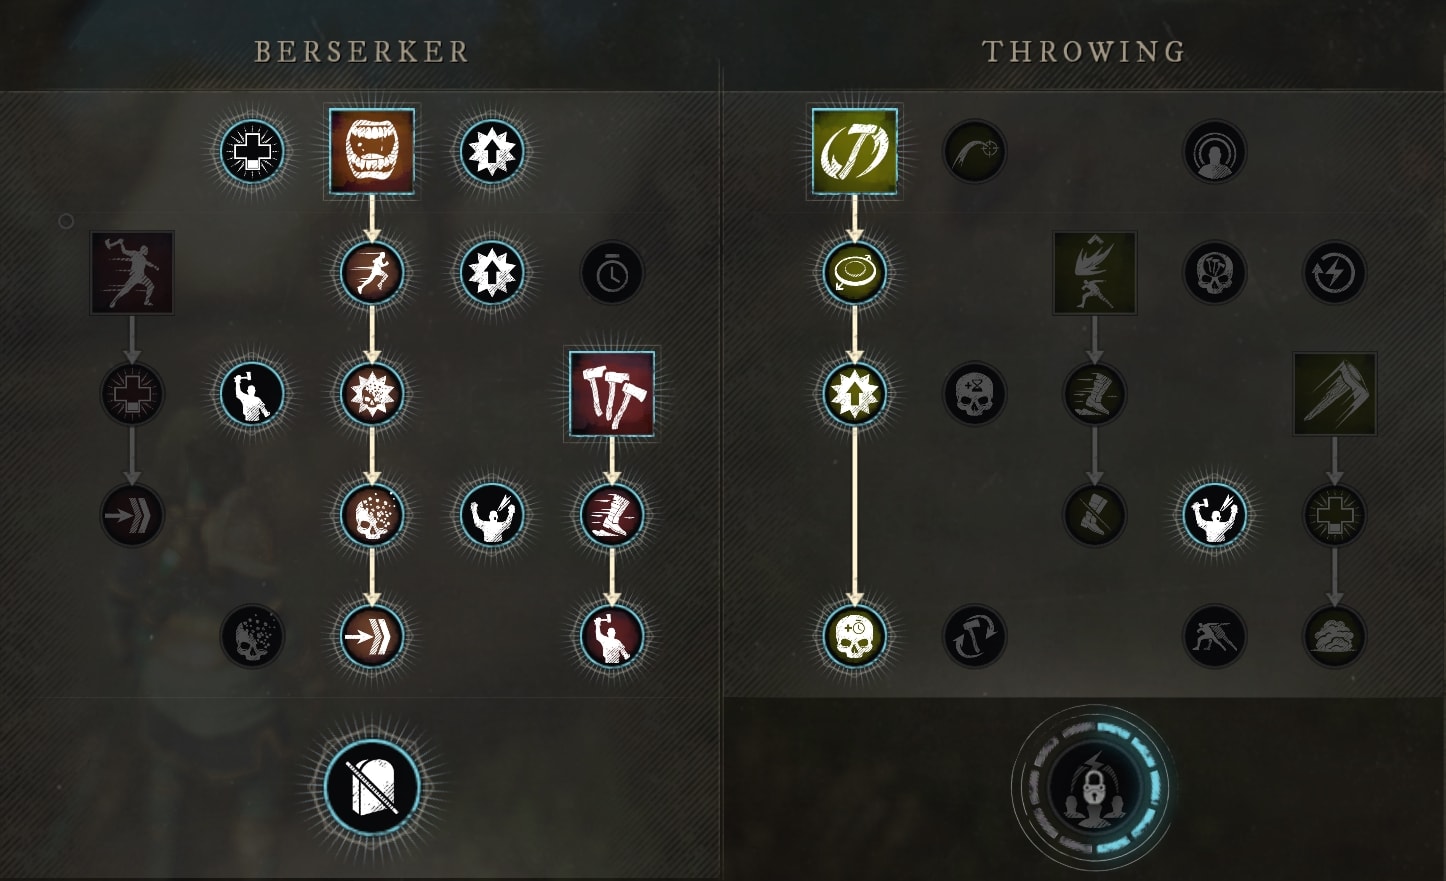
The main thing we’re looking for with the Hatchet skill tree is to max out the utility provided by Berserk, while also providing as much damage as possible. As such, We’ll be taking Berserk and maxing it out as a priority. We’ll also be grabbing as much extra damage as we can, alongside Defy Death. We’ll essentially be using a modified version of the Starter Melee Build from our Hatchet Weapon Guide, though with Feral Rush swapped out for the utility of Rending Throw.
This setup allows us to swap to the Hatchet to apply Rend as well as deal bursts of damage as our abilities allow. We take plenty of damage bonuses focused on dealing huge damage during Berserk or when bursting with Raging Torrent.
The only optional point that could be moved around here is Accumulated Power. While this provide a pretty big boost of damage, it only applies to a single hit and gets the most value from a standard rotation of attacks, being a loop of a Heavy Attack into three Light Attacks to maximize the benefit of both Accumulated Power as well as Relentless Fury.
If PvP is your focus, you may want to consider swapping out Raging Torrent for another skill, being either Feral Rush for the gap close potential or Social Distancing for the Slow. This is due to Raging Torrent being a skill that locks you in place for a bit, and without any kind of setup, you’ll never get the full value out of it.
Sword and Shield
The Sword and Shield is our main tanking tool, with the Shield allowing us to block both melee and projectile attacks alike. It’s home to all of our aggro management and defensive tools, letting us easily control PvE encounters for group content.
To do this, we’ll be using a slight variation of the Tank Build listed in our Sword and Shield Weapon Guide. The only notable difference is the shifting around of a few skill points.
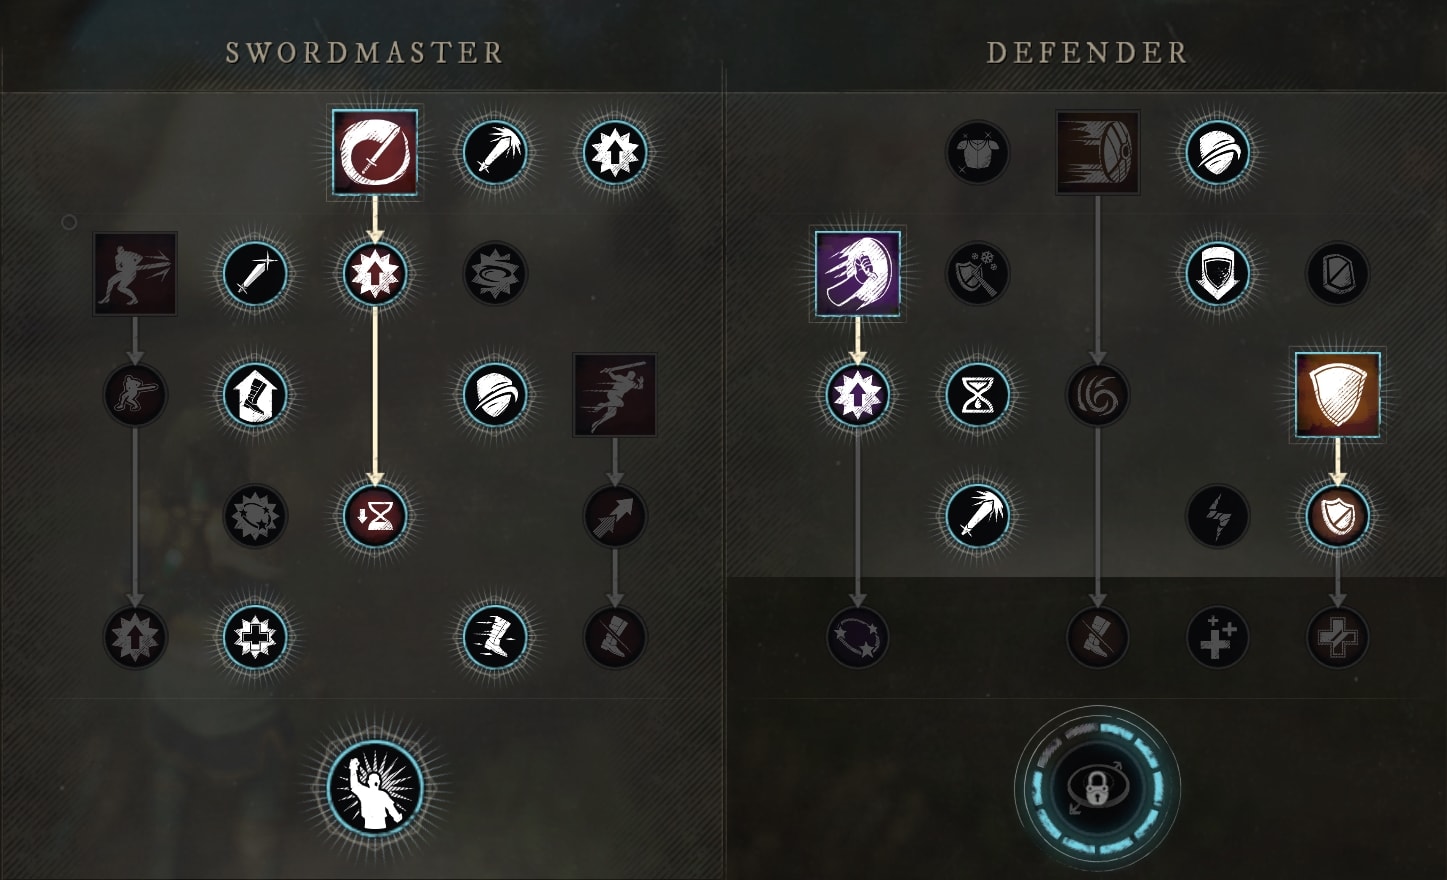
We’re going for Leadership as our Ultimate, this is because it just offers a more potent utility that affects your party and helps you clear encounters quicker. You’ll be more than sufficiently durable to handle most if not all encounters without the use of Defensive Formation.
Fortunately, or unfortunately, depending on how you view it; this means we need to pick up at least one Swordmaster Skill to be able to reach it. In this case, we’ll be opting for Whirling Blade just for what it provides. It’s great AoE damage that can also Rend on a low-ish cooldown. It also has additional utility in the slight forward movement it applies by being unable to be body blocked, allowing you to free yourself and reposition if you accidentally get cornered while tanking.
In addition to Whirling Blade, we’ll also be able to pick up quite a few damage-boosting passives that help us maintain aggro easier, as well as provide great benefits for blocking.
From the Defender side of the tree, we’ll be taking Shield Bash and Defender’s Resolve, which serve as our aggro management tools. Neither of these gets fully upgraded, as for the most part it is unnecessary to take either final upgrade.
Alongside these skills, we also take One with the Shield, which massively helps out cooldown management, especially when it comes to bigger pulls. This allows us to more readily and frequently use Whirling Blade and Defender’s Resolve for large groups to keep them focused on us.
Stats and Gearing
This section will go into detail on how to set up this build. We’ll be talking about armor, gems, and attributes here.
Armor Choices
Regardless of the content you’re doing, Heavy Armor is what you want. As a Tank you’ll want all the defenses you can get, this includes your armor. This setup leaves you a little slow and immobile as it is, and having better armor helps to at least mitigate the damage you take as you approach or group enemies.
Attribute Points
This build can use a couple of different attribute spreads and be effective. For the PvE side of things though I’ve personally found 200-300 Strength, 200-300 Constitution, and 0-50 Dexterity to work best.
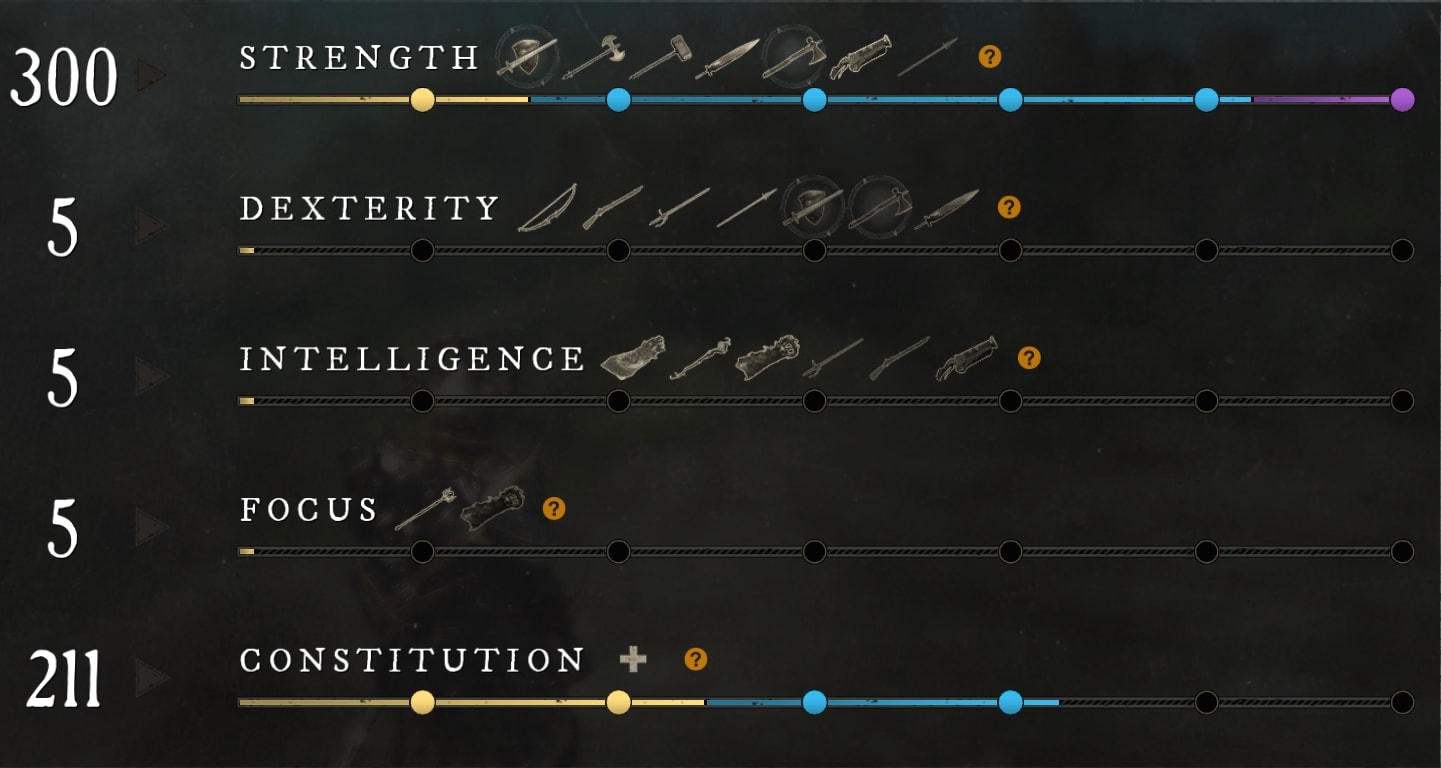
For deciding Attributes, it depends on whether or not you want the additional perk from Constitution at 250 points, to soft cap it at 300 for the health, or neither. the Constitution 350 perk is a more optional perk, but it does make you more durable, and if you opt to not take it, you can get an additional bonus from Strength or Dexterity instead. In this case, 300 Strength adds Grit to all of your attacks, making Stuns the only way of interrupting them, or you get extra damage and Crit Chance from Dexterity.
Gems
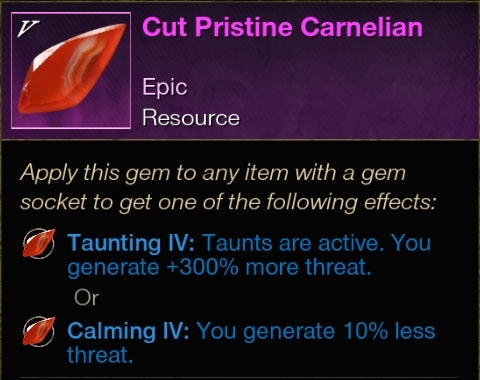
For our Weapons in PvE, the choice is simple, we use Pristine Carnelians. This helps us to easily manage aggro and allows us to hold taunts for situations where we lose aggro. Our Hatchet can consider alternatives but Carnelians are still the safer and more consistent option.
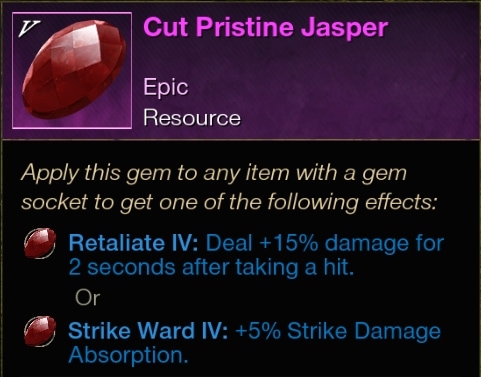
For PvP, we’d ideally want to go with Malachite, Jaspers, or an Elemental Gem. As a Frontline Melee that has access to multiple slows, Malachite will be more consistent. Jasper can also be a fairly consistent and even stronger option so long as they activate. This is because Jaspers damage boosting effect is multiplicative, unlike most similar effects. In most PvP scenarios, Elemental gems can end up boosting your damage as well, as many don’t gear to mitigate as much Elemental damage as they do physical damage.
As far as our armor gems go, you’ll mostly be using gems to reduce incoming damage. This largely means using a mix of Diamond, Malachite, Onyx, and Opals to balance our defenses as we desire. Typically in PvP Onyx/Diamonds tends to be the better option as there are fewer elemental options without gems playing a role. The few elemental options that are strong generally make us less overall damage, so natural mitigation and a couple of Opals or a full set of Diamonds can generally stave off enough damage.

Runeglass Gems can give us further control over our build, allowing for extra nuance and customization. In most cases, we’ll typically want to use Punishing Runeglass for most of our gear, regardless of the gem type. This gives us a bump in Melee Damage, which affects both weapons.
However, for the weapons themselves, we can consider Elemental Runeglass options to make up for the fact both weapons we have deal Slash damage, which doesn’t offer much coverage as far as enemy types go. In this case, the variations that grant Arcane and Lightning Damage will offer the best increases for Corrupted and Ancients respectively, which the base Slash does well enough into Angry Earth.
For further details on Runeglass Gems, you can refer to our Runeglass Gems Guide for everything you may need to know about Runeglass Gems and their effects.
Perk Options
Perks are a big part of the weapons in New World, they take some of the more unimpressive skills and make them into much bigger threats. Which perks you take and where you place them can alter how a skill gets used.
There is also some rarer named gear that can be found in New World that can have perk combinations that makes them stronger than any gear you could craft, or at the very least give you an alternative way to get a great gear. These notable items will be listed in their respective sections after the general perk layout is covered.
Weapons
For PvE, we’ll honestly be looking for a combination of a Faction Bane Perk and Refreshing Move alongside a third perk of choice on our Sword and Hatchet. For PvE Content, there’s no better perk than the Faction Bane perks. The Bane perks give huge increases to overall damage making them Best-in-Slot for PvE Builds. Refreshing Move is alow great for the Sword and Shield, especially playing as a Tank, as the Sword doesn’t have much in terms of cooldown reduction, but has some of the longest cooldowns.
The final perk is a bit of a toss up, as there are a few good options. Keen is a good general option since as a tank we won’t be able to rely on backstabbing for extra damage. Elemental Attunement perks are also great options for respective factions; Flame Attunement provides significant damage against Angry Earth and Arboreal Attunement does well against Corrupted and Lost. Finally, there’s Hated, which can be helpful if you find yourself struggling to hold aggro.
Our Shield that gets used alongside the sword also gets some very notable and desirable perks as well, though being more on the defensive side. Similar to our Armor, Shields get access to Faction Ward perks, which are always going to be a Best-in-Slot perk against the corresponding faction.
In addition to the Faction Ward Perk, Refreshing Move and Sturdy can be great options to improve our ability to soak damage. Optionally, Accelerated Defender’s Resolve can be a great option to make Defender’s Resolve a stronger panic button, increasing our speed and incoming healing effects.
Notable Weapons
We have access to an interesting Sword called the Widowmaker. This unique sword has a combination of perks you can normally get, featuring both Corrupted and Angry Earth Bane as well as Refreshing Move. While not Best-in-Slot for either faction, it’s a nice weapon that does well against both making it a great starter option for two of the commonly fought factions. Unfortunately for us, this is a global drop, meaning it can take a lot of time and luck to actually acquire.
There’s also a Sword called Centurion’s Blade, which has Vicious, Corrupted Bane, and Refreshing Move. This is another great sword that’s great against corrupted, though Vicious keeps it from being BiS. However, this weapon is a quest reward you will receive during the Brimstone Sands storyline, making it highly accessible.
The last Notable Sword is Guardian’s Resolve, another sword great for corrupted, which happens to also be better than Centurion’s Blade, but still not perfect. While still having Refreshing Move and Corrupted Bane its third perk is Thwarting Strikes, which can be a decent bump in damage if you go for 300 Strength so you have Grit on your attacks. This weapon can be Farmed from the named enemy “Rafik of Bishara”, who can be found in Heliopolis Elite Point of Interest in the Brimstone Sands.
Accessories
For our Amulet, we’d want to ideally get Health, Refreshing, and Fortified Recovery. Health gives us a fairly noticeable bump in health since we already run high CON, this gives it a greater effect overall compared to other builds. Refreshing lowers our cooldowns, which we’ll want to have access to as much as possible as a Tank. Fortified Recovery is a bit optional, but gives a nice extra layer of defense should we get low on health. In place of Fortified Recovery, you can also opt for the various Protection buff to mitigate specific damage types, but this is less flexible overall.
For our Earring, we’d want to take Regenerating, Refreshing, and Refreshing Toast. Since we have a larger health pool, Regenerating will provide a pretty good amount of sustain against chip damage by continually healing us over time. Refreshing Toast allows us to more frequently use potions to recover our health.
For our Ring, we’d want to take Leeching, Slash Damage, and Refreshing. Leeching helps us to sustain ourselves a bit better outside of group play and to ease the burden of healing us a bit for our support. Since both of our weapons deal primarily Slash Damage, boosting that here is a no-brainer.
Notable Accessories
The Blessing of the Forefathers is a decent starter Amulet, offering Divine alongside Health and Fortified Recovery. While it lacks Refreshing, it comes with Divine, which makes it easier for your supports to heal you. You can get this amulet as a drop from Archdeacon Azamela while running a Mutated version of the Depths Expedition.
There are quite a few options for Earrings, however, Doom’s Chance is a great option for us. Not only can it drop from “Alluvium Marl, The Caretaker” in the Garden of Genesis Expedition, but it’s also available as an Expedition Replica making it exceptionally easy to get in one way or another.
For Rings, there’s Heart of Heka which matches exactly what we want. This Ring can be farmed from the named mob “Heka of the Crossroads” which appears both in the Heka’s Cauldron and Atum’s Way Points of Interest in the Brimstone Sands.
As an alternative Ring, there’s also the Legate’s Ring, which offers a unique combination of Slash Damage, Keen Awareness, and Leeching. Normally, Slash Damage and Keen Awareness cannot appear on the same item, but that’s what makes this ring unique. However, this item is restricted to the Elite Chests in the Brimstone Sands, which can make it exceptionally hard and tedious to acquire without Luck Gear and Trophies. It is however worth getting if you have the dedication as it provides a significant damage boost for many melee weapons.
Armor
Being a PvE build, there are a few mandatory perks that this build absolutely needs. These become even more vital the deeper you go into Mutated Expeditions. All high-end PvE builds will make use of the Faction Ward Perks. These perks can stack, and can result in large defensive bonuses against the appropriate factions. Often this means having multiple decent gear pieces that each carry a different Faction Ward perk.
In addition to the Faction Ward perks, a few others to keep in mind and ones that can be critical to have for certain expeditions are Corruption and Blight Resistance. These two perks mitigate and delay the effects of some otherwise annoying effects, which would other have to be dealt with using an item instead.
Beyond those perks, you’d generally just want to get further stacks of Refreshing Ward, Luck, or weapon perks that are helpful to the build, which as far as the build goes there are only three perks that have potential: Empowering Whirling Blade, Keen Berserk, and Refreshing Torrent.
Empowering Whirling Blade can be a huge boost in your overall damage and ability to hold aggro of groups, granting up to 49% increased damage for the skill when it hits 3 or more targets. Keen Berserk is interesting for the massive Critical Chance boost it can offer, offering up to 14% increased Critical Chance when Berserk is used under 50% Health.
Refreshing Torrent alongside Raging Torrent’s upgrades allows it to reduce hatchet cooldowns by up to 42.5% when landing every hit of the skill. This makes it a useful tool to use at the start of Berserk for huge damage and then again after the cooldown ends to get Berserk up faster.
Notable Armor
You’d need great geat to obtain it, the but final bosses for Mutated versions of The Ennead, The Depths, and Lazarus Instrumentality can drop very strong gear sets for this build. Each set carries the respective Faction Ward perk and Refreshing Ward.
The Chardis Set from Lazarus has Invigorating as a third perk, which won’t be the absolute best to stack up, since there are easier ways to mitigate or play around most of the statuses, it does help make that expedition easier. The Expedition Captain Set from The Depths is pretty basic carrying Physical Aversion across the board as a third perk, as does most of the Aureate’s Set from the Ennead. However the Gloves of the set carry Empowering Breaker, while the body armor has Sturdy Energy. Both of these are fairly reasonable and useful effects to have, so it’s a nice well rounded set in that regard.
Skill Rotations and Combos
This section breaks down the individual weapon combos and full rotations from both weapons.
Combos
As a tank Build there aren’t many combos to be aware of, however the Hatchet does use a couple things to optimize its damage output and uptime.
Basic Attack Cycle (BAC)
 Heavy Attack
- Light Attack x3
- Repeat
 Heavy Attack
 Light Attack x3
 Repeat
This cycling of basic attacks ensures the maximum usage and potential from Accumulated Power and Relentless Fury. When done correctly, this boost each and every Heavy Attack by 35%, making them quite potent. You won’t always have the luxury of using this as a tank, but it’s great for when you do get a good DPS window from stagger or interrupt on targets that allow for it.
Refreshing Torrent Cycle
- Rending Throw
- Berserk
- Heavy Attack
- Raging Torrent
- Rending Throw
- BAC
- Heavy Attack
- Raging Torrent
This is a setup you can do to maximize the Damage dealt in a Single Berserk, but requires the Refreshing Torrent Perk, which allows Raging Torrent to heavily reduce its own cooldown. Having Refreshing Move can contribute as well, but isn’t necessary.
What we’re doing with this is Applying Rend, activating Berserk, then using a Heavy Attack to trigger Relentless Fury and then expend it very quickly with Raging Torrent. After the first use of Raging torrent, there is a bit of downtime that we fill with a Rending Throw, BAC, then an additional Heavy Attack.
The second cast of Rending Throw ensures we have it up for the full second Raging Torrent and the remainder of Berserk. Then we do a BAC to gain Accumulated Power and Relentless Fury for the additional Heavy Attack that follows. This Heavy Attack then reapplies Relentless Fury for the second Raging Torrent.
Rotations
Being a Tank build, this build doesn’t have any full rotations as most of your skill are used for specific purposes like taunting, blocking damage, or getting some cooldowns back.
This is the end of this very in-depth build guide for New World. With everything from the stat breakdown, skill choices, and the provided combos; you have everything you need to make this build work. We hope you enjoy trying this unique weapon pairing.
Here at VULKK.com we have a ton of useful New World Guides and more and more are being published regularly. We also have all of the news and updates covered to keep you up-to-date with all things New World!
Best New World Builds and Weapons Pairings
This list houses the best builds for PvP and PvE in New World. Here you will learn how to master a weapon and how to pair it with a secondary weapon to create a unique and incredibly powerful and versatile build. Some builds are PvE only, others focus entirely on PvP. And some are flexible enough that you can play them in both game modes.
These Build Guides are a continuation and follow-up to the more beginner-friendly individual Weapons Guides which you should start with if you are new to the game. We also have one massive collective guide to the Weapons in New World if you are just starting now and need a bit of explanation of how each weapon behaves and how they determine your gameplay and which should fit your play style.
New World Weapons and Abilities Guide for Beginners
This guide’s focus are weapons in New World. We’ll cover the Weapons and their strengths, weaknesses, and what each of their skill trees do!
New World Blunderbuss and Rapier Build Guide: the Elemental Assassin
This New World build guide features the Great Axe and Warhammer weapons combo. It focuses on Damage-dealing in PvP as its primary playstyle!
New World Great Axe and War Hammer Build Guide: The Warring Bruiser (PvP)
This New World build guide features the Great Axe and Warhammer weapons combo. It focuses on Damage-dealing in PvP as its primary playstyle!
New World Bow and Spear Build Guide: The Skirmisher (PvP)
This New World build guide features the Bow and Spear. The Skirmisher Build focuses on damage as its primary playstyle.