
This guide covers the default Star Wars Jedi Survivor Controls for PC and consoles and provides useful adjusted customized Keybinds setups for a better and smoother experience!
Star Wars Jedi Survivor is a sequel to Respawn Entertainment’s Star Wars Jedi Fallen Order. Similar to Star Wars Jedi Fallen Order and similar games like Elden Ring, it tends to be a bit uncomfortable to play using Keyboard and Mouse Controls. This guide focuses a lot on the PC Controls, but has all the information you need to help you learn what button or gesture does what on your PlayStation and Xbox Controllers!
In this guide and all the tables below I am using letters and symbols, to keep it simple, intuitive, and less flashy. Some of you may want to first learn what some of them mean, so here’s a quick summary, especially if you are a PC player, trying to match controller binds to keyboard and mouse:
- RS – Move Right Stick
- LS – Move Left Stick
- RS↓ – Press Right Stick
- LS↓ – Press Left Stick
- ↑↓→← – Arrows on the plus-shaped pad (D-pad) of controllers
General Control Options
Before we dive into the raw controls, there are a few general options to talk about. These affect multiple control schemes, and can be important to take the time to setup. How you set these really depends on comfort, but I’ll include what settings I use and why.
These settings are found under the Controls section of the game’s Settings Menu.
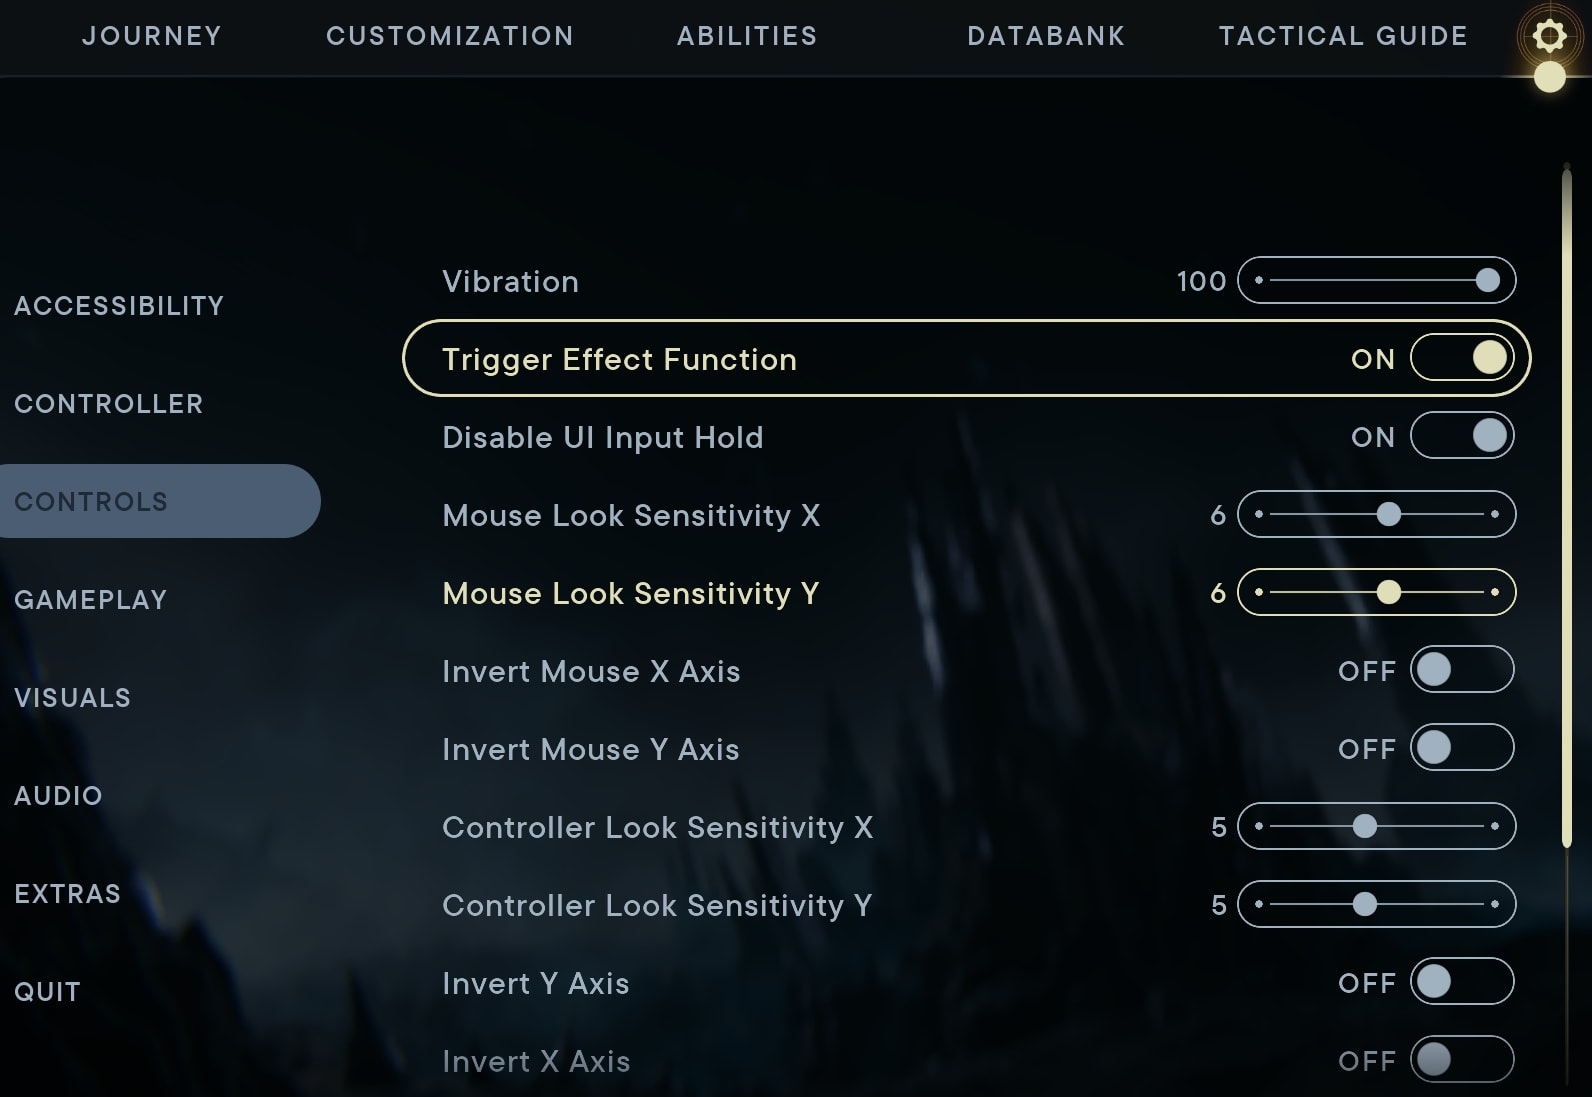
Vibration
Leave Vibration at the default 100%. The extra feedback is nice, but not overwhelming by any means. It never really felt like it added too much personally, regardless of the controller used.
Trigger Effect Function
This both enables Vibration on most controllers, but also trigger resistance for the Playstation 5 Controller. If you want Vibrations to work, this setting needs to be On. As for the additional trigger effects, I never really noticed them.
Disable UI Input Hold
This option, when toggled On, will allow you to perform any hold action with a single press. This is most noticeable for assigning points to your Skill Trees as well as things like Fast Travel which require you to hold the button to confirm the action.
With frequent character respect being a detrimental thing to your progression, this can help you avoid making those mistakes. It’s honestly worth having a slightly slower Fast Travel for it, and I recommend leaving the option Off.
Look Sensitivity and Camera Axis
I personally found the default setting of 5 to be perfect for controllers. It allows you to look about fairly quickly. Increasing the Mouse Look Sensitivity to 6 felt pretty comfortable and natural. This may be due to my lower DPI of 800, so adjust accordingly.
As far as inverting Camera Axis, I highly recommend against it for Keyboard and Mouse specifically. It feels very unnatural. For Controllers, it works fine with or without inversion, use whatever is comfortable. There are also separate inversion controls for Flight, meaning if you prefer inversion for flight sections but not ground sections you can do that.
How to Change Key Binds in Jedi Survivor
The option to access your bindings isn’t really hidden, but it is in a spot you might overlook if you were to try to jump straight to control options instead.
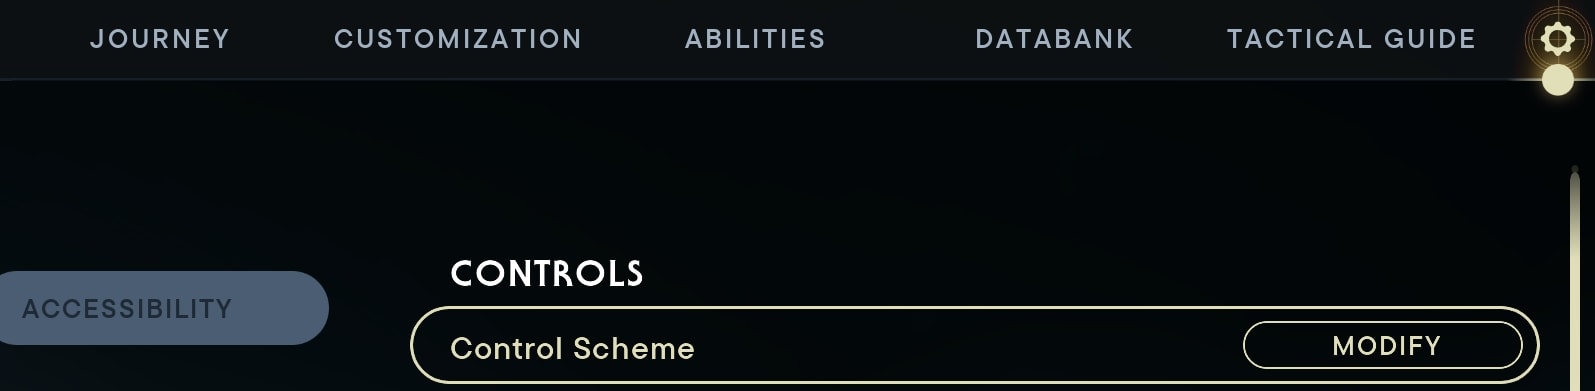
Instead of Controls, head to the Accessibility section of the option and look for Control Scheme at the top. This is the option that will allow you to access and modify the Binding listed below in the guide.
In-Menu Controls
Everybody starts from the game’s menus first before we get to the gameplay. It makes sense to clear up any confusion about which control does what in the game’s menus. This includes all menus while you play.
It’s worth noting that where the D-Pad is used below, the Left Stick can also be used; the same is also true of WASD and the Arrow Keys for Keyboard. The Mouse can also be used to select various menu options, though cannot move the menu itself in most cases.
| Control Name | Xbox | PS5 | PC |
|---|---|---|---|
| Open Menu | Menu | Options | Esc |
| Accept | A | ✖ | Space / Enter |
| Cancel | B | ⭘ | C / Esc |
| Up | ↑ | ↑ | W |
| Left | ← | ← | A |
| Down | ↓ | ↓ | S |
| Right | → | → | D |
| Next Tab | RB | R1 | E |
| Previous Tab | LB | L1 | Q |
| Secondary | X | ☐ | R |
| Tertiary | Y | △ | F |
| Secondary Next | RT | R2 | 3 |
| Secondary Previous | LT | L2 | 2 |
| Reset | RS↓ | R3 | MMB |
| Show Controls | LS↓ | L3 | G |
| Map Zoom In | RT | R2 | LMB |
| Map Zoom Out | LT | L2 | RMB |
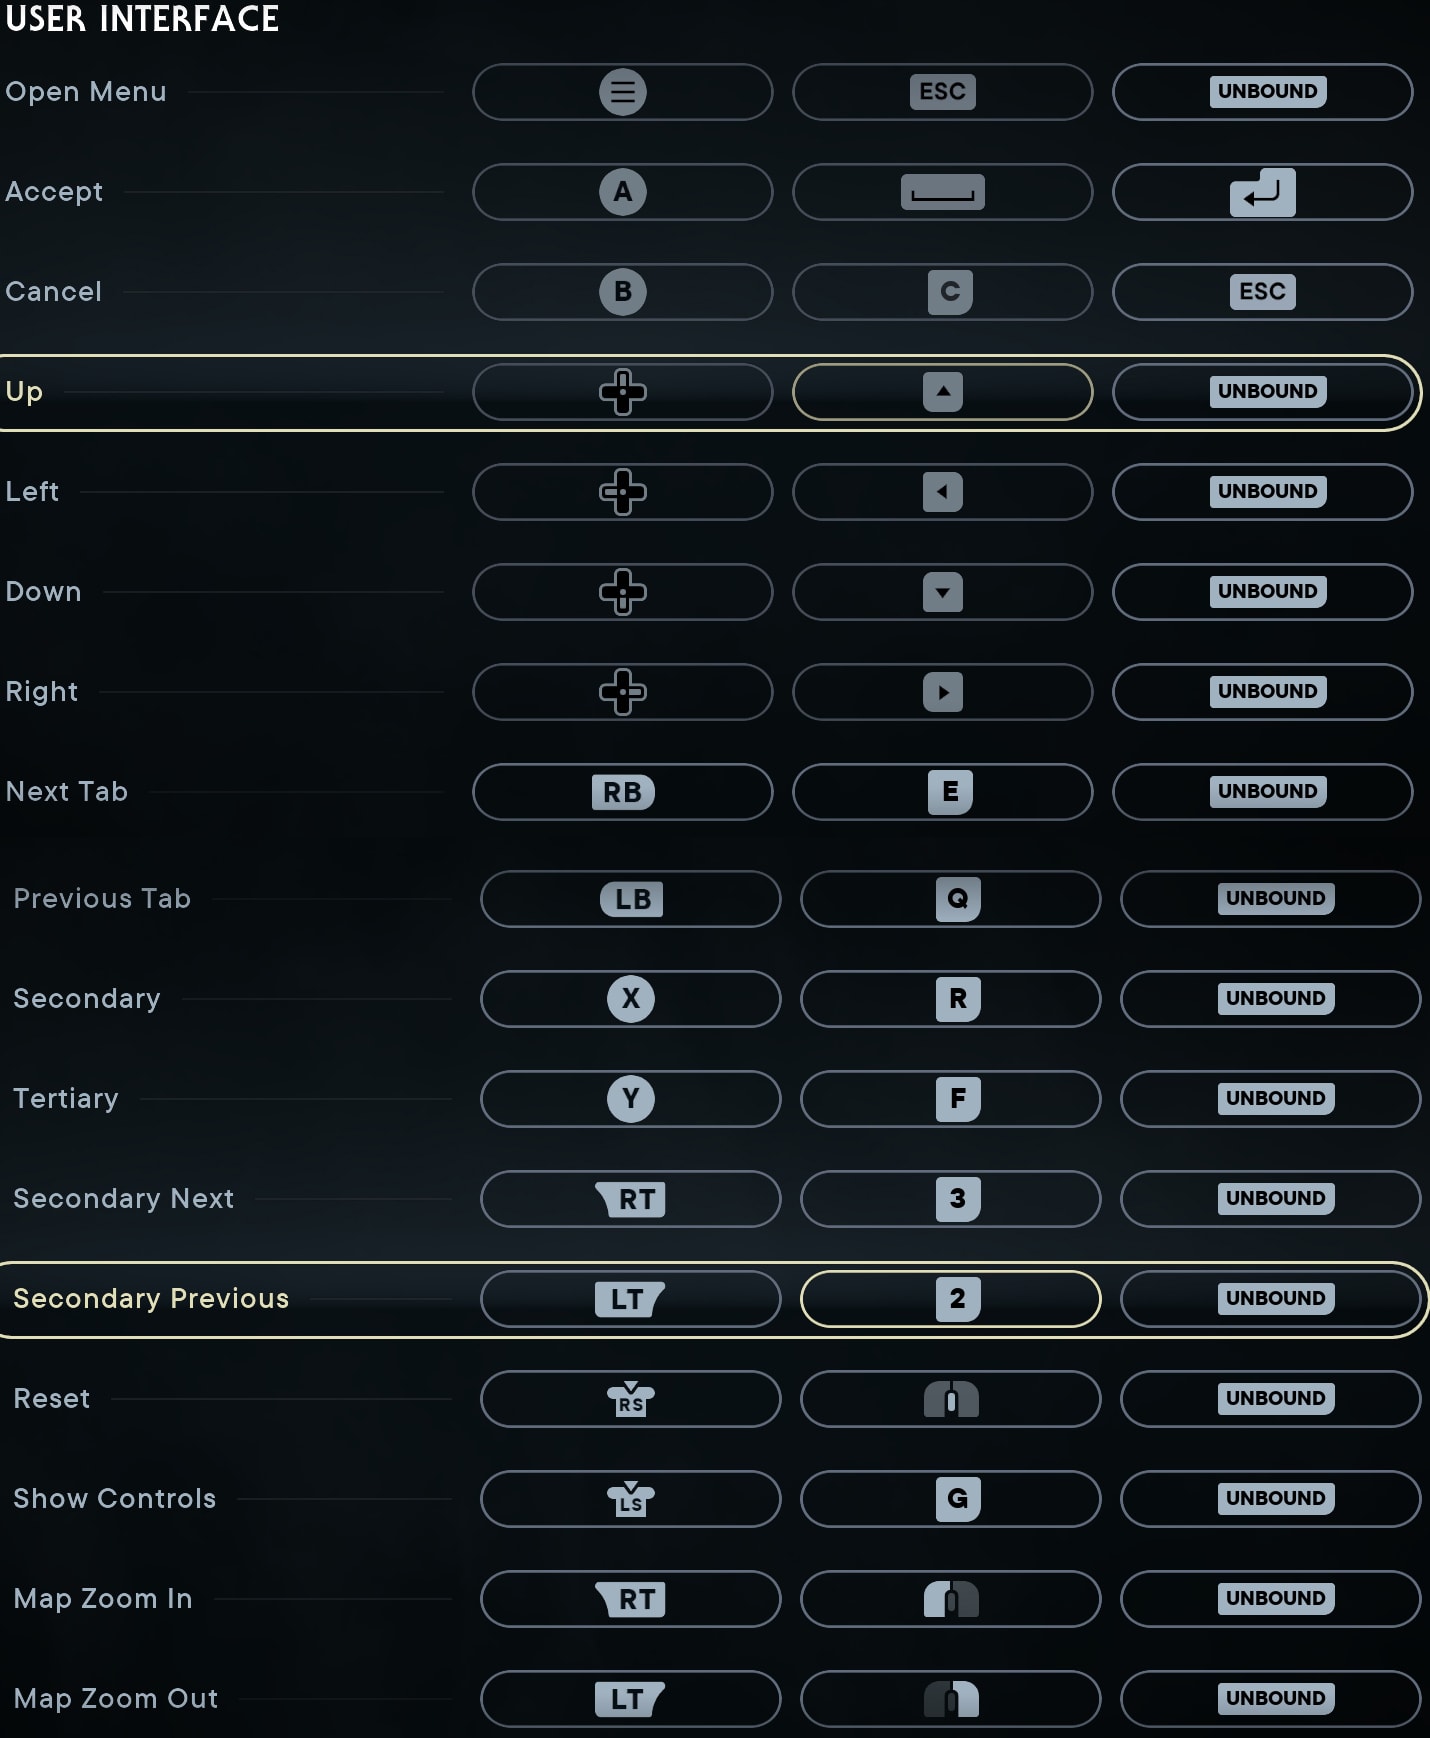
These are honestly best left as-is. There’s nothing wrong with any of these controls.
If you have the means to do so, the only change I’d recommend here for PC is adding an additional keybinding that the Mouse Wheel can Scroll Up or Down through menus. This may take additional effort outside of the game to properly bind as the game doesn’t currently allow for them to be bound outside of default controls.
In-Game Console Controls
Below are the Default Controls when playing Star Wars Jedi Survivor with a Sony Playstation or Microsoft Xbox controller. These are fully remappable, with some slight restrictions.
These restrictions come in the form of “Paired Actions”, which can only share a bind with each other. Below is a short list of these actions that are paired.
| Action | Paired Action 1 | Paired Action 2 |
| Ascension Cable | Force Pull (Console) | Interact (PC) |
| Special Attack | Zipline Change Direction |
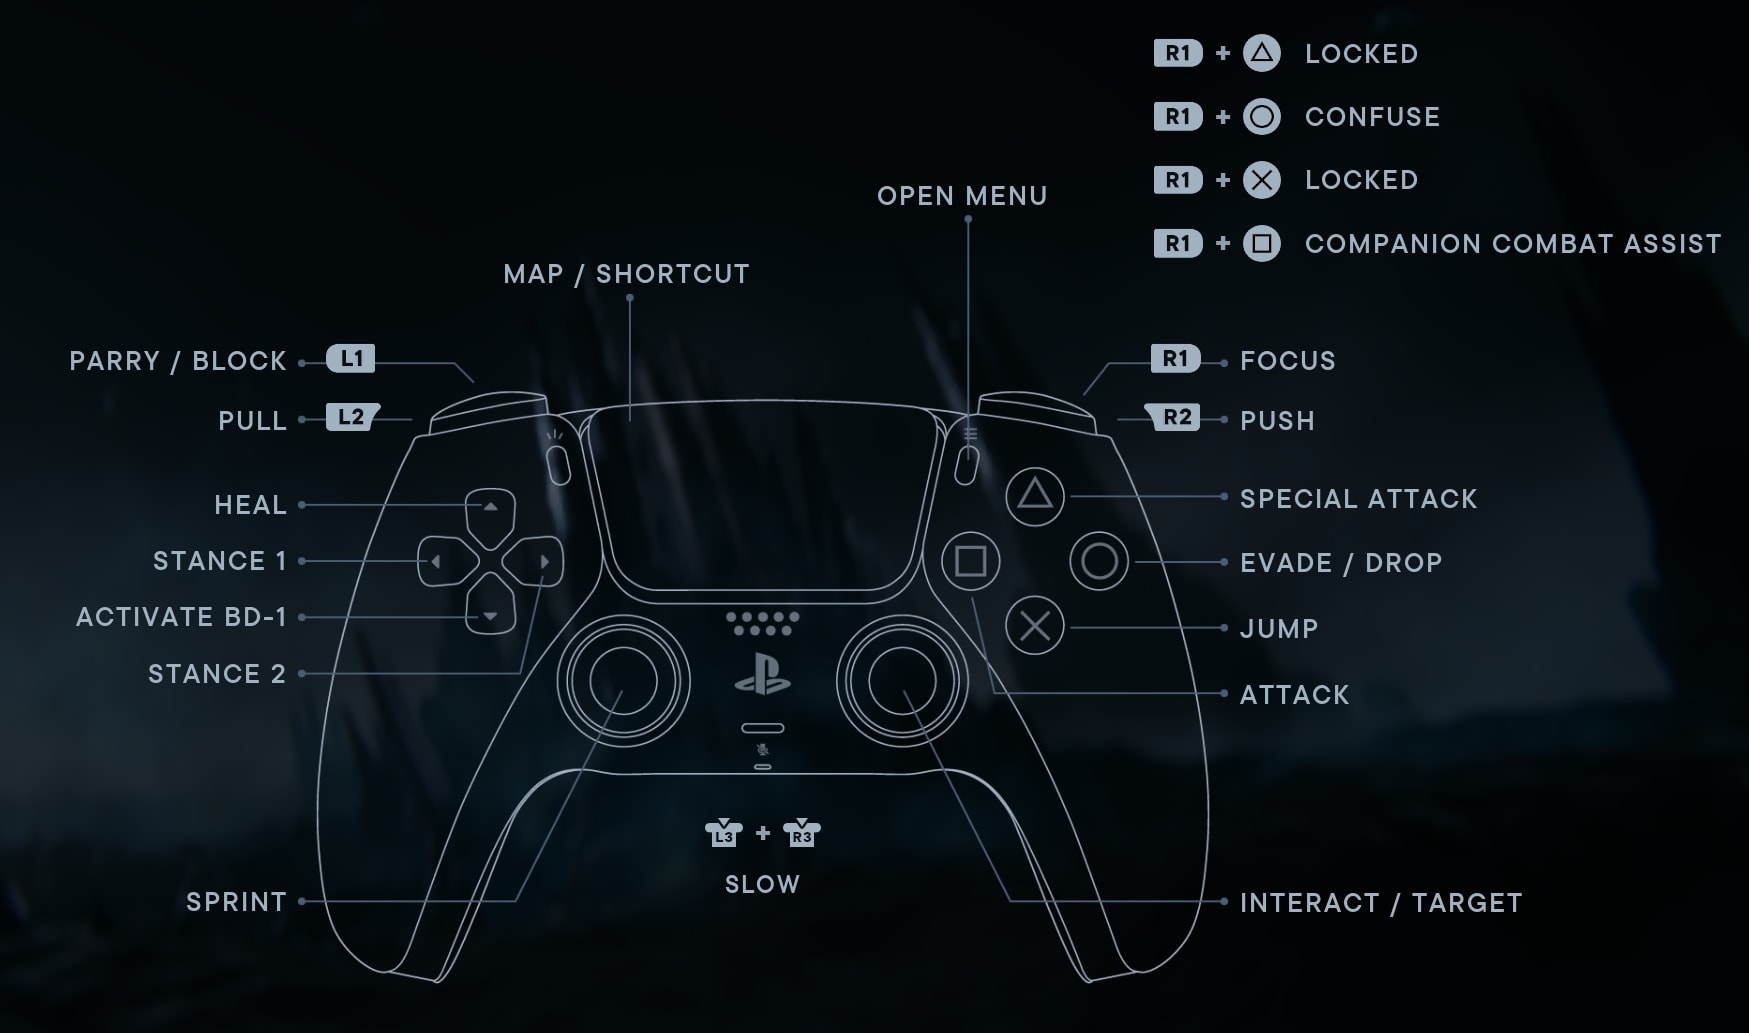
Basic Gameplay Console Controls
These are the controls you’ll use to control Cal’s movement and his Lightsaber gameplay.
| Control Name | Xbox | PS5 |
|---|---|---|
| Movement | LS | LS |
| Attack | X | ☐ |
| Block /Parry | LB | L1 |
| Jump | A | ✖ |
| Evade /Drop | B | ⭘ |
| Special Attack | Y | △ |
| Heal | ↑ | ↑ |
| Ascension Cable | LT | L2 |
| Interact / Target | RS↓ | RS↓ |
| Map / Shortcut | Change View | Touchpad |
| Sprint | LS↓ | LS↓ |
| Stance 1 | ← | ← |
| Stance 2 | → | → |
| Look | RS | RS |
| Swim Down | X | ☐ |
| Swim Up | A | ✖ |
| Swim Boost | B | ⭘ |
| Zipline Boost | RT | R2 |
| Zipline Brake | LT | L2 |
| Zipline Change Direction | Y | △ |
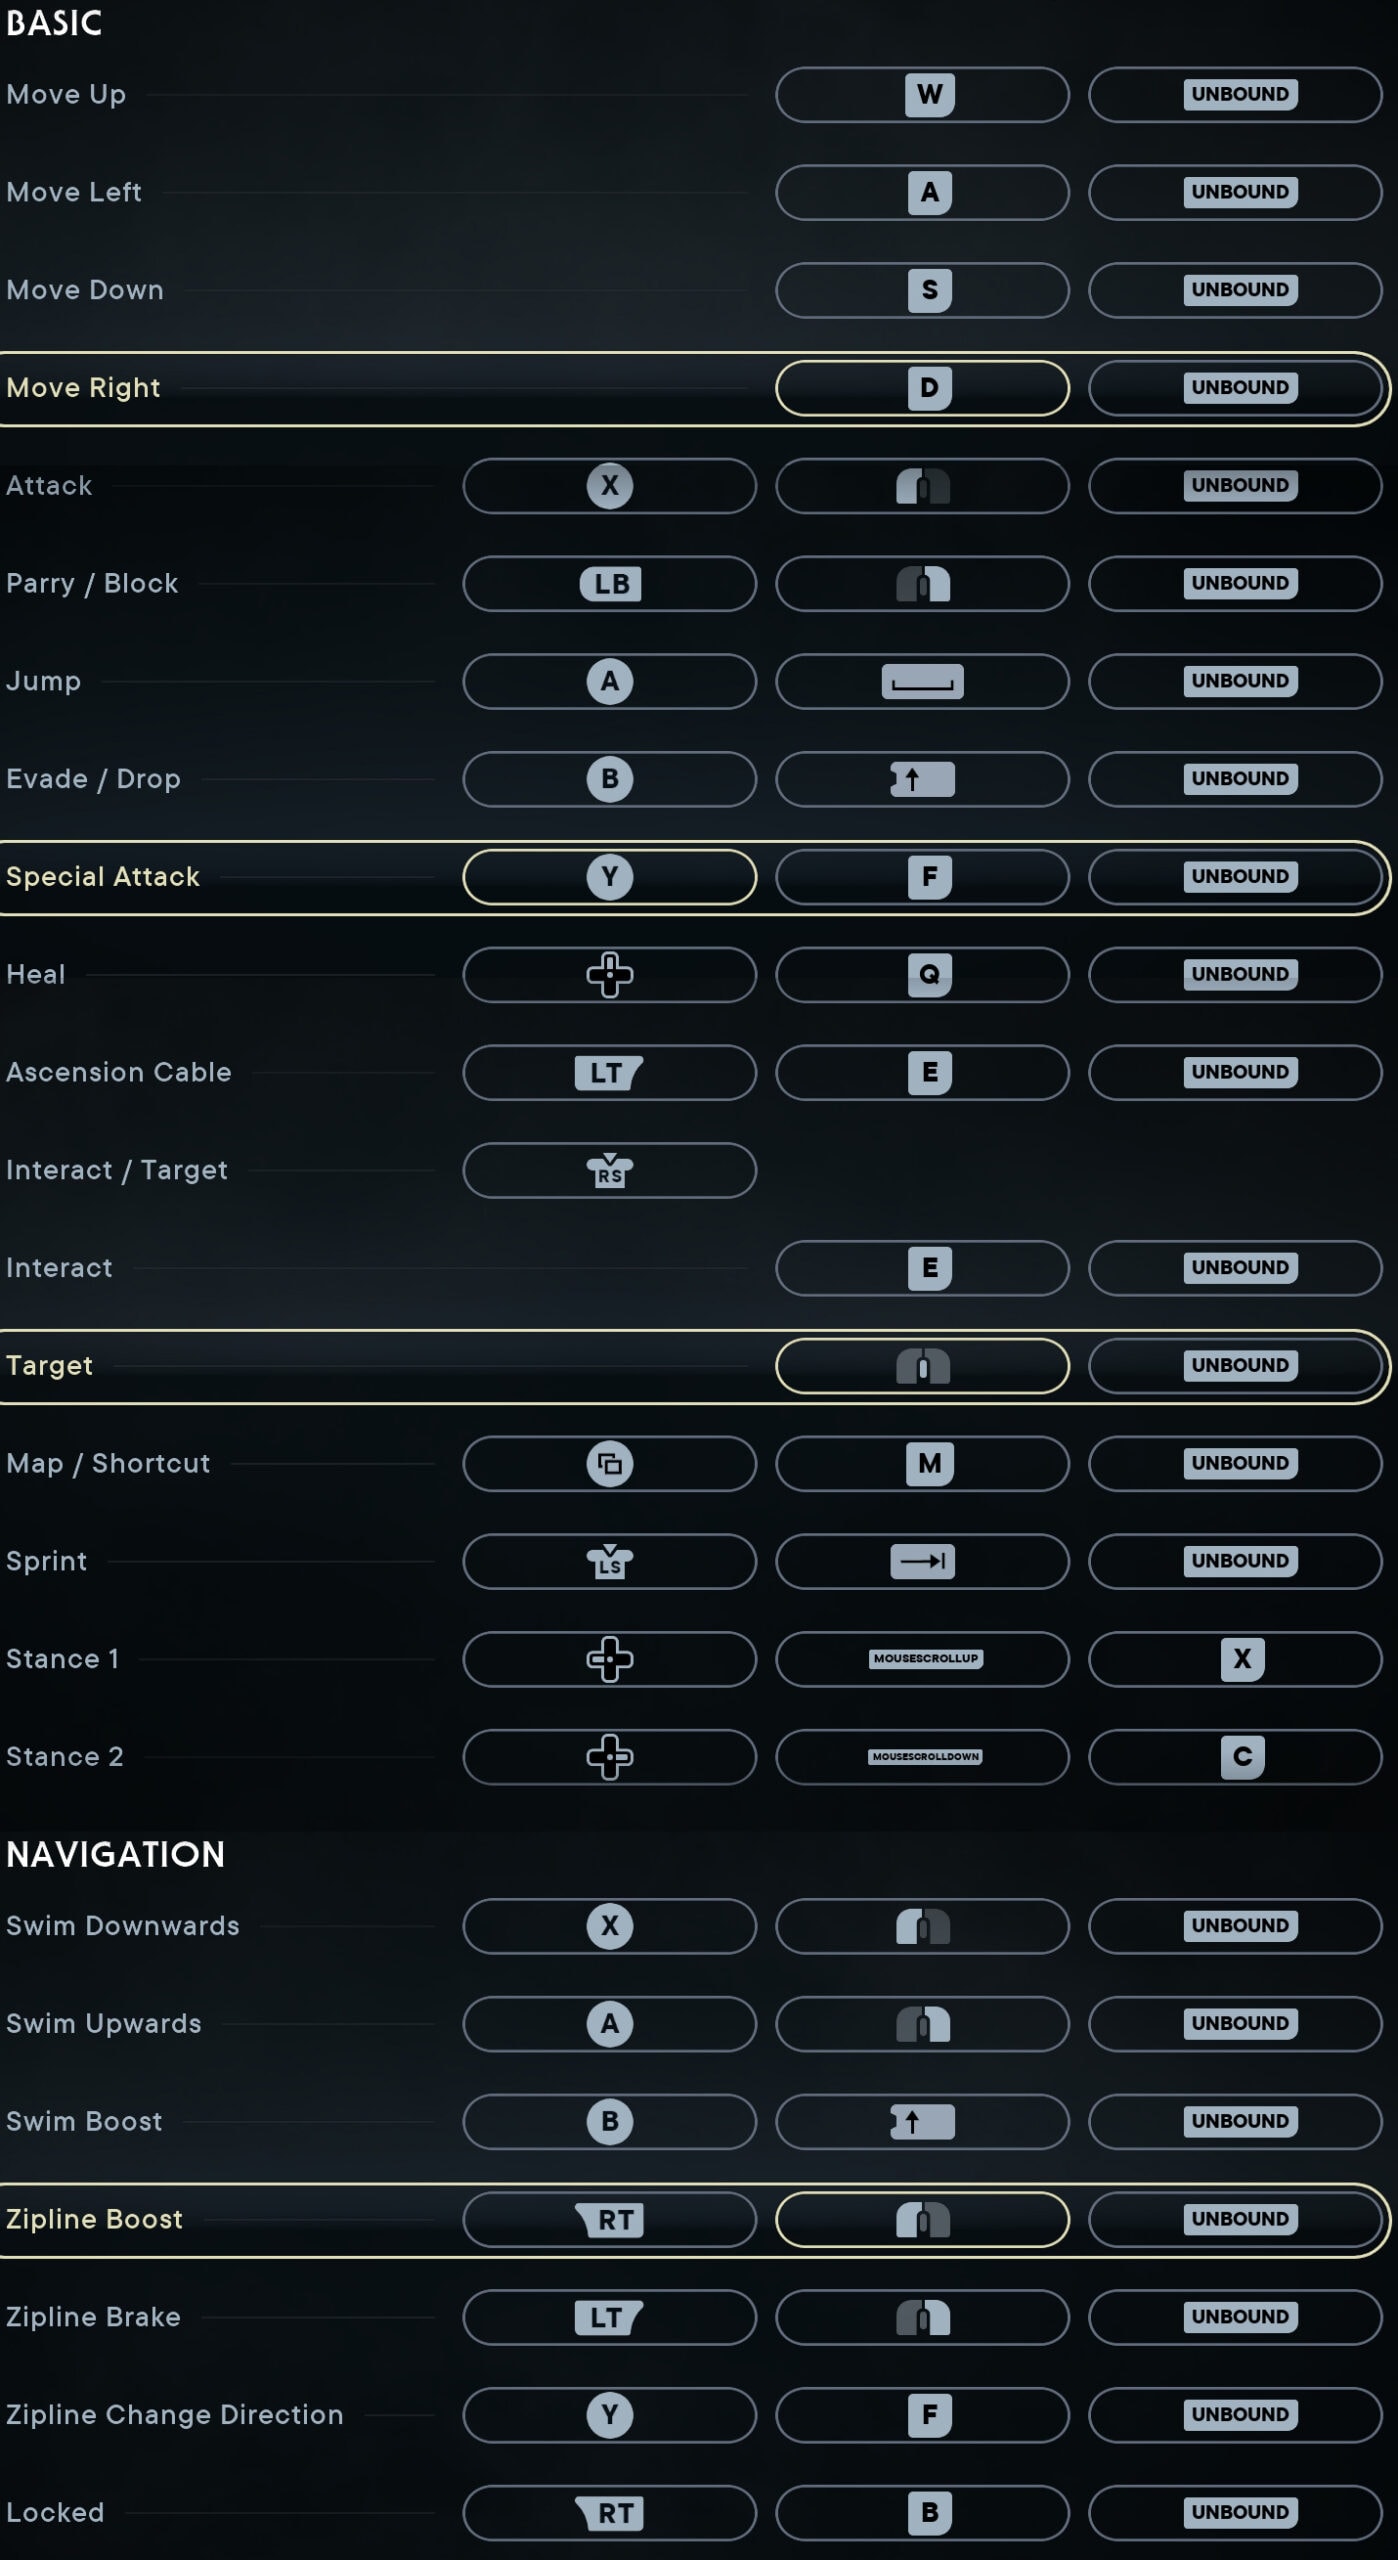
I personally found no reason to adjust the default bindings for either controller. I did try some alternative settings to try and keep combat controls closer together by moving Block/Parry to RB or R1 and swapping it with the Focus for Force. That ultimately didn’t change or enhance gameplay much other than allowing my left hand to focus on movement controls.
Force Powers and BD-1 Console Controls
These controls are similarly used in ground missions, letting you access your Force abilities as well as BD-1’s functions. These also may appear to be directly shared at first, but the bind for Focus is used in combination with most force powers. Similarly, the Activate BD-1 bind does the same for those abilities.
| Control Name | Xbox | PS5 |
|---|---|---|
| Focus | RB | R1 |
| Companion Combat Assist | X | ☐ |
| Push | RT | R2 |
| Pull | LT | L2 |
| Confuse | B | ⭘ |
| Lift | Y | △ |
| Slam | A | ✖ |
| Slow 1 | LS↓ | L3 |
| Slow 2 | RS↓ | R3 |
| Slow | N/A | N/A |
| Activate BD-1 | ↓ | ↓ |
| BD-1 Fire | RT | R2 |
| BD-1 Aim | L2 | L2 |
| BD-1 Koboh Grinder | ← | ← |
| BD-1 Electro Dart | → | → |
| Binoculars | RS↓ | R3 |
| Place Beacon | A | ✖ |

All of these bindings are great as-is and felt natural. No need to even consider changing these unless you find alternative binds from past experience more comfortable.
Miscellaneous and Accessibility Console Controls
These are the remaining Console Controls that aren’t part of the two major categories.
| Control Name | Xbox | PS5 |
|---|---|---|
| Skip Cinematic | B | ⭘ |
| Narritive Camera Zoom | RT | R2 |
| Skip Dialogue Line | A | ✖ |
| Exit Conversation | B | ⭘ |
| Activate Photo Mode | Unbound | Unbound |
| Toggle Slow Mode | Unbound | Unbound |
| Active Audio Ping | Unbound | Unbound |
| Nav Assist Ping | Unbound | Unbound |
| Shortcut Top | Y | △ |
| Shortcut Left | X | ☐ |
| Shortcut Right | B | ⭘ |
| Shortcut Bottom | A | ✖ |
With the Shortcut options being bound by default on a controller, this gives you fairly decent access to the Accessibility Options, as that’s the only thing that can currently be bound to them. Once set in the Accessibility Options Menu, you’ll have access to the Holomap, Photo Mode, Slow Mode, Audio Ping, Nav Assist, as well as Puzzle Hints with these buttons.

In-Game PC Controls
Below are the Default Controls when playing Star Wars Jedi Survivor with a Keyboard and Mouse. These are fully remappable, with some slight restrictions.
These restrictions come in the form of “Paired Actions”, which can only share a bind with each other. Below is a short list of these actions that are paired.
| Action | Paired Action 1 | Paired Action 2 |
|---|---|---|
| Ascension Cable | Force Pull (Console) | Interact Only (PC) |
| Special Attack | Zipline Change Direction |
Basic Gameplay PC Controls
These are the controls you’ll use to control Cal’s movement and his Lightsaber gameplay.
I have provided all default keyboard and mouse actions as well as a few suggestions for changes to make your gameplay smoother and more fluent.
| Control Name | PC Defaults | Change to |
|---|---|---|
| Movement | WASD | |
| Attack | LMB | |
| Block /Parry | RMB | |
| Jump | Space | |
| Evade /Drop | Tab | Shift |
| Special Attack | F | |
| Heal | Q | |
| Ascension Cable | E | |
| Interact | E | |
| Target | MMB | |
| Map / Shortcut | M | |
| Sprint | Shift | |
| Stance 1 | Mouse Wheel Up | |
| Stance 2 | Mouse Wheel Down | |
| Swim Down | LMB | |
| Swim Up | RMB | |
| Swim Boost | Shift | Tab |
| Zipline Boost | LMB | |
| Zipline Brake | RMB | |
| Zipline Change Direction | F |
The only major change we recommend here is to swap Sprint and Evade bindings. Shift is in a much more comfortable location for a button you’ll need quick and easy access to, as Evading is a huge part of combat. On the opposite side, Sprinting is rarely needed for combat and can be moved to Tab for easy access when needed.
If you play with a mouse and keyboard, you will not have the walk functionality. Cal will be able to only jog or sprint. You can add the ability to switch to walk at any time with the Walk Mod. We have featured it in our guide to recommended PC Mods for Jedi Survivor.
Force Powers and BD-1 PC Controls
These controls are similarly used in ground missions, letting you access your Force abilities as well as BD-1’s functions. These also may appear to be directly shared at first, but the bind for Focus is used in combination with most force powers. Similarly, the Activate BD-1 bind does the same for those abilities.
| Control Name | PC Default | Change To |
|---|---|---|
| Focus | Ctrl | Mouse 4 |
| Companion Combat Assist | LMB | |
| Push | 2 | |
| Pull | 3 | |
| Confuse | Z | V |
| Lift | F | |
| Slam | Space | G |
| Slow | 4 | C |
| Activate BD-1 | R | |
| BD-1 Fire | 2 | LMB |
| BD-1 Aim | 3 | RMB |
| BD-1 Koboh Grinder | X | |
| BD-1 Electro Dart | C | |
| Binoculars | B | |
| Place Beacon | E |
There are a couple changes here. The Big one is moving Focus to a Mouse Button. It’s easier to access here with a side mouse button, assuming you have access to one. If not, the default Ctrl bind is workable.
Then we shift the Force abilities around a bit, making a small cluster of buttons for your thumb to use. If Desired you can leave have Confuse, Lift, or Slam bound to Space if it’s more comfortable. Slow Should not be bound here to prevent any accidental activations, as it does not require the use of the Focus bind to activate.
If using Ctrl, I’d suggest moving the Confuse, Lift, and Slam binds to Z, X, and C respectively. This creates a secondary row just for the Focused Force Powers, since it’ll often be a bit more comfortable to quickly move your hand down to use one of them before moving back to your movement keys.
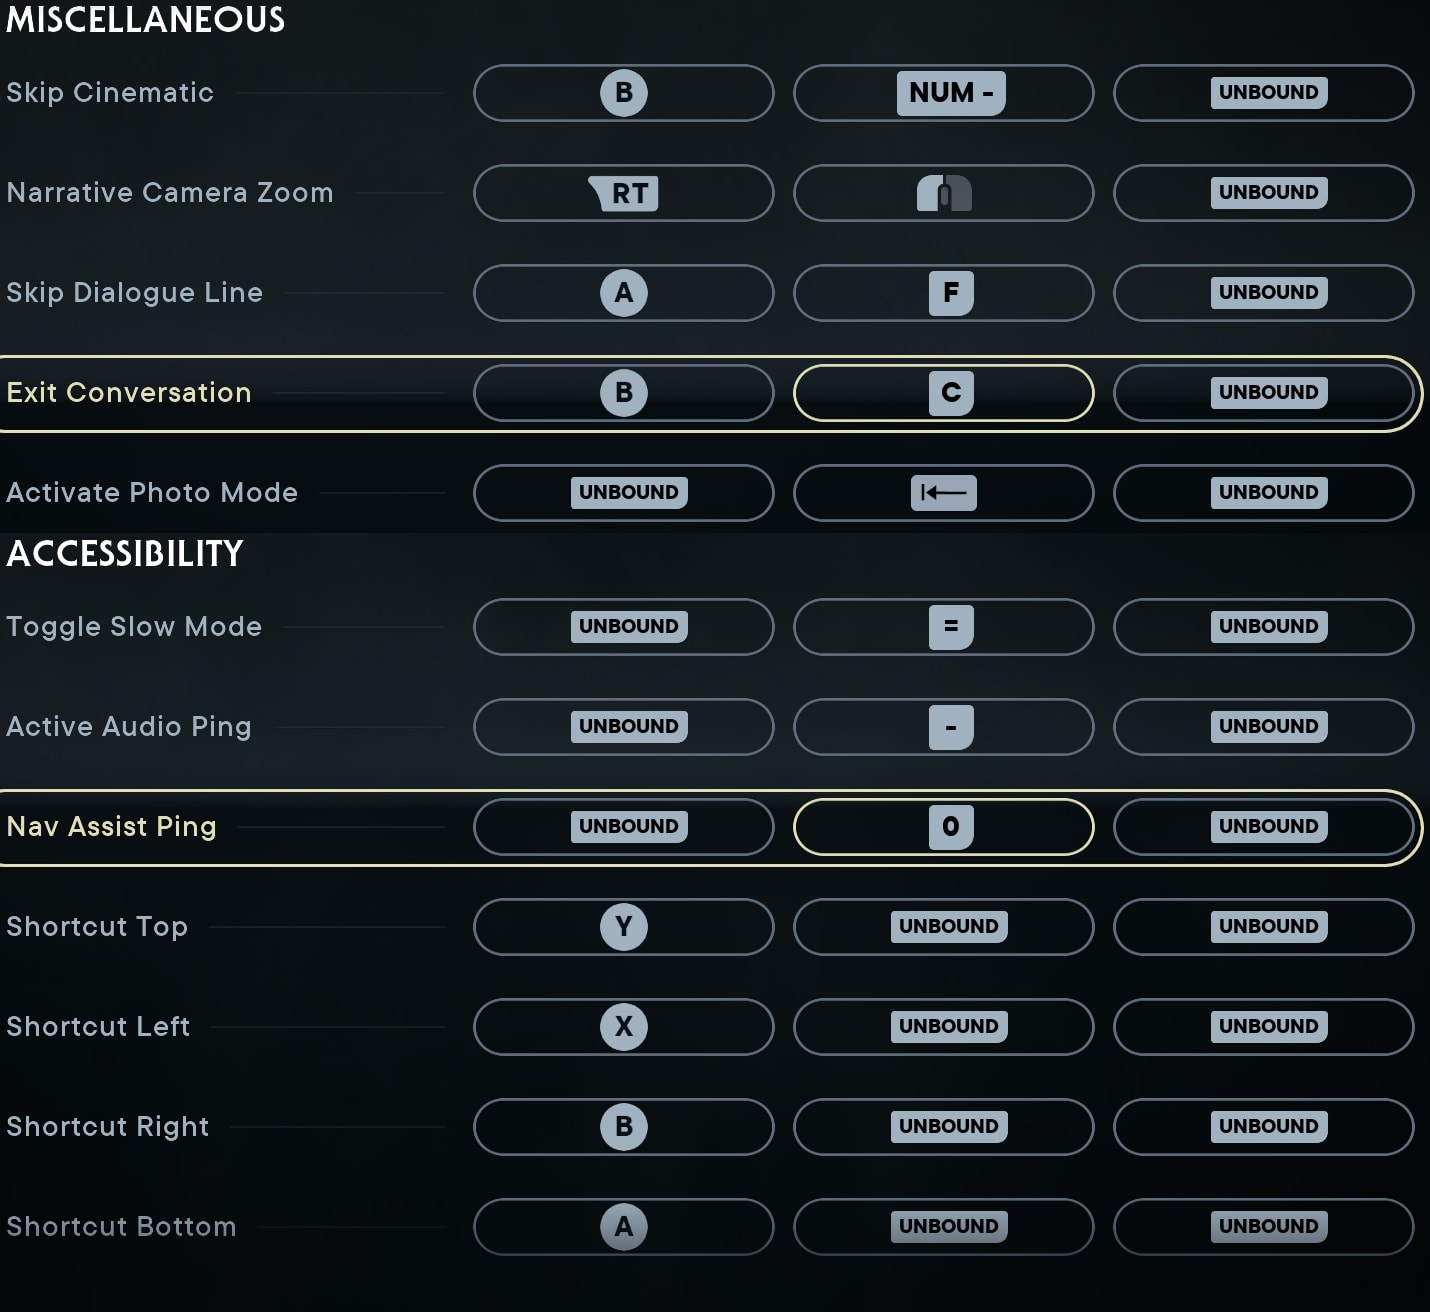
Miscellaneous and Accessibility Console Controls
These are the remaining PC Controls that aren’t part of the two major categories.
| Control Name | PC Default | Change To |
|---|---|---|
| Skip Cinematic | Space | Num – |
| Narritive Camera Zoom | LMB | |
| Skip Dialogue Line | F | |
| Exit Conversation | C | |
| Activate Photo Mode | Backspace | |
| Toggle Slow Mode | = | |
| Active Audio Ping | – | |
| Nav Assist Ping | Unbound | 0 (Zero) |
| Shortcut Top | Unbound | |
| Shortcut Left | Unbound | |
| Shortcut Right | Unbound | |
| Shortcut Bottom | Unbound |
The only major change here is moving Skip Cinematic away from Space and to somewhere very far away. It’d be fine there for most people, I chose to move it simply to avoid accidentally skipping cutscenes, as my keyboard doesn’t require much force to press keys, with Space being among the easiest to press by just resting my hand in a natural position.
I don’t personally use it, but if you need it, Placing Nav Assist Ping on Zero will put it right near the other accessibility options. Using the Shortcuts is optional, as the only option it can provide that isn’t already covered elsewhere (Map and the other accessibility options) is for Puzzle Hints. If you need them, bind them how you wish.
Now that you are familiar with the Controls and Customizable Keybinds in the game, it’s time to turn our head toward learning the basics and beyond with our Jedi Survivor Starter Guide and Jedi Survivor Combat Guide. These two will teach you all you need to get started. From there, you can branch to any other Jedi Survivor guide you might need. We’ve got them all.


