
This Star Wars Jedi Survivor guide will walk you through the Forest Array on Koboh. Follow it closely to easily go through the several puzzles and pick up all available Collectibles on the way to the Tower!
Jedi Survivor Forest Array Walkthrough

This is a step-by-step summary of our in-depth walkthrough to help you properly and fully explore the Forest Array area on Koboh in Star Wars Jedi Survivor, pick up all collectibles and reach the Tower at the end.
Instructions
How to get to the Forest Array
- Traverse through the Basalt Rift past the large gate in Swindler's Wash.
- Descend towards a sleeping bilemaw.
- Force Pull the Pillar covered in vines on the side of the bilemaw. Climb on it. Force Pull the second one and jump on it.
- At the Koboh Dust Pit, climb on the right side where the vines are to get across to the metal beam and to the other safe area past the Koboh Dust.
- Go through the wall run segment to reach the Forest Array Meditation Point.
Forest Array Walkthrough
- Start from the Meditation Point.
- On your right, pick up the Datadisc sitting on top of the gear disc in the middle of the Koboh Dust pit.
- Scan the Koboh Barrier to the left of the Meditation Point for a Databank Entry.
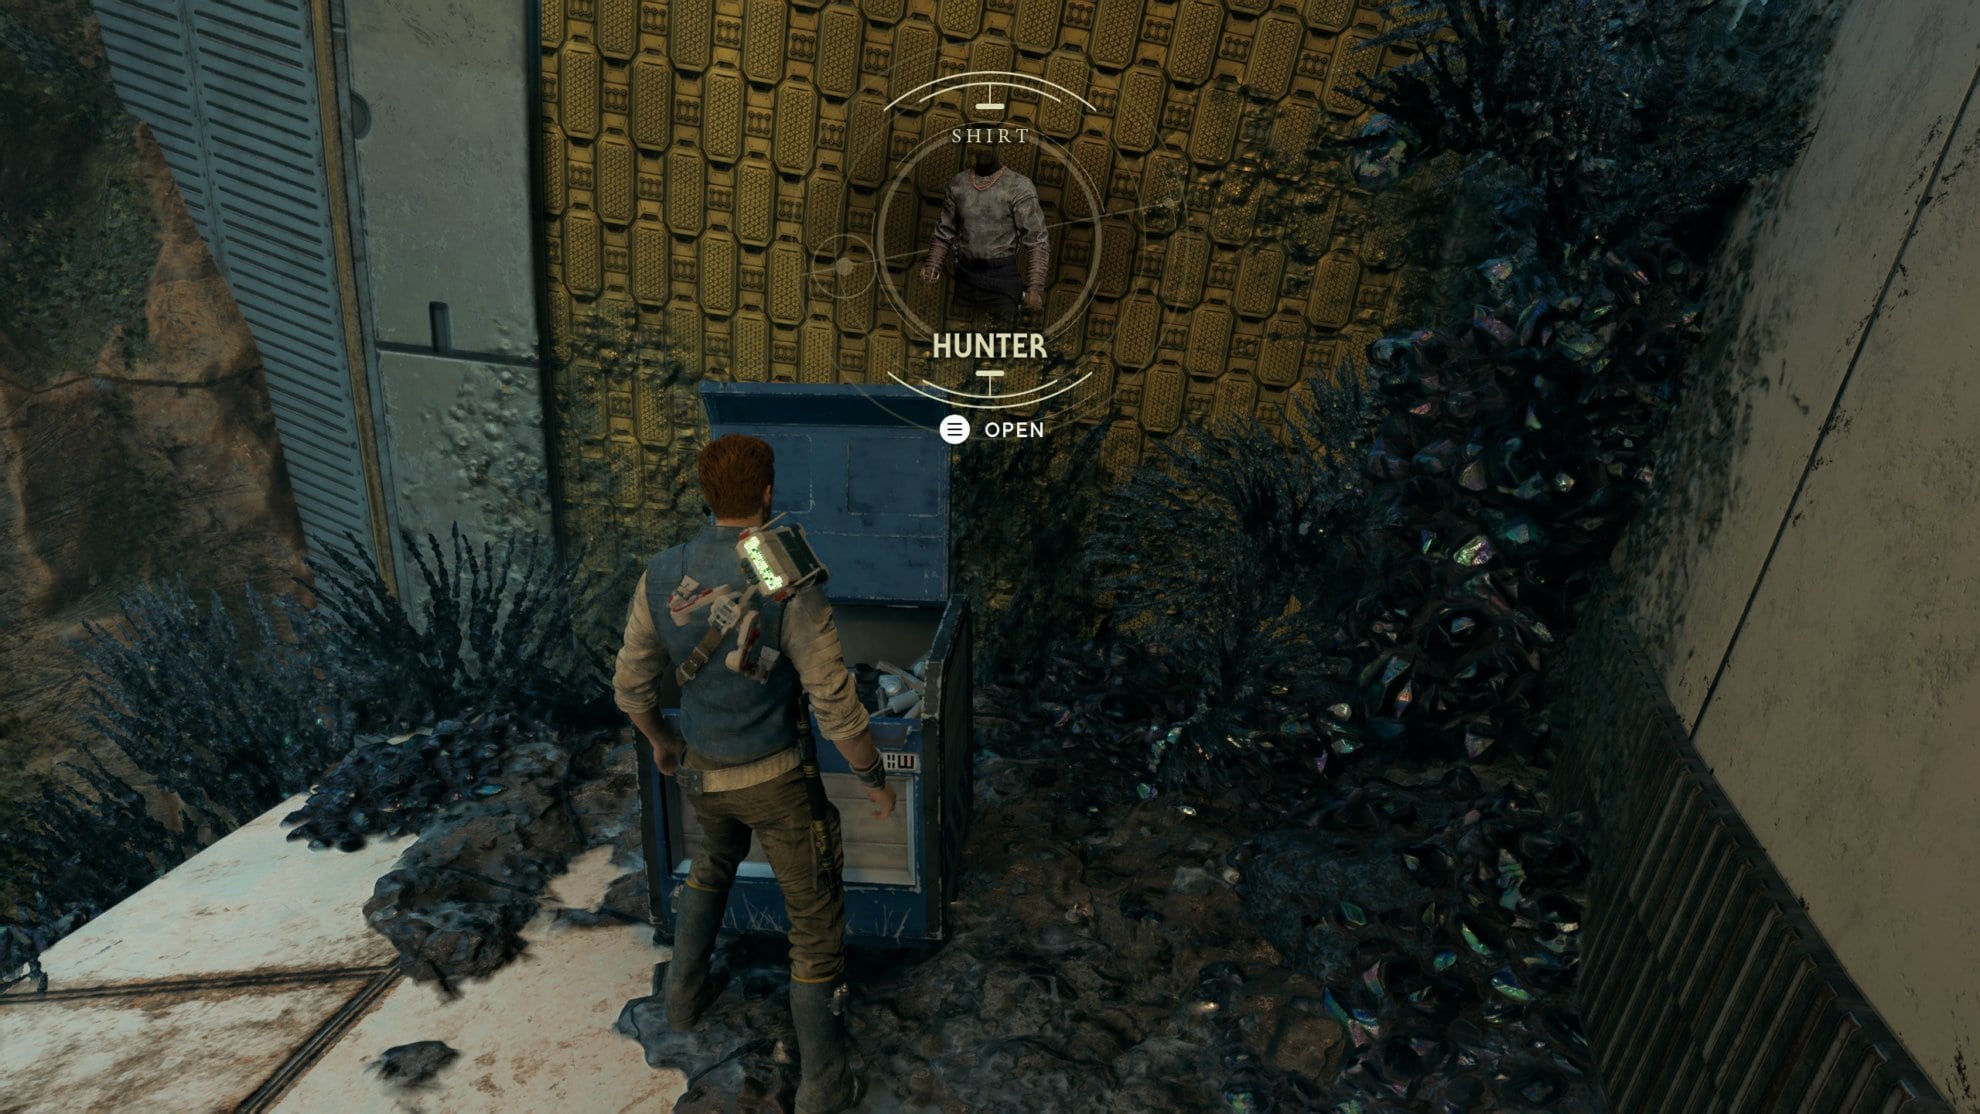
- Walk through the beam and Grapple Hook onto the metal grate. Reach and open the chest containing the Hunter shirt.
- To the right of this barrier in the pit below, you'll find another datadisc on top of a gear.
- Force Push the beam and walk on it. Force Pull another beam and cross to the other side.
- Before you get to the big bird, open the shortcut door to have a quick access from the Meditation Point to this area.
- Wall run to the rawka corpses.
- Defeat the Mogu that will appear on the bridge.
- Scan the wall of the structure behind the Mogu to get another Databank entry.
- Jump down onto a metal beam and Grapple Hook to get to the underside of the bridge and cross to the other side.
- Pick up the Collectible Essence that will grant you a Skill Point when activated.
- Go to the top of the bridge where you fought the Mogu and ascend the grates to reach the path above.
- Open the chest to the right to get the Lightsaber Part and slide down.
- Scan the device in the center of the chamber to get the Databank entry.
- Burn the Koboh Matter by placing the Orb into the Amplifier.
- Go to the newly opened chamber
- Make your way up and cut the cable to create a shortcut.
- Follow the path leading out to the forest. Find the hidden passage on the right wall to get a BD-1 Skin part in a chest.
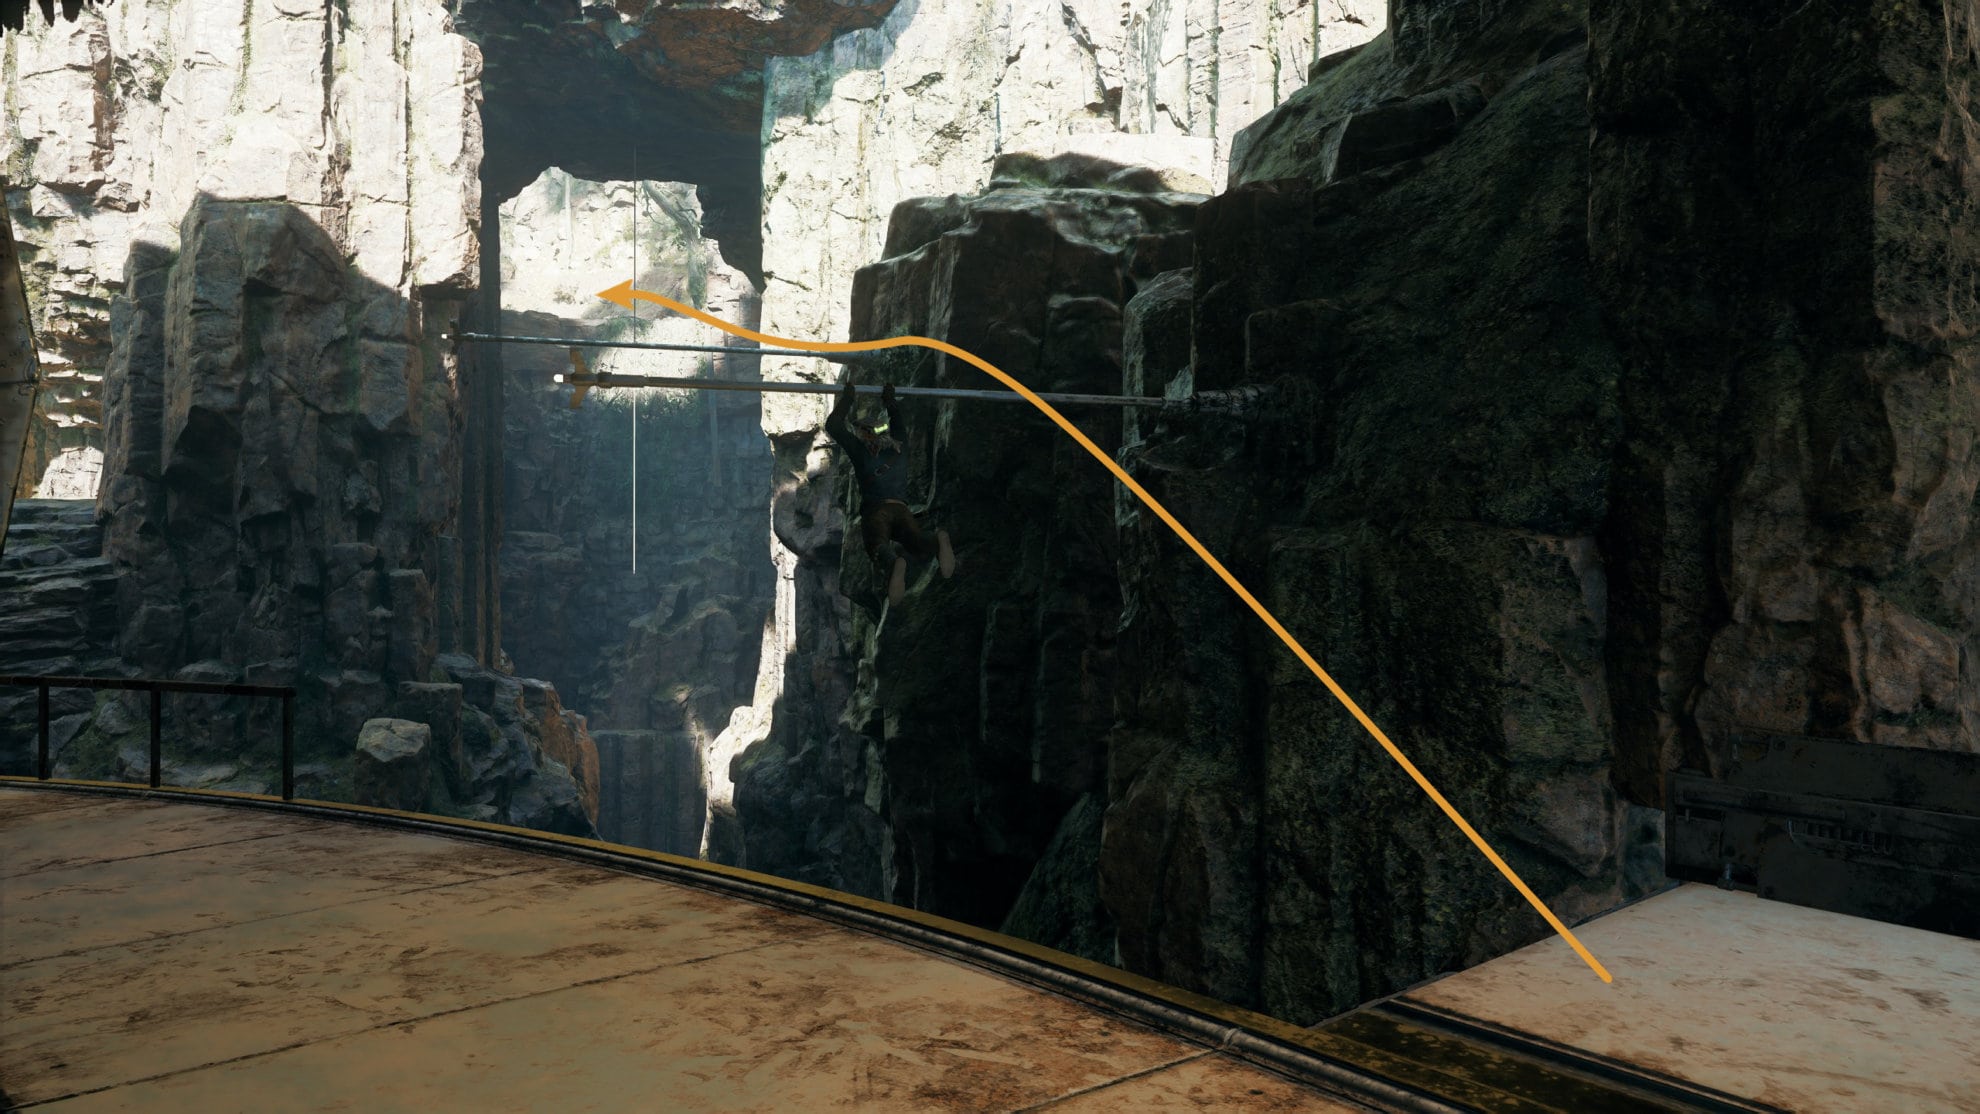
- Follow the path and jump off the ledge and onto the pole. Make your way to the rope and swing to the vines on the cliffside.
- Pick up the Fortification Perk Collectible.
- Reach the Meditation Point and pick up the Collectible Essence from the dark cave.
- Use Confusion on the bilemaw so it would fight the stormtroopers for you.
- Find the chest containing the Tactical Jacket behind one of the tents.
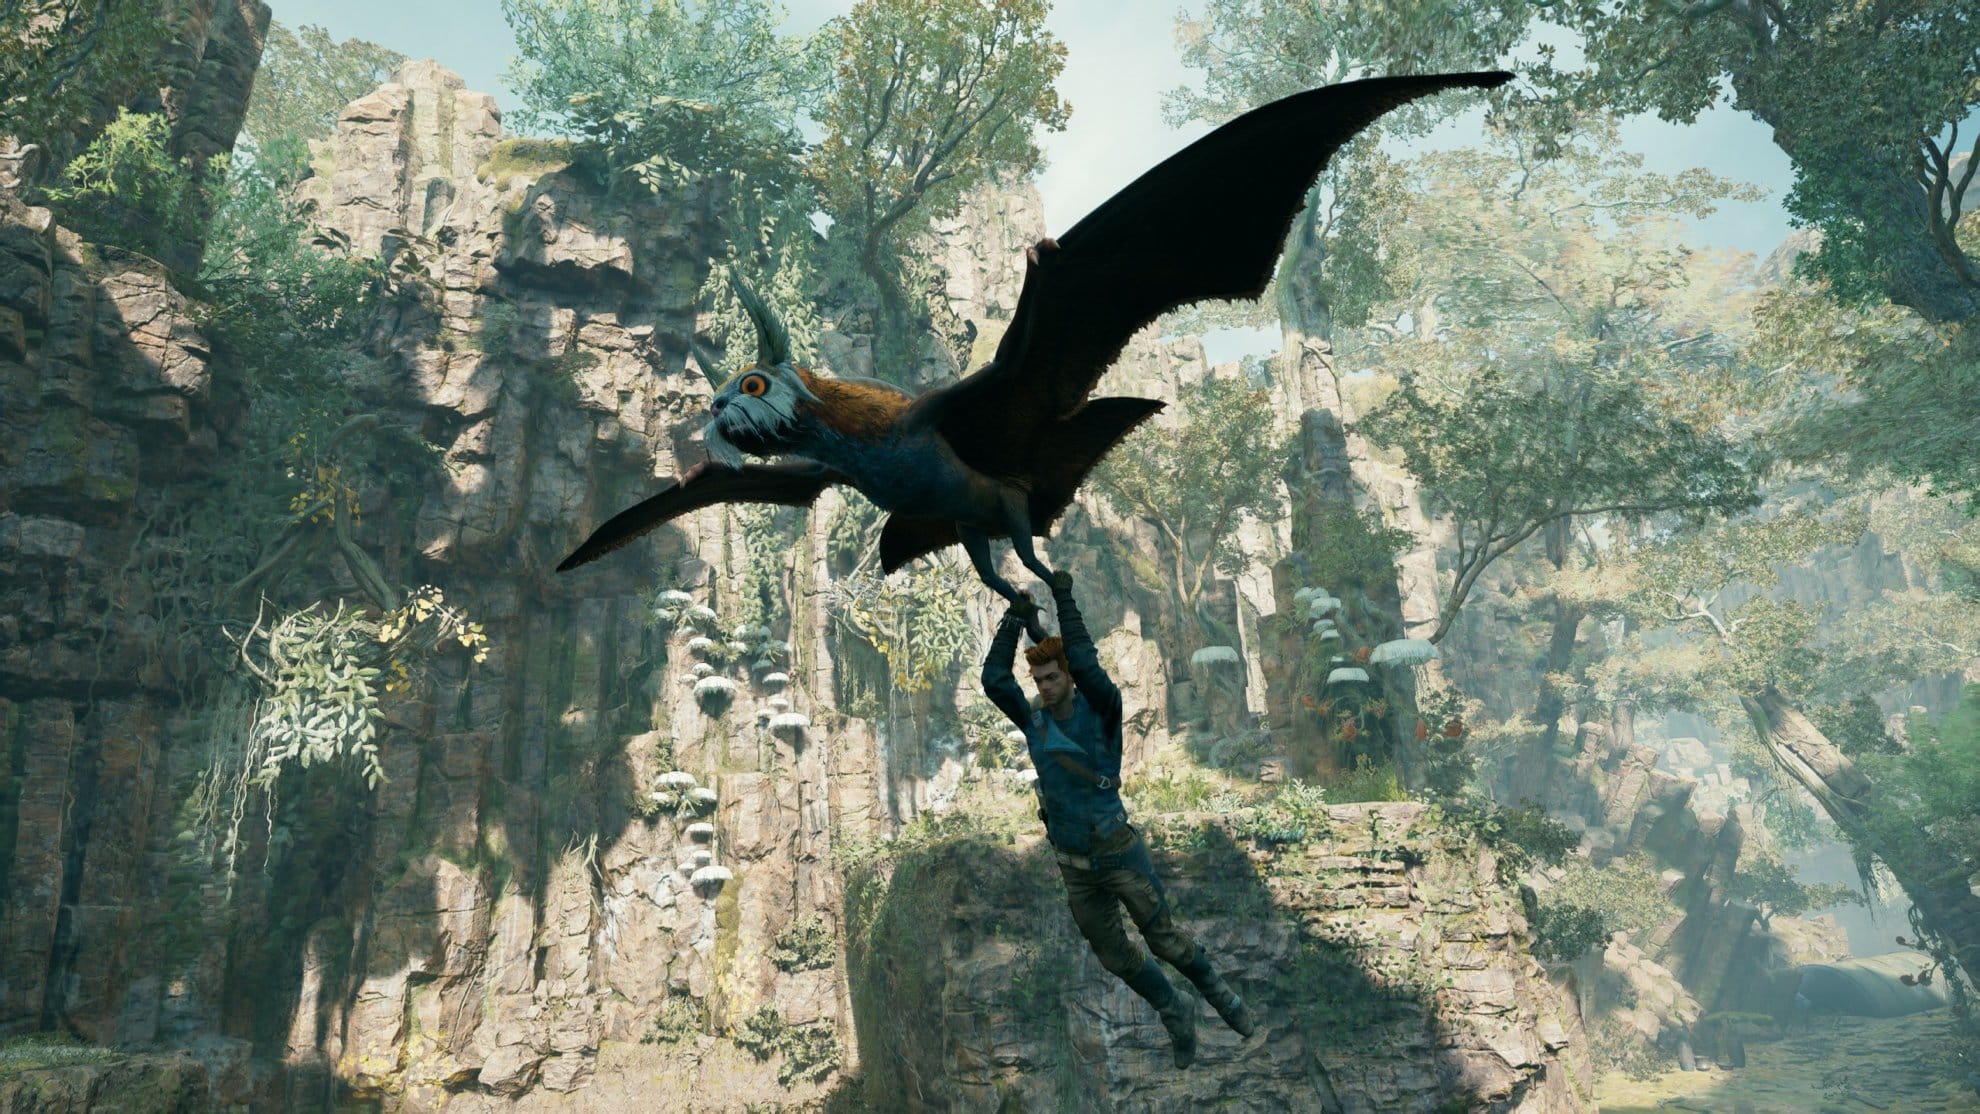
- Keep following the path to reach a relter. Glide with it back to the Forest Array.
- Open the shortcut to the Meditation Point on the left wall.
- Reach the Stormtroopers, defeat them, and wall run to the upper level. Take the relter and glide to the central plaza.
- Scan the rotational apparatus for a Databank entry.
- Use the rotating beam to access the chest at the end of the central plaza and pick up the Diligence Lightsaber Grip.
- Use the rotating beam to free the big bird. Take the path where the bird was and knocked you down earlier. At the end jump down and open the chest to get Hunter Pants.
- Go upstairs, glide down. Defeat the Stormtroopers and unlock the shortcut door back to the central plaza.
- Pick up the Priorite Shard from the end of the broken bridge.
- Use the Orb to get the Priorite Shards in the middle of the Koboh Dust pits to the left and right from the Tower.
- Bring the orb from the Central Apparatus and use it to create two bridges leading to the Tower.
- You can return later to pick up the remaining few Collectibles from the Forest Array area after you have unlocked additional skills and moves that will allow you to access them.
Inside the Tower
- Walk into the Medical Chamber.
- Watch the cinematics to learn who the Jedi in the bacta tank is.
- Fight against Dagan Gera.
- Collect the Health Essence Echo after the fight.
- Near the Cable where you exit the Tower, interact with the Memory Echo to hear an additional bit of story.
Notes
Everything is described in great detail with lots of images in our Full Walkthrough, which you will find below.
You can return later to this area to pick up what you were not able to on your first run through the Forest Array. Some of the items are locked behind abilities you will learn after you progress more through the story of the game. Other items are just a lot easier to pick up if you have, say double jump and slide through the air, for example.
How to get to the Forest Array
This segment is a bit short as I expect most of you are here looking for help with the actual puzzles, not the path to the Forest Array Meditation Point.
To make it to the Forest Array, you’ll have to traverse through the Basalt Rift past the large gate in Swindler’s Wash. As the Basalt rift, follow the left path beyond the Meditation Point and through a small arch.
There will be a log you can walk across where you’ll need to Force Pull another log to jump to the other side. Defeat the stormtroopers and descend towards a sleeping bilemaw.
You can defeat the bilemaw to perform the next task safely or just ignore the bilemaw if you’re fast enough and proceed with the following steps.
There’s a basalt pillar covered in vines that was to the right of the sleeping bilemaw. Force Pull it to have it jut out and climb on top of it. Go to the tip and Force Pull another basalt pillar and jump to it. Wall run across the wall on the left to reach the cliff. Follow the path and walk around the Koboh Dust, the bits of floating blue particles that will suffocate you.
You’ll run into a pit full of Koboh Dust that you’ll need to get across. There’s a cliff on the right side that is covered in vines. Jump to it to grasp the vines and climb across until you get to the end of the metal beam. Jump off and onto the clifftop to reach the other side of the pit.
Jump onto the metal platform with the lit corners and jump off the metal beam towards some walls. Wall run across these walls to reach the end and access the Forest Array!


Below is a video walkthrough showing you the path from the Forest Door to the Forest Array Meditation Point on Koboh, along with Collectibles you can pick up on the main path.
Forest Array Full Walkthrough
In this section of the guide, you’ll learn how to traverse the Forest Array while avoiding the Koboh Dust. Along with this, the various collectibles found in the area will be shown as well. Follow closely and this section will be a breeze.
This walkthrough assumes that this is your first visit here and along with the exploration, you will actually be doing the main mission objective to reach the tower.
Be sure to interact with the Meditation Point so you can respawn here should you make a mistake. To the right of the Meditation Point, you’ll find a pit full of Koboh Dust with a large gear at the end.
So good news and bad news, let’s start with the good news. On top of that gear is a datadisc you can use at a vendor. Bad news is there’s only one way to get it, by running through the Koboh Dust. Fortunately, you’re right next to a Meditation Point, so there actually isn’t much of a risk at all, just make sure you’re at full health when you do this.

Get a running start and double-jump further into the pit. From there, just run straight across to the gear and pick up the datadisc. You’ll respawn where you jumped off from and can heal at the Meditation Point.

To the left of the Meditation Point is a Koboh Barrier you can scan for a Databank entry. While this barrier appears fragile, you’ll be unable to destroy it with your lightsaber.

Walk through the beam and Grapple Hook onto the metal grate.

When you reach the top of the grate, jump to the right to land on the platform below. There you’ll find a chest containing the Hunter shirt! Climb the grates behind you to get back to the starting area.
To the right of this barrier in the pit below, you’ll find another datadisc on top of a gear. Jump in there, grab it, and respawn while healing at the Meditation Point if you think you need it.

Force Push this metal beam so you can walk across it to reach the platforms ahead.

Make your way across and Force Pull the beam to reach the grates along the wall. You’ll eventually reach an area where you can see a large bird that is stuck. Keep following the path and you’ll find a shortcut, activate it for easy access back to the Meditation Point.

Walk down the path where you’ll find some grates. Make your way across under the giant bird. There’s a locked door to the left that you won’t be able to open for the time being, so just ignore it for now.

When you get directly under the bird, you’ll be knocked off into the Koboh Dust below. Jump onto the grate in front of you and climb out before you suffocate. Up ahead is an area you can scan that will get you the Epic Moltings databank entry.

You’ll need to wall run to reach the other side where the rawka corpses are. Get to the other side and unlock the door to the left. From there head into the large chamber.

You’ll find a single rawka that’s still alive, dispatch it and proceed on the path forward. A Mogu will jump down onto the path, you’ll need to defeat it to progress. So long as you dodge its unblockable attacks you should be fine, though be mindful of not falling off the ledge.

After defeating the Mogu, you can find something you can scan at the end of the path. Scanning this will grant you the Auxiliary Array Telescope Databank entry.

Towards the ledge at the end of the path, there’s a metal beam you can jump down onto. Use your ascension cable to rappel across the gap and to the platform. There will be grates above you that you can move across to the other side of the bridge with.

When you make it across the bridge underside, you’ll find a Collectible Essence that will grant you a Skill Point when activated.
There’s a path to the right that’ll take you back to the chamber with the rawka corpses. Make your way back to the top of the bridge where you fought the Mogu and ascend the grates to reach the path above.
When you reach the top of the building, go to the right to find a chest with the Diligence Lightsaber Switch inside. From there, slide down into the chamber below.
If you want to collect the full Diligence Lightsaber customization, we have a guide for that. In fact, we have a complete catalog of the locations of all Lightsaber Components in the entire game!

When you get down, have BD-1 scan the device in the center of the chamber to get the Orb Amplifier Databank entry.

Force Pull the orb from the wall and place it into the Orb Amplifier.

Placing the Orb into the Amplifier will cause a beam of energy to shoot out that will destroy the Koboh Barriers. Take some time to rest at the Meditation Point and head into the newly opened area.

In this new chamber, you’ll need to jump up the platform near the center of the room and jump to the pole above you. Jump to the platforms and make your way to the ledge and cut the line to create a shortcut.

Go past the shortcut, jump down the ledge, and go to the right where you’ll find a scout trooper enjoying the view. While on this path, you can find a hidden passage on the right wall.

Go through the path and Force Push the metal beam to get across the gap. There you’ll find a chest containing the Swooper Head for BD-1.

Follow the path and jump off the ledge and onto the pole. Make your way to the rope and swing to the vines on the cliffside.
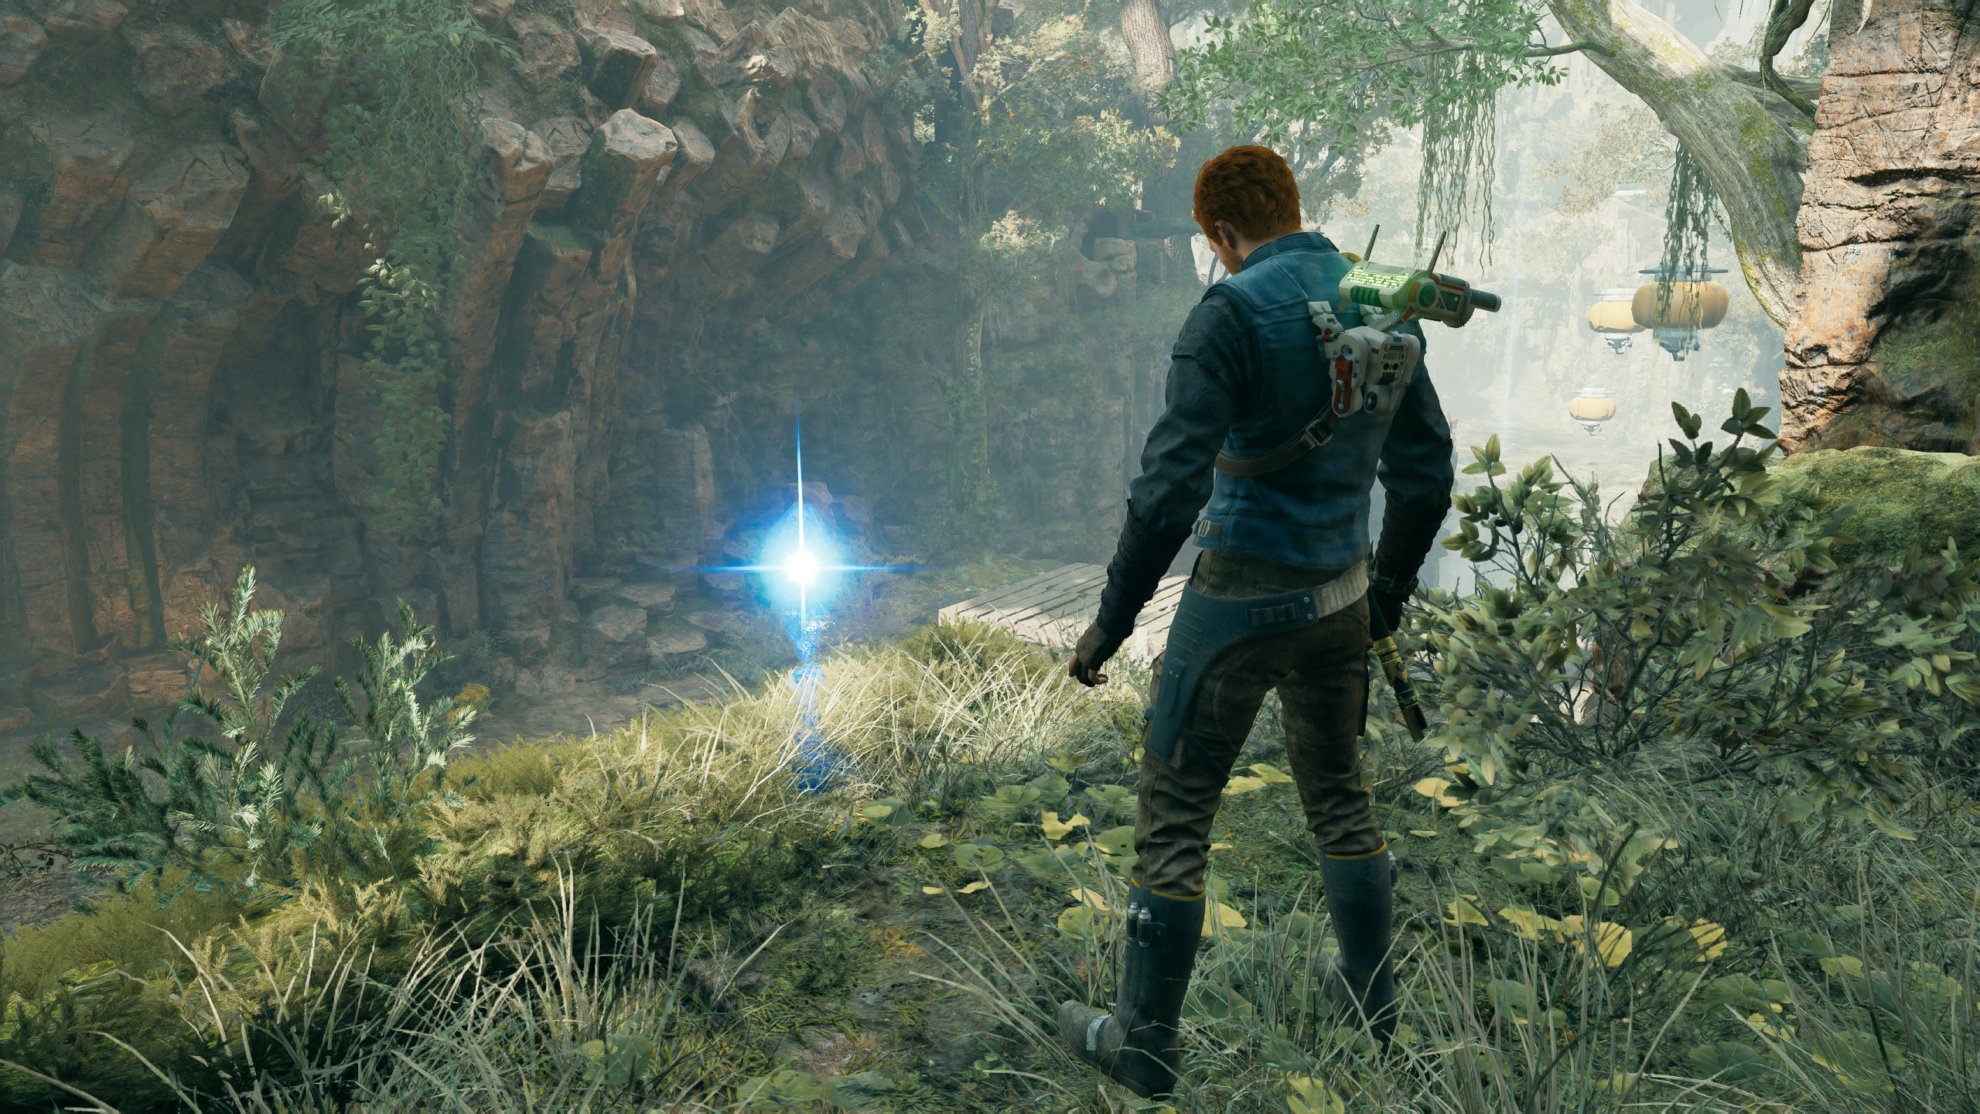
You’ll run into a Collectible Essence that’ll grant you the Fortification Perk. This will let you regenerate hit points up to a minimum amount, so it’s always useful to have! Once you collect that, jump down to get back where you started.
Go down the path that descends into a dark area with a space you can squeeze through. Go through to the other side where you’ll find a Meditation Point and a Collectible Essence that will give you Confusion: Major Fauna.

This will allow you to use Force Confusion on large beasts so you can use them to dispatch your enemies.
Rest at the Meditation Point and move forward up the path where you’ll find stormtroopers and a sleeping bilemaw. This is a good opportunity to use Confusion on the bilemaw to have it fight the stormtroopers for you.

Once you clear out the area of enemies, go behind one of the tents at the campsite. There you’ll find a chest containing the Tactical Jacket. If you want to collect the full set, check out our Tactical Outfit Guide.

Go down the path and to the right towards a very long root. Go down the root and move across it to reach some vines on a cliff face, then climb the vines.

Keep following the path and climb until you find a relter. A cutscene will play and afterward, you’ll be able to tame the relter. This will grant you the ability to grab onto relters to glide with them! Jump to the relter and glide down to get to the next area!
This will take you back to the Forest Array and if you head to the left, you’ll find the locked door with a previous Meditation Point beyond it. Be sure to open this shortcut and rest!

Follow the path you were previously on and you’ll find a group of stormtroopers. Defeat them and wall run up to the upper level. Use the relter up there to glide down to the central plaza below.

Have BD-1 scan the device to get the Central Rotational Apparatus Databank entry.

Behind the Apparatus is a lever you can push and pull with the Force. Use it to rotate the apparatus to create a shortcut to the starting area’s Meditation Point and continue to rotate the apparatus to free the bird.

If you rotate it to the other end, there is a chest you will be able to access. Inside you will find the Diligence Lightsaber Grip.

With the bird freed and the Koboh Matter out of the way, follow the energy beam to get to the grates you were unable to fully cross earlier. When you reach the end, jump down and you’ll find a crate containing the Hunter Pants.

Go upstairs and glide down with the relter to the group of stormtroopers. Defeat them and unlock the door that leads to the central plaza.

Force Pull the orb in the Central Apparatus and bring it towards the tower to power the bridge.

Before you power the bridge and head for the tower, you can pick up three more Priorite Collectible Treasures in the areas nearby – two are surrounded by Koboh Dust, and one is at the end of the broken briege. Use the Orb (just carry it with you) to clear a path to the following two locations.
The first one is back where the Bilemaw was (left from the tower), in the pool of Koboh Dust. The second is at the end of the broken bridge. Both shown on the image below – point of view is from the relter before you jump to it and before you actually wake up and fight the bilemaw.

The second treasure collectible is to the right from the tower, down in the pool of Koboh Dust, near a tree.

Now, bring the Orb to the Bridge Power Unit next to the bridge. Go across the bridge onto the platform and Force Pull the orb and throw it across the gap into the Bridge Power Unit on the other side. Make sure the targeting line is purple so you know it’ll land on the device. Cross the bridge then go up the elevator.

Inside the Tower
When you reach the top of the tower, you’ll find a Meditation Point. Rest here and proceed forward into the tower. To the right is a terminal you’ll need BD-1 to slice into, this will power the tower and let you move on with the mission.

Walk into the Medical Chamber where you’ll watch a cutscene. After the cutscene, you’ll enter a Force Vision and relive the memories of the person inside the bacta tank. This segment is very straightforward, complete it to get more cutscenes.

You’ll eventually snap back into reality when the Jedi in the Force Vision begins to speak to Cal. After this cutscene is finished, you’ll be greeted with a boss fight where you’ll be fighting Dagan Gera.
Fight against Dagan Gera
This fight is particularly hard on higher difficulties. Despite only having one arm, Dagan is exceptionally skilled. He can close a large distance very quickly with his unblockable attack.
While you can dodge, you can also easily avoid these unblockable attacks by jumping over him. Block and wait for openings after he finishes a combo or drain his stamina through parrying.

Once you defeat Dagan, watch the cutscene and you would have completed your objective in Reaching the Forest Array!

Don’t forget to pick up the Collectible Essence to get Maximum Health Increase!

Right next to the cable you are supposed to use to exit the tower, there is a memory echo you should also pick up.
Read our detailed guide on how to defeat Dagan Gera at the Forrest Array on Koboh. Whatever else you are looking for, we have likely covered it in our Star Wars Jedi Survivor Guides Master List. If not, just use the Search function on the site.
After your encounter with Dagan Gera, we have the next guide in our Walkthrough series to aid you on your first visit to Jedha looking for Cere. Or browse our Jedi Survivor Walkthrough series.


