This guide will cover everything you need to know about the Cool Attribute and Perk Tree in Cyberpunk 2077, including explaining what each branch of the skill tree does and helping you to determine which branches and perks of the skill tree are valuable to your build.
This guide is up-to-date for Cyberpunk 2077 Update 2.3
Introduction to the Cool Attribute
Cool is the stealth attribute. Its Perks enhance your ability to move around unnoticed and enable you to take out enemies silently with a single hit. It has 2 weapon-focused branches and a smaller stealthy one that ties them together.
The weapon-focused branches do synergize with each other, but you can absolutely create an effective build by only investing in one of the weapon branches.

The right branch focuses primarily on buffing the effectiveness of throwing weapons, though some of the boosts apply to silenced guns as well. Meanwhile, the left branch focuses on increasing the effectiveness of handguns and rifles, enabling them to deal heavy damage with a single headshot and making headshots easier to land.
Each Attribute Point spent on Cool increases your critical damage dealt by 1.25% and gives you access to some unique dialogue choices. Unlike Body, Technical Ability, and Intelligence, there aren’t any doors you can unlock directly with Cool. However, you will have a much easier time completing missions that require or have a bonus related to stealth.
In addition, the +25% critical damage boost from investing 20 points in Cool is arguably a lot stronger than the stat increase offered by other Attributes. It is possible to construct builds that have practically guaranteed crits with all of their attacks, so the stat increase from Cool can translate to an effective 25% damage boost!
That’s a whole lot more significant than +5 RAM like you’d get with Intelligence, +40 Armor like you’d get with Technical Ability, or +40 HP from investing 20 points in Body.
Cool synergizes particularly well specifically with Reflexes because both Attributes buff or derive buffs from the same elements. I’ll mention those synergies as we get to them.
Headhunter Skill Progression
Headhunter is the Skill associated with the Cool attribute. Every 5th level in Headhunter offers a small stat bonus or Perk-like effect that is valuable to players who invest heavily in Cool.
| Skill Progression Level | Headhunter Skill Progression Reward |
|---|---|
| -10% visibility to enemies | |
| +10% headshot and vulnerability damage | |
| +1 Perk Point* | |
| No weapon sway when crouched | |
| -10% visibility to enemies | |
| +15% headshot and vulnerability damage | |
| +1 Perk Point* | |
| Optical Camo activates while grappling enemies | |
| -30% recovery time for thrown weapons | |
| +30% movement speed while crouching | |
| Damage boosts from being undetected outside of combat persist for 3s after entering combat | |
| +15% Optical Camo charge after neutralizing an enemy during Focus or Deadeye mode, while undetected, or with a thrown weapon |
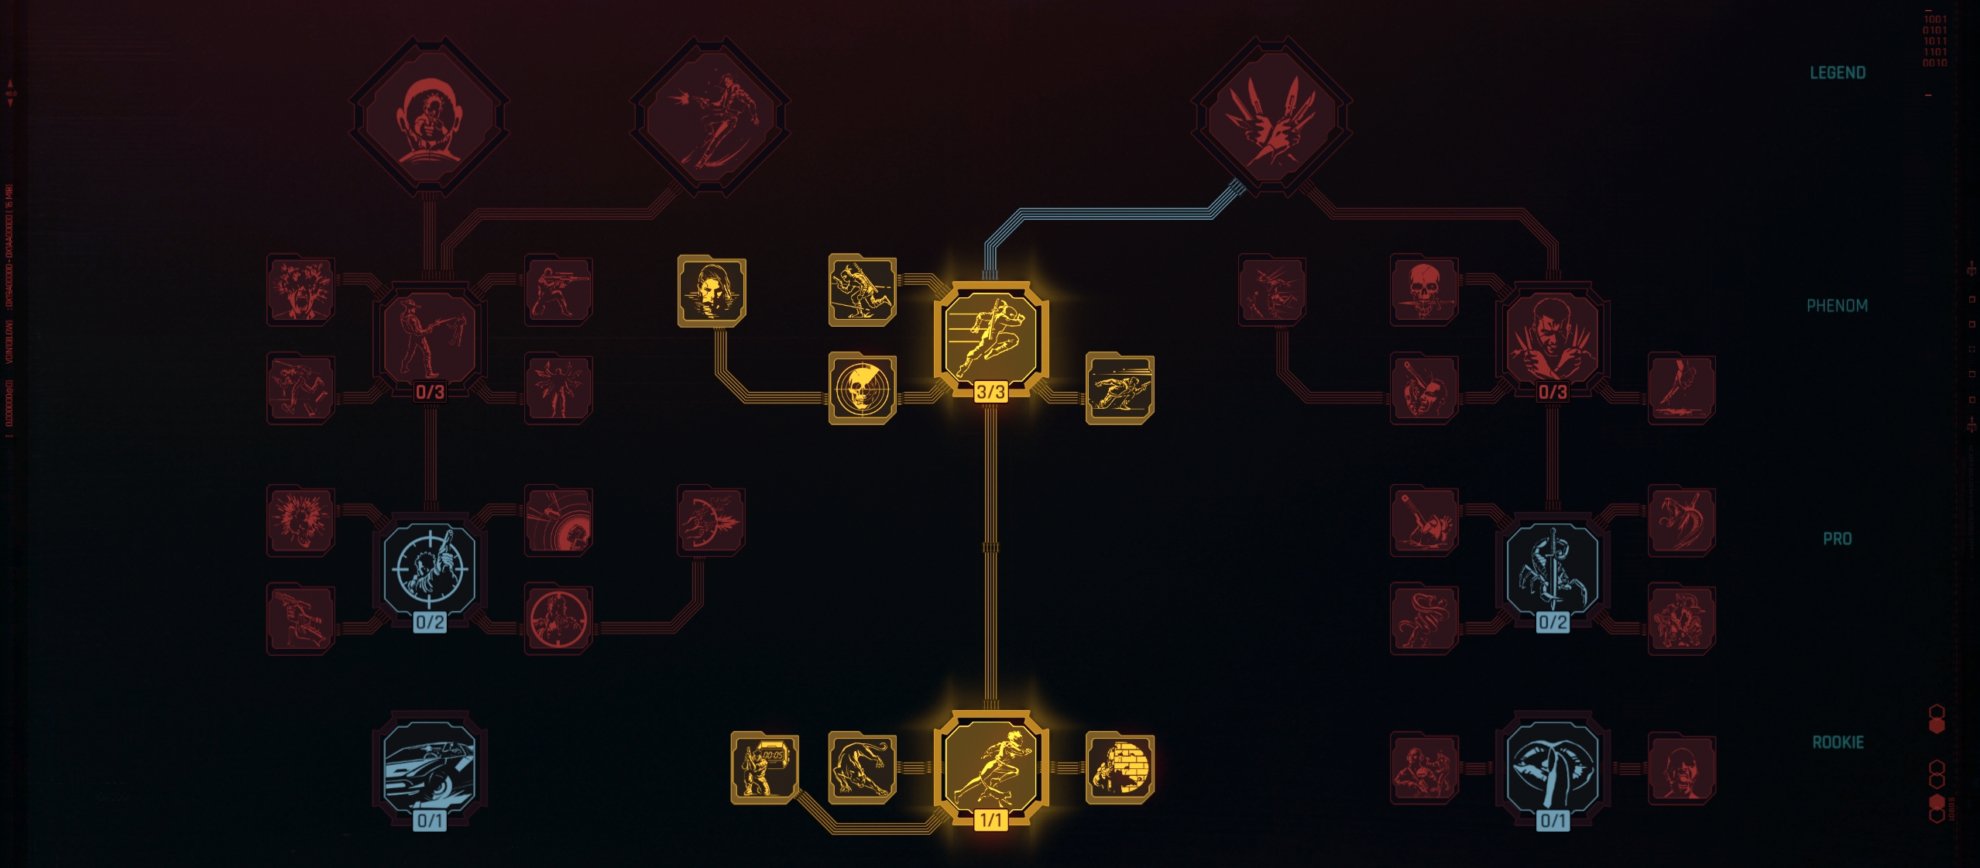
Knives, Axes, and Killer Instinct (Right Branch)
The right branch offers a ton of Perks that improve your damage dealt with throwable weapons, namely knives and axes, both of which can take out enemies silently. There’s also a few disconnected perks that apply to eliminating enemies with any silent weapon, so it applies to both the throwables as well as guns with silencers.

The silent elimination Perks are available at the Rookie tier (Cool 4), though only the main one, Killer Instinct, is ever worth taking because it increases your damage dealt by throwables and silenced guns out of combat by a whopping 25%! In my opinion, the 2 connected Perks just don’t offer enough of a benefit to be worth taking. You’ll typically be able to spend those points on something more valuable.
Killer Instinct also puts a little blue flash over an enemy health bar that tells you how much damage you’d deal with your next attack if you hit them with your current weapon, so you know if you’ll finish them off in a single shot or if they’ll have time to let out a scream and aggro the entire district before you snuff them out with a second attack.
The contiguous Perks at the Pro and Phenom tiers (Cool 9 and 15, respectively) in the right branch are all about buffing your throwables, as is the Legend tier (Cool 20), but that one is completely dependent on the middle branch as well and isn’t that great in my opinion, so we’ll be focusing on the “P” tiers here.
The Rookie Perks enable semi-special hits with throwables to apply Poison, which eventually also makes the enemy bleed and unable to sprint while healing you for a small amount. In addition, your Poison can gain some unique properties that allow you to apply it to mechanical enemies and deal a massive amount of bonus damage with your next throw (or strong melee attack) if your first one wasn’t enough on its own.
The Phenom Perks are a bit more of a grab bag. After you’ve unlocked these, you’ll be able to throw knives and axes a whole lot more often, thanks to some cooldown reductions (the game calls this Recovery Time), and deal a ton of damage with headshots (and weakspotshots).
You’ll also gain access to a special Finisher along with several powerful effects if you manage to neutralize an enemy in a semi-special way. The Finisher: Act of Mercy allows you to leap to an enemy and carve up their guts, face, or throat with your throwable and heal for a quarter of your max HP.
The other effects that can trigger when you kill an enemy in a semi-special way include massively increasing all critical damage dealt (up to +100%) for a short time and returning all of your throwables to you immediately.
The semi-special ways to kill an enemy and get those juicy effects include:
- Headshot or Weakspot
- Critical Hit (chance/stat-based)
- Poison
- Finisher: Act of Mercy
Some of the Perks in the blades branch in the Reflexes tree also apply to throwable weapons, though only where it makes sense. For example, you can leap even further with your Finisher and do it earlier with a knife, but you won’t be able to deflect bullets.
Handguns and Rifles (Left Branch)
The Perks in the left branch reward you for landing headshots from pistols, revolvers, precision rifles, and sniper rifles by increasing the damage dealt by headshots, as well as reducing your reload times and recovering your stamina after landing one. There are also a few Perks that make it a little easier to land headshots with handguns and rifles by making your aim more precise and accurate.

The Perks in the left branch start out at the Pro tier (Cool 9), and they focus primarily on making shots easier to land while aiming. The core effect at this tier is called Focus, which pauses Stamina consumption for a limited time when you aim, if your stamina was maxed out when you started aiming. When Focus ends, you spend a fixed amount of Stamina instead of spending it per shot.
Some of the other valuable Perks in this tier slow time while Focused, extend the effect’s short duration when you neutralize an enemy, and reduce the Stamina cost at the end on a per-neutralization basis. None of these Perks are directly dependent on landing headshots or weakspotshots, but many others are, and with a build that invests heavily in Cool, you’re not gonna deal much damage unless you hit the enemy where it hurts.
The Phenom and one of the Legend tier perks (Cool 15 and 20) focus more on significantly boosting the damage dealt when you land a headshot (or weakspotshot). Most of these buffs are reliant on the main Deadeye Perk, which directly increases your headshot and weakspotshot damage when your Stamina is above 85%.
Most of the other Perks are reliant on Deadeye being active and offer additional damage boosts, Stamina recovery, and reload time reductions when you land headshots or weakspotshots.
I want to reiterate that most of these buffs require your Stamina level to be high in order for them to apply at all. Many of the weapon Perks for the Reflexes attribute, which apply to blades, assault rifles, and SMGs, also improve Stamina recovery or are otherwise reliant on Stamina being high, meaning there is a clear synergy between Reflexes and Cool.
Along with being a lot noisier and close-range, the Perks in the Body tree, which buff shotguns, LMGs, HMGs, and Blunt weapons, are either unrelated to Stamina at all or require Stamina to be low, so there’s less value in combining Body with a build that invests heavily in Cool (and Reflexes).
Stealth (Middle Branch)
The middle branch offers some Perks that improve your stealth capabilities and mobility. It is smaller than the weapon-focused branches, offering Perks at only 2 tiers.
The most notable Perk in the Rookie tier (Cool 4) in the middle branch is a secondary Perk called Blind Spot, It makes your Mitigation Chance, which normally only improves your survivability, also makes it harder for enemies to see you, so the more Mitigation Chance you have, the easier it is to remain undetected.
If you’re going for a stealth build, keep your eyes peeled for any Perks and Cyberware that increase your Mitigation Chance or Mitigation Strength. To be clear, only Mitigation Chance improves your stealth, but you’re gonna crank it as high as it’ll go, so Mitigation Strength will provide more value from the survivability perspective since you have that higher chance for Mitigation to trigger.
The rest of the Perks in the middle branch become available at the Phenom tier (15 Cool), which leans more heavily into improving your movement while crouched, though there is a bit of that in the lower tier too.
In particular, you’ll gain the ability to sprint while crouching and even be able to activate Optical Camo while crouch sprinting. Be mindful that crouch sprinting consumes an absurd amount of Stamina, so you can’t do it for very long.
There is a Perk that reduces the Stamina cost significantly, but it only applies when you’re already in Combat, so it’s really only useful for short bursts outside of combat and as an alternative way to evade attacks while in combat.
Optical Camo Synergy
Unlike the other Attributes, Cool does not have any Perks that buff a specific type of Arms Cyberware. Instead, Cool has a couple of Perks that enhance Optical Camo, which is a piece of Cyberware for your Integumentary System.
If you’re not familiar with Optical Camo, it’s one of the few implants that gives you an active ability rather than just having a passive effect. Activating it reduces your visibility to enemies significantly, to the extent that you’re effectively invisible. In order to activate it normally, you need to assign it to the Gadget slot that is usually taken up by a Grenade.
Optical Camo normally has a ridiculously long cooldown, but you’ll be able to use it a lot more often, thanks to dedicated Perks on the Relic and Cool trees, in addition to a few buffs from the Headhunter skill.
| Optical Camo Buff | Effect |
|---|---|
Creeping Death | Neutralizing an enemy while Optical Camo is active (or you’re undetected) regenerates 15% of your max HP and Stamina and boosts your movement speed by 10% for 6s. |
Vanishing Act | Optical Camo activates automatically while crouch sprinting or sliding. |
Skill Level Progression: Headhunter 40 | Optical Camo activates while grappling enemies. |
Skill Level Progression: Headhunter 60 | +15% Optical Camo charge after neutralizing an enemy during Focus or Deadeye mode, while undetected, or with a thrown weapon. |
Emergency Cloaking | Activating Optical Camo manually from your Gadget slot will cause enemies to lose track of you, giving you a chance to exit combat. |
Unfortunately, the Optical Camo buffs are fairly clunky. You can’t turn it off early to conserve charge like you can with the Operating Systems. Even if you don’t need the entire duration, you can’t turn it off early like you can with Operating Systems, so you have to make use of the full duration if you manually activate it from the Gadget slot.
This charge/cooldown behavior isn’t even consistent. If you activate Optical Camo by crouch sprinting, sliding, or grappling in order to make use of Vanishing Act or Headhunter 40, you can spend only a portion of the charge since the effect turns off as soon as you stop doing one of those actions.
Furthermore, Emergency Cloaking only works if you manually activate it, so you can’t really make use of this Perk and a Grenade (or Projectile Launch System) at the same time! The fact that it works so inconsistently diminishes the value of all these effects, so it’s not always worth taking them at the same time unless you have points to spare.
Our comprehensive Blade Assassin Build Guide for Update 2.0 makes considerable use of the Cool Tree, so consider checking it out if you want to see a practical application of the Attribute.

Cyberpunk 2077 Intelligence Attribute and Perk Tree Explained
This guide will cover everything you need to know about the Intelligence Attribute and Perk Tree, including explaining what each branch of the skill tree does and helping you to determine which branches and perks of the skill tree are valuable to your build.

Cyberpunk 2077 Technical Ability Attribute and Perk Tree Explained
This guide will cover everything you need to know about the Technical Ability Attribute and Perk Tree, including explaining what each branch of the skill tree does and helping you to determine which branches and perks of the skill tree are valuable to your build.