A complete Cyberpunk 2077 FIA Agent Build and Guide to designing a covert assassin with a couple of tricks up their sleeve. The guide is specifically designed for Update 2.0+!
This guide is up-to-date for Cyberpunk 2077 Update 2.3
Table of contents
Introduction to the FIA Agent Build
As a secret agent for the NUSA’s finest, you’ll be an excellent marksman in peak physical shape with numerous spy gadgets at your disposal to help get you out of sticky situations when your cover’s been blown.
This build combines many tools to dispatch your enemies, including a silenced pistol, a customized sniper rifle, an implanted Cyberdeck, an arm-mounted Projectile Launch System (PLS), and a concealed knife for close-quarters combat.
You’ll have the tools to defeat every (non-boss) enemy in a single hit, though not every tool is suited for every job. You’ll need to make sure you select the right one so you maintain your tactical advantage and avoid blowing your cover.
Since you have such a broad skillset due to making significant investments in so many different Attributes, you’ll be able to make use of the good Cyberware in just about every category. Just about every piece of Cyberware you implant yourself with will offer an important benefit instead of having some categories be ridiculously strong while others are neglected.
From a skill tree perspective, you’ll be making the most significant investments in Technical Ability and Cool, though you’ll be getting quite a few core Perks in Intelligence and Body as well.
Your survivability is a bit more limited than what some other builds are capable of. It features a combination of health regeneration and mitigation. You can’t survive in the line of fire for very long, so you’ll need to be smart and minimize the number of frontal assaults by offing as many enemies as possible before they take notice.
Weapons
You’ll typically use your conventional weapons to kill adversaries with silent headshots from far away. They can still be effective once enemies have noticed your presence, but it will be harder to land headshots, and stronger enemies won’t go down with a single hit.
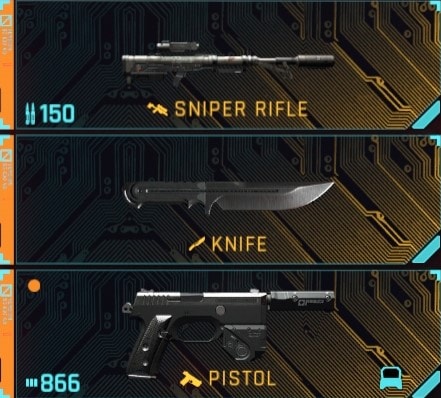
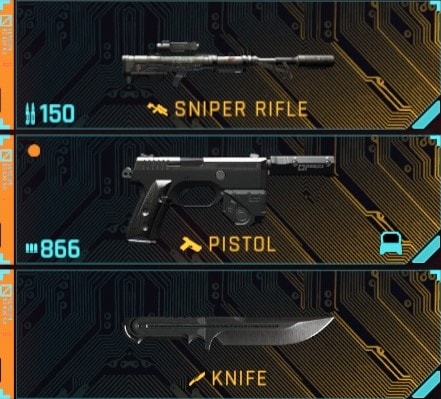
I recommend using a silenced power handgun, a power sniper rifle, and a knife for this build.
Silenced Power Handgun
The Silenced Power Handgun is your best option to covertly dispatch targets that are in your immediate vicinity but not so far away that you need to rely on the much better scope that comes with the Sniper Rifle to land the headshot. In many situations, you’ll be able to handle entire combat encounters exclusively with your Silenced Power Handgun, assuming no one notices the bodies dropping around them.
The Silenced Power Handgun struggles a bit more in actual combat. You’ll need to rely on all of the damage boosts at your disposal, including Reboot Optics, in order to defeat most normal enemies with a single headshot. Everything else will require multiple shots or the use of your Knife.
Prior to getting the recommended Iconics, use whichever silenced handgun you prefer. Revolvers tend to hit harder but have smaller clip sizes and are less likely to let you add a silencer. I recommend using the Kanetsugu as your Short Scope with both weapons.
Iconic Recommendation: Her Majesty
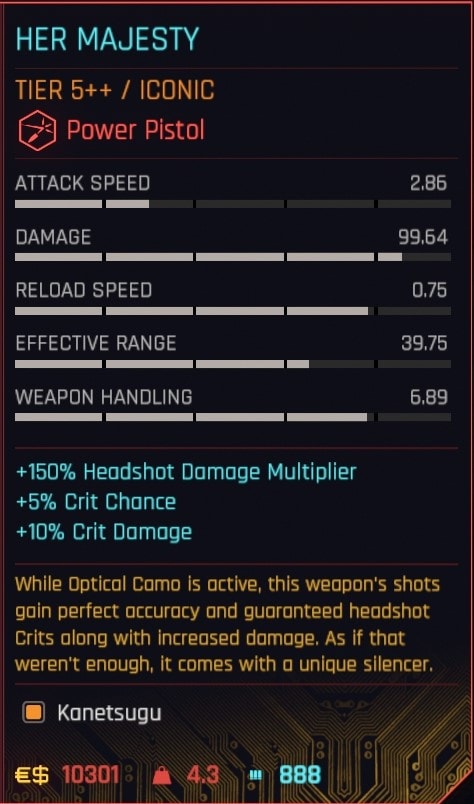
Her Majesty’s Iconic effect is terrible. The scope you aim with is Optically Camouflaged from you, so it’s significantly harder to aim while the gun’s damage is buffed. The buff also doesn’t do much since we already get guaranteed crits from Perks in the Cool tree.
HOWEVER, it’s pretty decent stat-wise, was given to you by an actual FIA Agent who used it for years in the field, looks the part, and doesn’t have any other real Iconic competitors.
In practice, Her Majesty is only slightly less consistent at one-shotting enemies than the Mancinella and has a significantly larger clip size.
The iconic power pistol Her Majesty is a gift from Alex from a main job “You Know My Name” in Dogtown. You will get it in any story scenario, as long as you own Phantom Liberty and play through the mission.
Iconic Recommendation: Mancinella
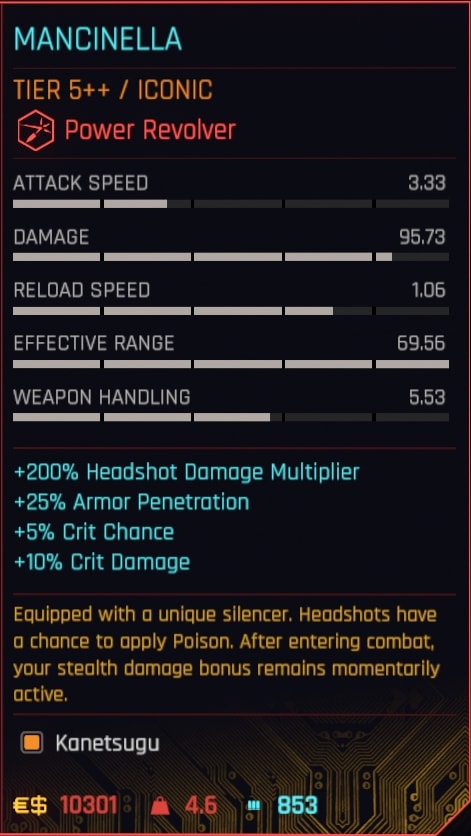
The Mancinella enables you to silently kill practically everything with a headshot, except for the strongest enemies.
It deals more damage per shot and is more reliably lethal in-combat than Her Majesty thanks to its stronger modifiers and Iconic effect that allows your stealth damage boost effects to last a few seconds into combat. T
Sadly, this one doesn’t look as much like a spy’s gun as Her Majesty.
You will receive the Mancinella from Mr. Hands at the beginning of the mission “Run This Town” in Dogtown. To unlock this mission, you have to complete the main job “Firestarter” in a certain way to guarantee the required scenario for “Run This Town” to kick in.
Power Sniper Rifle
The Sniper Rifle typically deals more damage per shot than your Handgun, but unless you spend a ton of time aiming because the target is super far away, the effective fire rate is significantly slower. You have to do a partial reload animation after each shot to eject the previous bolt from the chamber.
In other words, you’d want to switch from your Silenced Power Handgun to the Sniper Rifle whenever its long-range scope enables you to match the effective fire rate by allowing you to line up your shots quicker.
In addition, aside from my recommended Iconic, the Overwatch, Sniper Rifles cannot be silenced, so you will attract a lot more attention than you would with your Silenced Power Handgun.
Recommended Iconic: Overwatch
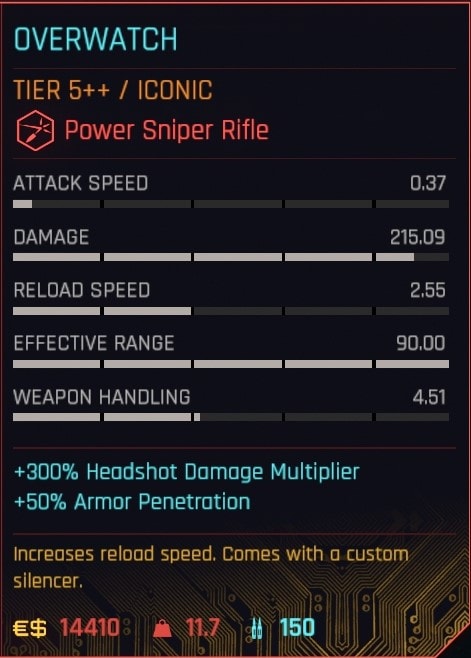
Besides symbolizing your love for (or mutually beneficial business arrangement with) Panam, the Overwatch is the only Sniper Rifle in the game with a Silencer. It doesn’t deal as much damage as some other Sniper Rifles, but it’s enough to take out practically all human targets with a single shot out of combat.
The Overwatch also comes with a significantly better scope than just about all other Iconic Sniper Rifles. It’s based on the HPO Kanone Max MK.77.
You are given the Overwatch by Panam at the end of the mission “Riders on the Storm”, regardless of your choices earlier in the mission.
Knife
The Knife is your capable backup weapon. Unlike your guns, the Knife’s headshot damage doesn’t drop off and actually increases your (critical) damage dealt the more targets you kill, enabling your Silenced guns to be more effective once the enemy has noticed your presence.
Knives are capable enough weapons on their own that they can be the focal point of a build. If you enjoy throwing knives at people’s heads, I encourage you to check out my Blade Assassin Build Guide.
That said, Knives have drawbacks, including their lack of range and scope, and those limitations are compounded by the fact that most of their buffs require you to land headshots consistently. They also have the worst melee range and struggle against groups of enemies.
For our purposes, it’s good to use the Knife when you can, but you’ll only need to pull yours out when facing off against heartier opponents that have noticed you, like MaxTac, especially if they deal melee damage.
Iconic Recommendation: Stinger
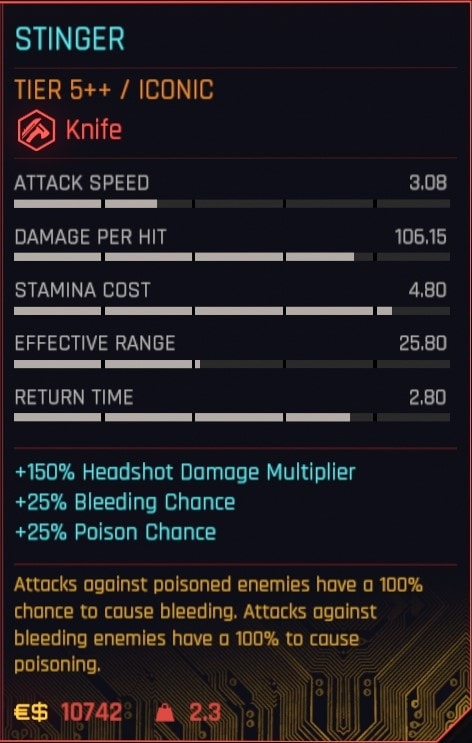
Which Iconic knife you use doesn’t matter all that much. I recommend the Stinger because it matches your ensemble the best by far and has the shortest return time. The return time is how many seconds it takes to come back after being thrown.
Feel free to use the Headhunter or Blue Fang instead if you prefer, at least until you are given the Stinger by Mitch at the end of the mission “I’ll Fly Away”.
Quickhacking
As an FIA Agent, you’ll have some hacking skills to aid you in the field, but you aren’t a true Netrunner. These Quickhacks are only able to take out enemies in specific situations. To be effective, they must be combined with another hack or weapon. Check out our Netrunner Build Guide for more information on how Quickhacking works.
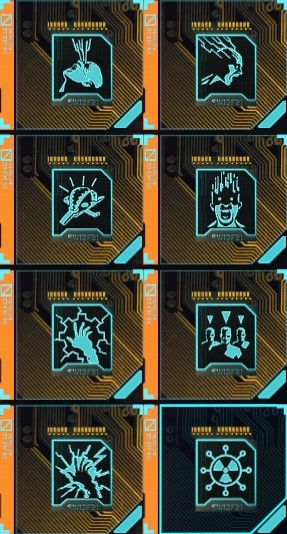
Recommended Quickhacks
I recommend 6 specific Quickhacks with this build. None of the others are super essential and won’t be used all that often, so you can either leave those spots empty or play around with the remaining ones. Bait and Request backup probably do the most to expand your capabilities, but they aren’t necessary since you have Optical Camo and Reboot Optics.
 Reboot Optics
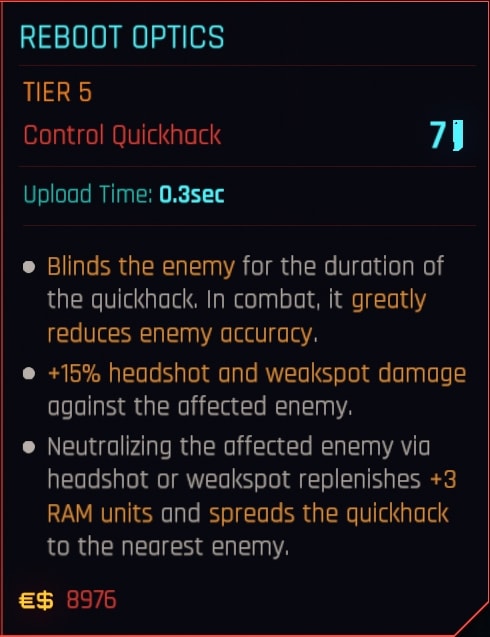
Reboot Optics makes it easier to remain unnoticed since enemies don’t consider it to be a hostile action; they just think their shoddy chrome is acting up again While blinded, they can’t tell that one of their buddies just got shot in the head right in front of them.
Affected enemies take increased damage from headshots and weakspots. The damage boost isn’t usually needed out of combat since your silenced shots already deal enough damage, though if enemies do notice you, this boost will often enable you to one-shot an enemy that you otherwise couldn’t.
Since it jumps to the nearest enemy and replenishes a bit of RAM if you neutralized them with a headshot or weakspotshot, you should only have to apply the hack manually once or twice per encounter.
Contagion
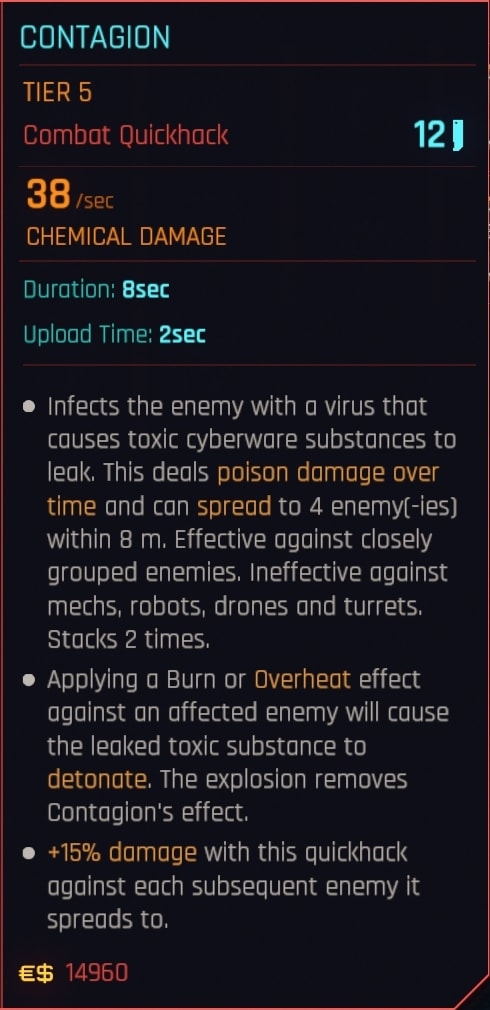
Contagion is what turns your PLS into a weapon of mass destruction. Those Thermal rounds will cause your Contagion to detonate, resulting in a second round of explosions.
The combined effects are enough to take down just about everything short of MaxTac that’s caught in the blast.
I only recommend using this combo if your cover has been blown and you’re pinned down, but technically, nothing is stopping you from using this combo more often.
You’ll be representing the FIA as more of a terrorist than a secret agent, but I imagine President Myers relishes such a thought…
Ping
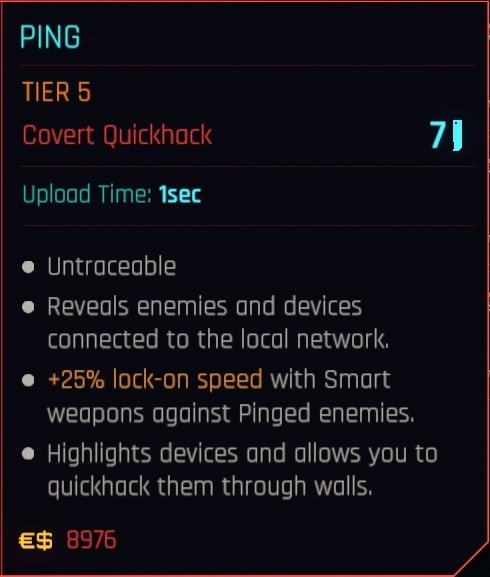
Ping is your wallhack ability, though you have to use it on a device or enemy that’s connected to the network.
If you use it on a device, you’ll reveal all devices and enemies connected to the local network, which can end up looking quite noisy as you get overloaded with information.
If you use it on a person, it will only reveal all the other people, though devices are much more common.
 Cyberware Malfunction
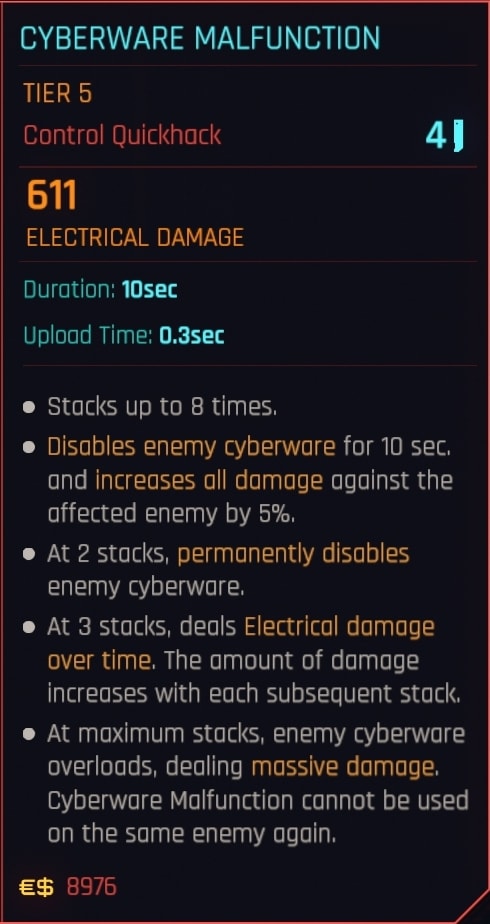
Cyberware Malfunction is a general-purpose debuff. It’s worth applying to any enemy that you can’t take down in 1-2 hits from your weapons.
It also makes affected enemies take increased damage from Short Circuit and makes Cyberpsychosis more effective.
If you plan to use either of those hacks, use Cyberware Malfunction first, and also use it against anything with a boss health bar.
Short Circuit
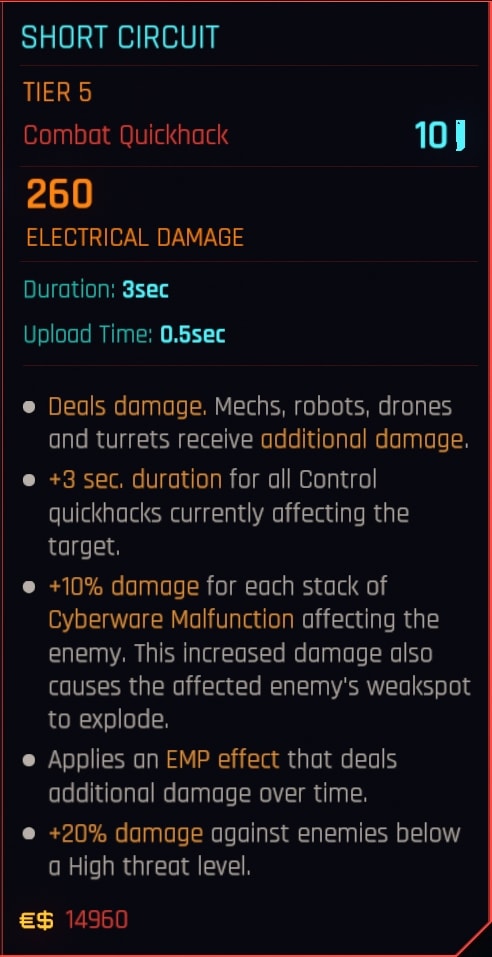
Your weapons often have a hard time dealing with mechanical enemies, and that’s where Short Circuit comes in. A single upload of Short Circuit can destroy any (non-boss) mechanical enemy.
You might need to lead with Cyberware Malfunction against stronger mechs just to be sure that they go down.
You should have just enough RAM to take down a single mech, though you can just pop overclock to pop the rest.
Memory Wipe
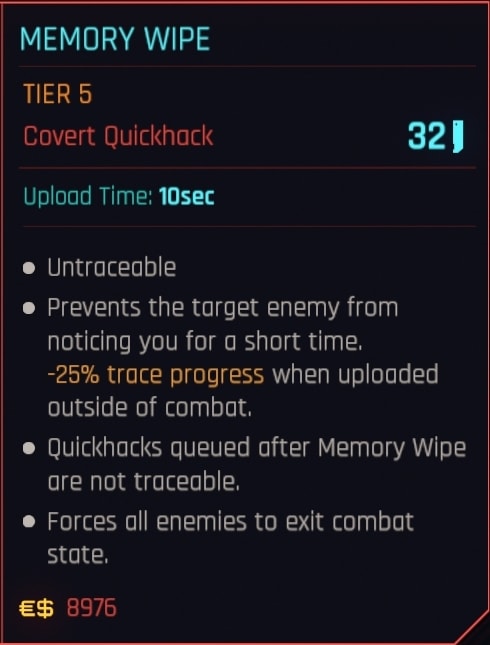
Memory Wipe allows you to escape combat if you so desire. You won’t be able to do so with Optical Camo unless you want to bother going in and swapping it in the menu mid-fight.
It costs more RAM than even a Netrunner has to spare, so you can only use this hack while Overclock is active.
Optional Additions
You will have 2 spare slots for additional Quickhacks. There aren’t any that I think are super important to have, so I recommend playing around with those slots and use what you like.
Bait and Request Backup probably offer the most expanded capability by enabling you to group enemies together better for your Contagion PLS combo, like a Spyder collecting flies in her web. I don’t think it’s worth the bother since you have to wait around for the enemies to come over, and by then, you could have just headshot them all and moved on.
System Collapse and Cyberpsychosis add some covert pizazz to your build as a stealth autokill and lethal diversion, respectively, but just with like Bait and Request Backup, you’re not really gaining anything.
If you want more of an edge in melee combat, I recommend using Cripple Movement, though don’t use it if you just want an enemy to stop moving so you can aim easier. Enemies affected by Cripple Movement wiggle around a whole lot more in my experience.
Quickhack Combos
![]() Contagion ▶
Contagion ▶ ![]() Thermal Projectile Launch System (charged)
Thermal Projectile Launch System (charged)
This combo lets you obliterate closely grouped enemies, though it is extremely noisy, so you should only need to use it if enemies have already noticed you skulking around.
![]() Cyberware Malfunction ▶
Cyberware Malfunction ▶ ![]() Short Circuit
Short Circuit
This combo will defeat almost every mechanical enemy in the game. There’s no reason to waste bullets against bots.
![]() Reboot Optics ▶
Reboot Optics ▶ ![]() Headshot
Headshot
Enemies affected by Reboot Optics take increased damage from headshots and weakspotshots. In combat, this damage boost can be enough to enable you to one-shot an enemy that otherwise would have taken multiple shots to kill. Reboot Optics jumps targets each time you kill an effected enemy with a headshot or weakspotshot.
![]() Cyberware Malfunction x2
Cyberware Malfunction x2
Using Cyberware Malfunction twice against the same target will permanently deactivate the affected target’s Cyberware, making them far easier to fight. You should use this against every boss.
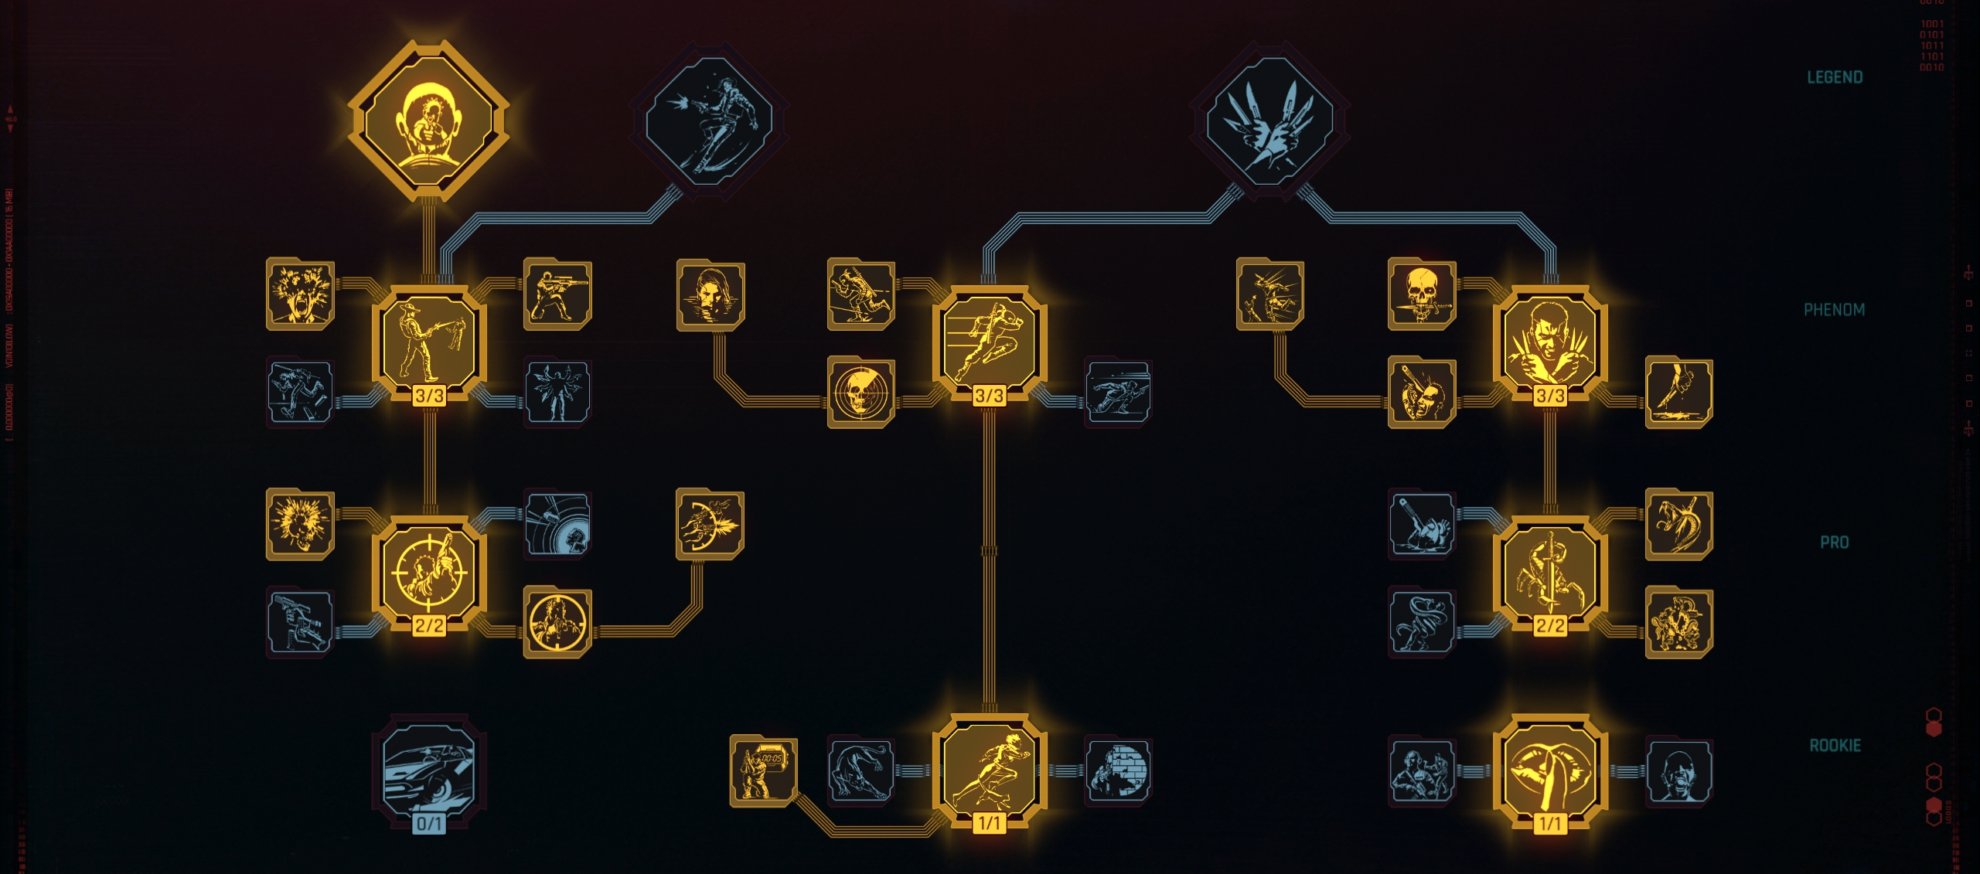
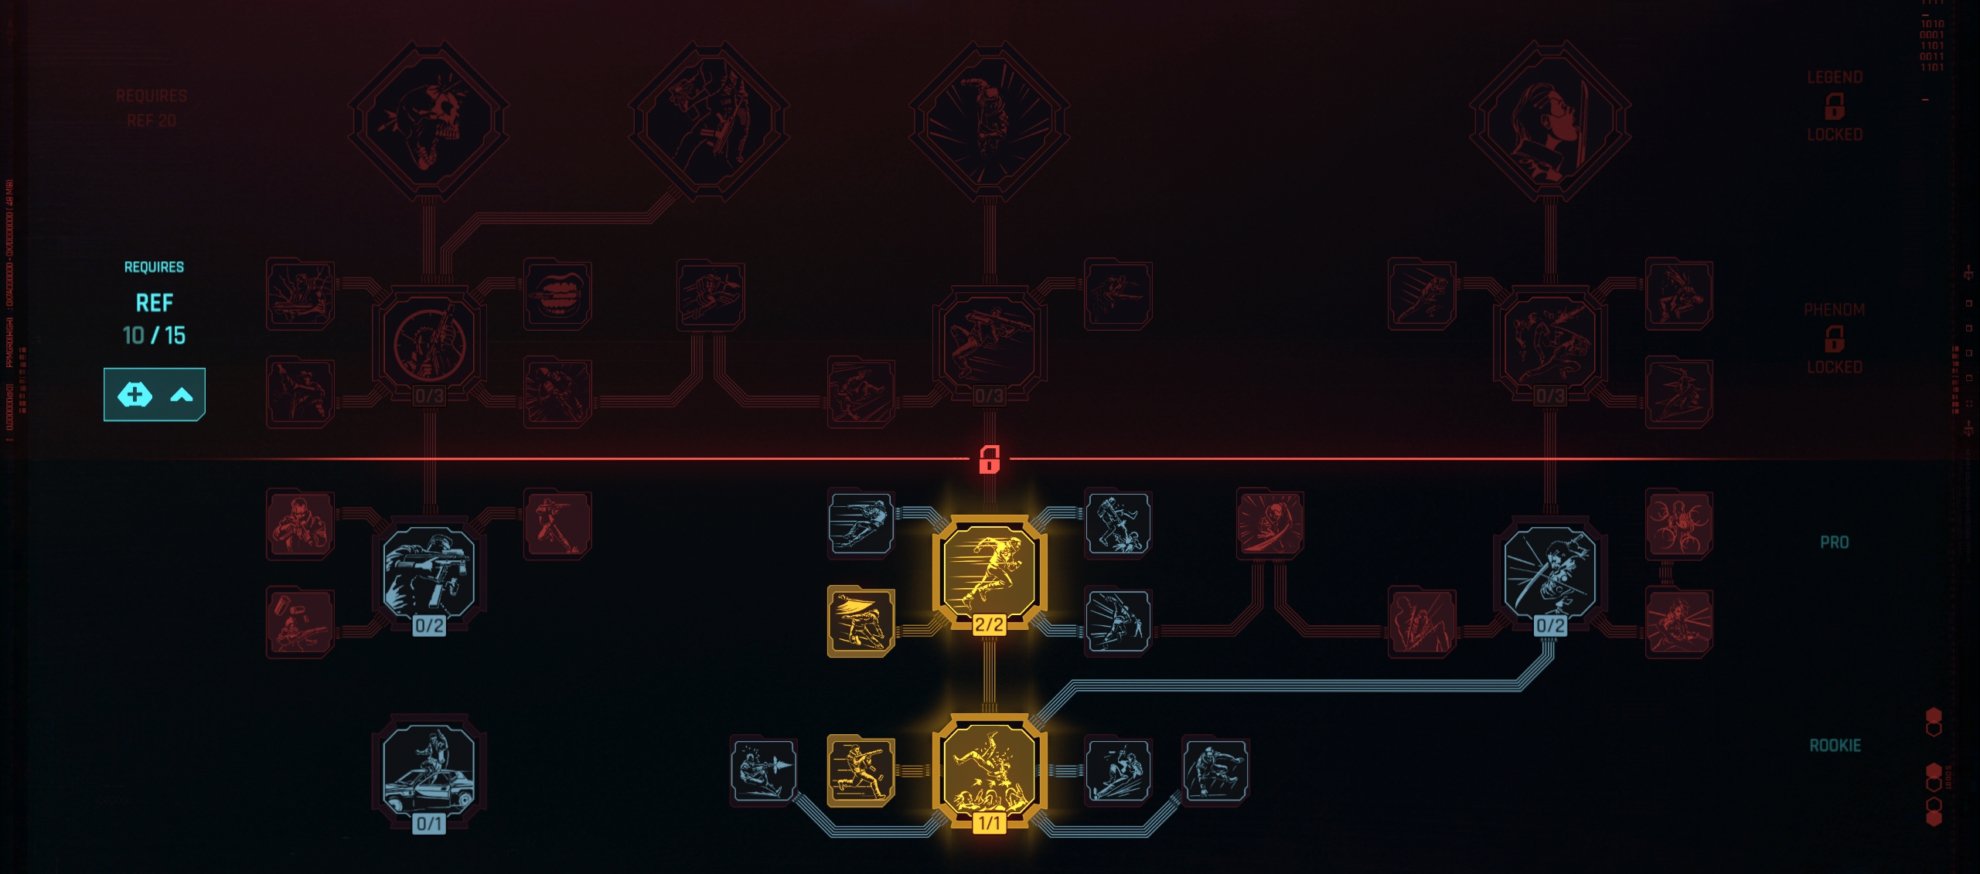
Core Attributes and Perk Points
For this build, you’ll be getting a ton of Perks in the Technical Ability and Cool trees, though you’ll also be making substantial investments in Intelligence and Body, along with a few points in Reflexes for mobility.
All Attributes
This build requires you to invest heavily in multiple attributes to access the top perks in a few branches, though you’ll be building wider rather than taller in order to obtain the requisite capabilities.
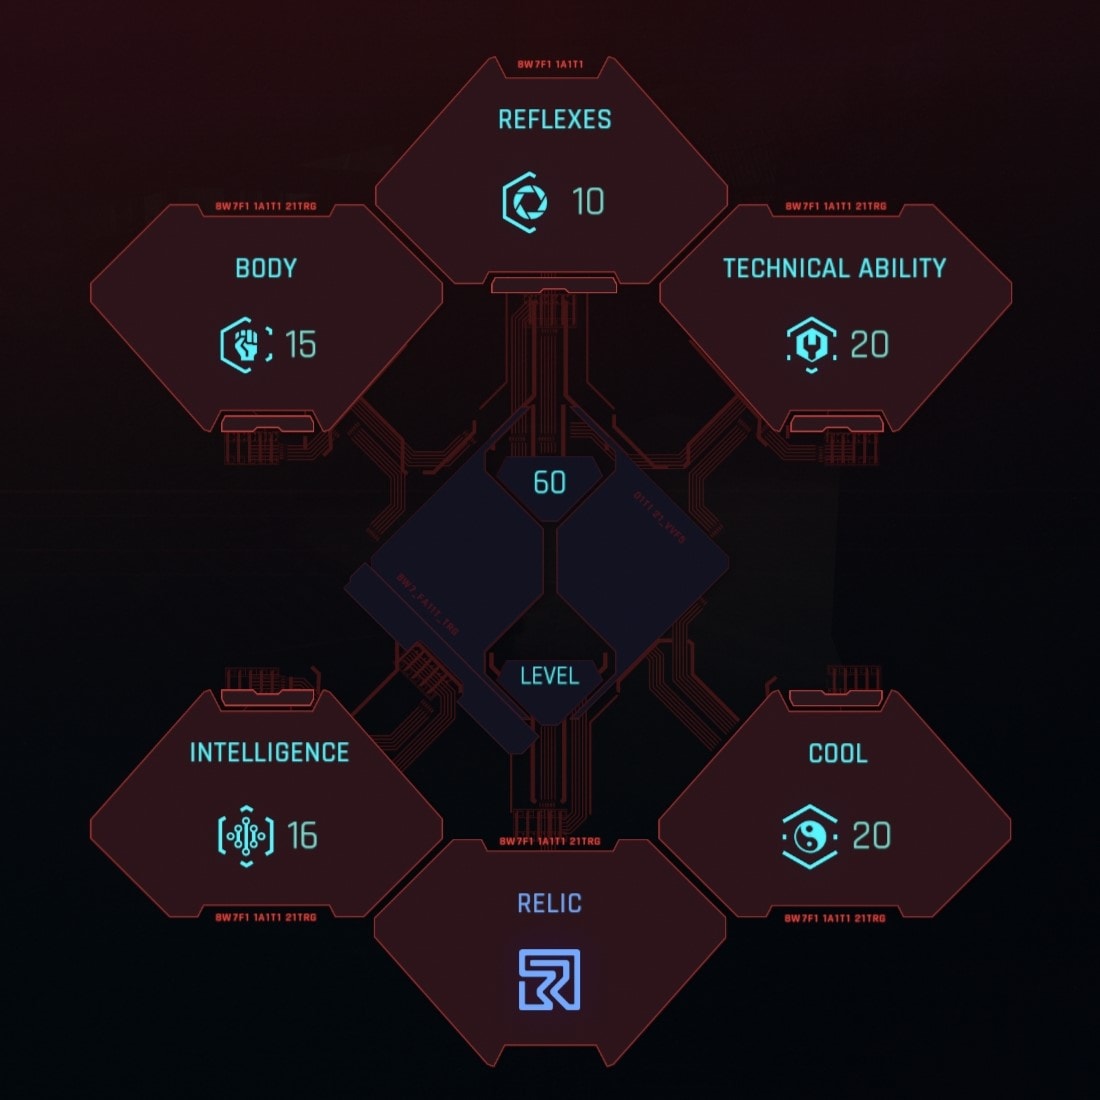
If you don’t have Phantom Liberty and won’t reach level 60, Reflexes is the least valuable branch. You shouldn’t spend any points in that category until you’ve gotten everything else. Outside of that, there will be some nice-to-haves that you can give up.
Since you get 1 RAM for every 4 points in Intelligence, I strongly recommend spending your final Attribute point to reach 16 Intelligence. You’ll benefit more from +1 RAM than you will +0.5% crit chance or +2 HP.
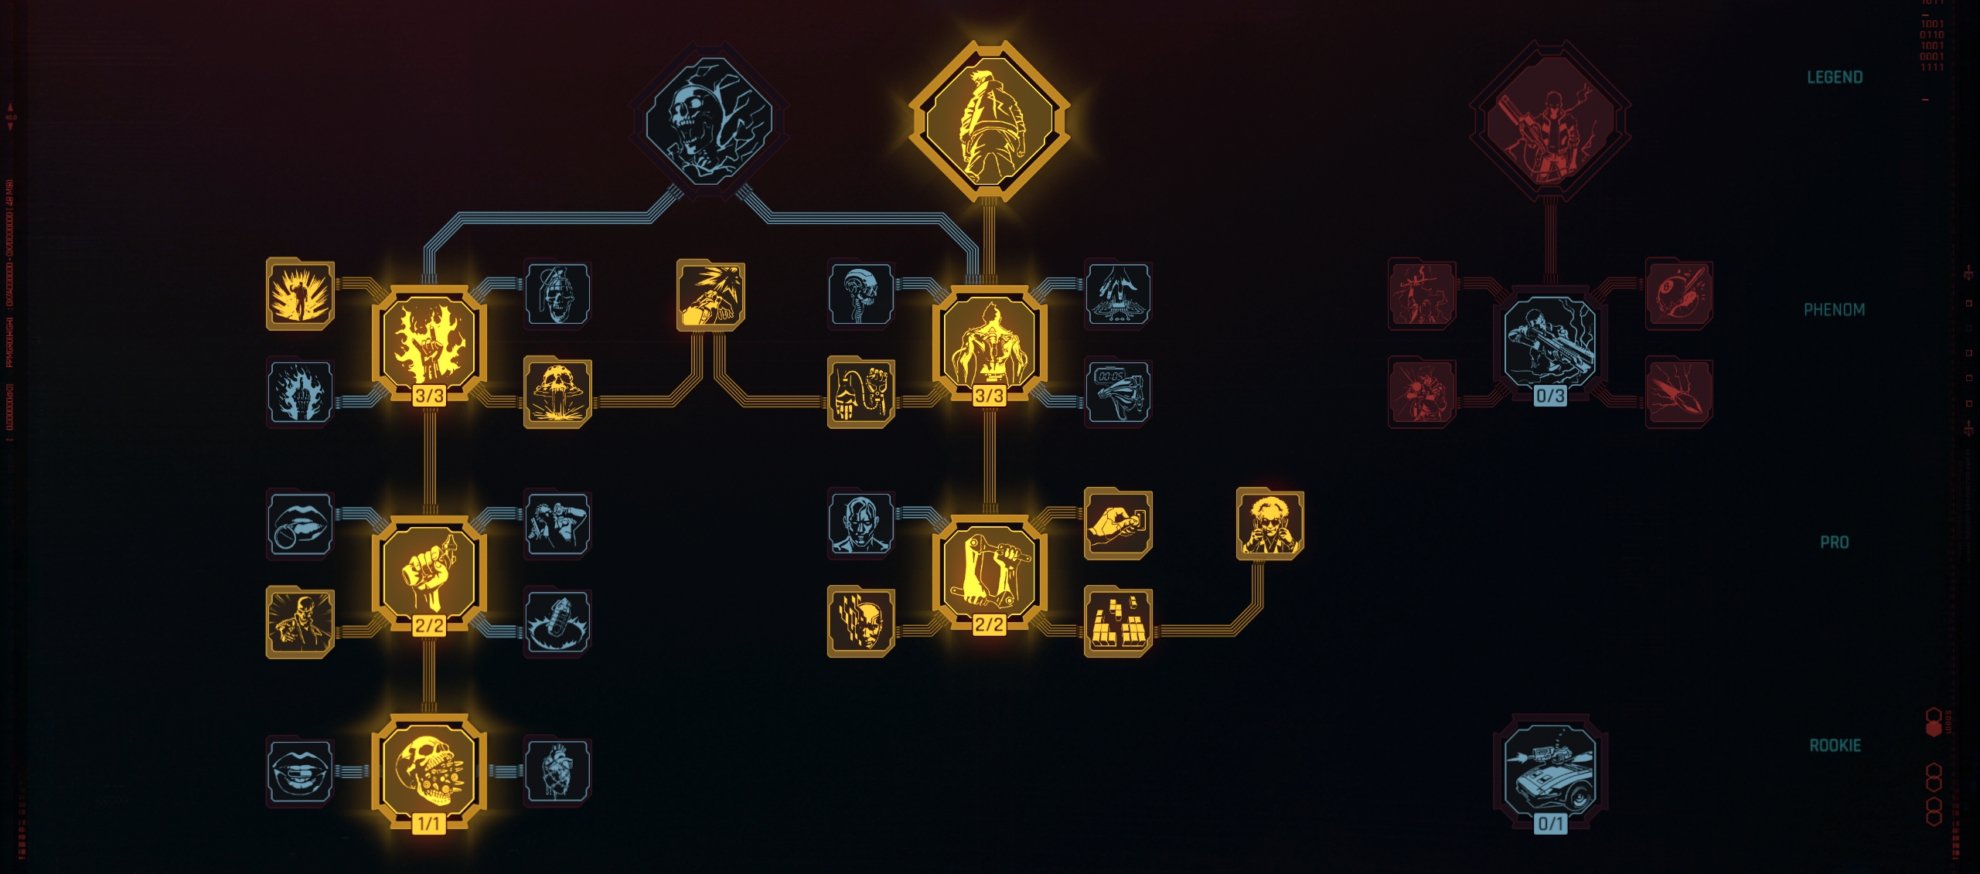
 Cool
Cool
You’ll be investing in all 3 branches of the Cool tree, which provides bonuses to rifles and handguns, stealth, and throwable weapons.
The left branch provides buffs to the guns you’ll be using with this build. Its two main effects are Focus and Deadeye, which mtrigger when you have high stamina. They make aiming easier, make your headshots deal significantly more damage, and refund stamina.
You’ll want to spend more points in the left branch whenever you have a hard time landing a headshot or can’t deal enough damage to one-shot most enemies, assuming your guns aren’t garbage.
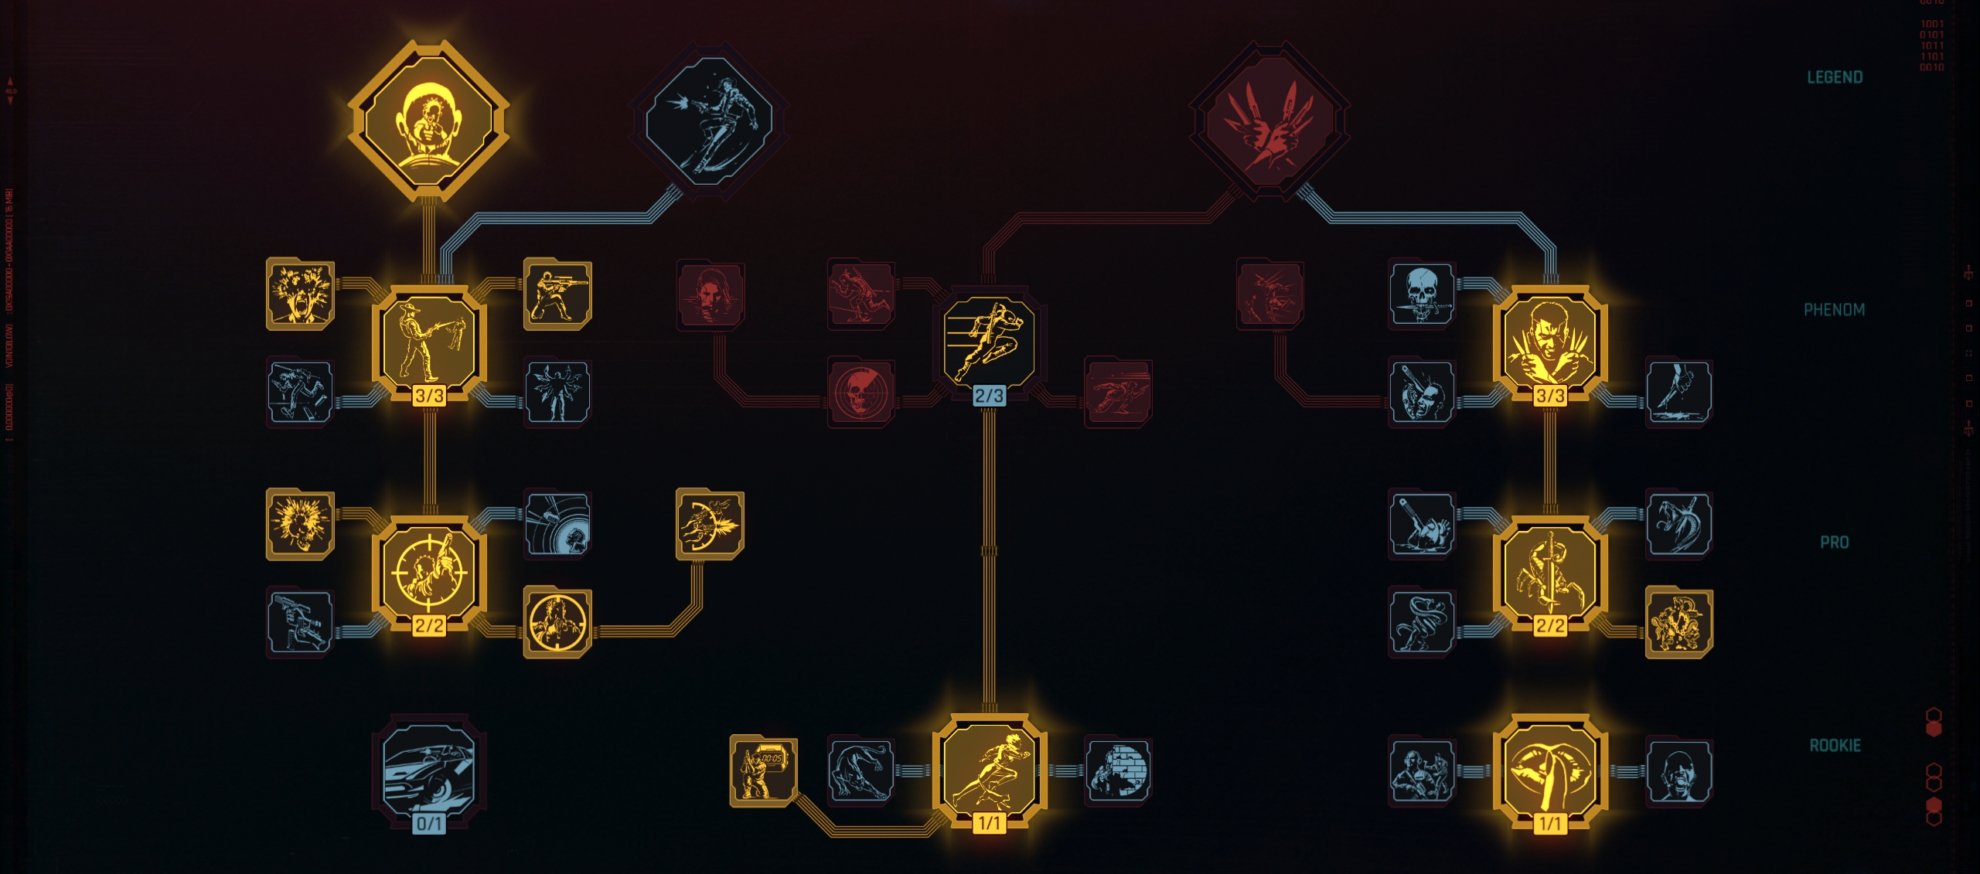
The middle branch improves your stealth capabilities, making you harder to detect and making your visibility to enemies scale with your Mitigation Chance stat. The higher tier Perks make you move faster while crouching and enable you to sprint crouch.
The Vanishing Act Perk makes Optical Camo activate while crouch sprinting and dashing. Since you’ll be using the Projectile Launch System (PLS), crouch sprinting will be the main way to activate Optical Camo. It’s a bit more of a flavor thing, but it will trivialize sections offering bonuses for remaining unnoticed.
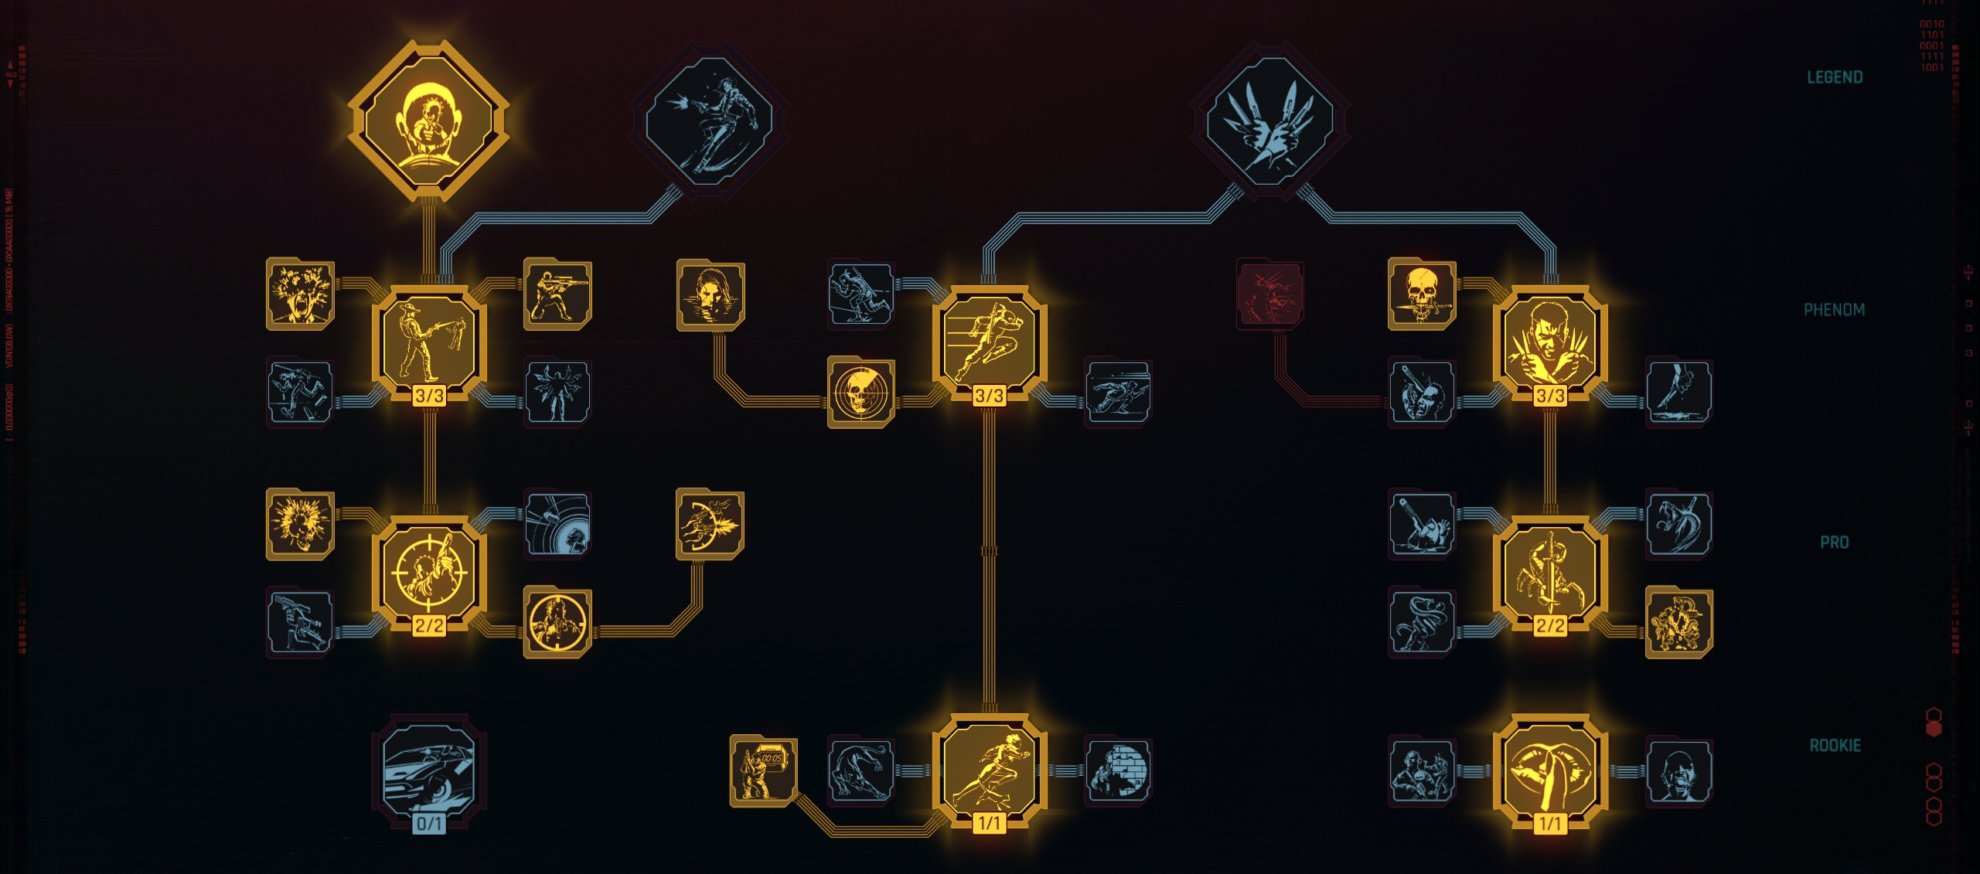
The right branch enhances your capabilities with Knives. At the very least, you need to build up to the Phenom tier (Cool 15) so that your thrown weapons return to you automatically on killing an enemy in a particular way with your knife, but the other options in that tier are also valuable.
If you enjoy fighting MaxTac, you’ll want to invest more heavily in knife buffs since this is your primary way of dealing damage in active combat. That said, your Knife will be lethal enough for everything else if you only get the central Perks in the right branch.
Everything you should know about the Cool Attribute and Perk Trees Technical Ability
Technical Ability increases your Cyberware Capacity and improves the effectiveness of your Healing Item, Explosives, and Cyberware. Just about everything in this tree is valuable, so if you have a spare Perk Point, spend it on something here, whatever you feel you need at the moment.
Remember that some of the Perks in this tree have more specific use cases than the other trees, so be sure to read each Perk effect carefully and only spend it if you will benefit from it now. For example, Chome Constitution only reduces damage taken IF you have all Integumentary System and Skeleton Cyberware slots filled.
I also want to mention that I don’t recommend taking Ticking Time Bomb with this build because sometimes you need to use Overclock out of combat, and there’s a good chance you’ll alert enemies to your presence when the EMP goes off.
Read our in-depth guide to the Technical Ability Attribute and Perk Trees Intelligence
We’ll be taking a bare-bones approach with Intelligence Perks. All you need is the ability to queue up a second Quickhack on the same target, Overclock functionality, and a bit of RAM recovery.
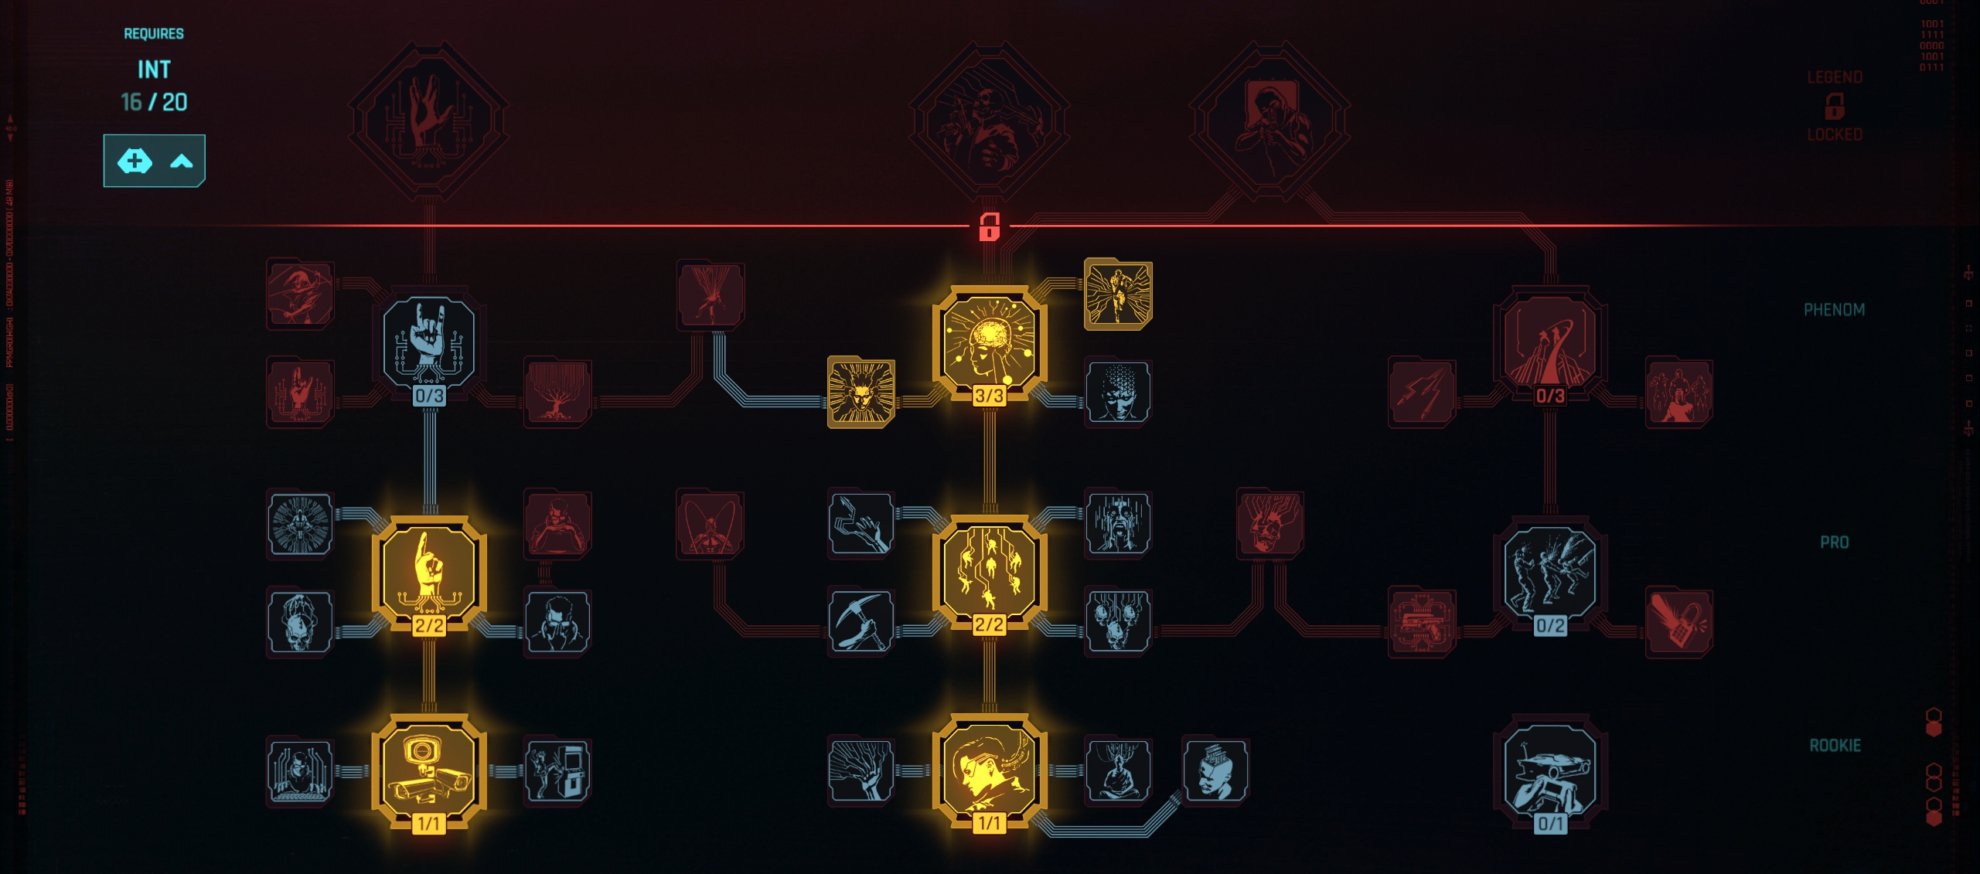
Everything beyond those base capabilities are really just nice to have, and there are more impactful Perks in other trees if you happen to have a spare point available.
An in-depth breakdown of the Intelligence Attribute and Perks Body
The only thing we need in Body are the boosts your health regeneration, all of which can be found in the middle branch. The Phenom tier (Body 15) gives access to an effect called Adrenaline Rush, which gives you some overshield (or rather overhealth) whenever you use your healing item.
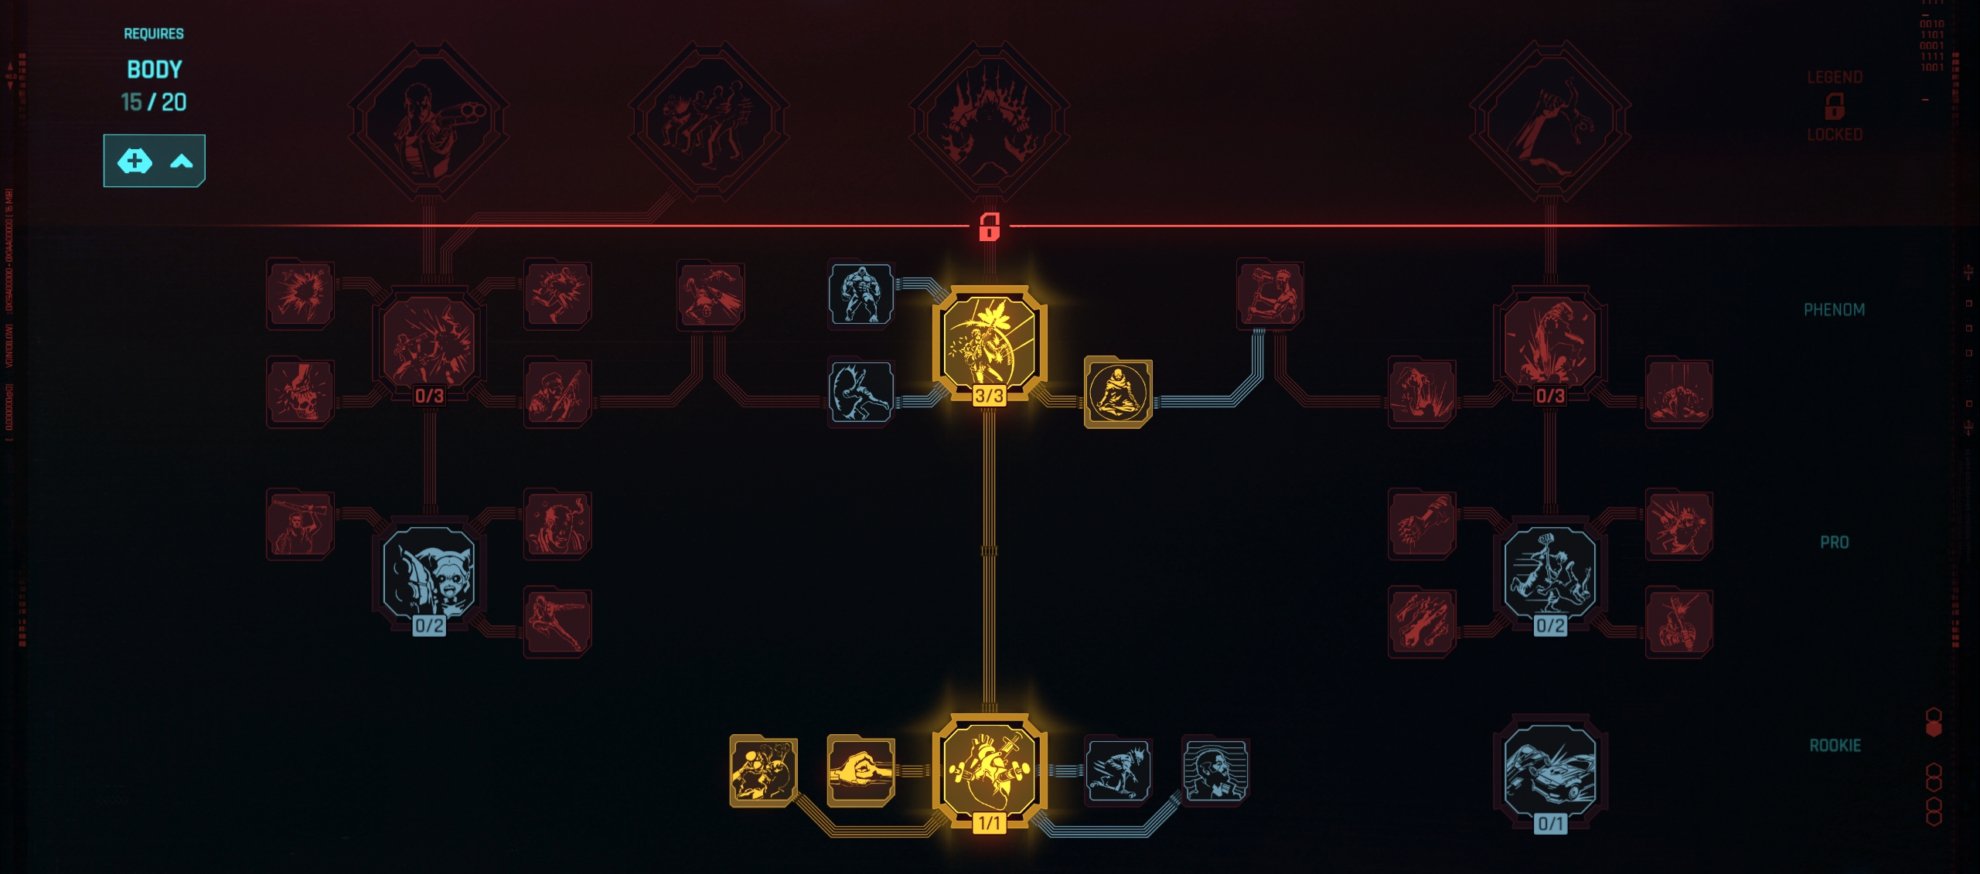
We would spend a few more Perk and Attribute Points here to get everything in the middle branch, but there are Perks in other branches that are more important.
Reflexes
The only thing we’re after in Reflexes is the ability to Dash. It’s pretty valuable in melee combat because you can’t block with a Knife, so your only recourse to avoid a melee attack is by dodging, and the base dodge is pretty trash.
The other nice thing about getting the ability to Dash is that you’ll slide when you’re out of combat, so Optical Camo will activate whenever you Dash out of combat, letting you use it to hop between nearby cover completely unnoticed.
 Relic
Relic
The only thing you will be able to make consistent use of in the Relic Skill tree is the Jailbreak and Launch Capacity Override Perk, which significantly buff your Projectile Launch System. These effects allow you to fire 5 explosives per charged shot and give you access to a third activation.

Vulnerability Analytics and Machine Learning are sometimes useful, but you’ll usually want to go for the head since all of your buffs apply to headshots while only some apply to these highlighted vulnerabilities.
The Optical Camo effect only applies when you manually activate the ability, so they don’t work if you just start crouch sprinting or sliding. However, you can just equip it in the pause menu temporarily if you want to exit combat.
You have to find Militech Data Terminals in Dogtown to fully unlock and upgrade the Relic Skill Tree and we have all of their locations available in that guide.
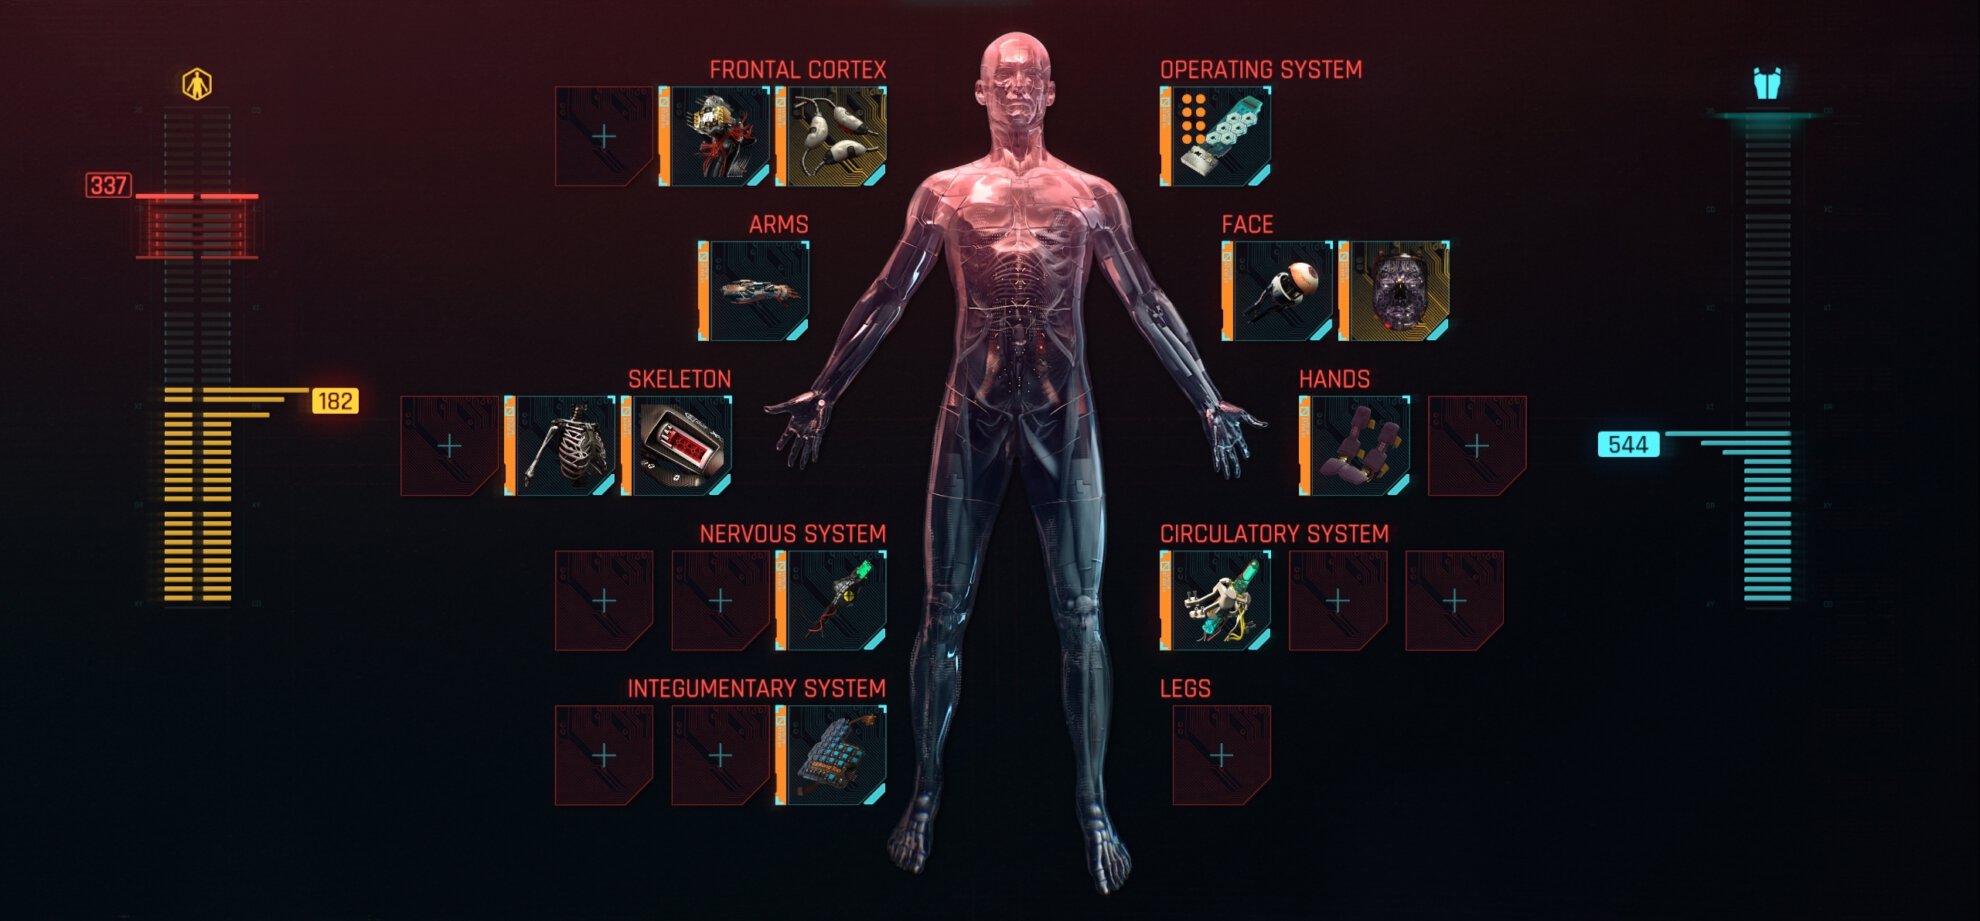
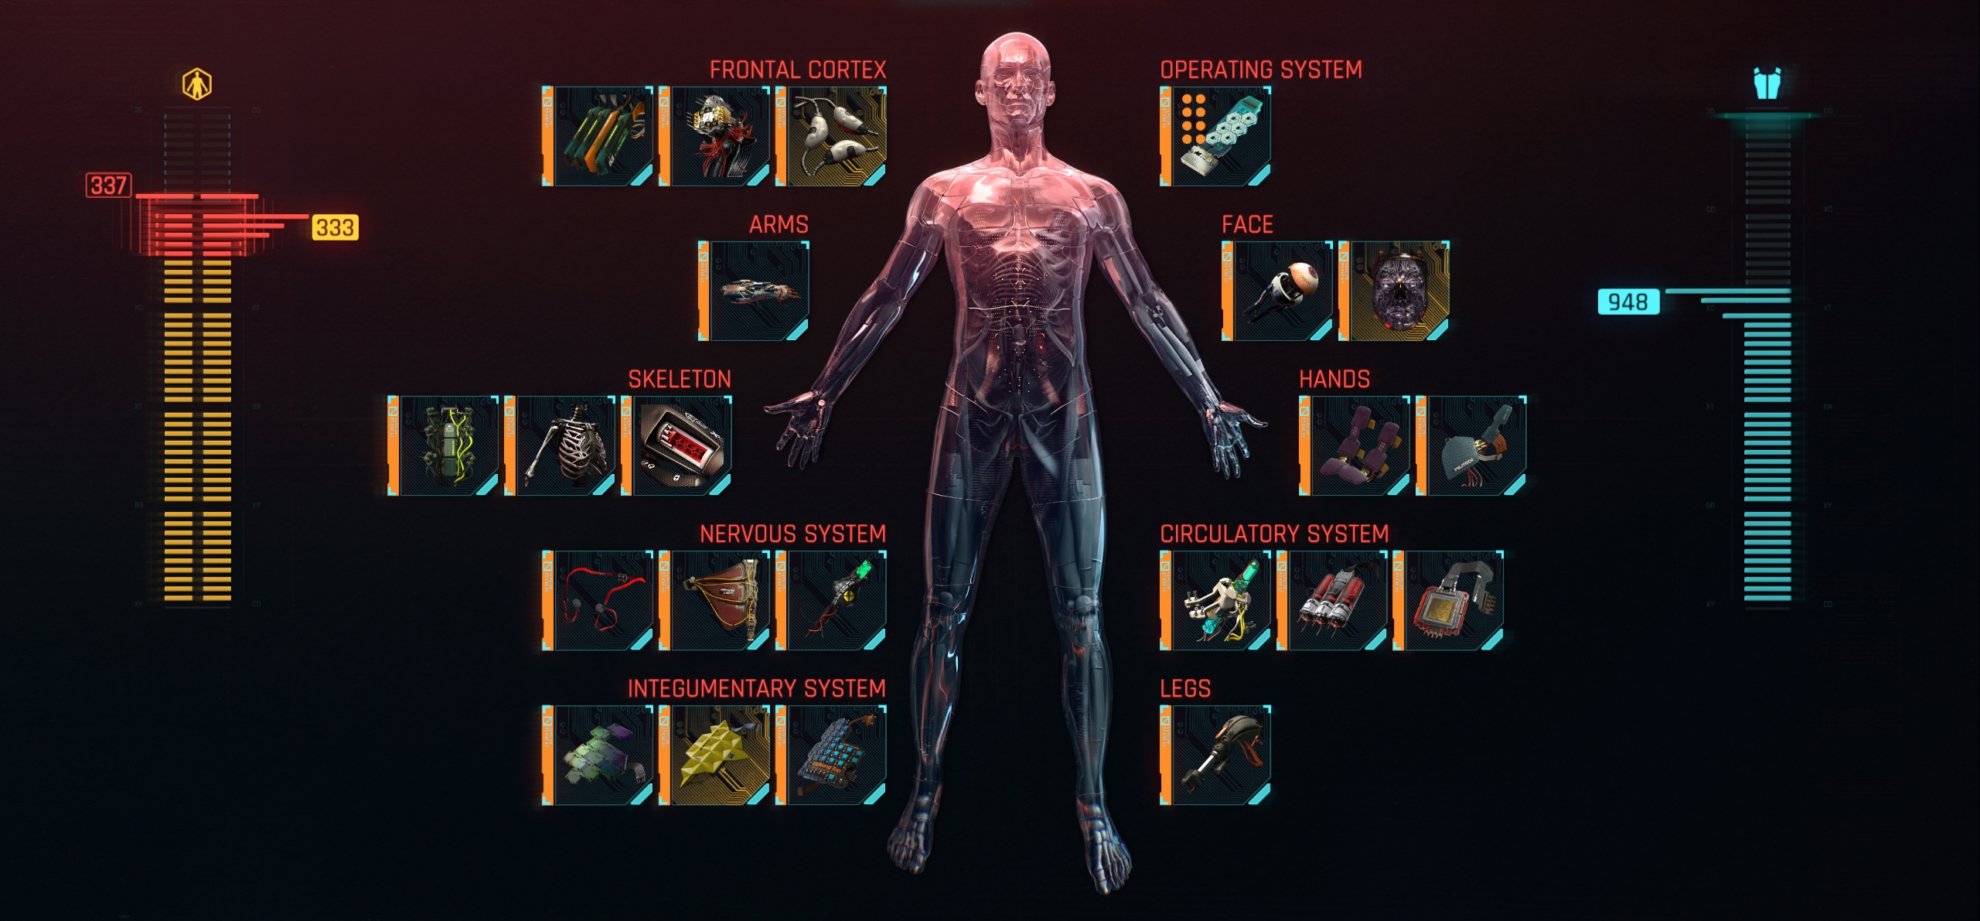
Cyberware
In this section, I’ll be covering the Cyberware I recommend you use with the FIA Agent build.
General Cyberware Recommendations
The amount of Cyberware you can equip is too variable to offer a one-size-fits-all solution. The Cyberware you’ll be able to equip depends on your exact street cred, level, current perks, and how many Cyberware capacity shards you’ve found. As a result, I’ve divided up my Cyberware recommendations into 3 categories based on their importance to the build.
It’s important to have something equipped in every Cyberware slot, but since so much of it is valuable, you have a bit of flexibility in terms of what exactly you equip, so I have included the defaults I recommend along with some alternatives. Not all alternatives can be combined at the same time.
Primary Cyberware Only
Primary Cyberware is what I consider to be essential to the build. It should be what you prioritize implanting first before anything else.
These essentials increase your damage output in ways that are unique to this build and provide all of your active ability Cyberware. There are also a few pieces to enhance your health regeneration for much-needed survivability and Overclock capabilities.
If you’re having trouble deciding how to tweak the build, I recommend defaulting to implants that have a Cool Attunement because they boost your headshot and weakspotshot damage. The higher the state, the more consistently you’ll be able to kill enemies in a single hit.
| Icon | Cyberware Implant | Category |
|---|---|---|
| Axolotl OR Memory Boost | Frontal Cortex | |
| Mechatronic Core | Frontal Cortex | |
| Thermal Projectile Launch System | Arms (read its dedicated segment further down in the guide) | |
| Dense Marrow | Skeleton | |
| Epimorphic Skeleton | Skeleton | |
| Stabber | Nervous System | |
| Optical Camo | Integumentary System (read its dedicated segment further down in the guide) | |
| Heal-on-Kill | Circulatory System | |
| Handle Wrap | Hands | |
| Basic Kiroshi Optics | Face | |
| Raven Microcyber MK.3 | Cyberdeck Operating System (read its dedicated segment further down in the guide) |
The Basic Kiroshi Optics aren’t strictly essential, but the game doesn’t let you be blind, so you gotta have something. Thanks to Ping, none of the fancy optics are that important, and the Cockatrice model is too expensive, and the Basic improves your stealth capabilities while being the cheapest option and having an ideal Cool Attunement.
Secondary Cyberware Included
Secondary Cyberware is what I consider to be important to the build but not to the same degree as the Primary Cyberware. Most of it focuses on enhancing survivability, but I want to clarify some of the ones that may seem less useful at first glance.
The Painducer makes you take damage in a more consistent manner so you won’t die suddenly and can trigger Shock-N-Awe more reliably while giving a lot of armor. Self-Ice is nice because you’ll seldom actually be in melee range of a Netrunner, so being able to stop hacks is lovely.

| Icon | Cyberware Implant | Category |
|---|---|---|
| RAM Upgrade | Frontal Cortex | |
| RAM Recoup OR Kinetic Frame | Skeleton | |
| Chitin OR Pain Editor | Integumentary System | |
| Blood Pump | Circulatory System | |
| Biomonitor | Circulatory System | |
| Lynx Paws OR Fortified Ankles | Legs | |
| Shock Absorber | Hands |
The Legs aren’t all that important, so use whichever you prefer. Lynx Paws offer the best build synergy, but Fortified Ankles offers superior mobility and survivability.
Tertiary Cyberware Included
Tertiary Cyberware is what I consider to be valuable to the build but not essential. The attunements are variable, and they’re really just nice to have if you have some spare Cyberware capacity that can’t be used on a Primary or Secondary.
You could absolutely give up or change any of these if you prefer something else, but this lets you fill in every available slot and fill up all but the final point of Cyberware Capacity for your Fury EMP.
| Icon | Cyberware Implant | Category |
|---|---|---|
| Neofiber | Nervous System | |
| Visual Cortex Support OR Atomic Sensors | Nervous System | |
| Countershell OR Nano-Plating OR Pain Editor | Integumentary System | |
| Shock Absorber | Hands |
For that final slot in the Integumentary System, use the most expensive implant you can afford out of those 3 options. If you don’t have Phantom Liberty, you will be using Pain Editor in lieu of Chitin, so Nano-Plating might be your only alternative.
Active Ability Cyberware
Active Ability Cyberware is Cyberware that you have to activate in order for it to provide any benefit in combat. With this build, there are 3 pieces of Cyberware that offer a distinct active effect, including the Cyberdeck, Projectile Launch System (PLS), and Optical Camo.
 Cyberdeck
Cyberdecks are the most complicated and customizable type of Operating System. They allow you to execute Quickhacks, so they are the focal point of Netrunner builds, but they can absolutely still be used as an alternative to Berserk or Sandevistan for other builds.
The Quickhacks used on inanimate devices (and vehicles with the Perk) are built into Cyberdecks, and you get access to all of these Quickhacks regardless of which Cyberdeck you choose. You unlock more of these Quickhacks as you upgrade the tier of your Cyberdeck.
The other Quickhacks are fully customizable. Each Quickhack costs a single slot to equip, just like Cyberware, and each activation of a Quickhack costs RAM, which is basically mana if you look at these as spells in a spellbook. You gain more Quickhack slots and base RAM as you upgrade the tier of the Cyberdeck, though the Cyberware Capacity cost and Intelligence requirement can also increase.
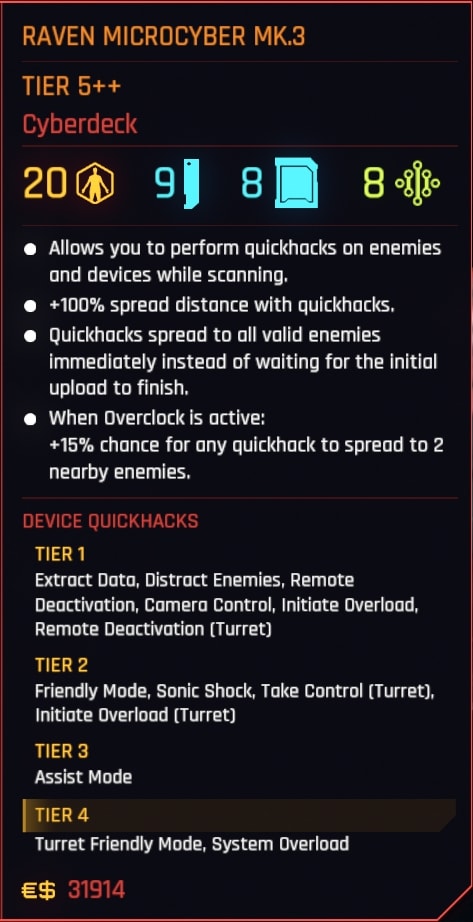
I strongly recommend using the Raven Microcyber MK.3 as an FIA Agent because it makes your spreadable Quickhacks spread to all valid targets immediately instead of sequentially.
This effect allows you to apply Contagion to an entire group of enemies all at once and then detonate most of them with a single charged shot from your Thermal PLS. The blasts are strong enough to wipe out anything short of MaxTac in the immediate vicinity.
If your cover ever gets blown, your only recourse is to blow everything up.
See all Cyberdeck Operating Systems in our Cyberware Catalog Projectile Launch System
The Projectile Launch System (PLS) is one of the 4 types of Arms Cyberware. Each type has 4 variations, each associated with one of the 4 damage types in the game: Physical, Electricity, Burn, and Chemical. Each has a chance to apply the DoT associated with the damage type.
The PLS is stands apart from the other types of Arms Cyberware because it replaces your Grenade instead of acting as a melee weapon. The individual explosives fired by the PLS are less damaging and have a smaller blast radius compared their grenade counterparts, but are all considered explosives, so they synergize better with the Technical Ability tree.
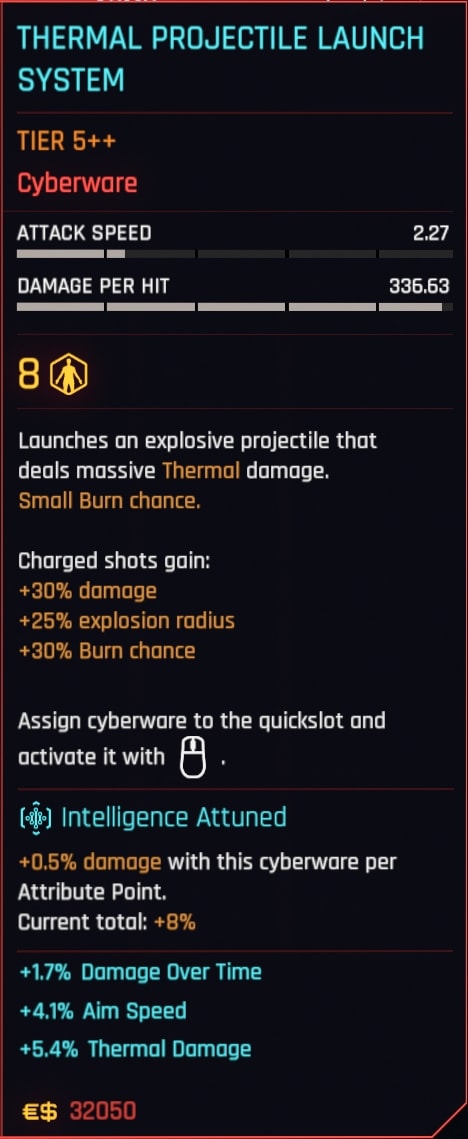
The Thermal Projectile Launch System is the only piece of Arms Cyberware you should use with this build.
You’re relying on the explosions to ignite enemies affected by your Contagion Quickhack, causing a secondary explosion to wipe out groups that are already aware of your presence.
Everything about the Arms Cyberware in Update 2.0 Optical Camo
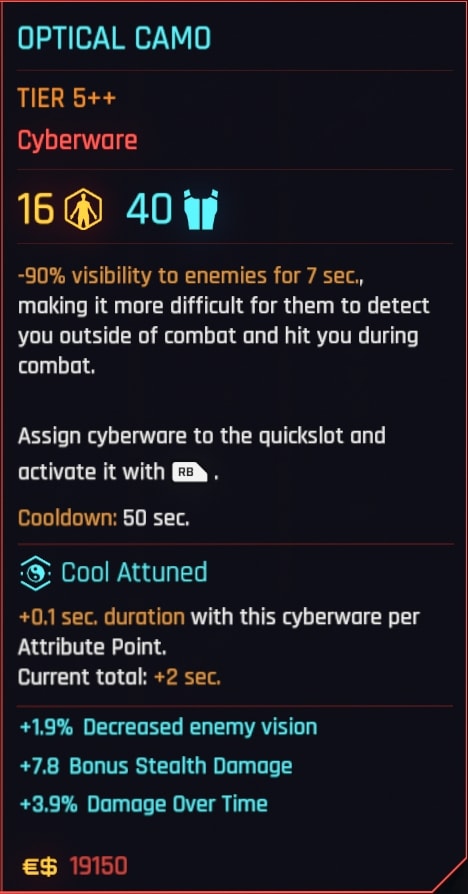
Optical Camo makes you practically invisible to enemies. You can use it as an active ability, but the Gadget slot for this build is taken up by the PLS, so you’ll only be able to activate it while crouch sprinting and sliding.
When you activate it manually, you have to spend the entire duration, you can’t use it piecemeal like you can with crouch sprinting and sliding.
Quickhack and Weapon Equip Order
The order in which you equip your weapons and Quickhacks is somewhat important with this build. Using a specific order can minimize the amount of time you spend flipping through menus, resulting in a more fluid experience.
Quickhack Equip Order
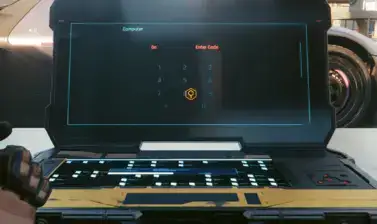
To achieve the desired order on the list in your Scanner, start in the bottom right slot (Contagion), work your way up the right column, then go down to the bottom left column (Short Circuit), and work your way up to the top.
This way, Reboot Optics will be at the very top of the list, allowing you to apply it quickly by already having a target over your reticle, activating the Scanner, and then pressing the button to apply the hack immediately.
By having Contagion at the bottom, you’ll be able to jump to it quickly by just pressing up to get to the last item in the list without compromising the overall sequence of the other hacks.
By the way, the Iconic version of Contagion continues to have bugs. Ignited enemies don’t always explode.
Weapon Equip Orders
There are 2 sensible orders for equipping your weapons. Both involve equipping the Sniper Rifle in the first slot because it is your longest range weapon that you’ll typically want to use first in any engagement.
Weapon Equip Order (Option 1)
Option 1 makes you swap from your Sniper Rifle to your Knife and your Handgun to your Sniper Rifle. This creates an incentive to use the Knife more often than you otherwise would since the Knife and Handgun have similar effective ranges, allowing you to build up Sleight of Hand stacks that increase your critical damage.
Weapon Equip Order (Option 2)
Option 2 is a pure maximum effective is orders the weapons descending from longest to shortest maximum range, so the only time you’ll need to swap weapons is when your current target is too close such that it doesn’t make sense to continue using your current weapon.
Abscond With This Look
I use the Legendary Corpo Armor Set with this build, though I swap out the glasses for a pair of black square glasses with tinted lenses because the ones that come with the Legendary Corpo set are way too narrow. Aviator sunglasses should also work quite well.

| Icon | Item Name |
|---|---|
| Beach Please Square Glasses with Tempered Lenses | |
| Corporate Blazer with Bulletproof Lining | |
| Carbonweave Silk Corporate Shirt | |
| Breathable Reinforced Bio-cotton Corporate Slacks | |
| Ergonomic Reinforced Corporate Evening Shoes |
Alternatively, you could wear the NUSA Suit, which you can find onboard Space Force One while rescuing President Myers, but that one means you can’t wear headgear, or it will show through…
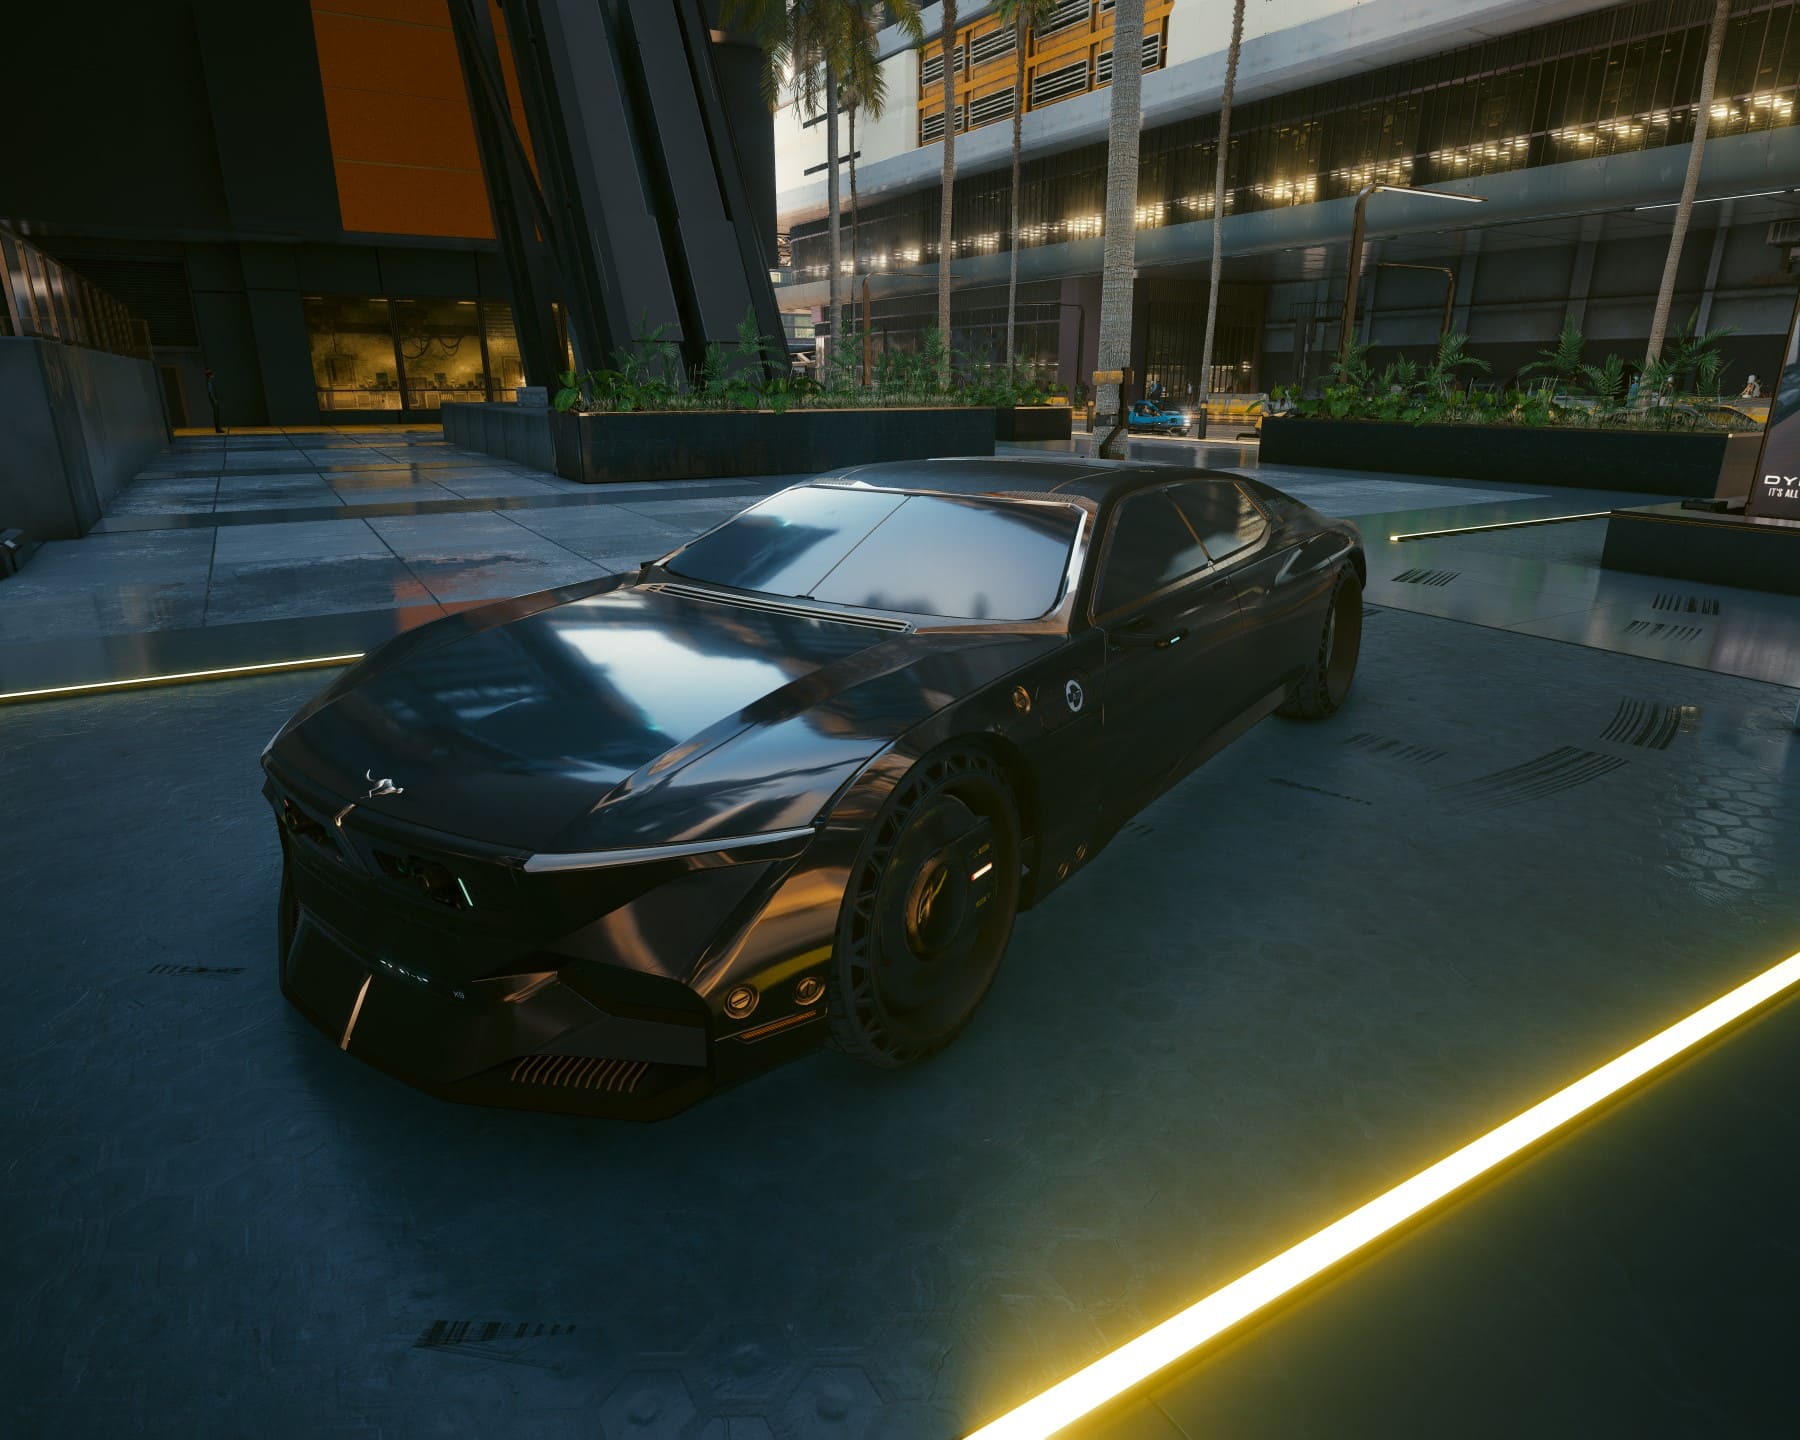
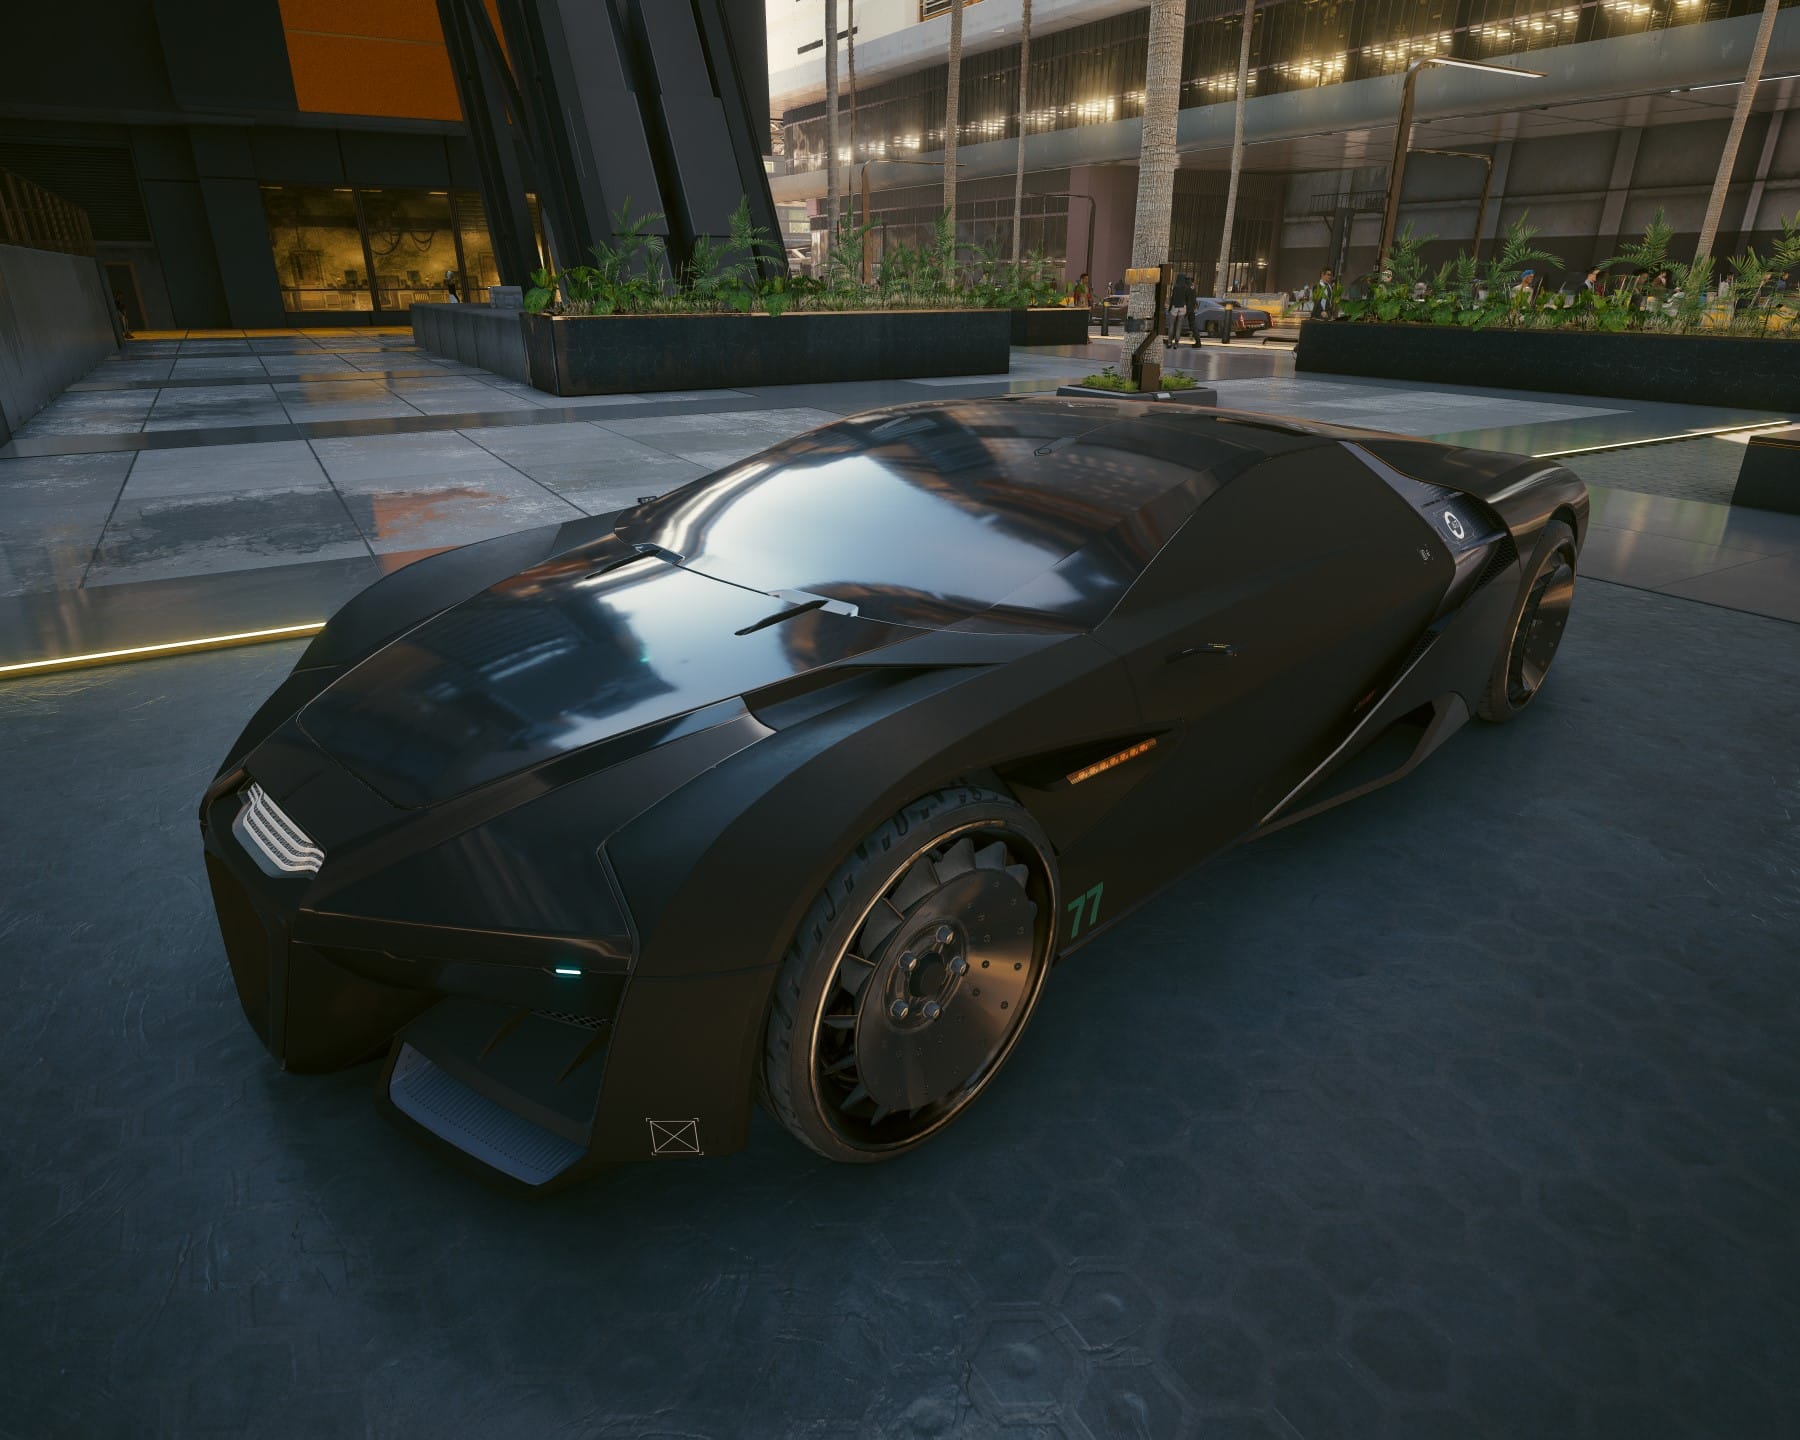
For vehicles, I also recommend using either the Hererra Outlaw “Weiler” or the Black Rayfield Caliburn. The Caliburn is far nicer to drive in, but the Outlaw is a luxury vehicle with armor and machine guns, so it’s more appropriate for a spy.
This concludes the guide for the FIA Agent build for Cyberpunk 2077. If you’re interested in a build on the opposite side of the gameplay spectrum, check out some of my other build guides, like the Solo Berserker and Pimp.


For everything else, visit our Master List of Cyberpunk 2077 Guides – a collection of highlighted guides about the game and its expansion.