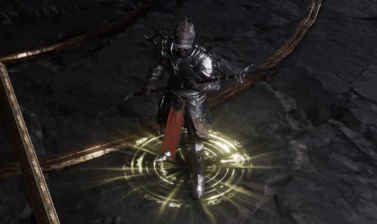
This Shaman Build for Last Epoch focuses on the Summon Thorn Totem Skill, a summon-focused build that does well in the early game and scales into the late game.
This Shaman build is made to take you from Level 1 to the endgame smoothly. It’s designed without Uniques in mind. Uniques, especially those with Legendary Potential can be used to push the build further and into the endgame.
This build in particular can be adapted to level any Primalist Mastery, but scales the best with the Shaman Mastery. As such this guide focuses on the Shaman version of the build.
To show you how to play this build starting from Level 1, we have a leveling section at the end of this guide that details our recommended leveling path for Class and Mastery Passives.
Build Overview
Being a Summon-focused build, our totems will do most of the work for us once they come online. This can take a little while, but its playstyle gets quite smooth once we’re properly set up.
We’ll use Summon Storm Crows, Eterra’s Blessing, and Summon Spriggan to help bolster our totems’ damage and cast speed. This ensures they deal plenty of damage and have the means to scale into harder content.
Defensively, we’ll have Spriggan Form providing us with healing Totems and a massive increase to our Armor. Summon Spriggan will also be helping out by giving us more healing, Dodge Rating, as well as being able to take some hits for us.
Skills and Specializations Breakdown
In this section, we’ll cover the Skills as well as the Specializations used in the build. Occasionally, more skills than the specialization limit are shown. If a Skill doesn’t have a Specialization Tree shown, then it is used as an Active Skill without one. This typically happens most with Utility skills.
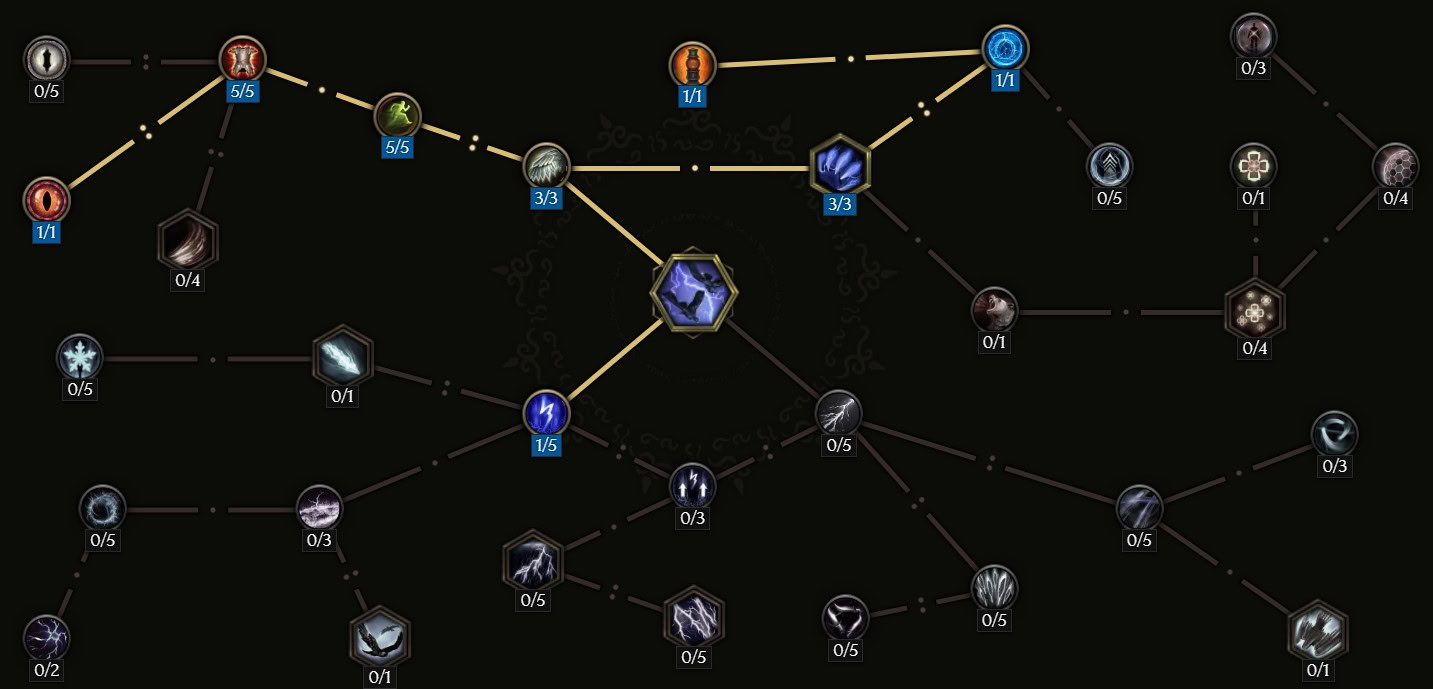
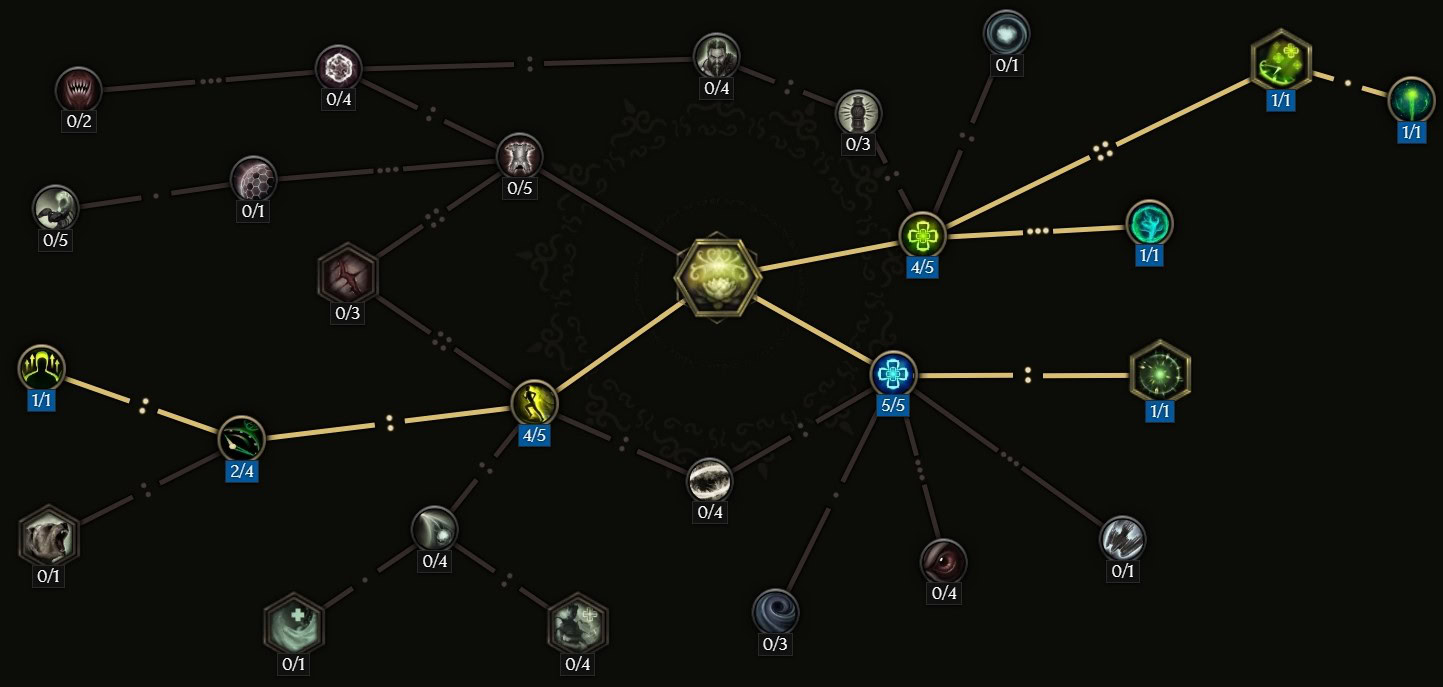
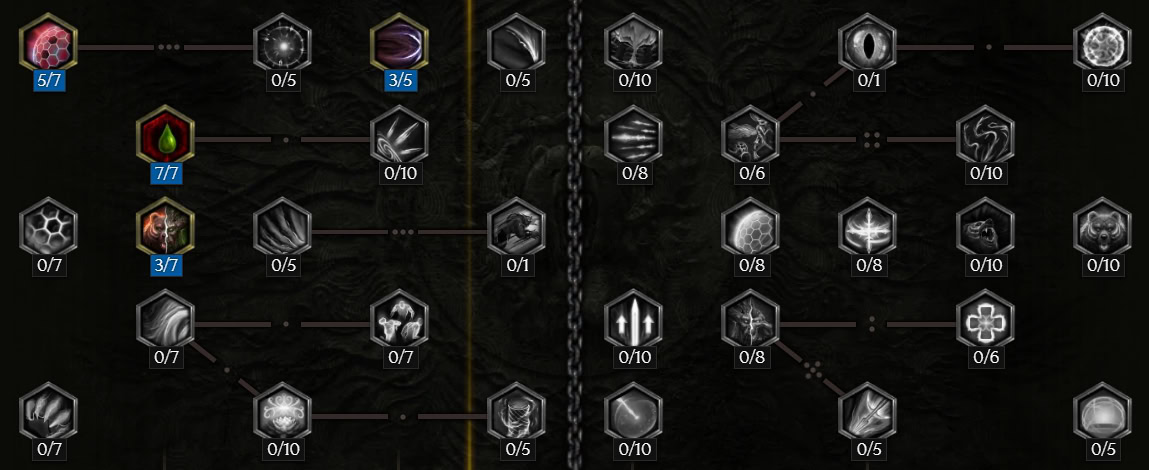
 Summon Thorn Totem
These provide early single-target damage in addition to a melee skill like Swipe or Gathering Storm. Later, the passive tree will affect the Spriggan Form’s Healing Totems instead.
The Specialization Tree for Summon Thorn Totem allows the Thorn Totems to be absolute crit machines. Instead of relating bursts of thorns in random directions, they’ll more actively target enemies while releasing more powerful thorns at them.
To top this off, they’ll also be shredding enemy armor and refunding some of their mana cost as they get de-summoned. This frees up some pressure on our gear, by not requiring us to have Armor Shred on our gear, and making it easier to sustain the man cost.
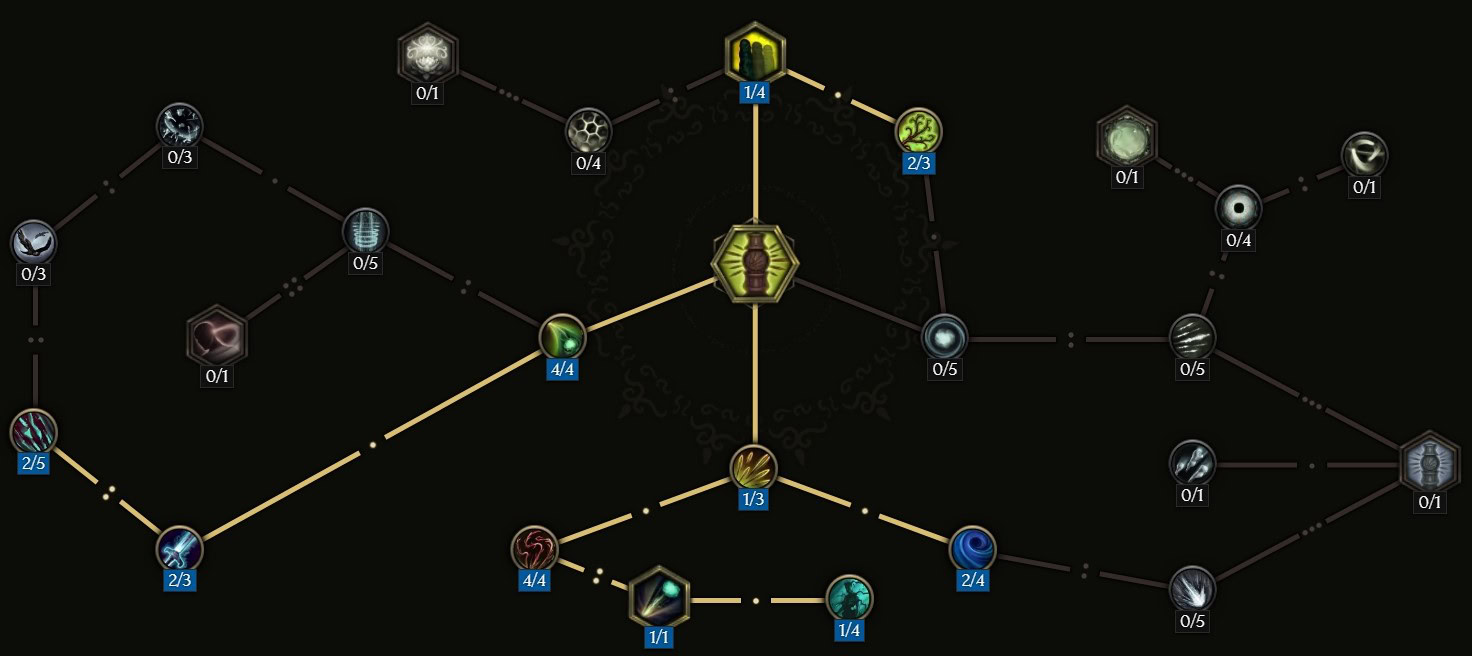
We’ll want to head straight for Spriggans’ Wrath first for some target piercing. This means taking 1 point in Torrent of Thorns, 2 points in Lethal Thicket, 1 point in Titan’s Bane, and finally 1 point in Spriggans’ Wrath.
Then we’ll put 1 point in Forested Expanse, then 2 points in Memories of Eterra to raise our summon cap and get the much-needed mana refund for replacing our totems. The increased Cap will be added to our cap for Healing Totems, allowing up to 6 to be active at a time.
Finally, we get the last of our damage and utility. We’ll put 1 point into Ancient Power, so we can put 2 points into Impale and pick up 2 points in Shred Armour. Then we’ll go back and max Ancient Power as well as max Lethal Thicket. Our remaining points are placed into On Astral Winds.
Any additional Skill Points from gear will go towards maxing On Astral Winds for more damage, or Shred Armour for more consistent Armor Shred.
Level
Passive
Points
Current/Max
1
Torrent of Thorns
1/3
2-3
Lethal Thicket
2/4
4
Titan’s Bane
1/1
5
Spriggans’ Wrath
1/4
6
Forested Expanse
1/4
7-8
Memories of Eterra
2/3
9
Ancient Power
1/4
10-11
Impale
2/3
12-13
Shred Armour
2/5
14-16
Ancient Power
4/4
17-18
Lethal Thicket
4/4
19-20
On Astral Winds
2/4
21-22
On Astral Winds
4/4
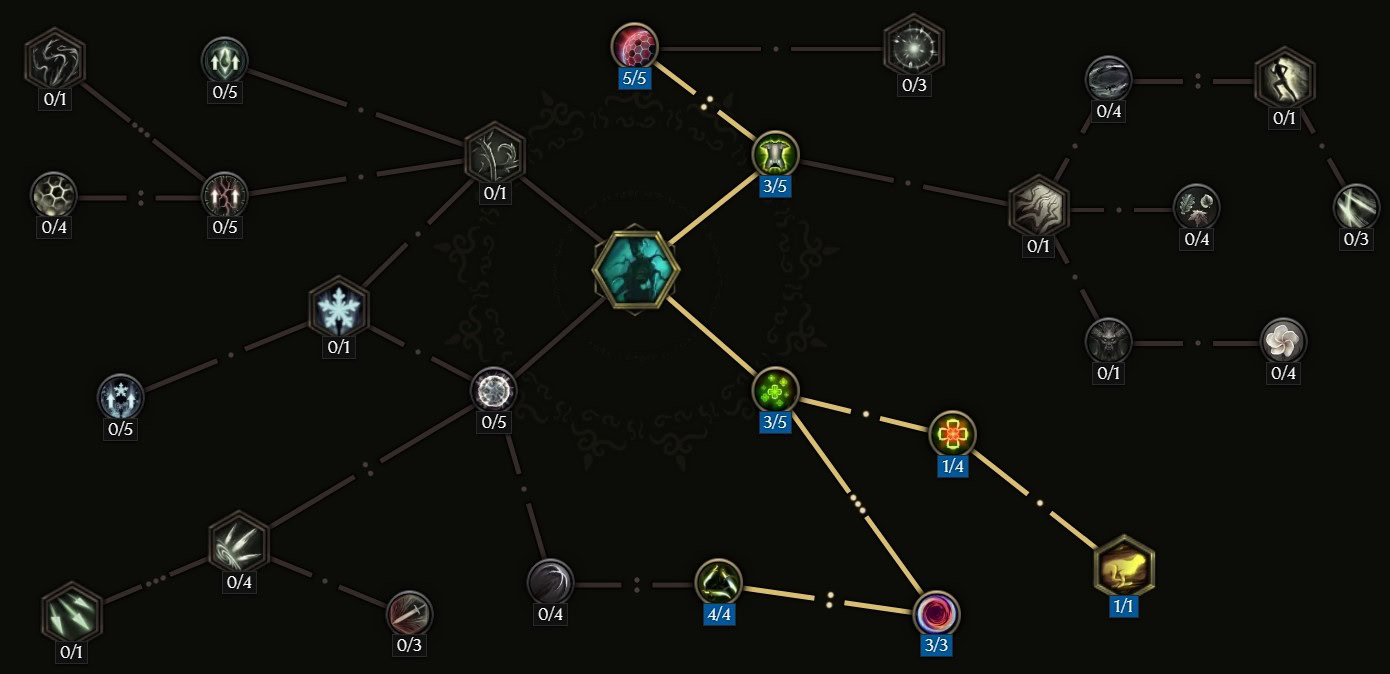
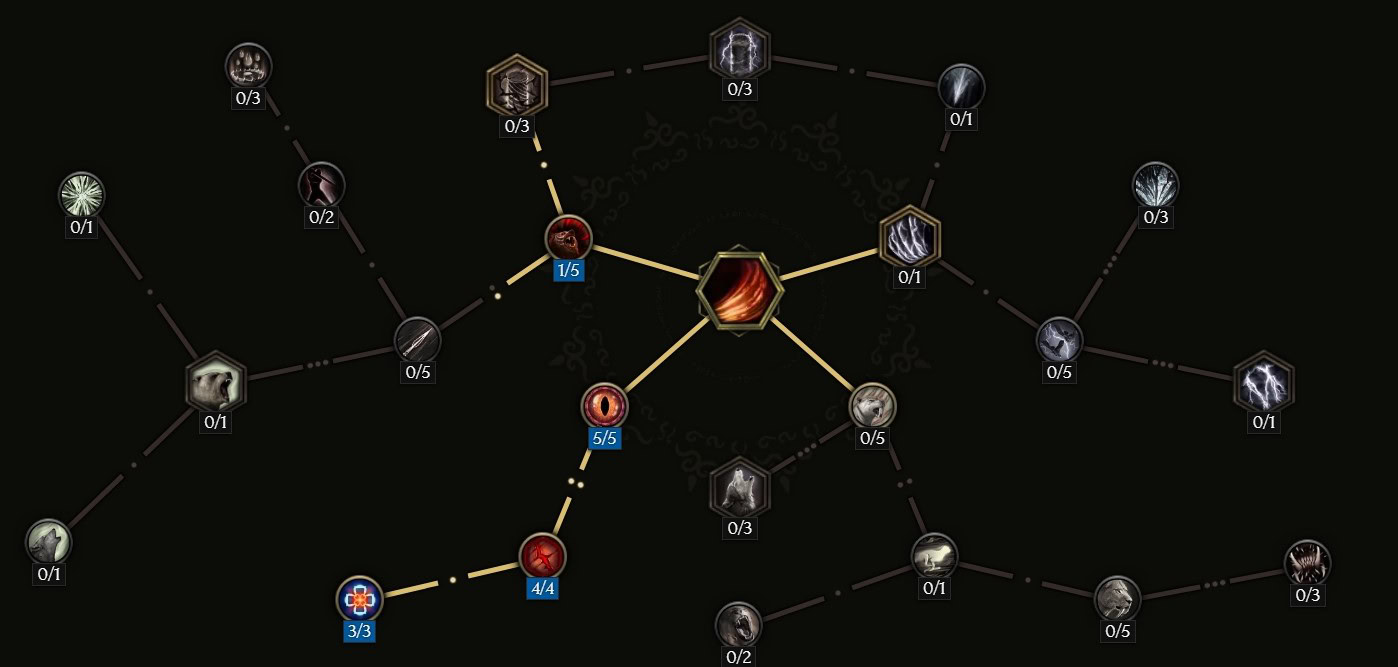
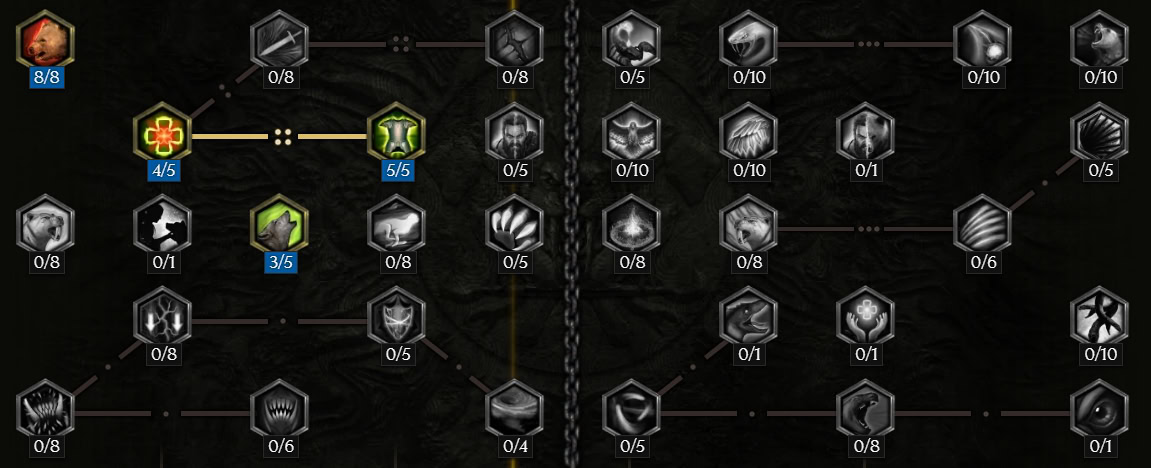
Spriggan Form
Spriggan Form gives us a whole new set of abilities, which is why most of our active skills are Summons, as they will remain active during this form. This form greatly buffs our survivability by replacing our Thorn Totems with Healing Totems. Once we have 5 points into it, the Healing Totems will gain all the benefits of our Summon Thorn Totem Specialization tree thanks to Spiked Totems.
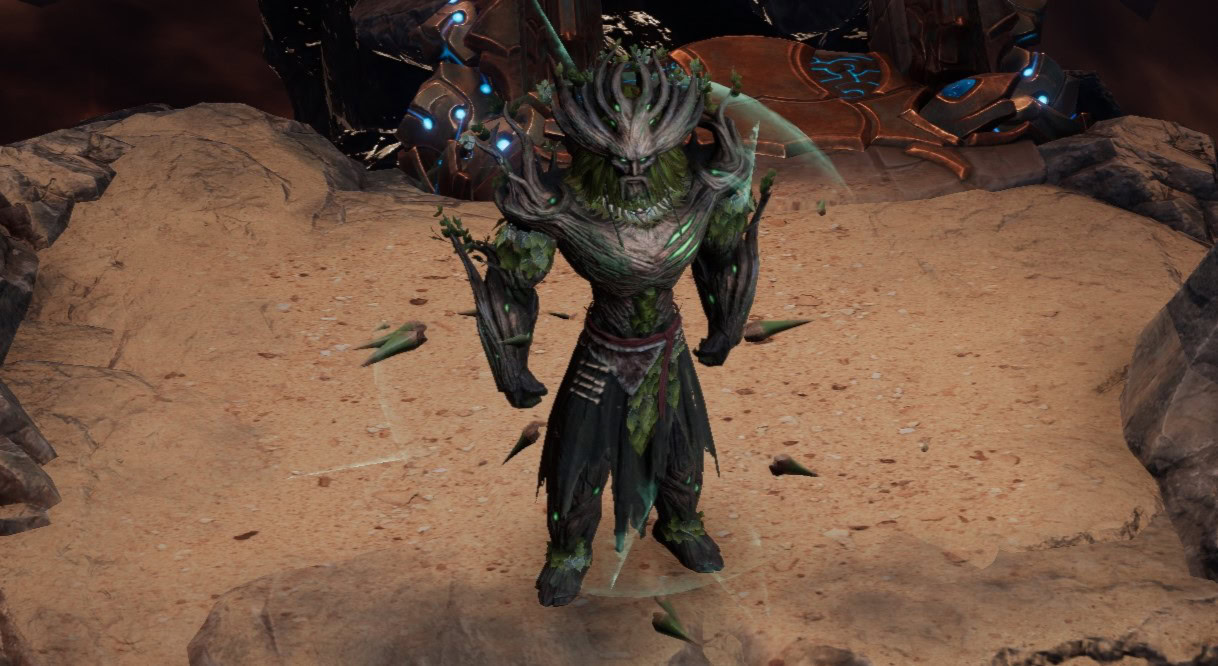
The Specialization Tree for Spriggan Form is highly focused on buffing our healing Totems, making them heal for a ton while spitting out thorns. As an added bonus, we’ll gain a ton of Armor in Spriggan Form, and have Thorn Shield to also help bolster our defenses further.
For leveling Spriggan Form, we’ll be prioritizing reaching Unbound Garden as soon as possible for more active totems. This means we’ll max Totem Warden, pick up Spiked Totems, and then max Unbound Garden. Then we’ll go for our defensive nodes, opting to max Guardian of Nature first for the increased healing, then maxing Ironbark for the Armor it provides, and finally maxing Deep Roots to extend the duration of Thorn Shield.
Any additional skill points from gear will go towards Eterra’s Bulwark, further buffing the defensive benefits of Thorn Shield.
Level
Passive
Points
Current/Max
1-4
Totem Warden
4/4
5
Spiked Totems
1/1
6-8
Unbound Garden
3/3
9-12
Guardian of Nature
4/4
13-17
Ironbark
5/5
18-20
Deep Roots
3/3
21-24
Eterra’s Bulwark
4/5
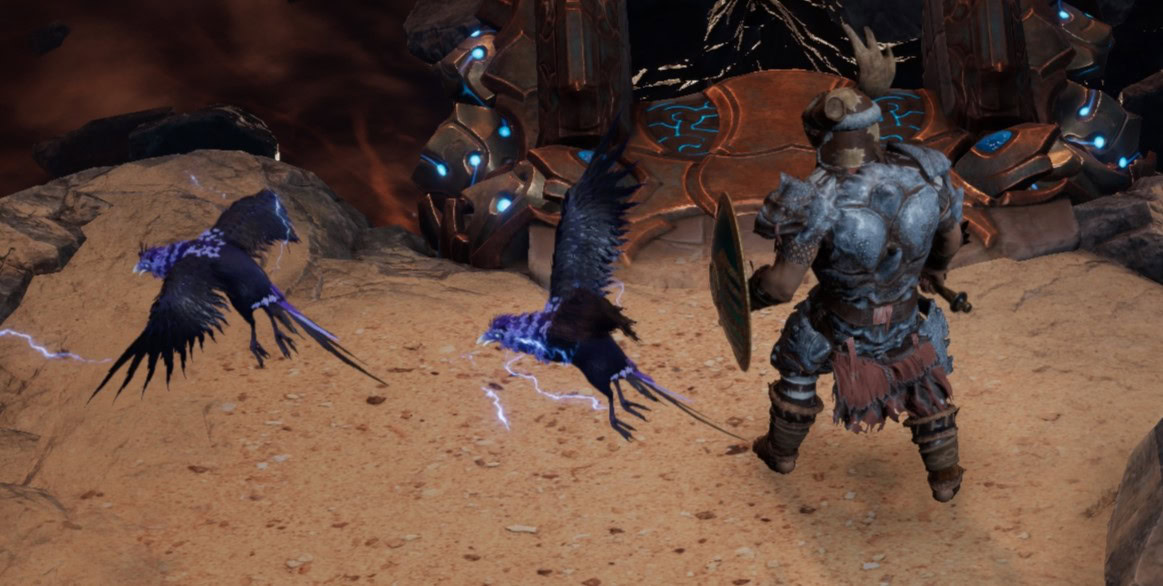
 Summon Storm Crows
Summon Storm Crows become a great way of buffing our Totems, giving them a ton of flat damage to scale with other passives. They’ll also be a secondary source of Armor Shred, despite them attacking slower as a result of their Specialization Tree.
The Specialization Tree for Summon Storm Crows focuses on the Aspect of the Crow, a powerful buff that grants Flat Spell Damage to our totems. As such we’ll be looking to make that effect as strong as possible through Cast Speed, Armor Shred, and Shock Chance.
We’ll want to pick up Arboist as soon as possible, so they focus on buffing our totems. As such we’ll take 1 point in Avis, grab 2 points of Aspect of the Crow, pick up Wisdom of the Storm, then grab Aborist. Then we’ll want to max out Aspect of the Crow followed by maxing out Avis so the buff is as strong as it can be and they apply it quickly.
Then we can focus on the utility of the skill, maxing out Nimbleness to give them a higher chance to Evade enemy attacks, making it easier to keep them alive. Then we can max Shredding Beaks and pick up Feathered Storm to allow them to easily Shred Armor.
Our final point and any additional Skill Points will be placed into Shocking Display to provide Shock Chance. The Shock Ailment will increase all Lighting Damage a target takes, which will be a good portion of our totem’s overall damage.
Level
Passive
Points
Current/Max
1
Avis
1/3
2-3
Aspect of the Crow
2/3
4
Wisdom of the Storm
1/1
5
Arborist
1/1
6
Aspect of the Crow
3/3
7-8
Avis
3/3
9-13
Nimbleness
5/5
14-18
Shredding Beaks
5/5
19
Feathered Storm
1/1
20
Shocking Display
1/5
21-24
Shocking Display
5/5
Summon Spriggan
Summon Spriggan is another summonable companion that will also be buffing our Totems, as well as keeping us alive as well with its healing aura.
The Specialization Tree for Summon Spriggan giga-buffs its aura, making it a powerhouse of offense and defense. It’ll end up giving our totems (and us) a ton of Critical Strike Chance, Critical Strike Avoidance, Healing, Spell Damage, and Dodge Rating. The Spriggan will also be considerably more bulky as a result of these aura boosts as other passives.
We’re going to prioritize Aura of Retribution first as it’s a very potent effect for both offense and defense. To do so, we’ll take 3 points in Aura of Life, max Aura of Kinship, and then max Aura of Retribution.
With Aura of Retribution up, we’ll put 1 point into Aura of Loyalty and 1 point into Aura of Evasion so it’s easier for our minions to stay alive. Then we’ll focus on the Spriggan’s defenses, taking 3 points into Arboreal Vitality and 5 points into Warding Bark.
Any Skill Points from gear can be put into maxing Arboreal Vitality and Aura of Life.
Level
Passive
Points
Current/Max
1-3
Aura of Life
3/5
4-6
Aura of Kinship
3/3
7-10
Aura of Retribution
4/4
11
Aura of Loyalty
1/4
12
Aura of Evasion
1/1
13-15
Arboreal Vitality
3/5
16-20
Warding Bark
5/5
21-22
Arboreal Vitality
5/5
23-24
Aura of Life
5/5
Eterra’s Blessing
Eterra’s Blessing will be used to help keep our minions topped off and cleanse ailments from them, but since it also comes as part of Thorn Shield, we’ll often use it on ourselves as well during harder encounters.
The Specialization Tree of Eterra’s Blessing will make it so we’re still able to use it and benefit from its effects during Spriggan Form. This is done by taking Rosebloom, which will cast Eterra’s Blessing on our Thorn Shield target. It will also allow us to revive fallen allies without having to exit Spriggan form.
We’ll prioritize Rosebloom first, as it will allow us to make use of the skill in Spriggan Form. To do so, we’ll start by maxing out Conservation and then picking up Rosebloom. By the time we Specialize this skill, we’ll have more than enough points to do this right from the start.
Next, we’ll put 2 points into Ardent Touch followed by 2 points into Encourage. This lets us pick up Swift Recovery, allowing us to revive companions if they go down. After this, we can put 2 more points into Ardent Touch before moving on. Then we can focus on its healing capabilities, putting 4 points into Improved Blessing, then picking up Purge, Efflorescence, and Regrowth.
This skill doesn’t benefit much from extra Skill Points. Rebuke can be a good investment to be able to push enemies away from yourself or your summons to better protect them., but isn’t necessary.
Level
Passive
Points
Current/Max
1-5
Conservation
5/5
6
Rosebloom
1/1
7-8
Ardent Touch
2/5
9-10
Encourage
2/4
11
Swift Recovery
1/1
12-13
Ardent Touch
4/5
14-17
Improved Blessing
4/5
18
Purge
1/1
19
Efflorescence
1/1
20
Regrowth
1/1
21-23
Rebuke
3/3
Swipe
Swipe is a temporary skill we’ll use for early leveling thanks to its decent AoE and ability to get Bleed very early. It’ll also allow us to quickly replenish our mana as well.
Since we only use Swipe for a rather short time, Swipe’s Specialization Tree will just focus on a couple of nodes, making it a very strong early skill. This makes it heavily focused on Bleed, but overall a very effective skill.
Before we go right into the Bleed section of the tree, it’s worth taking a point in Way of the Hunt for some early leech. Since the skill is Physical, Avarice won’t be providing that for us. Then we’ll just put 3 points into Blood Beast, 2 points into Rending, then max Duality of Nature. After this, we’ll just max Blood Beast and Rending in that order.
Levels
Passive
points
Current/Max
1
Way of the Hunt
1/5
2-5
Blood Beast
2/5
6-7
Rending
2/4
8-10
Duality of Nature
4/4
11-12
Blood Beast
5/5
13-14
Rending
4/4
Passive Trees
This section will cover each of the Passive Trees used by the build and the passives that benefit the build the most. We’ll list the rough leveling order here as well, in addition to the full leveling order in the leveling section at the end.
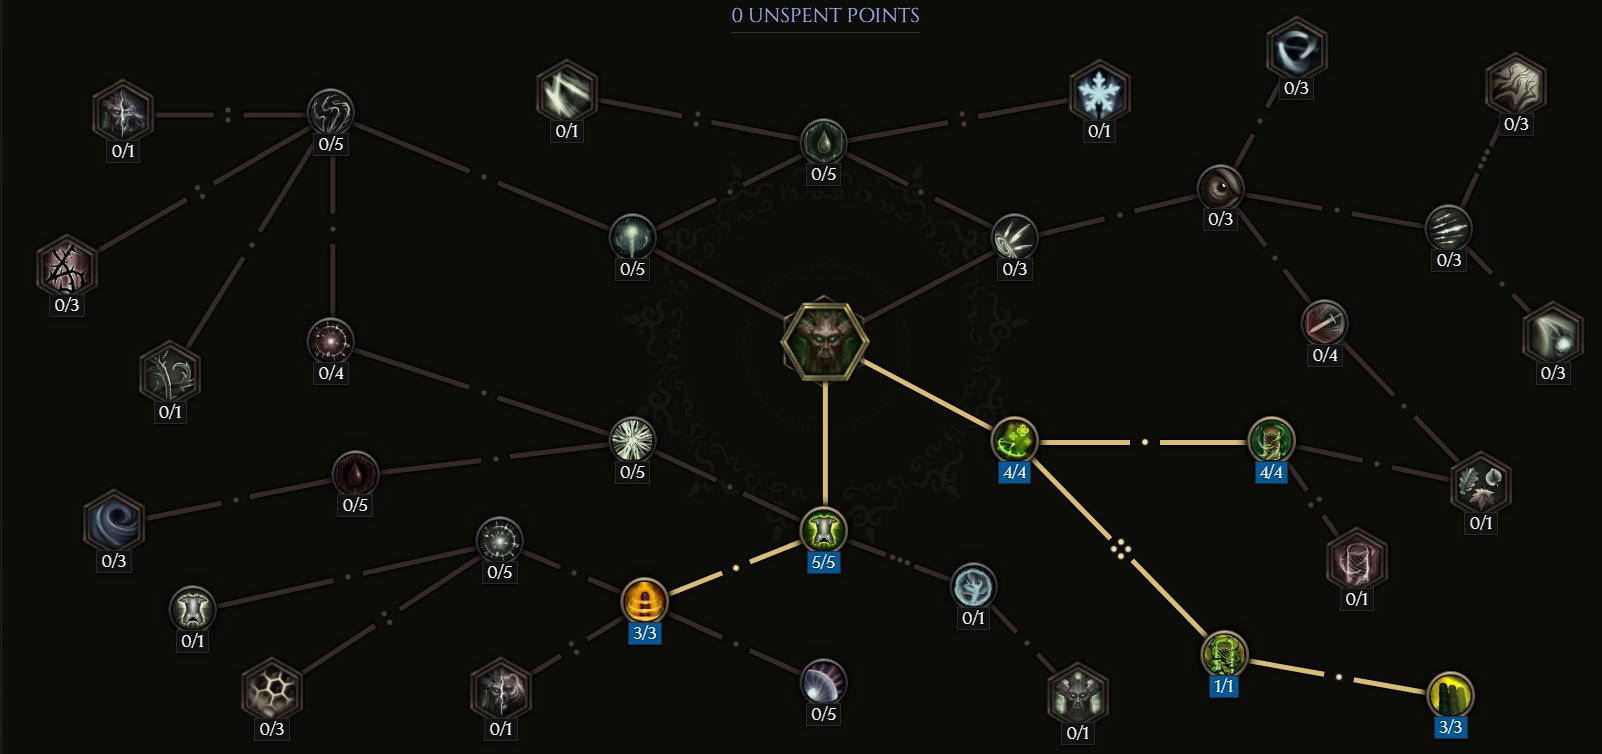
Primalist Passives
The Primalist Tree offers a lot of benefits for a Totem playstyle, including a lot of Health for the Totems, flat damage for the totems, as well as some nice defenses for us.
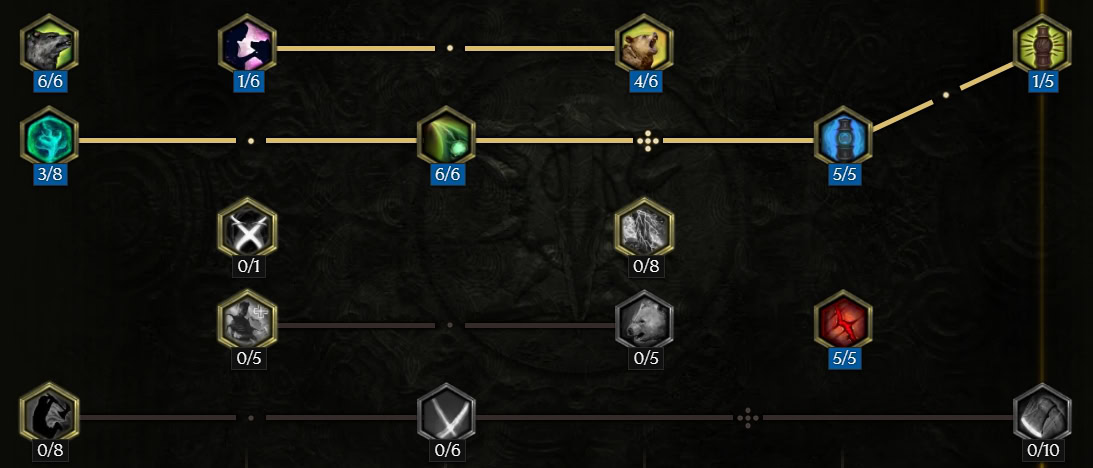
Gift of the Wilderness
Gift of the Wilderness gives us a good bit of flat Health, while also increasing the health of all our Minions.
Natural Attunement
Natural Attunement grants us a good bit of Attunement, while also granting some Lighting and Cold Resistance. Later with Attunement on Gear, you can drop this for additional points into Ancient Call.
Primal Medicine
We take just a single point of this to reach Ancient Call. Summon Spriggan and Eterra’s Blessing will take care of most of the healing needs for our minions.
Wisdom of the Wild
This grants us and our minions increased spell damage, which boosts all of our minions, as they all attack with Spells.
Ancient Call
Ancient Call gives us more flat health, though less than Gift of the Wilderness, and instead gives our minion a larger health increase as well as allowing them to be revived faster.
Elder Branch*
We’ll pick up Elder Branch later into progression, but it’s flat damage for us and our totem to help us scale better.
Berserker*
Berserker is a much later pick up that makes us much more durable by reducing all damage we take by 20% while under 35% health.
Rotbane*
We take a single point of Rotbane so our Totems are immune to Poison Damage. This tends to be one of the harder damage type to mitigate against, as many enemies that deal Poison Damage also Shred Poison Resistance.
Point Order
Below is the order in which passives points will be distributed into this tree. All passives marked with an asterisk(*) are taken later into the leveling process, refer to the full leveling order later in this guide for more info.
Passive
points
Current/Max
Gift of the Wilderness
6/6
Natural Attunement
3/8
Primal Medicine
1/6
Wisdom of the Wild
6/6
Ancient Call
4/6
Elder Branch*
5/5
Rotbane*
1/5
Berserker*
5/5
Druid Passives
We’ll start with our Druid Passives as we need to pick them up first to get access to Spriggan Form and Summon Spriggan.
Chitinous Plating
Chitinous Plating gives us a good boost of Armor and Endurance. With the 5 Points we allocate into it, our minions get a ton of Armor as well, which is the main reason we take it.
Claws of the Forest
Claws of the Forest boosts the damage of our minions as well as ourselves. All of the base spell damage our Totems and Spriggan deal is Physical, so it helps them a good bit.
Druidic Prowess
We mainly take Druidic Prowess as filler to reach Wind in the Leaves. The mix of Strength and Attunement is great for scaling our build though.
Wind in the Leaves
Wind in the Leaves grants a nice boost to our Attack and Cast Speed. With the 3 Points we allocate into it, it will also give us more Movement Speed in Spriggan Form, as well as make our Summoned Spriggan faster as well.
Thicket of Thorns*
Thicket of Thorns is a nice option for the later stages of the game, grant a good amount of Armor as well as a chance to auto-cast Thorn Shield (and Eterra’s Blessing by extension) on ourselves. This can be a great boost to overall survivability so long as we’re not being one-shot.
Point Order
Below is the order in which passive points will be distributed in this tree.
Passive
Points
Current/Max
Chitinous Plating
5/7
Claws of the Forest
7/7
Druidic Prowess
3/7
Wind in the Leaves
4/5
Shaman Passives
The Shaman Tree offers us a ton of flat Spell Damage for the Totems, as well as a ton of Cast Speed.
Shamanic Infusion
Shamanic Infusion grants a bunch of Attunement, as well as some Physical and Lightning Penetration for us and our minions. It’s a great boost of damage for us overall.
Silent Protector
We only take a couple points in this to fill the gaps between Shamanic Infusion and Fate Carver. It’s still a nice bit of armor for minimal investment.
Storm Bringer
We take two points of this to reach Avatar of Thunder later. It still boost our totem damage a little, but not a ton.
Fate Carver
Fate Carver is a pretty nice damage bonus early on for our totems. Though we can move points around much later on once we have a ton of increased Minion Damage on our gear.
Ancestral Speed
Ancestral Speed not only boosts the Cast Speed of our Totems, but also gives us a chance to gain Haste when we summon a Totem. This gives us more mobility while increasing the overall DPS of our Totems.
Avatar of Thunder
Avatar of Thunder Grants us and our minions a pretty sizable chunk of flat Lightning Damage. This is a great node for our overall damage scaling.
Protective Circle*
With up to 6 Totems active, Protective Circle can take care of our Cold, Fire, Lighting, and physical Resists. This takes a ton of pressure off our gear, leaving mostly Poison and Void Damage to worry about.
Rune of Awe*
Rune of Awe provides even more Flat damage for us and our minions to scale with. Like other flat damage nodes, this is great for scaling our damage.
Point Order
Below is the order in which passive points will be distributed in this tree. All passives marked with an asterisk(*) are exclusive to this Mastery. These must be adapted and placed elsewhere if not using this Mastery.
Passive
Points
Current/Max
Shamanic Infusion
8/8
Silent Protector
2/8
Storm Bringer
2/10
Fate Carver
3/8
Ancestral Speed
5/5
Avatar of Thunder
5/5
Rune of Awe*
8/8
Protective Circle
5/5
Fate Carver
8/8
Beastmaster Passives
Beastmaster has a couple of great nodes we can benefit from. This mostly provides more defensive scaling through the Aspect of the Boar.
Ursine Strength
Ursine Strength provides us with a good bit of Strength which scales our Armor up nicely. It will also reduce all damage from nearby enemies by a good bit for another great defensive layer.
Boar Heart
Boar Heart is another great passive that grants us the Aspect of the Boar defensive buff, which will decrease our damage taken when hit by a melee attack. It’s another good defensive layer for the build.
Call of the Pack
We mostly take this as a filler passive to reach Porcine Constitution. It still gives us and our Minions more Health to work with, so it’s not completely wasted filler.
Porcine Consitution
Porcine Constitution improves the Aspect of the Boar’s effect granted by Boar Heart. This boosts the damage reduction it grants and improves our Health Regeneration.
Point Order
Below is the order in which passive points will be distributed into this tree.
Passive
points
Current/Max
Ursine Strength
8/8
Boar Heart
4/5
Call of the Pack
3/5
Porcine Constitution
5/5
Gearing and Affixes
In this section, we’ll cover the gear you’ll want to look out for, as well as the ideal affixes you want on them. The Affixes listed below are for non-unique and non-legendary Items, however, the ideal affixes are just as valuable when crafted onto a Legendary item of the same type.
Ideal Gear and Affixes
This section provides the ideal Item Bases and respective Affixes for the build. Be on the lookout for gear that have two or more of the stats shown below. Ideal Exalted Affixes will be listed in CAPS. We’ll provide a loot filter below that will make this easier.
Item Base
Horned Staff, Prophecy Staff, or Obsidian Axe
Prefix 1
Cast Speed
Prefix 2
Parry Chance
Suffix 1
MINION SPELL/BOW DAMAGE
Suffix 2
MINION SPELL/MELEE DAMAGE
Item Base
Spriggan Seed or Spirit Catcher
Prefix 1
iNCREASED MINION DAMAGE
Prefix 2
Attunement
Suffix 1
Health
Suffix 2
Any Resist
Item Base
Raptor Helm
Prefix 1
LEVEL OF SUMMON THORN TOTEM
Prefix 2
Attunement
Suffix 1
% HEALTH
Suffix 2
Any Resistance
Item Base
Shamanic Garb or Greatwood Coat
Prefix 1
MINION SPELL CRITICAL STRIKE CHANCE
Prefix 2
Attunement or Vitality
Suffix 1
Health
Suffix 2
% HEALTH
Item Base
Crusader Gauntlets
Prefix 1
Cast Speed
Prefix 2
Minion Damage
Suffix 1
Health
Suffix 2
HYBRID HEALTH
Item Base
Heoborean Boots or Solarum Greaves
Prefix 1
MOVEMENT SPEED
Prefix 2
Vitality
Suffix 1
Increased Cooldown Recovery Speed
Suffix 2
HYBRID HEALTH
Item Base
Spidersilk Sash or Plated Belt
Prefix 1
Minion Damage
Prefix 2
Potion Cleanse
Suffix 1
HYBRID HEALTH
Suffix 2
Increased Cooldown Recovery Speed
Item Base
Turquoise Ring
Prefix 1
MINION DAMAGE
Prefix 2
Attunement
Suffix 1
HEALTH
Suffix 2
Any Resist
Item Base
Bone Amulet
Prefix 1
MINION DAMAGE
Prefix 2
Mana
Suffix 1
HEALTH
Suffix 2
Any Resist
Idol Affixes
This section will list the highest value Idol affixes for the build, as well as the Idol type(s) they can be found on.
Affix Name
Affix type
idol type
Shared Spell Damage
Suffix
Large or Huge
Shared Critical Strike Avoidance
Suffix
Large or Huge
Minion Critical Strike Chance
Suffix
Ornate or Adorned
Shared Physical Damage
Suffix
Humble
Necrotic, Poison, or Void Resistance
Suffix
Humble, Grand, or Ornate
% Health
Prefix
Stout or Large
Increased Aspect of the Boar Effect
Suffix
Grand, Ornate, or Adorned
Health
Suffix
Any
Critical Strike for Totems
Prefix
Ornate
Haste Chance when Summoning a Totem
Prefix
Grand
Unique and Legendary Items
Many endgame builds for Last Epoch will use one or several Unique or Legendary Items. The ones this build can get the most use out of are listed below alongside when they are the most useful.
Legacy of the Quiet Forest
Legacy of the Quiet Forest is a Unique Belt that will not only help sustain Rage in Spriggan Form but also provide most of our Void Resistance and possibly all of our Poison Resistance for the build. Compared to most belt options, it also has a fair bit of Armor.
Arboreal Circuit
Arboreal Circuit is a Unique Ring that not only gives us a noticeable bump in speed but gives our minions a huge chunk of Armor and Movement Speed. This helps our Summoned Spriggan to stay alive more easily. In addition, it will summon a taunting totem every so often, which keeps us and our Spriggan alive.
Silvafrond
Silvafrond is another Unique Ring that turns our Summon Vines skill in Spriggan Form into a mobility skill. This gives us a nice mobility option while we’re in Spriggan Form, though we’ll also want to get Increased Cooldown Recovery on our Belt and Boots to help reduce the inflated cooldown.
Death Rattle
Death Rattle is a Unique Amulet that gives our minions a good offensive boost of Damage, Critical Chance, and Critical Damage. More importantly, we recover Health when our Thorn Totems die, which also counts for when they get unsummoned, resulting in great Health sustain.
Loot Filter
Below is a custom Loot Filter, designed to help you gear up this build from Level 1. This Loot Filter will make it much easier to identify great items without much thought.
You can click Here to download our Loot Filter for this Build. Below is quick rundown of what gets filtered and when.
- Items Always Shown
- Unique/Set/Exalted Items
- All Idols
- All Items with Class-Specific Affixes (+Level Affixes are EMPHASIZED)
- Gear with 3+ of the Affixes Listed in the Gearing Section
- Ideal Exalted Affixes are EMPHASIZED
- Items Hidden
- Low-Level Gear, to ensure items that do show up are good for your level
- Toggle Options
- Hide all Normal, Magic, and Rare items that don’t meet the criteria above.
- Recolor options to show Class-Specifc items for other classes, for Alts.
Leveling Order
If you want to play this build from Level 1, this section is for you. Below is our recommended leveling order for Passive Trees and Skills.
Passive Points
Passive
Points
Tree
Current/Max
Gift of the Wilderness
6/6
Primalist
Natural Attunement
3/8
Primalist
Primal Medicine
1/6
Primalist
Wisdom of the Wild
6/6
Primalist
Ancient Call
4/6
Primalist
Chitinous Plating
5/7
Druid
Claws of the Forest
7/7
Druid
Druidic Prowess
3/7
Druid
Wind in the Leaves
3/5
Druid
Shamanic Infusion
8/8
Shaman
Silent Protector
2/8
Shaman
Storm Bringer
2/10
Shaman
Fate Carver
3/8
Shaman
Ancestral Speed
5/5
Shaman
Avatar of Thunder
5/5
Shaman
Rune of Awe
8/8
Shaman
Protective Circle
5/5
Shaman
Elder Branch
5/5
Primalist
Rotbane
1/5
Primalist
Ursine Strength
8/8
Beastmaster
Boar Heart
4/5
Beastmaster
Call of the Pack
3/5
Beastmaster
Porcine Constitution
5/5
Beastmaster
Berserker
5/5
Primalist
Fate Carver
8/8
Shaman
All Skill Icons in this guide are sourced from Last Epoch Tools, a Last Epoch Database.