
Count Ymir’s Finger Ruins expedition is the longest side-quest in Shadow of the Erdtree. However, it’s still shorter than the quests that unlock new endings in the base game.
The Count Ymir quest does not unlock a new ending. However, it does explain what the Fingers are all about and how they came to be, including how the Three Fingers and Flame of Frenzy relate to the Two Fingers at the Roundtable Hold.
Throughout this quest, you’ll unlock most of the new Sorceries in Shadow of the Erdtree, along with some of the edgiest weapons in the game to complement your Swordhand of Night AKA Sauron armor set.
Count Ymir's Finger Ruins Expedition Quest Walkthrough

Throughout this quest, you'll unlock most of the new Sorceries in Shadow of the Erdtree, along with some of the edgiest weapons in the game to complement your Swordhand of Night AKA Sauron armor set.
Instructions
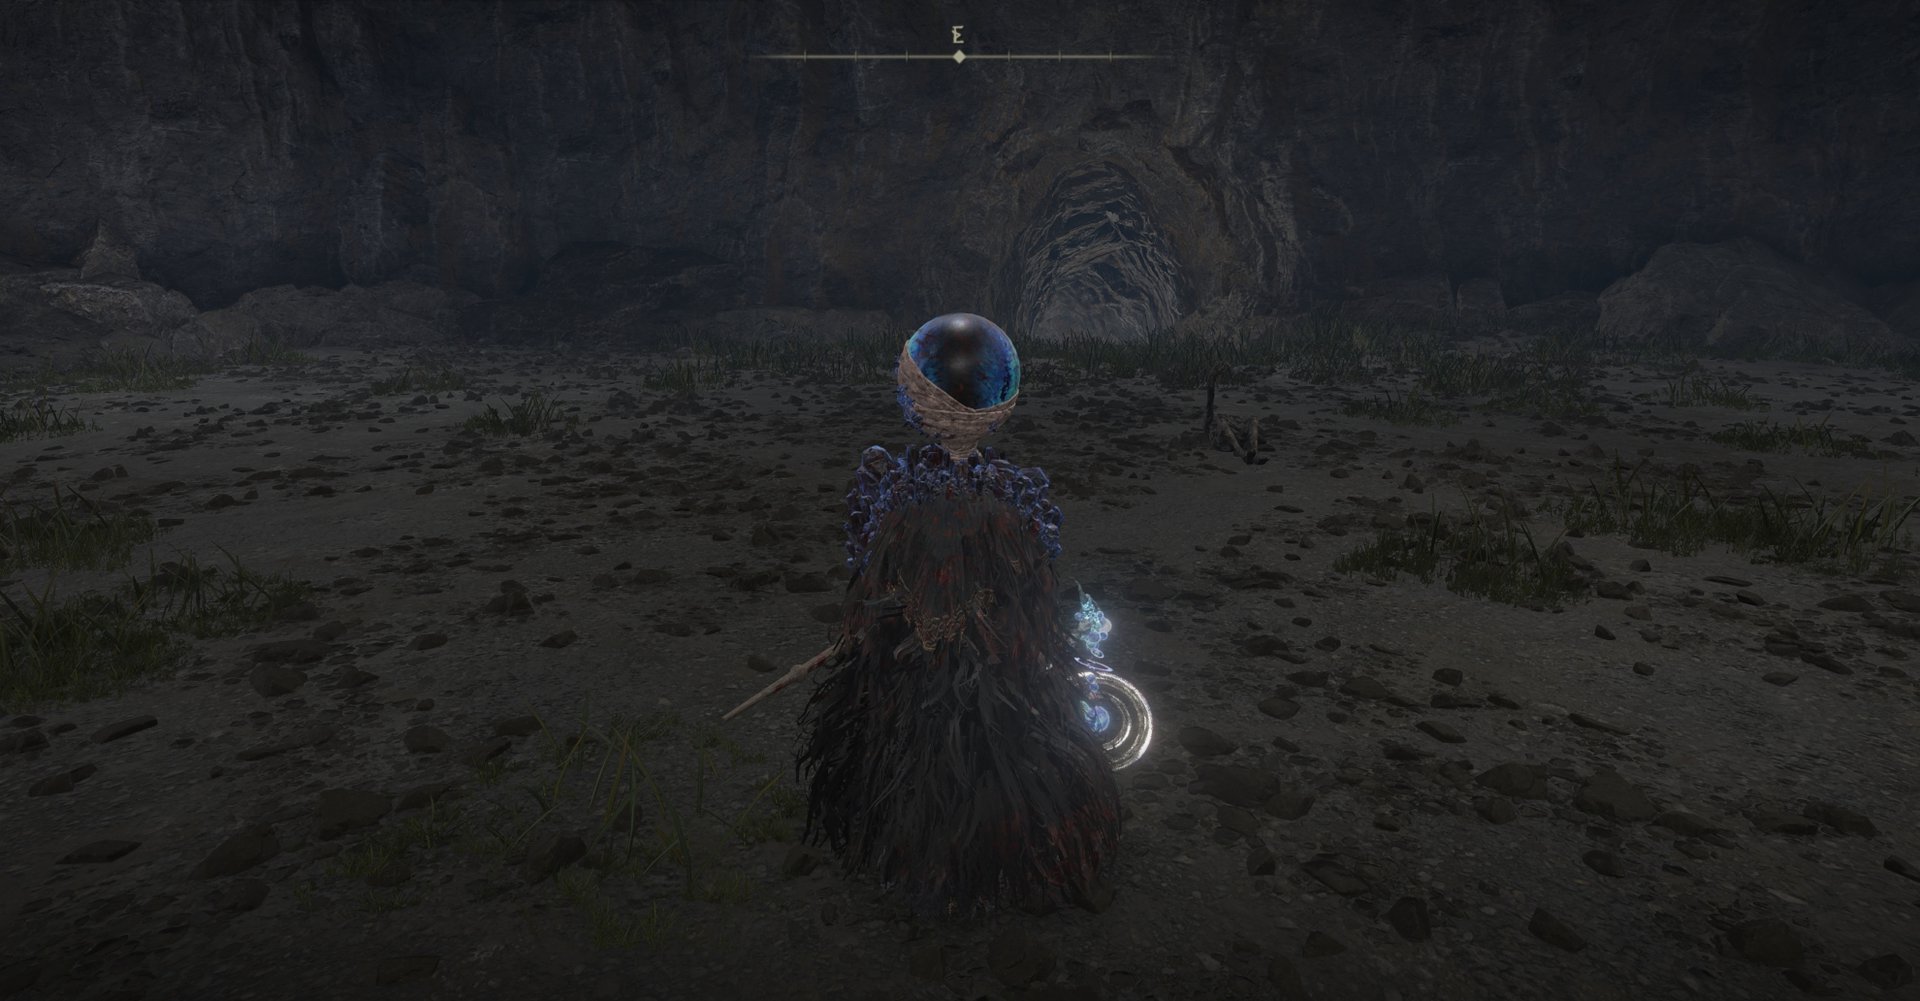
- Reach the Cathedral of Manus Metyr.
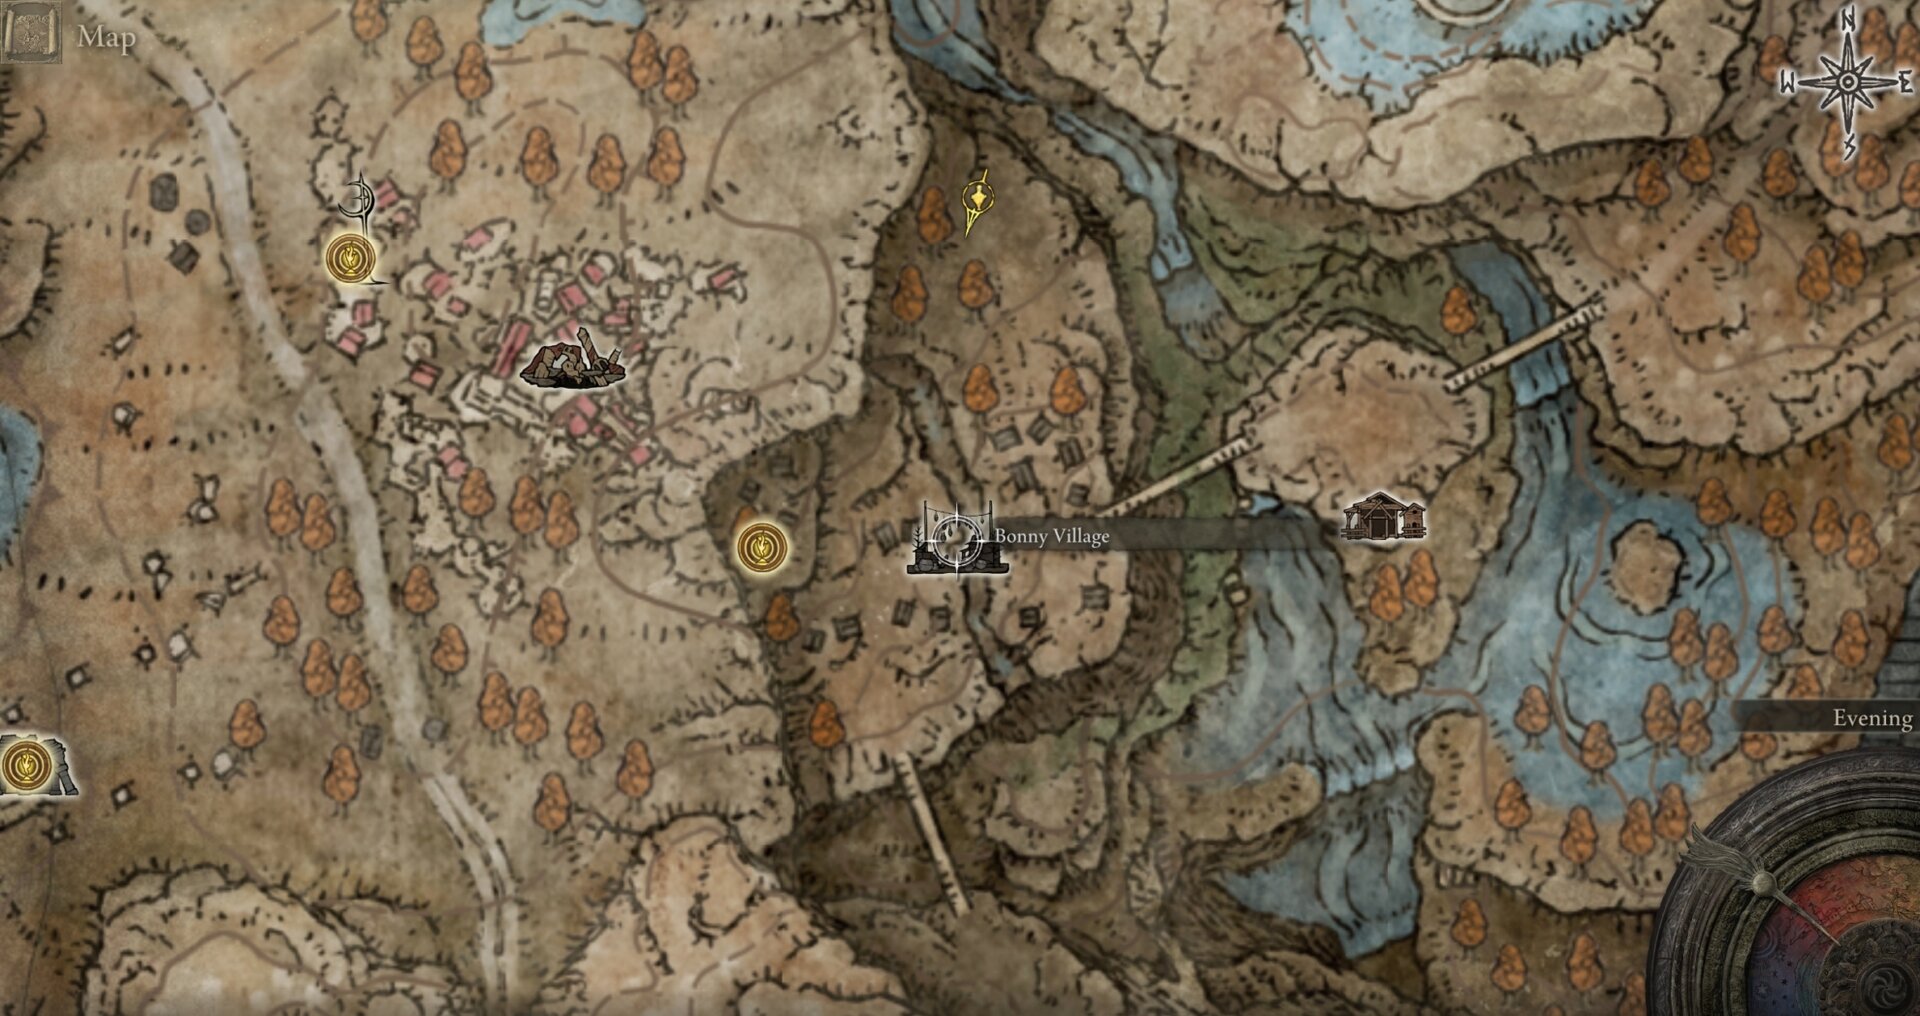
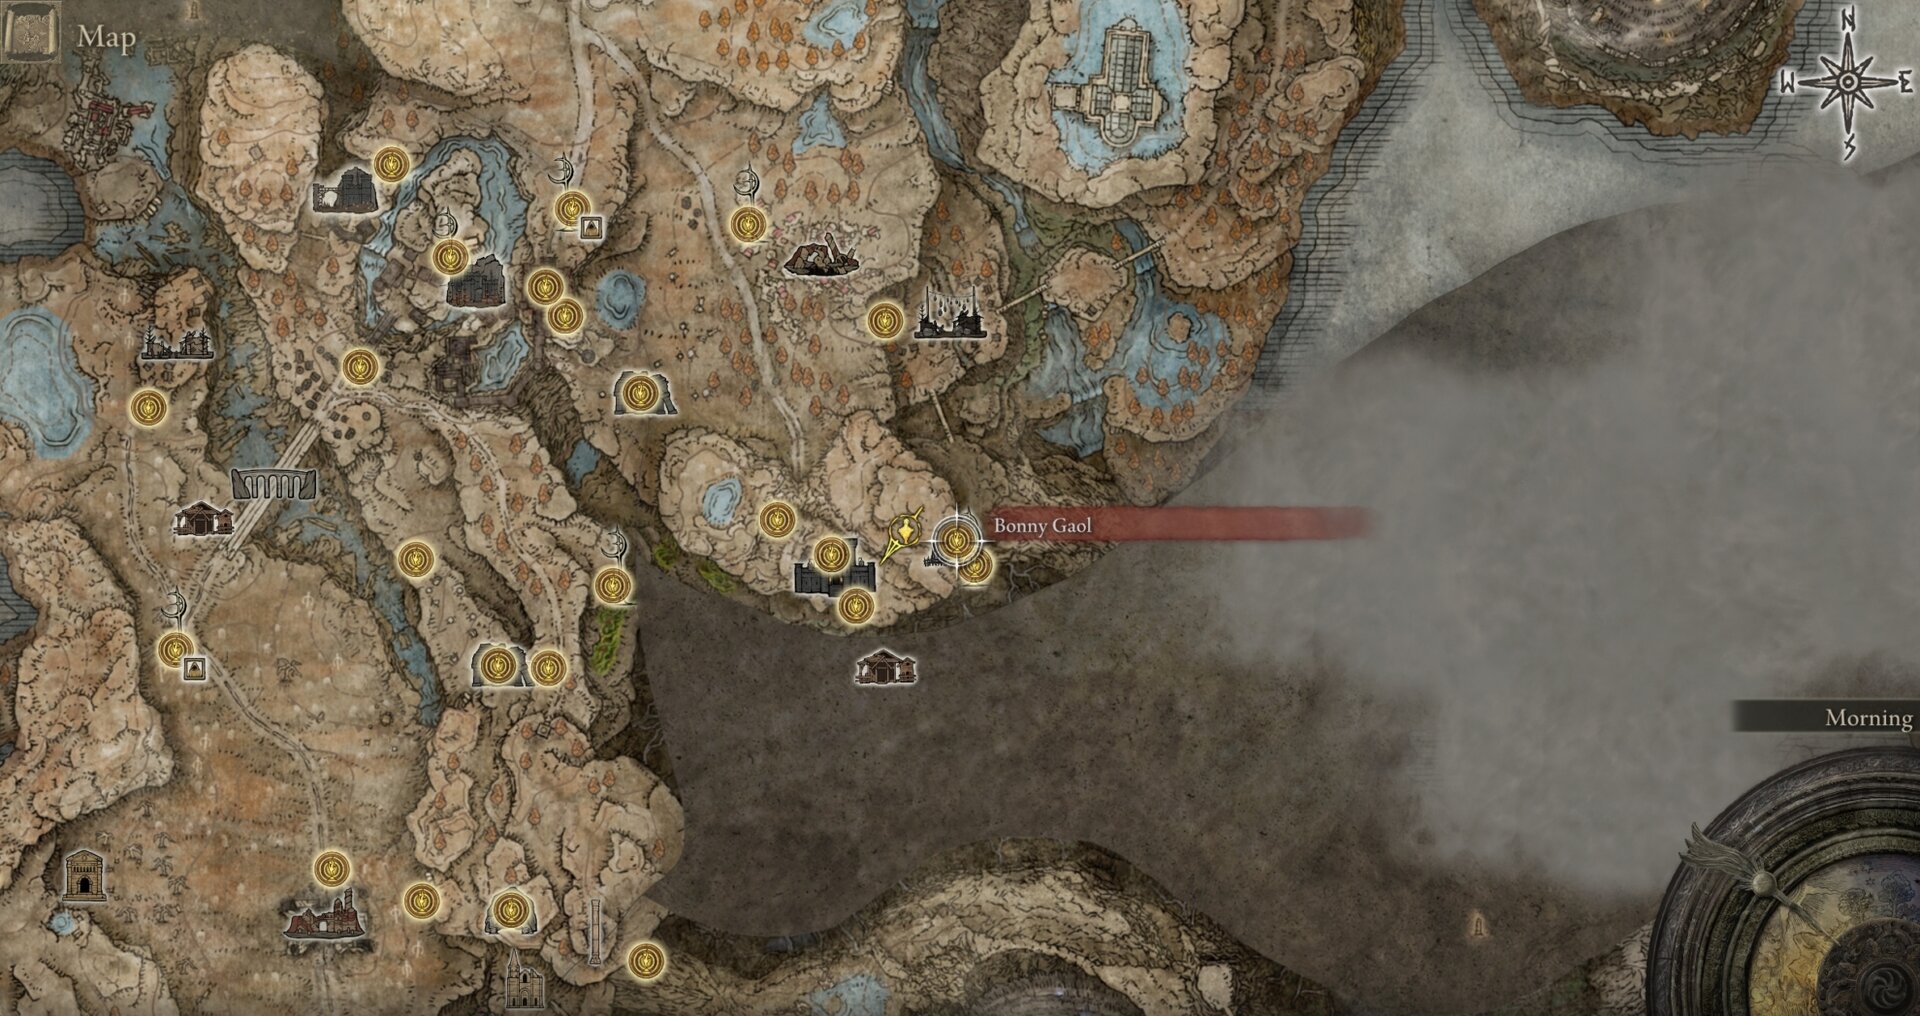
To reach the Cathedral of Manus Metyr on Scadu Altus, you have to go through Bonny Village. - Bonny Village Detour.
There are a couple of relevant items you'll want to pick up in Bonny Village, the O Mother emote, the Armor of Night, and the Shield of Night. - Meet Count Ymir and Jolán.
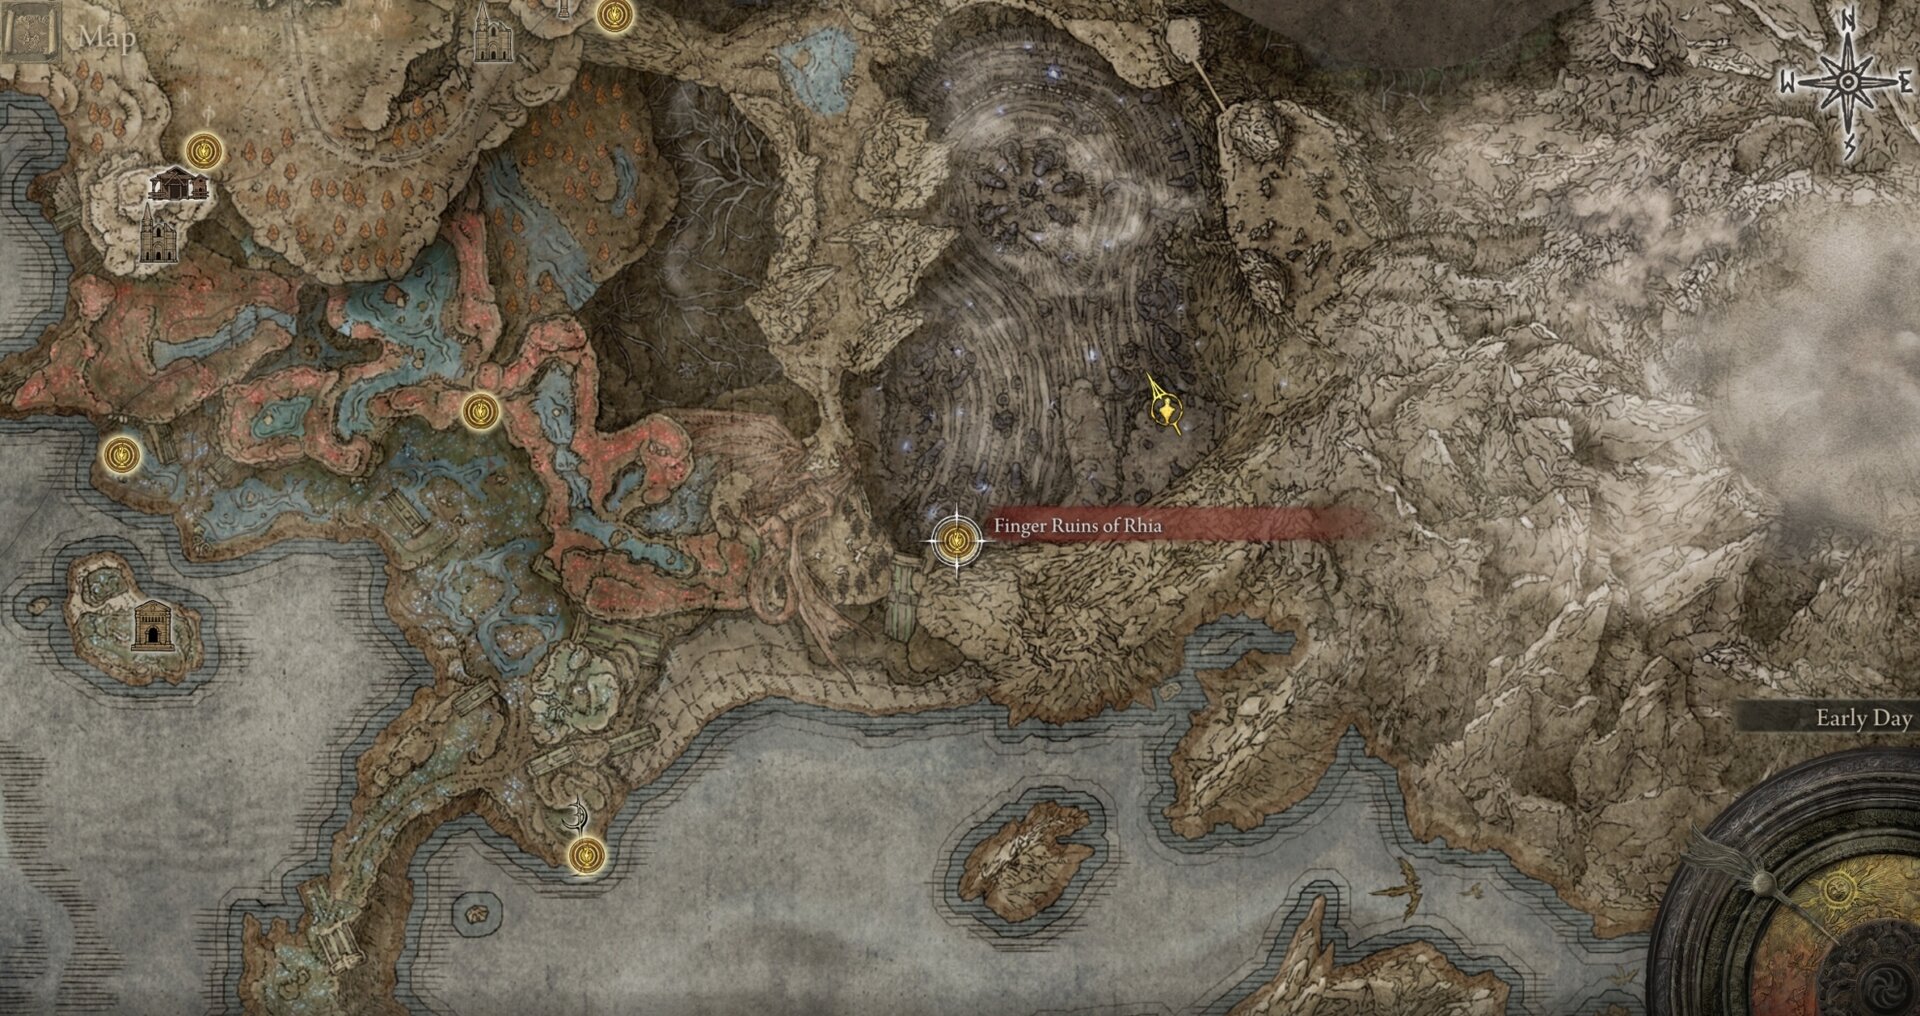
Inside the Cathedral, you'll find Count Ymir sitting on the throne. Talk to him. Next, talk to Jolán. - Finger Ruins of Rhia.
Make your way to the epicenter of the ruins. The Finger Ruins of Rhia are exceptionally large for how little is there. - Inform the Count.
Return to Count Ymir and inform him of your horn tooting. You can also speak to Jolán again afterwards. - A Peek at the Finger Ruins of Miyr.
Rest at the Site of Grace or reload the area. Talk to Count Ymir. Head over to the bottomless wooden throne and interact with it. - Expedition to the Finger Ruins of Dheo.
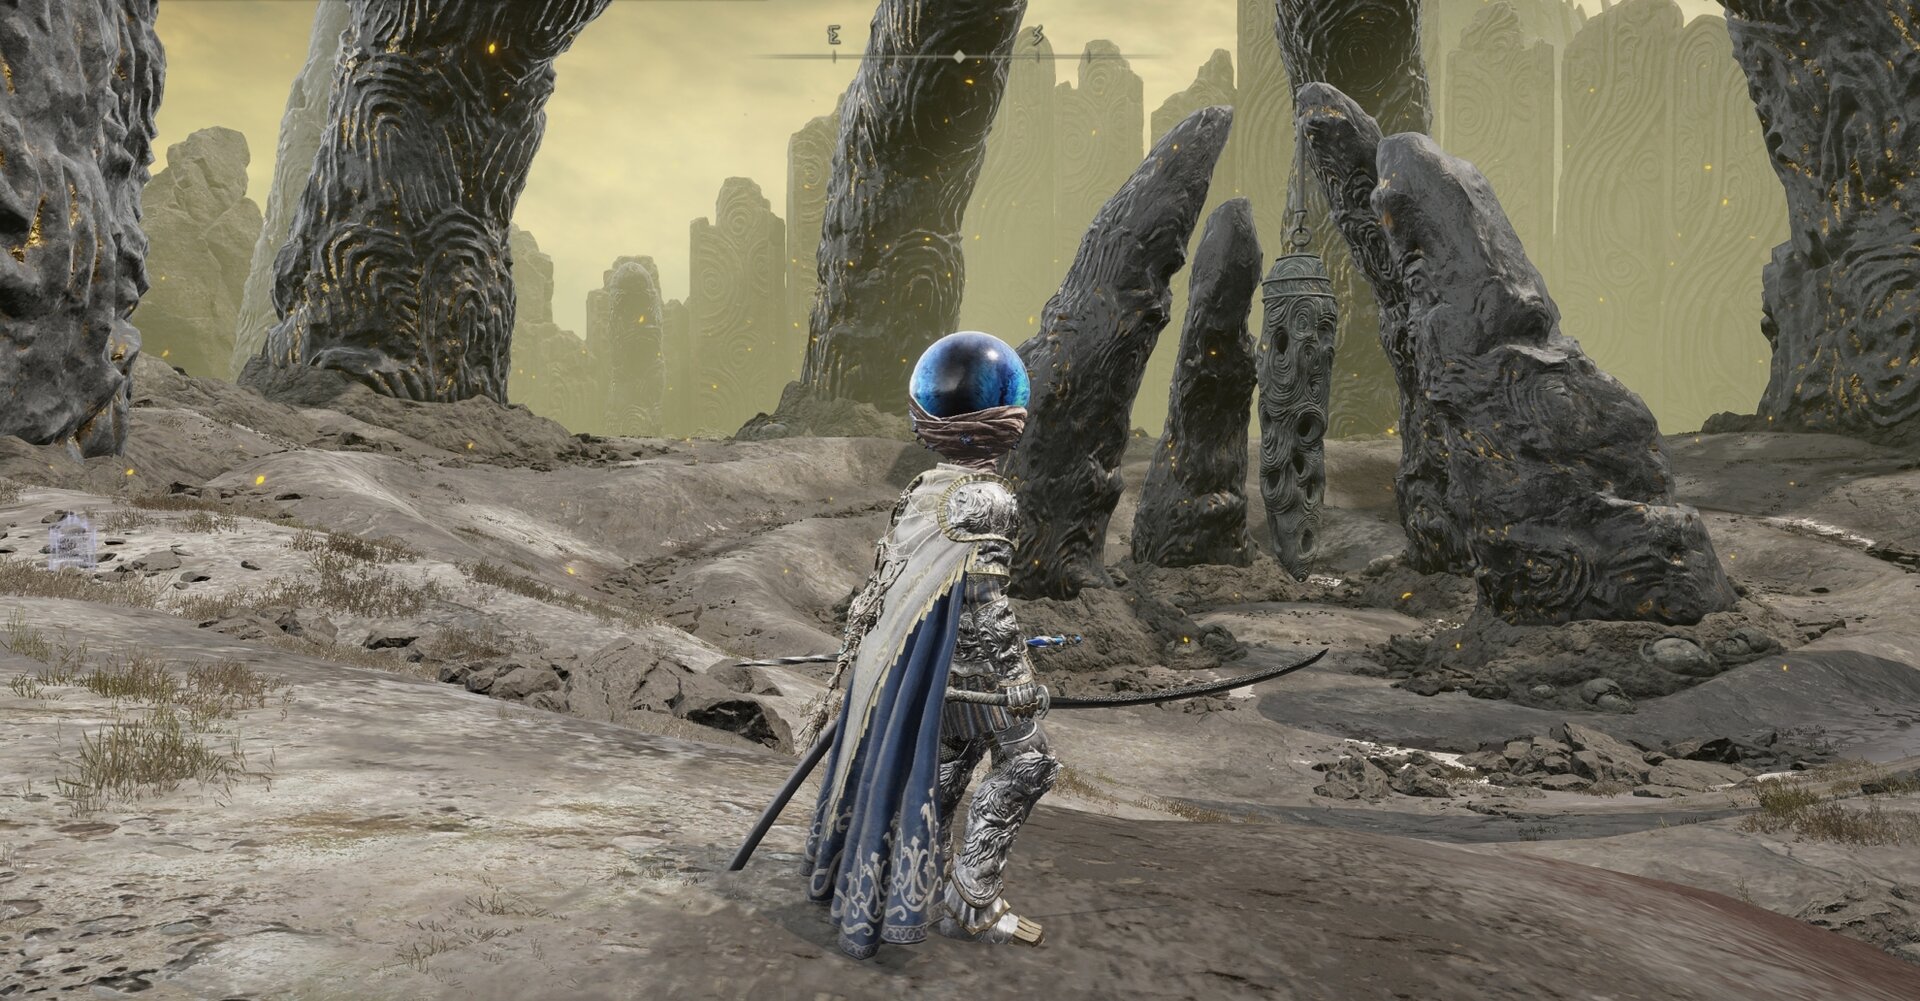
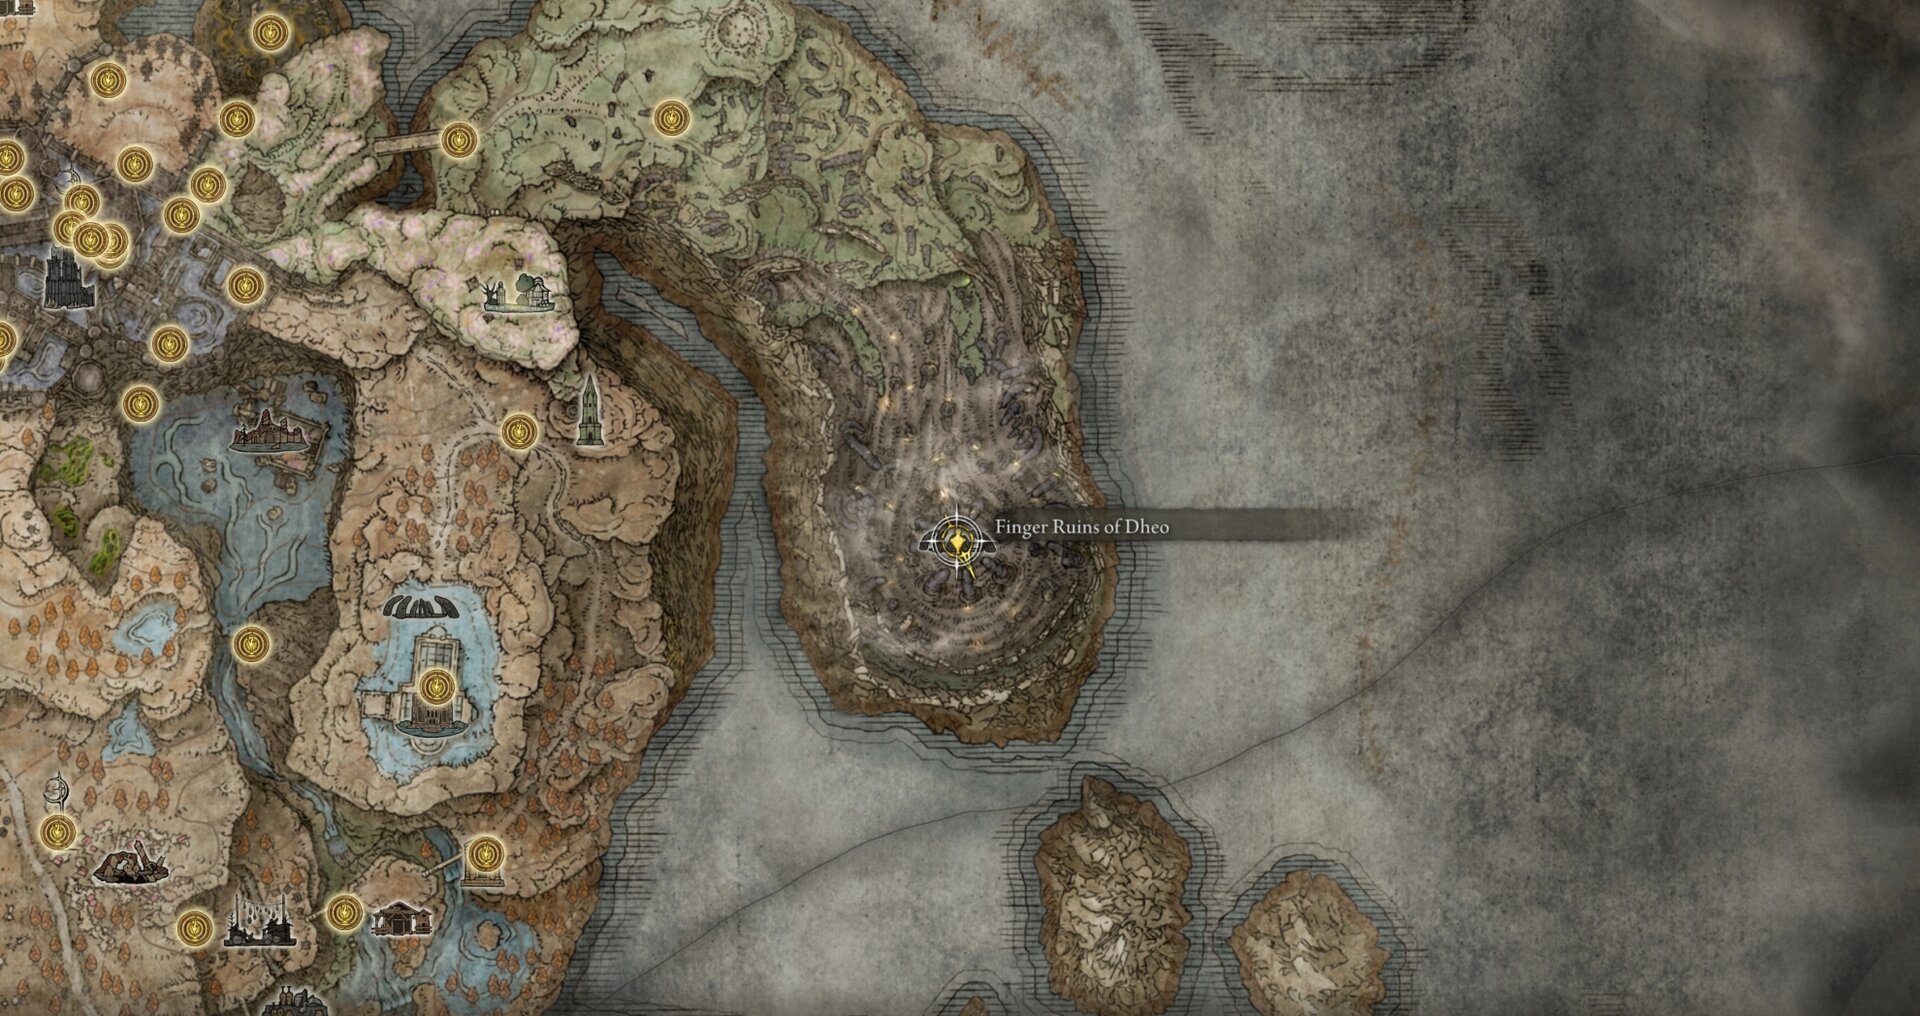
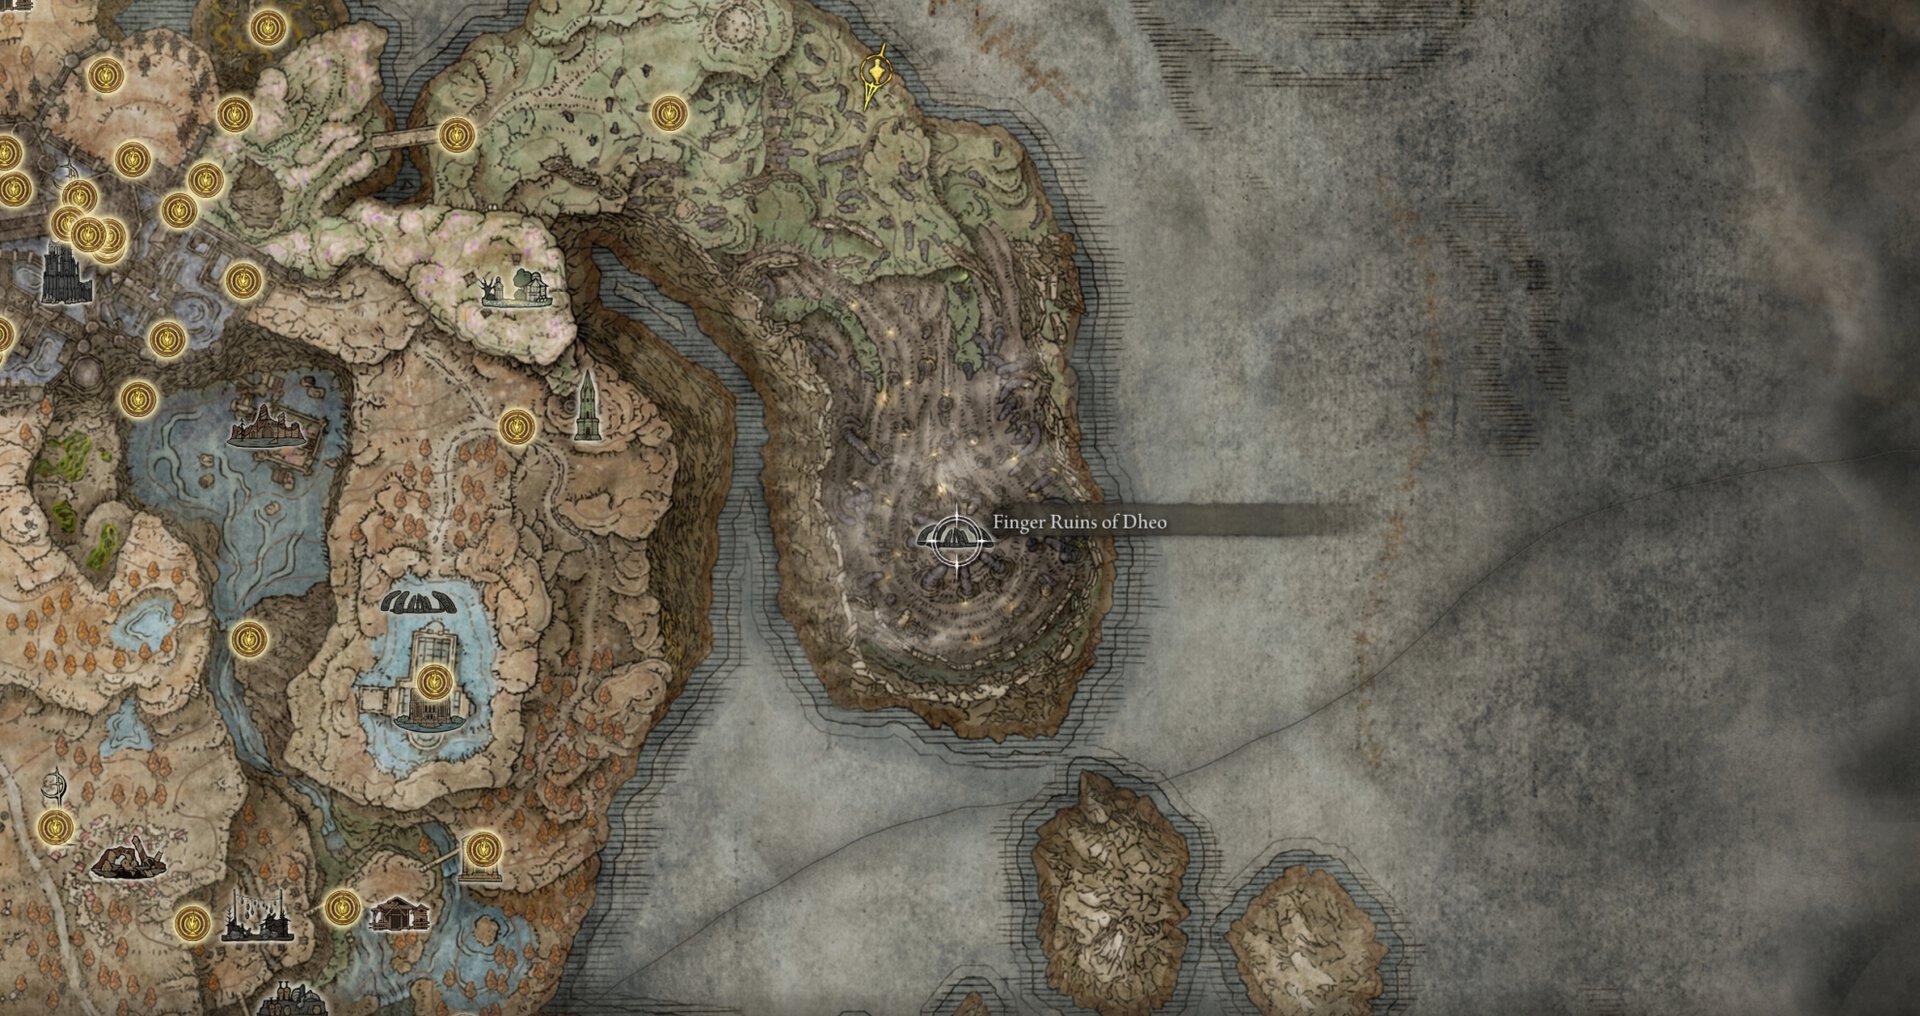
The Finger Ruins of Dheo are located behind the Shadow Keep. Make your way through the Church District. - Detour to the Shaman Village and Rabbath's Rise.
There are several important items at the Shaman Village on the way to the Finger Ruins of Dheo that pertain to Count Ymir, the Swordhands of Night, and Marika. - The Finger Ruins of Dheo.
After you've finished vacationing in the Hinterlands and touring Rabbath's Rise, warp back to the bridge leading to the Finger Ruins of Dheo. Explore the Ruins. - The Mother of Fingers.
Return to the Cathedral of Manus Metyr once again and speak with Count Ymir about your recent endeavors. - Jolán and Anna, Swordhands of Night.
After you defeat Jolán and Count(ess) Ymir, you'll have the opportunity to give Jolán either the Iris of Grace or Occultation, which will determine whether you get Jolán's Spirit Ashes or the Sword of Night.
Notes
Below this step-by-step quick walkthrough, you will find detailed explanation of every step with instructions on where to go and how to get there. We've supplied tons of maps and environmental images to guide you. There's a full list of all of the valuable loot that you should obtain along the way while you visit each place and explore it.
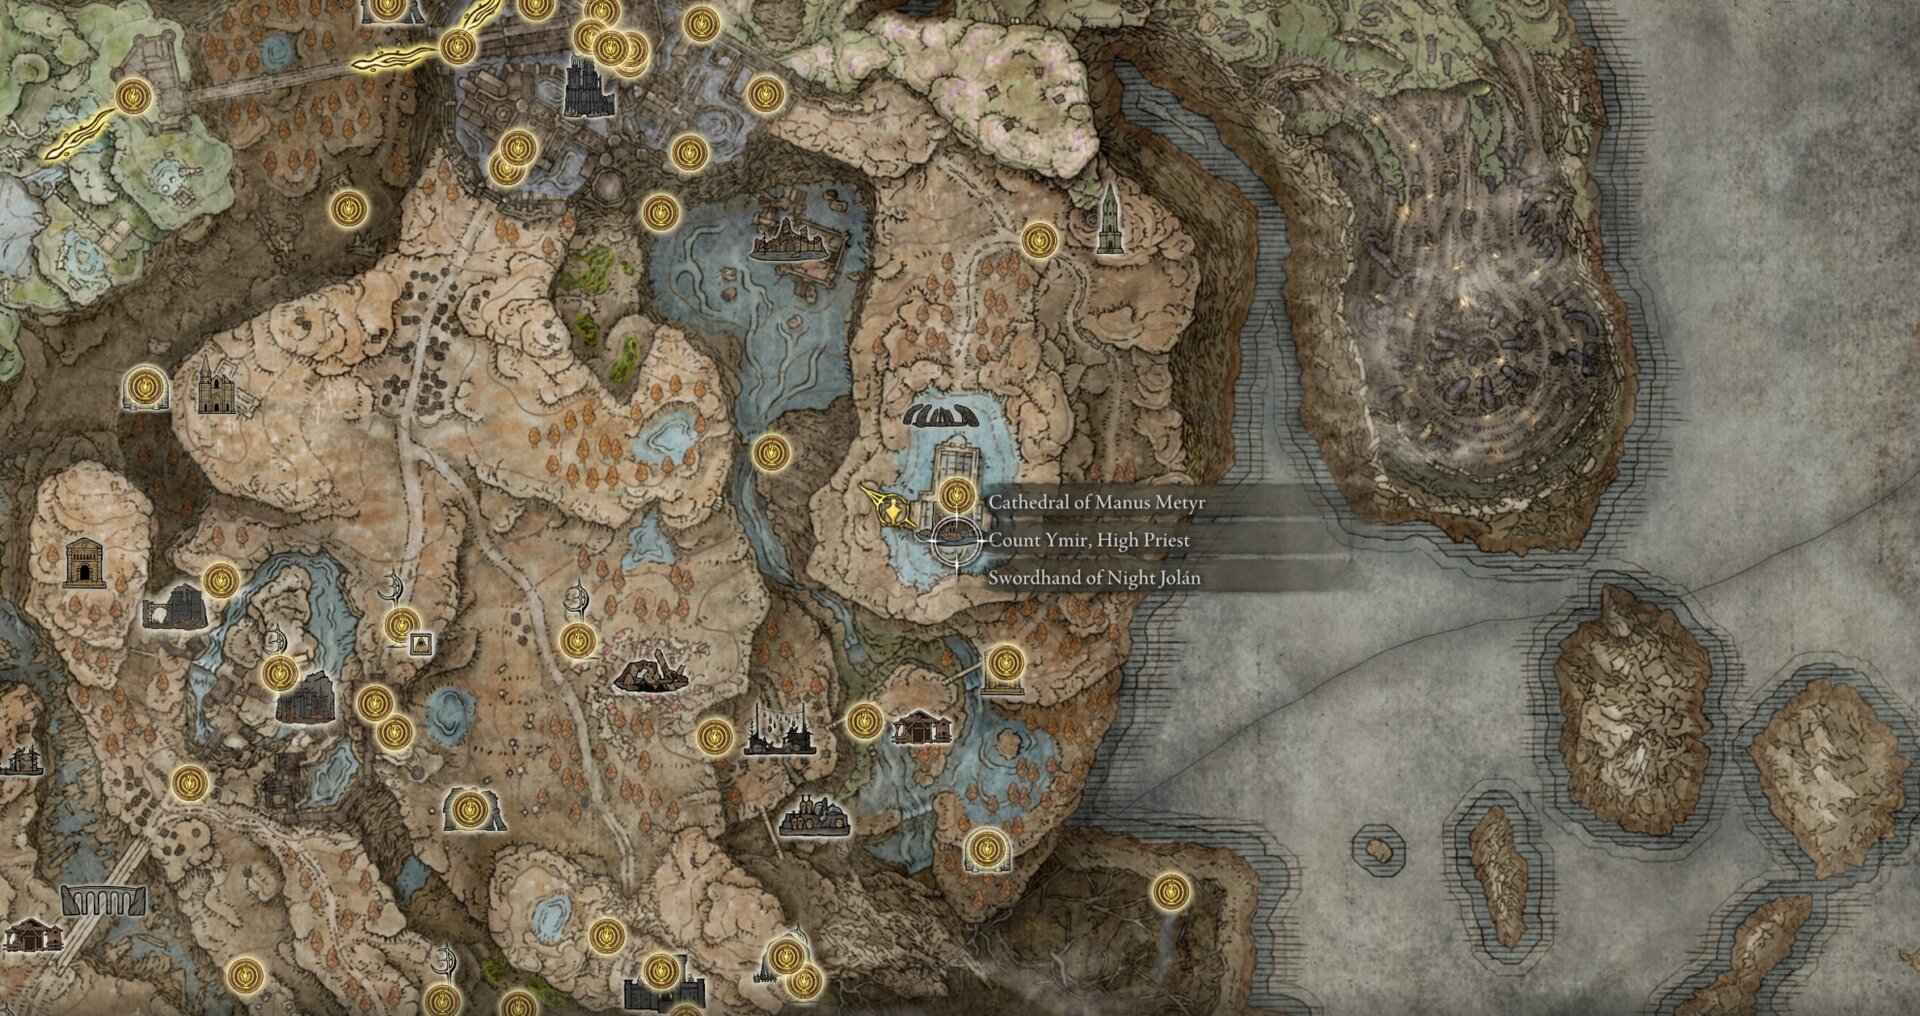
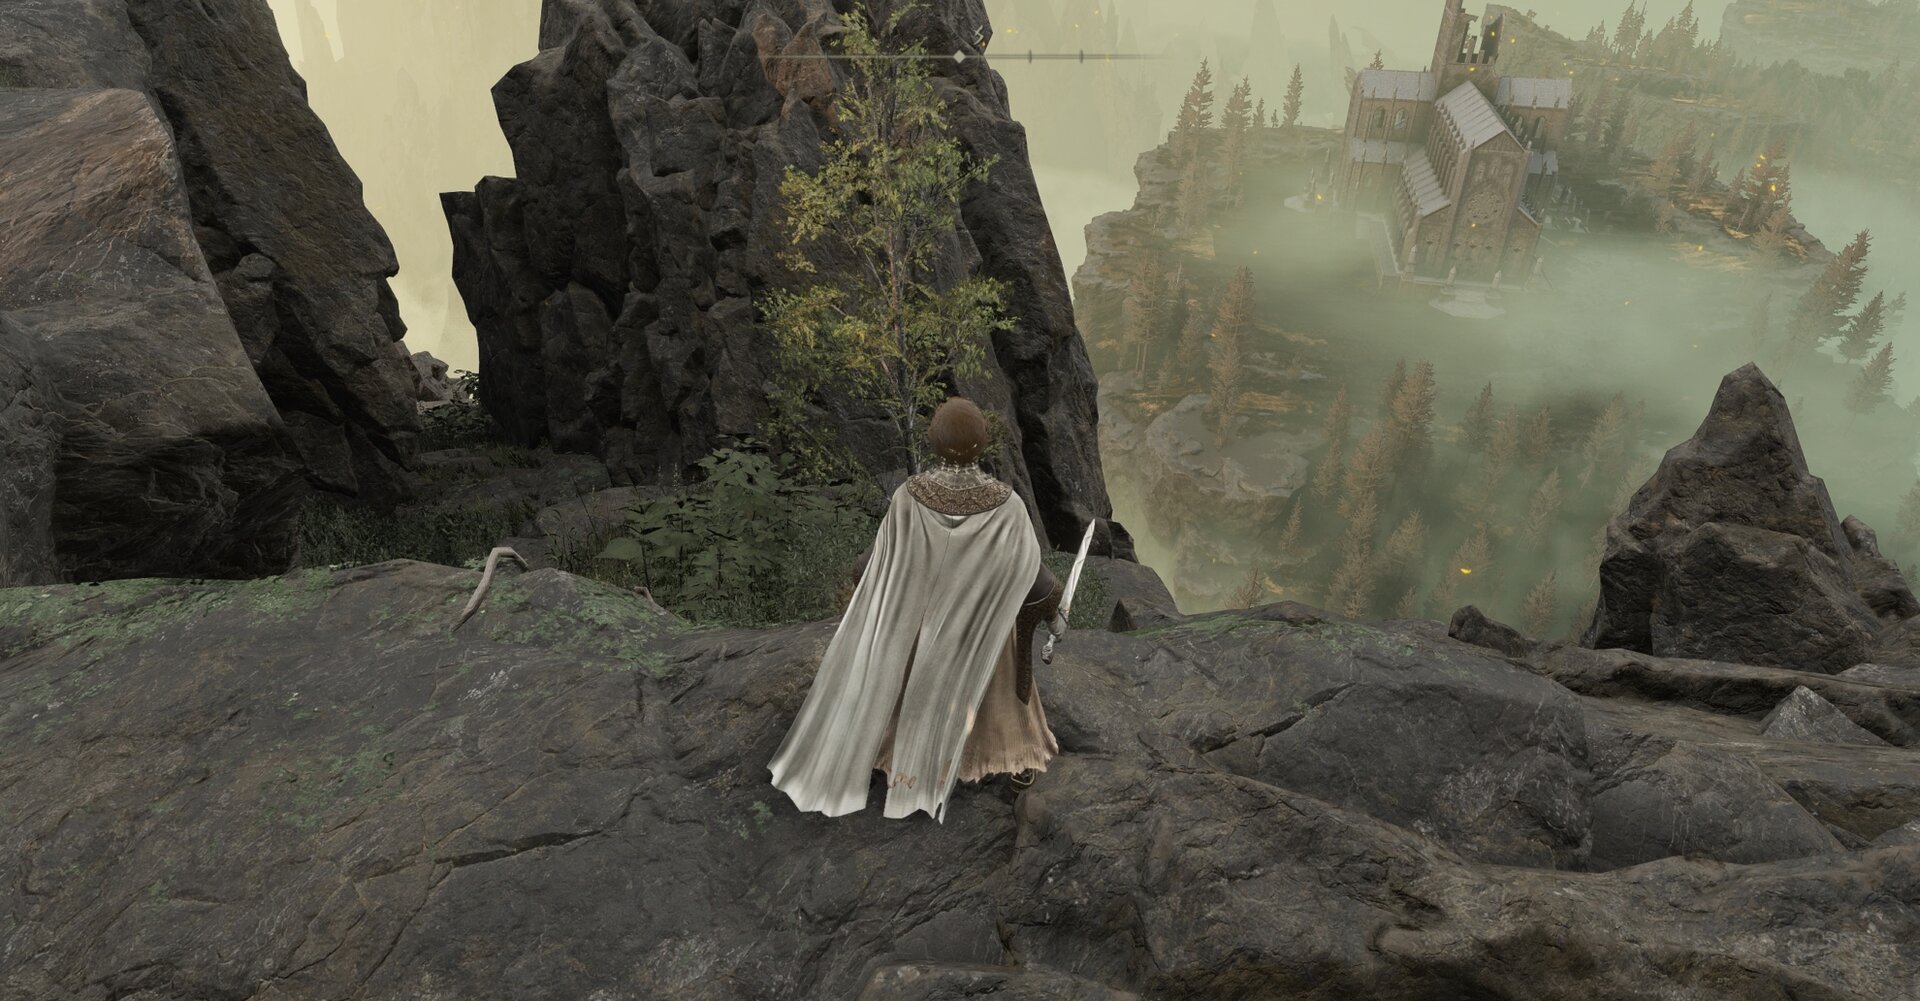
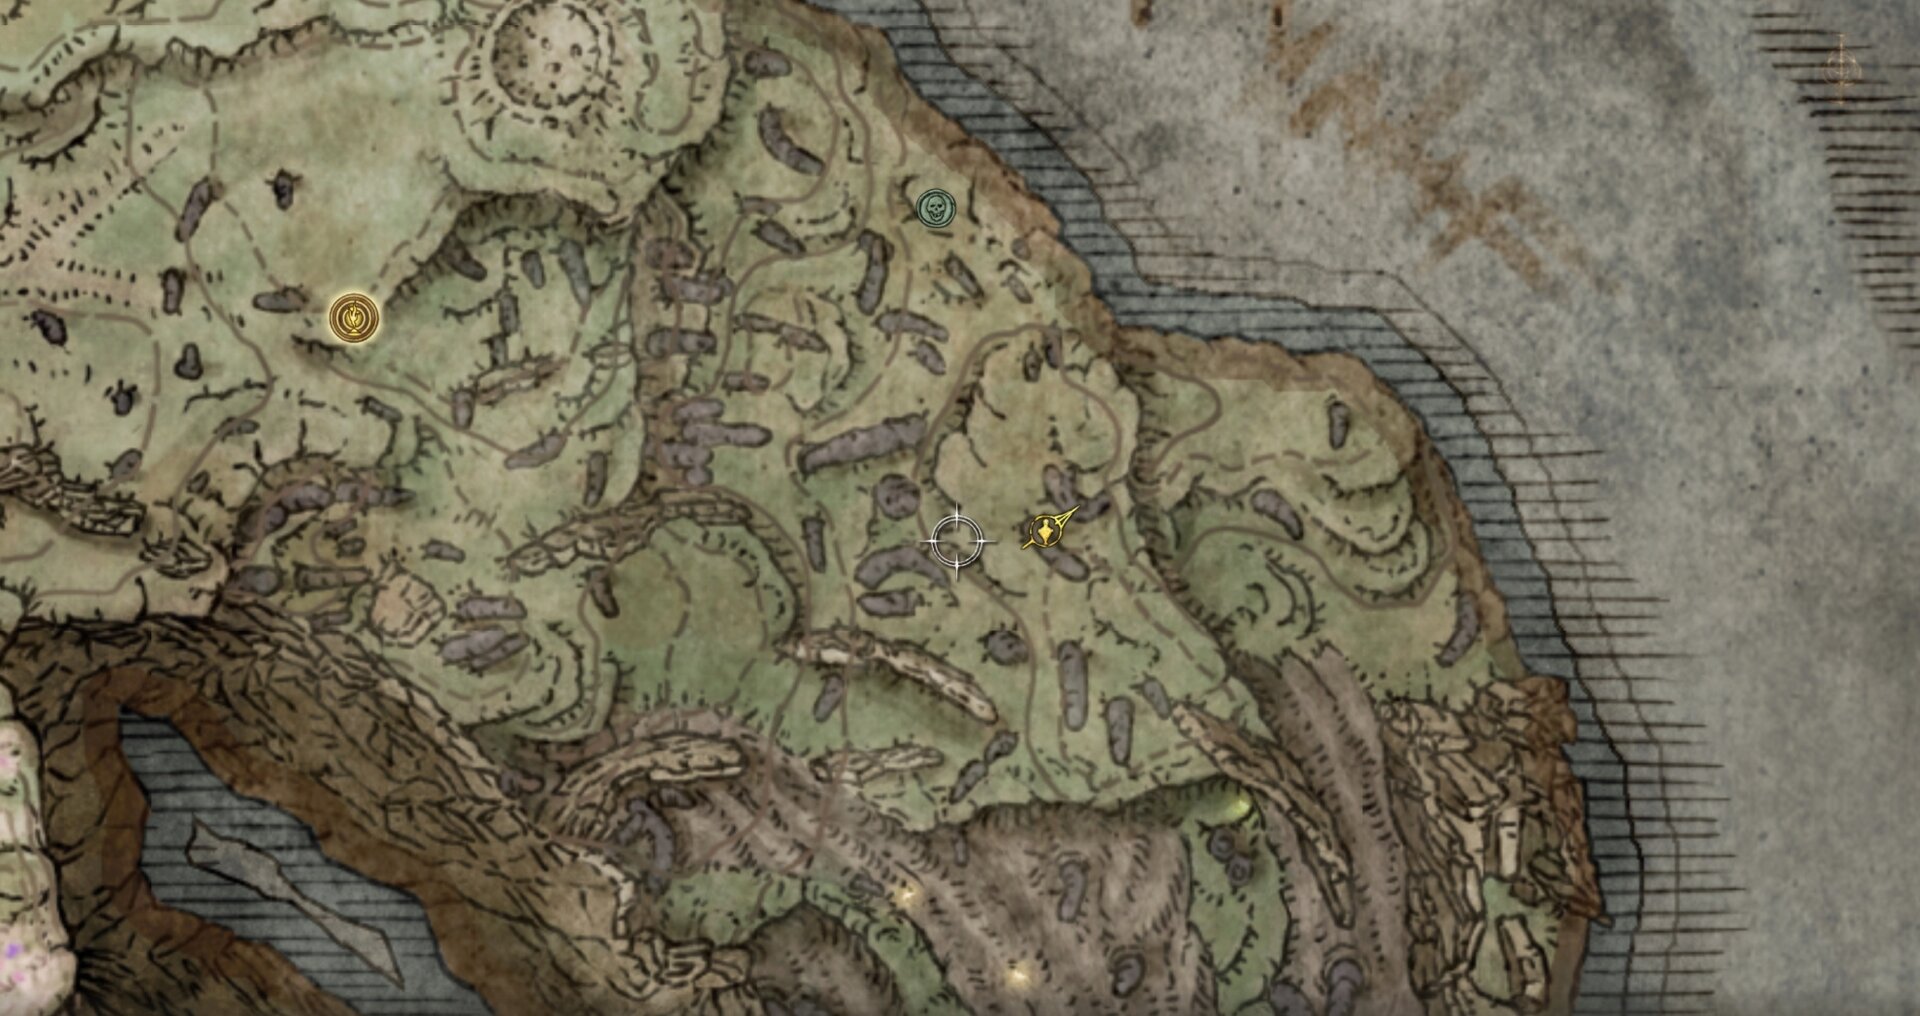
Step 1: Reach the Cathedral of Manus Metyr
Your first objective is to reach the Cathedral of Manus Metyr on Scadu Altus, though you can’t take the main path through the Shadow Keep on the Highroad.
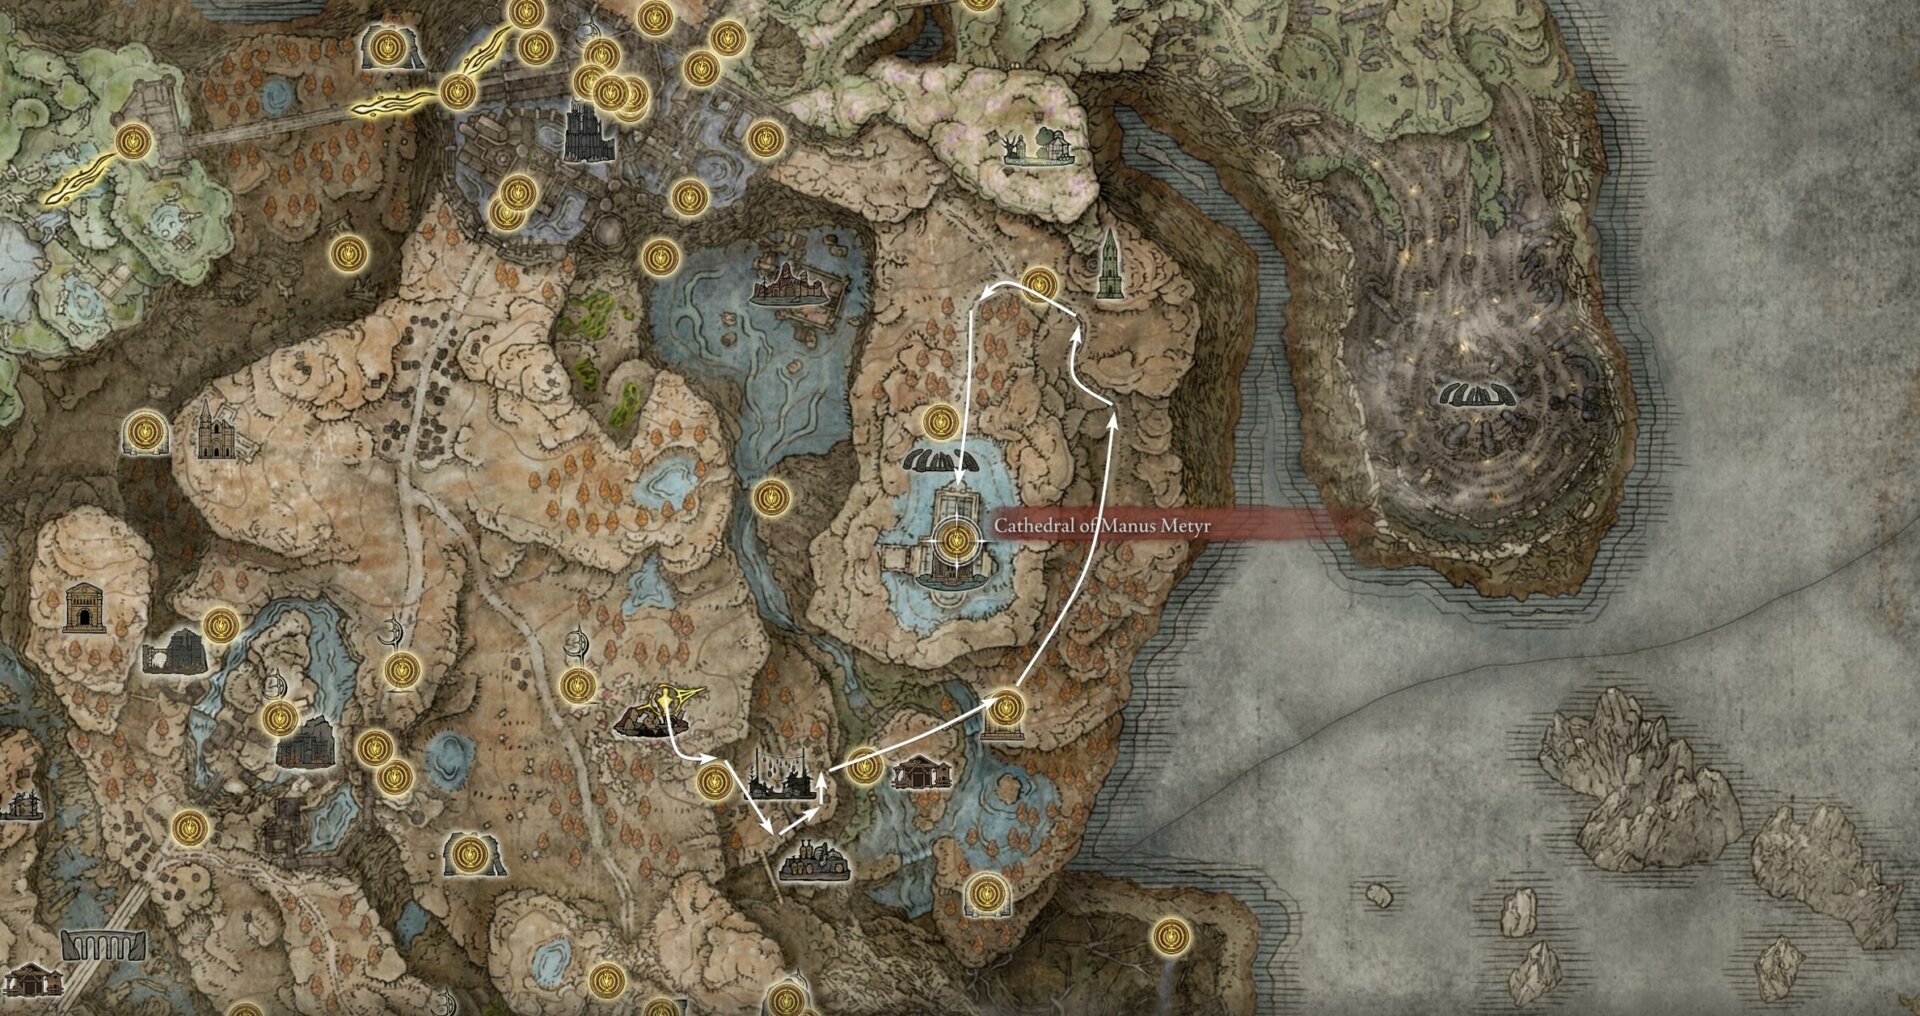
You have to go through Bonny Village, which is accessible by dropping down into Moorth Ruins and climbing back up through a dried up well.
Step 2: Bonny Village Detour
There are a couple of relevant items you’ll want to pick up in Bonny Village, the O Mother emote, the Armor of Night, and the Shield of Night. There are a bunch of other goodies here too, I recommend checking out our Bonny Village and Bonny Gaol Unique Item Locations Guide.
O Mother Emote
You can get the O Mother emote on the outskirts of town. You’ll need to use it later on to gain access to the Finger Ruins of Dheo.
Armor and Shield of Night
The Armor of Night is worn by the Swordhands of Night, Jolán and Anna. You can obtain both the Armor of Night and the Shield of Night from Bonny Gaol.
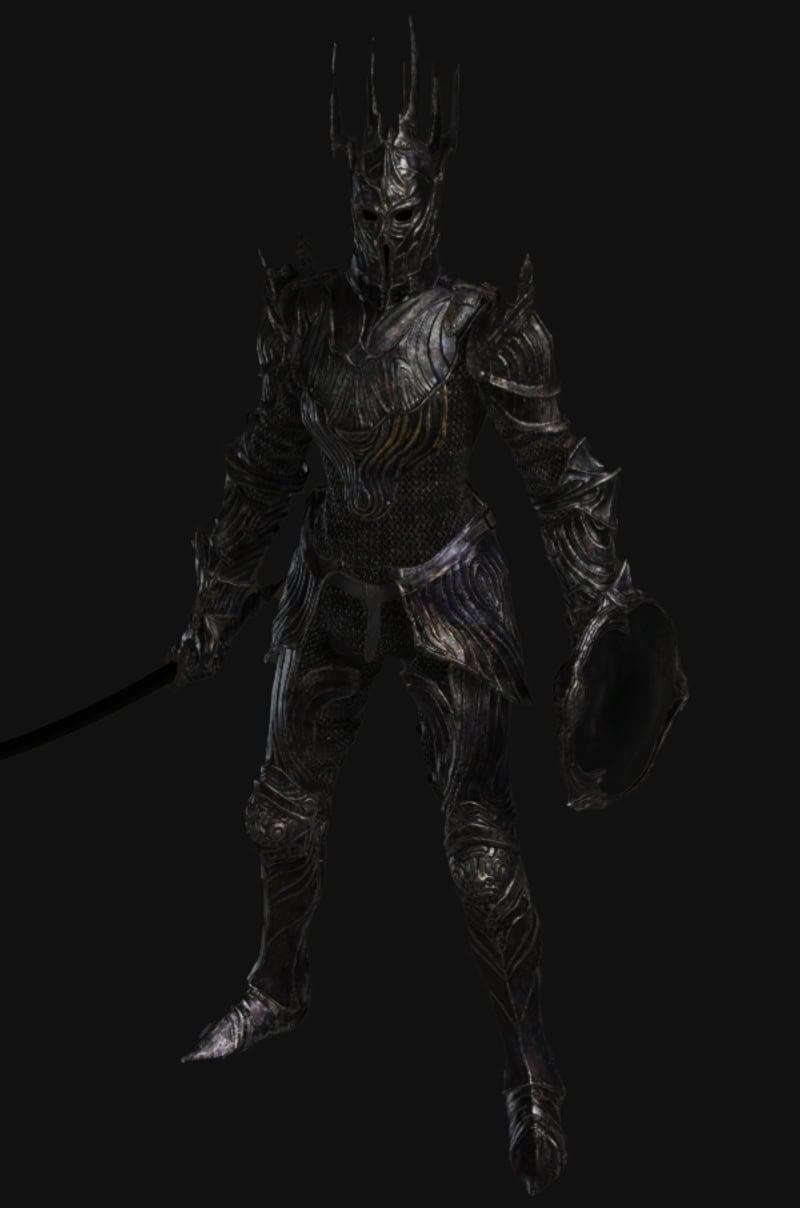
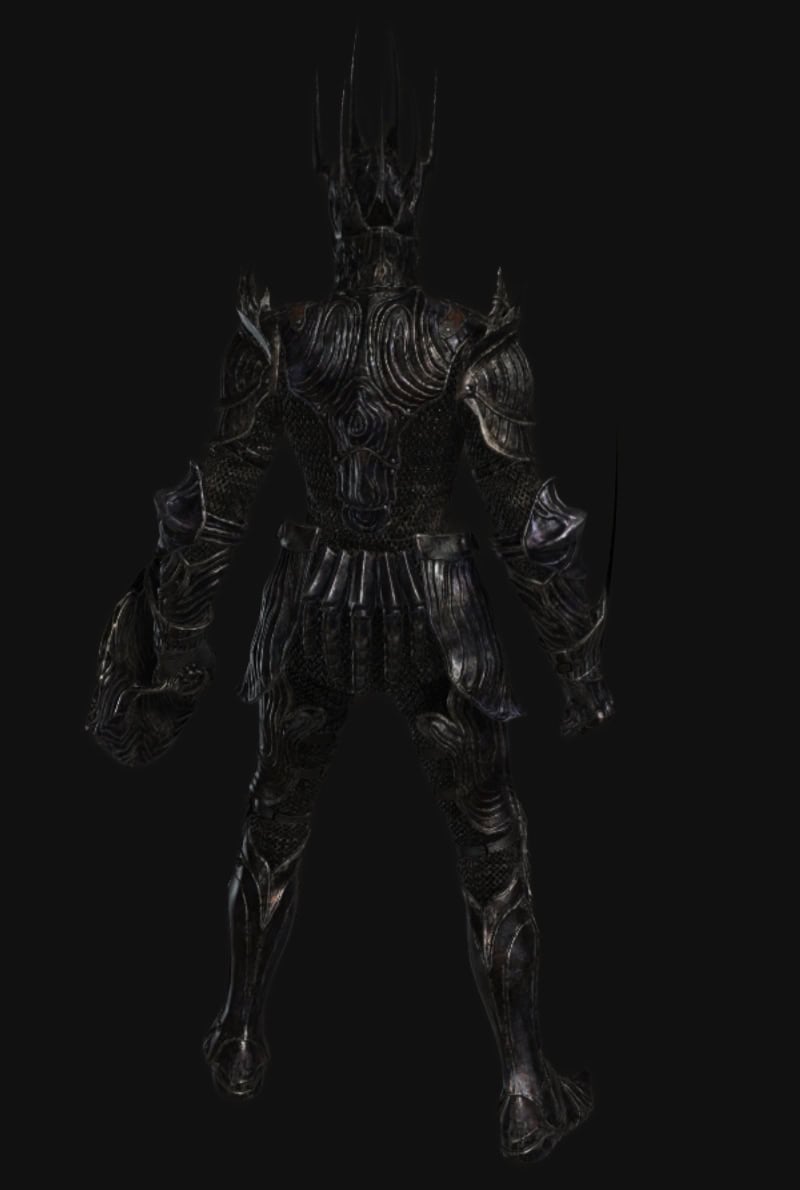
You can loot the Swordhand of Night armor set and Shield of Night from tortured corpses at Bonny Gaol in Bonny Village on Scadu Altus. You’ll need to use the jar elevator after defeating the Shadow Man wallowing on the elevator button.
You can take a closer look at the Sauron armor and all the associated gear to that set in our in-depth overview of the Swordhand of Night gear. The article features previews with high-quality images from all sides, including the weapons with lore descriptions and stats.
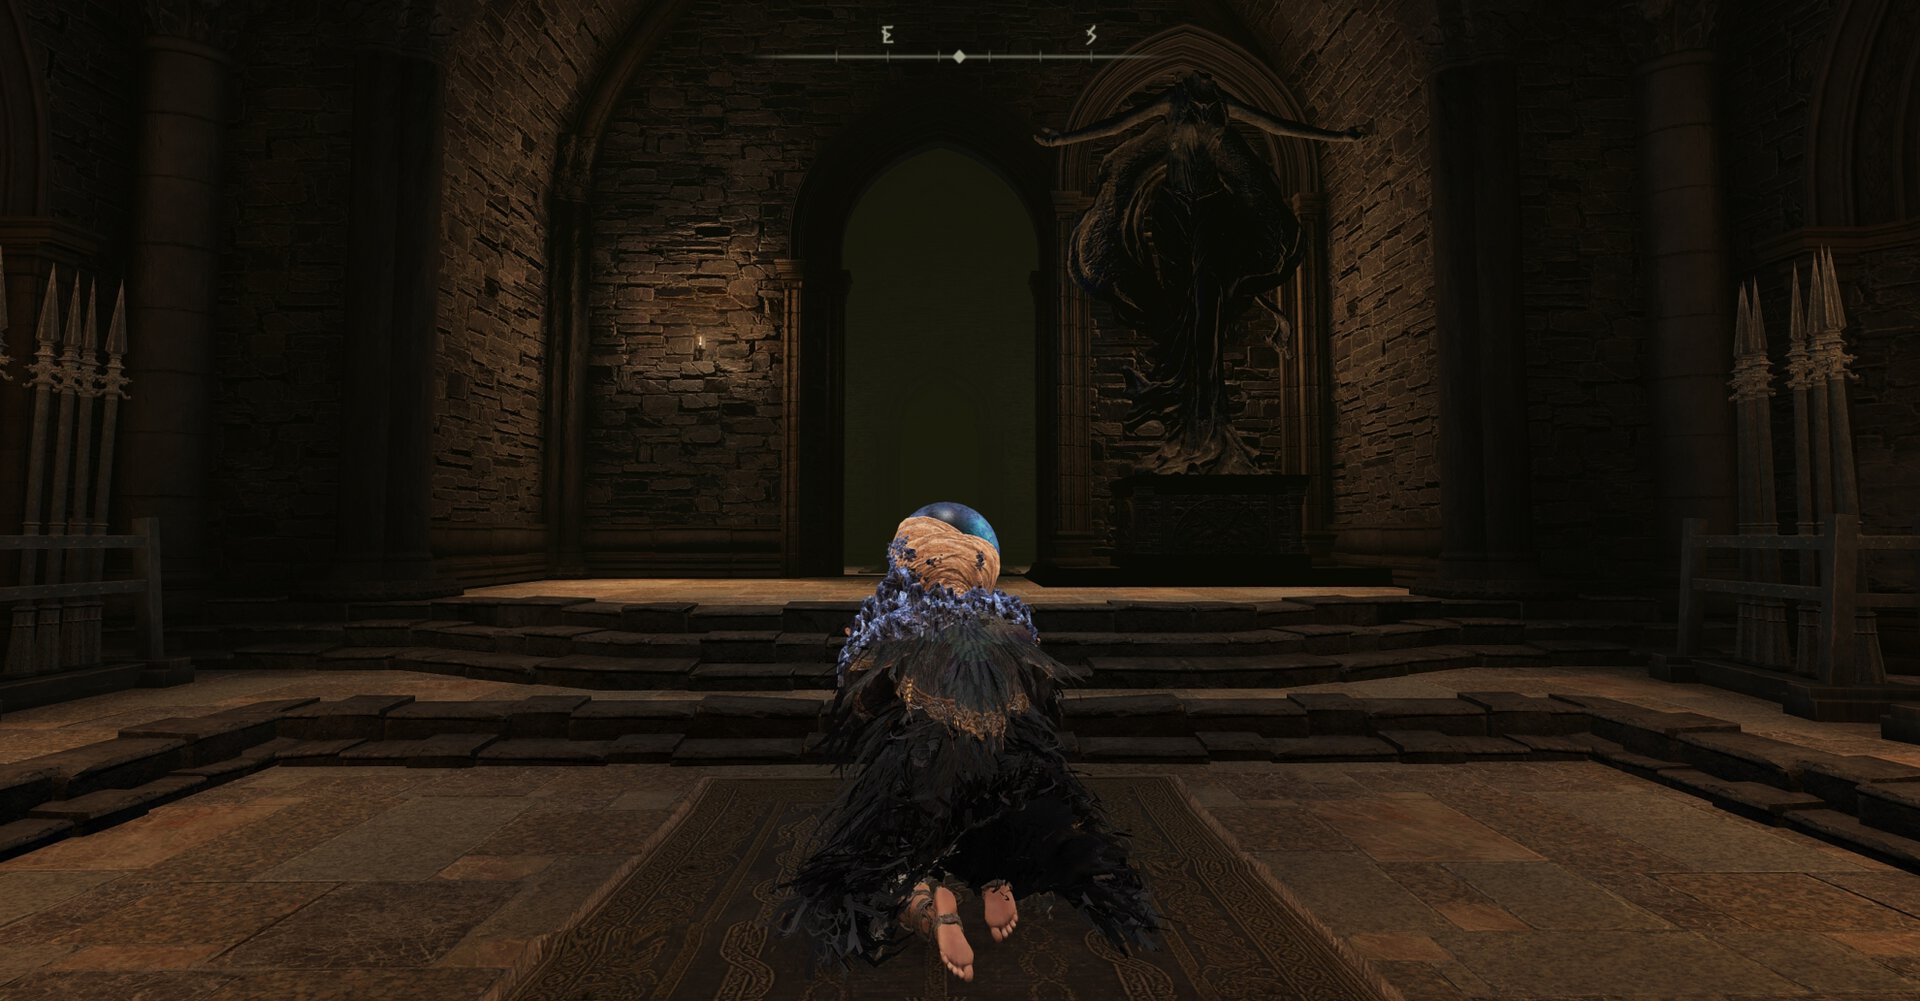
Step 3: Meet Count Ymir and Jolán
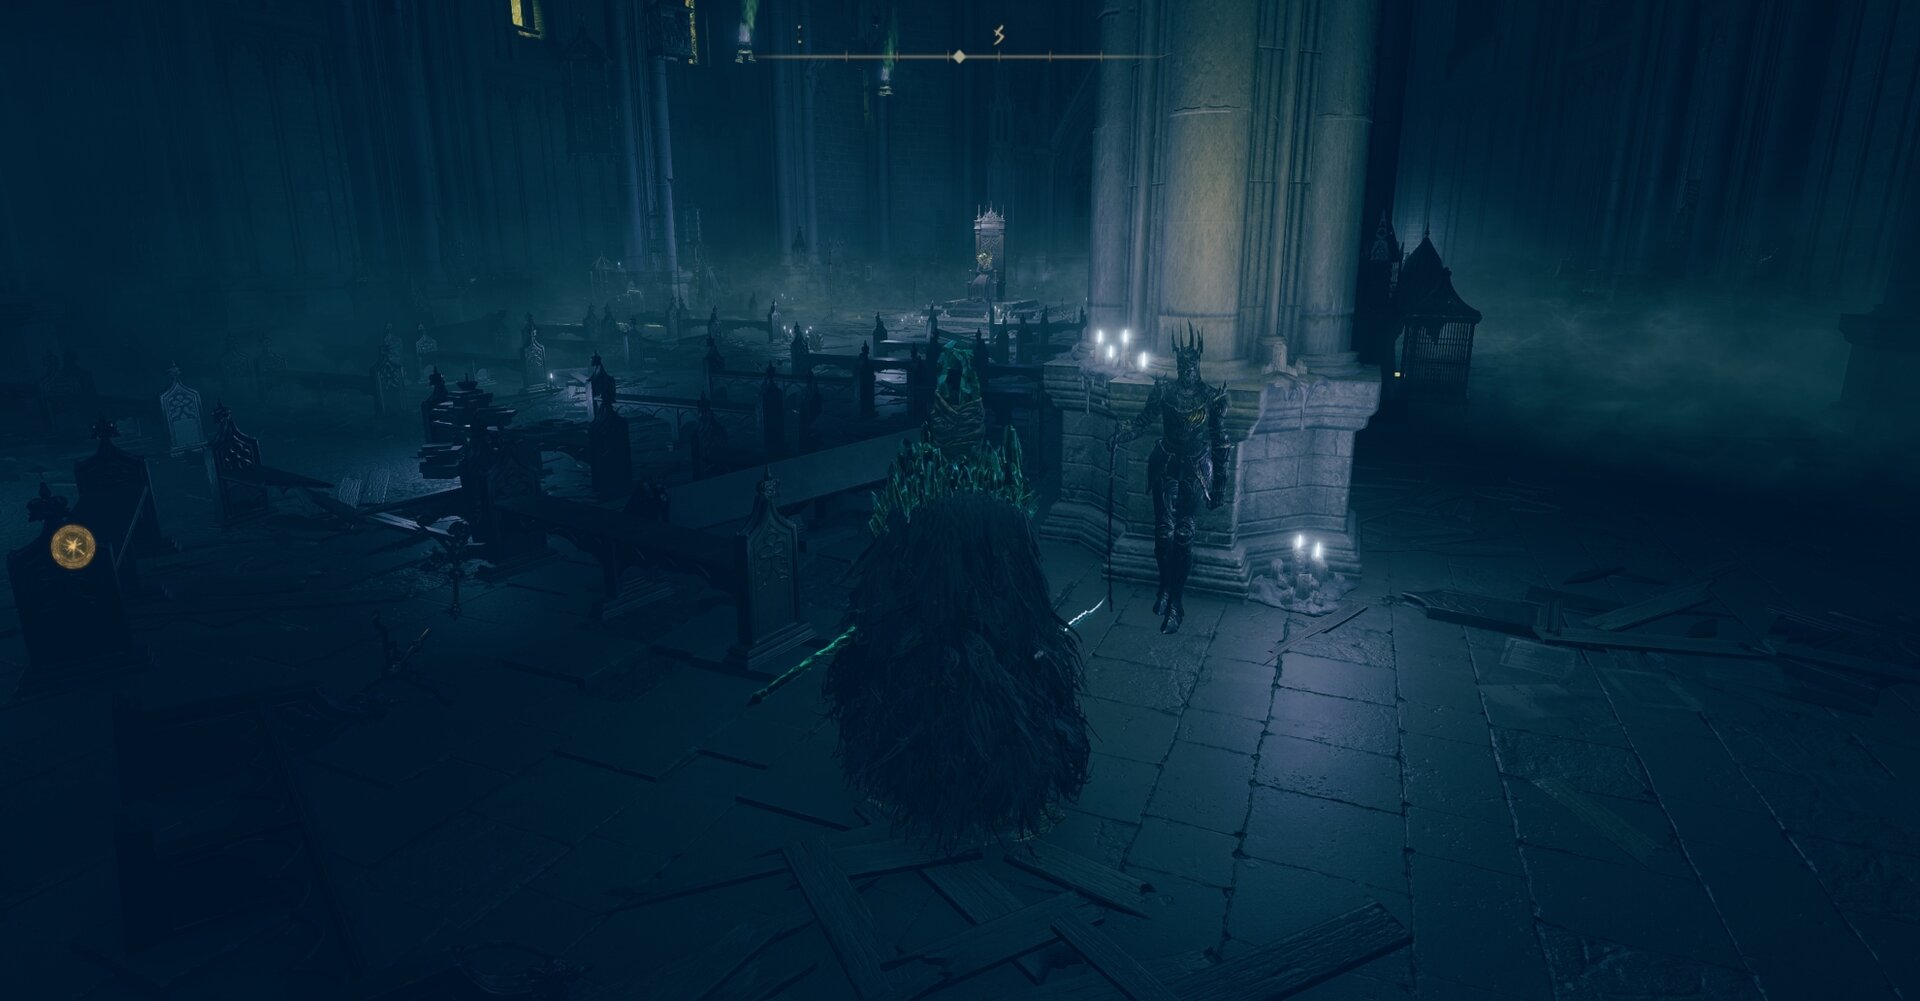
Inside the Cathedral, you’ll find Count Ymir sitting on the throne.
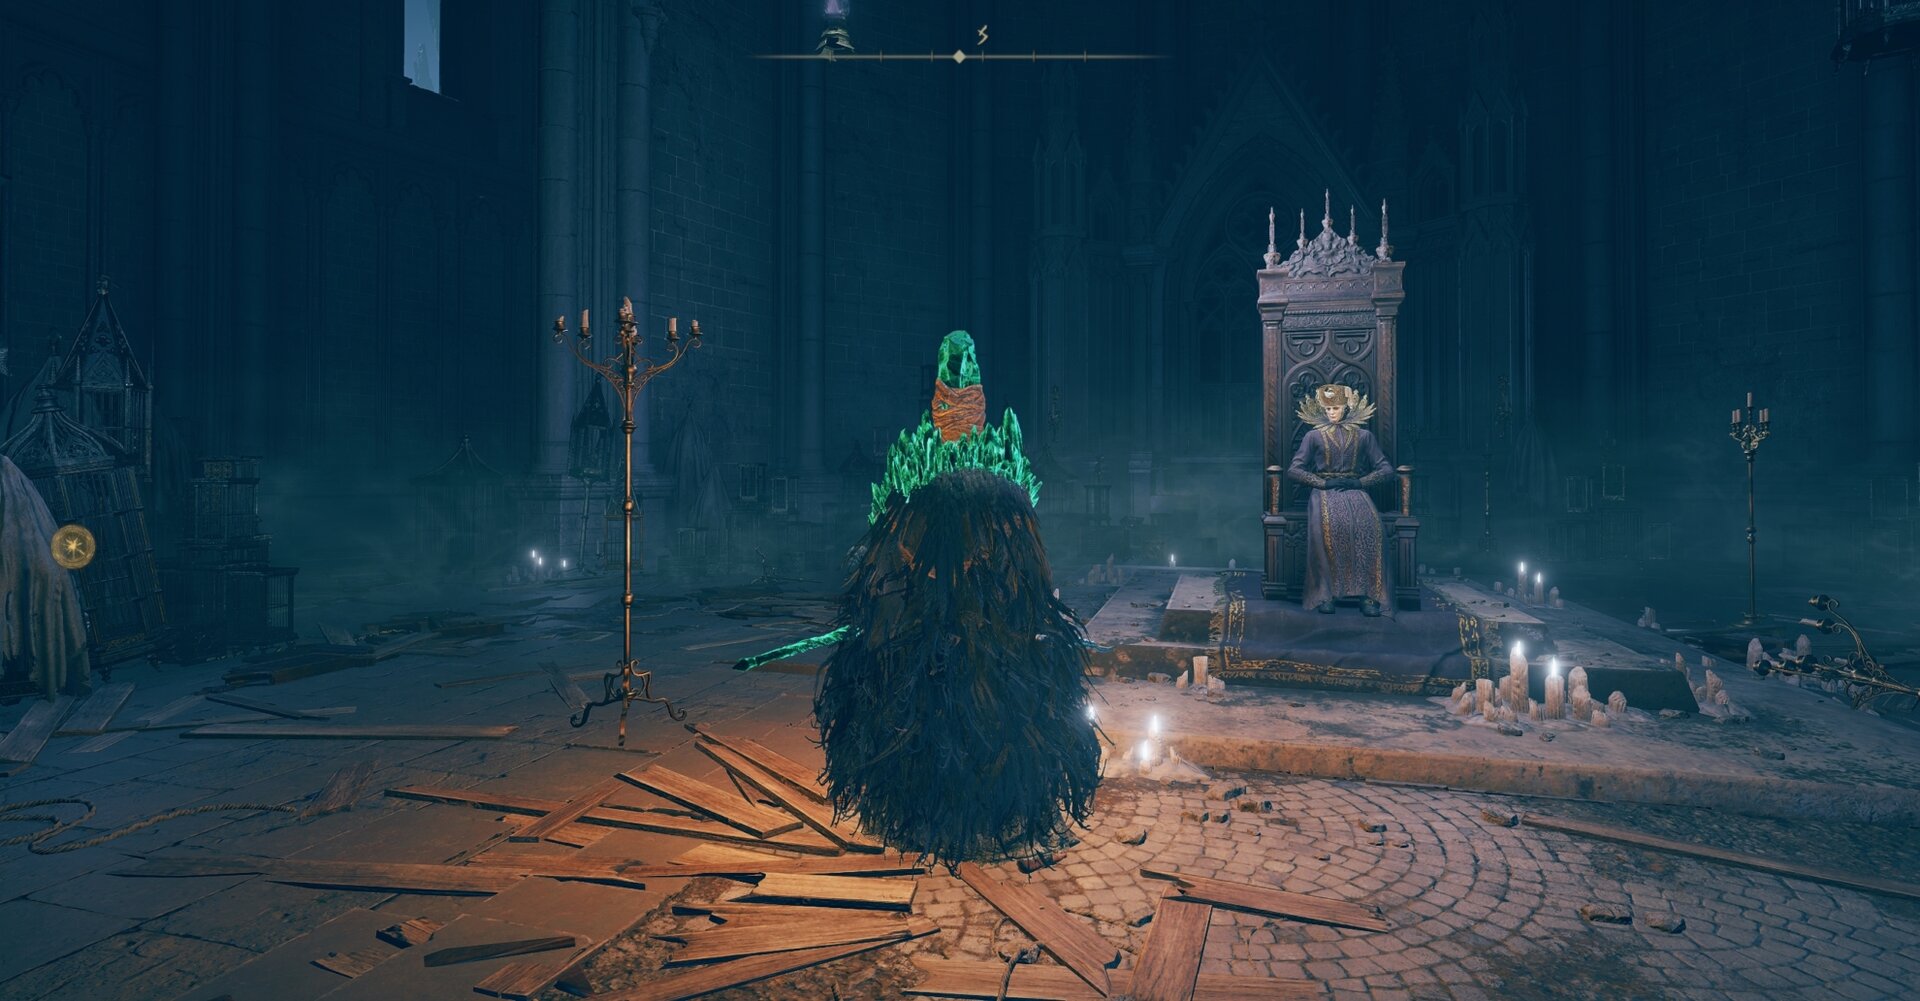
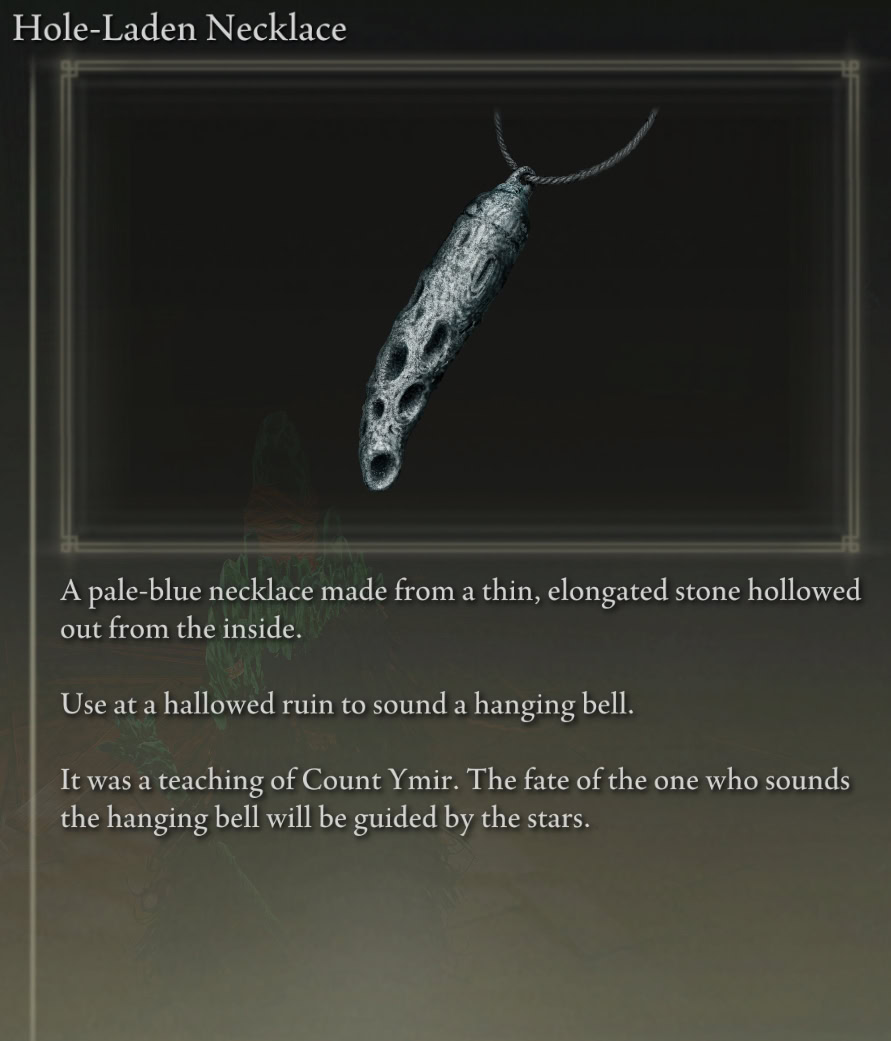
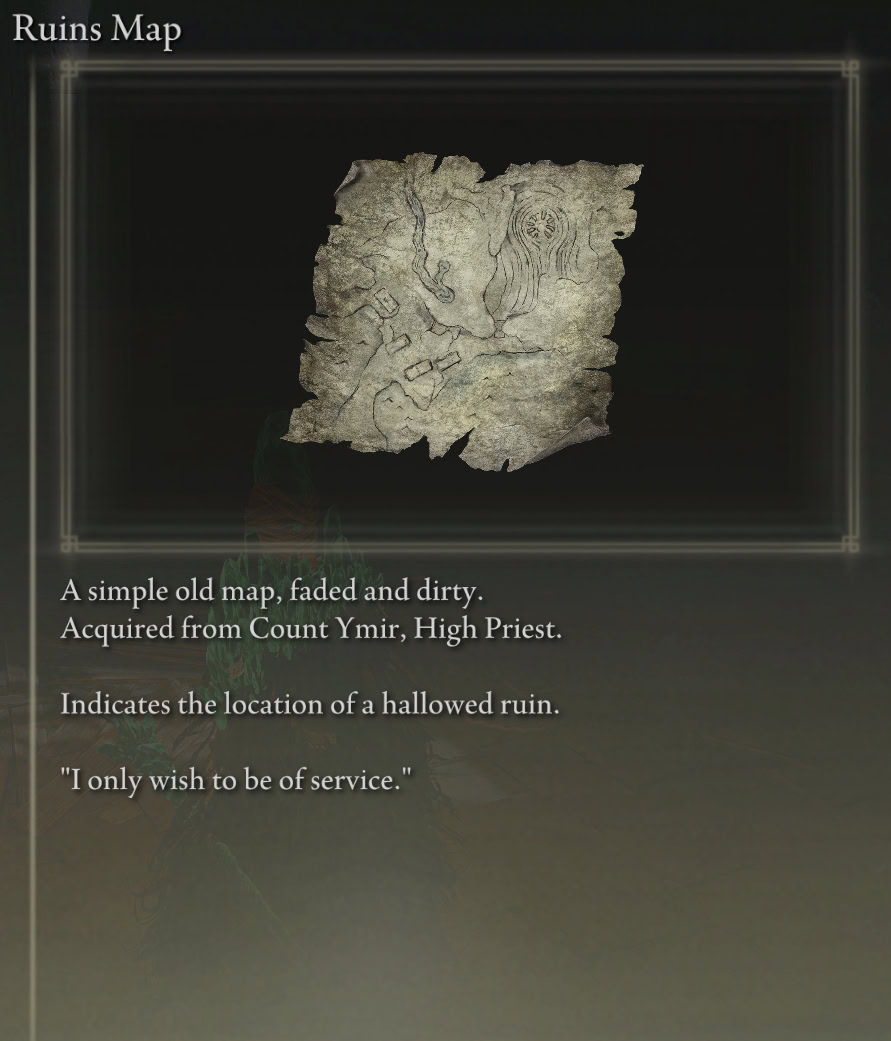
Exhaust his dialogue and he’ll give you the Finger Whistle and a map to some Finger Ruins.
Then, you can meet Jolán leaning against a column. No, your eyes didn’t deceive you. She was not there before. She doesn’t appear until you speak with Count Ymir. Exhaust her dialogue.
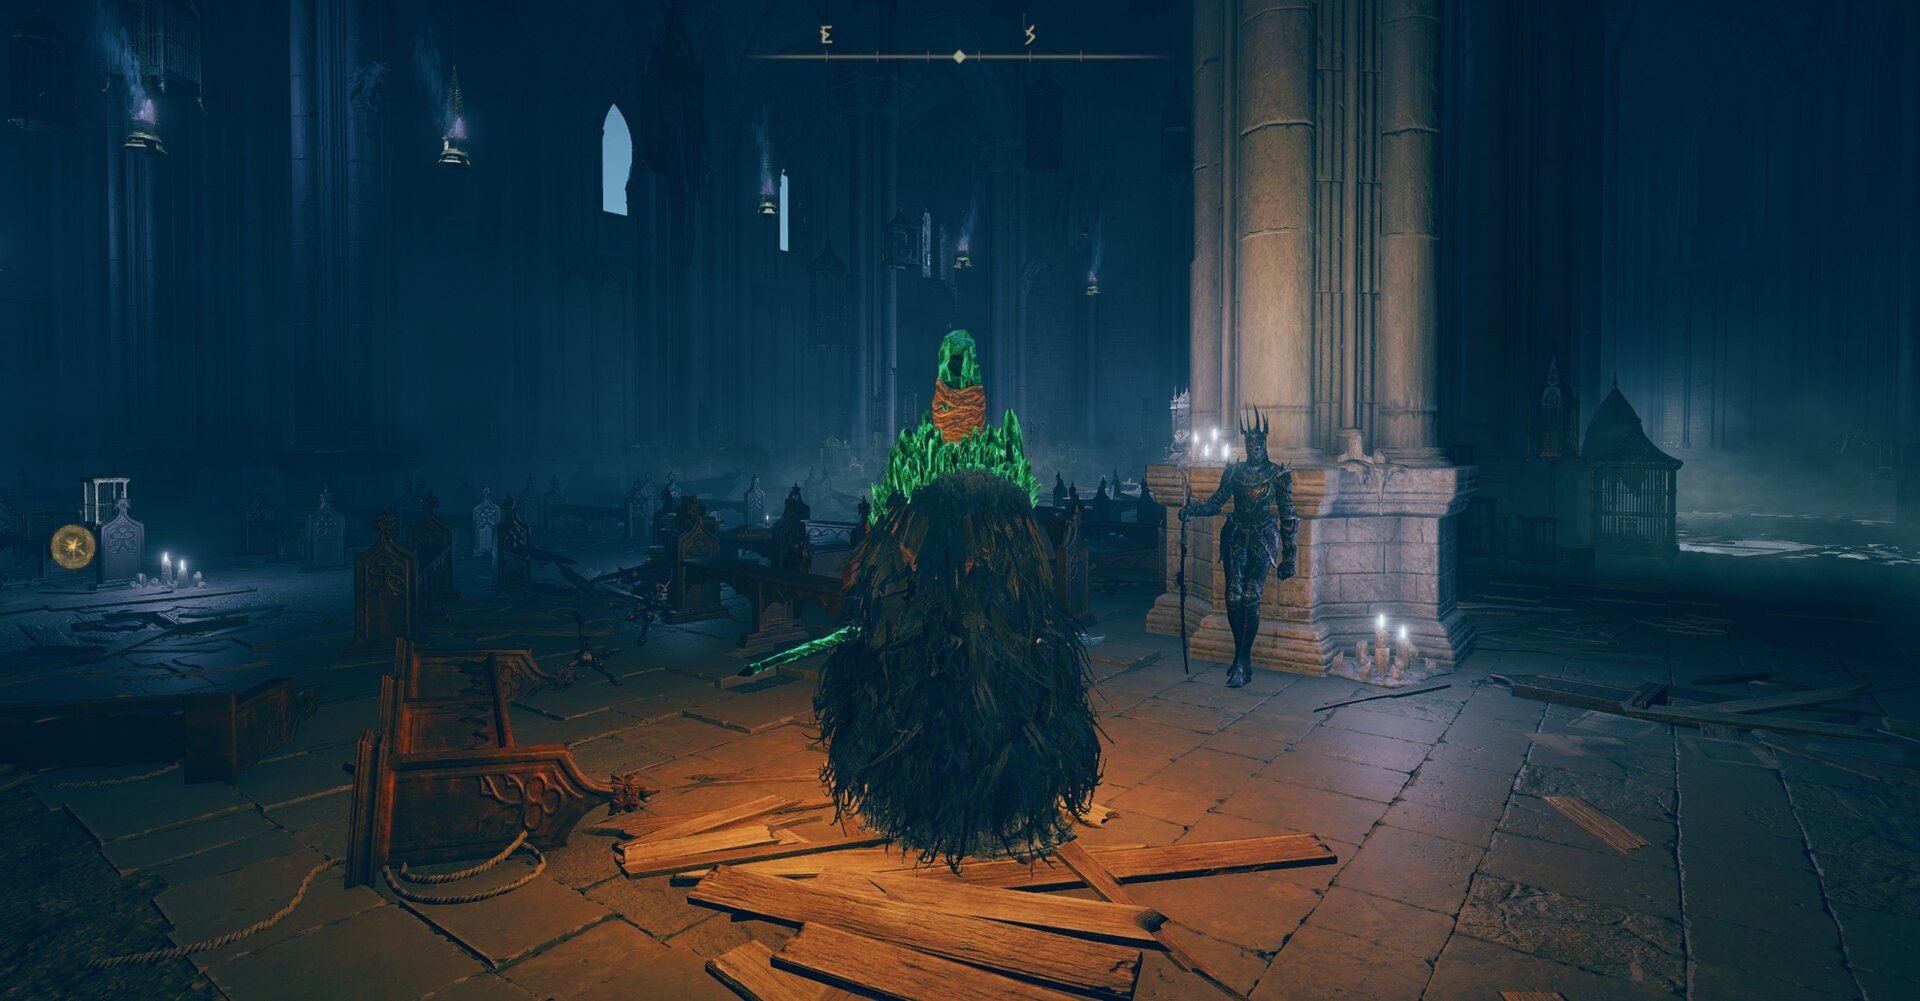
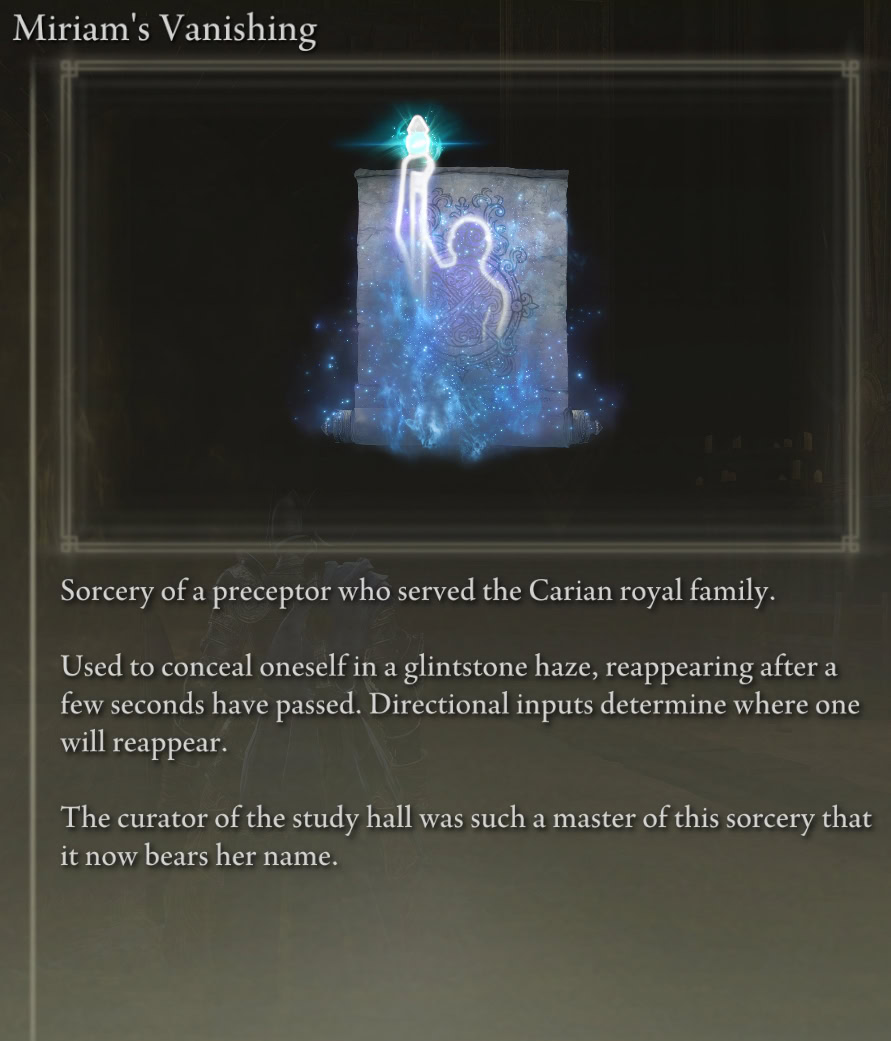
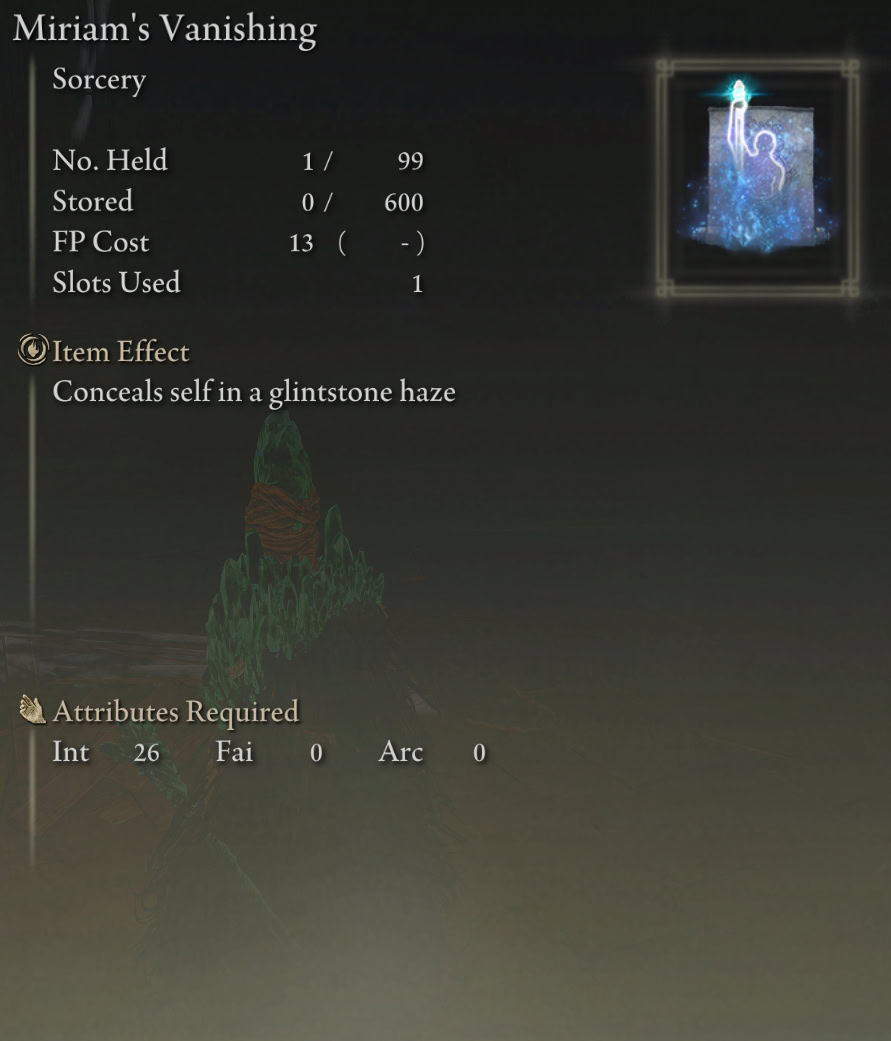
Count Ymir also teaches Sorcery, so you can purchase some lessons from him. Initially, the only new one available is Miriam’s Vanishing for 10k Runes, alongside a few other basic Sorceries.
Items Around Cathedral
There are no items inside the Cathedral of Manus Metyr itself. However, there are a few things to pick up outside.
Remembrance Duplication Coffin
There is a Remembrance Duplication Coffin on the southwestern side of the Cathedral of Manus Metyr. It works just like the Walking Mausoleums in the base game, minus the dental procedure.
There are 3 Remembrance Duplication Coffins in the Realm of Shadow. Each one is located at Finger Ruins.
Ash of War: Carian Sovereignty
Ash of War: Carian Sovereignty is the ultimate version of Carian Grandeur, the one used by Rellana, the Twin Moon Knight, that has a follow-up spin attack. Unfortunately, you can put it on the Carian Knight sword.
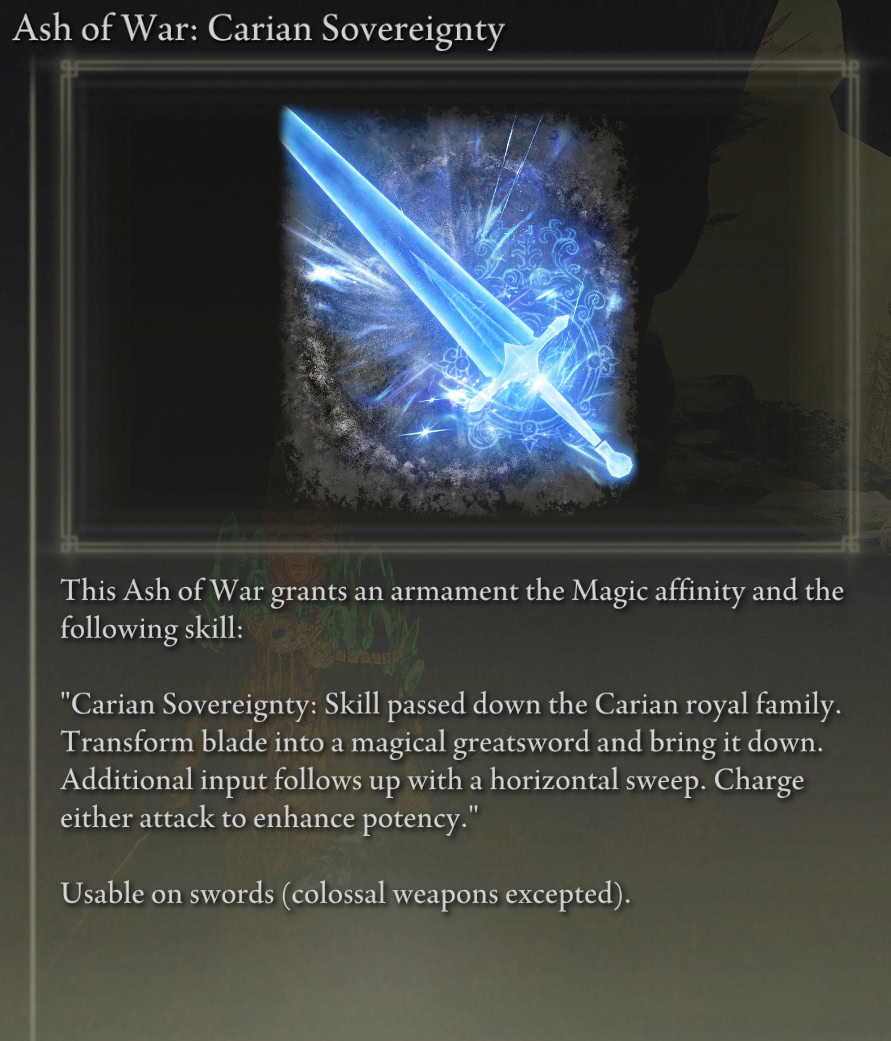
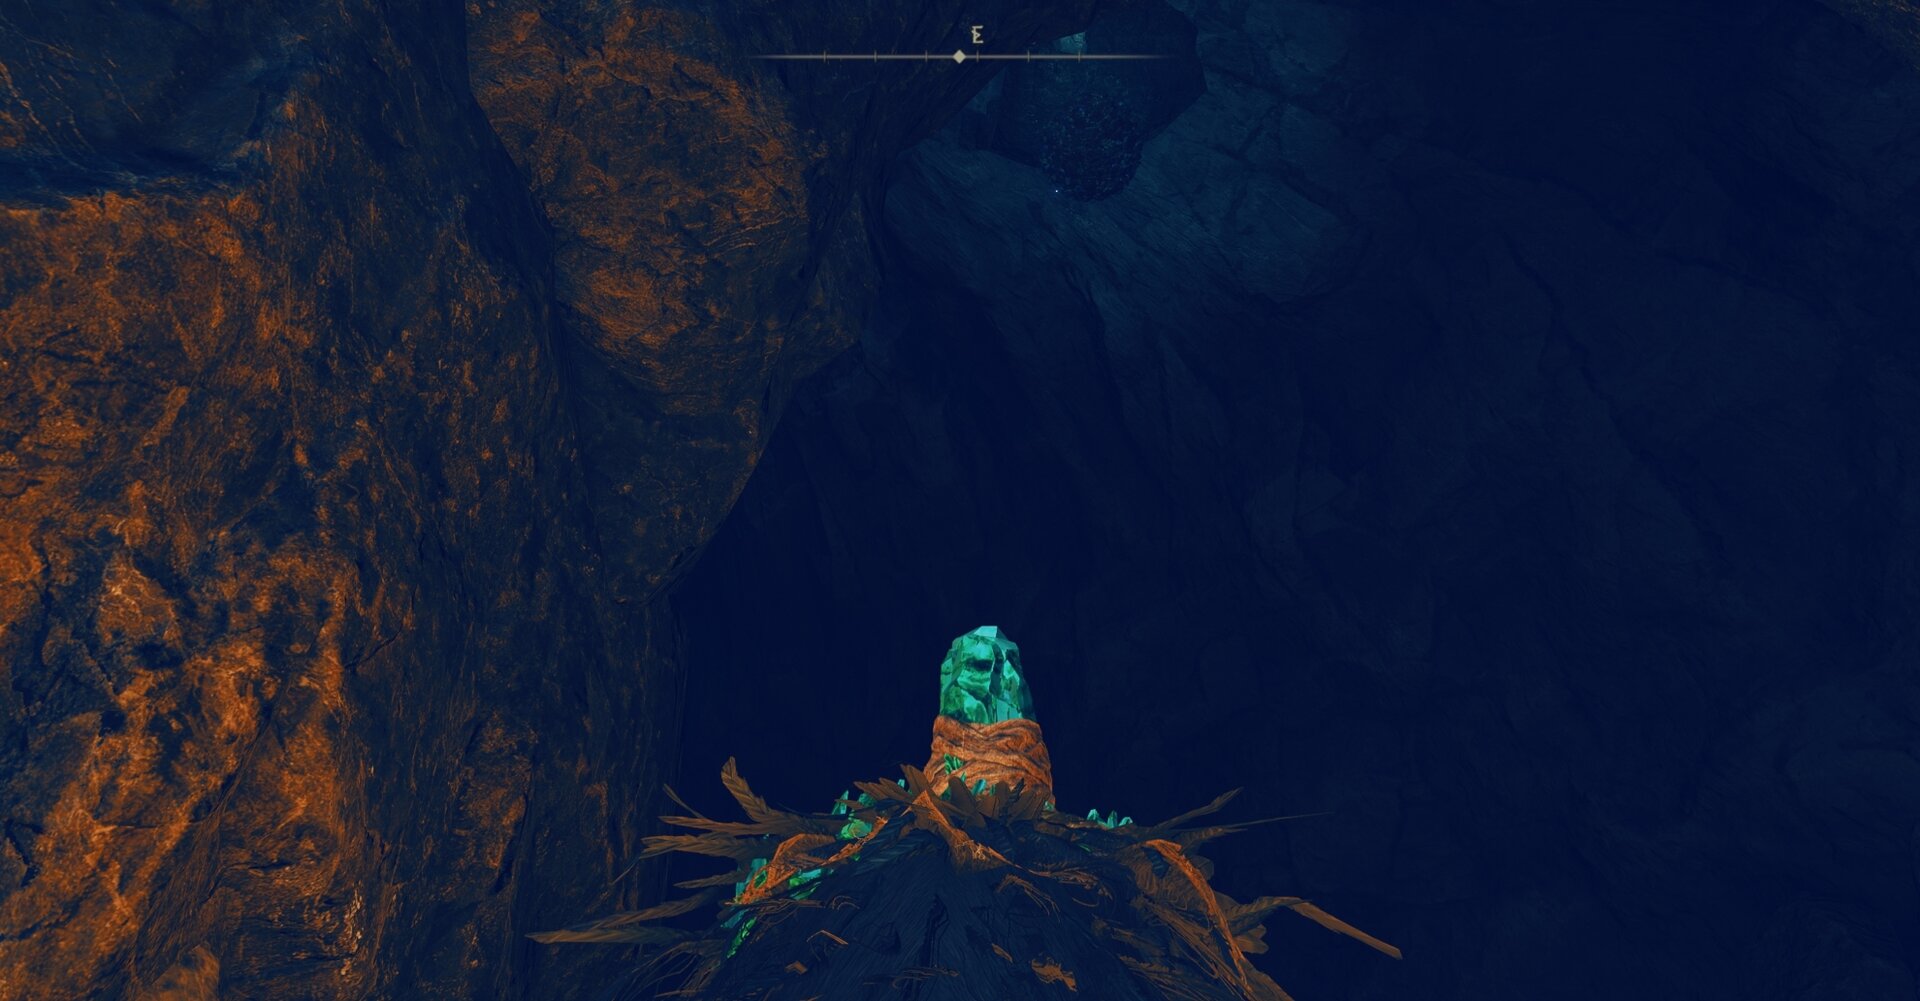
You receive Ash of War: Carian Sovereignty for defeating a blue dung beetle hanging from the ceiling of a cavern on the lower west side of the Cathedral of Manus Metyr.
Greater Potentate’s Cookbook 4
The Greater Potentate’s Cookbook [4] contains the recipe that will let you craft Hefty Magic Pots.
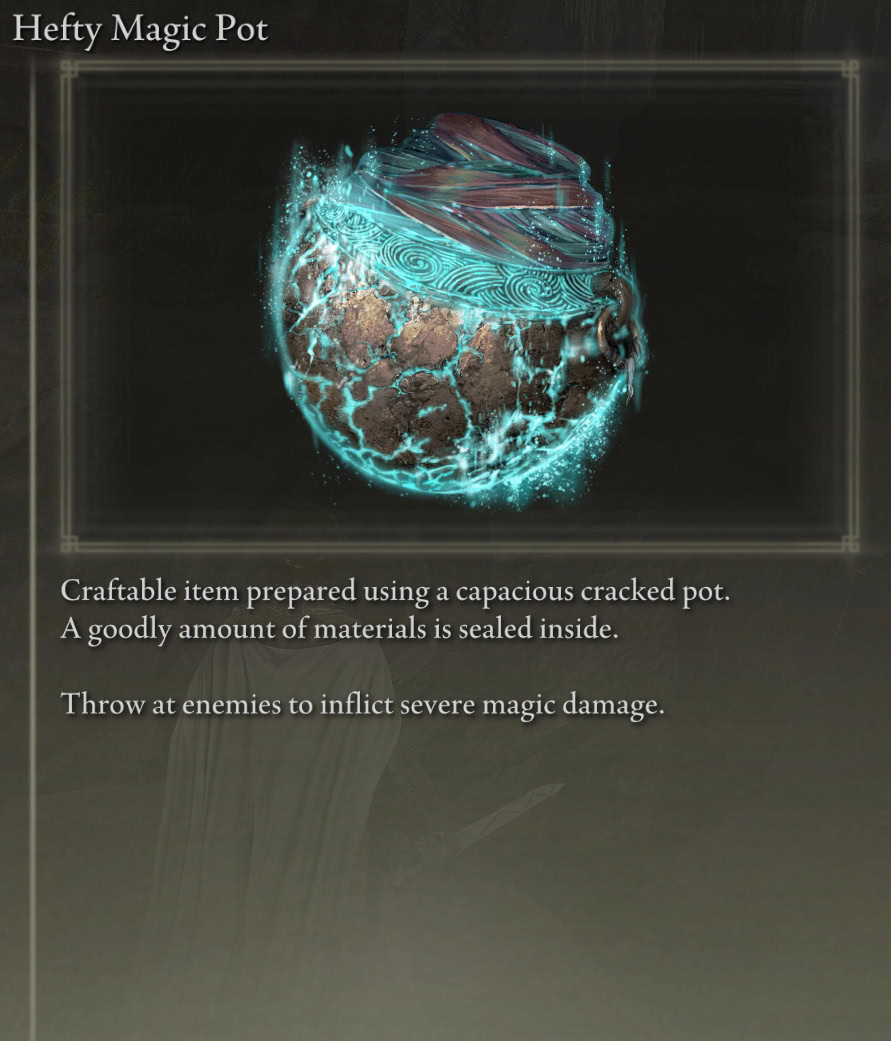
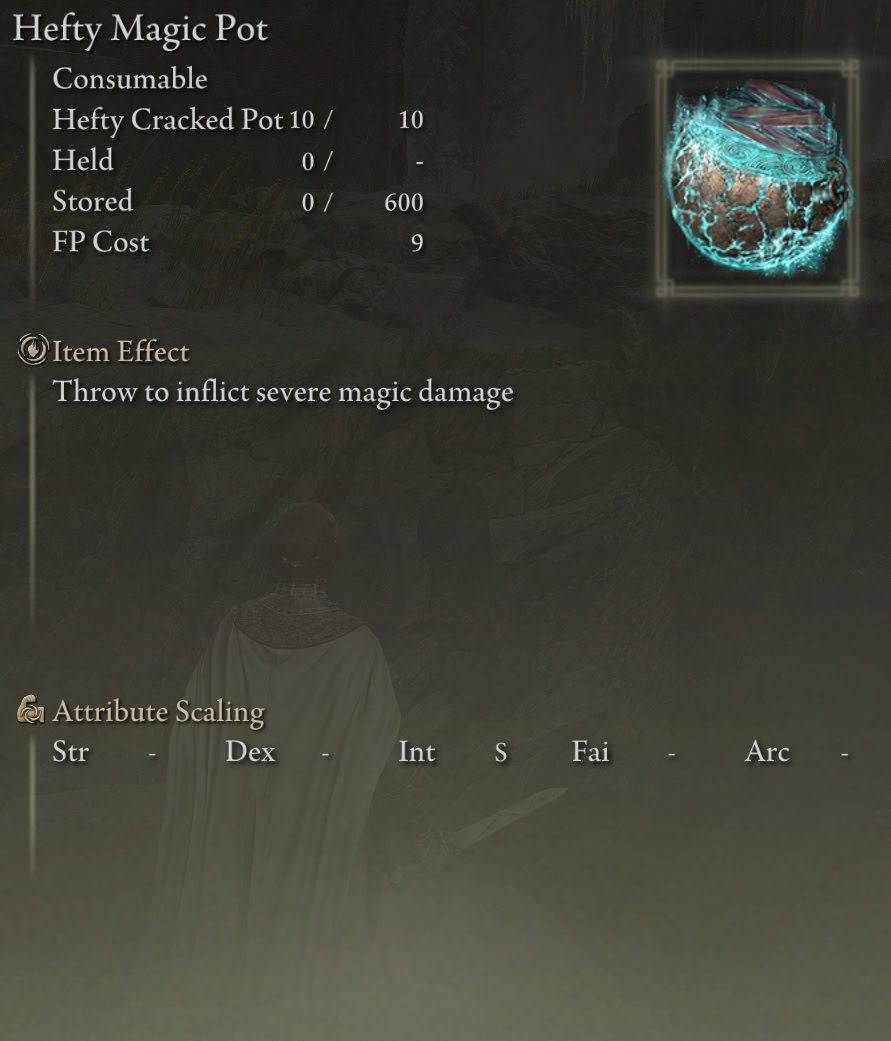
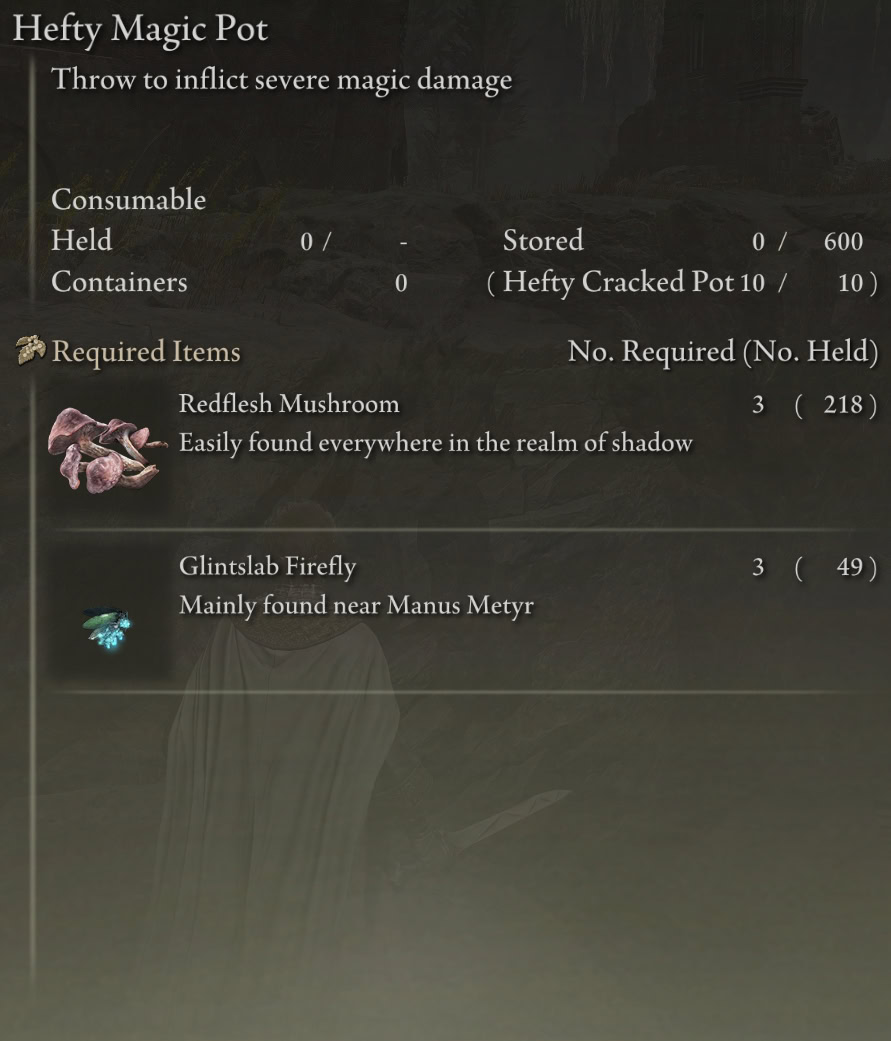
You can loot the Greater Potentate Cookbook [4] from a corpse on the eastern outer bank of the lake surrounding Cathedral of Manus Metyr.
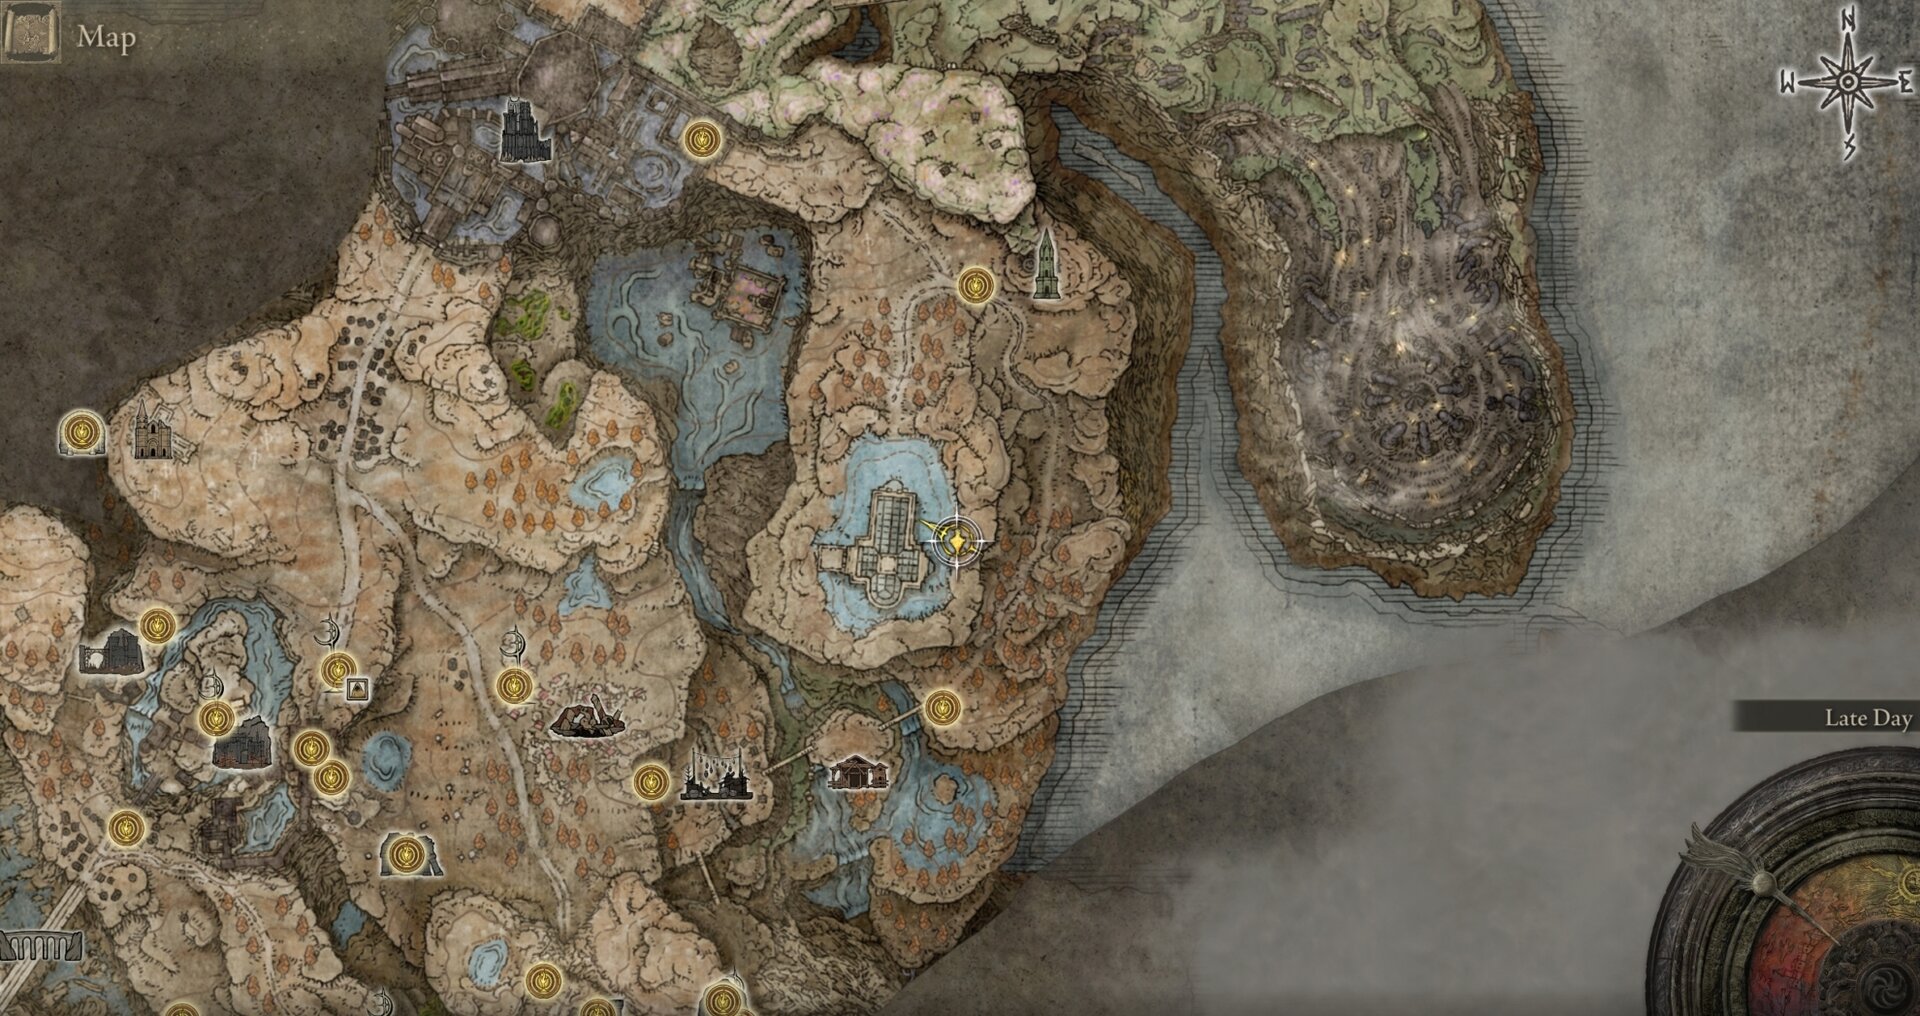
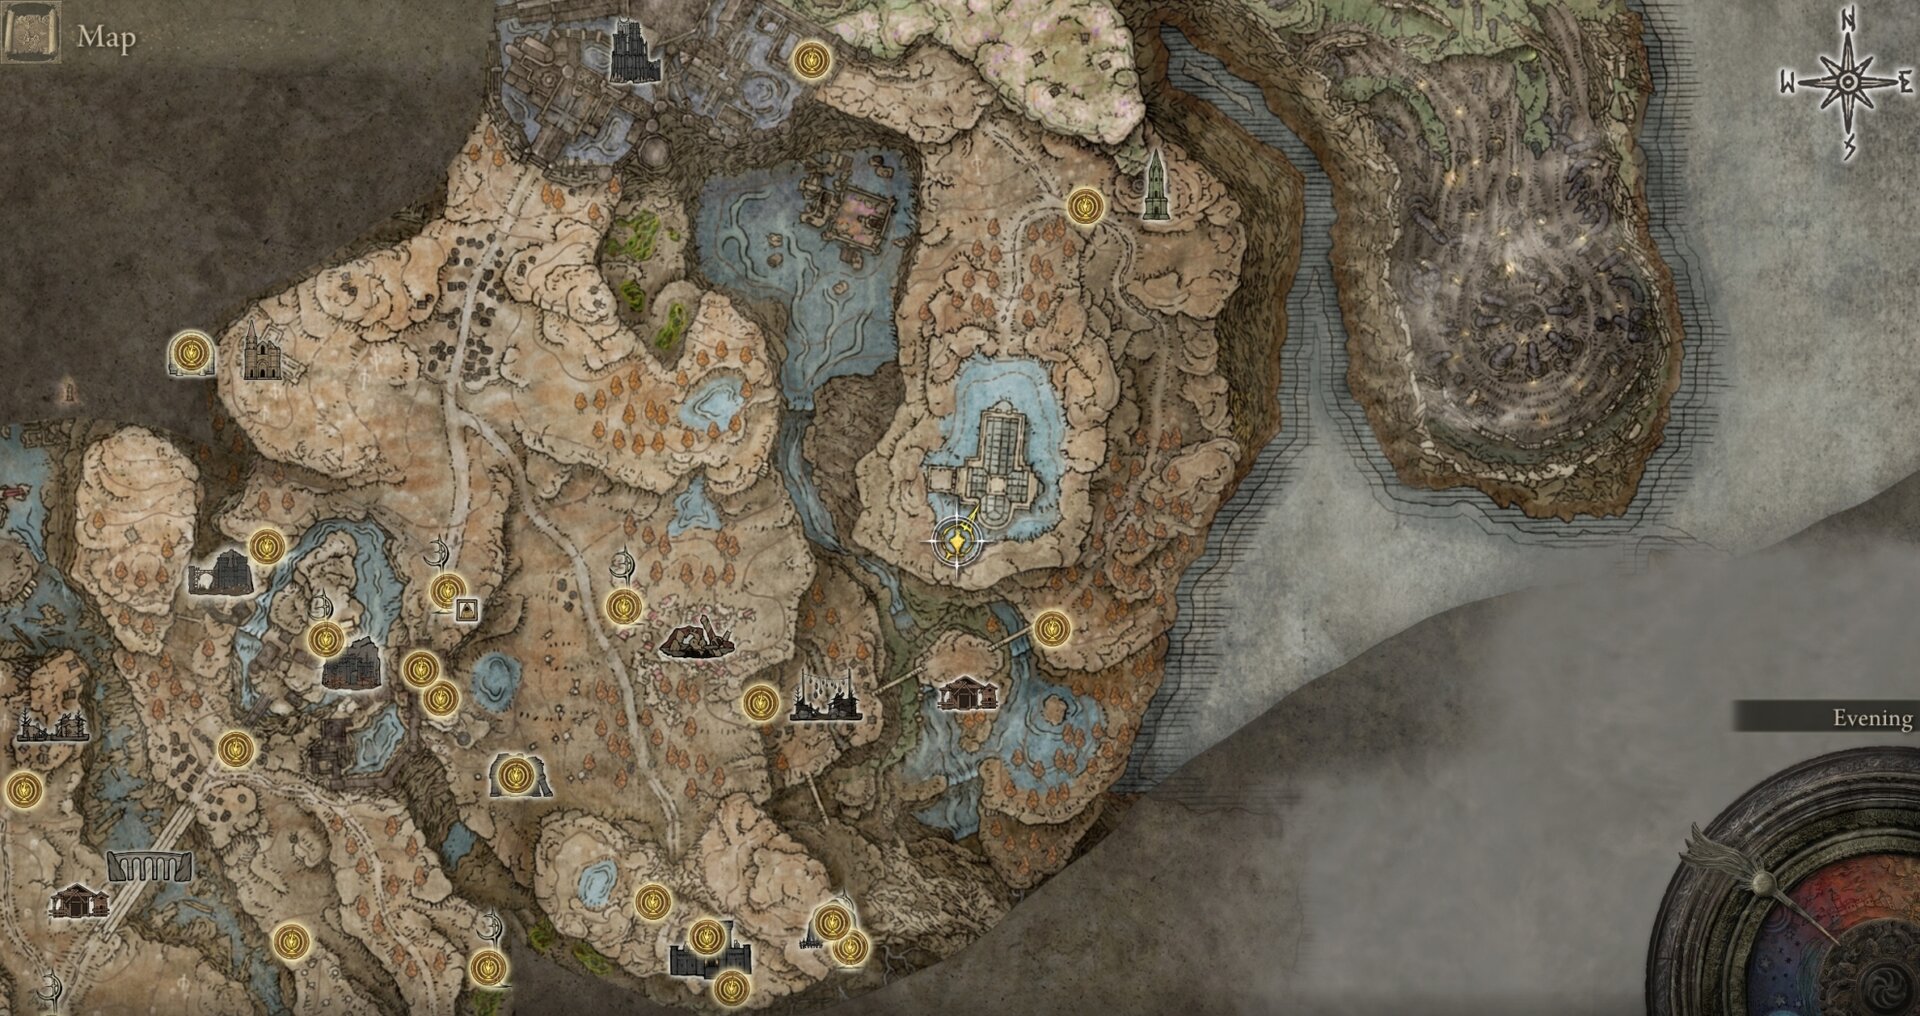
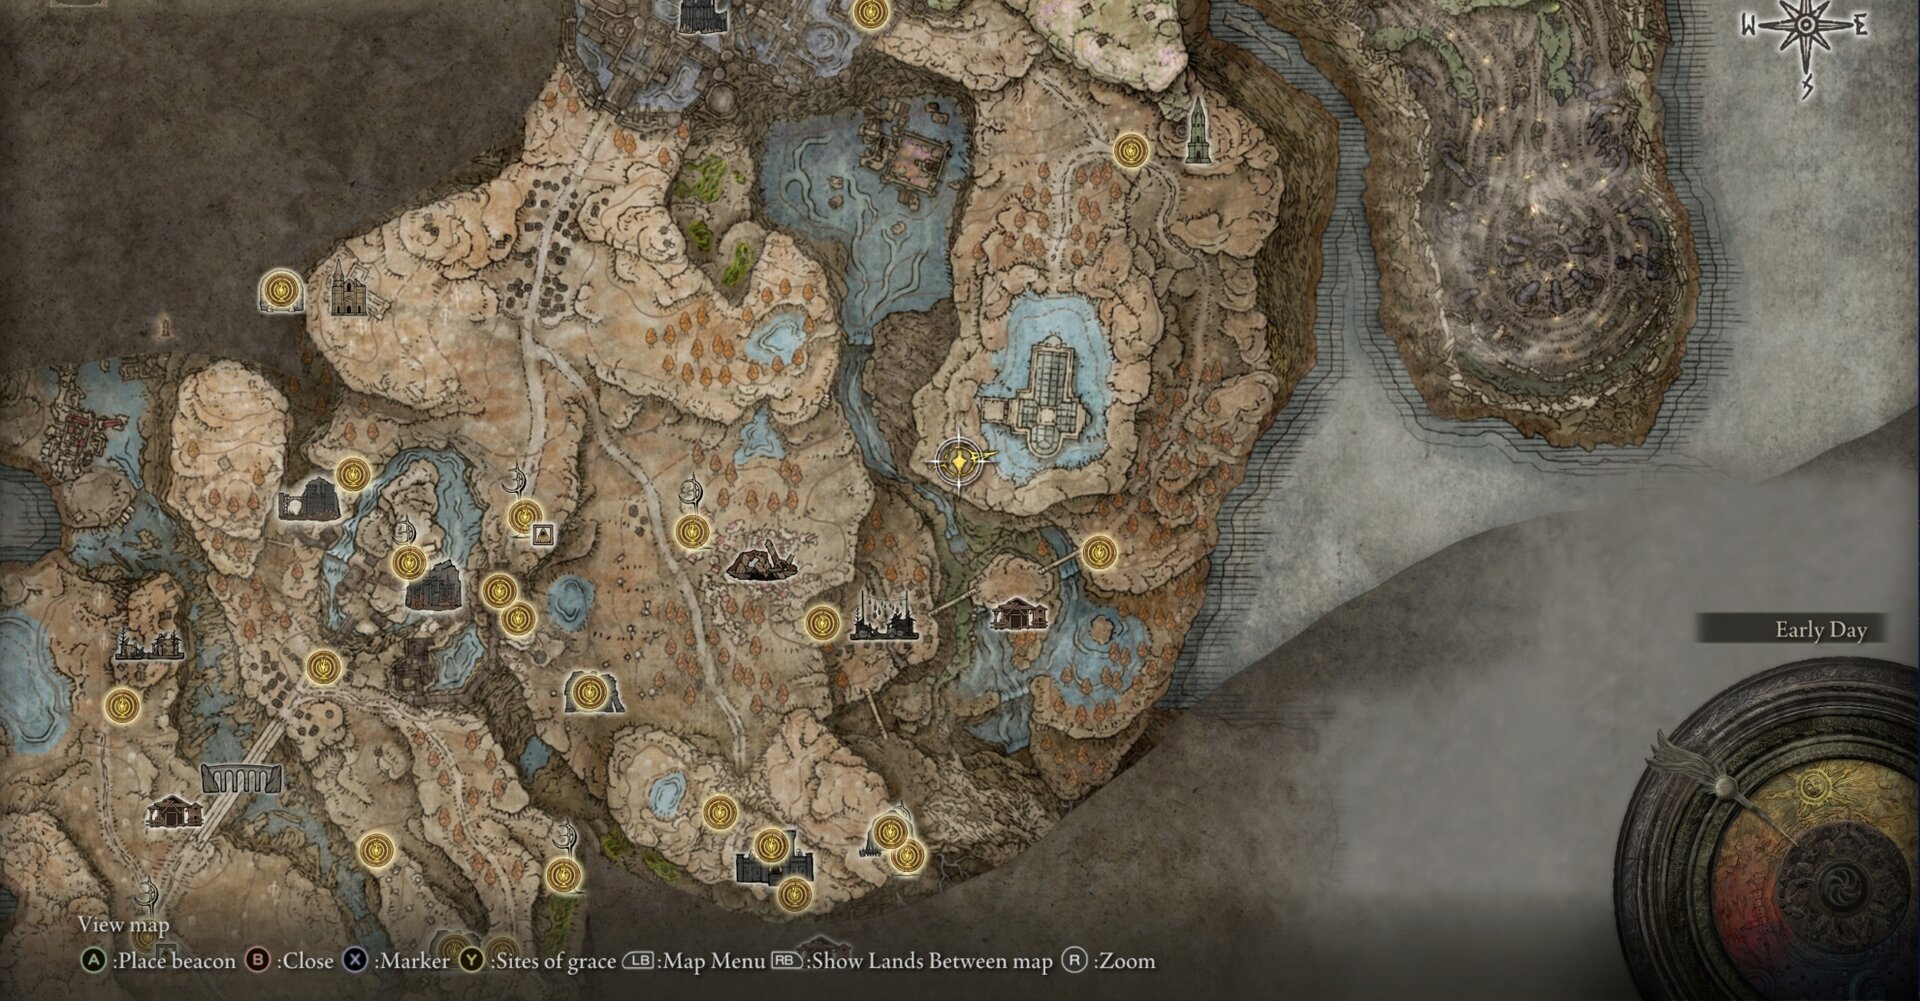
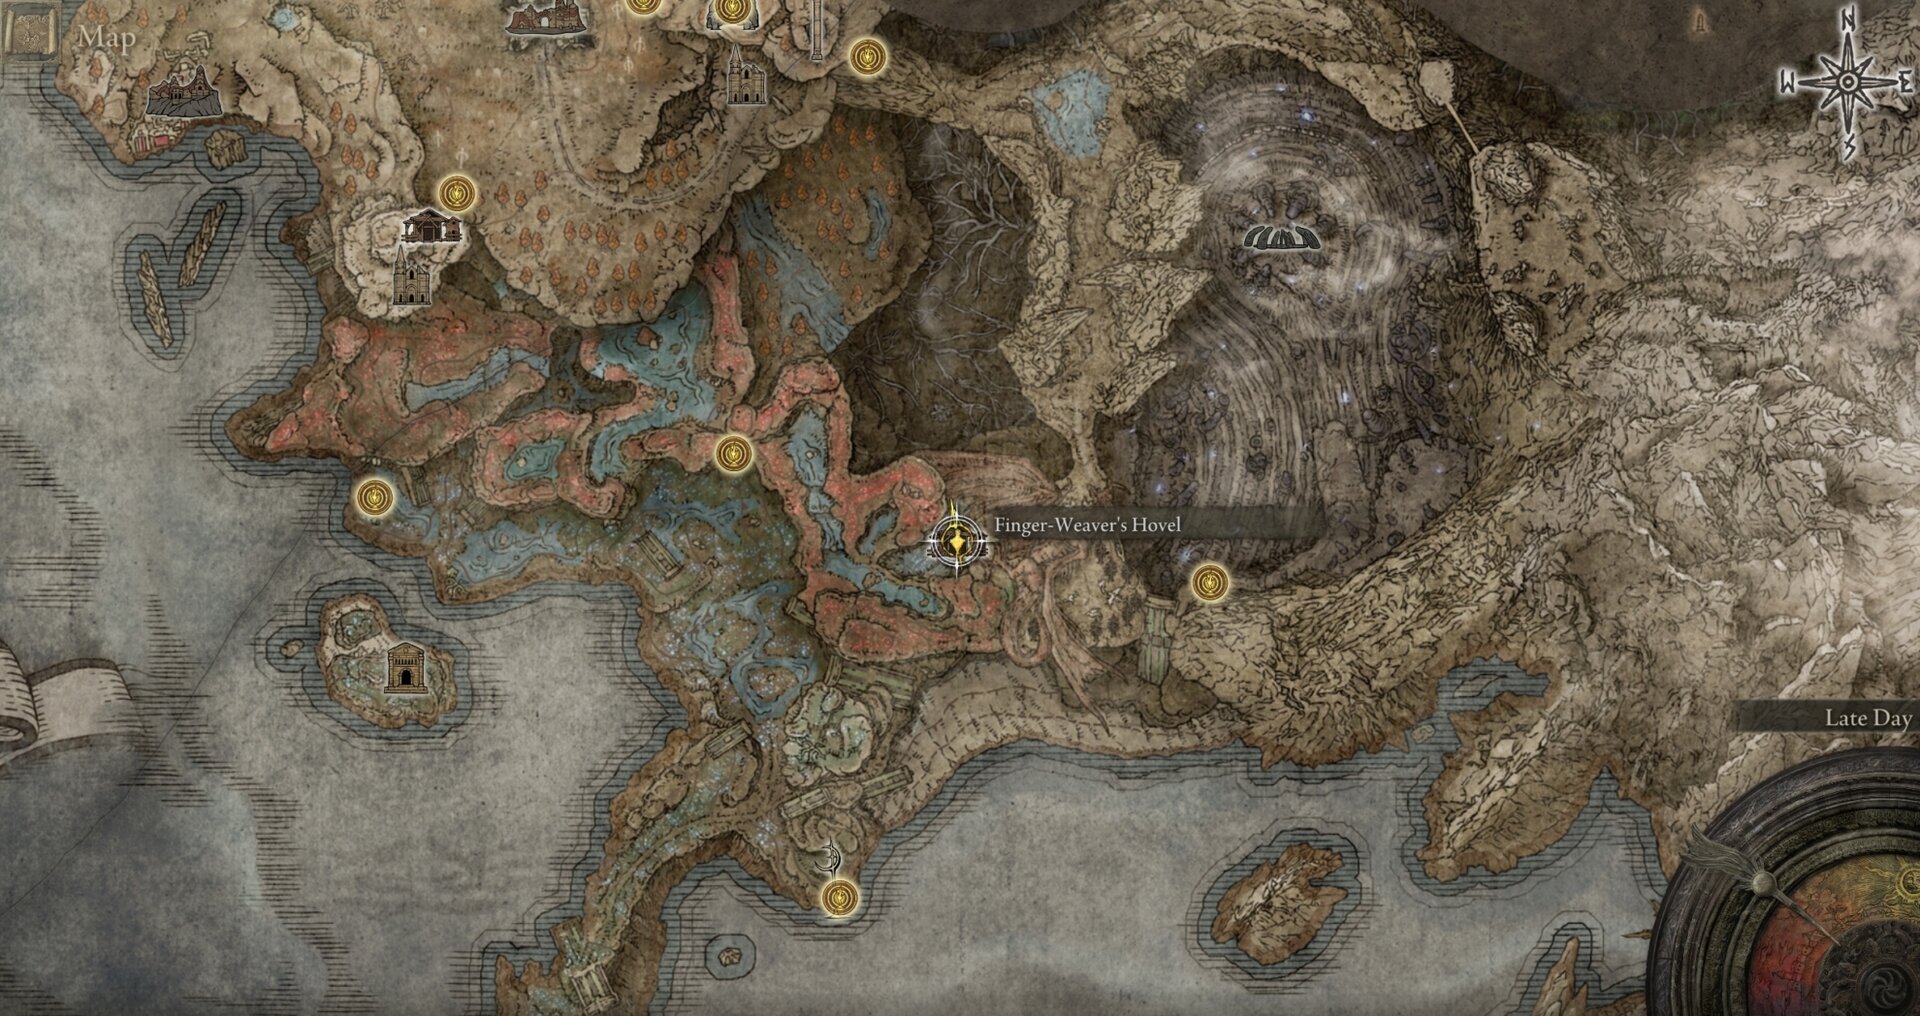
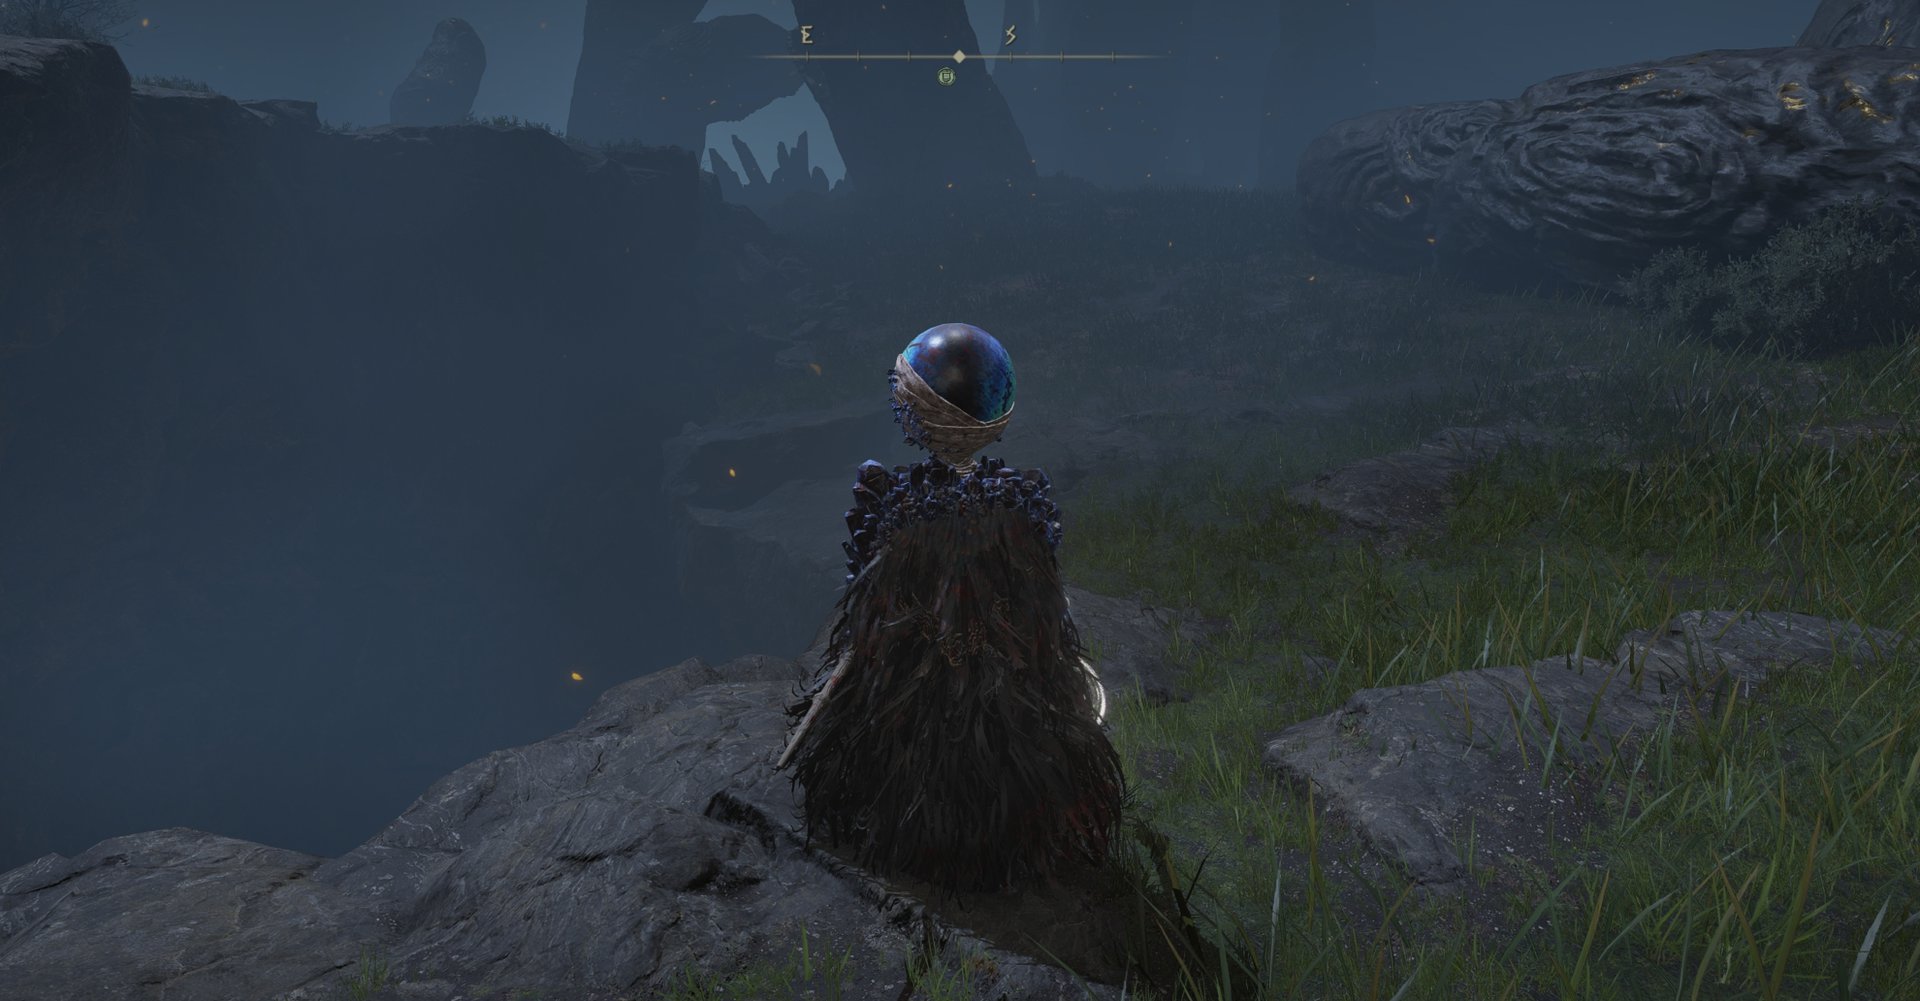
Step 4: Finger Ruins of Rhia
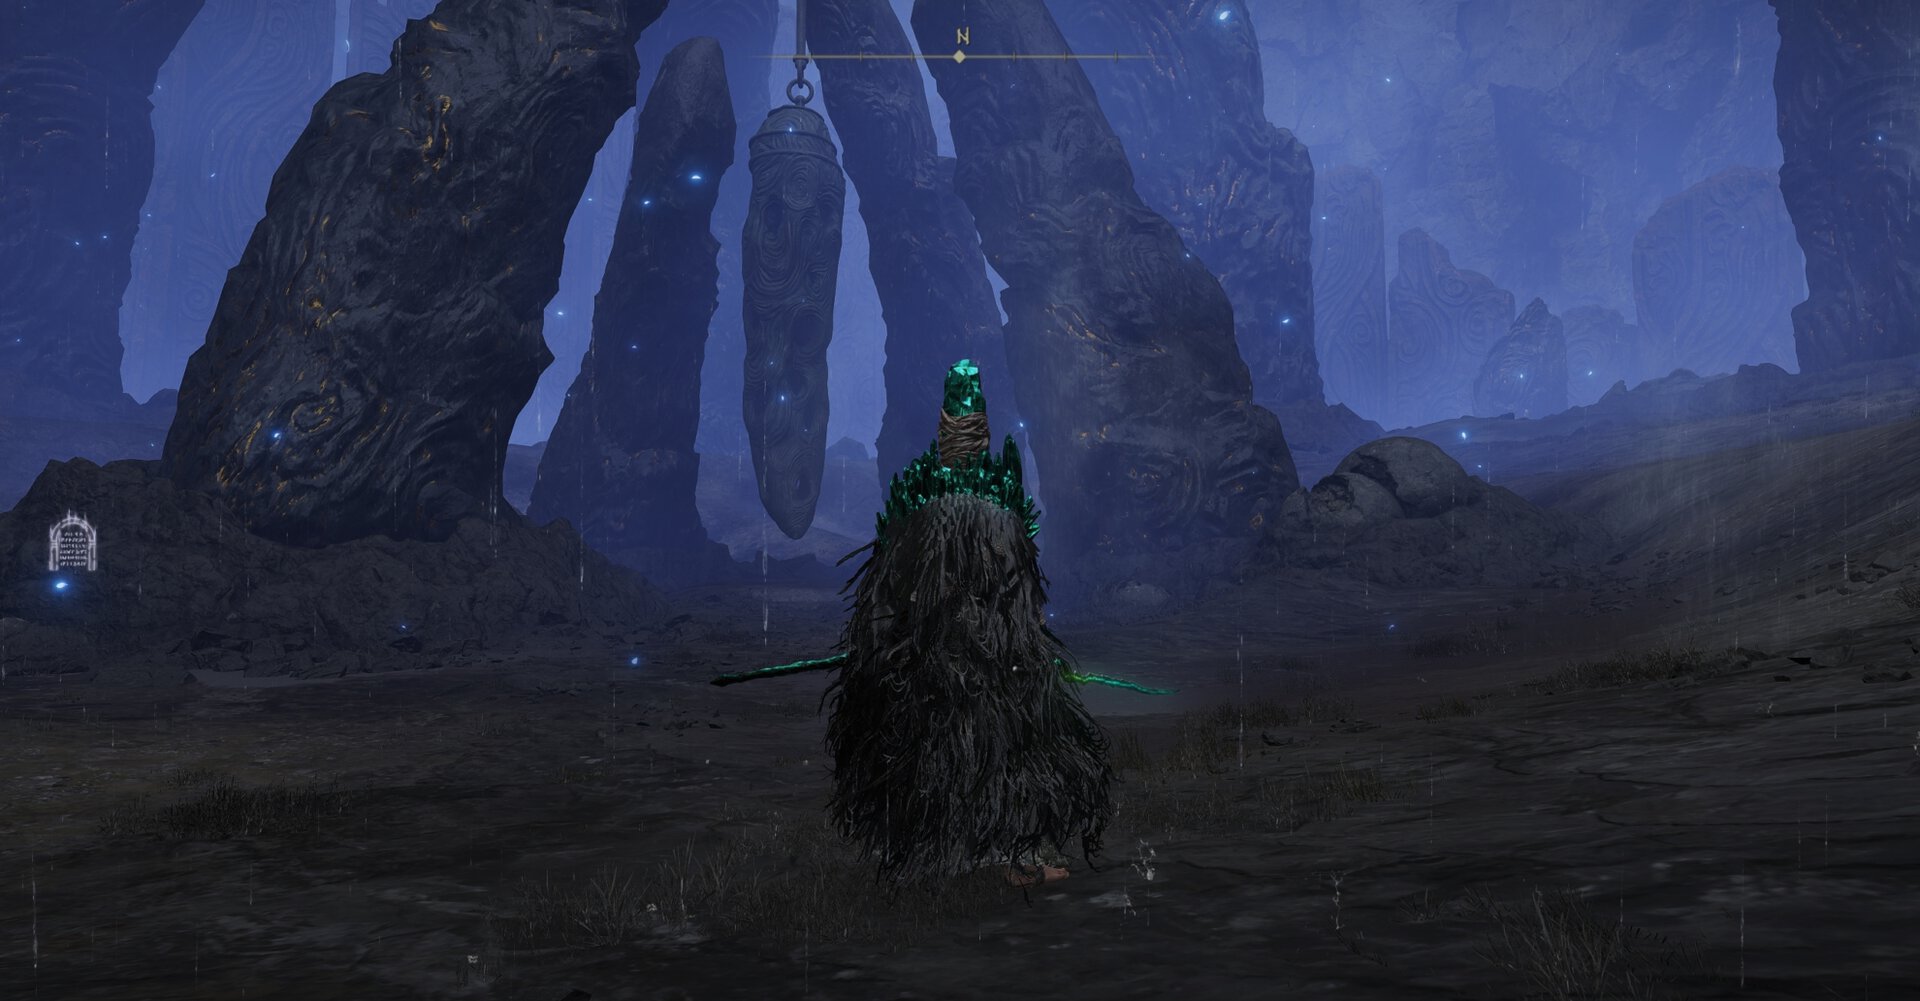
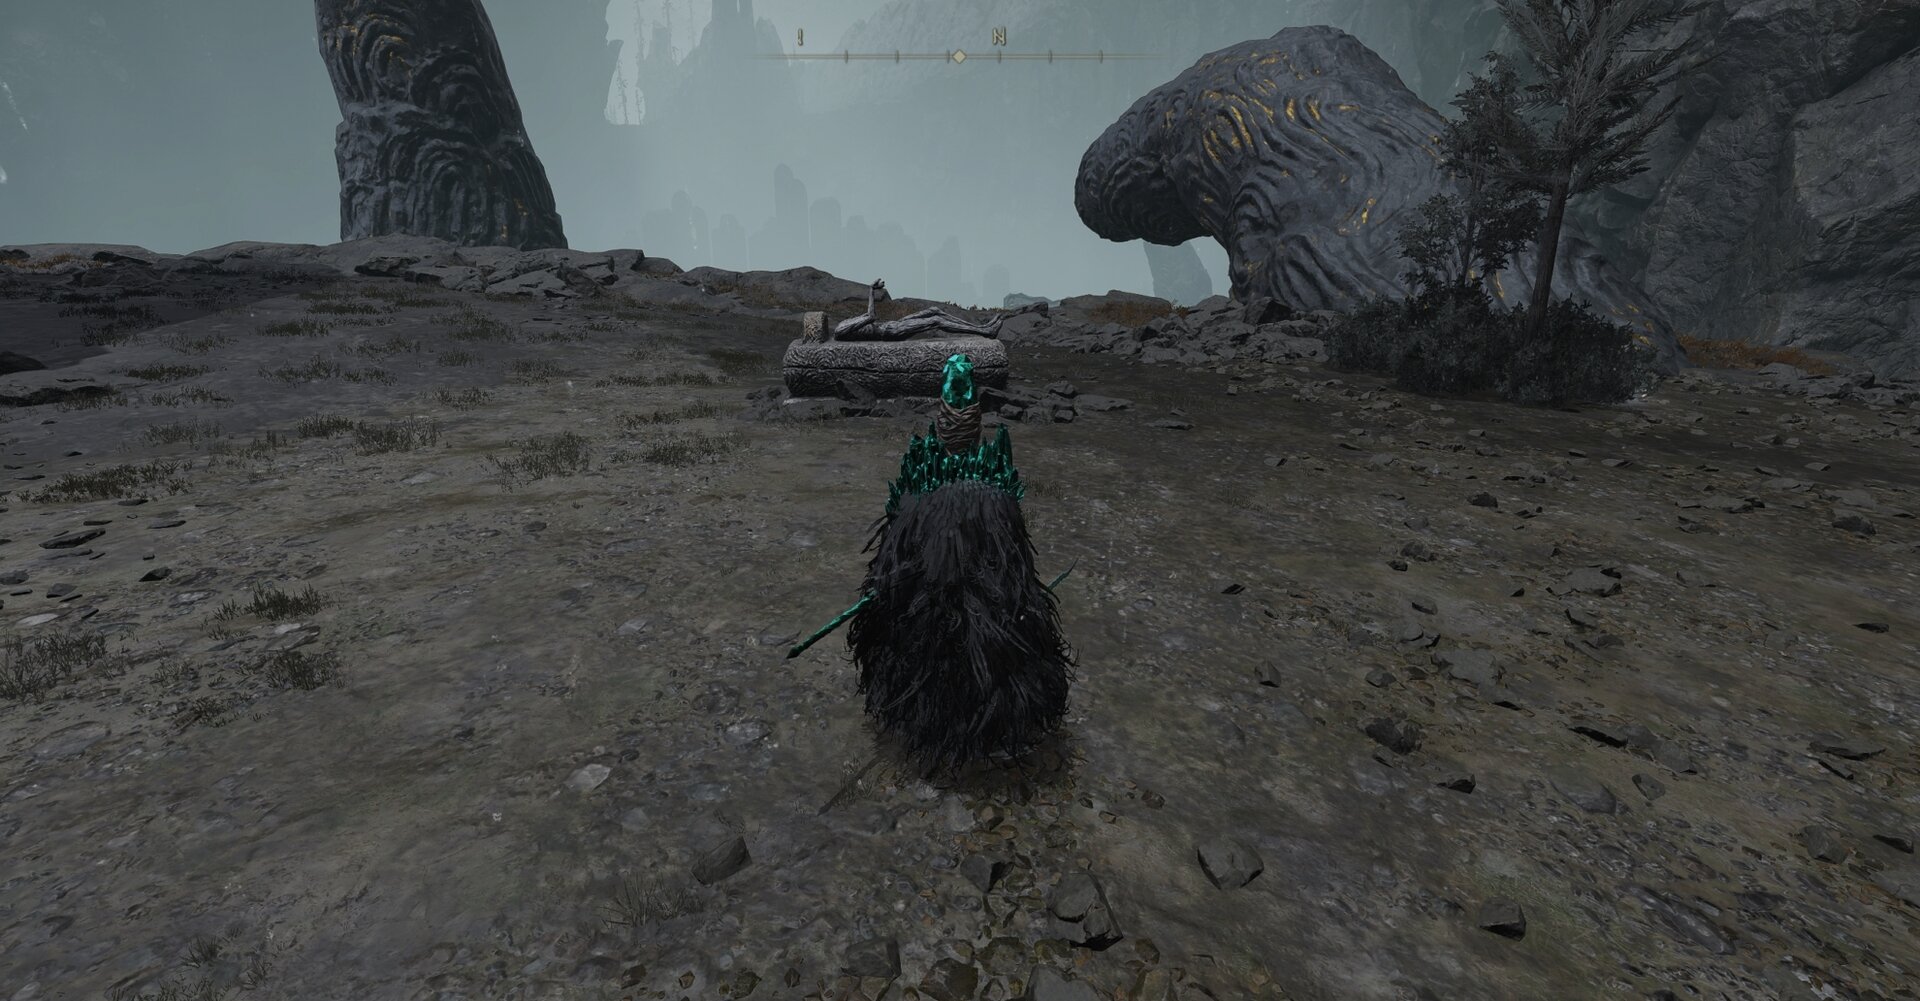
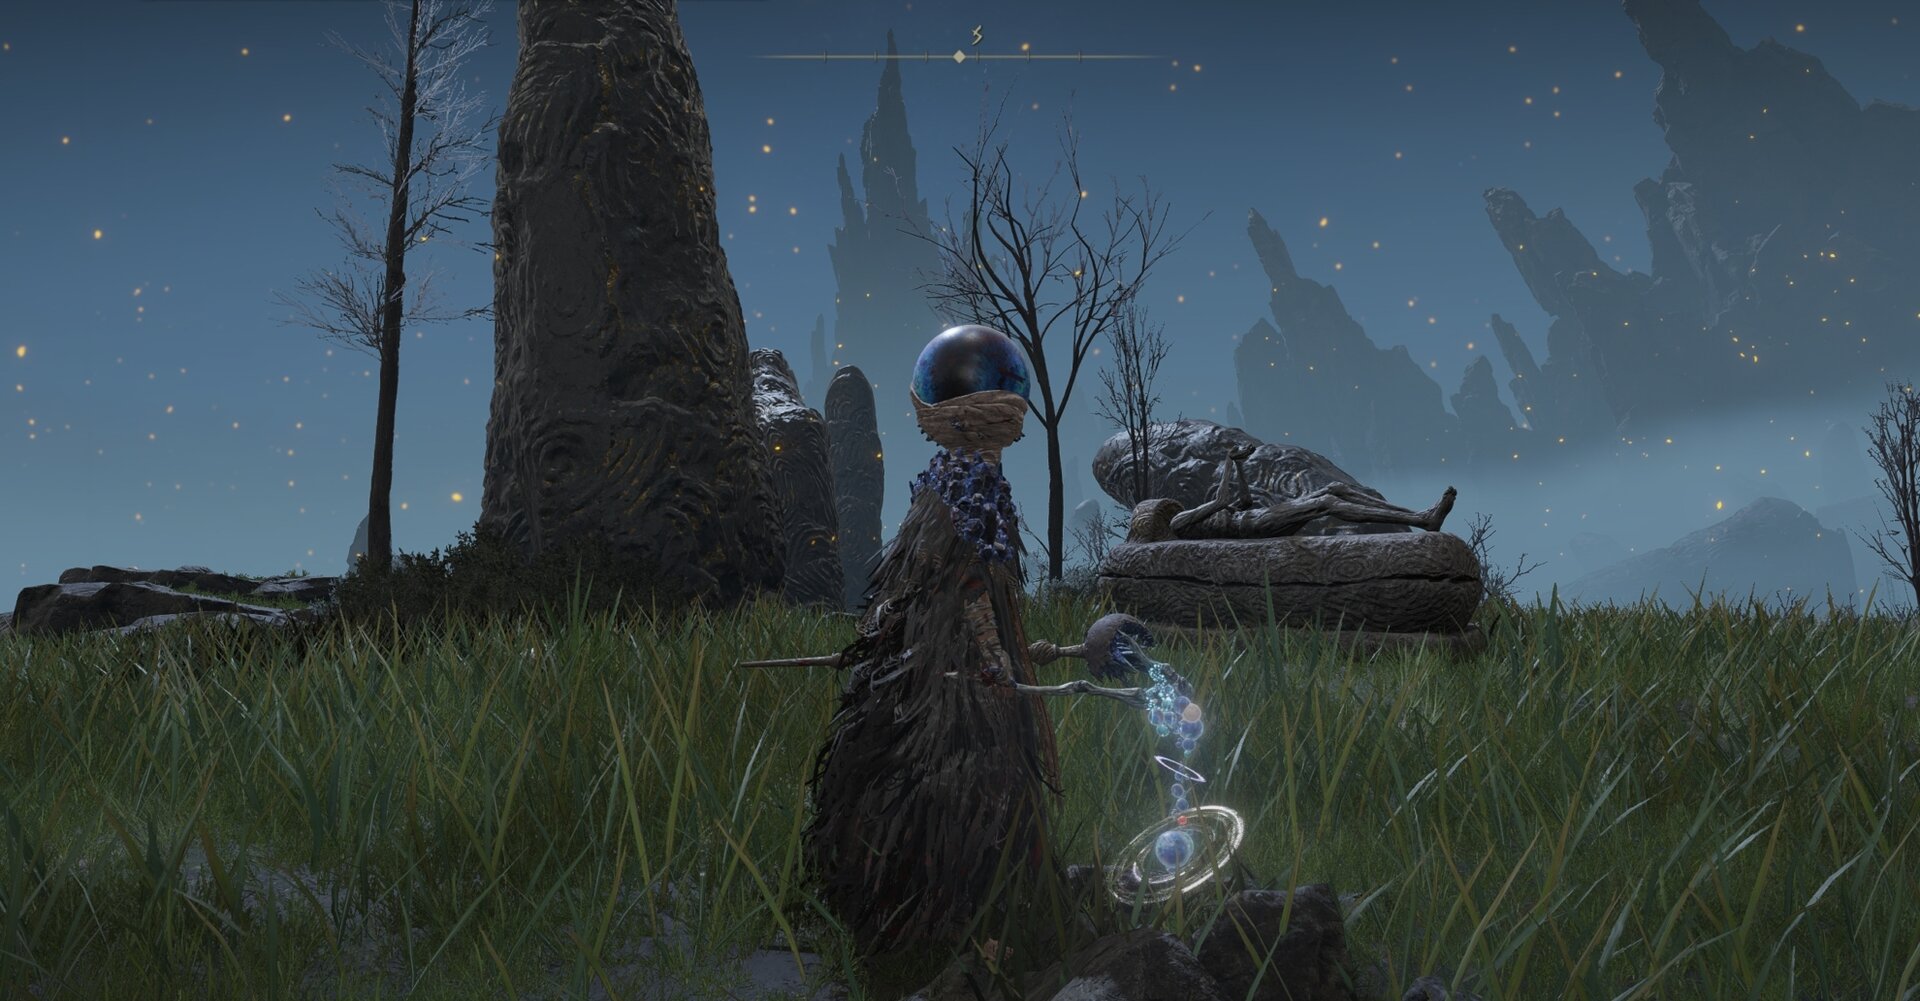
The Ruins map tells you to go to the Finger Ruins of Rhia, which is down south, accessible via the Cerulean Coast. Make your way to the epicenter of the ruins. There’s a specific Lamprey that will start slinging those little pink balls of magic glue at you. Don’t get hit or another Lamprey will come and suck on your face for a bit.
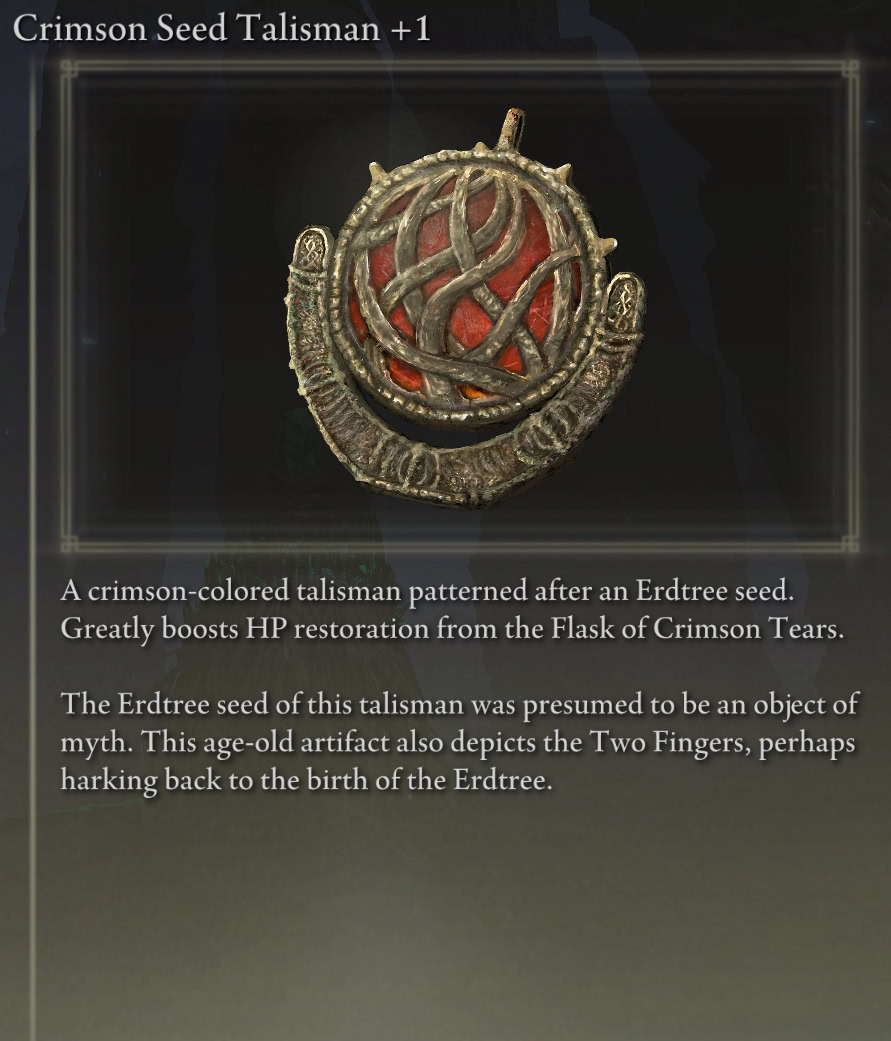
Blow on the horn in the center of the Finger Ruins of Rhia and you’ll receive the Crimson Seed Talisman +1.
Exploring the Finger Ruins of Rhia
The Finger Ruins of Rhia are exceptionally large for how little is there. Aside from the finger-related crafting materials, the only unique things nearby are the Finger-Weaver’s Cookbook [1] and a Remembrance Duplication Coffin.
Finger-Weaver’s Cookbook 1
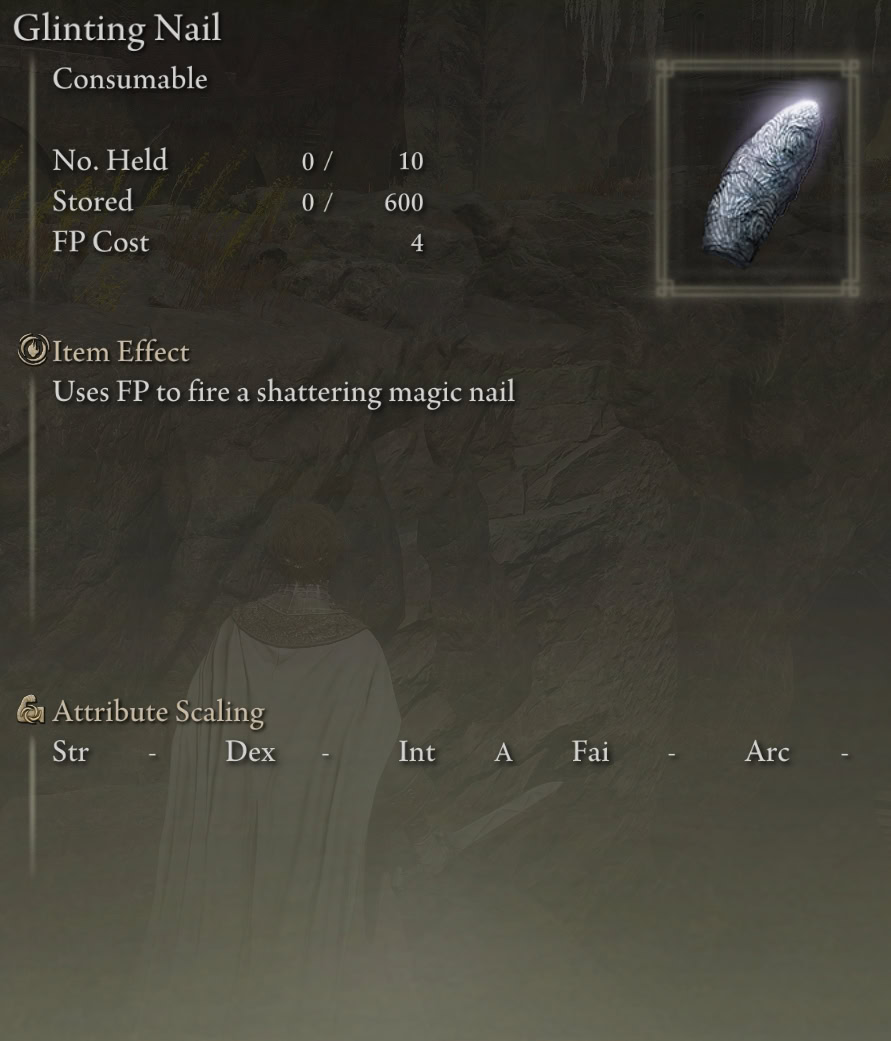
The Finger-Weaver’s Cookbook [1] contains the recipe to craft Glinting Nail.
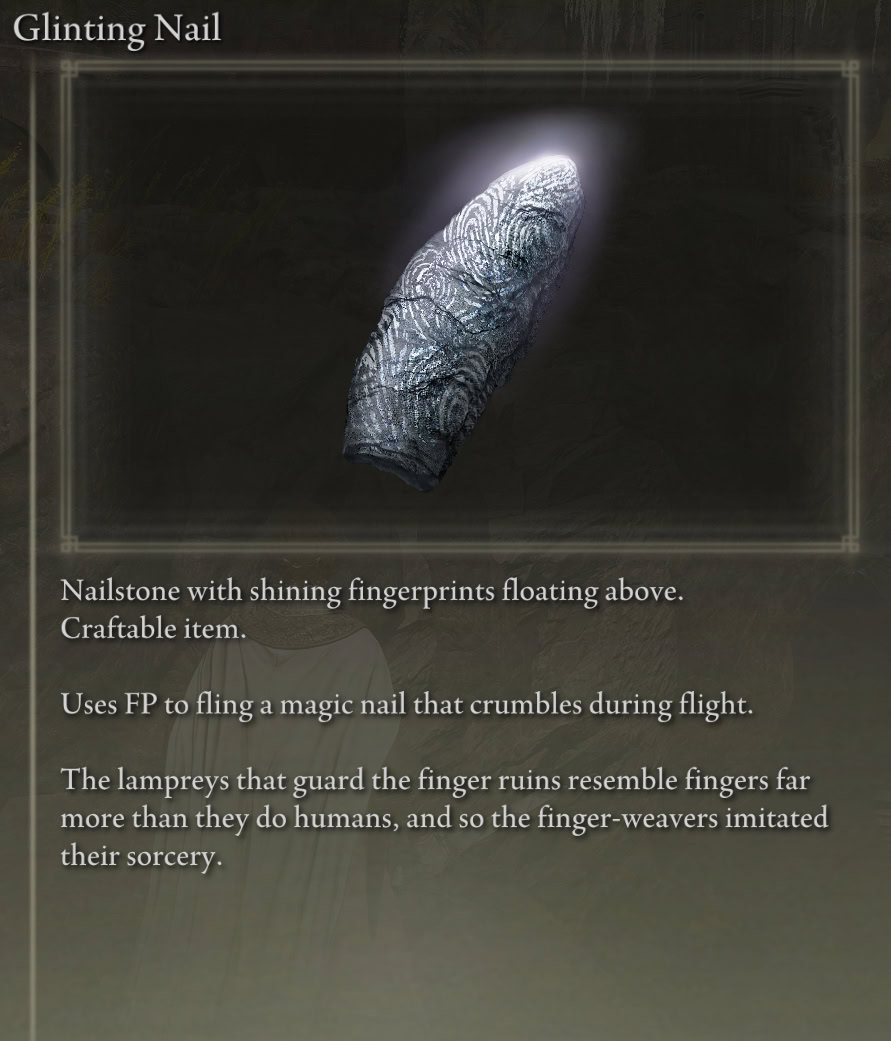
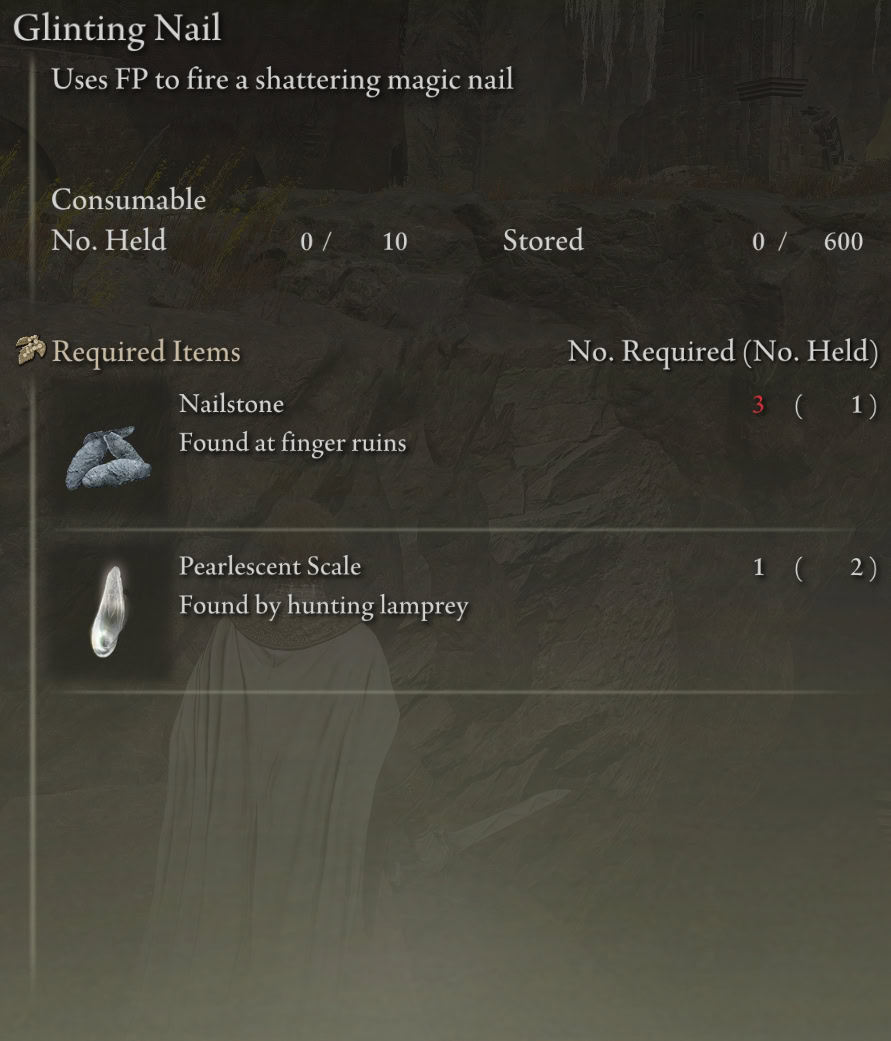
You can loot the Finger-Weaver’s Cookbook [1] from a corpse at the Finger-Weaver’s Hovel (shack) southeast of the Finger Ruins of Rhia. It’s outside of the ruins proper, but only accessible from inside them.
Finger Ruins of Rhia Remembrance Duplication Coffin
You’ll find a Remembrance Duplication Coffin at the Finger Ruins of Rhia on the fatter, easternly outcropping near the main entrance to the ruins.
Step 5: Informing the Count
Return to Count Ymir and inform him of your horn tooting. If you go to the Finger Ruins of Dheo instead of the Finger Ruins of Rhia, Count Ymir will make a remark about it. You can also speak to Jolán again afterwards, but her little arc wasn’t finished, so you won’t really get any story, just some more rewards later on.
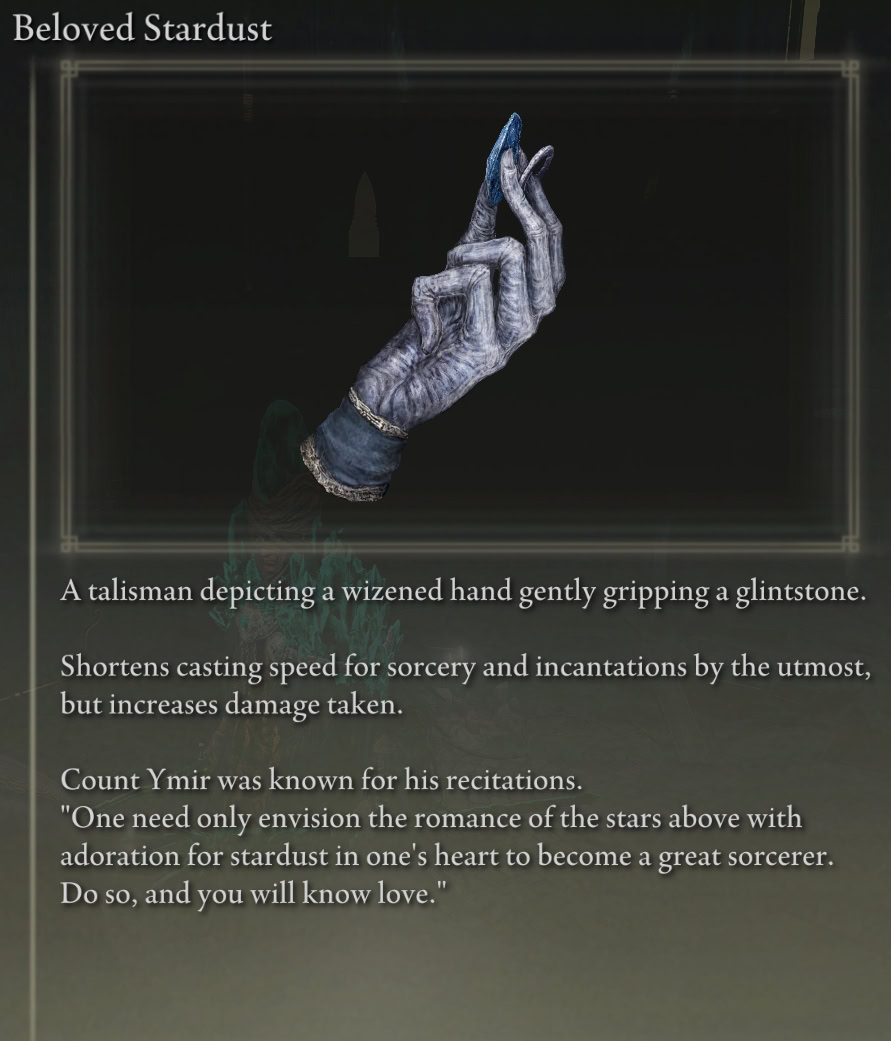
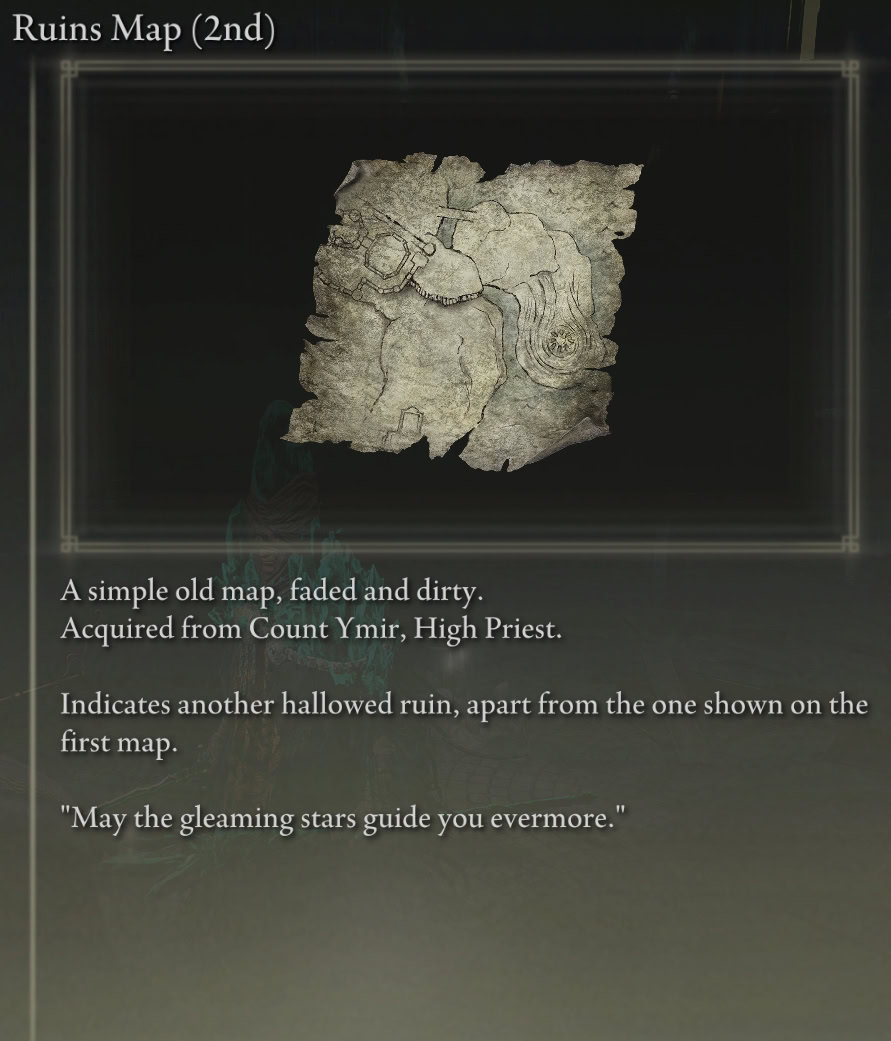
Ymir rewards you with the Beloved Stardust Talisman and a map to more Finger Ruins. The Talisman grants 99 Dexterity (only towards casting speed), but increases your damage taken by a whopping 30%.
You’ll also be able to ask Count Ymir some existential questions and unlock the ability to purchase Glintstone Nail(s) Sorceries from him for 12k Runes each.
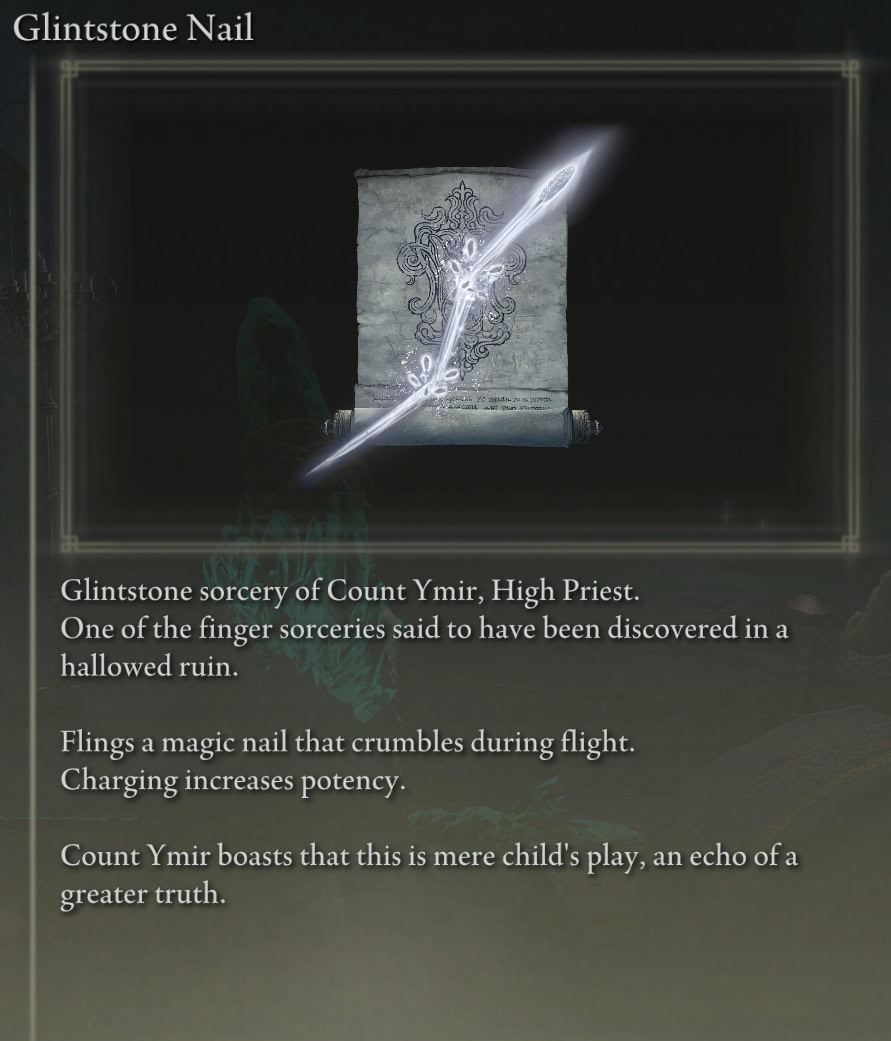
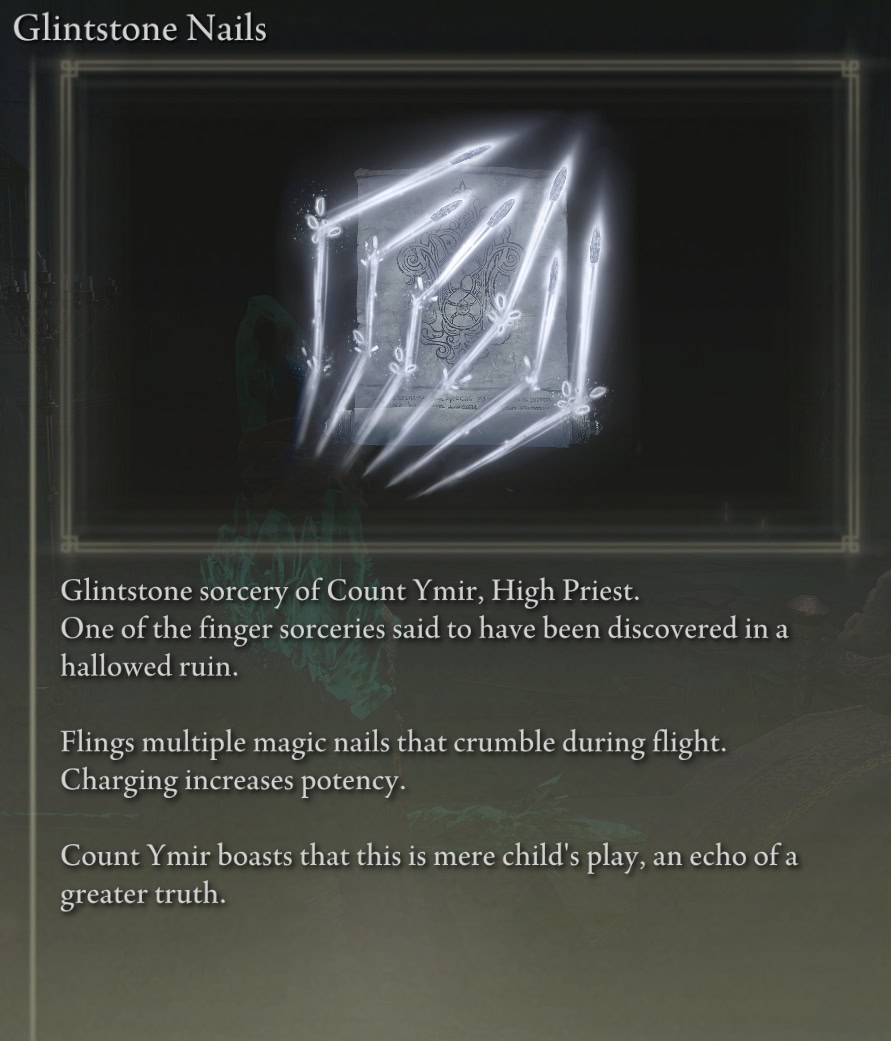
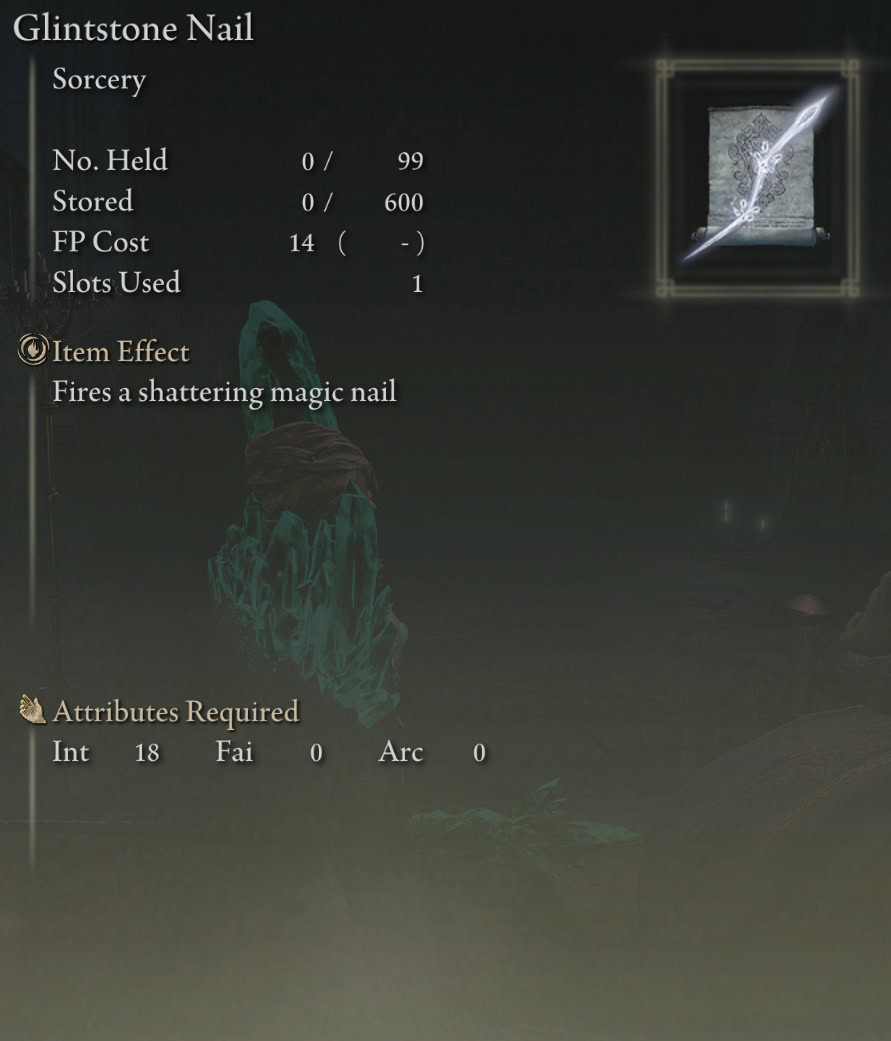
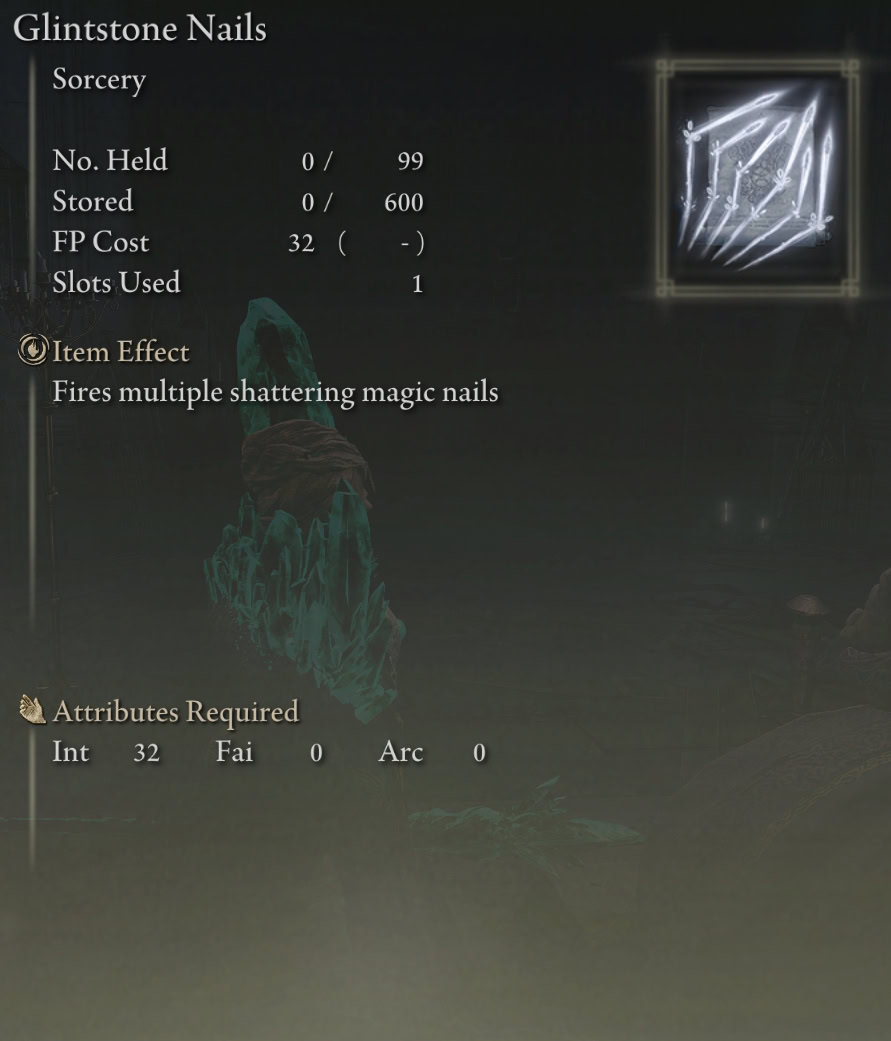
Glintstone Nail offers slightly longer range and deals more damage as an individual hit, but Glintstone Nails deals fires more shots and deals more damage overall. Both have a lot of staggering power and are worth using together.
Step 6: A Peek at the Finger Ruins of Miyr
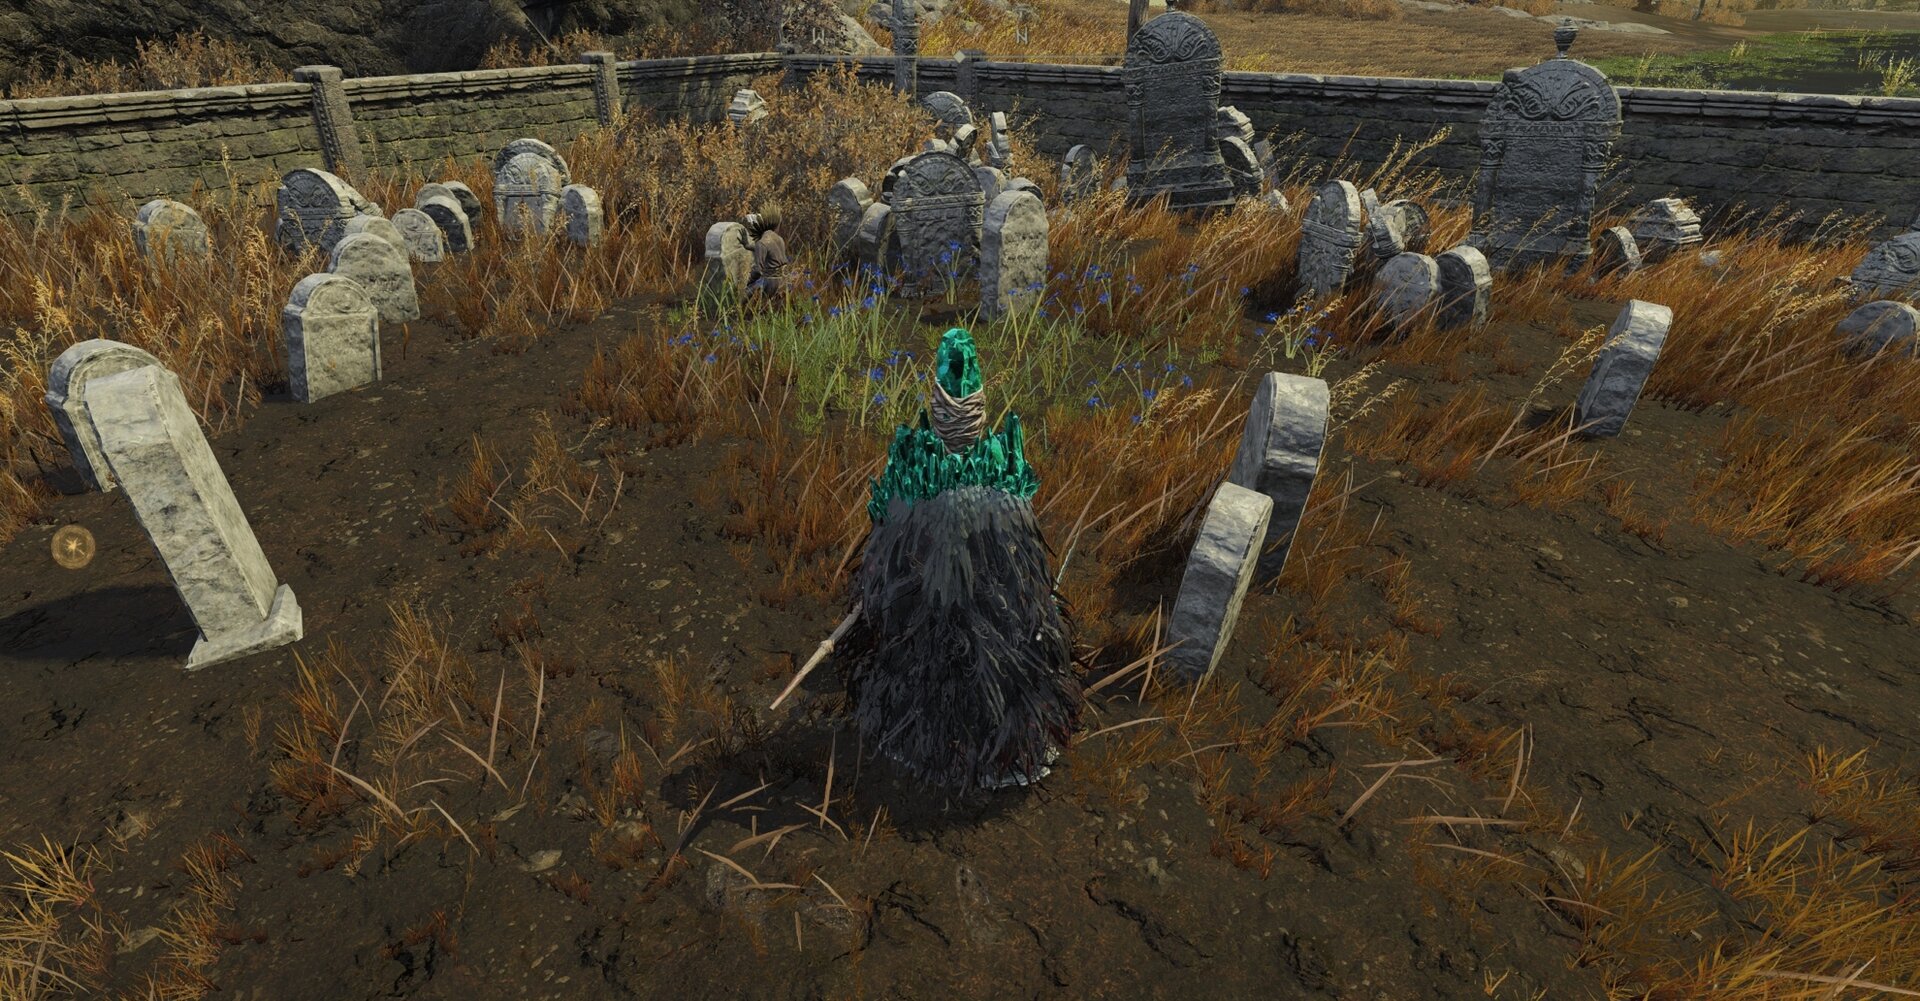
Rest at the Site of Grace or reload the area. You’ll find that Count Ymir has gotten up from his wooden throne. He’s out in the cemetery speaking to one of the graves. Interrupt his grieving process.
Head over to the bottomless wooden throne, and you’ll have the opportunity to interact with it. Be prepared to fight an invader.
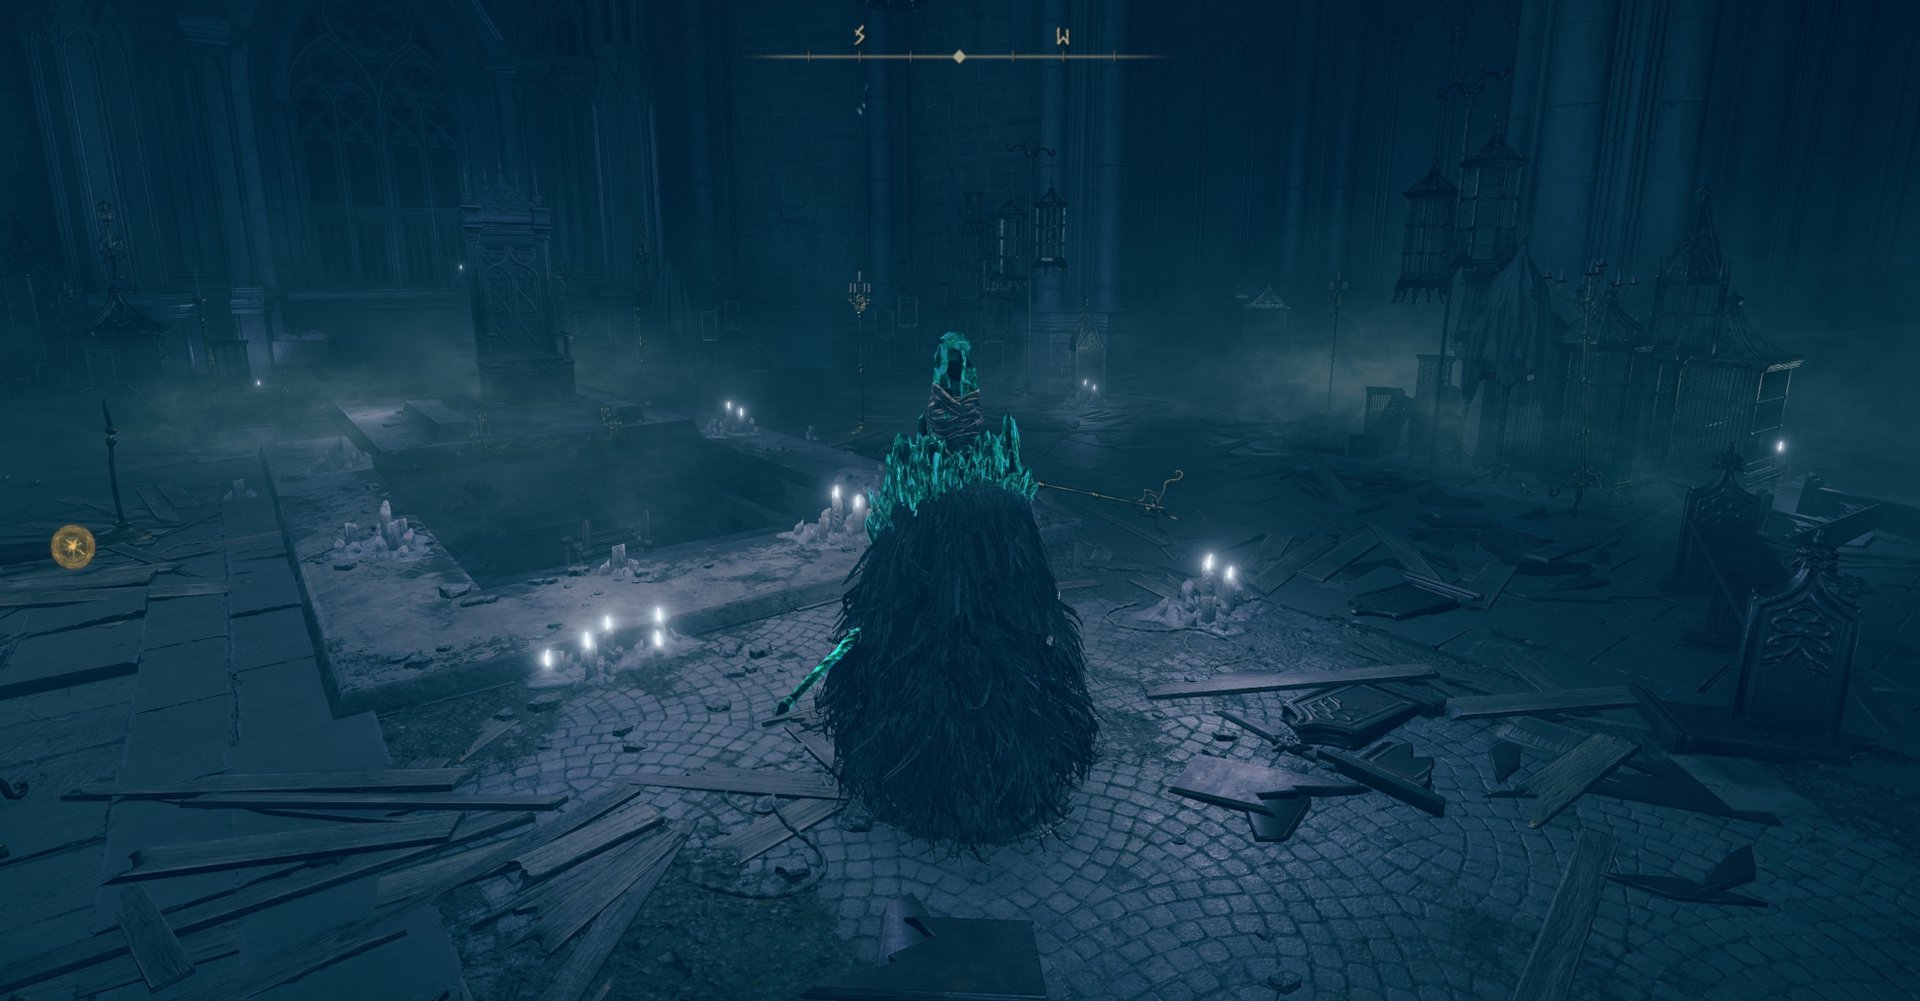
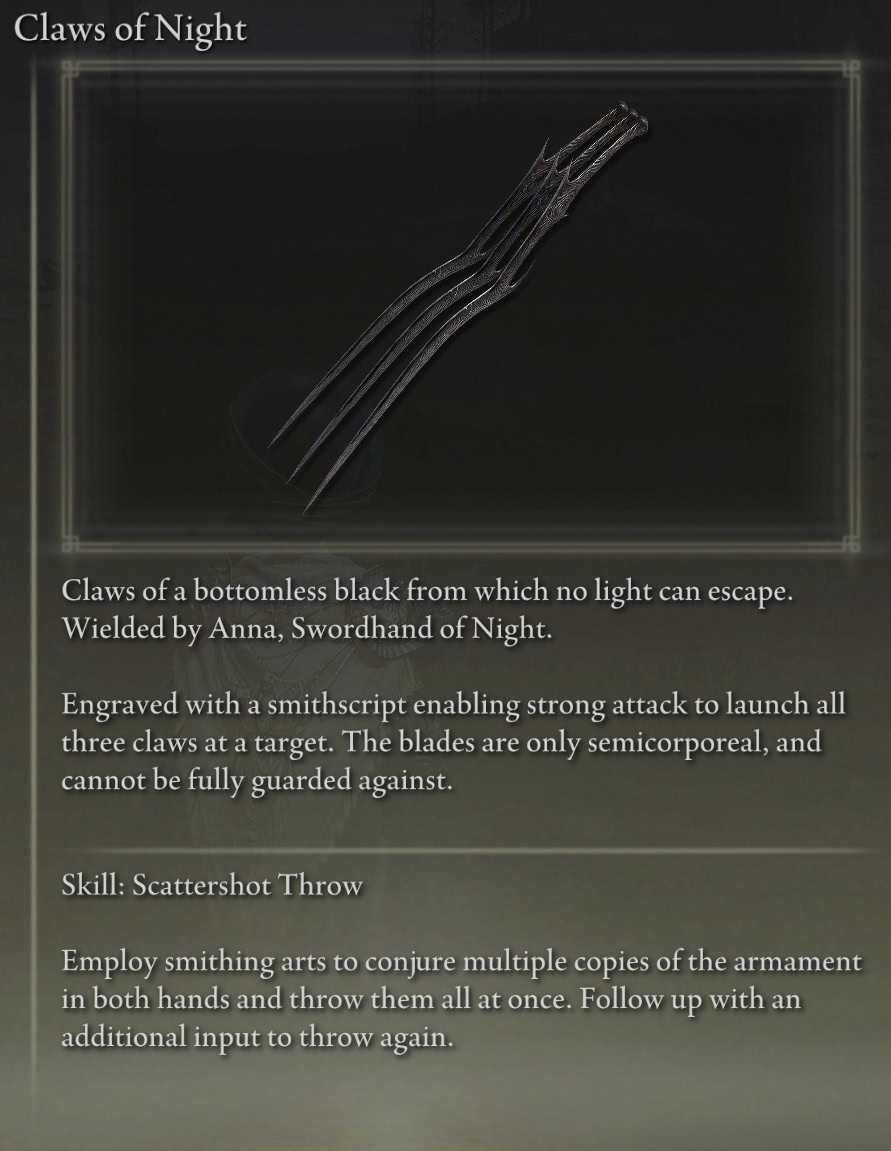
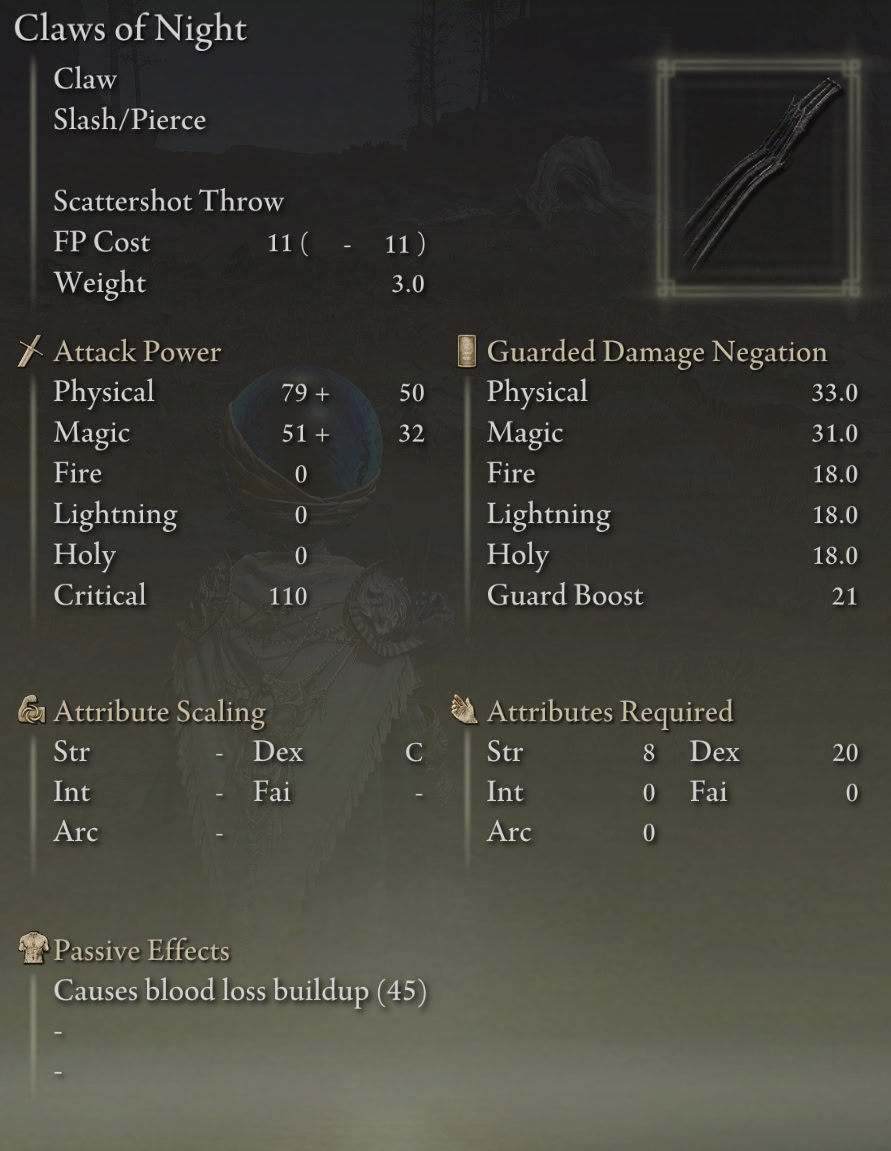
Climb down the ladder and you’ll be invaded by Swordhand of Night Anna, Jolán’s sister. You only get one attempt right now, but if you beat her, you receive the Claws of Night.
While you’re down there, you can also grab the Finger Weaver’s Cookbook [2] and a couple of Finger Mimic crafting materials.

The Finger Weaver’s Cookbook [2] contains the recipe to craft Fingerprint Nostrum, which grants +6 Intelligence, Faith, and Arcane for 90s at the cost of losing -3 HP/s over the same period of time.
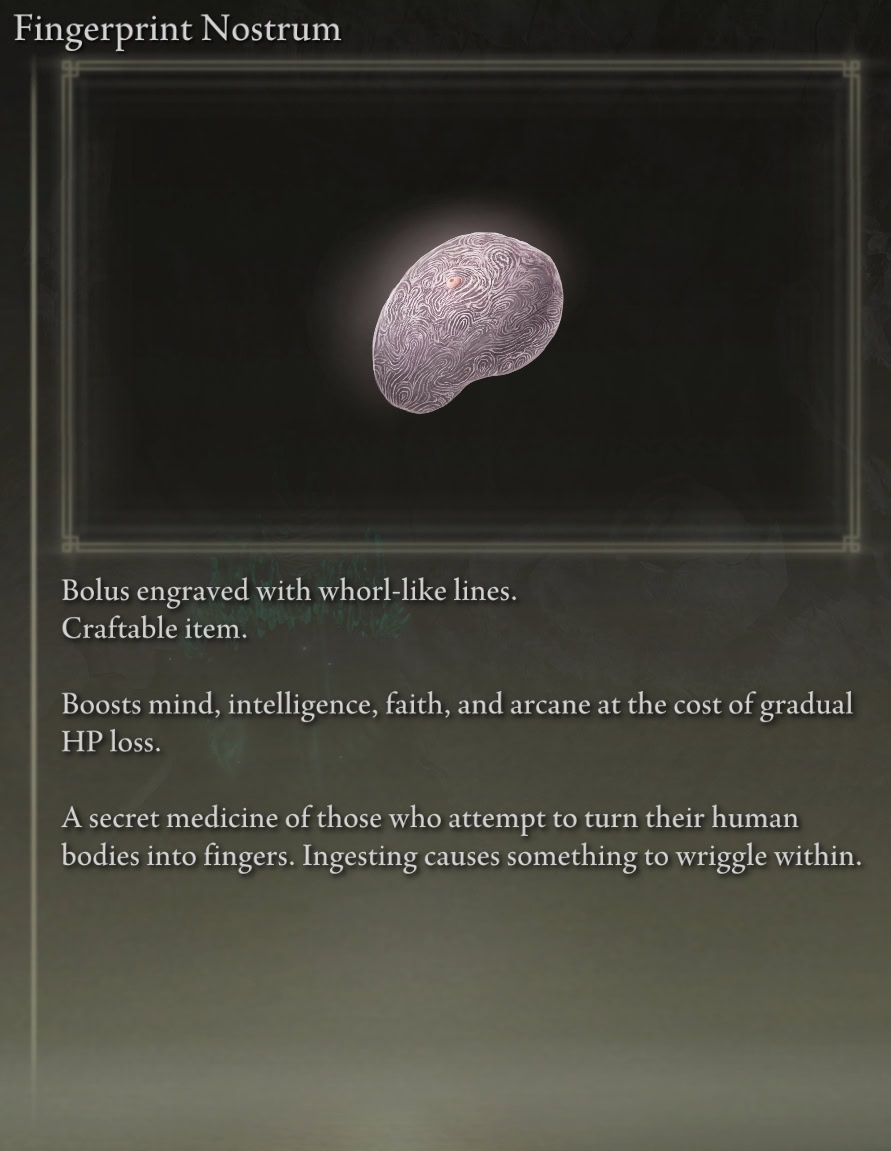
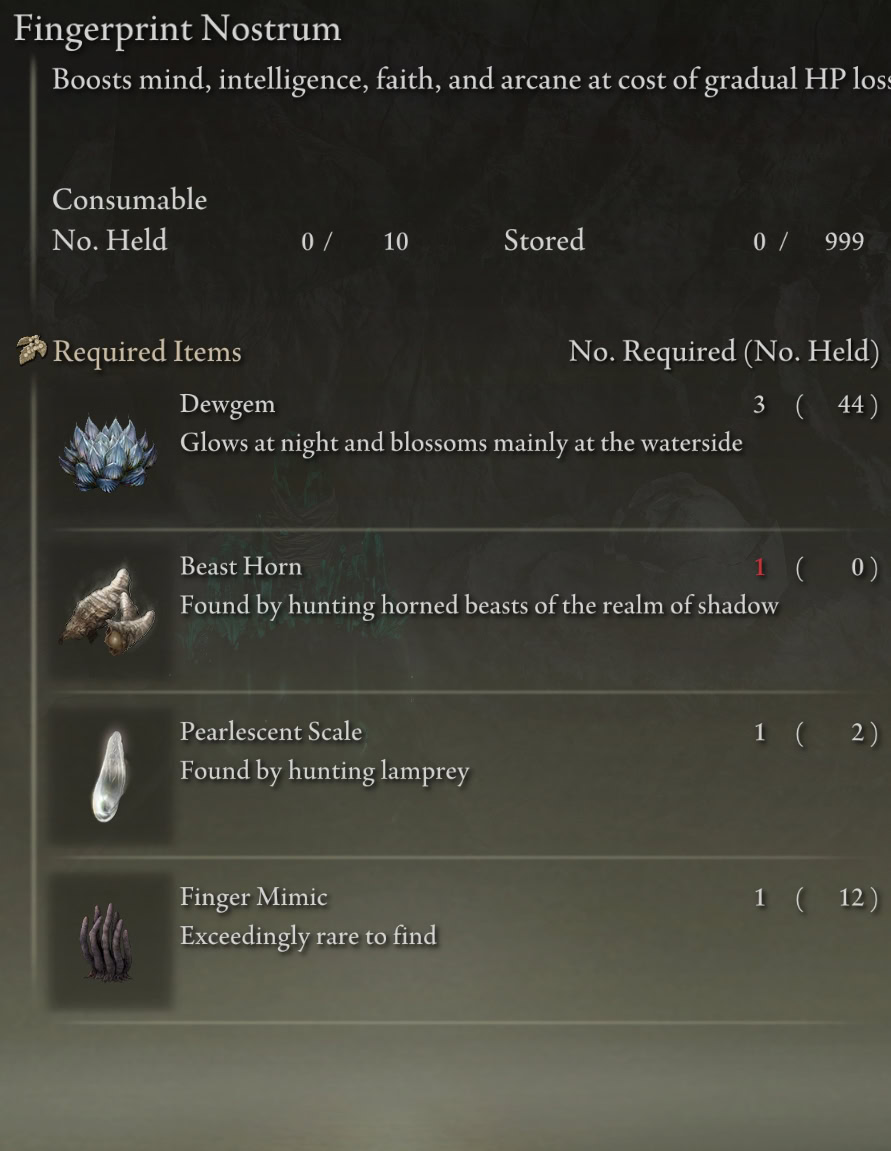
Overall, it’s a pretty great deal. The damage you take over time only amounts to 270 HP total, which is only 33% of the healing dealt by a single, fully upgraded Flask of Crimson Tears. If you have 60 Vigor (and you should), you’ll have 1900 HP. The health drain is nothing for a buff equal to 1.5 Physick Tears or Marika’s Soreseal Talisman.
Step 7: Expedition to the Finger Ruins of Dheo
If you don’t manage to defeat Anna, you’ll respawn with Count Ymir back on the throne. He’ll remark that you weren’t meant to see that yet, but it doesn’t cause any problems. You’ll want to inform Jolán of what you saw though.
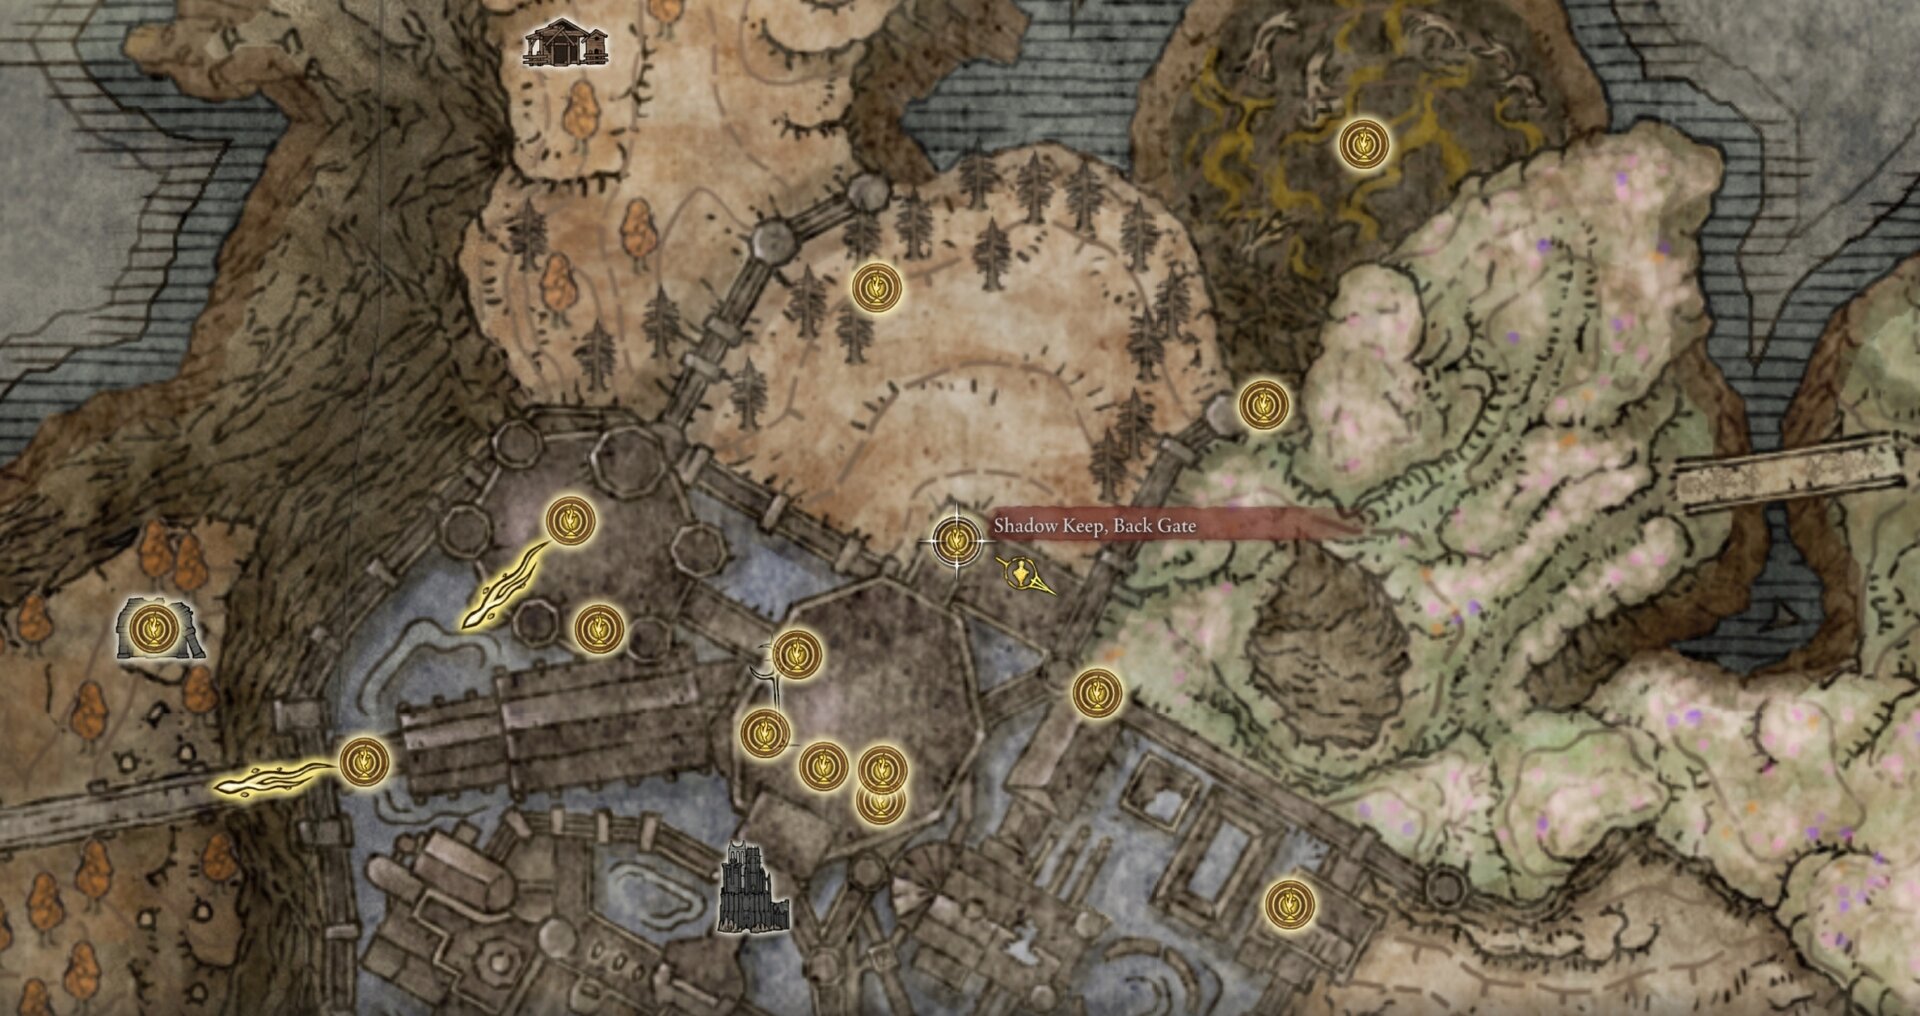
Your next objective is to reach the Finger Ruins of Dheo, which are located behind the Shadow Keep. You’ll need to make your way through the Church District, take the elevator there up to the rafters of the Specimen Storage, and then back down to the Shadow Keep, Back Gate leading to the Scadutree Chalice.
You don’t need to fight Commander Gaius and his “wild” boar, only reach the Site of Grace in front of the field he frolics about with his Albinauric ladyfriend. Check out our Shadow Keep Guide for more information on how to reach this location.
To the right of the door to Scadview is a large room with a headless statue of Marika. Use the O Mother emote in front of that statue to open the secret passage to the Hinterland.
There’s nothing unique to your left, but there are some rarer crafting materials. Namely, Golden Fireflies and Shadow Sunflowers, along with far too many rams and several little red bears.
To the right, you’ll need to fight a pair of Tree Sentinels. The first one pops out right after you have the opportunity to summon in Jolán. Once you defeat both of them, activate the Site of Grace near the bridge to the Finger Ruins.
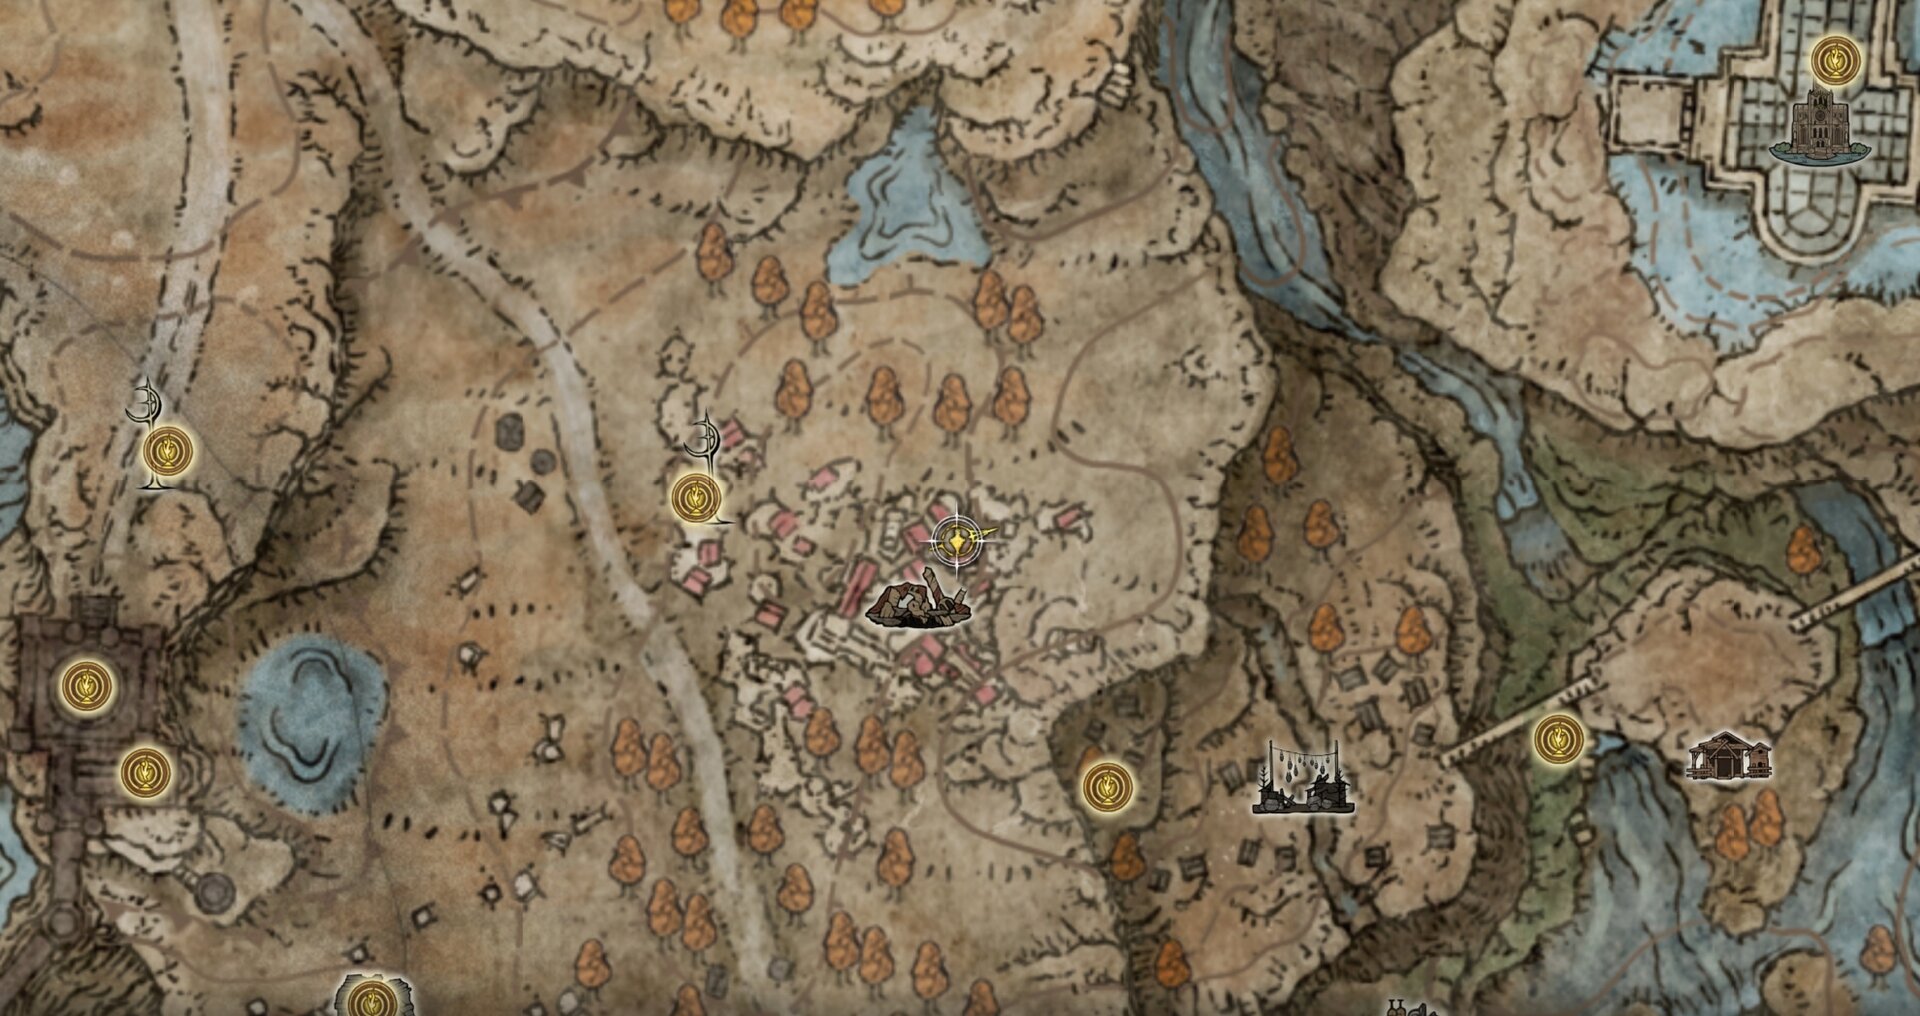
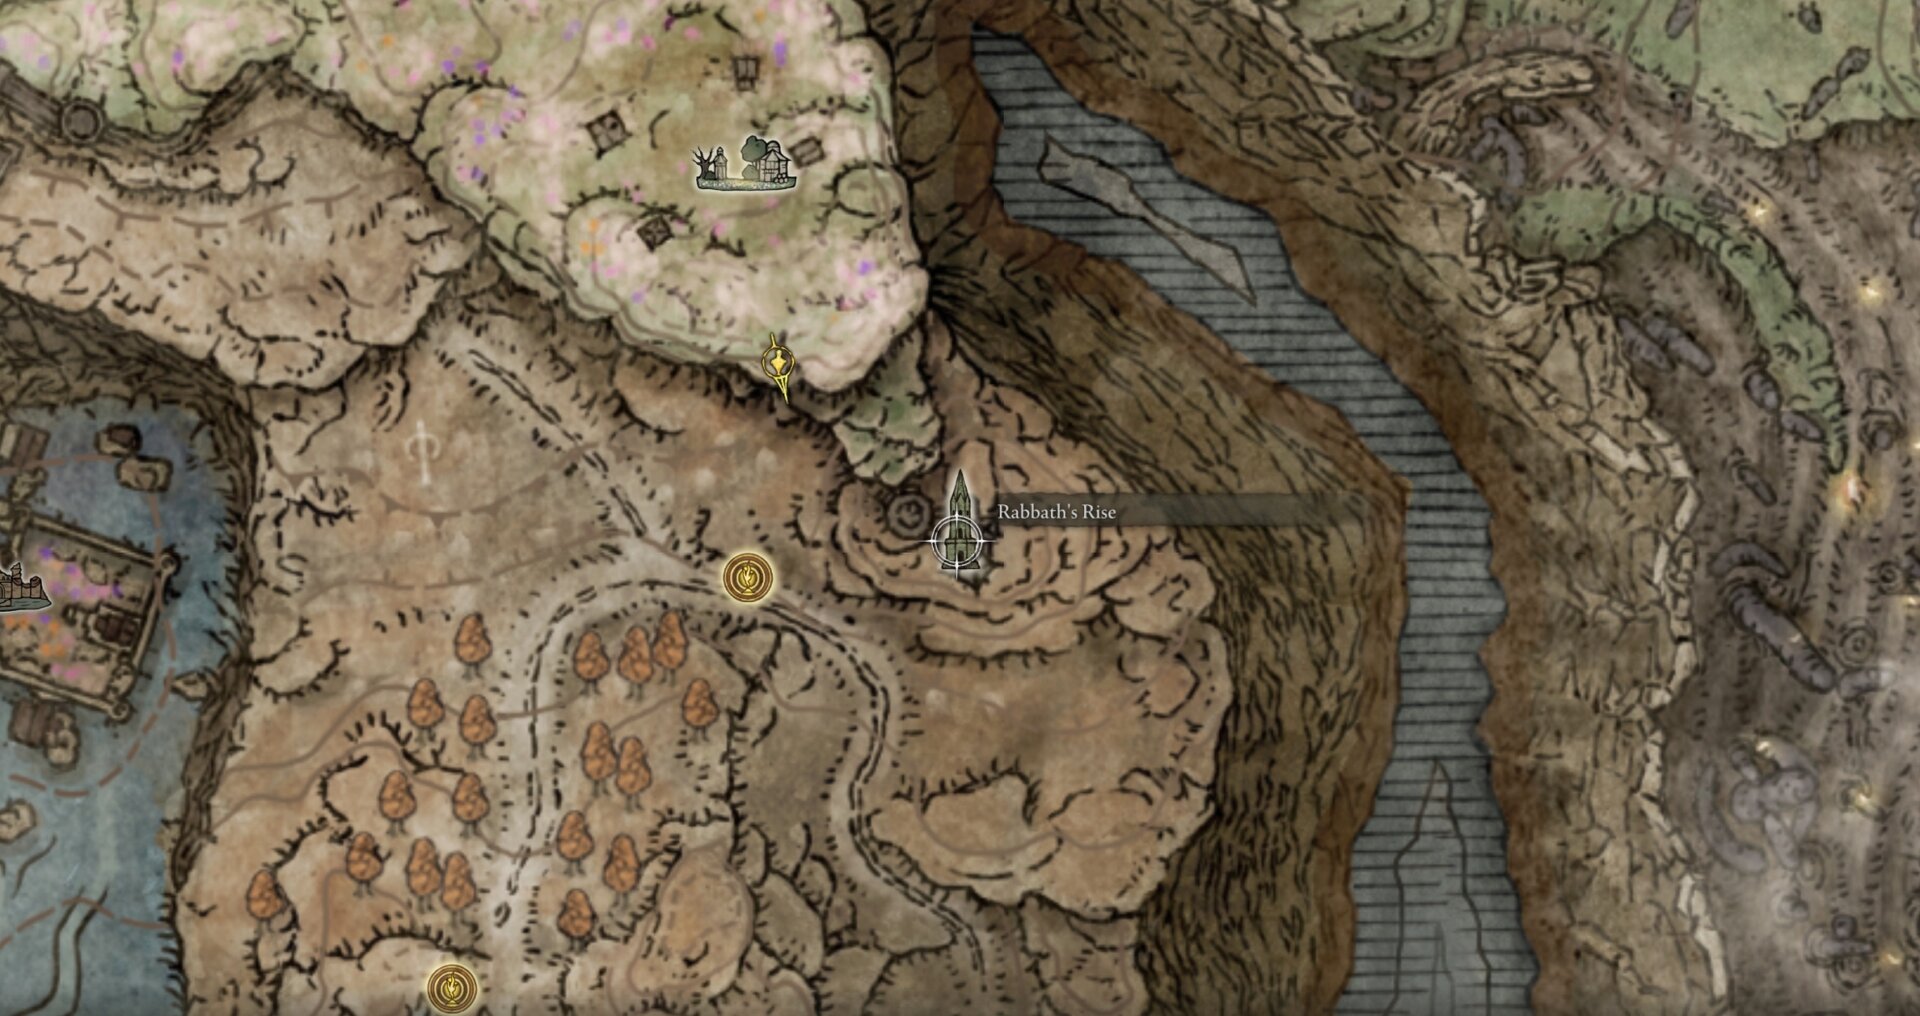
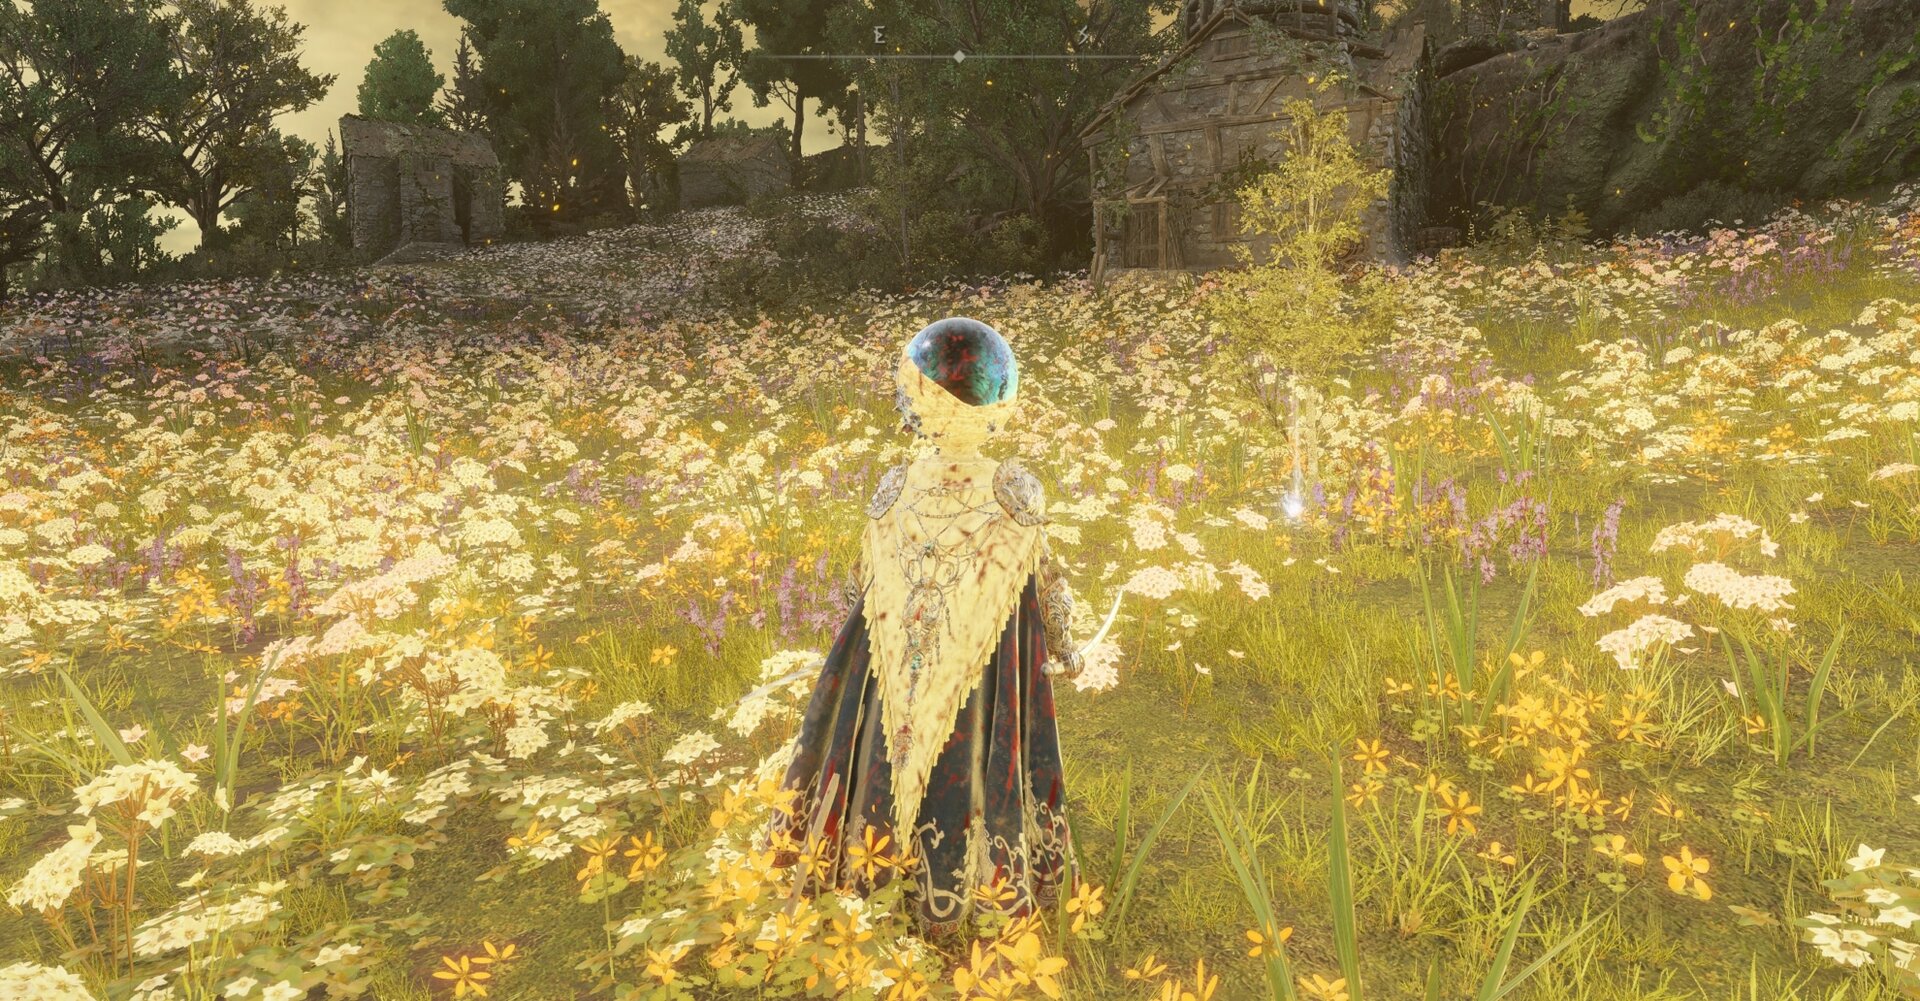
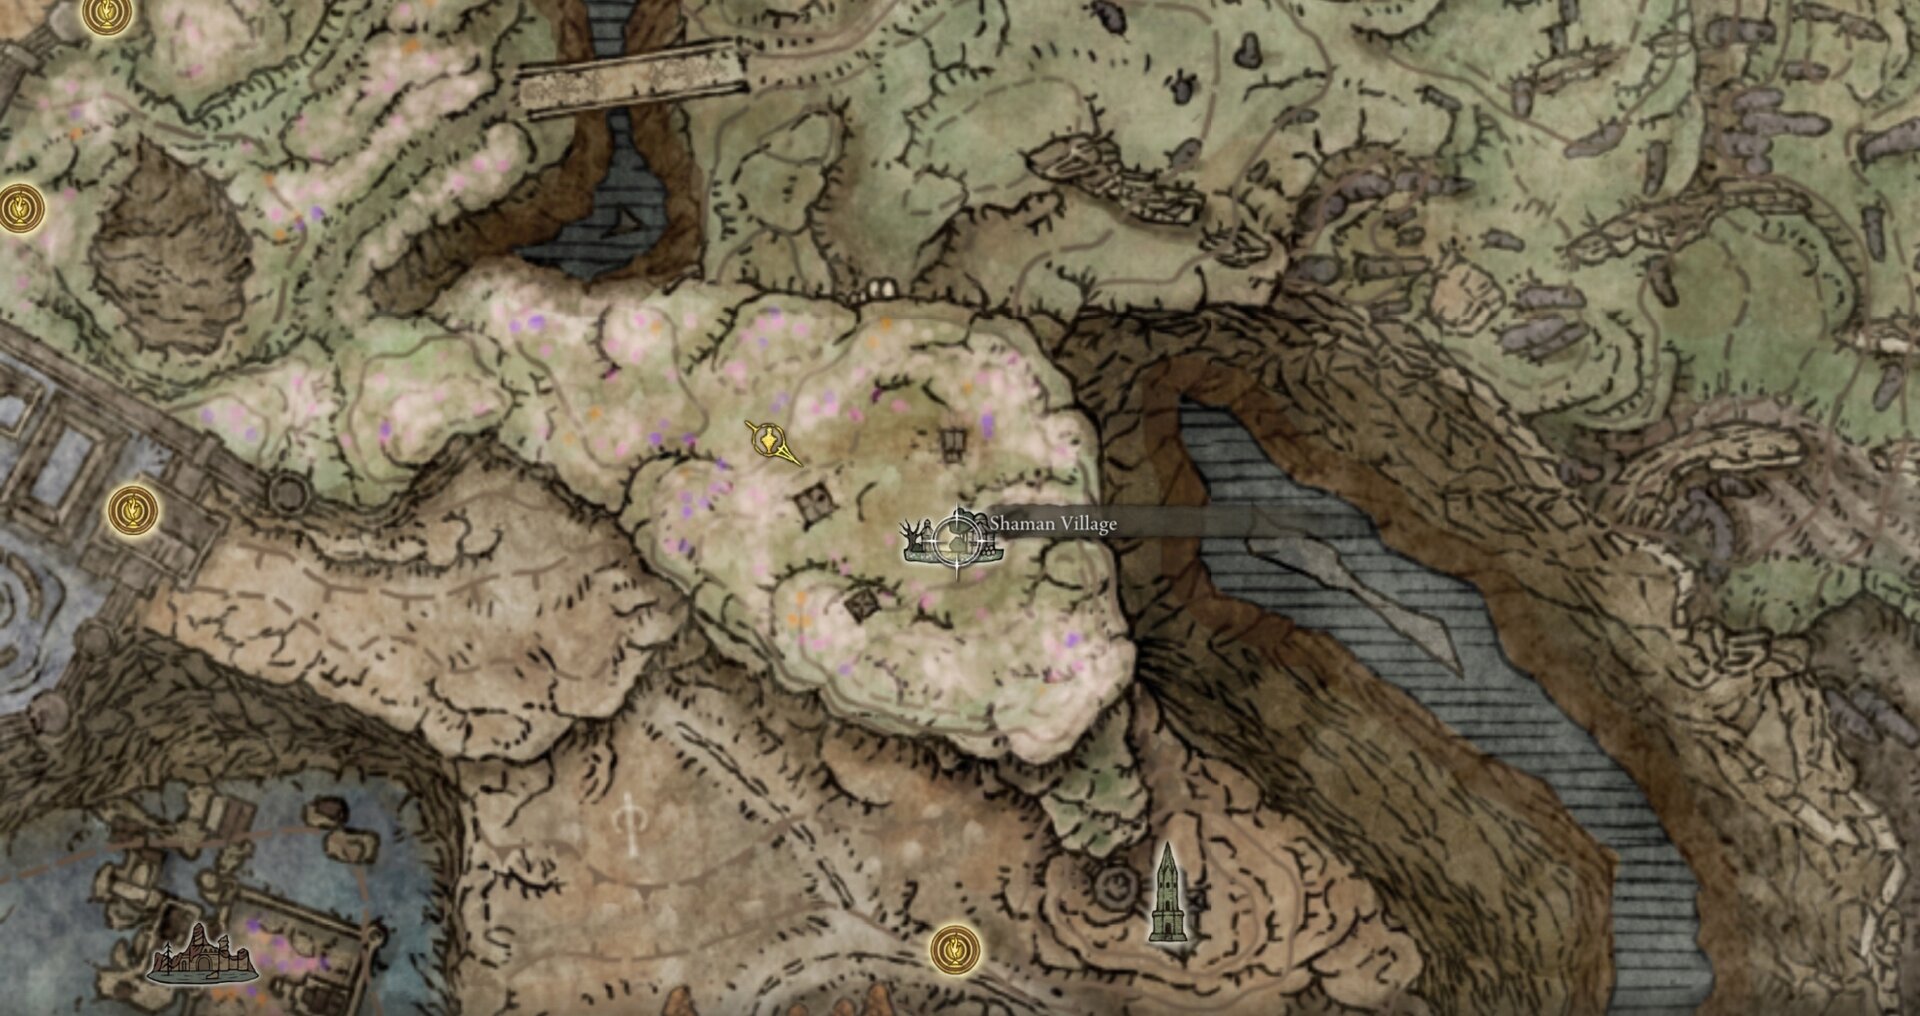
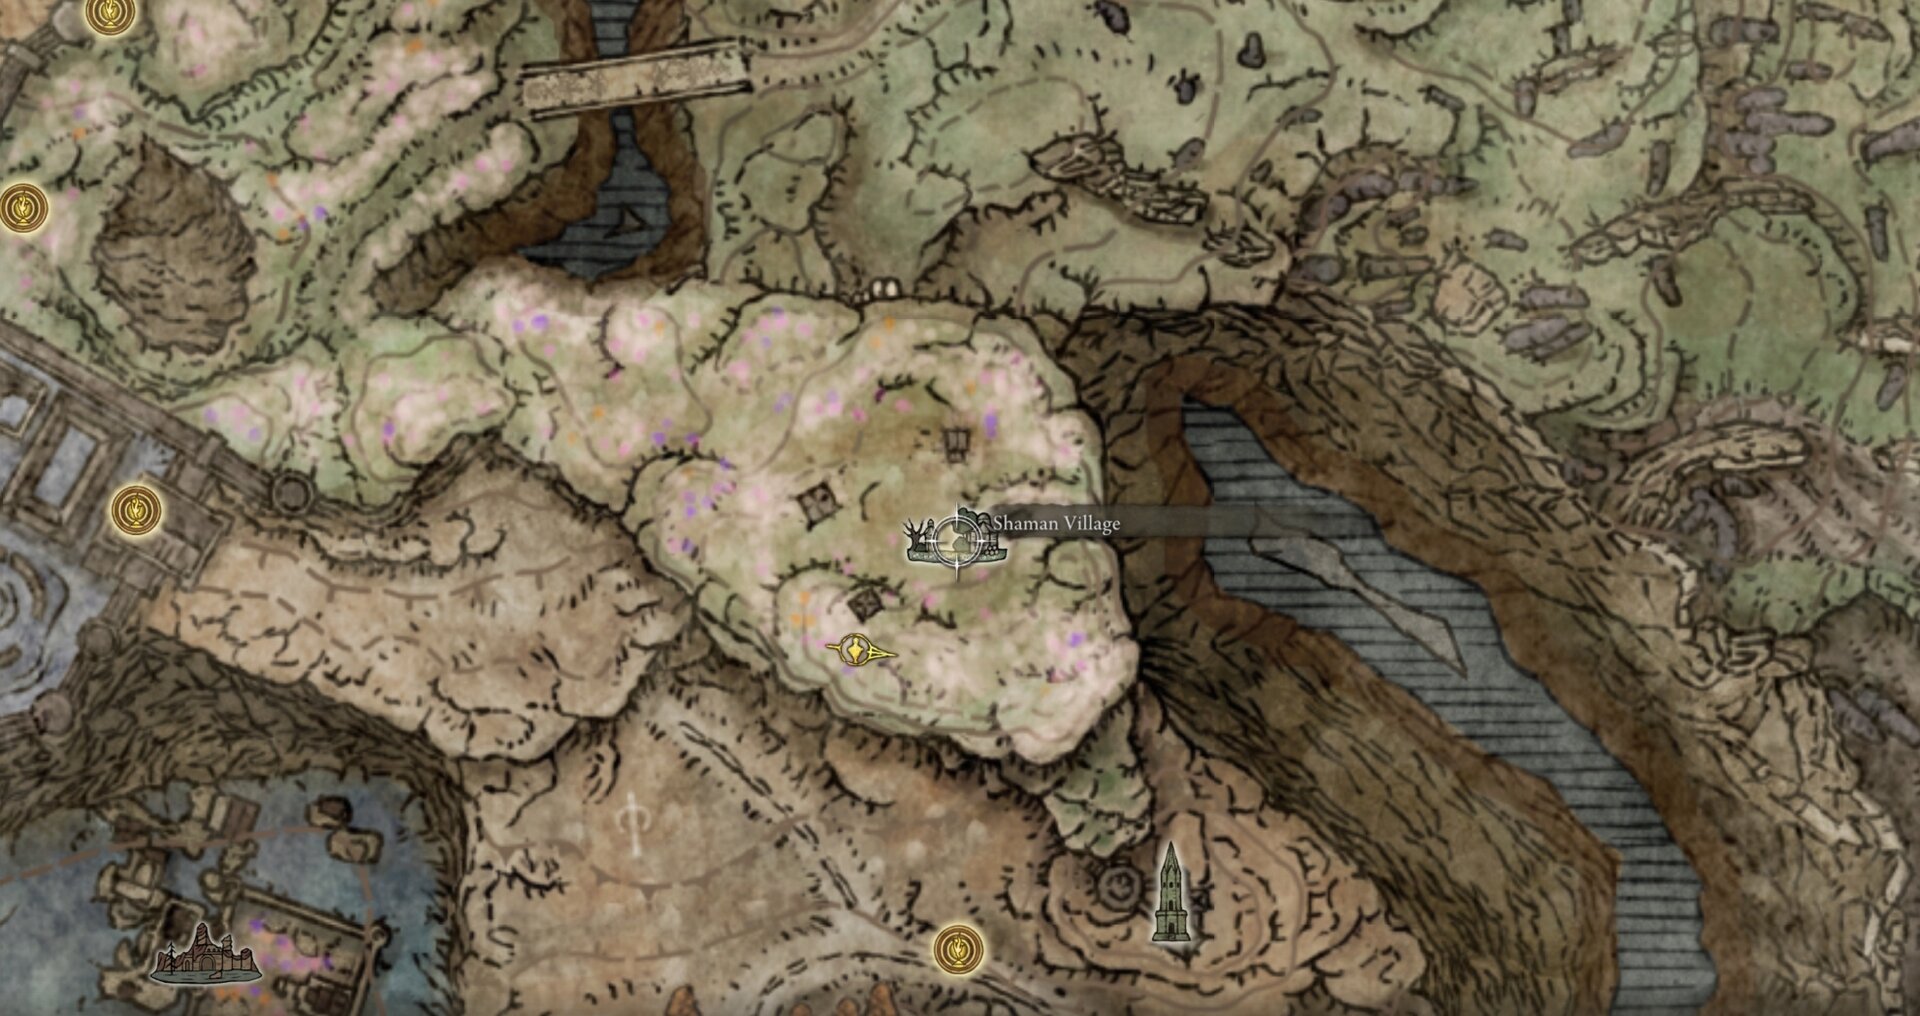
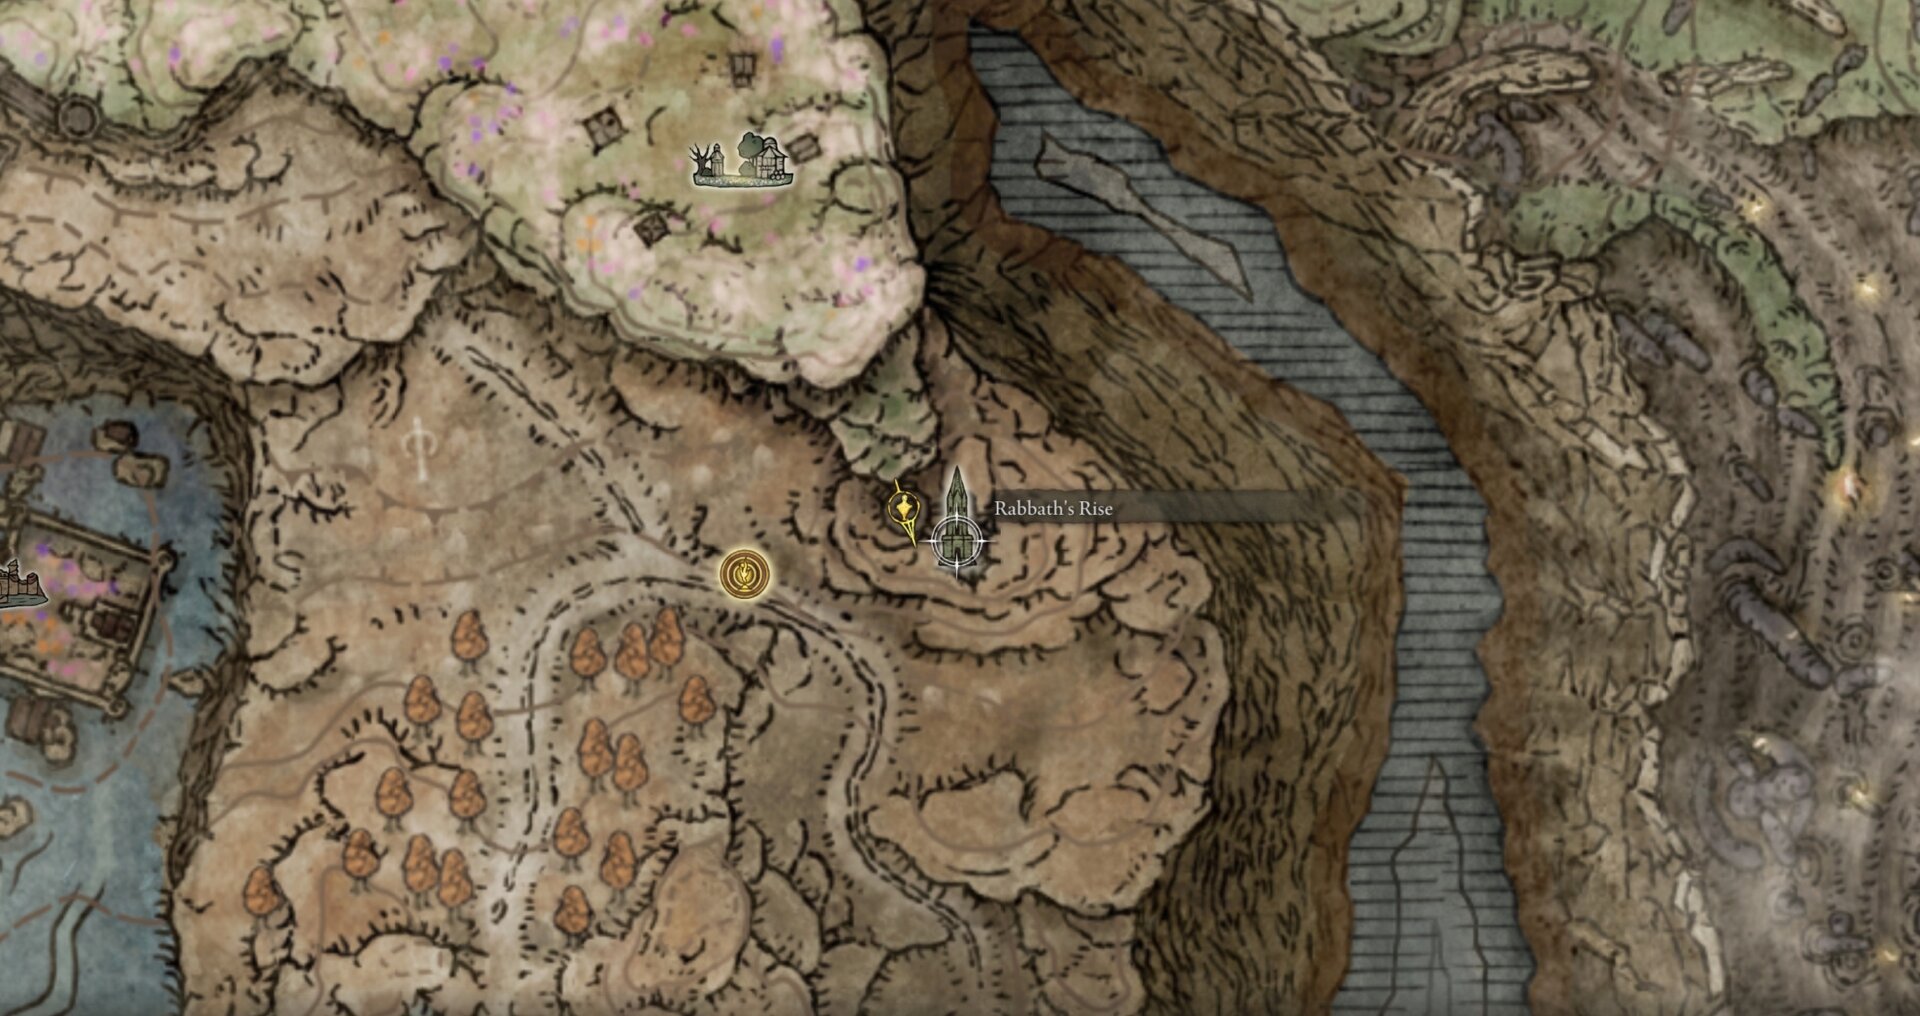
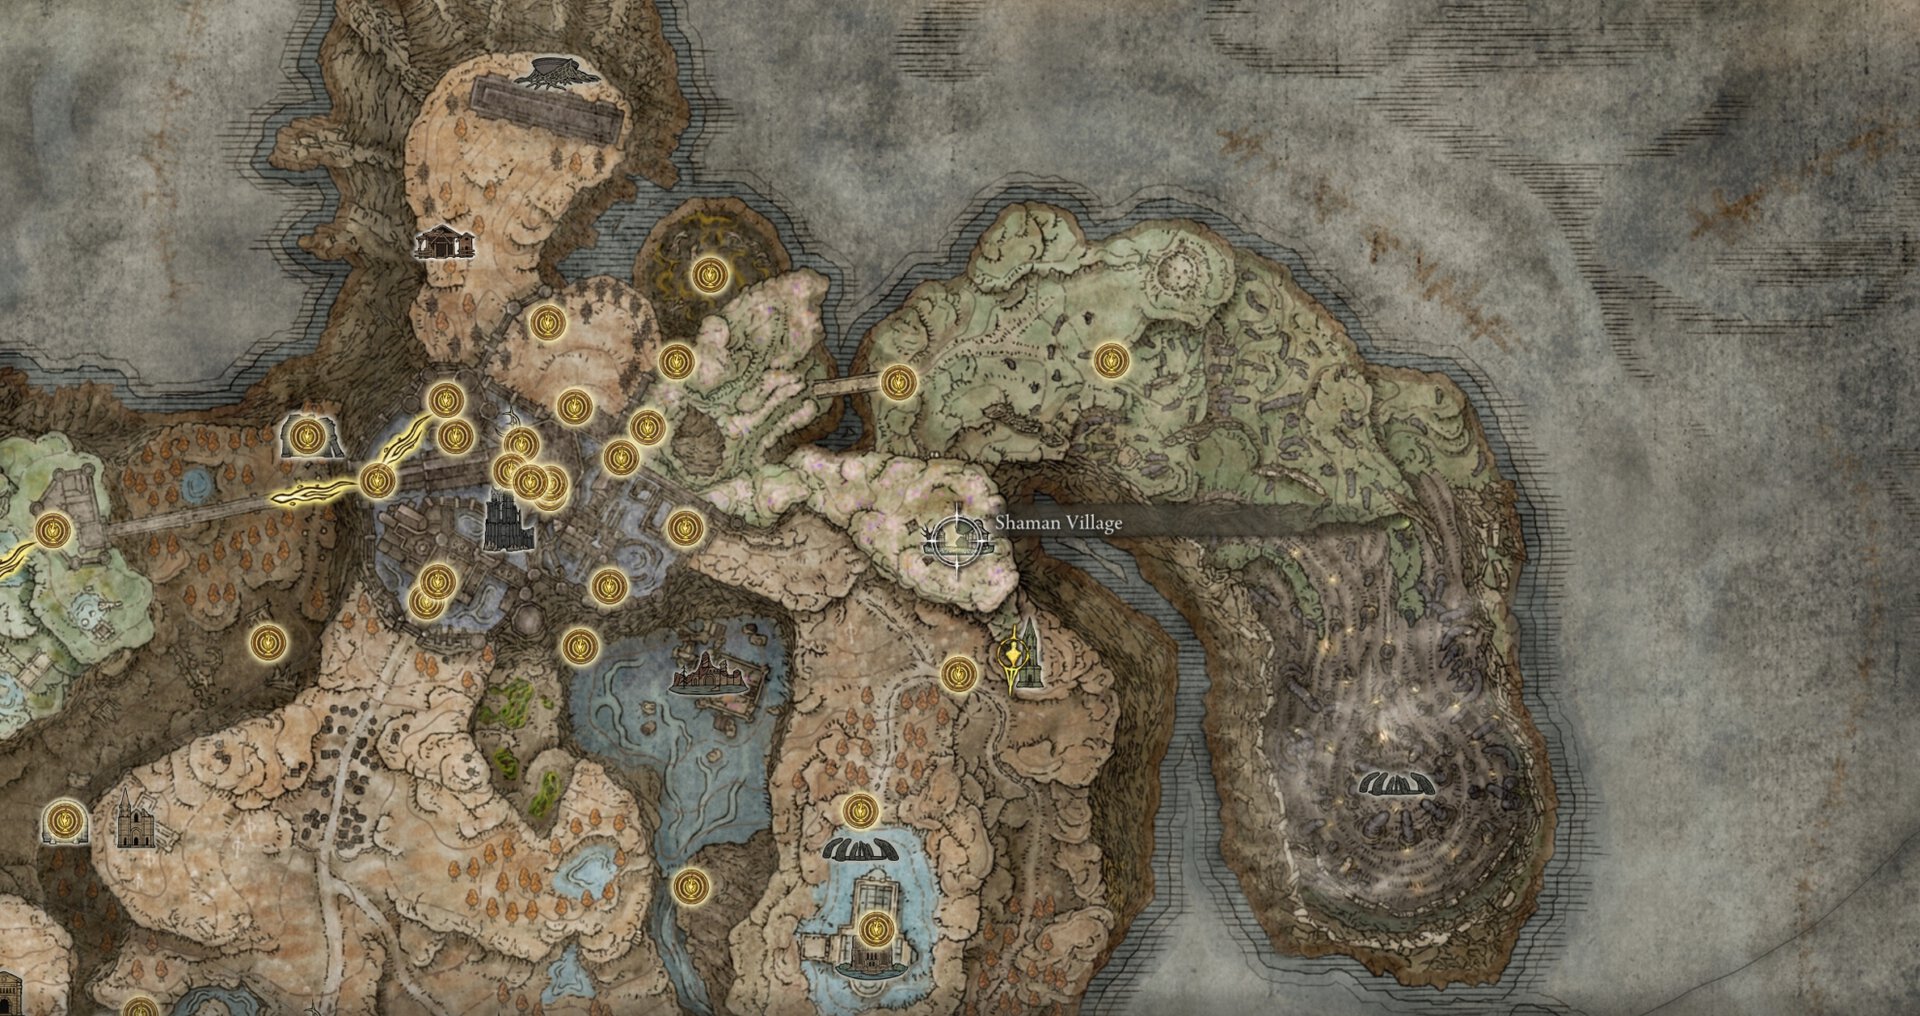
Step 8: Detour to the Shaman Village and Rabbath’s Rise
There are several important items at the Shaman Village on the way to the Finger Ruins of Dheo that pertain to Count Ymir, the Swordhands of Night, and Marika.
Rabbath’s Rise is a high tower you probably visited on your way to the Cathedral of Manus Metyr. The upper levels of the tower are only accessible from the top, dropping down from the Shaman Village to the upper balcony of Rabbath’s Rise.
Minor Erdtree Incantation
Minor Erdtree is a relatively cheap Incantation that costs 2 Memory Slots to conjure a very minor Erdtree that heals you and your allies in the vicinity.
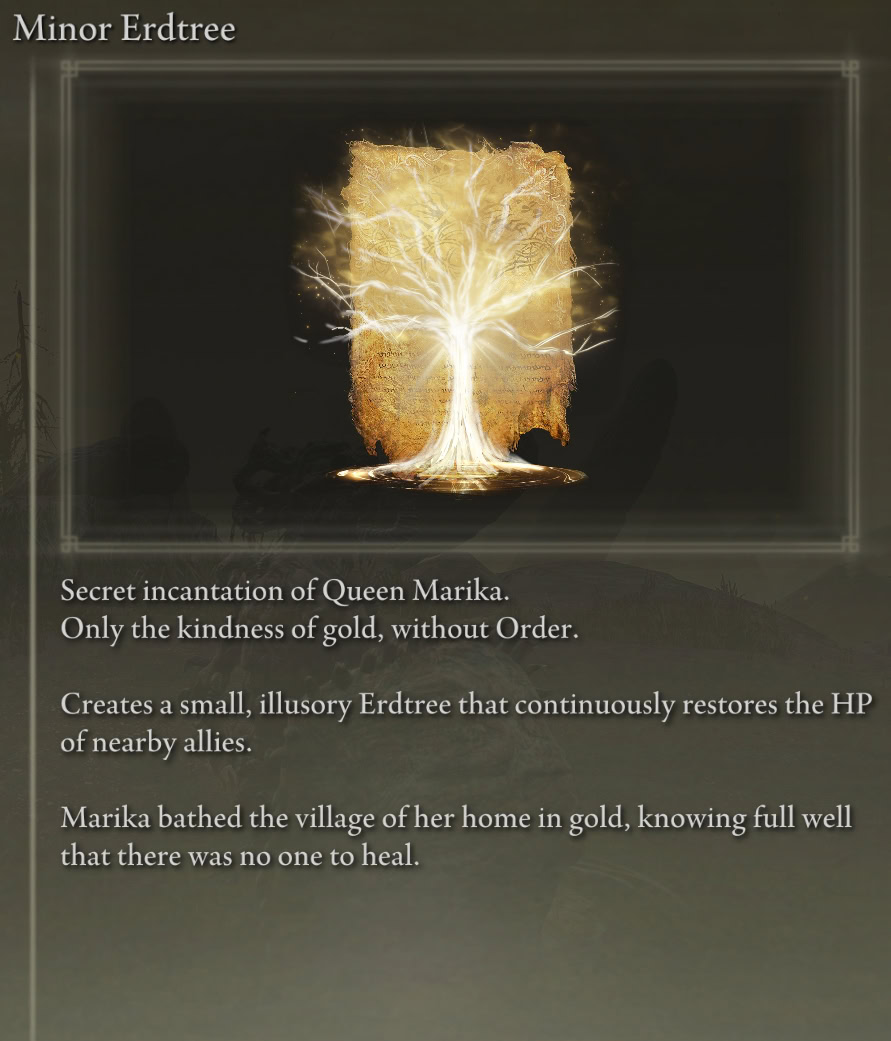
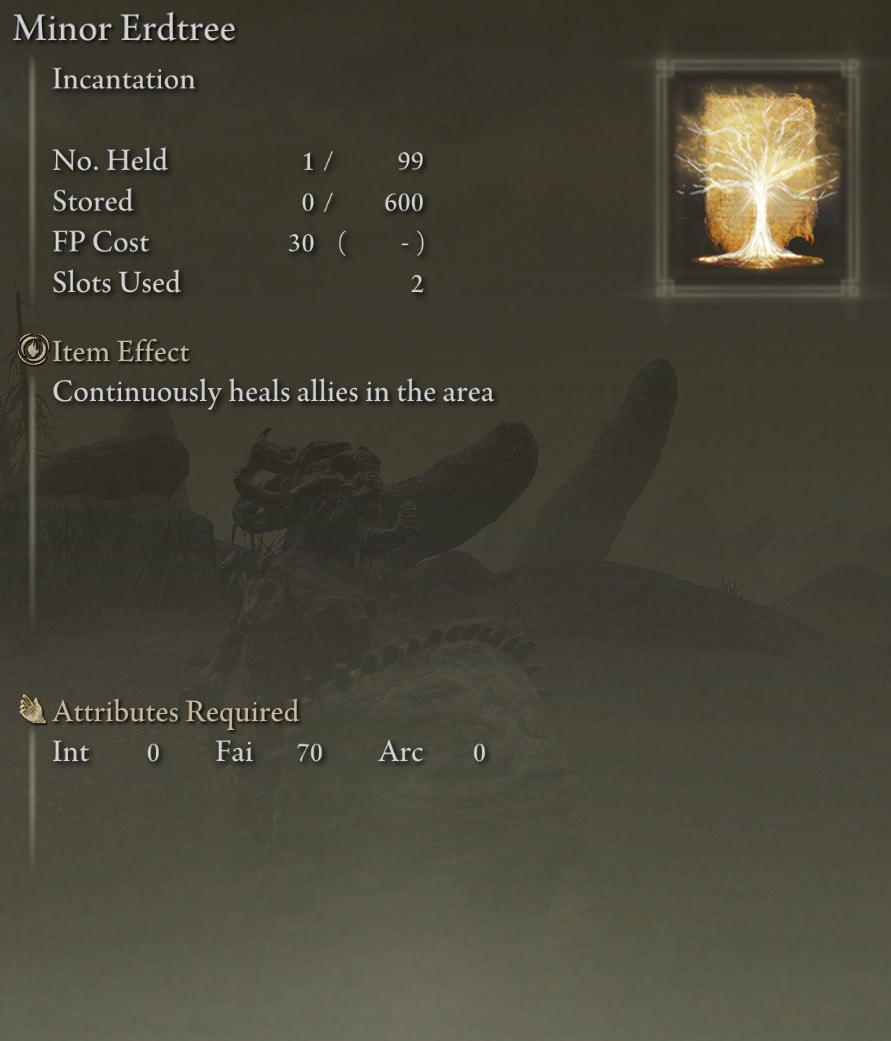
You can loot the Minor Erdtree Incantation from a regular tree at the Shaman Village. The area around the tree is bathed in gold and large enough to suggest that you were meant to fight a boss here, but there isn’t one.
Golden Braid Talisman
The Golden Braid Talisman is a stand-in for the Haligdrake Talisman +3 and boots Holy Damage Negation by what seems to be a variable amount, though it’s the same amount stronger than Haligdrake Talisman +2 can be quantified as a multiplicative 35-50% boost or an additive 16-20%.
All of the Drake Talismans (Golden Braid included) appear to change the percentage, not your relevant Defense stat, but apply a greater effect the lower your associated Damage Negation percentage is. It’s as if diminishing returns are being applied to the percentage, not the stat as one might expect.
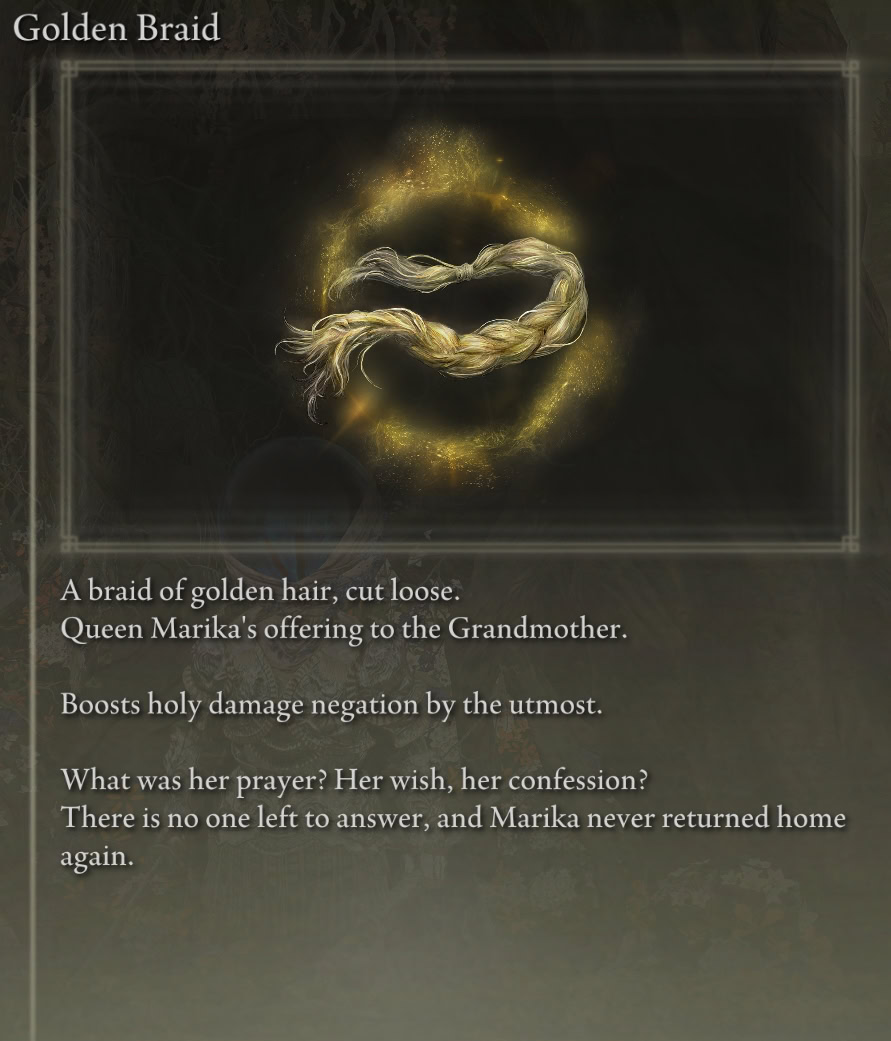
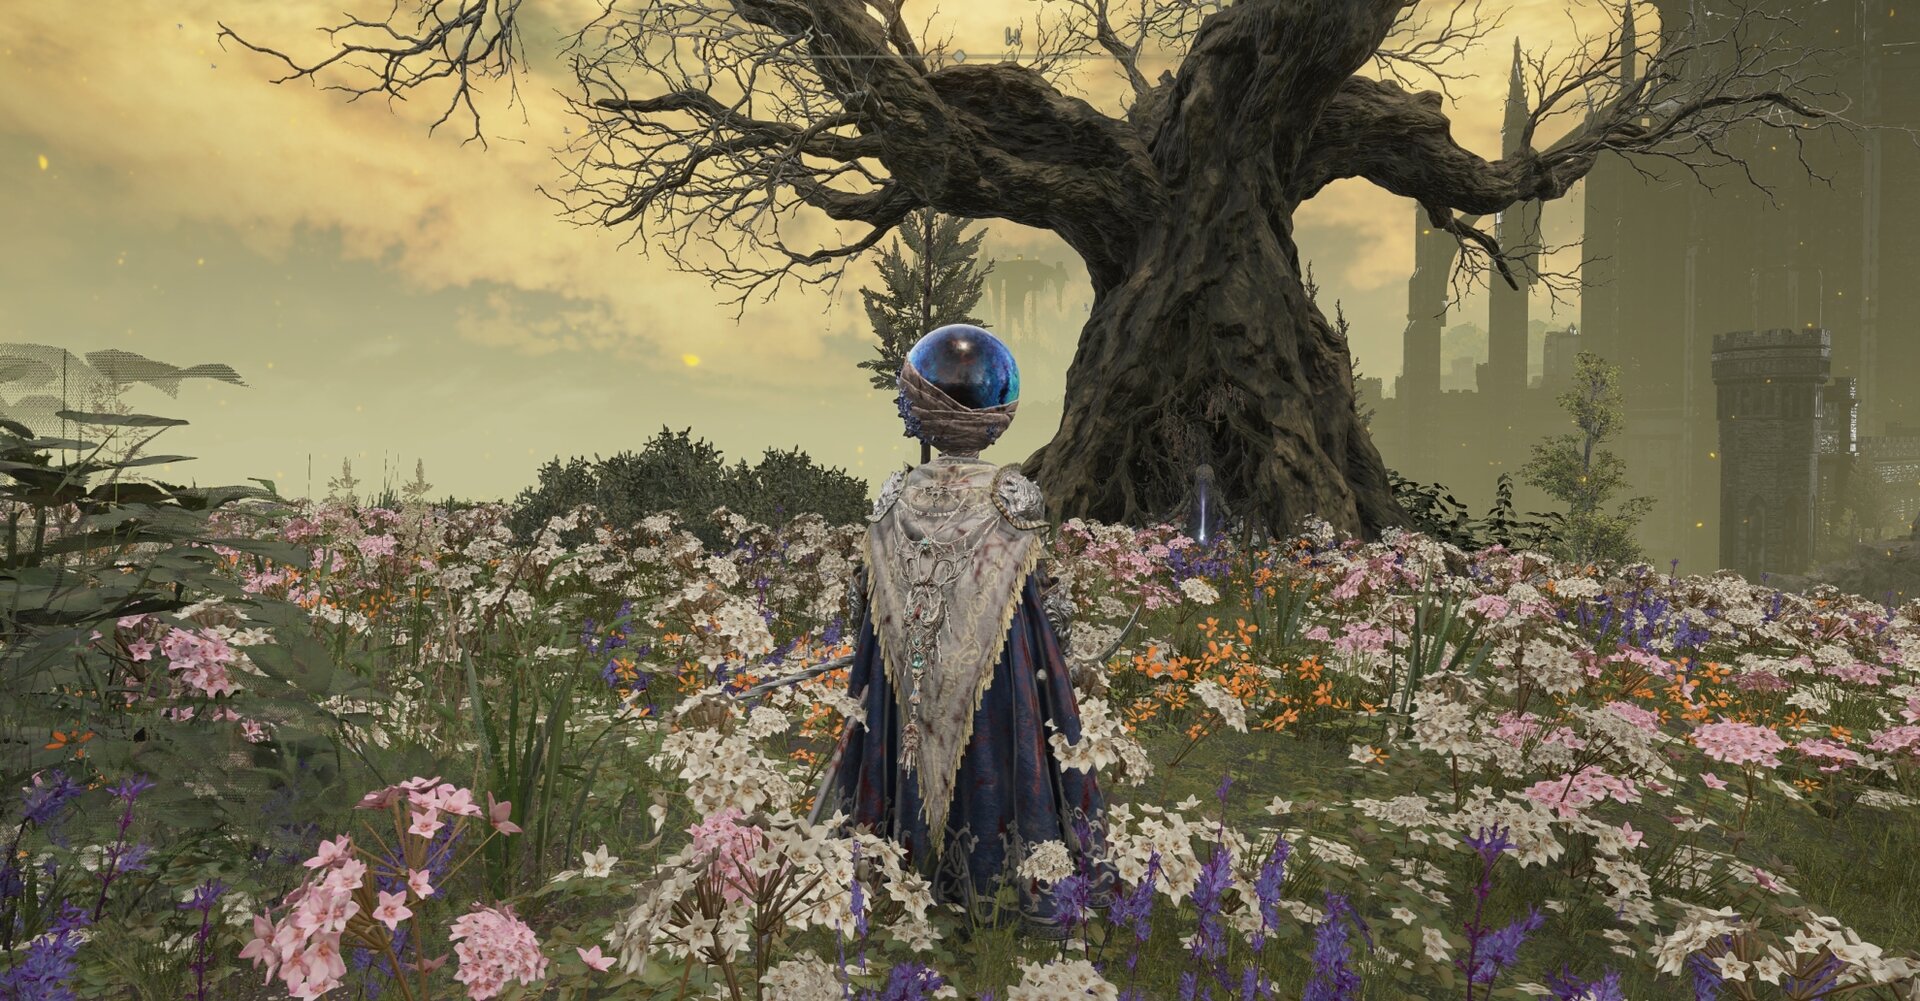
You can loot Marika’s hair from a dead tree with a stone lady inside at the top of Shaman Village.
It’s incredibly useful at protecting yourself from the final bosses of both the base game and Shadow of the Erdtree.
Spellmachinist’s Bell-Bearing and Rabbath’s Greatbolts
The Spellmachinist’s Bell Bearing allows you to purchase Rabbath’s Greatbolts from the Twin Maiden Husks at the Roundtable Hold. They cost 800 Runes a pop.
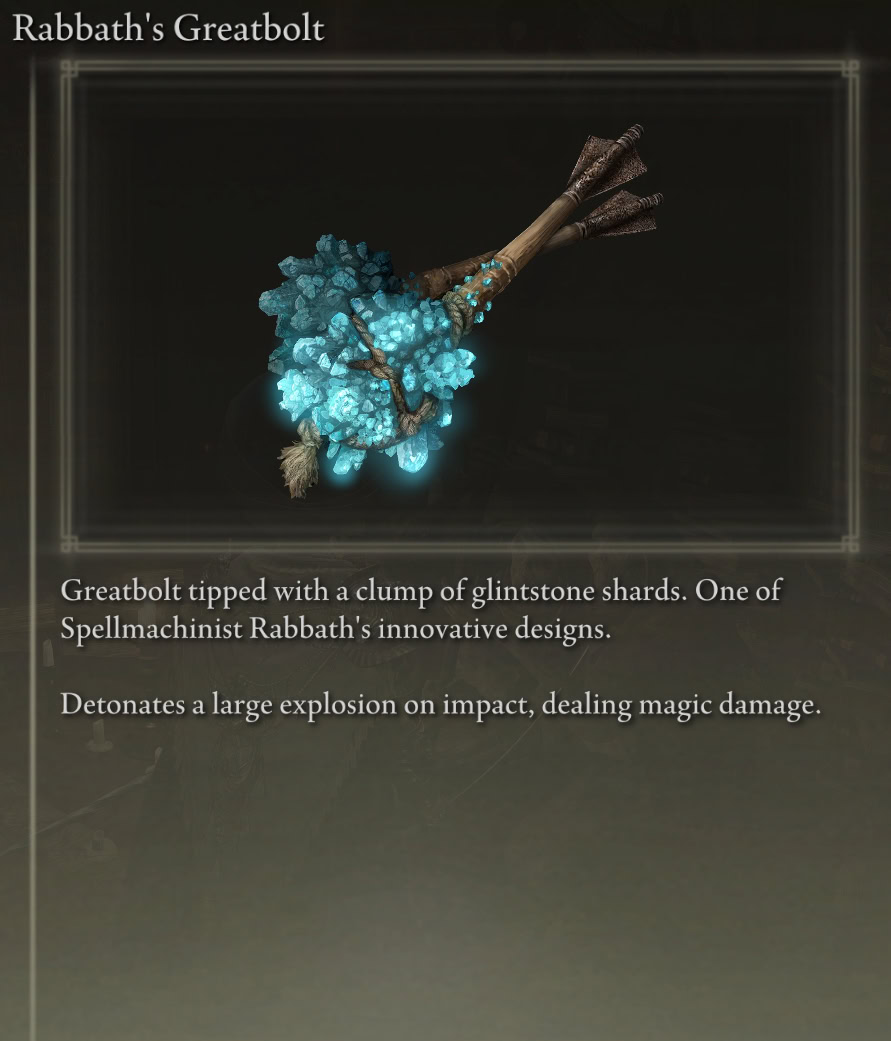

You can loot the Spellmachinist’s Bell-Bearing from a corpse that likely belonged to Rabbath. It’s unclear what his relationship is to Count Ymir.
Rabbath’s Cannon
Rabbath’s Cannon is a magical version of the Jar Cannon item from the base game. You are meant to combine it with Rabbath’s Greatbolts. You know you want this.
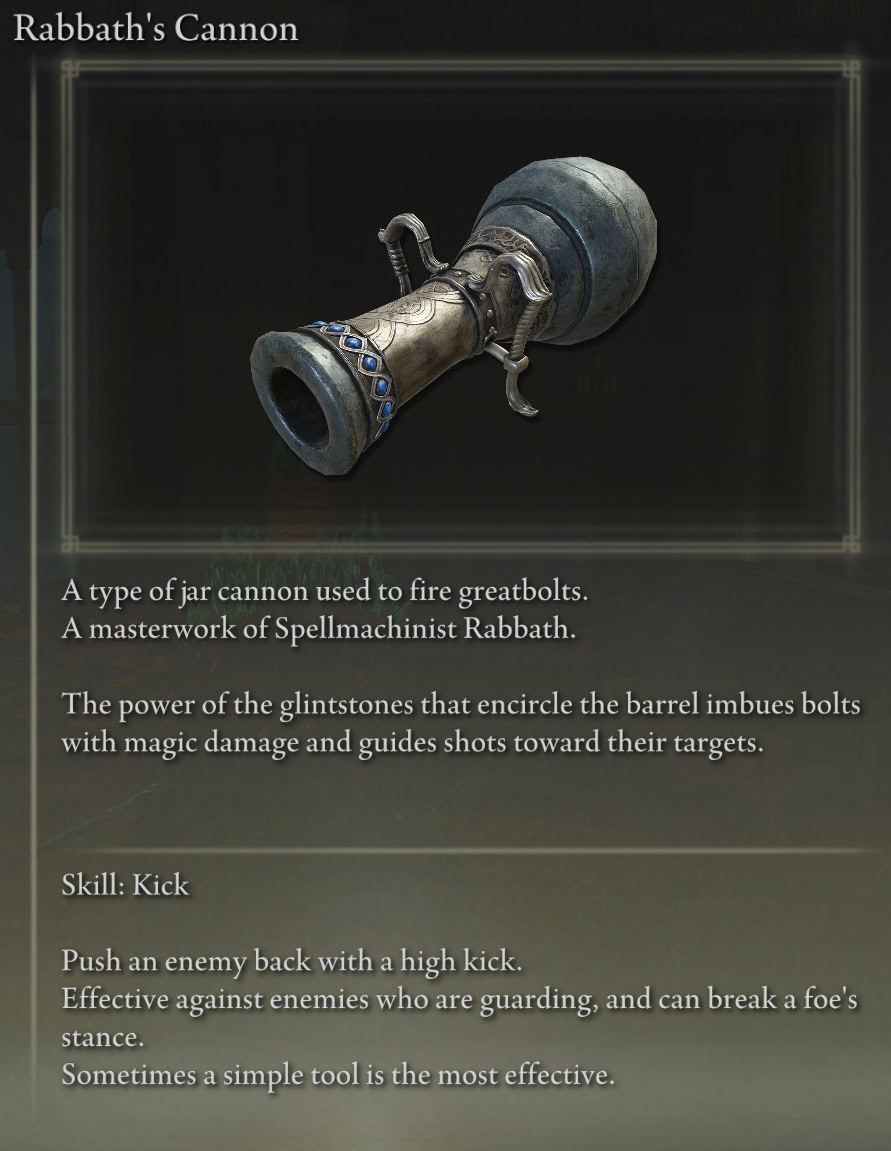
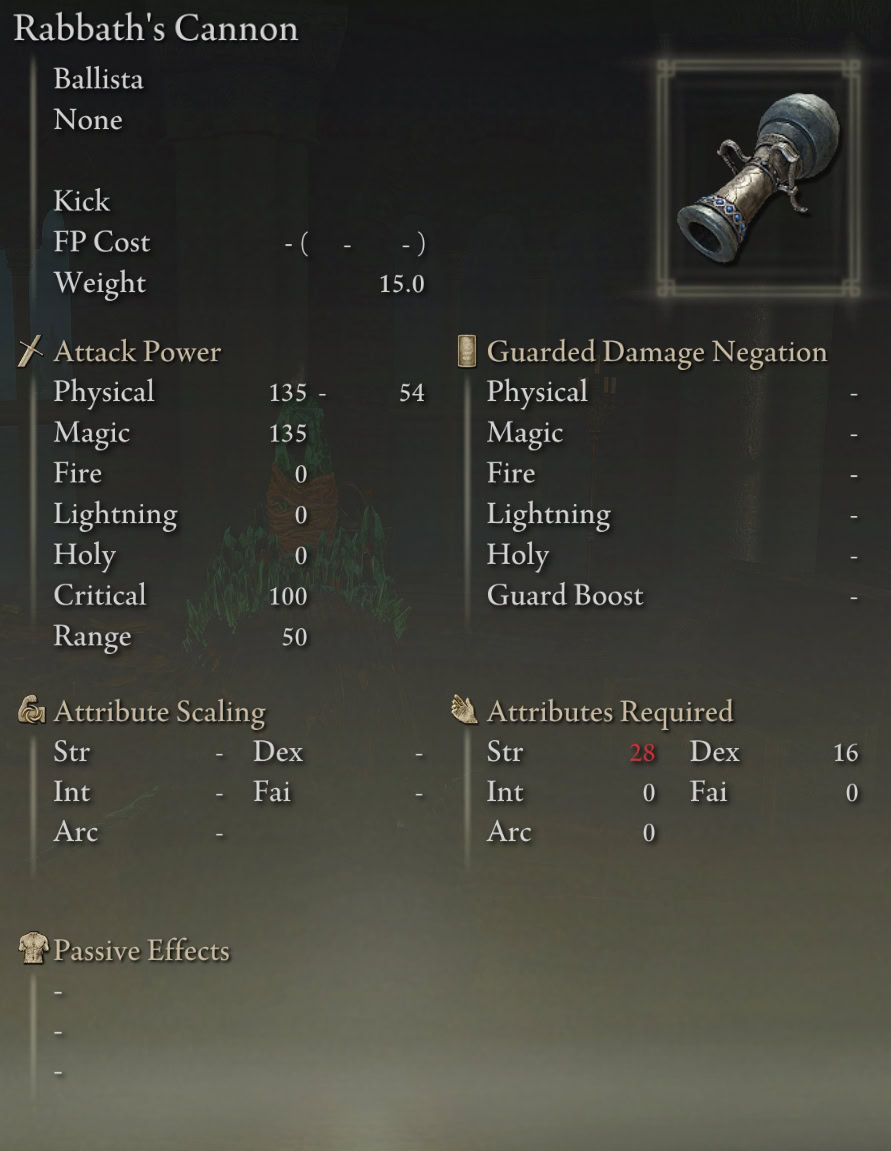
You can loot Rabbath’s Cannon from the chest at Rabbath’s Rise on Scadu Altus. You can either break the Spiritspring Stone and use your Spectral Steed to get it early, or just drop down through the roof from the Shaman Village.

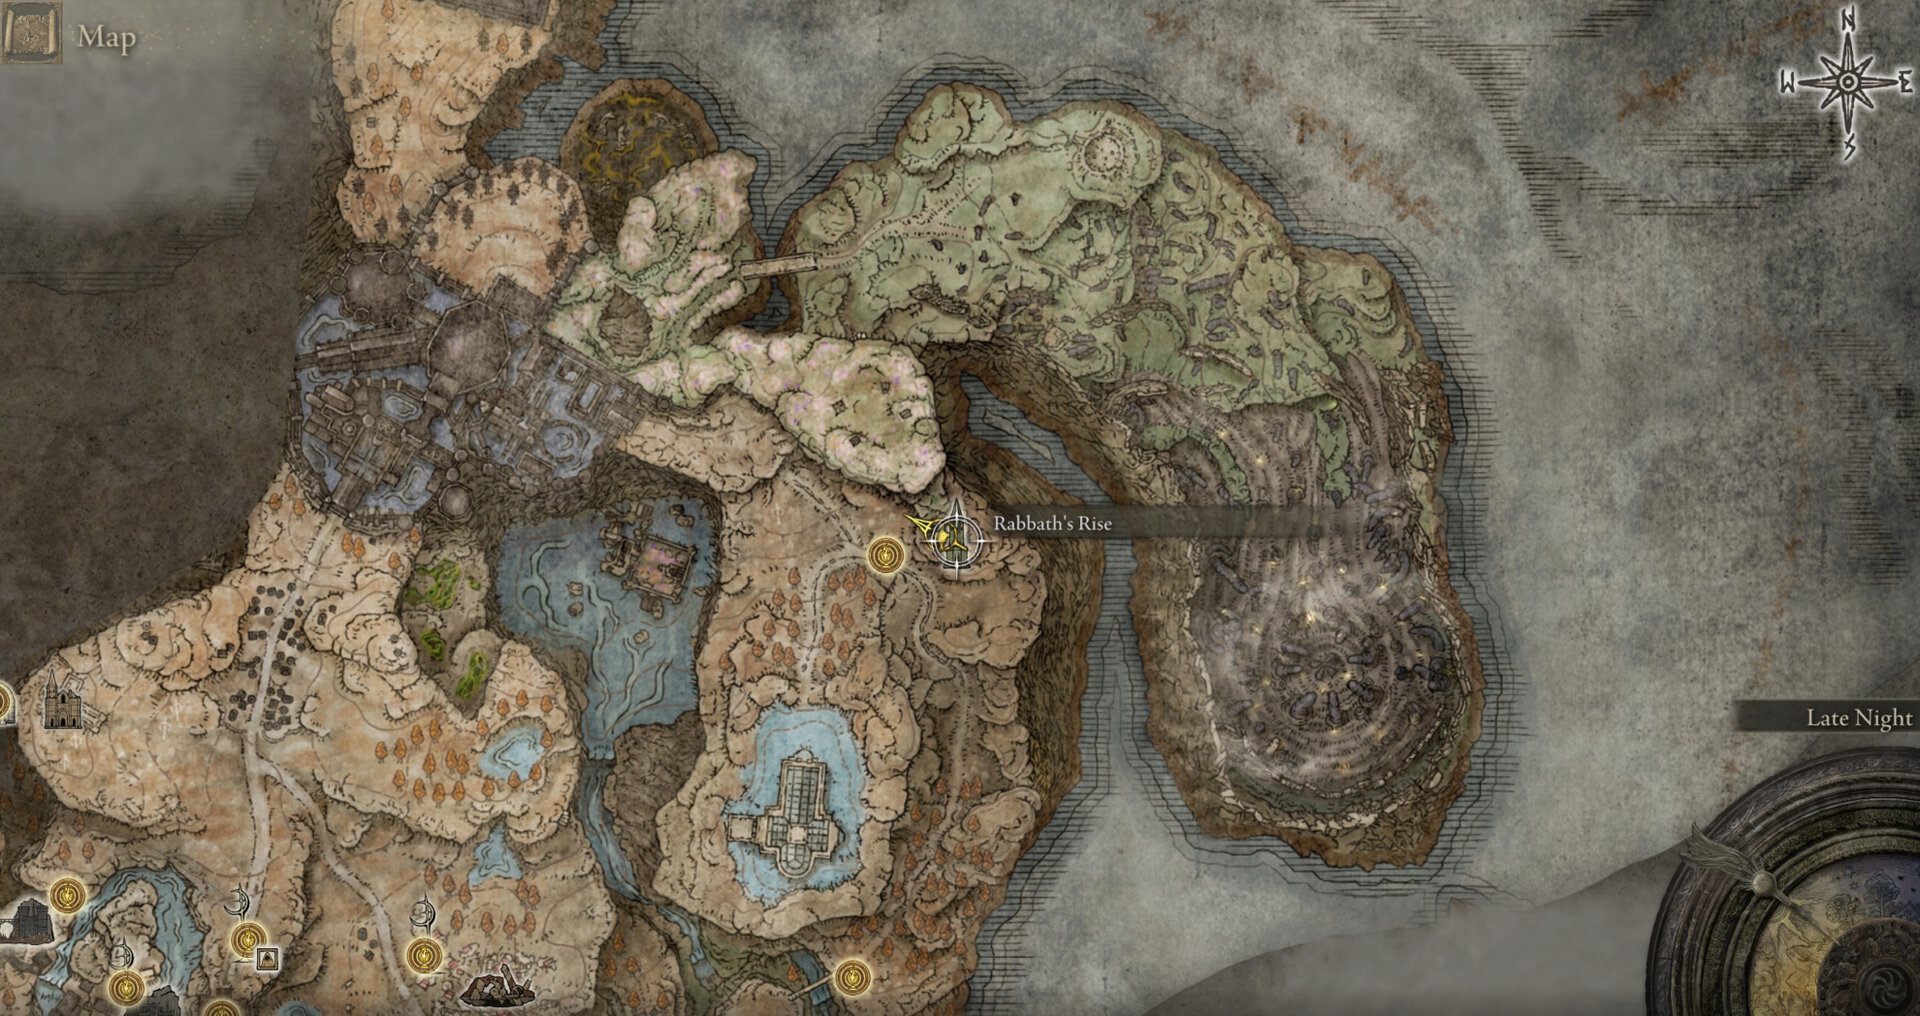
The Spiritspring Stone is located on a balcony inside Rabbath’s Rise behind an illusion wall.
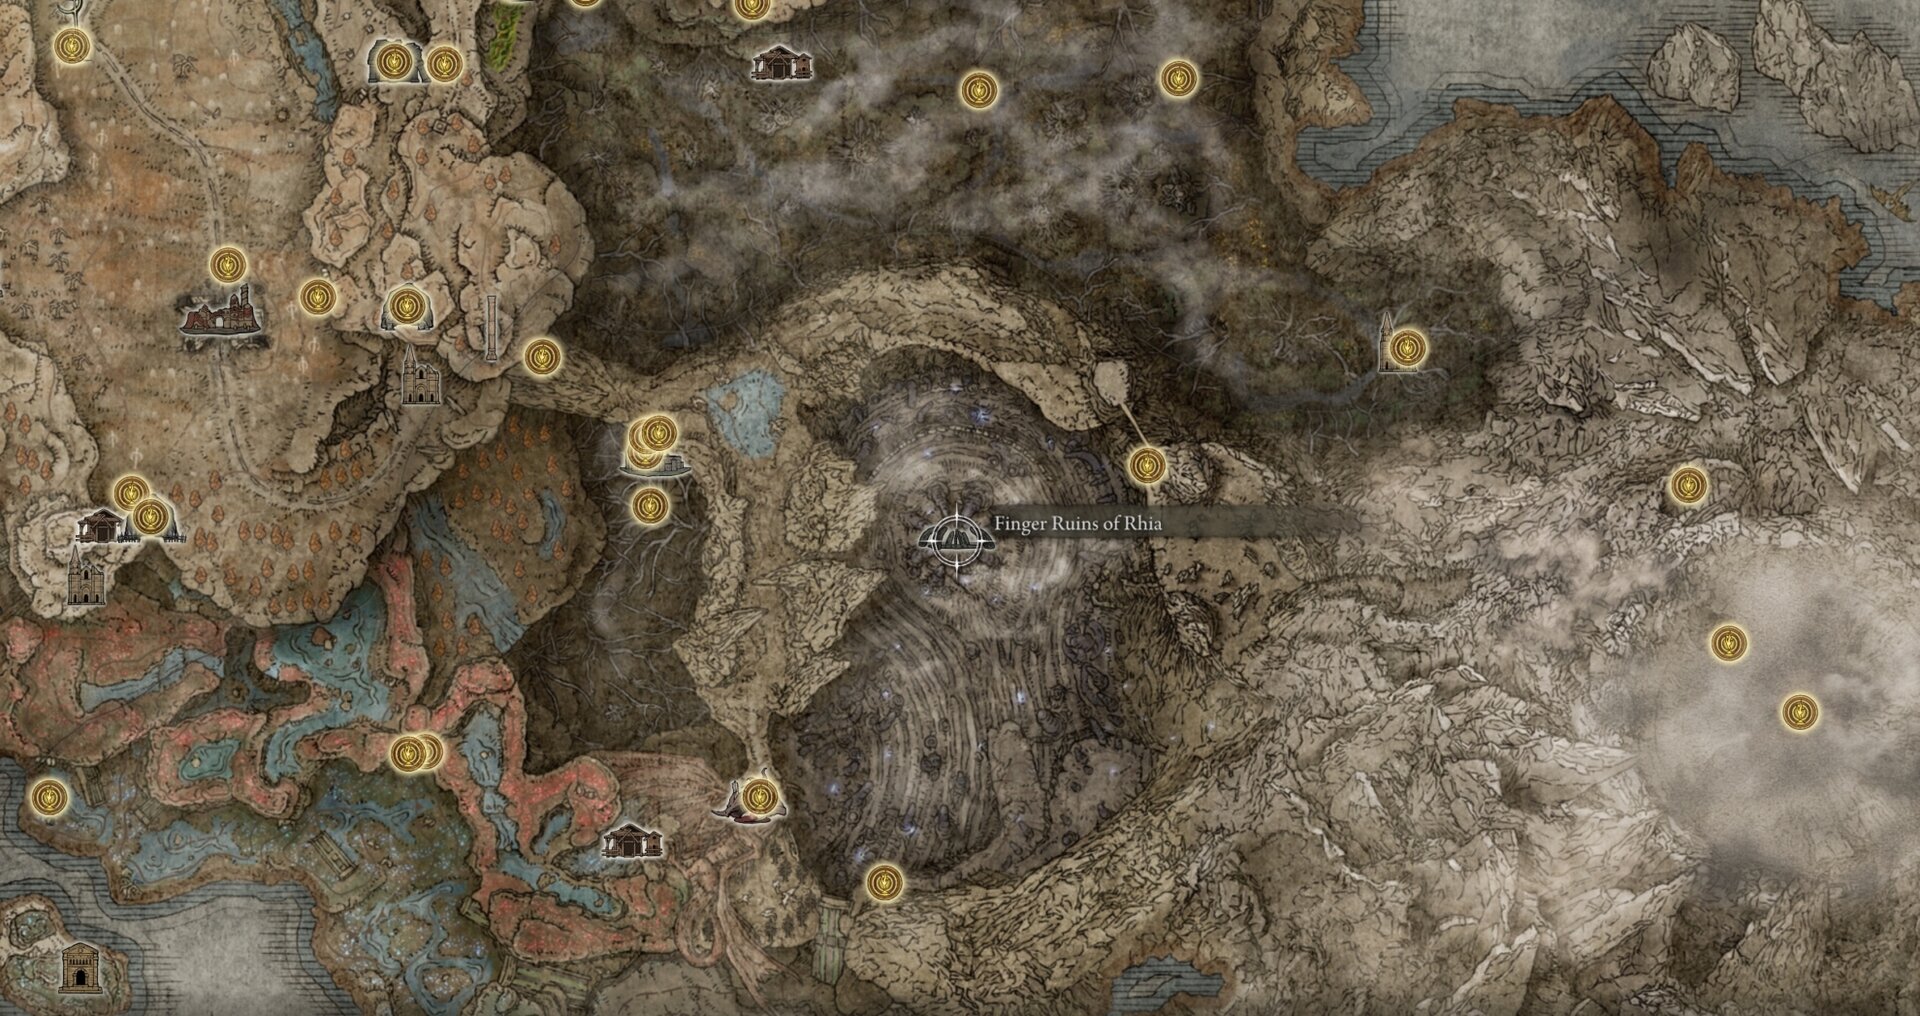
Step 9: The Finger Ruins of Dheo
After you’ve finished vacationing in the Hinterlands and touring Rabbath’s Rise, warp back to the bridge leading to the Finger Ruins of Dheo. You can head straight towards the ruins, but there are some goodies along the northern cliff that will lead you to a safer path through the ruins.
On the direct route, you’ll have to contend with 2 Lampreys shooting those pink magic traps at you. I recommend blocking one of the Lampreys’ line of sight with fingers as much as possible.
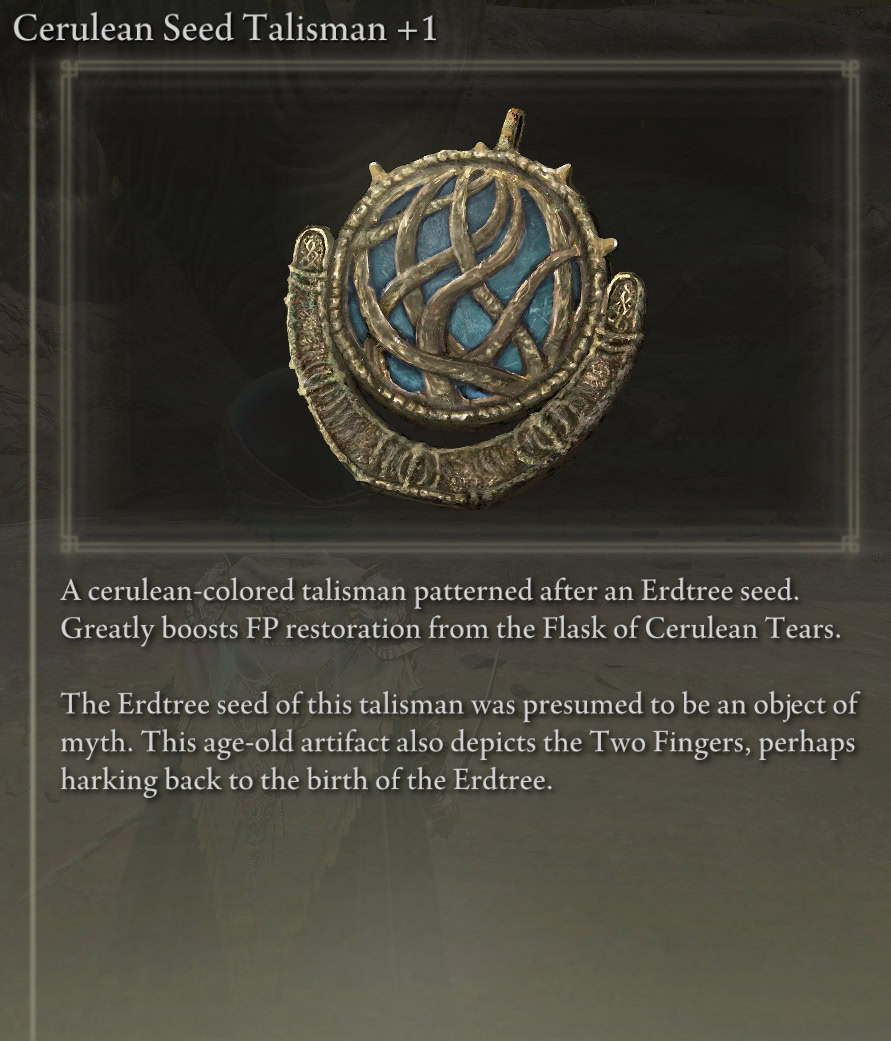
Just like with the Finger Ruins of Rhia, there’s another Finger Horn at the center of the Finger Ruins of Dheo that you’ll need to fornicate.
This time around, you’ll get the Cerulean Seed Talisman +1.
Exploring the Finger Ruins of Dheo
Near the northern edge of the Finger Ruins, you’ll find the Gravity Missile Sorcery, the Fingercreeper Spirit Ashes, a Two Fingers emote, and a Remembrance Duplication Coffin.
Gravitational Missile Sorcery
Gravitational Missile is one of the Sorceries used by Commander Gaius in his second phase. It sends out a few pulses depending on whether you charge it and then explodes.
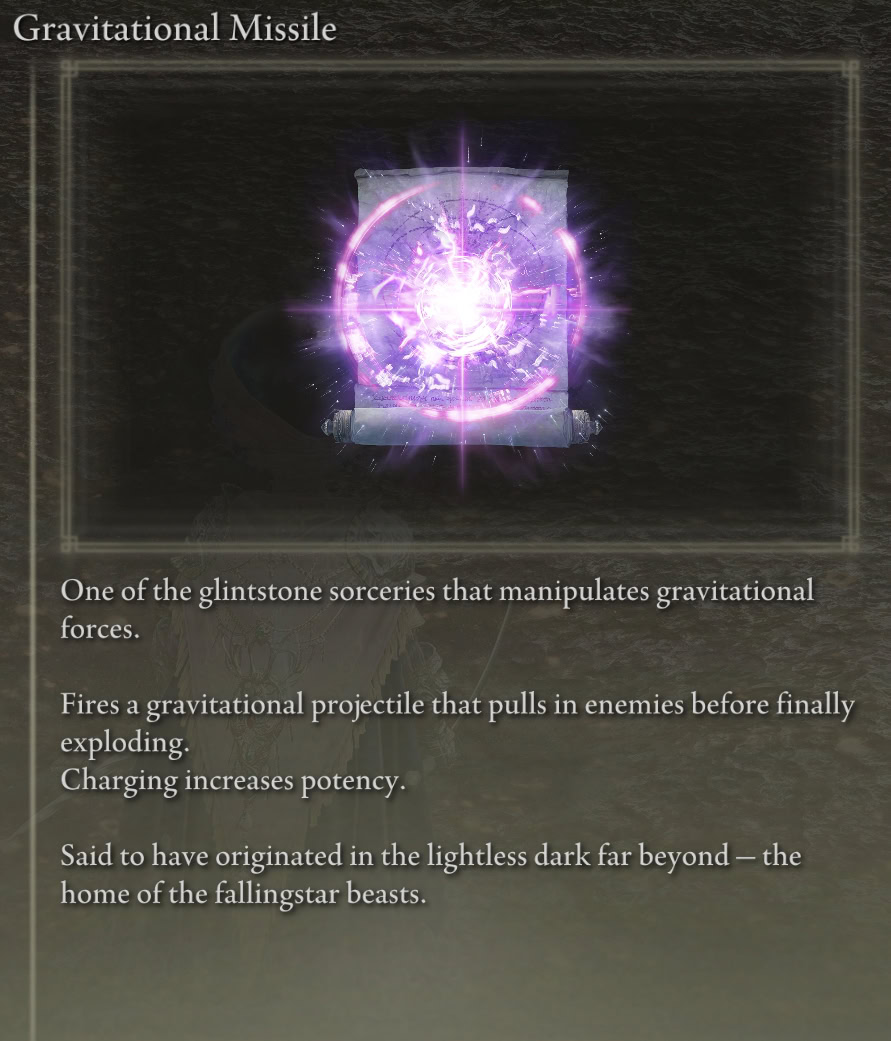
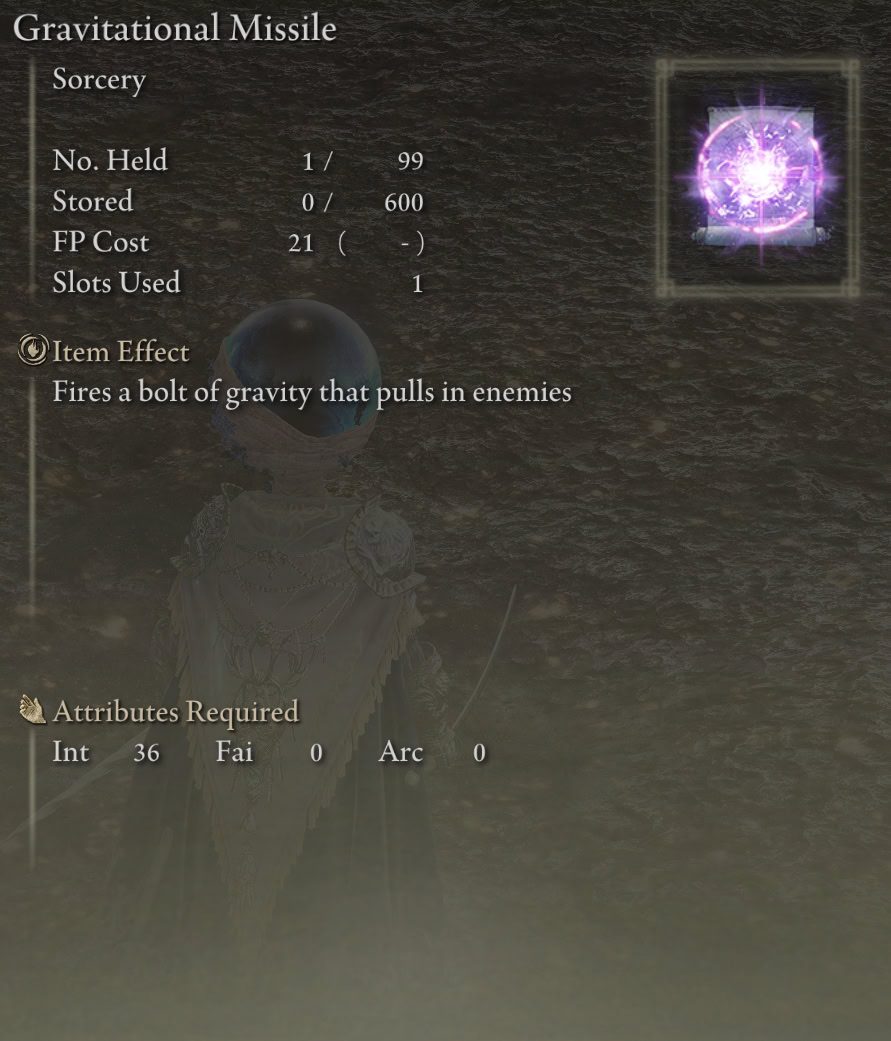
I think the unique effects are rather underwhelming, as the overall range is extremely short and the gravitational effect is only enough to stop enemy movement during a pulse. However, the explosion deals quite a bit of damage and occurs whenever the projectile makes contact with the ground.
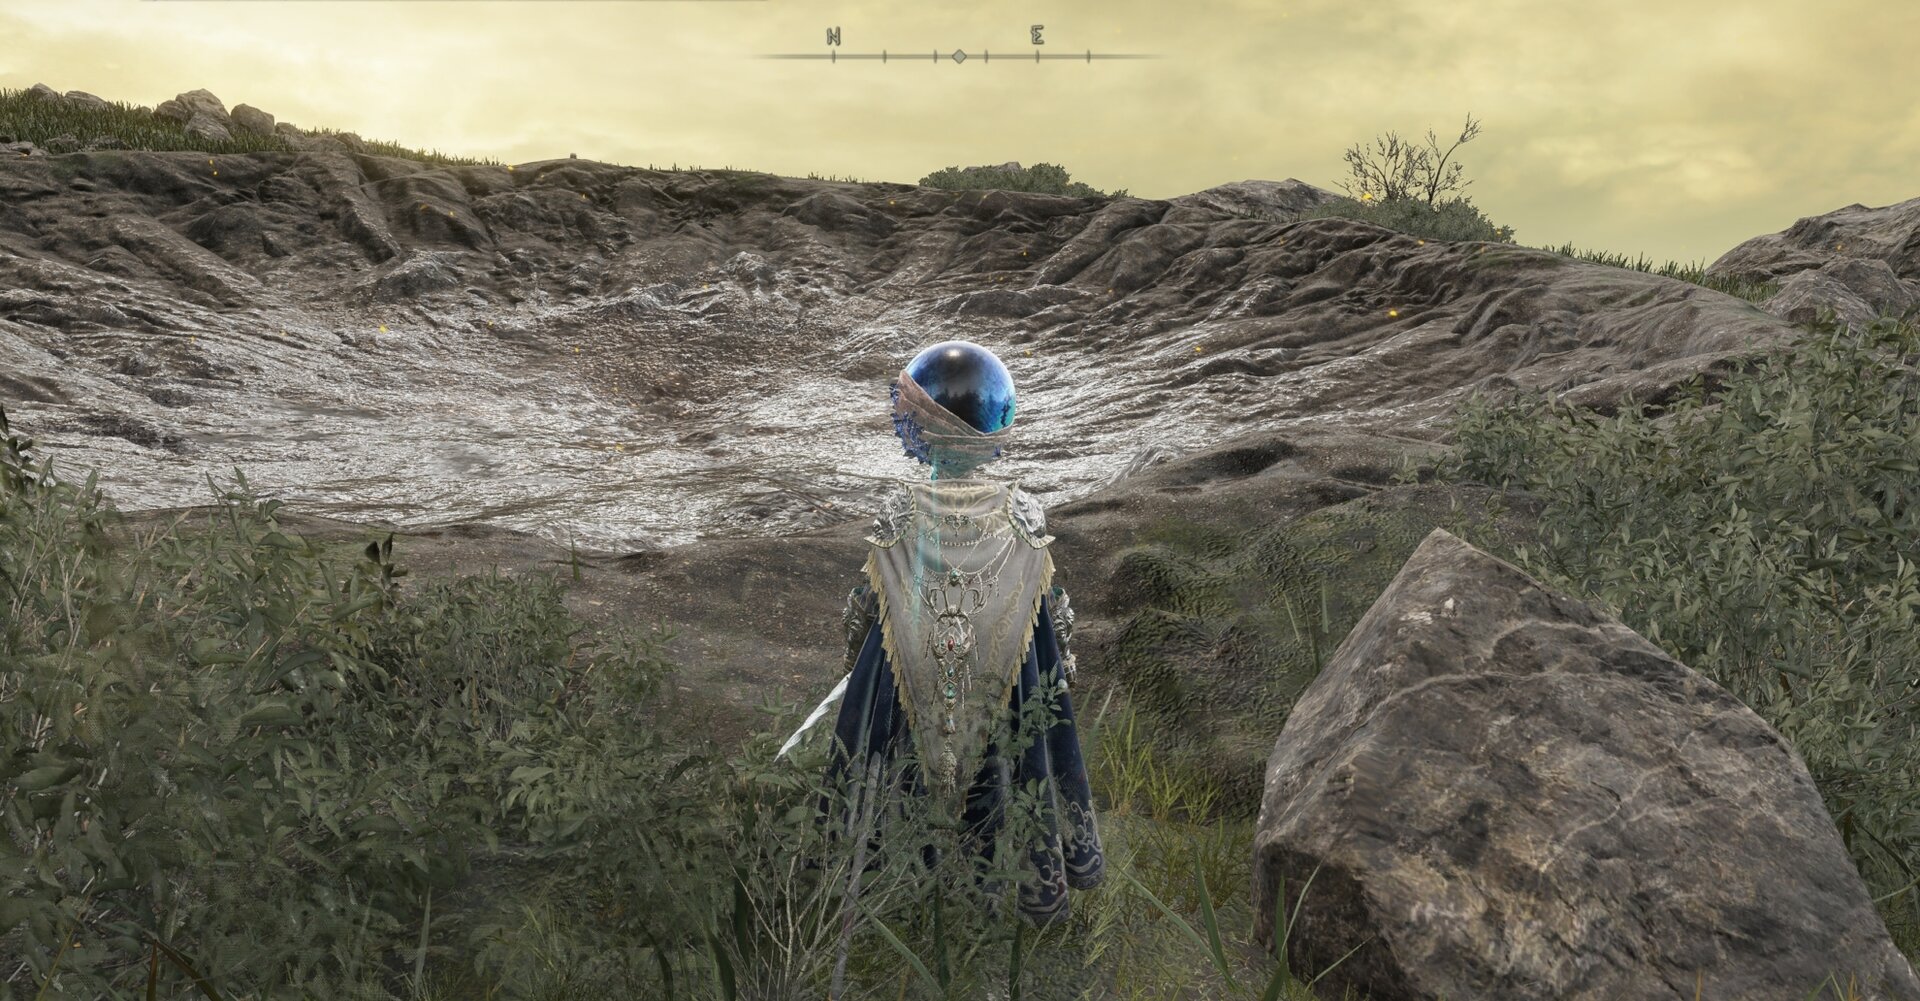
You receive the Gravitational Missile Sorcery for defeating the Fallingstar Beast at its crater on the edge of the Finger Ruins of Dheo.
It seems far more appropriate for you to get Gravitational Missile from Commander Gaius’ Remembrance since he actually uses that as one of his attacks while the Fallingstar Beasts use numerous attacks far more reminiscent of the Blades of Stone.
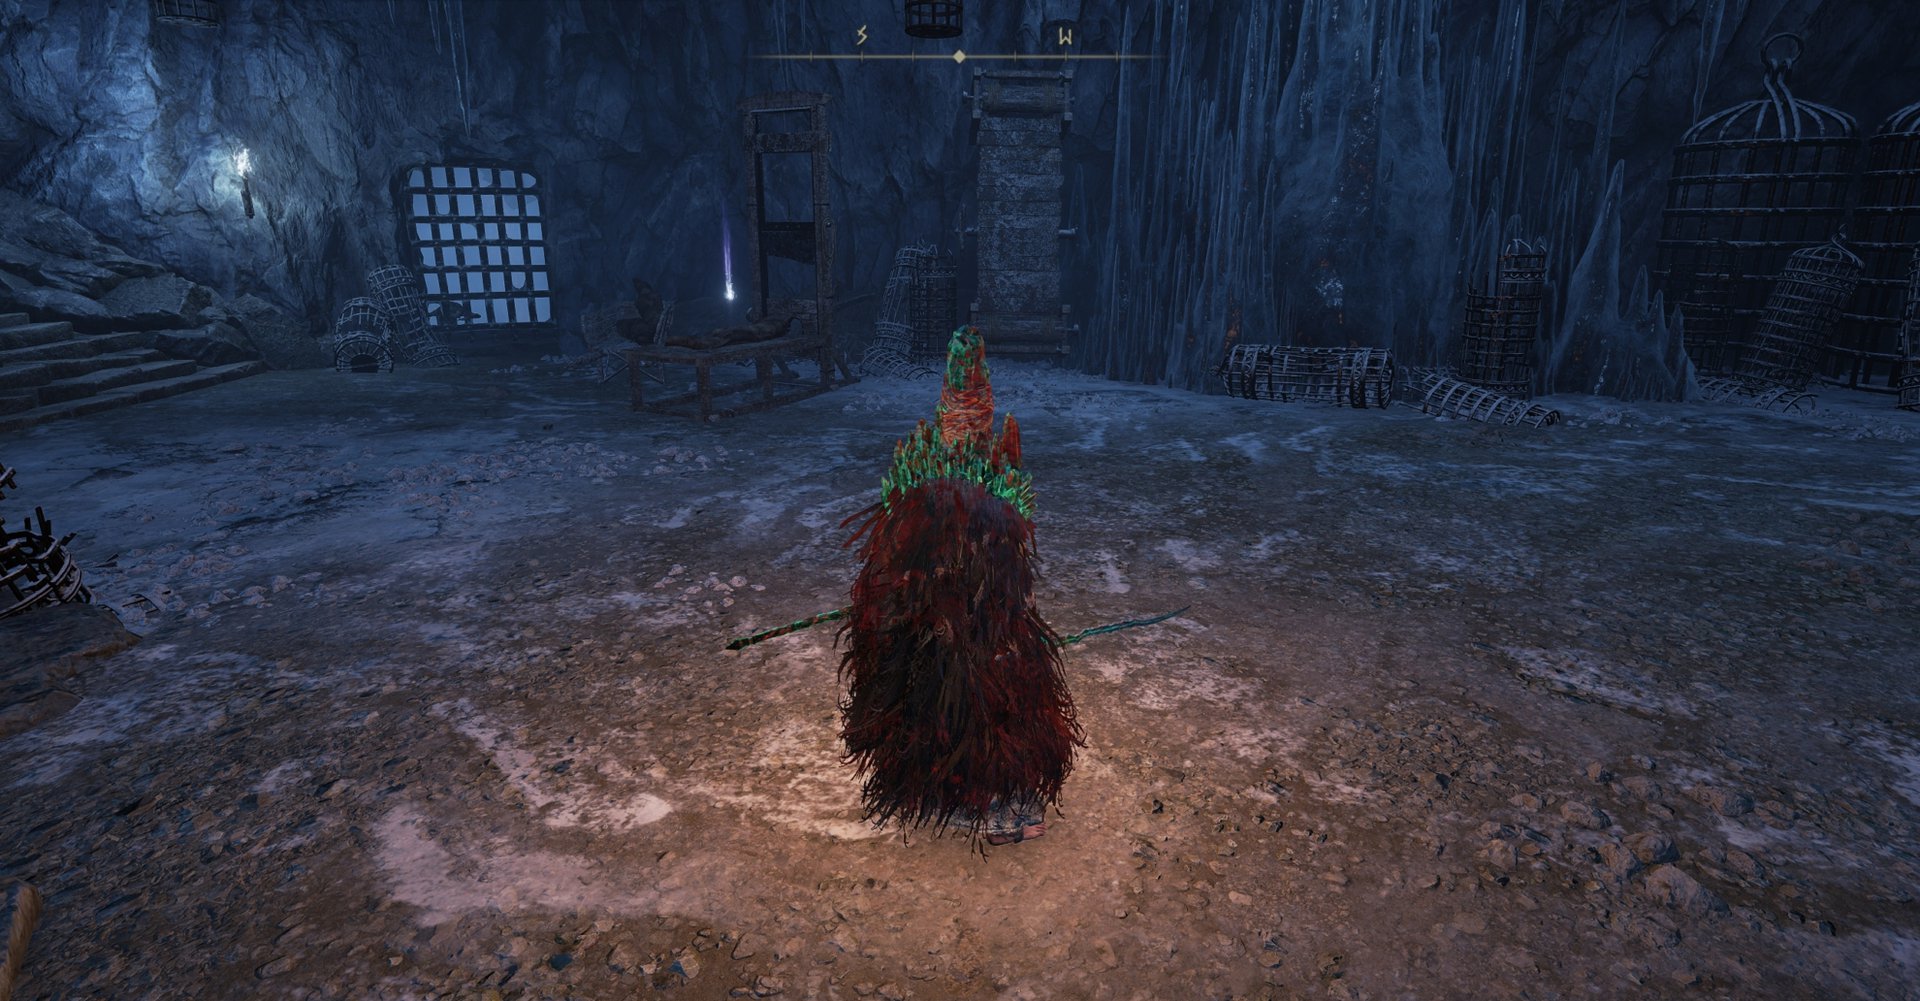
Fingercreeper Spirit Ashes
The Fingercreeper Ashes don’t creep as you’d expect. Instead, they heal you.
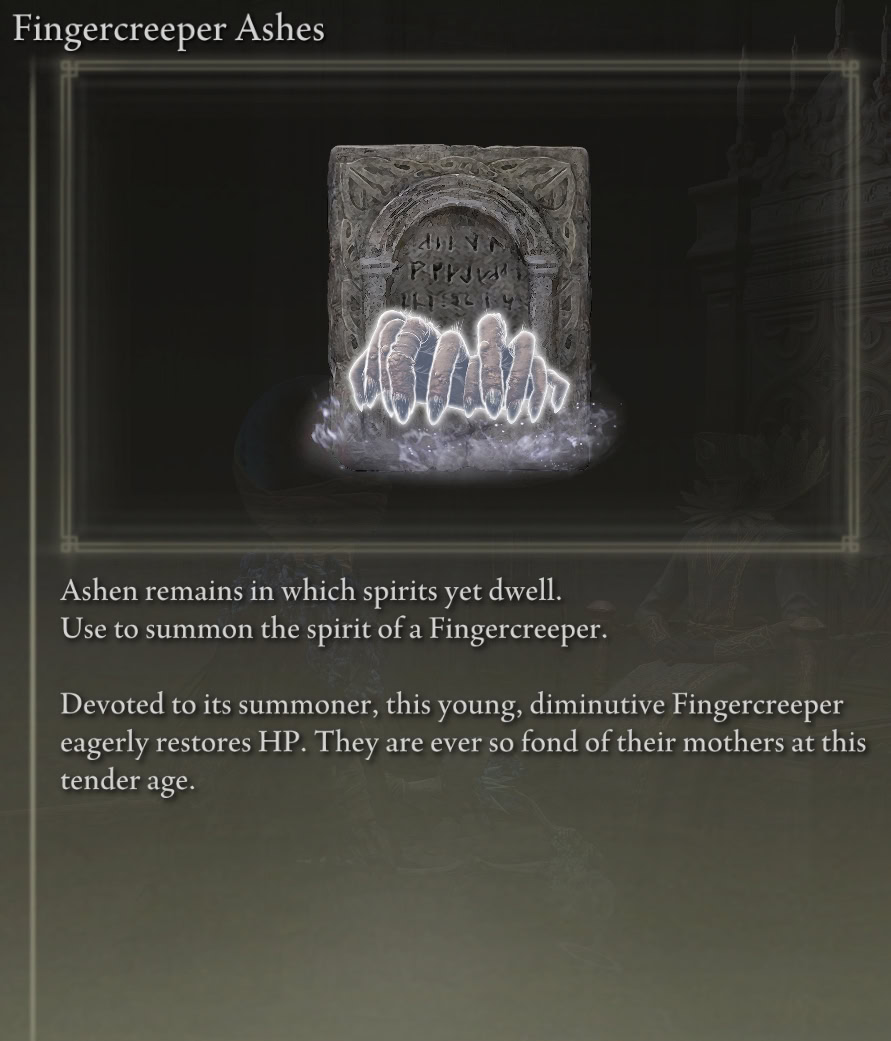
You can loot the Fingercreeper Spirit Ashes from a corpse acting as bait for a gigantic Fingercreeper at the bottom of a chasm at the Finger Ruins of Dheo.
The entrance to the chasm is near a ton of little Fingercreepers and Lampreys hanging on the fingers. Throughout the rest of the ruins, the two are fairly segregated. This is the only place you’ll find them so close together.
Finger Ruins of Dheo Remembrance Duplication Coffin
There is Remembrance Duplication Coffin on the second outer drop leading to the Finger Ruins of Dheo, past the Fallingstar Beast’s crater.
Step 10: The Mother of Fingers
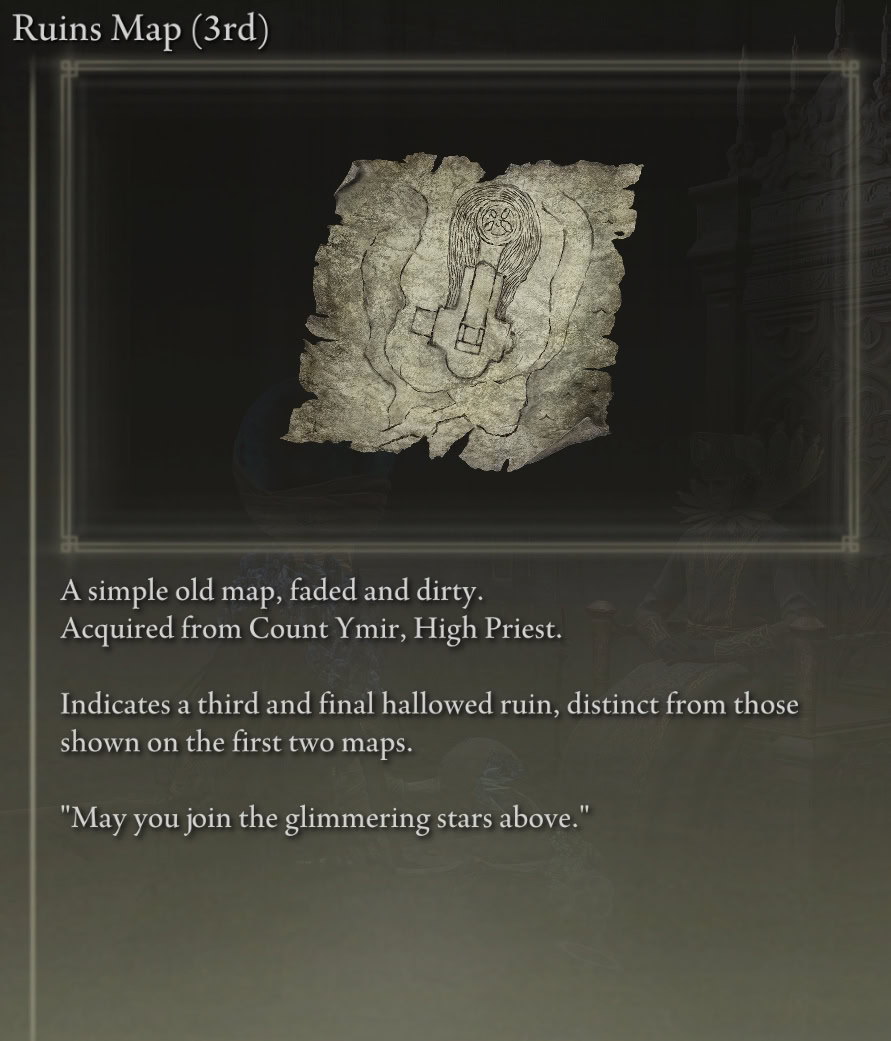
Return to the Cathedral of Manus Metyr once again and speak with Count Ymir about your recent endeavors. He’ll give you another map to a third set of Finger Ruins, the ones beneath the Cathedral of Manus Metyr.
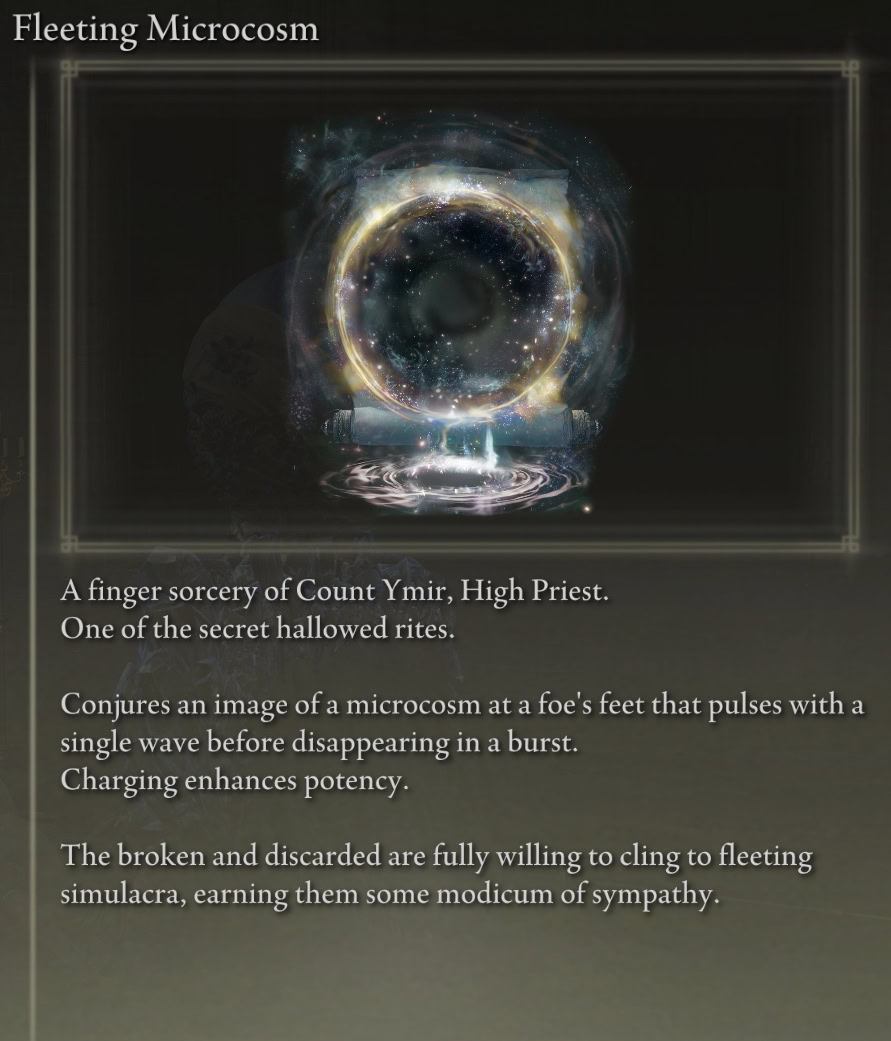
You’ll also be able to purchase Fleeting Microcosm from Count Ymir for 20,000 Runes. It’s pretty expensive for a Sorcery, but it’s one of the coolest looking spells FromSoftware has ever made and is strong enough to be worth using with most magic builds.
You can also speak with Jolán again, though she’ll have nothing to say about you finding her sister’s body this time. Just exhaust both Ymir and Jolán’s dialogue and reload the area.
When you return, you’ll find Count Ymir out at the cemetery again, leaving his throne unattended. Head down there and defeat Swordhand of Night Anna if you haven’t done so already and blow on the final Finger Horn.
Once you defeat Metyr, warp back to the Cathedral of Manus Metyr one final time and approach the throne to engage Jolán and then Ymir.
Metyr, Mother of Fingers, Boss Rewards
Defeating Metyr, Mother of Fingers rewards you with Remembrance of the Mother of Fingers.
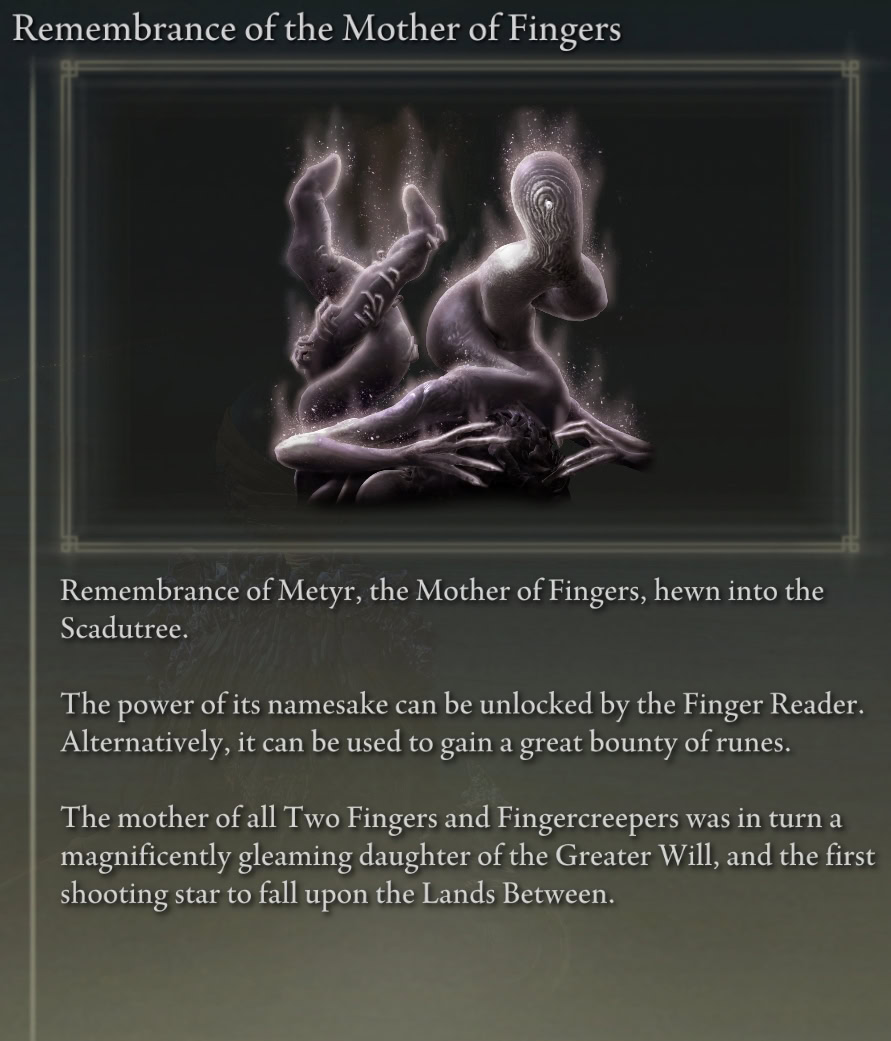
You can exchange the Remembrance of the Mother of Fingers for either the Staff of the Great Beyond or the Gazing Finger.
Staff of the Great Beyond
The Staff of the Great Beyond is Elden Ring’s equivalent of the Crystal Chime from Dark Souls 3. It allows you to cast both Sorceries and Incantations, and scales with both Intelligence and Faith. However, its scaling maxes out at B, and it doesn’t boost any type of spell like other Catalysts.
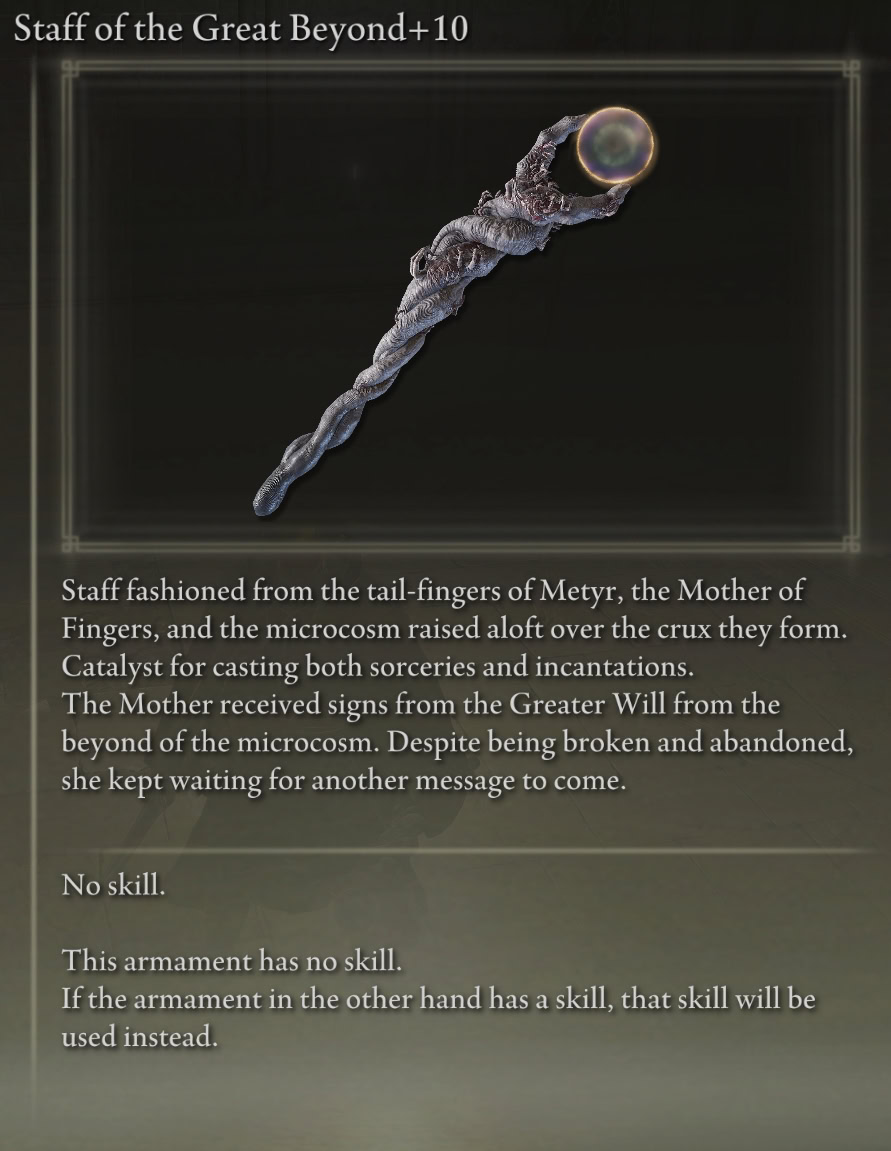
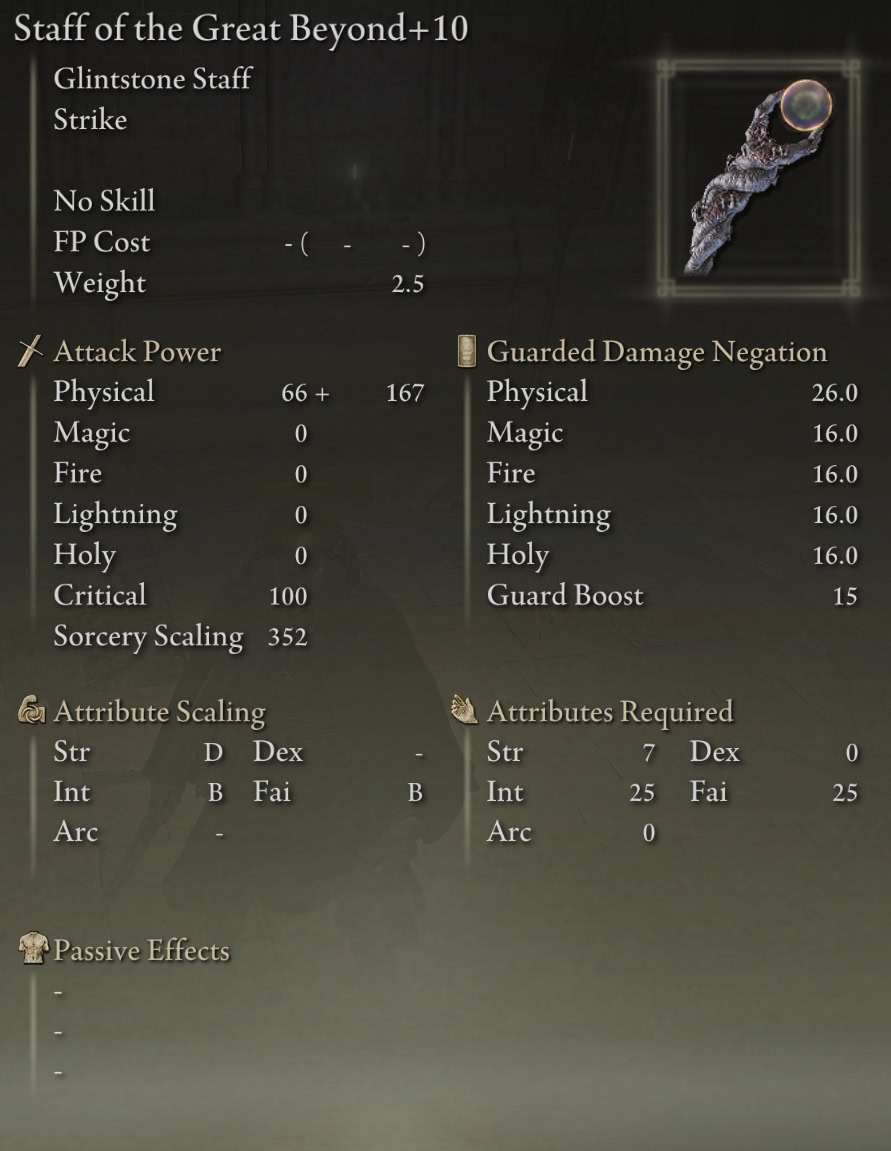
I’m not 100% sure, but I suspect the devs were trying to account for being able to buff Sorceries with Golden Vow by giving it such bad scaling.
Gazing Finger
The Gazing Finger is an absurdly phallic Colossal Weapon you get to wave around. Its hilarious Unique Skill, Kowtower’s Resentment allows you to place the pink lines on the ground that explode up.
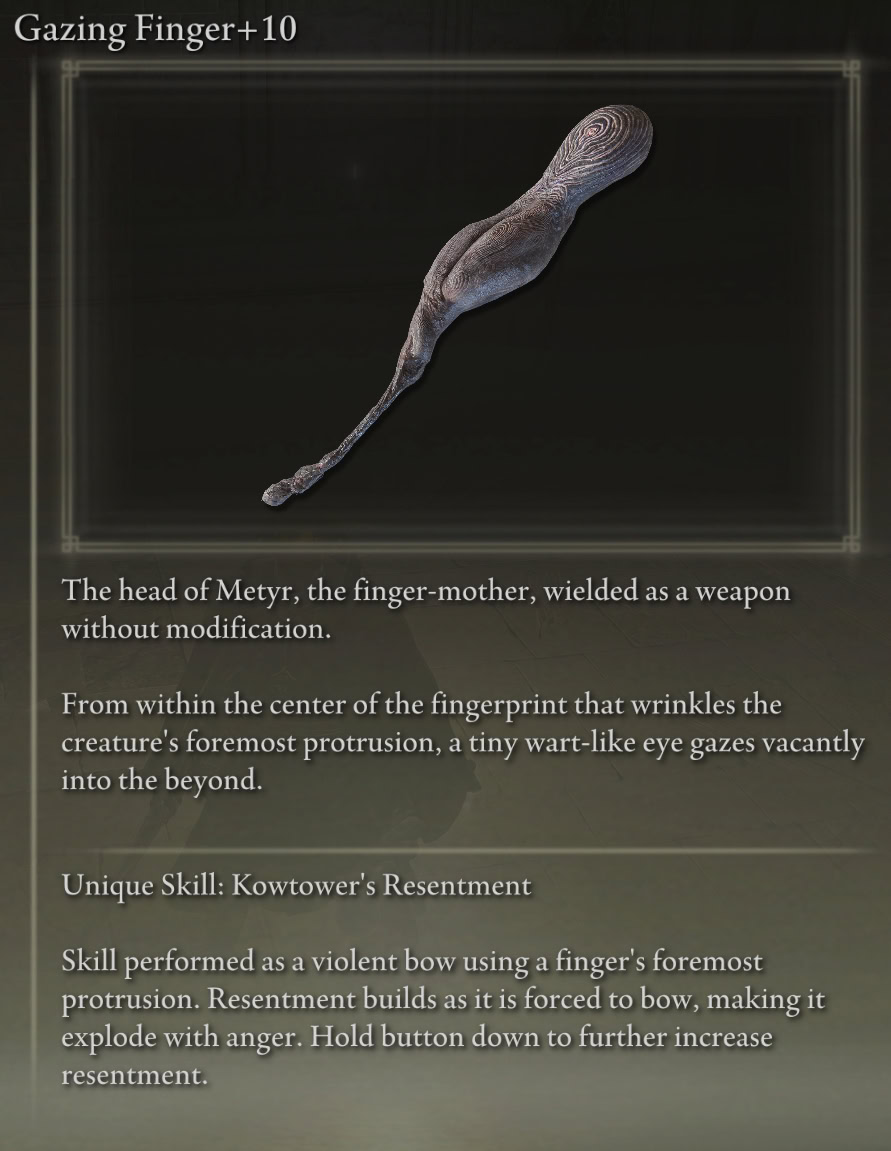
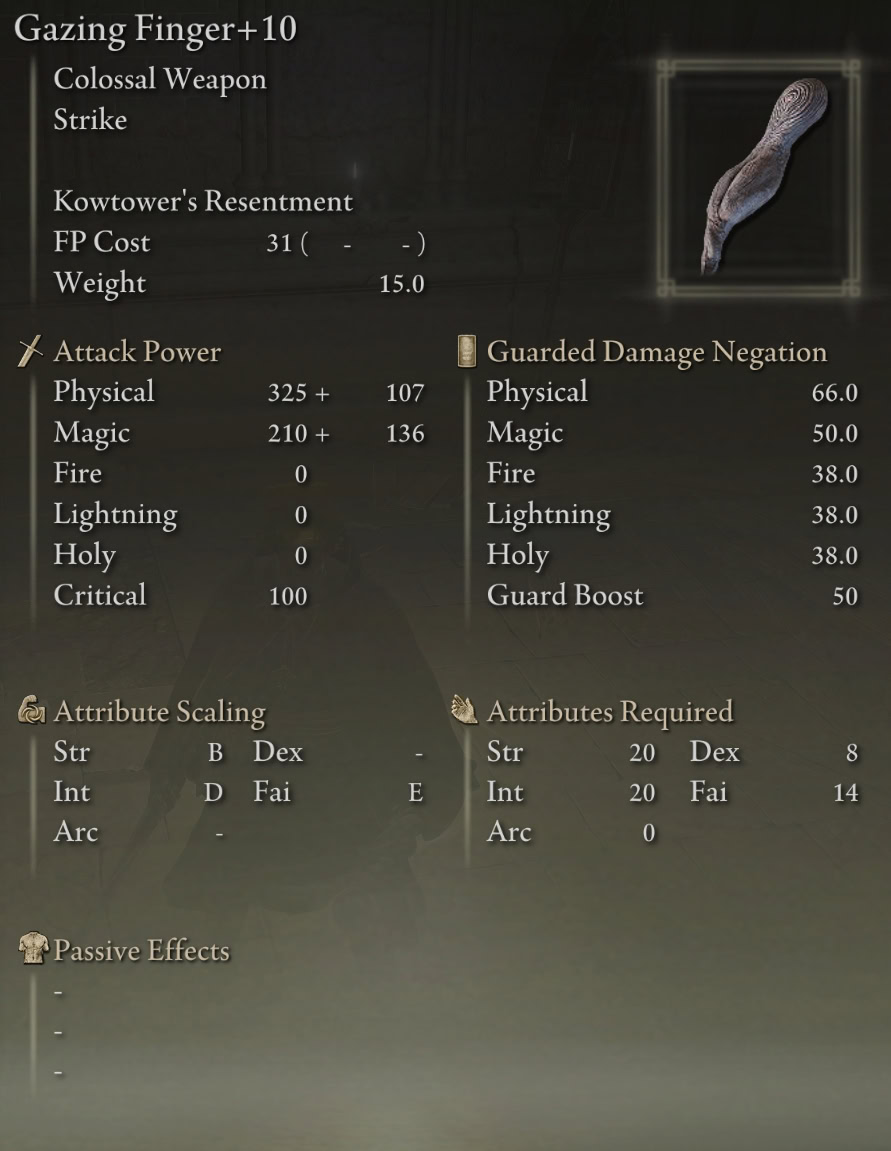
It’s clearly intended to be used alongside Beloved Stardust and the Staff of the Great Beyond, as it scales with Strength, Intelligence, and Faith, but not Dexterity. Even stranger, the Claws, Sword, and Shield only scale with Dexterity.
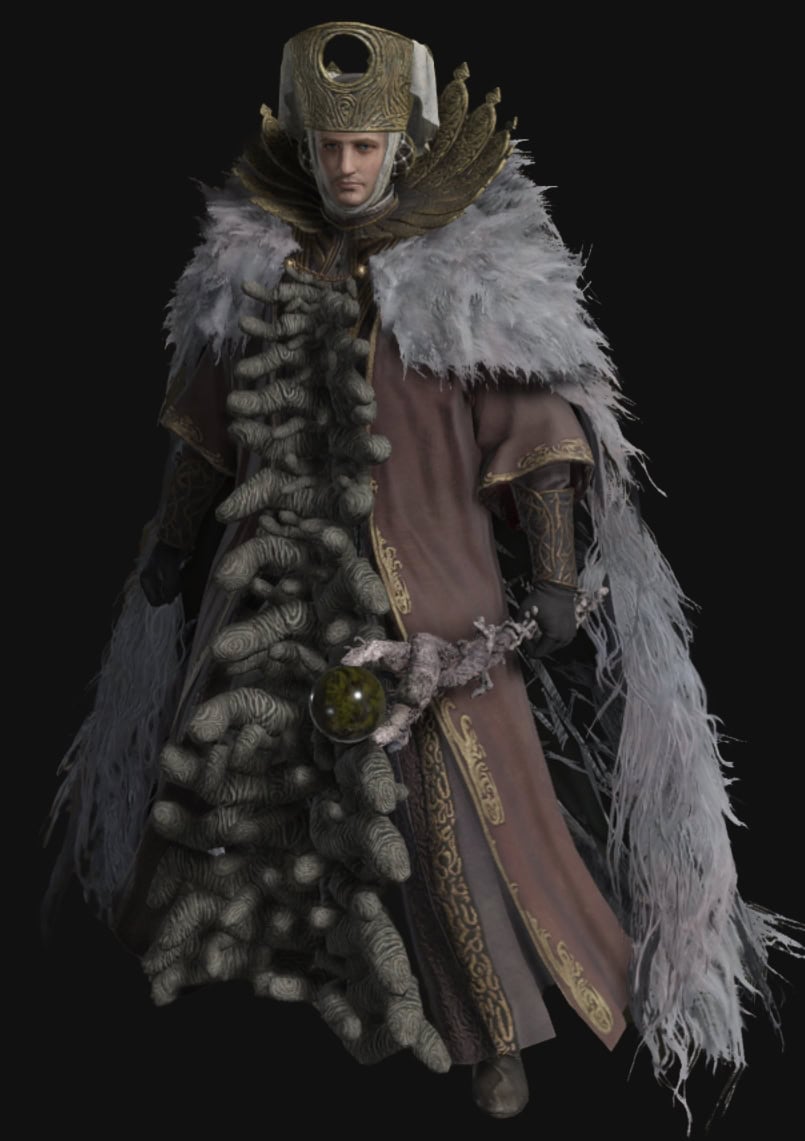
Count Ymir, Mother of Fingers, “Boss” Rewards
You receive the High Priest armor set, Maternal Staff, and Ymir’s Bell-Bearing for defeating Swordhand of Night Jolán and Count Ymir, Mother of Fingers. Giving Ymir’s Bell-Bearing to the Twin Maiden Husks at the Roundtable Hold will allow you to purchase any of Count Ymir’s Sorceries.
High Priest Outfit
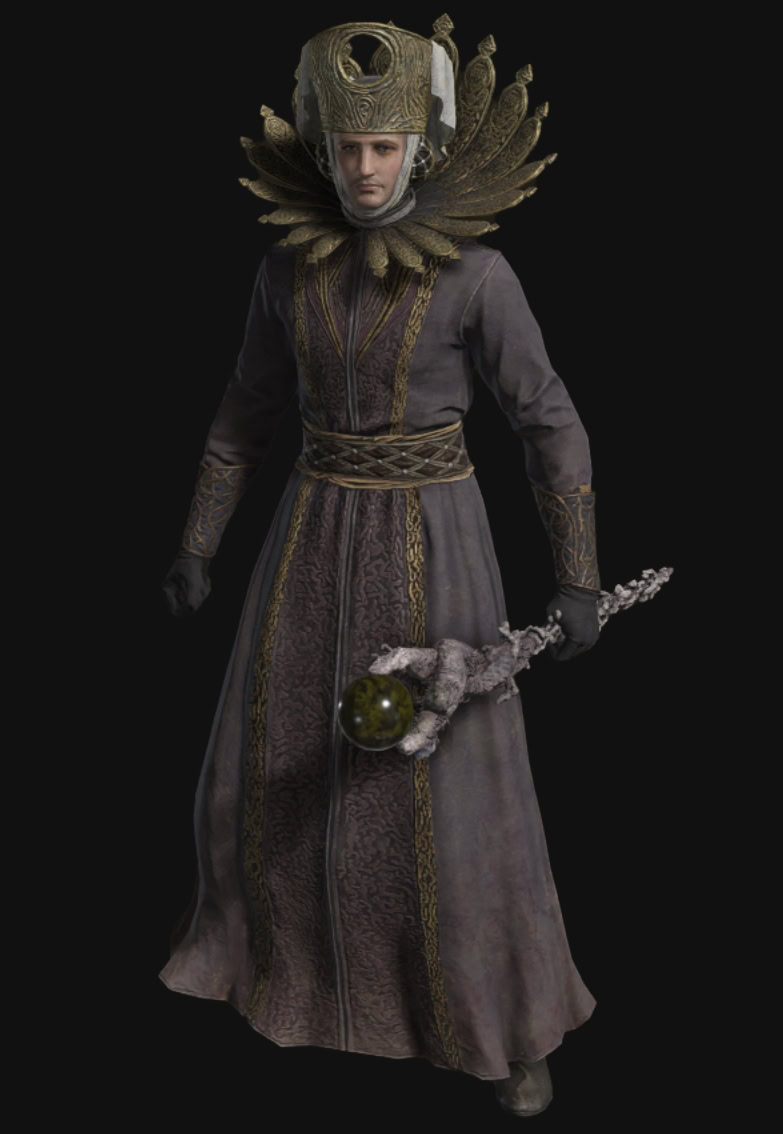

You can alter the High Priest Robe into the Finger Robes, which boost the damage dealt by Finger Sorceries by 8%. The High Priest Robe does not offer the same benefit.

Maternal Staff
The Maternal Staff boosts the damage dealt by Finger Sorceries by 15% and features A scaling with both Intelligence and Arcane, but does not enable you to cast Incantations like the Staff of the Great Beyond.
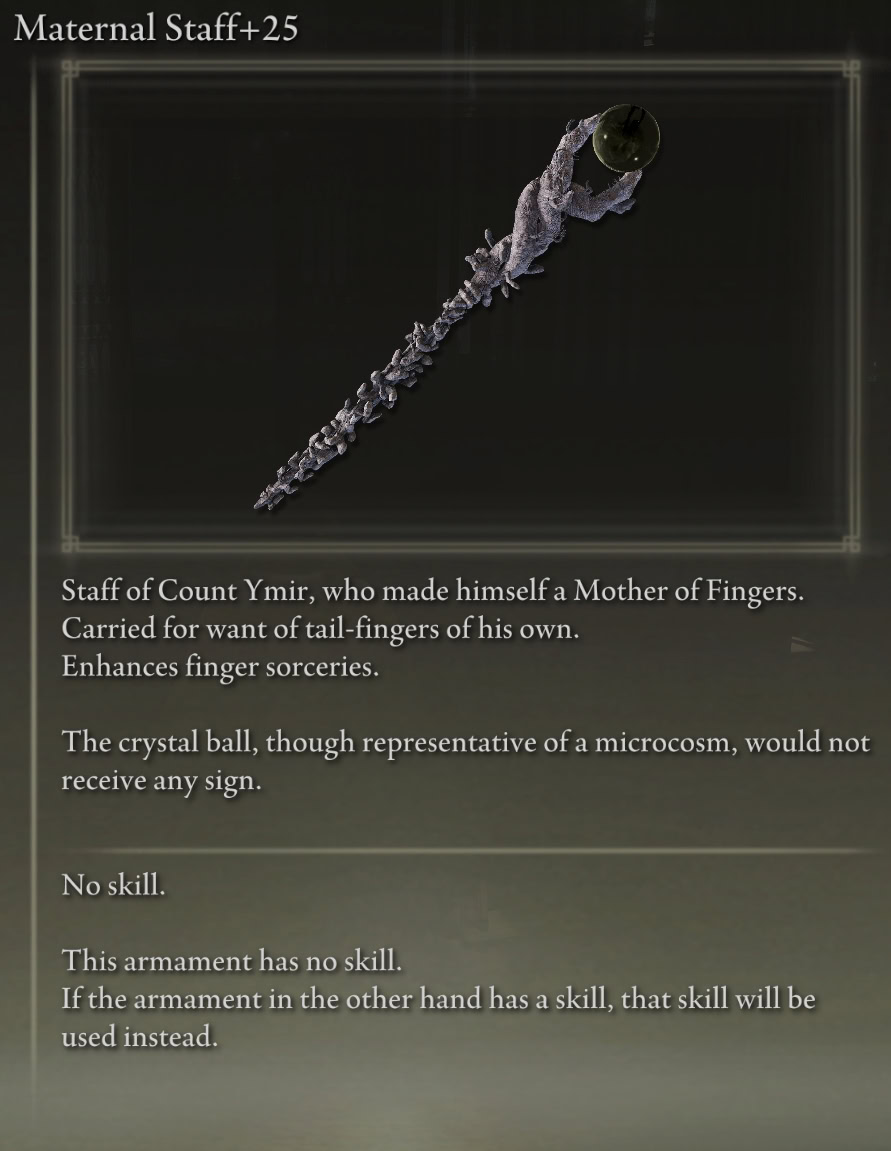

It’s identical to Lusat’s Glintstone Staff at 80 Intelligence and Arcane without the drawbacks. It’s slightly weaker than the Prince of Death’s Staff, though it depends on the Sorceries you’re using.
| Staff | Sorcery Scaling at X, Y Stats | Additional Effect(s) |
|---|---|---|
| Lusat’s Glintstone Staff | 413 at 80 Intelligence | +50% FP Consumption |
| Azur’s Glintstone Staff | 362 at 80 Intelligence | +40 Dex for Casting Speed +20% FP Consumption |
| Prince of Death’s Staff | 430 at 80 Int, 80 Fth | +10% Death Sorcery Dmg |
| Maternal Staff | 414 at 80 Int, 80 Arc | +15% Finger Sorcery Dmg |
| Carian Regal Scepter | 373 at 80 Intelligence | +10% Lunar Sorcery Dmg |
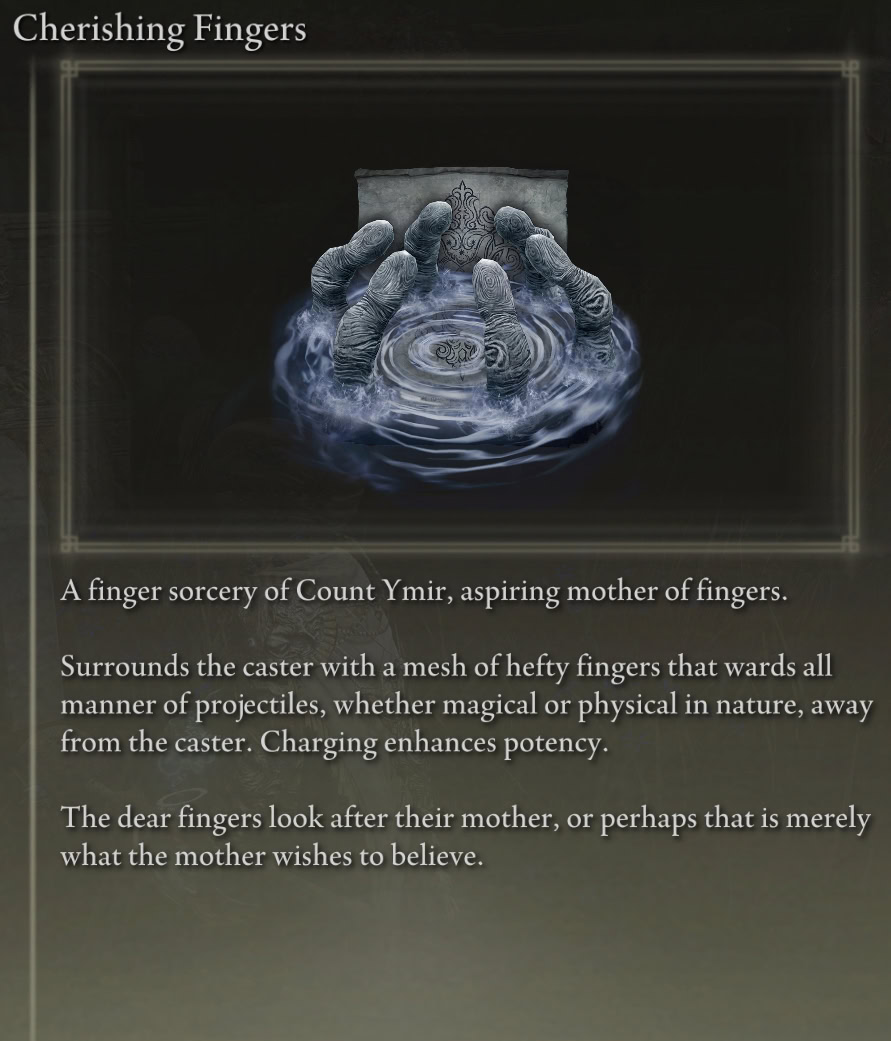
Cherishing Fingers Sorcery
After you’ve defeated Count Ymir, rest at the Site of Grace and then head outside to the Cemetery. You’ll be able to obtain the Sorcery Cherishing Fingers.

In our in-depth overview of all items from the High Priest Armor Set and Maternal Staff, you can find more high-quality images previewing the set from all angles as well as full lore descriptions and stats along with some tips on where and how to use the items.
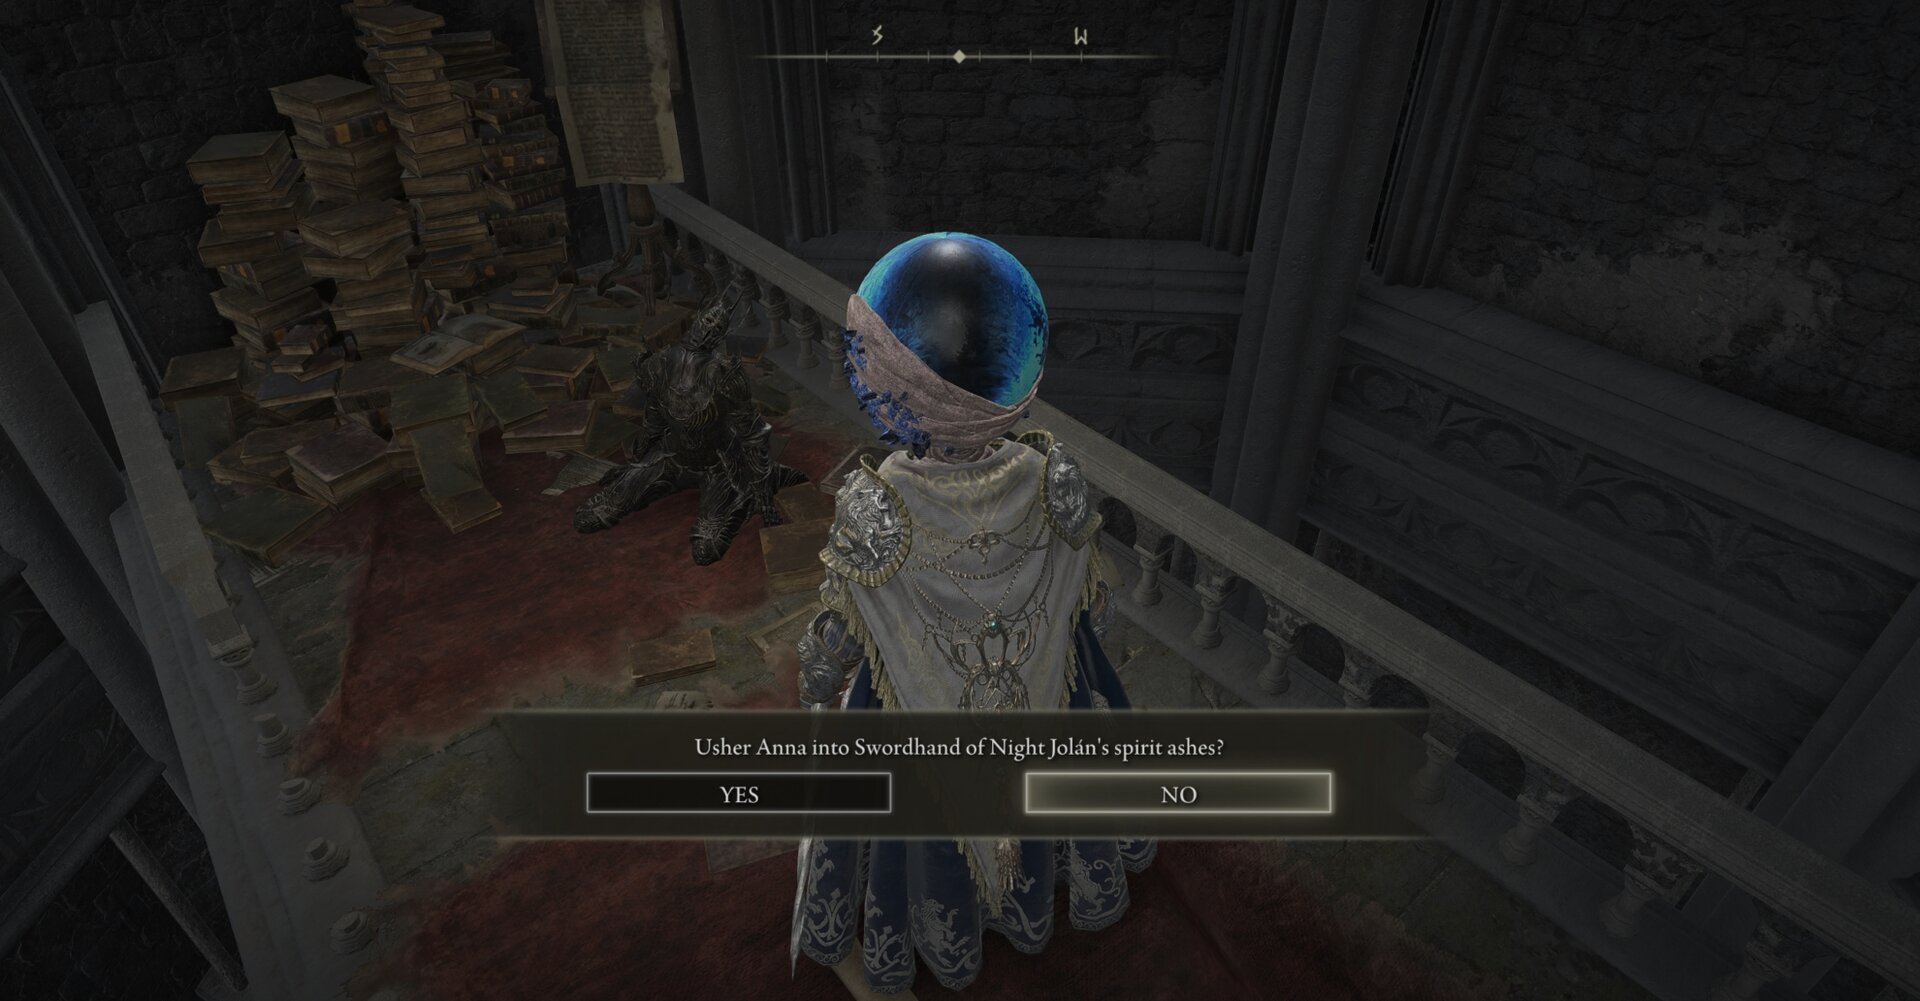
Step 11: Jolán and Anna, Swordhands of Night
After you defeat Jolán and Count(ess) Ymir, you’ll have the opportunity to give Jolán either the Iris of Grace or Occultation, which will determine whether you get Jolán’s Spirit Ashes or the Sword of Night. She’s sitting down on the job at her usual pillar.
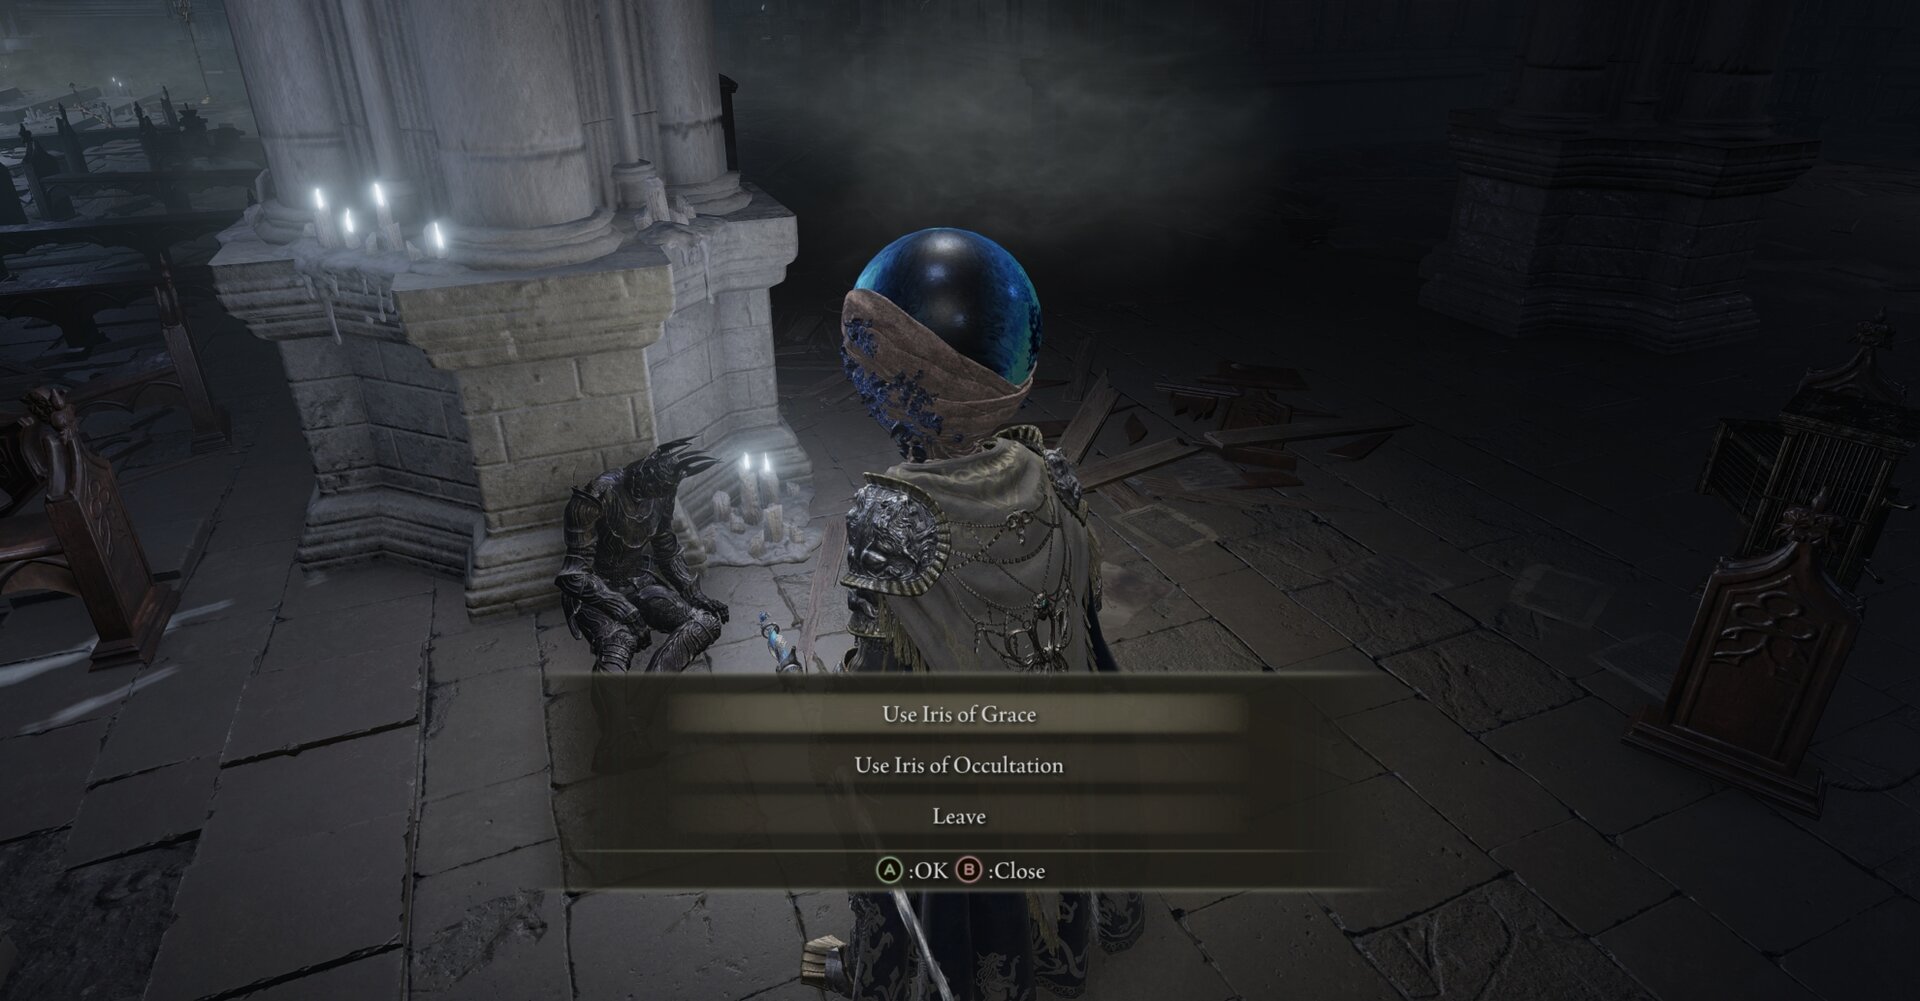
Choosing “Leave” will allow you to make the decision later, just like walking away or closing the prompt.
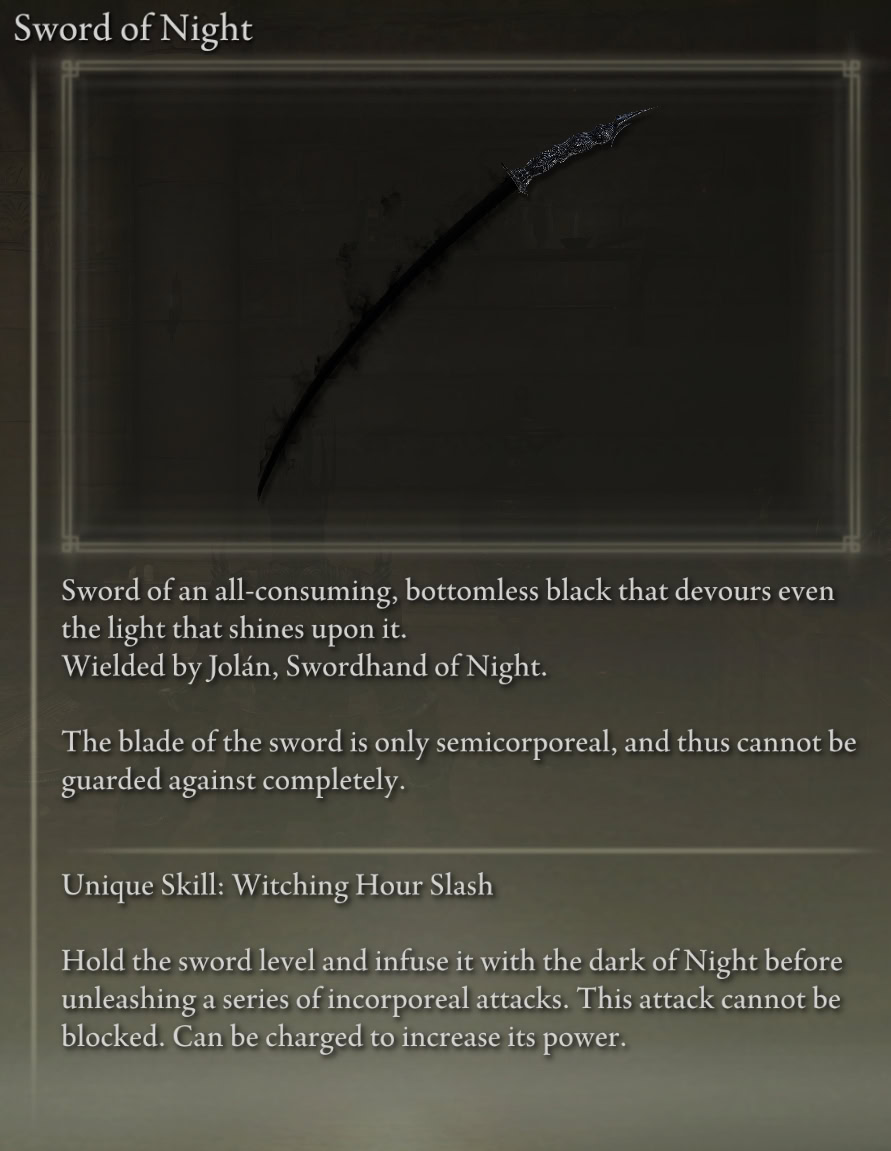
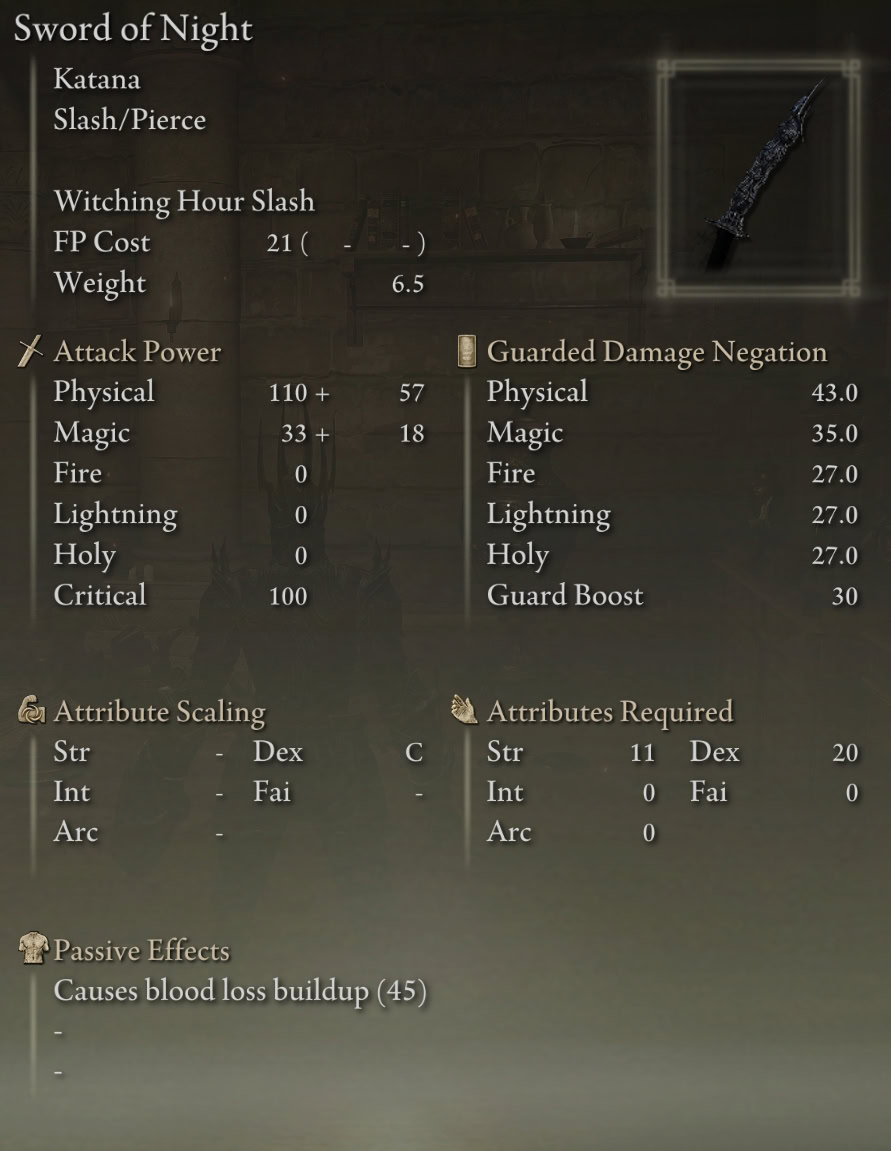
Iris of Occultation: Sword of Night
Give Jolán the Iris of Occultation if you want the Sword of Night. It’s just like the Claws of Night, except it’s a Katana and has a stationary Waterfowl Dance as its Unique Skill.
Iris of Grace: Swordhand of Night Jolán’s Spirit Ashes
Give Jolán the Iris of Grace if you want Swordhand of Night Jolán’s Spirit Ashes. She costs 86 FP to summon.
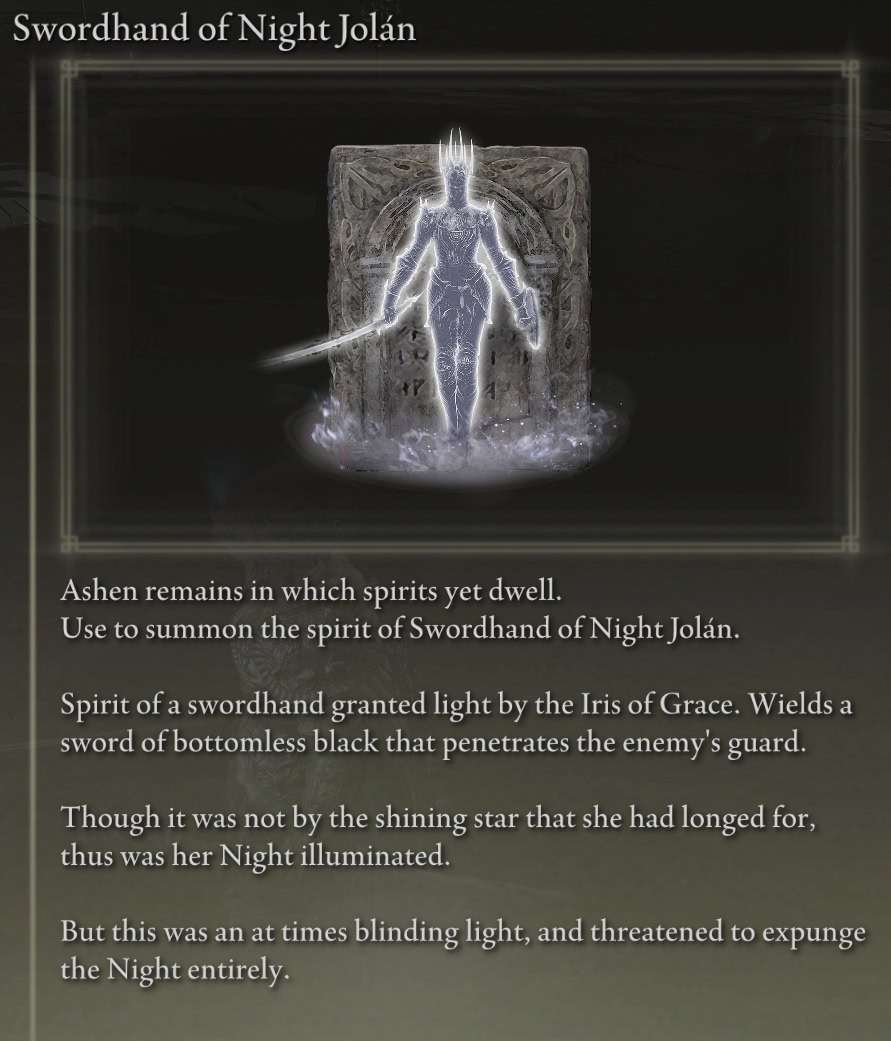
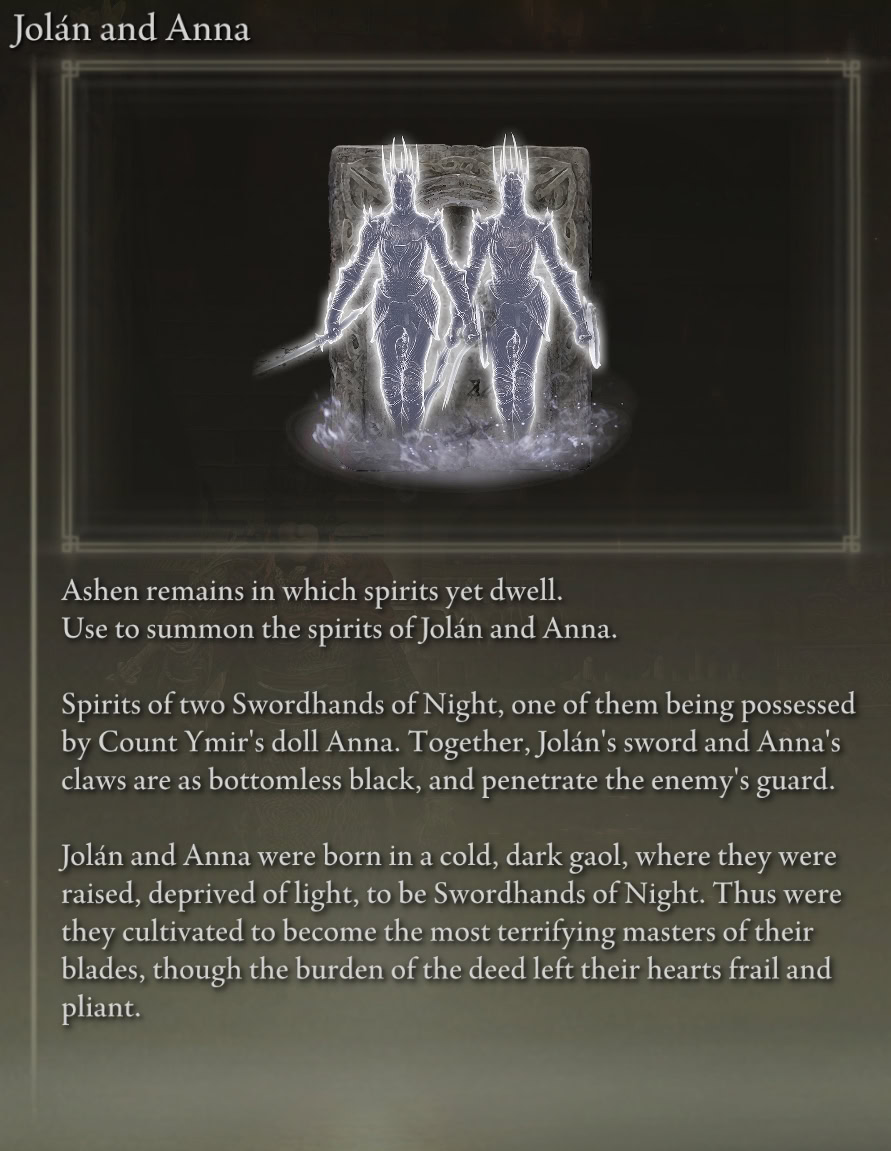
You can take Jolán’s Spirit Ashes up to Anna’s Puppet atop Rabbath’s Rise to exchange it for Jolán and Anna’s Spirit Ashes.
Jolán and Anna cost a whopping 144 FP to summon, so you can put Anna back in her body whenever you want to get back Swordhand of Knight Jolán’s Ashes or put them back together again.
Looking for something to wear? Check out our complete Shadow of the Erdtree Armor Sets and Associated Weapons Catalog!