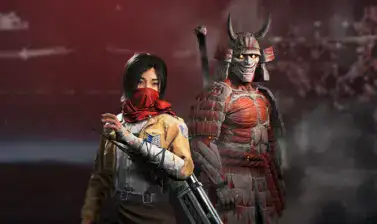
Everything you need to know about Assassin’s Creed Shadows controls setup for Keyboard and Mouse, and Controllers: settings, keybindings, customizations, tips and tricks.
Table of contents
How to access and customize Keybinds
You can customize almost every button on PC for keyboard and mouse. With the Controllers, you have default presets available.
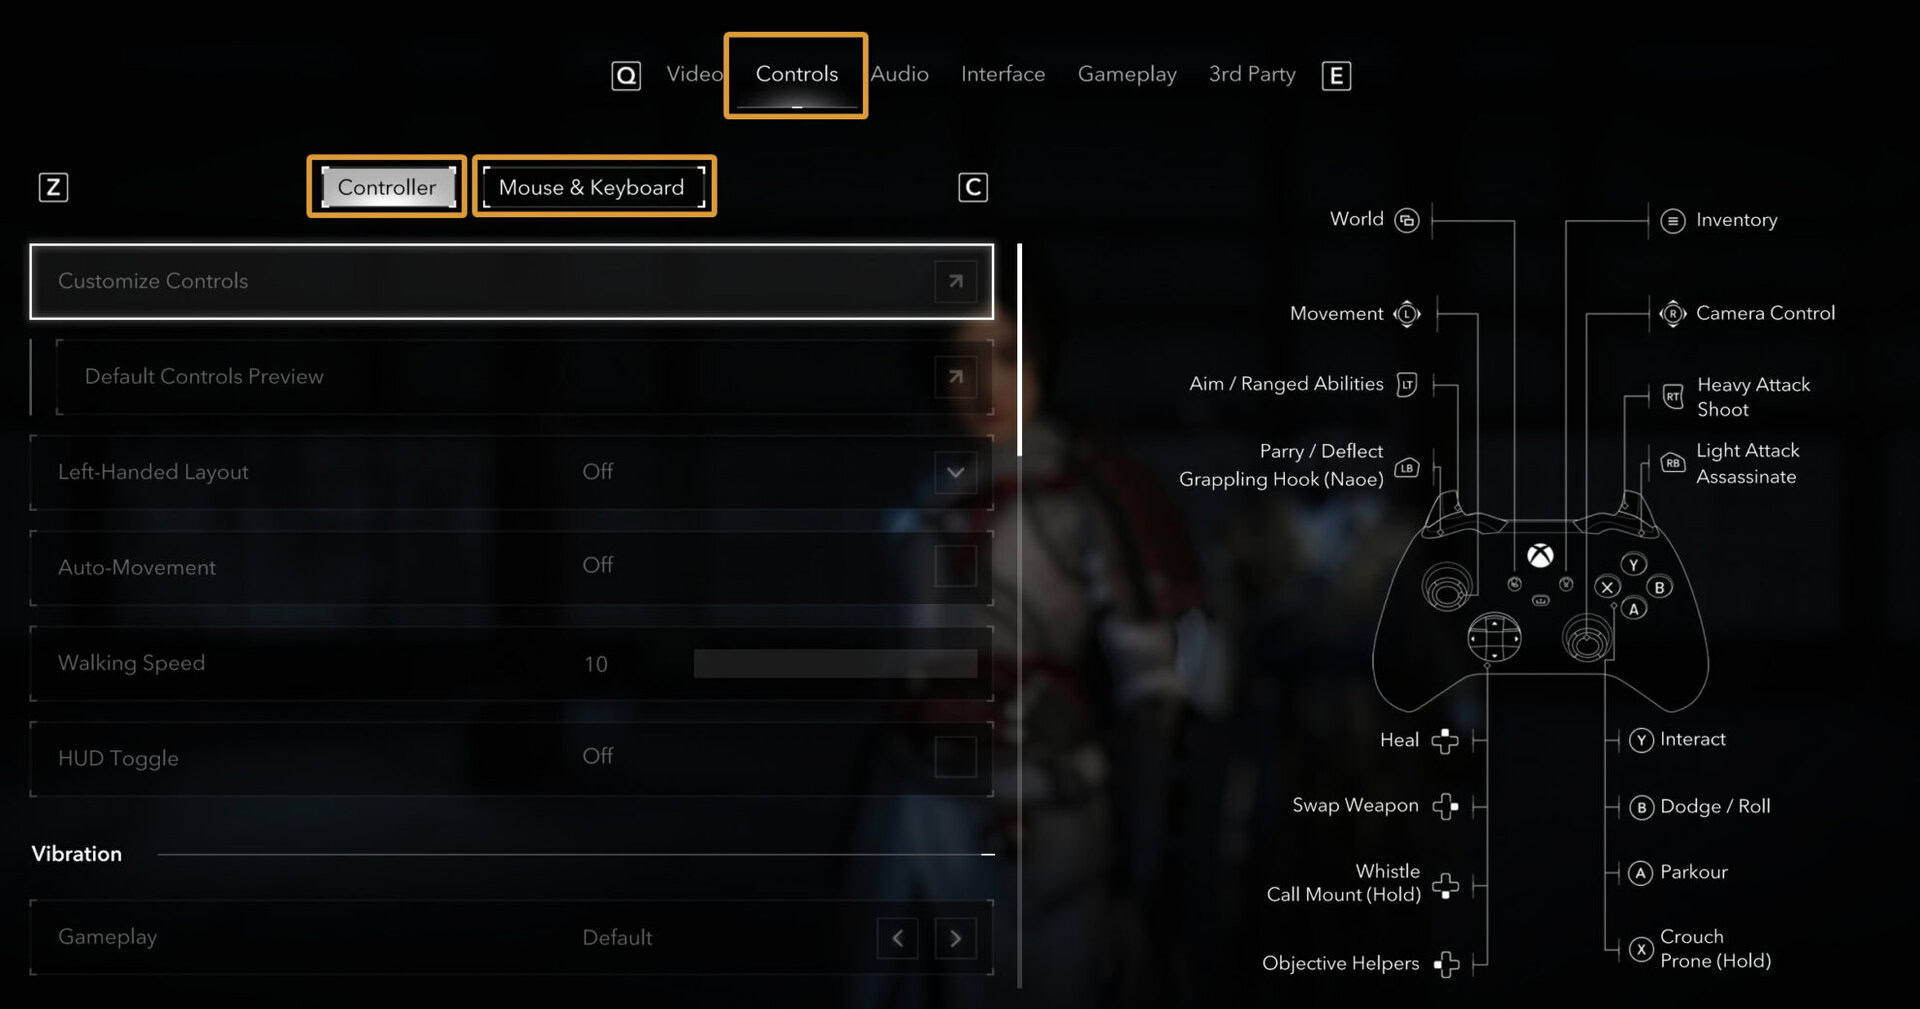
To view and modify settings for the Controls in the game, open the main menu and navigate to the Controls tab. From there, you can select either Controller or Mouse & Keyboard buttons to see the specific sections.
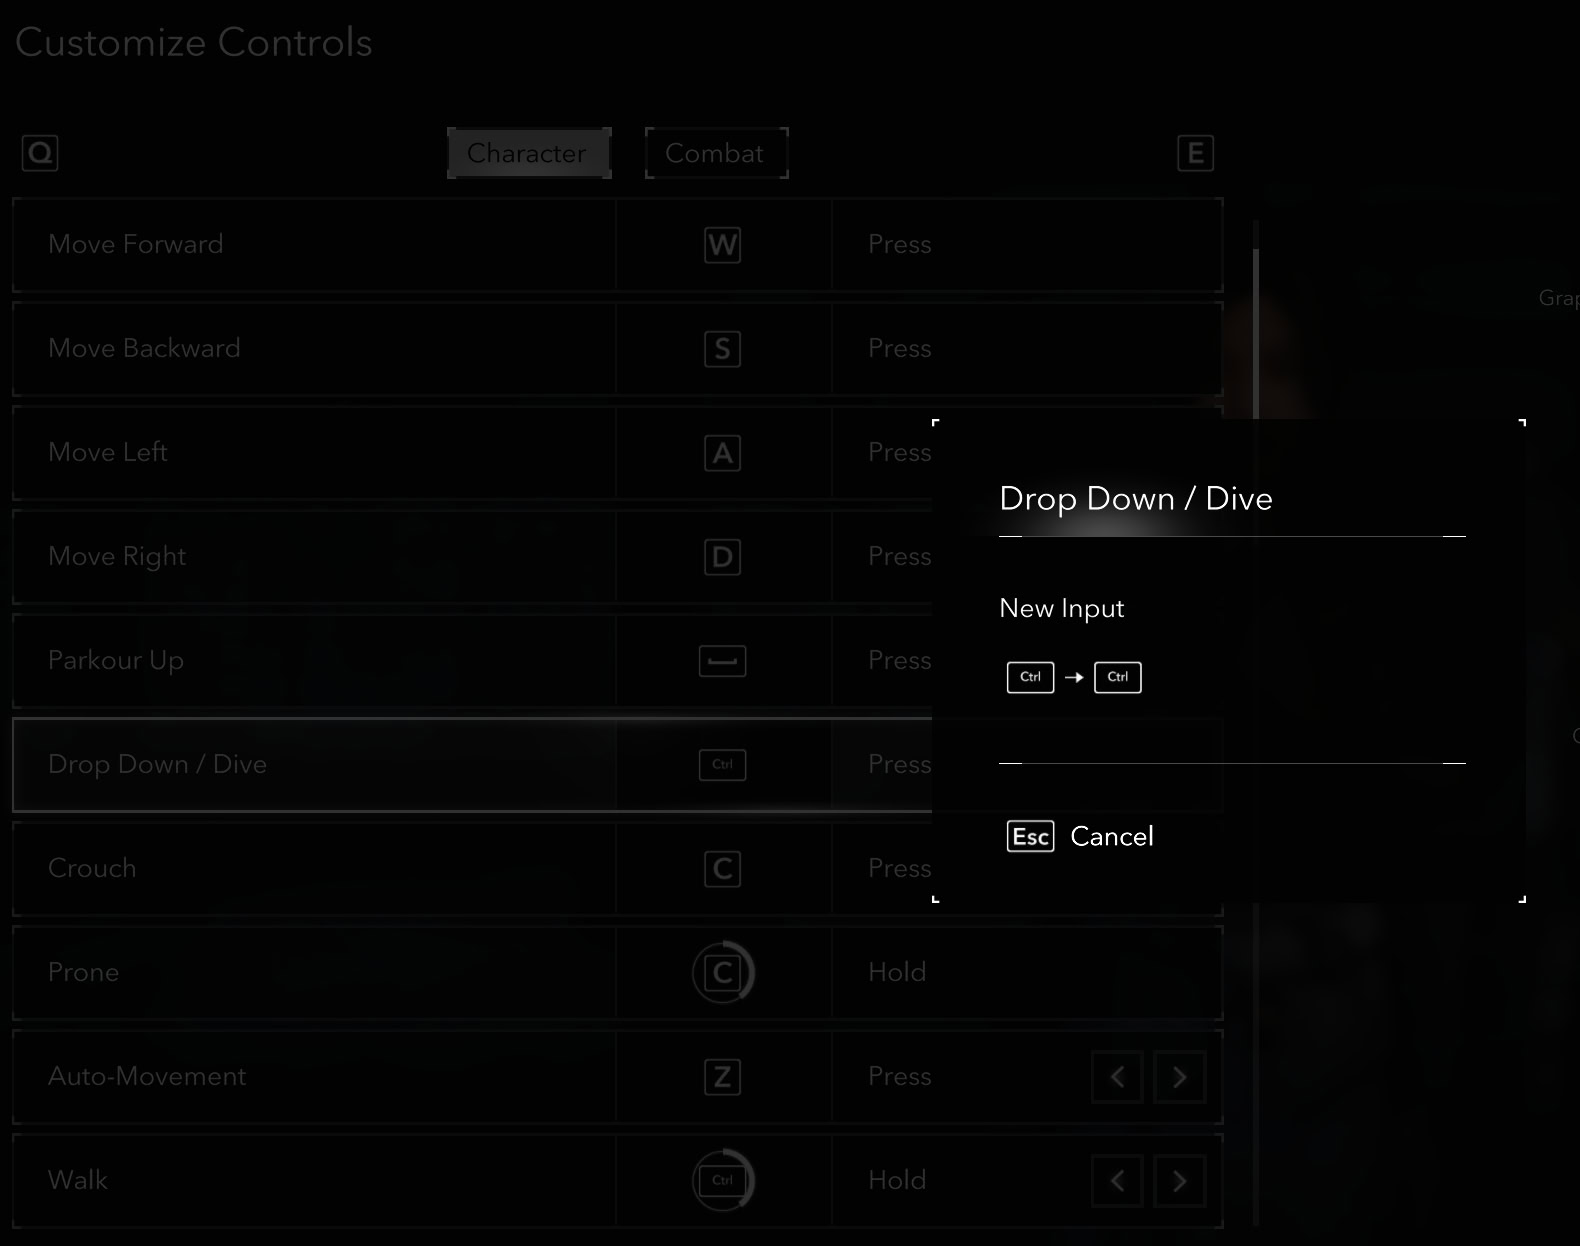
To customize a keybind, click on the button to remap it to whatever you want. A pop-up will appear asking you for a new keybind.
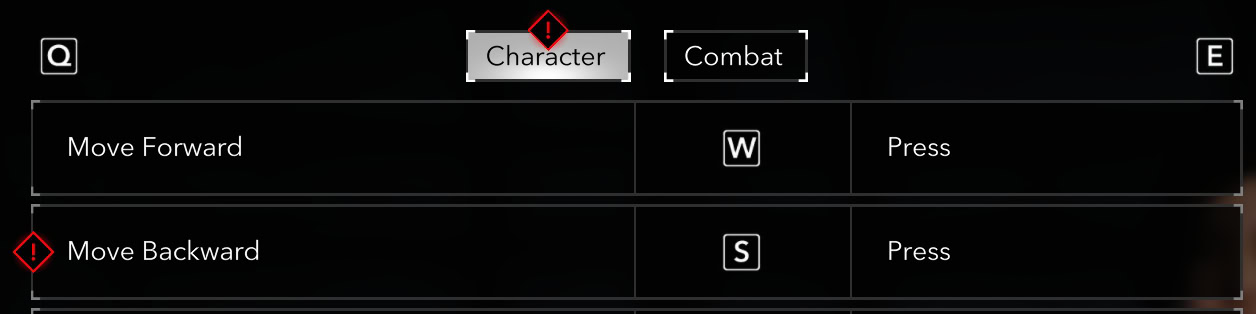
If the game detects a duplicate keybind, you will see a notification in the top right corner and a helpful red exclamation mark on the problematic keybinding slots.
PC Keyboard and Mouse Controls
Assassin’s Creed Shadows has excellent support for mouse and keyboard on PC. This continues the tradition of previous titles in the series.
To view or customize your keybinds on PC with keyboard and mouse, navigate to the Controls tab, select your preferred configuration at the top and click on “Customize Controls”. This should be the button on the first row.
Inside the Customize Controls screen, you can view the Character and Combat Controls separately.
Character Controls
This screen shows the available controls for movement, actions, shortcuts and camera controls.
Movement
| Action | Button | Type |
|---|---|---|
| Move Forward | W | Press |
| Move Backward | S | Press |
| Move Left | A | Press |
| Move Right | D | Press |
| Parkour Up | SPACE | Press |
| Drop Down / Dive | CTRL | Press |
| Crouch | C | Press |
| Prone | C | Hold |
| Auto Movement | Z | Press / Hold |
| Walk | CTRL | Hold / Toggle |
| Sprint | SHIFT | Toggle / Hold |
The controls for movement have no surprises at all. It feels a little sluggish holding C to make your character drop to a crawling position, but you don’t have to use it too often, unless you are extra cautious with Naoe and want to be absolutely sure you are not being spotted.
There seems to be a bug or maybe a design decision related to Drop and Walk. It is amazing that the developers did not forget to allow your character to walk normally when using keyboard and mouse. It happens! When you switch the functionality to be activated on Press instead of Hold, it conflicts with Drop Down as it uses the same command. The game doesn’t inform you about this conflict. You could simply remap one of the shortcuts.
The Auto-Movement feature is cool, but it only makes your character go forward. It does not follow paths or the Pathginder lines. This is a stunningly beautiful game, and you would not really want to auto-pilot, but when you are on a long journey from one marker to the next, it’s nice to allow your index finger to rest instead of keeping the W pressed all the time.
You can change the Walking speed from a slider located in the main window for Mouse & Keybind, but the default value of 5 is close enough to a normal strolling pace that I was perfectly satisfied with. In some rare cases, like when you explore Hidden Trails or Kofun, you may want to be able to walk at a slower pace, but that’s more like an exception and probably not many would feel the need to do it.
Actions
| Activity | Button | Type |
|---|---|---|
| Primary Interaction | E | Combined |
| Whistle | X | Press / Hold |
| Call Mount | X | Hold |
| Eagle Vision | V | Hold |
| Dismount | C | Hold |
| Swap Weapons | R | Press |
| Grappling Hook | Q | Press |
If you want to switch Whistle from a Press to a Hold, you will have to choose another keybind as holding X will call your mount. I find it extremely easy and convenient to use both on the same key, so good job Ubisoft.
It’s important to note that only Naoe has the Eagle Vision. This is the mode where she is able to see enemy targets marked with red color on the screen. The Grappling Hook is also Naoe’s private toy. Yasuke is too big to swing on it anyway.
Shortcuts
| Activity | Button | Type |
|---|---|---|
| Objectives | O | Press |
| World | M | Press |
| Inventory | I | Press |
| Mastery | Y | Press |
| Codex | P | Press |
| HUD Toggle | ` | Press |
| Objective Helpers | TAB | Press |
| Pathfinder | TAB | Hold |
On a first glance it may seem weird that Mastery is bound by default to Y, but it makes sense as it’s on the same row with other buttons that open the menus and you’d want M for your World Map, obviously. You will be opening it regularly to check for markers.
Assassin’s Creed Shadows is a stunningly beautiful game (2nd time I mention it, right?). The idea to have a quick key to toggle the UI ON and OFF is very neat. When you press it, it shows that keybind in a tiny button overlay in the top left corner and hides everything else.
You have the option to tweak the UI elements and decide how much of the UI you want visible on your screen, but if you like your markers and notifications, you can keep seeing them and get the opportunity to hide them all temporarily with the ` button for screenshot or while roaming the wilderness of the world.
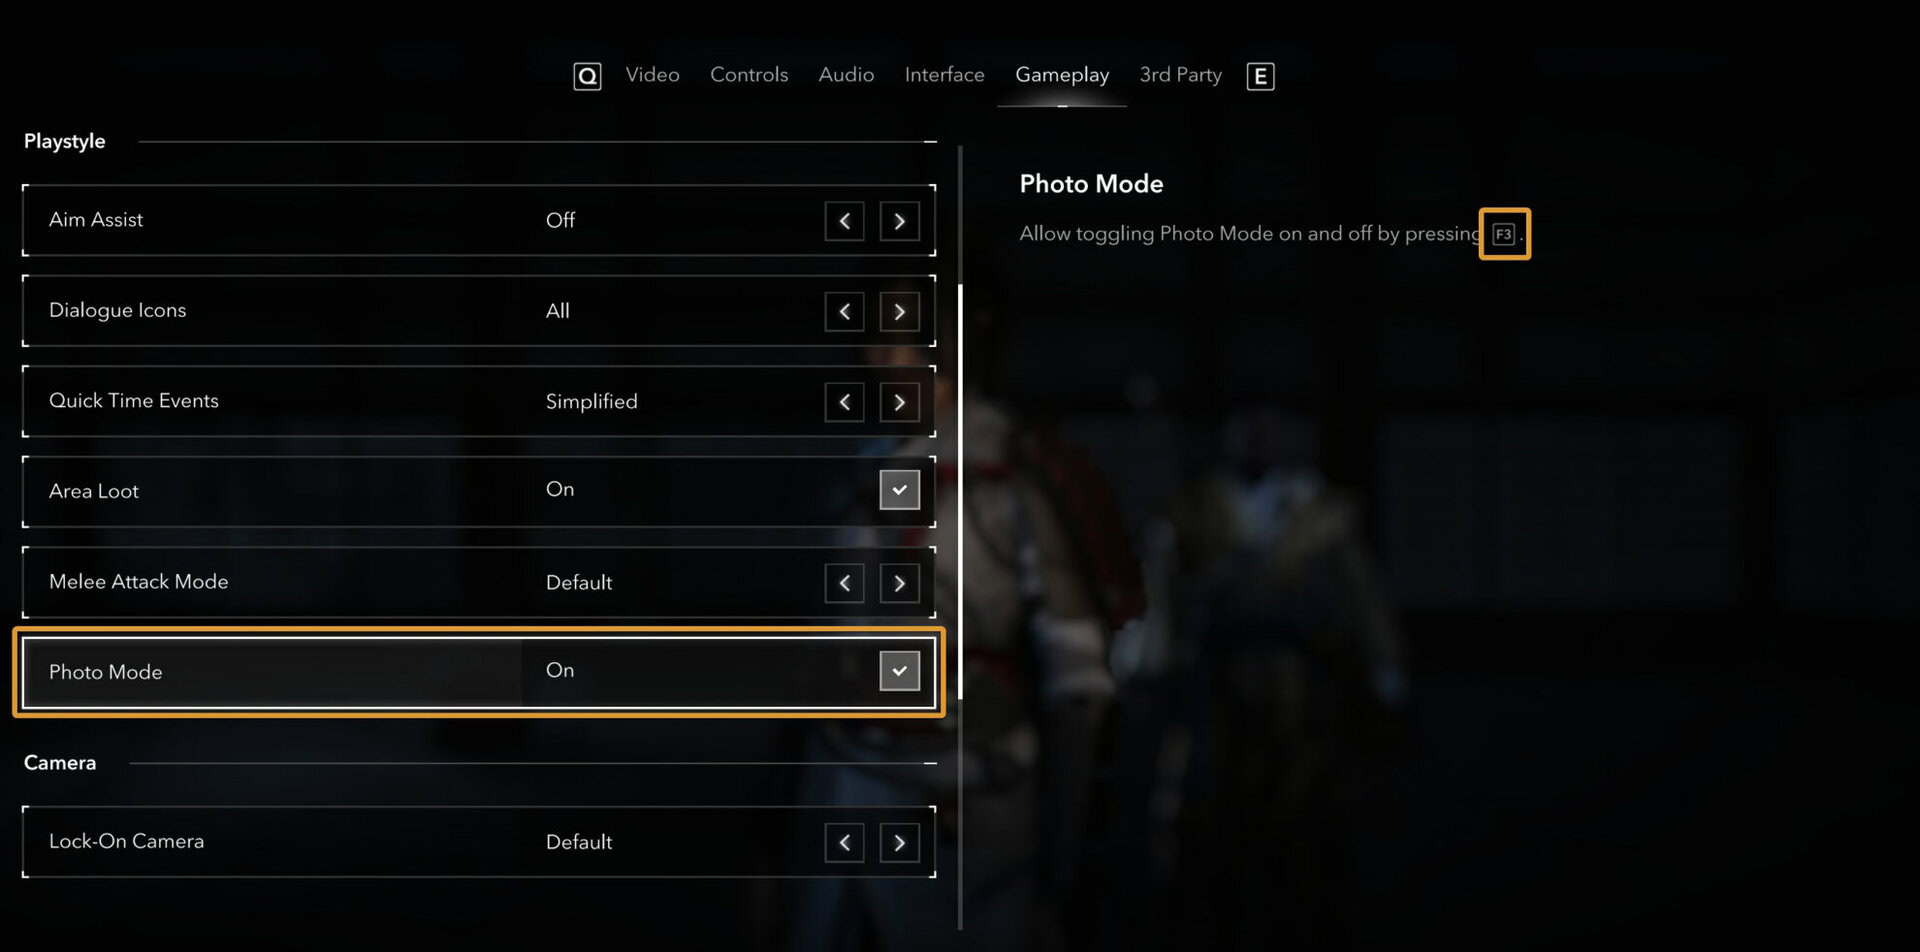
Speaking of screenshots, the controls do not list Photo Mode. It’s bound by default to F3 and cannot be changed. It is mentioned in the Gameplay settings, here:
Update 1.0.2 introduced a bulk sell feature when you want to dump unwanted gear to a vendor. It also features what might be an oversight from the developers.
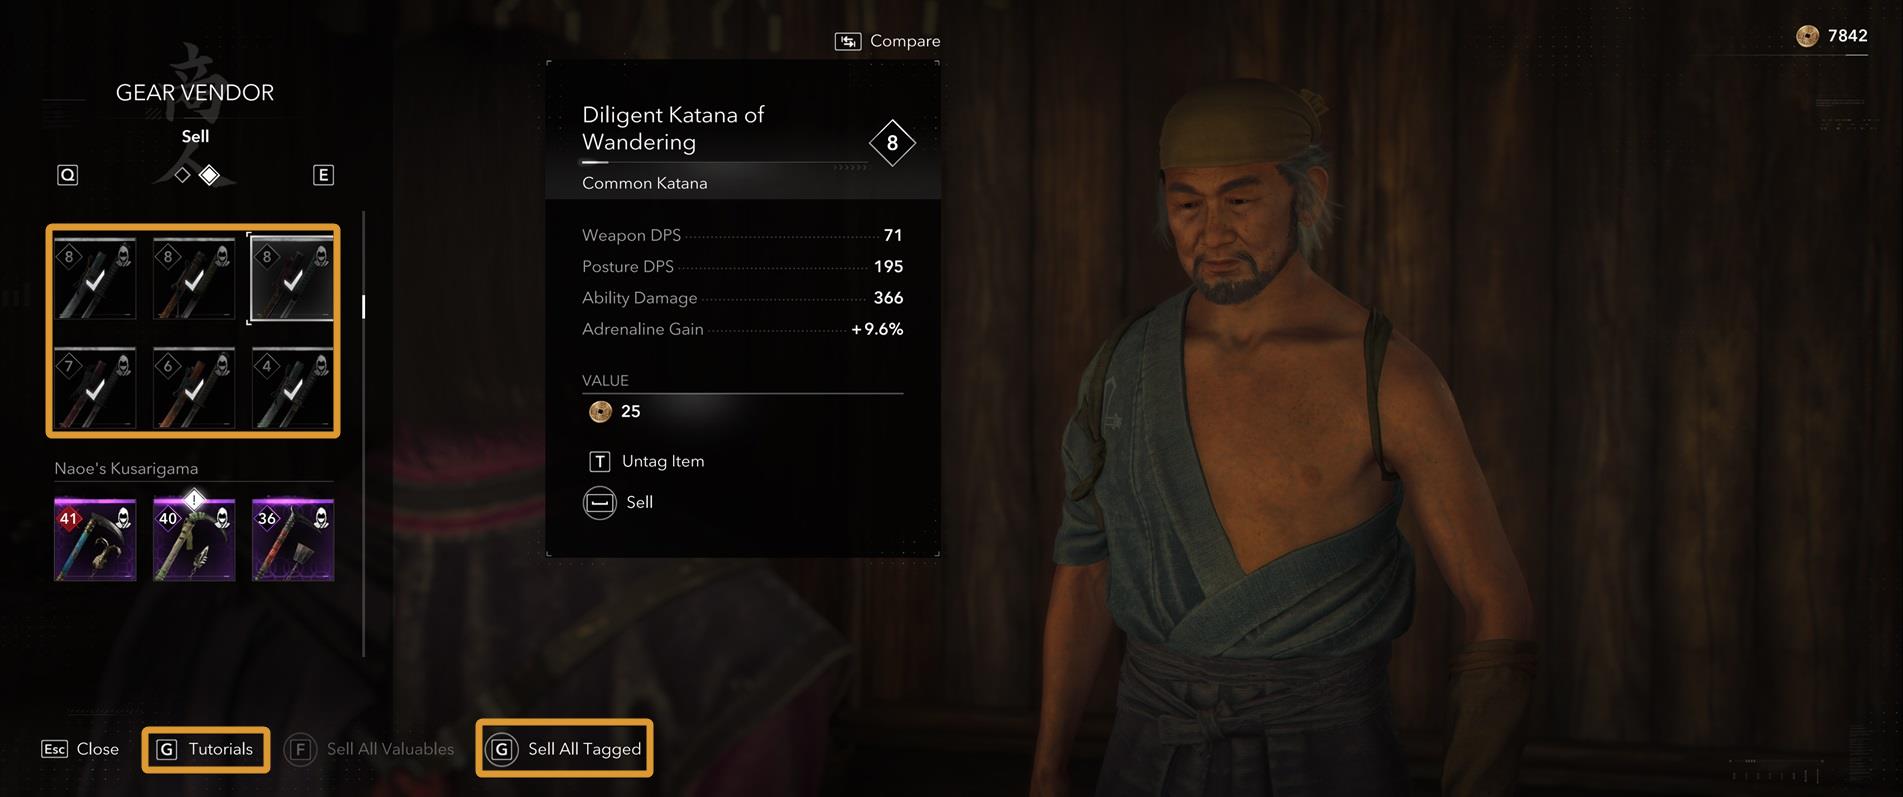
The same keybind “G” is used for both opening the tutorial and to sell all items while in the vendor menu. This will likely be fixed. Until then, if you are a keybind junkie, like us, you just have to wait as there seems to be no way to customize this action currently.
Camera
| Activity | Button | Type |
|---|---|---|
| Camera Up | ↑ | Press |
| Camera Down | ↓ | Press |
| Camera Left | ← | Press |
| Camera Right | → | Press |
Combat
The Combat controls are split into General section and Actions.
General
| Activity | Button | Type |
|---|---|---|
| Light Attack | LMB | Press |
| Heavy Attack | LMB+SHIFT | Press |
| Assassinate | F | Press |
| Heal | H | Press |
| Dodge / Roll | ALT | Press |
| Parry / Deflect | Q | Press |
| Lock Target | MMB | Press |
| Weapon Ability 1 | 2 | Press |
| Weapon Ability 2 | 3 | Press |
| Character Ability 1 | 1 | Press |
All of these controls are perfectly tuned the way they are, I find. You might be wondering why only 1, 2 and 3 for abilities. You get 3 ability slots.
One is for the main character class Mastery Path (Samurai for Yasuke and Shinobi for Naoe) and two are for the specific weapon you wield.
When you switch weapons, you get up to two new abilities that pop up on the same keybinds.
Actions
| Activity | Button | Type |
|---|---|---|
| Aim / Ranged Abilities | RMB | Hold / Press |
| Shoot | LMB | Press |
| Tool / Ammo 1 | 1 | Press |
| Tool / Ammo 2 | 2 | Press |
| Tool / Ammo 3 | 3 | Press |
| Tool / Ammo 4 | 4 | Press |
| Ally Ability | 5 | Press |
Although you can technically remap these, it is convenient to have the Aim and Ranged Abilities prompt on the right mouse button and I like its default setting being set to Hold. Tools are Naoe’s arsenal and Ammo is for Yasuke.
To select a ranged tool or ammo type, you press and hold (by default) the right mouse button and then you press a number to select the specific tool or ammo type. You will see them in the same place where your other actions are, in the bottom left corner of the screen.
Mouse Settings
The game allows you to customize several components of your mouse and how it works. You can tune it to left- or right-hand usage, for example, which is a good accessibility option.
The settings you can tweak for your mouse are available directly in the Mouse & Keyboard menu, below the button that takes you into the customizable shortcuts we have discussed above in this guide.
| Activity | Default | Range |
|---|---|---|
| Walking Speed | 5 | 1-10 |
| Sensitivity | 15 | 1-50 |
| Aiming Sensitivity | 13 | 1-50 |
| Acceleration | Off | 1-8 |
| Left-Handed Layout | Auto | Auto/On/Off |
| Invert X Axis | Off | On/Off |
| Invert Y Axis | Off | On/Off |
| Invert Scroll | Off | On/Off |
| Invert Cursor | Off | On/Off |
| Lock Cursor | Off | On/Off |
| Always Show Cursor | Off | On/Off |
Controller Setups
You can find the compare the two controller setups in a table format here. You have the ability to rebound the controls to whatever feels comfortable for you.
Movement
| Action | Xbox | PlayStation |
|---|---|---|
| Move | LS | LS |
| Look | RS | RS |
| Parkour | A | ✖ |
| Drop Down / Dive | B | ⭘ |
| Crouch | X | ☐ |
| Prone | X (Hold) | ☐ (Hold) |
| Sprint | LS (Press) | L3 |
Shortcuts
| Activity | Xbox | PlayStation |
|---|---|---|
| World Menu | View | Touchpad |
| Animus Hub Light | View (Hold) | Touchpad (Hold) |
| Inventory | Menu | Menu |
| Photo Mode | LS+RS (Press) | L3+R3 |
| HUD Toggle | RS (Double Tap) | R3 (Double Tap) |
| Objective Helpers | D-Pad Left | D-Pad Left |
| Pathfinder | D-Pad Left (Hold) | D-Pad Left (Hold) |
Actions
| Activity | Xbox | PlayStation |
|---|---|---|
| Primary Interaction | Y | △ |
| Whistle | D-Pad Down | D-Pad Down |
| Call Mount | D-Pad Down (Hold) | D-Pad Down (Hold) |
| Eagle Vision (Naoe) | RS (Hold) | R3 (Hold) |
| Dismount | B (Hold) | ⭘ (Hold) |
| Swap Weapons | D-Pad Right | D-Pad Right |
| Grappling Hook | LB | L1 |
Combat
| Activity | Button | Type |
|---|---|---|
| Light Attack | RB | R1 |
| Heavy Attack | RT | R2 |
| Assassinate | RB | R1 |
| Heal | D-Pad Up | D-Pad Up |
| Dodge / Roll | B | ⭘ |
| Parry / Deflect | LB | L1 |
| Lock Target | RS (Press) | R3 |
| Weapon Ability 1 | B | ⭘ |
| Weapon Ability 2 | A | ✖ |
| Character Ability 1 | X | ☐ |
Combat Actions
| Activity | Xbox | PlayStation |
|---|---|---|
| Aim / Ranged Abilities | LT (Hold) | L2 (Hold) |
| Shoot | RT | R2 |
| Tool / Ammo 1 | D-Pad Up | D-Pad Up |
| Tool / Ammo 2 | D-Pad Right | D-Pad Right |
| Tool / Ammo 3 | D-Pad Down | D-Pad Down |
| Tool / Ammo 4 | D-Pad Left | D-Pad Left |
| Ally Ability 1 | Y | △ |
| Ally Ability 2 | A | ✖ |
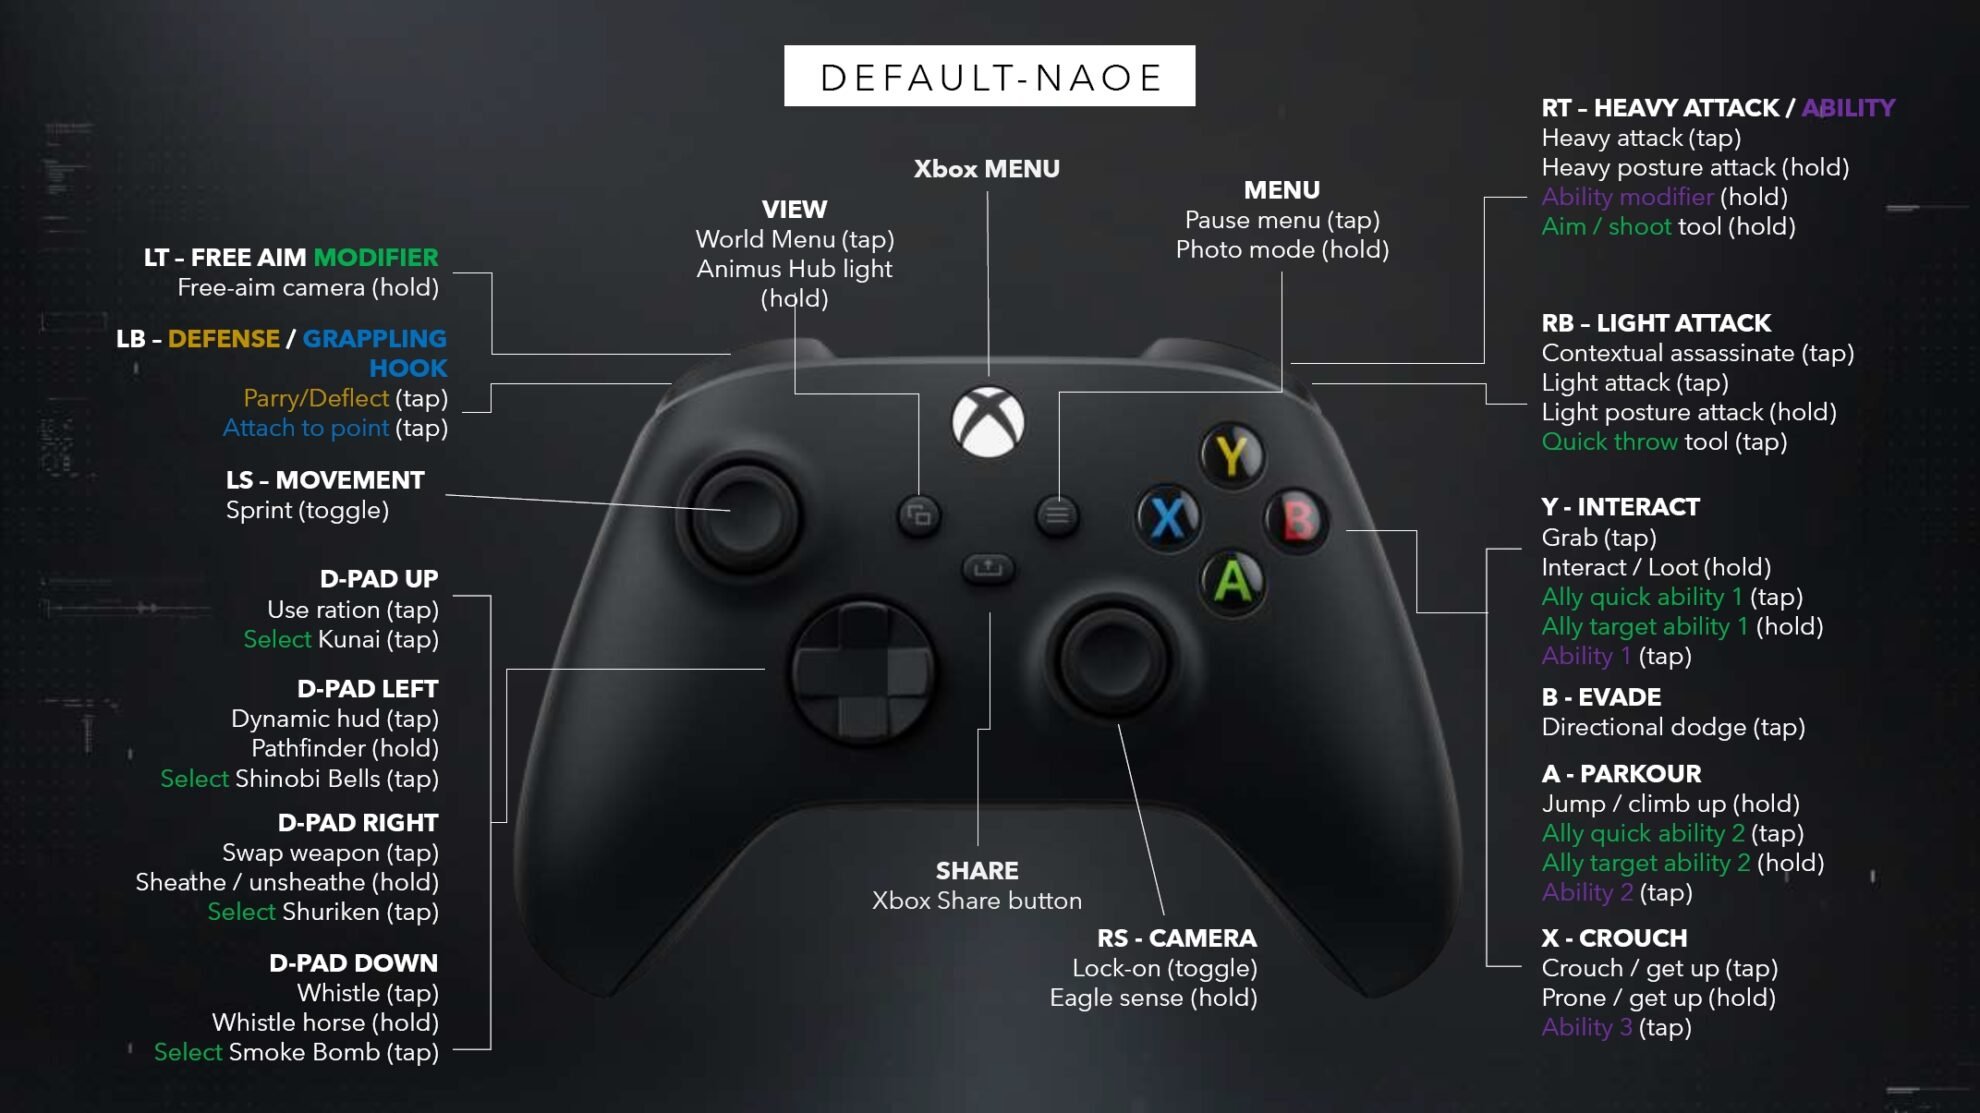
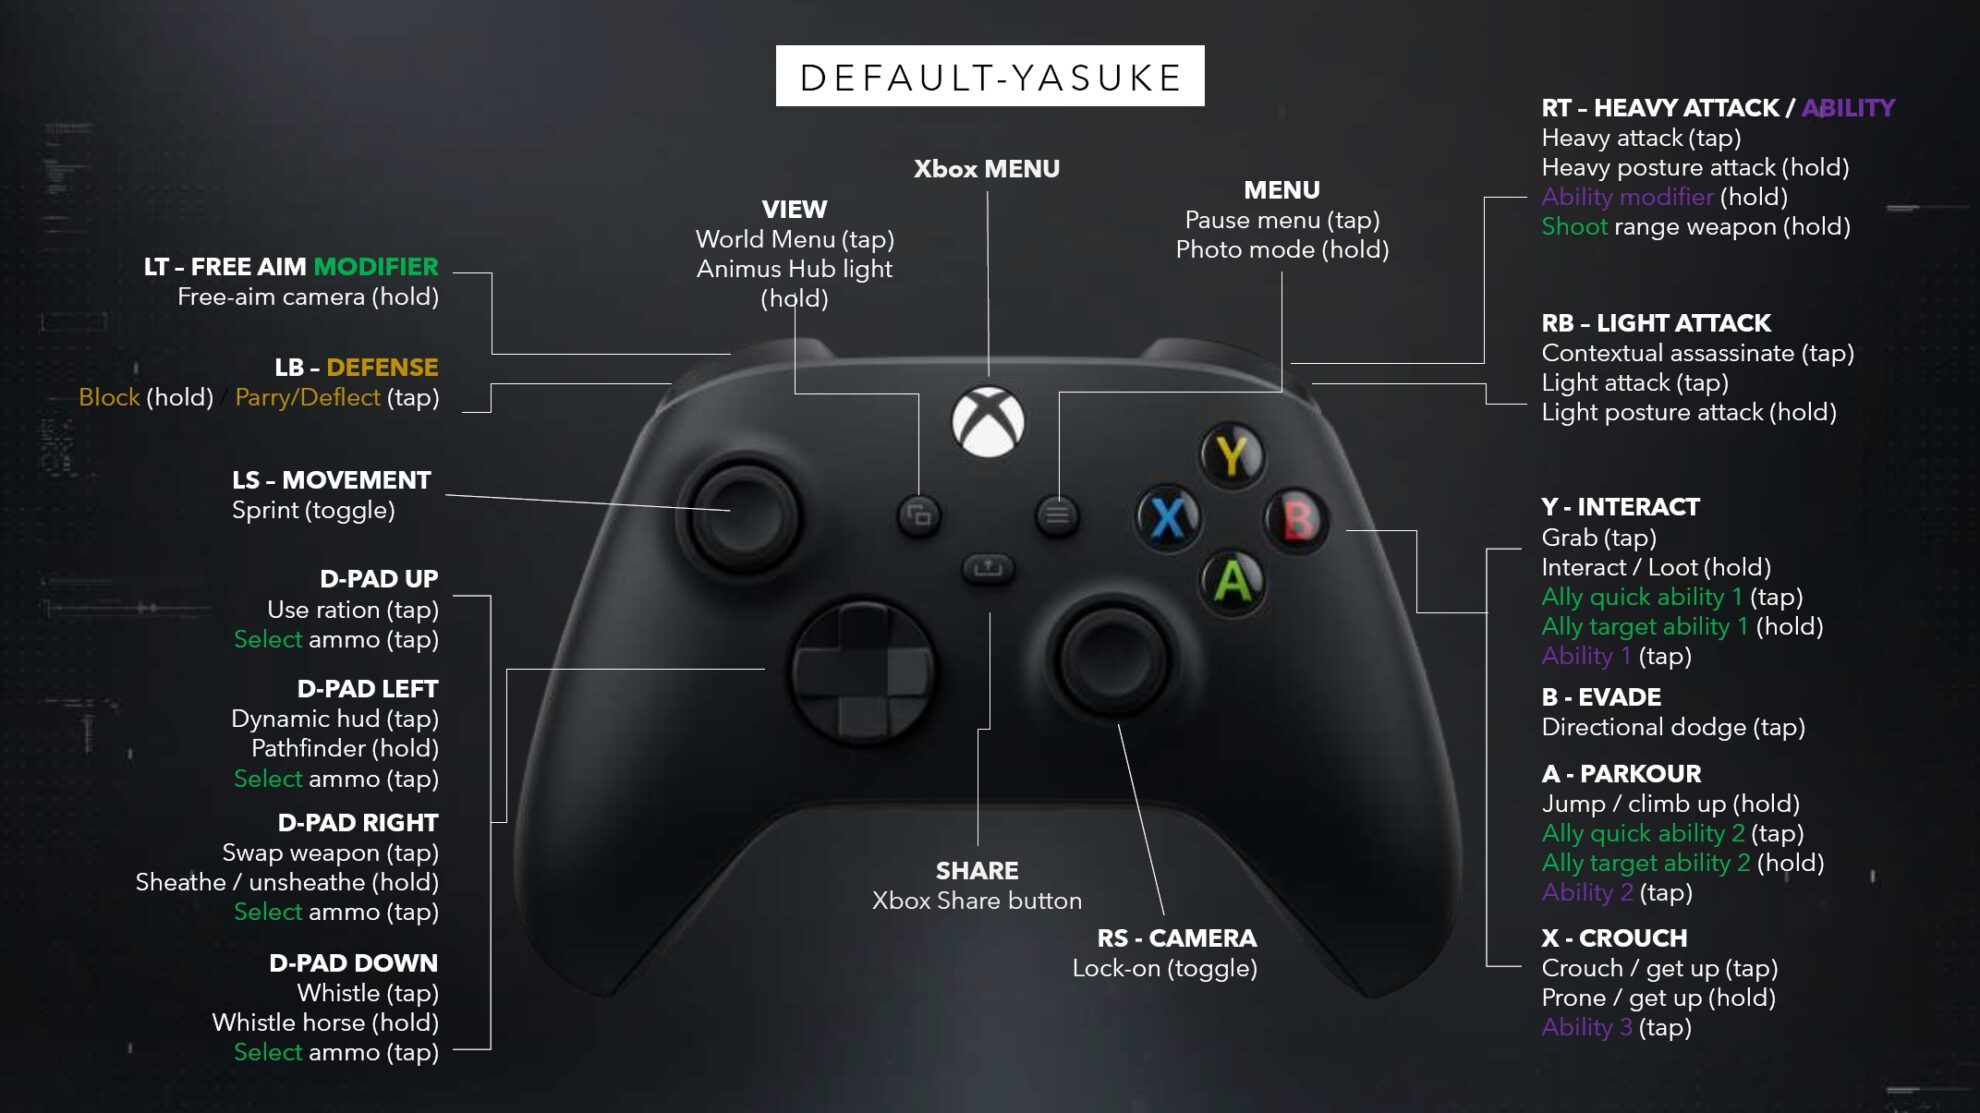
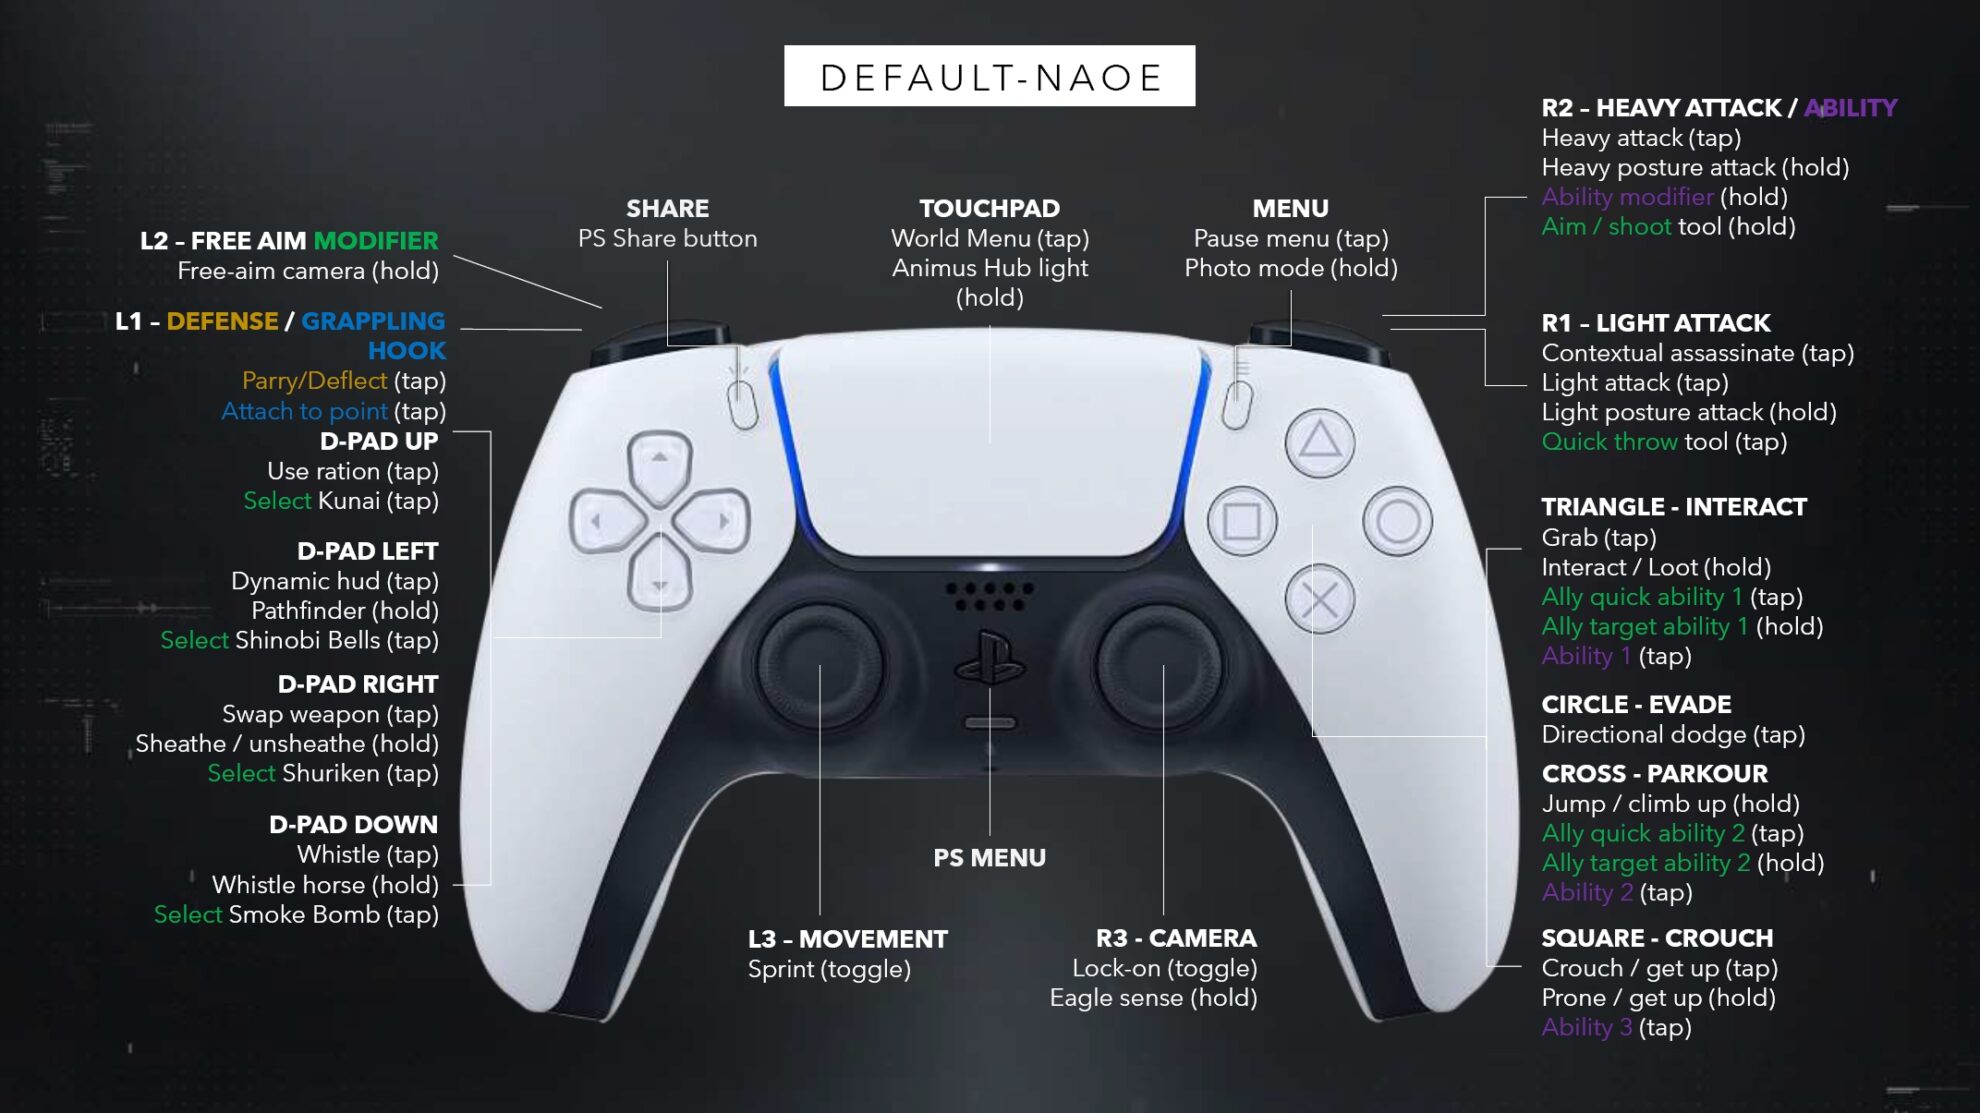
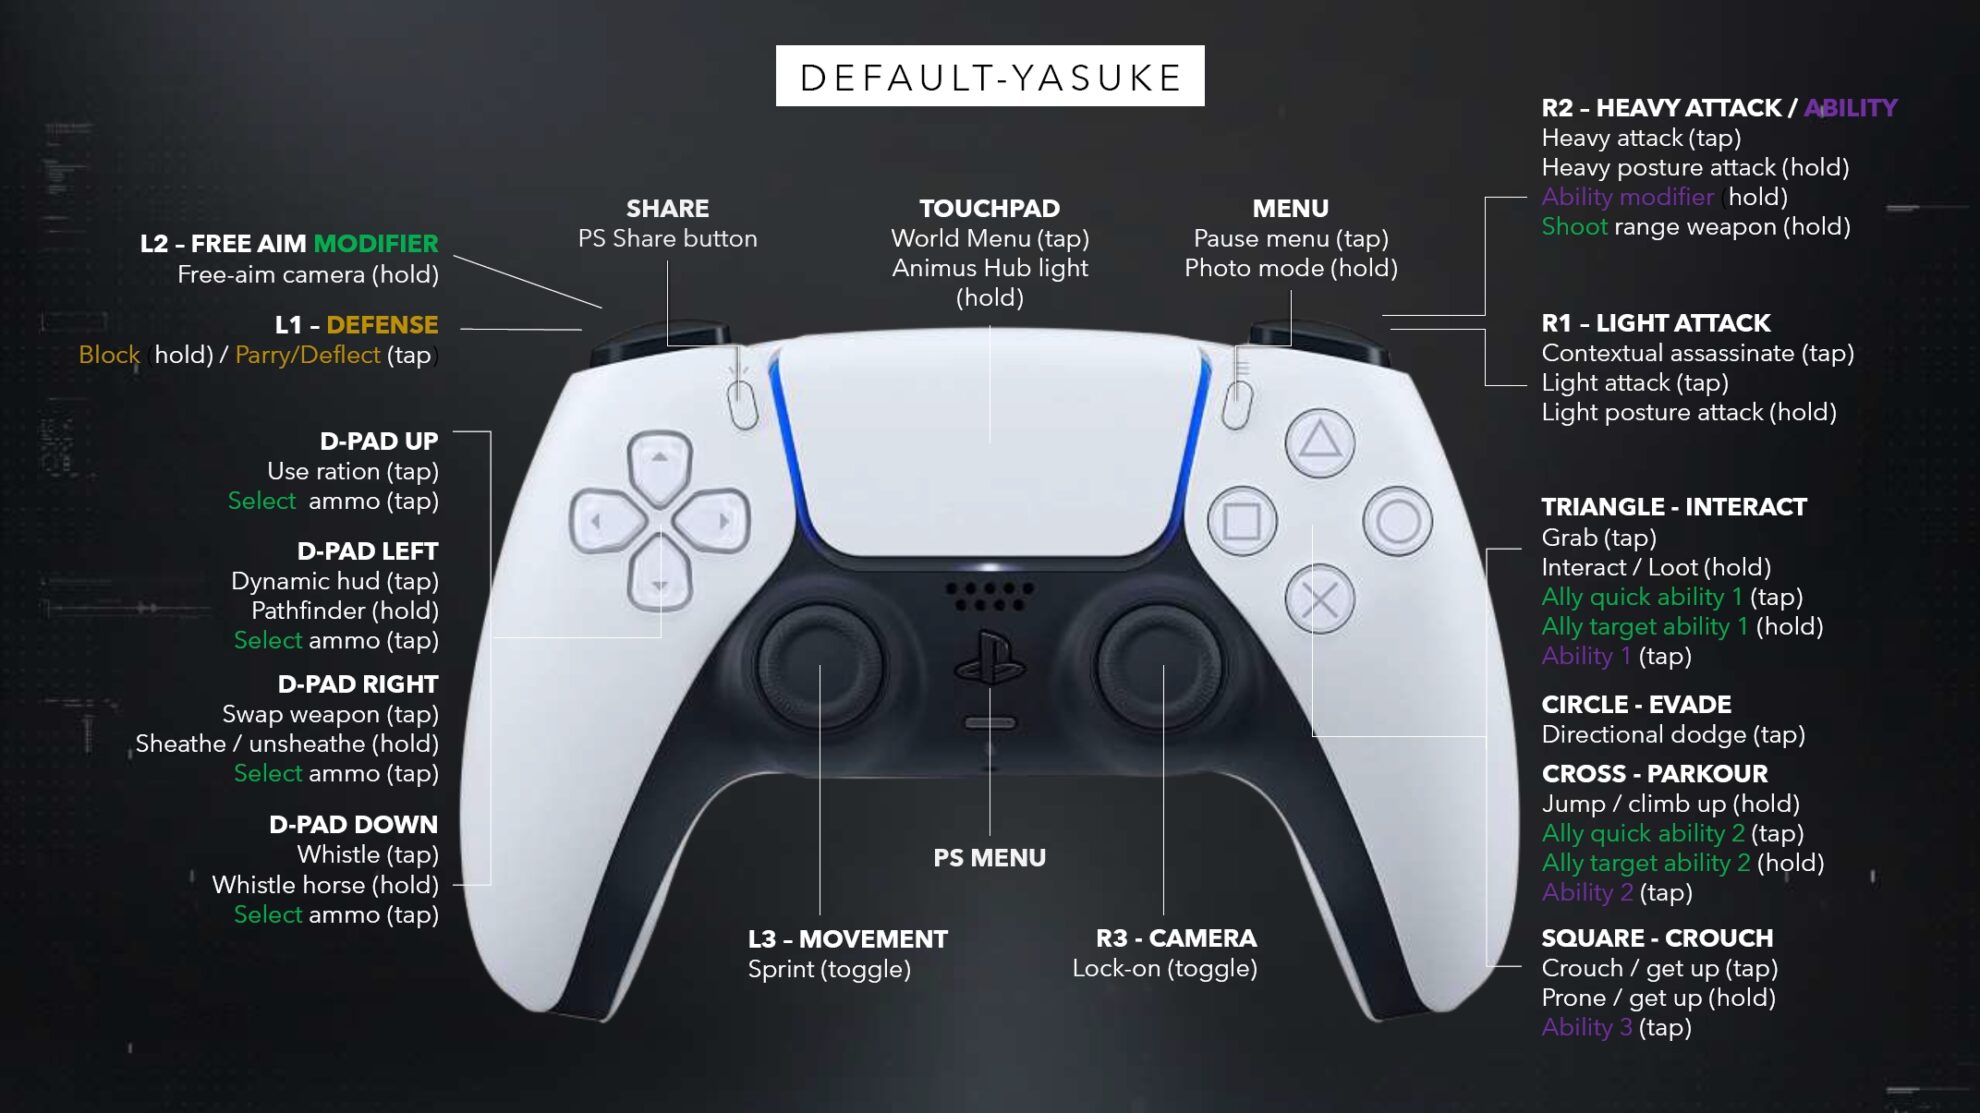
There are two sets of default controls when looking at the controller setup, a set of controls for Naoe and Yasuke.
Below are the controls for the Xbox Series S|X controller for Naoe and Yasuke.
Below are the controls for the Playstation 5 controller for Naoe and Yasuke.
We have a dedicated guide to all gameplay-related settings you should change as soon as possible that fall outside of the scope of this guide where our main focus have been the Controls.