An in-depth guide to Lord Kanoth Story Mode Boss – third encounter in the SWTOR R-4 Anomaly Operation. Includes path to the boss, mechanics breakdown, and strategy for all classes and roles!
Please keep in mind that this boss fight was released very recently, so new strategies are still developing. If you know of a different strategy that works well or is very popular, please share it in the comments!
Table of contents
Lord Kanoth SM Mechanics and Strategy
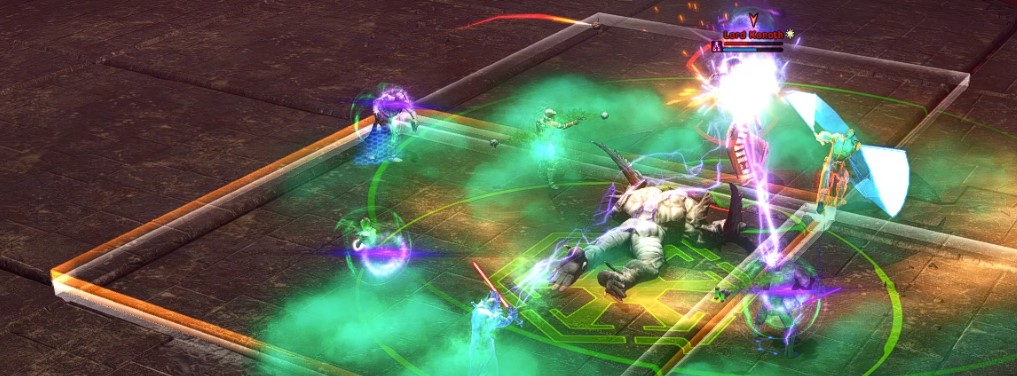
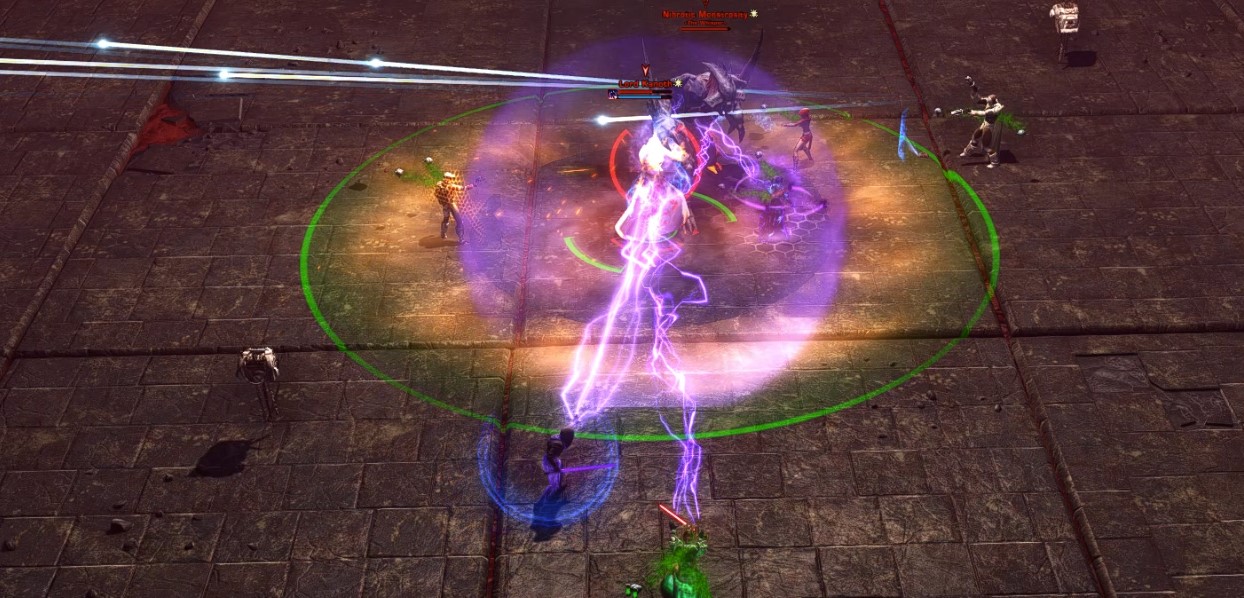
Lord Kanoth has a lot of different casts, but almost all of them are just different variations on creating Nihrot, the signature mechanic of this boss fight.
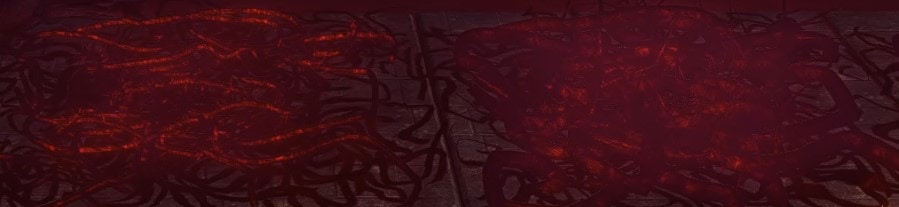
Nihrot
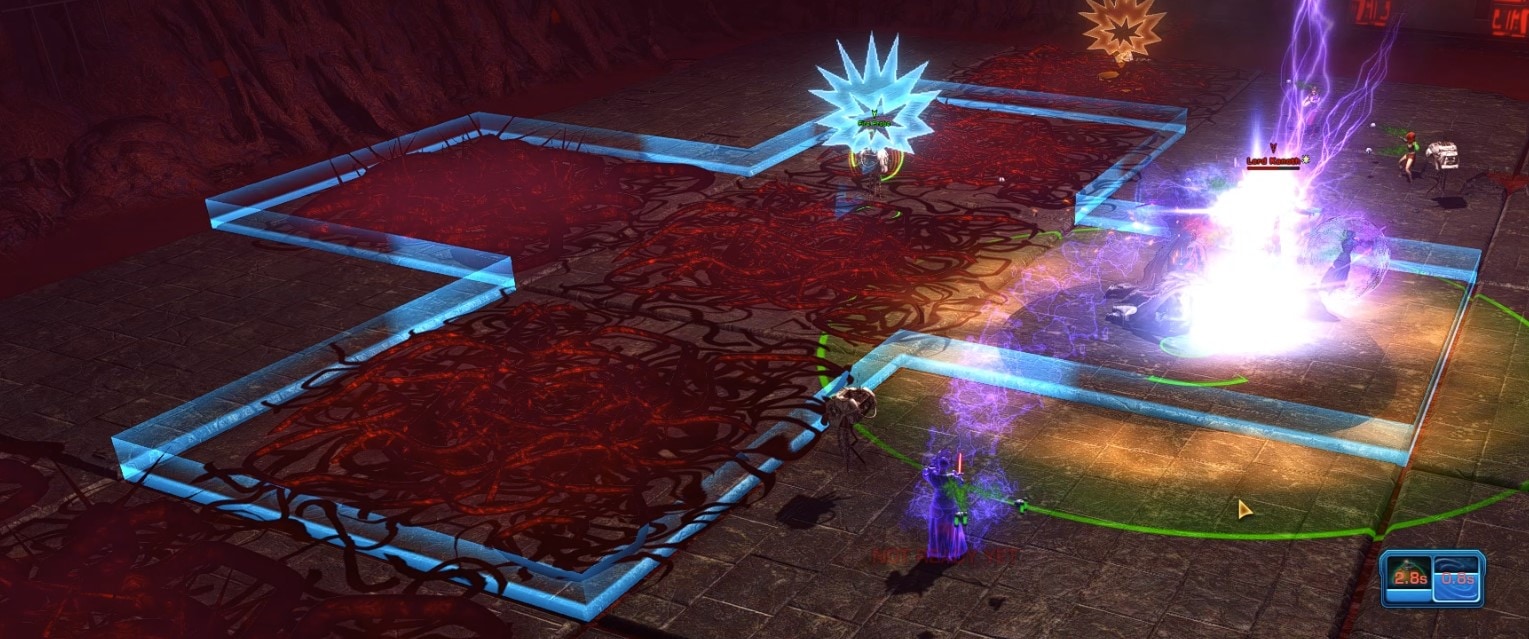
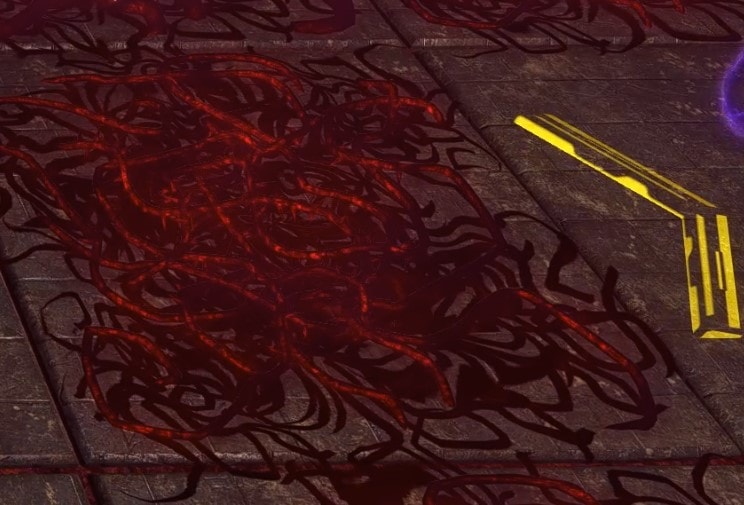
Nihrot is the red creep vine stuff on the ground and grows from many of Lord Kanoth’s attacks. It damages, slows, and hinders you while you stand on it and buffs Lord Kanoth when he is floating over a tile that has it by making him take less damage and deal more. Nihrot comes in 2 forms: hardened and unhardened. The hardened variant is rarer and more difficult to remove. Hardened Nihrot only appears when Nihrot grows on a tile that already has it.
Strategy
The entire fight is all about Nihrot. You’ll be using abilities on your Temporary Ability Bar to control the spread of Nihrot and physically move out of tiles that have Nihrot on them.
 Nihrot Suppression Grenades and Fire Probes (Temporary Ability Bar)
Nihrot is the red creep vine stuff on the ground and grows from many of Lord Kanoth’s attacks. It damages you while you stand on it and buffs Lord Kanoth when he is floating over a tile that has it by making him take less damage and deal more. Nihrot comes in 2 forms: hardened and unhardened. The hardened variant is rarer and more difficult to remove. Hardened Nihrot only appears when Nihrot grows on a tile that already has it.
You have 2 abilities on your Temporary Ability Bar. The first is called  Nihrot Suppression Grenade and the second is called
  Detonate Fire Probe. Both abilities allow you to remove Nihrot from specific tiles.
Nihrot Suppression Grenade
The Nihrot Suppression Grenade can remove non-hardened Nihrot from a single tile. It has a pretty short cooldown (11s) but only a 20m range, so you can’t really hit any tiles outside of the immediate vicinity.
Detonate Fire Probe
 Detonate Fire Probe
There are small, friendly droids called Fire Probes that slowly roam around the arena. They’re a bit easier to see if you turn on View Friendly NPC Nameplates in the game settings.
If you target one and press the Detonate Fire Probe button, it will cause that droid to explode and burn 5 tiles of Nihrot in a cross centered on the tile that the Fire Probe is currently hovering over.
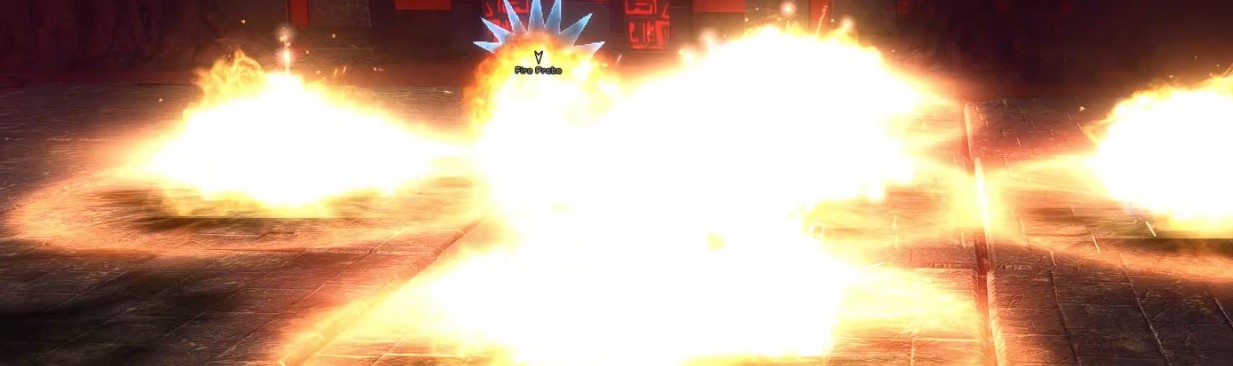
Detonating one of these Fire Probes is the only way to deal with hardened Nihrot, but they are effective at clearing out a bunch of Nihrot at once as well.
Strategy
Your main goal with the Lord Kanoth fight is to make sure that the Nihrot doesn’t get out of control. In order to accomplish this, you should be throwing your Nihrot Suppression Grenade at a tile with unhardened Nihrot on cooldown.
Since Fire Probes are rarer, they should only be detonated if you can remove at least 1 tile that has hardened Nihrot, will hit a Nihrotic Monstrosity, or otherwise clear at least 3 tiles with unhardened Nihrot.
This is an excellent Fire Probe, it’s hitting a hardened tile on the outer edge and 3 unhardened ones. It nearly hit a Nihrotic Monstrosity too!
Seed of Echoes
Lord Kanoth will toss out  Seeds of Echoes to 4 players in the group at the end of a 4.5s cast. The targets are depicted with purple arrows over their head. If 2 players are still standing on the same tile at the end of the cast, Nihrot will spawn on that tile.
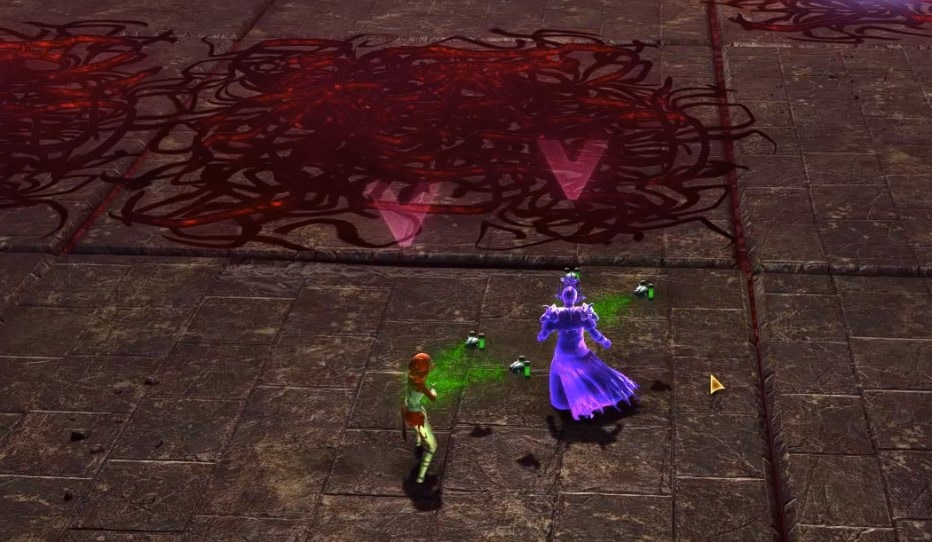
In addition, if you were targeted with Seed of Echoes, you’ll get a debuff called Echoing Impurity which is a short DoT that deals internal damage. It is cleansable but doesn’t deal very much damage.
Strategy
Everyone should spread out and try to not occupy the same tile as someone else, and make sure to move away from anyone that has purple arrows over their head. There is no need to pop a DCD for Seed of Echoes if you only get 1 stack of Echoing Impurity.
Growth Seed
 Growth Seed
Lord Kanoth will periodically cast Growth Seed (1s cast). With everything going on, you might think it does nothing, but it actually just causes Nihrot to grow on a single tile that he is not standing on. As soon as he finishes casting, a tile will flash a white border, signifying that Nihrot will appear there soon.
Strategy
Get out of this tile before Nihrot appears to avoid taking damage. Since Nihrot doesn’t hurt that much, it’s okay to finish your cast.
Directional Growth
Arrows appear at the edge of tiles with Nihrot or from the red goo surrounding the outer tile perimeter. The arrows point to a tile that Nihrot will grow in.
Strategy
Move out of tiles that arrows are pointing to since these will soon contain Nihrot. Burn any tiles that already have Nihrot in them that have an arrow pointing to them so they don’t become hardened.
Lateral and Vertical Growth
Lord Kanoth will periodically cast  Lateral Growth or
  Vertical Growth (both 4s). Horizontal Growth creates an entire row of Nihrot that is parallel to the purple altar and door while Vertical Growth creates an entire row of Nihrot that is perpendicular to the purple altar and door.
There doesn’t seem to be a consistent pattern for where the column / row of Nihrot appears.
Strategy
Early in the fight, this is the largest amount of Nihrot you’ll get at once. Make sure to stay on top of burning it away so you don’t get overwhelmed.
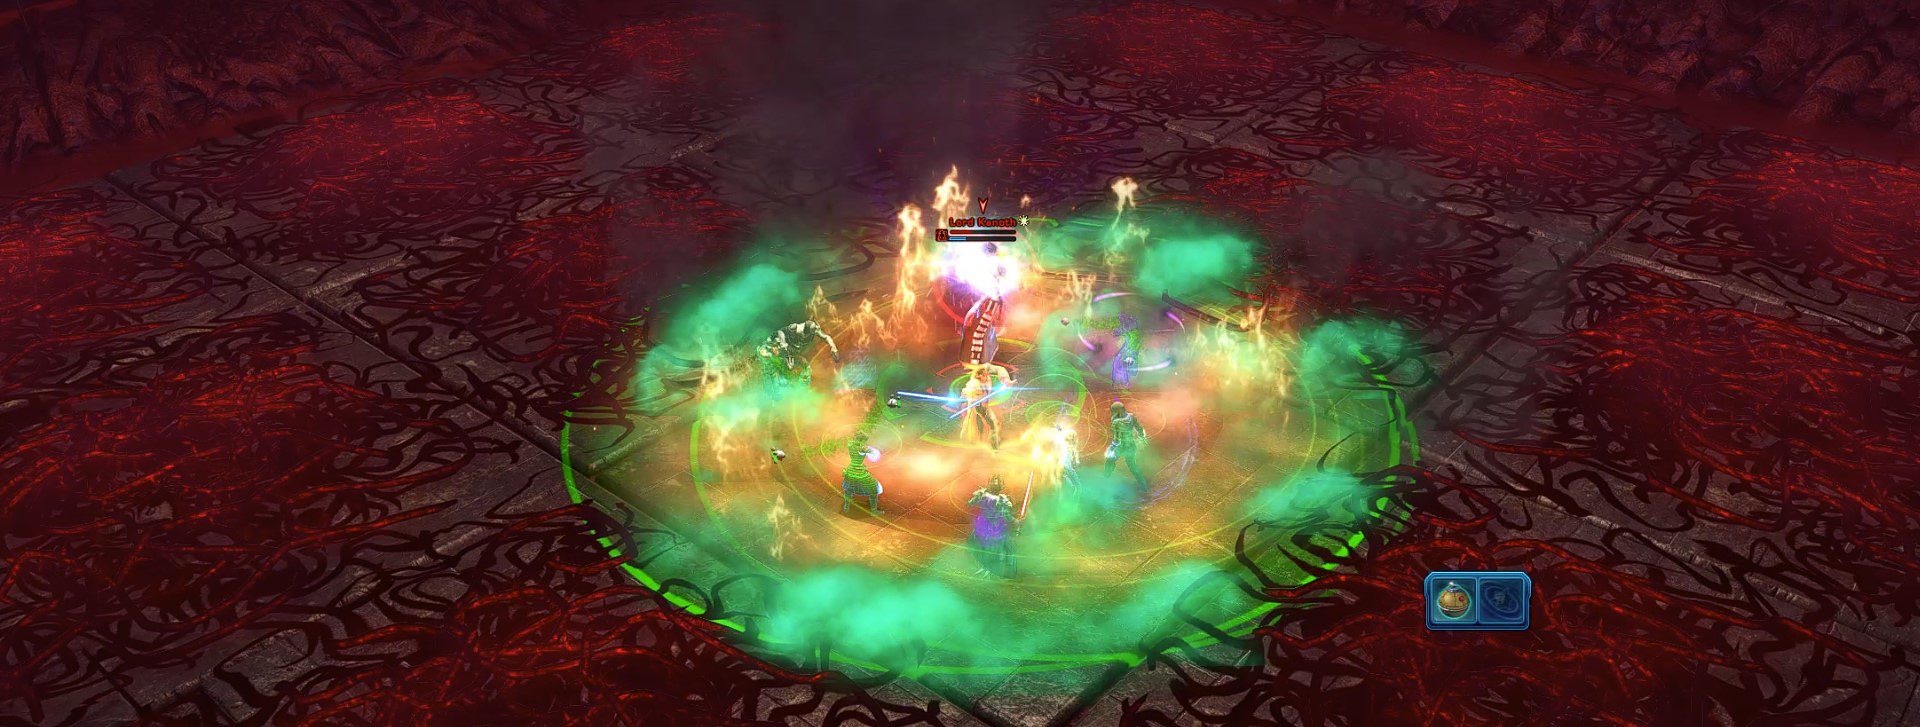
Surging Growth
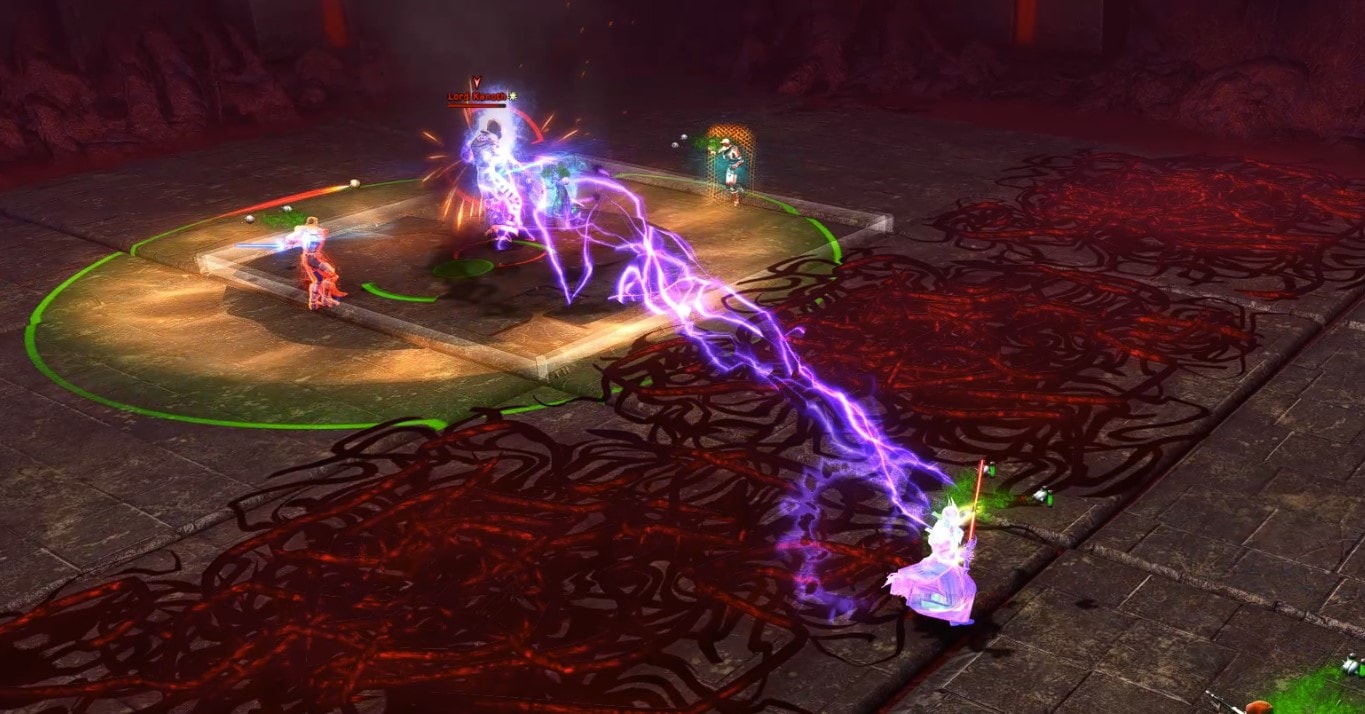
When Lord Kanoth hits 65%, he will teleport to the center tile, summon the first Nihrotic Monstrosity add, begin channeling  Surging Growth, and project a
  Nihrotic Barrier around himself. The channel of Surging Growth lasts up to 60s and causes Nihrot to start growing on tiles throughout the arena and the growth rate accelerates the longer he is able to channel. The current acceleration rate is denoted by the number of stacks on his Surging Growth buff.
If the channel is allowed to complete, the entire floor will be covered with Nihrot and you will wipe. The Nihrotic Shield absorbs all damage dealt to the boss, but must be broken with damage, like Revan’s Resonance channel on the third floor.
Strategy
Bring the Nihrotic Monstrosity over to Lord Kanoth and DPS it down first, but do not kill it on that central platform. Otherwise, Nihrot will spawn on that platform and you won’t be able to move Lord Kanoth out of it while his shield protects the Nihrot beneath it from fire.
Once the Nihrotic Monstrosity is defeated, keep DPSing Lord Kanoth’s shield so that it breaks.
Nihrotic Monstrosity (Subteroth Add)
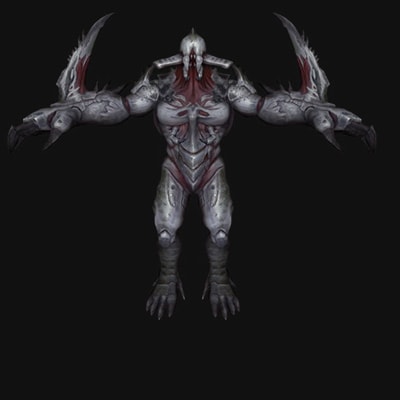
The Nihrotic Monstrosity has a buff called  Nihrotic Carapace that makes it take 50% less damage until it is hit with a Nihrot Suppression Grenade or Fire Probe. When the Nihrotic Monstrosity is defeated, it will spawn Nihrot on that tile thanks to its
  Nihrot Carrier buff.
The first one will spawn when Lord Kanoth hits 65% and begins channeling Surging Growth. Other Nihrotic Monstrosities will spawn periodically without Lord Kanoth channeling Surging Growth.
Strategy
Throw Nihrot Suppression Grenades at Nihrotic Monstrosities or Detonate Fire Probes that will hit it ASAP to remove the debuff. The add should be brought to Lord Kanoth so both can be hit at the same time, but it should be moved to a different tile before it dies so that Nihrot doesn’t spawn beneath Lord Kanoth. During Surging Growth, it is essential that the Nihrotic Monstrosity is not killed on the tile occupied by Lord Kanoth.
Choking Growth, Shockwave, and  Blastwave
Once Lord Kanoth hits 35%, he will jump to the center tile and will begin channeling  Choking Growth, which will cause Nihrot to grow on every other tile in the room.
Thankfully, ARIA has your back and will bring in 4 Fire Probes to help you burn away most of it. As these Fire Probes spawn, Lord Kanoth will create 3 large Whispers of himself at 3 of the corners in the middle 3×3 tile ring.
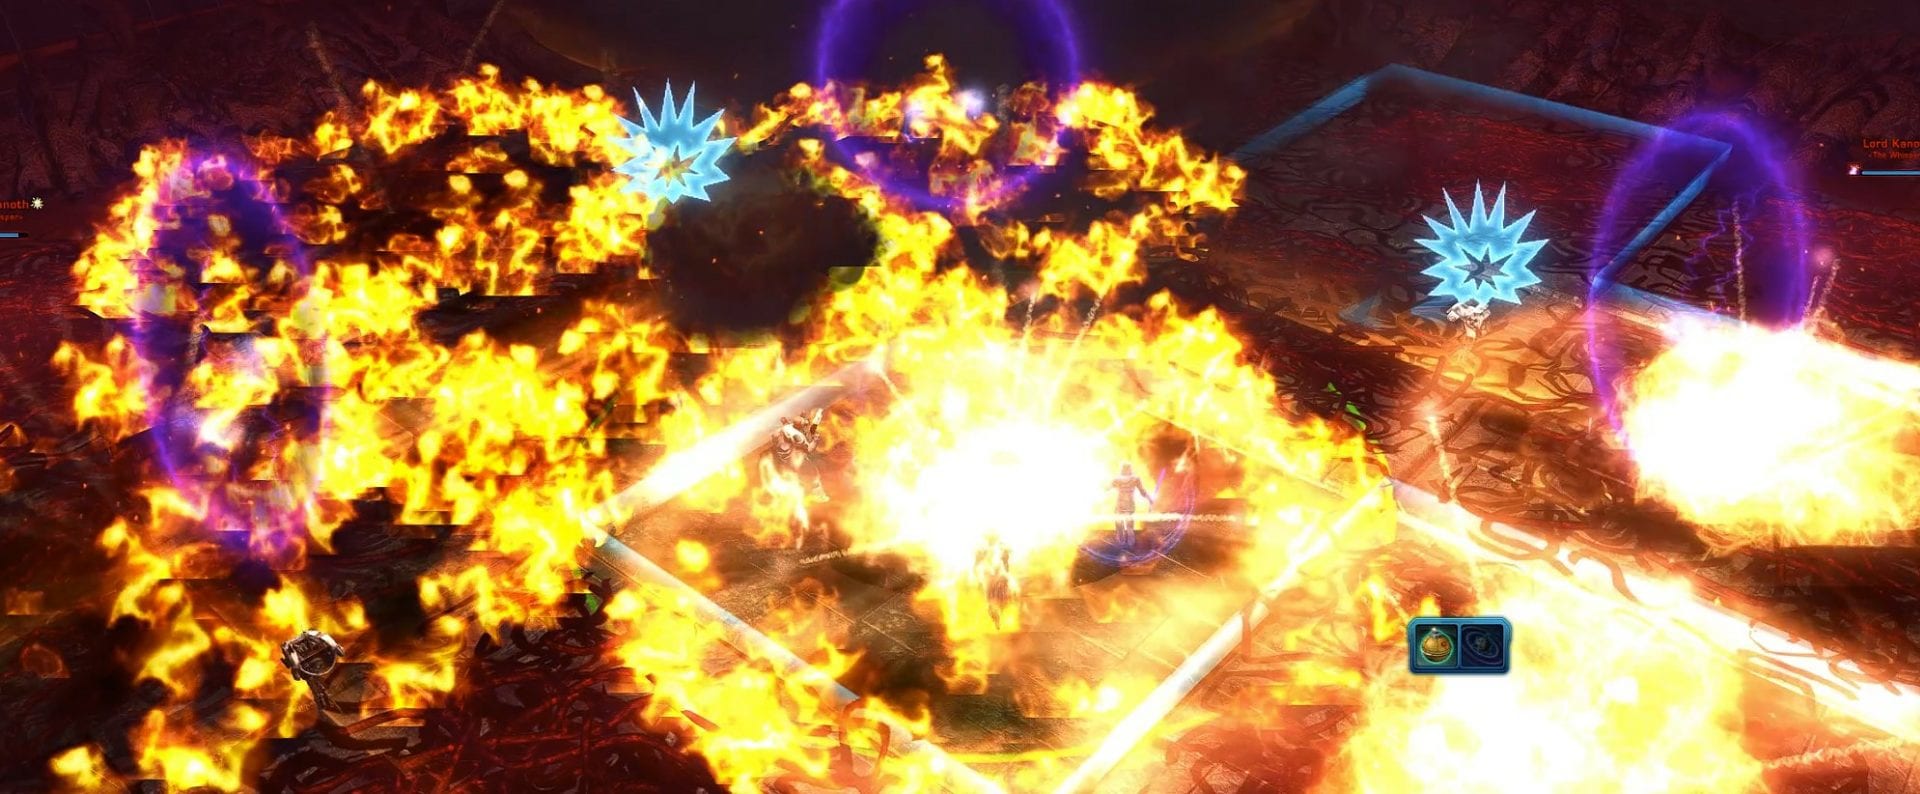
All 3 of them will begin a 9s channel of 1 of 2 devastating attacks:  Shockwave or
  Blastwave. To be clear, all 3 of them will always pick the same attack. Both Shockwave and Blastwave are fairly similar; they only differ in the shape of the telegraph on the ground, which changes where it’s safest to stand.
Both attacks use a similar animation that looks (and feels) like each of them is firing Thundering Blast at each other or the ground, creating overlapping yellow circles or squares of doom. If you’re standing in 2 or more overlapping telegraphs when the channel finishes, you’ll most likely die.
Shockwave (Circles)
Shockwave is the 360-degree circular attack where the Thundering Blast is fired into the ground beneath each Whisper.
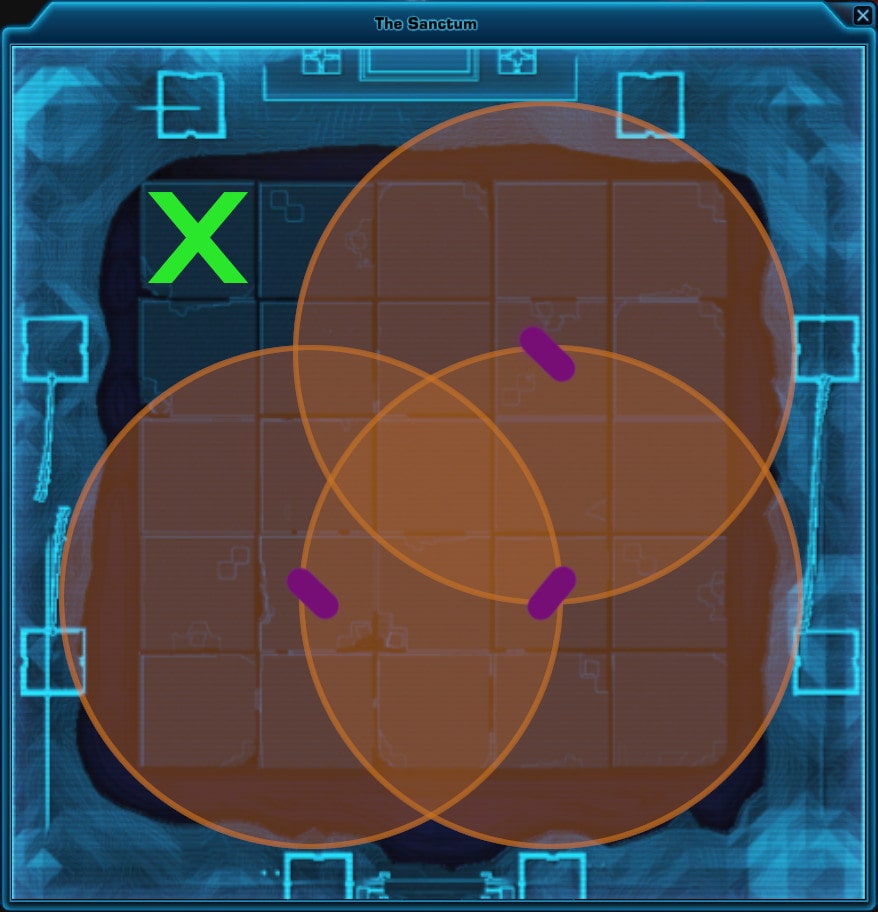
The safest place to stand to mitigate Shockwave is at the “empty” far corner of the tile where there would be an apparition if there were 4 of them. The tile with the green X will have Nihrot unless it is cleared manually by a  Nihrot Suppression Grenade because it is not covered by the 4 Fire Probes that spawn, but there is a tiny spot that would be behind that non-existent apparition that will not require clearing.
Blastwave (Conals or Squares)
Blastwave is the 90-degree conal attack where each Thundering Blast is fired directly across the room, you may want to think of as squares.
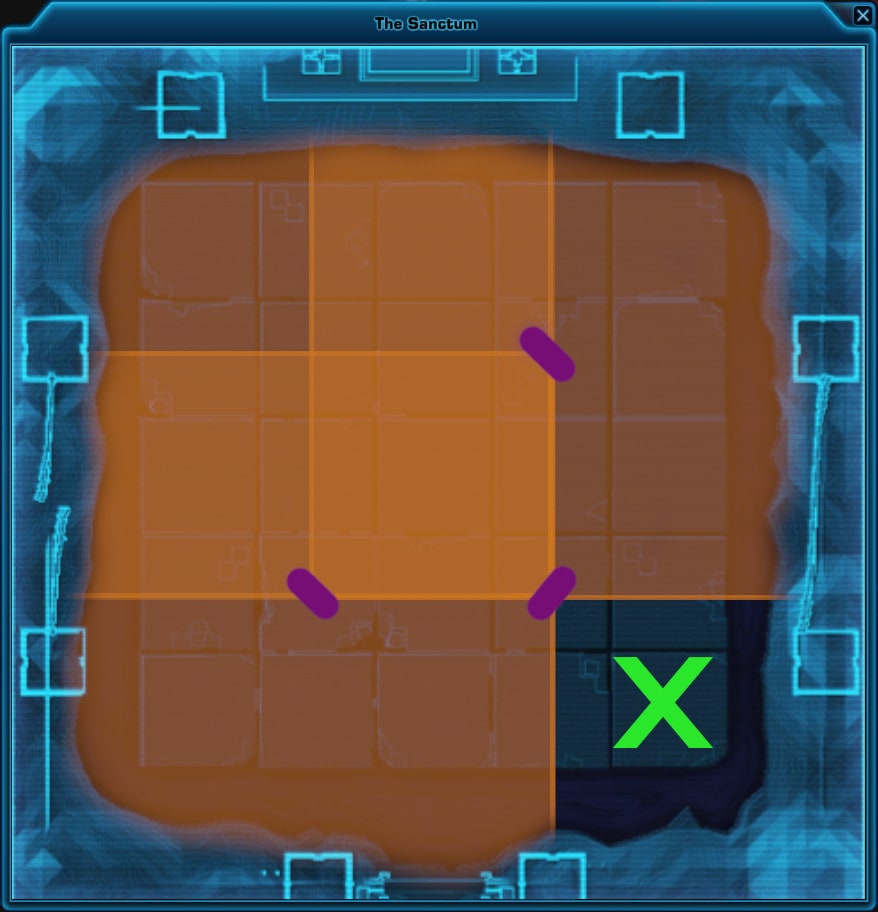
The safest spot for Blastwave is behind the middle apparition (across from where a non-existent 4th apparition would be). Just like with Shockwave, the tile with the green X will have Nihrot unless it is cleared manually by a Nihrot Suppression Grenade while the tile with the apparition will likely have been cleared by the Fire Probe and there will be a small area on that tile where no attack will hit.
Strategy
The Fire Probes should be detonated immediately to clear away much of the Nihrot (and make for a fantastic light show). Hopefully, you’ll be able to detonate them before the Whispers even spawn.
Then, your job is to determine if the Lord Kanoth Whispers are using Shockwave or Blastwave. If it’s Shockwave, you want to go to the corner where there isn’t any Lord Kanoth Whisper. If it’s Blastwave, you want to go to the corner and hide behind the middle Lord Kanoth Whisper.
You can tell which attack it is by looking at their castbars or the shape of the telegraph. Shockwave = Circles = No Ghost Corner. Blastwave = Conals / Squares = Middle Ghost Corner.
If you’re confused or disoriented by this mechanic, you can avoid a lot of the damage by doing one of the following instead:
- Standing behind any of the Whispers and popping a DCD
- Standing in the outer ring of Nihrot or red pool / hive goo and popping a DCD
- Pop a cheese DCD to block the damage that goes out at the end of the channel, though abilities that only work on single-target damage like Saber Reflect or Responsive Safeguards / Echoing Deterrence probably won’t work
The key thing to remember with both Shockwave and Blastwave is to get out of the middle of the room!
Where you choose to go will determine how much damage you’ll take. If you go to the safest spot, you’ll take 0 damage. If you go into the outer ring of Nihrot or stand behind any ghost, you’ll likely take a little bit of damage, so pop a DCD.
Creeping Growth
 Creeping Growth
When Lord Kanoth hits 25% and 15%, he’ll cast Creeping Growth, which causes a bunch of Nihrot to spawn in from the edges of the arena and all other Nihrot along an edge.
Strategy
You are given enough Fire Probes and Nihrot Suppression Grenades in SM to deal with this without too much trouble, though it does give you a lot less area to work with temporarily.
Tank-Specific Mechanics and Strategy
Lord Kanoth can be solo tanked. There are no mechanics that require 2 tanks or even 2 different taunts, though you’ll have more on your plate if you single-tank it. Many of these mechanics have implications for non-tanks, so I encourage everyone to read it so they understand what’s going on.
He has a bunch of different mechanics, but in SM, the key to tanking him is really just moving him out of Nihrot so he doesn’t get buffed and don’t let him move towards the Fire Probes.
Repel and Abduct (Push and Pull)
Lord Kanoth will knock the current nearby player with aggro away with  Repel or pull them close with
  Abduct if they’re far away. Both abilities have a 1s cast.
Strategy
Tanks need to watch their positioning and put their back away from the edge and Nihrot so they don’t get sent into Nihrot or the red pool / hive goo surrounding the tile perimeter. Standing in the red pool / hive goo reduces movement speed by 33%, deals periodic damage, and reduces healing received by 50%.
Fortify Ground
Lord Kanoth will create Nihrot on the tile beneath him. Fortify Ground is a 1s cast.
Strategy
Lord Kanoth needs to be moved to a different tile. Since Nihrot can harden, Fortify ground creates an additional incentive to keep Lord Kanoth off of platforms with Nihrot.
Sweep
 Sweep
SweepLord Kanoth will destroy any Fire Probes in his path using the Sweep ability.
Strategy
Tanks should not move Lord Kanoth towards tiles with Fire Probes.
Lord Kanoth Phases and Mechanics Order
Lord Kanoth doesn’t have phases, he just has a lot of similar attacks you have to deal with. Throughout the fight, he’ll cast the following:
 Fortify Ground Seed of Echoes
  Directional Growth Repel and Abduct Vertical Growth and Lateral Growth
Your job is to DPS him down while keeping the Nihrot under control with the Nihrot Suppression Grenades and Fire Probes.
There are a few percentages where significant events occur:
- At 65%, he’ll cast Walled Garden (does nothing in SM) -> Beckon (summons Nihrotic Monstrosity) -> Relocate (teleport to center tile) -> Surging Growth (spawns Nihrot, projects a Nihrotic Shield)
- At 35%, he’ll cast Choking Growth (creates Nihrot on all but center tile) -> 4 Fire Probes appear -> Shockwave OR Blastwave
- At 25% and 15%, he’ll cast Creeping Growth (creates a bunch of Nihrot)
 Walled Garden (does nothing in SM) -> Beckon (summons Nihrotic Monstrosity) ->
  Relocate (teleport to center tile) ->
 Below 65%, he will summon other Nihrotic Monstrosities periodically and below 35%, he can cast Choking Growth -> Shockwave or Blastwave again. As he starts dropping past these thresholds, he’ll be using the weaker and smaller Nihrot attacks less and less.
How to tank Lord Kanoth
Tanks have a lot of constraints in terms of where they can position the boss:
- Don’t walk into Nihrot or you’ll take damage
- Don’t let him float in Nihrot or he’ll get buffed (don’t forget about Fortify Ground)
- Don’t have your back to the outer edge of the room or you can get knocked into the red goo with Repel
- Don’t let him get too close to Fire Probes or he’ll Sweep them away
- Don’t get too far away from him or you’ll get yanked with Abduct
In SM, there isn’t strictly a need to swap, but having 2 tanks should help to make him easier to control. I recommend being more strategic with the Nihrot Suppression Grenades and Fire Probes strategically so that you have a safe space to go whenever Nihrot appears unexpectedly.
Acknowledgments and Special Thanks
First and foremost, I want to thank Elssha for creating all of the diagrams and infographics featured throughout the R-4 Anomaly guides. You can find Elssha and her content on twitch, twitter, and reddit.
I also want to thank my GM, Tsou, for helping to explain mechanics from the PTS and organizing many of the runs that allowed me to finish this guide so quickly. Finally, I want to thank my raid team, Time Turners, for all their amazing help in actually doing this operation.
Here is the full collection of my SWTOR R-4 Anomaly Guides: