A collection of tips for players new to Path of Exile 2 to help reach the endgame and learn the game better on your first character.
Table of contents
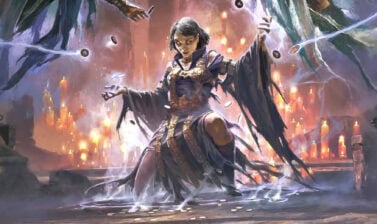
Picking A Class or Ascendancy
Realistically, every class in Path of Exile 2 can do virtually anything with enough time. This can be a bit of an intimidating choice as there are currently six Classes, each with two Ascendancies to choose from that allow for a variety of builds and playstyles.
Don’t worry about what’s overpowered or underpowered, pick the class that appeals to you and sounds like fun. It’s far more important to have fun with what you pick, as you’ll enjoy the process of Leveling more.
If you need help with what each Class and Ascendancy does, we have a guide Explaining All Classes and Ascendnacies in Path of Exile 2. This gives a quick overview with easy access to more in-depth individual guides to each Ascendancy to explain them fully.
As a quick general recommendation, Melee tends to be a fair bit harder in POE2. It’s not impossible or insanely difficult by any means, just that it will punish mistakes far harder.
Campaign Progression
Before we get into the Campaign itself, here are a few habits that are great to have as we progress.
First, check vendors regularly. Their stock of items rotates every level, and they can have really good items like Boots with Movement Speed or high Damage Weapons if we’re lucky. We can even use the Search box to quickly check for desired affixes.
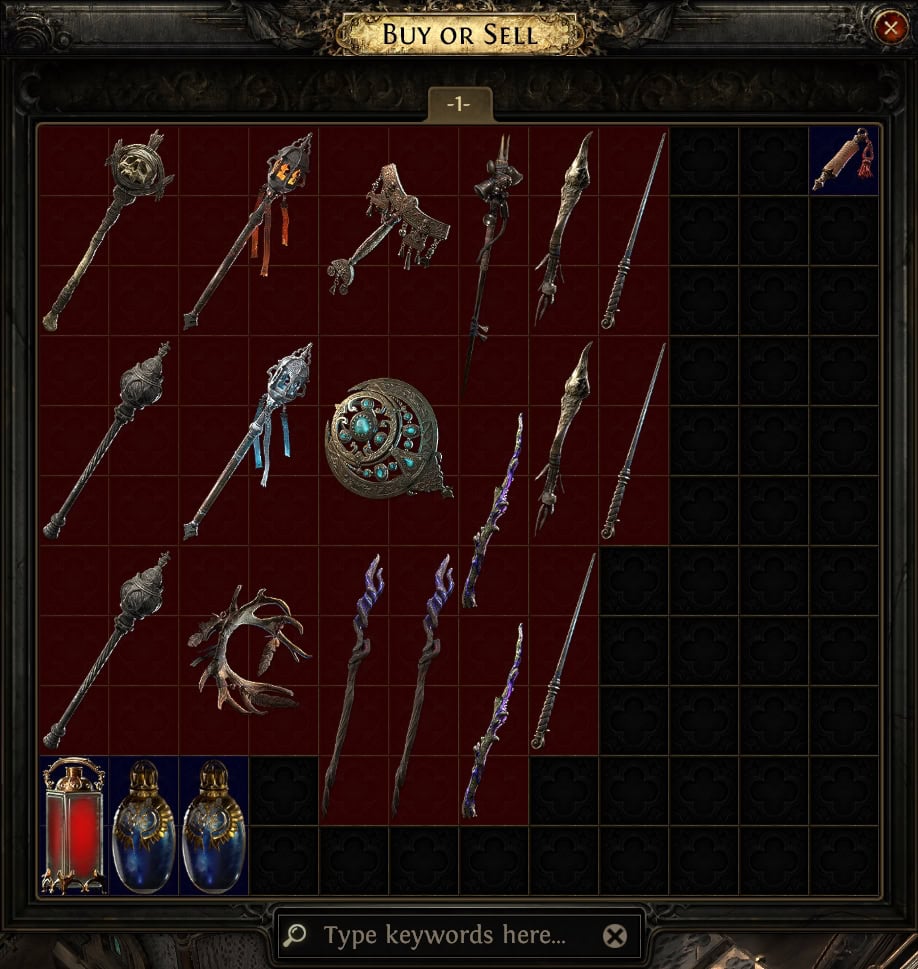
Once the Salvaging Bench is unlocked, be sure to pick up and salvage items with Sockets. These can be broken down into shards of Artificer’s Orbs, which will allow us to add sockets to any gear we want to use for a while.
Salvage all the early Magic and Rare Items that aren’t an upgrade for us. They won’t sell for much to other players or even vendors, and we’ll get more value out of the currencies these become. These allow us to increase the rarity of items to potentially make items more useful for our builds. Regal Orbs are slightly more scarce to start, so use them sparingly.

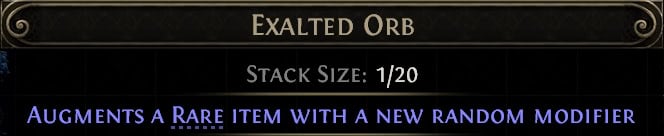
These currencies also have drop-only counterparts that will only add additional affixes until more cannot fit. Orbs or Augmentation can be used pretty freely, but Exalted Orbs are better used to trade or for endgame crafting.

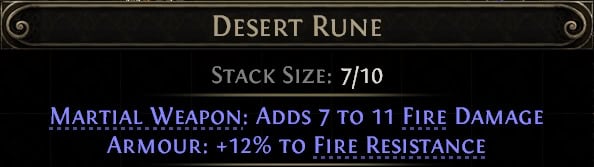
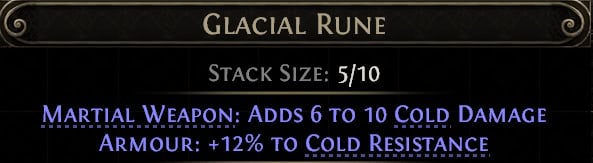
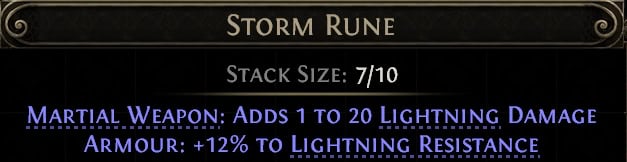
Don’t be afraid to Socket Runes for Elemental Resistances. They’re an easy way to get the resistance we need to better handle enemies. They’re common enough that we don’t have to worry too much about them.
Get a Loot Filter! Loot Filters are extremely powerful and help to hide items we don’t want or need and highlight things we’ll want to pick up. We’ll have a link at the bottom to one of the best community-made filters available.
While the Campaign itself is mostly linear, there are a slew of optional bosses and quests that provide a variety of rewards that are worth taking note of. Here’s a quick summary of what can be earned through the completion of the recommended Quests and Bosses.
These grant us a variety of Character Power bonuses, or those that have permanent effects on our character. Below are quick tables of what these bonuses are and where to find them. Bosses from these tables are marked with the Icon shown to the left. This varies a bit for quests.
Normal Difficulty
Normal is where we’ll pick up all the useful account-wide bonuses like Benches. These only need to be completed once per account for now and are likely to stay that way going forward.
| Name | Location | Reward |
|---|---|---|
| Beria of the Rotten Pack | Act 1 – Clearfell | +10 Cold Resistance |
| The Devourer | Act 1 – Mud Burrow | Level 1 Uncut Support Gem |
| Crowbell | Act 1 – Hunting Grounds | 2 Passive Points |
| King in the Mist | Act 1 – Freythorn | +30 Sprit and 1 Spirit Gem |
| Una’s Lute | Act 1 – Ogham Farmlands | 2 Passive Points |
| Smithing Tools | Act 1 – Ogham Village | Salvaging Bench*** |
| Candlemass, The Living Rite | Act 1 – Ogham Manor | +20 Maximum Life |
| Kabala, the Constrictor Queen | Act 2 – Keth | 2 Passive Points |
| Kabala Clan Relic Sun Clan Relic Relic Altar | Act 2 – Keth Act 2 – Bone Pits Act 2 – Valley of Titans | 30% increase Charm Charges Gained* OR 15% Increased Mana Recovery from Flasks* |
| Final Letter | Act 2 – Deshar | 2 Passive Points |
| Sisters of Garukhan | Act 2 – Spires of Deshar | +10% Lightning Resistance |
| Orok Campfire | Act 3 – Sandswept Marsh | Lesser Jeweler’s Orb |
| Mighty Silverfist | Act 3 – Jungle Ruins | 2 Passive Points |
| Ignagduk, the Bog Witch | Act 3 – Azak Bog | +30 Spirit and 1 Spirit Gem |
| Venom Vial | Act 3 – Venom Crypts | 25% Stun Threshold** OR 30% Elemental Ailment Threshold** OR 25% Increased Mana Regeneration** |
| Blackjaw, The Remnant | Act 3 – Jiquani’s Machinarium | +10% Fire Resistance |
| Mektul, the Forgemaster | Act 3 – Molten Vault | Reforging Bench*** |
| Sacrificial Heart | Act 3 – Aggorat | 2 Passive Points |
** These Bonuses CANNOT be changed after selection.
*** These are account-wide bonuses and only need to be completed once.
Cruel Difficulty
Cruel is largely the same as Normal, with the exclusion of a few one-time per-account bonuses like the Benches, Some Bosses becoming optional, and some slight changes to rewards.
| Name | Location | Reward |
|---|---|---|
| Beria of the Rotten Pack | Act 1 – Clearfell | +10 Cold Resistance |
| Crowbell | Act 1 – Hunting Grounds | 2 Passive Points |
| Una’s Lute | Act 1 – Ogham Farmlands | 2 Passive Points |
| Candlemass, The Living Rite | Act 1 – Ogham Manor | +20 Maximum Life |
| Kabala, the Constrictor Queen | Act 2 – Keth | 2 Passive Points |
| Kabala Clan Relic Sun Clan Relic Relic Altar | Act 2 – Keth Act 2 – Bone Pits Act 2 – Valley of Titans | 30% increase Charm Charges Gained* OR 15% Increased Life Recovery from Flasks* |
| Final Letter | Act 2 – Deshar | 2 Passive Points |
| Sisters of Garukhan | Act 2 – Spires of Deshar | +10% Lightning Resistance |
| Orok Campfire | Act 3 – Sandswept Marsh | Lesser Jeweler’s Orb |
| Mighty Silverfist | Act 3 – Jungle Ruins | 2 Passive Points |
| Ignagduk, the Bog Witch | Act 3 – Azak Bog | +30 Spirit and 1 Spirit Gem |
| Venom Vial | Act 3 – Venom Crypts | 10% Chaos Resistance** OR +5 All Attributes** OR 15% Reduces Potency of Slowing Effects applied to you** |
| Blackjaw, The Remnant | Act 3 – Jiquani’s Machinarium | +10% Fire Resistance |
| Sacrificial Heart | Act 3 – Aggorat | 2 Passive Points |
** These Bonuses CANNOT be changed after selection.
The Passive Tree
For many players, the Passive Tree can be very intimidating. However, there are a few simple rules we can follow that make it more manageable and accessible to put together a serviceable tree.
First, focus on getting Damage. Casters like the Witch and Sorcereress will want Spell Damage, while Melee and Ranged attackers will want Attack Damage. There are damage bonuses that are more specific to the Skill Tags of a Gem as well.
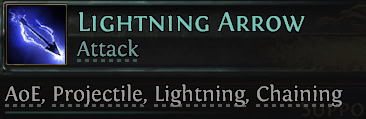
Like the example shown above with Lightning Arrow, it has the Skill Tags of AoE, Projectile, Lightning, and Chaining. This means Area Damage, Projectile Damage, Lightning Damage, and Elemental Damage would all work to increase its damage.
We go for damage to start because increased damage is much harder to come by outside of Weapon Affixes and Gem Links. The faster we can deal with enemies the easier it is to stay alive.
This would make an Early Lightning Arrow tree look like the one below. Granted the one below has points spent toward other skills.

The important thing to do when filling out the Passive Tree is to avoid redundant connections. The easiest way to do this after getting the useful nodes around your starting area is to follow the “Attribute Highways” and only leave them to grab what is needed. These take us around the Passive Tree much faster compared to pathing through other nodes.
Items and Affixes
Items can also be complicated to understand, between figuring out what is good and what something can be worth. Let’s start with getting our Defenses figured out, as gear will provide most of our defenses.
For the majority of builds, we’ll be after Maximum Life, Elemental Resistance (Fire, Cold, Lightning), and Chaos Resistance to cap out our Resistance. This increases our effective Maximum Life significantly, letting us take more hits with less risk.
There are a few affixes that are specific to certain pieces of gear that can be a high priority to pick up when we can, or if we need them. Movement Speed on Boots, Spirit on Body Armour or Amulets, and Skill Levels on Gloves, Helmets, and Weapons. Make sure they affect the skills your build uses.
Finally, for Armour pieces, they can also get Affixes that modify their local Armour, Energy Shield, or Evasion. These are typically the last thing to worry about for most builds, but never a bad thing to have since they do improve our survival. Builds that rely on Energy Shield instead of Life will often want to prioritize these rolls as much as Resistance.
For weapons, Affixes can be pretty straightforward too, so long as what you’re looking for isn’t very niche. Most Melee and Ranged Weapons will want to stack Physical Damage bonuses for damage alongside Attack Speed and Skill Levels. Wands, Foci, and Staves generally will want Spell Levels, Cast Speed, and Spell Damage. Sceptres will generally want Spirit, as well as the affix ‘Allies deal increased damage’ for Minion Builds.
Additionally, Unique items are special items with fixed affixes, which are often powerful additions to builds or enable builds themselves. Most of these can be found randomly while defeating enemies, even in the Campaign.
There are even some that are incredibly good for Leveling with. We have a guide detailing the Best Uniques for Leveling. This covers what makes them great leveling items and why you may consider them.
Trading
Look, I get it, trading is complicated and hard to understand at times. Let’s make it more manageable, shall we? After all, trading for items is the easiest way to help your progression and get gear for your current roster of characters.
Below is a quick summary of how to Buy, Sell, and Price Check items. If you want a more in-depth guide for trading, we do have a Trading Guide that will teach you everything you need to know and expand upon the basic tips below.
Buying
Buying Items is fairly easy to manage and requires no prior experience. It does however require that we know what we want from an item. Let’s say we need a new armor that will boost our Energy Shield and our Resistance. We can set up a search like the one below, adjusting the options as we desire.
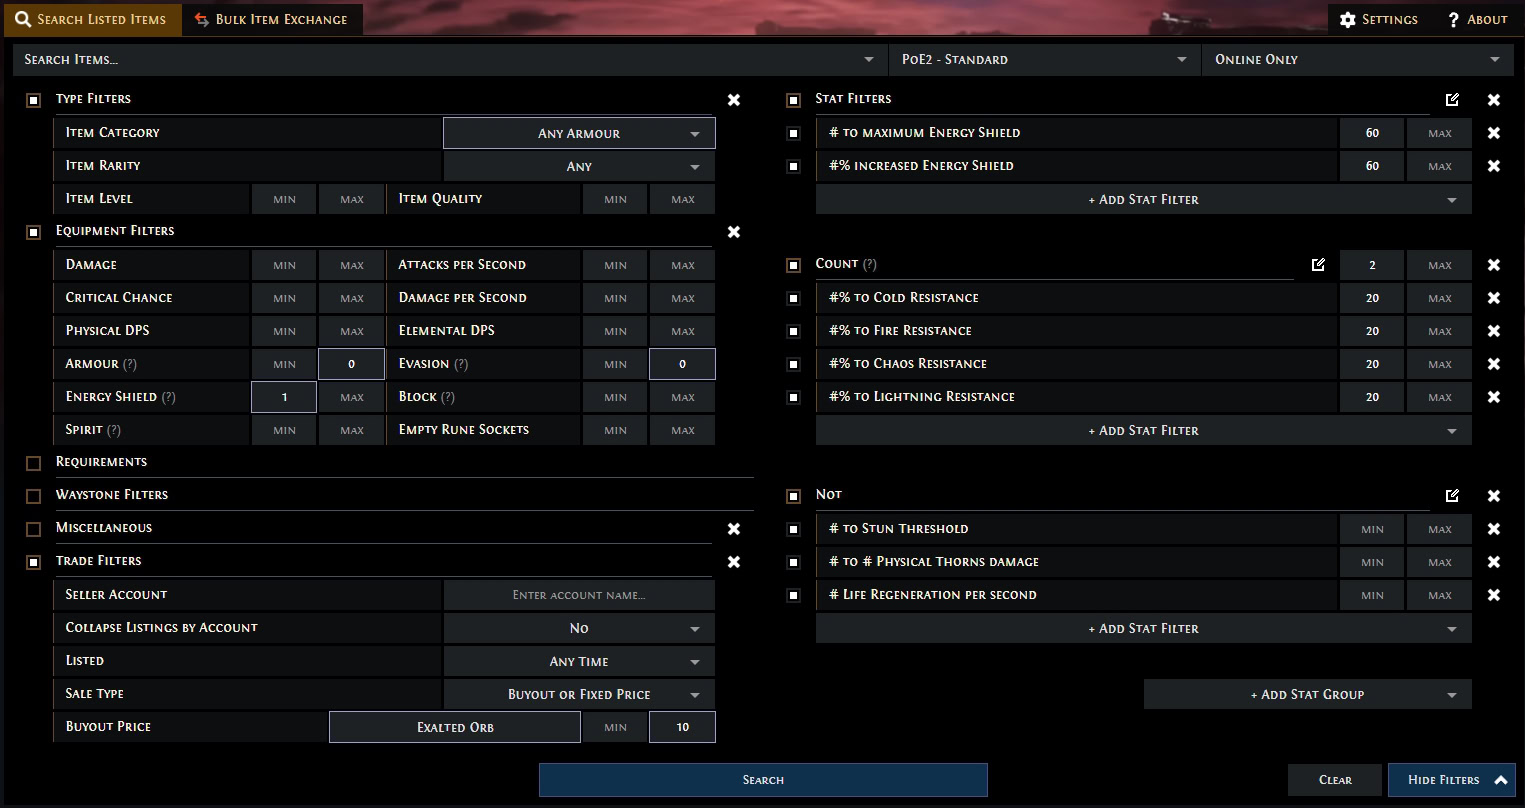
The important thing to note here is what each of the Stat Filters on the right are doing.
The first section says we always want those Energy Shield Affixes to be present. We’ve also set a minimum value that we don’t want listed items to be under.
The Second is a Count Filter, that says we want it to have any two Resistances. We’ve set similar minimum values for these as well, which says they need to be at least that value or higher.
The final section is a Not Filter, this says that we don’t want to see items that have any of the listed Affixes there.
When we find an item to our liking we click direct whisper on the Trade Site and it will send a whisper to the seller. If they’re ready to trade they will send a party Invite.
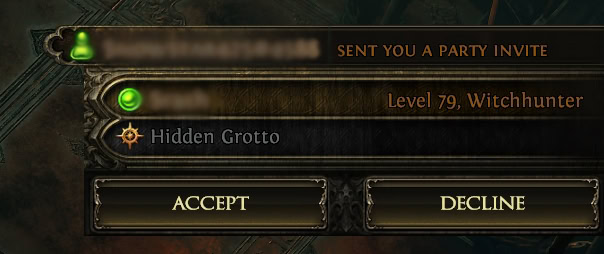
Be sure to grab our currency before accepting the party invite, then we can click the blue Icon in the party list on the left side of the screen to join their hideout.
Selling
Selling is a bit harder, especially since the bulk of the selling done nowadays requires a Premium Stash Tab, which costs a bit of money. It is however very worth it.
It can be done via posting items in Trade chat in-game, but it’s unlikely that most things will be sold there. Should we want to do so, we can link an item in chat by holding Ctrl and Alt while clicking our item. Then we can say what price we want for it and see if anyone wants to buy it.
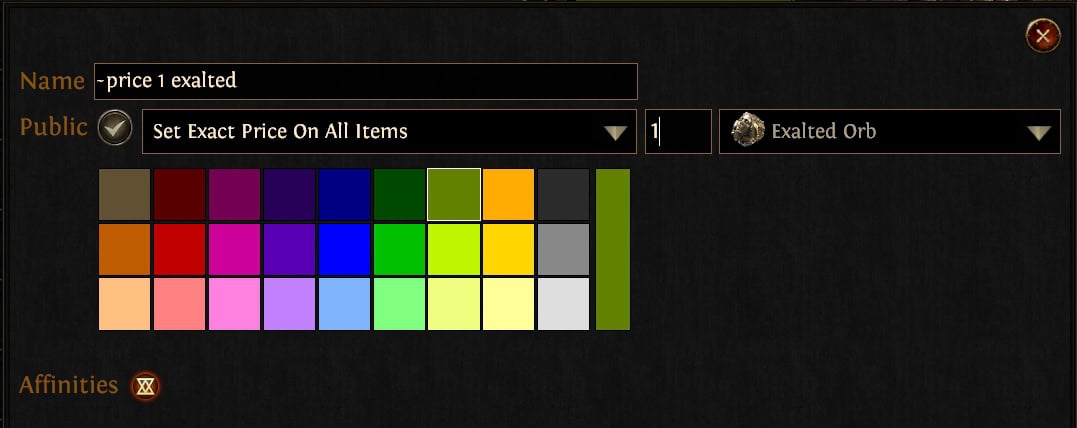
With a Premium Tab we can set a tab to be Public by Right-clicking it and checking the circle that says Public. This indexes any items we place in it, along with any prices set on them. We can set the price by Tab, or individually.
When pricing items by Tab, every item we place in the table will be listed for the price set on in the menu, as shown below.
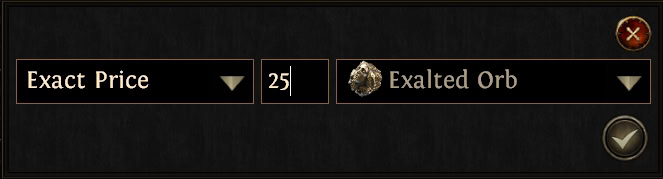
If we prefer to list and price items individually, we’ll need to set the tab as such. Doing so allows us to Right-click an item to bring up this menu, which allows us to set our price.
Price Checking
Checking the price of an item can be tricky, but we can simplify it to the basics here. By using the tips on Item Affixes below, we can more easily identify the priority affixes on a item, like this pair of boots.
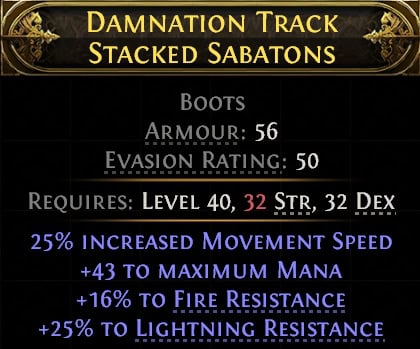
In this case, only the Movement Speed and Resistance matter in the pricing. So we can take those values and plug them into the Stat Filter on the Trade site shown below and see what similar items are priced at.
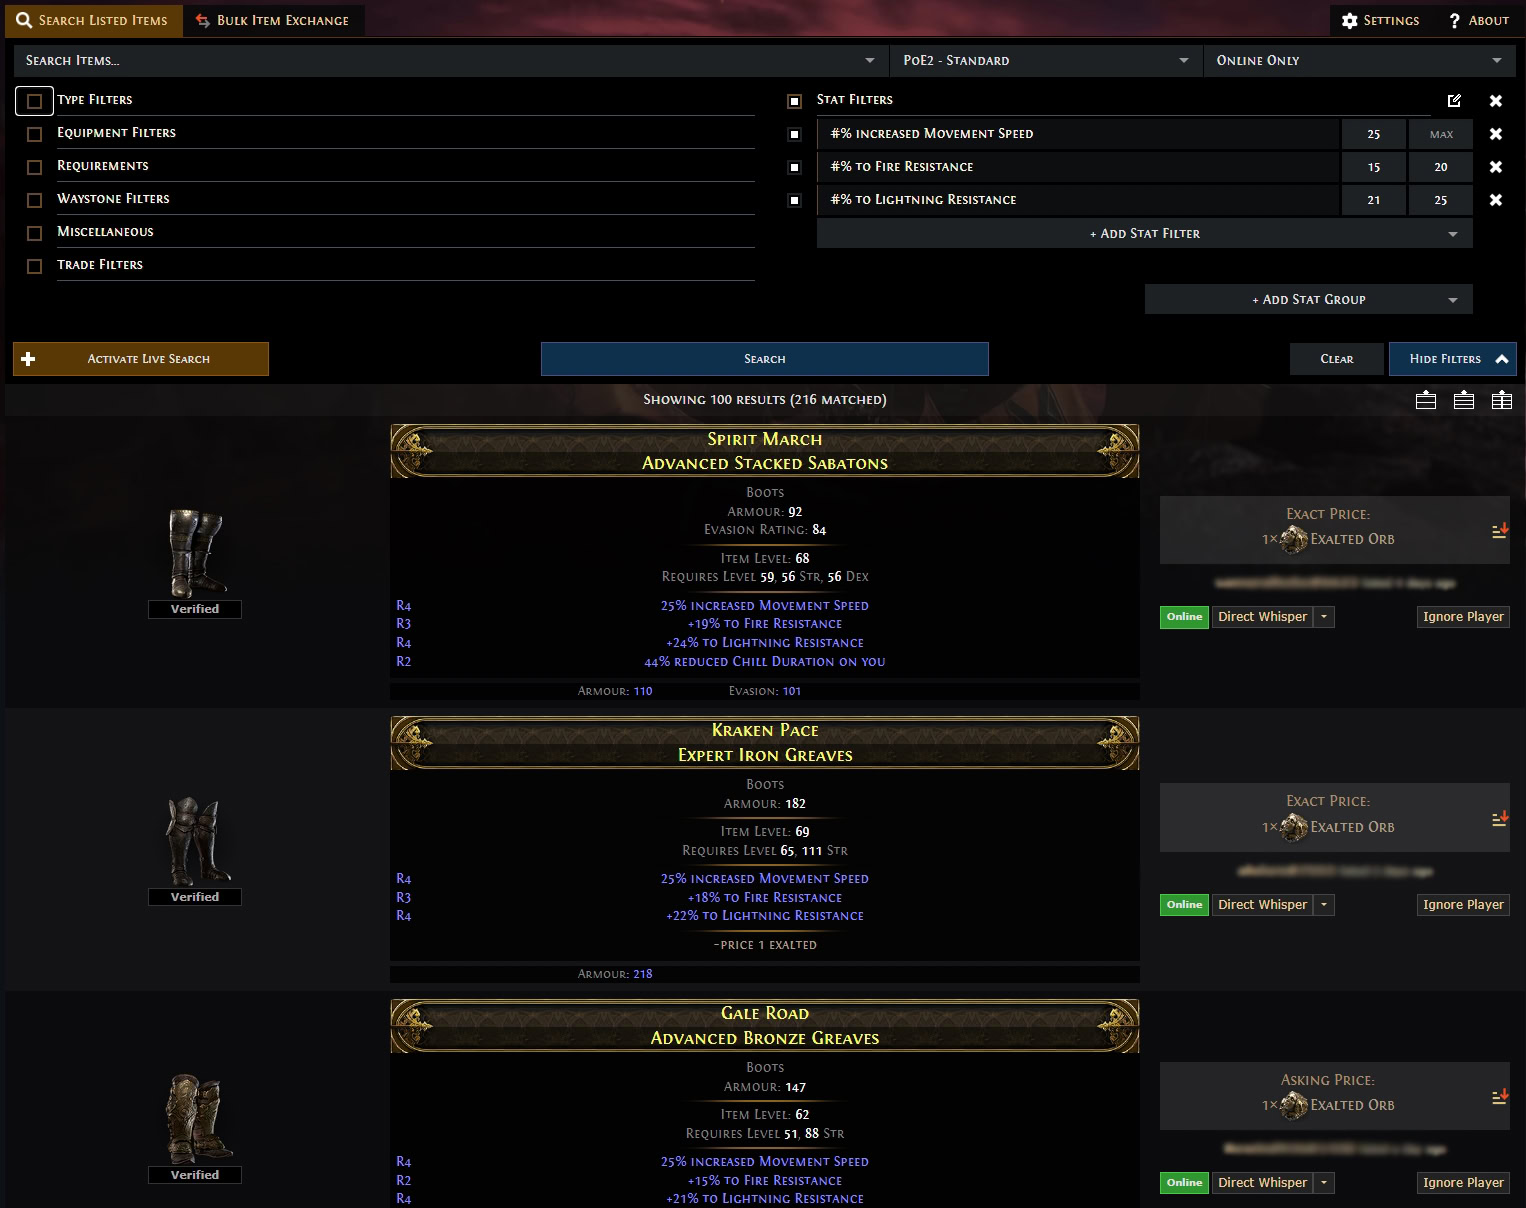
Assuming there’s not a low outlier price, which is a common sign of price manipulation or price fixing, we can assume this pair of boots would be worth a similar amount to the ones listed in the trade and we have a listing price to use.
Community Tools
Path of Exile 2 has a large community and plenty of great tools to improve the overall experience of the game. Below are a couple I highly recommend and use regularly to get more out of the game.
I can’t speak to many other tools than the ones below that I’ve used for years for POE1, so as a word of caution, be careful of any tools or sites out there. I highly recommend looking them up before starting to use them to ensure they’re safe.
As a word of caution, never use any built-in browser of any app to log in to your POE2 Account. While the apps and sites may be safe, it’s hard to say the same about a third-party browser.
Filterblade – Loot Filter Creator
Loot Filters vastly improve the gameplay experience, with many being set up to automatically hide less important items as we level.
Neversink and the folks at Filterblade.xyz are still hard at work getting their site set up for POE2. However, once they have everything set up, it’s by far the best of pre-made filters available. They even have it set up to be able to more easily customize the loot Filter beyond the presets.
In the meantime, Neversink has also created a temporary Loot Filter for Path of Exile 2 that hides minimal items and helps to highlight currency and other potentially valuable items. This works fantastically, and the GitHub page for it explains everything it does as well as how to use it.
Exiled Exchange 2 – Trade Macros
Exiled Exchange 2 is a fork of a tool from POE1 called Awaken POE Trade. This handy tool lets us quickly price-check items without having to manually do a trade search. This tool is fantastic to use, as it removes a lot of trade hassles.
It also allows us to set up convenient chat macros to make trading faster and easier, including defaults for many commonly used chat messages and chat commands. This tool also has a similar page set up to help you get started with using it.
PoE2DB
PoE2DB is first and foremost a database that is very widely used in the community. It offers a lot of valuable information to players, new and old alike.
With everything from an item database, to some basic tools like a very basic Passive Tree Planner, it has a lot of tools to make use of and is an excellent reference for crafting.
PoE2Wiki
PoEWiki2 is a community-driven wiki that has a lot of information on game basics and Item details. It’s everything you’d want from a Wiki: Stats, Interactions, Niche uses, etc. There’s a lot of good information there for anyone looking to learn the game in more depth.
Craft of Exile 2 – Crafting Simulator
While the current state of Path of Exile 2’s crafting system leaves a lot to be desired, Craft of Exile 2 is a good way to experiment with the tools the game offers without having to spend your currency doing it.
It’s one of the best resources to mess with when it comes to learning to craft items in Path of Exile. Like many community tools, it’s not fully set up for Path of Exile 2’s changes, but will be worth looking into when it is.
Path of Building 2 – Character Planner
Path of Building is easily the best PoE tool out there. Offering a Character Planner that allows you to import gear and will help calculate our actual damage and defenses, it’s a must-use tool. It even enables easier build sharing, which is a huge boon for build makers. Even if you’re not deep into build crafting or that sort of thing, it’s still a great Passive Planner.
Much like many community tools, this does not have a version available for Path of Exile 2 yet. We’ll add a link to it here once it’s been released. As it does not currently have a linkable site for it right at this moment.