This Skeletal Arsonist Build uses the Witch’s Infernalist Ascendancy to summon hordes of minions to do our bidding.
Table of contents
Build Overview
Skeletal Arsonists work incredibly well for leveling, as once we ascend to Infernalist, we can easily boost their damage. They do get quite expensive, but supporting their damage more easily makes a world of difference, as we don’t need any unique or very hyper-specific gearing for them to do well.
We’ll have other skills providing plenty of support as well. From Raging Spirits contributing additional damage, Flame Wall boosting their damage, and even Pain Offering providing a huge DPS gain. All of our Secondary minions also work to boost their damage to some degree, or provide other utility.
Defensively, we’ll be using a mix of Life and Energy Shield alongside Grim Feast and a Shield to make us exceptionally durable. As an Infernalist we do not want to opt for Chaos Innoculation. While it is normally a powerful defensive option, this prevents us from using half of our potential Ascendancy points that would otherwise scale our damage and defensive power.
The grid below is fully interactive. If this is your first visit, we recommend you skip that grid and keep reading the guide in its intended order. If you prefer, you can click or tab on an item and it will take you to a dedicated section of the guide explaining everything you need to know it.
PaSSIVE tREE

Playstyle
Playing a minion build is very straightforward, but does have its complexities at times. For the most part we can just let the minions do their thing, throwing out Fire Walls and Curses to bolster their damage and create additional minions.
Where it can be a little more complex is when it comes to bossing, as getting everything set up quickly can be tricky. We generally need to Curse, set up Pain Offering, and get Flame Walls up in a matter of a couple of seconds. Then refresh all of these things as they expire.
Thankfully we don’t have to do this constantly, letting minions continue to be a fun and easy build archetype to play. But the extra complexities in managing all of that in boss encounters give it just enough to do to keep it from being too simple and boring.
Skills
Below are the Skills we use for the build, including its Support Gem Links

Skeletal Arsonist
Skeletal Arsonists will be the bulk of our damage, dealing higher and more consistent DPS as we increase their number.

Scattershot
Scattershot is one of the most important damage links for our Skeletal Arsonists, making them throw three bombs instead of one. This has a high potential for overlap when they attack larger enemies, like bosses, giving crucial damage to boost them. Otherwise, it’s an increase to their overall clearing potential.

Last Gasp
Last Gasp is great as we don’t want to overinvest in their bulk. This ensures that even if some unfortunate timing happens with their respawn, they’re living for at least four seconds and getting damage out.

Martial Tempo
With their fire bombs being considered an Attack, this just helps to boost their over all DPS and offset Scattershot’s decrease.

Feeding Frenzy
Feeding Frenzy is another powerful damage bonus we can give our Skeletal Arsonists. This causes them to take more damage, but thanks to Last Gasp, it’s much less of an issue.

Concentrated Effect
Concentrated Effect is here as a final link for bossing. It’s the last major damage boost we can get. Ofcourse we cna also swap this with Magnified Effect when not bossing to help our Skeletal Arsonists clear better.

Summon Infernal Hound
The Infernalist’s Infernal Hound is a great supportive Minion, which we’ll be using to both soak up damage as well as apply Fire Exposure for our Arsonists.
As an Ascendancy Skill, Summon Infernal Hound gains Levels and Sockets based on our Character Level, capping out at Level 20 with 5 Sockets at Level 90.

Meat Shield
Meat Shield is arguably the most important support for this skill, as more Life for the Infernal Hound means an increased Effective Life Pool for us. This allows it to more easily take any of the damage split onto them from us. Meat Shield just also happens to contribute to the damage of the Igniting Aura as well.

Fire Exposure
Our Infernal Hound has a nice little Ignite Aura around it, which allows it to easily apply Fire Exposure to anything near it. This helps it and our Arsonists deal more Damage.

Elemental Army
Continuing to bulk up our loyal Hellhound friend, we’ll give them Elemental Army, bolstering their resistances and letting them soak transferred damage even easier.

Strip Away
Strip Away is our last damage link, boosting the effect of Fire Exposure. It’s a lower priority as it’s a relatively small boost without any other Increased Effect of Fire Exposure. It’s great to have, but we need the Infernal Hound to survive above all else.

Magnified Effect
If we’re not using it on our Skeletal Arsonists Magnified Effect is great here. It will increase the size of the Igniting Aura around the Infernal Hound, increasing the range it can apply Fire Exposure.

Raging Spirits
Raging Spirits becomes our main source of consistent damage, as each time we throw out a Fire Wall, it will summon 5 of these Spirits, up to the limit of 10.

Immolate
immolate is a strong option for a damage boost here. Between our Infernal Hound and Flame Wall it’s very easy to keep enemies ignited for the extra damage.

Minion Mastery
Extra Levels for our Raging Spirits translate to additional damage and a bit of extra Life. Though enemies won’t directly target them, get can die easily when caught in AoEs.

Fire Mastery
Much Like Minion Mastery, we add another level with Fire Mastery for extra damage and bulk.

Fire Infusion
This isn’t a strictly required damage upgrade, but worth it if we wanted to invest more into the build beyond just using it to level.

Elemental Focus
This is the last meaningful damage upgrade this skill can use outside of taking Feeding Frenzy from the Skeletal Arsonists. Combined with Fire Infusion it makes for a strong damage combo that doesn’t give up anything important.

Skeletal Cleric
The last of our army of Minions are ones we’ll get later into the leveling process, but very useful ones at that. These fragile Clerics will heal and revive our Arsonists and Infernal Hound. We’ll only need a couple of them and they’re well worth the Spirit reservation.

Ingenuity
We’re focused on purely their healing potential and the ability to revive other minions. Lowering their cooldowns is a great way to do that. It’s the only link we can support them with as well, with most useful supports being tied to other skills.

Arcane Tempo
If we don’t mind dropping this from Flame Wall, this is a nice inclusion to help them cast their healing spell more often. It’s still better on Flame Wall, because faster casting there means faster spawning of Raging Spirits.

Flame Wall
Flame Wall is a supporting skill for our Arsonists, adding more Fire Damage to the fire bombs they toss through the Flame Wall. More importantly, it’s out main way of summoning Raging Spirits, which heavily contribute to our damage.

Arcane Tempo
With no real investment into Cast Speed, this is almost mandatory to make Flame Wall comfortable to use often.

Fortress
This makes Flame Wall a ring, which helps to reduce the amount of micromanaging we need to do for the position of our minions. This lets us put it around a key enemy, or around the minions themselves to empower their attacks from any direction.

Pain Offering
Pain Offering is a power DPS increase we cna get by sacrificing a Minion. In exchange, the remaining Minions will gain Damage, Attack, and Cast Speed. We’ll often want to target one of our Clerics with this, as they’re not the main source of our damage and one will provide enough utility alongside this boost.

Ablation
Ablation heavily boosts the effect of Pain Offering, at the cost of some of our current Life. It’s a huge buff not worth skipping out on, even with this cost.

Font of Blood
Font Of Blood is great here as not only does it makes up for having just one cleric, but it allows us to recover the Life spent on the Ablation cost throughout the offering’s duration, if we’re in range the full time.

Font of Rage
This is an optional inclusion but adds another form of damage to our minions by granting them Rage. However, it will start to make Pain Offering incredibly expensive to cast.

Magnified Effect
Magnified Effect is also great here should we not be using it elsewhere. It extend the range of the Offering as well as any of the Font Supports attached to it. Again, optional inclusion, but helpful if our Infernal Hound doesn’t have its links yet.

Flammability
Flammability reduces an enemy’s Fire Resistance, which in turns allows us to ignore Fire Penetration Support and other investment into reducing Fire Resistance outside of Fire Exposure.

Heightened Curse
Heightened Curse increases the strength of Flammability, boosting its effect by 25%. This often means that even without leveling the gem it’s often cutting 40% Fire Resistance.

Inspiration
Curses can get insanely expensive with extra links, especially Heightened Curse. This helps offset that and keep it more reasonable.

Cursed Ground
Curse Ground allows us to create a zone of Cursed Ground which will constantly apply Flammbility to enemies within it. This reduces the need for request casts, also slightly offsetting the mana costs.

Ritualistic Curse
Ritualistic Curse increases the AoE of our Curse and by extension Cursed Ground. This gives us a huge space to work with further reducing the need for multiple casts.

Shield Charge
One of the benefits of using a Shield is having access to Shield Charge. While it’s not as insane as it was in POE1, it’s still a great mobility tool that doesn’t dip into our Spirit.

Second Wind
Second Wind allows us to store two uses of Shield Charge, which allows us to comfortably move from pack to pack and have an extra charge if we need it.

Ingenuity
If we find our Skeletal Mage not needing Ingenuity, we can opt to place it here. This further improves our mobility by offsetting the penalty of Second Wind.

Grim Feast
Between our minions dying and killing enemies, Grim Feast helps us to effectively double our Energy Shield Pool. While it may not always be at double, it goes a long way to help out. We’ll use it without supports, as there aren’t many that actually help us.
Passive Tree
Below is the Passive Tree we use for this Skill followed by an Act-by-Act breakdown of how the Passive Tree develops from Level 1.

Act 1 – 20 Points


During the early acts, we’ll need to get a lot of our Minion damage from the Passive Tree. So We’ll start by heading up the Minion and Spell Damage side of the Witch start, grabbing both Raw Destruction and Power of the Dead.
We’ll further bolster our minions by heading straight to the Minion cluster further up to grab Gravedigger, Necrotised Flesh, and Relentless Fallen. Gravedigger and the nodes between it and Necrotised Flesh allow our minion to revive a total of 25% faster knocking their revive time down to 6 seconds.
Act 2 – 30 Points


We’ll finish off the Minion Cluster by grabbing Fear of Death, using the Minion Damage nodes for pathing there. This gives our minions an accuracy boost, giving them an easier time hitting Evasive enemies.
Following this, we’re sending our point straight up the middle of the tree to teh Jewel Sockets, where we’ll start branching off more.
Act 3 – 55 Points


Our next step is to zoom to Lord of Horrors. This Notable Passive will reduce the Spirit Reservation of our minions by 12%, which knocks off around 7 Spirit cost early on, and often allows us to get another minion or two later on. While we’re here, grab Right Hand of Darkness, giving our Arsonists a bit more AoE for better clear and overlap with their bombs.

Following this, it’s on to the next Minion Cluster. Here we’re prioritizing Bringer of Order for increased damage. This helps our minions really start to pump out some serious damage.
By this point we should also be able to pick up Loyal Hellhound on our Ascendancy Tree, giving us a very helpful minions that provides some damage mitigation
Act 4 – 65 Points


For this Act, we’ll start by grabbing the Rest of the Minion Cluster. Holy Protector is a sizeable boost to our Minion’s Life Pool, keeping them from falling over to a stiff breeze. Silent Guardian does much the same, this time only boosting their Elemental Resistances.

Jumping back to the middle of the tree, we’ll grab Heavy Buffer to start building up our Energy Shield as our primary defensive layer instead of relying on mostly health.
By this point we should now be able to comfortably get our second set of Ascendancy Points, picking up Altered Flesh. So long as we have high Chaos Resistance and Fire REsistance, this helps to mitigate a ton of damage.
Act 5 – 75 Points


Time to grab more nearby minion bonuses. This time we’ll grab Crystalline Flesh to further bolster our Minion’s Elemental Resistances. Then we’ll grab Restless Dead for another 25% Minion Revive Speed, knocking their revive timer down to a comfortable 4 seconds. To finish the cluster, we grab Growing Swarm for more AoE and some Cooldown REcovery Rate for our Minions.
Act 6 – 90 Points


By the time we finish the final act of the Campaign, we’ll have enough points to facilitate a respec, trading a small amount of damage for much higher defenses. We’ll path through Practiced Signs to be able to keep Raw Destruction and Power of the Dead.
This respec allows us to pick up Pure Energy, Dampening Shield, Insightfulness, and Melding. Between these nodes and the rest of the Energy Shield Nodes near the Witch Start, we’re increasing our Energy Shield by another 200%, bringing us to a 300% accounting for Heavy Buffer.
Early to Mid Maps – 105 Points


Continuing the trend of bolstering our own defenses, we’ll path down from the Minion Cluster on the left side of our tree to grab Wide Barrier. This takes away a bit of our Energy Shield but gives a sizeable boost to our Block Chance. We’ll immediately patch that up by picking up Ancient Aegis, making our Body Armour grant us an additional 60% of its Energy Shield.

From here, we’ll continue further down this side of the tree to pick up Prism Guard, taking the Additional Maximum Fire Resistance on the way there. This brings us to 78% Maximum Fire Resistance, which allows us to further reduce the damage being converted to Fire through Altered Flesh on our Passive Tree.
Once we have these defensive bonuses, we should beable to comfortably earn our third set of Ascenandacy Points, taking Beidat’s Will. This will Reserve some of our Life to grant us a ton of extra Spirit, which enables to to get a bigger army and still pick up some key Spirit Skills.
Endgame Maps – 120 Points


Continuing the trend of picking up more defenses, we’ll grab the last few Notable Energy Shield nodes. We’ll start with Enhanced Barrier in the upper left, as this comes with even more Maximum Elemental Resistance, bringing us to a max of 79% Fire Resistance and 77% Cold and Lightning Resistance.
Then we’ll grab Patient Barrier in the top right, the largest increase to Energy Shield we can currently get. Then we finish off with Calibration, where we’ll path from our Minion Cluster nearby getting a bit of extra Minion Life in the process. This also comes with a bit of extra Mana as well. All said and done we’ll have a total 539% increased Energy Shield.

We’ll cover Jewels here, given how many sockets we have to fill. At a minimum, we’ll want our Jewels to have Minion Damage and Minion Attack Speed on them. These two affixes will be the highest priority to get. For the Remaining Prefixes, Increased Energy Shield and Offerings have Increased Maximum Life are both great options. For Suffixes, Cast Speed and Maximum Cold Resistance are both great options.

You’ve probably noticed the circle on the Passive Tree, that’s a Time-Lost Jewel. We have two great spots for these, being near the minion Cluster as shown and the socket next to Ancient Aegis. We’ll want them to have a Large Ladius and increase Minion Revive Speed or Minion Damage as a good starting point. The last Affix is lower in priority, but Increased Effect of Small passives is a great final option, but will likely be expensive.
Endgame with Diamonds – 114+ Points

This final change to our Passive Tree uses Diamonds to boost our Damage, and open up more passive points to spend anywhere we feel like. These push the build a bit further, but outside of farming them yourself and getting lucky, these tend to cost a fair bit, which is why they’re an addition to the final tree, rather than the final tree we have shown above.

Prism of Belief is an obvious inclusion here. Boosting the Level of our Skeletal Arsonists allows them to deal more damage, get additional Life, and potentially hit another level threshold to reduce their costs. Once we hit a total of +11 Skill Levels across gear and this gem, we’ll hit the last Spirit Reservation threshold we can feasibly reach without insane luck.

From Nothing has a couple of practical variants that are useful. There’s the one we prefer, which targets Blood Magic, to save points pathing to Prism Guard and the Maximum Resistance it offers. We lose one Jewel Socket in the process but it’s not bad.
The other targets Eternal Youth, allowing us to grab Ice Breaker and functionally have Freeze Immunity outside of certain map affixes. Savouring is also a great pickup here, giving us the ability to use our flasks more freely.
Gear and Stat Priorities
This section lists and explains the recommended stats for our gear, and any Uniques we recommend. Click or tap on an item to read the recommendations for it. The items with a lither border are uniques and are at explained at the top of the segment right below this grid.
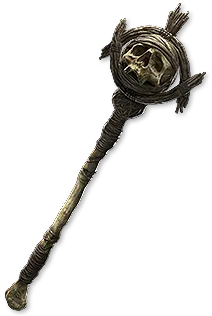
Our Primary weapon is a Sceptre and ideal a Rattling Sceptre for the free minions it provides. There’s a lot of things we can do with these, from turning them into living bombs to having them be distractions for the rest of our army.
Either way, our Ideal affixes for it will be Increased Spirit, Increased Damage for Allies, and Added Damage for Allies for our prefixes. Our Suffixes we’ll want +Levels to Minion Skills, and Increased Attack Speed for Allies. The final Suffix can be Increased Minion Life or Increased Presence Area of Effect. These pump up the DPS on our minions significantly.

This build uses a Shield for its offhand as Foci do not offer much for minions builds, and it’s better to just bolster our defenses to allow ourselves to become a tank for our minions.
We’re mainly looking for Maximum Life, Block Chance, and Resistances. If we want to min-max the defenses we get from this, Hitting Maximum Fire Resistance is a nice upgrade with Altered Flesh. We can push the Fire Resistance further with Soul Cores of Puhuarte as well, assuming we don’t need other Runes or Cores instead.

Our Helmet is a pretty standard Energy Shield Helmet, except we’ll also want Maximum Life to get more value from Beidat’s Will and Beidat’s Hand. Ideally, we’ll find a good Expert Feathered Tiara.
So we’ll be looking for Flat and % Energy Shield with Maximum Life as Prefixes. We also want +Levels to Minions Skills as a priority Suffix, with the others being either Rarity or Resistances.

Our Body Armour follows suit to our Helmet, a Standard Energy Shield with Maximum Life. Here we’ll want an Expert Hexer’s Robe for the highest Energy Sheild possible.
We’re looking for the same High Flat and % Energy Shield Rolls, with high Maximum Life to round off the prefixes. Since there’s nothing special of note for Suffixes, we just get Resistances here.
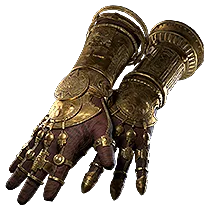
Our Gloves are continuing the same trend, as it’s more Life and Energy Shield, but they do provide us with another valuable stat too. We’re after Expert Intricate Gloves for this slot.
Prefixes are the same as our other gear so far, High Flat and % Energy Shield and high Maximum Life. Prefixes are a bit different, as we can also get Dexterity here and it’s an easy way to get the Dexterity we need for the build without having to get it from the passive tree. Rarity is also an option here as well, should we want it. Otherwise, the rest can be filled with Resistances.

For our Belt, the base doesn’t matter much here. A Utility Belt is nice with Minion Flasks, but even that isn’t hugely impactful. The only affixes we care about here are Maximum Life, Strength, increased Flask Charges Gained, and Reduced Flask Charges used. Otherwise we cna use the belt to round our any resistances we need.
Like most builds, Ingenuity is the chase item for this slot. While you’d think we wouldn’t gain much from this, it ultimately means a ton of extra Life and Resistances. This frees up a lot of slots to go for Rarity or other useful stats.

Our Boots are yet another piece of Energy Shield Gear, but given they’re boots, we do have some nice options. We’ll ideally be looking for Expert Feathered Sandals.
Our Prefixes are basically set in stone here. 35% Movement Speed, High % Energy Shield and high Maximum Life. Our Suffixes have the option to Include Rarity in addition to Resistances, but that’s about it. Intelligence can be nice for Mana, or making sure our Intelligence is high enough to fully level our skills to 20, as we do need to sacrifice some Attributes on our.

Our Rings don’t have a whole lot going for them. The best case scenario is Breach Rings with High Life and Flesh Catalysts to give even more Life to get more Spirit from Beidat’s Will. Beyond this, we’re mostly just filling out any remaining Resistances, Attributes, or getting a ton of Rarity.
A “perfect” ring would have Maximum Life and Rarity as Prefixes. Suffixes would be All Attributes and Chaos Resistance with All Elemental Resistances or Rarity if other gear caps our Elemental Resistances.
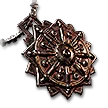
For our Amulet, we’ll want a Solar Amulet with High Spirit. The more Spirit we have the more minions we can have and the more buffs we can also fit in. So our Ideal Amulet becomes Maximum Life, Spirit, and % increased Energy Shield for Prefixes. Suffixes are +Levels to Minion Skills, All Attributes, and Cast Speed for QoL or Rarity.

While not super vital to the Build, let’s briefly talk about our Life Flask. Life Flasks can roll a Modifier that shares a portion of its recovery with our Minions. This modifier is okay, and in fact, can be very helpful early when our minions are quite frail. However, as they get higher level and we make them stronger, they need it less and less.

