This Incinerate Build uses the Ranger’s Pathfinder Ascendancy to set enemies ablaze without the need to ever stop moving.
Table of contents
Build Overview
This build’s main skill is Incinerate, focusing on the powerful ignite it inflicts after a full channel. To supplement this damage, we also use Flame Blast with Solar Orb as well as a pretty heavily buffed up Flammability. This allows all of these skills to quickly turn our foes to ashes.
We use Comet inside an Elemental Invocation Setup for a bit of extra burst damage and clear speed, primarily with Rares and Bosses while mapping. While this won’t be rapidly firing off, it does give just enough on-demand burst to deal with these Defensive setup, including Ghost Dance for a bit of extra sustain. This allows us to evade most hits, while having plenty of energy Shield to soak up anything we can’t.
For more information on Path of Exile 2’s Defences, check out our Defences Explained guide. This breaks down the many defensive options available and their respective strength and weaknesses.
The build summary card below is fully interactive – click or tap on an item to read its full description and recommendations. If this is your first visit, we recommend you skip that card and keep reading the guide in its intended order.
Overview
Build Type
Endgame Mapping
Excels when it has the tools to boost its damage and mobility, but it will feel sluggish without them. It is possible to level with this build, but it will be slower compared to a proper Leveling Build.
Playstyle
Ailment-based Caster
This build focuses heavily on using Incinerate to ignite enemies, dealing damage, and triggering Elemental Invocation for extra damage.
Build Difficulty
Relatively Easy
Once geared up, we’ll just be able to walk through maps holding down Incinerate, only occasionally needing to cast our Curse and Flameblast for tougher enemies. The build’s only slight difficulty comes from positioning ourselves as we clear to prevent getting trapped by mobs.
Gearing Difficulty
SSF Friendly
With no required uniques, we’d only be relying on luck to get our gear set up, which isn’t particularly demanding to begin with. We can use Essences and Expedition Artifacts to help fill any early gaps in our gear, even with early maps.
Click on a tab on each segment to expand it.
Ratings
Ease of Use
Progression Speed
Ease of Gearing
Mobbing Power
Bossing Power
Defences
Expedition Farming
Breach Farming
Ritual
Ease of Use
- Very Hard to play, Fragile and relies on damage to stay alive
- Hard to play, may require multiple combos or rapid sequence of skills
- Balanced, requires some knowledge or precise positioning
- Easy to Play, may require simple combos or automatic weapon swaps
- Very Easy, requires minimal experience to play optimally
Progression Speed
- Use a Leveling Build. It will require Skill Points, Ascendancy Points, or Unique items not available early on.
- Barely Viable, will be slow and may require alternative Ascendancy ordering.
- Viable, Levels with some issues.
- Decent Leveling Option, smooth leveling, but not the fastest.
- League Starter Potential, levels very quickly with the main skill.
Ease of Gearing
- Trade Required, make use of a harder-to-obtain unique.
- Trade Recommended, requires at least one uncommon unique.
- Trading Helps, uses common uniques or very specific .
- SSF Viable, Can be geared easily without trading, may require farming.
- SSF Friendly, No Uniques and very easy to gear without trading.
Mobbing Power
- Poor, clearing isn’t the best due to lack of AoE.
- Okay, Clears slowly due to limited AoE.
- Decent, clears well, but takes effort or set up.
- Great, take very little effort to clear enemies.
- Amazing, clears screens of enemies with ease.
Bossing Power
- Requires high investment and respec for decent damage.
- Requires Investment or respec for decent.
- Decent damage with minimal investment.
- Low Investment and great damage.
- Low Investment and high damage.
Defences
- Low Hit pool, mainly relies on damage to protect it.
- Decent Hit pool or has enough avoidance or mitigation .
- Good Hit Pool, may not reliably take hits from strong foes.
- Reliably tanks multiple hits from most foes.
- Able to tank most hits comfortably, even from bosses.
Expedition Farming
- Several modifiers are highly risky.
- Just a couple risky modifiers.
- Low risk, but some modifiers can mess up the build.
- Situationally able to deal with most modifiers.
- Able to deal with most modifiers without thought.
Breach Farming (Mostly tied to AoE)
- Struggles to survive tougher breach mobs.
- Survives, but clears slow, usually from a lack of AoE.
- Has an easier time on certain map layouts.
- Easily clears out breach mobs, regardless of map.
- Quickly and easily clears out breach mobs.
Ritual Farming
- Hard to survive, Doesn’t handle the cramped spaces well.
- Does well on some layouts and certain ritual types.
- Handles most rituals well enough.
- Most Rituals are completed easily.
- Rituals are completed easily and quickly.
The Good
A simple, almost one-button build
Immune to Temporal Chains
Handles most content with ease
The Bad
Relies on high Movement Speed boots for faster clearing
Channeling take time to ramp damage

Playstyle
Unlike a lot of builds, this one is straightforward with very little in terms of Skill Combinations or Rotations to worry about. Outside of very tough enemies, we’ll simply just channel Incinerate and kite them around, leveraging the minimal speed loss due to the combination of Mobility Support and the Pathfinder’s Running Assault Ascendancy
Of course, when it comes to the tougher enemies, we’ll still want to use Flameblast, Solar Orb, and Comet to get them out of the way faster. We’ll even set Comet up to be able to hit as hard as we could manage, despite having very little investment in it.
Skills
Below are the Skills we use for the build, including their Support Gem Links
Incinerate
Incinerate is our main DPS Skill, applying a consistent high damage Ignite as well as a powerful Fire Exposure effect for our other fire skills.
Mobility
Combined with the Pathfinder’s Running Assault and a small bit of investment in the passive tree, this allows us to lose very little speed while channeling.
Burgeon
Burgeon is a very strong support for Incinerate, as it provides a huge damage boost for continuous Channeling. However, it’s a bit risky as an interruption to Channeling, planned or otherwise, will reset the bonus.
If you find it to be too inconsistent, Strip Away is the only remaining damage option, unless we take power away from our other skills. It’s a choice between consistency or maximum damage.
Controlled Destruction
Incinerate isn’t able to Critically Strike in the first place, so this is just free damage.
Searing Flame
Searing Flame is very powerful here as well, as much of our damage will come from our Ignite, which doesn’t rely on a hit component.
Momentum
Thanks to Mobility and being a Pathfinder, this will provide a powerful and consistent damage bonus.
Solar Orb
Solar Orb only has one job here: allow us to Cast Flameblast without it being centered on us. It will still contribute some damage as long as enemies are on top of it, but it won’t be a ton unless we channel Incinerate on top of it.
Arcane Tempo
Arcane Tempo allows us to cast this faster, allowing us to start channeling Flameblast on it sooner.
Font of Mana
While Solar Orb won’t be covering a huge area, Font of Mana can still be useful here to help alleviate any mana issues.
Magnified Effect
None of our other skills use Magnified Effect, so it’s a great way to more consistently use Font of Mana.
Flammability
Our Curse for a huge amount of Damage by lowering resistance and Utility in the form of additional debuffs all in one package.
Heightened Curse
This will make our Curse more expensive, but also allow it to be decently powerful without much investment.
Focused Curse
Combined with the Impending Doom Passive, this allows us to reduce the activation delay and almost instantly apply our Curse and all of its associated debuffs.
Inspiriation
This becomes mandatory as we level our curse to offset its massively inflated cost, especially with Heightened Curse.
Blasphemy
Early on, we won’t have much use for our Spirit due to Elemental Invocation’s higher level requirement and need for extra sockets. This allows us to passively have Flammability up at all times, though we cannot run Heightened with it to mitigate this, as it will increase the Reservation.
Flameblast
One of our Secondary Damage skills, it can deal massive damage in an area around us or a Solar Orb. It’s great for helping bursting down Rares and Bosses.
Concentrated Effect
Due to our passive Tree, this skill will cover a massive area already. Concentrated Effect trades some of that area for more damage.
Considered Casting
With a decent Wand and casting Flameblast on a Solar Orb, it will have more than enough cast speed to offset the penalty that comes with this damage bonus.
Fire Mastery
Fire Mastery is the last damage support we can squeeze onto our skills. If we’d rather not invest a Jeweler’s Orb into this skill, feel free to use this over Burgeon on Incinerate if desired.
Elemental Invocation
Incinerate will constantly be igniting enemies, letting us charge this up fairly quickly to drop Comets on enemies.
Comet
Comet is the skill of choice here, as Invocations ignore the added Cast time for their required energy, making this one of teh strongest options for damage.
Embitter
Embitter turns all Damage as Extra Element bonuses into Cold Damage for a great damage boost. The bulk of this will be on our Wand, but we get some on the passive tree as well.
Cold Penetration
Cold Penetration is the last support we need here, allowing Comet to get around enemy resistances more easily, since we’re not investing in Elemental Penetration at all.
Impetus
Impetus is optional, as it only allows us to build energy faster. This, however, means Comet will be more demanding on our Mana, which is fine if we have the regen for it, but a pain otherwise.
Energy Retention
Similarly to Impetus, this allows for more Comets, this time giving a chance to retain some Energy instead of spending it all when triggered.
Ghost Dance
Ghost Dance improves our overall durability, restoring some Energy Shield each time an enemy lands a hit. This lets us shrug off far more small hits.
Fast Forward
This is the only Support we need here and allows us to get Ghost Shroud back at a faster pace.
Clarity
Clarity is cheap and can help resolve any potential Mana issues we may run into.
Cannibalism
Cannibalism is a great pairing with the Heavy Buffer passive, allowing us to easily recover the damage we allow to bypass our Energy Shield.
Frost Bomb / Contagion
We can’t quite start with Incinerate, so this pair of skills provides our early damage until we can start using Incinerate.
Frost Bomb we can place ahead of us as we run through zones, defeating any trailing enemies for experience. It’s higher damage also helps to take out the early bosses faster.
Contagion applies a Damage Over Time effect that will spread on death, making it great for large groups of enemies, particularly in the Red Vale.
Zenith
Zenith will be on Contagion, allowing it a fairly consistent damage bonus. It’s cheap at early levels, and this is easily one of the best damage supports for the early game.
Unleash
Unleash will also fit onto Contagion, applying Contagion to multiple targets with each cast. This helps get around the Contagion wanting to prioritize certain targets over others, typically stronger ones we don’t want to start the chain from.
Fast Foward
Fast Forward will go on Frost Bomb, then later Solar Or,b when we pick that up. While this reduce the duration they are active, it will make Frost Bomb explode sooner, and Solar Pulse quicker, getting their damage out faster.
Concentrated Effect
Concentrated Effect will also go on Frost Bomb, which makes it smaller, but more likely to one-shot weaker enemies and deal better damage to bosses. It serves a similar purpose on both Solar Orb as well as Flameblast.
Blink
Blink is an additional mobility tool we can use in the late game. We’ll assign it to Weapon Set 2 so we can reduce the amount of Spirit we need for the build.
Ingenuity
The only support we need for this skill, which allows for more frequent use of it.
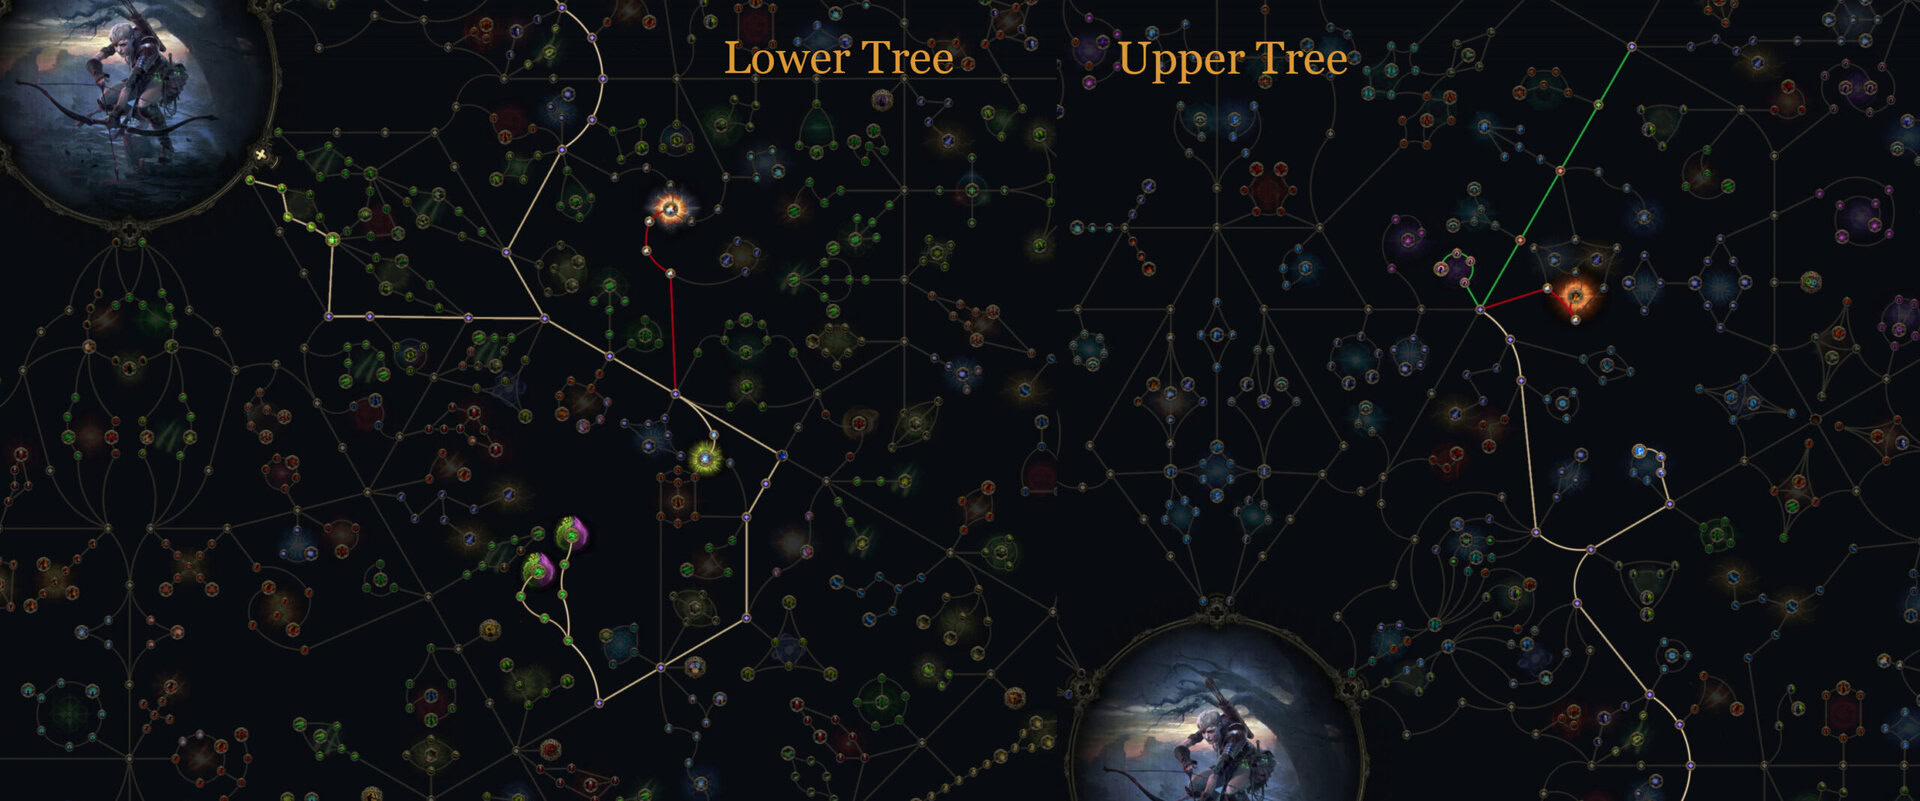
Passive Tree
Below is the Passive Tree we use for this Skill, and an Act-by-Act breakdown of how we progress the skill tree.
This Passive Tree makes use of Weapon Set Passives. All Passives allocated to Weapon Set 1 are shown in Red, while Weapon Set 2 is shown in Green.

Act 1


For Act 1, we’ll take the early movement Speed from Blur, since none of the early damage nodes affect our early skills. and make our way down to Freedom of Movement, to allow us to keep a faster pace while still casting.

We can however, pick up Harness the Elements on Weapon Set 1 to get some easy damage. As for Weapon Set 2, we’ll grab Strength and Dexterity, to allow us to use a Spear and Disengage for mobility.
Act 2

For Act 2, we’re focusing on getting to Unhindered ASAP. Make sure to take the top node for more reduction to our Movement Speed Penalty while casting. We’ll need this to use Incinerate as early as possible, or we can skip for now and delay Incinerate until we get our Second Ascendancy in Act 3.

We’ll need to grab Relentless Pursuit as our first Ascendancy, which all things considered isn’t a bad effect by any means, Slow Immunity protects us from being Chilled by Cold Damage, alongside any other potential slows we may see in the campaign, while also making it far easier to deal with Temporal Chains later.
Act 3

Now we’ll start working on damage by taking Fast Acting and Wasting to boost our Ignite Damage and Duration. These are fantastic for how early we can get them.

After our Second Ascendancy, we’ll finally have Running Assault and Incinerate will be pretty comfortable to use. We recommend reallocating the points for Unhindered to move toward the rest of our passives.

As we head up the tree, we’ll want to allocate a mix of Intelligence and Dexterity. Then we’ll grab Conservative Casting for the Mana Regen, but more importantly, the reduced mana cost, which heavily cuts down the cost of our skills.

Then we’ll reallocate our earlier attributes up here to fit what we need, as well as pick up Zone of Control to massively increase the size of our curse and Echoing Flames to boost our Elemental Damage.
Act 4


For Act 4, we’ll just grab Potent Incantation for Weapon Set 1. Then we’ll continue heading upwards, towards more of the passives.
Act 5

For Act 5, we’ll continue heading up the tree, stopping off to the left to pick up Overexposure for Weapon Set 1. We’ll also grab Impending Doom on Weapon Set 2 to have nearly instant curses in combination with Focused Curse.
Act 6


For Act 6, we’ll continue heading up to reach our main destination, Volcanic Skin. This gives us a good boost of damage and resistance. However, it cannot be allocated with Weapon Set Passives if we want to keep the Fire Resistance it provides.

We’ll also take a short detour near Conservative Casting to pick up Step Like Mist and Mindful Awareness to star boosting our Evasion and Energy Shield a bit.
There’s a lot of weapon Set passives going on here, so let’s start with Weapon Set 1. We grab Stormbreaker in the Exposure Cluster, and Echoing Frost in the central Elemental Cluster, as well as Burnout in the Fire Cluster. These give us a good boost of damage to anything we Ignite with Incinerate or Chill with Comet.
Weapon Set 2 will make the long trek over to Fated End. This helps massively as we’ll start encountering Life Regeneration effects on enemies starting in Maps, and this makes them MUCH easier to take out. As a bonus, it also further prevents them from recharging any Energy Shield they may have, though Ignite does that pretty well already.
Early to Mid Maps

As we start running Maps, we’ll need to balance getting both offense and defence. We’ll do this by pathing through Heavy Buffer to reach Slow Burn and Firestarter to massively boost our ignite damage. We’ll reallocate the Weapon Set 1 points from Harness the Elements to take these instead.

Traveling through here will be made even easier with our third Ascendancy, Traveller’s Wisdom, which grants us 6 additional Passive Points.
Endgame Maps

As we progress through maps, we’ll work on grabbing Immaterial and Shimmering from the Evasion and Energy Shield Cluster as well as Subterfuge Mask just below it to boost our Defences. With more Energy Shield, now, we can also grab Hallowed to help mitigate Stuns and various Ailments.
Then we can grab Intense Flames and Explosive Impact for damage. The Explosive Impact effect is quite a low chance, but does help with clearing, while Intense Flame helps out everything but Incinerate, as it doesn’t directly hit.

For our Final Ascendancy, we’ll take Practical Remedies. This allows us to prevent an Elemental Ailment of our choice. Thawing Campfire is easily the best pick to prevent Freeze, which can often result in death and is far more reliable than a charm. We can then replace our Thawing Charm with a Dousing Charm for full protection from Damaging Ailments across our three charms, which helps our energy Shield recover easier. Of course, we’ll also need decent gear to not be stunned often as well to free up the additional slot for this.
We’ll also want to hunt for or buy good Sapphires as well. We’re primarily looking for Ignite Magnitude and Ailment Magnitude together, the non-crit versions of the prefixes specifically. For Suffixes, Mana on Kill is a nice quality of life improvement, while Faster Ailment damage is also a nice bonus for our damage.
Endgame with Diamonds


As for Diamonds, Prism of Belief is an excellent pick up if we can get +3 Levels for Incinerate. It’s a huge jump in our consistent damage

From Nothing can offer us a good mix of Offence and Defence, particuarly when centered around Chaos Inoculation. This lets us get more Stun and Ailment threshold from our Energy Shield, Invocated Efficiency to boost Comet’s damage and offset its cost a bit, as well as Pure Chaos to just add a bit of extra damage to all of our skills that aren’t Incinerate.
Gear and Stat Priorities
A Wand is our weapon of choice here; any base works. The main things we want here are Spell Damage, Fire Damage, Damage as Extra Fire, Cast Speed, and Level to Fire Spells. Mana Regeneration is helpful if we get it, but not a huge deal if not.
We also want to use a Staff as our Weapon Swap, preferably a Chiming Staff to get access to Sigil of Power. Here, the only stats that can make a difference are Level to All Spells and Cast Speed. We’re only going to be using it for Utility and our Curse.
Our Offhand of choice is a Focus, preferably a Sacred Focus, but a Leylien Focus works just fine too. Much like our Wand, we’ll want Levels of All Spells, Spell Damage, and Cast Speed. Mana Regeneration is useful if we get it, but not mandatory. Then we round it off with Increased Energy Shield and Resistances to get some defenses out of it.
Unlike the rest of our Armour, we’ll eventually want to get a high Energy Shield Helmet, preferably a Kamasan Tiara. We’ll load this up with as much Energy Shield as we can get as well as Resistances. Intelligence can be a nice grab here if we need extra to meet gem requirements.
We use a Pure Energy Shield here to make the best use of Subterfuge Mask, turning it into a much stronger Hybrid Helmet compared to one that’s Hybrid by default. Hybrid Helmets still work until we get a great pure Energy Shield helm, though.
For our Body Armour, we opt for a Falconer’s Jacket. This sacrifices a bit of Evasion and Energy Shield compared to a Sleek Jacket, but in exchange we get some extra movement speed.
For Affixes, we’ll want Maximum Life, high Evasion and Energy Shield, and Resistances. Despite the majority of our hit pool being Energy Shield, we still want Life as an extra cushion and to have better Stun and Ailment Thresholds with minimal passive investment.
Our gloves aren’t anything special here. Vaal Wraps with as much Life, Evasion, Energy Shield, and Resistances as we can get. This is a great slot to pick up some extra Dexterity for Gem Requirements if needed.
For our Belt, we’ll want to go for a Heavy Belt for the extra Stun Threshold it provides. Here we’ll want to get Life, Mana, Strength, and Resistances.
Similar to our Gloves, our boots aren’t anything special either. We’ll want Quickslip Shoes with high Life, Movement Speed, Evasion, Energy Shield, and Resistance.
For our Rings, Prismatic Rings are a great option here. The main affixes we want here are Life, Mana, Cast Speed, and Resistances. Fire Damage can also be a great roll, especially on a Breach Ring paired with Esh’s Catalysts to boost it and any Fire Resistance or All Elemental Resistance rolls.

For an alternative Ring, Cracklecreep can be an okay Unique Ring. It just helps to spread our Ignite around without the need to directly apply it to everything. Its stats are not great, though, so a good Rare Ring is still preferable.
For our Amulet, the base doesn’t matter a ton. Solar Amulets allow us to get the required Spirit easier, Lunar Amulets are great defensiely, and Stellar Amulets can help with any attribute issues.
We’ll want to get an Amulet with Life, Levels of All Spells, Spirit, and Resistances. Again, Cast Speed can be nice, but it’s not mandatory.
We have two primary options for Anointing passives, Immolation is a large amount of Ignite Magnitude and the best DPS increase we can get. Master of Hexes can also be a strong option as well, but relies on Flammability to have value, and constantly interrupting Incinerate isn’t a great thing.