SWTOR Gunnery Commando Guide (DPS) for beginners and more experienced veterans: Skills, Choices, Rotations, Gearing, Builds, Tips!
This is a long guide. Use the Table of Contents, located in the left panel (top left button on mobile) to easily navigate through its chapters.
Introduction to Gunnery Commando
Gunnery Commando is capable of dealing gargantuan amounts of damage with individual destructive rounds and high-velocity blaster bolts that can penetrate armor! Unfortunately, these massive bursts are inconsistent and do not translate to high sustained DPS.
Gunnery is weaker in the sustained DPS department, but don’t let this discourage you from playing what you want.
Yes, you will have to work a bit harder compared to your mDPS peers in group content to pull viable numbers, but you should still be able to clear almost all content with Gunnery, and even without massive crits, throwing out missiles like candy is still extremely fun.
In terms of survivability, Commandos got nerfed with the release of 7.0 thanks to the wholesale removal of their AoE RDT (reduced damage taken). The combat style remains most vulnerable to AoE attacks, but it did get a bit of support in 7.8 to help make it more consistent across combat types.
Still, PvE endgame content is easier than it’s been in a long time, so you can survive just fine in the vast majority of fights. Movement, however, is a different story.
Commandos in general have the hardest time moving around quickly because their stronger movement ability is difficult to use, though a buff to Hydraulic Overrides in 7.8.1 has made this far less of a real detriment.
Major Changes in 7.0
Utility points are gone! Instead, there is a new system called the Ability Tree. Each discipline has 8 choices where they pick 1 of 3 options. The options have several similarities across the Combat Styles:
- 2 choices buff a discipline-specific ability (2 abilities, 1 choice each).
- 3 choices which are just old Utility effects. These choices are almost always the same for all disciplines.
- 2 choices where you’re picking between 1 ability or 1 of 2 passives. One of the ability choices tends to be an offensive cooldown (OCD). The other seems to be related to PvP balance, but there isn’t a clear pattern beyond the choice forcing players to decide which of 3 capabilities they want to keep.
- 1 choice where you’re picking 1 of 3 abilities. One of the abilities is always one of your primary CCs, either the 8s mez or 4s hard stun. Another of the abilities is the movement ability with the longest cooldown. The third option is less consistent, it seems to be there as an extra balance lever for BioWare since some abilities that got locked away are more impactful than others. The 3 abilities are almost always the same for each discipline.
This means almost all disciplines had 5 abilities locked away behind choices with the option for players to keep up to 3 of them. In addition, many extremely situational abilities were pruned entirely. Commando is one of the exceptions here though. Reserve Power Cell was the only ability that was fully removed from the Combat Style and there aren’t any new baseline effects, but 7 abilities were locked away behind 3 choices instead of the usual 5.
Battle rezzes in general are now healer-only (so Emergency Medical Probe is now restricted to Combat Medic), but there is no longer a global 5 min lockout on those abilities, so it’s treated just like any other ability, albeit with a much longer cooldown.
Guarding is now a tank-only ability, which is the logical next step since the nerf to Guard for DPS partway through 6.0 was ineffective at stopping its ubiquity in PvP.
DPS Mindset
How can I do as much damage as possible in each GCD (global cooldown, 1.5 second duration before you can activate another ability) given the constraints of the fight? Which ability do I use right now that will provide me the most DPS? How can I maximize my uptime? If I’m not activating an ability right now, why not? Can I finish this cast before I need to move? What happens if I don’t have time to finish a cast before moving? Can the healers deal with it without too much stress?
Group Composition Tips
In order to deal maximum damage, Gunnery requires 2 DPS debuffs provided by other disciplines:
| DPS Debuff | Presence of debuff increases DPS by approximately |
|---|---|
| Tech | 2.7% |
| Internal / Elemental (with Primed Ignition) | 1.2% |
| Total DPS Gain: | 3.9% |
Gunnery is pretty independent as far as group composition goes. Powertech / Vanguard and Operative / Scoundrel are the 2 Combat Styles that provide the Tech debuff. Operative synergizes a bit better with Gunnery since it also provides the Internal / Elemental debuff and can benefit from both debuffs that Gunnery provides, but PT is still a great option and neither makes that big of an impact on Gunnery’s DPS anyway.
So long as each DPS is given the debuffs they need (or at least the most impactful ones), you’ll be fine. Don’t fixate on having a 100% ideal composition.
Check out the SWTOR Damage Types and Damage Mitigation guide.
Abilities Explained
Please have the game open while reading through the next few sections. I will not be writing out ability descriptions and I will only be transcribing the components of discipline passives that directly relate to the ability and rotation. This forces you to read through what everything does so that you can understand what all of your passives and abilities do as well as locate these abilities in-game. Make sure you place all of these abilities on your bar in an order that makes sense to you.
Single-Target Rotational Abilities, Attributes, and Important Procs
 Grav Round
 Grav Round
(Tech/Kinetic/Direct/Single Target/Casted)
This is your main filler ability. Generally, it will be one of the first abilities you use on a new target. While it is technically a filler, Grav Round interacts in some way with almost every ability you use rotationally, and this greatly impacts when you should use it. Grav Round has 2 procs and 2 debuffs associated with it that are relevant to your rotation:
Gravity Vortex
This debuff counts as a DoT for the purposes of High Impact Bolt and increases the damage dealt by Demolition Round. Basically, your options are more limited as to what you can actually do to a target before you’ve hit them with a Grav Round, including not being able to deal damage with some of your most powerful abilities.
Sunder
This is the armor debuff. While all DPS specs provide two debuffs that increase the recipient’s damage taken in some way, the armor debuff is almost always the most useful of the debuffs since it affects the greatest number of abilities. The actual damage taken increase is still effectively 7% per attack though since bosses have 35% DR from armor and the debuff reduces armor by 20%.
The armor debuff represents a significant part of Gunnery’s raid utility. Most of the other debuffs are still nice, but you really notice when you don’t have an armor debuff in the group. The only damage that ignores armor is Internal/Elemental damage, which tends to mostly be reserved for DoT specs and a few other heavy-hitting attacks.
Charged Barrel
2 stacks of this buff are granted per use of Grav Round. Each stack increases the damage dealt by your next High Impact Bolt (or also Medical Probe) by 6%. In addition, thanks to the Honed Lock discipline passive, Charged Barrel also increases the critical chance of your next High Impact Bolt (or Medical Probe) by 3% per stack. This effect stacks up to 5 times, resulting in a 30% damage increase and 15% critical chance increase. The stack generation is weighted, so while you need to do 3 Grav Rounds to get all 5 Charged Barrels, you’ll still have 80% of the effect if you mess up and only do 2 casts before using High Impact Bolt.
If I ever find out that you deliberately used your Charged Barrel on Medical Probe in PvE, I will personally hunt you down and destroy you. Your job is to DPS, not throw away your GCDs on healing! I might make an exception if all your DCDs and medpac are on cooldown and you will literally die if you don’t use Medical Probe, but you better follow that up with the biggest tantrum of your life because unless that pull was going to be a wipe that you were trying to salvage, your healers and tanks weren’t doing their job and they need to hear about it! Charged Barrel is for High Impact Bolt ONLY! (does not apply in PvP)
Curtain of Fire
Grav Round (and Hail of Bolts) finish the cooldown on Boltstorm. This effect cannot occur more than once every 8 seconds. This proc used to be quite challenging to keep track of because it doesn’t align nicely with any other ability. Thankfully, it’s now much easier thanks to the Primed Ignition tactical.
I’ll get more into it later on when I talk about Boltstorm, but the basic idea is that when you use Vortex Bolt (which applies the DoT), you want to have one Boltstorm available for use at the very beginning of the DoT and one available for use sometime after, so generally you’ll proc one right at the beginning or in the short downtime in between DoTs and then proc the second about halfway through the DoT.
Boltstorm
 Boltstorm
(Ranged/Energy/Direct/Single Target/Channeled)
This ability is one of your harder-hitting attacks, though it is slightly weaker than High Impact Bolt and Demolition Round in terms of direct per-GCD damage. It’s also one of your cheapest rotational abilities, it only costs 8 Energy Cells per GCD. Since it’s so cheap and deals a fair bit of damage, it needs to be used often, but not always as soon as it becomes available. Your primary constraint is that it needs to be used before you are able to proc Curtain of Fire again. Boltstorm has 1 discipline passive and 2 tactical items associated with it that are relevant to your rotation:
Forced March
Forced March allows Boltstorm to be channeled while moving. Previously, this was a utility and then ability tree buff that also affected other discipline-specific abilities, but now it’s a hidden effect that DPS get for free.
Primed Ignition
Primed Ignition makes it so Vortex Bolt applies a DoT and Boltstorm, Grav Round, and Demolition Round all tick its damage. Since Boltstorm itself ticks 4 times, it is responsible for a significant proportion of your Primed Ignition DoT ticks, so it’s very important to use Boltstorm at the right time and as often as possible. So when exactly is the right time to use Boltstorm? Only use it if you can complete the channel before the Primed Ignition DoT falls off.
If the DoT is not on the target or will fall off mid-channel, delay using Boltstorm until the beginning of the next DoT. It’s possible to get two uses of Boltstorm per DoT application. In order to accomplish this, you need to use the first Boltstorm within the first couple of GCDs and then have the second one procced and activated while there are still at least 2-3 seconds left before the DoT falls off.
In practice, the first Curtain of Fire proc will happen anywhere between the end of the previous DoT and the first GCD or two of the current application of the DoT. The earlier you proc the first use, the earlier you are able to proc the second use, though it will typically proc somewhere around the time that the DoT has about half its duration left.
You can delay activating Boltstorm once it’s procced, though you need to activate it before Curtain of Fire can be procced again, provided the Primed Ignition DoT is up, of course.
Vortex Bolt’s cooldown does not divide evenly into the rate limit of Boltstorm, so along with the fact that you also have other priorities, particularly High Impact Bolt, Demolition Round, and managing your Energy Cells, when exactly you use it will fluctuate and occasionally you will only get a single Boltstorm during one application of the DoT.
When this happens, your second use of Boltstorm on the next application will be pretty early, usually about halfway through the DoT. This is fine since you’ll be set up to get the first proc for the next application pretty early as well and will have no trouble activating the second use in time.
If you are already a master at proccing Boltstorm as often as possible, you probably won’t notice much of a difference in DPS and can continue to proc and use Boltstorm without considering the Primed Ignition DoT and play the spec as you did prior to the release of the tactical in 6.0. If you aren’t as proficient with proccing and using Boltstorm, the Primed Ignition DoT serves as excellent scaffolding for the rest of the rotation.
Burning Bright
This tactical makes it so that dealing damage with Boltstorm increases the damage dealt by your next Vortex Bolt by 25% and stacks up to 4 times (up to 100%). Without the scaffolding from Primed Ignition, your rotation will be harder. Furthermore, doubling the damage dealt by Vortex Bolt, even with the new ability tree buff, isn’t enough to make it deal more sustained damage than Primed Ignition.
The key advantage of Burning Bright is that you don’t have to worry about losing DPS because of target swapping and get all of that damage immediately instead of over 15s, though 15s is still short enough to get a full application during a burst check so in PvE, all you get is epic flytext (which is a completely valid reason to use it in solo content).
High Impact Bolt
 High Impact Bolt
(Ranged/Energy/Direct/Single Target/Instant)
This ability is another of your hardest-hitting attacks. In terms of normal hits, it does almost the same amount of damage as Demolition Round, though thanks to the autocrit from the Concentrated Fire Legendary Item, it contributes to a larger amount of damage.
As I previously discussed, Grav Round interacts with this ability in a couple of key ways. First, the Gravity Vortex debuff counts as a DoT, fulfilling the requirement that High Impact Bolt can only be used against a target that is incapacitated or suffering from periodic damage. Second, Grav Round grants stacks of Charged Barrel, which increase the damage dealt by 30% and critical chance by 15% at 5 stacks.
You should only be using High Impact Bolt when you have 5 stacks of Charged Barrel due to these significant buffs, though it isn’t the end of the world if you accidentally use it at 4 stacks, especially against trash if you think you can defeat the enemy without having to cast another Grav Round to get that 5th stack.
Since High Impact Bolt is such a hard-hitting ability, you should be using it on cooldown as often as possible. This means you need to make sure that you are getting your 5 Charged Barrel stacks before High Impact Bolt comes off cooldown, and you will be cutting it close sometimes, though it’s less of an issue now that BioWare has made Energy Cell management easier for Gunnery.
Not losing Charged Barrel stacks is the biggest reason to use High Impact Bolt first if you have both Demolition Round and High Impact Bolt off cooldown at the same time. If you’re using the Concentrated Fire Legendary Item, High Impact Bolt always has a higher priority during Supercharged Cell than Demolition Round since the increased damage provided by the autocrit gets compounded by the increased armor penetration from Supercharged Cell, giving you more flat damage. This extra damage isn’t a whole lot though, not enough to be worth delaying High Impact Bolt over.
High Impact Bolt is also one of the best abilities to use outside of the Primed Ignition DoT window since High Impact Bolt doesn’t tick the DoT, so if you find yourself in a situation where you only have one GCD before Vortex Bolt comes off cooldown and both Demolition Round and High Impact Bolt available, it’s better to use High Impact Bolt first because it doesn’t tick the DoT while Demolition Round does. High Impact Bolt has 1 additional discipline passive associated with it that is relevant to your rotation:
Cell Charger
The Energy Cells consumed by High Impact Bolt is reduced by 10. In addition, you regenerate 2 Energy Cells every 1.5 seconds. Even without the additional passive Energy Cell regeneration, this passive brings the Energy Cell cost of High Impact Bolt down to only 5 Energy Cells, making it neutral in terms of Energy Cell consumption since you regenerate more than 5 Energy Cells every second passively. You still should try not to use this ability while below 60 Energy Cells, but it’s not nearly as bad as using one of your other abilities at that level.
Demolition Round
 Demolition Round
(Tech/Kinetic/Direct/Single Target/Instant)
This is normally your hardest-hitting rotational attack, though the Concentrated Fire legendary implant autocrits will make High Impact Bolt surpass it. Before you use Demolition Round on a target, you first need to make sure that you’ve applied a Gravity Vortex from Grav Round, since damage dealt by Demolition Round is increased by 25% when there is a Gravity Vortex on the target.
There really isn’t much more to this ability, it just hits hard and you want to use it as often as possible. While Demolition Round hits harder than High Impact Bolt, if you only have one GCD before you have to use Grav Round, it’s best to use High Impact Bolt first so that you don’t waste the stack of Charged Barrel it would generate, though if you can use them back to back, it’s better to use Demolition Round first. Demolition Round does not have any additional procs, debuffs, or discipline passives associated with it that I haven’t already mentioned.
Vortex Bolt
 Vortex Bolt
(Ranged/Energy/Direct/Single-Target/Instant)
When paired with the damage provided by the DoT from the Primed Ignition tactical, Vortex Bolt is consistently your most damaging GCD by a considerable margin. Even with the burst tactical, Burning Bright, Vortex Bolt is still your hardest-hitting rotational ability, so the priority doesn’t change depending on which tactical you use, though I’ll still mostly be focusing on Primed Ignition here.
The DoT that Primed Ignition applies is so strong that the rest of the rotation is structured around getting the most out of it, though you should think of this as a benefit, not a drawback since it’s fairly difficult to do things optimally without this added structure because there’s nothing in the rotation that allows you to easily keep track of when you can proc Boltstorm.
Since each tick of Boltstorm ticks the DoT, you want to make sure that you exclusively use Boltstorm while the DoT is active to maximize the number of ticks. Grav Round also ticks the DoT while Hammer Shot doesn’t, so it’s ideal to only use Hammer Shot in the 2 ish GCDs where the DoT is not active.
Try not to use Vortex Bolt on something that’s about to die and delay it if you are about to have to hit something else. You want to use Vortex Bolt against whatever you expect to be attacking for the next 13ish seconds.
Vortex Bolt has 1 implant, 1 proc, and 1 debuff associated with it that is relevant to your rotation that I haven’t already mentioned:
Overcharged Cells
Vortex Bolt generates 3 stacks of Supercharge. This implant is a redesign of Random Charge and helps to make Supercharge generation more consistent and better integrate Vortex Bolt into the rotation. Due to Vortex Bolt’s already high priority, it’s unwise to delay Vortex Bolt even if you will waste a stack of Supercharge.
Usually, it’s not an issue and unless you plan on maining the spec, you can completely ignore this bit of nuance. It’s hard to say for sure, but it seems that the fact that Electro Net doesn’t generate Supercharge is what throws everything off, so you need to be strategic about when you use it so that Electro Net doesn’t ruin any of your procs.
You can technically use Death From Above or even Sticky Grenade as single-target abilities instead of Grav Round if you’re at 7 stacks with 1-2 GCDs left on Vortex Bolt’s cooldown, but this will cause you to lose DPS directly as a result of those attacks dealing less damage, costing more Energy Cells, and not building up stacks of Charged Barrel, so I don’t recommend it.
Grav Primer
This proc is granted by Vortex Bolt itself and makes your next Grav Round instant. Since Grav Round already has a 1.5 second cast time, this does not provide any tangible DPS increase since it’s still on the GCD, which also lasts 1.5 seconds, though it does allow you to use the ability while moving, which increases Gunnery’s mobility.
Please make sure to consume this proc before activating Tech Override, or don’t activate Tech Override until after this proc has been consumed, because a single Grav Round will consume both procs.
This is an unfortunate bug that has existed for all procs of this nature since these procs were released. I really wish Vortex Bolt would just grant a charge of Tech Override instead since the only other thing you can even use this on in Gunnery is Plasma Grenade and combining the two would eliminate this problem, but I digress.
Marked
Vortex Bolt marks its target. Marked targets take 5% more damage from ranged weapon attacks. Unfortunately, the ranged debuff is one of the least useful of DPS debuffs because it doesn’t affect a very significant portion of abilities and damage output in the game outside of a couple of specs.
Furthermore, the specs that don’t provide it for themselves but can still benefit from it primarily deal Tech damage, not Ranged. That said, it does affect about half of Gunnery’s damage, so at least you will always benefit from it even if the rest of your group doesn’t.
Hammer Shot
 Hammer Shot
(Ranged/Energy/Direct/Single-Target/Instant)
This is your weak filler ability. It deals extremely low damage. You should only be using this ability to manage your Energy Cells and as a last resort to use while moving. Thanks to the Energy Cell cost reductions from 7.1, you can often completely avoid using Hammer Shot in your single-target rotation.
It’s your responsibility to remember how many Energy Cells each ability costs, and several of them have changed with 7.1. That information can be found in the description for each ability. Typically, you should only have to use Hammer Shot if you got rezzed and don’t have Recharge Cells available, do some sort of AoE, or are trying to do sustained DPS outside of the sustained DPS build.
You will rely on Supercharged Cell on cooldown to keep your Energy Cell level where it needs to be, but whenever you see yourself spike below 50-55 Energy Cells and Recharge Cells isn’t available, use Hammer Shot until you get back up to about 65-75 Energy Cells such that you’ll be able to activate your next ability without going below 60 Energy Cells. Hammer Shot does not have any additional procs, discipline passives, or debuffs associated with it that are relevant to your rotation.
AoE Damage
The formula for determining how much damage an AoE ability does per GCD such that it can be compared to single-target abilities is: (Damage Dealt/Number of GCDs) x Number of Enemies. An AoE ability’s place in the priority is as high as it can be until it reaches a single-target ability that deals more damage than the AoE will deal to all enemies in the GCD.
AoE damage is considered fluff if the adds do not need to die immediately or if you are otherwise shirking your main responsibilities to deal more damage than necessary to adds. It’s pretty easy to tell what is and isn’t fluff, don’t be greedy, and don’t hurt your group’s chances of beating the boss.
Mortar Volley
 Mortar Volley
(Tech/Kinetic/Direct/AoE/Channeled)
This is your strongest AoE ability, though it has a fairly long cooldown, so you can’t spam it. Mortar Volley’s damage per GCD surpasses the following abilities after the following number of targets are hit with one use of the ability:
- 1 Target: Hammer Shot
- 2 Targets: Grav Round, Boltstorm
- 3 Targets: Demolition Round, High Impact Bolt, Vortex Bolt
Please note that Demolition Round and High Impact Bolt are both right on the cusp of only needing 2 targets. High Impact Bolt needs 3 on average, though it will work out that autocrits will require 3 targets while regular hits only require 2 targets.
I have also not factored in Primed Ignition for Vortex Bolt since you won’t be causing as many DoT ticks when using frequent AoE and may be using a different tactical altogether.
Hail of Bolts
 Hail of Bolts
(Ranged/Energy/Direct/AoE/Channeled)
This is your spammable AoE. It always deals less damage than Mortar Volley, though thanks to the Blazing Barrel discipline passive that increases Hail of Bolts’ critical chance and critical damage, the actual DPS loss isn’t quite as significant as it may seem at first glance.
This ability costs slightly more than Mortar Volley, so you should never use this ability if Mortar Volley is off cooldown. Hail of Bolts also procs Curtain of Fire, and you should definitely use Boltstorm each time it procs since it will help with managing Energy Cells. Hail of Bolts’ damage per GCD surpasses the following abilities after the following number of targets are hit with one use of the ability
- 1 Target: Hammer Shot
- 2 Targets: Grav Round, Boltstorm
- 3 Targets: Demolition Round, High Impact Bolt, Vortex Bolt:
Since this ability deals almost the same damage as Mortar Volley, it also surpasses your other abilities with the same number of targets.
Plasma Grenade
 Plasma Grenade
(Tech/Kinetic and Elemental/Direct and Periodic/AoE/Casted)
This ability always deals less damage and costs more Energy Cells than Hail of Bolts. The only time you should ever use it in Gunnery is if you are using the Thermonuclear Plasma ability tree buff and even then only if you need to spread Gravity Vortex to additional targets, in which case it should be used ASAP.
It does affect an 8m radius compared to only 5m for Mortar Volley and Hail of Bolts, but since you can’t place it, this benefit is less valuable since you are often able to hit the same number of targets by placing the reticle for the AoE in a way that hits all of the targets.
Sticky Grenade
(Tech/Kinetic/Direct/AoE/Instant)
Sticky Grenade got a small upgrade in 7.0. It’s slightly cheaper and less damaging than a single GCD of Hail of Bolts (the damage difference comes from the Blazing Barrel passive), but you can use it while moving and for pre-casting. It also has a 60% slow that’ll be helpful in PvP. You shouldn’t ever use it for AoE purposes in PvE group content, but it’s fun to use in solo content. I like to shoot it at the melee adds that run to me.
Offensive Cooldowns
All offensive cooldowns (OCDs) should be used as frequently as possible under the conditions stated here and should only be delayed if they need to be saved for a DPS check or burst window, but don’t start delaying them until you see that you have to.
 Recharge Cells
 Recharge Cells
With 7.0, BioWare decided to combine Recharge Cells and Reserve Power Cell, which removed a ton of the finesse required to get maximum benefit out of either ability. Recharge Cells no longer triggers until an ability is activated that would consume Energy Cells or a channel finishes. It is best used right before you activate a 3s channeled ability like Boltstorm, Hail of Bolts, or Mortar Volley because this maximizes the amount of time where you’re still dealing damage but aren’t consuming any Energy Cells.
Recharge Cells is also grayed out until you have few enough Energy Cells to utilize the effects. It’s difficult to fully benefit from both components, so just activate when you use your next 3s channeled ability past 35 Energy Cells or with your next ability that costs 15 Energy Cells if you’re below 25 Energy Cells.
With the changes BioWare made in 7.1, you will only need to use this occasionally in single-target sustained situations. Though you’ll get more use when you are doing a lot of AoE damage because those abilities are more costly.
 High Velocity Supercharged Cell
 High Velocity Supercharged Cell
The biggest benefit of this “cooldown” is that it recharges 10 Energy Cells. The other effects only last 8 seconds and are incredibly weak. The 6% alacrity will only help to slightly reduce the cooldowns of your abilities and increase your Energy Cell Regeneration Rate, but you’re certainly not going to get an extra ability in that window. The 15% armor penetration is a little bit better, but it’s still a pretty small improvement; it’s only equivalent to a 5.25% damage increase for your Kinetic / Energy attacks, though 15% is enough to make some of your attacks like High Impact Bolt completely ignore armor because of other armor pen passives.
Use this as often as possible, though make sure you have it for any burst DPS checks and make sure you’re building Supercharge stacks when you can’t do any DPS. Please note that if you happen to be close to 60 Energy Cells shortly before the burst DPS check, it may be better to use Supercharged Cell before you go below 60 Energy Cells so your Energy Cell Rate is never reduced, rather than save it for the burst check.
There are several abilities that generate stacks of Supercharge, including Grav Round, Hammer Shot, Medical Probe, and Med Shot as well as Vortex Bolt with the Overcharged Cells implant. It can also finally be done with your Recharge and Reload ability (or equivalent item from the Cartel Market) since they made that a baseline passive for Commandos. No more having to spam Med Shot before pulling!
Don’t forget that you can also use Med Shot in-combat during periods of downtime where you can’t DPS anything in order to generate extra stacks of Supercharge.
Electro Net
 Electro Net
(Tech/Energy/Periodic/Single-Target/Instant)
While this ability isn’t technically an offensive cooldown since it’s still on the GCD, you should still think of it as one since it does a pretty high amount of damage. Against non-player enemies, builds up to 5 stacks that each increase the damage taken by Electro Net by 20% (100% total) and these stacks apply over the first 5 seconds after application automatically and are not dependent on whether or not the target moves, unlike in PvP.
Since it is still an attack, make sure you aren’t wasting this extra damage on an add. It also deals energy damage, so the increased armor penetration you get from Supercharged Cell will affect this ability, though I wouldn’t save it if I still needed to generate more than a stack or two. If you’re doing a burst DPS check or happen to have both abilities usable at the same time, apply Electro Net first, then Supercharged Cell because the first tick is the weakest and the last is the strongest.
Adrenal
 Adrenal
Make sure to activate the Adrenal right before you use Vortex Bolt so you get a full duration of the Primed Ignition DoT during your Adrenal. Then, you should use Electro Net so that you have another high-damage attack to get boosted in lieu of a Grav Round. It’s fantastic if you can also use Supercharged Cell while the Adrenal is active, but don’t delay anything to make that happen. It’s better to use damage boosts at the same time because the effects synergize such that the DPS increase is greater from using the effects together than using them separately.
Defensive Cooldowns and Mobility
Defensive cooldowns (DCDs) are not used just to stop you from getting killed, they’re there to minimize overall damage taken. For any Combat Style in any fight, your most effective DCDs should be mapped to the most damaging attacks in the fight while weaker DCDs should be used against weaker attacks.
Don’t pop all of your DCDs at once or only use them when your health gets low. You should be attempting to mitigate as much damage as possible by using your DCDs against predictable damage.
In fights where you’ll be taking a high amount of sustained damage, it’s important to use your DCDs in the order that maximizes your overall uptime. If you can tweak the order that you use your DCDs where it allows you to get an extra use out of one of them over the course of a long burn phase, you should definitely do that instead of activating your potentially stronger DCDs first.
It’s good to have 1 emergency panic button too, but everything else should be used to prevent your health from getting low in the first place. Part of knowing a fight is understanding how much damage you take and what you can do to mitigate that damage.
Reactive Shield
 Reactive Shield
This is your most reliable defensive cooldown. It will mitigate all damage that can be mitigated because it provides flat damage reduction. Along with your armor and Charged Barrier ability tree proc, you will have 56.7% damage reduction against Kinetic / Energy damage and 41% damage reduction against Internal / Elemental damage.
Thanks in part due to its long duration, Reactive Shield is best when trying to mitigate damage that you’re supposed to be taking. You’re not going to be able to cheese anything with this ability, but you have other abilities that can work as cheeses, though they aren’t completely reliable.
Adrenaline Rush
 Adrenaline Rush
Adrenaline Rush’s greatest strength is in its ability to reliably keep you alive through constant damage, generally the kind you’ll find in burn phases as well as damage that you know will be coming soon but don’t know exactly when. Very few other DCDs in the game can do this as well as Adrenaline Rush, though the ability isn’t without limitations.
Adrenaline Rush is one of the worst DCDs in the game at helping you to mitigate big hits since it provides its mitigation through constant small heals, which requires you to take the damage and survive. This ability isn’t going to do a thing if an attack takes away the final 36% of your health.
Echoing Deterrence
 Echoing Deterrence
Echoing Deterrence is one of the best DCDs in the game. It absorbs all the damage, heals you, and reflects the damage back at the attacker. Unfortunately, it doesn’t work on everything; it only mitigates direct, single-target attacks, so it won’t do anything against DoTs and AoE damage, though remember that in raids, damage types don’t always match their appearance.
Since this ability does completely absorb the damage, Echoing Deterrence should never be used at the same time as another defensive cooldown. You’ll either take no damage or all of it. If you take any amount of damage, this DCD did absolutely nothing and you just wasted it.
Unfortunately, most damage you’ll be taking in raids is AoE damage, so there aren’t too many attacks that Echoing Deterrence works against and there are many fights where this isn’t usable at all.
This isn’t a major problem though since you can almost always survive while only using Adrenaline Rush, Reactive Shield, and Diversion. Since it’s so often useless against damage you’re meant to take, it’s best to seek out attacks that you can reflect with this ability in order to deal extra damage.
Diversion
 Diversion
The Commando version of Diversion reduces your current threat against all enemies by 25% and grants Unshakable, +35% Defense Chance and AoE RDT, and 2 charges of Decoy for 6s. It is a completely different ability from Diversion for Snipers | Gunslingers and its Mercenary analog is Chaff Flare.
Prior to 7.0, Diversion had different additional effects unique to each discipline, but those effects were combined as part of the shift to ability trees. Unshakable is just interrupt immunity.
The defensive buffs work against different types of damage, so a single effect will only ever apply to one type of ability.
The +35% defense chance effect means your chance to completely avoid the damage from melee/ranged attacks (AKA weapon damage) is increased. Since it only improves your odds, this effect is not reliable against large singular hits, though heavier hits tend to be Force/Tech damage anyway.
The Decoy charges enable you to completely absorb the damage from the next two direct (non-DoT) Force/Tech attacks. While it isn’t specified in the description, this effect does not work against AoE damage, though as of Update 7.8, Diversion now provides 35% AoE RDT for the duration.
Medpac
 Medpac
Don’t save it for a rainy day because today is that rainy day! Unless you get hit by a one-shot mechanic (which you shouldn’t), you should never let yourself die while your Medpac is still available and you certainly should never try to use one of your heals before using your Medpac (and I hope you know that Unnatural Preservation is not included in this rule).
If everyone’s health is getting low or there’s a heal check in the current phase, do not hesitate to use your Medpac if you can take full benefit of the health provided or need to be above a certain health level to survive an imminent mechanic.
If you think Medpacs are too expensive, it’s time to get Biochem on one of your alts or even better, your raiding toon so that you can make your own or get reusables. Choosing not to use a medpac for financial reasons and subsequently dying is not a valid excuse.
 Field Aid
This is the cleanse for Commandos. Generally, healers are responsible for dealing with most of the cleanses, though there are a few instances where the DPS should help, like on Dread Council with Tyrans’ Death Mark. Before you use this on yourself, make sure that you don’t get Responsive Safeguard ticks off of whatever you’re trying to cleanse
Try to avoid using this as your cleanse, a lot of the cleanses that DPS are responsible for can be removed with an ability that is off the GCD like the CC break or Hold the Line thanks to the movement-impairing effect purge.
Unless the debuff is going out to many members of your group at the same time, your healers are responsible for cleansing you. Your job as a DPS is to spend your GCDs on dealing damage. Your healer’s job is to spend their GCDs on mitigating damage, which includes most cleansing.
Hold the Line
 Hold the Line
As of 7.8.1, Hold the Line is finally a proper movement ability for Commandos, offering the same functionality as the Vanguard version, which was nerfed at the same time.
It now provides 60% movement speed and partial CC immunity for 8s on a 40s cooldown. The partial CC immunity protects you from everything but stuns and mezzes, though that’s always been the case. It has enabled Commandos and Vanguards to cheese many mechanics throughout SWTOR’s history.
In general, Hold the Line should be used whenever you need to move more than a few steps and should be prioritized over Propulsion Round, unless you need to save the former for something specific.
For example, Propulsion Round is way better for escaping Corruptor Zero’s Anti-Gravity Field (his big red circle) but doesn’t handle corners very well, so it’s better to use Hold the Line to get out of the path of Unified Beam (his big laser).
Propulsion Round
Unlike other, similar abilities like Hightail It and Blade Blitz, you do not gain any sort of damage mitigation during this ability, so it can only be used for mobility.
Propulsion Round does cost a GCD to use, so you should avoid using this if you can safely get where you need to go without using it. This means you should be reserving it for moving long distances and getting out of fairly large circles.
Do not use Propulsion Round if you only need to take a step or two to get out of a circle. Even though this ability costs a GCD, it won’t disrupt the flow of your rotation. Just keep going and use Propulsion Round as needed.
It is possible to use Propulsion Round to move forward by doing some fancy maneuvering with rotating your character. It’s not too hard, it just takes some practice so you can do it quickly without having to think about it.
The key is to start walking in the direction you want to go and then quickly rotate your camera and character 180 degrees using your mouse (holding right click), then as soon as you finish rotating, activate your ability and rotate back during the animation.
Other people may comment with different methods, I know there are a few ways to do it, but that’s what I do. Regardless of your method, it needs to be muscle memory. A great time to practice this is while running back to the boss after a wipe.
Tech Override
 Tech Override
This ability makes your next ability with a cast time instant, allowing it to be used on the move. It does not provide a tangible DPS increase when used on abilities that have a 1.5 second cast time because the GCD is also 1.5 seconds long, so you don’t save any time by using it on those abilities.
Tech Override can provide a DPS increase when used on abilities that have a cast time longer than 1.5 seconds, like Concussive Round. Usually, Tech Override will be activated in order to make Grav Round instant so you can use it while moving. Make sure that you don’t have the Grav Primer proc from Vortex Bolt though if you plan to use this ability since a single Grav Round will consume both buffs simultaneously.
Crowd Control and Other Abilities
There are only a handful of instances in operations where CC is required, so I will briefly go over what the Commando has at their disposal in addition to any other abilities I haven’t yet mentioned.
Concussion Charge
This is your 360-degree knockback. Due to its short range, it can be rather difficult to use against some mechanics, like the Chained Manifestations on Styrak NiM, but it does knock them pretty far away. Also, please do not ruin everybody else’s day by using this ability for its AoE damage.
Cryo Grenade
This is your hard stun, meaning it does not break on damage. In PvE, this will generally only be used for specific mechanics since most things you’d care about stunning are immune. Be sure to pay attention when something is stunnable though, because that often means you’re intended to stun it.
Disabling Shot
 Disabling Shot
This is your interrupt. Commandos get the honor of having the interrupt with the longest cooldown in the game at 24 seconds! This usually isn’t a huge problem, there are really only a couple instances in the whole game that require a shorter cooldown and generally a melee DPS takes that, even over other ranged DPS. If you really want to be a clicker, I highly recommend you at least keybind this ability or you will have trouble with some of the shorter casts that need to be interrupted.
Concussive Round
This is your mez, a CC ability that breaks on damage. Usually if you’re using this in-combat, you will want to use it very soon after the enemy spawns, though usually healers are assigned this responsibility when possible. This is also one of the better abilities to use with Tech Override since it goes from being a 2s cast to instant, meaning it’s only a GCD, so you won’t lose as much DPS that way.
Commandos (and Mercenaries) and Operatives / Scoundrels are the only combat styles in the game that have default access to a mez, and Mercenaries / Commandos are the only ones with default access to one that lasts 60s against NPCs, so be prepared to get assigned to CC duty.
Advanced Recon Droid
This ability is a redesign of Stealth Scan, but it offers very little benefit in PvE. Stealthed enemies aren’t super common and the effect doesn’t work against bosses that stealth out. The most theoretically useful effect in PvE is the 30% reduction in damage taken while stunned, but it’s not gonna change the outcome of a fight, so it’s not worth using.
Advanced Recon Droid provides significantly more value in PvP, but it’s currently held back by an unnecessary nerf to its range. Pop it at the same time as Diversion.
Tenacity
 Tenacity
This is your CC break. Use it when you get CC’d and can no longer deal damage or satisfy a mechanic as a result of being CC’d.
Explosive Round
 Explosive Round
This ability deals more damage than Hammer Shot, but less than Grav Round. The key benefit here is that it’s instant, allowing you to deal damage while moving. It also does a small amount of AoE damage, but it isn’t ever worth using this ability for that purpose.
Unfortunately, it costs 20 Energy Cells and doesn’t generate a stack of Supercharge, so it’s never worth using for Gunnery. I really wish that it did generate Supercharge and cost 15 Energy Cells so the only thing you’d be giving up is a little bit of damage when you have to move just like Shock for Sorcerers.
Until they change it, the only time this ability should ever be used in PvE is if you’re a Commando is if you’re playing the other DPS spec, Innovative Ordnance, and even then, they only use it when they get a proc when their DoTs tick on something that’s below 30% health.
Additional Raid Utility
I have already covered some aspects of Gunnery’s raid utility, like the armor debuff, burst, and target swapping. Here I will cover the rest of it.
Supercharged Celerity
Commandos unfortunately have the worst raid buff by far. Disciplines that use the 1.4s GCD (which includes all DPS specs besides Gunnery, Telekinetics, and Combat) do not actually get to use an extra ability during this window because the alacrity increase isn’t significant enough. It is effective at all other GCD tiers though, so it’s an HPS increase for healers and DPS increase for tanks (lol).
This raid buff is also helpful in increasing the tick rate of infinitely refreshable DoTs that are applied at the beginning of the fight, like Telekinetics’ Weaken Mind and Tactics’ Gut, though you can’t really benefit from this in fights where these DoTs need to be frequently reapplied.
Since Supercharged Celerity boosts alacrity for a short time, it also has the potential to mess up some specs that use fairly strict rotations since it can desynchronize their cooldowns, which may be dependent on each other. You won’t get to recharge the 10 Energy Cells either if you use this instead of Supercharged Cell.
At the end of the day, it doesn’t matter that much because no Commando is ever gonna take this over Diversion.
Off-Healing
Your three off-healing abilities are Med Shot, Bacta Infusion, and Medical Probe. If you ever have to use these, something has clearly gone wrong with the fight, or someone is not pulling their weight and you should complain to the raid lead and make a big scene about having to off-heal.
This game is designed around each role being able to fully perform all of its duties without the need for another off-role’s help. You should not ever off-heal yourself unless you think you will literally die if you do not receive healing right now and the pull is still salvageable and the same goes for healing someone else.
If there is downtime though where you can’t do anything else at all, it’s okay to heal yourself with Bacta Infusion (make sure you can get up to 100 Energy Cells though) and Med Shot, but avoid using Medical Probe if you have any stacks of Charged Barrel, but really make sure there’s nothing you can do at all that would increase your damage output first.
Besides it not being your job as a DPS, a lot of bosses have fairly tight enrage timers, so if you’re having to waste your precious GCDs helping out another role because they can’t deal with what they are fully capable of dealing with, you’re gonna end up wiping to an enraged boss later anyway.
I would like to be clear that building stacks of Supercharge outside of the fight or during downtime is encouraged. I would not consider that to be off-healing though since the purpose is not to gain health.
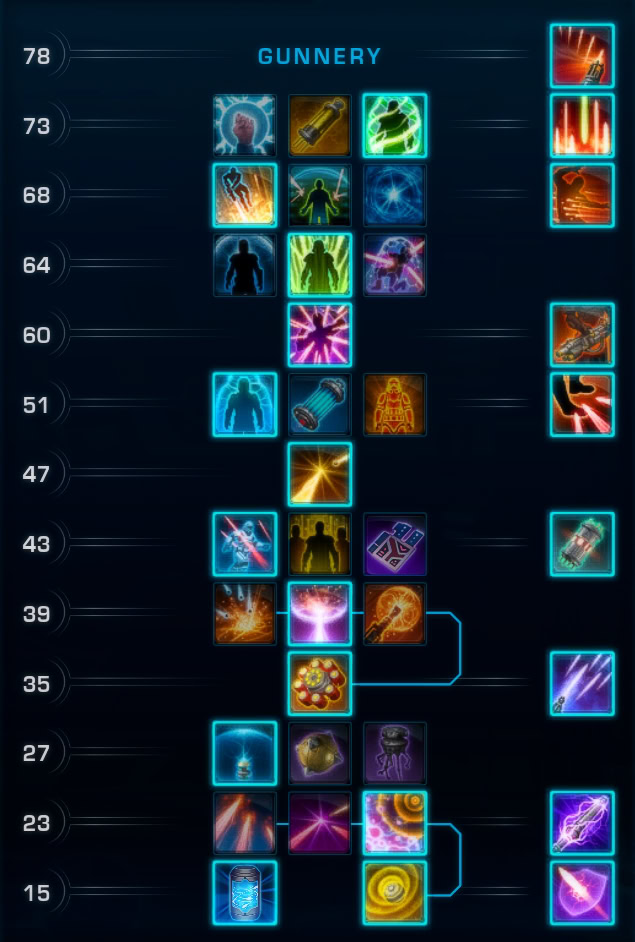
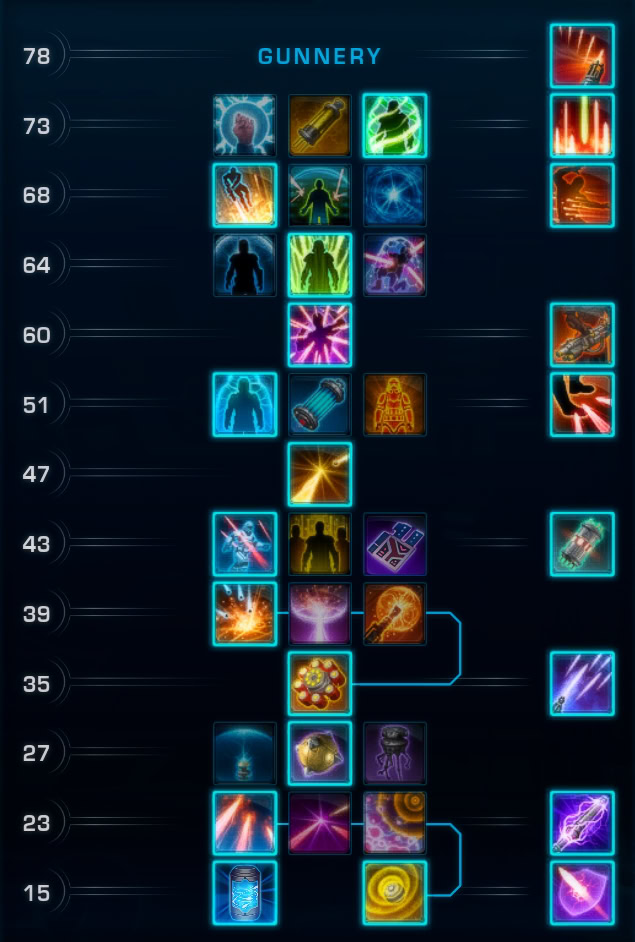
Ability Tree Choices
Make a habit of reading through all of your ability tree choices each time you log in. They are intended to be changed on the fly and having a clearer idea of what all of them do will help you to recognize situations where individual choices will be useful in-game.
Level 23 Choice – Grav Round Buff
 Proficient Gravitation
- Effect: Reduces the activation time of Grav Round by 0.2 seconds and the Energy Cells it consumes by 2.
- Recommendation: Never take this. Gravitating Bolt offers a greater sustained DPS increase that is far easier to take advantage of in boss fights. Now that the activation frequency of Supercharged Cell is more consistent thanks to Overcharged Cells and its duration is longer, Gunnery is no longer reliant on the additional Energy Cell efficiency provided by Proficient Gravitation. This option also desynchronizes the amount of Supercharge stacks you have with Vortex Bolt, making it more likely that you’ll waste stacks.
 Gravitating Bolt
- Effect: Targets affected by your Gravity Vortex take 50% more damage from Vortex Bolt and 10% more damage from High Impact Bolt.
- Recommendation: Take this in single-target situations. Gravitating Bolt offers the greatest single-target DPS boost out of these options and does not cause issues with Energy Cell Management thanks to the consistent frequency and longer duration of Supercharged Cell. That said, you will likely need to use Recharge Cells or, if necessary, use Hammer Shot a few times if you waste even a couple of Supercharge stacks.
![]() Grav Trio
Grav Trio
- Effect: Grav Round fires up to 2 additional half-strength rounds at other enemies within 5m of the primary target.
- Recommendation: Take this in solo content and in fights where you can consistently hit 2 additional high-priority targets. A single Grav Round with Grav Trio offers roughly the same sustained DPS as the damage boost to Vortex Bolt by Gravitating Bolt and also applies Gravity Vortex to more targets, which synergizes with other AoE effects. However, in boss fights, concentrating more damage onto the primary target is more important, and Plasma Grenade can almost always adequately spread Gravity Vortex with Thermonuclear Plasma when necessary.
Level 27 Choice – Sticky Grenade, Charged Barrier, and Advanced Recon Droid
 Sticky Grenade
- Effect: Grants the Sticky Grenade ability, which detonates after several seconds, dealing comparable damage to 1 GCD of Hail of Bolts to up to 8 nearby enemies and slowing them by 60% for 10 seconds. Standard and weak enemies enter a state of panic while the dart is active and are knocked down by the blast. 15s cooldown, costs 15 Energy Cells.
- Recommendation: Take this for solo content only. The knockdown and panic effects are fun, and the slow means that you’ll have an easier time keeping enemies in your AoE. Sticky Grenade deals more damage than a Grav Trio Grav Round if you can hit at least 4 targets. You can use it for a small amount of additional pre-casted burst in boss fights as well, but Charged Barrier is typically more valuable.
![]() Charged Barrier
Charged Barrier
- Effect: Grav Round and Medical Probe generate a stack of Charged Barrier, which increase damage reduction by 2% per stack for 15 seconds. Stacks up to 3 times.
- Recommendation: Always take this for group content. The other two options aren’t all that useful in PvE group content while 6% DR is consistently useful and effortless for Gunnery to maintain.
 Advanced Recon Droid
- Effect: Grants the ability Advanced Recon Droid, which reveals stealthed opponents and roots them for 2s, slows all enemies within its 8m radius by 30%, and grants Droid Overwatch for 15s. Droid Overwatch reduces your damage taken while stunned by 30%. 20s cooldown.
- Recommendation: Never take this in PvE. Many stealthed enemies in PvE content just ignore this ability, and while the stun RDT is nice, it costs a GCD and you’re giving up 6% DR, which diminishes the value in the few fights where you do get stunned.
Level 39 Choice – Demolition Round Buff
 Customized Round
- Effect: Increases the critical chance and critical damage of Demolition Round by 10%.
- Recommendation: Take this in fights with lots of downtime. Customized Round offers less single-target sustained DPS and isn’t as consistent as Gravitating Compound, but not by much, nor does it require high uptime. Since Demolition Round has a long cooldown, most of the DPS you’ll lose will be from your filler, Grav Round, making Gravitating Compound less effective. Still, I’d only take it in fights with frequent downtime, like Operator IX in TFB.
![]() Gravitating Compound
Gravitating Compound
- Effect: Demolition Round applies a Gravitating Compound to the target, increasing your Grav Round damage against the target by 10%.
- Grav Round damage against the target by 10%.
- Recommendation: Take this in most single-target situations. Gravitating Compound offers the greatest and most reliable single-target sustained DPS increase, even without Proficient Gravitation. However, it relies on high uptime and restricts target swapping, so if either of those presents an issue, switch to one of the other options.
![]() Thermonuclear Plasma
Thermonuclear Plasma
- Effect: Plasma Grenade spreads your Grav Round’s Gravity Vortex to the targets it damages, if it damages at least one target already affected by your Gravity Vortex. Demolition Round fire additional quarter-strength rounds at up to 8 enemies within a 20m radius of you centered on your target.
- Recommendation: Take this option for solo content and in boss fights with multiple enemies. Thermonuclear Plasma performs really well in just about any multi-target situation, and it becomes better than Gravitating Compound and Customized Round as soon as you can consistently hit at least 1 additional target with almost every use of Demolition Round. Since Demolition Round only deals full damage to the primary target, make sure to target the enemy with the most health.
Level 43 Choice – Diversion, Supercharged Celerity, and Overclock
 Diversion
- Effect: Grants the Diversion ability, which reduces your threat by a moderate amount and applies several effects that last 6 seconds: Melee and Ranged defense chance is increased by 35%, damage taken from AoE attacks is reduced by 35%, interrupt immunity, and 2 charges of Decoy. Each charge of Decoy intercepts and absorbs an incoming direct Force or Tech attack.
- Recommendation: Always take this. The defensive components of this ability are a bit different than they were in the past. Now all Commando disciplines have access to the DCD effects provided by both Gunnery and AS. For those of you that played Commando DPS in past expansions, you may notice that the individual DCD components are a bit weaker. The defense chance from AS only applies to melee / range damage and Decoy only lasts 6 seconds, though it’s still a great DCD and having both effects makes up for these shortcomings. The AoE RDT added in 7.8 makes it mandatory in boss fights.
 Supercharged Celerity
- Effect: Grants the Supercharged Celerity ability, which requires and converts 10 stacks of Supercharge to increase you and your Operation group’s alacrity by 10% for 10 seconds.
- Recommendation: Never take this. The Mercenary raid buff is the worst one by far. Supercharged Celerity does not sufficiently increase your alacrity to alter the number of abilities you can activate over its duration, specifically at the 1.4s GCD. It only gives you enough of a boost at all other GCD threshold. Since the vast majority of disciplines use the 1.4s GCD, the alacrity does not provide a tangible benefit, will lower your damage output since you can’t activate Supercharged Cell, and disrupt some rotations. The only way Supercharged Celerity can possibly boost group DPS is by increasing tick rates on refreshable DoTs, assuming they never fall off, and/or by lowering the cooldown of OCDs, potentially allowing them to be activated an additional time over the course of the fight or within the same phase, though that is extremely situational. Keep in mind that you will need to activate Supercharged Celerity before those DoTs and OCDs are activated in order for it to do anything.
![]() Overclock
Overclock
- Effect: Reduces the cooldowns of Concussive Round and Tech Override by 15 seconds each. In addition, Tech Override grants a second stack.
- Recommendation: Take this in specific fights only. Diversion is typically a vastly superior option, but it doesn’t work in every boss fight, as most boss attacks deal AoE damage, even if they don’t look like it. In those fights, you can take Overclock instead to boost your mobility.
Level 51 Choice – Cell Capacitor, Reflexive Shield, and Tenacious Defense
![]() Cell Capacitor
Cell Capacitor
- Effect: Recharge Cells now immediately recharges an additional 15 Energy Cells and grants 10% alacrity for 6 seconds.
- Recommendation: Never take this. The additional Energy Cells only ever amounts to an extra half-channel of Hail of Bolts every 2 mins and the alacrity boost is too weak to do anything. Reflexive Shield is ridiculously strong anyway.
![]() Reflexive Shield
Reflexive Shield
- Effect: When you take damage, the active cooldown of Reactive Shield is reduced by 3 seconds. This effect cannot occur more than once every 1.5 seconds. In addition, when taking damage, you have a 20% chance to emit an Energy Redoubt, which lasts up to 6 seconds and absorbs a small amount of damage. This effect cannot occur more than once every 10 seconds.
- Recommendation: Always take this as Gunnery. The Reactive Shield cooldown reduction adds up rapidly and the little Energy Redoubt is a nice bonus to your mitigation. Without AoE DR, it’s more essential to have Reactive Shield available as often as possible.
![]() Tenacious Defense
Tenacious Defense
- Effect: Reduces the cooldown of Concussion Charge by 5s and Tenacity by 30s. In addition, the duration of Hold the Line is extended by 4s.
- Recommendation: Never take this as Gunnery. Both of the other options are much stronger.
Level 64 Choice – Adrenal Surge, Combat Shield, and One Man Army
 Adrenal Surge
- Effect: Adrenaline Rush triggers at and can heal you up to 60% of your maximum health. Additionally, Adrenaline Rush lasts 2 seconds longer and heals for twice as much time each time it restores health.
- Recommendation: Always take this. Adrenal Surge significantly increases the reliability of Adrenaline Rush such that it will protect you from all but the most deadly attacks without needing to pair it with something else. The only drawback of Adrenaline Rush is its ridiculously long cooldown.
 Combat Shield
- Effect: Reactive Shield now further decreases ability activation pushback by 30% and increases all healing received by 20% and makes you immune to interrupts.
- Recommendation: Never take this in PvE. The other two options are far better than this one.
![]() One Man Army
One Man Army
- Effect: Activating Supercharged Cell lowers the cooldown of Adrenaline Rush by 5s. In addition, hindering a target with Electro Net increases your alacrity by 15% for 9s.
- Recommendation: Never take this. I have reworded the effect to emphasize the more useful part. You can shave off up to ~45s of Adrenaline Rush’s cooldown with One Man Army as a Gunnery Commando, which is technically helpful if you find yourself needing ability on cooldown and can tolerate its base effectiveness. However, I don’t think the cooldown reduction is significant enough to be valuable. Furthermore, the alacrity boost is worthless. Reducing your GCD from 1.4s to 1.3s for 15s doesn’t change the number of whole abilities you can activate in that time; it’s still 7, regardless. It also requires the target to be hindered, and the most lucrative targets for Net, bosses, are almost always immune, meaning the effect doesn’t apply at all.
Level 68 Choice – Propulsion Round, Echoing Deterrence, Cryo Grenade
 Propulsion Round
- Effect: Grants the Propulsion Round ability, which propels you backward 20m. While propelling, you are immune to CC. Propulsion Round also grants Smoke Screen, which makes you immune to leaps, pulls, pushback, and interrupts for 4s. Taking Melee or Tech damage while Smoke Screen is active refreshes the cooldown on Propulsion Round. Smoke Screen can only be granted once every 40s. Cannot be used while hindered. 17s cooldown.
- Recommendation: Take this if you can’t make use of Echoing Deterrence in PvE. Propulsion Round is more consistently useful in PvE compared to Echoing Deterrence, but since Hold the Line was buffed, it’s not nearly as important to take this in PvE.
 Echoing Deterrence
- Effect: Grants the Echoing Deterrence ability, which absorbs all incoming direct single-target damage for the next 6 seconds, reflecting 50% of the absorbed damage back at the attacker, and healing you for 5% of your maximum health each time an attack is absorbed. Can be used while stunned. 2 min cooldown.
- Recommendation: Always take this in PvP and if you can use it in PvE. This is a super strong DCD, but not every fight has something you can reflect, and even the ones with something reflectable damage can typically be mitigated by Diversion. Meanwhile, Propulsion Round will consistently provide a ton of value in almost all fights, so the only time you should take it is if you need another cheese or can deal a boatload of damage with the reflect.
 Cryo Grenade
- Effect: Grants the Cryo Grenade ability, which stuns the target for 4 seconds and deals a small amount of direct damage.
- Recommendation: Take this if there’s something that needs to be stunned. Mercenaries have to pick between extremely valuable abilities in this tier. Other disciplines get their hard stun as a baseline ability or otherwise don’t have to give up nearly as much, so see if one of those Combat Styles can do that mechanic instead.
Level 73 Choice – Concussive Force, Parallactic Combat Stims, and Trauma Stabilizers
![]() Concussive Force
Concussive Force
- Effect: Explosive Round immobilizes the target for 4 seconds. Direct damage caused after 2 seconds ends the effect. This effect can only occur once every 8 seconds. In addition, Concussion Charge’s knockback effect is stronger and pushes enemies 4m further away.
- Recommendation: Never take this as Gunnery. The effects are strong in PvP, but Gunnery lacks the proper talent synergies to justify using Explosive Round, so Trauma Stabilizers is always better.
![]() Parallactic Combat Stims
Parallactic Combat Stims
- Effect: You recharge 20 Energy Cells when stunned, immobilized, knocked down, or otherwise incapacitated. Additionally, your next Tech ability deals 10% extra damage or healing.
- Recommendation: Never take this. You can’t make use of the additional Energy Cells, while the damage boost is small and more likely to boost the damage dealt by a Grav Round than a Demolition Round. Trauma Stabilizers is more useful.
![]() Trauma Stabilizers
Trauma Stabilizers
- Effect: While Reactive Shield is active, you generate a stack of Trauma Stabilizers each time you take direct damage. Stacks up to 10 times. When Reactive Shield expires, each stack of Trauma Stabilizers instantly heals you for 4% of your maximum health
- Recommendation: Always take this. At 10 stacks, you heal for 40% of your max health when Reactive Shield ends, which is quite significant. Unfortunately, it doesn’t mention the stacks building only from single-target damage either, so it works the same as Echoing Deterrence and Diversion’s Decoy.
Gearing and Stats Priorities
Tactical Items
 Primed Ignition Primed Ignition |
|---|
| Effect: Vortex Bolt causes its target to burn for 12 seconds. Boltstorm, Demolition Round, and Grav Round all tick its damage. |
| Recommendation: This is your default tactical item. It provides the greatest single-target DPS increase compared to the other Gunnery tacticals and is in general one of the strongest tactical items in the game. Unfortunately, the large damage increase comes in the form of a 12s DoT, which significantly hampers Gunnery’s otherwise exceptional target swapping capabilities. It still does some damage as a DoT, but the bulk of it will come from the additional ticks from your abilities that cause it to tick, so if you have to target swap very frequently, it will be difficult to get as much of a benefit out of it. That said, the incredible DPS increase provided by this tactical means you’ll still use it in all group content. As I’ve already mentioned, Primed Ignition also provides a great cornerstone around which you can structure the rest of your rotation by helping you to keep track of your Curtain of Fire proc. |
 Gyroscopic Stabilizers Gyroscopic Stabilizers |
|---|
| Effect: Reduces the cooldown of Mortar Volley by 20s. In addition, Mortar Volley deals 25% more damage to targets affected by your Gravity Vortex. |
| Recommendation: This is your AoE tactical item. It makes Mortar Volley useable a lot more frequently and powerful enough to deal considerably more damage per GCD than Grav Round, though not nearly enough to match the single-target DPS increase of Primed Ignition. I would strongly consider using it in solo content, but that’s about it. |
In our Catalog of all Tacticals in SWTOR you will find information about all other Tacticals that we didn’t list in this guide. You may find something adequate that is also cheaper and easier to obtain for your needs while you work on getting the recommended one for your combat style and build.
Legendary Items
BioWare has removed set bonuses from the game and replaced them with Legendary Items, which are just implants with old 4 or 6-piece set bonus effects on them, so rather than needing to collect 4 pieces of a gear set to get the 4-piece set bonus, or 6 pieces for the 6-piece, you’ll get either a 4 or 6-piece set bonus effect on an implant.
This was done to improve customization (now you can mix and match set bonus effects), make them easier to obtain, and consume less inventory space, though unfortunately, we don’t really get to experience the benefit of this customization as Gunnery. Here are the Legendary Items you should use as a Gunnery Commando:
- Concentrated Fire – Activating Supercharged Cell makes your next High Impact Bolt or Bacta Infusion an autocrit.
- Overcharged Cells – Vortex Bolt builds 3 stacks of Supercharge.
 Concentrated Fire – Activating Supercharged Cell makes your next High Impact Bolt or Bacta Infusion an autocrit.
 Overcharged Cells – Vortex Bolt builds 3 stacks of Supercharge.
Both implants are similarly valuable to Gunnery, though Assault Specialist benefits more from Overcharged Cells, so you might want to pick up that one first. Also, please don’t waste your autocrit from Concentrated Fire on Bacta Infusion unless you can’t deal damage and won’t be able to before the proc falls off.
You can learn more from the dedicated Guide to Legendary Items in SWTOR 7.0. It also offers a full list of all currently available Legendary Implants in the game.
Stat Priority
As a DPS, you’ll need to care about 3 different stats: Accuracy, Alacrity, and Critical Rating. There are thresholds associated with Accuracy and Alacrity, so you need to prioritize reaching those thresholds to get the full benefit from each stat point.
- Accuracy to 110.00% – Before investing in any other stats, make sure you hit 110% Accuracy because attacks that miss deal 0 damage, and no other stats matter if the attack doesn’t land. Furthermore, many procs require you to actually deal damage, not just activate the ability, so you can mess up your rotation if an attack misses. You need 110% Accuracy in PvE and not just 100% because bosses have a 10% chance to dodge/resist player attacks, and any percentage over 100% reduces this chance. Anything over 110% is not helpful in PvE, so you do want to go over 110%, but with as little excess as possible.
- Alacrity to ~7.5% – Once your Accuracy is above 110.00%, it’s time to think about Alacrity. It has the second-highest priority because you do not get the full benefit of the stat unless you surpass one of the GCD thresholds. It’s less important than Accuracy because your attacks still need to hit. You need 7.15% Alacrity to get from the 1.5s GCD to the 1.4s GCD. However, as you approach 7.15%, you actually start getting a mix of 1.4s and 1.5s GCDs, resulting in an experience that feels clunky and inconsistent. You need roughly 0.4-0.5% more Alacrity past the exact threshold to effectively eliminate those 1.5s GCDs. Please note that this discipline gets +3% Alacrity from their stance, so you don’t need as much to reach the desired threshold, and it is more practical to go for the 1.3s GCD if you decide to use the Zeal (Cyan) Alacrity Guild Perk Set Bonus.
- Critical gets the rest – After you’ve got your thresholded stats sorted out, you can start investing in crit. To be clear, Critical Rating is still valuable; it just has the lowest priority because it does not have a threshold associated with it that you need to meet to get the most out of each point of stat as the other tertiary stats you care about do. Critical Rating increases both your Critical Chance and Critical Damage. If you have a single effect that increases your Critical Chance by 100% all on its own (it can’t be from multiple effects combined), all of the Critical Chance percentage for that attack gets added to your Critical Damage percentage, causing the attack to deal supercritical damage.
Find out which mods to purchase from Hyde and Zeek in SWTOR on the Fleet to minimize spending and optimize your build. The dedicated guide contains tips for all roles in both PvE and PvP.
Augments
Augments allow you to put additional stats on every piece of gear except tactical items. Since the stats come in much smaller amounts, augments allow you to fine-tune your gear to provide almost as much of each total stat as you want.
To equip an augment, you must first use an Augmentation Kit that matches the crafting grade of the augment (ex. Grade 11 augments require MK-11 Kits).
The 296, 302, 310, and 318 iRating augments released with 7.6 and 7.7 are BiS. The higher the iRating, the more stats they offer and the more expensive they are to make or buy, though most of the benefit is provided by having augments at all, and the base-rarity blue 296 augments are the cheapest.
Almost everyone should buy the blue 296 augments because they provide the greatest bang for the buck, but you do have multiple options:
- Gold 318 augments (Superior [Type] Augment 86). These are overall best-in-slot (BiS) and offer ~25% more stat than gold 300 augments, which is roughly equivalent to 4 additional gold augments. They’re extremely expensive and completely unnecessary for all content in the game, so I only recommend them to the wealthiest individuals.
- Purple 310 augments (Advanced [Type] Augment 86). They offer ~13% more stat than gold 300 augments, which is roughly equivalent to 2 additional gold 300 augments worth of stat. They are cheaper than the gold 318s, but they’re in the same price bracket in terms of affordability, so there’s no reason for anyone to use them at this point.
- Blue 302 augments ([Type] Augment 76) are the mid-tier augments. For all intents and purposes, these are equivalent to the gold 300 augments from 6.0. I only recommend them if you’re close to a stat threshold or don’t already have gold 300 augments and want something a bit better than the blue 296s.
- Blue 296 augments ([Type] Augment 83) are the most basic tier of augments for level 80 players. They are pretty cheap as only the schematic comes from the associated lair boss, Propagator Core XR-53. You don’t need any Corrupted Bioprocessors to craft these augments.
Check out our 7.7 Augments Guide for everything you need to know about augmenting gear!
Earpiece
Which Earpiece you use will depend on what specific tertiary stats the rest of your gear and augments provide. Typically, you’ll need to use either an Accuracy (Initiative, yellow icon) or Alacrity (Quick Savant / Nimble, green icon) Earpiece.
Crystals
Advanced Eviscerating Crystals are the best. They are the only type of crystal that increases one of your tertiary stats. Since the stat pool for tertiary stats is much smaller than that of primary or secondary stats, adding 41 is a more significant upgrade than it would be if you were to add 41 to one of the primary or secondary stats (mastery, power, or endurance).
Relics
I recommend the Relic of Focused Retribution (FR) and Relic of Serendipitous Assault (SA) for all PvE content. Each relic offers a proc; FR’s proc boosts your Mastery, whereas SA’s proc increases your Power stats. If you have the choice, purchase the Relic of Focused Retribution first because in equal amounts, and only in equal amounts, Mastery offers more of a DPS gain than Power.
Biochem Items
I recommend the Advanced Kyrprax Proficient Stim, Advanced Kyrprax Medpac, and Advanced Kyrprax Attack Adrenal for all PvE content. Grade 11 Biochem items from the crafting tier released with 6.0 remain BiS. Since they haven’t been updated to level 80, their effects are weaker than they should be, though they can still have an impact.
You should use the Proficient Stim as a DPS because it provides 2 tertiary stats that you need, Accuracy and Critical Rating, and tertiary stats are harder to come by and what you build your gear around. You should use the Attack Adrenal because it provides Power, which typically provides the greatest DPS increase, though it’s also more consistent, which is what you need for DPS checks.
Regarding the Zeal Guild Perk Alacrity Boost
If your guild uses the Zeal (cyan) guild perk set bonus, which gives a passive +5% Alacrity boost, you won’t need nearly as much Alacrity stat to reach your desired Alacrity threshold. My recommendations do not factor in these boosts, so if you have one, you’ll need to pay attention to percentage thresholds rather than the stat amounts. Just keep adding one augment at a time until you reach the desired percentage.
Guild leaders, I recommend using the Fortune (yellow) guild perk set bonus instead. It grants +5% Critical Chance and also boosts the Critical Rate and Time Efficiency of all Crew Skills by 2%. The reason for this is that you don’t have to change the way you gear in order to benefit from the effect.
Neither effect works in MM raids or PvP, so if you or your guild members do either of those activities, you’ll need to tweak your gear to reach the desired threshold depending on the activity, which I find super tedious. Even if your guild doesn’t do those activities, leaders still need to actively maintain the set bonus because your gear will become suboptimal on top of losing the bonus, whereas it’s not a big deal if your crit is a little lower for a bit.
The Alacrity boost is much stronger than the Critical Chance boost. Still, PvE content isn’t balanced around these guild perk set bonuses anyway, so I find it better to have a smaller boost I don’t have to worry about than a larger boost I have to manage.
Best Gunnery Commando Builds in 7.0
These are the builds that I recommend for different types of content and situations. The Build Essentials are what I consider to be the core components that make the build viable. Without them, the build no longer accomplishes its primary function. Build Essentials can include important ability tree buffs, a tactical item, and even legendary items occasionally. The ability tree buffs that aren’t listed as Build Essentials can be changed as needed without compromising the integrity of the build, though I have included a full set of default choices that will be most consistently helpful in accomplishing what the build sets out to do.
Boss Fight Build
Build Essentials:
 Gravitating Bolt
 Charged Barrier
 Reflexive Shield Diversion
![]() Adrenal Surge Primed Ignition Tactical
Adrenal Surge Primed Ignition Tactical
In boss fights, your top, coequal priorities are executing mechanics and dealing maximum, typically single-target, sustained DPS. The talents in this build enable maximum sustained DPS, though sometimes you will need to adjust to account for specific mechanics or provide utility to your group. You’ll also be taking talents that increase your survivability and active mobility because you can’t deal damage or do mechanics if you aren’t alive or in range.
The boss build is inferior against regular enemies because your AoE is weaker and less immediate in exchange for being more efficient and sustainable. You’re relying on your target to be alive for an extended period of time to deal damage, and enemy health typically doesn’t line up with a full-fledged boss rotation.
This build is not as performant in PvP because your CC is primarily limited to whatever you get for free, and your instantaneous burst will be weaker or outright non-existent.
There’s nothing that really stands out about Gunnery’s boss fight build and it’s quite similar to what was available in 6.0. You may want or need to switch to Echoing Deterrence, Thermonuclear Plasma, Customized Round, or Overclock depending on the makeup of the boss fight.
Solo Content Build
Build Essentials:
![]() Grav Trio Sticky Grenade
Grav Trio Sticky Grenade![]() Thermonuclear Plasma Diversion Reflexive Shield
Thermonuclear Plasma Diversion Reflexive Shield![]() Adrenal Surge
Adrenal Surge![]() Trauma Stabilizers Gyroscopic Stabilizers Tactical
Trauma Stabilizers Gyroscopic Stabilizers Tactical
In story content, on planets, and in flashpoints, you’ll almost exclusively encounter regular enemies AKA trash mobs. While you can technically use DPS to measure performance against trash, it is far more appropriate to think in terms of how many GCDs it takes to defeat each enemy and a whole group, and which talents get you over the threshold and actually reduce the number of hits to kill.
As of 7.0, SWTOR now offers dedicated talents and tactical items that are designed and balanced for use specifically against trash mobs.
These talents almost always have effects that trigger when you specifically defeat an enemy or when you enter or exit combat. They expand single-target attacks into powerful AoEs or reset cooldowns on specific abilities, often with a massive yet short-lived, damage boost attached to it.
These factors come together to create a truncated rotation that incentivizes a high APM and deals enough damage to defeat an entire group of trash in a flashy way in a matter of seconds.
Yes, trash mobs pose no threat to someone more invested in the game like you, dear reader. The advantage of making such a build is that they genuinely deal more DPS. My testing with Assassin showed a ~25% reduction in TTK, and the combat experience was a lot more fun.
These effects aren’t suitable in boss fights because their effects last such a short time and can only trigger reliably when you are in a small group and are fighting enemies that have a small amount of HP.
These same deliberate limitations also prevent them from being effective in PvP because it’s so difficult to predict exactly when your opponent will die, and such buffs aren’t useful after the fact anyway. Furthermore, you often have to give up effects that are more useful in PvP to take these talents.
Buckle up! You’re gonna be firing lots of explosives at everything! Make sure you have Gravity Vortices on everything and then unleash your Demolition Round. Don’t target the enemy with the most health when using Demolition Round.
I recommend using Gyroscopic Stabilizers as the tactical because it will help you take out groups of adds faster, while the other single-target options are often excessive. Mortar Volley deals more single-target damage than Grav Round with that tactical, but consider if it would be off cooldown in time for your next AoE opportunity if you decide to use it against a single target.
PvP Build
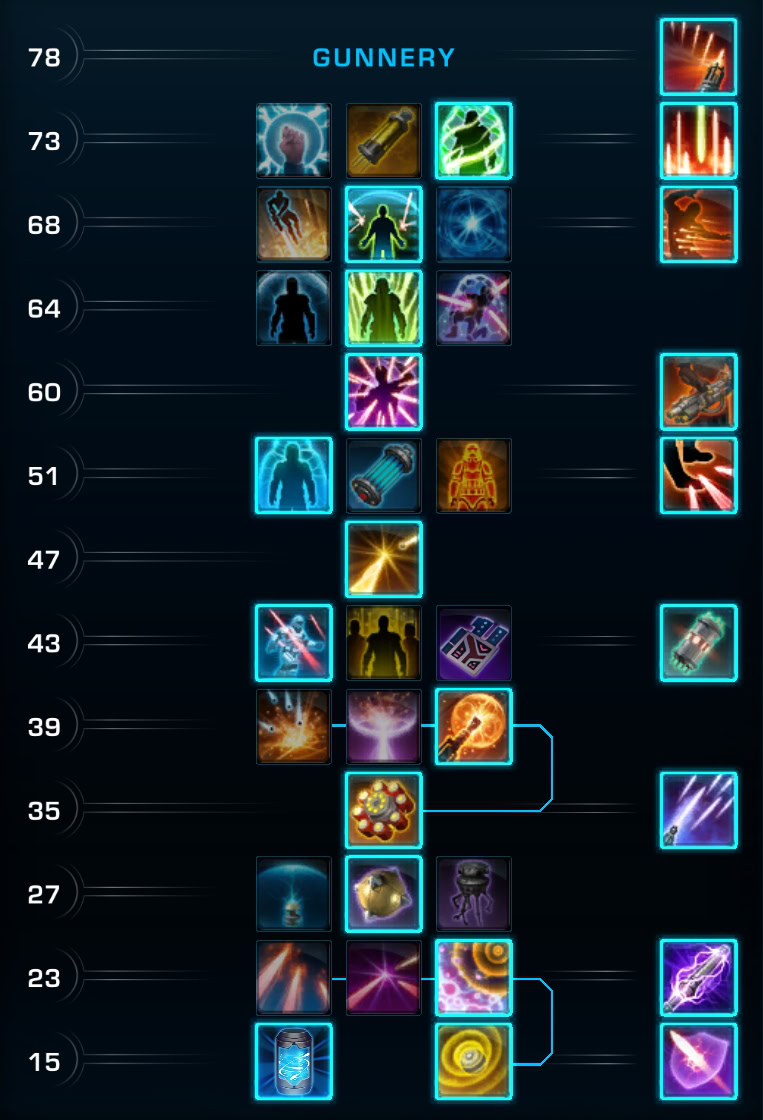
Build Essentials: Gravitating Bolt Diversion Reflexive Shield![]() Adrenal Surge
Adrenal Surge Burning Bright Tactical
This build is meant for PvP because it trades sustained DPS for spike damage. It also offers exceptional survivability that requires very little effort or skill to utilize.
Your DCD rotation alternates Reactive Shield + Diversion with Echoing Deterrence (if available) or Adrenaline Rush (if not). Reactive Shield is usually just a little too weak to keep you alive the whole time on its own, as is Diversion, so you combine them.
Once you get down to about half health again after using that combo, use Echoing Deterrence. You’ll need to pop Reactive Shield and Diversion again as soon as they’re up if they’re still focusing you, but if your opponent is smart, you might need to use Adrenaline Rush instead.
If you just need a few more seconds, buy time with your Warzone Adrenal and Warzone Medpack.
The DPS priority system is basically the same in PvE and PvP, though you won’t have Primed Ignition to help you keep track of Boltstorm’ cooldown reset. It’s easy to forget that you need to use it often, especially with it getting interrupted so much, so I recommend prioritizing it over everything else.
You can also use Thermonuclear Plasma instead of Customized Round. The AoE is more fun, but Customized Round offers more reliability to your spike damage. Neither is very high impact.
Openers, Rotations, Priorities
Opener
This is the rotation you use at the very beginning of the fight and for burst DPS checks. It can be a little different than the standard rotation because everything is off cooldown, including your OCDs and relic procs. It’s important to get as much damage as possible while all of your damage boosts are available to maximize their impact.
- Grav Round (pre-cast)
- Electro Net
- Supercharged Cell
- Adrenal
- Vortex Bolt
- Demolition Round
- Boltstorm
- Grav Round
- Grav Round (should proc Boltstorm)
- High Impact Bolt
- Diversion (for threat drop)
- Boltstorm
- Priority System
 Electro Net
 High Impact Bolt
Gunnery’s opener is basically just following the priority system when you have all of your abilities available to you. I do want to point a few things out:
This opener assumes that you are using the Primed Ignition tactical. If you aren’t, you’ll want to delay Vortex Bolt. If you’re using the Burning Bright tactical, you’ll want to delay Vortex Bolt until after your first Boltstorm, which you can use immediately after Demolition Round.
The second Grav Round after the first Boltstorm should proc your next Boltstorm, but it’s okay to delay it because it also gives you your 5th stack of Charged Barrel, which fully buffs the damage of the next High Impact Bolt and we want to get that on cooldown as soon as possible.
Supercharged Celerity and the Primeval Fatesealer Relic are used prior to Electro Net so that the cooldown on Electro Net is reduced, but Supercharged Cell and the Adrenal are used afterwards because you’ll only be missing out on a tick of buffed damage while those abilities have the potential to buff a whole extra ability if they’re used after. Try to wait to activate them until the end of Electro Net’s GCD if you can.
Diversion is used there for the purpose of reducing your threat. Tanks have 12 seconds at the beginning of the fight where the boss is forced to attack them when using their single and AoE Taunts back to back. This assumes that tanks will be their taunts immediately, and that won’t be the case but exact timing will vary depending on which tank classes your group has and what fight you’re doing (tanks can’t always afford to use their Taunts like this), so this will give you a little bit of wiggle room. The taunt itself will likely fall off some time during your Boltstorm channel, but you can ask your tanks after how many GCDs they do their first Taunt and then wait that many GCDs after my recommended placement to use Diversion as well, but this is a nice rule of thumb.
Single-Target Priority
In Gunnery, you use a priority system because it is impossible to use all of your rotational abilities on cooldown, so when multiple high-damage abilities are available at the same time, a priority list is used to determine which one should be used first in order to provide the highest DPS and ensures that your most damaging abilities are being used as frequently as possible.
Primed Ignition Priority
- Vortex Bolt
- Boltstorm (only if there are about ~3 seconds left of Primed Ignition DoT or if it’s almost time to proc again)
- Grav Round (if you’re running late on proccing Boltstorm or Gravity Vortex isn’t applied)
- Demolition Round
- High Impact Bolt (with 5 stacks of Charged Barrel)
- Electro Net
- Hammer Shot (if you have too few Energy Cells)
- Boltstorm (only if Primed Ignition DoT is up)
- Grav Round
 Hammer Shot (if you have too few Energy Cells)
This priority assumes that you are using the Primed Ignition tactical. In my opinion, it is much easier to execute in practice, even though it may look a little more confusing at first glance. Here are some additional notes and rationale about the priority:
In the grand scheme of things, a few seconds delay on Electro Net isn’t going to reduce the number of uses you get during a fight, but delaying your other abilities by a few seconds will add up more quickly. It still is one of your most damaging abilities though, so you don’t want to delay it too long.
Demolition Round and High Impact Bolt do similar amounts of damage, though if you want to be super duper optimal, Demolition Round does slightly more damage. However, you’ll get more damage out of an autocrit High Impact Bolt as the last GCD in a Supercharged Cell window than you will out of a Demolition Round, so it really depends on the situation regarding which one you use first.
You’ll find the Charged Barrel proc to be in short supply sometimes, so if you only have 1 GCD to spare before you have to use Grav Round to proc Boltstorm because you’re running late, it’s better to use High Impact Bolt first there as well. High Impact Bolt is also cheaper to use, so if you’re running low on Energy Cells, it’s probably better to use High Impact Bolt first. If you don’t want to think about this stuff at all, you’re not gonna miss out on much DPS either way.
Really the only things that need a Gravity Vortex are Demolition Round and High Impact Bolt (and Mortar Volley with Gyroscopic Stabilizers), and while the armor debuff is nice to have, missing out on having it for a single ability will have less of an impact than delaying your abilities too much.
If you have a choice between using Demolition Round/High Impact Bolt and Boltstorm and there’s only about 3 seconds left on the Primed Ignition DoT, you’ll deal slightly higher damage by using Boltstorm than you would if you delayed Boltstorm by a GCD and only got half of the ticks to trigger the DoT. Also, the alternative will be to delay Boltstorm for 3 more GCDs, until the next Primed Ignition DoT, which is far too long. At that point, you’ll have missed out on a whole Boltstorm proc, which is not a good idea.
Vortex Bolt should be used on whatever you plan to be attacking for the next 12 seconds. If you’re about to switch, it’s okay to delay Vortex Bolt for a GCD or two until you switch, otherwise you should hold off on switching if you can at least until after your Boltstorm if possible.
It’s important that you’re doing something in every single GCD. Don’t wait around to see if Boltstorm got procced (you need to be able to anticipate it, which takes practice) or if one of your abilities is about to come off cooldown. You will not get to use all of your abilities on cooldown. Some of them will be delayed. This is completely okay and it’s why this spec has a priority system and not a rotation.
Due to the number of things that Grav Round does, you have to be opportunistic and preemptive with your Energy Cell management in AoE situations because AoE attacks are more expensive than your regular rotation.
The fewer benefits you get out of Grav Round, the more important it becomes to use that GCD on Hammer Shot instead so you are able to use Grav Round on the GCDs where it does the most without having to worry about running out of ammo. Grav Round can do the following things:
- Generate Charged Barrel stacks
- Proc Boltstorm
- Tick Primed Ignition DoT
It’s important to practice executing the priority system on a dummy at least until you can execute it without having to constantly look at your bar.
If there is downtime during a fight, remember that you can precast things and often place your DoTs on shortly before the boss can actually take damage. You won’t get the full damage of your DoTs but you also won’t have to spend a GCD to apply them when the boss is vulnerable, so you will end up dealing more damage.
The key to being a great DPS is to always be DPSing. Using any damaging ability is better than just standing there not doing anything. Some DPS is better than zero DPS. Even if you mess up, keep doing the rotation! Unless there’s a mechanic that prevents you from dealing damage or forces you to stop DPSing, you should not stop DPSing.
If a tank is telling you to stop DPS or hold off for a few seconds because they can’t keep aggro, don’t listen to them, they’re the one that doesn’t know the proper way to keep aggro. Tell them to git gud and read a tank guide!
Static Rotation Alternative
Some players have demonstrated greater success on the dummy by using a mostly static rotation. Supercharged Cell is used as often as possible but its activation floats around.
- Vortex Bolt
(Primed Ignition active)
- Demolition Round
- Boltstorm
- Grav Round
- Boltstorm (only if Primed Ignition DoT is up)
- Grav Round
- Grav Round
- Grav Round
(Primed Ignition falls off)
- High Impact Bolt (with 5 stacks of Charged Barrel)
- Grav Round
- Hammer Shot (as needed)
Repeat
This rotation consistently delays Demolition Round and High Impact Bolt so that the former is always the first ability after Vortex Bolt, since it can tick Primed Ignition, and the latter is always outside of Primed Ignition since it doesn’t tick it.
Vortex Bolt is by far and away the most important ability to use on cooldown and you almost always have to delay something anyway, so this structure can yield results.
The problem is that Supercharged Cell needs to be used as often as possible and will float around, which screws up the cooldowns on everything.
You have a few GCDs to work with to keep Vortex Bolt, Demolition Round, and High Impact Bolt in roughly the right spot, but it’s super easy to desync the cooldown reset on Boltstorm.
You really want one of those 3 Grav Rounds preceding High Impact Bolt to reset the cooldown on Boltstorm because, if it ends up being later, it won’t be up in time to trigger on the Grav Round between both Boltstorm and it’s harder to predict when it will happen.
This isn’t the end of the world in terms of DPS. It’s okay to use Boltstorm later and move the Grav Rounds up, but that causes a cascade of other delays and makes you less resource efficient than you can afford to be.
You also end up following more of a priority system at that point, which betrays the purpose of using a static rotation at all.
I don’t think it’s worthwhile because the DPS gain is so minimal and will be worse unless you’re absolutely perfect with it.