SWTOR Vengeance Juggernaut PvE Guide (DPS) for beginners and more experienced veterans. Includes everything from Skills to Choices, Rotations, Gearing, Builds, and Tips!
Table of contents
Introduction to Vengeance Juggernaut
Vengeance Juggernauts bloody the battlefield by channeling their rage into a flurry of Force-empowered lightsaber swings.
Vengeance is pretty average when it comes to sustained, purely single-target DPS. It’s not one of the strongest specs, but it doesn’t have any glaring weaknesses in that department either. Thanks to Enrage having expanded functionality alongside specific ability tree buffs, Vengeance is capable of better burst than it has been in the past, though it still can’t hold a candle to actual burst DPS specs.
By far the biggest strength of Vengeance Juggernaut is its incredible potential for AoE damage. Broadsword did rightly nerf it in 7.8, but it’s still powerful thanks to Bloodbound and Shatter Burst.
In terms of survivability, DPS Juggernaut is technically in a worse place compared to 6.0, though the nerfs to survivability don’t affect their performance in PvE content very much at all.
Saber Reflect is only useful against specific attacks in certain fights and you’ll always have access to a cheese ability whenever you need it. That said, almost all disciplines received some sort of survivability nerf in 7.0, and in PvE, I think Vengeance actually came out less scathed than a lot of other disciplines.
Major Changes in 7.0
Utility points are gone! Instead, there is a new system called the Ability Tree. Each discipline has 8 choices where they pick 1 of 3 options. The options have several similarities across the Combat Styles:
- 2 choices buff a discipline-specific ability (2 abilities, 1 choice each).
- 3 choices which are just old Utility effects. These choices are almost always the same for all disciplines.
- 2 choices where you’re picking between 1 ability or 1 of 2 passives. One of the ability choices tends to be an offensive cooldown (OCD). The other seems to be related to PvP balance, but there isn’t a clear pattern beyond the choice forcing players to decide which of 3 capabilities they want to keep.
- 1 choice where you’re picking 1 of 3 abilities. One of the abilities is always one of your primary CCs, either the 8s mez or 4s hard stun. Another of the abilities is the movement ability with the longest cooldown. The third option is less consistent, it seems to be there as an extra balance lever for BioWare since some abilities that got locked away are more impactful than others. The 3 abilities are almost always the same for each discipline.
This means almost all disciplines had 5 abilities locked away behind choices with the option for players to keep up to 3 of them. In addition, many extremely situational abilities were pruned entirely. Vengeance permanently lost access to 2 abilities:
- Chilling Scream
- Guard
Guarding is now a tank-only ability, which is the logical next step since the nerf to Guard for DPS partway through 6.0 was ineffective at stopping its ubiquity in PvP.
Battle rezzes in general are now healer-only, but there is no longer a global 5 min lockout on those abilities, so it’s treated just like any other ability, albeit with a much longer cooldown.
Group Composition Tips
Since the damage dealt by Vengeance is split between several different damage types, it is a bit more dependent on having a good group composition than some other specs, so having multiple Vengeance Juggs in the same group could hurt your overall damage output. In order to deal maximum damage, Vengeance requires 3 other DPS debuffs:
DPS Debuff
Presence of debuff
increases DPS
by approximately
Force
3%
Internal/Elemental
2.5%
AoE
1.25%
Total DPS Gain:
6.75%
Since both Sorcerer DPS specs and Hatred Assassins provide both the Force and AoE debuffs and also benefit from at least 1 of the debuffs provided by Vengeance, they are ideal classes/specs to bring alongside a Vengeance Jugg. Another great DPS class to bring is Operative since both specs provide the Internal/Elemental debuff (which Vengeance needs) as well as the Tech damage debuff, which will allow the final DPS to bring whatever they want.
To be clear, the disciplines and Combat Styles I mentioned above are by no means required and are not the only ones that provide the DPS debuffs required by Vengeance, they are just the most efficient and allow the 4th player to bring whatever they want.
So long as each DPS is given the debuffs they need (or at least the most impactful ones), you’ll be fine. Don’t fixate on having a 100% ideal composition.
DPS Mindset
How can I do as much damage as possible in each GCD (global cooldown, 1.5 second duration before you can activate another ability) given the constraints of the fight? Which ability do I use right now that will provide me the most DPS? How can I maximize my uptime? If I’m not activating an ability right now, why not? Can I use one more ability before I need to move? Can the healers deal with me sitting in a circle for an extra GCD without too much stress?
Check out the SWTOR Damage Types and Damage Mitigation guide for more details on how they differ from each other and how to determine which attack does what damage!
Our in-depth analysis and breakdown of the relationship between mechanics and strategy in boss fights in SWTOR may also help you perform better in group content.
Abilities Explained
Please have the game open while reading through the next few sections. I will not be writing out ability descriptions and I will only be transcribing the components of discipline passives that directly relate to the ability and rotation. This forces you to read through what everything does so that you can understand what all of your passives and abilities do as well as locate these abilities in-game. Make sure you place all of these abilities on your bar in an order that makes sense to you.
Single-Target Rotational Abilities, Attributes, and Important Procs


 Shien Form
(Discipline Passive)
I want to start this section by going over Shien Form, which is a discipline passive. It used to be an actual ability way back in the day, but the devs decided to do away with stances in order to streamline things. For the sake of nostalgia, I kind of miss it, but at the same time, I get why the devs decided to just make all stances passive.
Every single spec always had an optimal stance for DPS purposes and they were always active, so the only thing they really did was make it so people playing those specs sometimes did way less damage than they were designed to do if they were using the wrong stance or didn’t have one active. Yes, Jugg, Assassin, and PT could use them to switch to their tank stances for defensive purposes, but that only made things harder to balance.
In any case, I am choosing to begin this section with this passive because it has a significant effect on the rotation. Shien Form Increases all damage dealt by 6% and movement speed by 15%. In addition, all attacks that consume rage will refund 1 rage when used. The first part is pretty straightforward. Every melee spec with the exception of Rage has access to a 15% movement speed boost if they want it.
For those of you that are interested in lightsaber form lore, I would like to point out that Shien Form is depicted in this game as being objectively better than Juyo Form (used by Annihilation Marauders). Shien Form provides several buffs including an always active 6% damage dealt increase, meanwhile base Juyo Form only gives a up to a 4% damage dealt increase that has to be built up with multiple melee strikes and the buff falls off after 30 seconds.
Now it does get a bit better later on damage-wise by increasing the crit chance of your bleed effects by 1% per stack of Juyo Form thanks to the passive called Juyo Mastery, but even that only effectively increases damage dealt by an additional 3%. It takes a completely unrelated discipline passive to bring the number of stacks of Juyo from 4 to 6, but then we’d have to weigh that against Shien’s 15% movement speed boost and Rage refund mechanic. Overall, I just really don’t think it works out in Juyo’s favor here, but I digress.
The Rage refund mechanic is what is actually impactful to the rotation. Basically, it somewhat obfuscates the true Rage costs of abilities and really puts the focus on just making sure you have enough Rage right now to activate your next ability and somewhat inhibits you from thinking about where you’ll be down the line.
This is further complicated by the fact that different abilities have vastly different Rage costs. Some abilities actually generate Rage rather than consume it while others require that you have almost half your bar filled with Rage in order to activate them. All of this causes you to focus on being in the moment and making split-second decisions rather than looking ahead. I guess that fits with the whole concept of vengeance though as well as Anakin’s reckless behavior. He was a Shien master after all.
 Impale
(Melee/Energy/Direct/Single-Target/Instant)
This ability is pretty straightforward, it deals a high amount of damage upfront and applies a short, weak DoT. Since Impale deals so much damage, it is important to use it on cooldown. Its damage output also makes it the best ability to use with Furious Power.
Impale costs 4 Rage to activate, meaning you only spend 3 to use it. You’ll almost always have enough Rage to activate it, though if you aren’t using Sundering Assault on cooldown, you may not have enough Rage to activate subsequent abilities. Impale has 1 discipline passive associated with it that is relevant to your rotation:
Eviscerate
Impale causes the target to bleed for a small amount of Internal damage over 6 seconds. In addition, dealing damage with Impale applies the Melee damage DPS debuff. This damage dealt by the DoT is equal to about half of the damage dealt by Impale itself, so the initial hit accounts for about 70% of Impale’s overall damage. It’s really just important to know that Impale is one of your abilities that applies a DoT. The melee DPS debuff is only relevant if you have an Assassin / Shadow in the group since Marauders / Sentinels also provide the Melee debuff and Assassins / Shadows are the only other DPS spec that deals any rotational melee damage.
 Force Scream
(Force/Kinetic/Direct/Single-Target/Instant)
This ability is similar to Impale, though it isn’t quite as strong. It may feel like Force Scream costs more Rage than Impale, but they do both cost 4 Rage (and refund 1 with Shien Form). Force Scream has 1 proc and 1 discipline passive associated with it that are relevant to your rotation:
Draining Scream
Force Scream causes the target to bleed for a small amount of internal damage over 6 seconds. This DoT is effectively identical to Impale’s Eviscerate DoT.
Savagery
Shatter, Impale, Hew, and Vengeful Slam increase the critical chance of your next Force Scream by 50%. Stacks up to 2 times, lasts 15s. If you are doing your rotation properly, your next Force Scream will always be an autocrit. Since Impale and Vengeful Slam are used on cooldown and have the same cooldown duration as Force Scream, it’s almost impossible to mess this up. The autocrit is very important for the ability to deal a good amount of damage though since only an autocrit of Force Scream deals more damage than a regular hit of Impale.
Vengeful Slam
(Force/Energy/Direct/AoE/Instant)
This ability is a fair bit weaker than Force Scream and Impale in single-target situations and for this reason, some people consider it to be more of a filler, but I don’t think it’s good to think of it that way since it still needs to be used on cooldown.
This ability is also responsible for Vengeance’s capacity to deal AoE damage rotationally and provide the armor debuff in an AoE fashion thanks to the Crushing Fist ability tree choice. I would also like to point out that this ability deals Force damage, not melee damage, so it cannot be buffed by Furious Power. Vengeful Slam has 2 discipline passives associated with it that are relevant to your rotation:
Bloodbath
Vengeful Slam spreads your bleed effects to all targets it damages if at least one of the targets is already affected by your bleeds. This passive makes Vengeful Slam your DoT spread ability.
Ruin
The cooldown of Vengeful Slam (and Smash) is reduced by 6 seconds and no longer consumes Rage. This passive now appears to be completely hidden, but basically, all you need to know is that Smash initially costs Rage and Vengeful Slam replaces Smash, so Vengeful Slam counts as an ability that consumes rage for the purposes of things like Shien Form, so it still refunds 1 Rage whenever it is activated.
Since Vengeful Slam is free, it effectively generates 1 Rage whenever it’s used, though sometimes that 1 Rage will get wasted due to how much Rage you generate, but it’s okay to ignore that. The ability is cheap and damaging enough that it’s worth using on cooldown regardless of whether you can actually benefit from the Rage generation. The cooldown reduction is already baked into the ability as well, the only thing you really need to know is that this passive makes it so that Vengeful Slam has the same cooldown duration as Force Scream and Impale.
Shatter
 Shatter
(Force/Internal/Direct and Periodic/Single-Target/Instant)
This is your most damaging ability. Shatter has an initial direct damage hit that deals about as much damage as your stronger semi-rotational filler abilities like Saber Throw and Vicious Slash Force, followed up by a 12s DoT that can deal almost as much damage with a single tick as your other bleed DoTs do over their entire durations. Shatter has 2 discipline passives associated with it that are relevant to your rotation:
Rampage
Shatter finishes the active cooldown on Ravage and generates 3 Rage. Both components of this discipline passive are crucial to your rotation:
- The cooldown reset on Ravage means that you don’t have to use Ravage on cooldown but rather only make sure that it gets used before you next have Shatter available. It also effectively reduces Ravage’s cooldown which is longer than Shatter’s normally. Since Ravage deals so much damage with the Hemophilic Slash tactical, you should continue to use Shatter to reset its cooldown even if it will clip Shatter’s DoT.
- The 3 Rage refund is on top of the 1 Rage refund from Shien Form. Since Shatter costs 5 Rage, you need to have 5 Rage to activate the ability but it will only effectively cost 1 Rage to actually use.
Bloodmaster
You deal 5% more bleed damage with your bleed effects for each different bleed effect present on the target (up to 15% total). The wording of this effect is a little vague in the game as to whether or not it applies to all bleed damage where it would function more like an invisible buff on you as opposed to an invisible debuff on specific targets. It’s difficult to test as the effective change is rather small, but as far as I can tell, it seems to increase the damage taken by each enemy on an individual basis depending on how many bleed effects they have specifically. In single-target situations, this effect doesn’t really matter a whole lot since you have so many other incentives to use your abilities that apply bleeds on cooldown already and you already want to use Ravage with Hemophilic Slash when as many bleed effects are active as well since that is a flat damage increase based on the number of ticks. Basically this passive just adds a damage increase in an interesting way.
Hew
(Melee/Energy/Direct/Single-Target/Instant)
This ability is super strong, it deals almost as much damage as Impale’s direct damage, though since you aren’t able to use it as often, it accounts for a smaller proportion of your total damage output. Hew has a 30m range, which is super nice and along with Saber Throw and Force Charge, it means you’ll basically always have something you can do when you’re not in melee range.
Since it deals so much direct melee damage, Hew is one of your best abilities to pair with Furious Power. Normally, Hew can only be used if the target has less than 30% HP, though it has a proc that allows it to be used at any health level:
Destroyer
Dealing damage with Ravage or one of your bleed effects has a 30% chance to trigger Destroyer, which finishes the cooldown on Hew and makes your next Hew consume no Rage and is usable on a target with any health level. Cannot occur more than once every 20 seconds. This effect is basically random, though because of Hemophilic Slash, it has a much better chance to trigger during Ravage than anywhere else in the rotation. Since the rate limit is long and the chance of it proccing is relatively low, you shouldn’t ever rely on being able to use Hew at any given time, just use one of your semi-rotational fillers if you have nothing for the next GCD if you can’t use Hew. The 20s rate limit is nice though, it gives you a lot of room as to when you actually have to use Hew. You basically just have to use it before the Destroyer proc falls off, so it has pretty low priority, really it should just only be used instead of one of your semi-rotational fillers. In addition, since Hew normally costs Rage and Destroyer makes it free, Shien Form will cause Hew to generate 1 Rage when used, just like Vengeful Slam. Finally, the Destroyer proc is the reason that Vengeance can’t use the War Bringer utility since a single use of Hew will consume both Destroyer and War Bringer. Would be nice if they made it so that the War Bringer utility just gave you a second charge of Destroyer instead.
When you get below 30%, Hew becomes usable without the proc. It has an 8.9s cooldown, costs 3 Rage (and then refunds 1 because of Shien Form). It’s still just as strong damage-wise without the proc, the big difference is the Rage cost. Make sure you have enough Rage when you use it unprocced where it won’t disrupt the rest of your rotation.
You don’t want to run into a situation where you don’t have enough Rage for a future ability since that will negate the extra damage you just dealt. You don’t have too many opportunities to use it without the proc though since you still need to use Ravage for Hemophilic Slash.
If you’re using the Cut to Pieces tactical, Hew does more damage than Ravage, so use Hew before (and instead of) using Ravage, provided you can afford the Rage. Hew doesn’t have any other discipline passives associated with it that are relevant to your rotation.
Sundering Assault
(Melee/Energy/Direct/Single-Target/Instant)
This is the weakest of your rotational abilities, though it’s the main way you generate Rage, so you’ll still need to use it frequently. Since the new Bloodrage ability that replaces Enrage offers a direct DPS increase, you’ll be using it on cooldown and this will make it so you don’t have to use Sundering Assault on cooldown anymore.
I’ll be sure to update the guide when I have a clearer idea about how Rage consumption will work in 7.0. Don’t hesitate to use Sundering Assault if you will need the Rage, but try to delay it for as long as you can without messing up the timing of your other abilities.
Sundering Assault also applies the Armor debuff, so in fights where you aren’t able to hit multiple targets with Vengeful Slam, there is no need to take the Crushing Fist ability tree option. The Armor debuff (along with all other raid ability tree option debuffs) lasts 45 seconds, so there is no chance of the debuff falling off since Sundering Assault’s cooldown is much less than that. Sundering Assault has 2 Combat Style passives that are relevant to your rotation:
Raging Assault
Reduces the cooldown of Sundering Assault by 3 seconds and increases the Rage it generates by 2. This passive should be removed from the game and its effects should be rolled into the base ability. All this passive does is create confusion because it makes the text that appears in the ability tooltip inaccurate. Just so we’re clear, Sundering Assault generates 7 Rage.
Endless Rage
You generate 1 Rage whenever you are attacked. Cannot occur more than once every 6 seconds. This passive isn’t strictly related to Sundering Assault, but I figured I’d mention it here. Basically, this just makes it easier to manage your Rage in actual combat, enabling you to use Vicious Slash and Hew unprocced as needed.
Ravage
(Melee/Energy/Direct/Single-Target/Instant)
Most of us miss the old 3s channel animation for Ravage, but at least for Vengeance, the fact that it’s only a GCD makes the rotation a lot simpler. If BioWare were to ever bring back the 3s channel for Ravage, I think there’s a good chance they would give Vengeance some sort of discipline passive that would make Ravage the instant ability it is now in order to maintain the elegant rotation they created.
Thanks to the Hemophilic Slash tactical, which makes Ravage refresh and tick your bleeds, Ravage plays an important role in Vengeance’s rotation. When you have Hemophilic Slash equipped, you’ll only ever be using the ability when at least two of your bleeds are on the target, resulting in the damage dealt per GCD being stronger than Force Scream. When it’s able to refresh all 3 bleeds, the effective damage dealt by Ravage is similar to that of Impale’s direct damage and Hew.
Now it is important to note that Furious Power charges should not be used on Ravage because Furious Power only increases your melee damage dealt, so it won’t affect the DoT ticks it triggers. This is unavoidable when Furious Power is activated when 4 charges are available, and that’s fine. The key thing is to just not activate singular charges of Furious Power on Ravage.
When Hemophilic slash is not being used, Ravage is still a strong filler, so make sure to use it before you’d use Vicious Slash, or Saber Throw (provided you’re in melee range), though it doesn’t have priority over any of your other rotational abilities.
Since dealing direct damage with Shatter resets the cooldown on Ravage, and Shatter is used on cooldown, and Shatter has a cooldown that is shorter than Ravage’s regular cooldown, you only have to make sure to use Ravage before the next time you use Shatter. This gives you the freedom to use it at ideal points in the rotation, rather than use it on cooldown. This doesn’t matter a whole lot when you’re using Cut to Pieces, but it does make a difference when it comes to the Hemophilic Slash tactical.
The damage contributed by Hemophilic Slash is roughly equivalent regardless of which DoT you refresh. Since Shatter has to be used on cooldown and its cooldown is equal to its duration, refreshing it doesn’t really do anything, therefore the only benefit is the extra tick you get.
Meanwhile, the individual additional ticks from the Force Scream and Impale bleeds don’t matter as much because they are so small, but the duration refresh is more significant since those DoTs don’t have 100% uptime, though you still won’t double the damage since Impale’s DoT will get clipped by needing to activate Impale again and Force Scream will only deal damage will sometimes only tick once or twice before getting refreshed.
Your ideal points in the rotation are immediately before and after Vengeful Slam. Before Vengeful Slam is the only time in the single-target rotation when you’ll have all 3 bleed effects on the target. After Vengeful Slam, you’ll only ever have 2 of your bleeds, though if you don’t use it by this point, you won’t always have an opportunity to use it before you have to reapply Shatter.
Be mindful when you switch targets; Ravage is only ideal to use before and after Vengeful Slam if you have 2-3 bleeds on the target. You still should use Ravage before your next Shatter, so sometimes you need to use it even when the DoTs aren’t up, but definitely try to avoid using Ravage when you don’t have at least 2 DoTs on the target.
You will also have 2 bleeds on the target immediately after Impale, though this location is worse than after Vengeful Slam for two reasons. First, you’ll be refreshing Impale’s bleed effect immediately after applying it, as opposed to an extra GCD after like you would if you used Ravage after Vengeful Slam to refresh Force Scream’s DoT, basically you don’t get as many DoT ticks by doing it there.
Second, you may miss out on using Ravage to refresh all 3 DoTs if you aren’t paying attention, which would be the case if Shatter was used immediately after the previous Vengeful Slam. This also makes you more likely to mess up a raid mechanic because you have to pay closer attention to your rotation.
By saving Ravage for before or after Vengeful Slam, you force yourself to check only when it’s ideal to activate Ravage and if you weren’t able to use it then for whatever reason, you don’t have to deliberate about whether or not to use it after Vengeful Slam because the answer will always be yes.
From my testing, I have not found a noticeable DPS increase to just always save Ravage for use before Vengeful Slam when you’ll have all 3 DoTs on the target, (though this might change if Major Fracture ends up being used).
The vast majority of the DPS increase comes from the extra tick of Shatter and significant duration extension on a single one of the other two DoTs because you don’t gain very much DPS from refreshing a DoT that was just applied and 10% vs 15% damage increase from Bloodmaster is pretty insignificant as well.
Ravage does not have any additional passives or procs associated with it that I haven’t already mentioned.
Other Semi-Rotational Abilities
All of the abilities in this section should only be used if you are unable to use one of your main rotational abilities. This will happen naturally in your rotation on occasion or if you are outside of melee range and Hew is unavailable. Never expend a charge of Furious Power on one of these abilities.


Saber Throw
 Saber Throw
(Melee/Energy/Direct/Single-Target/Instant)
This ability deals almost as much damage as Vicious Slash with the added benefits that it has 30m range, provides the Armor debuff thanks to the Sundering Throw discipline passive, and grants 3 Rage. Overall, Saber Throw is the best and most versatile of your semi-rotational filler abilities.
I want to draw attention to how fantastic it is that this is a non-rotational 30m range ability that provides the Armor debuff. In fights with multiple bosses, this enables you to easily maintain the Armor debuff on a second target, or even on two targets if you use it on cooldown and just alternate which boss you use it on.
The armor debuff has a 45s duration though, so if you only need to maintain it on 1 other enemy, just use Saber Throw by default on that other enemy whenever the gap in your rotation comes up. If you are the only player in your group that provides the Armor debuff, you should always use Saber Throw in this fashion.
The 3 Rage this ability generates isn’t required for the main rotation, though due to how Rage consumption works for Vengeance, the 3 Rage is able to basically hide in your Rage meter to cover the Rage cost of a single non-rotational ability, like an AoE ability or Vicious Slash. From what I can tell, there isn’t enough room in the Rage meter to be able to hold more than 3 spare Rage though, so if you can’t save up more Rage by using Saber Throw multiple times and not spending extra Rage or also save the 3 Rage generated by Force Charge.
Remember that you only get these benefits by actually using the ability, so be sure to actually use Saber Throw if you can benefit from it. If there aren’t any other bosses or you don’t exit melee range over the entire fight, try to use it over Vicious Slash as much as you can.
Retaliation
(Melee/Energy/Direct/Single-Target/Instant)
This is technically your most damaging non-rotational ability by a small amount, but it usually isn’t available to you in Vengeance. It only triggers if you miss an attack (which won’t happen since you have 110% accuracy) or if you manage to completely dodge an attack, which usually only happens when Saber Ward is active or if some other accuracy-reducing or defense chance-increasing effect is active like Diversion or Predation.
Beyond damage output, Retaliation also only costs 2 Rage (1 after Shien) and can’t miss, so you might be able to cheese an extra hit in sometimes if your final hit misses due to some sort of defense chance-based immunity.
Remember that Retaliation is still weak, its damage output isn’t competitive with your actual rotational abilities, only use it if you happen to be able to use it when you would use a different semi-rotational ability instead. Never use it just because it’s available. Honestly, it’s also fine to just take this ability off your bar if you’d rather not deal with the added complexity or temptation to immediately press the glowy button.
Vicious Slash
(Melee/Energy/Direct/Single-Target/Instant)
This ability is the worst of your semi-rotational fillers. It deals ever so slightly more damage than Saber Throw, but the reason it is the worst is that it costs 3 Rage (2 after the Shien Form refund). You will end up using it somewhat often, especially in the single-target rotation.
The big advantage of this ability though is that it doesn’t have a cooldown, so you’ll always be able to use it if nothing else is available. There’s nothing wrong with using Vicious Slash as your semi-rotational filler ability per se, it’s just not quite as good as your other options.
Force Push
(Force/Kinetic/Direct/Single-Target/Instant)
This ability doesn’t cost any Rage to use (it doesn’t trigger Shien Form though) and if you take Extending Roar, it deals about as much damage as Saber Throw and Vicious Slash.
Thanks to the Fearless Victor Legendary Implant which increases melee damage dealt by 10%, Force Push is no longer your most damaging filler with Extending Roar. It’s still decent because it’s free, which makes your rotation a tiny bit easier, but you can definitely get away with not ever taking or using Force Push now.
Please note that if you aren’t using Extending Roar, don’t use Force Push at all for DPS because it won’t deal enough damage to be worth using over Assault. Be mindful that it is a knockback as well, so if something doesn’t have knockback immunity, you’re gonna send it to another planet, not that it will be too much of a problem for you since you can just leap to it immediately because Force Push resets the cooldown on Force Charge.
In actual fights (as opposed to practicing on the dummy), the fact that this ability is free is less significant since you’ll gain extra Rage for use on Vicious Slash and unprocced Hew.
Extending Roar also makes it so that Force Scream is usable beyond 10m, though it does deal significantly reduced damage unless you use Force Push to provide a short proc that makes Force Scream do full damage.
I find this to be quite difficult to do in Vengeance because you will almost always have to delay something that deals more damage in order to get the Extending Roar proc and you don’t have a huge window to use it anyway because Force Scream is used so frequently. If the stars align, that’s great, but I think it’s generally just better to use Force Push for the damage increase.
AoE Abilities
The formula for determining how much damage an AoE ability does per GCD such that it can be compared to single-target abilities is: (Damage Dealt/Number of GCDs) x Number of Enemies.
An AoE ability’s place in the priority is as high as it can be until it reaches a single-target ability that deals more damage than the AoE will deal to all enemies in the GCD.
AoE damage is considered fluff if the adds do not need to die ASAP or if you are otherwise shirking your main responsibilities to deal more damage to adds. It’s pretty easy to tell what is and isn’t fluff, don’t be greedy, and don’t hurt your group’s chances of beating the boss.

Vengeful Slam
(Force/Energy/Direct/AoE/Instant)
This is your DoT spread and most powerful AoE ability. It also applies the armor debuff if you’re taking the Crushing Fist ability tree option, which you definitely should be in every single fight with AoE. This ability needs to be used on cooldown in AoE situations.
Force Scream with Projected Scream
(Force/Kinetic/Direct/Single-Target/Instant)
Projected Scream is a new ability tree buff that makes Force Scream deal damage in a cone (and slow targets) and should always be taken. Since Force Scream is an autocrit in Vengeance, this ability can deal a sizeable amount of damage.
Since it’s a rotational ability, nothing really changes with its usage if you’re new to Vengeance. If you are a veteran player, you might have to get used to using the ability more frequently in AoE situations than you’re probably used to.
The cone itself is super weird because it originates from the enemy you hit, not from your mouth as it should. It might help to visualize your target as a prism and the initial Force Scream projectile as a beam of light. In order to use Force Scream effectively as a conal attack, you need to make sure that your target is the closest enemy to you while the other enemies you want to hit are behind your target.
Mad Dash
(Melee/Energy/Direct/AoE/Instant)
Since this ability now has the old Through Victory utility effect built-in, its damage as an AoE ability is pretty good, though not quite as strong as your other options. If you find yourself with a spare GCD and a bunch of enemies lined up, it’s pretty fun to mow through them with Mad Dash. Only use it when you have a spare GCD though.
Sweeping Slash
(Melee/Energy/Direct/AoE/Instant)
Sweeping Slash is your spammable AoE. It doesn’t deal very much damage and costs a lot of Rage. With Game Update 7.7, it was reintroduced as a baseline ability for Juggernauts.
If you find yourself wanting to use Sweeping Slash often in combat, it’s probably better to equip Cut to Pieces. You’ll mostly use Sweeping Slash while leveling or if you want to rip someone out of stealth in PvP.
Offensive Cooldowns
All offensive cooldowns (OCDs) should be used as frequently as possible under the conditions stated here and should only be delayed if they need to be saved for a DPS check or burst window, but don’t start delaying them until you see that you have to.
Bloodrage
 Bloodrage
All Combat Styles now have an ability with shared core functionality that has additional unique effects for each discipline. For Vengeance, that ability is Enrage, which gets replaced by Bloodrage and has the following effect: Detonates your bleeds on all targets within 10m of you, dealing damage and generating 6 Rage.
This damage scales with how many bleeds are on a target, so it is best used when all 3 of your bleeds are active. In single-target situations, all 3 of your bleeds will always be on the target immediately after you activate Force Scream and when using Hemophilic Slash, will continue to be active if you use Ravage to refresh all 3 DoTs. In AoE situations, make sure to activate this after spreading your DoTs with Vengeful Slam.
Since Bloodrage has a fairly short cooldown, especially if you’re using Bloodbound, make sure you can’t get in an additional activation of the ability before you start delaying it for a DPS check.
Furious Power
This ability is optional and will likely only be taken in fights with burst DPS checks. While the tooltip says it boosts the damage dealt by your next direct single-target melee attack, it does not boost the damage of or consume a charge of Furious Power on Sundering Assault or regular Assault. I assume this is a quality of life thing since those are weak abilities that no spec wants buff.
The only other non-discipline-specific abilities that will consume a charge are Ravage, Vicious Slash, Saber Throw, and Retaliation. It isn’t the end of the world if you accidentally consume a charge on one of those abilities, but try to avoid it when possible. It’s much easier to avoid consuming charges on unwanted abilities if you use Furious Power charges as you gain them.
In order to get the absolute maximum in sustained DPS out of this cooldown, you should use Furious Power charges as you get them immediately before using your strongest melee abilities, which are Impale and Hew for Vengeance.
Make sure you have all 4 charges available for the burst DPS check though. It takes almost 2 minutes to get 4 charges of Furious Power.
Adrenal
 Adrenal
It’s essential that you have this available for burst DPS checks because Vengeance doesn’t offer a whole lot of burst due to limited OCDs.
Also, delay your Adrenal for when you’re able to use Ravage during the second priority slot back to back since this will be the period of time when you’ll be dealing the most damage due to high DoT uptime. It’s also beneficial to minimize uses of Sundering Assault while the Adrenal is active, though this can be unavoidable.
It is highly unlikely that a fight will last long enough where this delay will be enough to where it will result in missing out on a use of the Adrenal.
Defensive Cooldowns and Mobility
Defensive cooldowns (DCDs) are not used just to stop you from getting killed, they’re there to minimize overall damage taken. For any Combat Style in any fight, your most effective DCDs should be mapped to the most damaging attacks in the fight while weaker DCDs should be used against weaker attacks.
Don’t pop all of your DCDs at once or only use them when your health gets low. You should be attempting to mitigate as much damage as possible by using your DCDs against predictable damage.
In fights where you’ll be taking a high amount of sustained damage, it’s important to use your DCDs in the order that maximizes your overall uptime. If you can tweak the order that you use your DCDs where it allows you to get an extra use out of one of them over the course of a long burn phase, you should definitely do that instead of activating your potentially stronger DCDs first.
It’s good to have 1 emergency panic button too, but everything else should be used to prevent your health from getting low in the first place. Part of knowing a fight is understanding how much damage you take and what you can do to mitigate that damage.

")


Endure Pain
In the Vengeance discipline, Endure Pain also provides 15% DR while it is active in addition to giving the bonus health. Be sure you call out to your healers when you activate this ability by saying something like “I have fake health” so they know your health is temporary.
If a bit of extra mitigation is needed, Endure Pain is usually a good first choice since it works against everything and has a pretty short cooldown, unless some other DCD is specifically better suited to the damage you’ll be taking.
Endure Pain also functions as your-self cleanse and that component of the effect is built in.
Saber Ward
This DCD is useful against any attack, though it mitigates damage differently depending on the attack type and it’s far more powerful against melee/ranged damage than force/tech.
Against melee/ranged damage, Saber Ward increases your defense chance, which is the chance to completely avoid taking the damage. Against frequent ticks of damage, the 50% defense chance increase is not statistically different from giving you 50% DR against those damage types instead.
Thanks to the Blade Turning Combat Style passive, for the first 2 seconds of Saber Ward, you actually have 100% defense chance against melee/ranged damage, meaning you are completely immune to melee/ranged damage for 2 seconds. As a DPS, you don’t take a whole lot of melee/ranged damage in raids unless an add is hitting you, though Saber Ward is one of your best cooldowns against adds.
Saber Ward also provides 25% damage absorption against force/tech attacks, though it is a bit weaker than other DCDs that provide 25% mitigation you might be familiar with. Since provides damage absorption rather than damage reduction, the 25% isn’t added to whatever your current DR is (mostly armor rating), resulting in less mitigation overall.
I would recommend using something else against force/tech damage unless this is the only thing you have left. It’s better than nothing, but against big hits, you’ll probably need to pair it with something else.
Enraged Defense
 Enraged Defense
This ability provides a ridiculous amount of healing, though depending on how good your healers are and how healing-intensive the fight is, you might have a hard time activating this since it can only be used when you are below 70% HP.
In fights where there isn’t a whole lot of damage going out, I like to use this ability as soon as I see it light up. Otherwise, it’s best used against ticking damage since the healing goes out each time you take damage. Enraged Defense will basically make it so you are temporarily immune to death by anything but massive single hits or an insane amount of adds.
This ability still works okay against singular hits as well, but you have to be careful not to waste it. A lot of the time your health will be pretty high if you’re about to take a big hit, so you may only be able to activate Enraged Defense after taking the damage, which means you’d activate it when you potentially won’t be taking any further damage before the DCD expires.
The situations where Enraged Defense is most useful are the same as when Saber Ward is most useful, though I don’t think you’d want to ever use the two DCDs at the same time.
If you find yourself in a fight where you’re using Enraged Defense on cooldown, you might want to consider reducing its cooldown by taking the Through Passion ability tree choice.
Saber Reflect
Since this ability provides complete immunity to the damage types it works on, Saber Reflect should never be paired with anything else because those other DCDs won’t do anything to increase your survivability if this one works.
There aren’t too many instances where Saber Reflect mitigates anything though since it only works on single-target damage and as I’ve mentioned several times, the vast majority of damage dealt is single-target. It still works pretty often as a cheese though and sometimes things that look like AoEs are actually considered single-target.
This ability can also be used offensively by reflecting things that you could otherwise easily avoid. Definitely experiment with it and use it offensively when you can, though make sure it’s available if there’s something you need to cheese.
Medpac
 Medpac
Don’t save it for a rainy day because today is that rainy day! Unless you get hit by a one-shot mechanic (which you shouldn’t), you should never let yourself die while your Medpac is still available and you certainly should never try to use one of your heals before using your Medpac.
If everyone’s health is getting low or there’s a heal check in the current phase, do not hesitate to use your Medpac if you can take full benefit of the health provided or need to be above a certain health level to survive an imminent mechanic.
If you think Medpacs are too expensive, it’s time to get Biochem on one of your alts or even better, your raiding toon so that you can make your own or get reusables. Choosing not to use a medpac for financial reasons and subsequently dying is not a valid excuse.
Threatening Scream with Hardened Defense
As a DPS, Threatening Scream is your threat drop and the Hardened Defense ability tree buff makes it so Threatening Scream reduces AoE damage taken by 60%. All danger circles are considered AoE damage, but the majority of boss attacks are considered AoE damage as well, even if they don’t look like it, so this is one of the most powerful DCDs in the game for boss fights. It’s far less useful in solo content and PvP where AoE damage is far less frequent.
If you have to stand in a circle or stand in front of the boss, preemptively pop Threatening Scream so you can mitigate the damage you might take from a cleave.
Mad Dash
This ability is both a defensive cooldown and movement ability. As a defensive cooldown, it’s your cheese ability. It gives you 100% defense/resist chance for the duration of the dash, meaning you’re completely immune to taking damage during your dash, provided that it’s damage that is mitigable, so it won’t work against things like 0 damage kills and typeless damage.
Since the mitigation is so short, it can be fairly difficult to time, so you may need to practice it a little bit, and don’t be afraid to completely stop DPSing for a moment if there’s something that will kill you if you don’t do the cheese correctly.
As a movement ability, Mad Dash does help you cover a fair bit of distance, but it does cost a GCD to use, so it is best used when you’re out of range of the boss so you couldn’t deal damage anyway or after your other movement abilities have been used. It’s not the end of the world to use this ability for movement though, especially now that the damage increase effect of the old Through Victory ability tree option is built in. Bottom line: try to hit something with Mad Dash if you can or use it when you’re out of range of everything.
I also want to add that if you’re using this ability against one of the Energy Spheres from Brontes, or some similar mechanic where something detonates on contact with you, make sure that you hit the orb at the end of the animation, rather than the beginning or middle. If you don’t do this, the mitigation might not work because of position lag. The server may not update your position until the end of the animation after the mitigation has ended.
Force Charge
(Melee/Energy/Direct/Single-Target/Instant)
This is one of your gap closer abilities. It generates 3 Rage and deals very little damage. Outside of the very beginning of the fight, it can be a DPS increase to run in from 20m with a 30m ability like Hew or Saber Throw and then use Force Scream once you’re within 10m range, but the DPS loss isn’t too huge, only like half a GCD’s worth of damage and it’s less fun than leaping in, so if you want to be super duper optimal with your DPS, avoid using Force Charge to get in range when possible.
Force Charge can often be used while you are still flying through the air from a knockback, definitely do that if you’re able to. If you are switching targets or haven’t hit anything in a while, you might want to consider using Sundering Assault as your first ability even if a normally higher priority ability is available so you don’t have to worry about Rage at all. It also ensures that the armor debuff is on the target. It’s usually a DPS loss to do this, but it essentially guarantees that there won’t be any hiccups with the rest of the rotation.
Force Charge also interrupts the cast of whatever target you leap to, though it doesn’t apply a 4s lockout like your actual interrupt ability does, so it’s more for just buying you a couple of seconds for your or someone else’s interrupt to come off cooldown than a more proper solution to a mechanic. This does come up fairly often if your group is leveraging your short interrupt cooldown though, so it’s important to be aware that you can do this.
Intercede
You should really only think of this ability as a movement tool to use exclusively when you’re more than 30m away from your target. The threat and damage reduction it provides are nice, but because this ability costs a GCD to use, it’s not really functionally different from an off-heal, which you should not use in PvE.
Healers and tanks are fully capable of doing their jobs without your help. Their job is to spend GCDs to mitigate damage while yours is to spend GCDs to deal damage. If you can salvage a pull, I guess it’s worthwhile to use for non-movement purposes, but if you feel you have to use this on a regular basis, someone isn’t pulling their weight and you should make that known to the raid lead.
Crowd Control and Other Notable Abilities


Force Choke
This is your hard stun, meaning it does not break on damage. In PvE, this will generally only be used for specific mechanics since most things you’d care about stunning are immune, though the more recent operations do have lots of opportunities to stun things. In general, be sure to pay attention when something is stunnable because that often means you’re intended to stun it.
Force Choke generates 3 Rage over the duration of the stun and deals the same amount of damage as Assault, meaning it’s technically a better ability to use if you need Rage and have nothing else to use, though you need a bit of foresight to take advantage of since it takes 4 seconds to actually get all that Rage.
Disruption
This is your interrupt. As a Sith Warrior, you have the shortest cooldown on your interrupt in the game at 12 seconds, though a few other melee classes can match it. This short cooldown does mean you are capable of handling an interrupt mechanic entirely on your own or with less help than is normally required and your raid group may want to take advantage of this. If you really want to be a clicker, I highly recommend you at least keybind this ability or you will have trouble with some of the shorter casts that need to be interrupted.
Intimidating Roar
This is your mez, a CC ability that breaks on damage. It’s exceedingly rare that you’ll be able to use this ability in boss fights. If an add needs to be CC’d for an extended period of time, it will almost always be done by a Combat Style that has access to a minute-long mez. Furthermore, many enemies are immune to mezzes but are still vulnerable to hard stuns.
Taunt
This ability forces a target to attack you for 6 seconds and puts you at the top of the threat table. Only use this if a tank or raid lead specifically tells you to use it or if the boss is running rampant because one or both of the tanks are dead. Make sure that you have a DCD ready or there isn’t too much of a point to Taunting as you’ll probably get killed pretty quickly. If you’re going to use Threatening Scream, make sure you activate it right before you Taunt so you don’t accidentally lose aggro after 6 seconds.
If one tank dies in a fight with a tank swap mechanic, a common strategy is to have a DPS Taunt and hold aggro only for enough time to get the stacks or get hit by the attack that forces the tanks to actually swap and then have the actual tank take the boss back immediately after. This isn’t always possible, but it’s important to be aware of.
Unleash
This is your CC break. Use it when you get CC’d and are unable to deal damage or satisfy mechanics as a result of being CC’d.
Assault
 Assault
This ability generates 2 Rage deals very little damage and doesn’t have a cooldown. You should almost never have to use this in Vengeance. If you’re out of Rage and don’t have Enrage or Sundering Assault available, you have really messed up your rotation and need to spend more time practicing on the dummy.
Seething Hatred
When you exit combat, the cooldowns of Force Charge, Bloodrage, and Saber Throw are reset. This was previously a utility that is now an effect built into the Combat Style
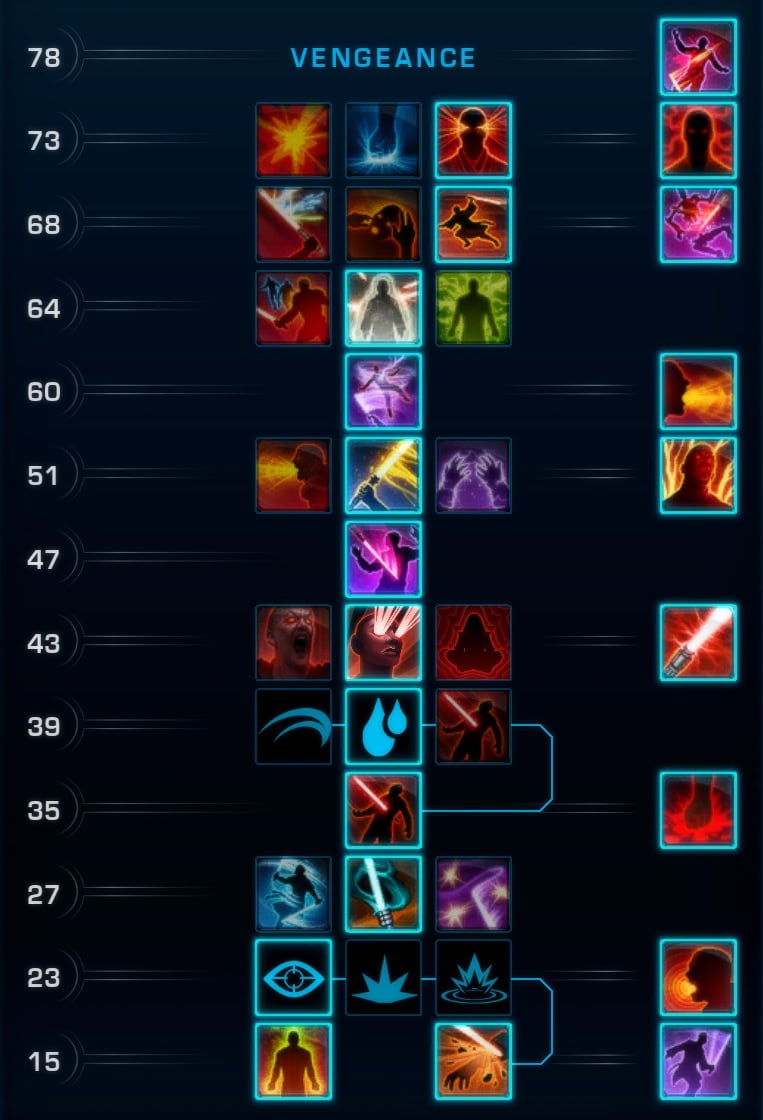
Ability Tree Choices
Level 23 Choice – Shatter Buffs
 Deep Cuts
- Effect: Shatter also increases the critical chance of all your bleed effects on that target by 10%.
- Recommendation: Take this in fights where you can DoT spread, but enemies don’t die very often. The single-target sustained DPS offered by Deep Cuts is effectively identical to that of Major Fracture, and while the damage boost can be distributed to secondary targets, it doesn’t go out immediately or have short-term reliability. The former makes it vastly superior to Major Fracture in situations where you can DoT spread, assuming Shattering Burst is not usable. However, the latter makes it weaker during DPS checks. If you don’t want to bother with these minor distinctions, take Deep Cuts in group content.
 Major Fracture
- Effect: Increases the initial damage of Shatter by 50%.
- Recommendation: Take this in pure single-target situations or in fights where you have to participate in a burst check. The single-target sustained DPS offered by Major Fracture is effectively identical to that of Deep Cuts, but the damage goes out with the initial hit and does not apply to secondary targets. The former makes it better if you have to participate in a DPS check, while the latter makes it inferior in fights with any amount of DoT spreading.
 Shattering Burst
- Effect: Targets affected by Shatter explode when they die, dealing damage equal to Shatter’s initial hit to all targets within 5m.
- Recommendation: Take this for solo content and in fights where adds die frequently. The idea with this option is that explosions will cause a chain reaction, so once one target dies, the entire group dies as other explosions are triggered. Shattering Burst will also offer the greatest single-target DPS in boss fights where adds are routinely dying near the boss. If you’re still able to DoT spread but can’t make use of Shattering Burst, take Deep Cuts instead. If you’re not sure whether to take Shattering Burst or Deep Cuts for a given fight, try them both out and see which one yields higher DPS.
Level 27 Choice – Path Carver, Overwhelming Slashes, or Projected Scream
 Path Carver
- Effect: Increases the damage dealt by Sweeping Slash by 15%
- Recommendation: Never take this. Projected Scream will always contribute more to your AoE damage because it expands the number of abilities that deals AoE damage while allowing you to incorporate another single-target rotational ability when multiple targets are present.
 Overwhelming Slashes
- Effect: Ravage immobilizes the target for 3 seconds and generates 1 Rage.
- Recommendation: Never take this. It is more oriented toward PvP since bosses are immune to roots, and ads typically aren’t worth rooting.
 Projected Scream
- Effect: Force Scream damages up to 8 additional enemies within 5m of the primary target and slows them by 50% for 6 seconds.
- Recommendation: Always take this. As of 7.7, Projected Scream was buffed to deal damage in a sphere around the primary target rather than a cone, making it much easier and less demanding to use, though it still doesn’t make visual sense. It takes 3-4 Sweeping Slashes to deal as much damage as you’ll get out of a single Force Scream in Vengeance thanks to the autocrit. You do not have the spare GCDs or Rage to use Sweeping Slash that many times in between uses of Force Scream.
Level 39 Choice – Impale Buffs
 Bleeding Pommel
- Effect: Impale deals 10% additional damage and generates 1 Rage for each of your bleed effects on the target it hits.
- Recommendation: Never take this. Bleeding Pommel offers less DPS than Bleeding Offense and only offers a tiny bit of extra reliability, though never enough to matter.
 Bleeding Offense
- Effect: Impale deals a small amount of additional bleed damage that automatically critically hits. Impale’s critical hit chance is increased by 20%.
- Recommendation: Take this for boss fights. The bleed damage is about as strong as individual ticks from your Impale and Force Scream DoTs combined. Along with the extra critical chance to Impale, Bleeding Offense is strong enough to result in higher damage output than Bleeding Pommel. The autocrit also synergizes well with both options at level 43, which each buffs Bloodrage.
 Skewering Strike
- Effect: Replaces Impale with an ability that leaps to your target and roots them for 3 seconds. 10m range.
- Recommendation: Take this in solo content and PvP. The added self-root is problematic in boss fights, but the additional mobility and CC are quite valuable in all other situations.
Level 43 Choice – Furious Power, Bloodbound, or Blood Rites
 Furious Power
- Effect: Grants the ability Furious Power, which consumes all ability charges of Furious Power when activated and applies the same number of stacks to you. Each stack increases your next direct single-target melee attack by 25%. 15s cooldown, 60s for all 4 charges.
- Recommendation: Never take this. Furious Power is weaker than at least 1 alternative ability tree buff offered at level 43 for all Juggernaut and Marauder disciplines.
![]() Bloodbound
Bloodbound
- Effect: Critically hitting with a bleed effect reduces the cooldown of your Bloodrage by 1 second. In addition, Bloodrage also purges movement-impairing effects and heals you for 2% of your max health for each bleed effect it triggers, up to 20%.
- Recommendation: Take this in group content. Bloodbound provides the most single-target sustained DPS in boss fights out of the options in this tier. In fights with a lot of adds, you can end up dealing ludicrous amounts of off-GCD damage as the cooldown of this ability drops like a rock. Bloodbound’s only real drawback is that it doesn’t do all that much when you exit combat frequently since the cooldown of Bloodrage gets reset whenever you exit combat.
 Blood Rites
- Effect: Bloodrage no longer generates Rage. Instead, activating Bloodrage grants Blood Rites, increasing the critical hit chance of your bleed effects by 50% and generates 1 Rage each time you critically hit with a bleed effect. Lasts 10 seconds.
- Recommendation: Take this in solo content. The cooldown on Bloodrage is reset when you exit combat, and few trash pulls last longer than 10s in solo content, so you will be getting the effects offered by this option for almost the entirety of combat if you aren’t fighting a boss. Blood Rites is also superior to Bloodbound in group content before you obtain the Champion’s Precision implant.
Level 51 Choice – Extending Roar, Warmonger, or Unyielding
 Extending Roar
- Effect: Increases the range of Force Scream to 30m, but Force Scream deals reduced damage beyond 10m. Additionally, Force Push deals 20% more damage and grants Extending Roar, which allows your next Force Scream to deal full damage regardless of your distance from the target.
- Recommendation: Take this in solo content only. Thanks to the Fearless Victor Legendary Implant, Force Push with Extending Roar is no longer your most damaging semi-rotational filler ability. It’s still nice since it doesn’t cost Rage, which can help make your single-target rotation slightly easier, but it’s not a direct DPS increase anymore, and you’ll likely gain far more DPS from having Force Charge effectively available all the time with Warmonger. In solo content, this is basically the only useful option and can be helpful for screaming at enemies that didn’t aren’t quite close enough for a DoT spread.
 Warmonger
- Effect: Getting attacked reduces the active cooldown of Force Charge by 1 second. This effect cannot occur more than once every 1.5 seconds. In addition, Force Charge enables Hew to be used against a target regardless of their remaining health.
- Recommendation: Take this in group content only. Warmonger is effectively a DPS increase because it enables Force Charge to basically always be available whenever you need it. In contrast, the proc that makes Hew available eliminates the DPS loss from using Force Charge instead of another GCD.
 Unyielding
- Effect: You generate 4 Rage when stunned, immobilized, put to sleep, or knocked around.
- Recommendation: Never take this. The resulting DPS increase will never be worth more than a fraction of a GCD’s worth of damage per trigger, and you don’t get CC’d often enough in PvE for that to add up to anything worthwhile.
Level 64 Choice – War Master, Hardened Defense, or Payback
 War Master
- Effect: Force Charge grants Unstoppable, which increases your damage reduction by 20% and grants CC immunity for 4 seconds.
- Recommendation: Take this primarily for solo content and PvP. Some adds knock you away as soon as you leap to them, and Unstoppable prevents that. The only time you should take this in PvE group content is if you can benefit greatly from the CC immunity or if there isn’t a major predictable source of AoE damage and you find yourself using Force Charge frequently. The poster child for such a fight is Gate Commander Draxus in DF.
 Hardened Defense
- Effect: Activating Threatening Scream grants Hardened Defense, which reduces your AoE damage taken by 60% for 15 seconds.
- Recommendation: Almost always take this for boss fights. AoE RDT (reduced damage taken) is extremely important in PvE since the vast majority of damage dealt by bosses is considered AoE damage. Without this option, you will be extremely squishy in group PvE content.
 Payback
- Effect: Reduces the cooldown of Unleash by 30 seconds and causes Unleash to heal you for 10% of your maximum health when used.
- Recommendation: Never take this. The other options are always far more useful. It’s not even close.
Level 68 Choice – Saber Reflect, Intimidating Roar, or Mad Dash
 Saber Reflect
- Effect: Grants the Saber Reflect ability, which absorbs all direct single-target ranged, Force, and tech damage and reflects 100% of it back to the attacker. Lasts 5s. 1 min cooldown.
- Recommendation: Take this in fights where there is something significant to reflect. This ability has the potential to deal and mitigate a lot of damage, but not every fight has something like that because most damage in raids is AoE, and even if there is something to reflect, you might still be better off taking Mad Dash if there’s a lot of movement and you just need a cheese. In solo content, this option is better if you value the damage and is probably useful in more challenging solo content like Heroics and MM Chapters where DPS is more important.
 Intimidating Roar
- Effect: Grants the Intimidating Roar ability, which mezzes up to 8 enemies within 8m of you for up to 6 seconds. 1 min cooldown.
- Recommendation: Never take this. It’s useful in PvP, but in PvE, if you need to mez something, 6 seconds is almost never gonna cut it.
 Mad Dash
- Effect: Grants the Mad Dash ability, which makes you dash forward 20m, dealing a moderate amount of damage (includes Through Victory damage increase) and increasing your defense chance by 100% while dashing. Cannot be used while immobilized or hindered (maybe).
- Recommendation: Take this for group content by default. Saber Reflect is only useful in specific fights, but there are a lot of instances where the increased mobility is useful and it also functions as more reliably a cheese since it mitigates all damage types. In solo content, this option is better if you value higher mobility.
Level 73 Choice – Pooled Hatred, Crushing Fist, or Through Passion
 Pooled Hatred
- Effect: Whenever your movement is impaired, you gain a stack of Pooled Hatred, which increases the damage dealt by your next ability that consumes Rage. This effect can stack up to 5 times and lasts 15 seconds.
- Recommendation: Take this in specific fights only. Adds are usually the ones that apply slows in PvE, and Crushing Fist is typically more useful when adds are present. If you find yourself in a situation where you’re getting slowed, but there aren’t more than 3 targets, take this option over Crushing Fist.
 Crushing Fist
- Effect: Vengeful Slam sunders targets it damages. Sundered targets have their armor reduced by 20% for 45 seconds.
- Recommendation: Take this in AoE situations only. If there’s only a couple of targets, it isn’t too hard to maintain the armor debuff on all of them by just using Saber Throw and Sundering Assault, but if there’s a lot of targets, this option is more valuable. It’s worth noting that the armor debuff really only affects spammable AoE attacks since almost all DoTs and DoT spreads deal Internal / Elemental damage and most spammable AoEs deal Energy / Kinetic damage, though Vengeful Slam and Force Scream are notable exceptions to this rule, so this option will always be valuable to you in AoE situations.
 Through Passion
- Effect: The cooldown of Enraged Defense is reduced by 30 seconds.
- Recommendation: Take this in fights where you can’t benefit from the other options. It’s a nice effect, but it isn’t essential unless you’re taking a lot of damage for most or all of the fight, or if the cooldown reduction allows you to use Enraged Defense when you need to use it and it wouldn’t be off cooldown if not for the 30s cooldown reduction.
Gearing and Stats Priorities
Tactical Items
 Hemophilic Slash Hemophilic Slash |
|---|
| Effect: The initial hit of Ravage refreshes the duration of your Force Scream, Impale, and Shatter bleeds on that target and ticks their damage. |
| Recommendation: This is your boss fights tactical. It provides the greatest single-target sustained DPS boost out of all Vengeance tacticals, which isn’t saying much. Hemo is one of the weaker boss fight tacticals, only being strong enough to outclass generic damage-boosting options. |
 Cut To Pieces Cut To Pieces |
|---|
| Effect: Critically hitting with one of your bleed effects reduces the active cooldown of Vengeful Slam by 1.5 seconds, cannot occur more than once every 2s. |
| Recommendation: This is your solo content tactical. It offers a boost to your AoE damage by increasing the availability of Vengeful Slam. After getting slammed with the nerf bat in 7.8, it can no longer surpass Hemophilic Slash in sustained DPS situations and is only worth using against trash mobs, the likes of which you’ll find in solo content and Flashpoints. |
 Grit Teeth Grit Teeth |
|---|
| Effect: Getting attacked reduces the active cooldown of Saber Ward by 2s. Cannot occur more than once every second. |
| Recommendation: This is a generic survivability tactical that works well for Juggernaut DPS in PvP Arenas to help you survive longer. If you’re getting focused (and you will as a Jugg), you can shave off a minute from Saber Ward’s cooldown every 30s. It synergizes with the Nimble Master implant to vastly improve your kiting ability. |
In our Catalog of all Tacticals in SWTOR you will find information about all other Tacticals that we didn’t list in this guide. You may find something adequate that is also cheaper and easier to obtain for your needs while you work on getting the recommended one for your combat style and build.
Legendary Implants
BioWare has removed set bonuses from the game and replaced them with Legendary Implants, which are just implants with old 4 or 6-piece set bonus effects on them, so rather than needing to collect 4 pieces of a gear set to get the 4-piece set bonus, or 6 pieces for the 6-piece, you’ll get either a 4 or 6-piece set bonus effect on an implant.
This was done to improve customization (now you can mix and match set bonus effects), make them easier to obtain, and consume less inventory space. Here are the Legendary Implants you should use as a Vengeance Juggernaut:
- Champion’s Precision – Bloodrage grants Champion’s Precision, increasing your critical chance by 20% for 8 seconds.
- Fearless Victor – Whenever you use an attack that spends Rage, your melee bonus damage is increased by 10% for 10 seconds.
- Nimble Master – Your movement speed is increased by 100% while Saber Ward is active.
 Champion’s Precision – Bloodrage grants Champion’s Precision, increasing your critical chance by 20% for 8 seconds.
 Nimble Master – Your movement speed is increased by 100% while Saber Ward is active.
Fearless Victor is also useful for Marauders and Sentinels, so if you plan to also play that combat style, I’d get Fearless Victor first. If you just play Juggernaut, Champion’s Precision will allow you to not have to bother with using the Blood Rites ability tree buff much at all.
In PvP Arenas, you should consider swapping out Fearless Victor for Nimble Master and use it alongside Grit Teeth. Kiting isn’t fun for a lot of folks, but the winning team is usually the one who managed to keep all 4 players alive longer.
If you want to know more about Legendary Implants, check out my guide Legendary Implants in SWTOR 7.0. It explains how to unlock Legendary Implants and contains a list of all Legendary Implants in the game.
Stat Priority
As a DPS, you’ll need to care about 3 different stats: Accuracy, Alacrity, and Critical Rating. There are thresholds associated with Accuracy and Alacrity, so you need to prioritize reaching those thresholds to get the full benefit from each stat point.
- Accuracy to 110.00% – Before investing in any other stats, make sure you hit 110% Accuracy because attacks that miss deal 0 damage, and no other stats matter if the attack doesn’t land. Furthermore, many procs require you to actually deal damage, not just activate the ability, so you can mess up your rotation if an attack misses. You need 110% Accuracy in PvE and not just 100% because bosses have a 10% chance to dodge/resist player attacks, and any percentage over 100% reduces this chance. Anything over 110% is not helpful in PvE, so you do want to go over 110%, but with as little excess as possible.
- Alacrity to ~7.5% – Once your Accuracy is above 110.00%, it’s time to think about Alacrity. It has the second-highest priority because you do not get the full benefit of the stat unless you surpass one of the GCD thresholds. It’s less important than Accuracy because your attacks still need to hit. You need 7.15% Alacrity to get from the 1.5s GCD to the 1.4s GCDs. However, as you approach 7.15%, you actually start getting a mix of 1.4s and 1.5s GCD, resulting in an experience that feels clunky and inconsistent. You need roughly 0.4-0.5% more Alacrity past the exact threshold to effectively eliminate those 1.5s GCDs.
- Critical gets the rest – After you’ve got your thresholded stats sorted out, you can start investing in crit. To be clear, Critical Rating is still valuable; it just has the lowest priority because it does not have a threshold associated with it that you need to meet to get the most out of each point of stat as the other tertiary stats you care about do. Critical Rating increases both your Critical Chance and Critical Damage. If you have a single effect that increases your Critical Chance by 100% all on its own (it can’t be from multiple effects combined), all of the Critical Chance percentage for that attack gets added to your Critical Damage percentage, causing the attack to deal supercritical damage.
Find out which mods to purchase from Hyde and Zeek in SWTOR on the Fleet to minimize spending and optimize your build. The dedicated guide contains tips for all roles in both PvE and PvP.
Augments
Augments allow you to put additional stats on every piece of gear except tactical items. Since Augments allow you to put additional stats on every piece of gear except tactical items. Since the stats come in much smaller amounts, augments allow you to fine-tune your gear to provide almost as much of each total stat as you want.
To equip an augment, you must first use an Augmentation Kit that matches the crafting grade of the augment (ex. Grade 11 augments require MK-11 Kits).
The 296, 302, 310, and 318 iRating augments released with 7.6 and 7.7 are BiS. The higher the iRating, the more stats they offer and the more expensive they are to make or buy, though most of the benefit is provided by having augments at all, and the base-rarity blue 296 augments are the cheapest.
Almost everyone should buy the blue 296 augments because they provide the greatest bang for the buck, but you do have multiple options:
- Gold 318 augments (Superior [Type] Augment 86). These are overall best-in-slot (BiS) and offer ~25% more stat than gold 300 augments, which is roughly equivalent to 4 additional gold augments. They’re extremely expensive and completely unnecessary for all content in the game, so I only recommend them to the wealthiest individuals.
- Purple 310 augments (Advanced [Type] Augment 86). They offer ~13% more stat than gold 300 augments, which is roughly equivalent to 2 additional gold 300 augments worth of stat. They are cheaper than the gold 318s, but they’re in the same price bracket in terms of affordability, so there’s no reason for anyone to use them at this point.
- Blue 302 augments ([Type] Augment 76) are the mid-tier augments. For all intents and purposes, these are equivalent to the gold 300 augments from 6.0. I only recommend them if you’re close to a stat threshold or don’t already have gold 300 augments and want something a bit better than the blue 296s.
- Blue 296 augments ([Type] Augment 83) are the most basic tier of augments for level 80 players. They are pretty cheap as only the schematic comes from the associated lair boss, Propagator Core XR-53. You don’t need any Corrupted Bioprocessors to craft these augments.
Check out our 7.7 Augments Guide for everything you need to know about augmenting gear!
Earpiece
Which Earpiece you use will depend on what specific tertiary stats the rest of your gear and augments provide. Typically, you’ll need to use either an Accuracy (Initiative, yellow icon) or Alacrity (Quick Savant / Nimble, green icon) Earpiece.
Crystals
Advanced Eviscerating Crystals are the best. They are the only type of crystal that increases one of your tertiary stats. Since the stat pool for tertiary stats is much smaller than that of primary or secondary stats, adding 41 is a more significant upgrade than it would be if you were to add 41 to one of the primary or secondary stats (mastery, power, or endurance).
Relics
I recommend the Relic of Focused Retribution (FR) and Relic of Serendipitous Assault (SA) for all PvE content. Each relic offers a proc; FR’s proc boosts your Mastery, whereas SA’s proc increases your Power stats. If you have the choice, purchase the Relic of Focused Retribution first because in equal amounts, and only in equal amounts, Mastery offers more of a DPS gain than Power.
Biochem Items
I recommend the Advanced Kyrprax Proficient Stim, Advanced Kyrprax Medpac, and Advanced Kyrprax Attack Adrenal for all PvE content. Grade 11 Biochem items from the crafting tier released with 6.0 remain BiS. Since they haven’t been updated to level 80, their effects are weaker than they should be, though they can still have an impact.
You should use the Proficient Stim as a DPS because it provides 2 tertiary stats that you need, Accuracy and Critical Rating, and tertiary stats are harder to come by and what you build your gear around. You should use the Attack Adrenal because it provides Power, which typically provides the greatest DPS increase, though it’s also more consistent, which is what you need for DPS checks.
Regarding the Zeal Guild Perk Alacrity Boost
If your guild uses the Zeal (cyan) guild perk set bonus, which gives a passive +5% Alacrity boost, you won’t need nearly as much Alacrity stat to reach your desired Alacrity threshold. My recommendations do not factor in these boosts, so if you have one, you’ll need to pay attention to percentage thresholds rather than the stat amounts. Just keep adding one augment at a time until you reach the desired percentage.
Guild leaders, I recommend using the Fortune (yellow) guild perk set bonus instead. It grants +5% Critical Chance and also boosts the Critical Rate and Time Efficiency of all Crew Skills by 2%. The reason for this is that you don’t have to change the way you gear in order to benefit from the effect.
Neither effect works in MM raids or PvP, so if you or your guild members do either of those activities, you’ll need to tweak your gear to reach the desired threshold depending on the activity, which I find super tedious. Even if your guild doesn’t do those activities, leaders still need to actively maintain the set bonus because your gear will become suboptimal on top of losing the bonus, whereas it’s not a big deal if your crit is a little lower for a bit.
The Alacrity boost is much stronger than the Critical Chance boost. Still, PvE content isn’t balanced around these guild perk set bonuses anyway, so I find it better to have a smaller boost I don’t have to worry about than a larger boost I have to manage.
Best Vengeance Juggernaut Builds in 7.0
These are the builds that I recommend for different types of content and situations. The Build Essentials are what I consider to be the core components that make the build viable. Without them, the build no longer accomplishes its primary function. Build Essentials can include important ability tree buffs, a tactical item, and even Legendary Implants occasionally.
The ability tree buffs that aren’t listed as Build Essentials can be changed as needed without compromising the integrity of the build, though I have included a full set of default choices that will be most consistently helpful in accomplishing what the build sets out to do.
Vengeance Boss Fight Build
Build Essentials:
Deep Cuts Bleeding Offense![]() Bloodbound Hardened Defense Hemophilic Slash
Bloodbound Hardened Defense Hemophilic Slash
In boss fights, your top, coequal priorities are executing mechanics and dealing maximum, typically single-target, sustained DPS. The talents in this build enable maximum sustained DPS, though sometimes you will need to adjust to account for specific mechanics or provide utility to your group.
You’ll also be taking talents that increase your survivability and active mobility because you can’t deal damage or do mechanics if you aren’t alive or in range.
The boss build is inferior against regular enemies because your AoE is weaker and less immediate in exchange for being more efficient and sustainable. You’re relying on your target to be alive for an extended period of time to deal damage, and enemy health typically doesn’t line up with a full-fledged boss rotation.
This build is not as performant in PvP because your CC is primarily limited to whatever you get for free, and your instantaneous burst will be weaker or outright non-existent.
In add-heavy fights, you may have better performance with Shatter Burst if the adds are detonating on the boss or other, stronger enemies, but you need not worry about this too much.
Most of the time, you’ll be taking the non-essential default options, like Warmonger, Mad Dash, and Through Passion, but there are instances where you’ll need to swap them out.
Solo Content Build
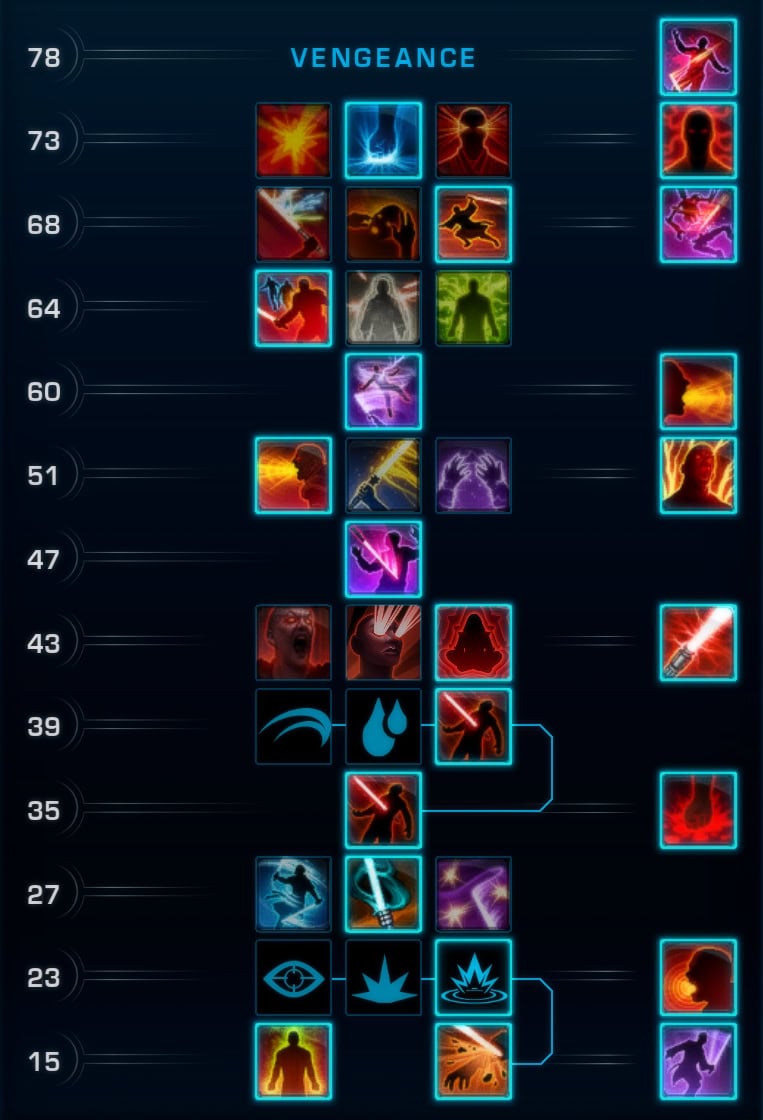
Build Essentials:
Shatter Burst Projected Scream Blood Rites War MasterCrushing Fist Cut to Pieces tactical
In story content, on planets, and in flashpoints, you’ll almost exclusively encounter regular enemies AKA trash mobs. While you can technically use DPS to measure performance against trash, it is far more appropriate to think in terms of how many GCDs it takes to defeat each enemy and a whole group, and which talents get you over the threshold and actually reduce the number of hits to kill.
As of 7.0, SWTOR now offers dedicated talents and tactical items that are designed and balanced for use specifically against trash mobs.
These talents almost always have effects that trigger when you specifically defeat an enemy or when you enter or exit combat. They expand single-target attacks into powerful AoEs or reset cooldowns on specific abilities, often with a massive yet short-lived, damage boost attached to it.
These factors come together to create a truncated rotation that incentivizes a high APM and deals enough damage to defeat an entire group of trash in a flashy way in a matter of seconds.
Yes, trash mobs pose no threat to someone more invested in the game like you, dear reader. The advantage of making such a build is that they genuinely deal more DPS. My testing with Assassin showed a ~25% reduction in TTK, and the combat experience was a lot more fun.
These effects aren’t suitable in boss fights because their effects last such a short time and can only trigger reliably when you are in a small group and are fighting enemies that have a small amount of HP.
These same deliberate limitations also prevent them from being effective in PvP because it’s so difficult to predict exactly when your opponent will die, and such buffs aren’t useful after the fact anyway. Furthermore, you often have to give up effects that are more useful in PvP to take these talents.
Remember, Blood Rites is vastly superior to Bloodbound outside of boss fights because you’ll be exiting combat frequently, meaning the cooldown of Bloodrage will get reset before you get a chance to activate it a second time.
Vengeance PvP Build
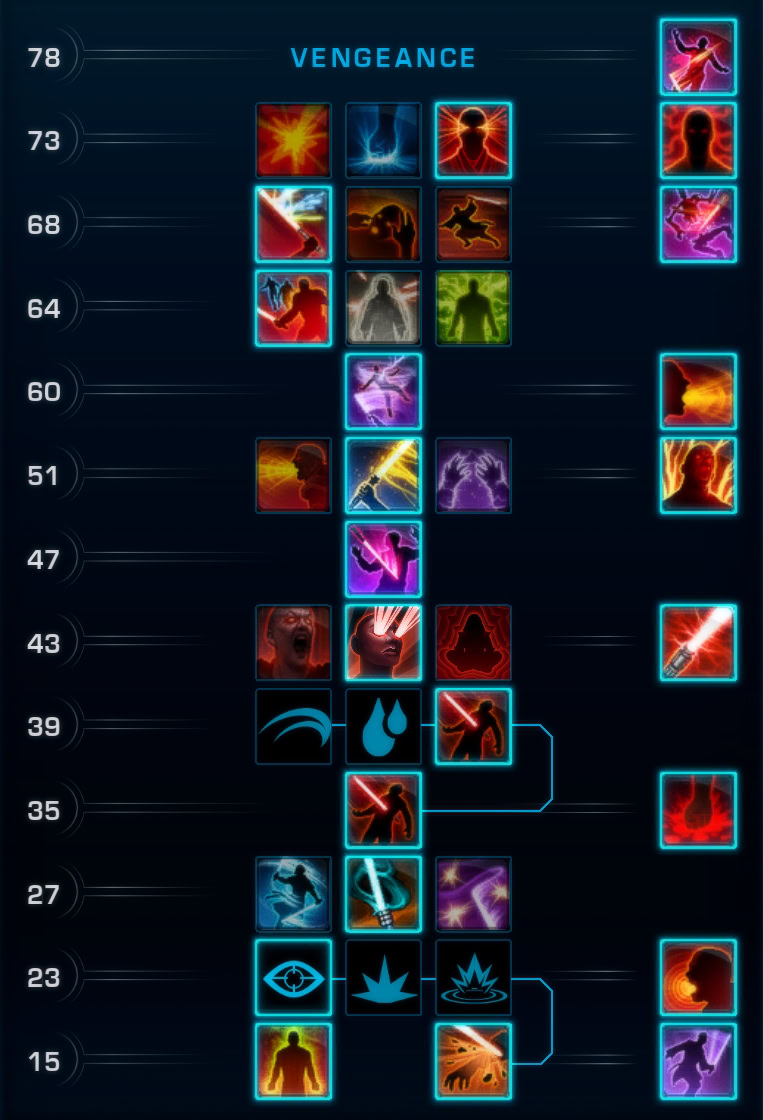
Build Essentials
Projected Scream Skewering Strike
![]() BloodboundWarmonger War Master
BloodboundWarmonger War Master
This build is best suited for fighting against enemy players, where survival and control are the name of the game and fight duration is completely variable. You will be trading a huge chunk of sustained damage output in order to stack as much damage into a single instant as possible, making it harder for your opponent to mitigate at all.
Survivability is king because you secure objectives or win outright when you outlast your opponents, though it also means there is more time for help to arrive. Controlling effects help immensely with securing objective and improving the reliability of your spike damage landing, but they also improve your own survivability.
Time where the enemy can’t hit you is time where you aren’t taking damage, and CC is especially helpful to use against enemies that have some sort of OCD or DCD active because you don’t want to be taking more damage than your opponent or not hitting as hard against them.
The PvP build is far less effective in boss fights because most bosses are immune to CC and the ability order you use to set up your massive damage spikes requires you to break what would be a sustained rotation by delaying important abilities.
This often results in higher resource costs, but the downtime from CC helps to mitigate the inefficiency. Fillers often play a role in survivability as well, so it is as much of a waste to use them either.
The CC will be useful in solo content, but your burst is focused onto a single enemy and is often super duper overkill. It is better to spread that damage out a bit.
Vengeance can deal a bunch of AoE damage, but they lack traditional spike damage and their survivability is inconsistent. This build leans into its strengths and covers for those weaknesses.
Don’t forget that you’ll take 20% less damage and be immune to CC for 4s every time you use Force Charge.
Alongside Champion’s Precision, I recommend using Deep Cuts, Fearless Victor or Second Wind, and Cut to Pieces in Warzones, and swapping them out for Major Fracture, Nimble Master, and Grit Teeth in Arenas.
Openers, Rotations, Priorities
Hemophilic Slash and Grit Teeth
You’ll use Hemophilic Slash for boss fights and Grit Teeth for PvP. Ravage is more important with Hemophilic Slash, but you can use it the same way in PvP with Grit Teeth or any other tactical you might want to use.
Opener
The opener is the rotation you use at the very beginning of the fight and for burst DPS checks. It’s important to get as much damage as possible while all of your damage boosts are available and active to maximize their impact.
- Force Charge
- Sundering Assault
- Furious Power (if it were applicable, but it’s not)
- Adrenal
- Impale
- Shatter
- Bloodrage
- Force Scream
- Ravage
- Vengeful Slam
- Hew
- Rotation
The opener for Vengeance is basically just the rotation with a set starting point and your offensive cooldowns thrown in, though I do want to point out a couple of things.
It’s necessary to leap in with Force Charge and use Sundering Assault. If you don’t, you won’t have enough Rage and be forced to use Bloodrage early. You can use Saber Throw instead, but you will be using it mostly on cooldown in order to delay future activations of Sundering Assault, so it’s not much of a DPS increase if you can pull the boss without having to leap in.
Bloodrage should be used before Force Scream because you’ll deal more additional supercritical damage with Force Scream than you would by ticking its DoT since the Champion’s Precision implant increases your critical chance by 20% and that gets converted to supercritical damage because Force Scream is an autocrit.
Rotation
Vengeance’s rotation is a hybrid between a priority list and a static rotation. There are 3 abilities that all have the same cooldown duration: Imaple, Force Scream, and Vengeful Slam. In order to use all of those abilities and all of your other high-damage abilities on cooldown, you have to alternate using one of those 3 abilities and another ability from a priority list.
- Impale
 Slot 1
- Force Scream
- Slot 2
- Vengeful Slam
- Slot 3
- Repeat
 Impale
 Force Scream
 Vengeful Slam
Impale, Force Scream, Vengeful Slam, and Sundering Assault should be coming off cooldown just in time for you to use them. If this is not happening, you probably need to increase your APM.
The relative order of those 3 abilities isn’t all that important, it’s mostly just convention. It’s beneficial to do Vengeful Slam last out of the 3 because you will spread all of your DoTs.
If there is a bit of downtime or you make a mistake and accidentally use 2 priority slot abilities in a row or two of Impale / Force Scream / Vengeful Slam rather than alternating, just keep going with the alternating pattern that you normally do. The cooldowns will correct themselves momentarily, though you will sometimes see two of Impale / Force Scream / Vengeful Slam available at the same time, so just use whichever one is supposed to be next.
Main Priority
You should prioritize using all of these abilities in Slots 1-3 if any of them are available.
- Shatter
- Sundering Assault (only if you need the Rage)
- Ravage (only in Slot 2 or 3)
- Hew
- Semi-Rotational Abilities Priority
 Sundering Assault (only if you need the Rage)
 Ravage (only in Slot 2 or 3)
 Hew
HewShatter and Sundering Assault will occupy all 3 slots evenly. Each time they come off cooldown, they will be used 1 Slot later than they were the last time they were activated. For example, if you use Shatter in Slot 1, the next time you use it will be in Slot 2.
Conversely, Ravage should never be used in Slot 1. It’s not the end of the world if you do, you just miss out on some DoT ticks by refreshing earlier than you need to. Hew is the ability you can delay to account for the more specific timing requirements of the other 3 abilities.
You can use Sundering Assault on cooldown, though the Rage generated by Bloodrage will end up getting wasted, which is a DPS loss because Sundering Assault is quite a bit weaker than what will usually be Vicious Slash.
However, being forced to delay one of your stronger abilities will destabilize your rotation, resulting in a far greater DPS loss, so it’s better to use Sundering Assault if you’re not certain that you’ll have enough. Keep in mind that you can pre-cast Sundering Assault if there’s downtime because you generate Rage upon activation, not upon dealing damage.
You can sometimes use Saber Throw in lieu of Sundering Assault if you only have room for a few Rage. It will let you delay Sundering Assault longer, and you won’t miss out on damage over Vicious Slash, but this is a more advanced technique.
You can easily end up shooting yourself in the foot by prioritizing Saber Throw for Rage generation because you are giving up your only real ability with 30m range and might end up not building enough Rage to afford your next rotational attack.
Semi-Rotational Abilities Priority
If all of the Main Priority abilities are unavailable or it’s not time to use any of the ones that are technically available, you’ll want to use a Semi-Rotational ability instead.
- Hew (unprocced)
- Retaliate (if available and you care)
- Saber Throw (situational)
- Vicious Slash
 Retaliate (if available and you care)
 Vicious Slash
The vast majority of the time, you’ll be using Vicious Slash, but the others do come up occasionally, especially in Priority Slot 1 when you need to delay Ravage to Priority Slot 2.
You shouldn’t ever see Retaliate while practicing on the dummy, but it does come up in boss fights. Remember, it’s only a little bit stronger and cheaper than Vicious Slash. You’ll need to resist the urge to prioritize Retaliate over one of your strong attacks just because you see it glowing, and its proc can fall off before you get the chance to use it.
The most common time you’ll be able to activate Retaliate is when a boss becomes immune, and you hit it with a pre-casted Sundering Assault for the Rage generation.
Saber Throw should be used as a semi-rotational attack whenever you are out of range with your other, higher-priority attacks or you want to apply the armor debuff to a secondary target, typically another boss. Again, you can also use it for Rage generation, but that’s a bit risky unless you’re really comfortable with the fight and spec.
Cut to Pieces Tactical
The Cut to Pieces tactical makes it so that the cooldown of Vengeful Slam is reduced by 1.5 seconds whenever one of your bleed DoTs critically hits, though this can only occur once every 2 seconds as of Update 7.8 when it was nerfed.
Opener
The following should be more than enough to get through anything outside of max level heroics and such.
- Force Charge
- Sundering Assault (if necessary)
- Shatter (on healthiest, centermost target)
- Vengeful Slam
- Bloodrage (not on GCD)
- Force Scream (at centermost target)
- Sweeping Slash (if hitting at least 3 targets)
- Impale (as needed)
- Hew (as needed)
- Vengeful Slam
- Filler Abilities Priority
Standard enemies will die by the time you use Force Scream, and Strong enemies can be finished off with Impale, Hew, and the second Vengeful Slam. They may die sooner depending on the effectiveness of Shatter Burst.
Make sure to apply Shatter to the healthiest, centermost enemy so that you can DoT spread to as many enemies as possible with Vengeful Slam.
Since Shatter is your hardest-hitting DoT and Force Scream deals more damage if it’s buffed by Champion’s Precision, you want to use Bloodrage after DoT spreading but before Force Scream.
It’s more important to get those abilities on cooldown ASAP than trying to insert Impale before spreading. You probably won’t get off more than one activation before combat ends, regardless of when you use it.
Impale and Hew are your longer-range high damage options that you can use to defeat targets that missed some of your AoE damage, compensate for attacks not critting, and helping to drop the HP of stronger enemies.
You have time for 3 GCDs before Vengeful Slam will be back off cooldown, so you can use Impale, Hew, and even Sweeping Slash depending on what you need to accomplish.
The more enemies that are on the ground before Shatter falls off, the better.
Filler Priority
Combat will last longer if you’re doing harder content like Heroics, and the rotation starts to break down at that point, so you have to start throwing in filler abilities after your second Vengeful Slam.
- Vengeful Slam
- Hew
- Return to Opener Abilities
- Sweeping Slash (if hitting at least 3 targets)
- Ravage
- Retaliate (if available and you care)
Something will be back up before you can do everything in the filler priority. Just incorporate those abilities as they become available, treating the opener as a sort of superior priority list.