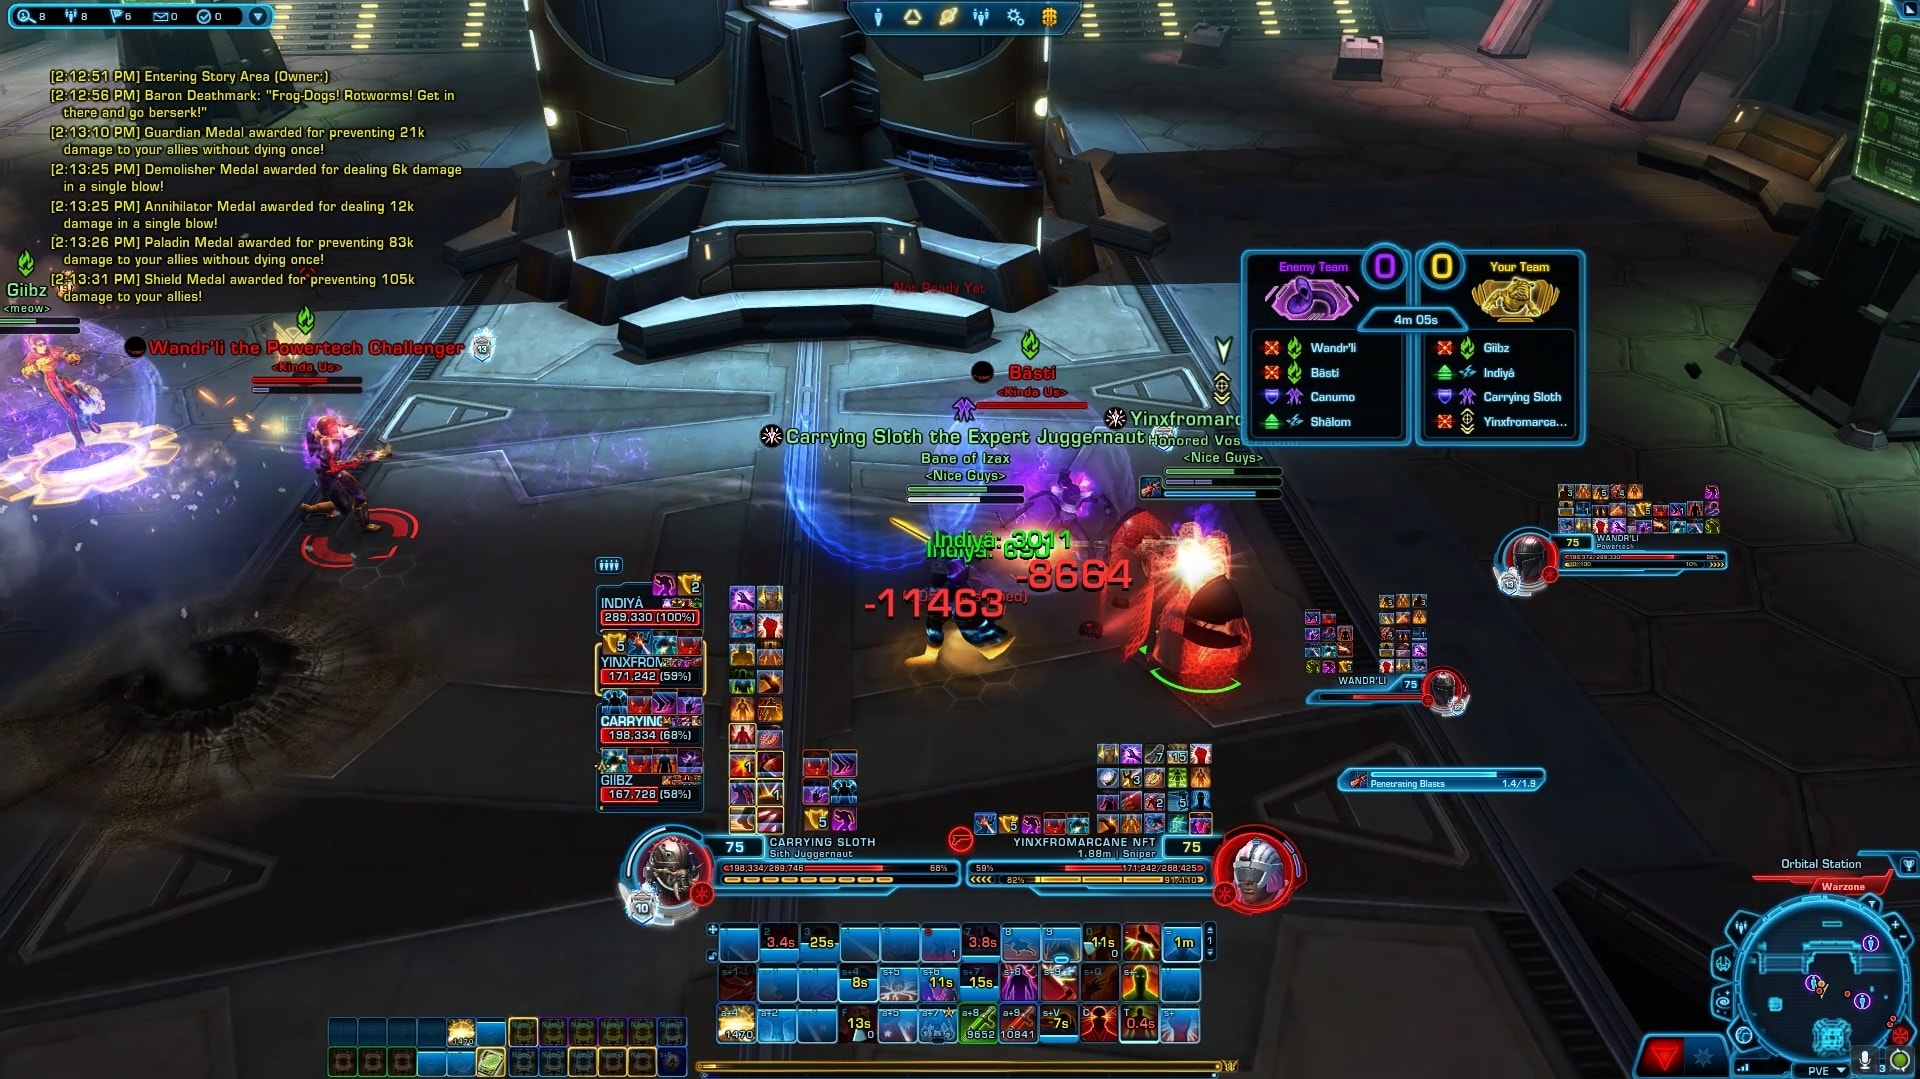
This is an in-depth SWTOR Immortal Juggernaut 7.0 Tank guide focusing exclusively on PvP, written by Valek. It’s suitable for beginner players as well as veterans, who seek to learn how to improve their performance!
Table of Contents:
- Introduction to Immortal Juggernaut in PvP
- Abilities Explained
- Ability Tree Choices
- Gearing and Stats Priorities
- Best Immortal Juggernaut PvP Builds in 7.0
- Openers, Rotations, Priorities
- PvP Tanking Tips, Tricks and Recommendations
- About the Author
Introduction to Immortal Juggernaut in PvP
Immortal Juggernaut is a hard hitting, high defensive tank that utilizes both lightsaber and force attacks to deal damage. In this guide I will outline the basic builds and playstyle for the class while elaborating on why I believe they are strong in the current patch. Immortal utilizes multiple ways of utility that can help a team in PvP while having great defensives, offensives, and peel mechanics making it an excellent choice to pick up for the Legacy of the Sith expansion!
Common Terms
Hardstun
A stun that will not break on damage
Whitebar/Resolve
After a certain amount of stuns have been used against an enemy, their resolve bar (a bar you can see next to the character portrait that becomes purple when a stun or pushback ability has been used against them) will become white indicating they can’t be stunned or pushed until that bars color is reset.
Mez or CC
A stun that can be broken by damage.
AoE
Known as Area of Effect, this is what any ability that can hit more than one enemy is called. I.e. Force Storm, Suppressive Fire, Smash
DoTs
Damage over Time, any ability that leaves a debuff applying damage after an initial hit. i.e. Affliction, Corrosive Dart, Retractable Blade
DCD
Defensive Cooldown, this is any ability that will mitigate or shield/absorb any incoming damage.
HP
Hit points, also known as your health.
Tank Tunnel
Being the primary focus of enemy players as a tank despite better targets being available.
Roots
Any ability that impairs your movement without applying resolve to your resolve bar.
DR/Damage Reduction
An effect some abilities can apply to reduce incoming damage on yourself/teammates or outgoing damage on enemy players.
Peel
Using stuns or roots to help control an enemy player from attacking a friendly target.
Damage Types
There are two different types of damage, white damage which is any damage that comes from your weapon, and yellow damage which is any attack that does not come from your weapon.
White damage is only one type of damage, but yellow damage has subcategories such as Kinetic, Energy, and Internal damage.
You can read the Guide to damage types in SWTOR by Endonae for in-depth analysis and explanation of how damage types work in the game.
Immortal Abilities Explained
Let’s talk about the abilities you will be using as Immortal. I will list off all the abilities as well as a description of how you should be using them. (Note all cooldown timers are based on having 0 alacrity. Different abilities will have different cooldown timers with increased alacrity.)
Damage Abilities
 Assault
 Assault
Generates 2 rage and inflicts weapon damage with a series of quick melee attacks. Attacks with both weapons if dual wielding. (Basic Attack)
This is your basic attack, you will need to use this if you are out of rage. It generates 2 rage per hit.
Aegis Assault
 Aegis Assault
Increases damage reduction and shield absorption by 3% for 20 seconds, generates 6 rage, and deals weapon damage to the target with a series of quick melee attacks | Replaces Sundering Assault. (12 second cooldown)
This is your main rage builder for Immortal as well as giving a small amount of damage reduction. This is an ability at the top of your ability priority list. Maintaining rage using this ability will help you be able to dish out damage.
Crushing Blow
 Crushing Blow
Crushes the target beneath a powerful blow, dealing weapon damage, enabling Retaliation, and impairing the target for 45 seconds. Impaired targets deal 5% less damage with Force and tech attacks. If you are protected by your Aegis Assault, Crushing Blow damages up to 7 additional nearby enemies for the same amount. Does not damage sleeping, lifted, or incapacitated enemies. This attack knocks down all affected standard and weak enemies. Generates a high amount of threat. (12 second cooldown, costs 4 rage)
This is your big hitter, this is going to be where a lot of your damage comes from. Not only a single target hit but also an AoE hit and is a good way to get in cleave damage. In the description it mentions the ability does not damage sleeping, lifted, or incapacitated enemies – this is only the aoe on mezzes that break on damage. You should be using Crushing Blow each time it is available.
 Sweeping Slash
Slashes up to 8 enemies within 5 meters in front of you for weapon damage and inflicts the targets with Trauma, which reduces the healing received from all sources by 20% for 6 seconds. (Costs 2 rage, Chosen in skill tree)
A choice in the skill tree for Immortal, this is a good option to pick up if you want to be doing a lot of AoE damage as well as spreading a lot of Trauma.
Smash
 Smash
SmashSmashes up to 8 enemies within 5 meters, dealing kinetic damage. Stuns weak and standard enemies for 2 seconds. (15 second cooldown, costs 1 rage)
One of your many AoE abilities, Smash applies the Unsteady debuff to reduce accuracy by 5% on all targets hit by Smash. Using this constantly on multiple enemy targets will most certainly make their life more annoying by having a higher chance of missing their attack.
Force Scream
 Force Scream
Blasts the target with a Force-enhanced scream, dealing kinetic damage. In addition, standard and weak enemies are stunned for 4 seconds. (12 second cooldown, costs 3 rage)
Using Force Scream applies a small absorption shield on use. When you parry, deflect, shield, or resist an attack there is a 50% chance the Revenge proc will be applied, this will reduce the amount of rage needed to use Force Scream which is a very nice perk as you’ll using Force Scream often.
Force Charge
 Force Charge
Jumps to a distant target, dealing damage with the main-hand weapon, immobilizing the target for 2 seconds and interrupting the target’s current action. Builds 3 rage.
Cannot be used against targets in cover. (15 second cooldown)
Your basic gap closer, you will use this ability anytime you need to get to your target right away.
 Force Push
 Force Push
Deals kinetic damage, knocks the target back several meters, and knocks the target down for 2 seconds. Force Push immediately finishes the cooldown of Force Charge. (1 minute cooldown)
One of the Juggernaut’s most unique and useful abilities in PvP, Force Push can be used to separate targets from one another, i.e. separating a tank from a healer with guard. Force Push is a unique ability as it is a knockback, but also sort of a mini stun in a sense that the affected player has to go through the animation of being knocked back and standing up. During this animation abilities cannot be used.
Ravage
 Ravage
Performs a series of lightsaber attacks that deal weapon damage. Strikes both weapons if dual wielding. (18 seconds cooldown)
You will primarily be using this ability when you don’t have any rage to spare, if you need to root someone if you use the Overwhelming Slashes utility, or are lining up a burst combo. Ravage applies the Defensive Slashes buff which increases defense chance by 2% and stacks up to 3 times.
Vicious Slash
 Vicious Slash
Slashes the target for weapon damage and inflicts the target with Trauma, which reduces the healing received from all sources for 20% for 6 seconds.
This will be your most used ability, anytime you don’t have Crushing Blow, Aegis Assault, Smash, or Force Scream, this is your filler. Note that the application of Trauma is strictly only for Immortal, none of the other classes or disciplines that use Vicious Slash has this feature.
Vicious Throw
 Vicious Throw
Throws the main-hand lightsaber at a target, dealing weapon damage. Only usable on targets at or below 30% max health. (10 second cooldown, costs 3 rage)
Basic execute, always use when a target is below 30% health off cooldown.
Retaliation
 Retaliation
Retaliates against the target for weapon damage. Cannot be parried, dodged, or missed. Retaliation can only be used after successfully defending against a melee or ranged attack or after one of your melee attacks is parried, dodged, or misses. (6 second cooldown, costs 1 rage)
Retaliation is an important ability for Immortal, after using Crushing Blow Retaliation becomes free not using any rage. As Immortal Retaliation doesn’t respect the GCD (Global Cooldown) so you can use this at the same time as any ability and both will hit the target.
Saber Throw
 Saber Throw
Throws the main hand lightsaber at a distant target, inflicting weapon damage and building 3 rage. (30 second cooldown)
Saber Throw can be a very useful ability when you need to build rage, or if you use the Throwing Arm tactical you can apply a 70% accuracy debuff from 30 meters away.
Stuns/CC
Backhand
 Backhand
Bashes the target for kinetic damage, stunning it for 4 seconds. This ability generates a high amount of threat. (1 minute cooldown)
One of your two stuns, also called hardstuns, use anytime you need to control a target or set up a killable target for friendly DPS.
Force Choke
 Force Choke
Chokes the target, stunning it for 4 seconds and generating moderate threat. Deals kinetic damage and builds 3 rage over the duration. This ability can be channeled while moving. (1 minute cooldown)
Your second hardstun, you can use this directly after your Backhand to stun even longer, but will apply a whitebar.
Intimidating Roar
Paralyzes up to 8 nearby enemies in fear, preventing all action for up to 6 seconds. Damage ends the effect prematurely. In addition, targets affected by Intimidating Roar deal 15% less melee and ranged damage for 10 seconds after the confounding effect ends. Targets immune to the confounding effect will immediately suffer from this damage reducing effect. (1 minute cooldown, Chosen in skill tree)
This is your Mez/CC, you might see Intimidating Roar be called Fear by some and is definitely one of the most useful abilities Juggernauts have. You will want to use this anytime you need to remove a player out of a fight for the duration of the CC, whether it’s a healer, or a DPS doing a lot of damage.
Defensive Cooldowns
Enraged Defense
 Enraged Defense
Empowers you with 12 charges of Enraged Defense, lasting up to 15 seconds. Whenever you take damage a charge of Enraged Defense is consumed to heal you. This ability can be used while stunned or otherwise controlled but cannot be used while above 70% health. (Base 2 minute cooldown, 1:30 with Through Passion utility)
This is your main dcd, this will always be the first dcd you will use as Immortal. It is the second fastest cooldown Immortal has, and is almost the most valuable. Anytime you are getting close to around 25-30% hp you will want to use this ability which will heal you to full.
Saber Ward
 Saber Ward
 Raises a lightsaber ward, increasing melee and ranged defenses by 50% and absorbing 25% of the damage taken from Force and tech attacks. Lasts 12 seconds. (2:30 cooldown)
With the tactical Grit Teeth, this will be your second most used ability. Anytime there could be a lot of damage incoming it is a good time to use Saber Ward. This is a dcd you will want to use pretty early after your first Enraged Defense if you are using the Grit Teeth tactical.
Saber Reflect
Reflects all direct single target ranged, force, and tech attacks back to the attacker for 5 seconds. The damage done by each reflect is capped. In addition, Saber Reflect generates a high amount of threat on all engaged enemies within 30 meters when activated. (1 minute cooldown, Chosen in skill tree)
This is a dcd that isn’t very useful as Immortal unless you are being tunneled. In my opinion this is something you will rarely take compared to the other choices you have in this branch of the utility tree.
Mad Dash
Madly dash forward 20 meters, dealing weapon damage to enemies in your path and increasing your defense chance by 100% while dashing. Can be used while immobilized and purges movement-impairing effects. (35 second cooldown)
In the same branch as Saber Reflect and Intimidating Roar, Mad Dash can be a good pick up if you are constantly being rooted and have no need to take Intimidating Roar.
Invincible
 Invincible
Reduces all damage taken by 40% for 10 seconds. (2:30 cooldown)
Invincible is a DR defensive with a long cooldown timer. You will want to use this cooldown as one of your last priorities due to its
Endure Pain
 Endure Pain
Temporarily increases your maximum health by 30% for 20 seconds and removes all cleanseable effects. When the effect ends, the health is lost. (1 minute cooldown)
Endure Pain is a temporary health increase. It is best paired with Warzone Medpac due to Endure Pain increasing your entire health pool, your Warzone Medpac will heal for more. Of course you won’t be able to use Medpac each time you use Endure Pain in the same fight. But besides that, using Endure Pain close to having and maintaining 30% hp left could result in you dying instantly when the ability ends which is something you will need to watch out for and try your best to survive if that is the case. Endure Pain also has a cleansing effect that can cleanse debuffs such as roots and slows.
Unleash
 Unleash
Purges incapacitating and movement-impairing effects. (Base 2 minutes cooldown, 1:30 with Payback utility)
This is your stun breaker, as a tank this is an important ability to know when to use. Breaking properly and applying guard can save the life of a teammate. Typically you will want to use your breaker before your teammate receives a lot of damage. Guarding burst classes such as AP Pt and MM Sniper is imperative.
Warzone Medpac
 Warzone Medpac
Immediately restores 35% of maximum health. Only usable in Player versus Player environments. Only usable once per fight.
Warzone Adrenal
 Warzone Adrenal
Increases damage reduction by 15% for 15 seconds while fighting other players. Only usable in Player versus Player environments. (3 minute cooldown)
Cooldown usage/priorities
Enraged Defense – Saber Ward – Endure Pain – Medpac with Endure Pain if needed – Invincible
Interrupt
Disruption
 Disruption
Smashes into the target, disrupting its current action and preventing that ability from being used for the next 4 seconds. (12 second cooldown)
Your interrupt ability, use anytime an enemy player is casting an ability you can interrupt.
Important Tank Abilities
Taunt
 Taunt
TauntTaunts the target, forcing it to attack you for 6 seconds. Player targets deal 30% less damage when attacking anyone other than you for 6 seconds. (15 second cooldown)
You will want to use this when a single target is doing any sort of damage. In all honesty this is an ability I use on any DPS doing any sort of damage every time Taunt is off cooldown. Thought I will note at the start of fights, whether it is Regular Warzones or Ranked, most DPS will use OCS (Offense Cooldowns) at the start, abilities such as Explosive Fuel for Powertech, Laze Target for Sniper, or Polarity Shift for Sorcerer. At the start of fights it can be very useful to taunt these specific classes using OCDS to reduce the amount of burst damage they do.
Threatening Scream
 Threatening Scream
Taunts all enemies within 15 meters, forcing them to attack you for 6 seconds. Player targets deal 30% less damage for 6 seconds when attacking anyone other than you. (45 second cooldown)
Exact same thing as Taunt, but is an AoE that can hit multiple enemies in its radius.
Threatening Rage
 Threatening Rage
Instantly generates 6 rage, reduces the cooldown of Taunt and Threatening Scream by 5 seconds and damages all taunted targets around you. (45 second cooldown)
This is a new ability to Immortal in 7.0. This ability was called Enrage in 6.0, but all disciplines of Juggernaut have their own unique ability now. Threatening Rage is a nice addition to Immortal, as using it can reduce the cooldown of both your taunts while damaging enemies you have taunted upon use. Depending on the situation you will want to use this after using an AoE taunt to get the most out of its damaging effect. In ranked however it is better to use this as a root breaker which you can take in the utility tree.
Intercede
 Intercede
Leaps to a friendly target, reducing their threat by a moderate amount and reducing damage taken by 20% for 6 seconds. (20 second cooldown)
Another important tank ability for Immortal, interceding to a target with guard can massively increase their damage reduction from enemy players. Using this on a friendly target without guard is also very useful, as sometimes interceding can be enough to help minimize the incoming damage without having to apply guard.
Guard
 Guard
GuardWhile active, the guarded player takes 5% less damage and generates 25% less threat. In addition, so long as you remain within 15 meters of the guarded player, 50% of all incoming damage from enemy players is transferred back to you.
The bread and butter of being a tank, applying guard to friendly targets to help mitigate damage they will receive. This is your most important job in PvP, guarding the correct person at the correct time can provide immense advantages to your team. Looking for key abilities and enemy movement is the must here, and I will go more in depth with this in the General Tanking Tips and Tricks section of the guide.
Trauma
 Trauma
Reduces healing received from all sources by 20% for 6 seconds.
Trauma is not an ability, but a debuff that your Vicious Slash and Sweeping Slash apply. This debuff is important to apply to all enemies to reduce their incoming healing.
Immortal Passives
Like any Class Discipline, Immortal comes with a slew of very good passives. Here I will list all of the passives as well as their effect.
Soresu Form
 Soresu Form
Utilize a Defensive Lightsaber form, increasing armor rating by 61.5%, damage reduction by 6%, shield chance by 15%, threat generation by 150%, and accuracy by 10%. While utilizing Soresu Form, all damage dealt is reduced by 10%, and all Assault abilities generate 1 less rage.
Quake
 Quake
QuakeTargets damaged by Smash and Sweeping Slash become Unsteady. Unsteady targets have their melee and ranged accuracy reduced by 5% for 45 seconds. In addition, damage dealt by Force Scream is increased by 40%.
Lash Out
 Lash Out
Retaliation consumes 1 less rage and no longer causes a global cooldown. In addition, melee and ranged defense is increased by 3%.
Rule of Two
 Rule of Two
Increases armor rating by 15% and when your guarded target is attacked, your movement speed is increased by 30% for 6 seconds.
Sonic Barrier
 Sonic Barrier
Activating Force Scream grants Sonic Barrier, which absorbs a small amount of damage. Lasts up to 10 seconds.
Conquering Defense
 Conquering Defense
Increases shield chance by 4% and reduces the cooldown of Saber Ward by 30 seconds.
Revenge
 Revenge
Parrying, deflecting, shielding, or resisting an attack has a 50% chance to grant Revenge, reducing the rage consumed by your next Force Scream or Vicious Throw by 1. Lasts up to 12 seconds, and stacks up to 3 times.
Dark Blood
 Dark Blood
Increases the duration of Endure Pain by 10 seconds. Increases elemental and internal damage reduction by 5%.
Defensive Slashes
 Defensive Slashes
Dealing damage with Ravage increases your defense chance by 2%. Stacks up to 3 times and lasts for 6 seconds.
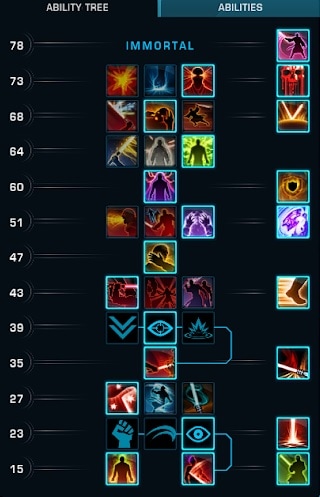
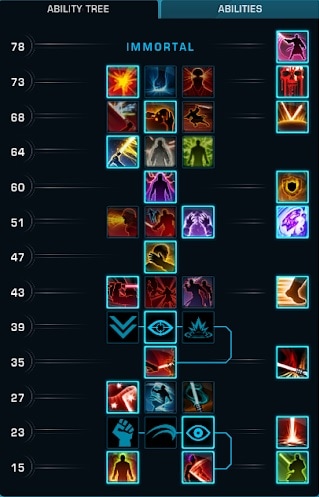
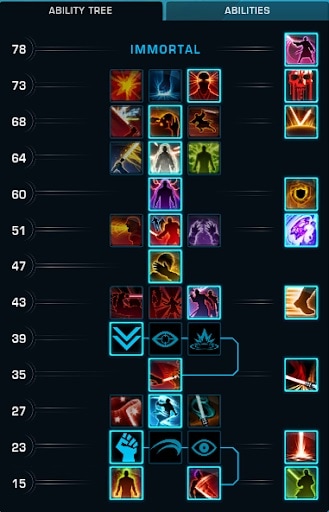
Immortal Ability Tree Choices
Level 23
 Through Strength
Aegis Assault increases your damage reduction by an additional 2% when it deals damage.
 Targeted Assault
Aegis Assault deals 50% more damage to taunted targets.
 Taunting Strike
Increases the damage, critical hit chance, and threat of Aegus Assault by 20%.
Recommendation
In my opinion, none of these will have any real game changing effects. You can choose what you personally prefer here, but I think Taunting Strike is the best choice to maximize damage output.
Level 27
 Sweeping Slash
Slashes up to 8 enemies within 5 meters in front of you for weapon damage and inflicts the targets with Trauma, which reduces the healing received from all sources by 20% for 6 seconds.
 Overwhelming Slashes
Ravage immobilizes the target for 3 seconds and generates 1 rage.
 Projected Scream
Force Scream does damage to additional enemies in a cove in front and slows them by 50% for 6 seconds.
Recommendation
Sweeping Slash is the best to take here to maximize damage and apply trauma, but if you are needing to control a target with roots Overwhelming Slashes is a good choice. Projected Scream is probably the least useful skill you can pick up in this tree.
Level 39
 Crushing Rage
Dealing damage with Crushing Blow while Aegis Assault is active grants a barrier of protection to up to 8 allies within 10 meters for 6 seconds. (Unlisted effect of applying 10% DR to surrounding allies)
 Critical Blow
Crushing Blow critical chance and threat generated is increased by 20% and its cooldown is reduced by one second each time it critically hits.
 Crushing Mark
Crushing Blow deals 50% more damage to taunted targets.
Recommendation
Personally Critical Blow is the easy pick for me here to get the most damage, but all 3 of these can be good choices to use depending on what team composition you have. Crushing Rage can help surrounding teammates survive with the 10% DR applied to them but is really only useful if your team is made up of mostly melee. Crushing Mark is another good choice, but relies heavily on using Crushing Blow on taunted targets to make any real use of the effect which is not as efficient as Critical Blow in maximizing damage.
Level 43
 War Machine
Critically hitting with direct attack reduces the cooldown of your Threatening Rage by 1 second. Threatening Rage purges movement impairing effects and increases your melee and ranged defense chance by 10% for 10 seconds.
 Marked for Death
Dealing direct damage to taunted targets generates 1 rage. This effect can occur once every second. (This description is missing an effect, which heals you for 1% whenever you deal direct damage to taunted targets)
 Reckoning
Intercede grants Reckoning, increasing the damage dealt by your next melee ability by 20%. This effect lasts for 10 seconds. Additionally, reduces the cooldown of Intercede by 5 seconds and reduces the threat and damage taken by an additional 10% each for the friendly target of Intercede.
Recommendation
All good choices here, you could take any and be just fine. Personally I recommend taking War Machine as having Threatening Rage on a shorter cooldown for taunts, damage increase, and breaking roots. Marked by Death is similar to Crushing Mark in the previous tier, and relies solely on you attacking your taunted target. Reckoning can be a good choice when you are not being rooted a lot and want to help protect your team a bit more while having a good buff of a 20% damage increase on your melee ability.
Level 51
 Extending Roar
Increases the range of Force Scream to 30 meters, but Force Scream deals reduced damage beyond 10 meters. Additionally, Force Push deals 20% more damage and grants Extending Roar, allowing your next Force Scream to deal full damage regardless of the distance from the target.
 Warmonger
Getting attacked reduces the active cooldown of Force Charge by 1 second. This effect cannot occur more than once every 1.5 seconds.
 Unyielding
You generate 4 rage when stunned, immobilized, put to sleep, or knocked around.
Recommendation
Similar to the previous branch, you could take any of these three and be completely fine. Personally I prefer to use Unyielding to help keep my rage up. Warmonger is also equally as good of a pick as having Force Charge available more often as an interrupt and or gap closer can be good.
Level 64
 War Master
Force Charge grants Unstoppable, granting immunity to movement-impairing effects and effects that push or pull you around for 4 seconds. In addition, Force Charge enables your next Vicious Throw or Hew to be used against a target with any percentage of health.
 Hardened Defense
All damage is reduced by 30% while stunned.
 Payback
Reduces the cooldown of Unleash by 30 seconds and causes Unleash to heal you for 10% of your maximum health when used.
Recommendation
Now this is where the important picks start to occur in the Immortal utility tree. Payback is the best choice here, as having a short cooldown on your breaker can help protect your team when you are stunned. Hardened defense is a good pick if you are having trouble surviving and need that extra damage reduction when you are stunned. Due to the changes in 7.0 a lot of stuns were removed from the game from some classes and are picked in the utility tree for others, this is why Hardened Defense isn’t a must have anymore. War Master is the best choice here if you are wanting to do the most damage, but I highly recommend Payback in almost any PvP scenario, especially ranked.
Level 68
 Saber Reflect
Reflects all direct single target ranged, force, and tech attacks back to the attacker for 5 seconds. The damage done by each reflect is capped. In addition, Saber Reflect generates a high amount of threat on all engaged enemies within 30 meters when activated.
 Intimidating Roar
Paralyzes up to 8 enemies in fear, preventing all action for up to 6 seconds. Damage ends the effect prematurely. In addition, targets affected by Intimidating Roar deal 15% less melee and ranged damage for 10 seconds after the confounding effect ends. Targets immune to the confounding effect will immediately suffer from this damage reducing effect.
 Mad Dash
Madly dash forward 20 meters dealing a low amount of weapon damage to enemies in your path and increasing your defense chance by 100% while dashing. Can be used while immobilized and purges movement-impairing effects when activated.
Recommendation
Another set of important choices, as Immortal Intimidating Roar is the best choice here. Being able to control enemy players and apply a damage reducing effect after a 6 second CC is very useful. Mad Dash is a choice you can pick here if you are being rooted a lot and want another ability to help mitigate a bit of extra damage. Using Mad Dash as another sort of gap closer can be helpful against certain comps, especially full ranged comps. Saber Reflect is pretty useless here as Immortal unless you want to punish anyone hitting you directly.
Level 73
 Pooled Hatred
Whenever your movement is impaired, you gain a 10% damage bonus to your next ability that consumes rage. This effect can stack up to 6 times and lasts 15 seconds.
 Crushing Fist
For the Immortal Discipline, Smash slows the targets it damages by 60% for 10 seconds.
 Through Passion
Reduces the cooldown of Enraged Defense by 30 seconds.
Recommendation
Through Passion is the choice you will want to take almost 99% of the time. Pooled Hatred and Crushing Fist are good options on their own, but nothing will be able to be as useful as Through Passion. If you are wanting to maximize damage and not worry about surviving then pick Pooled Hatred. Crushing Fist can help peel for friendly targets by applying a devastating slow to enemy targets hit by your Smash but in my opinion is the worst pick here.
Gearing and Stats Priorities
Tacticals
 Throwing Arm Throwing Arm |
|---|
| Effect: Saber Throw lowers the target’s accuracy by 70% for 6 seconds |
| Recommendation: Having a 30 meter 70% accuracy debuff can be immensely helpful for your teammates. Throwing your saber on a Sniper casting Ambush to have a chance of that big hitting ability missing is very useful. |
 Second Amulet Second Amulet |
|---|
| Effect: Retaliation refunds one rage and finishes the cooldown of Furious Strike. |
| Recommendation: This is a Rage Juggernaut tactical, but the effect of Retaliation refunding one rage can be somewhat useful, but certainly not the best choice. |
 Grit Teeth Grit Teeth |
|---|
| Effect: The active cooldown of Saber Ward is reduced by 2 seconds when you are attacked. This effect cannot occur more than once per second. |
| Recommendation: This is the tactical you should be using in every situation unless you cannot get your hands on it. Having a reduction on a decent dcd each time you get attacked(which you will always be getting attacked if you have guard on someone getting attacked) can be very useful in helping with your survival. This is a crafted tactical that can be bought off the GTN or picking up the schematic from Kai Zykken when available in his shop. |
 Life Warden Life Warden |
|---|
| Effect: Taking damage below 20% heal will rapidly heal you for a large amount. 10 minute cooldown. |
| Recommendation: Definitely the worst choice of the tacticals listed here, but not completely useless. If you aren’t able to get the previous tacticals but have this one it is a good substitute to have until you are able to get one of the above tactical. |
Legendary Implants/Set Bonus Implants
| Force Resistance Package |
|---|
| Effect: Elemental, Internal, Kinetic and Energy damage reduction is increased by 3%. |
| Recommendation: Mainly meant to be used in PvE, can be taken in PvP to help mitigate some damage, but not the best choice. |
| Retaliator Package |
|---|
| Effect: Retaliation has no cooldown. |
| Recommendation: Fun to spam Retaliation, but not the best choice to take for PvP. |
| Fearless Victor Package |
|---|
| Effect: Whenever you use a rage spending damage ability, your melee damage is increased by 10% for 10 seconds. |
| Recommendation: Definitely one of the best choices here, you are constantly using abilities spending rage, so a constant damage increase is an amazing choice. |
| Champion’s Precision Package |
|---|
| Effect: Activating Enrage, Bloodrage or Threatening Rage grants Champion’s Precision, increasing your critical chance by 20% for 8 seconds. |
| Recommendation: Another very good choice here, You will be using Threatening Rage quite often and having an added 20% critical chance increase can be very useful to maximize your damage. |
| Nimble Master Package |
|---|
| Effect: Activating Saber Ward grants Nimble Master increasing your movement speed by 100% for the duration of Saber Ward. |
| Recommendation: A fun choice if you are keen to try to survive and kite when getting tank tunneled. |
| Vicious Thirst Package |
|---|
| Effect: Vicious Slash, Massacre and Sweeping Slash add Vicious thirst to their targets, stacking up to 5 times. Killing an enemy with Vicious Thirst stacks increases your damage by 3% per stack for 10 seconds. |
| Recommendation: Not a very practical bonus for any spec, the gains are minimal compared to other implants. |
Pairing Champions Precision Package and Fearless Victor Package are the best options to maximize the most damage you can do and apply the most pressure to enemy players. If you are aiming to try to survive and kite more, Using Nimble Master along with the Grit Teeth tactical can help, Champion’s Precision Package would be the second implant to go for with this build.
Stat Priority
You are able to buy all gear pieces from the PvP vendor in the Combat Section of the Imperial/Republic Fleet, but gear drops from crates you receive after completing weeklies will only drop to your certain spec you have selected. To get the right pieces to drop in crates for Immortal in this guide, be sure to have one of the DPS specs selected as your Loot Discipline which can be applied by right clicking your character portrait. Some pieces will drop accuracy (Pummler Gauntlets and Greaves) which you will not need as Immortal. You should be using Serendipitous Assault and Focused Retribution as your relics. For Color Crystals, Eviscerating is always the go to.
Another note to make is some stats may vary depending on what Class Buffs and Datacrons you have found in the galaxy, as some effect mastery and endurance. As of writing this guide, no moddable gear is available yet. So for now the stats you should aim for are 7.15% alacrity and the rest in Critical.
Reason for DPS Gear
In PvP it is common to see any of the 3 tank classes using DPS gear. The reasoning behind this is due to the fact that mitigation stats just don’t help much in any way in doing damage. Due to this fact it is best to use DPS gear to help your team do more damage AND keep them alive. With mitigation stats all you could really do is guard swap and taunt due to not having any stats to increase actual damage. If you plan to be the best huttball player though, mitigation stats are the way to go, but I’d say that is the only place it would be useful.
Best Immortal Juggernaut PvP Builds in 7.0
These are probably the most useful builds you can run as Immortal.
The Typical Build
Damage Focused Build
Survival Build
I do want to note a bad build though, the taunt damage build. With the taunt damage build you would be using the level 23 passive Targeted Assault and the level 39 passive Crushing Mark. This build can work, but it would require a lot of concentration on who you taunt so you could use these 2 abilities on them. Frankly you can’t always guarantee you will be hitting the target you have taunted, and you certainly don’t want to waste a taunt on a target just to deal more damage to them.
Openers, Rotations, Priorities
Opener
Your opener should consist of these abilities in this order:
- Force Charge
- Aegis Assault
- Crushing Blow
- Retaliation
- Smash
- Force Scream
- Ravage
- Threatening Rage
- Vicious Slash / Sweeping Slash.
Burst Rotation
Your Burst Rotation should consist of these abilities in this order:
- Aegis Assault
- Threatening Rage + Crushing Blow
- Retaliation
- Force Scream
- Smash
- Ravage
Priorities After Opener
- Aegis Assault
- Crushing Blow
- Force Scream
- Retaliation
- Ravage
- Smash
- Vicious Slash / Sweeping Slash.Saber Throw
- Assault
 Assault
Outside of the burst rotation, you should be using ![]() Threatening Rage as a rage builder, root breaker, or a cooldown reduction on your taunts.
Threatening Rage as a rage builder, root breaker, or a cooldown reduction on your taunts.
PvP Tanking Tips, Tricks and Recommendations
Focus Target’s Target & Target’s Target
Having these 2 keybinds can define how fast you can react to enemy DPS abilities. I highly recommend having these 2 keybinds, which are “Acquire Target’s Target” and “Acquire Focus Target’s Target”. Found here in the settings:
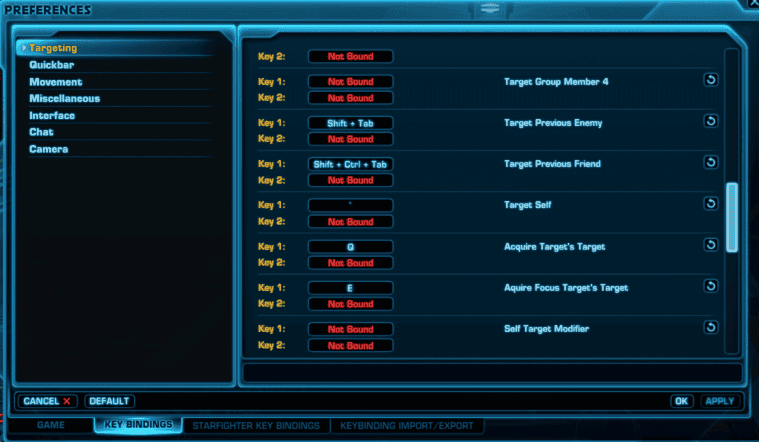
These keybinds can help you greatly with guard swapping. Having a sniper on focus target, and seeing them cast ambush, all it takes is the press of a button to acquire their target and throw that friendly a guard. I have my keybinds set to Q and E because these keybinds are very close to where my fingers are while playing, so it is quick to press and guard.
General Tanking Tips
Tanking in Regular Warzones
Tanking in Regular Warzones comes completely down to how you, the player, want to play. You could use any of the builds I have talked about previously in the guide and determine how you want to play! Personally I enjoy trying to do the most damage in regs while also trying to guard swap each time a teammate is low. But at the end of the day it is your choice if you want to be the super offensive tank or super defensive tank.
Tanking in Solo Ranked
Tanking in Solo Ranked is drastically different than in Regular Warzones. Depending on what you have on your team and what type of game it is going to put on as much pressure on the enemy team is key. In games with 3 DPS and 1 Tank it’s simple, you either die first or kill the enemy team first. Of course you will still want to play the tank role and swap guard, use taunt, and cc’s. In a Tank/Heal/2 DPS game – playing more conservative is best depending on if you think your dps players are capable of getting a kill. If you feel you need to step up on the damage don’t be afraid to.
Tanking in Group Ranked
Definitely the hardest content to tank on this list, Group Ranked is where boys become men. Being able to consistently put out damage AND mitigate damage for your team is key to victory. Again depending on what you are playing and what you are playing against – playstyle will change. For instance if you are playing a hardswap composition, conserving burst and playing more defensive in between your team’s swaps is the best. It all depends on what you are playing with and against, and every situation can have a different means of approach for the tank.
Dealing with Tank Tunnel
Tank tunnel is when you, the tank, are getting tunneled directly by enemy players. Depending on the sort of content you are doing there are different ways to deal with this.
Regular Warzones, against melee
Depending on if you are playing with a healer or have a healer on the team, the best thing to do is keep guarding while kiting around the engagement. Using abilities to keep separation between you and the melee dps attacking you can help you survive. Abilities like Force Charge to leap to enemy players, Mad Dash to quickly get away from enemy players while also breaking roots, and Intercede to which you can use to leap to friendly targets that are distant from the enemy melee attacking you.
Regular Warzones, against ranged
Again the same thing depends on who you have on your team. Against ranged using LoS objects (For example, the middle box in the middle of the map on Ancient Hypergate) to run around and keep breaking the casts the ranged classes are casting on you.
Solo Ranked with 3 DPS
Dealing with tank tunnel in solo ranked is going to be pretty similar to the things I mentioned in the previous regular warzone tips. You will want to keep distance between you and the melee, you can also do this by kiting around an object just like you would vs ranged. Again using Mad Dash to create distance can be useful, or running behind a corner to make the melee group together and use Intimidating Roar (Fear). (Example is the box in the middle of Corellia square, or in between the 4 towers in Tatooine Canyon).
Solo Ranked with a healer
Again you won’t change much here, this just depends on what you are against and what heal class you have with you. If you play to LoS the enemy team, you will want to be paired with a Sorcerer/Sage Healer. If you are with an Operative/Scoundrel or Mercenary/Commando healer – playing the distance and kiting game is best as these healers cast the majority of their long heals while a Sorcerer won’t have this issue.
Group Ranked
You should always be playing the trinity composition in Team Ranked (2 DPS, 1 Healer, 1 Tank). Dealing with tank tunnel will be a lot easier as you are playing with players you know and are communicating with. You will take everything in the previous tips into consideration, what team comp you have, what the enemy has, what healer you have. These are the main things you need to consider when choosing how you should deal with the tank tunnel.
How to Peel for Teammates
Keeping teammates alive is a tank’s number one priority. You can do this with guard but also by using peels! Let’s talk about one of Immortal’s best ways of peeling, which is with Intimidating Roar.
Using Intimidating Roar to mez out an enemy player attacking teammates will not only give your teammate time to reorganize themself and possibly gain cds, but will also apply the 15% melee and ranged reduction debuff. Using your hard stuns are another way to help peel for teammates.
There are a couple ways you can use these hard stuns to help but depends on the situation. If a friendly target is being attacked by 2 different enemies, you can use one stun on each enemy to help relieve the pressure of both. If one enemy is the main issue, using both stuns is a viable option too. You can use both stuns on one target, but after they will be white barred.
The last way to help peel is by using roots/knockbacks. If you are taking the root on ravage with the Overwhelming Slashes utility, this is a good option to root enemy players and help create distance between them and your teammate. Using Force Push to knock away enemy targets is another good option, and can help your teammates immensely.
Tanking Against Ranged
Tanking against ranged in PvP can prove to be tricky, as you need to watch your positioning to not over extend to attack them. If you over extend to attack the ranged, this can leave you vulnerable to a knock back which can result in your guarded target being killed. Watching for key abilities such as Ambush (Marksman Sniper) and Thundering Blast (Lightning Sorcerer) will give an indication of who to guard.
There are really only 3 abilities that ranged classes can use that are worth guard swapping immediately for. These 3 abilities are Ambush (Marksmanship Sniper), Explosive Probe (Engineering Sniper), and Thundering Blast (Lightning Sorcerer). Mercenary is a class that is a bit too difficult to guard swap against considering their main, big hitting abilities are not casted, but are an instant ability. When electro net is used though, using guard on the target can help relieve some of the pressure the net is causing with its hindering effect.
Marksman Sniper
One of the easiest classes to read, Marksman has a staple rotation of Snipe, Snipe, Ambush. This can be easy to read and if you react fast enough, you can guard the Ambush. Snipers get a buff that looks like this: ![]() from using Snipe 2 times.
from using Snipe 2 times.
At 2 stacks Ambush has a reduced cast time, so looking for this buff and acquiring the Sniper’s target. Wait for ambush to start casting and use your acquire target’s target keybind, or if you have a sniper on focus target, use your acquire focus target’s target keybind and guard that target. In this screenshot, you can see that the sniper has a green buff on his buff bar, this is Target Acquired ![]() . When a Sniper has this buff, it is imperative that you guard the target, as that means the Sniper’s Ambush will be an auto crit.
. When a Sniper has this buff, it is imperative that you guard the target, as that means the Sniper’s Ambush will be an auto crit.
You can also see a red eye on the Sniper’s target, this is your visual indication of who the Sniper is casting Ambush on.
Engineering Sniper
Dealing with an engineering sniper can be quite tricky. Guard swapping against it on the other hand can be quite simple, it just requires a bit of attention. When playing vs an Engineering Sniper, all of their burst comes from one predictable ability. This ability is explosive probe, and vs an Engineering Sniper it is important to be looking at your teammates buff bar, as the explosive probe debuff shows up like this ![]() . When the target with this debuff is attacked it will explode and put 3 stacks of explosive probes on the target
. When the target with this debuff is attacked it will explode and put 3 stacks of explosive probes on the target ![]() . This deals quite a bit of damage all together, and as the tank, you can mitigate that just by guarding the target with the debuff shown above. If you are having a hard time staying alive vs an Engineering Sniper, I would recommend staying out of the Sniper’s AoE attacks.
. This deals quite a bit of damage all together, and as the tank, you can mitigate that just by guarding the target with the debuff shown above. If you are having a hard time staying alive vs an Engineering Sniper, I would recommend staying out of the Sniper’s AoE attacks.
Diversion
 Diversion
This section will only apply if you have a sniper on your team but are playing against a sniper as well. Diversion is an ability that denies an enemy sniper from entering cover. Cover is how Sniper’s cast the majority of their abilities. In cover Sniper’s have the ability to use Entrench which grants them immunity to all controlling effects, but diversion cancels this out and forces the Sniper out of cover. Typically diversion is used for this exact reason vs a Sniper, if your friendly Sniper get’s diversion thrown on them and is getting attacked/stunned you should guard them.
Lightning Sorcerer
Lightning Sorc can deal a lot of burst damage with 2 abilities, Thundering Blast + Chain Lightning. While Chain Lightning can be activated instantly after using certain abilities, the most burst will come from the TB + CL pair, and luckily for us, Thundering Blast is casted, which means you can easily guard it. You also have a visual key from the Sorcerer that shows they are casting Thundering Blast, it will look like this:

If you are targeting the Sorc, or have them on focus target, you will primarily be looking for this cast:

Guard swapping to their target on this ability can help mitigate a lot of burst damage the Sorcerer can do. Note that Sorcerers have a set bonus that increases damage by 20% of their next ability after using Force Speed, usually this ability would be Thundering Blast – so catching this ability in guard can mitigate a lot of its damage.
Tanking Against Melee
Tanking against melee is on the easier side of tanking in PvP, due to you will always see where the melee you are watching runs to. There are 2 abilities that you need to look for as a tank against 2 classes, Thermal Detonator (Advanced Prototype Powertech) and Volatile Substance (Concealment Operative). These 2 abilities leave a debuff on the target that you can guard swap to to mitigate the damage. Here is an example of what you should look for against 2 melee classes.
Here you can see both enemy Powertechs are running towards my team’s Sniper. I already have him selected to guard, but the way their characters are positioned is a key indication they are going to swap to the unguarded Sniper.
Advanced Prototype Powertech
Generally it is a good idea to guard the target a Powertech is sitting on, and swap guard if they swap targets. Watching for when an enemy Powertech uses their offensive cooldown, Explosive Fuel, and guarding their target is important. Powertech damage outside of what you can predictably guard is very high. The ability that you want to guard swap for is Thermal Detonator, and will show up as a debuff on the target looking like this ![]() . Thermal Detonator can be part of a burst rotation, which can nuke the target’s health. You have a very tiny visual key, which is the animation of the Powertech throwing the Thermal Detonator
. Thermal Detonator can be part of a burst rotation, which can nuke the target’s health. You have a very tiny visual key, which is the animation of the Powertech throwing the Thermal Detonator
While this is a very tiny visual indication, you also have an audio cue which will sound like a high pitched beep. It can help make guarding the target easier when you see the animation where the Thermal Detonator goes along with the sound.
Concealment Operative
Concealment can utilize a high burst rotation due to a tactical. As a tank, you want to look at the buff bar of your teammates to watch if they get the debuff Volatile Substance, which is where the operative burst rotation starts. The debuff will look like this ![]() , guarding this will require a lot of attention, as this tactical Concealment Operatives run makes this ability detonate instantly, causing it to critically hit, they will also be granted another auto crit big hit ability after they utilize Volatile Substance. Unfortunately, there is no easy way to see a visual key like a Lightning Sorcerer or Marksman Sniper has.
, guarding this will require a lot of attention, as this tactical Concealment Operatives run makes this ability detonate instantly, causing it to critically hit, they will also be granted another auto crit big hit ability after they utilize Volatile Substance. Unfortunately, there is no easy way to see a visual key like a Lightning Sorcerer or Marksman Sniper has.
Conclusions
I’d like to thank Vulkk for the opportunity given to me to write this guide.
I go by Valek, I have mained Juggernaut for 6 years now. I have mained tank for about the same time and PvP’d for even longer. I hope that this guide can help shed some light on the class as well as tanking in general. This guide can be used across all forms of PvP, from Regular Warzones to Ranked.
I have several achievements in ranked such as: Season 8: Top 3 Assassin, Juggernaut, and Shadow. Season 9: Top 3 Assassin, Juggernaut, and Vanguard. Season 10: Top 3 Juggernaut, Guardian, and Powertech, Season 11: Top 3 Guardian, Season 12: Top 3 Marauder and Powertech, along with a multitude of gold tiers across the seasons.
You can occasionally see me stream at https://www.twitch.tv/valekxd or watch previous team ranked videos I have of tanking.
If any questions arise, you can message me in-game or leave questions below in the comment section. I will do my best to reply in the comments, but a for sure answer will come from an ingame mail/whisper. I play on the server Darth Malgus and my character names are Yuggers (Guardian), Vålek (Juggernaut), Smash Monkey (Marauder), and Syrenza (Assassin).

Class Guides List
Complete list of all SWTOR Class Guides for PvE and PvP for the Legacy of the Sith Expansion, ordered by Combat Style and Discipline! Everything you need to know about each Class!
Best Solo Builds Guides List
Complete list of guides to the Best Solo Builds for each Combat Style (Class) in SWTOR: how to optimize your character’s skill trees, gear and playstyle for the most enjoyable solo gameplay experience!
Endgame Gearing Guide
A complete guide to the entire SWTOR endgame gearing process from the perspective of someone who just hit level 80 in SWTOR
Galactic Threads Mission Walkthrough
Galactic Threads is a main mission in SWTOR, part of the Legacy of the Sith storyline. It takes you to Elom, Tatooine, Hoth and Ilum in pursuit of information about Darth Malgus and Shae Vizla.

Dantooine Crash Site Guide
A complete end-to-end guide to the Dantooine Crash Site in SWTOR, including all Biomes, every Dynamic Encounter, rewards, and achievements! Everything you should know.

Dantooine Stronghold: Unlocking, Layout and Rooms Overview
The Dantooine Farmstead is SWTOR’s newest Stronghold. It’s coming with Update 7.8 “Pursuit of Ruin” in December, but it’s now on the PTS and is mostly finished.