SWTOR Seer Sage PvE Guide for beginners and more experienced veterans: Skills, Choices, Rotations, Gearing, Builds, Tips
Use the Table of Contents, located in the left panel (top left button on the mobile menu) to navigate through this long guide more easily and quickly.
Introduction to Seer Sage
Welcome to my 7.0 guide for Seer Sage! This is the only healer discipline in the game that uses the Force to revitalize allies. The signature trait of Sage healing is flexibility; in my opinion, it’s the least rotational of the 3 healer disciplines. In most of your GCDs, you’ll be free to pick whichever heal you think is most applicable to the situation.
Sage healers are also the only ones that have access to a dedicated off-DPS build where they can (and must) take 110% accuracy but don’t have to give up HPS like the other healers do. The DPS provided by this build isn’t necessarily higher than what other healers are capable of, but they can deal that damage without having to sacrifice healing output and sometimes deal that damage when the others couldn’t afford to spend so many GCDs on damaging abilities.
Sage healers may not have the strongest raidwide AoE healing in the game, but they can precisely control how many targets they wish to heal at a given time. The fewer targets an AoE healing ability can heal, typically the stronger it is, allowing skilled Sage healers to strategically concentrate AoE healing into only the targets that need it most. You won’t need to stick down a puddle that heals 8 people if only 4 of them would actually benefit and will be able to heal those 4 players for more
BioWare made a bunch of subtle changes with 7.0 that have culminated in healing feeling a bit different. Healing dealt by heal abilities did not keep pace with increases to overall HP such that it takes more GCDs to get a player back up to full health. Healing in general is more positional and AoE-centric, so you as the healer will have to pay closer attention to where your allies actually are and rely on this AoE healing to prevent anyone’s health from getting too low so you don’t have to spend a significant amount of time bursting a single person back up.
There’s also less of a clear general healing priority than there’s been in the past. Sage healing is a lot more about choosing the right heal for the job depending on how many players can benefit from healing. For example, Wandering Mend is still a decent choice for single-target burst healing, but it won’t be your strongest option unless other players in the group also need healing.
In terms of survivability, Sage healers are in a slightly worse place compared to 6.0, though almost everyone got some sort of survivability nerf. Combat styles with healer disciplines also fully lost access to AoE DR, so they are a bit squishier against some attacks compared to most DPS. Thankfully, Sage healers still have the DCDs available to survive these big hits, so it’s not too big of an issue.
BioWare will likely be making balance changes throughout the first few patches, so be sure to check back to this guide after each update. You can check at the top of the guide to see if the guide has been updated for the most recent patch.
Major Changes in 7.0
Utility points are gone! Instead, there is a new system called the Ability Tree. Each discipline has 8 choices where they pick 1 of 3 options. The options have several similarities across the Combat Styles:
- 2 choices buff a discipline-specific ability (2 abilities, 1 choice each).
- 3 choices which are just old Utility effects. These choices are almost always the same for all disciplines.
- 2 choices where you’re picking between 1 ability or 1 of 2 passives. One of the ability choices tends to be an offensive cooldown (OCD). The other seems to be related to PvP balance, but there isn’t a clear pattern beyond the choice forcing players to decide which of 3 capabilities they want to keep.
- 1 choice where you’re picking 1 of 3 abilities. One of the abilities is always one of your primary CCs, either the 8s mez or 4s hard stun. Another of the abilities is the movement ability with the longest cooldown. The third option is less consistent, it seems to be there as an extra balance lever for BioWare since some abilities that got locked away are more impactful than others. The 3 abilities are almost always the same for each discipline.
This means almost all disciplines had 5 abilities locked away behind choices with the option for players to keep up to 3 of them. In addition, many extremely situational abilities were pruned entirely. Sages permanently lost access to 1 ability:
- Force Slow
Battle rezzes in general are now healer-only, but there is no longer a global 5 min lockout on those abilities, so it’s treated just like any other ability, albeit with a much longer cooldown. Its current implementation is somewhat problematic, but I’ll cover that in much greater detail later on.
Guarding is now a tank-only ability, which is the logical next step since the nerf to Guard for DPS partway through 6.0 was ineffective at stopping its ubiquity in PvP.
Healing Mindset
Who is the person most likely to die at this moment? Out of the heals that are off cooldown right now, which will be sufficiently effective in protecting this player? If everyone seems particularly healthy, do I have enough Force? If I have enough Force and there’s no healing to do, what is the highest damaging ability I can use right now?
Always assume no other healers exist and you are solely responsible for the lives of your fellow team members. Pay attention to the amount of damage going out at different points throughout the fight, these will help you assess urgency which will in turn inform how much Force you need, when you can DPS, and who is most likely to need healing.
Do not put yourself in some sort of special category that is more deserving of healing. Your heals are heals for everyone. They are not additional personal defensive cooldowns that allow you to take more damage. Everyone needs to be alive. Dead tanks mean the boss might roam around killing the rest of the group. Dead DPS means you might not meet the checks or face enrage. Dead healers means more players might die. You or someone else has made a mistake if you are forced to choose between saving one of two people.
Single-Target Healing Philosophy
Single-target healing is about cost management and triage. Your heals cost Force and you can only heal a certain number of players at a time at a certain rate. Your job is determining which heal at your disposal is best for the player currently most likely to die, you switch targets once your current target has been healed enough that someone else will become the new player most likely to die.
As a healer, it’s incredibly valuable to know roughly how much damage each of the boss’s attacks deal and when the periods of high and low damage are in a given fight. Be efficient with your heal abilities, don’t overheal by wasting a strong heal on someone who already has high health. If your Force is at a comfortable level when no one can really benefit from your heals, then it’s time to use your DPS abilities until people need to be healed again.
Abilities Explained
Please have the game open while reading through the next few sections. I will not be writing out ability descriptions and I will only be transcribing the components of discipline passives that directly relate to the ability and rotation. This forces you to read through what everything does so that you can understand what all of your passives and abilities do as well as locate these abilities in-game. Make sure you place all of these abilities on your bar in an order that makes sense to you.
Primary Healer Abilities and Associated Procs
 Rejuvenate
(Force/Direct and Periodic/Single-Target/Instant)
Rejuvenate applies a small, immediate, direct heal and larger periodic HoT that ticks over 15 seconds. The actual healing provided by Rejuvenate is relatively small, but you still have to put a bit of thought into who you apply it to because it can be spread with Healing Trance thanks to a new ability tree buff. Rejuvenate has 1 proc and 1 discipline passive associated with it that are relevant to your rotation:
Conveyance
Increases the effectiveness of your next heal in some way specific to each heal. I’ll mention how Conveyance affects each heal as we get to them. This proc is one of the core parts of the Sage healer playstyle and is one of the primary reasons that Rejuvenate should typically be used on cooldown. Since the Conveyance proc affects so many abilities, it does not cause any abilities to light up.
Force Shelter
Force Shelter grants 3 boosts to Rejuvenate:
- If Rejuvenate is refreshed on a target, that target will be healed for the amount remaining on the previous Rejuvenate (the proc is called Renewal).
- The duration of Rejuvenate is extended by 6 seconds.
- Rejuvenate grants Protected, which increases the target’s armor rating by 10% by 45 seconds.
Thanks to the Renewal, there is no immediate downside to clipping Rejuvenate; you’re guaranteed to get the full amount of the heal from each use of Rejuvenate (so long as their health is low enough that you aren’t overhealing). Basically, you don’t have to consider whether the target already has Rejuvenate whenever you apply it.
The duration extension helps to increase the overall healing dealt per activation by enabling 2 extra Rejuvenate ticks over those 6 seconds. This manner of increasing duration enables Rejuvenate to synergize better with the Revitalize legendary implant and Rejuvenating Aura ability tree buff.
The boost is extremely small, resulting in less than a 2% increase in actual DR, though it varies slightly depending on the armor rating of the combat style and discipline.
| Armor | DR Provided by Protected |
|---|---|
| Light | 1.28% |
| Medium | 1.61% |
| Heavy | 1.86% |
| Tank (Juggernaut / Guardian) | 1.30% |
| Tank (Assassin / Shadow) | 0.85% |
| Tank (Powertech / Vanguard) | 1.30% |
The effects of tank stances (Soresu Form, etc.) and Protected buff boost armor rating rather than Kinetic / Energy DR%, so they are limited by the base value at the low end and diminishing returns at the high end. Light armor has a lower base value, so the percentage increase can’t offer as much of a boost while tanks are hitting diminishing returns since they already get so much armor from their stance. Shadow tank gets hurt by both since they have light base armor but it gets maxed out by Combat Technique.
I think that’s enough talking about such tiny variations in mitigation. The core conclusion here is that you shouldn’t consider the armor buff on Rejuvenate when thinking about who to apply it to.
Healing Trance
(Force/Direct/Single-Target/Channeled)
Healing Trance is your channeled healing ability, with four ticks of healing going out over the course of the channel. As with all channeled abilities, critical chance is assessed at every tick such that each tick has an individual chance to crit, however procs and other things that appear in your buff bar will not be consumed until the channel ends and such procs apply their effects to the entire channel (provided the timer lasts that long).
While Healing Trance isn’t quite as strong for single-target healing as Force Armor and Wandering Mend, you’ll still end up using it on cooldown simply because it has a comparatively short cooldown, is a core part of your Force management, and is one of your cheapest heals (per GCD).
Conveyance buffs Healing Trance by increasing its critical chance by 25%. Combined with your base critical chance, you’ll end up having a total critical chance of about 66% when using the Conveyance proc, so about ⅔ ticks will crit on average. This is important because it grants you Resplendence procs which you need for Force management.
You will not benefit from an increased critical multiplier from supercrit if you consume a stack of Force Potency and the Conveyance proc at the same time. Force Potency is basically a stronger version of the Conveyance proc for this ability, so if you plan to use Healing Trance with Force Potency, you should save the Conveyance proc for another ability by delaying either Healing Trance or Rejuvenate.
To be clear, Healing Trance is still one of the best options to pair with Force Potency because you’re guaranteed to get 3 stacks of Resplendence and you effectively get to buff 2 GCDs worth of healing while only spending 1 stack of Force Potency. Conveyance also provides a greater average HPS boost to other abilities, so if you don’t need the stacks of Resplendence or are getting them guaranteed through Force Potency, you should consume Conveyance on another ability. Healing Trance has 1 proc associated with it that is relevant to your rotation that I haven’t already mentioned:
Resplendence
Critically healing with Healing Trance grants 1 stack of Resplendence. Activating Vindicate while you have Resplendence consumes 1 stack of Resplendence, makes Vindicate restore 5 additional Force, and prevents you from becoming Weary. Resplendence stacks up to 3 times and lasts 30s.
This proc is essential to Force management because it makes each use of Vindicate far more efficient. You should never use Vindicate without the Resplendence proc. Prior to 6.1.1, this proc also reduced the cast time of Salvation, which meant that you had to use Vindicate before using Salvation, but this is thankfully no longer an issue.
Wandering Mend
(Force/Direct/AoE/Instant)
Wandering Mend is one of your strongest heals, though it’s a bit weaker than it’s been in past expansions. Without the Conveyance proc, it goes to whoever you target and the next time that player takes damage, it heals them and then travels directly to whichever player within 20m of that player that has the lowest health and does the same thing. With the Conveyance proc, Wandering Mend will heal each target upon reaching them rather than wait for them to take damage. Overall, Wandering Mend can heal up to 4 times (or 5 with the One for All tactical item).
It can heal the same person more than once, but can’t heal the same person twice in a row; it has to travel to someone else and then come back. Normally, this means Wandering Mend can only heal the same person twice per activation, though it can heal the same person 3 times only if One for All is equipped and they are the target of the first heal and they still have the lowest health within 20m after it’s healed 4 times.
Since it can heal the same target multiple times, Wandering Mend is a fairly powerful burst healing ability, though it comes with a few caveats. First, it won’t necessarily heal the person you want it to if they get healed up such that they are no longer the person with the lowest health. Second, thanks to new ability tree buffs, Wandering Mend isn’t always the most powerful single-target burst heal anymore, but it typically remains your strongest GCD because of the healing it does to other players.
The benefit of using the Conveyance proc with Wandering Mend is to enable you to reliably utilize the full power of the ability, but it’s essential to remember that the proc doesn’t directly increase your HPS. In order to actually increase your HPS with Conveyance, you must use Wandering Mend on cooldown in situations where there is little damage going out to the whole group such that not all ticks are triggering by the time Wandering Mend comes off cooldown.
Unless there is frequent damage going out to multiple players in the group, it is unlikely that Wandering Mend will be able to heal 4 times, let alone 5, before the ability comes off cooldown unless you pair it with the Conveyance proc. If you activate Wandering Mend while the first instance is still out, you will overwrite it, effectively wasting your previous GCD similar to clipping a DoT or HoT. Sometimes Wandering Mend will stick to someone that rarely takes damage, like a DPS in the first phase of the TFB fight or an rDPS in the Zorn and Toth fight in EC. In these cases, it’s best to just give up that past GCD and use Wandering Mend again on someone else.
Wandering Mend has a noticeable travel time, especially if you’re thinking about how long it takes from activation to healing the final time, because the heal is not granted until the ability arrives at the target. This travel time prevents multiple players from getting healed by the same tick of AoE damage. Due to that significant travel time, you cannot heal multiple people off of a single tick of AoE damage. If you are in a period of the fight where there is frequent AoE damage (burn phases usually), you should definitely not consume the Conveyance proc on Wandering Mend since you’ll be able to fully benefit from the heal while still being able to use the ability on cooldown.
Finally, I want to point out that Force Potency should not be paired with Wandering Mend because each stack of the ability only increases the critical chance of a single tick of Wandering Mend, so you’re only guaranteed 2 critical ticks from Wandering Mend with 2 stacks of Force Potency. You’re just not getting as much healing per stack of Force Potency as you would with any other heal. Wandering Mend has 1 buff associated with it that I want to mention:
Twisted Force
Wandering Mend grants Resistance to the targets it heals for 45 seconds. Resistant targets have their internal and elemental damage reduction increased by 3%. Just like Rejuvenate’s armor buff (and the light side faction from the sequel trilogy), Resistance is extremely weak. There’s no need to use Wandering Mend differently in order to apply this buff to your teammates.
Deliverance
(Force/Direct/Single-Target/Casted)
Deliverance is the first of your most basic healing abilities; you cast it and it heals and has no cooldown. Often, this ability is referred to as your big heal. The Conveyance proc reduces its cast time, which is helpful, but you should never use it on this ability since it provides a greater benefit to your other abilities.
There are specific situations where Deliverance is your strongest heal, but it will typically be your filler heal for those GCDs where abilities you’d prefer to use are on cooldown. Due to its simplicity and large base amount, this is one of your best heals to pair with Force Potency, and it’s okay to delay your other heals to ensure that one or both of the charges of Force Potency are used with this ability. Deliverance does not have any additional procs or passives associated with it that are relevant to your rotation that I haven’t already mentioned.
Benevolence
(Force/Direct/Single-Target/Casted)
Benevolence is the second of your basic heal abilities. Often, this ability is referred to as your small heal (again, Deliverance is your big heal). Benevolence offers a shorter base cast time compared to Deliverance, weaker overall healing, and is your most expensive heal in general.
The Conveyance proc increases Benevolence’s critical chance by 60% and since your critical chance will be above 40% (at least for this ability), it will be a guaranteed crit, though it isn’t considered an autocrit, so you won’t get the extra crit multiplier because only autocrits benefit from supercrit.
Since Conveyance provides the exact same effect as Force Potency, you won’t get any benefit from having Benevolence consume the Conveyance Proc and a stack of Force Potency at the same time, so be sure that only 1 is active before using Benevolence. Force Potency is far better when paired with other abilities anyway while Conveyance is still very strong when used with Benevolence, especially when paired with the Altruism proc. Properly managing your Force still takes priority and there can be superior options, but if you have a spare Conveyance proc, using it on Benevolence in single-target healing situations.
Since Benevolence doesn’t have a cooldown, its only real benefit is that it offers immediate, reliable healing, thereby functioning as an emergency heal of sorts, though I don’t think you should basically ever be using it that way without its proc that I’ll explain in a moment.
Yes, Benevolence can reliably get a semi-substantial heal out by the end of a GCD, but so can many of your other heals while being considerably cheaper. Force Armor offers more protection and sooner if you’re concerned about them taking another hit that could kill them (which you always would be if you’re looking at Benevolence as an emergency heal). Healing Trance and Wandering Mend will heal for roughly the same amount by the time you’re a GCD into the channel, offer some healing sooner, and heal for more before you can get your next heal off. Telekinetic Blitz (with Metaphysical Mender) will flat out heal for more in the same amount of time. Even Rejuvenate with the Renewal can heal for more than a regular Benevolence in the same amount of time, assuming the target already had Rejuvenate.
It’s exceedingly rare that none of these superior alternatives will be available when a target happens to need emergency healing. Furthermore, Benevolence doesn’t heal for enough to make much of a difference very often. Ticking damage from lethal circles like the yellow puddles provided by Dread Master Bestia usually tick far more frequently than once per GCD and deal more damage than the healing you’ll deal with Benevolence. You can also see their health plummet over the course of a few seconds, so the notion of an emergency loses a bit of its meaning unless you are new to the fight and don’t understand what’s happening.
More instantaneous damage like Dread Master Brontes’ purple spikes of pain circles only hit once, so there’s less urgency. Yeah they could die from other sources like the fingers or an AoE pulse, but the emergency is over if they can survive more than a GCD anyway and the usefulness of Benevolence as an emergency heal completely evaporates at that point because you could use Deliverance instead.
At the end of the day, I don’t think GCD-dependent emergency healing is exceedingly rare in SWTOR, and Benevolence will basically never be the best option. Overusing Benevolence will lead to greater consequences far more often than you’ll have actually managed to save someone with Benevolence specifically and in those exceedingly rare instances where it would have made a difference, you can often just battle rez them instead. Benevolence has 1 proc and 1 discipline passive associated with it that are relevant to your rotation:
Altruism
Deliverance, Salvation, Mind Crush, and Disturbance make your next Benevolence instant, cost no Force, and heal for 60% more. Lasts up to 15s, can only occur once every 10s. This proc transforms Benevolence from a mostly garbage ability into one of your best heals. The only time you should really use Benevolence is when you have Altruism and you should make sure that you don’t waste any Altruism procs, so always use Benevolence before using one of the abilities that procs it if 10s have elapsed (the debuff will have a third of its duration left).
The concerns I raised before about Benevolence are alleviated when you have the Altruism proc. It’s ideal to save Altruism until the last second so you have an actual emergency heal in your back pocket where you only use Benevolence when Altruism is about to become available again and immediately re-proc it with another ability (likely Deliverance).
This approach also makes it easier to benefit from Conveyance in emergencies too. In an actual emergency, you can’t go “wait, wait, let me get ready and apply this HoT first so my emergency heal autocrits”. The idea is that you already have Conveyance and were probably planning to use it on another ability instead but can let Benevolence cut in line.
Be careful, though; trying to keep 100% availability on Benevolence + Altruism takes a bit of mental effort. Don’t let it get in the way of making sure people survive, but it’s good to practice especially in fights that are easier to heal so it’s not so much of an additional mental burden in fights where healing is more intense.
Don’t forget to actually use it as soon as someone takes a big hit either. Emergencies don’t happen once every 10 seconds (unless you have a really inattentive group). Think of every Altruism proc as the final boss in any RPG where it’s actually okay to use all those rare potions you’ve been saving up for that special occasion.
Clairvoyance
Increases the critical chance of Benevolence by 10%. This passive won’t do anything when paired with Conveyance or Force Potency, but will allow Benevolence to heal for slightly more on average when just using the Altruism proc.
Salvation
(Force/Periodic/AoE/Casted)
Salvation is your 8-person AoE healing ability. You put the circle down and people get a HoT when they stand in it. Once they have the HoT, they are free to leave. The actual radius where the HoT will get applied to you is significantly larger than the ring that appears on the ground, about twice the size (the placement reticle shows its actual size).
As of 6.1.1, Salvation no longer consumes Resplendence to become instant and its cost is not reduced with Conveyance. With 7.0, Salvation is considerably less powerful and costs less Force (only 54 now) as some AoE healing power was migrated to the ability tree.
Even with these changes, Salvation remains your second most expensive heal, but still offers sufficient healing to use when AoE healing is required. Generally there will be some fights (or at least portions of fights) where you’ll use it on cooldown and other fights where you’ll hardly use it at all. You’ll typically want to use it as often as possible when there’s a lot of constant AoE damage going out, especially when everyone is stacked up. Even in fights where people aren’t stacked all the time, be opportunistic when you see players start to coalesce naturally.
The Conveyance proc makes Salvation an instant cast, reducing the activation time (thereby increasing its HPS) and allowing it to be used while moving. I don’t think it’s particularly worthwhile to expend the Conveyance proc on this ability. As I’ve mentioned previously, no fights in the game demand AoE burst healing and Salvation is not equipped to provide it. This means that there isn’t much demand to use this ability while moving, just use one of your other abilities while moving instead and use this as soon as you can stop moving.
The only time I would recommend consuming the Conveyance proc on this ability is if you will be moving for an extended period of time or will be moving very frequently where you’d end up having to delay Salvation for a very long time or run out of abilities that you can do while moving, like if you’re kiting the spike on the ground on Firebrand and Stormcaller, walking down the stairs on Soa, or after the first floor on Revan. Salvation does not have any additional procs or discipline passives associated with it.
 Force Armor
(Force/Direct/Single-Target/Instant)
This is the bubble! It’s one of your strongest and definitively cheapest single-target heals. The catch? Only a third of Force Armor’s overall protection actually heals the target if they don’t take damage in the next 30s. The total damage mitigation provided by the bubble is about 41k, which includes 26k damage absorption from the bubble and 15k healing from Soothing Protection. The bubble’s health cannot crit, though the Soothing Protection healing can.
In lieu of having a cooldown, this ability has a lockout in the form of a debuff called Force-imbalanced when it is applied that prevents you from applying it again to that target while that debuff is active. The debuff lasts 15s when the bubble is applied by a healer and 20s when applied by a DPS. Since Force Armor doesn’t have a cooldown, the Force-imbalanced debuff serves as your tracking for who does and doesn’t have a bubble, so make sure you have your UI set up so that you can clearly see who does and doesn’t have the debuff. The bubble itself can last up to 30s, so don’t rebubble people just because you see the debuff fall off; make sure the bubble has actually been consumed first.
Only 1 bubble can be active on the same player at the same time, so if someone else bubbles a player, they will get the Force-imbalanced debuff preventing you from bubbling them and if you choose to bubble them after Force-imbalanced is over but before the bubble has collapsed, the bubble will get overwritten, invalidating the bubble from the other player (or yourself).
Returning to healing numbers, Force Armor isn’t a cut above the rest anymore and can’t be buffed by Conveyance proc, though it’s still strong. The key reason you still want to prioritize using it is because it’s so efficient, costing less than half of the Force compared to your other healing abilities while still providing comparable and more reliable damage mitigation. You can actually leverage the fact that Force Armor doesn’t interact with Conveyance (or Force Potency) to gain more control over which ability you want to spend your boost on, though don’t use Force Armor on someone just because you want to save that proc; you still need to make sure they’re a worthwhile target.
In general, Force Armor should still be your top priority to apply to players you are 100% sure will take damage, but if you have any uncertainty, I think you’re better off healing them instead. Wasting 20 Force if the bubble would have been effective is less costly than throwing away an entire GCD if the player didn’t end up needing it.
Typically, you should apply bubbles to tanks as often as possible and then only to other group members if you see they have an uncleansable damaging debuff or are otherwise certain that they’re gonna take damage in the near future. Force Armor has 3 passives associated with it that are relevant to your rotation:
Efficacious Currents
Reduces the Force cost of Force Armor by 15 and reduces the duration of Force-imbalanced by 5 seconds. In addition, the amount of damage absorbed by your Force Armor is increased by 10%. This is one of the discipline passives that makes it so that healer bubbles are better than DPS bubbles. Sage healers get to provide stronger bubbles that can be applied more frequently for less Force.
If you are in a situation where a DPS needs to off-heal, Sages’ best off heal is by far the bubble, so this is the first heal you should stop using if off-healing is needed. It’s completely fine for you to stick to Deliverance instead. Don’t forget that if you are in a situation where off-healing is needed, something has gone horribly wrong with the fight and it should be discussed after what will almost certainly be a wipe.
Soothing Protection
Applying Force Armor also grants 10 stacks of Soothing Protection to the target. Whenever the target receives direct (non-HoT) healing from you, 1 stack of Soothing Protection is removed. When Force Armor ends, the target is healed for an amount depending on how many stacks of Soothing Protection remain. Soothing Protection impacts how the bubble works in several ways:
- Sage healers become fully beholden to heal-blocking mechanics like Force Leech and Curse of the Monolith. Before Soothing Protection was introduced, Sage healers could still “heal” targets affected by these debuffs, giving them an unfair advantage in those fights.
- Enables the bubble to partially crit and significantly increases the overall mitigation provided. Both of these factors enable the bubble to actually provide competitive healing numbers compared to your other abilities. Without Soothing Protection, Force Armor would just be a cheaper option, but not necessarily a worthwhile GCD.
- Raises the skill ceiling with bubbling. If you want to get the absolute most out of each bubble, you want it to be the final ability you use before the target takes damage and want to avoid healing them until the bubble has been consumed. This is an advanced technique that only results in a small HPS increase. It should only be done once you have a lot of experience with Sage healing.
I also want to clarify that Soothing Protection grants its heal whenever the Force Armor buff leaves the target’s bar, so in addition to taking enough damage, Soothing Protection will also trigger if Force Armor is right-clicked off or 30s have elapsed and the bubble just falls off. You cannot right-click off Soothing Protection directly, and there really isn’t a reason to do this.
Telekinetic Blitz with the Metaphysical Mender Tactical Item
(Force/Kinetic/Direct/Single-Target/Instant)
I want to start by explaining the ability from how it will work for you as a healer because the in-game tooltip is inaccurate and doesn’t even explain everything:
Activating Telekinetic Blitz deals a small amount of damage and dealing damage with Telekinetic Blitz heals whichever ally within 20m of the damaged target has the lowest health. In addition, Telekinetic Blitz grants Empowered, which reduces the Force cost of Telekinetic Blitz by 15 and increases the damage and healing it deals by 30%. Empowered can stack up to 3 times and lasts 5 seconds. If Telekinetic Blitz is activated when you have 3 stacks of Empowered, the effect is removed. Telekinetic Blitz can have up to 3 charges at a time, has a 10s cooldown, and you can gain 2 charges of Telekinetic Blitz whenever you activate Force Speed.
The Metaphysical Mender tactical adds the healing effect and Force cost reduction. Force Speed granting 2 charges of Telekinetic Blitz comes from the Endless Offensive set bonus from 6.0 which was secretly merged into the base ability. Please note that when you activate Force Speed, the cooldown on Telekinetic Blitz is reset, so if there’s only a couple seconds left before you get a charge from the regular cooldown, you might want to wait before using Force Speed, but don’t let this bug get in the way of keeping people alive.
In order to get the most out of Telekinetic Blitz, you only ever want to activate it 4 times in succession so that you can max out Empowered stacks where the 4th activation of Telekinetic Blitz is free and deals 90% more damage and healing. Since Empowered lasts 5 seconds, you can fit 2 GCDs in between each Telekinetic Blitz activation without Empowered falling off, but target swapping that much is gross, so I only recommend doing it if that doesn’t bother you or you messed up and need to buy time for a charge of Telekinetic Blitz or Force Speed to come off cooldown.
I think it’s easiest to get into a rhythm where you wait until you have 2 charges of Telekinetic Blitz and less than 3s left on Force Speed’s cooldown before starting your quartet of Telekinetic Blitzes and then just doing other heals in the meantime. Just like how you would try to do a high-priority singular ability on cooldown, you want to do this Telekinetic Blitz quartet as often as possible since it’s one of your strongest heals.
As you can see, Telekinetic Blitz adds a fair bit of complexity to Sage healing, but in return, you get free off-DPS and one of the strongest direct heals in the game.
Restoration
 Restoration
(Force/Direct/Single-Target/Instant)
This is your cleanse ability. All healers can cleanse any debuff that they are supposed to be able to cleanse as part of a healer mechanic. Unless the debuff is going out to a ton of people at the same time, you and your co-healer are responsible for cleansing. Any help you get from DPS or tanks is a gift and a kindness, but it is still your responsibility. It is the DPS’ job to do as much damage as possible, and while it isn’t always the case, cleansing often requires either spending a GCD where they do no damage or they have to give up some other utility that may help increase their DPS in order to get a self cleanse.
Outside of debuffs that are essential to cleanse, there are other, weaker debuffs that are only removable by specific combat styles. Sages are the only ones that can use their cleanse ability to remove Force debuffs while Operatives and Mercenaries are the only ones that can use their cleanse ability to remove Tech debuffs. This is a pretty minor thing in PvE, but it’s still good to be aware of. These sorts of debuffs are typically only applied by adds and often involve some sort of CC. Sometimes the debuff itself will indicate what cleanse type it is, but if it doesn’t, just try cleansing it and then if it doesn’t work, ask your Tech co-healer to try cleansing it.
Some cleansable debuffs may also increase a player’s DPS by triggering some sort of reactive damage effect, like Cloak of Pain, Power Yield, or Saber Reflect. The most notable instance of this is Nefra’s DoT, though there are many fights in the game where players can increase their DPS and it isn’t always a DoT. Reactive damage is typically tied to a DCD so they might not even take damage from doing this and the DCD isn’t always wasted by doing this.
That said, DPS are incentivized to push the limits of how long they can survive because damage boosts from reactive damage are often pretty juicy. Unless healing is light, don’t feel obligated to pour extra healing into them to allow them to stand in feces for longer. You don’t need to be an enabler. Also, if you feel confident that they will die, it’s okay to cleanse them or threaten to pull them. DPS usually learn their lesson after they get killed once.
DPS are usually pretty proactive about telling you not to cleanse them and I think the onus should be on the DPS to notify you if they want to use reactive damage. It’s unreasonable to expect you to know every single instance of reactive damage in the game and how every single combat style can take advantage of it. By the same token, you should try your best to accommodate what they are trying to do by healing through the damage when possible. Often, the alternative will be you needing to throw in some off-DPS instead.
At the end of the day, make sure to communicate with the rest of the group so you’re all on the same page about who is cleansing what. Restoration has 1 discipline passive associated with it that is relevant to your rotation:
Mend Wounds
Restoration now removes negative physical effects and heals the target for about 6k, identical to the initial heal provided by Rejuvenate. The physical effects part just brings Restoration to match the capabilities of the other 2 healing disciplines. Restoration should never be used for the purpose of healing the target.
Vindicate
 Vindicate
This ability doesn’t actually do any healing, but it is what you use for managing your Force. Normally when Vindicate is used, you gain 40 force immediately, but a stack of Weary is applied to you that reduces your Force regeneration rate by 2 for 10 seconds, meaning you spend a GCD to gain 20 Force over the long term unless you’re able to remove the Weary debuff before you need to heal again (not relevant to Sage healers). This is a pretty terrible deal, but thankfully the Sage healer can utilize Resplendence (the proc from Healing Trance crits), which consumes a stack of Resplendence so that you gain an additional 5 Force and don’t gain any stacks of Weary. Vindicate has 1 additional discipline passive associated with it that is relevant to your Force management:
Amnesty
Activating Force Barrier purges all stacks of Weary. In addition, when a stack of Resplendence is consumed by activating Vindicate, 1 stack of Weary is removed. If you don’t have any stacks of Weary, you instead gain the Amnesty proc, which increases your Force Regeneration rate by 2 for 10 seconds. If you activate Vindicate when you have the Amnesty proc but no stacks of Resplendence, the Amnesty proc will be consumed instead of applying Weary. With Amnesty and Resplendence, you’ll effectively get 65 Force out of the Vindicate GCD.
The only thing you really want to avoid is ever having the Weary debuff and Amnesty basically enables you to climb out of being Weary to actually even increase your Force regen rate. It’s ideal to always have the Amnesty buff, but it’s really only essential when you’re low on Force for an extended period of time because of a heal check. Remember, you should only activate Vindicate when you have stacks of Resplendence or at least Amnesty. If you do ever have stacks of Weary, try to get rid of them as soon as possible by using Vindicate with Resplendence or activating Force Barrier.
I encourage you to deliberately get 4 stacks of Weary outside of combat and then spam Healing Trance to get stacks of Resplendence so you can see for yourself how Amnesty works. In the next section, I’ll explain how Force management works in greater detail.
Force Management
Think of your Force as a reservoir. It will regenerate slowly, taking a little over a minute to regenerate from 0 to full when nothing is happening. In actual combat, the Force you get back comes from using the Vindicate. Since Vindicate doesn’t heal on its own, you can leverage your vast Force reserves to reduce the number of Vindicate activations during healing-intensive portions of the fight. In other words, you can save up Force when healing is light by using Vindicate more and spend more Force when healing is intense by dipping into those savings.
At any given time, you should have at least 100 Force and when healing is light, you should utilize that time to make sure your Force is at a comfortable level for what’s to come. Your goal is to have as much Force as possible as you go into phases where you think you’ll need it. There will be some instances where you’ll be running low on Force the entire time and just need to use Vindicate periodically even if there is a lot of healing to be done. This is unavoidable, so you can only attempt to mitigate it by trying to have as much Force as possible going into those phases and try to maintain 100% uptime on the Amnesty proc.
In practice, during heal checks when you’re low on Force you just end up using Vindicate every so often with Resplendence stacks as you see yourself start to dip below 100 Force and this will happen about as often as Amnesty falls off, so you can continue to heal during burn phases at a certain rate indefinitely.
I have mentioned bits and pieces about which abilities are related to Force management when talking about abilities, but I want to summarize the main components again here.
Weary Debuff
Whenever you use Vindicate without the Resplendence (or Amnesty) proc, you get a stack of Weary that lasts 10 seconds. Each stack reduces your Force regeneration rate by 2 stacking up to 4 times with the duration getting reset with each new stack application. Your base Force regeneration rate is 8 per second, so at 4 stacks of Weary you are not passively regenerating any Force (though with alacrity factored in, you’ll still regenerate 1.3 per second). You should not ever be getting any stacks of Weary and if you do, you should feel very embarrassed and rectify the situation as soon as possible. Anyone who is looking at the raid frame will be able to see you being an idiot if they see this debuff ever.
Resplendence Proc
 Resplendence Proc
These stacks proc from Healing Trance ticks when they crit. When you use Vindicate with Resplendence, you’ll receive an extra 5 Force and won’t generate a stack of Weary. Use the Conveyance proc from Rejuvenate OR Force Potency to increase the critical chance of Healing Trance.
Amnesty (Proc Component)
When you use Vindicate with a Resplendence proc, you’ll get another proc called Amnesty that increases your Force regeneration rate by 2 for 10 seconds. It does not stack, but does get refreshed. You will not receive this proc if you have any stacks of Weary, but 1 stack of Weary is removed instead. Amnesty is good to have active as often as possible, but don’t let it take priority over any healing you need to do. Remember that if you do run out of Force, you’re completely useless because you can’t heal.
Once you get down to about 100 Force, you need to keep the proc active at all times, meaning you have to use it about once every 10 seconds. This will prevent you from running out of Force and provided that you’re using all your other abilities optimally, resulting in your maximum sustained healing rate. Your co-healer will have a similar kind of max rate and at that point, it’s on the rest of the group to manage their defensive cooldowns properly and not take unnecessary damage because you physically can’t heal any more than you already are. It is especially important that you go into these healing intensive phases with as much Force as possible, along with having everyone bubbled, and your Mental Alacrity, Force Potency, and Adrenal off cooldown.
Amnesty (Passive Component)
The passive component of Amnesty allows you to reverse the Weary debuff. When you have stacks of Weary and stacks of Resplendence, using Vindicate will remove one stack of Weary and one stack of Resplendence. In addition, if you need to use Vindicate and have no Resplendence stacks but do have the Amnesty proc, you can use Vindicate and will not get a stack of Weary and Amnesty will be removed instead.
If you mess up in a major way and have to use Vindicate because you’re super out of Force, you can use Force Barrier to purge all stacks of Weary as well. In order to get the most bang for your buck (and in this case your buck is Force Barrier), use Vindicate 3-4 times in a row if you can, but make sure you use it at least twice so you have more than 1 stack of weary, and then use Force Barrier so cleanse multiple stacks of Weary. Be mindful you won’t be healing for 4 or 5 GCDs if you do this. Make sure you don’t need Force Barrier for any mechanics when you do this and know that you have majorly messed up if you need to do this.
Offensive (Healing) Cooldowns
Offensive cooldowns boost your healing dealt in some way. They should be saved for when you need more powerful healing than you’re normally capable of providing, like during burn phases or other heal checks, or when someone makes a mistake that causes the group to take extra damage. These situations aren’t too common throughout the fight, so be liberal when using them. The only time you shouldn’t use them when things are going worse than you’d prefer is if you know there’s a heal check coming up where things are guaranteed to be worse than they are right now.
In fights that are lighter on healing, consider using these cooldowns with your DPS abilities instead, especially if there’s a very tight DPS check. I have also included some defensive abilities that other players have that are defensive in nature which can act as OCDs for you if you call out to activate them. These can serve as emergency cooldowns so you can afford to use all of your OCDs during DPS checks.
Mental Alacrity
 Mental Alacrity
Mental Alacrity’s alacrity allows you to get more healing done in the same amount of time and will slightly increase your Force Regeneration rate relative to how quickly you activate abilities because it increases your alacrity by more than is needed to reach the 1.2s GCD, but not enough to reach the 1.1s GCD.
Alacrity also reduces the cooldown duration of all offensive abilities that are activated while Mental Alacrity is active (including your other offensive cooldowns); this is slightly more valuable to healers since the abilities they use are decided based on the situation, though the benefit is still rather small. Since Mental Alacrity can lower the cooldown of your offensive cooldowns, it’s important to use it before Force Potency or your Adrenal if you plan to use multiple cooldowns at the same time so those abilities will have a short cooldown for their next activation.
It’s particularly beneficial to pair Mental Alacrity with the healing adrenal because you’ll get more buffed heals off thanks to the alacrity. Besides considering other cooldown activations, there is no need to change how you heal while Mental Alacrity is active.
Force Potency
 Force Potency
Force Potency makes your next two direct heals have a 60% increased critical chance (so they will be a guaranteed crit); this ability has a 90 second cooldown. It’s fairly tricky to use and have both charges be effective since charges can very easily be wasted on many of your abilities. As a healer, it’s best to expend stacks of Force Potency on Healing Trance, Deliverance, Benevolence + Altruism, or Force Mend. Never pair Force Potency stacks with Restoration, Wandering Mend, Rejuvenate, or Telekinetic Blitz because these abilities will consume multiple stacks of Force Potency on a single activation or otherwise not provide enough benefit to be worthwhile.
Remember that Conveyance boosts the critical chance of Healing Trance and Benevolence, so there is no benefit to using both Force Potency and Conveyance on either of those abilities at the same time.
I prefer to use Force Potency for Force regeneration in the following mini-rotation:
- Force Potency
- Healing Trance
- Vindicate x3
- Force Armor
- Healing Trance
- Vindicate as needed
 Force Armor
This mini-rotation allows you to get a boatload of Resplendence procs since every single tick should crit. Force Armor must be used before your next Healing Trance because it is the only offensive GCD (apart from Saber Strike lol) that won’t consume the second stack of Force Potency and you have 1 GCD to spare after using Vindicate x3 before Healing Trance comes off cooldown.
If you need a healing boost rather than more Force, make sure you have already decided who will receive your next 2 healing abilities so you don’t accidentally waste 1 of the stacks of Force Potency. Typically, you’ll want to use it if a player just took a really big unexpected hit and requires some emergency healing by doing Healing Trance -> Deliverance, Deliverance x2, or Deliverance -> Benevolence + Altruism. It’s okay to delay Rejuvenate to ensure that the most appropriate abilities are getting buffed.
If healing never gets that intense or you need to participate in the DPS check, make sure 1 of the stacks goes to Telekinetic Throw and the other goes to Project because these are your most damaging direct attacks.
 Adrenal
 Adrenal
Increases Force and Tech Power or Critical Rating for 15 seconds, 3 min cooldown. This one is pretty straightforward and really good to pair with Mental Alacrity since you get more GCDs during the Adrenal and the cooldown on the Adrenal is reduced. If you’re using the Triage Adrenal, your DPS will be reduced by 20% while it is active so don’t plan on DPSing during this period, though you likely won’t be doing any DPS if you need to use one of these for healing. It is also wasteful to use Vindicate while the Adrenal is active since only healing going out is getting buffed, so make sure you have as high of Force as possible before activating your adrenal to minimize the number of Vindicates you have to do.
Force Barrier + Empowered Restorer Implant
 Force Barrier +
 The Empowered Restorer legendary implant makes it so that activating Force Barrier grants a bubble to up to 8 players within 5m of you that absorbs about 50k damage and grants 25% damage reduction exclusively against elemental attacks, not internal. These effects last up to 8s or until their bubble runs out of HP. You do not have to keep channeling Force Barrier for the bubbles to stay active and continuing to channel the ability does nothing beyond providing you with damage immunity and Enduring Bastion stacks.
The primary benefit is the 50k bubble you just gave to everyone.The fact that Force Barrier only mitigates elemental damage, makes that damage reduction far more situational, which is unfortunate because 25% is quite significant. I think BioWare was just trying to be creative with the mitigation, but internal and elemental damage are treated as being interchangeable everywhere else in the game to provide a more relevant descriptor to damage dealt (it’s more appropriate to say fire damage is elemental rather than internal even though both ignore armor). The biggest implication is that this implant is a fair bit more effective at mitigating damage from previously Republic-exclusive combat styles, particularly Knights. Most Guardian and Sentinel burn DoTs deal elemental damage while the deliberately equivalent Juggernaut and Marauder bleed DoTs deal internal damage.
In practice, when you activate Force Barrier while you have the Empowered Restorer Implant, the people around you stop taking damage for a few seconds, which gives you an incredibly luxurious break in situations where players are about to take damage. In order to maximize the benefit, you want to be opportunistic with its use such that you Force Speed into a group of allies that are players that are very close together who are about to take a bunch of damage or that don’t want to take anymore damage until they can be healed up a bit and immediately pop Force Barrier to give them all the bubble.
Make sure you have Force Barrier available for healing-intensive phases where everybody is already stacked up. Since these bubbles only last 8s, it’s not really feasible to pre-apply it. For example, I found that there was not enough time on the final droid in Brontes’ clock phase to apply it to everyone before Fingers start attacking during the 6 Finger phase.
Don’t forget that Force Barrier only acts as an offensive cooldown if you have the Empowered Restorer legendary implant equipped.
Ballistic Shield and Scrambling Field (if applicable)
 Ballistic Shield and Scrambling Field (if applicable)
Snipers / Gunslingers have an ability called Ballistic Shield / Scrambling Field which makes a huge shield that increases damage reduction to all those inside it by 20% for 20-25 seconds, 2 min 30 sec CD (shorter than Adrenal). If there is a Sniper / Gunslinger in the group, the whole point of their ability is to make the healers and the tanks’ lives easier. Generally, the DPS aren’t going to be very focused on everybody’s health levels while you as a healer will have a clear idea of how healthy the raid is, so I think it makes the most sense to put healers in charge of this ability.
Call out if, when, and where you want it if there isn’t a clear instance where the Sniper / Gunslinger already knows to use it, like during burn phases. It’s okay to ask if it is or when it will be available as well, just make sure that it’s clear that you don’t want to activate it right this second. I recommend calling out for it to be activated the instant a tank dies, especially if the boss hurts a lot, or something else goes very wrong. It’s probably better to use your other cooldowns before asking to use this, but please do not hesitate to ask for this to be used if you have a Sniper / Gunslinger in the group. Again, you as a healer are in the best position to make judgments about when it would be most beneficial to be activated.
Other Players’ Medpacs
 Other Players’ Medpacs
Every single player conveniently has this little once-per-fight 100k heal they can do. Sometimes individual players are hesitant to use since they only get it once per fight or their individual health might not yet be low enough where they feel it’s needed (usually if they’re at like 35-50%) or they might be reluctant to use it if they don’t have reusables.
As a healer, you have a great vantage point of the health of the entire raid and their situation might be a little more dire than they think because you can’t afford to heal them for a while. When I’m healing, I will call something out like “please use your medpac now if you are low on health and have not already done so”. Generally you should call this out if you’ve already used everything else and are running low on Force since it is once per fight. No one should be dead from non-one-shot mechanics with their Medpac still usable.
Revival
 Revival
This is your battle rez. The raidwide lockout on other battle rez abilities was removed with 7.0 in order to compensate for the simultaneous removal of stealth rez, so raid groups now always potentially have 2 brezzes, though there are a few annoying limitations with BioWare’s (hopefully only current) implementation.
The cast on your brez no longer gets interrupted if you try to brez someone who has already been revived but has not yet accepted it, making it possible to waste the second rez. In addition, DPS no longer have access to the brez ability and the cooldown on brez no longer resets on death, meaning you won’t have your rez consistently available for every pull. It’s unclear if BioWare intends to improve this or if these are just natural restrictions to what would have otherwise been a buff to battle rezzes. When someone dies, that player typically needs to be rezzed ASAP, though remember to coordinate with your co-healer so you don’t waste the second rez.
If multiple players are dead at the same time, ask your raid lead if you aren’t sure who you should revive. Generally, you should choose to revive the player who gives you the greatest chance of beating the fight. This is typically determined by which role is most in need of an additional player. If the other healer is dead and they still have their brez, they’re objectively the best target, but if theirs is on cooldown, it’s a bit trickier.
If a tank is barely surviving because there’s an important tank swap mechanic or multiple bosses, it’s probably best to revive a tank. If there’s a lot of raidwide damage going out, it’s probably best to revive a healer. If you think you can get through the rest of the fight with 1 tank or 1 healer, or if you need more DPS to just kill the boss or beat a check, then you should probably revive a DPS.
Force Empowerment and Force Empowerment
Force Empowerment grants +10% Mastery and Endurance (and also Presence, but who cares) for 10 seconds with a 5 min cooldown and raidwide lockout. The Sorcerer version is called Unlimited Power and shares the same raidwide lockout.
Generally, Force Empowerment should be used during DPS checks, but not every fight has one and not everyone is aware of healer checks, so don’t hesitate to ask if the raid buff can be saved as a healer cooldown, though make sure you know that your current cooldowns aren’t cutting it. Don’t forget that Force Empowerment effectively heals the entire raid for 10% HP thanks to the Endurance boost it provides and this can save lives if used correctly. Your raid buff should be saved as a healer cooldown only in a super duper last resort situation, like the raid might wipe if I don’t use this and it’s a good pull. All of your other cooldowns should already be on cooldown if you are using this. Generally it will be popped at the beginning of the fight and if it is available it’s probably getting saved.
You should also be mindful of when this and other raid buffs are active and consider if you would like your healing cooldowns to be active at the same time so you’ll either have a shorter period of more significantly increased healing or a longer period where your buffs are stretched out. When you use them at the same time, they’ll synergize and you’ll do more numbers overall but then you’ll be at nothing for the remainder of the time. Since health can only go up to 100%, it may be better to stretch them out in longer periods of intense healing.
Defensive Cooldowns and Mobility
Defensive cooldowns (DCDs) are not used just to stop you from getting killed, they should be used to minimize overall damage taken. For any combat style in any fight, your most effective DCDs should be mapped to the most damaging attacks in the fight while weaker DCDs should be used against weaker attacks. Don’t pop all of your DCDs at once or only use them when your health gets low. You should be attempting to mitigate as much damage as possible by using your DCDs against predictable damage.
In fights where you’ll be taking a high amount of sustained damage, it’s important to use your DCDs in the order that maximizes your overall uptime. If you can tweak the order that you use your DCDs where it allows you to get an extra use out of one of them over the course of a long burn phase, you should definitely do that instead of activating your potentially stronger DCDs first.
It’s good to have 1 emergency panic button too, but everything else should be used to prevent your health from getting low in the first place. Part of knowing a fight is understanding how much damage you take and what you can do to mitigate that damage.
It’s a bit trickier now with the complete loss of AoE RDT, but do not treat your heals as extra defensive cooldowns for yourself. You have to stand in line and wait for heals until you are the most likely player to die just like everyone else, and without AoE RDT, that will naturally happen more frequently. My point here is that you should not change your behavior around popping DCDs just because you’re a healer.
Sage has two primary defensive cooldowns that don’t last a very long time but have short cooldowns.
Force Mend
 Force Mend
Even though it functions by healing you, don’t think of this as a heal ability; it is a defensive cooldown. You shouldn’t think of it as a heal because it is off the GCD, can only be used on yourself, and has a cooldown like that of a DCD.
The idea behind how this ability works is that you’ll be able to take bigger hits because your health will be higher than it otherwise would be if you hadn’t used the ability such that your health should be brought down to about the same level after a hit as you would if you were another class. Therefore, you should try to use Force Mend on cooldown if you can benefit from the full heal. If you’re already at full health, wait until you aren’t and then make the assessment as to whether or not this is a big or small hit.
Cloud Mind
Cloud Mind now grants 25% damage reduction by default alongside reducing your threat. In fights with lots of adds, you may need to use this ability very frequently or even on cooldown for threat reduction purposes. Cloud Mind will only make it easier for tanks to get aggro; it will basically never make adds immediately stop attacking you unless something else moves to the top of that enemy’s threat table.
The reason that adds generally attack healers first is because healers generate a smaller amount of threat on every enemy in the fight while DPS and Tanks generate threat that is usually equal to the amount of damage they deal only to enemies that they deal damage to, so when adds spawn, healers are the only ones that have generated any threat on them initially, and they won’t change aggro unless someone else has higher threat. For this reason, if you know that you need Cloud Mind for damage reduction, it’s okay to save it for that instead of reducing your threat.
It’s also worthwhile to wait until the adds actually start hitting you before using Cloud Mind since they won’t change targets until someone starts hitting them anyway, so by waiting until they hit you, the short DR won’t go to waste.
Force Barrier and Enduring Bastion
This ability grants immunity to all attacks for up to 8 seconds by increasing defense / resist chance by 20,000%. It also functions as a second CC break and is often permissible to be used as such, especially if you aren’t taking the Empowered Restorer implant.
Be mindful that this DCD will not always help you and there are fights where it will be largely useless as a DCD. If the damage is typeless (wondering what that is – consult with the SWTOR Damage Types Guide), Force Barrier will not do anything and neither will any other defensive cooldown in the game, so it’s mainly an emergency button as a DCD. It will let you survive pretty much anything that doesn’t break the fight. Unfortunately, while you are channeling this ability, you cannot do anything either, so it should only ever be channeled for as long as it needs to be. This generally means that it only gets used for avoiding really big hits, but usually not directly from enemies since most enemies will stop attacking you while Force Barrier is being channeled but then they resume attacking you once you break the channel. I think it works by secretly bestowing the Benign presence provided by the Translocate ability where it temporarily takes you off the threat table.
When the Force Barrier channel ends, it grants Enduring Bastion that lasts 5 seconds which is a bubble just like Force Armor. How much it absorbs is dependent on how long you channel it for. Each charge of Enduring Bastion absorbs as much damage as a non-healer Force Armor. You get the first stack on activation and get a subsequent stack for every 2 seconds you channel, up to 4 stacks, meaning you get 4 stacks if you hold it for 6 seconds. Again, you’re not doing anything while you’re channeling Force Barrier, there’s a reason it was ridiculed as a self-stun when it was released, so unless you’re the last one alive or have some really intense damage to deal with, it’s not worth it to channel for very long just to get the stacks. That said, It is off the GCD, so you can pop it once for just a moment to get the single stack of Enduring Bastion which is nice in burn phases.
Most of the time, you will be using Force Barrier as an OCD in conjunction with the Empowered Restorer legendary implant.
Phase Walk
 Phase Walk
This ability can be activated off the GCD even though it has a cast; the only reason it has one at all is to prevent you from placing it in the air or while you’re moving. Phase Walk can be activated in the middle of channels (including Force Barrier), but not casts though, without interrupting said channel so long as you stay in range of whatever you’re hitting plus the standard 5m. Phase Walk can also be used while CC’d, even though the button will be grayed out if you try to use it while CC’d.
If you try to teleport while in the air, sometimes it doesn’t work, sometimes there is a whole lot of lag before it teleports you so be mindful of that. When thinking about different spots to place Phase Walk, ask yourself: is there a specific location I know I will want to return to at some point later in the fight? Is that position going to be generally safe to return to? Ask yourself this in every single fight and consider that its usefulness may be different in each phase.
Force Speed
 Force Speed
This is your bread-and-butter movement ability and it’s one of the best in the game due to the high speed it provides and incredibly short cooldown. In general, you should try to move as little as possible outside of moving for mechanics, and when you do move, you should use Force Speed whenever possible in order to minimize your time spent moving.
You should move as little as possible because when you’re moving, you’re not as focused on your abilities or the raid frame or what’s happening during the fight and your options are more limited while moving. If you’re using Telekinetic Blitz with Metaphysical Mender, you will have to use this ability mostly on cooldown because it secretly gives 2 charges of Telekinetic Blitz.
Medpac
Don’t save it for a rainy day because today is that rainy day! Unless you get hit by a one-shot mechanic (which you shouldn’t), you should never let yourself die while your Medpac is still available.
If everyone’s health is getting low or there’s a heal check in the current phase, do not hesitate to use your Medpac if you can take full benefit of the health provided or need to be above a certain health level to survive an imminent mechanic.
If you think Medpacs are too expensive, it’s time to get Biochem on one of your alts or even better, your raiding toon so that you can make your own or get reusables. Choosing not to use a medpac for financial reasons and subsequently dying is not a valid excuse.
DPS Abilities and When to DPS as a Healer
Avoid overhealing. If everyone is at max health, do DPS instead. There are a few exceptions to this general rule. Sometimes tanks need to be overhealed because they are constantly taking hits that cause them to lose a ton of their health, but those are easily identifiable. The other major instance comes from needing to regenerate Force, especially if you need to prepare for an upcoming healing-intensive phase.
Overhealing considerations extend to Force Armor as well. You should only be bubbling players that you know will take damage, and you should be confident about whether they will take damage. Don’t give someone a bubble just because you have nothing else to do and you think they might take damage. Do DPS instead. Just to be clear, you should still bubble people even if they are at max health, but don’t do it just because you have no other healing to do.
Off-DPSing as a Sage healer is a bit more complicated than it can be for the other heal specs because your Force is a reservoir that requires very active maintenance and preparation. At any given time when you’re DPSing, you need to make sure that you have enough Force leftover so that you can heal in an emergency (probably about 200-300 Force). You also want to make sure you are prepared for the next phase and have enough Force to get through comfortably or have as much as you can for an extended healer check, which means doing more Rejuvenate + Healing Trance to increase your Force if you’re out of Resplendence stacks.
Your DPS abilities are also a bit more expensive than your healing abilities, so it’s helpful to maintain the Amnesty proc as much as possible while DPSing. Remember that you should be doing some sort of ability at all times, so if you aren’t healing, you should be DPSing. Mental Alacrity and Force Potency can also be used to increase DPS if you do not expect to use them elsewhere in the fight, though I’d hold onto the Adrenal just in case things go sideways.
There are a few instances where you will be required to DPS since healing will be very light or there is a DPS check. If you need to take a moment to stop DPS to manage your Force, this is fine since your primary function is to make sure no one dies. Please note that there are some instances where people might get a little lower than you would like but won’t die when your DPS is needed.
DPS abilities also have a chance to miss without 110% accuracy, so you should strongly consider using Metaphysical Mender + 110% accuracy in fights where you can or are required to off-DPS since Metaphysical Mender requires the accuracy for Telekinetic Blitz anyway. You have several abilities at your disposal.
Weaken Mind
 Weaken Mind
This is your most damaging ability, but it is a DoT that takes 18 seconds to tick. Both the application and individual ticks can miss if you don’t have 100% accuracy. Do not apply this to something that is about to die or become invulnerable. You need about half the ticks to land for it to do more damage than your other abilities. Since this ability exclusively deals periodic damage, it will never consume nor benefit from Force Potency.
Mind Crush
 Mind Crush
This ability deals an initial hit of direct damage followed by a short DoT. It also has a longer cast time (same as Deliverance) but does enough damage to compensate for this longer cast time, resulting in it being your second most damaging attack. When casting this, make sure you have enough time to finish the cast and make sure the target will be able to benefit from the entire duration (6 seconds). This ability can also proc Altruism (for Benevolence).
Just like with Rejuvenate, do not pair Force Potency with Mind Crush. Its overall damage output is split between the initial direct damage and the DoT, but Force Potency will only boost the critical chance of the initial direct damage.
Telekinetic Blitz
Telekinetic Blitz is a fair bit weaker in terms of DPS, but its low cost and the healing provided by the Metaphysical Mender tactical more than makes up for it. Both of these factors allow you to DPS more easily and your goal is to prioritize using it 4 times in a row whenever people need healing to avoid having to switch back to full heal mode, but if no healing is required, use a pure DPS ability instead.
Project
 Project
This ability now deals more damage than Disturbance (and Telekinetic Throw per GCD) while still costing the same amount of Force as Disturbance, so you now have a stronger incentive to prioritize Project and pair it with Disturbance.
Telekinetic Throw
 Telekinetic Throw
This ability is channeled over 3 seconds. It does the same DPS as Disturbance but costs less Force. Since it’s active and deals DPS for 2 GCDs, it’s the best DPS ability you can use with Force Potency because it will only consume 1 stack as opposed to 2, essentially allowing you to get 3 GCDs of Force Potency as opposed to 2.
The channel is also valuable because you can break it whenever you want after the first GCD in case you unexpectedly need to heal someone. You aren’t locked into that second GCD like you would be if you casted Disturbance twice instead.
Disturbance
 Disturbance
Disturbance is casted, costs the same Force as Project, but deals less damage. The only advantage offered by Disturbance over Project and Telekinetic Throw is that it can technically proc Altruism. That said, it’s pretty rare that you’ll be able to off-DPS continuously for 10s, and even then, you only have a very short window where the proc is even available since Mind Crush also procs Altruism and that ability always has a higher priority.
DPS Priority
This is your general priority list for deciding which DPS ability to use when multiple are available. Remember that each ability has benefits and drawbacks; don’t forget to take those into account when deciding which ability to use:
- Telekinetic Blitz (only w/ Metaphysical Mender if healing is needed)
- Weaken Mind
- Mind Crush
- Project
- Telekinetic Throw
- Disturbance
Crowd Control and Other Notable Abilities
Rescue
 Rescue
This is the famed Sage pull! While it is primarily used for trolling to great effect, especially when paired with Phase Walk to jump off ledges while pulling an unsuspecting victim to their doom while you teleport back safely, it does still have some utility in combat. If you are 100% certain that someone will die if you don’t pull them, do it; if you are 99% certain they will die, probably don’t pull them. You will get yelled at if you mess up.
You should have a very good idea of where this ability is on your bar because if you have to waste time finding it, you’ll probably end up sending a corpse soaring through the air instead of saving someone’s life. At that point, you’re better off just removing it from your bar. If there’s time, try to minimally disrupt the other person’s rotation since it will interrupt their cast and communicate with them beforehand if there’s time.
Force Wave
 Force Wave
This is your conal knockback. As of 7.0, Force Wave now has the Force Wake utility effect as part of the baseline ability. The only fight that Force Wave is important for right now is Styrak in NiM where you have to knock back the Chained Manifestations. Also, please do not ruin everybody else’s day by using this ability for its AoE damage. It’s important to note that the Force Wake effect and damage can miss, but the knockback won’t ever miss.
Force Stun
 Force Stun
This is your hard stun. Most stuns have a range of either 4m or 10m depending on whether it’s a melee or ranged advanced class. Your stun has a 10m range.
Mind Snap
 Mind Snap
This is your interrupt. If you really want to be a clicker, I highly recommend you at least keybind this ability or you will have a lot of trouble with some of the shorter casts that need to be interrupted.
Since 110% accuracy is required to prevent Mind Snap from missing, you will typically only be assigned to do interrupts as a last resort, though there are some fights in the game where the entire group is expected to interrupt. In the same way that healers are prioritized for cleanse mechanics, DPS and tanks are prioritized for interrupt mechanics.
Don’t let the low accuracy discourage you from interrupting liberally. You can mitigate a lot of damage by interrupting attacks that healers aren’t normally assigned to deal with because it’s a bit tricky to interrupt on demand as a healer. One of the best examples of this is with the End of Line cast from the Regulators in the Operator IX fight in TFB. It deals quite a bit of damage and knocks the tank back, but if you manage to interrupt it, you just prevented a whole lot of damage without even spending a GCD.
Force Lift
This is your mez, a CC ability that breaks on damage. Usually if you’re using this in-combat, you will want to use it very soon after the enemy spawns. As a healer, it will most often be your responsibility to CC enemies since you have a 60 second CC and won’t lose DPS by activating it. Be mindful that without 110% accuracy, it can miss.
Force of Will
 Force of Will
This is your CC break. Use it when you get CC’d and are unable to heal who you need to heal.
Forcequake
 Forcequake
This is your AoE ability. It deals more damage than most of your other single-target damaging abilities when there are 3 targets present and deals more than all of your single-target damaging abilities when there are 4 targets present.
Ability Tree Choices
Make a habit of reading through all of your ability tree choices each time you log in. They are intended to be changed on the fly and having a clearer idea of what all of them do will help you to recognize situations where individual choices will be useful in-game.
Deliverance Buffs – Level 23 Choice
 Sustained Aura
- Effect: Deliverance applies Sustained Aura, which heals the target for about 16.5k over 12s
- Recommendation: Only take this in fights where Keeper of Peace is mostly ineffective and you don’t need more mobility. Sustained Aura offers less of an HPS increase compared to Keeper of Peace and the long duration of the HoT makes it easy to clip when you have to spam heals on the same player. Telekinetic Blitz + Metaphysical Mender does alleviate the clipping issue, but Keeper of Peace will still usually be the better option.
 Keeper of Peace
- Effect: Deliverance also heals 1 additional target within 8m of the primary target.
- Recommendation: Almost always take this. Keeper of Peace offers the greatest HPS increase out of the 3 Deliverance buffs by far, but you aren’t able to apply all that healing to a single player. It works best at healing mDPS and tanks that are standing near each other, but even in fights where players are mostly spread out, you can usually run over to someone and have Keeper of Peace heal yourself and another player. I typically only switch away from Keeper of Peace if I find it’s ineffective over half the time or I need a lot more mobility.
 Hastening Call
- Effect: After casting Deliverance, you are granted Hastening Call, which makes your next Deliverance instant. This effect cannot occur more than once every 10 seconds.
- Recommendation: Take this in fights where you have to move a lot and can’t take Telekinetic Blitz + Metaphysical Mender. Telekinetic Blitz offers significantly more mobility, but there are situations where it’s hard to use or you might not have Metaphysical Mender. Since Deliverance normally has a cast time that is greater than a GCD, Hastening Call actually offers a small HPS increase in addition to the mobility, though it’s still the weakest of the Deliverance buffs because it only boosts your HPS by about 6k. Do not take Hastening Call to try to mitigate spike damage; an extra 25k HP a second earlier is less likely to make a difference in someone’s survival compared to everyone’s health just being higher thanks to higher HPS. If you activate Deliverance while you have both the Conveyance and Hastening Call procs, they will both be consumed, and Deliverance will be instant, but Conveyance will have been wasted because Deliverance no longer has a cast time at all.
Benevolent Haste, Cloud Mind, or Bastion of Light – Level 27 Choice
 Benevolent Haste
- Effect: Benevolence increases the movement speed of the target by 50% for 6 seconds. This effect cannot occur more than once every 12 seconds.
- Recommendation: Almost never take this. Even in past expansions when Benevolent Haste had far less competition as a utility, it was basically never taken, and has the potential to mess players up if they aren’t prepared for a sudden movement speed increase. The speed boost is too weak, too short, and takes too long to be applied. If someone needs to move, Rescue will almost always be a vastly superior option. Only consider taking this in fights where you’re taking almost no damage; don’t have to worry about adds; and there’s someone who you know will need to move faster and Rescue will be insufficient.
 Cloud Mind
- Effect: Grants the ability Cloud Mind, which increases your damage reduction by 25% for 6 seconds and reduces your threat by a moderate amount.
- Recommendation: Always take this. Reducing your threat is super helpful in fights with adds and the 25% DR is often essential to your survival.
 Bastion of Light
- Effect: Benevolence has a 50% chance to cause your Rejuvenate to tick twice.
- Recommendation: Never take this. The effect is ridiculously weak. Even if you’re consistently using Benevolence with Altruism once every 10s, that still only amounts to a single extra Rejuvenate tick every 10s on average.
Healing Trance Buffs – Level 39 Choice
 Rejuvenating Aura
- Effect: Healing Trance spreads your Rejuvenate to up to 4 allies within 8m.
- Recommendation: Always take this. Even in fights where everyone is spread out most of the time, everyone usually stacks up for burn phases and other heal checks, so this will almost always be useful when healing is most intense and provides a far greater HPS increase than the other Healing Trance buffs. Rejuvenating Aura also synergizes strongly with the Revitalize legendary implant.
 Potent Resolve
- Effect: While Mental Alacrity is active, Healing Trance’s healing is increased by 3%.
- Recommendation: Never take this. Even if the boost was 30% or didn’t require Mental Alacrity to be active, I don’t think that would be enough. 3% healing is laughably weak compared to the alternatives.
 Resurging Power
- Effect: Healing Trance builds stacks of Resurging Power. Each stack increases the healing done by your next Benevolence, Keeper of Peace, or Deliverance by 5%. Stacks up to 3 times.
- Recommendation: Never take this. Rejuvenating Aura will always be stronger. Even with Keeper of Peace and ignoring the Revitalize implant, so long as you spread Rejuvenate to a single other player with every third Healing Trance channel Rejuvenating Aura will come out on top.
Force Defense, There Is No Death, or Force Empowerment – Level 43 Choice
 Force Defense
- Effect: Healing with Healing Trance grants a stack of Force Defense, which increases your damage reduction by 2% per stack. Stacks up to 3 times, lasts 30s.
- Recommendation: Take this if you don’t need There Is No Death or Force Empowerment. Both of the other options in this tier can be better, but aren’t always needed, whereas Force Defense is at least always useful. It’s also fine to just take this all the time if you don’t want to bother changing your talents once you’ve set them.
 There Is No Death
- Effect: If a friendly player is killed while they were affected by your Rejuvenate, your next Revival, Keeper of Peace, or Deliverance activates Instantly. In addition, taking direct damage reduces the cooldown of Force Barrier by 3s and Rescue by 2s. Cannot occur more than once every 5s.
- Recommendation: Sometimes take this if you are using the Empowered Restorer legendary implant. The key benefit of There Is No Death is the cooldown reduction on Force Barrier, though it won’t always be enough to enable an additional use of the ability over the course of the fight because Force Barrier has a very long cooldown. The other benefits provided by There Is No Death are just nice to have, but they aren’t good enough to make this boost worth taking without the cooldown reduction on Force Barrier.
 Force Empowerment
- Effect: Grants the ability Force Empowerment, which increases mastery, endurance, and presence for you and your Operation group members within 40m by 10%. Lasts 10s. 5 min cooldown. Those affected by Force Empowerment become Drained and cannot regain Force Empowerment for 5 mins.
- Recommendation: Take this if you are the only Sorcerer or Sage in the group. Since there is a 5 min lockout, only 1 player should take Force Empowerment; the others should take different options instead. Lightning Sorcerer / Telekinetics Sage has the weakest alternatives so they should take Force Empowerment before you do as a healer, but your alternatives are weaker than what Madness Sorcerer / Balance Sage can get, so you should take Force Empowerment before they do.
Telekinetic Defense, Force Mobility, or Resistance – Level 51 Choice
 Telekinetic Defense
- Effect: Your Force Armor reverberates with Force energy, blasting attackers for about as much damage as a Disturbance whenever it absorbs direct damage to you. This does not affect Force Armors placed on or by allies and cannot occur more than once each second.
- Recommendation: Never take this. Your primary job as a healer is to heal, not deal damage. Without AoE RDT, you’re unlikely to get more than a tick out of it anyway, so when you can DPS, just use a DPS ability instead.
 Force Mobility
- Effect: Healing Trance can be channeled while moving.
- Recommendation: Always take this. Being able to channel Healing Trance while moving is a huge boost to mobility that extends beyond those 3 seconds because Vindicate is instant and you really can’t use it without those Resplendence stacks from Healing Trance. Furthermore, you absolutely never want to have to break or delay a channel of Healing Trance simply because you have to move. It’s essential that you can activate Healing Trance whenever you want.
 Resistance
- Effect: Increases damage reduction by 3%.
- Recommendation: Never take this. The effect is super weak; you can easily make up for that extra damage taken through the extra healing you’ll be able to do as a result of being able to channel Healing Trance while moving.
Valorous Spirit, Metaphysical Alacrity, or Kinetic Collapse – Level 64 Choice
 Valorous Spirit
- Effect: Force Mend increases your damage reduction by 15% for 6 seconds and the cooldown of Force Mend is reduced by 5 seconds.
- Recommendation:
Take this whenever you don’t need shorter cooldowns on Force Speed and/or Force Barrier. In my opinion, the additional damage mitigation provided by Valorous Spirit is superior when you aren’t using Force Speed on cooldown. Typically this means Valorous Spirit should be used when you aren’t taking Telekinetic Blitz + Metaphysical Mender. Since the DR applies after the healing, you can’t benefit from both the healing and the damage reduction against the same instance of damage. Against big hits, you’ll have to pick whether you want the DR or the healing, and the math works out such that you’ll want to use DR if the hit will be greater than about 50% of your max HP; don’t worry about being exact, the closer you are to the threshold, the less difference it makes.
 Metaphysical Alacrity
- Effect: Reduces the cooldowns of Force Speed by 5 seconds and Force Barrier by 30 seconds. In addition, Force Speed lasts 0.5 seconds longer, Mental Alacrity increases your movement speed by 100% while active, and activating Force Barrier finishes the cooldown on Force Speed.
- Recommendation: Always take this whenever you’re using Force Speed and/or Force Barrier on cooldown. The movement speed boosts are nice too, but the cooldown reductions are what make Metaphysical Alacrity competitive with and sometimes superior to Valorous Spirit. The most consistent situation where Metaphysical Alacrity is better is when you’re using Telekinetic Blitz + Metaphysical Mender since the cooldown reduction on Force Speed will allow you to get 2 charges of Telekinetic Blitz more frequently. With Empowered Restorer, you might also be able to sneak in an additional activation of Force Barrier thanks to the 30s cooldown reduction from Metaphysical Alacrity as well
 Kinetic Collapse
- Effect: Force Armors you place on yourself erupt in a flash of light when they end, mezzing up to 8 nearby enemies for 3 seconds.
- Recommendation: Never take this in PvE. It’s an excellent choice in PvP, but adds in PvE group content are almost always immune to mezzes. That said, there’s nothing wrong with taking it if you come across an add fight where the effect actually works.
Force Lift, Phase Walk, or Telekinetic Blitz – Level 68 Choice
 Force Lift
- Effect: Grants the Force Lift ability, which mezzes enemy NPCs for 60s. If the effect ends prematurely, the target is stunned for 2 seconds. Strong, Elite, and Champion enemies heal rapidly.
- Recommendation: Take if you need to CC something. As a Sage, you have pretty easy access to a 1min mez; the only other combat style with this raid utility is Mercenary / Commando. If a fight requires you to CC something, take this. Consider taking this in FPs in fights where the adds hit really hard.
 Phase Walk
- Effect: Grants the Phase Walk ability, which allows you to place a mark on the ground that lasts up to 10 minutes. At any point, you can teleport back to that mark if you are within 60m, at which point the ability goes on cooldown for 60s.
- Recommendation: Take this if you need more mobility. Phase Walk is a powerful mobility tool, but unless you’re using it for a specific mechanic, like calling the train in the Mutant Trandoshans fight in Dxun, it’s typically not essential, so it’s fine to give it up if you need Force Lift or Telekinetic Blitz.
 Telekinetic Blitz
- Effect: Deals a small amount of damage to your target and grants Energize, which increases the damage (and healing, if applicable) dealt by Telekinetic Blitz by 30%. Stacks up to 3 times and lasts 5 seconds.
- Recommendation: Take this with Metaphysical Mender only. Without a tactical item, Telekinetic Blitz is just a really weak overcomplicated ability. With Metaphysical Mender, Telekinetic Blitz becomes a powerful heal that happens to do a bit of DPS as well.
Egress, Mind Ward, or Confound – Level 73 Choice
 Egress
- Effect: Force Speed grants Egress, purging all movement-impairing effects and granting immunity to them for the duration.
- Recommendation: Take this in fights where you get slowed. Adds tend to apply slows more frequently than bosses, but slows aren’t super common in raiding. Egress can also be used to cleanse certain DoTs that have a movement-impairing component like Captain Horic’s Corrosive Grenade in S&V NiM.
 Mind Ward
- Effect: Reduces periodic damage taken by 15%.
- Recommendation: Take this in fights where enemies deal periodic damage to you. Mind Ward isn’t that great, bosses rarely have more than 1 DoT and it basically never has 100% uptime. 15% RDT against a single attack is extremely weak, but it’s better than nothing and that’s about it. Sadly, there isn’t a consistently useful alternative in this tier for raiders.
 Confound
- Effect: Targets affected by your Weaken Mind are slowed by 30% for its duration.
- Recommendation: Never take this. The effect is super weak, even the DPS specs never take this and both of them require 100% uptime on Weaken Mind.
Healing Numbers and Priority
In order to properly triage, it’s very important to see how strong your healing abilities are in relation to each other, both from a per use and per GCD standpoint, to enable you to make the right decision regarding which one to use at any given time. Keep in mind that there are many other factors that will influence which heal ability you will use next besides the overall healing dealt.
The healing amounts I have included in this section and throughout the rest of this guide are taken directly from the ability tooltips on my Sage; if the tooltip has a range, then I take the average of the maximum and minimum. Overall, my goal was to examine the effectiveness of all heals in the same situation. These numbers assume that none of the abilities crit, though I have incorporated individual extra crit chance buffs like the one for Benevolence.
You’ll see separate columns for per ability use and per GCD so you can have a much clearer idea of your overall HPS with each ability. I’ve tried to present the information in a way that allows you to compare apples to apples as much as possible, so typically single-target healing numbers are shown even for AoE healing, but there are some instances where it makes more sense to incorporate healing dealt to multiple targets, so pay especially close attention to whether I’m referring to single-target or AoE healing.
Healing done per player without Conveyance
| Heal | Healing done per player per ability use | Healing done per player per GCD | Force Cost per ability use per GCD |
|---|---|---|---|
 Force Armor+ Force Armor+ Soothing Protection Soothing Protection | 41k | 41k | 26 |
 Wandering Mend Wandering Mend | 27k | 27k | 45 |
Wandering Mend +  Tactical Tactical | 40k | 40k | 45 |
| Telekinetic Blitz +  Tactical (avg) Tactical (avg) | 34k | 34k | 22.5 |
 Benevolence Benevolence | 18k | 18k | 58 |
Benevolence +  Altruism Altruism | 30k | 30k | 0 |
 Healing Trance Healing Trance | 39k | 22k | 33.2 |
 Deliverance Deliverancew/ Buff | 46k | 35k | 33.6 |
 Rejuvenate + Rejuvenate +  Conveyance Conveyance | 34k | 34k | 45 |
 Salvation Salvation | 17k | 13k | 40.3 |
Salvation + Tactical Tactical | 20k | 16k | 40.3 |
Regarding Wandering Mend: Remember, this chart is for single-target healing only and Wandering Mend can only heal the same target 2 times (or 3 times with One for All) per activation. Without the tactical, Wandering Mend heals for about 54k total and with the tactical, it heals for about 68k.
Regarding Conveyance: I have incorporated the average healing provided by the Conveyance proc as you’ll see in the next chart so you can get a better picture of how much Rejuvenate contributes per activation in this context. Strangely (or perhaps deliberately), the average healing contributed by Conveyance happens to be equal to the non-crit healing dealt by the HoT component of Rejuvenate at ~13k.
Single-Target Healing Priority
A simple single-target priority system doesn’t really exist anymore for Sage healing because there’s a reason you’d want to use any ability at a given time. I can still give you one, but there’s a boatload of caveats:
- Benevolence (only situationally w/ Altruism)
- Rejuvenate (only for Healing Trance)
- Healing Trance (if you need more Resplendence stacks)
- Force Armor (on Tanks or with confidence)
- Telekinetic Blitz (only w/ Metaphysical Mender)
- Rejuvenate
- Wandering Mend
- Deliverance (if you can benefit from Ability Tree buff)
- Healing Trance
- Deliverance
Don’t forget to incorporate Vindicate for Force management!
When someone needs emergency healing or the Altruism proc will fall off very soon, Benevolence with Altruism has the highest priority; without Altruism, you don’t ever want to use Benevolence.
If the target is expected to take damage (and tanks almost always will), Force Armor is typically your best option for mitigating damage against a single target. If your desired target is already bubbled, the next ability you should consider using is whichever one gets buffed by your tactical item, so Telekinetic Blitz with Metaphysical Mender or Wandering Mend with One for All.
Healing Trance is weaker than it’s been in past expansions, but since it enables you to regenerate Force far more efficiently and can spread Rejuvenate, you will need to use it basically on cooldown even though its direct healing is a bit lower.
Without One for All, Wandering Mend is typically a worse choice than Deliverance for pure single-target healing, but it’s quite rare that multiple players in the group don’t need any healing, so it’s often a superior choice when you don’t need to spam heals on a single player.
Rejuvenate is in a weird spot because its healing is rather low, even with the average Conveyance contribution, though you can get more healing out of a single GCD by spreading it with Healing Trance and/or using the Revitalize legendary implant. I think in order to minimize the amount of brain power you have to use to get the most out of those HPS boosts, it’s best to use it liberally, but don’t fret if you accidentally forget to use it or go out of your way to use it if you want to use another heal right now.
Average Healing Contribution from Conveyance
Note: This chart is looking at overall Conveyance effectiveness, so it incorporates both single-target and AoE healing.
| Heal | Healing done per player per ability use | Healing done per player per GCD | Conveyance Contribution per ability use |
|---|---|---|---|
| Wandering Mend | 27k | 27k | 17k |
| Healing Trance | 45k | 25k | 6k |
| Deliverance w/ Buff | 46k | 46k | 11k |
| Benevolence | 28k | 28k | 11k |
| Benevolence + Altruism | 45k | 45k | 16k |
| Salvation | 17k | 17k | 16k base + 4k per additional target |
Regarding Wandering Mend: Using Conveyance on Wandering Mend does increase your overall HPS because the maximum healing dealt by Wandering Mend is so much higher than your other abilities, but Conveyance only increases your HPS by enabling this ability to be used when it otherwise wouldn’t be possible because there isn’t any raidwide damage going out. When raidwide damage is going out such that Wandering Mend would tick 4-5 times before it comes off cooldown, using Conveyance on Wandering Mend is a complete waste.
I have defined Wandering Mend’s contribution per tick as the difference between the total healing provided by Wandering Mend (using 4.5 ticks per activation) minus the average healing dealt per GCD by Force Armor or Deliverance + Conveyance, which are the most likely abilities that would be used in lieu of Wandering Mend.
Regarding Salvation: Salvation’s cast time being reduced results in a 4k healing increase per target, but Salvation should only ever be used if you can manage to heal at least 3 targets with it and should only be used with Conveyance if you are able to heal additional targets because it’s instant, resulting in 16k as the minimum benefit provided by Conveyance with it being increased linearly depending on how many additional targets it enables you to hit with Salvation.
Conveyance Priority
Conveyance still has a pretty straightforward priority. AoE heals tend to benefit more from Conveyance, but their healing boosts are far more situational, so higher risk, but higher reward whereas healing boosts to single-target abilities are smaller, but consistently beneficial:
- Healing Trance (only for Resplendence procs)
- Wandering Mend
- Salvation (situationally)
- Benevolence (only w/ Altruism)
- Deliverance
The actual healing increase provided by Conveyance to Healing Trance is quite small. The main benefit you get is the increased chance to proc Resplendence. Since Vindicate is so much more effective with Resplendence, you’ll still need to spend most of your Conveyance procs on Healing Trance, but you don’t want to just mindlessly pair the two together. If you have 2-3 stacks of Resplendence, you’re better off delaying Healing Trance and using Conveyance on another ability until you actually need to use Vindicate.
Conveyance’s greatest direct HPS increase typically comes from enabling Wandering Mend to be used when it would otherwise not work because damage isn’t going out to the whole group frequently enough. As I mentioned before, Conveyance does not cause Wandering Mend to heal for more. The HPS increase comes from Wandering Mend being usable at all, so if AoE damage dealt is frequent enough, like it typically is in burn phases, you should use Conveyance on a different ability.
Salvation’s place in the priority is really dependent on how many additional targets you’re able to hit with the ability as a result of it being instant and it can easily surpass Wandering Mend if you’re able to heal enough additional targets. The most notable examples of when using Salvation as an instant ability is beneficial is when everybody is about to disperse after being stacked up for a while like when Heirad casts Lightning Field or when you’ll be moving for an extended period of time like during the 2nd and 3rd bosses in Dxun. If you think players will remain stacked up until after you finish casting Salvation, you’re better off using Conveyance with a different ability instead.
Usually, you won’t have too many Conveyance procs to spare besides using it on those abilities, but outside of those instances, pairing it with Benevolence while you have the Altruism proc provides a greater overall healing increase compared to using it with Deliverance. In these cases, you might want to delay spending your Conveyance proc by bubbling players you think will take damage or use Vindicate instead (assuming you have Resplendence stacks) until one of your stronger abilities comes off cooldown.
Salvation vs Other Heals Priority
The formula for determining how much healing an AoE ability does per GCD such that it can be compared to single-target abilities is: (Healing Dealt/Number of GCDs) x Number of Allies. An AoE ability’s place in the priority is as high as it can be until it reaches a single-target ability that heals for more than the AoE will heal to all allies in the GCD.
Fluffing is less relevant with AoE healing since StarParse tells you your effective healing rate (EHPS), but it is still possible. Remember, your goal is to prioritize whoever you think is most likely to die next while AoE healing is more about efficiency. If the whole group just got whacked and is really low but won’t take damage for a while but the tanks will continue to get hit, you should prioritize the tanks even if you’d be able to get full benefit out of an AoE heal. You should only throw in Salvation if you think that they’ll be able to survive that GCD without your dedicated healing.
| Number of Targets | Healing per Use | Healing per GCD | Surpasses these abilities in healing output per GCD |
|---|---|---|---|
| 1 | 17k | 13k | |
| 2 | 34k | 26k | Healing Trance |
| 3 | 51k | 39k | Telekinetic Blitz, Benevolence, Rejuvenate, Deliverance |
| 4 | 68k | 52k | Wandering Mend (4 ticks), Force Armor |
| 5 | 85k | 65k | |
| 6 | 102k | 78k | Wandering Mend (5 ticks) |
| 7 | 119k | 91k | |
| 8 | 136k | 104k | Healing Trance + Rejuvenate Spread |
AoE healing in general has become a bit more positional thanks to new ability tree buffs, including for Sages, though it’s still pretty straightforward to tell when you need to use what. We can break this down into a few tiers:
- At 3 targets, all but your strongest single-target heals are surpassed
- At 4 targets, all of your single-target heals are surpassed
- At 5 targets, strong AoE healing takes priority
Gearing and Stats
Tactical Items
| One for All |
|---|
| Effect: Wandering Mend heals up to 5 targets instead of 4. |
| Recommendation: This should be your default tactical item since it is useful in both single-target and AoE healing situations. |
| All for One |
|---|
| Effect: Salvation’s pool concludes with a burst of light Force energy, healing up to 8 allies within it for 2365-2556 health. |
| Recommendation: This tactical item should be used during fights where you can reliably affect more than 4 targets with Salvation during all healing intensive portions of the fight where you will be using Salvation. Generally, stick to using the Wandering Mend tactical unless most or all of the group is stacked together for the majority of the fight or you’re doing an activity with more than 8 players like a 16m raid or world boss where it’s more likely that 8 players will be stacked together. |
| Metaphysical Mender |
|---|
| Effect: Telekinetic Blitz heals an ally within 20m of the damaged enemy. This healing scales up with each charge of Empowered, and Empowered charges also reduce the Force that Telekinetic Blitz consumes by 30% per charge. The healing done is a smart heal. |
| Recommendation: This tactical item should be used when you have a lot of time to off-DPS or need to Interrupt or CC something since those abilities require 110% accuracy. Metaphysical Mender also forces you to actually look at what’s happening in the fight since you have to target an enemy, which will hopefully improve your raid awareness. You should be using this tactical fairly often since only the most healing intensive fights (meaning NiM raids) will truly require One for All. |
In our Catalog of all Tacticals in SWTOR you will find information about all other Tacticals that we didn’t list in this guide. You may find something adequate that is also cheaper and easier to obtain for your needs while you work on getting the recommended one for your combat style and build.
Legendary Implants
BioWare has removed set bonuses from the game and replaced them with Legendary Items, which are just implants with old 4 or 6-piece set bonus effects on them, so rather than needing to collect 4 pieces of a gear set to get the 4-piece set bonus, or 6 pieces for the 6-piece, you’ll get either a 4 or 6-piece set bonus effect on an implant.
This was done to improve customization (now you can mix and match set bonus effects), make them easier to obtain, and consume less inventory space. Here are the Legendary Items you should use as a Seer Sage.
- Revitalize – While Rejuvenate is active on a target, it has a 15% chance to spontaneously heal the target whenever it receives non-Rejuvenate healing from you. Revitalize is currently bugged and does not work at all.
- Empowered Restorer – Activating Force Barrier puts a barrier on nearby allies, absorbing some damage and granting them an additional 25% Elemental damage reduction while active. Lasts up to 8 seconds. Absorb shield HP is equivalent to twice as much as Force Armor.
- Unmatched Haste – The duration of Mental Alacrity is increased by 5 seconds and using Force Speed reduces the active cooldown of Mental Alacrity by 5 seconds.
- Dynamic Force – The cooldown of Force Potency is reduced by 15 seconds.
Sage healers have more options for their legendary implants than just about any other combat style. Revitalize and Empowered Restorer are the strongest pair, but you might already have one of the other 2 options if you play Sorcerer / Sage or Assassin / Shadow DPS. In the Builds section, I’ll be listing which pair are ideal for each build under build essentials, but you can use any pair with any build if you’re short on Tech Fragments or don’t play Sage heal that much.
For example, Unmatched Haste synergizes with the Telekinetic Blitz build because you’re already gonna be using Force Speed on cooldown and will have a shorter cooldown on Force Speed while you might not be using Rejuvenate quite as often.
Be mindful that some options offer crit while others offer alacrity, so make sure to account for this whenever you change the amount of alacrity. The builds I recommend will factor this in so you don’t have to change out other pieces when changing legendary implants.
I do want to point out as well that Dynamic Force is super weak despite looking decent on the surface. It takes 7 minutes and 30 seconds for Dynamic Force to contribute to a single additional activation of Force Potency, assuming you’re activating Force Potency on cooldown (which you won’t be) and most fights in the game don’t last nearly that long in the first place. The only time it’s okay is if you don’t have anything else or don’t want to bother with getting another implant. If you plan to be a Sage Healer main, Dynamic Force is a waste.
If you want to know more about Legendary Items, I have a guide called Legendary Items in SWTOR 7.0. It explains how to unlock Legendary Items and contains a full list of them broken down by Combat Style.
Augments
Augments allow you to put additional stats on every piece of gear except tactical items. Since Augments allow you to put additional stats on every piece of gear except tactical items. Since the stats come in much smaller amounts, augments allow you to fine-tune your gear to provide almost as much of each total stat as you want.
To equip an augment, you must first use an Augmentation Kit that matches the crafting grade of the augment (ex. Grade 11 augments require MK-11 Kits).
The 296, 302, 310, and 318 iRating augments released with 7.6 and 7.7 are BiS. The higher the iRating, the more stats they offer and the more expensive they are to make or buy, though most of the benefit is provided by having augments at all, and the base-rarity blue 296 augments are the cheapest.
Almost everyone should buy the blue 296 augments because they provide the greatest bang for the buck, but you do have multiple options:
- Gold 318 augments (Superior [Type] Augment 86). These are overall best-in-slot (BiS) and offer ~25% more stat than gold 300 augments, which is roughly equivalent to 4 additional gold augments. They’re extremely expensive and completely unnecessary for all content in the game, so I only recommend them to the wealthiest individuals.
- Purple 310 augments (Advanced [Type] Augment 86). They offer ~13% more stat than gold 300 augments, which is roughly equivalent to 2 additional gold 300 augments worth of stat. They are cheaper than the gold 318s, but they’re in the same price bracket in terms of affordability, so there’s no reason for anyone to use them at this point.
- Blue 302 augments ([Type] Augment 76) are the mid-tier augments. For all intents and purposes, these are equivalent to the gold 300 augments from 6.0. I only recommend them if you’re close to a stat threshold or don’t already have gold 300 augments and want something a bit better than the blue 296s.
- Blue 296 augments ([Type] Augment 83) are the most basic tier of augments for level 80 players. They are pretty cheap as only the schematic comes from the associated lair boss, Propagator Core XR-53. You don’t need any Corrupted Bioprocessors to craft these augments.
Check out our 7.7 Augments Guide for everything you need to know about augmenting gear!
Earpiece
Which Earpiece you use will depend on what specific tertiary stats the rest of your gear and augments provide. Typically, you’ll need to use either an Accuracy (Initiative, yellow icon) or Alacrity (Quick Savant / Nimble, green icon) Earpiece.
Crystals
Advanced Eviscerating Crystals are the best. They are the only type of crystal that increases one of your tertiary stats. Since the stat pool for tertiary stats is much smaller than that of primary or secondary stats, adding 41 is a more significant upgrade than it would be if you were to add 41 to one of the primary or secondary stats (mastery, power, or endurance).
Relics
I recommend the Relic of Focused Retribution (FR) and Relic of Serendipitous Assault (SA) for all PvE content. Each relic offers a proc; FR’s proc boosts your Mastery, whereas SA’s proc increases your Power stats. If you have the choice, purchase the Relic of Focused Retribution first because in equal amounts, and only in equal amounts, Mastery offers more of a DPS gain than Power.
Biochem Items
I recommend the Advanced Kyrprax Versatile Stim, Advanced Kyrprax Medpac, and Advanced Kyrprax Critical Adrenal for all PvE content. Grade 11 Biochem items from the crafting tier released with 6.0 remain BiS. Since they haven’t been updated to level 80, their effects are weaker than they should be, though they can still have an impact.
The Triage Adrenal will offer a more reliable boost to healing output, but the DPS reduction makes it unsuitable for helping with DPS checks. The healing performance difference between the two is not big enough to warrant spending the credits or managing an extra button on your bar.
Honestly, you might want to consider picking up a Shield Adrenal too since healers are a bit squishier than DPS.
Regarding the Zeal Guild Perk Alacrity Boost
If your guild uses the Zeal (cyan) guild perk set bonus, which gives a passive +5% Alacrity boost, you won’t need nearly as much Alacrity stat to reach your desired Alacrity threshold. My recommendations do not factor in these boosts, so if you have one, you’ll need to pay attention to percentage thresholds rather than the stat amounts. Just keep adding one augment at a time until you reach the desired percentage.
Guild leaders, I recommend using the Fortune (yellow) guild perk set bonus instead. It grants +5% Critical Chance and also boosts the Critical Rate and Time Efficiency of all Crew Skills by 2%. The reason for this is that you don’t have to change the way you gear in order to benefit from the effect.
Neither effect works in MM raids or PvP, so if you or your guild members do either of those activities, you’ll need to tweak your gear to reach the desired threshold depending on the activity, which I find super tedious. Even if your guild doesn’t do those activities, leaders still need to actively maintain the set bonus because your gear will become suboptimal on top of losing the bonus, whereas it’s not a big deal if your crit is a little lower for a bit.
The Alacrity boost is much stronger than the Critical Chance boost. Still, PvE content isn’t balanced around these guild perk set bonuses anyway, so I find it better to have a smaller boost I don’t have to worry about than a larger boost I have to manage.
Stat Priorities
There are 2 stat builds you need to have for Sage Healing. The first is just a Standard healing build while the other you’ll use specifically with Telekinetic Blitz + Metaphysical Mender.
I have explained the stats priority for each of them in the next section of the guide, dedicated specifically to these builds.
Find out which mods to purchase from Hyde and Zeek in SWTOR on the Fleet to minimize your spending and optimize your build. The dedicated guide contains tips for all roles in both PvE and PvP.
Best Seer Sage Builds in 7.0
These are the builds that I recommend for different types of content and situations. The Build Essentials are what I consider to be the core components that make the build viable. Without them, the build no longer accomplishes its primary function.
Build Essentials can include important ability tree buffs, a tactical item, and even legendary items occasionally. The ability tree buffs that aren’t listed as Build Essentials can be changed as needed without compromising the integrity of the build, though I have included a full set of default choices that will be most consistently helpful in accomplishing what the build sets out to do.
Standard Build
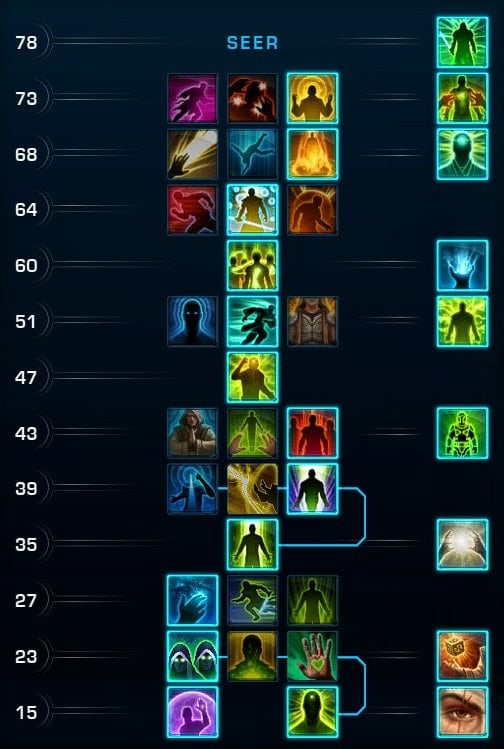
Build Essentials:
Cloud Mind Rejuvenating Aura Force Mobility All for One or One for All  Empowered Restorer Implant
 Revitalize Implant
This build offers maximum sustained healing but with diminished DPS capabilities. It’s easier to play than the Telekinetic Blitz + Metaphysical Mender build and feel more familiar if you’ve played Sage healer prior to 6.0. If you need to use Phase Walk or Force Lift, this is the only build you can use. Pay close attention to the default choices I’ve recommended, especially Keeper of Peace and Valorous Spirit. I didn’t include all of them as essential, but you’ll only be switching them for specific fights.
Stats Priorities for the Standard Build
This is the build you’ll be using with the All for One and One for All tactical items and it’s the same as what you’d use with the other healer disciplines.
- Alacrity to 7.5% – We’re using the lower alacrity threshold because we need so much alacrity that we’d have to give up too much critical rating to go for the 1.3s GCD. Since this is the only stat with a threshold for standard healing gear, it has the top priority.
- Critical gets the rest – This stat provides just as much of a healing boost as alacrity, but because it doesn’t have a stat threshold associated with it, we don’t care as much about exactly how much we have.
Note: With 344 gear and new augments, it is better to gear like a DPS and shoot for 110% accuracy, followed by 7.5% alacrity, and crit getting the rest. With such high stat pools and low healer checks, you have ample opportunity to off-DPS (meaning accuracy is more valuable) and you get enough of your other stats to heal enough.
Telekinetic Blitz + Metaphysical Mender Build
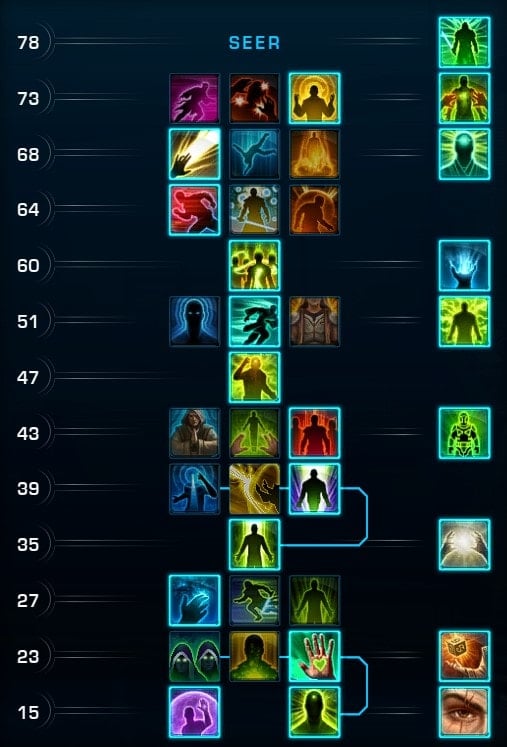
Build Essentials:
Cloud Mind Rejuvenating Aura Force MobilityMetaphysical AlacrityTelekinetic BlitzMetaphysical Mender Unmatched Haste Implant Empowered Restorer Implant 110% Accuracy
Telekinetic Blitz + Metaphysical Mender is best suited to fights where it’s easy to predict who will benefit from the 20m smart heal such that you don’t have to think about who you want to heal while using the ability and can focus on dealing more damage without having to switch between enemy and ally targets. It’s definitely not worth the trouble in fights where there’s multiple bosses and everyone is super spread out because you don’t know if the heal will hit the target you want to hit. Since Telekinetic Blitz is instant, this build is also great whenever you have to move a lot.
Don’t forget to have 110% accuracy. Technically, it’s not essential and your other heals will be stronger because you’ll be able to afford more crit rating , but if you ever miss with a 3-stack Telekinetic Blitz, you’ll feel more devastated than a child that just found out his adoptive parents only wanted to keep his sister and were sending him back to the orphanage.
Stats Priorities for the Telekinetic Blitz + Metaphysical Mender Build
This build is essential to use with Telekinetic Blitz + Metaphysical Mender because healing with Telekinetic Blitz is dependent on dealing damage with the ability, so if the attack misses, so will the heal. If you have a set of DPS gear, so long as your accuracy augments aren’t on your implants, you should be fine to just use that, though make sure your alacrity is where it needs to be.
- Alacrity to 7.5% – I personally think that reaching this alacrity threshold is more important than reaching the accuracy threshold because it affects all of your heals while accuracy only affects one of them that has a relatively longer cooldown.
- Accuracy to 110.00% – The purpose of getting this accuracy is to ensure that your Telekinetic Blitz attack doesn’t miss. If the attack misses, the heal from Metaphysical Mender doesn’t trigger. The accuracy is also better for fights without much healing to do since it means your off-DPS won’t miss.
- Critical gets the rest
Healing with Telekinetic Blitz and Metaphysical Mender
If you are using Telekinetic Blitz with Metaphysical Mender, things get a bit more complicated. At first glance, it may seem like this set turns Sage healing into easy mode thanks to the more frequent smart heals, but you have a few more things to juggle, to the extent that this set would be quite difficult to use if it weren’t for the smart healing.
Just so we’re on the same page, the effects of the Endless Offensive set bonus from 6.0 are now baseline effects for Sages, so activating Force Speed grants 2 charges of Telekinetic Blitz, Empowered can stack up to 3 times, and Telekinetic Blitz in general deals 10% more damage and healing.
Thanks to these set bonus effects, your 4th use of Telekinetic Blitz (with 3 stacks of Empowered) will be completely free and heal for 90% more than it does on its initial use. In practical terms, this 4th use will heal for about 30k non-crit and over 60k when it does crit! In order to maximize how often this happens, 4 Telekinetic Blitzes should be used at a time and then you should wait to use Telekinetic Blitz again until you can use 4 to benefit from the 3rd Empowered stack. Generally, it’s easiest to do these back to back since it requires you to target an enemy, though you can throw in 2 other GCDs in between each use of Telekinetic Blitz if you prefer since the Empowered buff lasts 5 seconds.
It’s also important to use Force Speed on cooldown as often as possible and take the Metaphysical Alacrity utility to maximize the number of Telekinetic Blitzes you can use. Remember that you can only hold 3 charges at once, so you need to make sure that you either use it only when you have 0 or 1 charges remaining. It shouldn’t come up, but if you’re healing properly, you shouldn’t ever have 3 charges of Telekinetic Blitz, 0 Empowered stacks, and Force Speed recently put on cooldown at the same time.
Force Speed should generally be used midway through your Telekinetic Blitzes to allow you to use 4 charges of Telekinetic Blitz in quick succession. Usually, you’ll either wait until you have 2 charges of Telekinetic Blitz that have come off cooldown normally, then after you’ve used 1 or both of them, use Force Speed followed by the two extra Telekinetic Blitzes you just got.
There is a minor bug that was never fixed from the set bonus. When you activate Force Speed, the cooldown on the current charge of Telekinetic Blitz is reset, so try to use Force Speed as soon as possible immediately after it has come off cooldown or wait an extra second or two before using Force Speed to let the current charge come off cooldown, though don’t let this get in the way of making sure you get your 4 Telekinetic Blitz uses.
One of the biggest challenges I’ve noticed with this set bonus is managing your Force. The average cost per GCD of each set of 4 Telekinetic Blitzes ends up being 22.5, which is cheaper than even your Force Armor, so you end up being able to go much longer before having to worry about managing your Force. It’s easy to just forget that you have to manage your Force at all until you run out.
Try your best to make sure you don’t go below 60 Force though or else you won’t be able to do a full channel of Healing Trance. While it certainly isn’t ideal, I often find myself using Force Potency on two Healing Trances so I can get 6 guaranteed Resplendence procs to get my Force back to a more comfortable level.
Telekinetic Blitz will likely take up about a third of your total GCDs provided you’re using it and Force Speed as often as possible. You probably won’t end up using Deliverance very much at all and will likely only end up using Benevolence if you get the Altruism proc from Salvation or Mind Crush, both of which are already used situationally, so you’ll really only be regularly using Telekinetic Blitz, Healing Trance, Wandering Mend, Rejuvenate, and Force Armor.
When Telekinetic Blitz isn’t available, just adhere to the regular healing priority, or if you want to go the extra mile and be truly optimal with using your strongest healing abilities as often as possible, weave your normal healing abilities in between your Telekinetic Blitzes. You can do 1 Healing Trance channel, 2 normal GCDs, or 1 normal GCD and 1 slightly longer Deliverance or Salvation cast in between each Telekinetic Blitz. You will get the most out of Telekinetic Blitz so long as you’re able to use a 4th Telekinetic Blitz to consume 3 charges of Empowered and always have at least 1 charge of Telekinetic Blitz on cooldown so you never have 3 charges of Telekinetic Blitz available. In order to do this, you will have to switch targets a lot. Generally I only do this if it’s absolutely necessary, like if I need to use Vindicate, bubble someone, or accidentally use Telekinetic Blitz before I am able to do it 4 times in a row.
I would also like to outline a few situations where Telekinetic Blitz + Metaphysical Mender should generally not be used:
- In fights where you need to use Phase Walk. In order to access Telekinetic Blitz, you have to give up Phase Walk, so if you’re using that ability for a mechanic, you can’t take Telekinetic Blitz.
- In fights where everyone is spread out or you have a composition with mostly rDPS. If the arena is very big, the 20m range on the smart heal might not be sufficient. You really don’t want to spend too much time trying to figure out where the player is with low health and then waste more time trying to figure out which boss is closest to that target. You really just want to tab target the boss and know that Telekinetic Blitz will heal the person that you want to heal.
- In fights with a lot of adds or multiple bosses. Players are also often fairly spread out on these sorts of fights, so it’s very easy to waste a lot of time trying to figure out which enemy to target. It’s fine to use Telekinetic Blitz in fights where you’re assigned to exclusively heal part of the group, like the Terror from Beyond.
- In fights with lots of spike damage or where non-tanks are frequently at very low health. With these sorts of fights, it can be difficult to guarantee that the smart heal will actually pick the right target. Tanks still tend to take a lot of damage in these sorts of fights but require more dedicated healing while non-tanks can be safely left alone for a short while. For example, if a tank is at 35% HP and a DPS is at 30%, the smart heal will choose to heal the DPS because they have lower health but triage indicates that the tank is in need of immediate healing because they are far more likely to take damage that could kill them.
As you can see, it usually comes down to situations where it’s difficult to heal the person you actually want to heal without just targeting them in the raid frame. In general, if you feel like Telekinetic Blitz is not healing the person you want to heal or you’re having to spend too much time trying to make sure it heals that person, don’t use Telekinetic Blitz + Metaphysical Mender.