This guide explains the best builds for Virulence, Engineering and Marksman Sniper disciplines that are optimized to perform extremely well in solo content. They enable you to have a far more enjoyable experience fighting trash mobs than you would with a sustained DPS build since you’ll be utilizing effects designed specifically for use against trash mobs!
Table of contents
Why solo builds are worth using in SWTOR
For almost the entirety of SWTOR’s history, fighting trash wasn’t fun because the combat system didn’t support it. Trash mob encounters rarely last more than a few seconds while boss fights and PvP typically last at least a few minutes, requiring you to make use of far more abilities.
In solo content, you’re mostly fighting trash mobs that have so little health that the majority of enemies won’t be able to survive for more than 2-3 abilities and you often can’t even get through a whole rotation before that combat encounter is over.
Stronger single enemies like elites (golds) where you would be able to stretch your rotational legs are rare enough that you can trivialize them with proper use of offensive cooldowns (OCDs) so even they don’t always survive a full rotation cycle.
I believe this disconnect was responsible for making skipping trash via stealth and cheese such a popular approach to playing PvE in SWTOR. BioWare clearly understood this and (mostly) solved it by introducing extremely powerful new ability tree buffs and legendary implants that synergize with existing tactical items.
These ridiculously potent effects form the basis of the solo builds and are able to exist without causing (too many) balance issues in group content because they are short-lived and only reliably trigger off of combat events that are fairly unique to and common when fighting trash mobs.
Virulence Sniper
In this section, I’ll be covering the ability tree build and solo ability priority for Virulence Sniper. Please refer to the 7.0 Virulence Sniper PvE Guide if you want more detailed information, especially on topics pertaining to gearing, abilities, and ability tree choices.
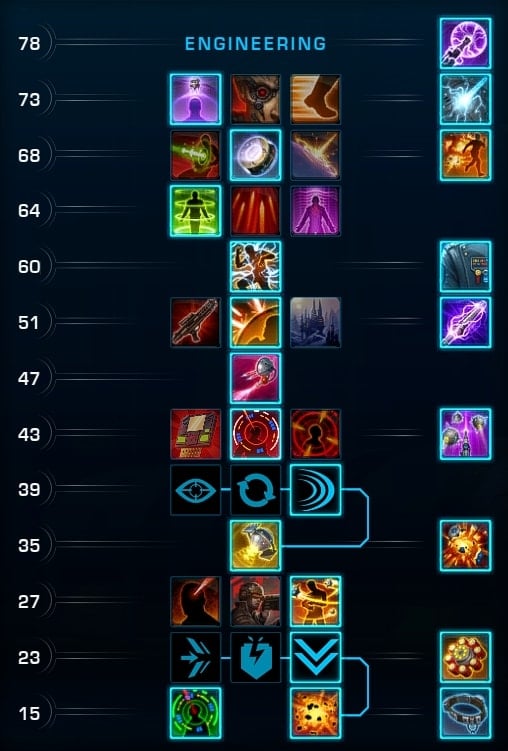
Virulence Solo Content Ability Tree Build
The Build Essentials are what I consider to be the core components that make the build viable. Without them, the build no longer accomplishes its primary function.
The ability tree buffs, implants, and tacticals that aren’t listed as Build Essentials can be changed as needed without compromising the integrity of the build. However, I have included a full set of default choices that will be most consistently helpful in accomplishing what the build sets out to do.
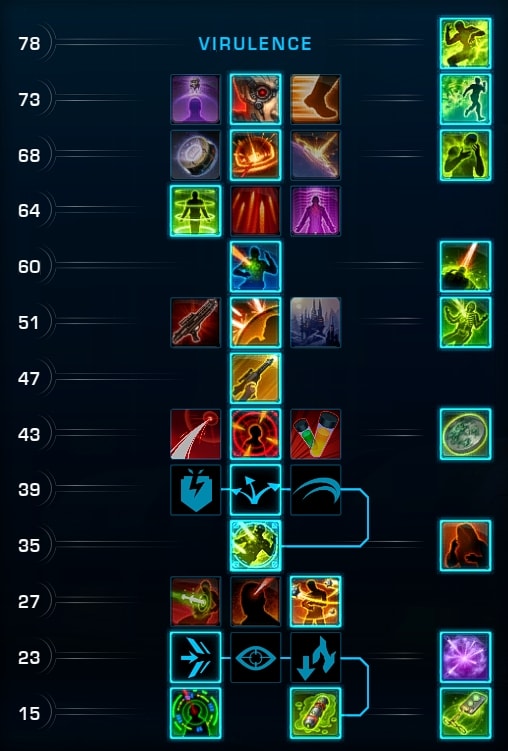
Build Essentials:![]() Corrosive Technologies
Corrosive Technologies Winnow
 Ballistic Dampers
 Hololocate OR
  Orbital Strike
 Locked and Loaded Implant
 Improved Targeting Implant
 Airborne Agents Tactical
This build enables you to poison and weaken every enemy in the immediate vicinity with Corrosive Dart -> Weakening Blast -> Corrosive Grenade and then pick off each target with a partial channel of Cull with each death creating a poison explosion.
Corrosive Grenade only has a 5m radius, so it’s hard to get the entire group with 1 throw, so you might need to lob multiple grenades to spread your Poisons to the whole group. Hopefully BioWare buffs the radius of Corrosive Grenade to 8m, but the ability has been this way for the entire lifetime of the game, so it probably won’t happen.
Since Winnow only resets the cooldown of Cull if you kill during Cull, you want to start with targets that have the lowest health and work your way up to the ones with the highest health. If there’s a Strong (silver) or Elite (gold) enemy in the group, be sure to activate Viral Targeting and Target Acquired (if applicable) as soon as you apply Weakening Blast. If you don’t think you’ll be able to snuff the life out of the target by the time Cull is over, throw in 1-2 Lethal Shots first.
I recommend switching between Orbital Strike and Hololocate as needed. Hololocate is great to teleport back if you just need to get into one area to click on something and then go back the way you came while Orbital Strike can be used in the meantime as a potent AoE attack since Hololocate has a 2 min cooldown.
How to use this build
This is the general rotation you’ll be using your abilities in against each group of trash in order to maximize your damage output.
 Orbital Strike (pre-cast, if applicable)
 Enter Cover
- Lethal Shot (pre-cast, if applicable)
- Corrosive Dart (DoT)
- Weakening Blast (DoT boost)
- Viral Targeting (makes DoTs autocrit)
- Corrosive Grenade (AoE DoT and spread)
- Lethal Shot (only when you don’t expect to finish anything off with Cull)
- Cull (finisher, repeat as needed)
 Orbital Strike (pre-cast, if applicable)
 Enter Cover
 Lethal Shot (pre-cast, if applicable)
 Corrosive Dart (DoT)
 Weakening Blast (DoT boost)
 Viral Targeting (makes DoTs autocrit)
 Corrosive Grenade (AoE DoT and spread)
 Cull (finisher, repeat as needed)
Orbital Strike’s usage is dependent on whether you have the ability available and/or want to use it on that set of trash mobs. I’d recommend saving it for groups that have a stronger enemy. Lethal Shot is in a similar boat. I’d hold off on using it unless there’s an enemy in the group that you think will need a bit more damage to take down. A lot of regular trash can be taken out with just the DoT spread + individual Culls.
Make sure you use Weakening Blast and Viral Targeting before Corrosive Grenade so that you can spread the Weakening Blast debuff and get the duration increase on Integrated Toxins from Corrosive Technologies.
Once you’re done with the opener in solo content, you’ll continue to Cull each enemy one by one until the whole group is dead. Remember to DoT spread from the target that is most central to the group so you hit the most targets, but when Culling enemies, start from the enemy with the lowest HP and work your way up, so you may end up Culling a different target than you threw Corrosive Grenade at.
If you don’t think you’ll be able to defeat the next enemy by the time the Cull channel has ended, spam Lethal Shot instead. In heroics and FPs, you might be able to get away with Culling first and it will come off cooldown by the time you’re done with Lethal Shots.
Engineering Sniper
In this section, I’ll be covering the ability tree build and solo ability priority for Engineering Sniper. Please refer to the 7.0 Engineering Sniper PvE Guide if you want more detailed information, especially on topics pertaining to gearing, abilities, and ability tree choices.
Engineering Solo Content Ability Tree Build
The Build Essentials are what I consider to be the core components that make the build viable. Without them, the build no longer accomplishes its primary function.
The ability tree buffs, implants, and tacticals that aren’t listed as Build Essentials can be changed as needed without compromising the integrity of the build. However, I have included a full set of default choices that will be most consistently helpful in accomplishing what the build sets out to do.
Build Essentials:
 Explosive Reset
 Shocking Blast
 Targeting Beam Ballistic Dampers Locked and Loaded Implant
 Ruthless Interrogation Tactical
Explosive Reset and Targeting Beam work together to ensure that you get to reuse an autocrit Explosive Probe against each enemy with Plasma Probe triggering the detonations.
I prefer using Ruthless Interrogation because you don’t need the small amount of extra AoE from MG-2 Polygrade Dispersal Caps on weaker enemies and you’ll have to use Interrogation Probe and Series of Shots on stronger enemies anyway and Interrogation Probe will help you take those beefier enemies down.
Shocking Blast offers a more consistent damage boost against stronger targets and makes the ability feel more punchy.
How to use this build
You only need a couple of abilities to take out standard and weak enemies, but the process is a bit more complex for stronger ones.
Standard and Weak Enemies Rotation (Regular Trash)
- Plasma Probe
 Targeting Systems ►
  Explosive Probe (repeat on each target)
 Plasma Probe
 Targeting Systems ►
  Explosive Probe (repeat on each target)
Against Standard and Weak Enemies, you’ll want to apply Plasma Probe first and then Targeting Systems + Explosive Probe to pop each enemy. Plasma Probe will detonate Explosive Probe while killing the enemy will reset the cooldowns on Targeting Systems and Explosive Probe.
You should be able to finish off a full set of trash under one Plasma Probe, but reapply it if that’s not the case.
Strong and Elite Enemies Rotation (mostly Heroics and Flashpoints)
- Orbital Strike (pre-cast, if applicable)
- Enter Cover
- Plasma Probe (AoE DoT)
- Interrogation Probe (single-target DoT)
- Targeting Systems ► Explosive Probe (single-target burst)
- Series of Shots (single-target channel)
- EMP Discharge (only if necessary, AoE burst)
- Fragmentation Grenade (if necessary, small AoE)
 Interrogation Probe (single-target DoT)
 Series of Shots (single-target channel)
 EMP Discharge (only if necessary, AoE burst)
 Fragmentation Grenade (if necessary, small AoE)
Against stronger enemies, you’ll want to apply Interrogation Probe first and follow up Explosive Probe with Series of Shots, and then, if necessary, EMP Discharge and Fragmentation Grenade. Plasma Probe should have fallen off right after you do EMP Discharge, but in order to actually sustain this, you’ll occasionally need to use Fragmentation Grenade to finish everything off.
We do this order because we want the DoTs to have as much time to tick as possible, have Explosive Probe drop its Cluster Bombs early, and be able to deal AoE damage with EMP Discharge, which is only usable against targets that are affected by Interrogation Probe (the EMP is emitted by the probe) and only deals AoE damage if they’ve been electrified by your Electrified Railgun.
Fragmentation Grenade happens to be free and deal a bit of AoE damage, so you might only need to use it on the first enemy you take down.
Marksmanship Sniper
In this section, I’ll be covering the ability tree build and solo ability priority for Marksmanship Sniper. Please refer to the 7.0 Marksmanship Sniper PvE Guide if you want more detailed information, especially on topics pertaining to gearing, abilities, and ability tree choices.
Marksmanship Solo Content Ability Tree Build
The Build Essentials are what I consider to be the core components that make the build viable. Without them, the build no longer accomplishes its primary function.
The ability tree buffs, implants, and tacticals that aren’t listed as Build Essentials can be changed as needed without compromising the integrity of the build. However, I have included a full set of default choices that will be most consistently helpful in accomplishing what the build sets out to do.
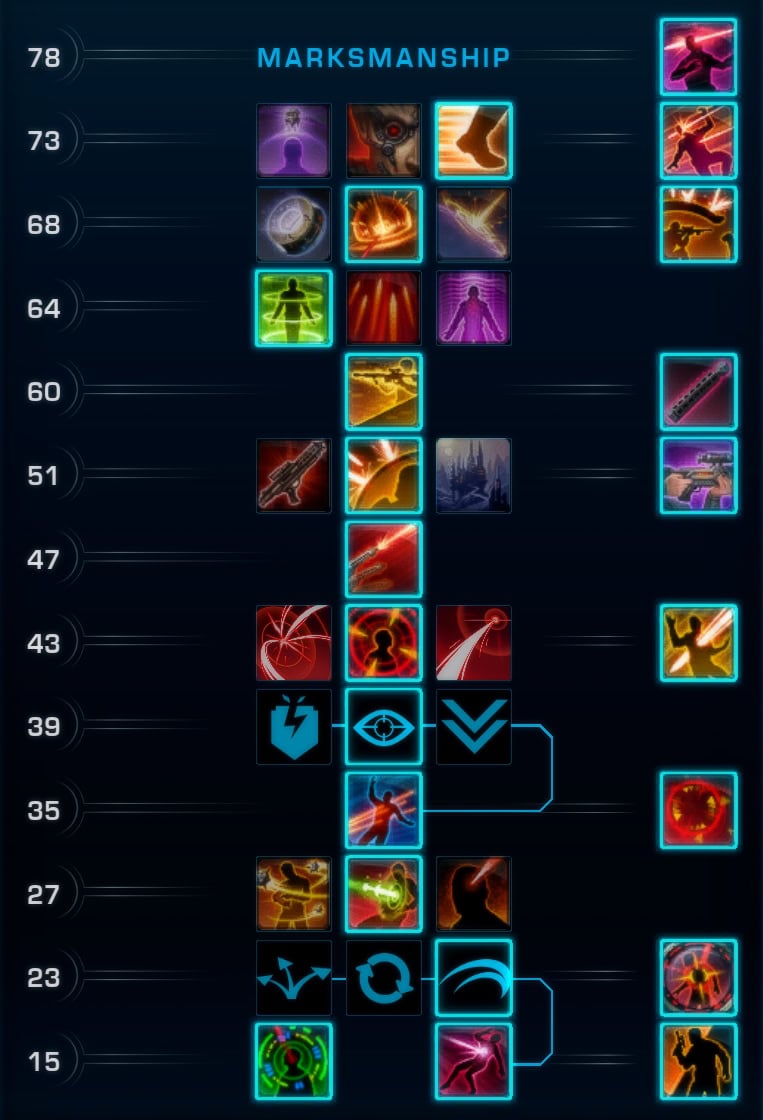
Build Essentials:
 Targeted Ambush
 Energy Barrel
 Target Acquired Ballistic Dampers Energy Regulators Second Wind
 Refraction Point
This build is super fun for solo content since it enables you to one-hit kill standard and weak enemies with Ambush autocrits, making you really feel like a Sniper. However, on higher-level planets, you will need to follow your autocrit Ambush up with Takedown or Followthrough since Ambush won’t quite be enough on its own.
In groups with higher-health enemies like you’ll find in Heroics, you can make use of the Refraction Point tactical, allowing Penetrating Blasts and its subsequent Followthrough to deal a ton of damage to multiple nearby targets. A single Penetrating Blasts channel + Followthrough can be enough to defeat Standard enemies even on max-level planets, though you might have to finish some off with Takedown.
Energy Barrel provides the greatest damage increase to Penetrating Blasts, and even though it makes the attack cost more Energy, it doesn’t matter because pulls are so short and you can rely on Adrenaline Probe and Sniper Volley to manage your Energy.
If you don’t want to worry about Energy at all, I recommend using Energy Regulators as your second implant. Alternatively, you can use Second Wind for increased survivability and mobility, or Improved Targeting if you want more reliably available Laze Targets. Locked and Loaded is also fine, but the effect is minimal.
How to use this build
I think it makes the most sense to think about Marksmanship in terms of the different ability sequences you can do since your most powerful abilities can have their cooldowns reset. Against stronger enemies on higher-level planets, you will need to chain these sequences together, meaning you have to put some thought into how to approach a given trash mob in order to maximize the amount of damage dealt.
Finishers: Ambush and Takedown Spam
- Enter Cover
- Laze Target ► Ambush
- Followthrough or Takedown (if necessary)
 Ambush
 Followthrough or
  Takedown (if necessary)
The cooldowns on Ambush and Laze Target are reset if you defeat whatever you hit with it within 3s (so 2 attacks if you’re fast) so long as Ambush critically hit, and it will autocrit if you use Laze Target.
Conversely, Takedown’s cooldown is only reset if your target is defeated specifically by Takedown, there’s no wiggle room. You will typically only need to use Takedown on max-level planets due to the absence of level sync. You can use Followthrough instead of Takedown as well, though Takedown hits harder and gives a damage boost, but Followthrough feels more fluid to use because you don’t need to wait for Ambush to land.
I recommend only using this combo if the enemy has less than ~100k HP. Otherwise, you won’t deal enough damage to finish them off and won’t get those juicy cooldown resets.
Sustained AoE: Penetrating Blasts and Followthrough
- Enter Cover
- Orbital Strike (pre-cast, if necessary)
- Penetrating Blasts
- Followthrough
- Takedown
- Sniper Volley (if necessary)
- Penetrating Blasts (if necessary)
- Followthrough (if necessary)
 Penetrating Blasts
 Sniper Volley (if necessary)
Against higher-HP enemies like you’ll find in heroics, you’ll need to use Penetrating Blasts and Followthrough to deal damage to multiple targets at the same time. These abilities deal AoE damage because of the Refraction Point tactical, though Followthrough only deals AoE damage if you manage to finish the channel on Penetrating Blasts and get the Refraction Point proc.
In other words, not every Followthrough will deal AoE damage. Keep in mind that a single channel of Penetrating Blasts + Followthrough is typically enough to defeat most normal enemies, with the damage being heavily weighted toward Penetrating Blasts
Be careful to fire both at the enemy with the highest HP that is located closest to the center of the group. If you hit an enemy towards the edge of the group, you won’t hit everything. If you hit an enemy with too little HP, the channel will get interrupted and you’ll miss out on dealing AoE damage with the final tick(s) of Penetrating Blasts and Followthrough.
If you’re using Orbital Strike, make sure you’re targeting a Strong or Elite (Silver or Gold) enemy or your target will die before the channel on Penetrating Blasts finishes.
Then, you spam Takedown to finish off stragglers and can also use Sniper Volley to reset the cooldown on Penetrating Blasts if multiple enemies still have a lot of HP left. Remember, Takedown only gets reset if you defeat your target with it, so if you aren’t sure if it’ll work, hit something else.
Fillers
If Ambush, Takedown, and/or Penetrating Blasts are unavailable or won’t be off cooldown in time for when you’d need to use them, you have some fillers at your disposal to help whittle down your opponents.
- Corrosive Dart (DoT)
- Snipe ► Snipe ► Followthrough
- Suppressive Fire
 Snipe ►
  Suppressive Fire
You shouldn’t need to use Suppressive Fire all that often unless you mess up, but you will need to incorporate Corrosive Dart, Snipe, and single-target Followthroughs against stronger enemies, particularly Elites (gold enemies).
Each Snipe makes your next Followthrough deal more damage and reduces the cast time on Ambush and 2 activations back-to-back will reset the cooldown on Followthrough and enable its use. If your target still has a lot of HP, you should be able to throw in an Ambush and Penetrating Shots as well, though only use Laze Target if you have a spare charge for the finisher.
Major Cooldown Abilities for Snipers
These abilities offer some sort of temporary boost to your offense, defense, and/or mobility. They are referred to as cooldowns (CDs) because they usually only last a short time while having a long cooldown.
You may want to group each category together on your bar so you can recognize them more easily, though keep them separate from the attacks I listed above.
Offensive Cooldowns
Offensive cooldowns (OCDs) increase your damage dealt temporarily. Sometimes they’re more generic boosts to everything, other times they only apply to specific abilities. It’s important to make sure you’re being thoughtful about which abilities you use and try to use them as fast as possible while the boost is active to maximize their effectiveness. Use them against stronger enemies to defeat them faster.
Viral Targeting, Targeting Systems, and Laze Target
All 3 disciplines have an ability that has a similar core effect of enabling a specific attack to autocrit (Cull for Virulence, Explosive Probe for Engineering, and Ambush for Marksmanship) and a bonus effect that’s discipline-specific. For Engineering and Marksmanship, you want to make sure that you’re pairing this ability with every single activation of Explosive Probe or Ambush respectively since it enables you to one-shot most enemies.
Virulence is a bit more unique since it doesn’t have a cooldown and the bigger benefit is from the ongoing autocrit to DoT ticks, and you’ll want to use it before Corrosive Grenade rather than Cull.
Target Acquired (Virulence only)
 Target Acquired (Virulence only)
Target Acquired’s most beneficial effect is to reset the cooldown on Viral Targeting, though it also boosts your weapon damage from attacks like Weakening Blast, Cull, and Lethal Shot. Only use it if Viral Targeting is on cooldown and only right before Corrosive Grenade.
Defensive Cooldowns
Defensive cooldowns (DCDs) increase your survivability temporarily, making it less likely that you’ll be defeated. Use them whenever you’re taking more damage than you can handle.
Shield Probe
 Shield Probe
Shield Probe just absorbs a small amount of damage. It’s nice to use to soften the blow if you know you’re about to take a big hit or can’t afford to take another.
Entrench
 Entrench
Entrench makes you immune to crowd control and reduces the damage you take from AoE attacks by a massive amount. If enemies are knocking you around, try to stun you, or use a ton of AoE abilities, use Entrench to ignore it.
Marksmanship gains 3s of Entrench after rolling with
Countermeasures
 Countermeasures
Countermeasures is your most powerful defensive cooldown, but it only lasts a short time, so it really only works against singular attacks. You are guaranteed to avoid the damage from weapon attacks like blasterfire and lightsaber swings while significantly reducing the damage taken from Force and tech attacks.
Meticulous Preparation
 Meticulous Preparation
Meticulous Preparation resets the cooldowns on the DCDs I just listed, Shield Probe, Entrench, and Countermeasures, as well as Cover Pulse. If you feel you need more survivability and are out of cooldowns, don’t hesitate to pop this.
Crowd Control
These abilities have some sort of controlling effect on your opponent that often provide some sort of defensive benefit to you.
Distraction
 Distraction
This ability can interrupt your target’s cast or channel and locks them out of activating that ability again for a short time. Typically the longer or more threatening-sounding the ability is, the more important it is to interrupt.
Cover Pulse
 Cover Pulse
Cover Pulse is a 360-degree knockback that roots targets for 5s, though the root breaks on damage. If you’re feeling overwhelmed by a bunch of melee enemies, consider using this, though be careful, as you likely won’t be able to use AoE against the whole group anymore because they’ll all be separated.
Diversion
 Diversion
Diversion causes you to throw a smoke bomb that reduces enemy accuracy significantly, making enemies more likely to miss. Throw this if you’re getting shot by a bunch of enemies in a small area.
Mobility
These cooldowns allow you to move much faster than you would normally be able to go.
Covered Escape
 Covered Escape
Covered Escape makes you roll forwards 18m (your max range is 35m) and makes you immune to all damage while rolling. It’s a powerful ability to avoid big hits and get out of dodge, but it can be difficult to time.
You can use Countermeasures to reset the cooldown of Covered Escape thanks to the Evasive Maneuvers ability tree buff.
Escape
 Escape
This ability breaks you out of any controlling effects. Since it has such a long cooldown, only use it if you are prevented from doing what you want to do. For example, if you’re rooted in place but can still hit your target, there’s no need to break free.
Countermeasures
Countermeasures also boosts your movement speed significantly for a few seconds, purges movement-impairing effects, and make you immune to them for the duration. It’s unlikely that you’ll be able to make use of these effects at the same time as the mitigation, so you have to decide how you want to use it.
Sniper Solo Gearing and Stats
This section will cover the core elements of gearing and stats for Sniper. If you want a more detailed explanation, please refer to the main Virulence, Engineering, and Marksmanship PvE guides. Don’t forget to obtain the legendary implants and tactical items I mentioned when referring to individual disciplines!
Stat Priority
As a DPS, you’ll need to care about 3 different stats: Accuracy, Alacrity, and Critical Rating. There are thresholds associated with Accuracy and Alacrity, so you need to prioritize reaching those thresholds to get the full benefit from each stat point.
- Accuracy to 110.00% – Accuracy reduces the chance for your attacks to miss.
- Alacrity to ~7.5% – Alacrity holistically increases the speed at which you can execute your rotation.
- Critical gets the rest – Critical refers to both your chance to critically hit and the damage multiplier for critical hits. Critical Rating affects both.
Find out which mods to purchase from Hyde and Zeek in SWTOR on the Fleet to minimize spending and optimize your build. The dedicated guide contains tips for all roles in both PvE and PvP.
Individual Pieces
- Augments: Blue 296 augments ([Type] Augment 83 + Augmentation Kit Mk-11)
- Crystals: Advanced Eviscerating (+41 Critical)
- Relics: Relic of Focused Retribution and Relic of Devastating Vengeance (highest iRating you have)
- Biochem: Advanced Kyrprax Medpac, Proficient Stim, and Critical Adrenal
I recommend a Relic and Adrenal that boost your critical chance for solo content because, unlike Power, Critical Rating isn’t capped by level sync.