This guide explains the best solo builds for Juggernaut Vengeance and Rage Disciplines in SWTOR that are optimized to perform extremely well in solo content. They enable you to have a far more enjoyable experience fighting trash mobs than you would with a sustained DPS build since you’ll be utilizing effects designed specifically for use against trash mobs!
Table of contents
Why solo builds are worth using in SWTOR
For almost the entirety of SWTOR’s history, fighting trash wasn’t fun because the combat system didn’t support it. Trash mob encounters rarely last more than a few seconds while boss fights and PvP typically last at least a few minutes, requiring you to make use of far more abilities.
In solo content, you’re mostly fighting trash mobs that have so little health that the majority of enemies won’t be able to survive for more than 2-3 abilities and you often can’t even get through a whole rotation before that combat encounter is over.
Stronger single enemies like elites (golds) where you would be able to stretch your rotational legs are rare enough that you can trivialize them with proper use of offensive cooldowns (OCDs) so even they don’t always survive a full rotation cycle.
I believe this disconnect was responsible for making skipping trash via stealth and cheese such a popular approach to playing PvE in SWTOR. BioWare clearly understood this and (mostly) solved it by introducing extremely powerful new ability tree buffs and legendary implants that synergize with existing tactical items.
These ridiculously potent effects form the basis of the solo builds and are able to exist without causing (too many) balance issues in group content because they are short-lived and only reliably trigger off of combat events that are fairly unique to and common when fighting trash mobs.
Vengeance Juggernaut Solo Build
In this section, I’ll be covering the ability tree build and solo ability priority for Vengeance Juggernaut. Please refer to the 7.0 Vengeance Juggernaut PvE Guide if you want more detailed information, especially on topics pertaining to gearing, abilities, and ability tree choices.
Vengeance Solo Content Ability Tree Build
The Build Essentials are what I consider to be the core components that make the build viable. Without them, the build no longer accomplishes its primary function.
The ability tree buffs, implants, and tacticals that aren’t listed as Build Essentials can be changed as needed without compromising the integrity of the build, though I have included a full set of default choices that will be most consistently helpful in accomplishing what the build sets out to do.
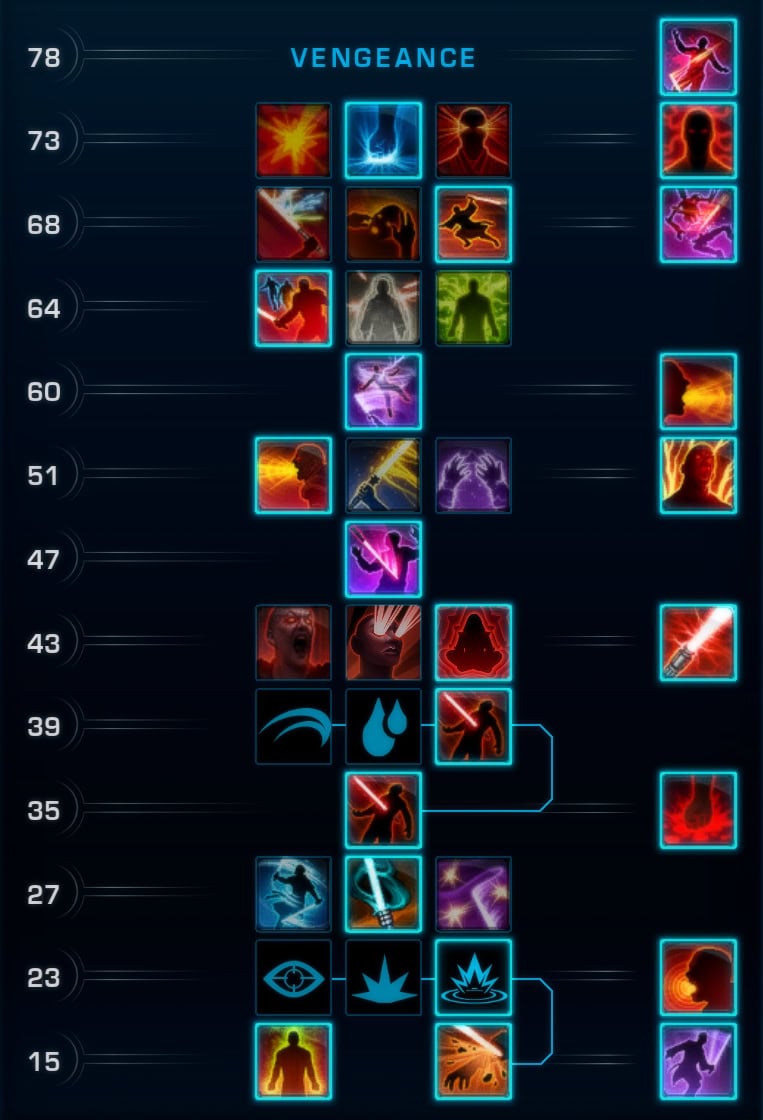
Build Essentials:
 Shattering Burst
 Projected Scream
 Blood Rites
 War Master
 Crushing Fist
 Cut to Pieces Tactical
 Champion’s Precision Implant Fearless Victor Implant
Many of the essentials I recommend offer gargantuan boosts to your AoE potential that synergize together to offer additional damage throughout entire combat encounters.
To those of you that are seasoned Vengeance Juggernauts, Blood Rites may stick out as an odd recommendation given how Bloodbound is the better option practically everywhere else. However, in conjunction with the Champion’s Precision implant and the Seething Hatred combat style passive, Blood Rites effectively makes your DoTs have a 100% chance to crit and the buff will have practically 100% uptime thanks to the cooldown reset and long duration.
Cut to Pieces, Shattering Burst, and Projected Scream are the biggest parts of this build though because they enable you to do a ton of direct AoE damage while spreading your DoTs with ease.
As iconic as it is, I don’t recommend using Saber Reflect for solo content for Vengeance, at least not outside of Heroics. Most adds get stunned by Vengeful Slam and don’t even hit very hard in the first place, but the damage can be enough to prevent you from DoT spreading, so it really doesn’t do much besides destabilize your rotation. Meanwhile, Mad Dash offers a nice boost of mobility and extra AoE attack.
How to use this build
The following opener should be more than enough to get through anything outside of max level heroics and such.
 Force Charge
- Sundering Assault (if necessary)
- Shatter (on healthiest, centermost target)
- Vengeful Slam
- Bloodrage (not on GCD)
 Force Scream (at centermost target)
- Sweeping Slash (if hitting at least 3 targets)
- Impale (as needed)
- Hew (as needed)
- Vengeful Slam
 Filler Abilities Priority
 Force Charge
 Sundering Assault (if necessary)
 Shatter (on healthiest, centermost target)
 Vengeful Slam
 Bloodrage (not on GCD)
 Force Scream (at centermost target)
 Sweeping Slash (if hitting at least 3 targets)
 Impale (as needed)
 Hew (as needed)
Standard enemies will die by the time you use Force Scream, and Strong enemies can be finished off with Impale, Hew, and the second Vengeful Slam. They may die sooner depending on the effectiveness of Shatter Burst.
Make sure to apply Shatter to the healthiest, centermost enemy so that you can DoT spread to as many enemies as possible with Vengeful Slam.
Since Shatter is your hardest-hitting DoT and Force Scream deals more damage if it’s buffed by Champion’s Precision, you want to use Bloodrage after DoT spreading but before Force Scream.
It’s more important to get those abilities on cooldown ASAP than trying to insert Impale before spreading. You probably won’t get off more than one activation before combat ends, regardless of when you use it.
Impale and Hew are your longer-range high damage options that you can use to defeat targets that missed some of your AoE damage, compensate for attacks not critting, and helping to drop the HP of stronger enemies.
You have time for 3 GCDs before Vengeful Slam will be back off cooldown, so you can use Impale, Hew, and even Sweeping Slash depending on what you need to accomplish.
The more enemies that are on the ground before Shatter falls off, the better.
Filler Priority
Combat will last longer if you’re doing harder content like Heroics, and the rotation starts to break down at that point, so you have to start throwing in filler abilities after your second Vengeful Slam.
- Vengeful Slam
- Hew
- Return to Opener Abilities
- Sweeping Slash (if hitting at least 3 targets)
- Ravage
- Retaliate (if available and you care)
 Ravage
 Retaliate (if available and you care)
Something will be back up before you can do everything in the filler priority. Just incorporate those abilities as they become available, treating the opener as a sort of superior priority list.
Rage Juggernaut Solo Build
In this section, I’ll be covering the ability tree build and solo ability priority for Rage Juggernaut. Please refer to the 7.0 Rage Juggernaut PvE Guide if you want more detailed information, especially on topics pertaining to gearing, abilities, and ability tree choices.
Rage Solo Content Ability Tree Build
The Build Essentials are what I consider to be the core components that make the build viable. Without them, the build no longer accomplishes its primary function.
The ability tree buffs, implants, and tacticals that aren’t listed as Build Essentials can be changed as needed without compromising the integrity of the build, though I have included a full set of default choices that will be most consistently helpful in accomplishing what the build sets out to do.
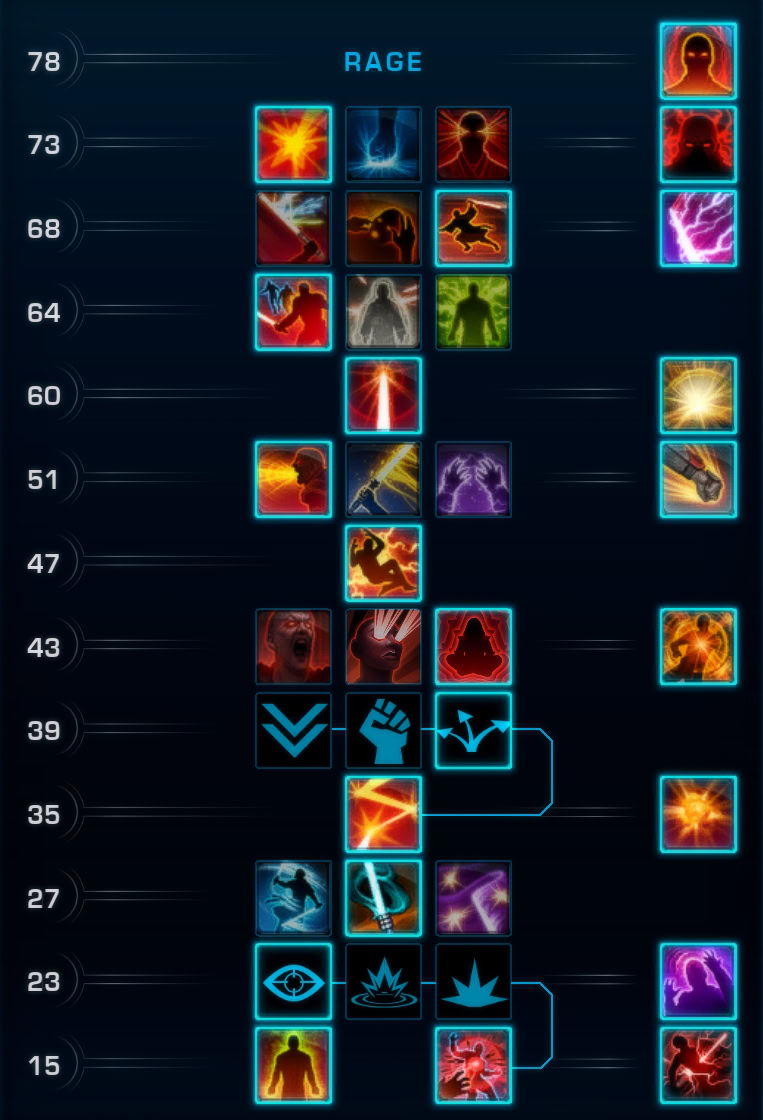
Build Essentials:
 Obliteration
![]() Indignant Rumination War Master
Indignant Rumination War Master Enrage Crush Tactical Champion’s Precision Implant Fearless Victor Implant
The Rage solo emphasizes resetting or turning off the cooldown of your strongest attacks boosting the damage they deal. You have unparalleled flexibility to focus a massive amount of your damage into a single target or spread it over a wider area to damage a whole group.
This absolutely exceptional amount of control over where your damage goes does mean that Rage is considerably harder to learn and play than another solo build, but practically everything you learn will prepare you for group content if you end up wanting to do that. This complexity really only comes up in heroics and FPs though since combat doesn’t last long enough outside of those situations.
Indignant Rumination and Obliteration are what enable you to ignore cooldowns. Indignant Rumination makes it so abilities that cost Rage don’t have a cooldown while Enrage is active and Enrage lasts 6s. Obliteration makes it so defeating an enemy within 3s of dealing damage with Obliterate resets the cooldowns on Raging Burst, Smash, and Obliterate, and makes them deal more damage for the next 6s, though you can’t reset the cooldowns again while the damage boost is active.
The other essentials are more general but still have significant damage boosts. Dark Synergy offers higher overall sustained DPS, which is nice for bosses, though it’s harder to use because you need to incorporate Smash instead of being able to rely solely on Focused Burst as you can with Subjugate. If you opt for Subjugate, use Pooled Hatred instead of Crushing Fist for your level 73 choice.
Projected Scream and Extending Roar give you a longer-range AoE Force Scream, and you can spam Scream from range 4 times in a row with Indignant Rumination, though this is weaker than your other AoE, so I don’t consider either choice to be essential.
How to use this build
I think it makes the most sense to think about Rage in terms of the different ability sequences you can do since you don’t have to worry about cooldowns while Enrage is active. Against stronger enemies on higher-level planets, you will need to chain these sequences together or finish enemies off with other attacks.
Enraged Crush AoE
This is the main sequence that will be enough to take out most groups of trash outside of heroics and FPs.
- Force Charge (to enter combat and for autocrit)
- Enrage (for Rage generation and Indignant Rumination)
- Force Crush (against healthiest and most central enemy)
- Smash (with Dark Synergy) or Raging Burst (with Subjugate)
- Obliterate (to something you can defeat within 2 GCDs)
- Force Crush (against healthiest and most central enemy)
- Smash (with Dark Synergy) or Raging Burst (with Subjugate)
 Force Charge (to enter combat and for autocrit)
 Enrage (for Rage generation and
  Force Crush (against healthiest and most central enemy)
  Smash (with
  Dark Synergy) or
  Raging Burst (with
  Obliterate (to something you can defeat within 2 GCDs)
The main idea is you’re using Enrage with Indignant Rumination to go through and do Enrage Crush twice. The Force Charge and Obliterate are essential because they make your Smashes / Raging Bursts autocrit.
The Force Crushes will deal AoE damage, though you do need to be quick about it because it only deals AoE damage if you hit the target you applied it to with Smash or Raging Burst.
If any enemies are left standing, you can finish them off individually with Furious Strike and/or another Obliterate ▶ Raging Burst. When you exit combat, the cooldowns on Force Charge and Enrage are reset, though notably not Force Crush.
Single-Target Burst
This is the sequence to use if you want to focus a ton of damage into a single target. You should be able to take out a strong enemy or weaker and should be able to proc Obliteration to reset the cooldown on Obliterate, Raging Burst, and Smash.
- Enrage
- Obliterate
- Raging Burst
- Obliterate
- Raging Burst (defeats target)
- Obliterate (boosted by Obliteration)
- Raging Burst (boosted by Obliteration)
You may defeat something earlier, which is fine, but it’s a bit wasteful. Only the first Raging Burst will be free and deal 15% more damage thanks to the Shockwave proc, though the damage will actually be higher on subsequent activations because they’ll benefit from Dark Synergy (if you’re taking that).
Scream Spam
This isn’t optimal, it’s just a fun one for when you want to channel your inner Vaylin with repeated screaming. Thanks to Projected Scream and Extending Roar, you’ll be able to deal AoE damage to targets up to 30m away.
- Obliterate or Force Charge (for autocrit)
- Force Crush (optional)
- Force Push (optional)
- Raging Burst or Smash
- Enrage
- Force Scream
- Force Scream
- Force Scream
- Force Scream
 Force Push (optional)
 Force Scream
You can technically skip to Enrage if you want, but you’ll be missing out on some significant damage boosts like Dark Synergy and Cascading Power.
If you really enjoy this sequence, consider using the Joiner’s Pressure tactical instead, which makes it so you deal 20% more damage for 10s after using Force Push against a target affected by Force Crush. I personally don’t enjoy it because the cooldown on Force Push is too long and the timing is really tight, but you do you.
Dedicated Finishers
These attacks are either not used as often in the attack sequences or are otherwise often available while dealing a high amount of damage. If an enemy has a bit of remaining HP, you can use 1-2 of these to finish them off.
- Furious Strike
- Vicious Throw
- Force Scream
- Retaliation
- Obliterate (for Obliteration proc)
 Furious Strike
 Vicious Throw
To be clear, it’s fine to finish enemies off with other attacks, but you will run into situations where you’ll need another hit. If you know something will take 2 hits, try your best to incorporate Obliterate so you get the Obliteration proc.
Major Cooldown Abilities for Juggernauts
These abilities offer some sort of temporary boost to your defense, mobility, or control. They are called cooldowns (CDs) because they usually only last a short time while having a long cooldown. I am not covering abilities that are optional or not useful in solo content.
You may want to group each category together on your bar so you can recognize them more easily, though keep them separate from the attacks I listed above.
Defensive Cooldowns
Defensive cooldowns (DCDs) increase your survivability temporarily, making it less likely that you’ll be defeated. Use them whenever you’re taking more damage than you can handle.
Endure Pain
 Endure Pain
Endure Pain removes all cleansable debuffs and increases your HP by 30% for 10s. Once 10s have elapsed, you lose 30% HP. It’s useful if you have to cleanse something like a painful DoT or survive just a little bit longer.
Enraged Defense
 Enraged Defense
Enraged Defense makes you heal each time you take damage, up to 12 times for the next 15s. If you’re taking frequent hits, as you often are against trash mobs, you’ll heal to full quickly. You can’t use Enraged Defense unless you have less than 70% HP, but it’s good to use after Endure Pain, which will conveniently remove 30% of your HP.
Saber Ward
 Saber Ward
Saber Ward has a long cooldown but actually prevents you from taking damage instead of just healing you. While it’s active, you’ll be significantly more likely to completely avoid the weapon attacks and are guaranteed to absorb a quarter of all damage you take from Force and tech attacks. For the first 2 seconds, you will completely avoid all weapon damage.
Crowd Control
These abilities have some sort of controlling effect on your opponent that often provide some sort of defensive benefit to you.
Disruption
 Disruption
This ability can interrupt your target’s cast or channel and locks them out of activating that ability again for a short time. Typically the longer or more threatening-sounding the ability is, the more important it is to interrupt.
Force Choke
 Force Choke
Force Choke hard stuns your target for 4s. It also deals a small amount of damage and generates 3 Rage over its duration. It has a long cooldown, so I recommend using it defensively to prevent yourself from being overwhelmed or to interrupt an attack if Disruption is on cooldown.
Force Push
This is your knockback, it has a fairly long cooldown, but it really yeets the target and deals a moderate amount of damage too. Force Push also resets the cooldown on Force Charge, so if you really need, you can use Force Push to interrupt, and then follow it up with Force Charge to interrupt again. Since neither attack deals that much damage, this maneuver isn’t worth using if they aren’t doing anything you’d want to interrupt.
Mobility
These cooldowns allow you to move much faster than you would normally be able to go.
Force Charge
This ability causes you to leap at your enemy target, generate 3 Rage, and deal a small amount of damage. If you’re taking War Master, it also lets Hew or Vicious Throw become usable against targets at any health level. In Rage, it makes your next Raging Burst or Smash autocrit.
Intercede
 Intercede
Intercede makes you leap to a friendly target, lower their threat, and reduce their damage taken by 20% for 6s. Technically you can leap to your companion, but it’s not worth it unless they’re far away. In solo content, I find it to be most useful just to leap to friendly NPCs to reach mission objectives faster.
Unleash
 Unleash
This ability breaks you out of any controlling effects. Since it has such a long cooldown, only use it if you are prevented from doing what you want to do. For example, if you’re rooted in place but can still hit your target, there’s no need to break free.
Juggernaut Solo Gearing and Stats
This section will cover the core elements of gearing and stats for Juggernaut. If you want a more detailed explanation, please refer to the main guides for Vengeance Juggernaut and Rage Juggernaut. Don’t forget to obtain the legendary implants and tactical items I mentioned when referring to individual disciplines!
Stat Priority
As a DPS, you’ll need to care about 3 different stats: Accuracy, Alacrity, and Critical Rating. There are thresholds associated with Accuracy and Alacrity, so you need to prioritize reaching those thresholds to get the full benefit from each stat point.
- Accuracy to 110.00% – Accuracy reduces the chance for your attacks to miss.
- Alacrity to ~7.5% – Alacrity holistically increases the speed at which you can execute your rotation.
- Critical gets the rest – Critical refers to both your chance to critically hit and the damage multiplier for critical hits. Critical Rating affects both.
Find out which mods to purchase from Hyde and Zeek in SWTOR on the Fleet to minimize spending and optimize your build. The dedicated guide contains tips for all roles in both PvE and PvP.
Individual Pieces
- Augments: Blue 296 augments ([Type] Augment 83 + Augmentation Kit Mk-11)
- Crystals: Advanced Eviscerating (+41 Critical)
- Relics: Relic of Focused Retribution and Relic of Devastating Vengeance (highest iRating you have)
- Biochem: Advanced Kyrprax Medpac, Proficient Stim, and Critical Adrenal
I recommend a Relic and Adrenal that boost your critical chance for solo content because, unlike Power, Critical Rating isn’t capped by level sync.