This guide explains the best builds for Commando DPS disciplines that are optimized to perform extremely well in solo content.
The builds enable you to have a far more enjoyable experience fighting trash mobs than you would with a sustained DPS build since you’ll be utilizing effects designed specifically for use against trash mobs!
Table of contents
Why solo builds are worth using in SWTOR
For almost the entirety of SWTOR’s history, fighting trash wasn’t fun because the combat system didn’t support it. Trash mob encounters rarely last more than a few seconds while boss fights and PvP typically last at least a few minutes, requiring you to make use of far more abilities.
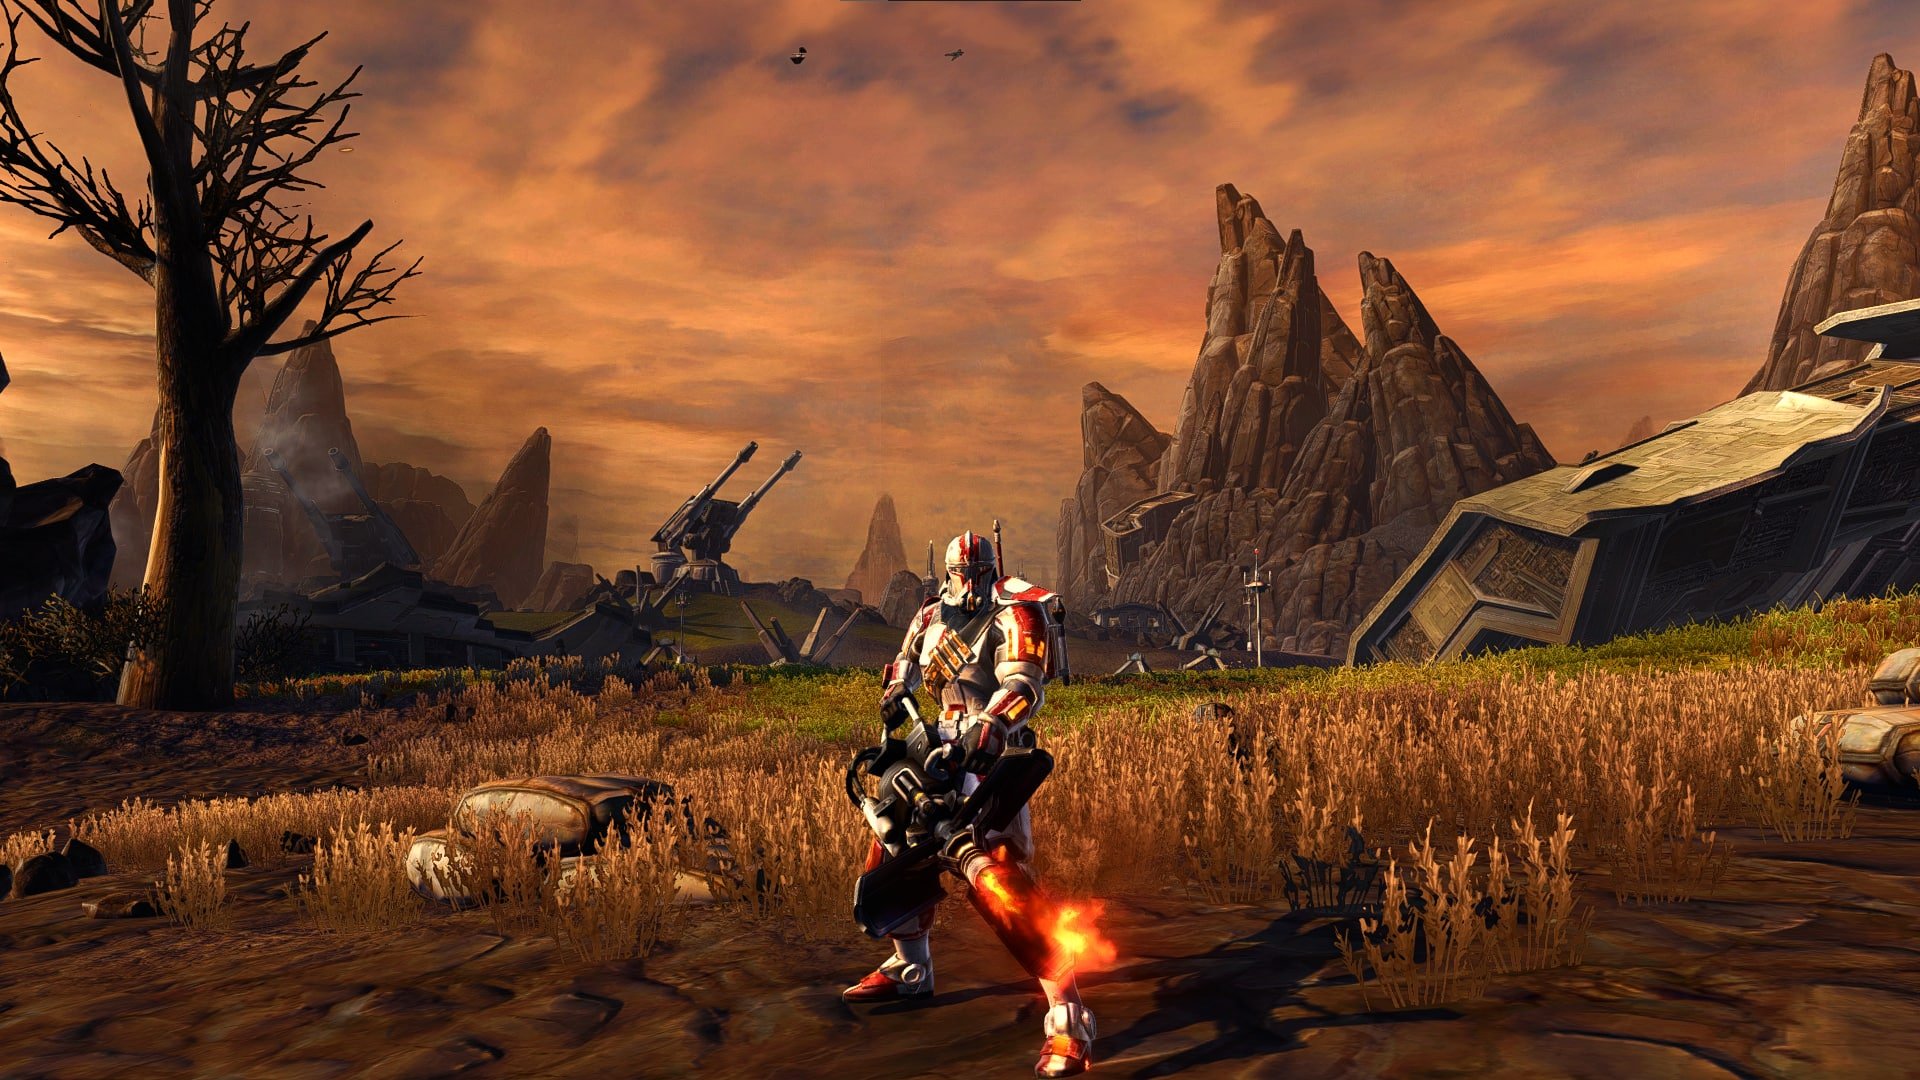
In solo content, you’re mostly fighting trash mobs that have so little health that the majority of enemies won’t be able to survive for more than 2-3 abilities and you often can’t even get through a whole rotation before that combat encounter is over.
Stronger single enemies like elites (golds) where you would be able to stretch your rotational legs are rare enough that you can trivialize them with proper use of offensive cooldowns (OCDs) so even they don’t always survive a full rotation cycle.
I believe this disconnect was responsible for making skipping trash via stealth and cheese such a popular approach to playing PvE in SWTOR. BioWare clearly understood this and (mostly) solved it by introducing extremely powerful new ability tree buffs and legendary implants that synergize with existing tactical items.
These ridiculously potent effects form the basis of the solo builds and are able to exist without causing (too many) balance issues in group content because they are short-lived and only reliably trigger off of combat events that are fairly unique to and common when fighting trash mobs.
Gunnery Commando Solo Build
In this section, I’ll be covering the ability tree build and solo ability priority for Gunnery Commando. Please refer to the 7.0 Gunnery Commando PvE Guide if you want more detailed information, especially on topics pertaining to gearing, abilities, and ability tree choices.
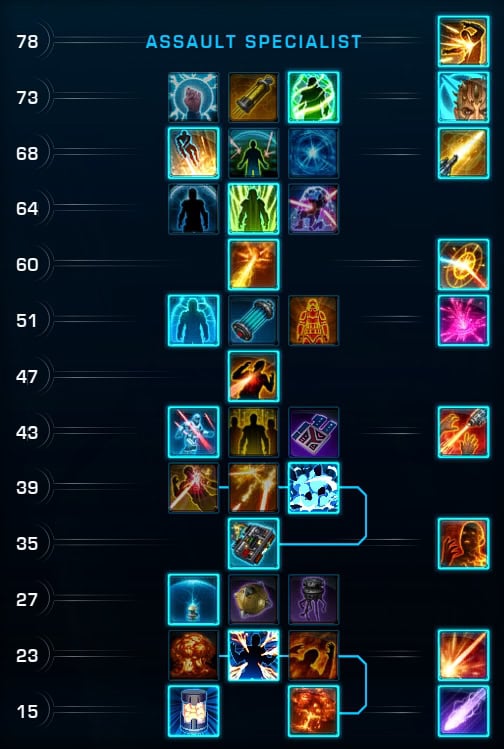
Gunnery Solo Content Ability Tree Build
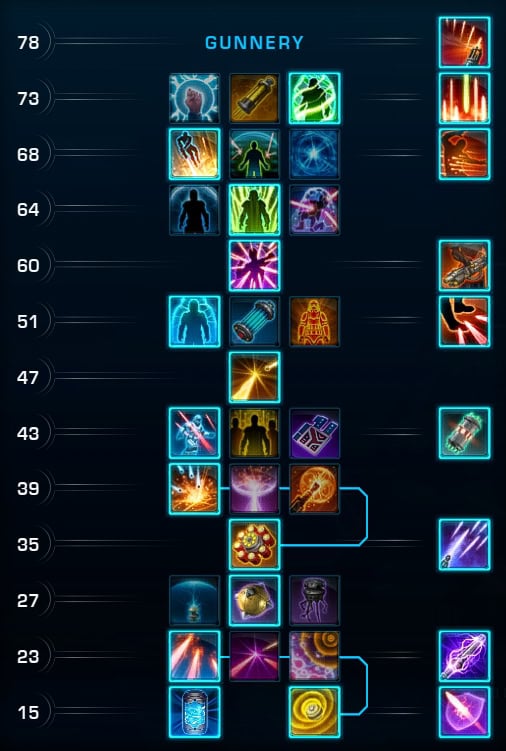
Build Essentials:
![]() Grav Trio
Grav Trio![]() Thermonuclear Plasma
Thermonuclear Plasma Diversion
 Reflexive Shield
![]() Adrenal Surge
Adrenal Surge![]() Trauma Stabilizers
Trauma Stabilizers Overcharged Cells Implant
 Concentrated Fire Implant
 Gyroscopic Stabilizers Tactical
With this build, you’ll be able to fire loads of explosives at everyone while having a substantial amount of survivability and mobility. The damage and multi-target potential of your explosives are dependent on whether or not the enemies are affected by your Gravity Vortex debuff.
Gravity Vortex can be applied by Grav Round (which will hit up to 3 targets with Grav Trio) and spread with Plasma Grenade. Demolition Round and Mortar Volley deal more damage to targets affected by your Gravity Vortex and Demolition Round fires additional weaker rounds at secondary targets affected by your Gravity Vortex.
How to use this build
This is the general rotation you’ll be using your abilities in against each group of trash in order to maximize your damage output. You are slightly limited by ability cooldowns being too long, though you should be able to do this against most groups of trash.
 Grav Round (pre-cast)
 Supercharged Cell (if available)
 - Tech Override (if available and using Plasma Grenade)
- Plasma Grenade (if needed to spread Gravity Vortex)
- Grav Round (only if Plasma Grenade is not instant)
- Demolition Round (against highest HP target)
- Mortar Volley (AoE)
- Vortex Bolt (finisher)
- Boltstorm (finisher)
- Grav Round (for procs)
- High Impact Bolt (finisher)
- Boltstorm (finisher)
 Grav Round (pre-cast)
 Supercharged Cell (if available)
  Tech Override (if available and using
  Plasma Grenade)
 Demolition Round (against highest HP target)
 Mortar Volley (AoE)
 Vortex Bolt (finisher)
 Boltstorm (finisher)
 High Impact Bolt (finisher)
The main idea here is to start by applying Gravity Vortex to everything and then use the abilities that benefit from Gravity Vortex being applied and deal damage to multiple targets.
Grav Round with Grav Trio is enough for groups of trash that have 3 enemies or fewer, but sometimes you need to include Plasma Grenade to spread it to everything, especially if there are more than 3 targets. The travel time on Plasma Grenade is long, so Gravity Vortex won’t be spread by the time you can fire Demolition Round unless you use Tech Override to make it instant or do another attack in between Plasma Grenade and Demolition Round.
After you’ve done Demolition Round or if that ability is on cooldown, you can use Mortar Volley, which will be enough to finish off most Standard and Weak enemies. The only things left standing will be stronger enemies or those that didn’t get hit by everything.
You can finish those enemies off with Vortex Bolt, Boltstorm, and High Impact Bolt. Make sure to only use High Impact Bolt only when you have 4+ stacks of the Charged Barrel proc. If you don’t think 4 stacks will be enough to take it out, use a Grav Round first to build the 5th stack. If you used Supercharged Cell earlier and you have obtained the Concentrated Fire legendary implant, your High Impact Bolt will autocrit.
Assault Specialist Commando Solo Build
In this section, I’ll be covering the ability tree build and solo ability priority for Assault Specialist (AS) Commando. Please refer to the 7.0 Assault Specialist Commando PvE Guide if you want more detailed information, especially on topics pertaining to gearing, abilities, and ability tree choices.
Assault Specialist Solo Content Ability Tree Build
Build Essentials:
![]() Eruptive Flames
Eruptive Flames![]() Heavy Shrapnel Diversion Reflexive Shield
Heavy Shrapnel Diversion Reflexive Shield![]() Adrenal Surge
Adrenal Surge![]() Trauma Stabilizers Overcharged Cells Implant Concentrated Fire Implant
Trauma Stabilizers Overcharged Cells Implant Concentrated Fire Implant Energized Charges Tactical
Similar to Gunnery, this build boosts your survivability, mobility, and AoE potential. The AoE damage boost primarily comes from enabling some of your core single-target abilities to deal AoE damage. Unlike Gunnery, AS is better suited to heroics and FPs because it takes more time to set up the damage.
The idea is to light an enemy on fire, make them bleed, and then spread those effects to the whole group. While they’re burning and bleeding, you can focus down the stronger enemies with single-target abilities.
Both implants and the tactical I recommend synergize with each other to strengthen Supercharged Cell. Technically, you can use the Continuous Fire tactical instead of Energized Charges, but the AoE DPS increase isn’t super huge or ever essential. Meanwhile, Energized Charges provides a massive boost to your single target damage output, allowing you to finish off those pesky Elites (golds) a lot faster.
How to use this build
This is the general rotation you’ll be using your abilities in against each group of trash in order to maximize your damage output.
 Serrated Bolt (pre-cast, DoT 1)
- Incendiary Round (DoT 2)
- Plasma Grenade (DoT spread)
- Supercharged Cell (if applicable)
- Assault Plastique (at enemy with highest HP)
- Mag Bolt (at Strong or Elite enemy)
- Hail of Bolts (AoE, procs Mag Bolt)
- Explosive Round (finisher, only use with Hyper Assault Rounds)
- Mag Bolt (finisher, will be procced)
 Serrated Bolt (pre-cast, DoT 1)
 Incendiary Round (DoT 2)
 Plasma Grenade (DoT spread)
 Assault Plastique (at enemy with highest HP)
 Mag Bolt (at Strong or Elite enemy)
 Hail of Bolts (AoE, procs Mag Bolt)
 Explosive Round (finisher, only use with Hyper Assault Rounds)
 Again, your objective is to apply your DoTs and then spread them to the group with Plasma Grenade. After they’ve been spread, you can start mixing in some single-target abilities like Assault Plastique (which does AoE damage too) and Mag Bolt. Since Mag Bolt is a heavy hit on its own and will detonate Assault Plastique early, we want to use it before we get its proc to reset its cooldown.
Hail of Bolts is what will proc Mag Bolt, though Full Auto and Charged Bolts also work as single-target alternatives if you don’t need more AoE damage. Finally, you’ll have Explosive Round and another Mag Bolt. Only use Explosive Round if you have the Hyper Assault Rounds proc (the button will be glowing), otherwise, the attack does far less damage while being far more expensive.
Major Cooldown Abilities for Commando
These abilities offer some sort of temporary boost to your offense, defense, and/or mobility. They are referred to as cooldowns (CDs) because they usually only last a short time while having a long cooldown. I’ll only be covering the ones that you’ll reasonably have access to all the time.
You may want to group each category together on your bar so you can recognize them more easily, though keep them separate from the attacks I listed above.
Offensive Cooldowns
Offensive cooldowns (OCDs) increase your damage dealt temporarily. Sometimes they’re more generic boosts to everything, other times they only apply to specific abilities. It’s important to make sure you’re being thoughtful about which abilities you use and try to use them as fast as possible while the boost is active to maximize their effectiveness. Use them against stronger enemies to defeat them faster.
Supercharged Cell
Supercharged Cell increases your damage dealt in some way that is unique to each discipline, and it makes your next High Impact Bolt or Mag Bolt autocrit. It’s a lot stronger with AS compared to Gunnery, so it’s more important to pay close attention with that spec.
In Gunnery, it really just makes your attacks ignore some more of your target’s armor.
In AS, the first time you deal weapon damage after activating the ability will apply a super strong DoT called Supercharged Burn, though the target needs to already be affected by your Incendiary Round. It’s best to activate Supercharged Cell when you’re attacking a Strong or Elite enemy since they have more HP, allowing you to full benefit from the DoT.
Electro Net
 Electro Net
This ability is a lot more complicated in PvP, but in PvE, it’s really just a super strong DoT and slow, so it’s good to use against something that has a lot of HP like an Elite or Champion if you think it’ll take a while to defeat.
Recharge Cells
 Recharge Cells
Recharge Cells causes your next ability to cost no Energy Cells and after activating that ability, rapidly recharges 50 Energy Cells over the next few seconds. It’s best to activate it when you’re at about 30-40 Energy Cells right before doing an ability with a 3s channel (Boltstorm, Full Auto, Hail of Bolts, or Mortar Volley). There’s no need to activate Recharge Cells if the combat encounter is almost over because you can just use your out of combat regen ability instead.
Defensive Cooldowns
Defensive cooldowns (DCDs) increase your survivability temporarily, making it less likely that you’ll be defeated. Use them whenever you’re taking more damage than you can handle.
Reactive Shield
 Reactive Shield
Reactive Shield offers 25% damage reduction for 12s. It works against all attacks and lasts a long time, so try to use it preemptively whenever you expect to take a lot of damage. Thanks to Trauma Stabilizers, Reactive Shield will heal you for 40% of your max health when it ends, assuming you got hit 10 times while it was active. Its cooldown is also reduced whenever you take damage thanks to Reflextive Shield.
Diversion
Diversion makes you more likely to dodge weapon damage like blastersfire and lightsaber swings. It also makes you take no damage from the next 2 single-target Force or Tech attacks. Both components only last 6s, so it really just buys you a little bit of time if you accidentally overcommitted, so you might want to consider following it up with Propulsion Round or Concussion Charge.
Adrenaline Rush
 Adrenaline Rush
Activating this ability applies a Health Monitor to you for the next minute. If you drop below 60% HP, Adrenaline Rush triggers, causing you to heal rapidly back up to 60% HP for a short period. While Adrenaline Rush is active, you’re basically unkillable except by massive singular hits, which you will never encounter in solo content.
Crowd Control
These abilities have some sort of controlling effect on your opponent that often provide some sort of defensive benefit to you.
Disabling Shot
 Disabling Shot
This ability can interrupt your target’s cast or channel and locks them out of activating that ability again for a short time. Typically the longer or more threatening-sounding the ability is, the more important it is to interrupt.
Concussive Round
 Concussive Round
This ability mezzes a target for up to 60s, meaning they are stunned but the stun breaks if they take damage. Use it on the strongest enemy that is furthest from the group. You want to mez the one that will hit the hardest that you can avoid DoT spreading to. Sometimes it isn’t possible to do this, and in those cases, I recommend just DoT spreading to it and leaning on other defensive or offensive cooldowns.
Concussion Charge
 Concussion Charge
This is your knockback. It fires your jetpack to send targets back pretty far if they’re standing near you. Use Concussion Charge if you need to interrupt something and Disabling Shot is unavailable or want a bit of breathing room between you and your enemies.
Mobility
These cooldowns allow you to move much faster than you would normally be able to go.
Propulsion Round
 Propulsion Round
This ability sends you flying backward 20m and has 2 charges. Use it whenever you want to create distance between you and your enemy.
Hold the Line
 Hold the Line
This ability offers a small movement speed boost and makes you immune to knockback, roots, and slows. I recommend using it right before an enemy knocks you back. The most common knockback attack that NPCs use is called Surge, so keep an eye out for that cast.
Tenacity
 Tenacity
This ability breaks you out of any controlling effects. Since it has such a long cooldown, only use it if you are prevented from doing what you want to do. For example, if you’re rooted in place but can still hit your target, there’s no need to break free.
Tech Override
Tech Override makes your next ability with a cast time instant, allowing it to be used while moving when it otherwise wouldn’t be. It is not a DPS increase just to make something instant, so only use it if you want to use something while moving that isn’t instant.
Commando Solo Gearing and Stats
This section will cover the core elements of gearing and stats for Commando. If you want a more detailed explanation, please refer to the main guides for each discipline. Don’t forget to obtain the legendary implants and tactical items I mentioned when referring to individual disciplines!
Stat Priority
As a DPS, you’ll need to care about 3 different stats: Accuracy, Alacrity, and Critical Rating. There are thresholds associated with Accuracy and Alacrity, so you need to prioritize reaching those thresholds to get the full benefit from each stat point.
- Accuracy to 110.00% – Accuracy reduces the chance for your attacks to miss.
- Alacrity to ~7.5% – Alacrity holistically increases the speed at which you can execute your rotation. Please note that you’ll need different amounts of Alacrity Rating to reach 7.5% with each of this combat style’s disciplines. Refer to the main PvE guides for each spec for more information.
- Critical gets the rest – Critical refers to both your chance to critically hit and the damage multiplier for critical hits. Critical Rating affects both.
Find out which mods to purchase from Hyde and Zeek in SWTOR on the Fleet to minimize spending and optimize your build. The dedicated guide contains tips for all roles in both PvE and PvP.
Individual Pieces
- Augments: Blue 296 augments ([Type] Augment 83 + Augmentation Kit Mk-11)
- Crystals: Advanced Eviscerating (+41 Critical)
- Relics: Relic of Focused Retribution and Relic of Devastating Vengeance (highest iRating you have)
- Biochem: Advanced Kyrprax Medpac, Proficient Stim, and Critical Adrenal
I recommend a Relic and Adrenal that boost your critical chance for solo content because, unlike Power, Critical Rating isn’t capped by level sync.