This guide explains the best builds for Vanguard DPS disciplines that are optimized to perform extremely well in solo content.
The builds enable you to have a far more enjoyable experience fighting trash mobs than you would with a sustained DPS build since you’ll be utilizing effects designed specifically for use against trash mobs!
Table of contents
Why solo builds are worth using in SWTOR
For almost the entirety of SWTOR’s history, fighting trash wasn’t fun because the combat system didn’t support it. Trash mob encounters rarely last more than a few seconds while boss fights and PvP typically last at least a few minutes, requiring you to make use of far more abilities!
In solo content, you’re mostly fighting trash mobs that have so little health that the majority of enemies won’t be able to survive for more than 2-3 abilities and you often can’t even get through a whole rotation before that combat encounter is over.
Stronger single enemies like elites (golds) where you would be able to stretch your rotational legs are rare enough that you can trivialize them with proper use of offensive cooldowns (OCDs) so even they don’t always survive a full rotation cycle.
I believe this disconnect was responsible for making skipping trash via stealth and cheese such a popular approach to playing PvE in SWTOR. BioWare clearly understood this and (mostly) solved it by introducing extremely powerful new ability tree buffs and legendary implants that synergize with existing tactical items.
These ridiculously potent effects form the basis of the solo builds and are able to exist without causing (too many) balance issues in group content because they are short-lived and only reliably trigger off of combat events that are fairly unique to and common when fighting trash mobs.
Plasmatech Vanguard Solo Build
In this section, I’ll be covering the ability tree build and solo ability priority for Plasmatech (Plasma) Vanguard. Please refer to the 7.0 Plasmatech Vanguard PvE Guide if you want more detailed information, especially on topics pertaining to gearing, abilities, and ability tree choices.

Plasmatech Solo Content Ability Tree Build
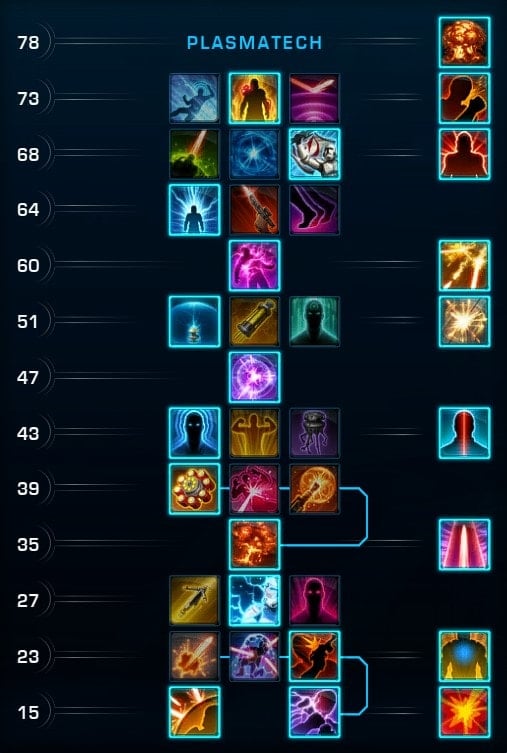
Build Essentials Tactical Strike
 Storm
Storm Primed Det Packs
 Hold the Line
![]() Efficient Tools
Efficient Tools Shock Trooper Implant
 Superheated Fuel Tactical
These ability tree buffs maximize your AoE damage potential and mobility, allowing you to quickly dispatch an individual group of trash and engage the next encounter ASAP. You also have a bit more CC immunity thanks to Hold the Line allowing you to ignore physics and Efficient Tools allowing Adrenaline Rush to double as a CC break.
This build is less suited to single-target sustained DPS, so it won’t fair quite as well in boss fights, as you’re giving up pretty substantial single-target damage increases in favor of AoE. That said, it takes a while to benefit from that damage, so you wouldn’t be able to feel it anyway. You have Battle Focus to compensate for boss fights too.
For the level 43 and 51 choices, I recommend Elite Vanguard and Electro Shield respectively by default, but Reactive Plating (43), Iron Will (51), and Paralactic Combat Stims (51) are also decent alternatives.
How to use this build
This is the general rotation you’ll be using your abilities in against each group of trash in order to maximize your damage output.
 Storm
Storm- Shockstrike (on centermost target)
- Plasmatize (on enemy with lowest HP, if there’s a strong or elite in the group)
- Incendiary Round ▶ Ion Wave (DoT spread)
- Explosive Surge (applies burning DoT to everything)
- Artillery Blitz or Explosive Surge x2 (additional AoE)
- Plasma Flare (with
 Overcharged Plasma proc)
  High Impact Bolt (with Hyper Assault Cell proc)
- Shockstrike
 Shockstrike (on centermost target)
 Plasmatize (on enemy with lowest HP, if there’s a strong or elite in the group)
 Incendiary Round ▶
  Ion Wave (DoT spread)
 Explosive Surge (applies burning DoT to everything)
 Artillery Blitz or
  Plasma Flare (with
  High Impact Bolt (with
  Hyper Assault Cell proc)
Not all abilities will be available immediately in each encounter, if an ability isn’t available, just skip it and use it when it becomes available. For the most part, you’ll have trash pulls where you will have DoT spread available and ones where you’ll lean more on Artillery Blitz and Explosive Surge. You shouldn’t need to use both Artillery Blitz and DoT spread on the same group of trash unless it’s in a heroic.
Plasmatize can technically be used against regular trash and it will be comparable, but I think it’s worthwhile over even something like Explosive Surge since it takes a bit to get the damage out, so I only recommend using Plasmatize if it will eventually jump to something that has significantly more HP.
Tactics Vanguard Solo Build
In this section, I’ll be covering the ability tree build and solo ability priority for Tactics Vanguard. The Tactics guide is not yet finished, so please refer to the 7.0 Plasmatech Vanguard PvE Guide if you want a bit more information on shared abilities and gearing.
Tactics Solo Content Ability Tree Build
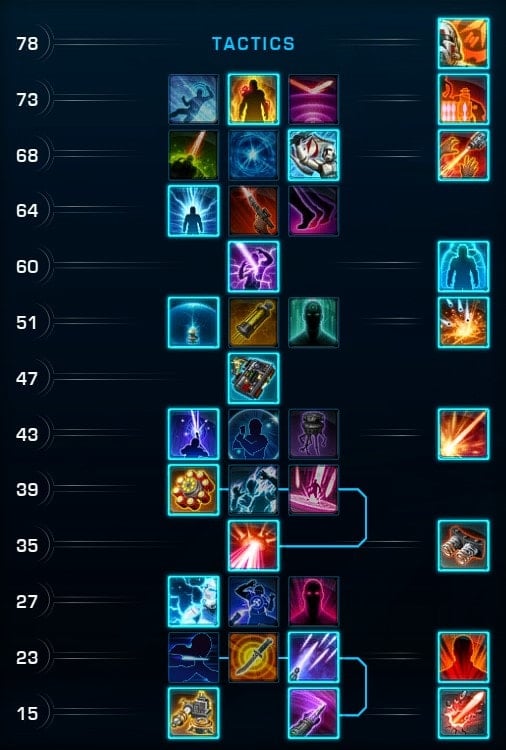
Build Essentials: Ricochet Rounds Storm
 Advanced Infantry Tactics
 Electro Shield
![]() Efficient Tools Shock Trooper Implant
Efficient Tools Shock Trooper Implant Flame Detonation Tactical
The Tactics solo build doesn’t get a whole lot specifically from the ability tree. Gut isn’t worth applying to anything weaker than Strong (silver) enemies and Cell Burst isn’t available consistently for every trash pull. The biggest component of your solo capabilities as Tactics comes from the Flame Detonation tactical because it turns Assault Plastique into an AoE.
The Cell Burst buff at level 39 doesn’t matter all that much. High Yield Explosives only applies the damage boost to the primary target while Kill Zone doesn’t enable Cell Burst to deal full damage to secondary targets, as if the Energy Lode stacks aren’t scaling. Superheated Cells is a DoT that is weaker than the boost to Assault Plastique.
How to use this build
This is the general rotation you’ll be using your abilities in against each group of trash in order to maximize your damage output.
- Storm (if necessary)
- Cell Burst (if you have 4 stacks of Energy Lode)
- Assault Plastique (big hit)
- Explosive Surge (for Flame Detonation and AoE)
- Gut (apply to all Strong and Elite enemies)
- Flak Shell (if Gut was used)
- Artillery Blitz (big AoE, skip if excessive)
- High Impact Bolt (finisher)
- Stockstrike (finisher, procs High Impact Bolt)
- High Impact Bolt (if available, finisher)
 Cell Burst (if you have 4 stacks of
  Energy Lode)
 Assault Plastique (big hit)
 Gut (apply to all Strong and Elite enemies)
 Flak Shell (if Gut was used)
 Stockstrike (finisher, procs High Impact Bolt)
The main idea is to start each fight by applying Assault Plastique and causing it to explode immediately and deal AoE damage with Explosive Surge.
If you have Cell Burst available, you can use that first, but it takes time to build 4 stacks. It’s important to use your 4-stack Cell Burst before Assault Plastique if you’re taking High Yield Explosives so that Assault Plastique is buffed against the primary target. Make sure that both Cell Burst and Assault Plastique are used against the strongest enemy since they’re your most damaging attacks.
Then, you’ll want to apply Gut to all of the Strong and Elite enemies (silvers and golds) since they’ll take longer to defeat. Once Gut is on all relevant targets, you can use Flak Shell, which will proc High Impact Bolt and refresh Gut on all relevant targets, causing additional damage from Ricochet Rounds.
If it’s just regular enemies, you can just skip that and either do Artillery Blitz if there are multiple enemies with a bunch of health left (unlikely) or finish them off individually with High Impact Bolt and Stockstrike. If there are enemies still left standing, you probably should have used Artillery Blitz first, though you can now probably get away with another Explosive Surge instead.
If there’s only a single enemy left, you can spam Tactical Surge or Hammer Shot until one of your stronger abilities is available.
Save Battle Focus for bosses and especially beefy groups of enemies. Use Reactive Shield liberally since its cooldown gets reduced from taking damage and you can deal damage with it thanks to Electro Shield. Balmorran Advanced Weaponry boosts your damage dealt and survivability while giving you 4 Energy Lodes for Cell Burst, so use that often as well.
Major Cooldown Abilities for Vanguards
These abilities offer some sort of temporary boost to your offense, defense, and/or mobility. They are referred to as cooldowns (CDs) because they usually only last a short time while having a long cooldown. I’ll only be covering the ones that you’ll reasonably have access to all the time.
You may want to group each category together on your bar so you can recognize them more easily, though keep them separate from the attacks I listed above.
Offensive Cooldowns
Offensive cooldowns (OCDs) increase your damage dealt temporarily. Sometimes they’re more generic boosts to everything, other times they only apply to specific abilities. It’s important to make sure you’re being thoughtful about which abilities you use and try to use them as fast as possible while the boost is active to maximize their effectiveness. Use them against stronger enemies to defeat them faster.
Battle Focus
 Battle Focus
Battle Focus increases your critical chance by 25% (or 100% in Plasma) for the next 15s, making it arguably the most powerful OCD in the game. Since it has a fairly long cooldown, it can’t be used on most groups of trash, so I recommend saving it for particularly powerful enemies. Use Tactical Surge or Flame Burst instead of Hammer Shot while Battle Focus is active.
Shoulder Cannon
 Shoulder Cannon
Activating Shoulder Cannon loads up 4 missiles (or 7 in Tactics) over the next 15s. Each time you press the ability again, you’ll fire one of the missiles. The ability can be used while stunned and is off the GCD, so it can be used at the same time as other abilities. If you want to maximize the damage increase from Battle Focus, fully load the missiles before using Battle Focus and then fire all of them while it’s active. I’ve found this to be a bit excessive though sometimes, so it’s fine to just use it whenever you need a bit more damage against other enemies too.
Recharge Cells
 Recharge Cells
Recharge Cells causes your next ability to cost no Energy Cells and after activating that ability, rapidly recharges 50 Energy Cells over the next few seconds. It’s best to activate it when you’re at about 30-40 Energy Cells right before doing an ability with a 3s channel or that costs 20 Energy Cells (Artillery Blitz, Ion Wave, Cell Burst). You’ll have to use Recharge Cells shortly after Battle Focus wears off because you want to be more reckless with resource management to maximize the damage. There’s no need to activate Recharge Cells if the combat encounter is almost over because you can just use your out-of-combat regen ability instead.
Defensive Cooldowns
Defensive cooldowns (DCDs) increase your survivability temporarily, making it less likely that you’ll be defeated. Use them whenever you’re taking more damage than you can handle.
Reactive Shield
 Reactive Shield
Reactive Shield offers 25% damage reduction for 12s. It works against all attacks and lasts a long time, so try to use it preemptively whenever you expect to take a lot of damage. In Tactics, the ability’s cooldown is also reduced whenever you take damage thanks to Reflexive Shield passive. You can leverage this cooldown reduction to use it more often, making it synergize better with Electro Shield.
Adrenaline Rush
 Adrenaline Rush
Activating this ability applies Fired Up to you for the next minute and if you drop below 35% HP, Adrenaline Rush triggers, causing you to heal rapidly back up to 35% HP for the next several seconds. While Adrenaline Rush is active, you’re basically unkillable except by massive singular hits. As a Vanguard, thanks to the Efficient Tools ability tree buff, you can use Adrenaline Rush as a CC break like Tenacity. In Plasma, you also have 30% DR while the healing is active and the cooldown of the ability is reduced whenever you get attacked.
Balmorran Advanced Weaponry (Tactics Only)
 Balmorran Advanced Weaponry (Tactics Only)
Balmorran Advanced Weaponry immediately boosts your damage dealt by 10% and increases your armor by 200%, which is equivalent to about 25% damage reduction against attacks that are mitigated by armor (kinetic/energy damage). Both effects last for 10s. Balmorran Advanced Weaponry also builds 4 Energy Lodes, allowing you to activate Cell Burst immediately. I recommend using Balmorran Advanced Weaponry immediately after Cell Burst so you can do a second one right away or whenever you’re out of other DCDs and need some additional survivability.
Thermal Yield (Plasma Only)
 Thermal Yield (Plasma Only)
 Thermal Yield works similarly to Balmorran Advanced Weaponry, but instead of giving you the full boost upfront, you build a stack each time you are attacked that boosts your damage dealt by 2%, increases armor by 40%, and reduces the Energy Cell cost of Ion Wave and Plasma Flare by 5. The effect can stack up to 5 times, resulting in the same +10% damage and +200% armor at 5 stacks as well as making Ion Wave and Plasma Flare free. The effects still last 10s, but each time you take damage, the duration is reset, though it can only last a maximum of 30s. I recommend using Thermal Yield on cooldown.
Crowd Control
These abilities have some sort of controlling effect on your opponent that often provide some sort of defensive benefit to you.
Riot Strike
 Riot Strike
This ability can interrupt your target’s cast or channel and locks them out of activating that ability again for a short time. Typically the longer or more threatening-sounding the ability is, the more important it is to interrupt.
Neural Surge
 Neural Surge
This ability stuns all nearby enemies for a couple of seconds. Stunned enemies can’t do anything, allowing you to do whatever you want without having to worry about them retaliating.
Harpoon
 Harpoon
This ability pulls your target to you, though it only works if they’re 10-40m away. Since you’re so reliant on AoE to deal damage to the whole group, it’s not super useful as a gap closer in solo content unless you’re fighting a single enemy. However, you can use it to pull something closer that would otherwise not have gotten hit by your AoE.
Mobility
These cooldowns allow you to move much faster than you would normally be able to go.
Storm
This ability causes you to leap at your enemy target, interrupt their cast or channel, and deal a small amount of damage. It can be used again within 6s of activating it, allowing it to deal a bit more damage, but it goes on cooldown after that. It’s great to use when you want to engage another group of enemies or if you desperately want them to stop casting something.
Hold the Line
This ability offers a significant movement speed boost and makes you immune to knockback, roots, and slows for 10s. It’s significantly stronger than the Commando version. I recommend using it when you want to move faster and Storm isn’t appropriate or right before an enemy knocks you back. The most common knockback attack that NPCs use is called Surge, so keep an eye out for that cast.
Tenacity
 Tenacity
This ability breaks you out of any controlling effects. Since it has such a long cooldown, only use it if you are prevented from doing what you want to do. For example, if you’re rooted in place but can still hit your target, there’s no need to break free.
Vanguard Solo Gearing and Stats
This section will cover the core elements of gearing and stats for Vanguard. If you want a more detailed explanation, please refer to the main guides for each discipline. Don’t forget to obtain the legendary implants and tactical items I mentioned when referring to individual disciplines!
Stat Priority
As a DPS, you’ll need to care about 3 different stats: Accuracy, Alacrity, and Critical Rating. There are thresholds associated with Accuracy and Alacrity, so you need to prioritize reaching those thresholds to get the full benefit from each stat point.
- Accuracy to 110.00% – Accuracy reduces the chance for your attacks to miss.
- Alacrity to ~7.5% – Alacrity holistically increases the speed at which you can execute your rotation.
- Critical gets the rest – Critical refers to both your chance to critically hit and the damage multiplier for critical hits. Critical Rating affects both.
Find out which mods to purchase from Hyde and Zeek in SWTOR on the Fleet to minimize spending and optimize your build. The dedicated guide contains tips for all roles in both PvE and PvP.
Individual Pieces
- Augments: Blue 296 augments ([Type] Augment 83 + Augmentation Kit Mk-11)
- Crystals: Advanced Eviscerating (+41 Critical)
- Relics: Relic of Focused Retribution and Relic of Devastating Vengeance (highest iRating you have)
- Biochem: Advanced Kyrprax Medpac, Proficient Stim, and Critical Adrenal
I recommend a Relic and Adrenal that boost your critical chance for solo content because, unlike Power, Critical Rating isn’t capped by level sync.