This guide explains the best SWTOR Marauder Solo builds for all three disciplines: Annihilation, Fury and Carnage. Optimized to perform extremely well in solo content.
The builds enable you to have a far more enjoyable experience fighting trash mobs than you would with a sustained DPS build since you’ll be utilizing effects designed specifically for use against trash mobs!
Table of contents
Why solo builds are worth using in SWTOR
For almost the entirety of SWTOR’s history, fighting trash wasn’t fun because the combat system didn’t support it. Trash mob encounters rarely last more than a few seconds while boss fights and PvP typically last at least a few minutes, requiring you to make use of far more abilities.
In solo content, you’re mostly fighting trash mobs that have so little health that the majority of enemies won’t be able to survive for more than 2-3 abilities and you often can’t even get through a whole rotation before that combat encounter is over.
Stronger single enemies like elites (golds) where you would be able to stretch your rotational legs are rare enough that you can trivialize them with proper use of offensive cooldowns (OCDs) so even they don’t always survive a full rotation cycle.
I believe this disconnect was responsible for making skipping trash via stealth and cheese such a popular approach to playing PvE in SWTOR. BioWare clearly understood this and (mostly) solved it by introducing extremely powerful new ability tree buffs and legendary implants that synergize with existing tactical items.
These ridiculously potent effects form the basis of the solo builds and are able to exist without causing (too many) balance issues in group content because they are short-lived and only reliably trigger off of combat events that are fairly unique to and common when fighting trash mobs.
I do want to note that the Marauder solo builds are a fair bit less refined (as in clunkier and more complicated) than all of the other disciplines, though the skills are more transferrable to and from group content as the overall ability usage is similar.
Annihilation Marauder Solo Build
In this section, I’ll be covering the ability tree build and solo ability priority for Annihilation Marauder. Please refer to the 7.0 Annihilation Marauder PvE Guide if you want more detailed information, especially on topics pertaining to gearing, abilities, and ability tree choices.
Annihilation Solo Content Ability Tree Build
The Build Essentials are what I consider to be the core components that make the build viable. Without them, the build no longer accomplishes its primary function.
The ability tree buffs, implants, and tacticals that aren’t listed as Build Essentials can be changed as needed without compromising the integrity of the build, though I have included a full set of default choices that will be most consistently helpful in accomplishing what the build sets out to do.
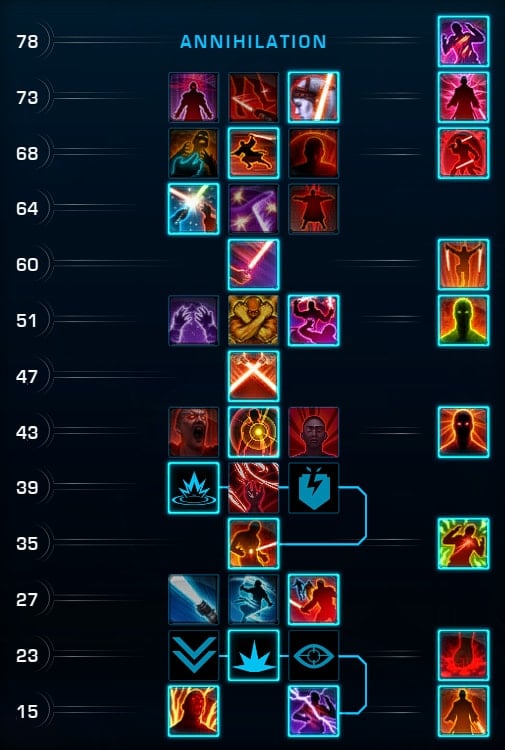
Build Essentials: Draining Center
 Predation
 Blood Wave
 Bleeding Center
 Cloak of Retribution
![]() Brazen
Brazen Malmourral Mask Tactical
 Dispatcher Implant
 Berserker’s Call Implant
This build is fairly similar to what you use for sustained DPS, the biggest difference is in the tactical item, though the build is fully optimized for solo content. Your objective is to apply and spread your DoTs and then whack the group with AoE Annihilate and Dual Saber Throw.
I recommend using Draining Center over Juyo Rend because you get another big hit in your arsenal along with additional survivability. The added survivability is valuable because you’ll want to take Brazen for the Fury generation. You can and should switch to using Spiteful Saber instead of Malmourral Mask against bosses since the latter does little to improve single-target sustained DPS.
Usually, you’ll want to apply Force Rend to the strongest enemy in the group, or at least a different one from what you applied Rupture to so that the target doesn’t die before you have a chance to spread.
How to use this build
 Force Charge (if necessary)
- Deadly Saber
- Battering Assault (on target with highest HP)
- Rupture (DoT, apply to target with highest HP)
- Berserk (damage boost)
- Force Rend (DoT, apply to target with highest HP)
 Smash (for DoT spread)
- Annihilate (on centermost target that is affected by Force Rend)
- Dual Saber Throw (aim to hit as many enemies as possible)
- Rupture (spam on centermost target with lowest HP)
 Reuse High-Damage Abilities
 Force Charge (if necessary)
 Deadly Saber
 Battering Assault (on target with highest HP)
 Rupture (DoT, apply to target with highest HP)
 Berserk (damage boost)
 Force Rend (DoT, apply to target with highest HP)
 Smash (for DoT spread)
 Annihilate (on centermost target that is affected by
  Dual Saber Throw (aim to hit as many enemies as possible)
This rotation really only works against groups that have higher HP like you’ll see in heroics on higher-level planets. Against normal groups of trash, especially with weak enemies, you’ll end up defeating enemies you apply your DoTs to before you get a chance to spread, so it’s crucial that you’re hitting whichever enemy has the most HP at any given time.
Usually, you can only apply both DoTs to the same target if it’s a strong or elite (silver or gold) enemy. Even though Force Charge and Battering Assault don’t deal that much damage, they can be enough to push something over the edge. Force Rend is the big one though because it will autocrit and deal double damage.
Assuming you can get the DoTs applied before the targets bleed out, you’ll want to DoT spread with Smash. Position yourself such that you’re in the middle of the pack to maximize the number of enemies you hit, but make sure your still clip the bleeding enemies.
Once you’ve DoT spread, you want to use Annihilate next, which will deal AoE damage thanks to Malmourral Mask and finish off any remaining normal enemies it hits while boosting further DoT damage. It’s absolutely essential that your target has Force Rend on it because otherwise, Annihilate won’t deal AoE damage.
You’ll follow that up with Dual Saber Throw, which you want to aim such that you’ll hit as many enemies as possible. The easiest way to accomplish this is by standing at one end of the pack and target something on the opposite end so you guarantee that the sabers go through the group.
Now that all of your high-damage abilities are on cooldown, it’s time to spam Rupture, which will tick your bleeds on all other nearby targets thanks to Blood Wave. Try to maximize the number of targets you’re hitting and prioritize the target with the least HP because the DoT ticks from Rupture and Force Rend will deal more damage than the reapplication of Rupture.
By the time your high-damage abilities come off cooldown, only the strongest enemies remain, so you can activate Berserk ▶ Force Rend, Deadly Saber, Annihilate, Rupture, and Dual Saber Throw again as they become available along with Ravage, Vicious Throw, and Vicious Slash. The exact order doesn’t matter too much.
Fury Marauder Solo Build
In this section, I’ll be covering the ability tree build and solo ability priority for Fury Marauder. If you want more detailed information, especially on topics pertaining to gearing, abilities, and ability tree choices, read the full Fury Marauder PvE Class Guide.
Fury Solo Content Ability Tree Build
The Build Essentials are what I consider to be the core components that make the build viable. Without them, the build no longer accomplishes its primary function.
The ability tree buffs, implants, and tacticals that aren’t listed as Build Essentials can be changed as needed without compromising the integrity of the build, though I have included a full set of default choices that will be most consistently helpful in accomplishing what the build sets out to do.
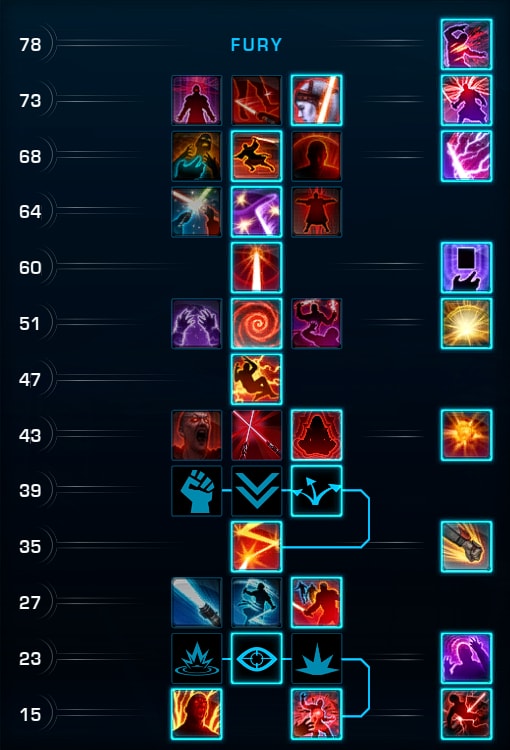
Build Essentials: Dark Synergy Predation
 Obliteration
![]() Furious Rumination
Furious Rumination![]() Brazen
Brazen Enrage Crush tactical Fearless Victor Implant Berserker’s Call Implant
It’s challenging to play Fury in solo content because you have to use specific abilities at specific times against specific enemies in the group. You can’t just blindly hammer away at a single enemy and end up wiping out the whole group like you can with some other disciplines.
That said, if you can handle and master Fury in solo content, you’ll have a much easier time with the discipline in group content because you’re forced to understand how all the procs and cooldown reductions work together. Playing Fury in solo content essentially teaches you how to start and recover from different points in the rotation.
If you want, you can use Subjugate and/or Criticality instead of Dark Synergy and Furious Rumination. Criticality offers slightly higher single-target DPS, but with Furious Rumination, you’re basically overflowing with Rage, so you don’t need to worry about it nearly as much. Subjugate enables you to deal AoE damage with Raging Burst, which will increase the rate at which you will take out the weaker enemies, though it will take longer to defeat the stronger enemies as single-target DPS is lower.
I recommend Furious Rumination because it offers a more fluid experience whereas Dark Synergy is optimal for single-target situations while still offering a boost to your AoE damage output. Any combination of the 4 ability tree buffs will work just fine though.
How to use this build
This is the opening rotation you’ll use against trash. You need to think carefully about which mob you’re hitting with each attack.
- Force Charge (if necessary)
- Battering Assault (for Rage, if necessary)
- Obliterate (for Dominate autocrit proc)
- Furious Strike (for Furious Rage damage boost and heavy hit)
- Force Crush (for AoE and Destruction buff)
- Smash (AoE damage, detonates Force Crush)
- Berserk (earliest you can use it)
- Obliterate (against target with lowest HP for Obliteration)
- Force Scream (only if Raging Burst is excessive)
- Raging Burst (against same target as last Obliterate)
- Furious Strike (for Furious Rage damage boost and finisher)
- Obliterate
- Raging Burst
 Obliterate (for
  Dominate autocrit proc)
 Furious Strike (for
  Furious Rage damage boost and heavy hit)
 Force Crush (for AoE and
  Smash (AoE damage, detonates
  Force Scream (only if
  Raging Burst is excessive)
You’ll want to start by leaping in and making sure you have sufficient Rage, use Battering Assault if you need more. Then you’ll want to use Obliterate since it deals a fair bit of damage and grants a proc that makes your next Raging Burst or Smash autocrit. You’ll be using Obliterate pretty much on cooldown, so that’s why it has higher priority.
Your first major objective is detonating Force Crush as an AoE with Smash (Raging Burst also works, but Smash is better in this case). Force Crush only lasts 3s, so you have to be quick about applying it and immediately following it up with Smash or the final tick will go off and you’ll miss out on your AoE damage.
You can also miss out on the AoE damage from Force Crush if the target is defeated by Smash, so it’s essential that you apply Force Crush to the enemy with the highest HP in the group.
Before you do Force Crush + Smash, throw in a Furious Strike since it hits hard and gives you a proc that boosts the damage dealt by your next Smash or Raging Burst. Remember, Furious Strike should be used next on a target that will be able to survive through the subsequent Smash autocrit and Force Crush detonation, so use it on a different enemy if there are no Strong or Elite enemies present.
Force Crush also boosts the damage dealt by your next Smash or Raging Burst and makes it free. Berserk gives the same proc and can be used at the same time as other abilities, so make sure to only use 1 per Smash or Raging Burst. In general, you should only use Force Crush once per trash pull since it has such a long cooldown.
To be clear, as soon as you Smash, you can use Berserk since the buff will be consumed and will last long enough to boost your next Raging Burst. In longer pulls, you can usually get 2 Berserks off.
Once you’ve done Smash and Force Crush, it’s time to finish enemies off with Obliterate, Raging Burst, and Furious Strike. You need to leverage the Obliteration ability tree buff to reset the cooldowns of Obliterate, Raging Burst, and Smash and boost their damage dealt or you’ll take significantly longer to defeat the rest of the group.
In order to get the Obliteration proc, you need to defeat the enemy within 3s (2 attacks) of using Obliterate on it, so you need to pay close attention to what enemy you expect to defeat next and how much damage it will take to defeat them. Obliterate + Raging Burst is sometimes overkill, so you can use Force Scream instead of Raging Burst if you think that will be enough to finish something off.
You can use Sweeping Slash, Mad Dash, and Dual Saber Throw for an additional bit of AoE (especially from range) as needed and Vicious Throw, Furious Strike, Force Scream, and Ravage for other single-target attacks.
Carnage Marauder Solo Build
In this section, I’ll be covering the ability tree build and solo ability priority for Carnage Marauder. Please refer to the 7.0 Carnage Marauder PvE Guide if you want more detailed information, especially on topics pertaining to gearing, abilities, and ability tree choices.

Carnage Solo Content Ability Tree Build
The Build Essentials are what I consider to be the core components that make the build viable. Without them, the build no longer accomplishes its primary function.
The ability tree buffs, implants, and tacticals that aren’t listed as Build Essentials can be changed as needed without compromising the integrity of the build, though I have included a full set of default choices that will be most consistently helpful in accomplishing what the build sets out to do.
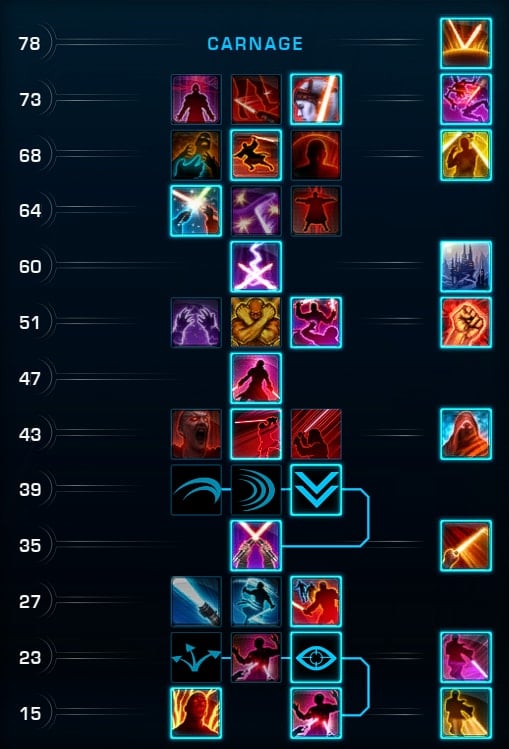
Build Essentials: Berserk Gore Predation![]() Frenzied Blade
Frenzied Blade Swiftness Cloak of Retribution
![]() Brazen
Brazen Andeddu’s Malevolence Tactical Dispatcher Implant Berserker’s Call Implant
The Carnage solo content build is nearly identical to the single-target sustained build. The biggest difference comes from how Gore is used. You’ll be leveraging Berserk Gore and Andeddu’s Malevolence which will allow you to hit every enemy in the group and make each of them bleed.
You could use Piercing Gore instead, but you’ll basically never be able to hit as many targets and it’s far more inconsistent. You can also use Rush Down instead of Frenzied Blade, it doesn’t really matter all that much since you won’t be using Massacre all that often against trash mobs and Frenzied Blade offers higher single-target sustained DPS along with greater utility and burst.
How to use this build
This is the general priority system you’ll be using your abilities in against each group of trash in order to maximize your damage output.
- Dual Saber Throw (AoE, grants
 Dispatcher’s Challenge)
 - Force Charge (if necessary)
- Berserk ▶ Massacre ▶ Battering Assault ▶ Ferocity
- Devastating Blast (hits hard with Ferocity + Execute)
- Vicious Throw (hits hard with Ferocity + Dispatcher’s Challenge)
- Gore (can be spammed with Berserk)
- Sweeping Slash (only as AoE finisher or filler against 3+ targets)
- Massacre (single-target filler)
- Assault (free single-target filler)
 Massacre ▶
  Ferocity
 Devastating Blast (hits hard with
  Execute)
 Vicious Throw (hits hard with
  Gore (can be spammed with
  Sweeping Slash (only as AoE finisher or filler against 3+ targets)
 Assault (free single-target filler)
The main idea is to prioritize abilities that empower your heavy hitters and then use those heavy hitters against the enemies with the most health. After you’ve used your Devastating Blast and Vicious Throw autocrits, it’s time to spam Gore on everything until you’ve run out of Berserks.
It’s typically not worthwhile to use more than 1 heavy hitter against a regular enemy since it’s overkill, so spread them around amongst the weaklings. When there’s a stronger enemy, you should focus the big hits onto stronger enemies and use the Gore spam on the normal enemies.
Once you’ve run out of Berserks and Gored practically everything, you can spam Sweeping Slash and Massacre until your higher-priority attacks come off cooldown. You should only use Assault if you can’t afford to use Massacre or Sweeping Slash.
Major Cooldown Abilities for Marauders
These abilities offer some sort of temporary boost to your offense, defense, or mobility. They are called cooldowns (CDs) because they usually only last a short time while having a long cooldown. I am not covering abilities that are optional or not useful in solo content.
You may want to group each category together on your bar so you can recognize them more easily, though keep them separate from the attacks I listed above.
Offensive Cooldowns
Offensive cooldowns (OCDs) increase your damage dealt temporarily. Sometimes they’re more generic boosts to everything, other times they only apply to specific abilities. It’s important to make sure you’re being thoughtful about which abilities you use and try to use them as fast as possible while the boost is active to maximize their effectiveness. Use them against stronger enemies to defeat them faster.
Berserk, Fury, and Frenzy
 Fury, and
  Frenzy
Activating Berserk grants 6 stacks that offer a buff that’s unique to each discipline along with a 5% damage boost thanks to the Berserker’s Call implant. The effects for the solo content builds are as follows:
- Annihilation – You generate 4 Rage immediately and your next 6 DoT ticks autocrit. In addition, Force Rend deals double damage heals for 35% of the damage it deals.
- Fury – You gain 4 Rage immediately and 8 Rage over the next 6s.
- Carnage – Your alacrity is increased by 30% for the next 6 GCDs and Ferocity gains an additional charge if it’s activated while Berserk is active.
Rather than having a cooldown, Berserk is only usable while you have 30 stacks of Fury. You generate 4 Fury each time you activate an ability that costs Rage while Berserk is not active and 2 Fury each time you are attacked thanks to Brazen. Annihilation also generates Fury from DoT crits and Fury (the spec) generates Fury from dealing damage with Ravage.
Frenzy gives you 30 stacks of Fury, allowing you to use Berserk immediately. This is valuable because in all 3 disciplines, you want to activate Berserk at very specific points, so use Frenzy if you don’t have enough Fury at the point when you’d want to activate it. Please refer to the individual sections for more information about when to activate Berserk for each discipline.
Defensive Cooldowns
Defensive cooldowns (DCDs) increase your survivability temporarily, making it less likely that you’ll be defeated. Use them whenever you’re taking more damage than you can handle.
Cloak of Pain
 Cloak of Pain
Cloak of Pain increases your damage reduction by 20% deals a small amount of damage back to the attacker whenever you take damage (up to once per second). If you’re taking Cloak of Retribution, it also generates 1 Rage each time you send damage back.
It lasts for 10s, but the duration is refreshed whenever you are attacked, but cannot last for more than 30s. Since the ability has such high uptime thanks to its long duration and short cooldown, you want to use Cloak of Pain as often as possible.
Saber Ward
 Saber Ward
Saber Ward has a much longer long cooldown but offers more potent effects. While it’s active, you’ll be significantly more likely to completely avoid the weapon attacks and are guaranteed to absorb a quarter of all damage you take from Force and tech attacks.
Disruption
 Disruption
This ability can interrupt your target’s cast or channel and locks them out of activating that ability again for a short time. Typically the longer or more threatening-sounding the ability is, the more important it is to interrupt.
Mobility
These cooldowns allow you to move much faster than you would normally be able to go.
Force Charge
 Force Charge
This ability causes you to leap at your enemy target, generate 3 Rage, 2 Centering (thanks to Interloper), and deal a small amount of damage. In Fury, it also makes your next Raging Burst or Smash autocrit.
Unlike with Juggernauts, you can’t use it quite as often since its cooldown doesn’t reset when you exit combat nor get reduced when you take damage. You’ll need to leverage the second charge from Interloper to leap from one group of trash to the next.
Predation
 Predation
Predation increases purges slows and roots and increases your movement speed by a significant amount for 10s. It also slightly increases your chance to avoid damage from weapon attacks. Use it whenever you want to go faster.
Unleash
 Unleash
This ability breaks you out of any controlling effects. Since it has such a long cooldown, only use it if you are prevented from doing what you want to do. For example, if you’re rooted in place but can still hit your target, there’s no need to break free.
Force Camouflage
 Force Camouflage
Force Camouflage turns you invisible for a few seconds and it’s arguably the most versatile ability in the game. While invisible, you’re immune to CC, take 50% less damage, and move faster. Out of combat, you’re able to sneak past groups of enemies undetected. As soon as you use an offensive ability (attack or otherwise), Force Camouflage ends.
In addition, when Force Camo is activated, all cleansable debuffs are cleansed, any abilities being casted at you are interrupted, and your threat is lowered by a moderate amount, assuming you’re in combat. You will not exit combat by activating Force Camouflage.
All of the effects are pretty powerful and its cooldown isn’t super long, so use it whenever you need one of its effects, though consider that Predation offers a more significant movement speed boost and also purges movement-impairing effects.
Marauder Solo Gearing and Stats
This section will cover the core elements of gearing and stats for Operative. If you want a more detailed explanation, please refer to the main guides for each discipline. Don’t forget to obtain the legendary implants and tactical items I mentioned when referring to individual disciplines!
Stat Priority
As a DPS, you’ll need to care about 3 different stats: Accuracy, Alacrity, and Critical Rating. There are thresholds associated with Accuracy and Alacrity, so you need to prioritize reaching those thresholds to get the full benefit from each stat point.
- Accuracy to 110.00% – Accuracy reduces the chance for your attacks to miss.
- Alacrity to ~7.5% – Alacrity holistically increases the speed at which you can execute your rotation. Please note that you’ll need different amounts of Alacrity Rating to reach 7.5% with each of this combat style’s disciplines. Refer to the main PvE guides for each spec for more information.
- Critical gets the rest – Critical refers to both your chance to critically hit and the damage multiplier for critical hits. Critical Rating affects both.
Find out which mods to purchase from Hyde and Zeek in SWTOR on the Fleet to minimize spending and optimize your build. The dedicated guide contains tips for all roles in both PvE and PvP.
Individual Pieces
- Augments: Blue 296 augments ([Type] Augment 83 + Augmentation Kit Mk-11)
- Crystals: Advanced Eviscerating (+41 Critical)
- Relics: Relic of Focused Retribution and Relic of Devastating Vengeance (highest iRating you have)
- Biochem: Advanced Kyrprax Medpac, Proficient Stim, and Critical Adrenal
I recommend a Relic and Adrenal that boost your critical chance for solo content because, unlike Power, Critical Rating isn’t capped by level sync.