A complete guide to SWTOR’s Eternity Vault Operation. A great introductory operation, Eternity Vault will teach you the basics of running operations.
The guide will teach you how to beat this operation on any difficulty mode, explain and show what achievements you can unlock, and the rewards you can earn. This guide covers Story Mode and Veteran Mode. Eternity Vault does not currently have a Master Mode available.
Table of contents
- Group Compositions
- How to Start the Operation and its Story
- First Boss: Annihilation Droid XRR-3
- The Prison Block
- Prison Block Shortcut
- Second Boss: Gharj
- The Jungle
- Third Boss: The Ancient Pylons
- Fourth Boss: The Infernal Council
- Final Boss: Soa, The Infernal One
- Achievements for Eternity Vault
- Defeating the Annihilation Droid
- Defeating Gharj
- Solving the Ancient Pylons
- Defeating the Infernal Council
- Defeating the Soa
- Defeating the Annihilation Droid (Veteran Mode)
- Defeating Gharj (Veteran Mode)
- Solving the Ancient Pylons (Veteran Mode)
- Defeating the Infernal Council (Veteran Mode)
- Defeating the Soa (Veteran Mode)
- Decoration and Vehicle Drops
Group Compositions
The standard composition for group composition in 8m Operations is 2 tanks, 4 DPS, and 2 Healers (2 standard Flashpoint groups). However, especially in easier difficulties and older content, mechanics and numbers checks do not require the standard composition, and in fact, gain nothing from having a second tank.
Conventionally, 8m Eternity Vault is done with 1 tank, 5-6 DPS, and 1-2 healers. The second tank has practically nothing to do of consequence even in VM. It does not make the raid harder to use 1 tank, you are only making everything take longer to defeat by giving up a DPS.
A single healer can handle it on their own if they know what they’re doing, but it is typically a lot more challenging to solo heal than to solo tank. It’s best to bring two healers for Veteran Mode. Sadly, this team composition issue has been a continuous problem throughout the history of SWTOR in that DPS can handle many tank mechanics, and mitigation stats as a method to prevent this are underutilized.
How to Start the Operation and its Story
Eternity Vault is seen as the easiest operation in Star Wars: The Old Republic. Compared to others, it’s short and has easy mechanics. It’s also one of the primary operations used by people to farm Tech Fragments and operation gear that can be deconstructed for OP-1 Catalysts.
The Eternity Vault is an ancient Rakatan prison located on Belsavis. After a bombing run occurred in the area during the Galactic War, the prison was breached and its inhabitants have awoken. Both the Republic and Empire send in strike teams to neutralize the threats found within.
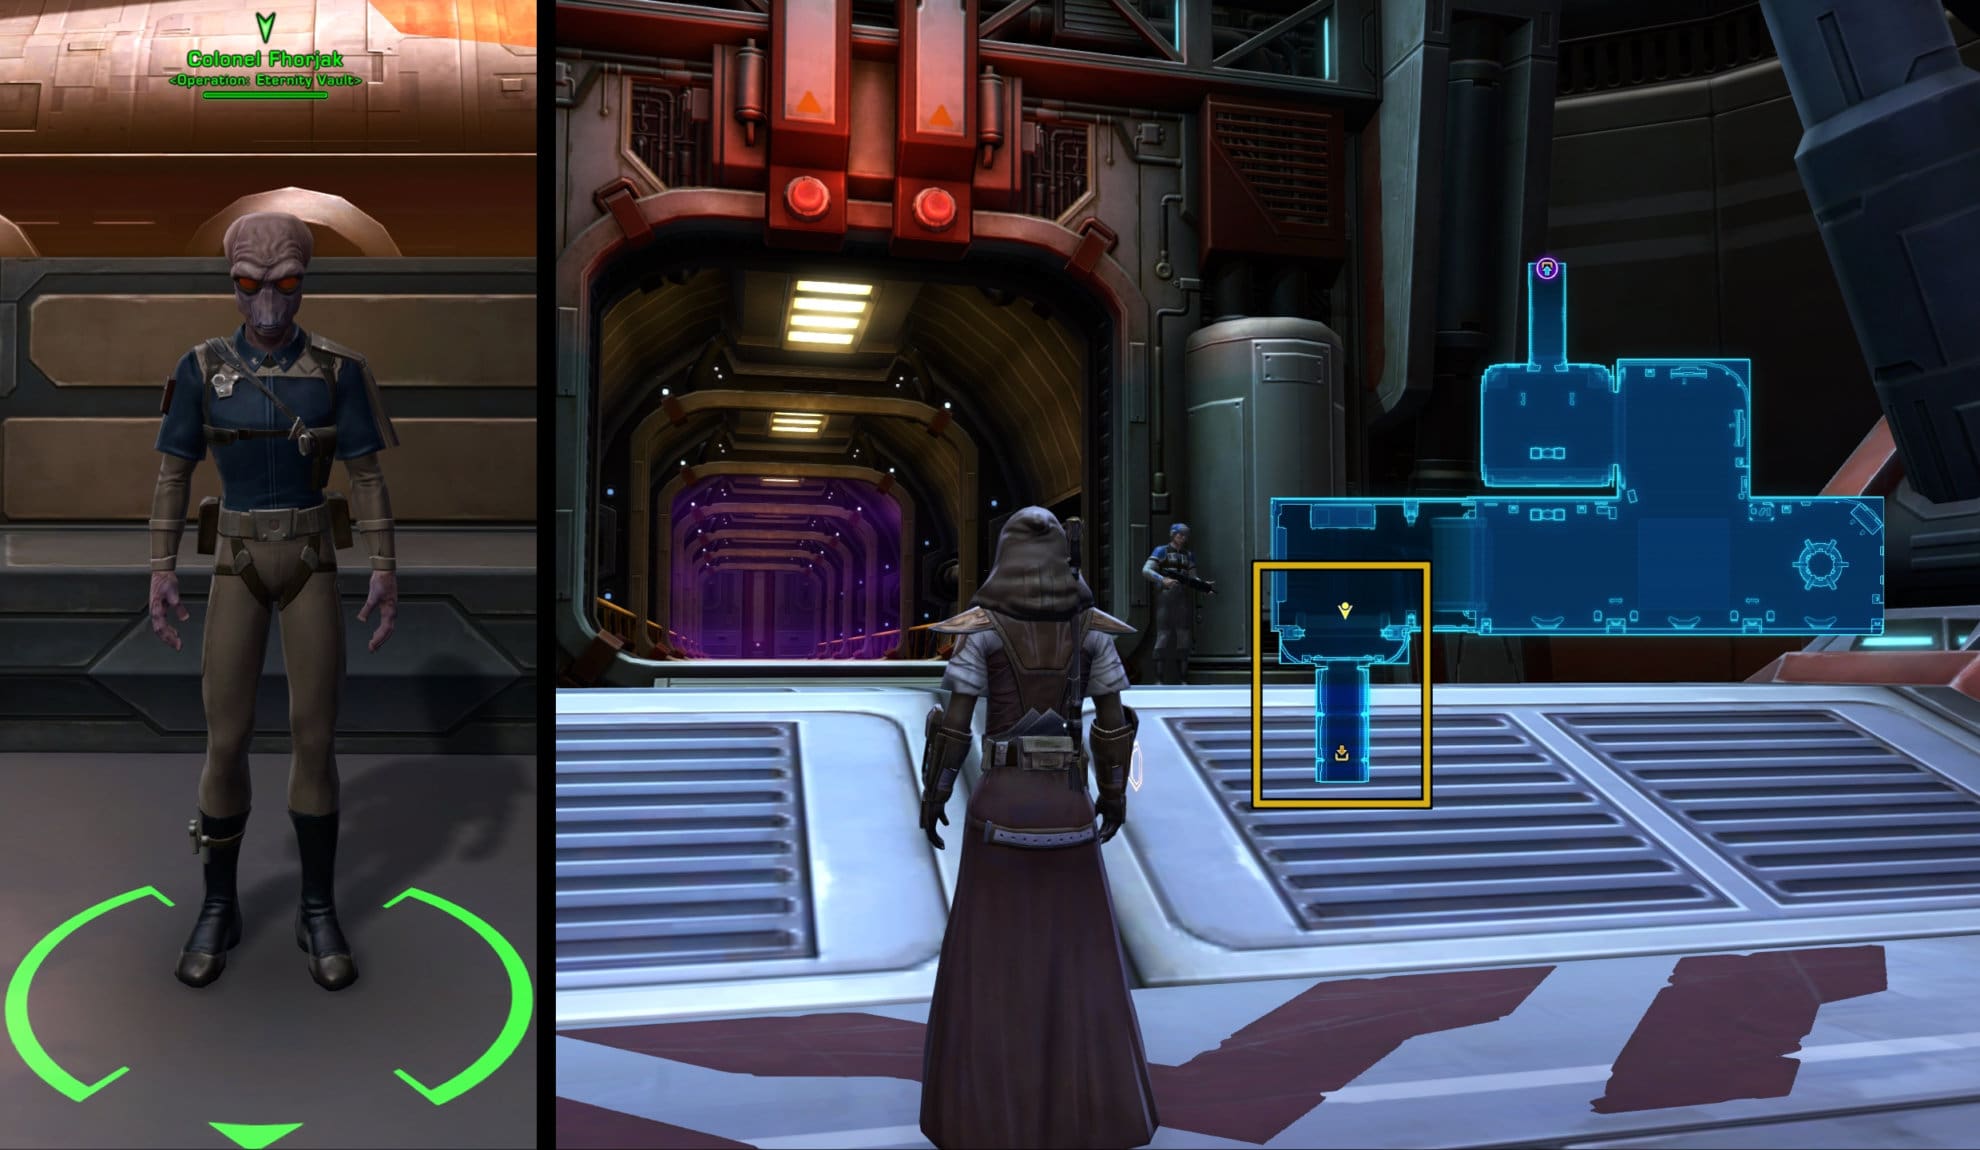
To start the Story for Eternity Vault and start the operation for Republic characters, you’ll need to the north side of the Ziost Shadow’s Mission Deck at the fleet. To start the story, you’ll need to talk to Colonel Fhorjak in the Belsavis Operations Hangar. The port that leads to the operation is on the left side of the room.
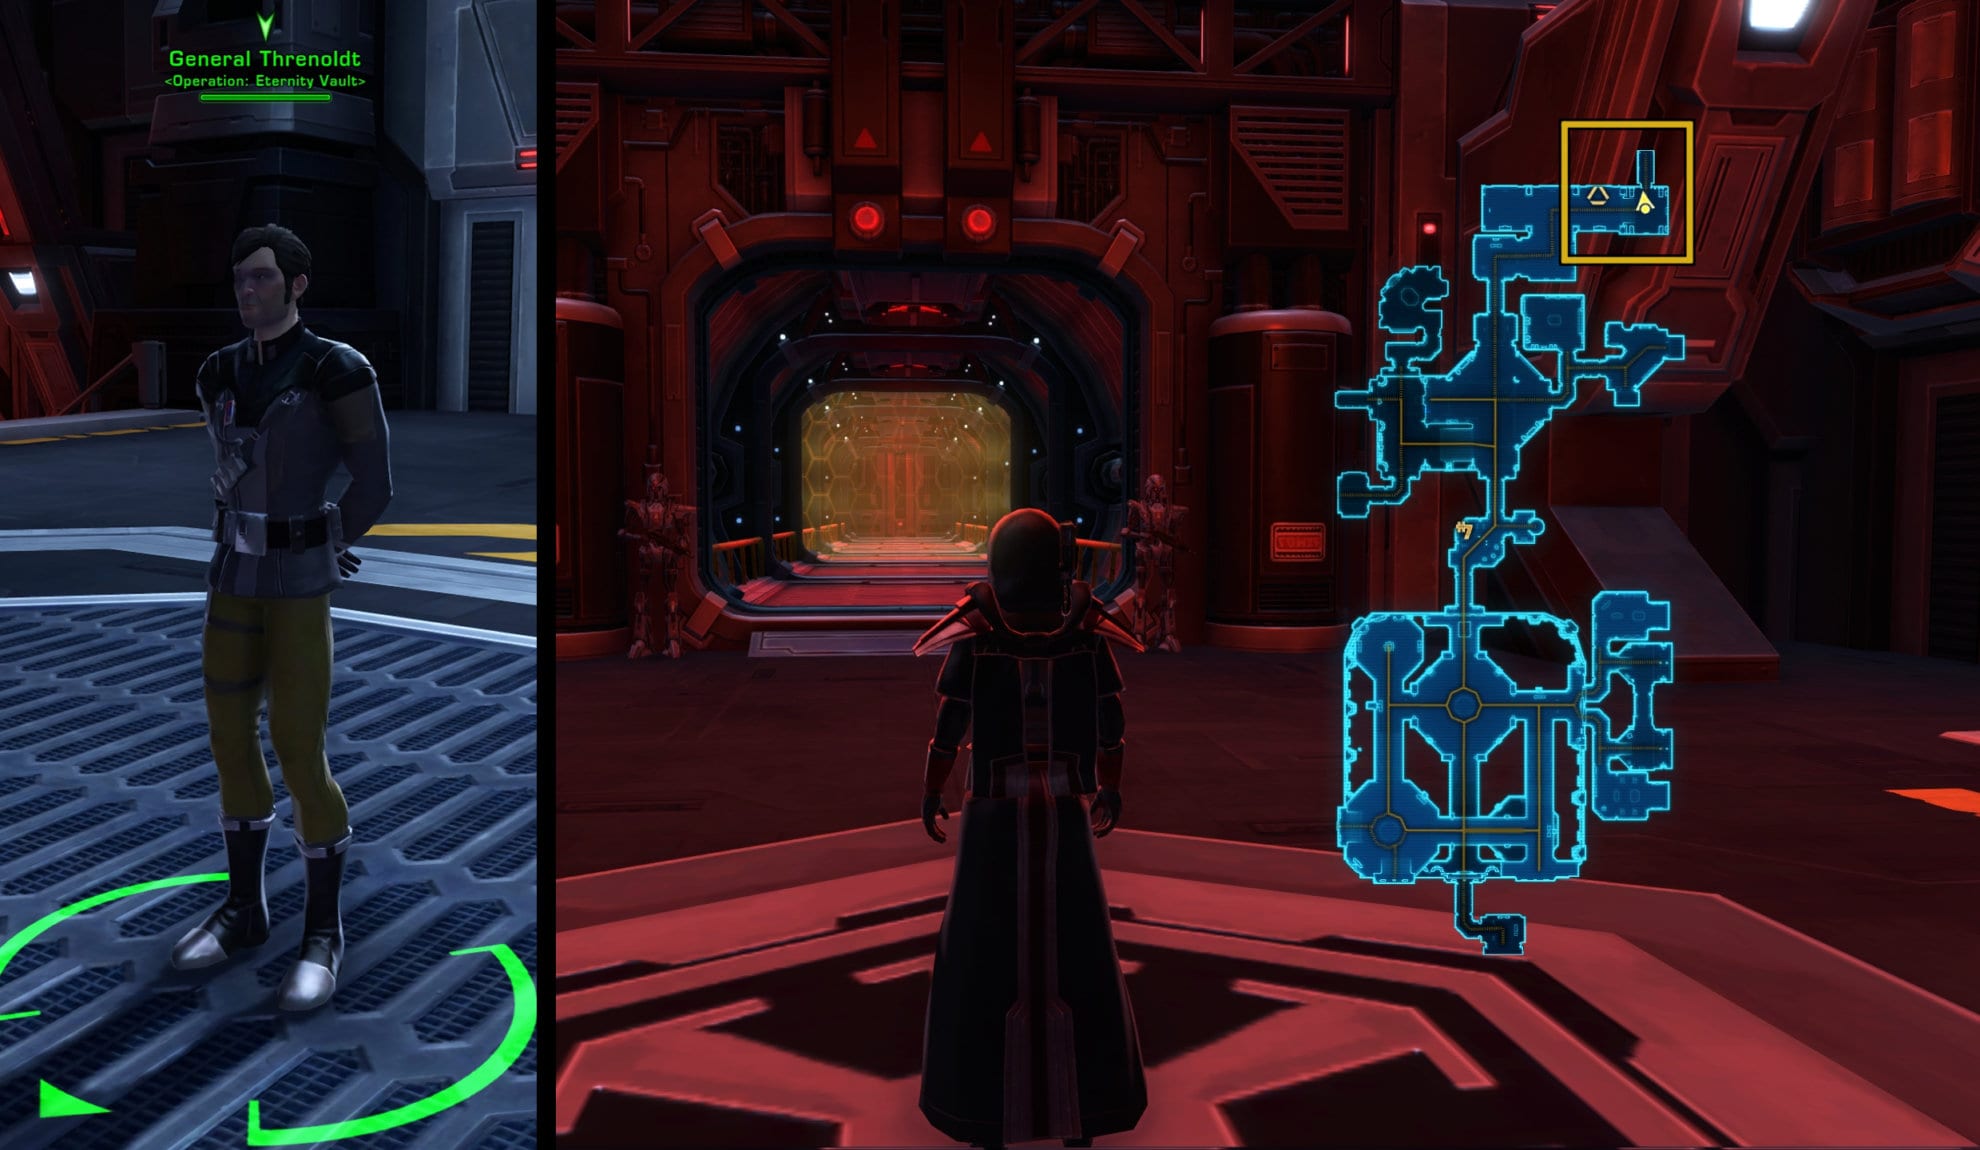
To start the Story for Eternity Vault and start the operation for Imperial characters, you’ll need to go the north side of the Ziost Shadow’s Mission Deck at the fleet. To start the story, you’ll need to talk to General Threnoldt. The port that leads to the operation is on the right side of the room.
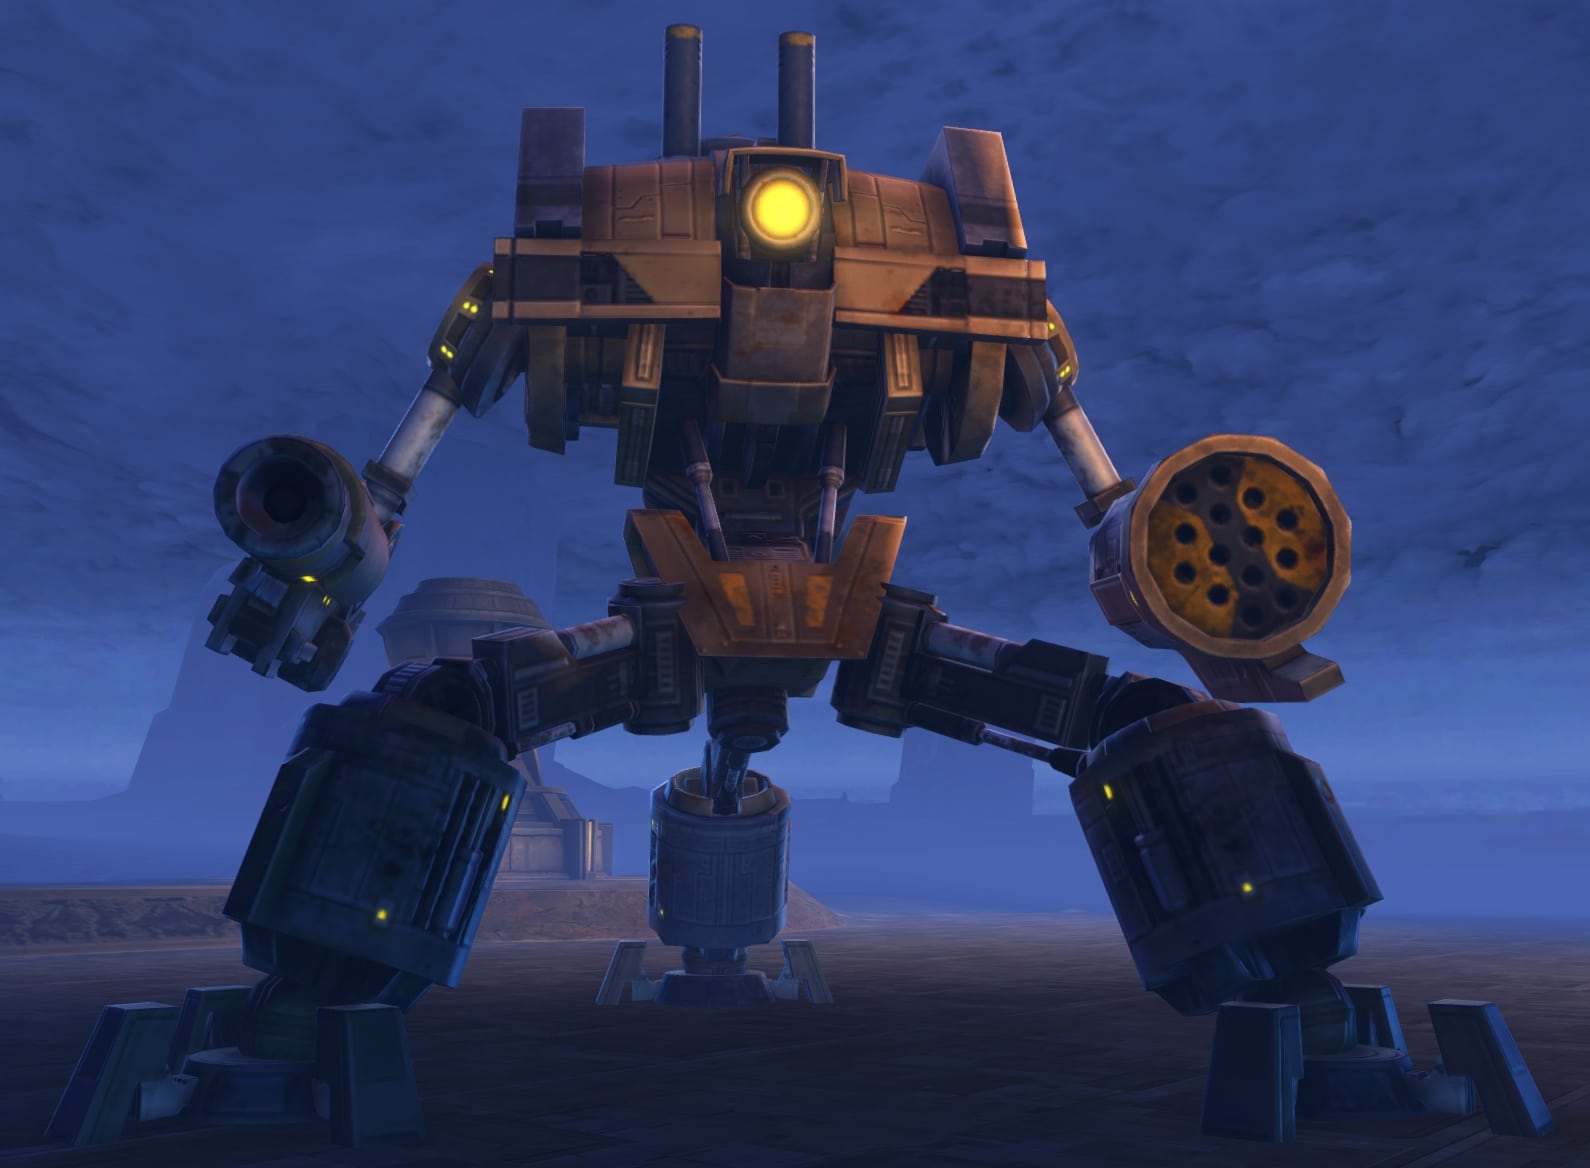
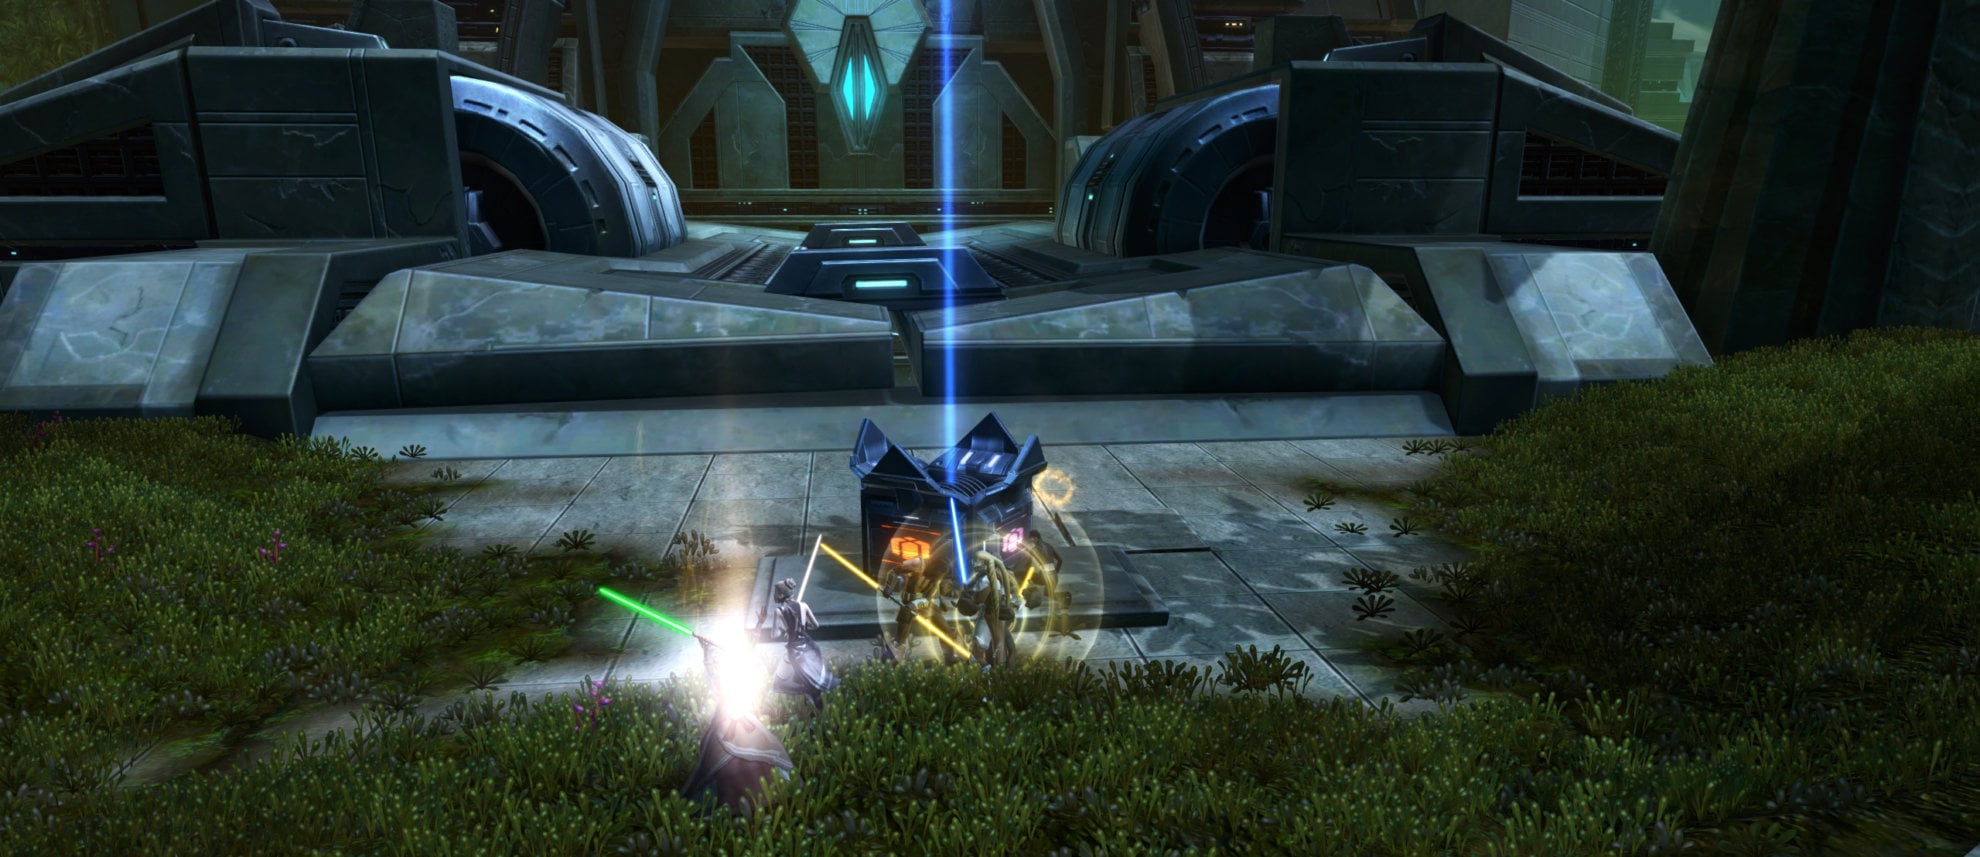
First Boss: Annihilation Droid XRR-3
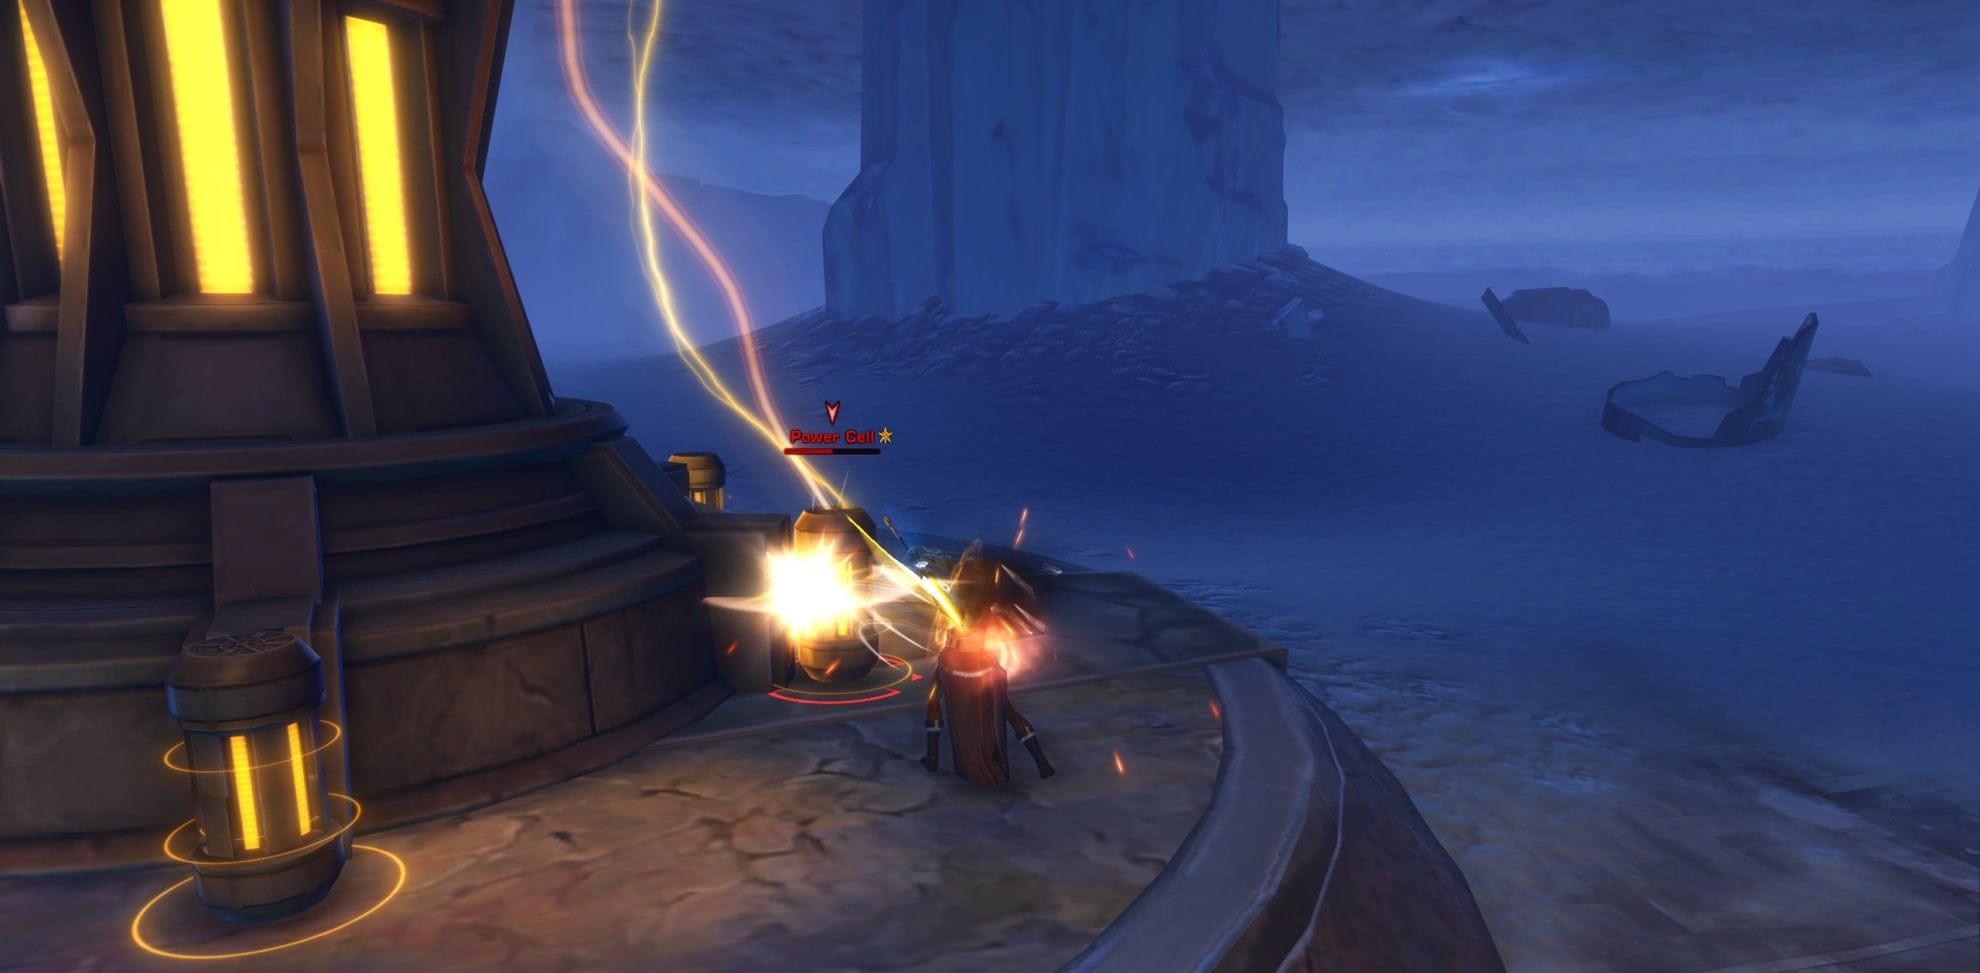
After using the escape pods to reach the planet’s surface, you’ll need to destroy two Perimeter Defense Cannons before you can fight the first boss. To destroy the cannons, you’ll need to destroy the power cells at the base of the turrets. After destroying the cells, they will either be destroyed or lose most of their health. In the latter scenario, you’ll need a single ranged attack to finish off the turret. If you’re melee, leap or dash to the cannon to finish it off.
The turrets have a large aggro range, so only go into the area if your team is ready as they deal considerable damage when they’re both focusing on a single target. If you’re ranged, you can also hit the turrets directly instead of aiming for the power cells. You can also do this as melee as it requires less target swapping, but can be annoying leaping or charging up there.
Once both turrets all destroyed, you’ll hear Soa monologue about XRR-3. Get used to this, he loves monologuing. Don’t get too close and like with every operation, give the tank a few seconds to build up aggro with their attacks.
To defeat this boss, everyone requires good placement on the map to efficiently take out XRR-3. It’s loaded with numerous AoEs that can have you grouping up one moment, and then spreading out the next.
Positioning
First thing first, knowing where the tank(s) stand and where the DPS and Healers stand. The tank should keep XRR-3 faced away from the group but at the same time, have their back facing a nearby corner. They can do this by standing at 10 o’clock of the boss’s default orientation. The boss will often push back the operation members a good distance, so limiting the distance you’re pushed back will help you get up sooner to regain aggro.
A Guardian/Juggernaut or Vanguard/Powertech can charge back to the boss after they’re pushed. A Shadow/Assassin cannot successfully Shadow/Phantom Stride back to the boss while mid-air. It’s good practice for any of these tanks to use their single target taunt while in the air but before they get too far away to taunt.
The positioning for the DPS and Healers is simple enough, melee DPS attack the boss from behind while ranged DPS and healers can afford some distance to avoid shockwaves. DPS and Healers should be spread out a bit if XRR-3 uses Storm Protocols.
Shockwave and Overwhelming Swipe
“Proximity Violation”
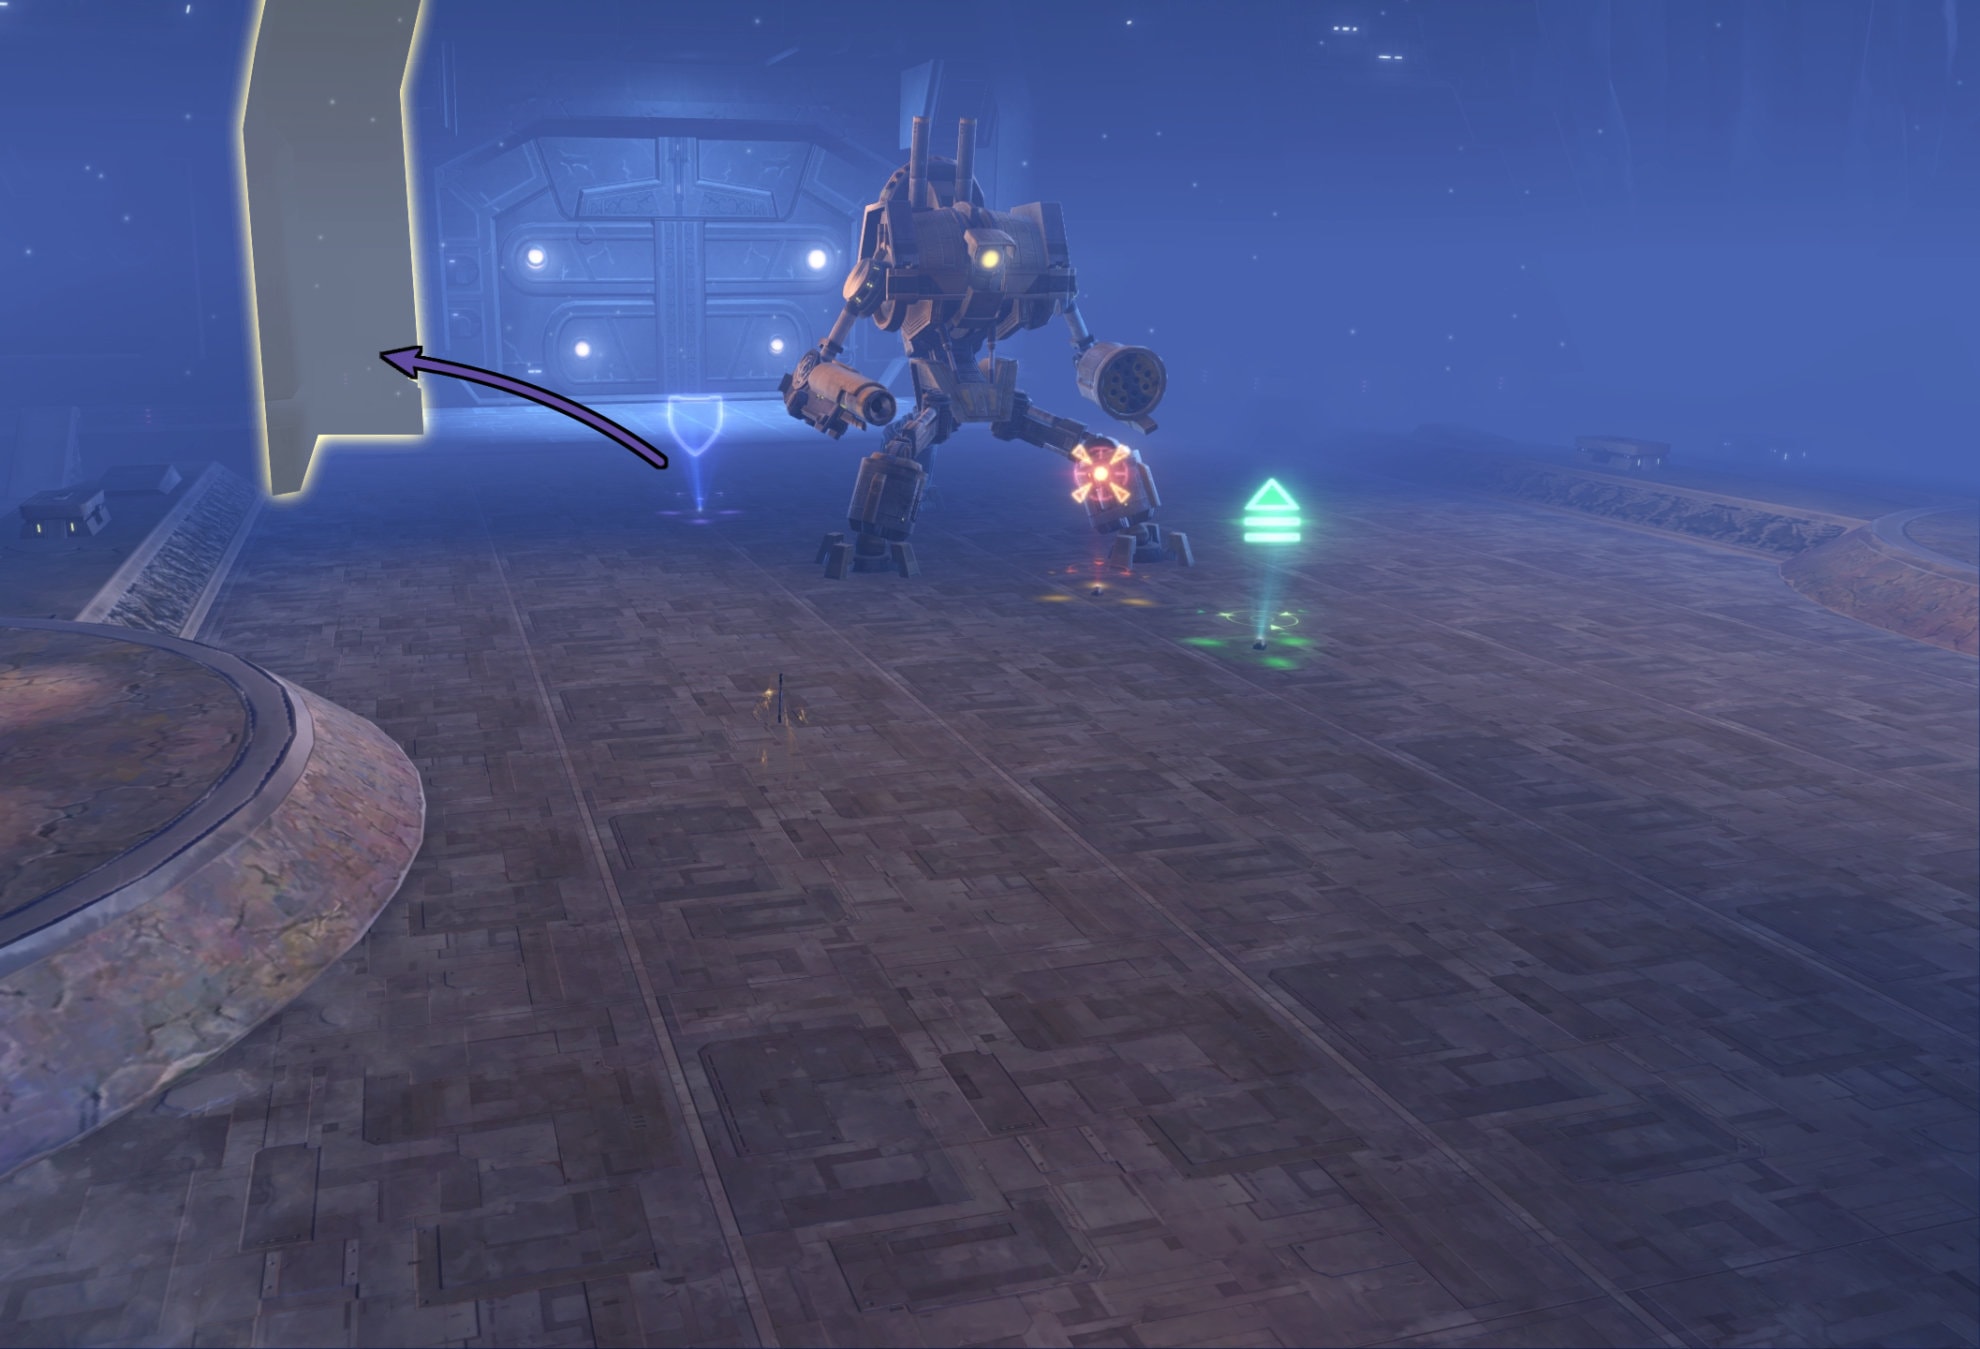
When you hear this from XRR-3, he’s about to use Shockwave followed by Overwhelming Swipe.
Two CC abilities XRR-3 has are Shockwave and Overwhelming Swipe. These two go hand in hand, so melee characters need to be prepared for this. If XRR-3 raises a leg, he’s going to stomp it to use Shockwave. Anyone hit by Shockwave will be stunned for a few seconds.
After using Shockwave, XRR-3 will use Overwhelming Swipe to push away anyone nearby. The tank should use their single target taunt against XRR-3 mid-air if they are being pushed away. If the tank isn’t knocked back, they should use their AoE taunt as XRR-3 will reset aggro after using Overwhelming Swipe. Melee units should charge or dash back to XRR-3 as soon as they are able as this is often followed by a Missile Salvo.
Missile Salvo
“I have been armed with 24 distinct weapons technologies”
When you hear this from XRR-3, he’s about to use Missile Salvo.
This is when everyone needs to group up for AoE heals. The DPS and Healers should stack behind the boss for group healing. The tank won’t take too much damage from this barrage and should only need light healing.
Missile Salvo counts as a ranged attack. Any DCD that increases damage reduction or defense chance is good to use when XRR-3 is using Missile Salvo. With enough luck and/or defense chance, you can outright dodge the incoming missiles.
Storm Protocols
“Enemy tactics analyzed. Engaging storm protocols.”
When you hear this from XRR-3, he’s about to use Storm Protocols.
Storm Protocols is easy to dodge but can be hard to manage if your group is not well coordinated. Red circles may appear underneath you at random intervals, you will need to avoid running into other players while escaping these AoEs to avoid drawing the AOEs to them. When finished casting, the tank should regain aggro through taunts so XRR-3 doesn’t target someone else.
Storm Protocols deals Force/Tech damage, you can pop your DCDs that combat this type of damage to keep yourself alive and make it easier on the healers.
That’s about it for XRR-3, so maintain your positions, deal with the various AoEs appropriately, and you’ll do just fine.
Veteran Mode Differences
There are no mechanical differences in Veteran Mode, but the tanks need to be sure to maintain aggro at all times to protect the DPS and Healers. So long as everyone groups up for heals during Missile Salvo, this will be an easy encounter.
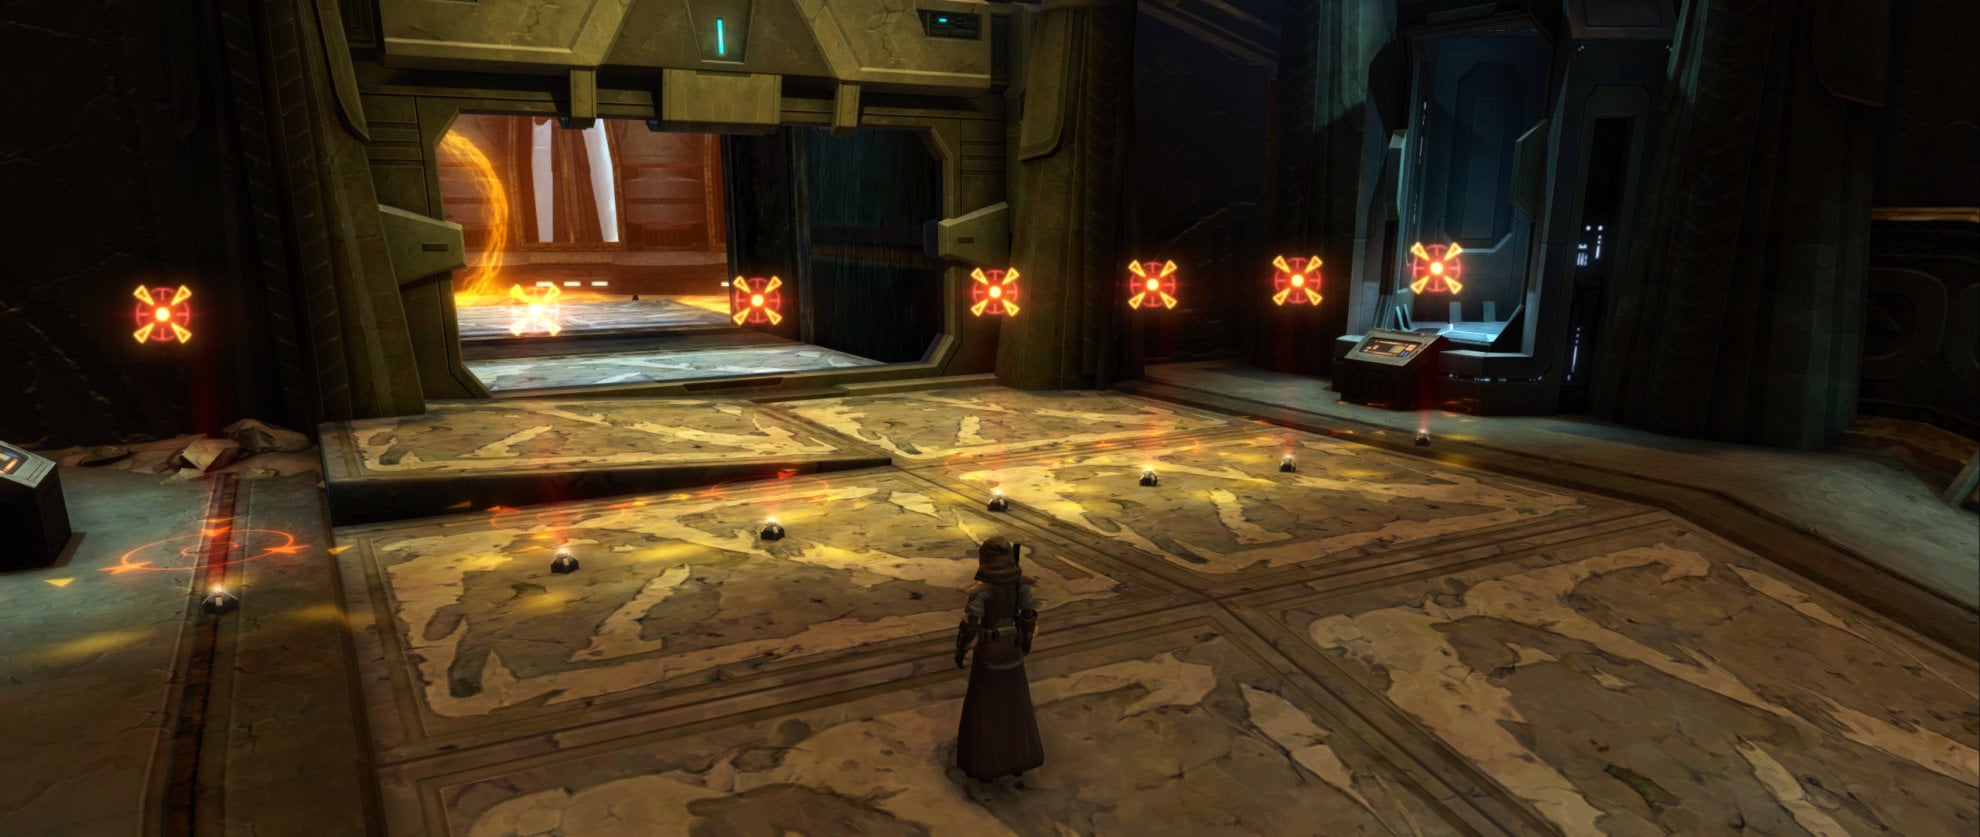
The Prison Block
To access the Prison Block, you’ll need to open the gate behind XRR-3. This gate is held together by 8 Exposed Wirings. Simply right-click all of them to open the path to the Prison Block.
The path through the Prison Block is straight forward but it’s fairly hazardous. There are actually two paths you can take, the standard path or the shortcut commonly used by stealth classes. The latter option provides a shortcut for everyone in the group but we’ll be going over the main path first.
After crossing some narrow bridges, you’ll reach the walkways around the prison block. You’ll need to fight through Eternal Warden probe droids and Escaped Infernal Thralls trying to escape the prison. The Eternal Wardens in particular are an issue as they can push back opponents, so keep your back to the wall otherwise you’ll be pushed off into the chasm below.
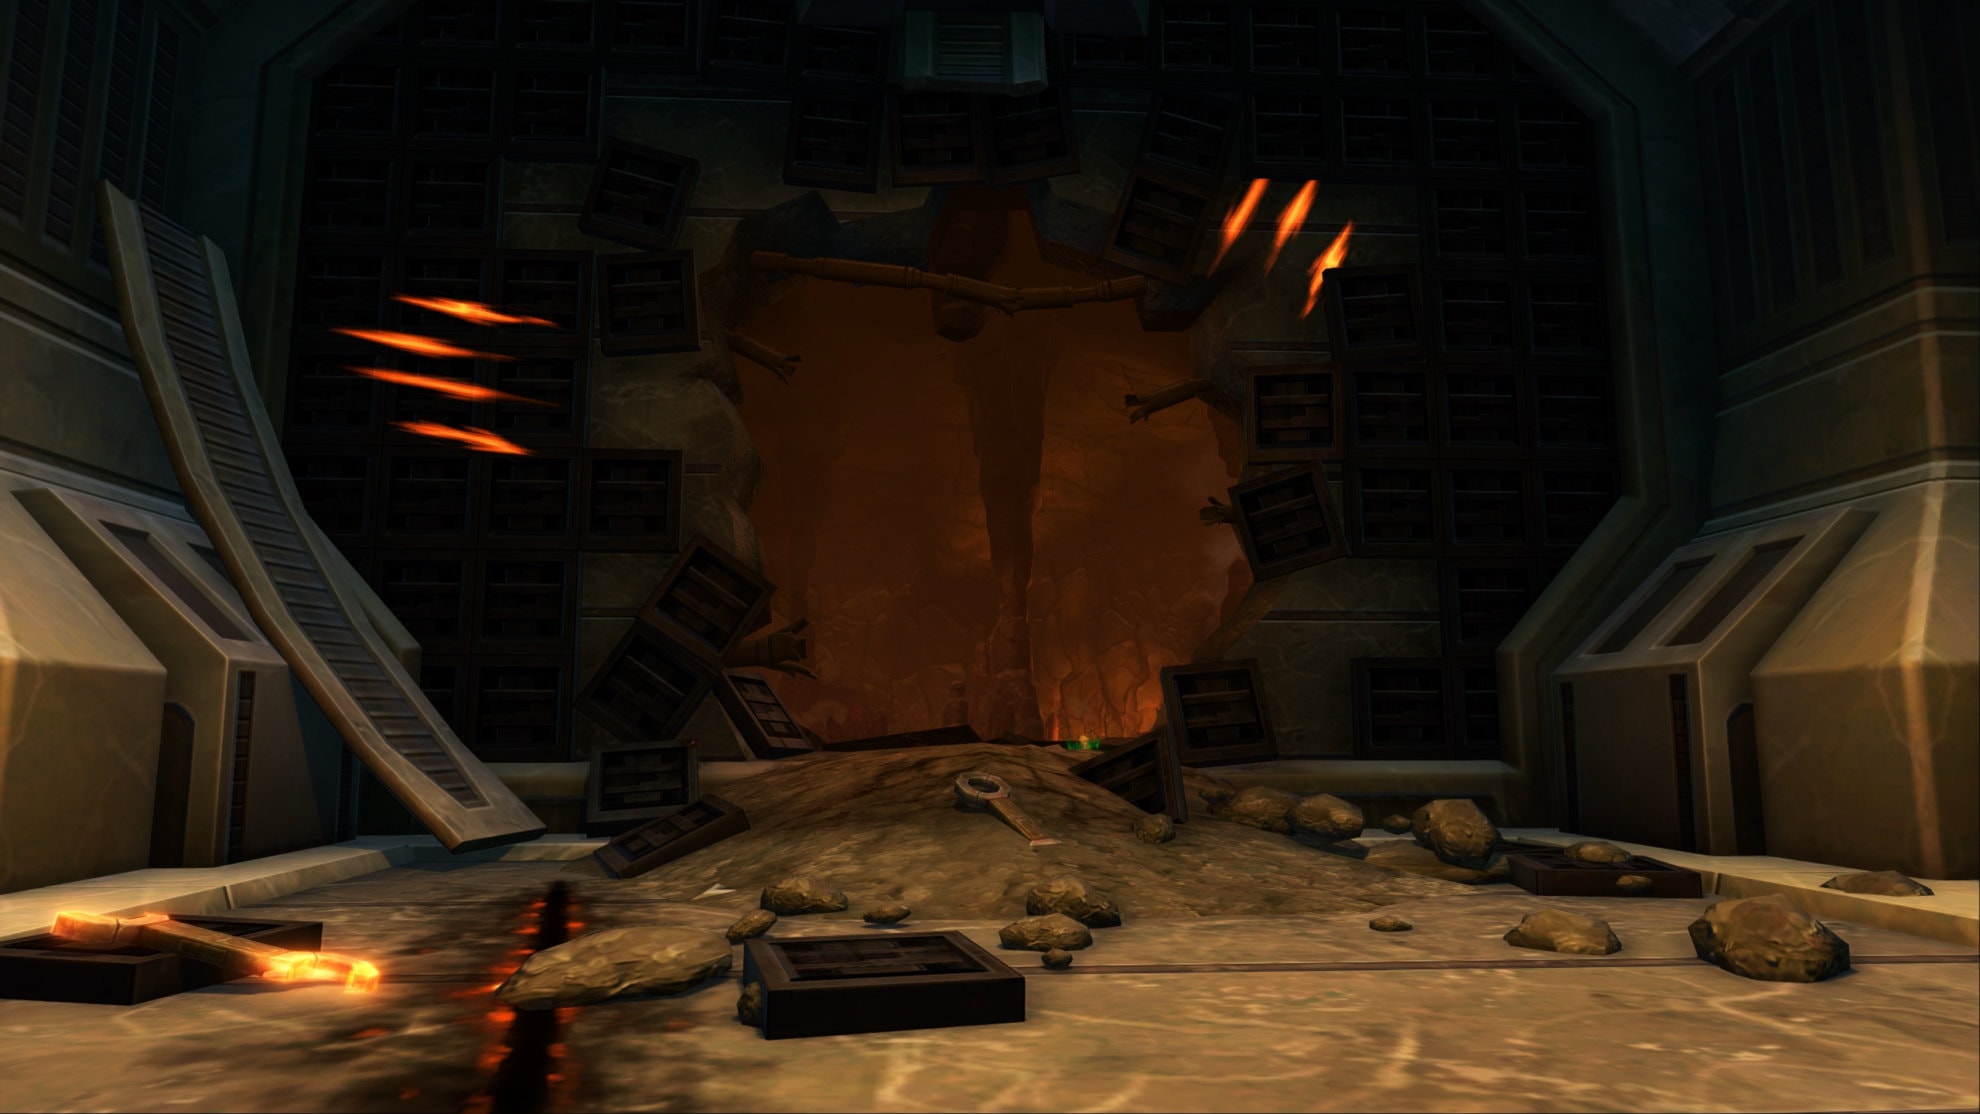
After fighting your way through the prison block, you’ll reach an empty cell that is filled with claw marks and a wall that was ripped open. Something big came through here, so now you have to follow it! This entrance leads to the Gharj Lava Cave.
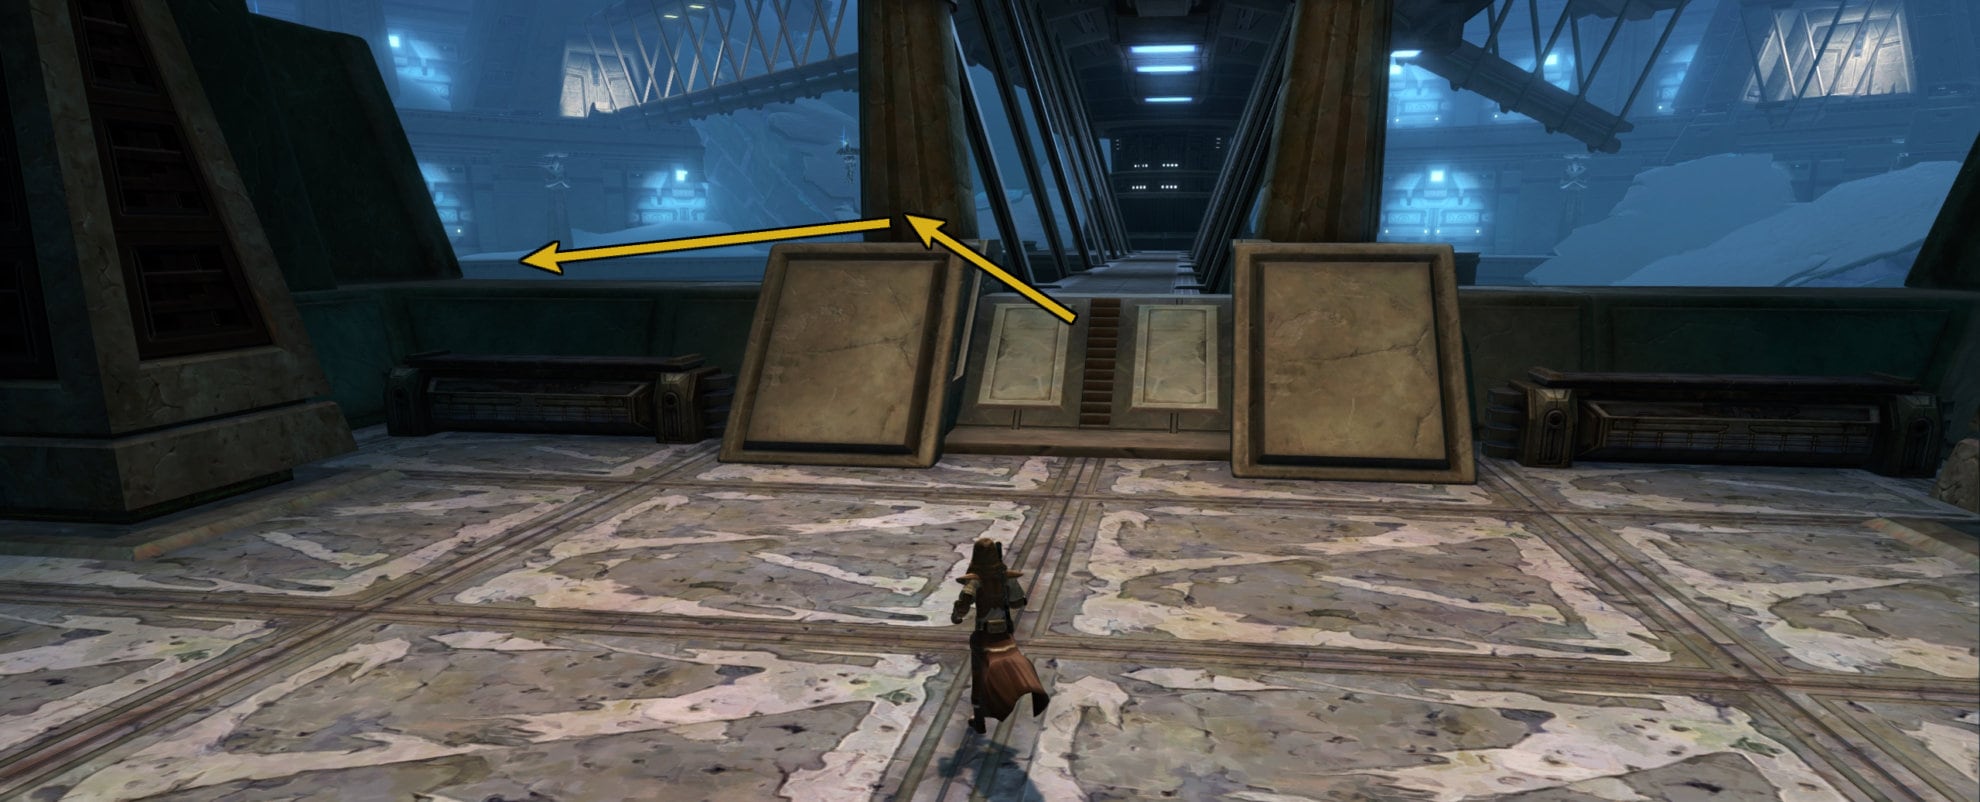
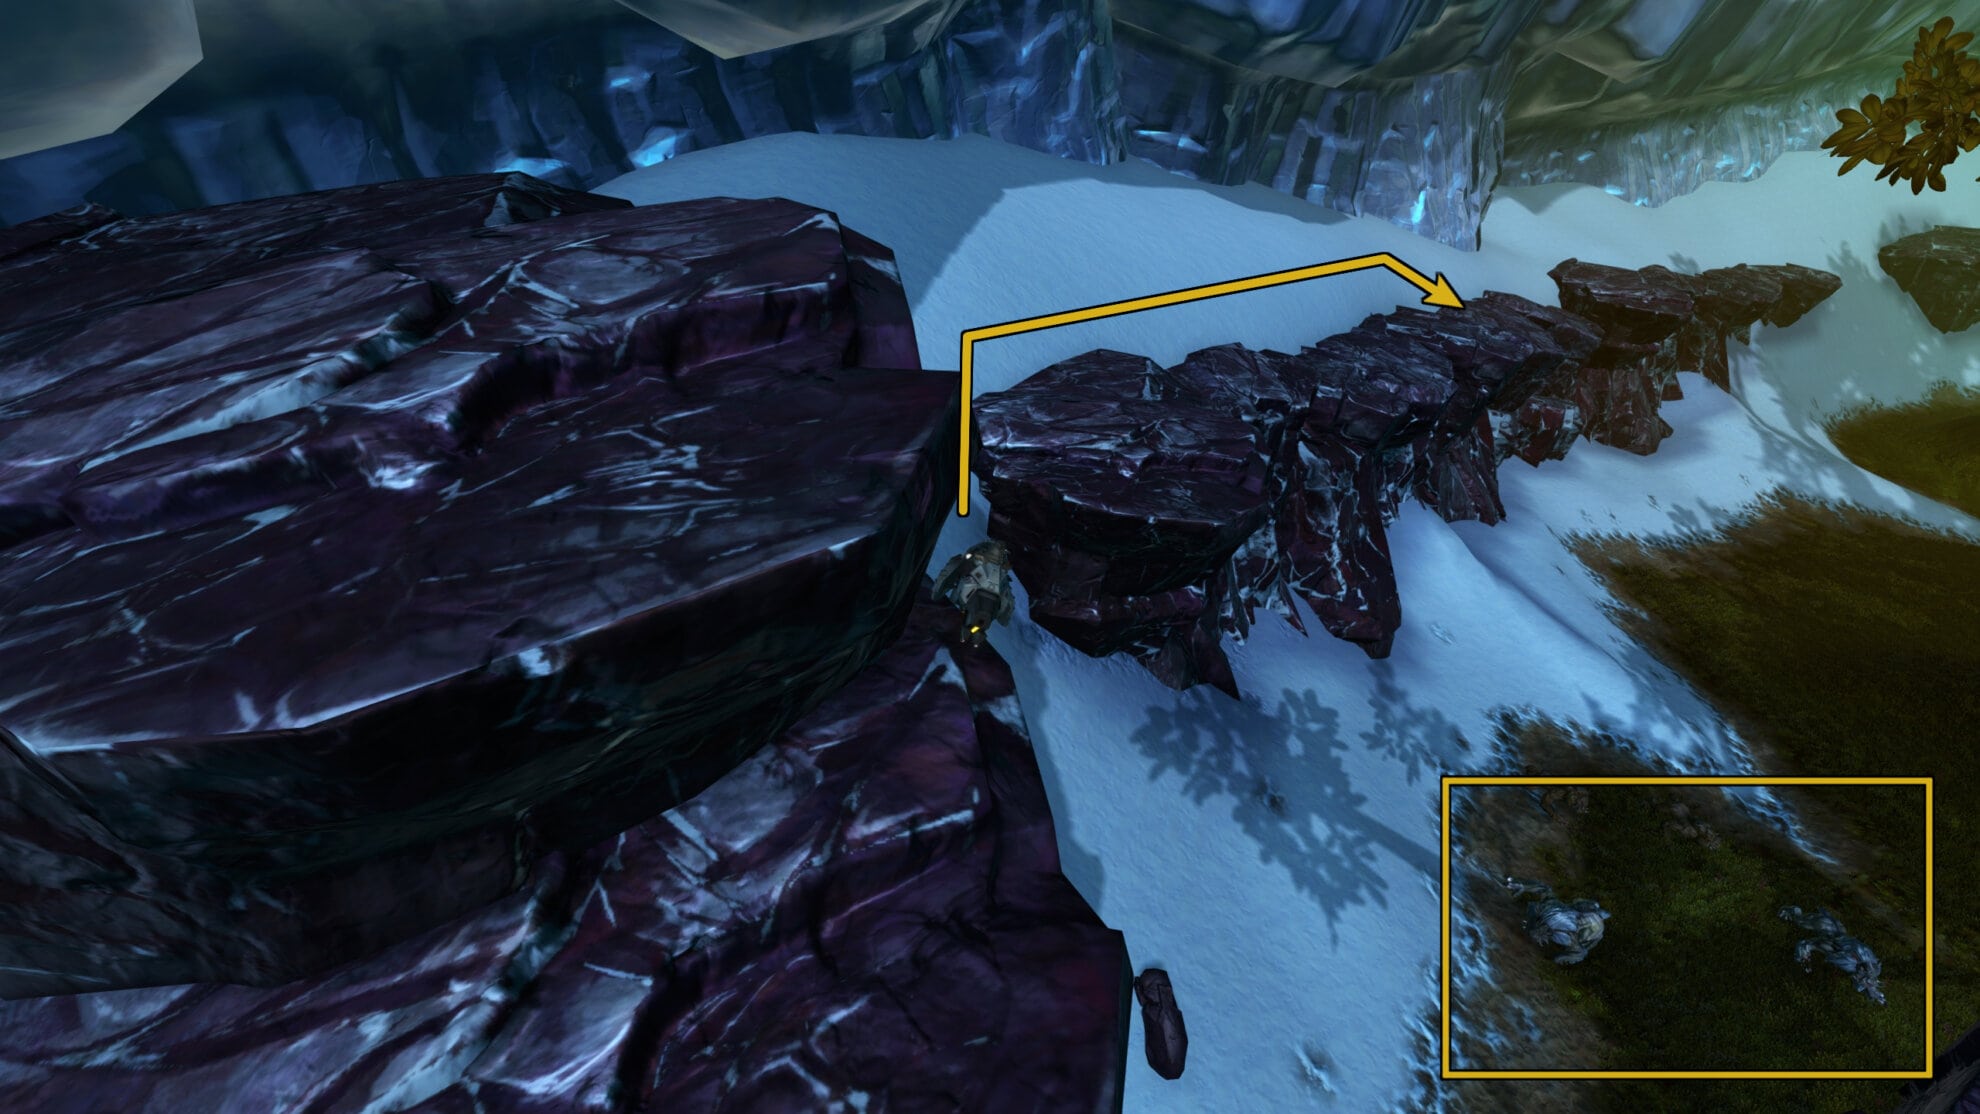
Prison Block Shortcut
The most common path to circumvent the Prison Block is to long jump down to a ledge near the door that leads to the Gharj Lava Cave. This is primarily used by stealth classes so they can avoid getting ganged up on by all the enemies in the area.
If you’re sufficiently tanky and mobile enough, you can still get through this though you’ll end up dying at the end of the experience. You require Force Speed, Scamper/Exfiltrate, or the Rocket Boost ability Legacy unlock to use this shortcut.
To start the shortcut, make your way to the first bridge in the Prison Block and jump onto the ledge on the left. You’ll see a ledge below you, this is your goal. Line the center of your character with the corner of the ledge, and with your target destination at the bottom. Step back, and activate your Rocket Boots (Force Speed and Scamper/Exfiltrate also work here), and land at the ledge below.
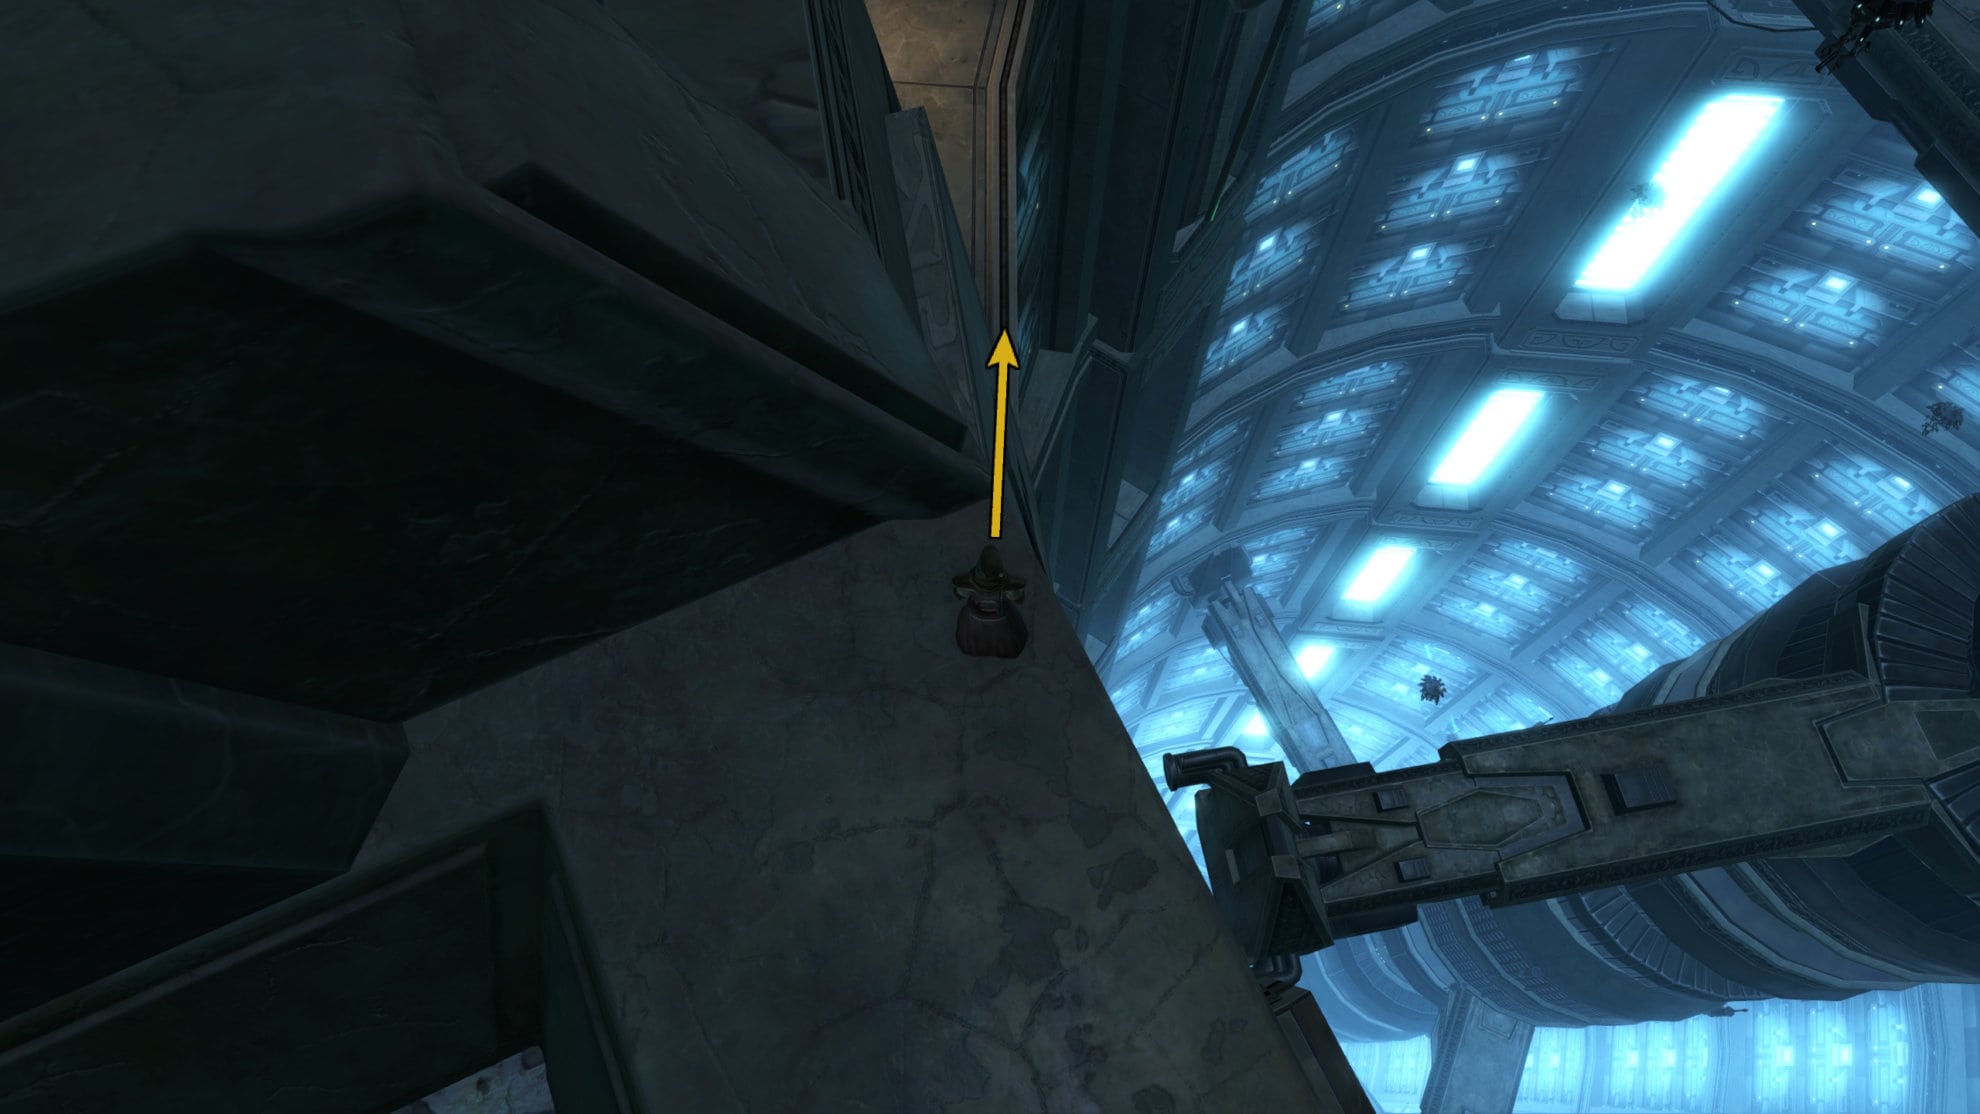
Heal up, use stealth if you have it, and make your way to the Gharj Lava Cave. Don’t get too close to the Eternal Wardens when they’re using a blue scanner around them, this might cause them to break your stealth. Don’t get too close to the Firestalkers (giant lava Akk Dogs), and reach Gharj. Don’t stop until you hear Soa monologue about Gharj.
You can watch this short video below for more clarity regarding this shortcut.
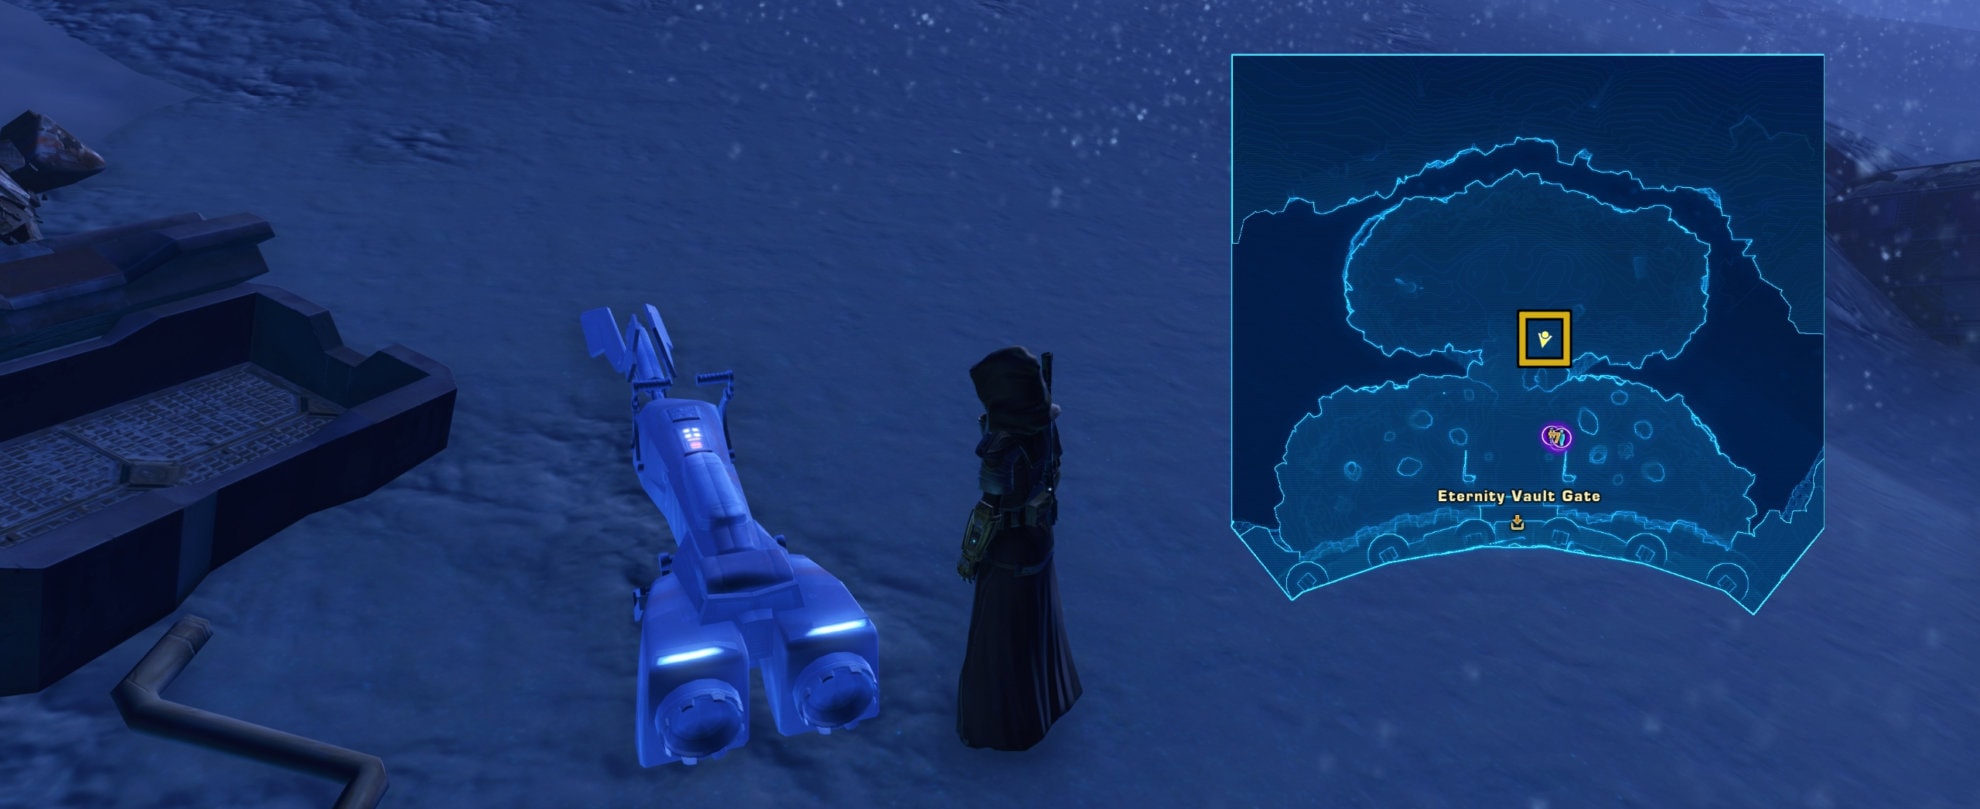
Gharj should appear when the speeder shortcut is activated. Once you hear Soa, you know for sure that the speeder at the start of the operation is active. This speeder can be used to reach the latest boss encounter the group has reached and allow the non-stealthers to skip the adds and get straight to Gharj.
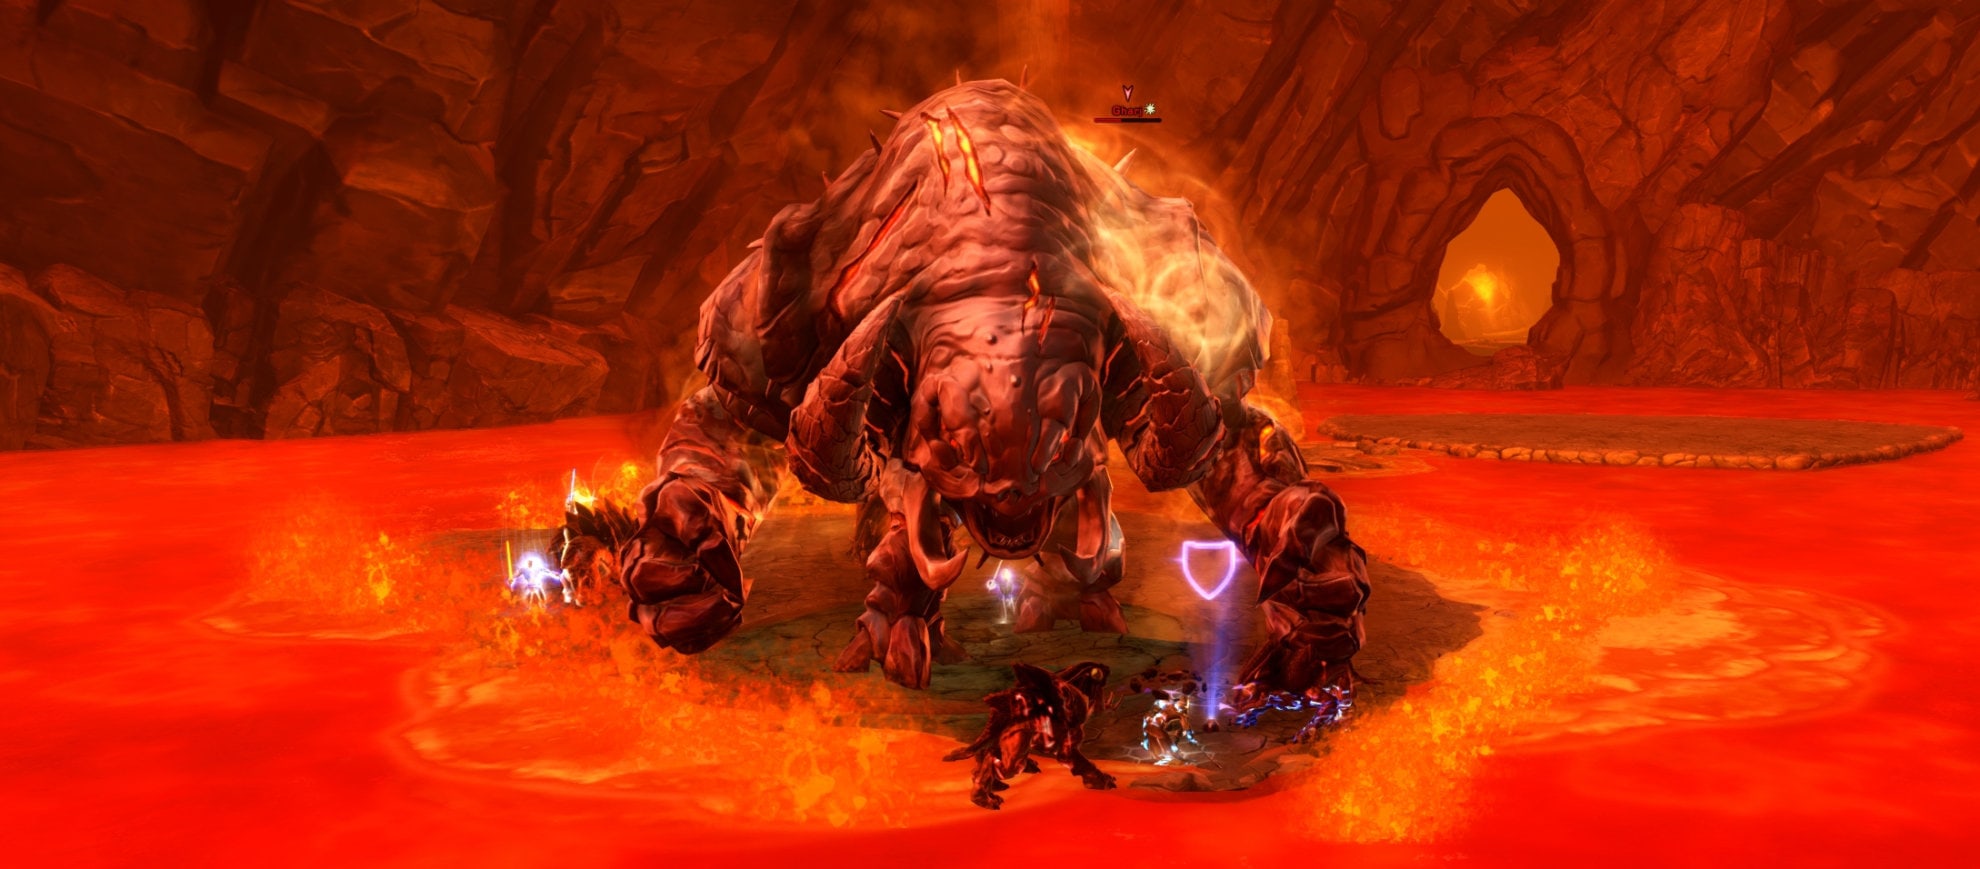
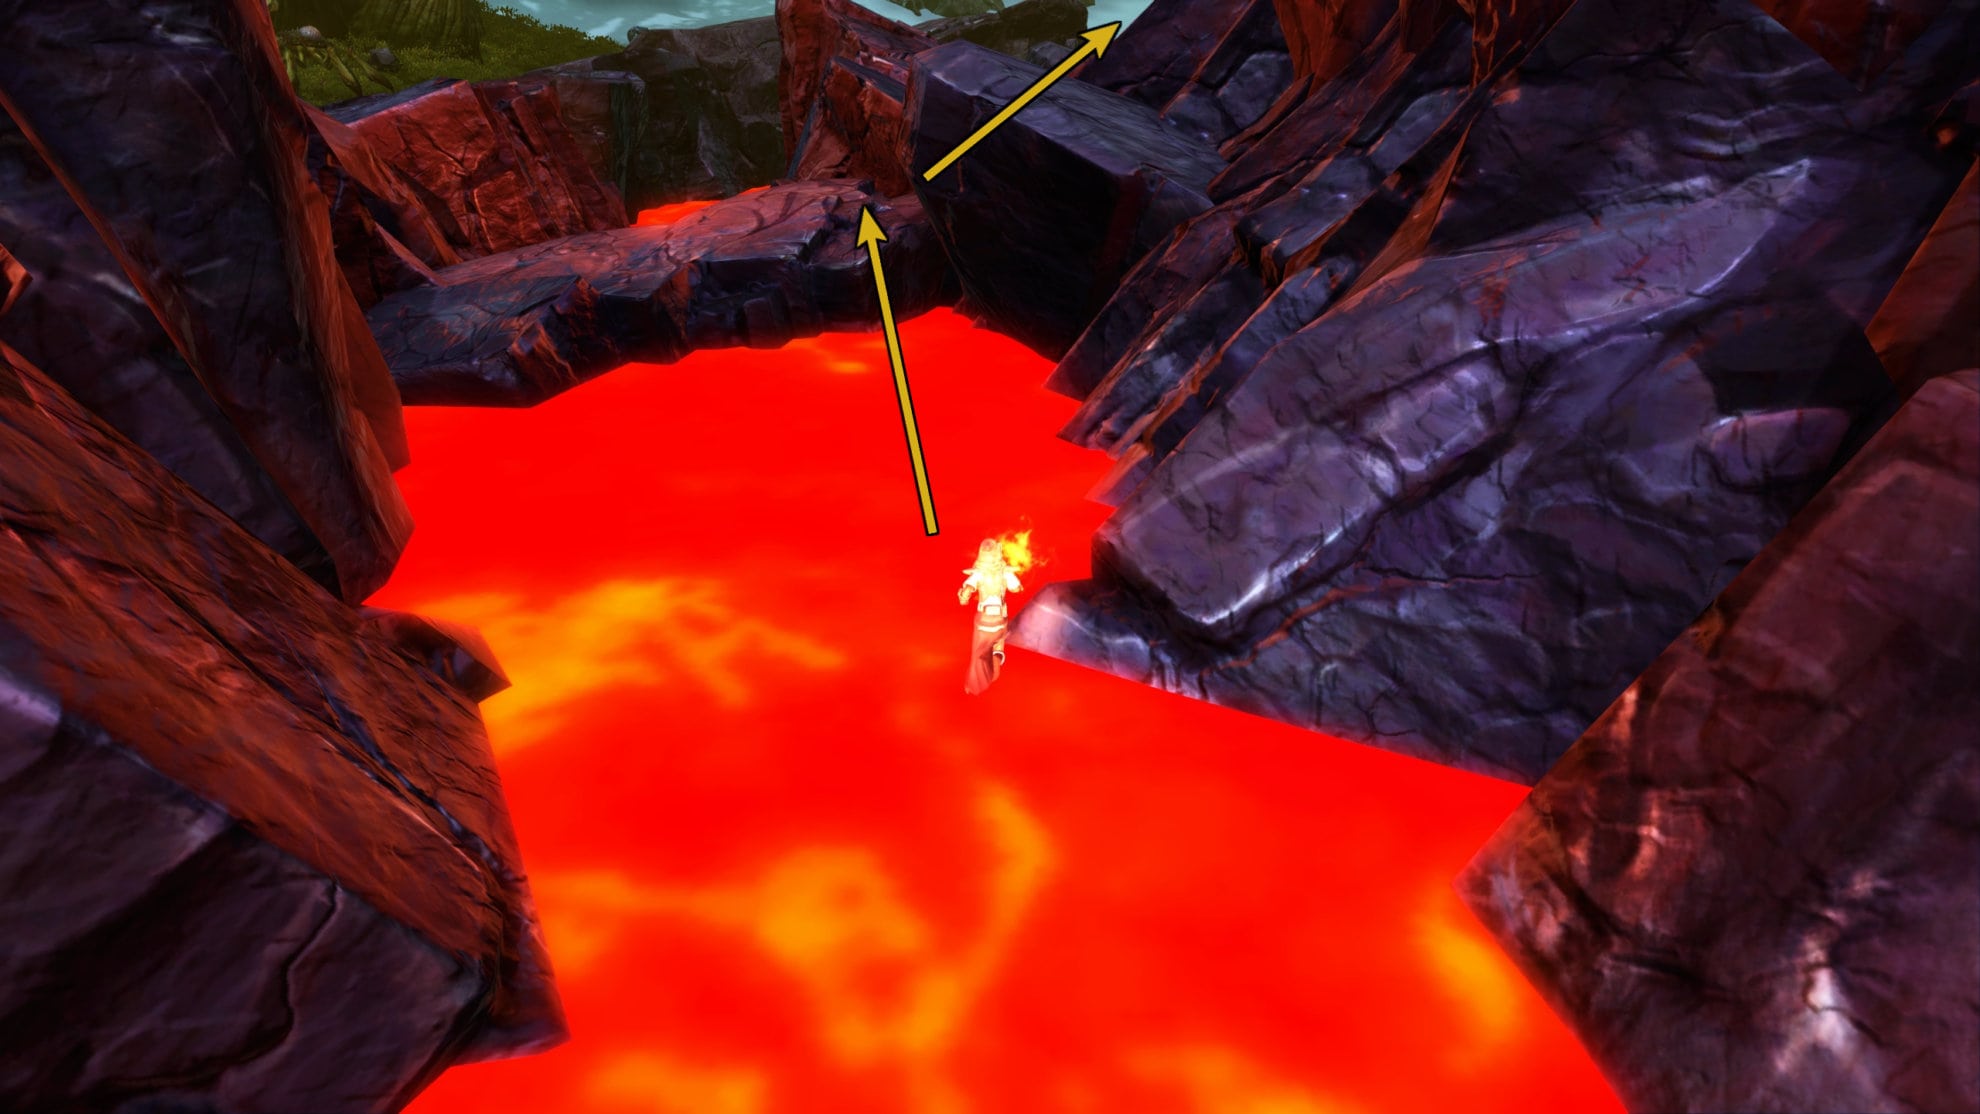
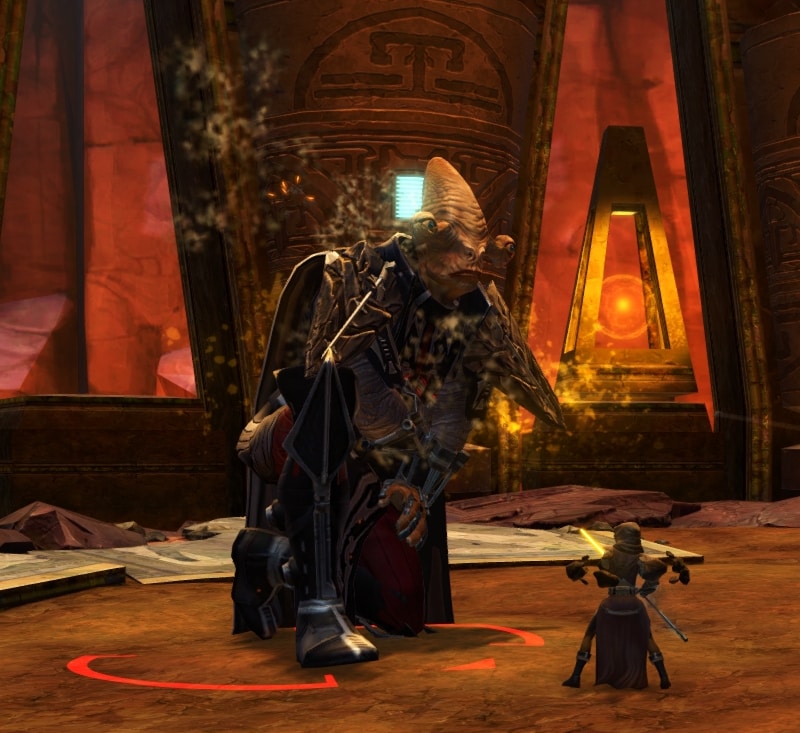
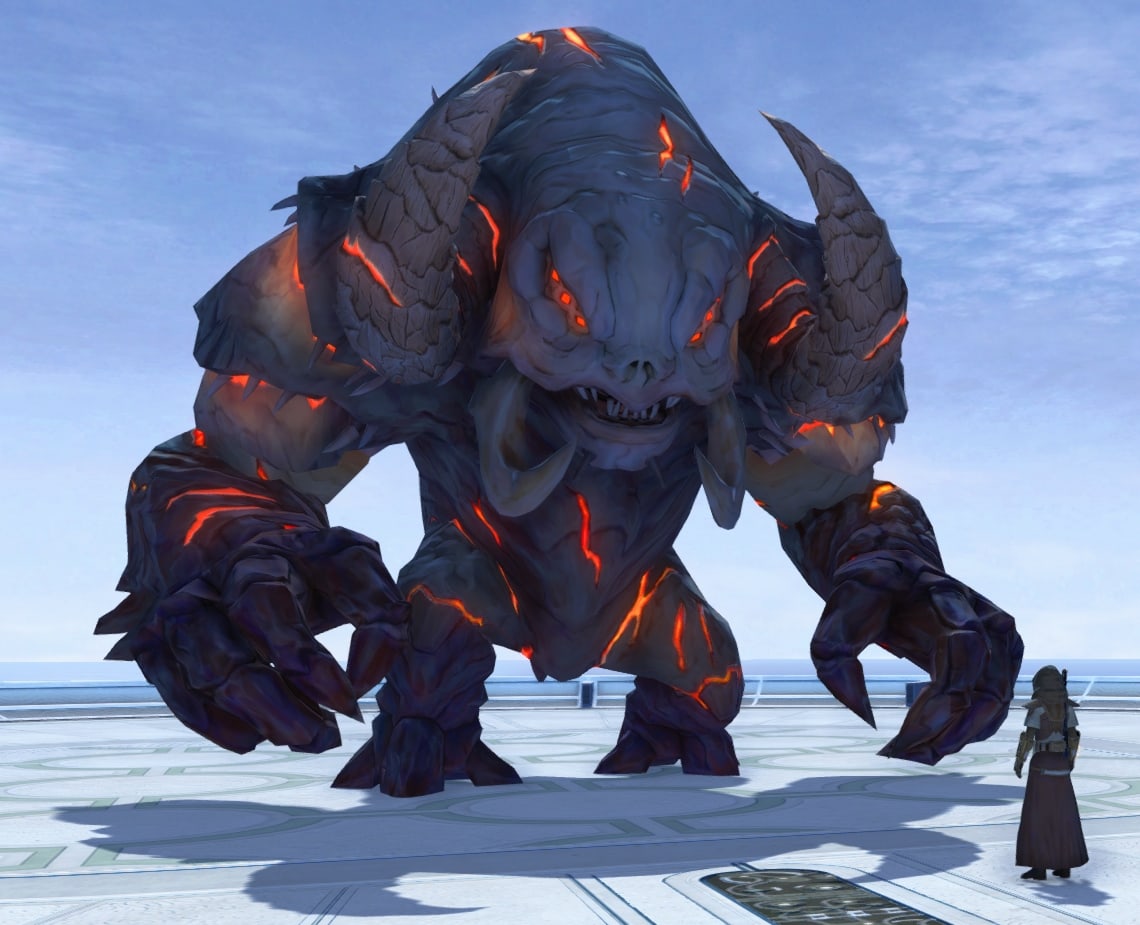
Second Boss: Gharj
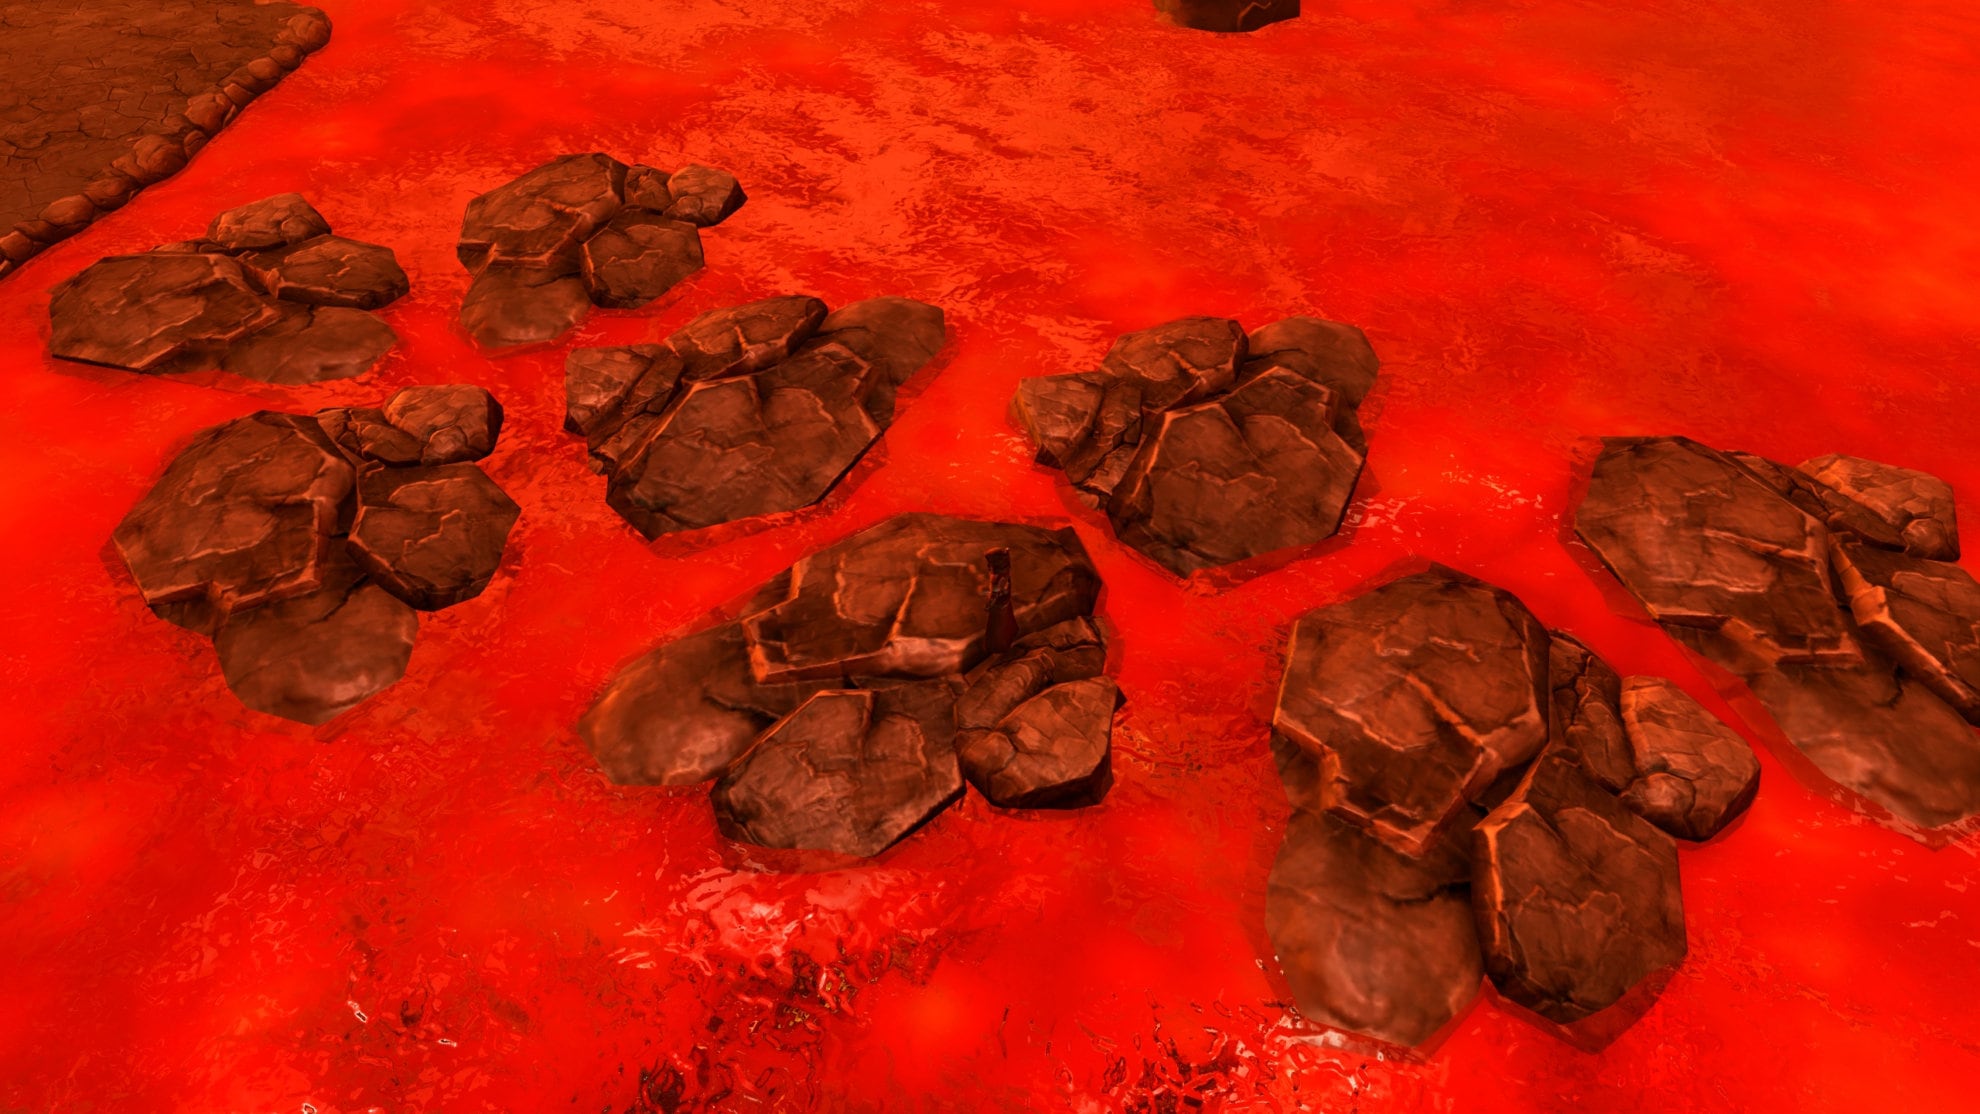
When you reach Gharj, you’ll have to jump across some rocks or take damage from the lava below. If you’re new to this encounter, take some time to practice jumping across these rocks without taking lava damage. This is a core feature that you’ll need to master for the boss fight.
This fight heavily depends on the tank’s ability to position on Story and Veteran Modes. In this fight, you’ll have to avoid falling into lava, get out of the lava if you’re knocked into it, and have good map awareness throughout the fight.
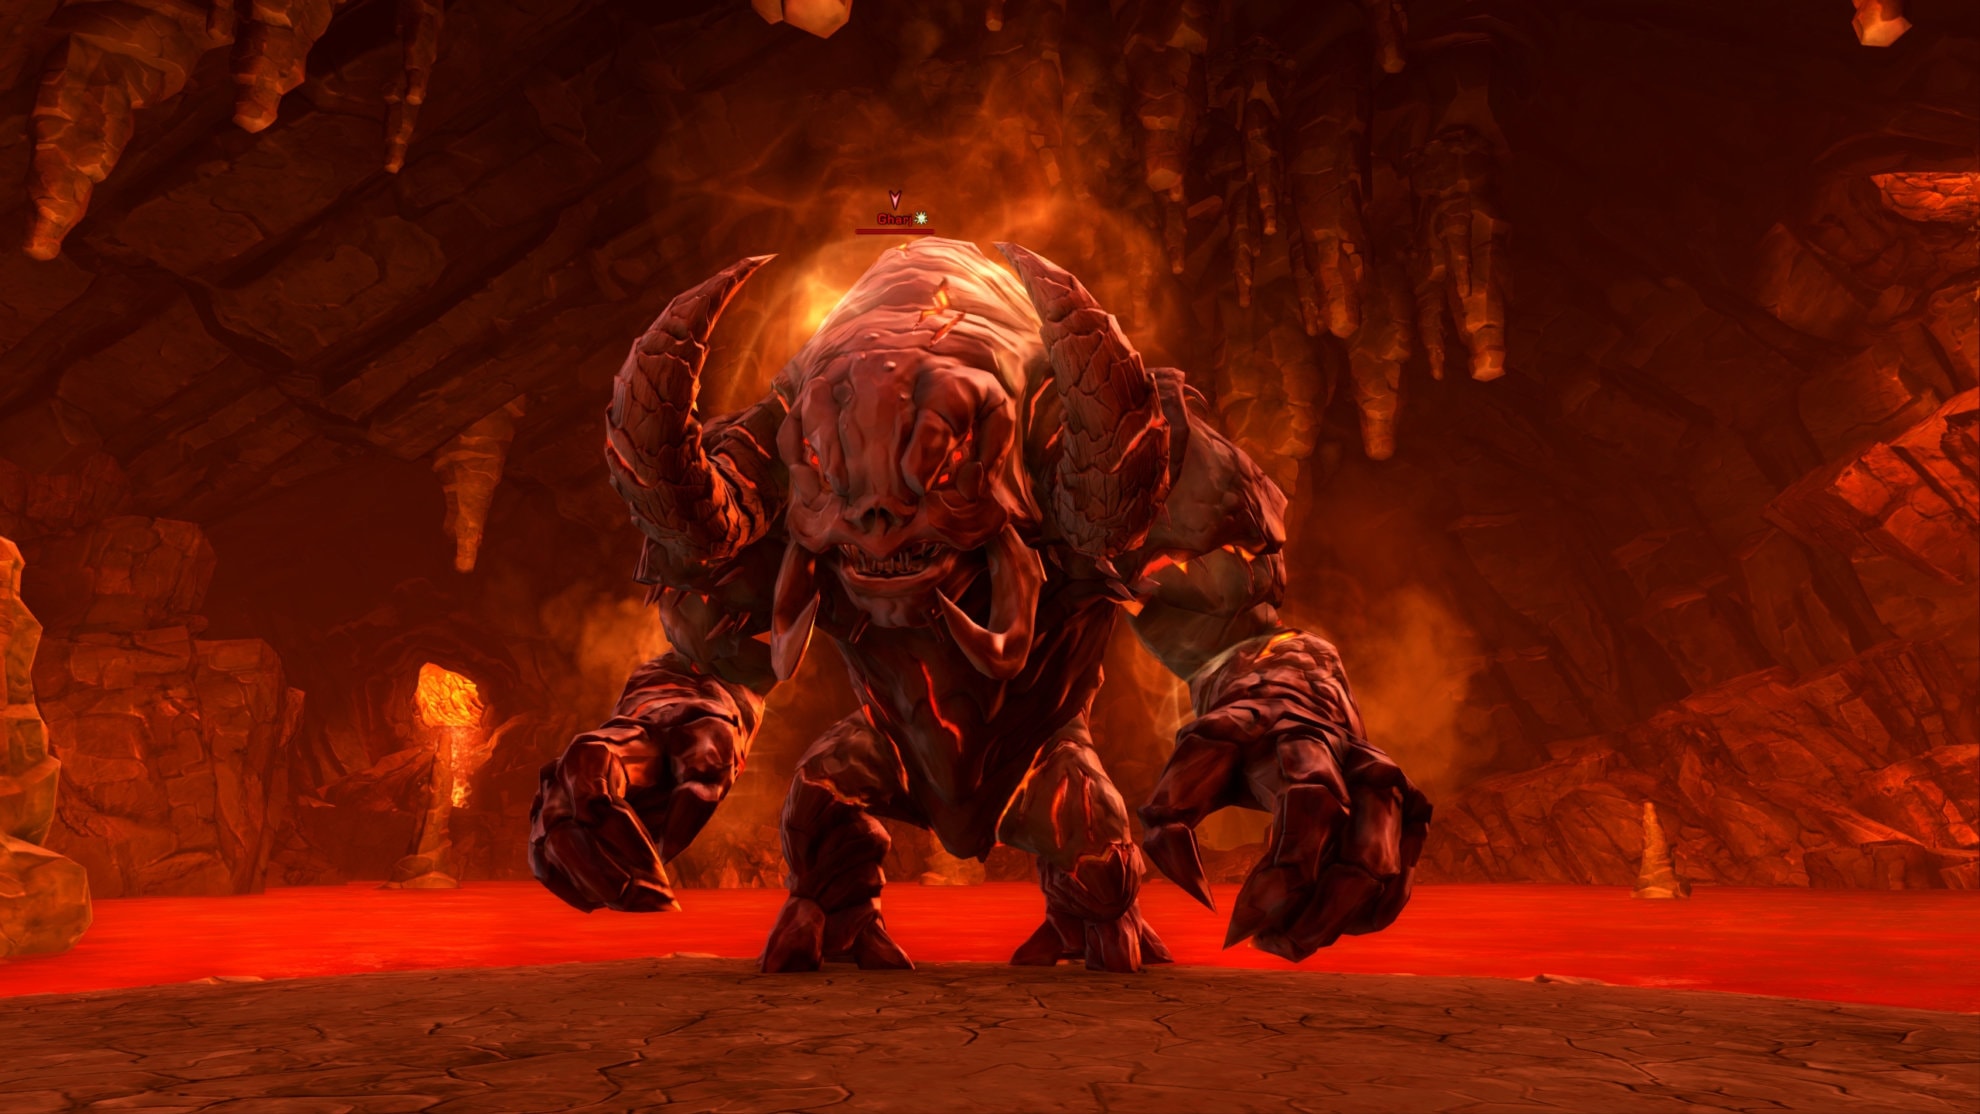
Gharj will be jumping on an island during his idle animations. Don’t get too close and let the tank be the one to pull Gharj. Meanwhile, the tank needs to bring Gharj to one of the tips of the island. Use the most lengthwise tips to position so the DPS and Healers have plenty of space to land on should Gharj use Pulverizing Slam.
Pulverizing Slam
Gharj will occasionally knock back the entire group except for the tank with Pulverizing Slam. This can be used once around every 24 seconds and is a 1-second cast, so it can require quick reflexes.
This can push DPS and Healers into the lava, but their chance of landing in lava is greatly decreased if they have more room on the island to land on. Worst case scenario, they’re pushed into a lava fall which will result in an instant kill, so the DPS and Healers need that extra space to survive.
Abilities that make you immune to knockbacks and physics such as Hold the Line/Hydraulic Overrides, Hunker Down/Entrench, or teleportation node abilities such as Phase Walk and Hololocate/Hideout are useful in this fight.
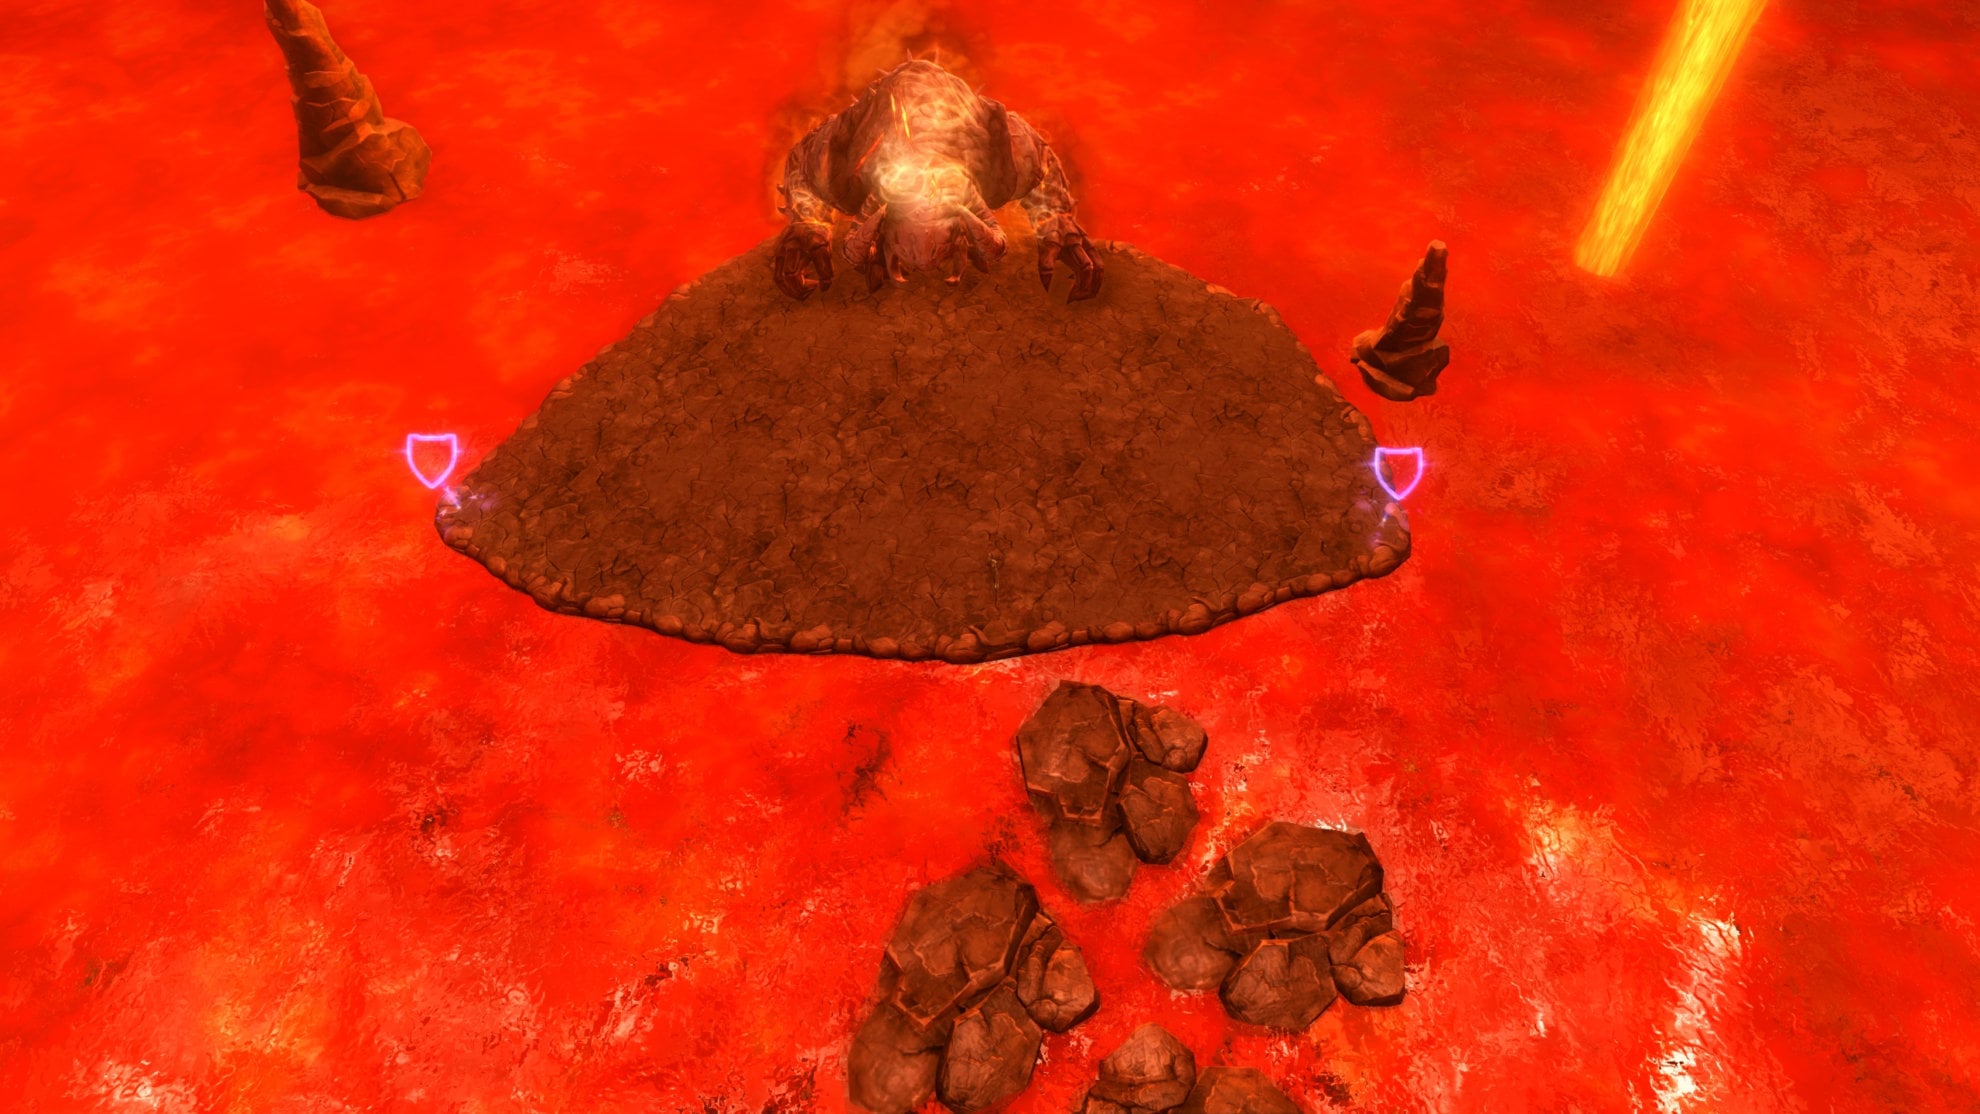
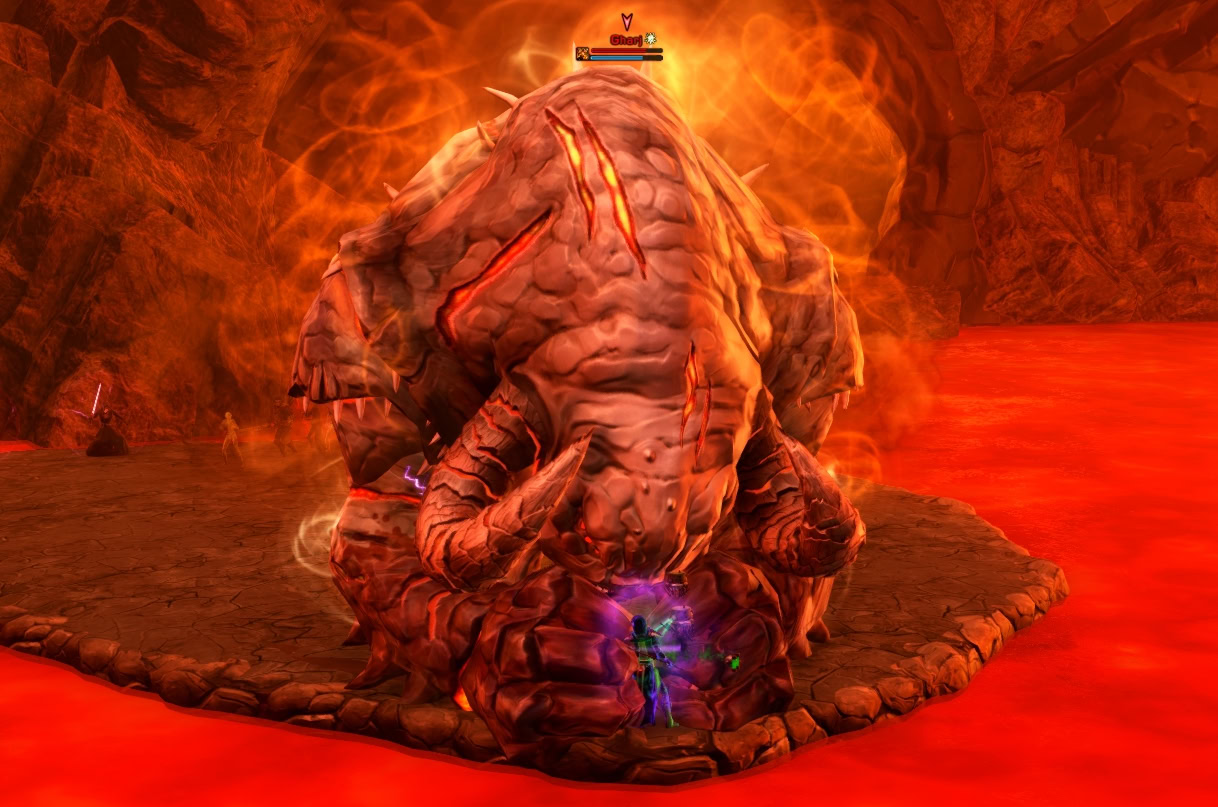
Gharj Frenzy and Jumping to New Islands
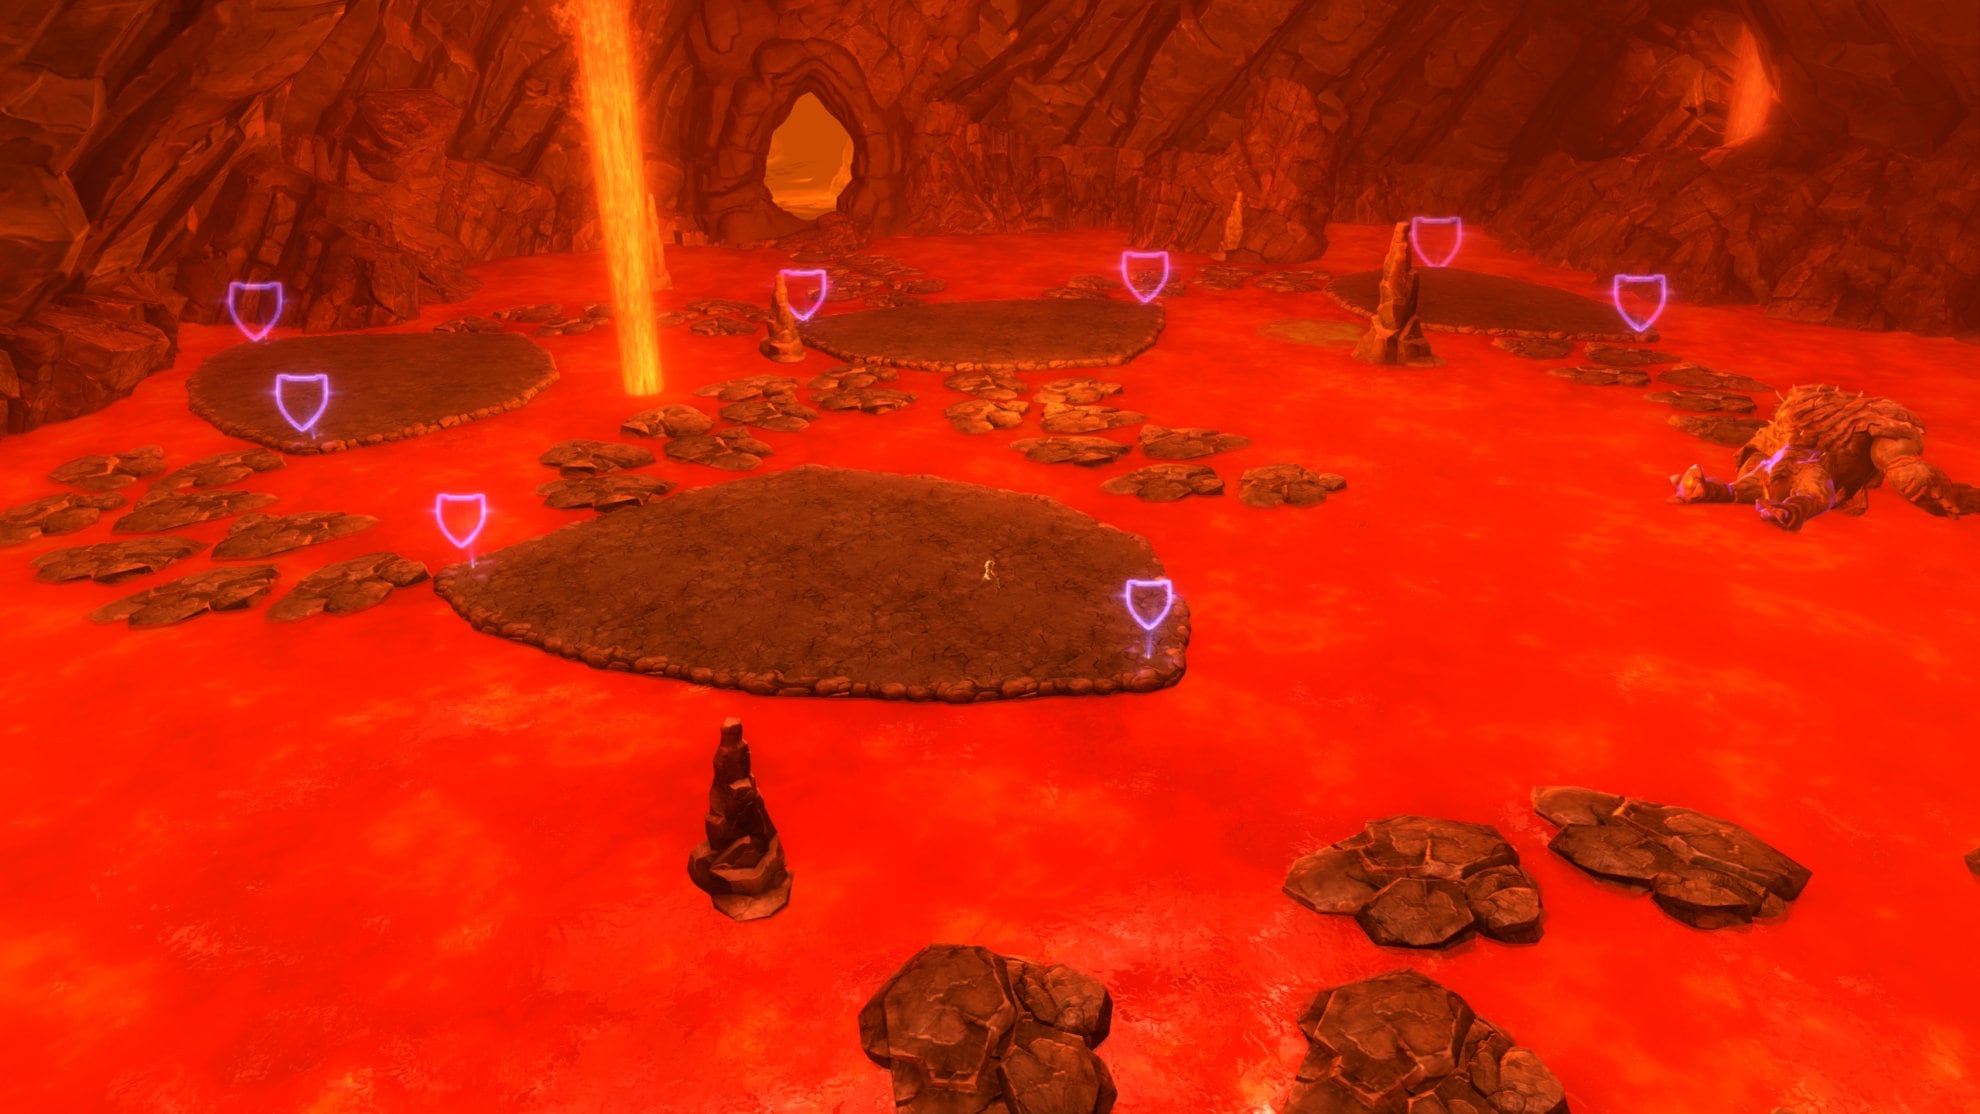
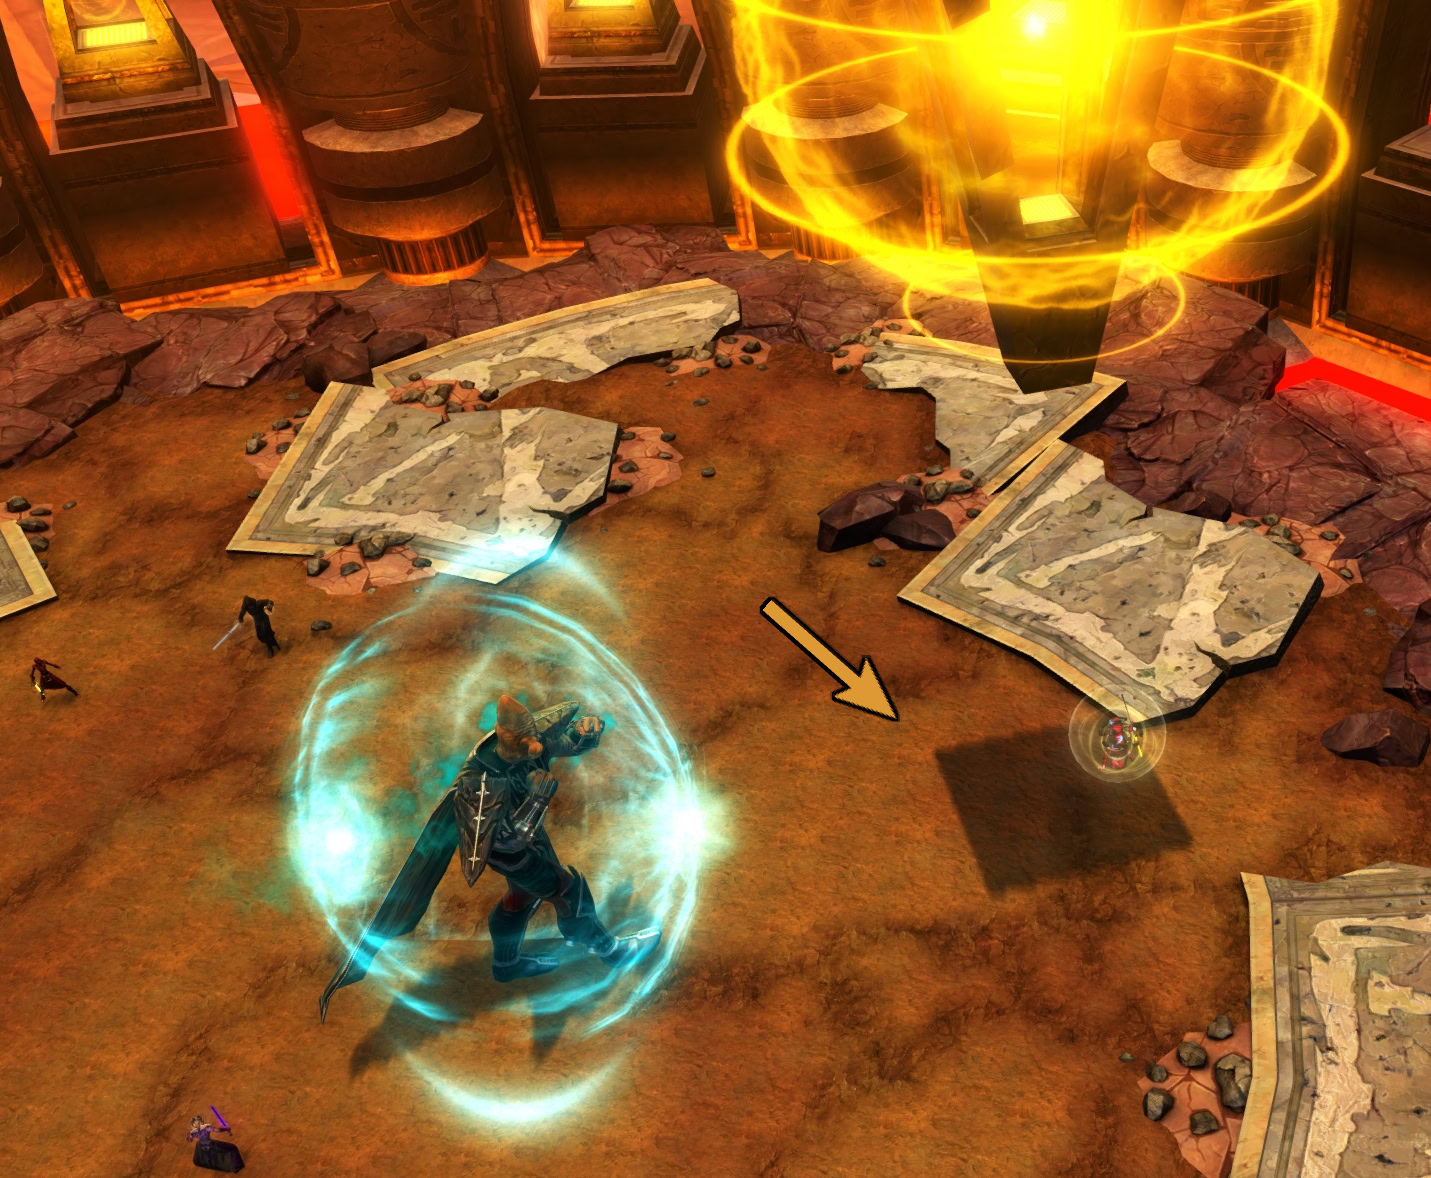
Every time Gharj gets to 90%, 70%, 50%, 30%, and 10% health, he goes into a Frenzy. During a frenzy, Gharj will begin to jump repeatedly. This will deal AoE damage to anyone within 6 meters. DPS can pop AoE damage reduction DCDs during the frenzy or if they are low on health, back off 6 meters to get healing.
The island you’re on will begin to rumble as it’s about to sink into the lava. A new island will pop up and the falling stalactites will act as a bridge that leads to the new island. Everyone needs to jump across the stalactites to the new island taking as little lava damage as possible. Be quick as these stalactites will only be around for a short time.
If you have the movement, DCDs, or self-heals, you can just run across the lava as the DoT will quickly disappear after getting on land. Though the longer you stand in the lava, the stronger the DoT becomes so keep any contact with it limited.
If you’re a Sentinel/Marauder, avoid using Transcendence/Predation here without your team’s consent. Everyone is used to a certain movement speed and the extra boost without warning may throw off their jumps.

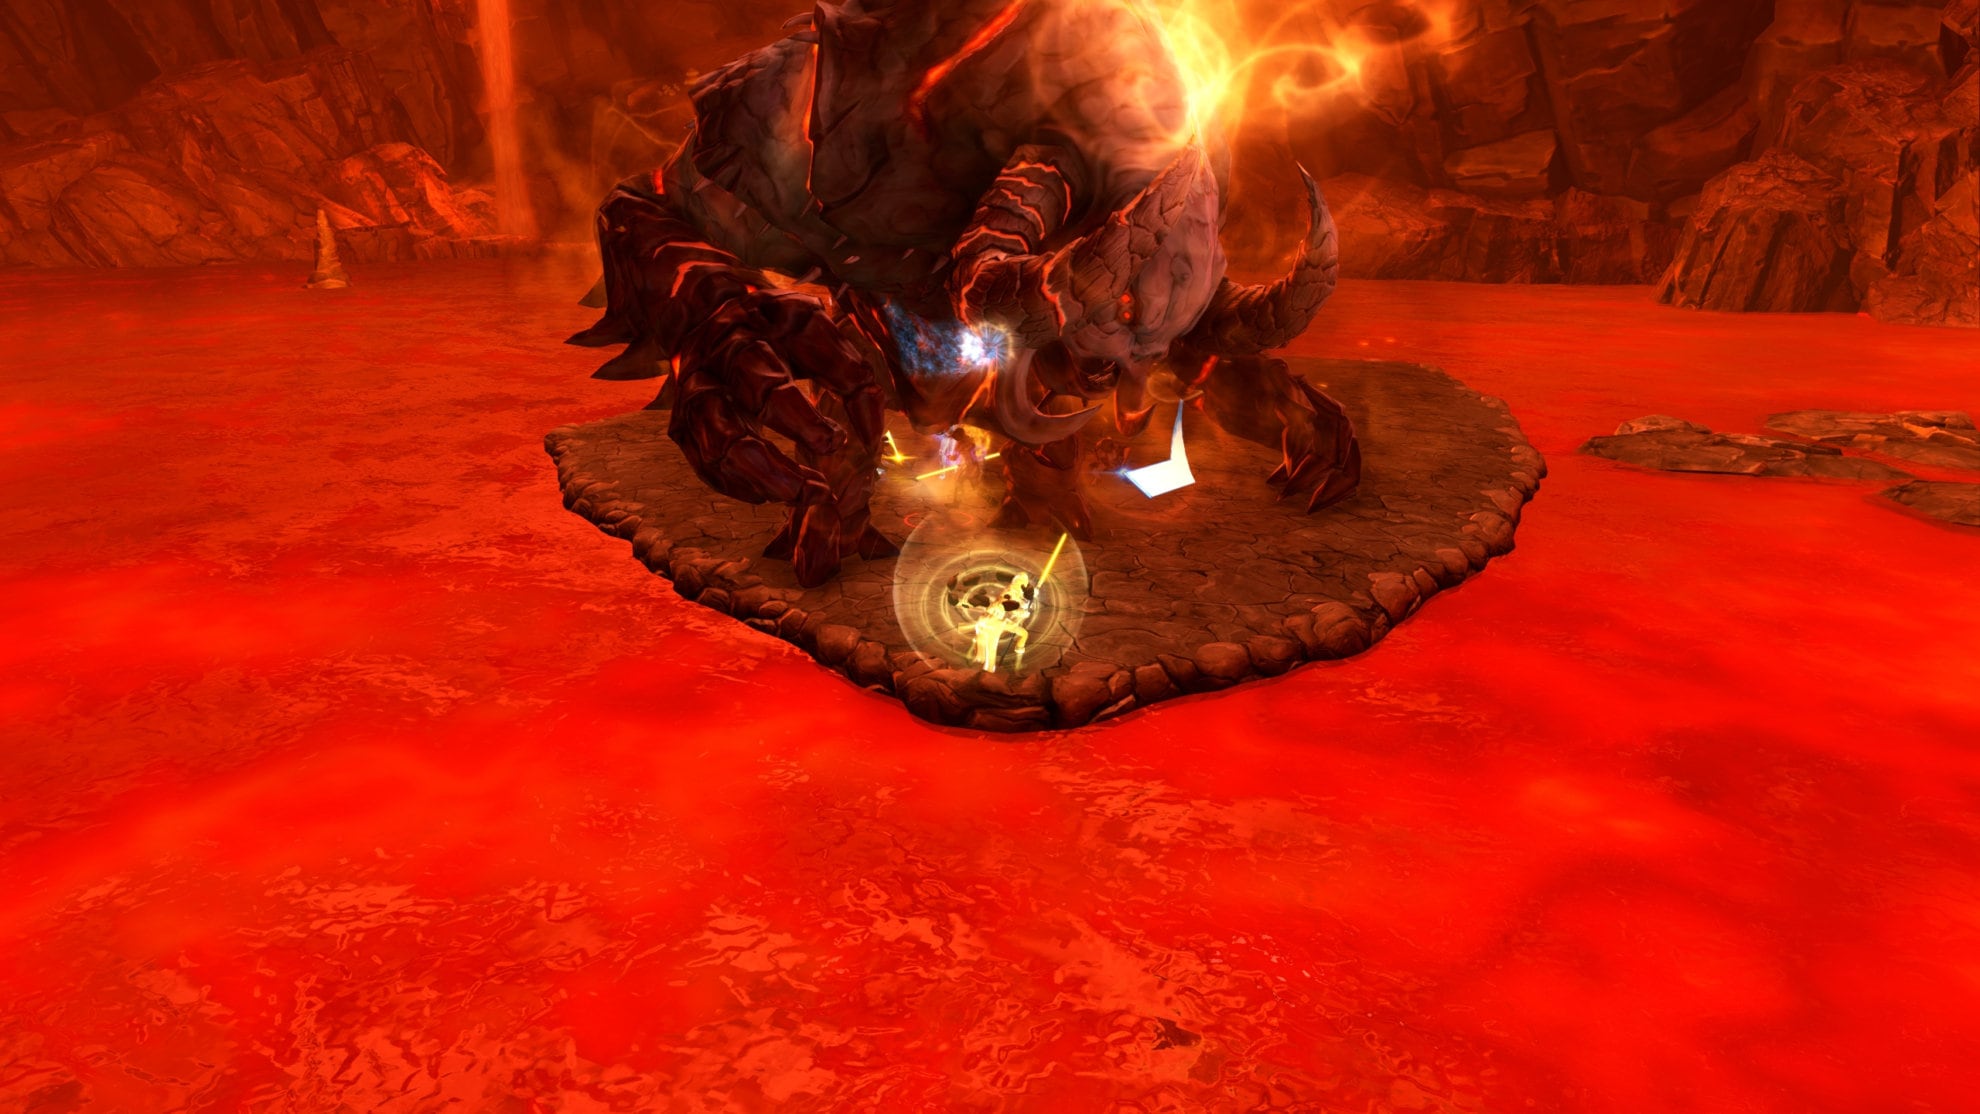
Once at the new island, the group will want to huddle together for AoE heals from the healers. Meanwhile, the tank should stand in the center of the island and prepare to taunt Gharj. Gharj will walk towards the island and then jump to whoever his target is (this should be the tank).
The tank should taunt Gharj as he’s walking to the island or right after he jumps, but nearby will be stunned for a second after Gharj jumps to the island. The reason why the tank should taunt in the middle of the island is so that it’s easier to orient Gharj to face the island tip instead of the group. If the tank were to taunt at the tip of the island, Gharj could end up facing the team and damage them.
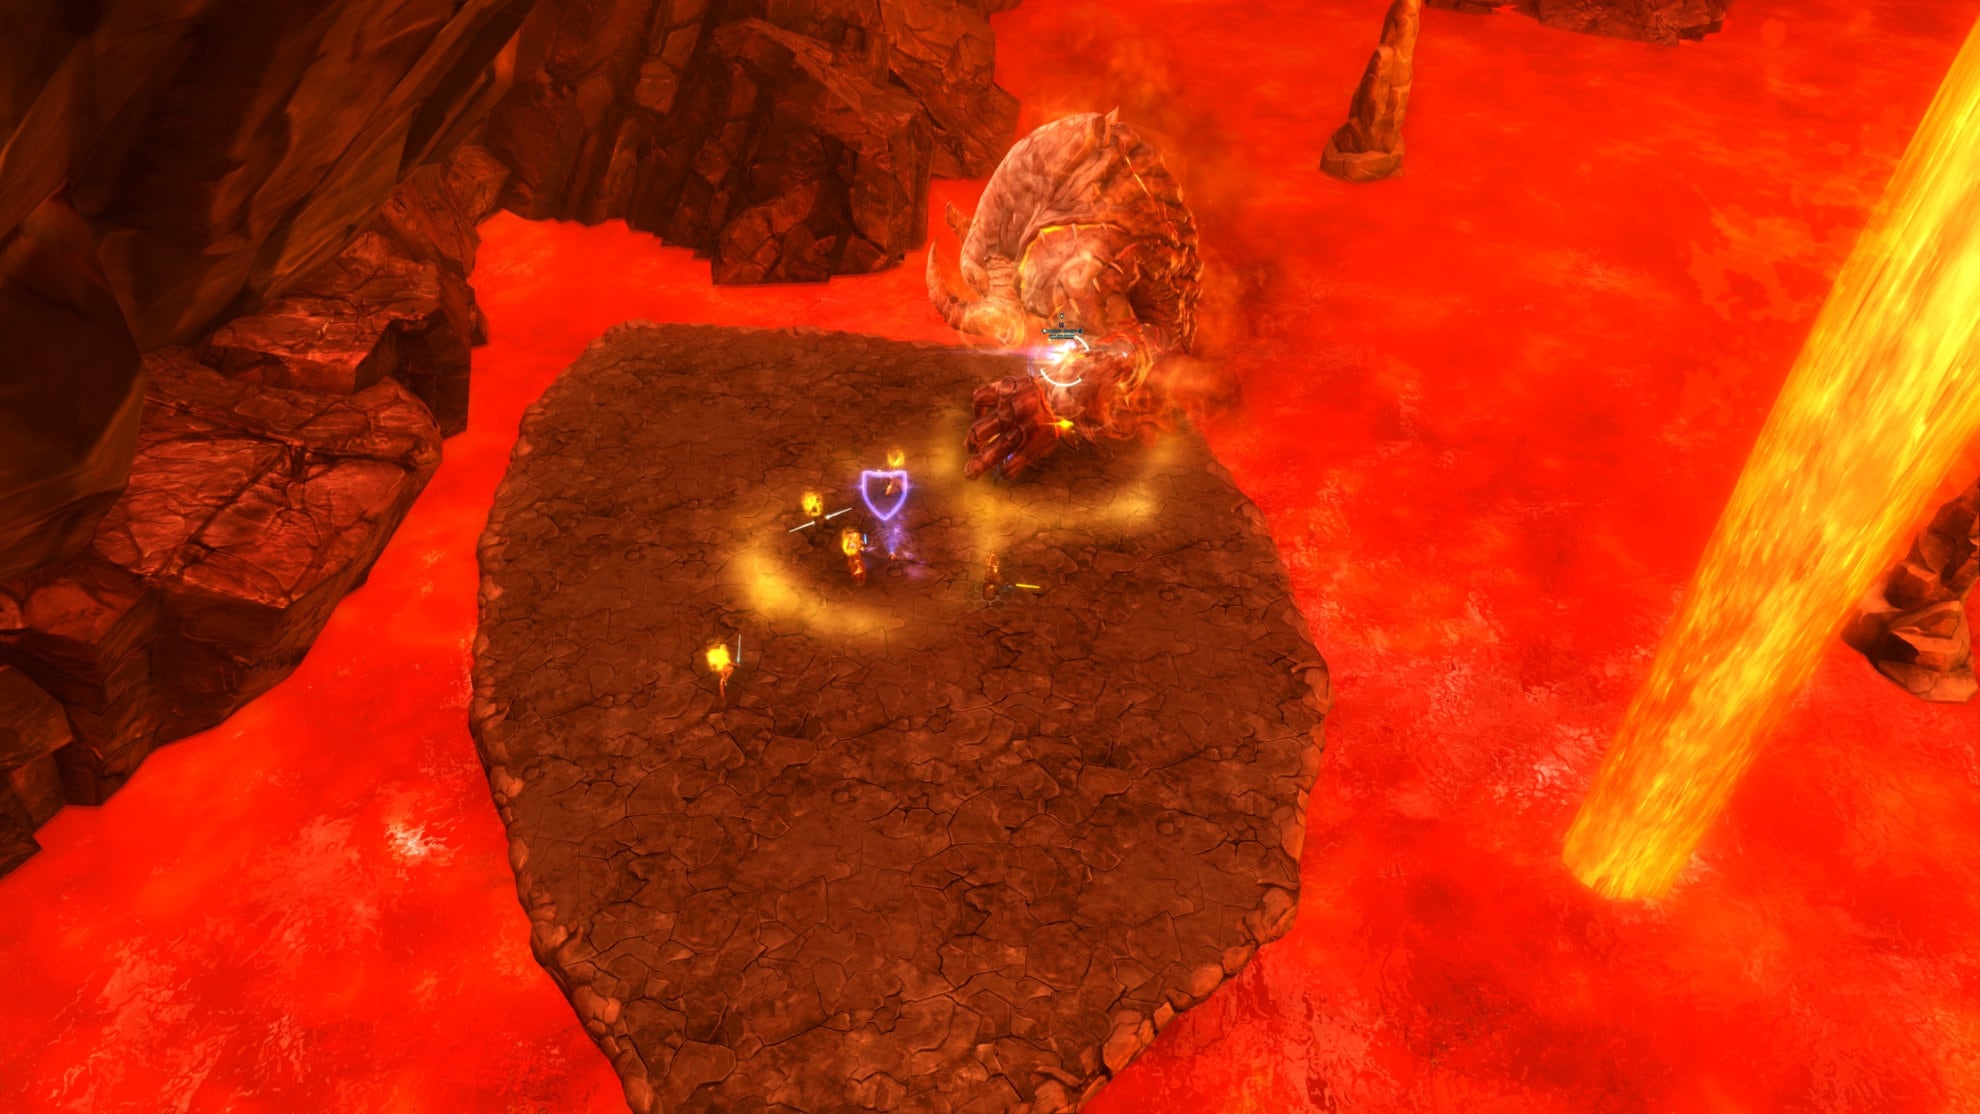
Once the tank has aggro, they need to take them to the tip of the island so everyone can repeat the process.
Firestalker Adds
When Gharj has around half his health, he’ll begin to summon Firestalkers when he goes into a frenzy. The tank needs to move towards the center of the island when they spawn and use their AoE taunt along with any AoE abilities to aggro as many Firestalkers as possible. They can easily down a DPS or a Healer if the group isn’t careful. When aggro is gained, everyone should get to the new island.
With these mechanics in mind, you’ll just need to repeat these steps until Gharj is defeated. Just back off from Gharj when he frenzies if you’re a DPS, make good jumps across the stalactites, and don’t step into the lava.
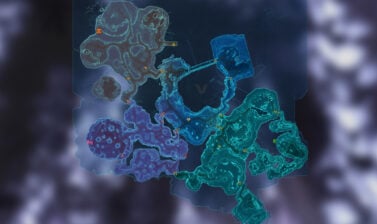
For the tank’s convenience, here is a picture that shows all the islands with markers showing where you should stand on the islands. All islands appear after Gharj is defeated while only one will appear during the fight. This is a good reference as you’ll get an idea of where the islands form throughout the map.
BUG ALERT
A common bug with this boss encounter is that the island Gharj is on will not always sink when he enters a frenzy. When Gharj enters a frenzy, be sure to look at the island. Do not move to the new island if your current island is not shaking!!! If you notice your current island is not shaking, look at the new one. If the new one is shaking, it’s bugged and will soon sink. This often surprises players who lack good situational awareness, so keep your eyes peeled for this detail.
Veteran Mode Differences
There are no mechanical differences in Veteran Mode, though Gharj’s Frenzy Jumps will deal a lot more damage. The DPS and Healers need to back off to avoid unnecessary damage that will make the healer’s job harder.
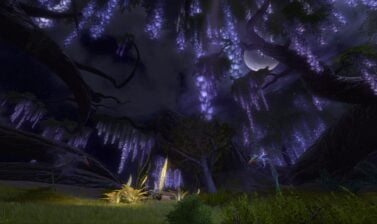
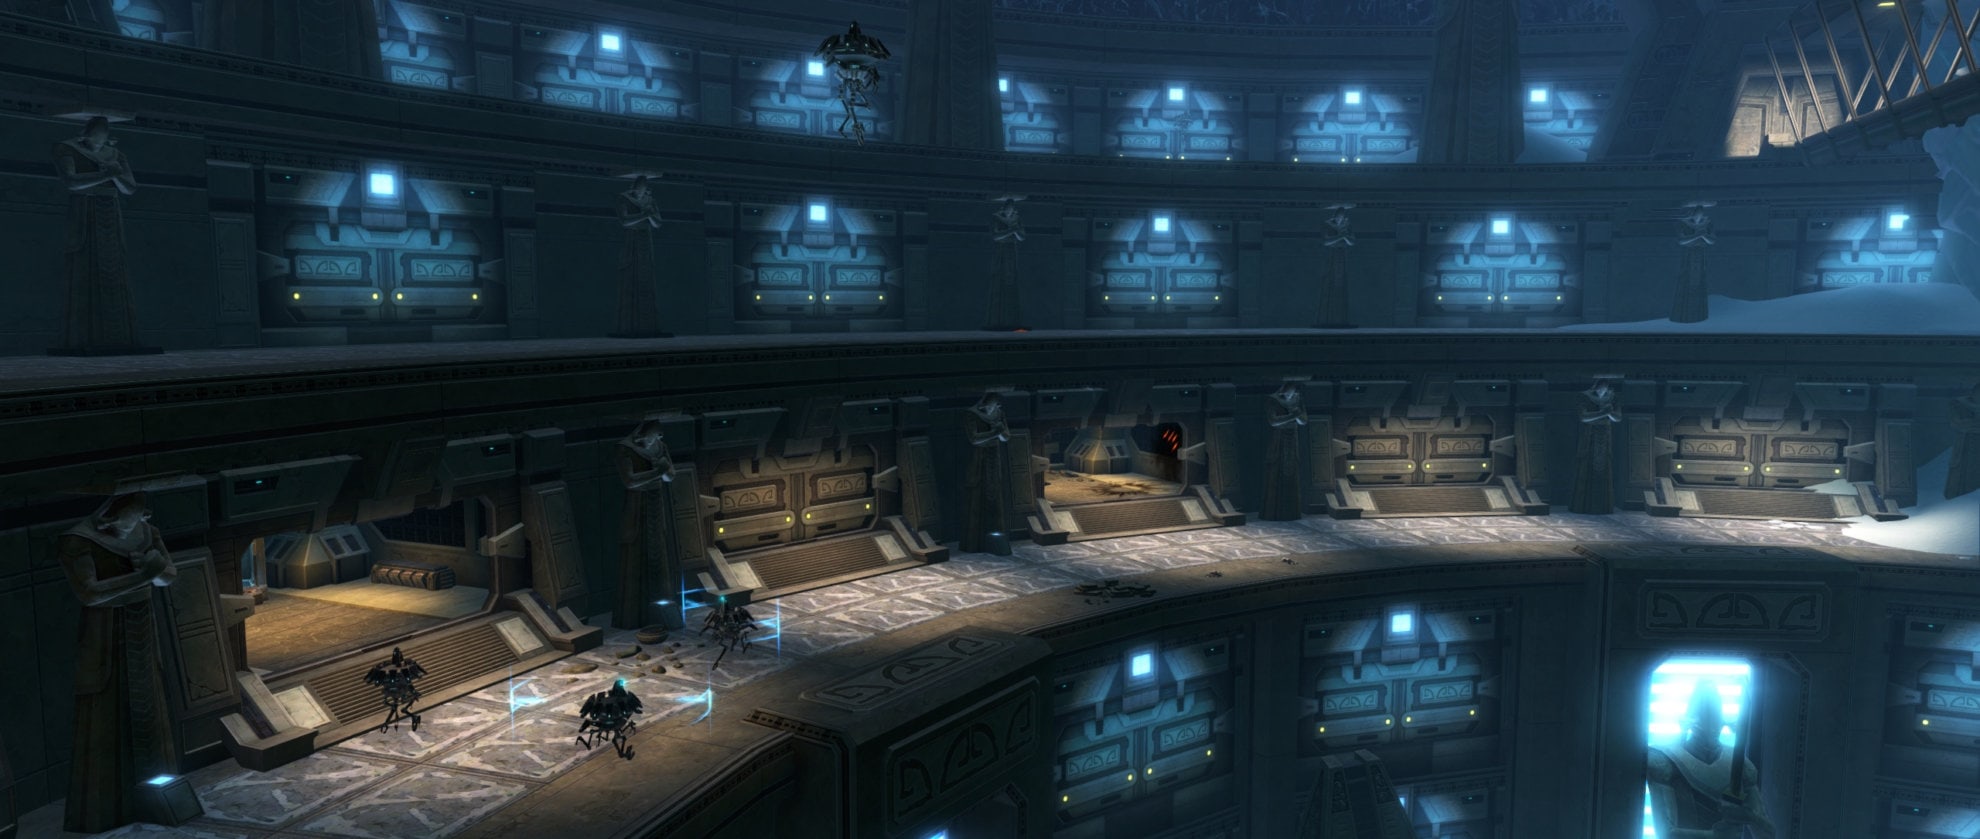
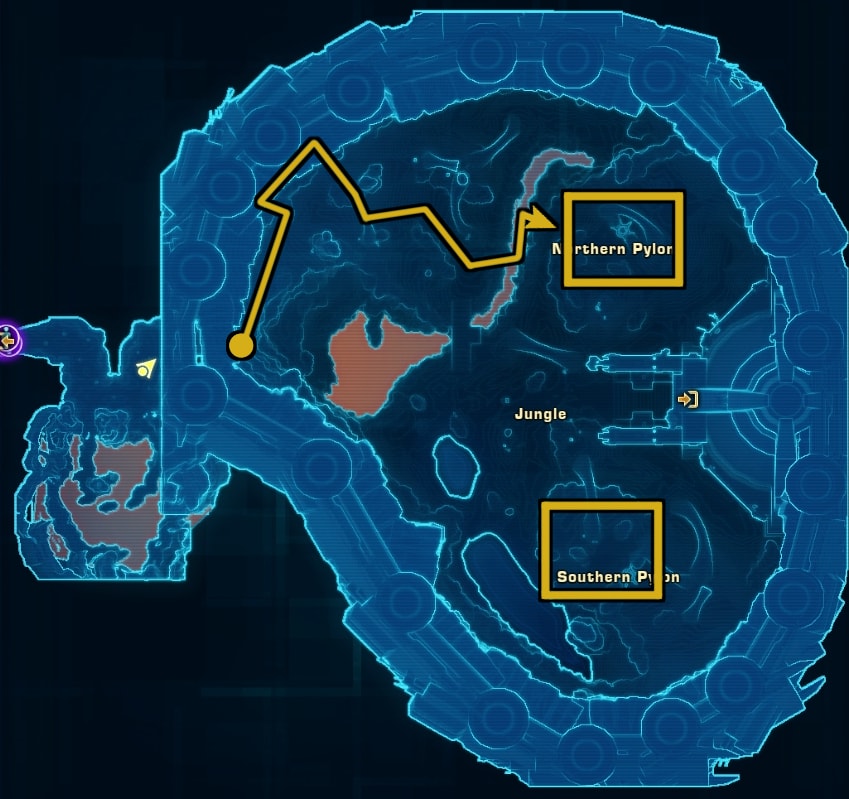
The Jungle
After defeating Gharj, you’ll need to head east and through another cave. You’ll reach a new speeder checkpoint location and gain access to The Jungle of the Eternity Vault.
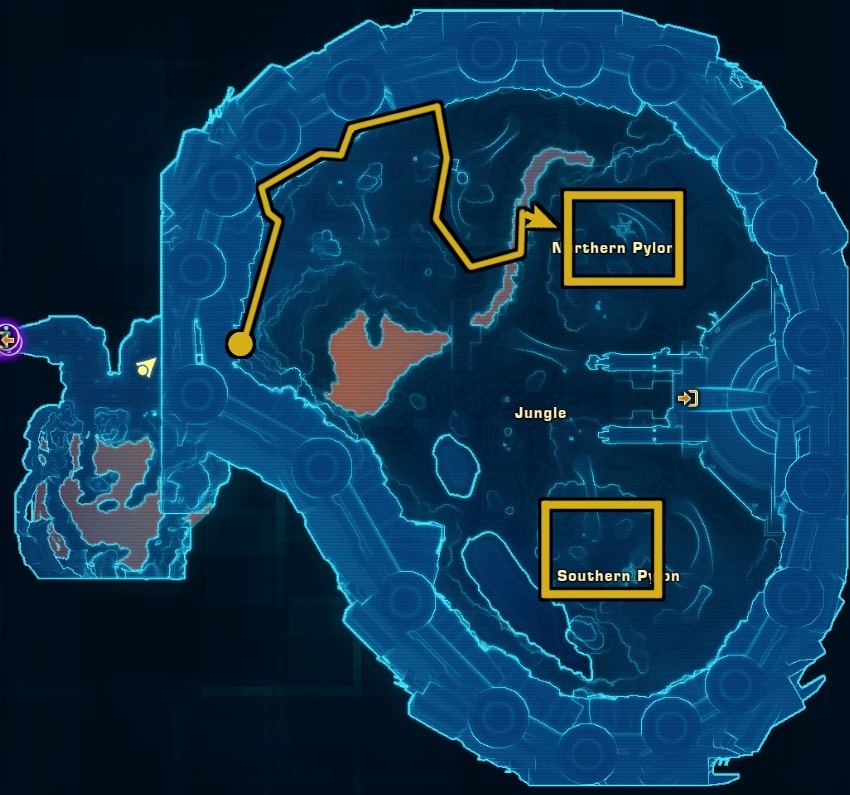
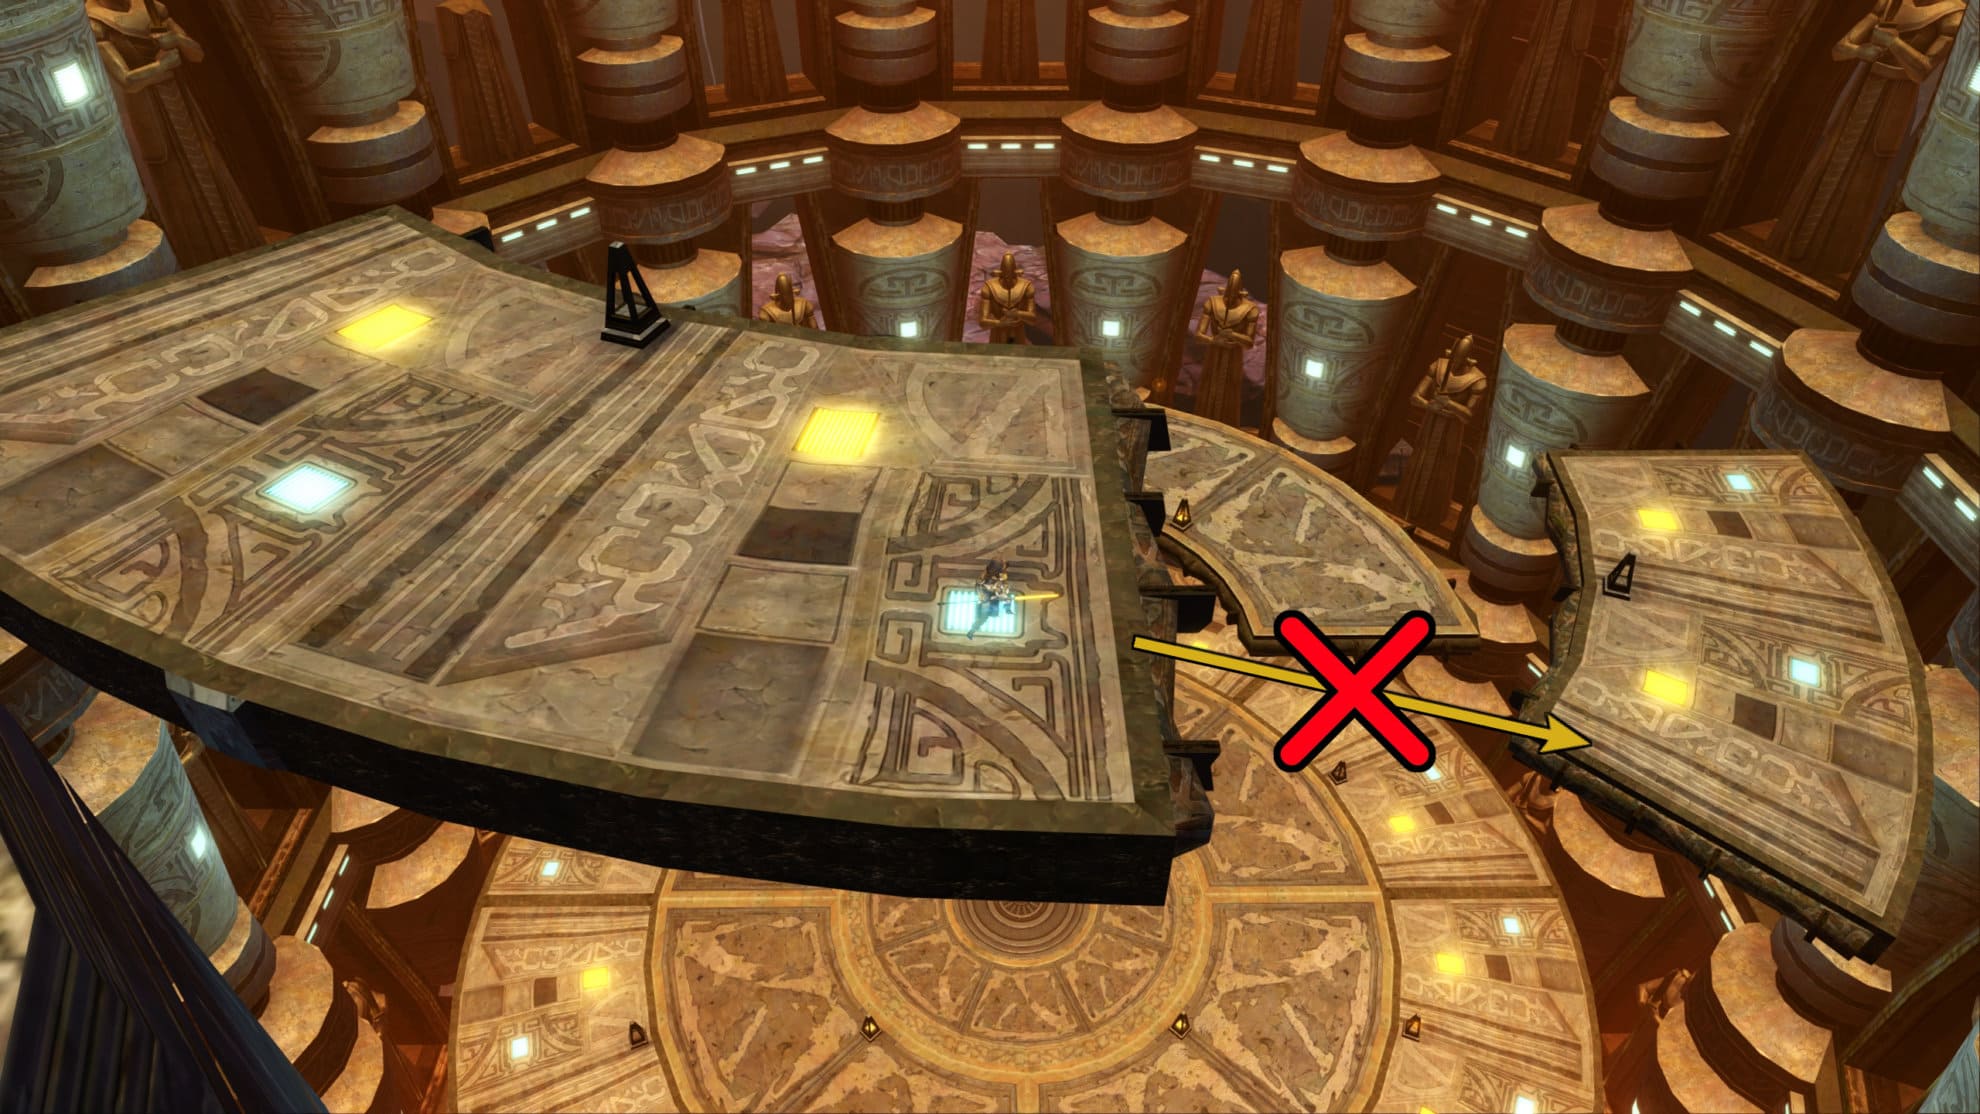
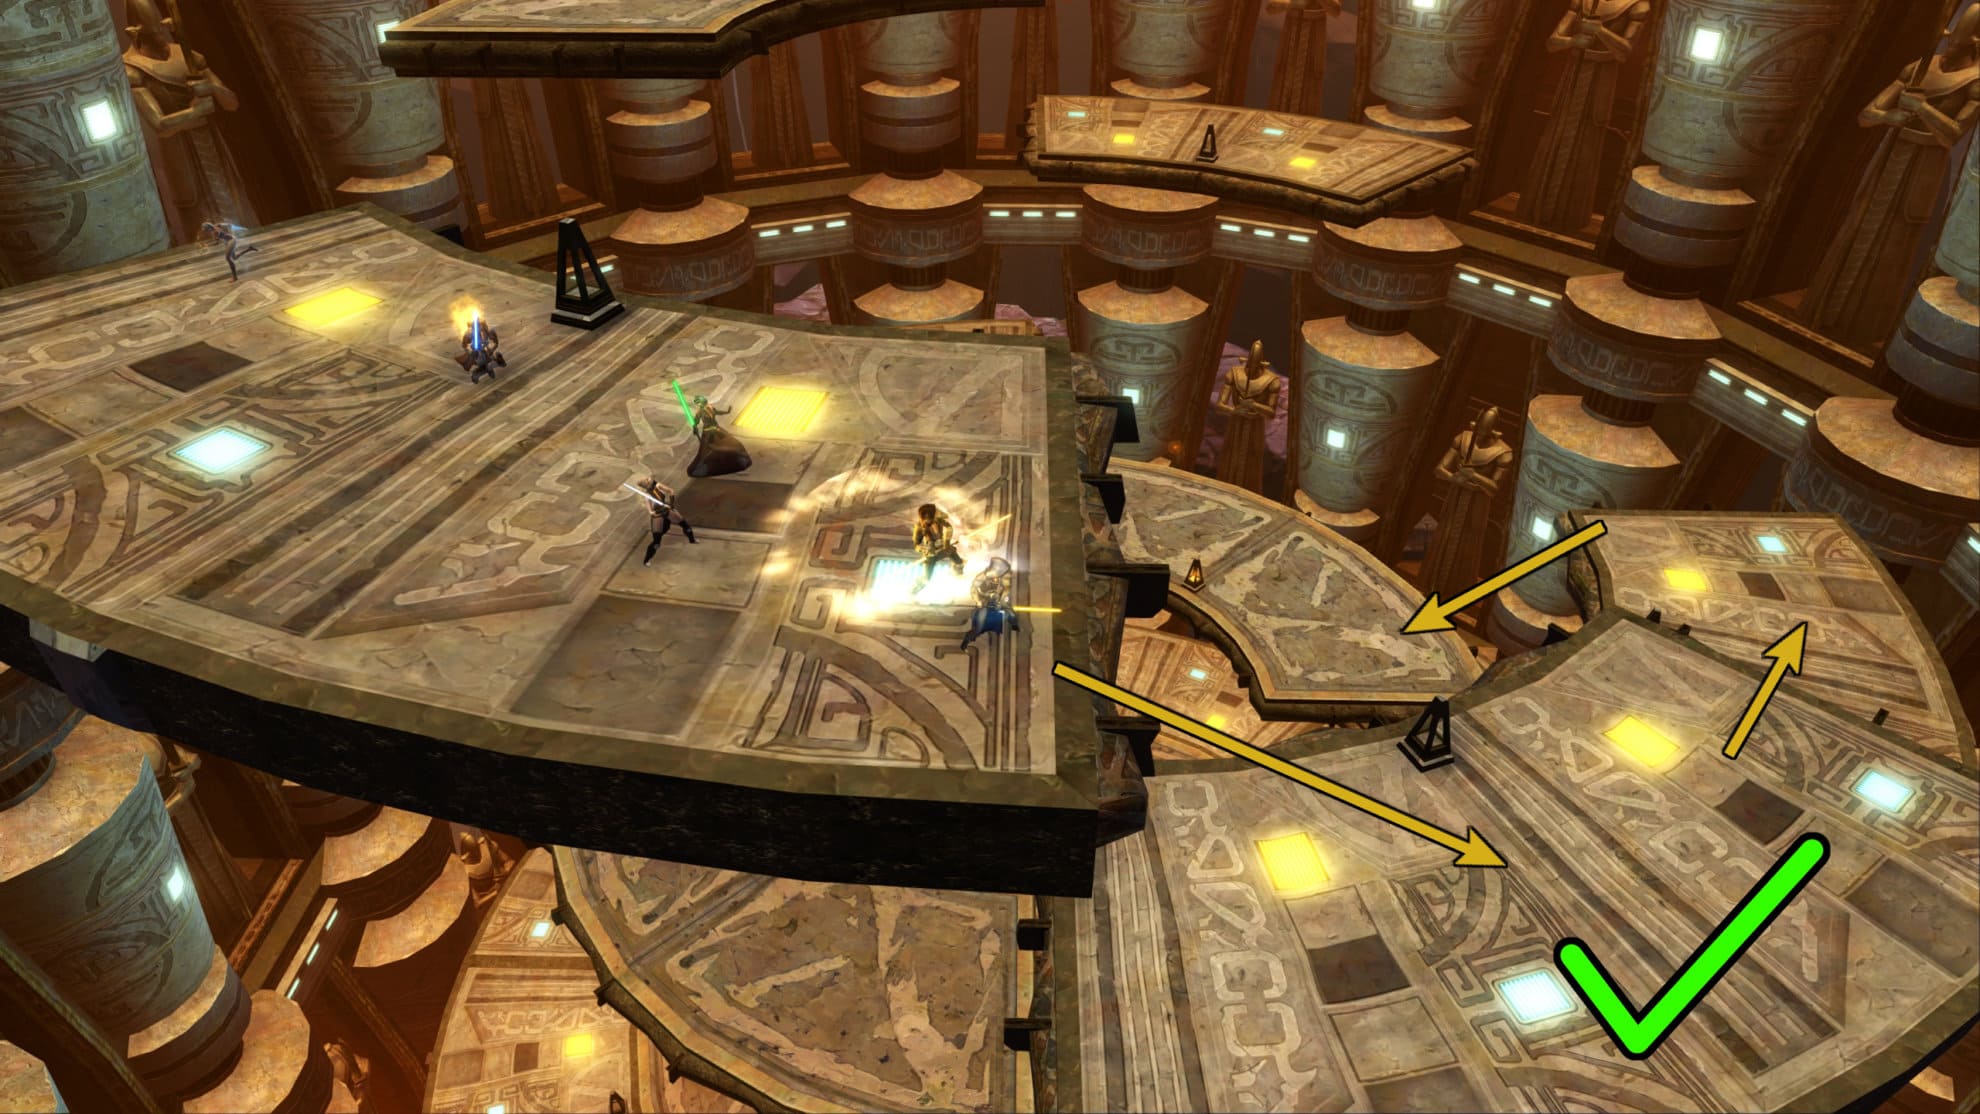
The jungle is full of Manka Cat packs that can easily overwhelm the group. These packs are very close to one another so it’s easy to aggro 2-3 packs of Manka Cats in this area. Many opt to work around them to avoid fighting them entirely. There are two ways to get around the cats to reach your destination, the North and South Pylons.
Jungle Shortcut Path #`1
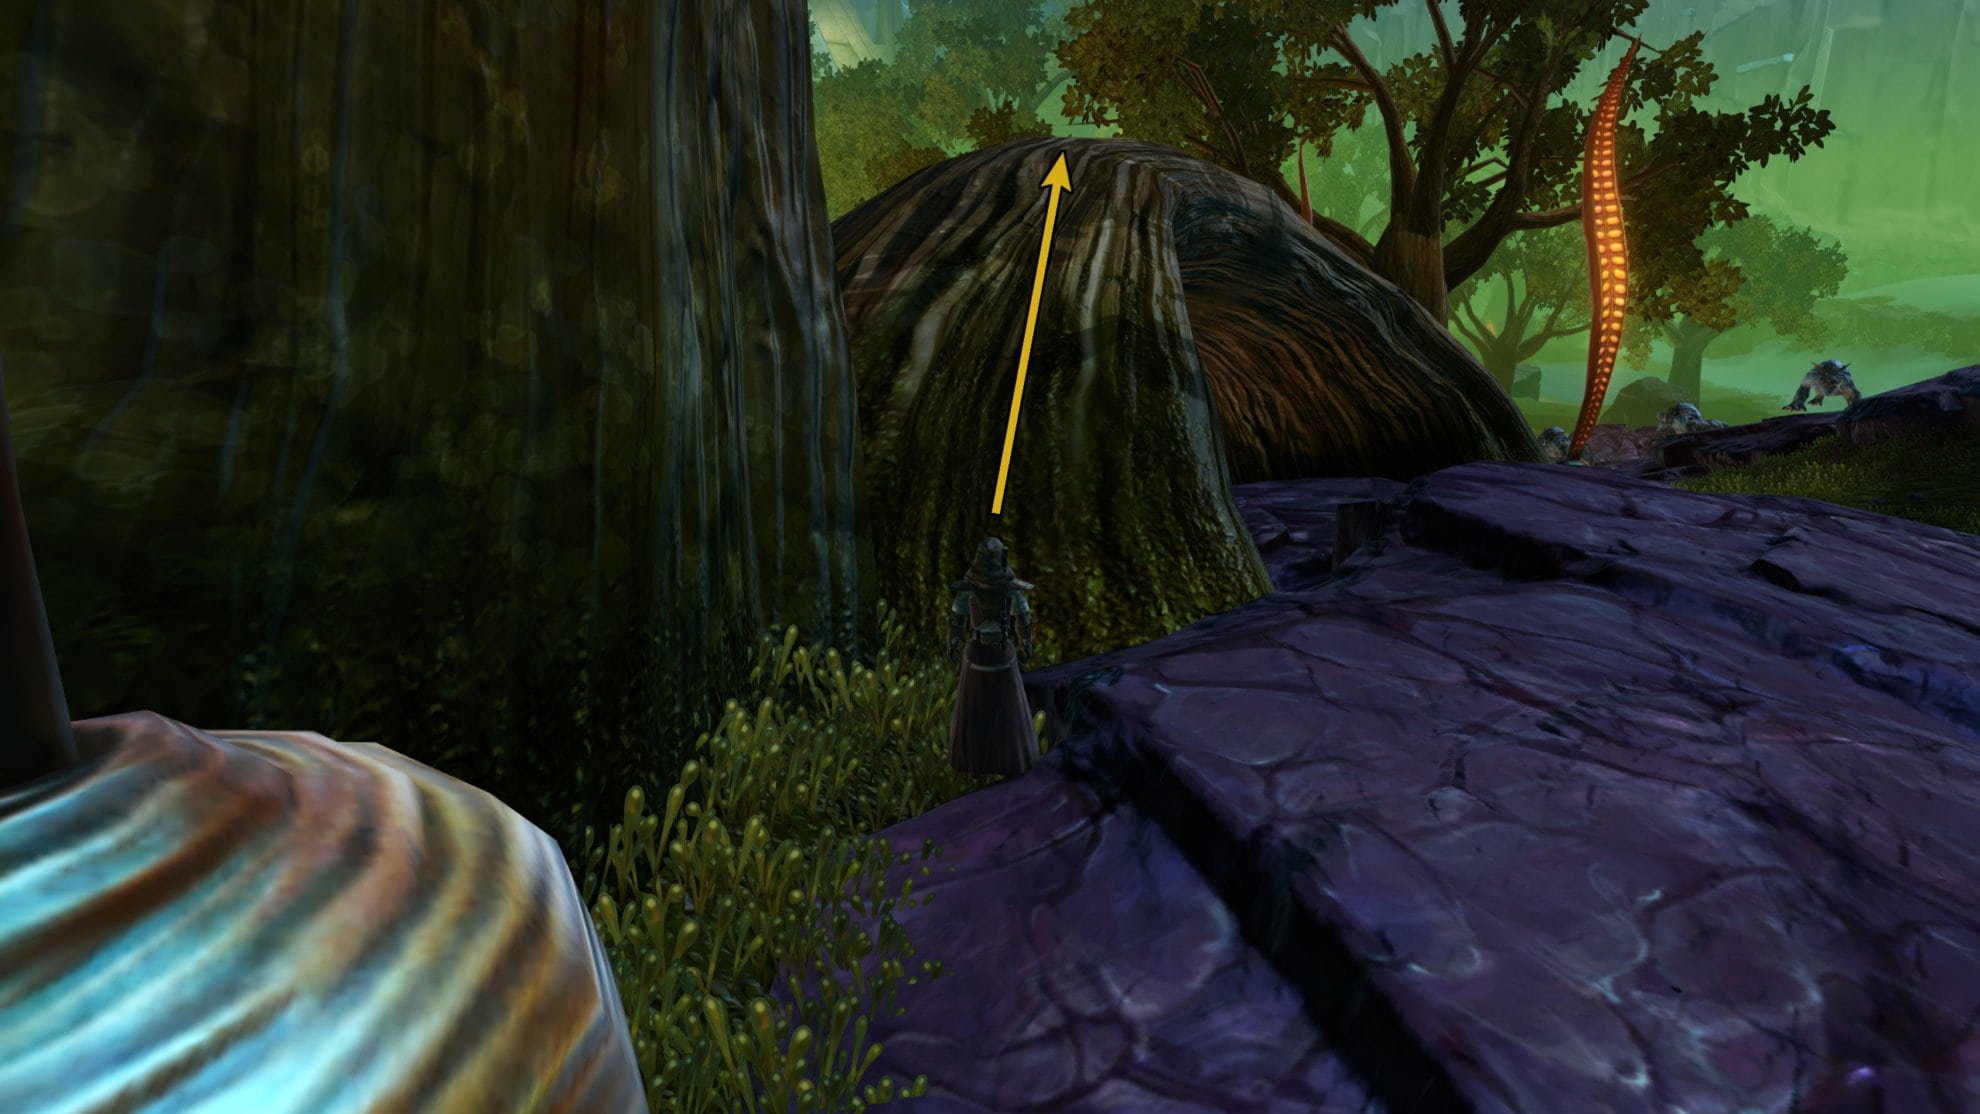
In both Jungle paths, you’ll have the luxury of being able to mount to cut down on travel time. This first path is the most common one you’ll see groups use. Here is the map showing the first path you can use to reach the pylons, and visual examples will be explained after.
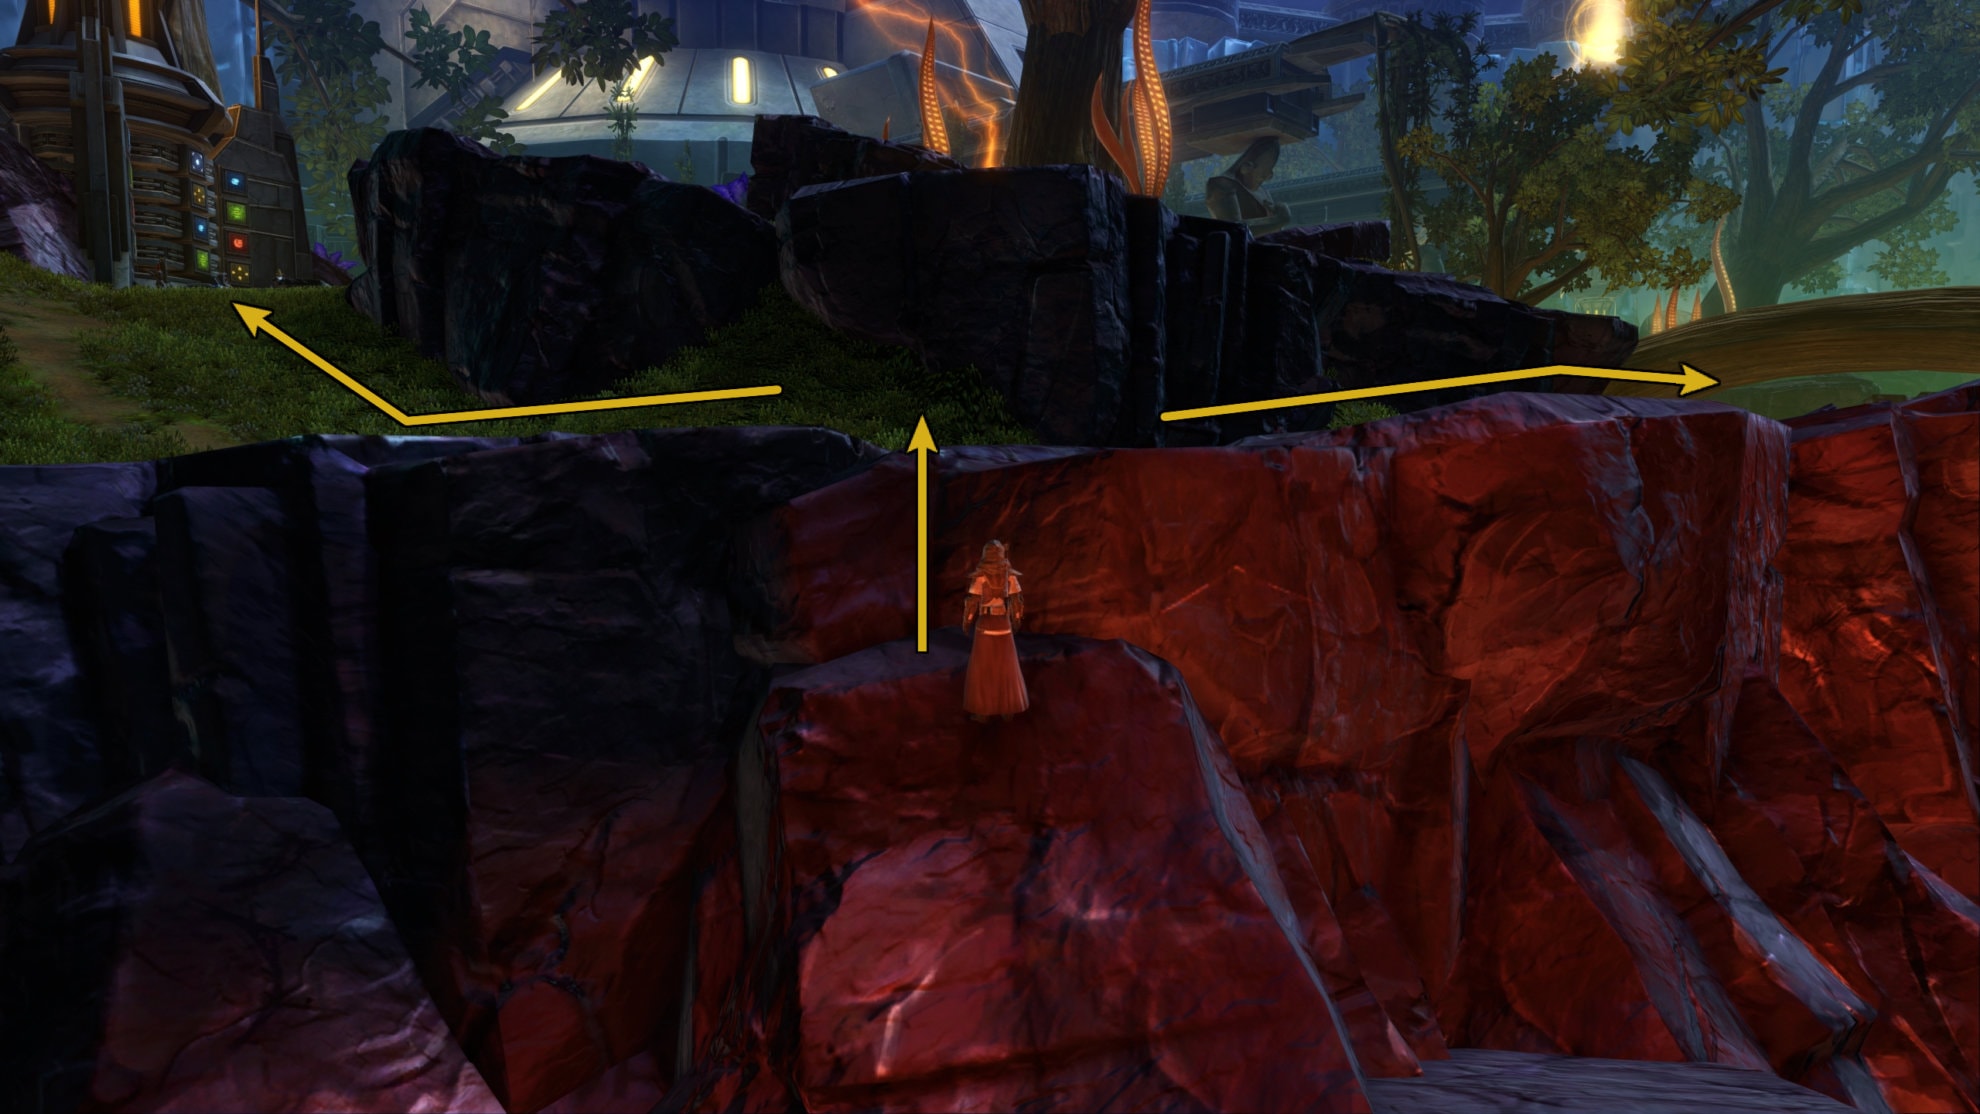
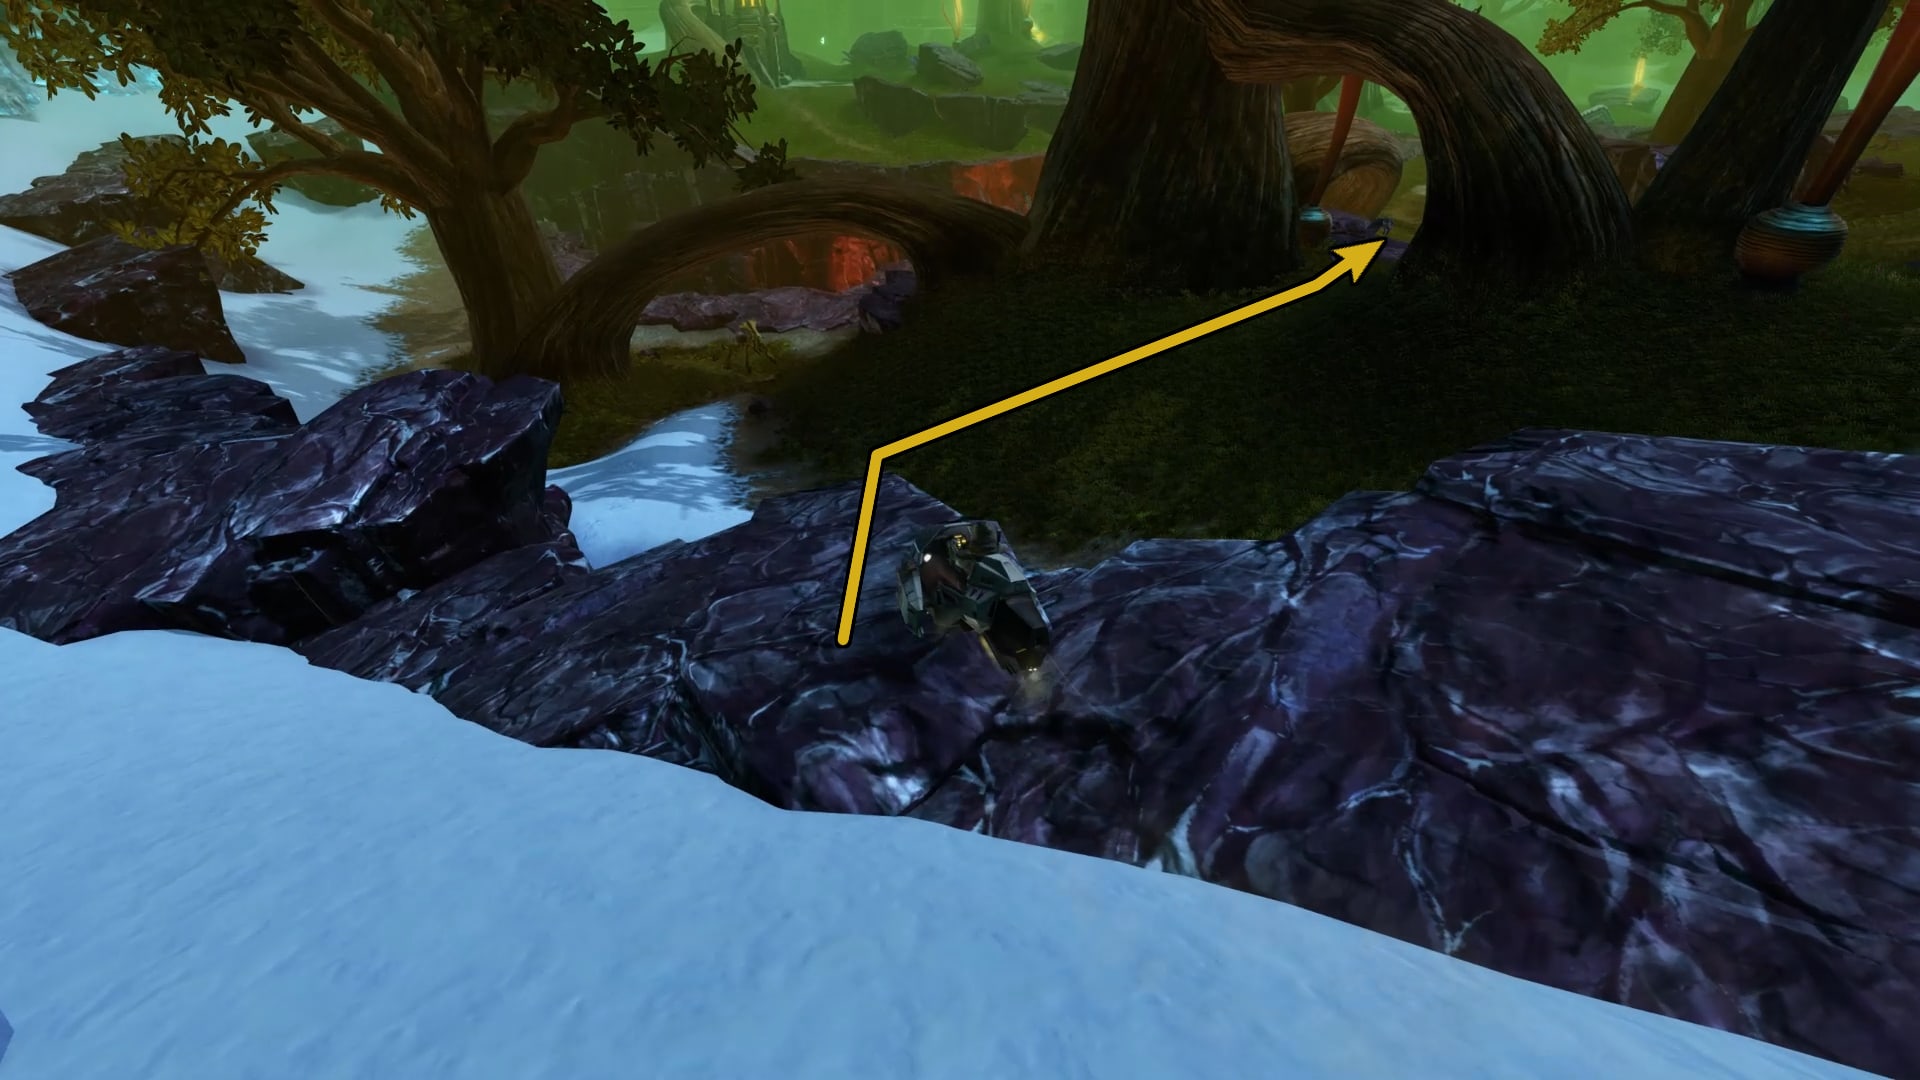
To the left of some Manka Cats near the cave exit is a rocky ledge. Jump on top of this ledge without aggroing the cats and make your way around until you see a curved tree trunk.

Go to the curved tree trunk and go to the very middle then jump down. Follow the path and head towards a crevice with a lava flow.
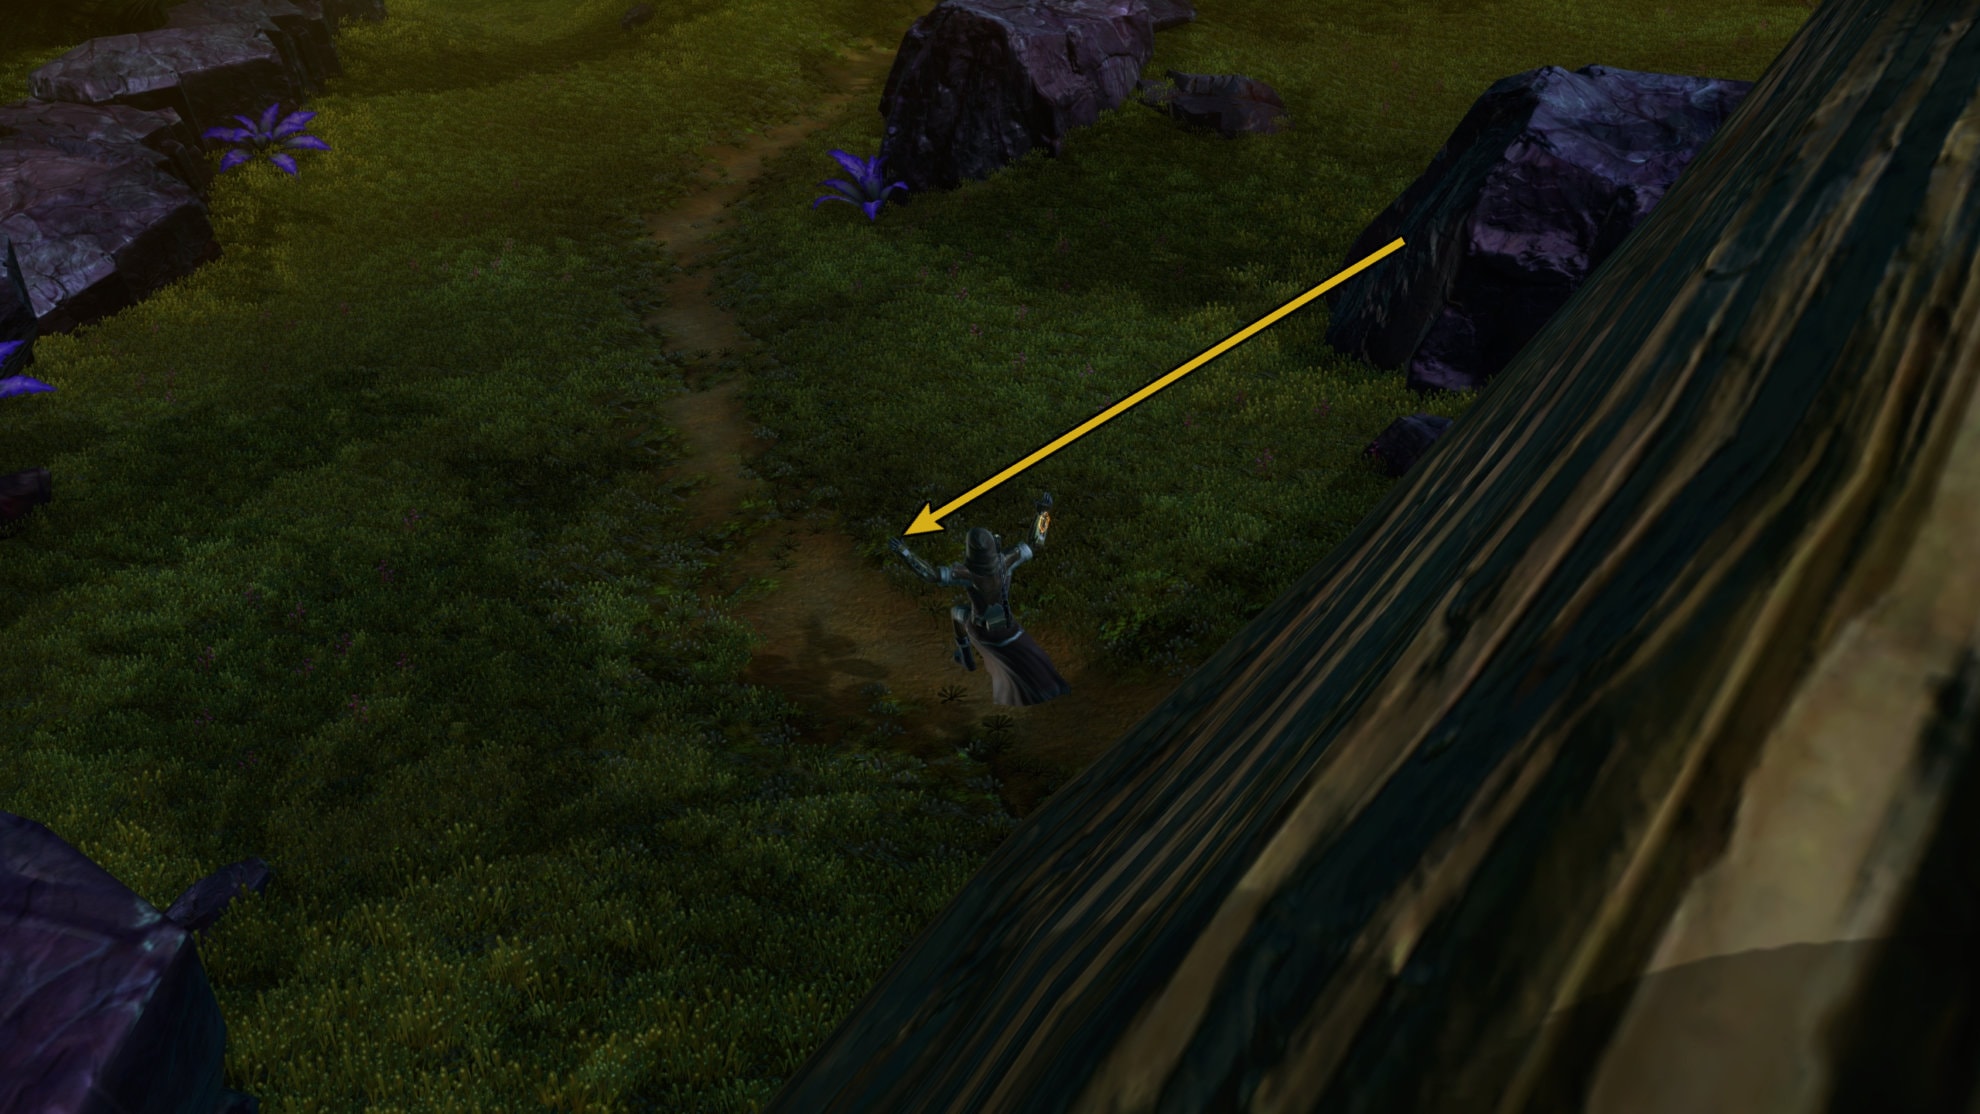
Avoid the Manka Cat packs and jump into the crevice with the lava flow. Run to the rocky bridge and jump up to the grassy area.
Heal up once you’re up on the ledge. If you’re in the left operation frame, go to the left to reach the North Pylon. If you’re on the right operation frame, go to the right to reach the South Pylon.
Jungle Shortcut Path #2
The second path is less commonly used due to a lack of knowledge on it. It requires a harder jump to make initially and is slightly longer, but it is much safer than the first path.
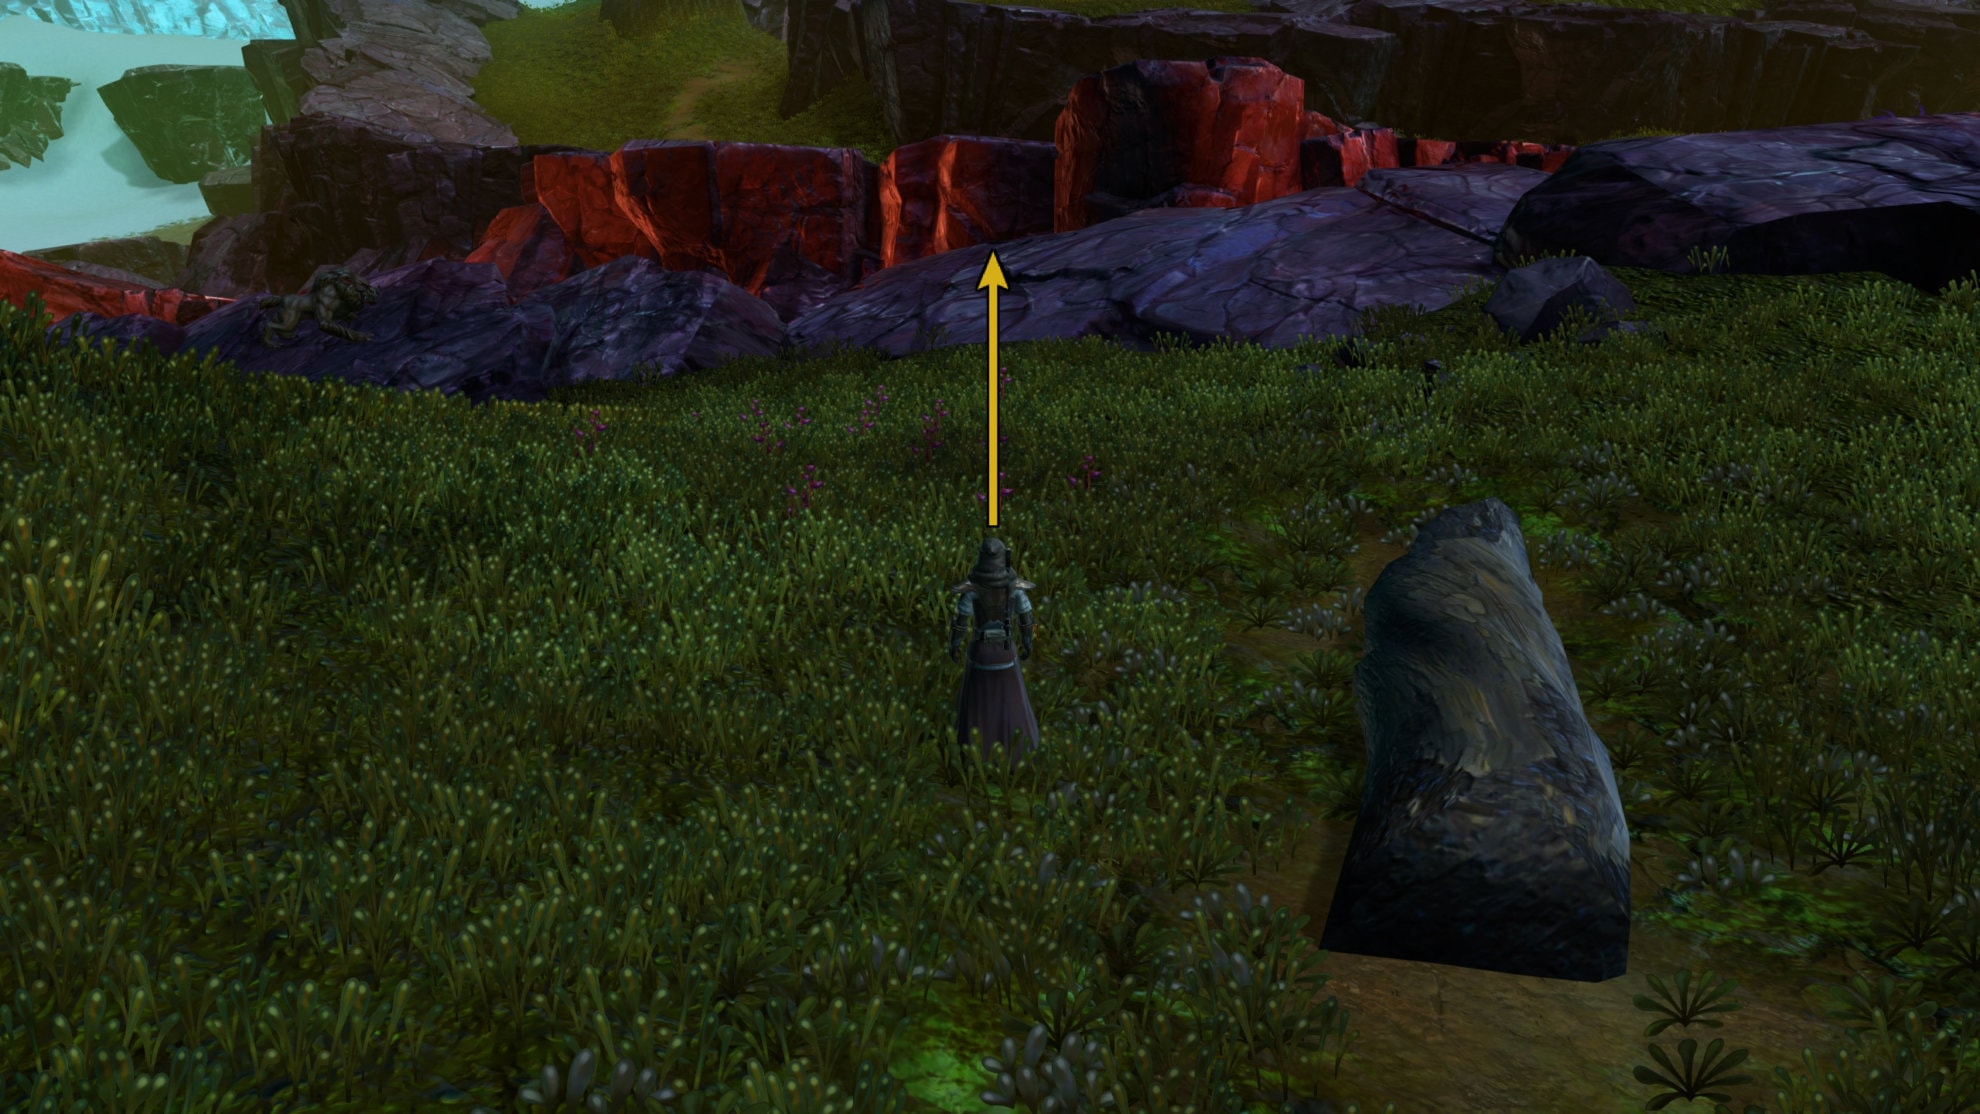
The first jump is on the rocky ledge left of the Manka Cats near the entrance. You’ll want to hug the wall and make a high jump onto a ledge. It’s a bit tricky but once you get up there, hug the ice wall and follow the wall.
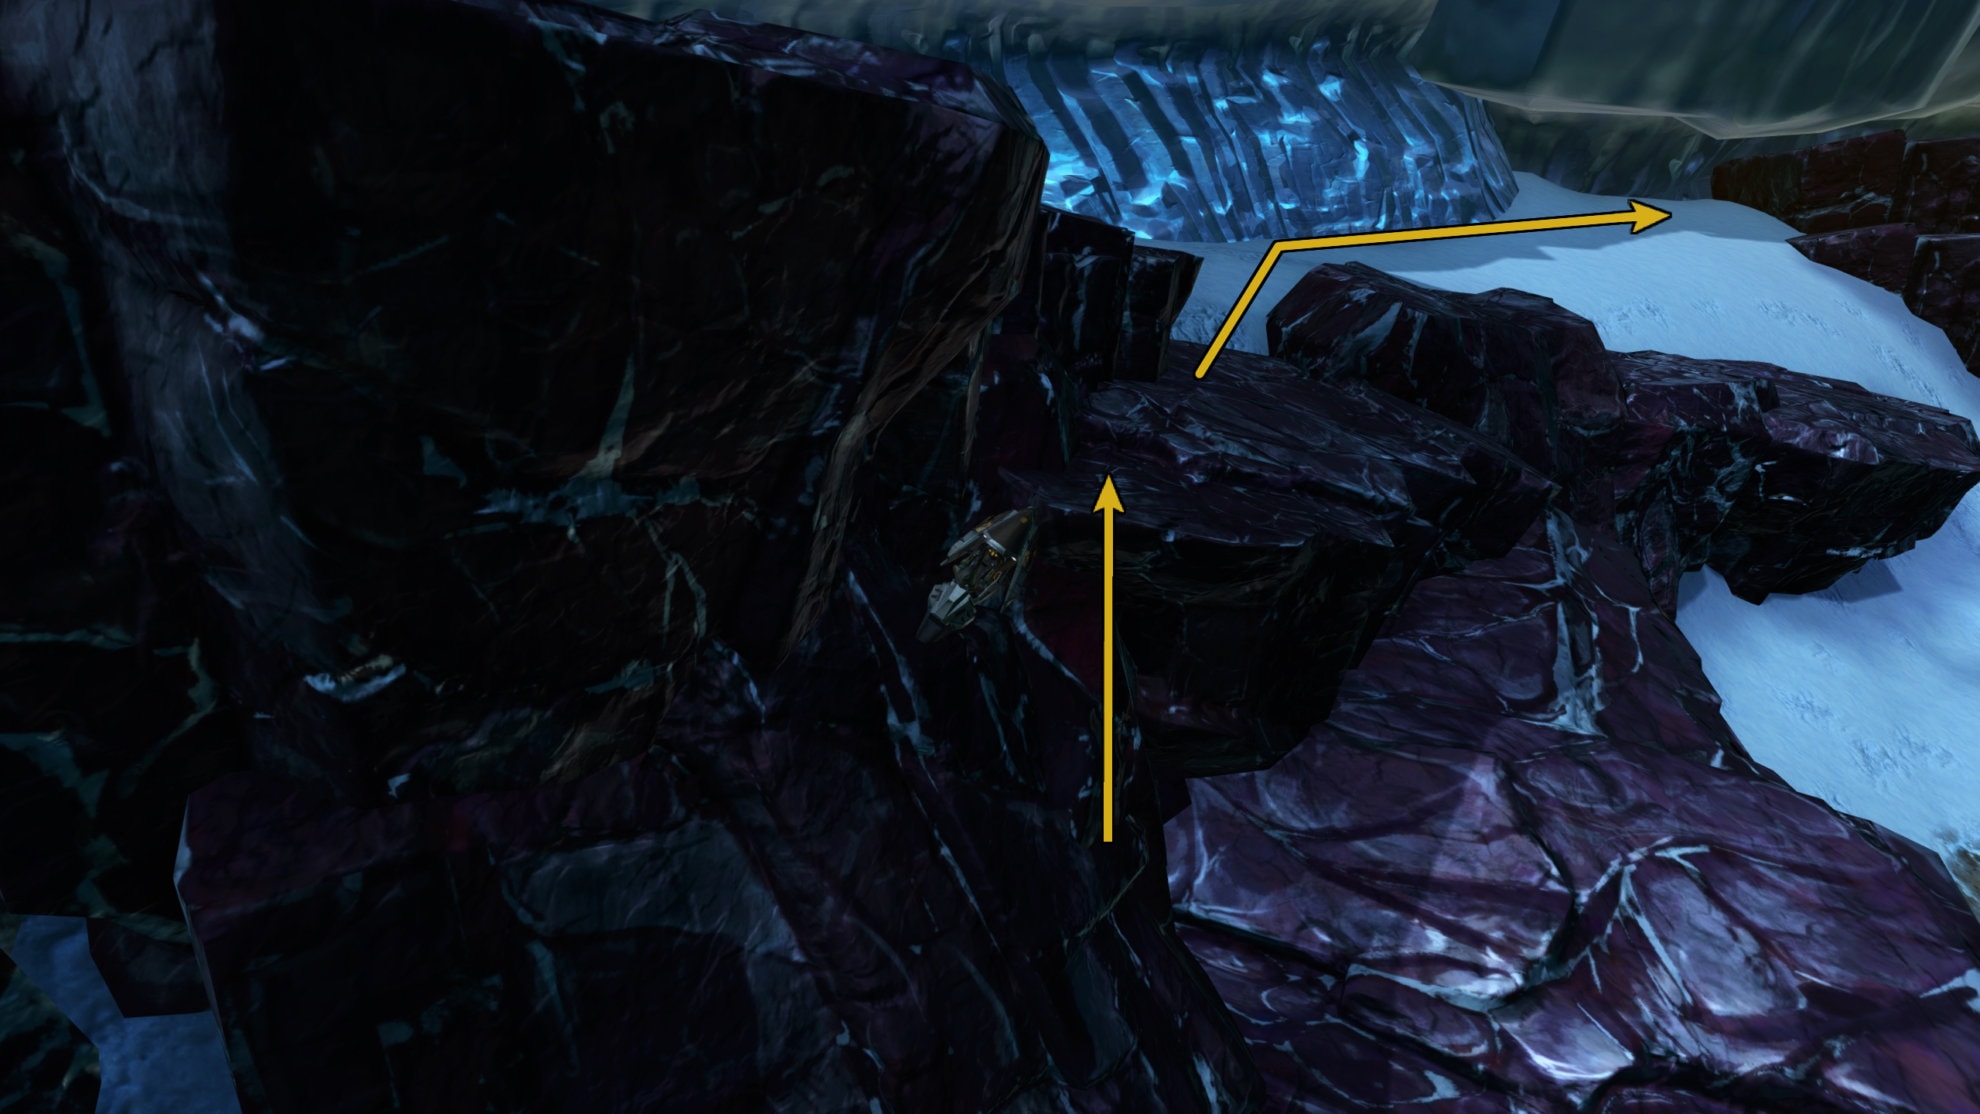
You’ll run into a gap where you can find a snowy hill to the left and a pack of Manka Cats below to the right. Jump to the left onto the snowy hill and continue following the wall until you see a tree with a hole in it. Go through this hole and make your way to the trail.
Avoid the Manka Cat packs and jump into the crevice with the lava flow. Run to the rocky bridge and jump up to the grassy area.
Heal up once you’re up on the ledge. If you’re in the left operation frame, go to the left to reach the North Pylon. If you’re on the right operation frame, go to the right to reach the South Pylon.
Third Boss: The Ancient Pylons
There are two Ancient Pylons in The Jungle, one to the north and one to the south. If you’re in an 8-man Operation, everyone on the left operation frame usually goes north while everyone on the right operation frame usually goes south. If you’re in a 16-man operation, two frames go north and two frames go south.
This isn’t a traditional “boss” encounter as you’re only fighting average enemies while both groups try to simultaneously solve a puzzle. Let’s go over what this puzzle is and how it works.

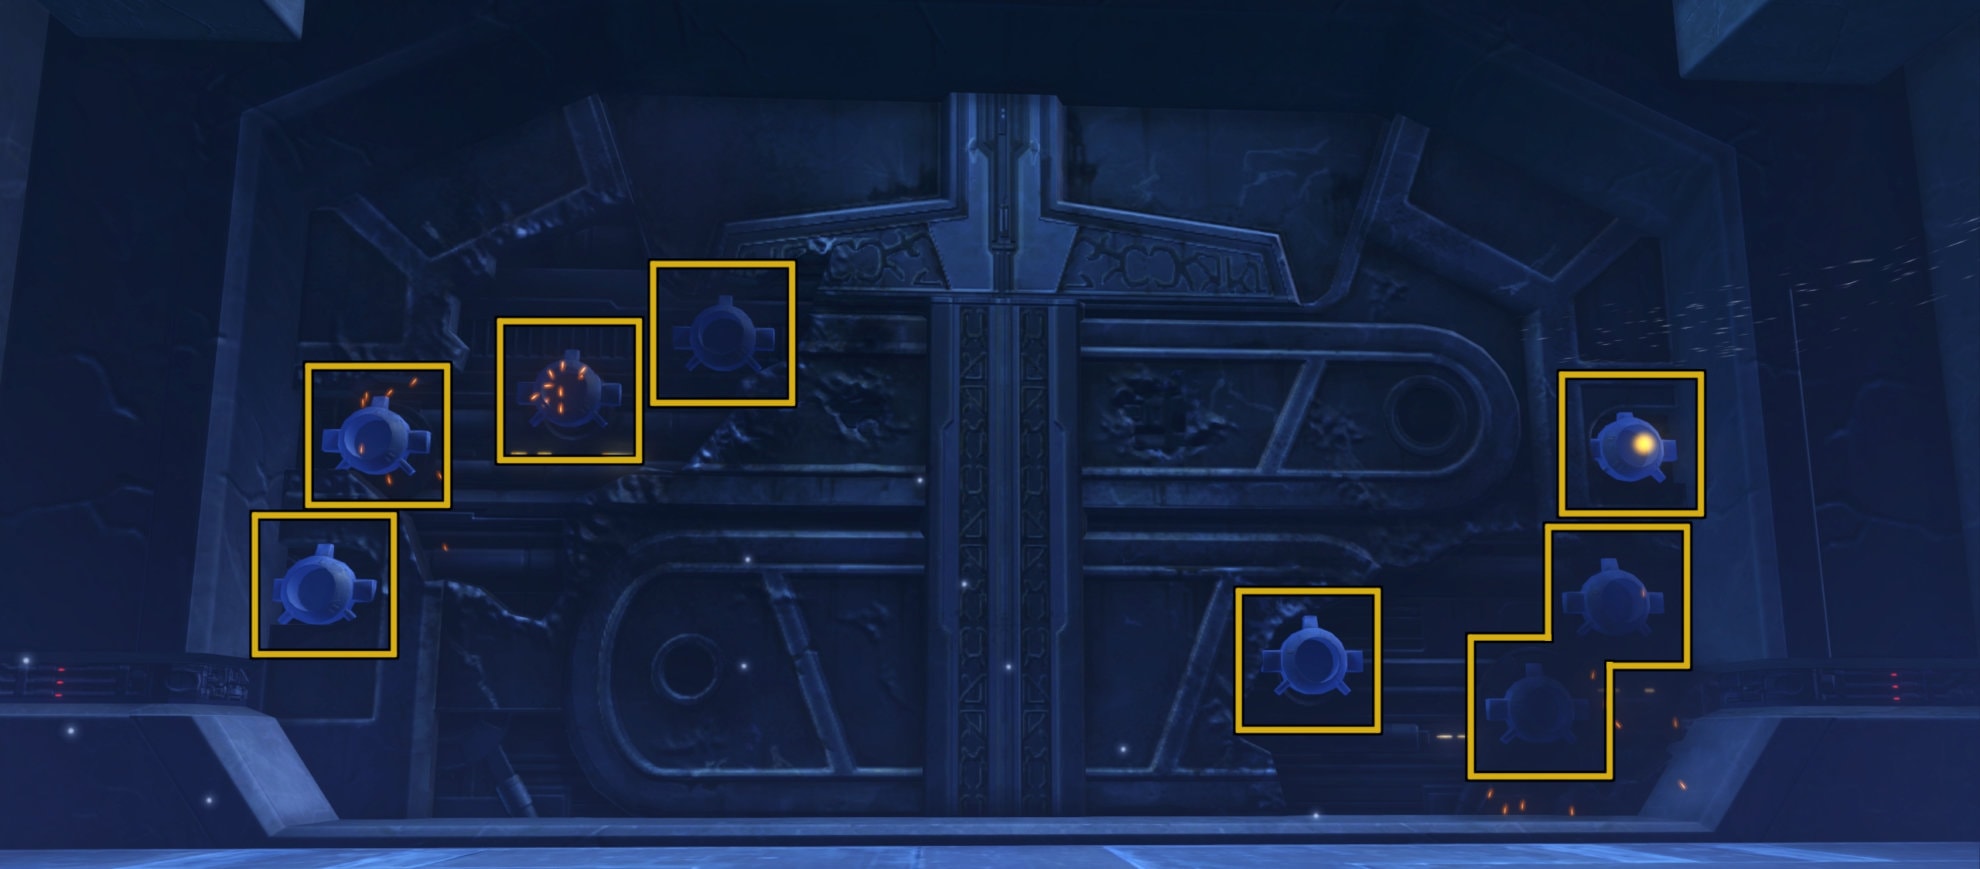
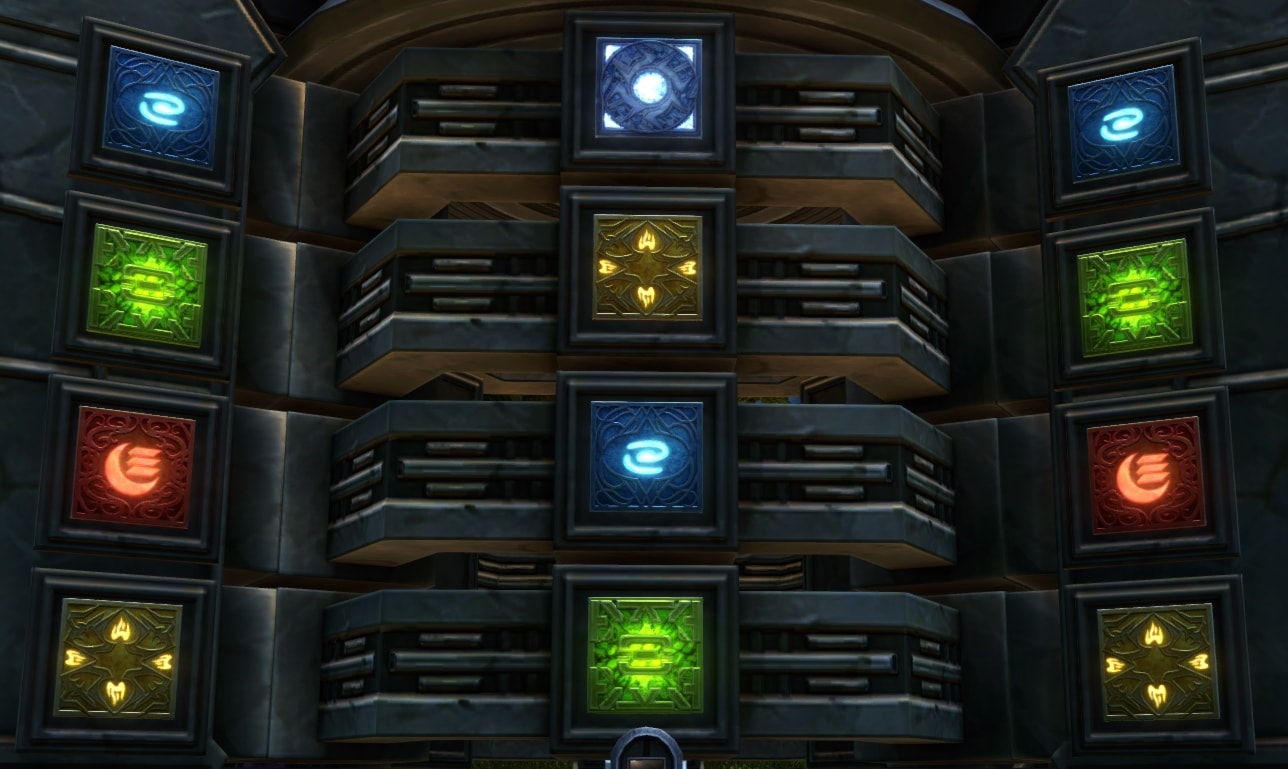
The goal of this puzzle is to have the colored block in the center column match the colored blocks in the left and right columns. You do this by using the Left and Right Keypads to rotate the wheels in the middle column to get the corresponding colored block in the middle.
Once you have the center block match the side blocks, you use the Confirmation Console in the middle of the terminal to lock in the row to move to the next row. You initially start at the bottom row, then make your way up as you lock in your choices.
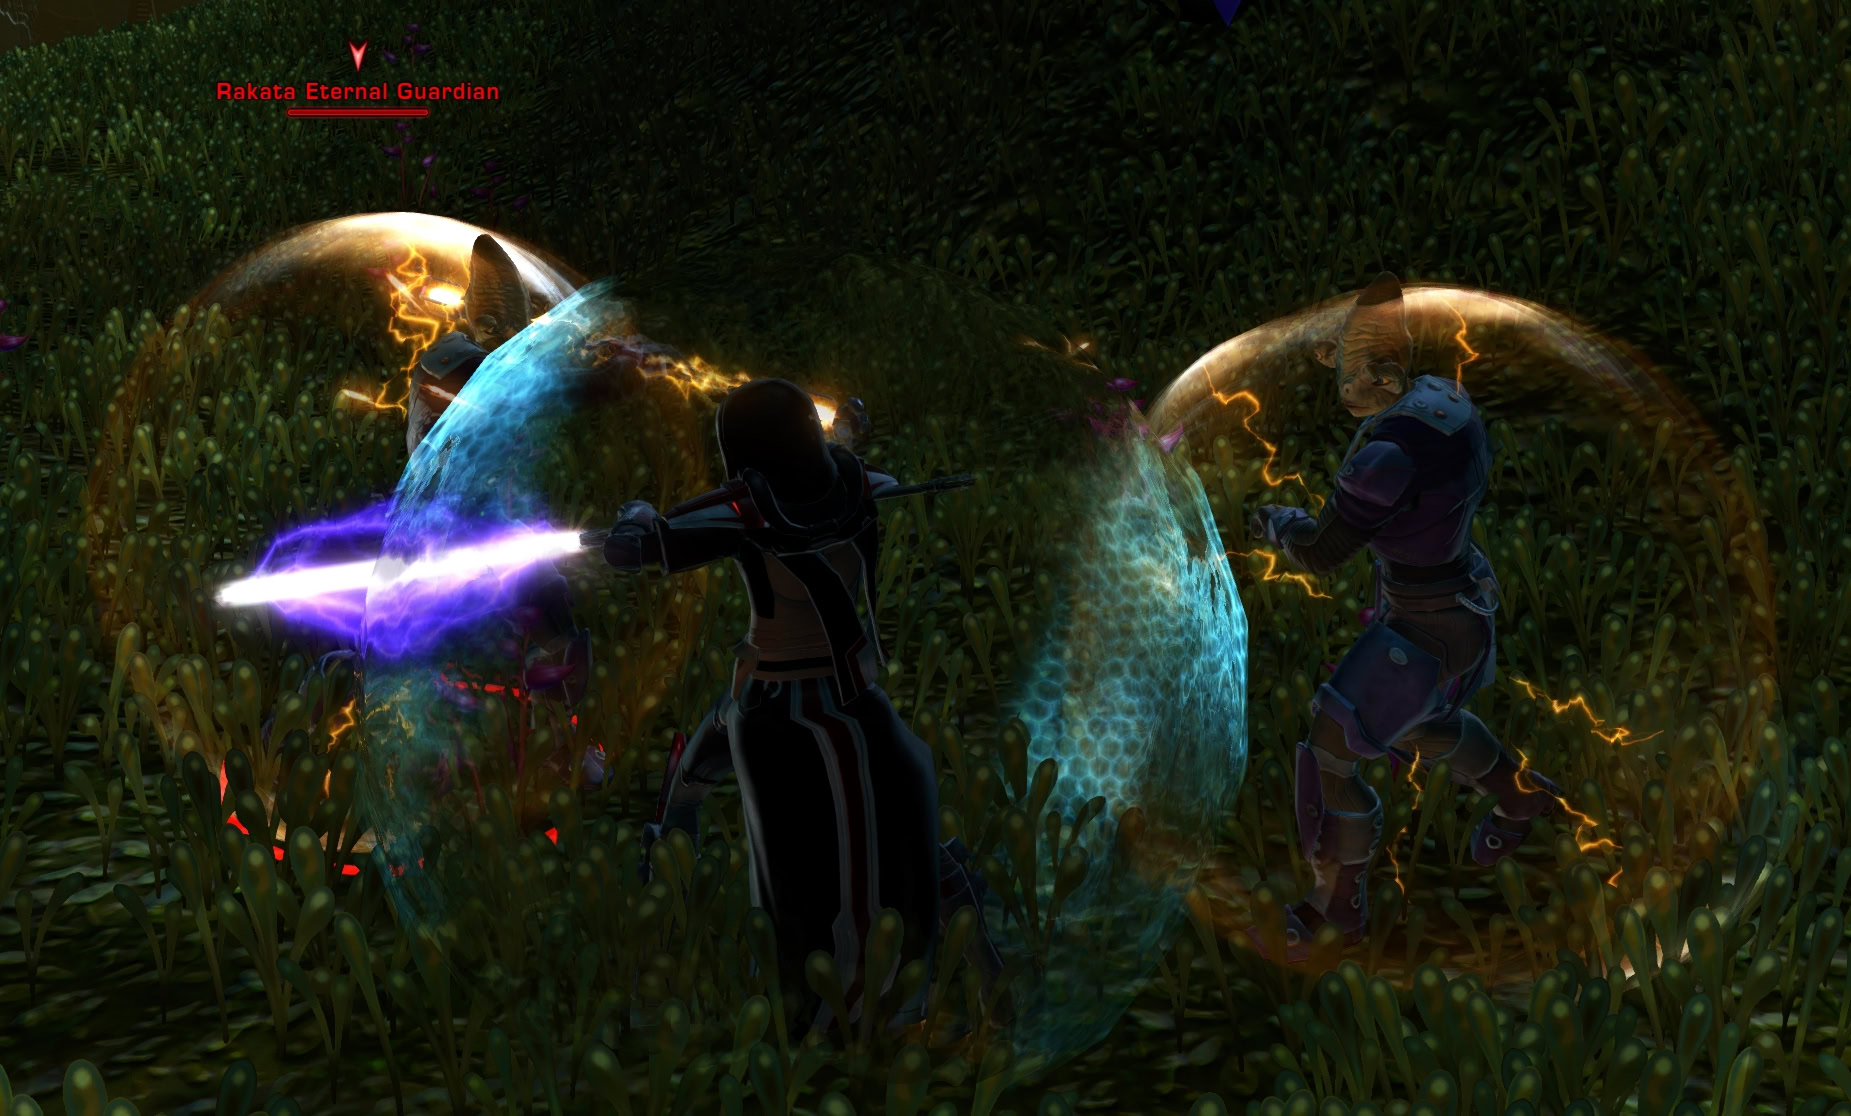
As you’re trying to solve the puzzle, enemies will spawn and attack the group. These start as Rakata Eternal Guardians/Watchers, and then later on Primordial Acklays will appear. If for whatever reason someone goofs during the puzzle, you can reset the pylons and any combat encounters going on with the Emergency Reset Terminal.
Solving the Puzzle
This puzzle requires cooperation from everyone as there’s a timer on this boss fight. If the group takes too long to solve both puzzles simultaneously, the encounter will reset. If you end up fighting 3 Primordial Acklays, then you know you’re out of time. Let the group designate those who are going to focus on pressing the Keypads as soon as their active and those who are going to fight the adds.

These colored blocks are on a wheel, so if we were to see this from a top-down perspective, we get an idea of where the various colors are located on the wheel and how many left or white turns are needed to get your desired color.
The left keypad rotates the active wheel clockwise while the right keypad rotates the active wheel counter-clockwise.

Now that we know how the puzzle works, let’s use an example for the Ancient Pylons.
The following image has red on the sides and blue in the center. The quickest way to get red is to press the Right Keypad two times. If you tried getting to it with the Right Keypad only, you would need to press it four times to get red. Once you get all red in this row, you’ll use the Confirmation Console to lock in the row to work on the next.

Do note that you won’t move to the next row if the other pylon’s group has not solved the same row at their pylon. If you can, take the shortest route to save time for everyone involved.
Here’s a table you can use to determine which keypad to use for the shortest route:
| Red | Yellow | Green | Blue | Purple | White | |
|---|---|---|---|---|---|---|
| Red | – | L/R 3 | Right 1 | Right 2 | Left 1 | Left 2 |
| Yellow | L/R 3 | – | Left 2 | Left 1 | Right 2 | Right 1 |
| Green | Left 1 | Right 2 | – | Right 1 | Left 2 | L/R 3 |
| Blue | Left 2 | Right 1 | Left 1 | – | L/R 3 | Right 2 |
| Purple | Right 1 | Left 2 | Right 2 | L/R 3 | – | Left 1 |
| White | Right 2 | Left 1 | L/R 3 | Left 2 | Right 1 | – |
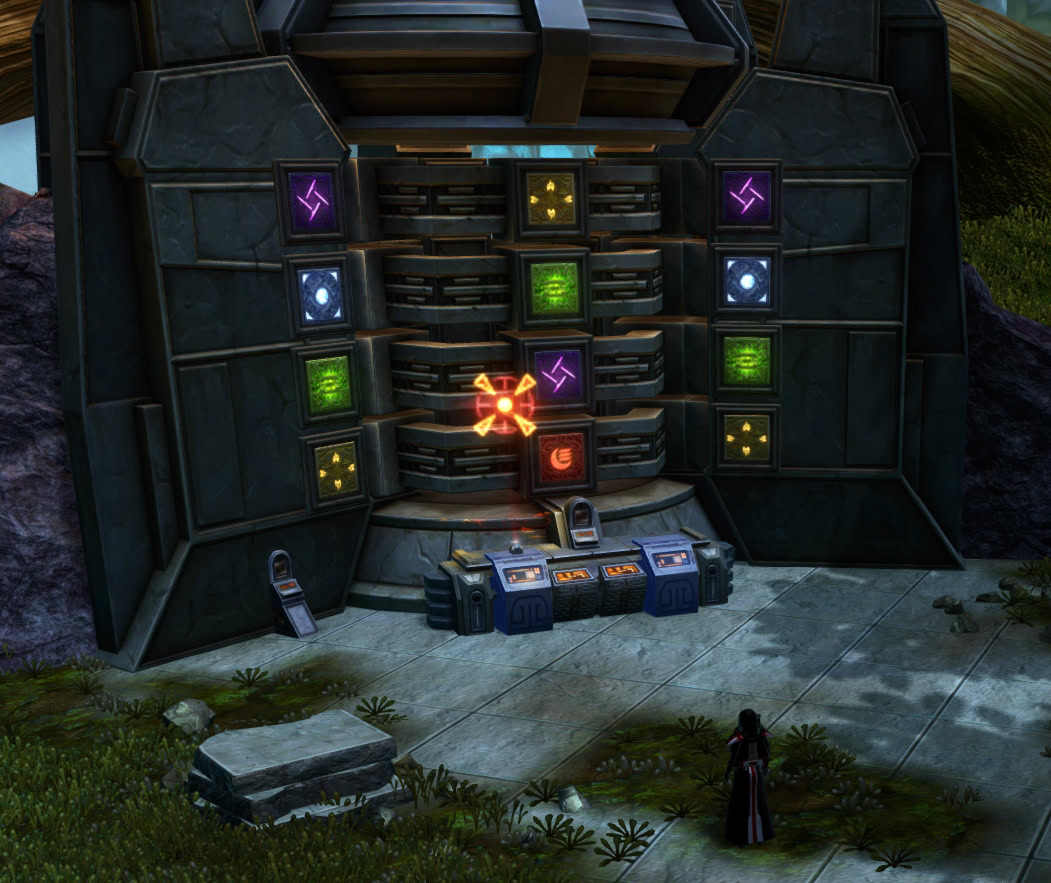
Now let’s look at a full pylon puzzle set for an example, we’ll be using the one in the following image:
Starting at the bottom and then working up, your solution will be:
Left 2, Right 2, Right 2, Right 2 (or LRRR for short)
If your solution is something like Right 1, Right 2, Left/Right 3, 2 Right, it’ll be easier to say “All Right (or RRRR)” as Left 3 and Right 3 are the same things. The simpler you can make this for everyone is better. You can place a Tank/DPS/Heal Tactical Marker over the button that currently needs to be pressed for an easier time. These tactical markers are a legacy perk and can be unlocked in your Legacy Window.
It’s very simple once you get the hang of it. Once both groups have completed the puzzle, you’ll all be teleported to a loot chest. Pick up your loot and run inside the tunnel below to reach the Inner Sanctum. If any adds are chasing you, ignore them and keep running inside until they drop aggro.
All Left Strategy
Many people like to complete operations as soon as possible, so a common method used by randomly made groups is to press the Left Keypad only. The idea behind this is that it’s very simple for everyone to only press the Left Keypad as you’ll eventually get your corresponding color by brute-forcing the puzzle.
It’s not always the most efficient strategy, it’s just an easy one to understand. You might be more efficient with the puzzle if you take the time to solve it. Because many people use the all-left strategy, they may blindly use the left button out of force of habit. Be sure to make sure everyone in your group understands whether you are doing all left or solving, otherwise it’s a detriment to the whole operation.
The Adds
When enemies spawn, you’ll encounter Rakata Eternal Watchers, Rakata Eternal Guardians, or Primordial Acklays. The most common add you’ll encounter is the Rakata Eternal Guardians. These are melee units that can cast the Force Barrier buff on themselves. If successfully casted, they will reflect any damage done to them for the next 10 seconds. Interrupt them or stun them while they cast Force Barrier as you can potentially take a good chunk of damage.
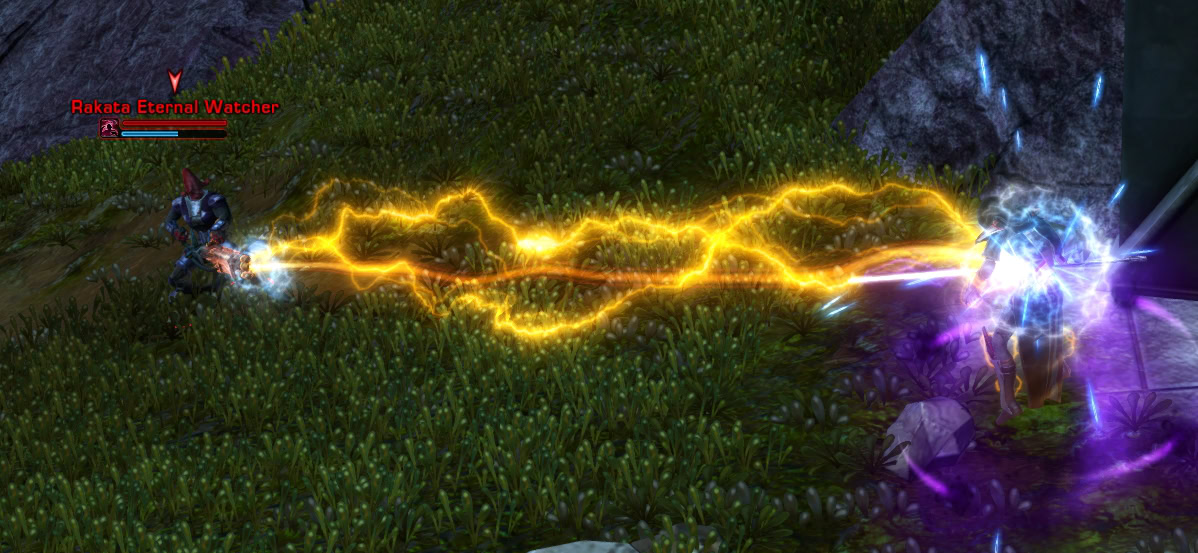
Rakata Eternal Watchers are the most annoying of the adds to spawn. These are ranged units that can use a Stasis Beam on a random target, lifting them into the air for 3 seconds. This is particularly annoying if they’re lifting the player currently pressing a button.
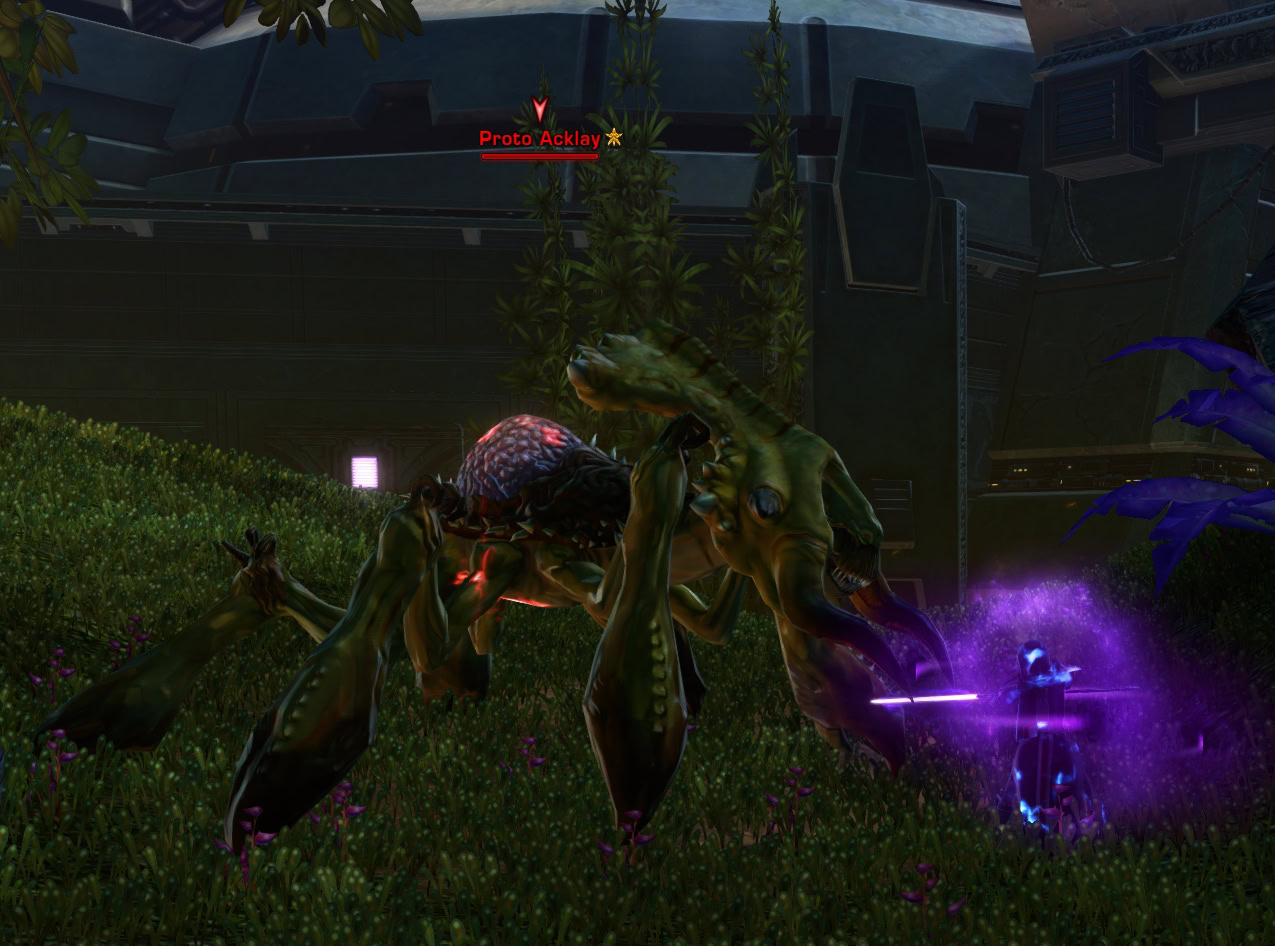
Last are the Primordial Acklays that spawn in. They deal the most damage out of all the adds and spawn in greater numbers throughout the encounter. Initially, there will be two instances where 1 spawns, then an instance where 2 spawn, then a final instance where 3 spawn. By the time the 3 spawn, you’re essentially out of time and will fail the puzzle soon after. Ideally, you should not reach this phase by being efficient with the puzzle-solving.
Veteran Mode Differences
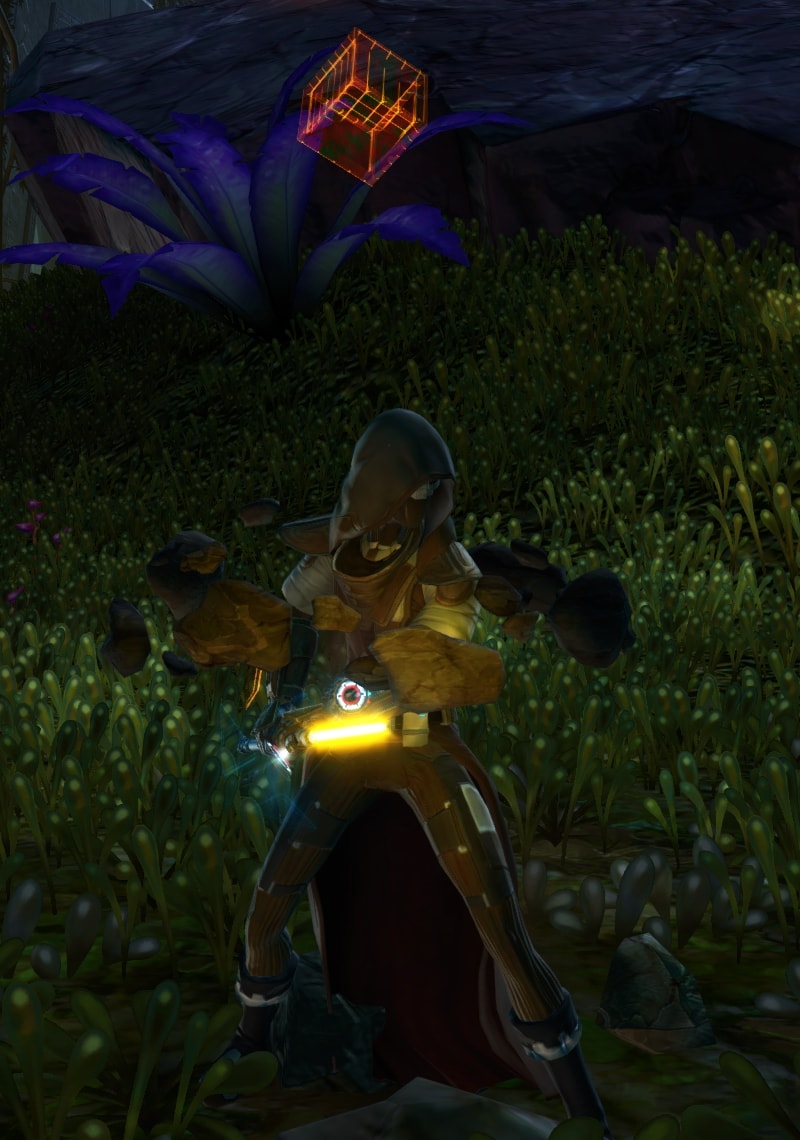
The main difference in Veteran Mode is that every time someone presses a Keypad, they get a debuff for several seconds that prevents them from pressing another Keypad for 30 seconds. If you see an orange, floating cube over your head, you will not be able to press a Keypad until it disappears. This means at least two or three people will need to swap with one another for Keypad duty.
The Force Barrier buff and Acklays are also far more deadly in Veteran Mode as well, be more proactive with interrupting Force Barrier and make sure to use DCDs against multiple acklays.
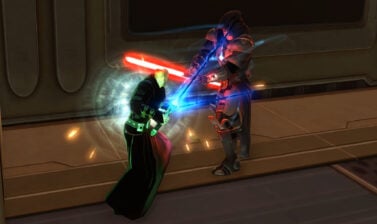
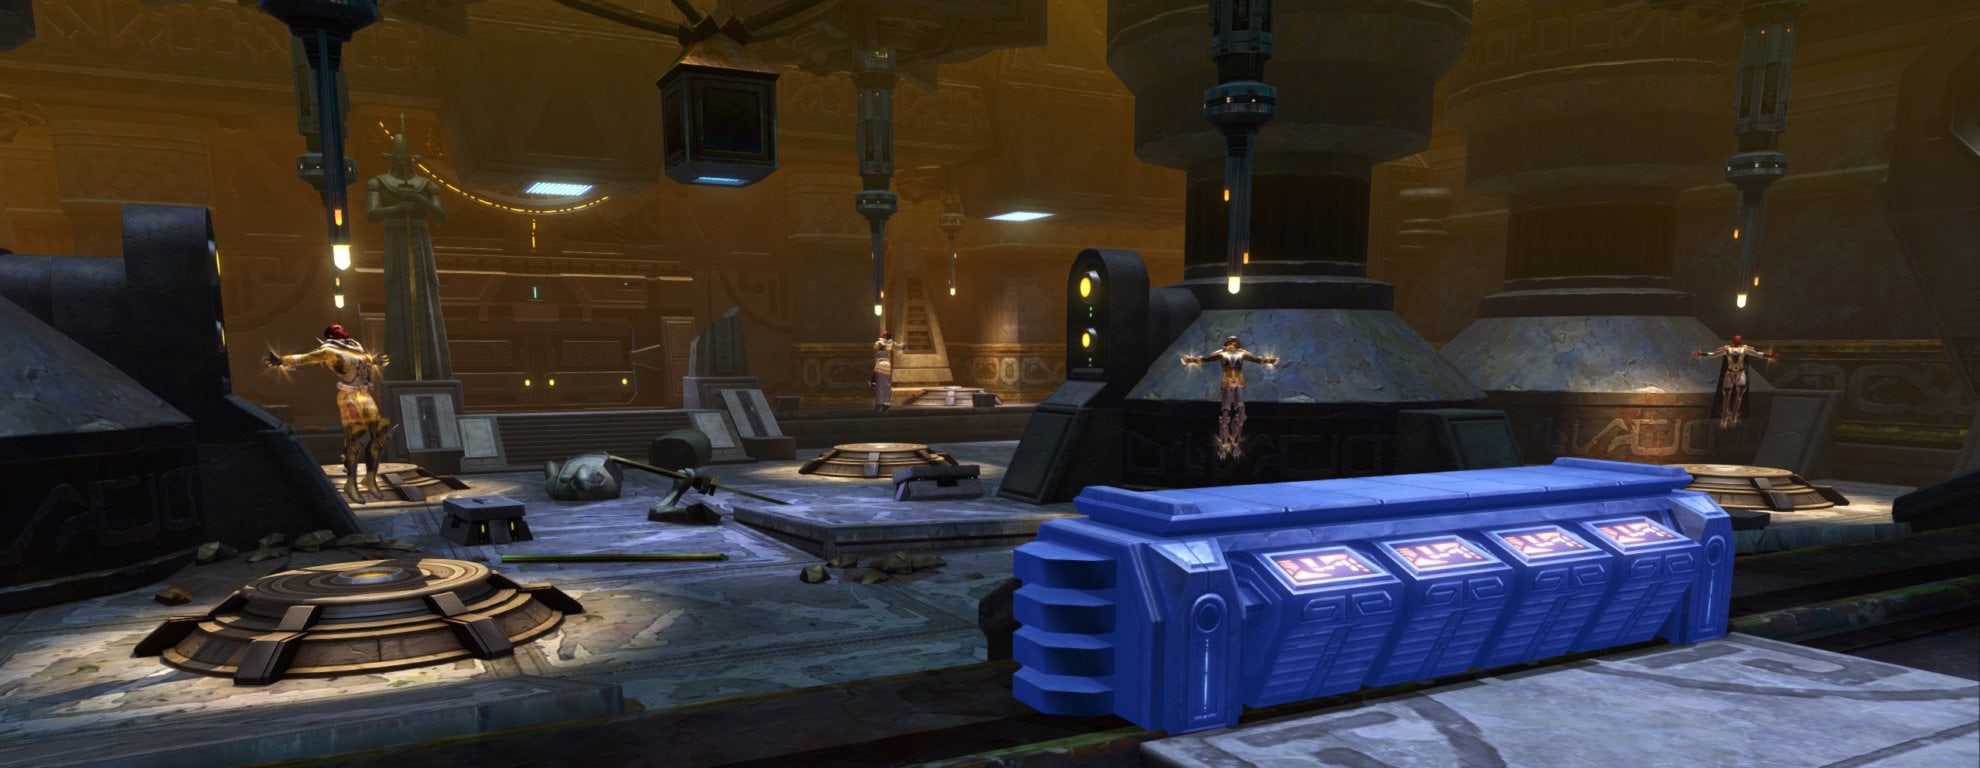
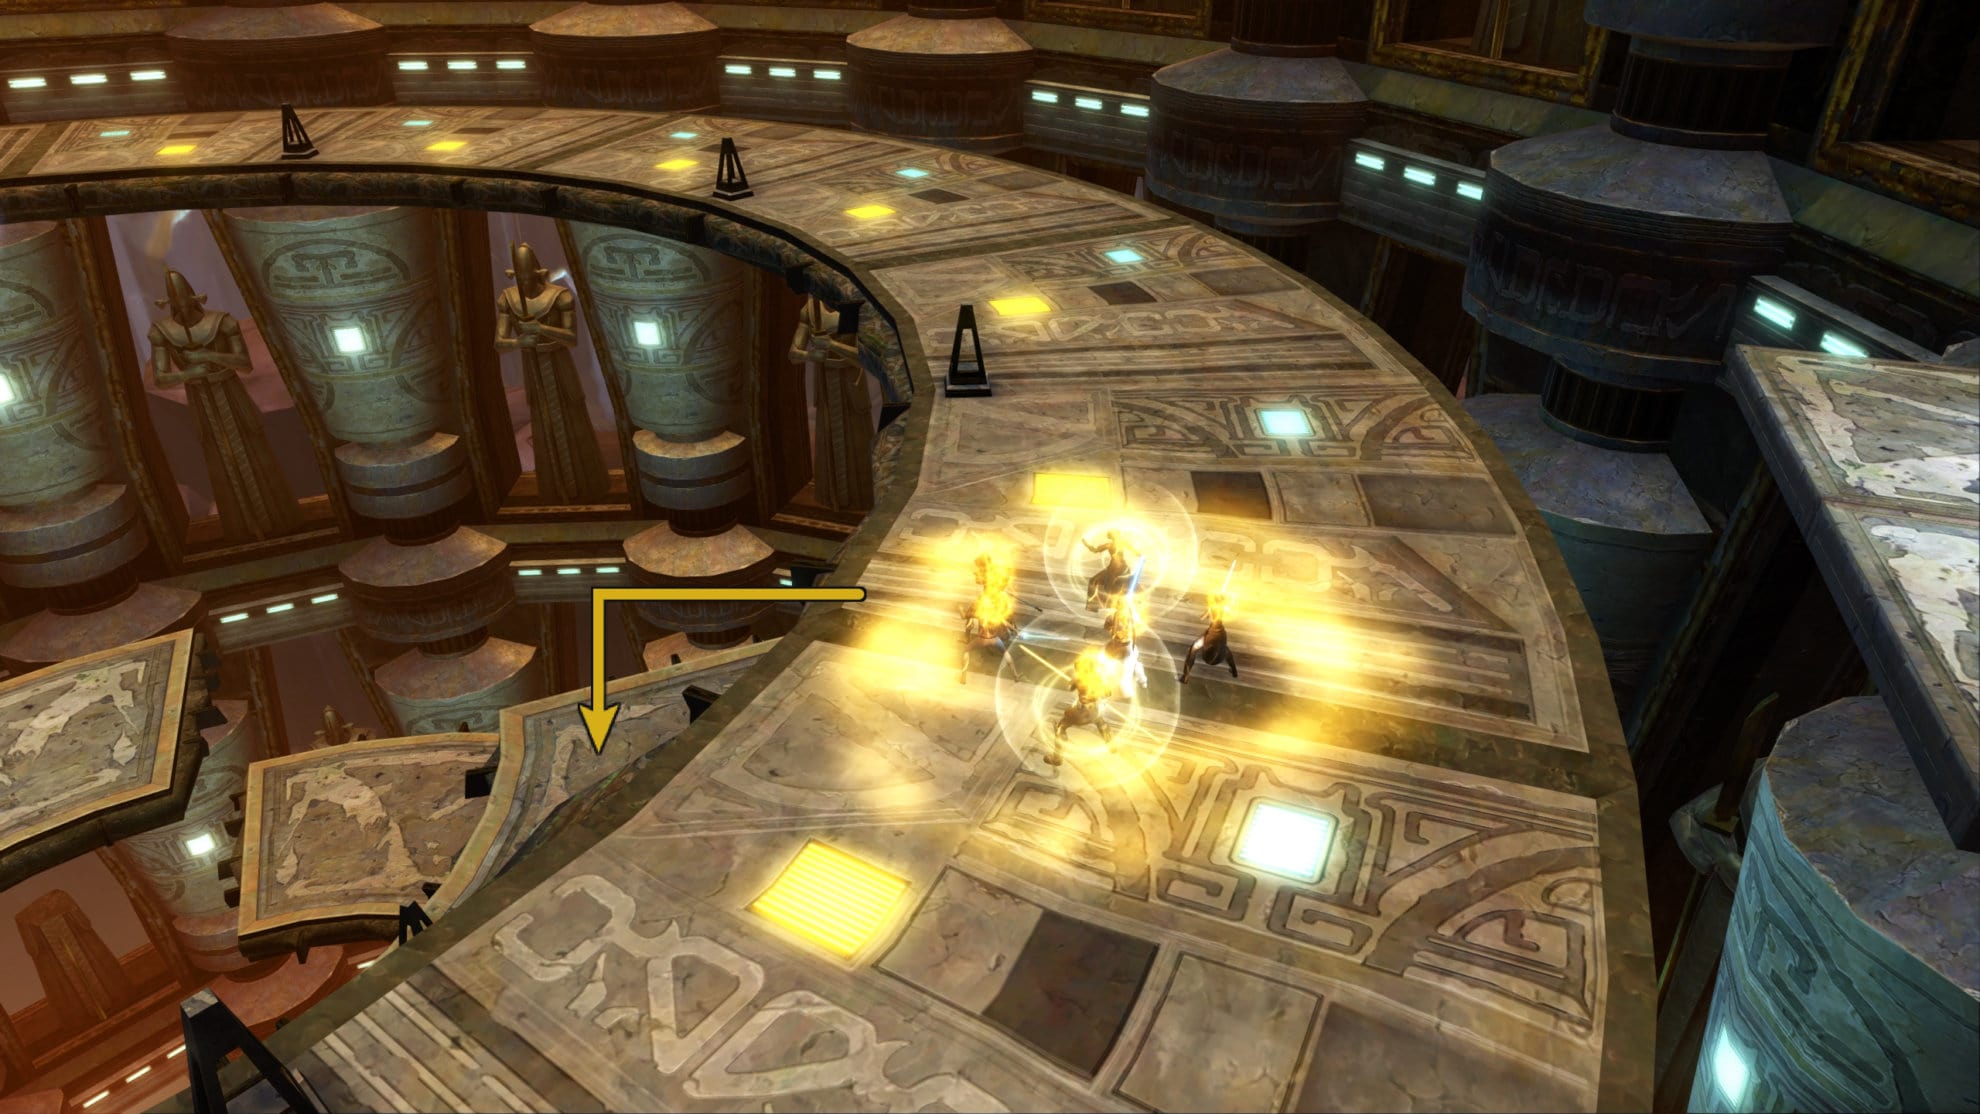
Fourth Boss: The Infernal Council
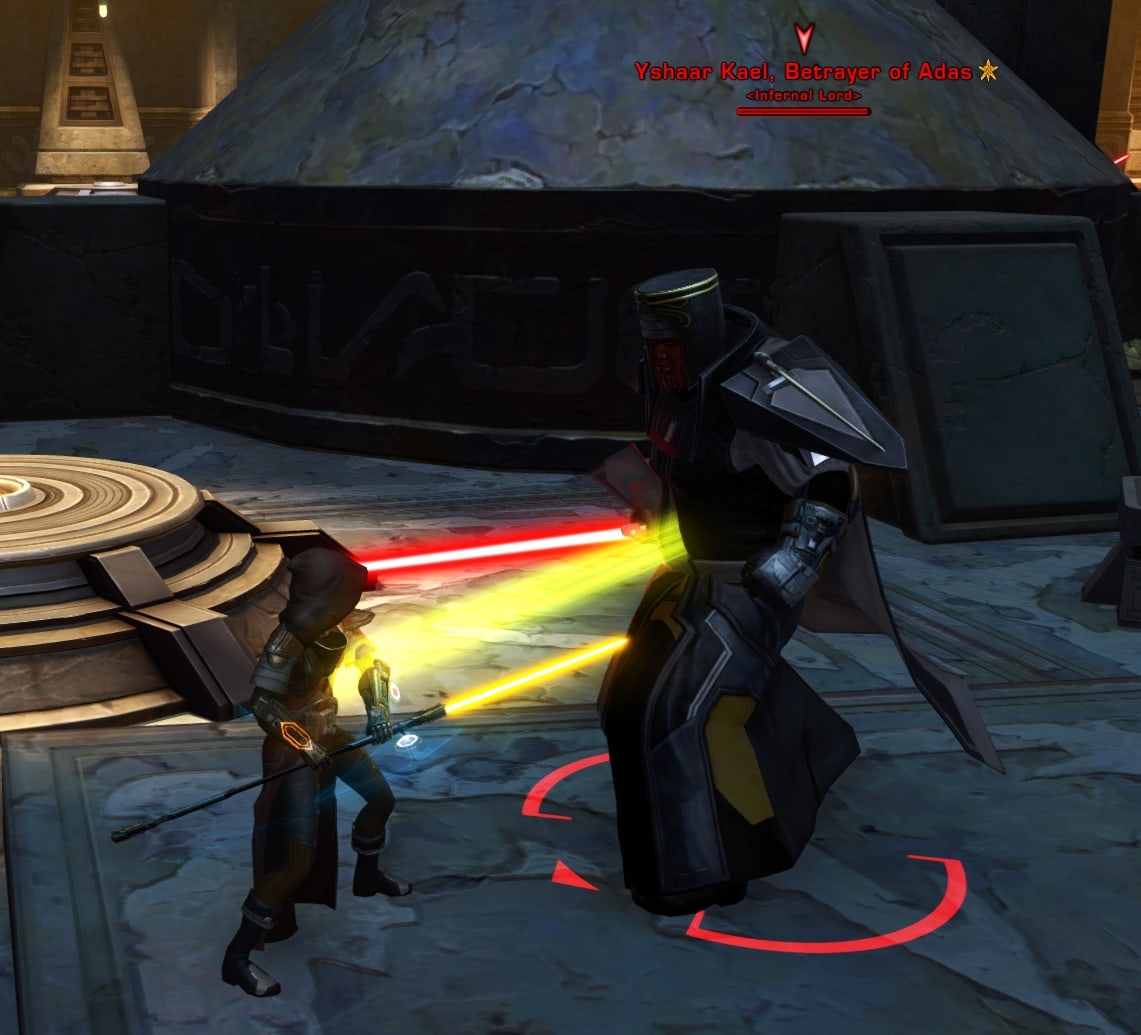
The Infernal Council is a boss encounter where everyone in the group has a one-on-one with an imprisoned Sith. Once the fight starts, everyone has about two minutes to defeat their opponent before they enrage.
Each of these Sith have titles that correspond with how they fight. You’ll have Infernal Lords, Infernal Marauders, and Infernal Assassins.
- Lords apply a debuff that reduces their target’s armor.
- Marauders apply a debuff that reduces their target’s healing by 75%.
- Assassins deal high damage and have a channeled damaging ability.
You will want the Tanks to fight the Lords, DPS to fight Marauders, and Healers to fight Assassins. If your group only has one tank, then a DPS will need to fight a Lord.
- Tanks fight Lords due to the Lord’s low damage output. Their damage reduction debuff won’t mean too much against someone with a lot of armor.
- DPS fights Marauders as they can easily out-damage them without relying on self-heals. Sending a Healer against a Marauder is a death sentence for the healer. Along with this, the Marauders have far more health than the others so those with high DPS need to defeat them. A tank or a healer might not defeat them in time which can cause the encounter to reset.
- Healers fight Assassins as the Assassins have no debuffs, just high damage that the Healer can heal through. Whenever an Assassin uses their channeled attack ability, the Healer should interrupt them or pop DCDs as soon as possible.
To start the fight, someone needs to activate the blue terminal at the front of the room. Everyone but the one activating the terminal should be near their opponent, ready to attack them the moment they are free.
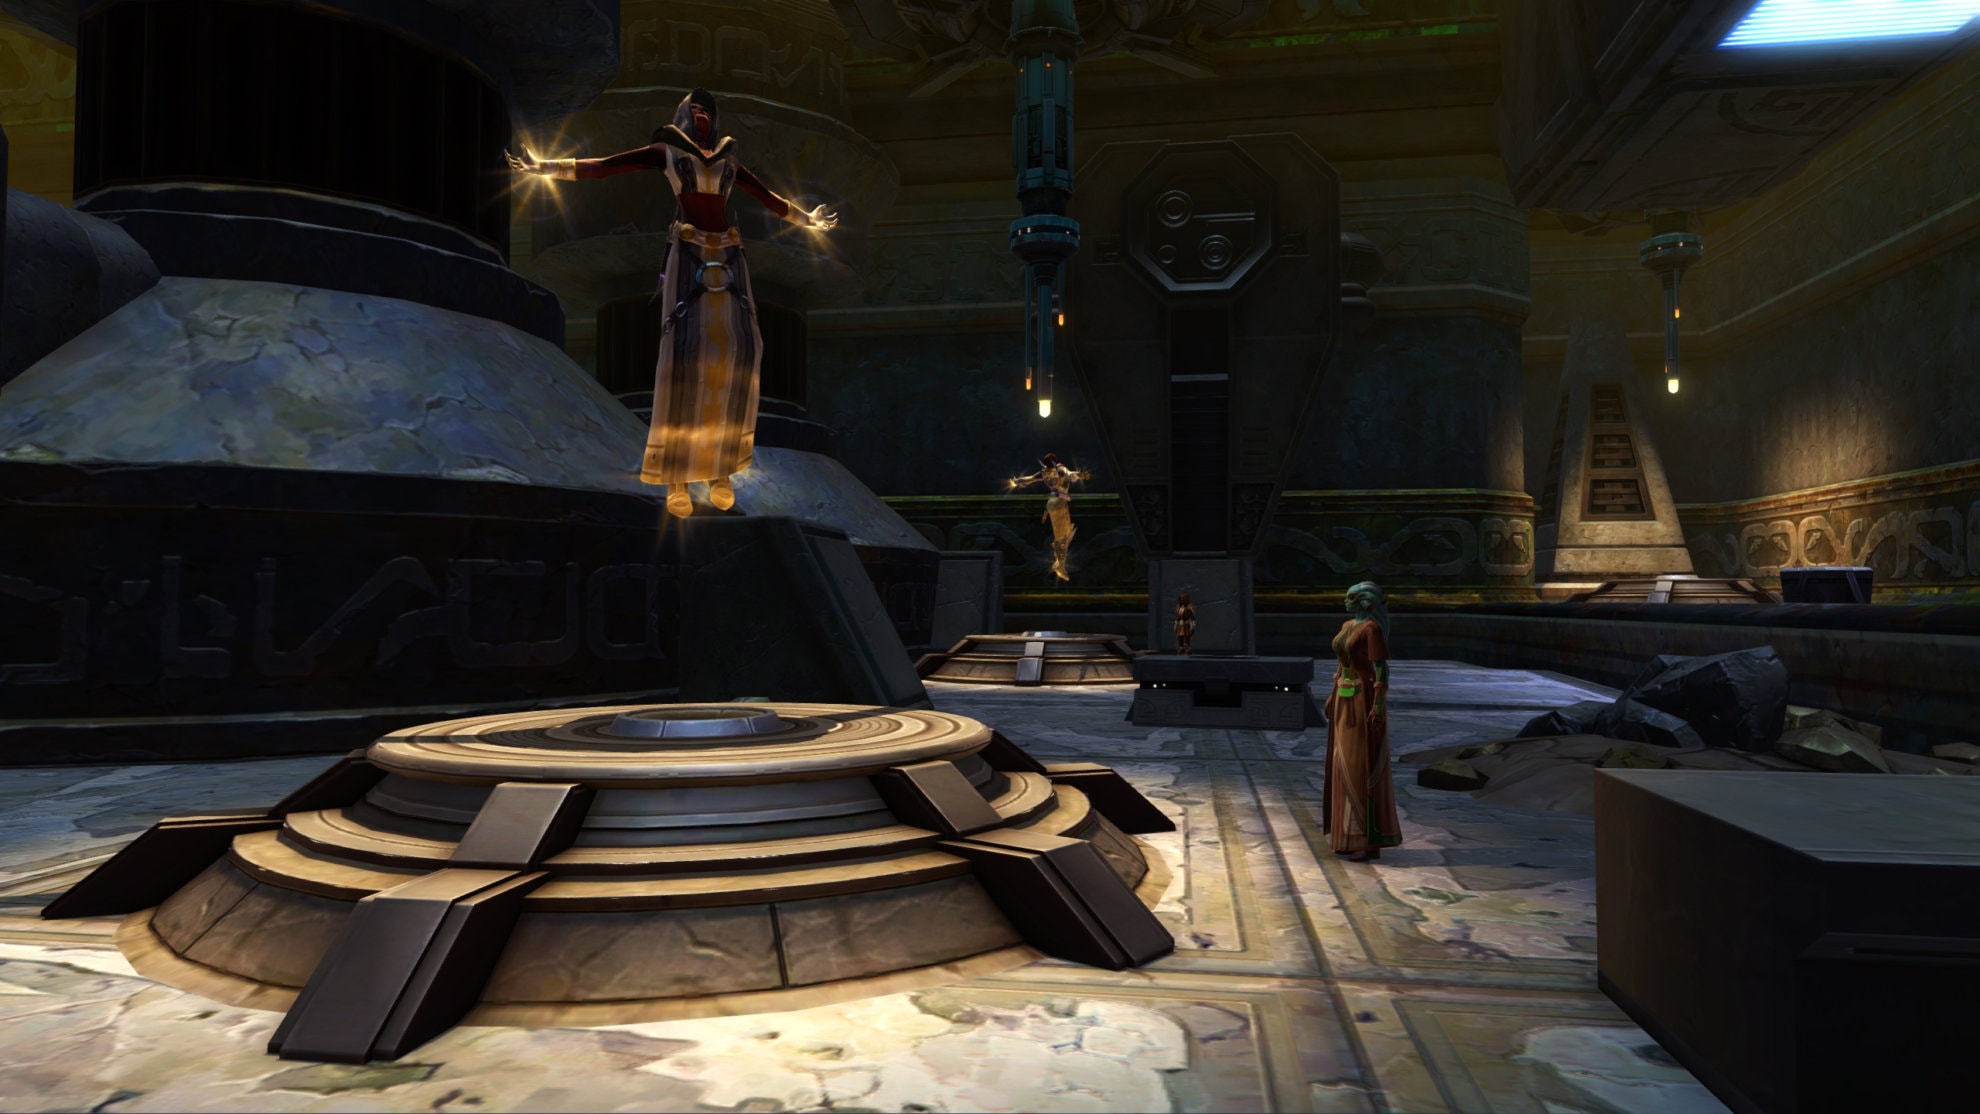
After activating the terminal, everyone must attack their opponent to keep them from wandering around and causing trouble for others. You can tell who’s your bound opponent as there will be a green line connecting you two.
Once everyone defeats their opponent, you can pick up your loot from the Infernal Assassin, Kahesh the Reborn.
If someone is doing poorly in this fight, it might be best to have them sit out the encounter and watch to learn. Have a more experienced DPS fight a Lord/Assassin then take on the spare Marauder. The spare Marauder will walk around the room slowly and will not fight anyone unless struck. The DPS can more quickly dispatch a Lord or Assassin as they have less health than the Marauders, offering them ample time to then defeat the spare Marauder.
Penalty of Destiny
The Penalty of Destiny debuff applies if you help your allies in one of the following ways:
- You attack their opponent with a damaging ability.
- You heal your ally.
If you have a Slow-Release Medpac  /Kolto Probe
  , Trauma Probe
 ![]() /Kolto Probe
/Kolto Probe  , or Force Armor
  /Static Barrier
  before the fight starts, right-click these buffs to remove them. If you have any of those heals/shields active during the fight, you risk invoking the Penalty of Destiny. Remove any allied shields or heals before the fight starts!
Try to not use large AoE attacks to avoid damaging someone else’s opponent, otherwise you’ll spend a minute of having no damage or healing. You can draw the opponent to a wall and aim any directional AoEs to the wall so you don’t hit anyone else’s opponent. Just be sure to not get close to other opponents and risk hitting them.
If you don’t have this debuff and have defeated your opponent, you can help an ally by attacking their opponent to apply damage ONCE. Don’t use any channeled abilities or DoTs for this attack, just limit it to one hard-hitting attack that lacks delay or setup. Try to help a tank or a healer as they have less damage than the DPS and will typically take longer to defeat their opponent. Go for the remaining Assassin or Lord with the most remaining health.
A common issue that appears in this encounter is with Watchman Sentinels and Annihilation Marauders. Their Zen/Berserk buff will grant healing to allies, so to avoid applying the Penalty of Destiny, any Watchman Sentinels and Annihilation Marauders need to be moved to their own operation frame. Their buff will be limited to themselves in their own frame and they can continue their fight as normal without reducing their damage by abstaining from Zen/Berserk.
If you have the Penalty of Destiny debuff, you can still sunder a target’s armor or apply debuffs tied to your abilities to make it easier for your allies. You won’t deal any damage to the, but the debuffs will still apply and make it easier for the remaining players to defeat their opponent.
Veteran Mode Differences
The damage output of the Infernal Council is increased, but there are no mechanical differences.
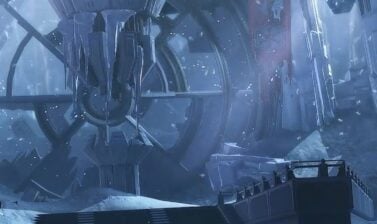
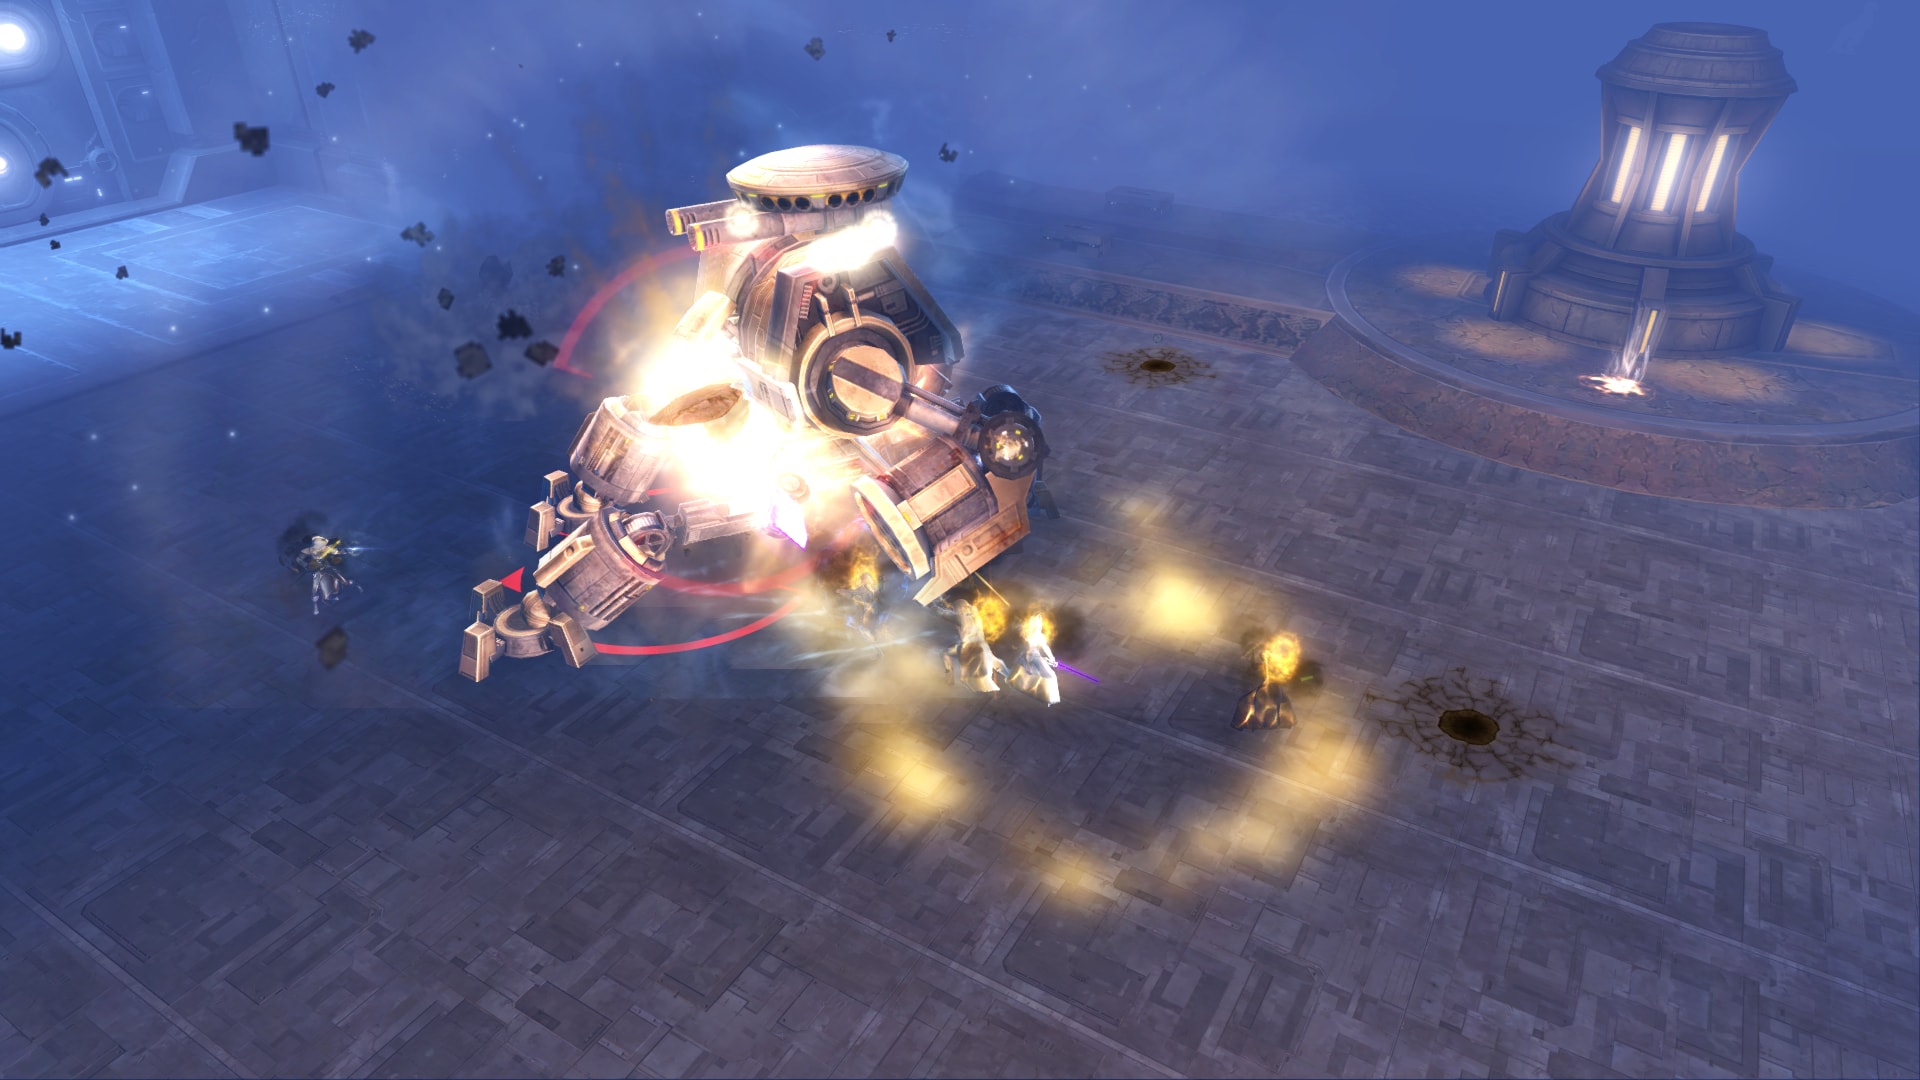
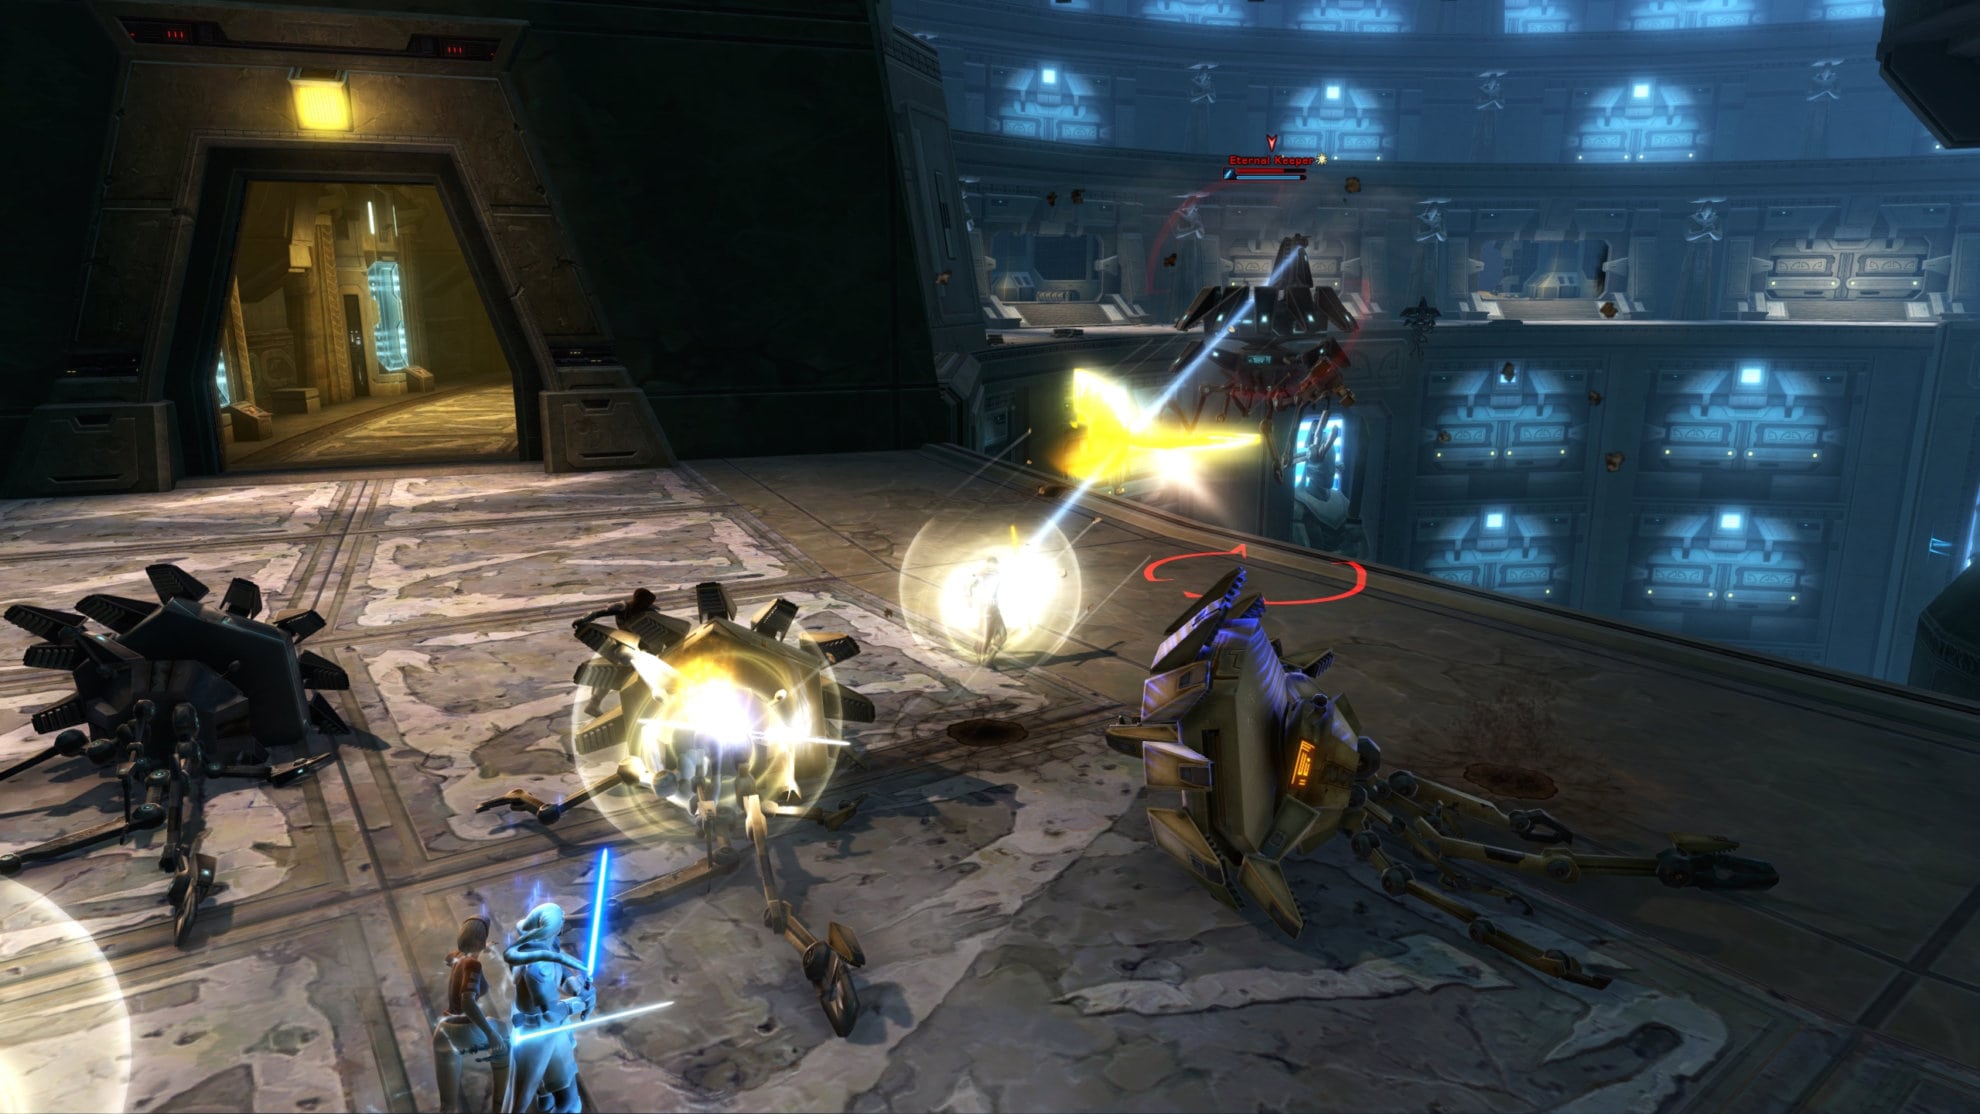
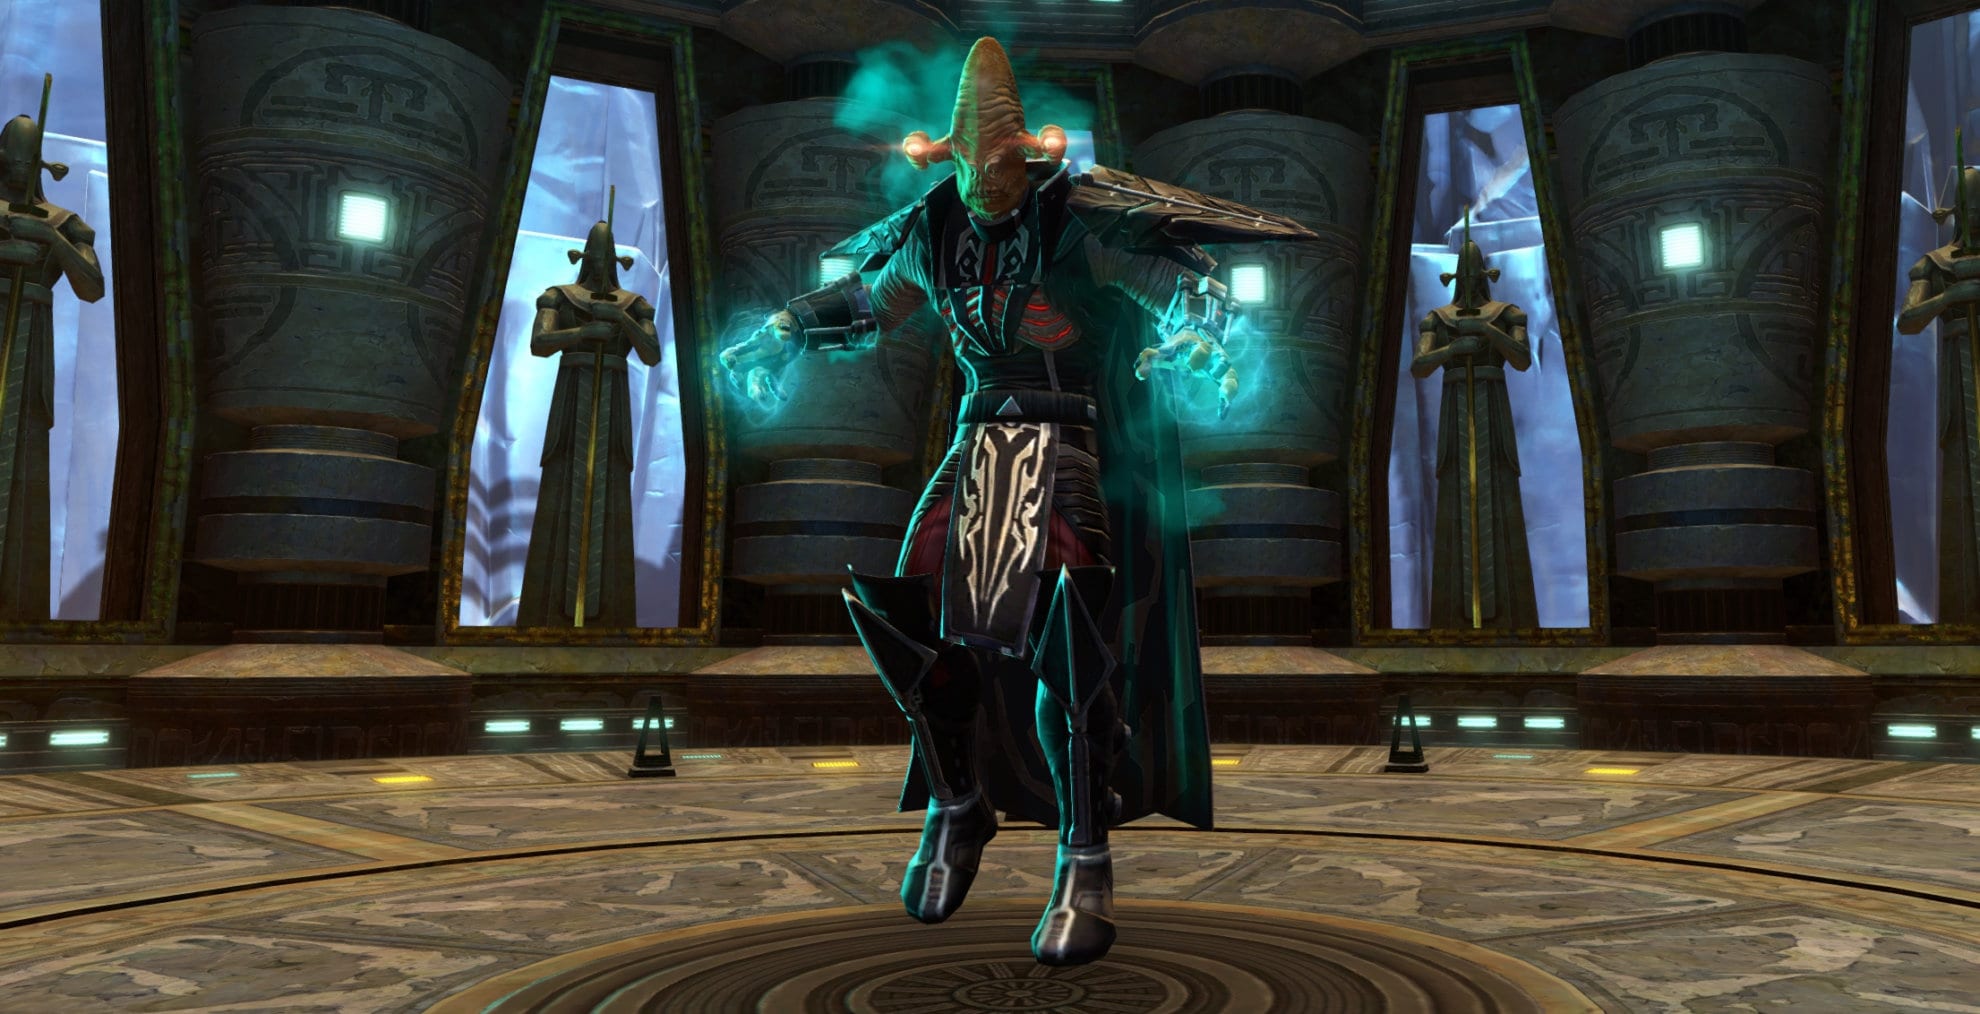
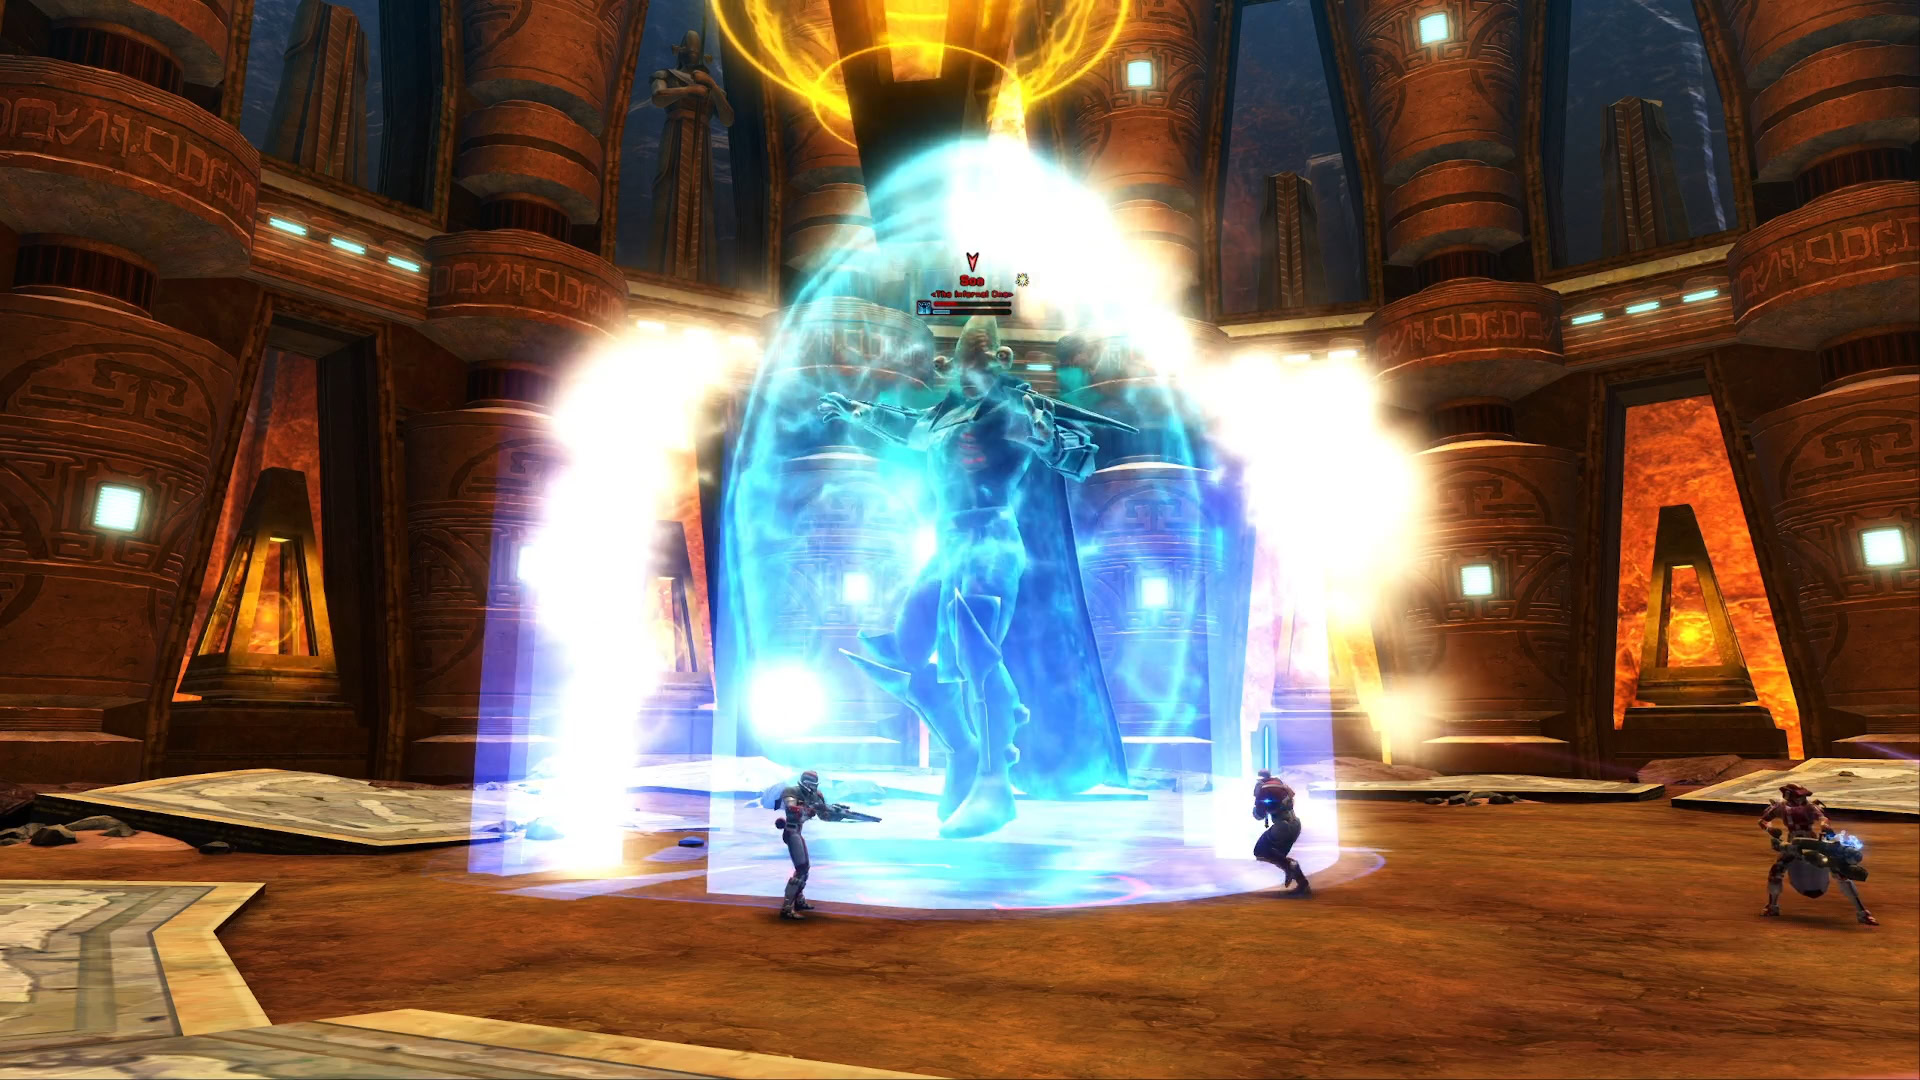
Final Boss: Soa, The Infernal One
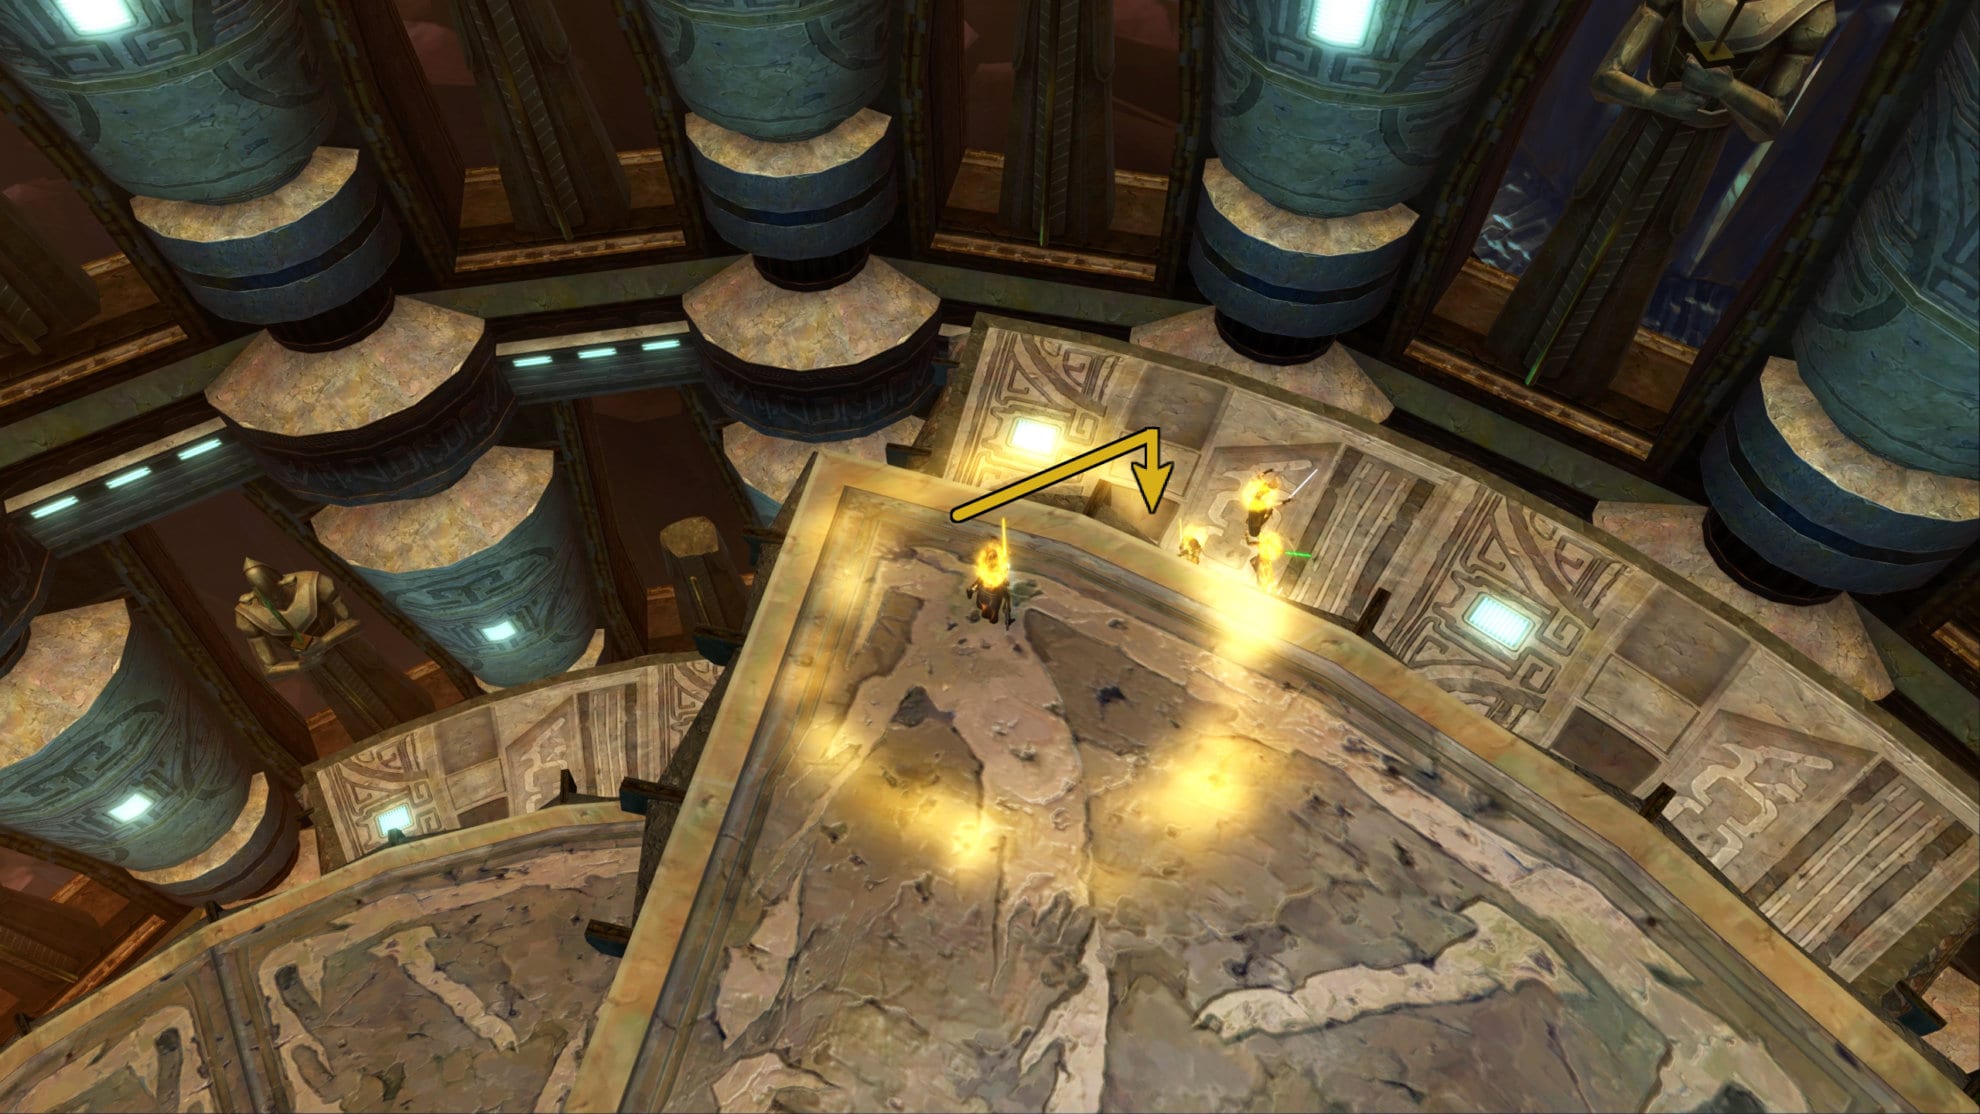
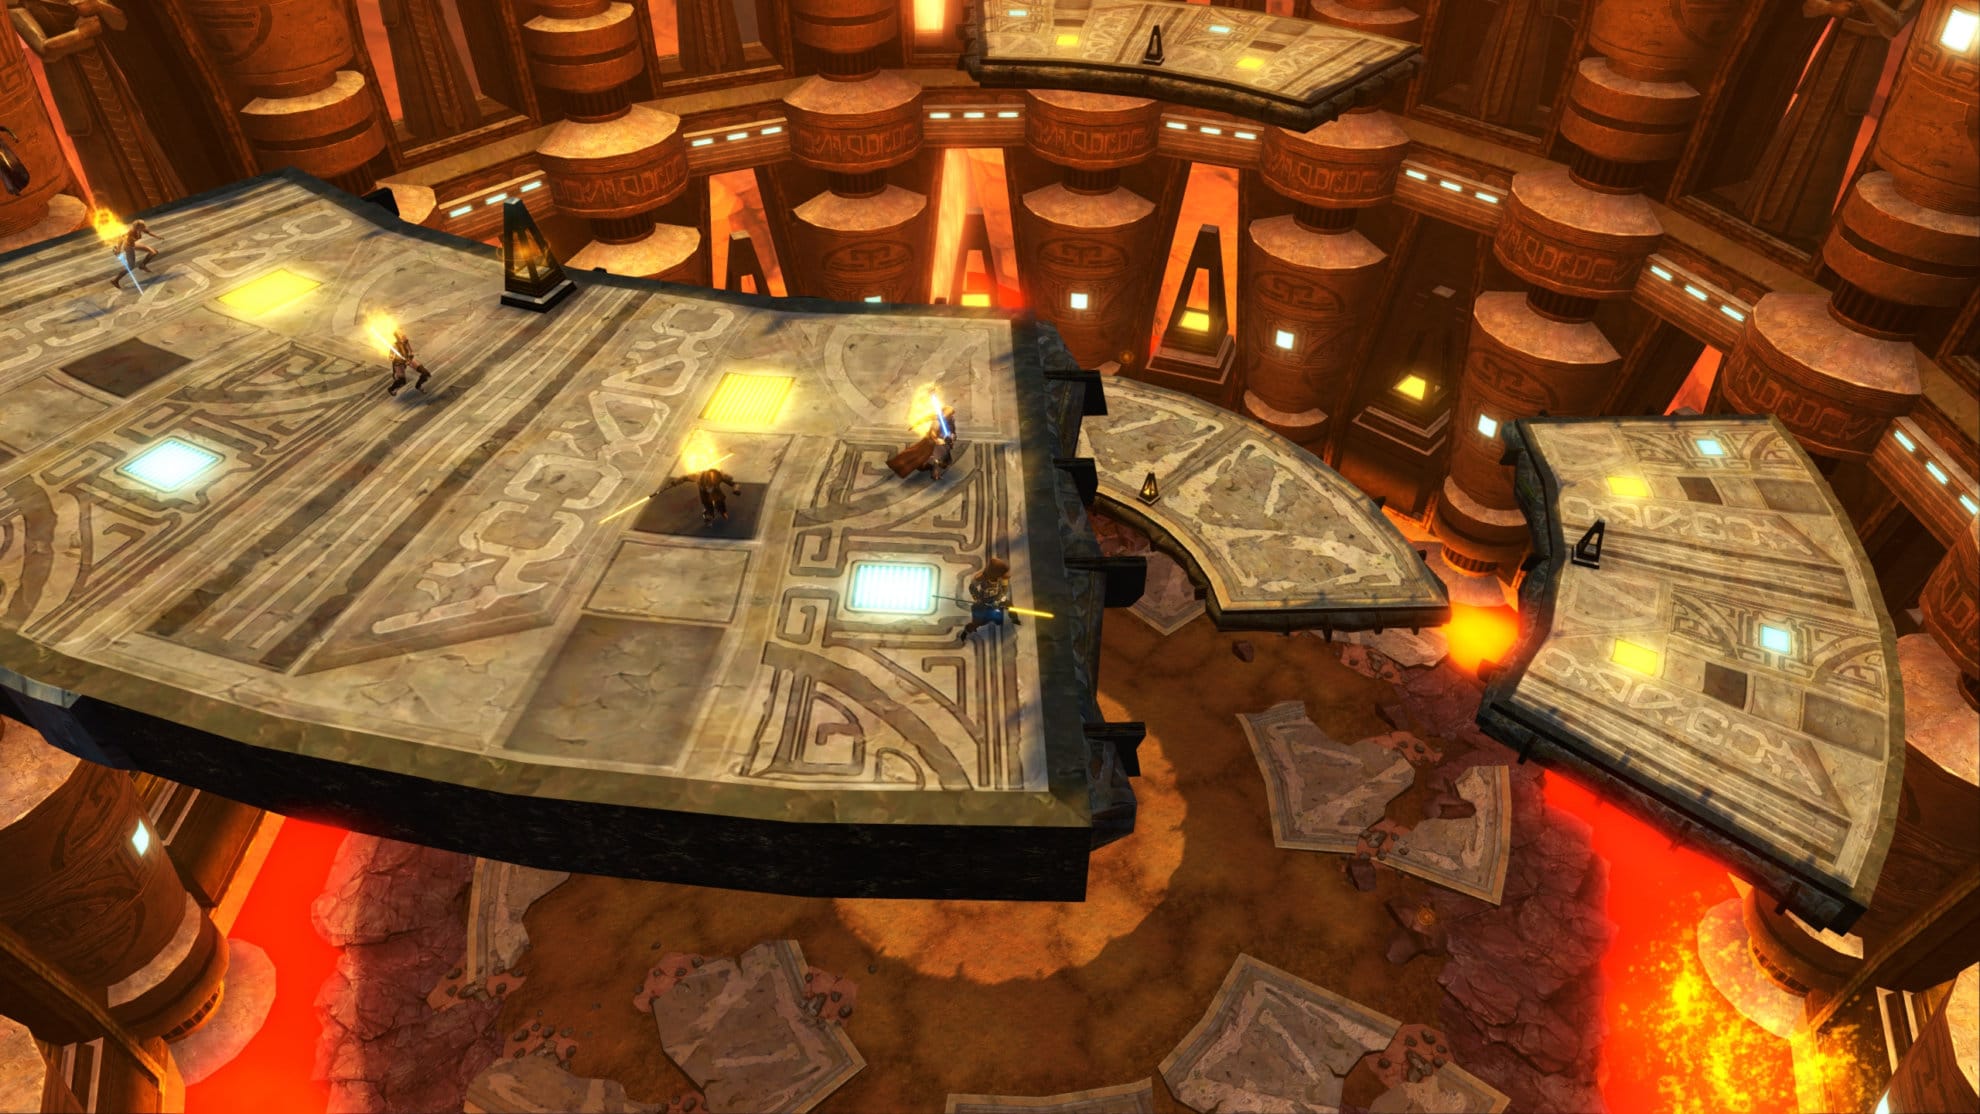
When you reach Soa, it’s good to prepare yourselves in the hallway by repairing your gear. This fight involves platforming and good map awareness on everyone’s end. It’s good to get into the habit of stopping at this line made by the DPS markers. The reason being is that in Veteran Mode, going beyond here risks aggroing Soa before the group is ready.
The area you’ll fight Soa in is comprised of three concentric rings. You’ll need to keep your orientation during this fight by knowing where the west part of the map is. As the fight goes on, the inner two rings will fall down, taking one standing on them with them. You’ll want to stay close to the west side of these rings so you can easily access the west outer ring area. If this was a clock, you’ll want to be on the 9 o’clock position on the outer ring when the rings are about to fall.
Phase 1
Once the group is ready, Soa will emerge from his bubble and can then be taunted and damaged. He’ll primarily attack with Shock attacks and will occassionally shock a random target and then refocus the tank.
During this first phase, the numerous obelisks in the area can create a large pools of Force Energy. Everyone should avoid staying in these pools otherwise they’ll take damage.

Once Soa hits 75% health, he’ll say the following:
“I have waited 20,000 years, but I will wait no longer!”
Once you hear Soa say this, run to the outer rig on the west side of the arena! This is where the entrance is.
It’s entirely possible that Soa might not say this on Story Mode as his health is melted more quickly and he’ll be busy monologuing about something else. Don’t rely solely on the voice line. It helps, but back off when he hits 75% health. When Soa Shields himself, he is about to break the floor!
Once you’re at the west side of the rings and the platforms fall down, jump down to the next platform. Do not attempt to make another jump just yet.
The next jump looks tempting as it doesn’t look too far off, but you’ll want to wait a bit. After a few seconds, another platform will fall behind the first platform you landed on. Once this is down, then you can work your way down until you reach a gap that’s too large to jump.
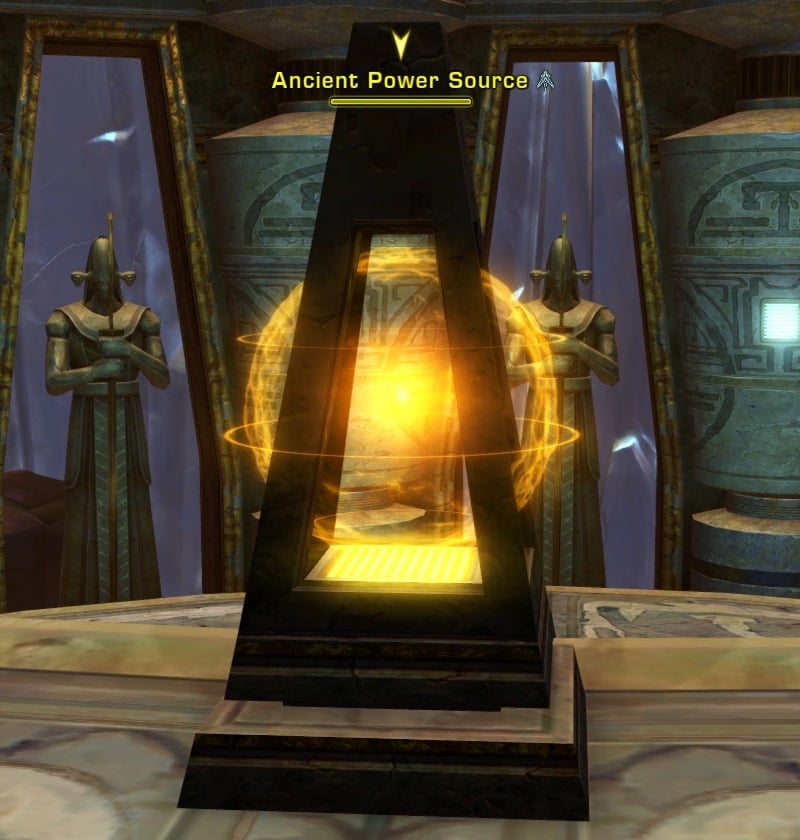
As you jump down, you’ll notice these Ancient Power Sources. Destroy these as you jump down the platforms. Failure to destroy these power sources will grant Soa a powerful AoE ability called Orb Detonation once you fight him again. Avoid jumping to these power sources as if you destroy them, you might risk a bug where Soa doesn’t lose orb charges and have guaranteed orb detonations. Destroy these power sources as they come to you to not encounter this bug.
When you reach this area with a large gap, everyone needs to group up in a corner so the healers can heal everyone through AoEs. When another platform falls and closes the gap, you can make your way to the bottom of the area, heal, and prepare to take on Soa again.
Phase 1’s Jumping Section Summary
- Starting from the West part of the arena you’ll want to fall down forward, heal, and wait for the next platform to fall behind you.
- Fall backwards then fall right three times. Heal and wait for the next platform to fall.
- Go right three times, backwards once, then forward onto the floor and heal.
Phase 2
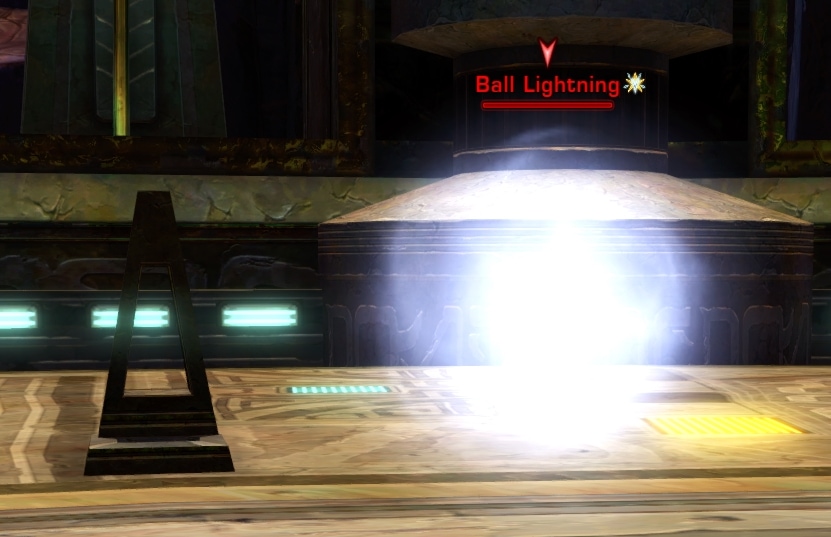
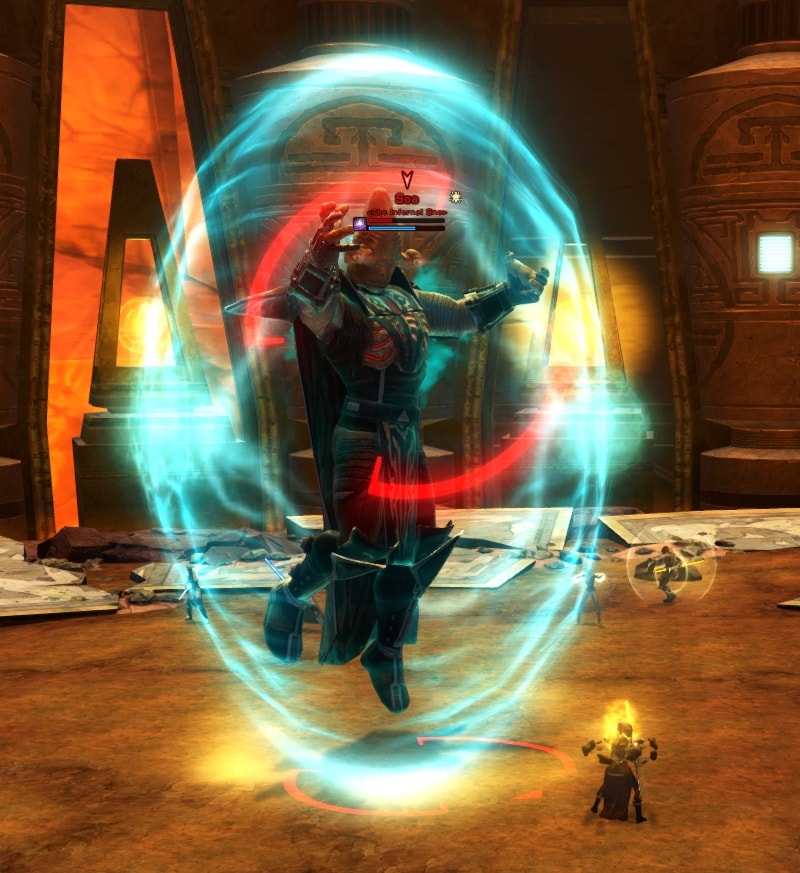
In phase 2, Soa will have three new abilities. He can use Ball Lightning, Force Cyclone, and Mind Trap.
Every so often, two obelisks in the area will create Ball Lightning. These balls will target a select group member and slowly follow them. Anyone in their path will take damage. Once the balls reach their target, they will explode and damage their target and anyone nearby.
Ball Lightning
Keep an eye on the Ball Lightning and if you’re its target, move it away from the others and pop any DCDs to get rid of it and get back to fighting Soa. Ball Lightning deals Force/Tech damage, so any anti-Force/Tech abilities, damage reduction DCDs, or personal shields are best to mitigate or negate its damage. Keep an eye on your System Alerts on your screen as it’ll tell you who is being targeted by ball lightning.
Force Cyclone
People hit by Force Cyclone will be lifted and flung around the room for a while. This doesn’t deal any damage but this can be an issue if the tank or a healer is the target of this attack. At the end of the ability, you’ll be gently placed on a platform outside the area. Get back in there and keep attacking Soa.
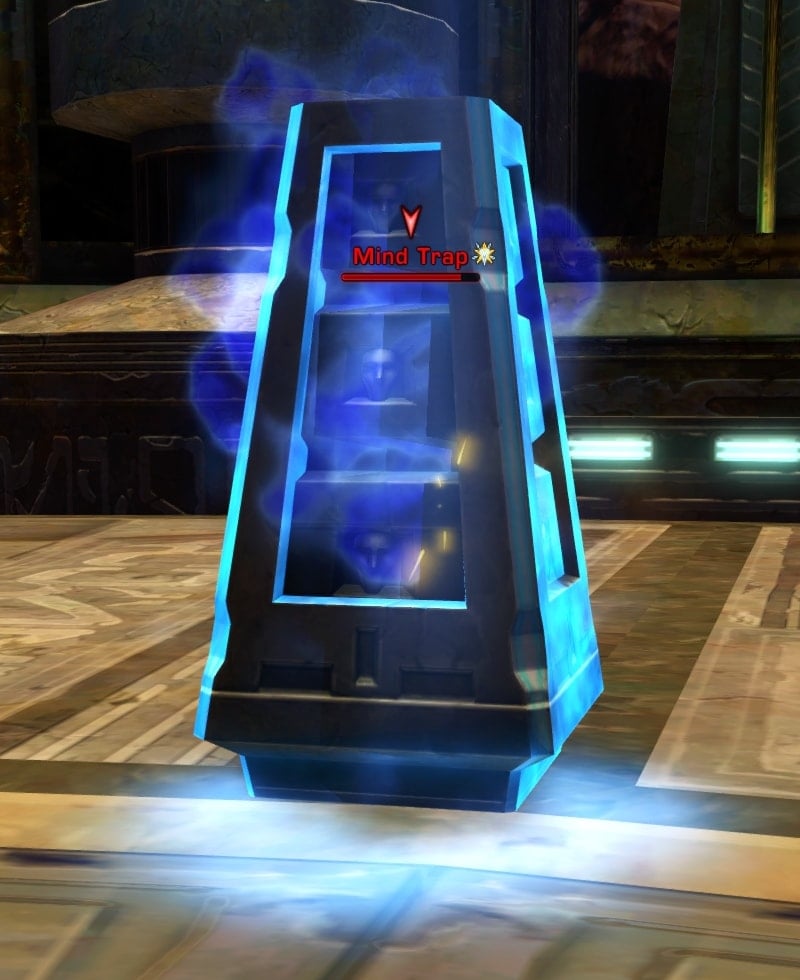
Mind Trap
If you’re mind trapped, you’ll find yourself in a blue spectral room without any enemies within. You can actually use this opportunity to heal yourself as you wait for your allies to help you, assuming you have any self heal abilities.
Meanwhile in the physical realm, a glowing blue Mind Trap will appear. Some people will need to destroy this Mind Trap to free their imprisoned ally. It should go without saying that if the tank or healer is mind trapped, everyone should drop everything to focus on destroying the mind trap.
The Mind Traps have very low health, so the DPS need to take the time to destroy them and free their allies as soon as they appear. It’s best for DPS to go after Mind Traps when they’re using a filler ability during their rotation. Avoid using DoTs on them as they won’t last long and it’s better to save those DoTs for Soa.
Power Orb Detonation
If you failed to destroy enough Ancient Power Sources during the platforming section, Soa will be able to detonate between 1 to 5 power orbs, you can see these orbs circling around him. Once detonated, this creates a bright flash and damages everyone in the arena. This can be very deadly in Veteran Mode but it’s rarely seen due to most people being good about destroying the power sources.
When you get Soa to 30% health, he’ll once again say:
“I have waited 20,000 years, but I will wait no longer!”
Once again, when you hear Soa say this, run to the outer ring on the west side of the arena!
The platforms will once again fall and they’ll be in the exact same pattern as the first time. Make your way down the platforms, destroy any power sources, heal up when needed, and reach the ground at the bottom.
Phase 2’s Jumping Section Summary
- Starting from the West part of the arena you’ll want to fall forward, heal, and wait for the next platform to fall behind you.
- Fall backwards then fall right three times. Heal and wait for the next platform to fall.
- Go right three times, backward once, then forward onto the floor and heal.
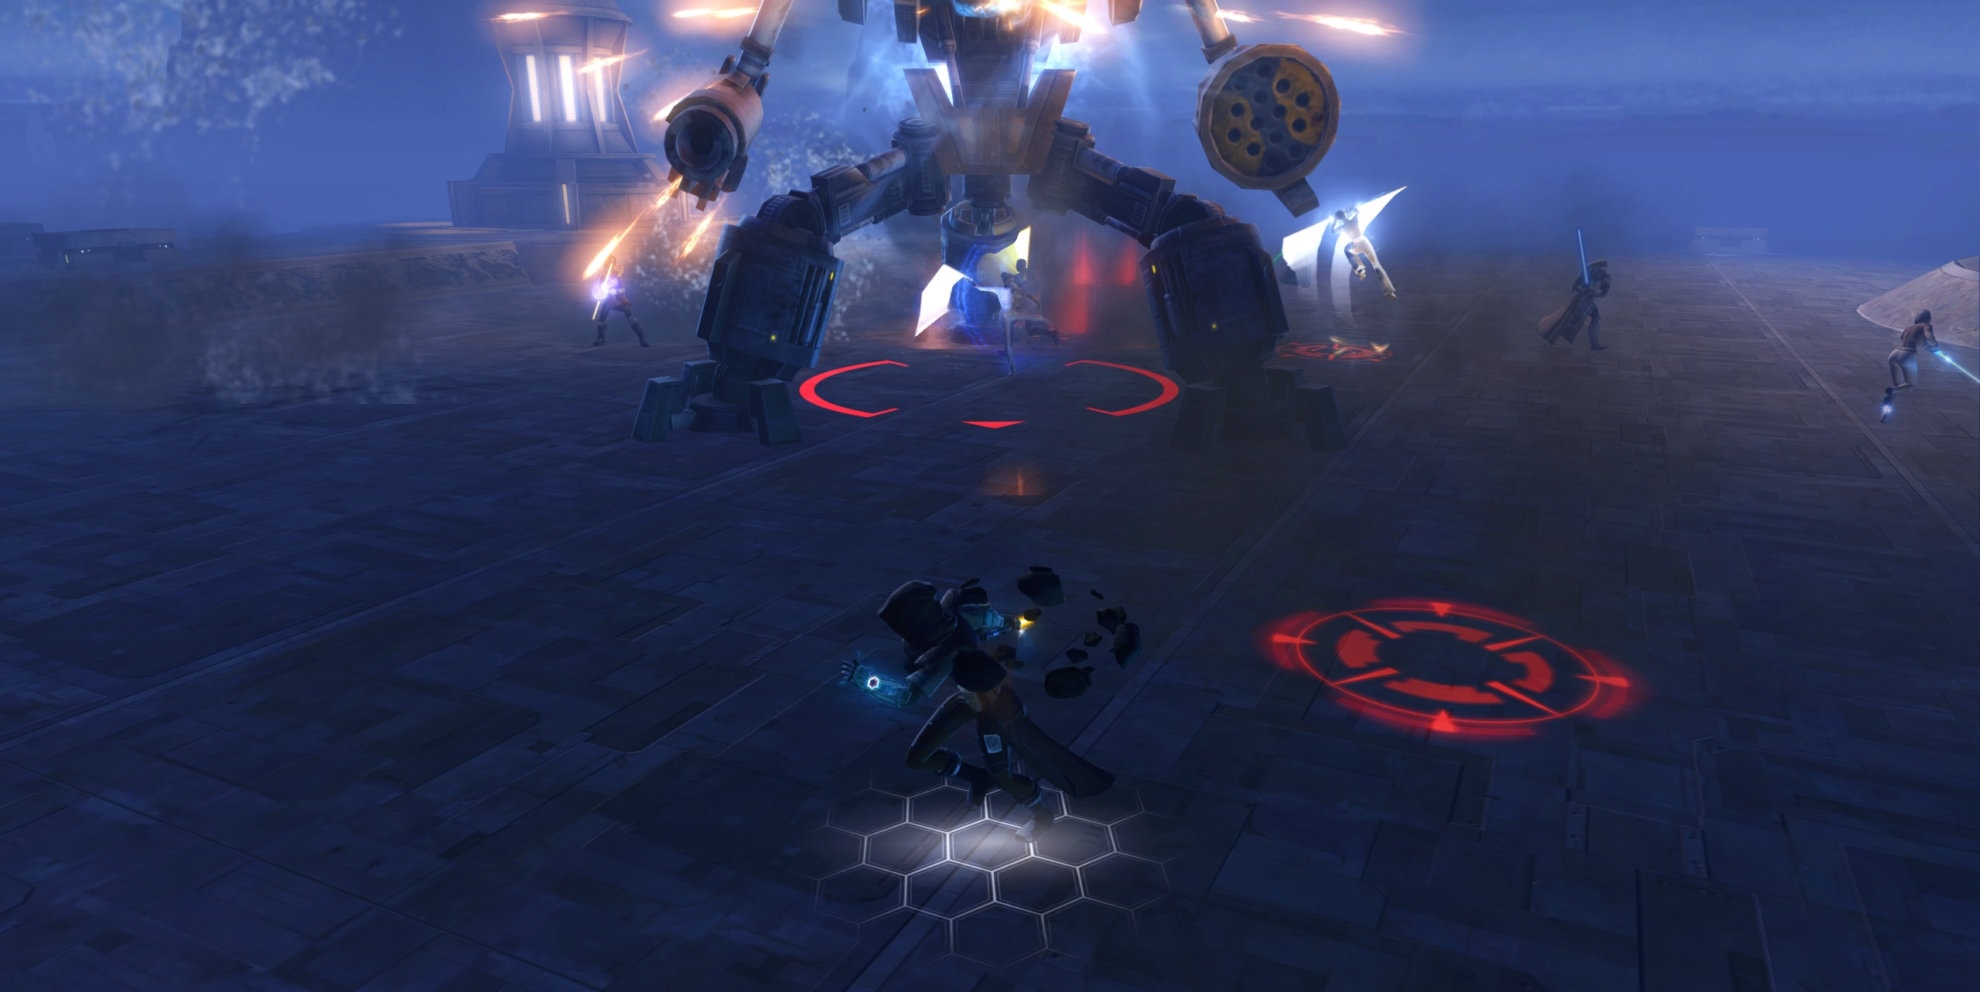
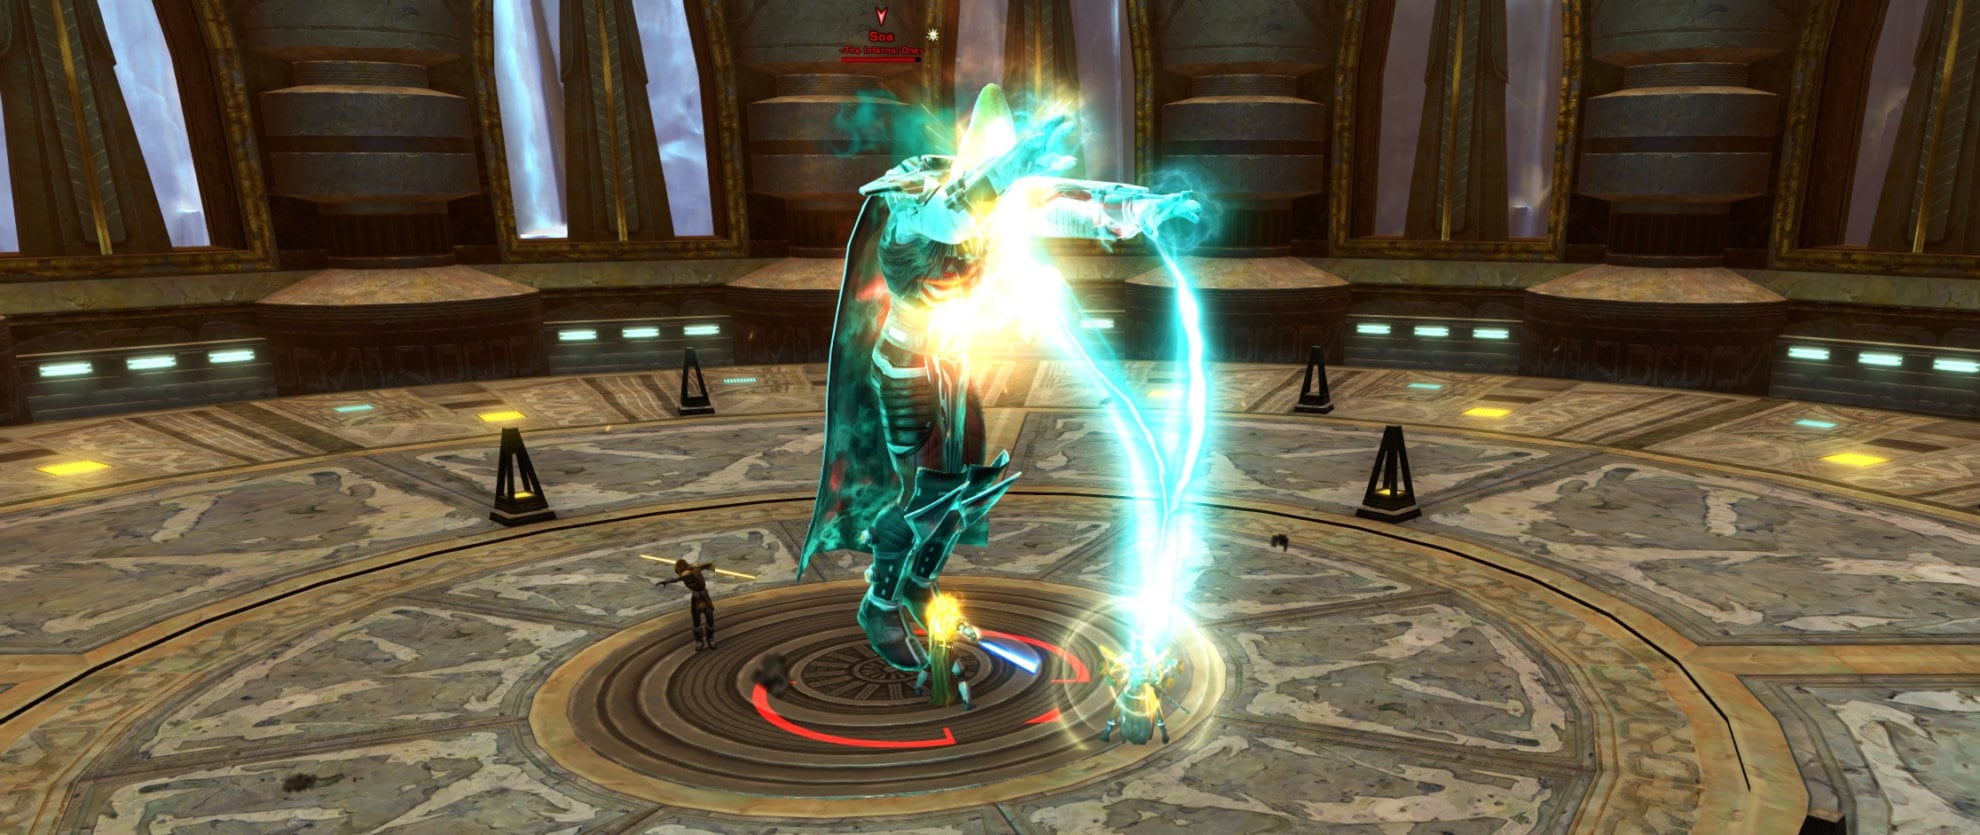
Phase 3
For the final phase of this fight, Soa will gain a shield and become immune to damage. Everyone but the tank should avoid attacking Soa so the tank can maintain aggro. If Soa has any Orbs remaining, he’ll continue to use Orb Detonation.
Soa will also continue to use Ball Lightning and Mind Traps for the third phase of the fight. The DPS’s top priority should be destroying any Mind Traps while Soa is shielded, but immediately focus Soa when his shield is down. Once his shield is back up, they can focus the Mind Trap again.
This next part is entirely dependent on the tank or whoever can taunt Soa if the tank is Mind Trapped. One of the obelisks (more commonly called “rocks” in this operation) in the room will be pulled up through the Force and hover above an area in the arena. In Story Mode, this is noticeable by the large blue circle.
The tank needs to have Soa follow them until he is underneath the AoE. The obelisk will light up and then fall onto the ground, dealing damage and pushing back anyone nearby. If you’re a DPS or Healer, stay away from this area. If you’re the tank, keep your back facing the center of the arena. If you have your back facing the walls, you might end up being pushed into the lava at the edge of the room.
This falling obelisk counts as Force/Tech damage and can be mitigated by DCDs that affect Force/Tech damage.
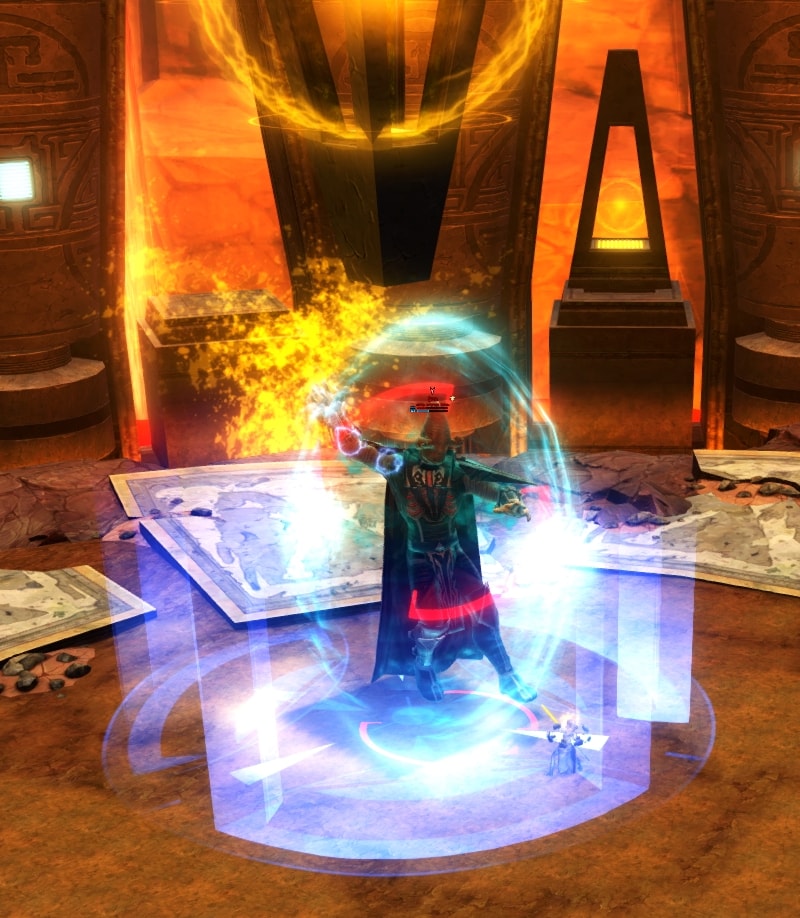
DPS should have their full procs going into the shield-breaking process and apply all DoTs and debuffs on Soa and pre-cast when he’s under the rock. The tank should then taunt on cooldown to mitigate losing threat during this damage preparation stage.
When the obelisk lands on Soa, his shield will be destroyed and he’ll be vulnerable for 12 seconds. He won’t attack back and everyone needs to deal as much damage as possible while he’s vulnerable. If you already applied DoTs, debuffs, and precasting, you should be able to deal damage far more efficiently than if you were to wait for his shield to go down.
Once Soa recovers, he’ll regain his shield and the tank needs to repeat the process of getting him under a falling obelisk. Repeat this until Soa is defeated and can finally stop monologuing.
Veteran Mode Differences
The main difference in Veteran Mode takes place in the final phase of this fight. When the obelisks float, there won’t be a blue circle beneath them. The tank needs to pay more attention to the area and look for a square shadow. They’ll need to place Soa directly beneath the square shadow so his shield can be taken down.
It’s good practice for the tank to increase their max zoom distance to more easily see the entire arena. To do this, press Esc, go to Preferences > Controls, and under Camera you’ll find Camera Max Distance. Set that to 100% to increase your maximum zoom out distance.
If the tank is doing poorly to pull Soa to the Shadow, use a Legacy Tactical Marker to point them where to go. If needed, a DPS with a taunt can pull him to the shadow so he gets hit. We all learn at some point, mistakes can happen but since this is often people’s first operation, you must get used to not making mistakes as the operations only get harder from here.
Achievements for Eternity Vault
The only achievements granted in Eternity Vault is for defeating the bosses once in either Story Mode or Veteran Mode. The following achievements have 16-person variants that offer the exact same decoration rewards that fit onto medium or large sized wall hooks:
Defeating the Annihilation Droid
Defeated the Annihilation Droid in “The Eternity Vault” operation on 8-person story mode.
Defeating Gharj
Defeated the Annihilation Droid in “The Eternity Vault” operation on 8-person story mode.
Solving the Ancient Pylons

Solved the Ancient Pylons mystery in “The Eternity Vault” operation on 8-person story mode.
Defeating the Infernal Council

Defeated the Infernal Council in “The Eternity Vault” operation on 8-person story mode.
Defeating the Soa

Defeated Soa in “The Eternity Vault” operation on 8-person story mode.
Defeating the Annihilation Droid (Veteran Mode)
Defeated the Annihilation Droid in “The Eternity Vault” operation on 8-person veteran mode.
Defeating Gharj (Veteran Mode)

Defeated Gharj in “The Eternity Vault” operation on 8-person veteran mode.
Solving the Ancient Pylons (Veteran Mode)
Solved the Ancient Pylons mystery in “The Eternity Vault” operation on 8-person veteran mode.
Defeating the Infernal Council (Veteran Mode)
Defeated the Infernal Council in “The Eternity Vault” operation on 8-person veteran mode.
Defeating the Soa (Veteran Mode)
Defeated Soa in “The Eternity Vault” operation on 8-person veteran mode.
Decoration and Vehicle Drops
The following decorations can randomly drop from any enemy in the Eternity Vault Operation:
Ancient Rakata Alchemical Beast
This decoration can drop from Gharj and will fit in Centerpiece hooks.
Commemorative Statue of Soa, The Infernal One
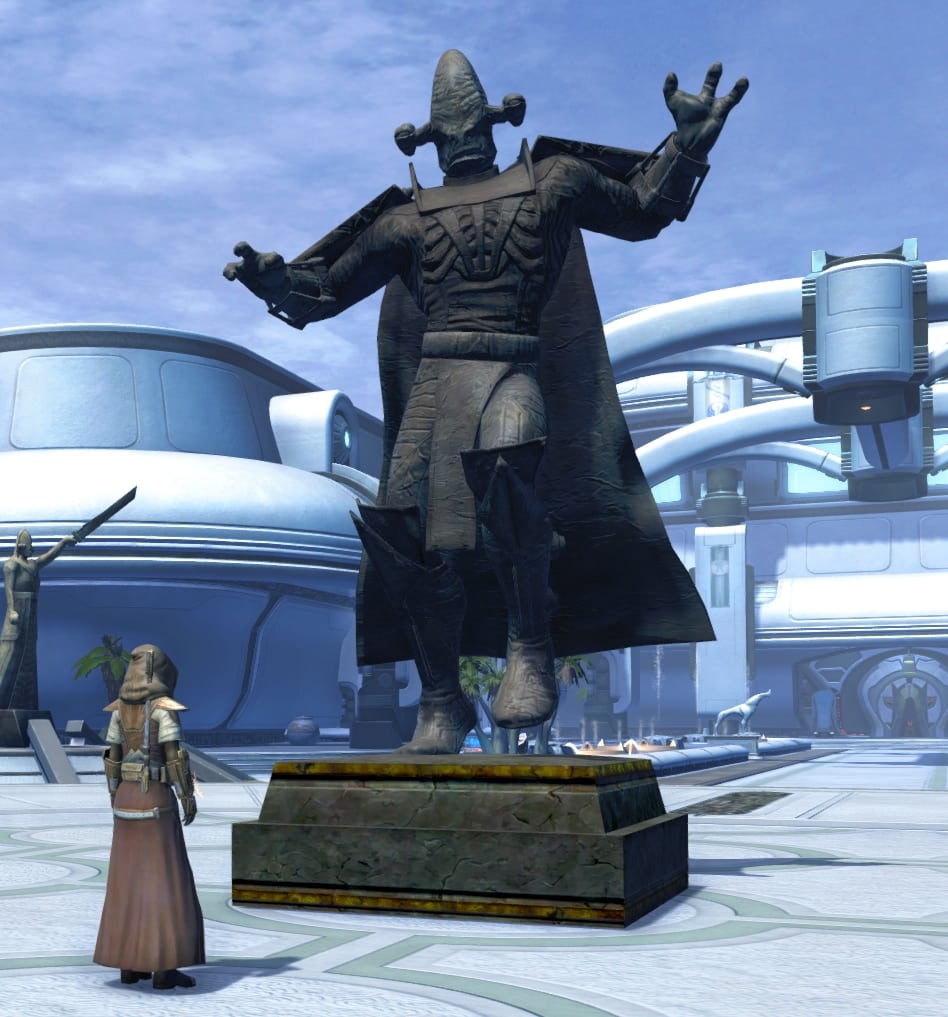
As is tradition with the final bosses of operations, Soa gets a commemorative statue. Fortunately for you, this statue cannot monologue and will fight a Large or Centerpiece sized hook. This decoration can drop from Soa but can often be found fairly cheap on the GTN.
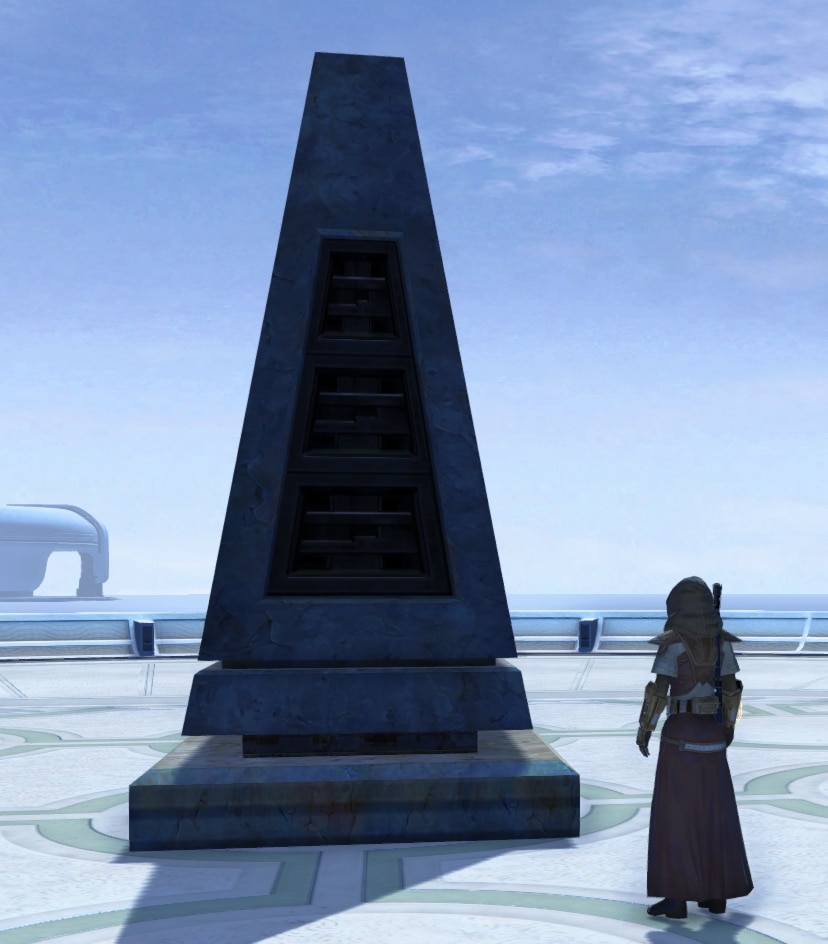
Rakata Energy Pylon
This decoration will fit on a Medium or Large hook and can drop from adds or bosses.
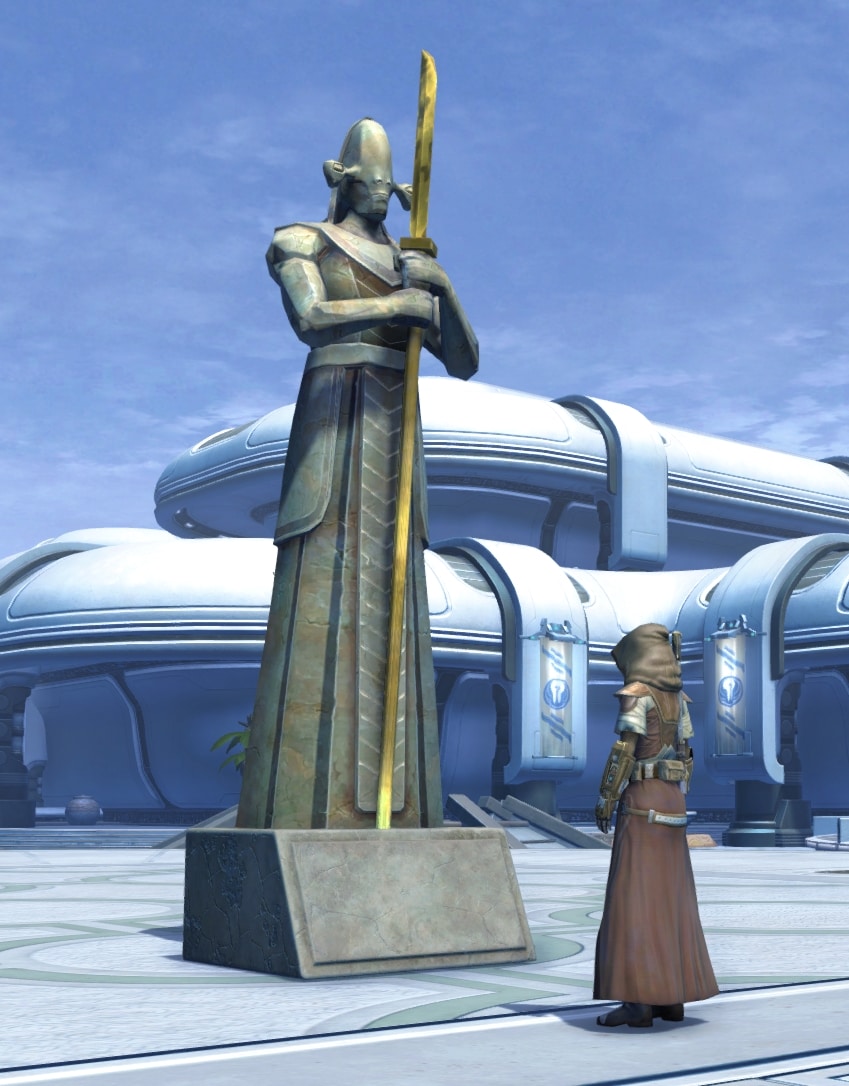
Rakata Herald Statue
This statue will fit in a Medium or Narrow hook and drops from adds or boss encounters.
Rakata Mind Trap
Last and certainly least, the Rakata Mind Trap. This miniature mind trap will fit on a Small or Narrow hook and drops from adds or boss encounters.

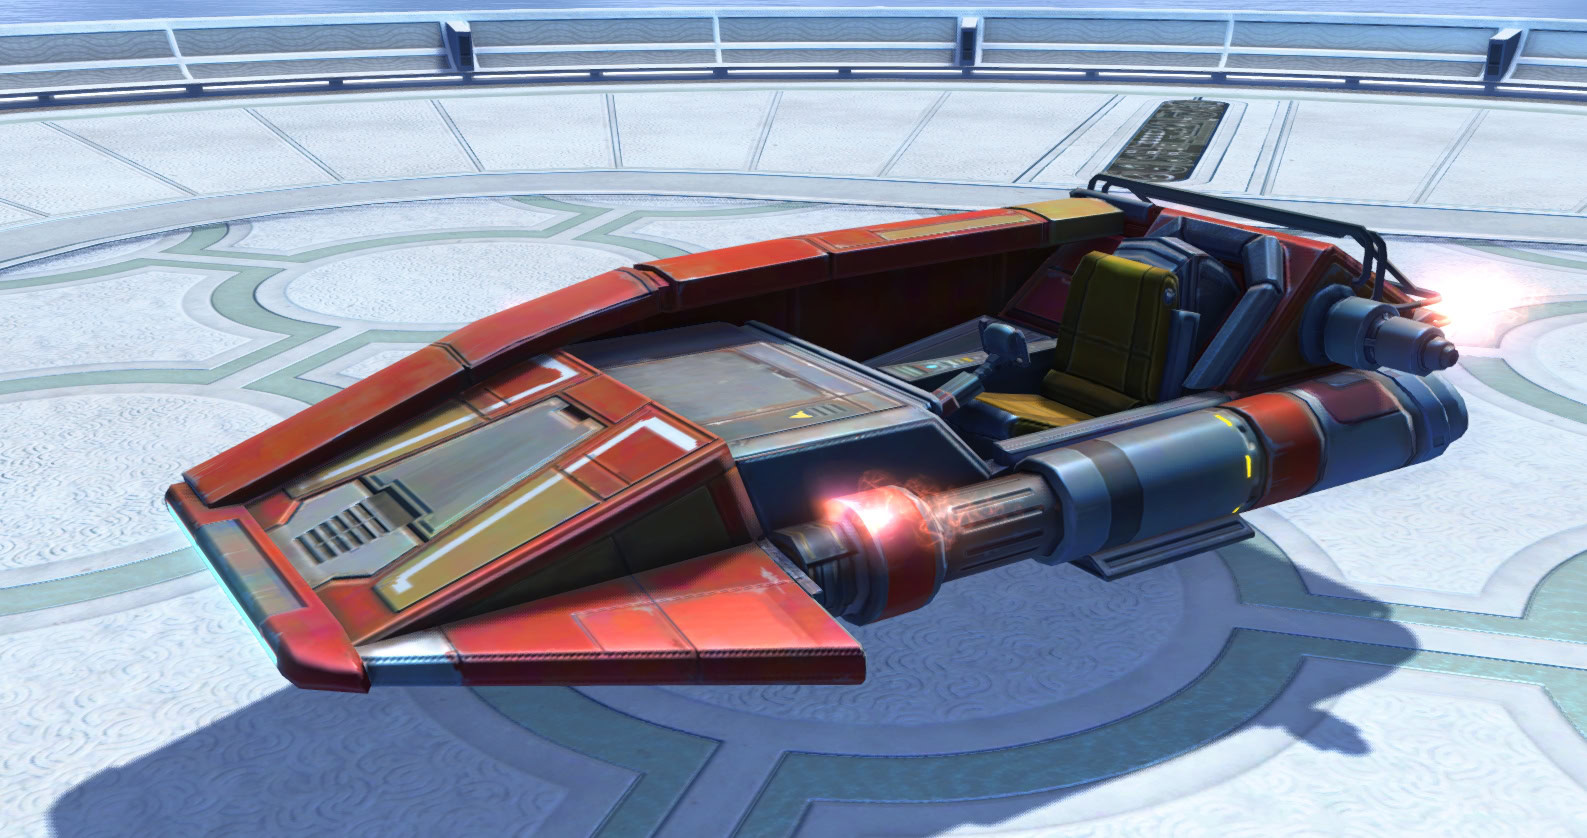
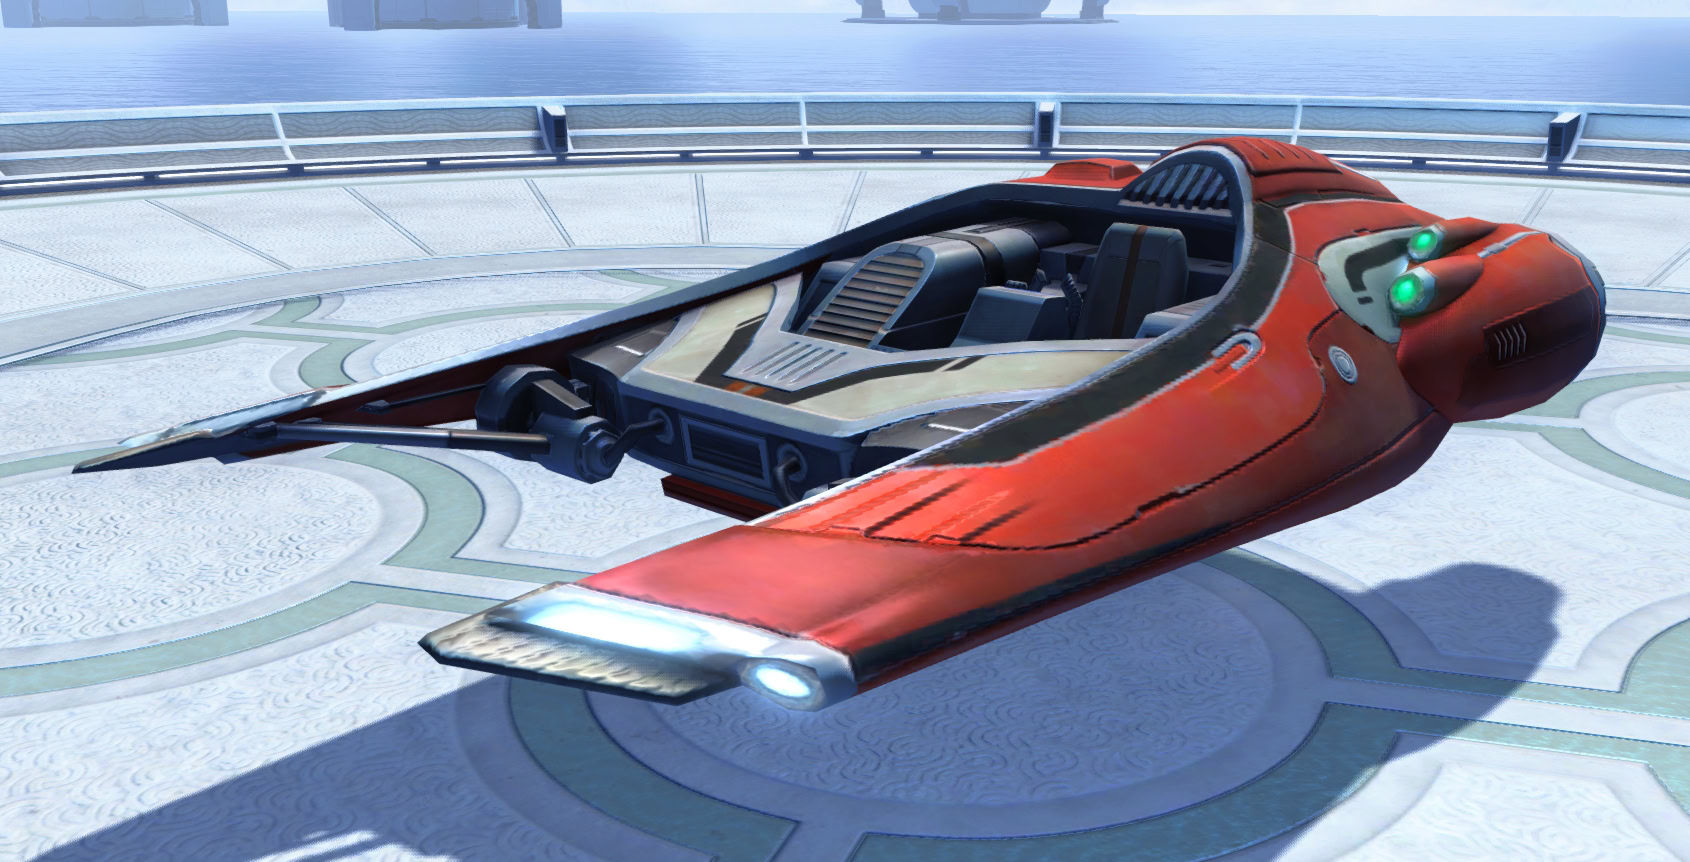
Tirsa Elite and Desler Avenger Mounts
The Tirsa Elite and Desler Avenger mounts have a chance to drop after defeating Soa. If you already have it, be sure to trade it to someone who doesn’t have it. Sharing is caring!
This concludes my guide on the Eternity Vault Operation. Check out our SWTOR Guides Master List for more SWTOR guides and content!