Defences in Path of Exile 2 can be a complicated topic, but we’ll break down every option available for staying alive while keeping it easy to understand.
What are Defences in PoE2
Defences in Path of Exile 2 all have one singular purpose: preventing our Life from reaching zero.
Defences can mean a wide array of things depending on what build we play. We’ll be covering most of them, but we’ll break them into two subcategories: Core Defences and Secondary Defences.
The Core Defence Layers are the following three stats: Armour, Energy Shield, and Evasion; or stats that the game defines as Defences. Every build in Path of Exile 2 will utilize one or two of these Core Defensive Layers. Each of these has its strengths and weaknesses, which can be leaned on in the case of strengths or compensated for in the case of weaknesses.
Secondary Defence Layers are those that can be used as an added layer on top of these, or in some cases, even replace them. These consists of the following: Resistances, Recoup, Leech, Damage Taken As, Block, and Parry.
Unlike the Core Defences, we’ll want to incorporate these when possible, so long as we’re not sacrificing too much to do so. Every class has varying levels of access to each of these, which can make them generally less approachable.
Core Defensive Layers
Let’s start with the Core Defensive Layers of Armour, Energy Shield, and Evasion. Each of these differs in how they interact with enemies, so some math is required, but we’ll keep it light.
Armour
Armour is the strongest in the Campaign, where its ability to consistently mitigate weak Physical Damage hits is the most useful and makes many early monsters far less dangerous.
Its biggest drawbacks are that it only applies to Physical damage, unless using the Blackbraid Unique Body Armour. In addition to this, it can be broken by certain enemies or any enemy with an affix that allows it.
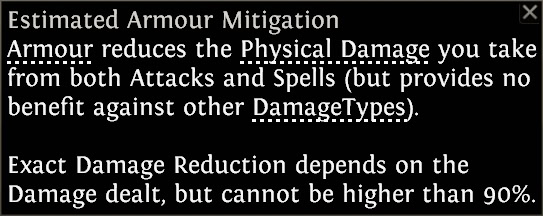
The Math behind Armour is fairly straightforward, using the simple formula below:
Mitigation = Armour / (Armour + 10 * Incoming Damage)
As a quick Example, let’s say we have 1,000 Armour and we’re taking a hit that would deal 200 Damage, how much is prevented? Let’s plug it into the formula.
Mitigation = 1000 / (1000 + 10 * 200) = 0.3333 = 33.33%
To further break this down, here’s a quick table
| Damage Reduction | Armour Needed |
|---|---|
| 33% | 500% of incoming damage (5x) |
| 50% | 1000% of incoming damage (10x) |
| 66% | 2000% of incoming damage (20x) |
| 75% | 3000% of incoming damage (30x) |
| 90% | 9000% of incoming damage (90x) |
However, in addition to this basic formula, there are a couple of other limits to keep in mind when using Armour that affect how much damage is mitigated.
When Armour is higher than the Incoming Damage, Armour can reduce damage by an amount up to 20% of its total value. Using the previous 1,000 Armour example, it can reduce damage by a maximum of 200, provided the damage isn’t well above 1,000
When Incoming Damage is significantly higher than Armour, Armour instead only reduces up to 10% of its value. Using the same 1,000 Armour, even if a hit were expected to deal 4,000 damage, it will at most reduce damage by up to 100 total. In this particular example, this is just under that limit and would mitigate just under 98 damage.
One last thing to talk about with Armour are the effects like those found on the Goregirdle Unique Belt.
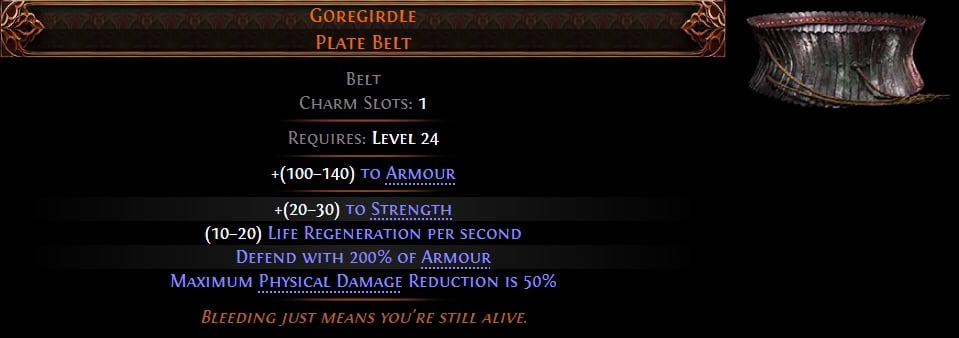
In particular, we’re looking at the “Defend with X% of Armour” and “Maximum Physical Damage Reduction is X%” affixes found here. While this is the only item that has both together, both do appear on some Passives, like Blade Catcher, and Ascendancies such as the Tactician’s Stay Light, Use Cover.
Defend with X% of Armour functions exactly as expected, altering how much of our Armour is used in the formula above. In the case of Goregirdle, this line effectively doubles any Armour we get. If this is a value less than 100%, this will instead reduce our Armour.
Remember that doubled Armour will not result in twice the Damage mitigation. If you use the same example as before, with 200 damage hitting 1,000 Armour, if we redo the calculation, we end up with 50% Damage reduction instead of the previous 33%.
Maximum Physical Damage Reduction is X% is a much more straightforward affix. This set an upper limit for the damage reduction provided by Armour. However, even at 50% we’d still need enough Armour to mitigate the maximum amount as Armour can still only mitigate damage up to 20% of its value.
Energy Shield
Energy Shield is currently regarded as the strongest of the Core Defensive Layers in the endgame. The biggest reason for this is that Energy Shield acts like Life, but can easily be gotten in far higher amounts, not even accounting for scaling on the Passive Tree.
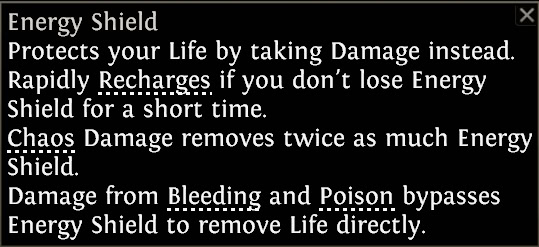
Despite this, it’s significantly weaker during the Campaign. This is because it comes in amounts far lower than even Life early on, and cannot be easily recovered while constantly under attack, requiring four seconds without damage to begin recovering. Even at the endgame, getting swarmed can easily mean death, but often the higher raw Hit Pool makes it tough for enemies to get through
Once it does begin to recharge, it recharges at a base rate of 12.5% of maximum Energy Shield per second, taking 8 additional seconds to recover if it started recharge from zero.
Both of these values can be scaled, with Recharge Delay being able to start sooner and Recharge Rate being able to recover a greater portion of Energy Shield per second.
| Increase | Delay (Seconds) | Recharge Rate (Value) | Recharge Time (Seconds) |
|---|---|---|---|
| 0% | 4 | 12.5% | 8 |
| 50% | 2.67 | 18.75% | 5.3 |
| 100% | 2 | 25% | 4 |
| 200% | 1.33 | 37.5% | 2.67 |
| 300% | 1 | 50% | 2 |
In addition to this scaling, there are a handful of effects that can trigger the Recharge, or even prevent it from being interrupted, which allows a character to be significantly more durable.
The most common case this is relevant is the Energy Barrier Support Gem, which triggers Energy Shield Recharge and prevents it from being interrupted for 2 seconds when stunned while using a supported skill. This is often used in combination with very quick attacks or spells where any interruption means near-constant regen, so long as we’re taking just a light stun every few seconds.
Evasion
Evasion is the most well-rounded Core Defensive Layer, being effective during the campaign and at the endgame against most enemies, but struggles against AoE hits. However, it tends to be by far the most complicated and misunderstood.
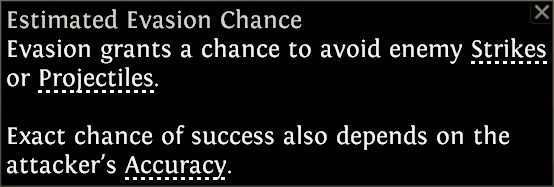
Simply put, Evasion is an entropic system. This means it’s designed to prevent situations of extreme luck, positive or negative. Just how does this play out? How can we better understand how this works? Well, let’s jump in.
Evasion is broken down into three main components: Evade Chance, Accuracy, and a hidden Entropy value we never see.
Evade Chance is primarily determined by the Evasion Rating of the target, be it ours or that of an enemy. However, it also relies on the attacker’s accuracy as well, which makes it hard to consistently determine, to the point that the Estimated Evade Chance displayed in-game is a rough approximation based on Normal Enemies of the same level, Magic and Rare Monster tend to be slightly higher in level, and have improved stats overall.
Accuracy and Hit Chance are essentially the opposite side of Evasion Rating and Evade Chance, largely determined by the Attacker’s Accuracy. While it makes the bulk of the math behind it, Target Evasion Rating is also in effect here, which can alter the real Hit Chance. Accuracy is also affected by distance for players in particular. While this often doesn’t come up, due to most ranged attacks requiring high Dexterity, which impacts Accuracy
Finally, there’s a hidden Entropy Value that rolls between 0-99 each time we enter combat. This Entropy Value serves to limit the luck factor behind Evasion, preventing both good luck and bad luck. While we never actively see it, this Entropy value will clear up a lot of the “bad luck” one would experience. So, breaking it down, we’ll go over a very simple example.
For this example, we’ll use two monsters, and assume that Enemy A has a 5% chance to hit and Enemy B has a 30% chance to hit.
- Enemy B attempts to hit us, rolling the initial Entropy value, in this case 50.
- Enemy B misses, and its chance to hit is added to the Entopy value, now at 80.
- Enemy A attacks, adding 5 to the Entropy Value, now 85, by missing.
- Enemy B attacks and hits, as the 30 Entropy bring the value over 100, to 115.
- 100 Entropy is subtracted from the Entropy value and continues on as normal.
Now, it also worth nothing that the Entropy value will re-roll itself after being out of combat for 3.33 seconds, or 100 server ticks.
As of Update 0.3, Evasion now works for all Hit Damage, minus a handful of boss attacks that cannot be evaded. Combined with the Deflection mechanic added in the same update, Evasion is a much more viable defence on its own, albeit still entirely RNG if you survive or explode from a heavy hit.
Hybrid Defensive Layers
We’d be remiss not to cover the Hybrid Core Defensive Layers, or rather the combinations of the Core Defensive Layers. These being: Armour & Evasion, Armour & Energy Shield, and Evasion & Energy Shield. With these, there are a total of six distinctive defensive profiles. The important thing to keep in mind is that Hybrid Defensive Layers often work well together, covering each other’s flaws, though not perfectly.
Armour & Evasion
Of the Hybrids, Armour and Evasion tend to be the weakest pairing, at least for POE2. While they do cover flaws in each other, they don’t do so in an entirely beneficial way. So, what do we mean by this?
Well, Armour is exceptionally strong early, but requires a high amount to be comfortable in the endgame. Evasion demands the same, if not more, investment for it to be reliable. This results in this pairing being weaker, as they effectively hold each other back.
A lot of this has to due with the general lack of Life available outside of Gear. Both of these fall apart without enough of a Life Pool to take a hit, while simultaneously wanting to give up Life in some places to get more of either defence. So it shouldn’t come as too much of a surprise that Energy Shield is often the more ideal pairing for either when deciding on hybrid Defences.
Armour & Energy Shield
Unlike Armour and Evasion, Armour and Energy Shield are generally okay together, especially after the introduction of stronger hybrid nodes in Update 0.4. This combines the Physical Mitigation of Armour with the high hit pool of Energy Shield.
There’s plenty of passive tree support for this now, after the introduction of the Druid class. There are some great hybrid nodes, like Iron Slippers, that allow us to have high Energy Shield Boots and obtain a significant amount of Armour as a result. There’s also Ruinic Helm, which can take a pure Armour Helmet and turn it into a hybrid piece.
We get limited access to Armour Applies to Elemental Damage as well, though any Pure Armour or hybrid pieces. Which this scale with our Armour, and we’re not getting a ton of it on hybrid pieces, but it’s some extra mitigation on top of what we have access to already.
Combined with powerful, unique items like Sacrosanctum and leveraging Recoup in general, this hybrid can be an incredibly strong defensive option. The only real downside is that we’re often having to sacrifice one stat for the other, with Energy Shield being the bulk of our hit pool.
Evasion & Energy Shield
Evasion and Energy Shield are often the strongest Hybrid Defensive Layer. Mechanically, they just fit together perfectly. Energy Shield provides the raw Hit Pool to be able to take hits that aren’t evaded, while Evasion gives Energy Shield an easier time recovering in combat.
Outside of this natural synergy, there’s also far more support on the passive tree for this hybrid. This includes two exceptionally good nodes, Spectral Ward and Subterfuge Mask, which provide a solid amount of flat Energy Shield respectively, but heavily investing into the other on a specific piece of gear.
Unlike the Armour and Evasion Hybrid, we’re not pressed to get much, if any, Maximum Life. Since Energy Shield can easily take the bulk of the hits, we’re better off forgoing Maximum Life in place of pure investment into Evasion and Energy Shield. There’s even the Ghost Shroud Spirit Gem, which will recover a portion of our Evasion as Energy Shield, adding to the overall defensive power this hybrid has.
Secondary Defensive Layers
Secondary Defensive Layers are present in most builds, either entirely passively from our gear, or even invested in to make them much stronger. So let’s get into each and what allows them to be used as defensive layers.
Blind
Blind is a debuff that can be applied to enemies, lowering their Accuracy. Why would it be considered a Defensive Layer?
Blind is a Defensive Layer because it acts similarly to Evasion, just instead of increasing our Evasion, we’re decreasing an enemy’s Accuracy instead. It’s almost the inverse, with the biggest differences being that we can’t scale it a ton as we can with Evasion, and having limited ways to apply it.
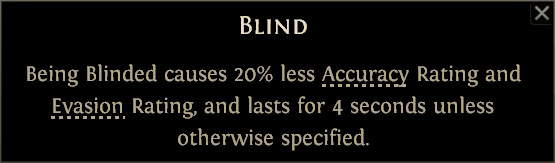
However, since it’s a buff applied to enemies, we can pair it with Evasion to make it more effective. Though, just like with Evade Chance not being able to exceed 95%, Hit Chance also cannot drop below 5%.
Block and Parry
Passive Block is present anytime we use a Shield, Buckler, or certain Quarterstaves, granting a chance to mitigate 100% of the damage from a hit. While this chance is capped at 75% without modifiers to increase that value, it’s more than enough to shrug off hits consistently.
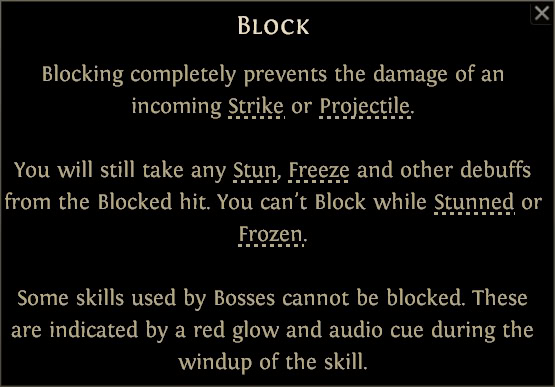
One downside is that while mitigating damage, we’re still vulnerable to Ailments. We can still get Stunned or Frozen, which will prevent further Blocking, or be afflicted with a Damage over Time Ailment that ignores Block entirely. The other major downside is that, similarly to Evasion, without an Affix on an item or a passive that allows all hits to be Blocked, we cannot block AoE Hits.
Despite these Flaws, Passive Block remains a consistent and viable defensive option when available, but does require some investment to perform its best. However, there are more active Versions of Block that can be incredibly reliable when used well in the form of Active Block for Shields, and Parry for Bucklers.
Active Block, unlike its passive form, will block ALL blockable hits in the direction we face while using it. In addition, we’re unable to be Light Stunned during this action.
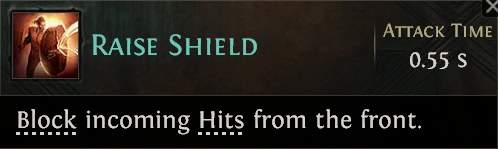
Instead of pure chance, this form of blocking relies on our Stun Threshold, letting individual hits build up to that threshold in the form of a Stamina Meter, where we are punished with a Heavy Stun if we allow it to happen. However, we can stop at any time and allow our Stun Threshold to reset, allowing the Stamina Meter to drain.
Parry functions much like Active Block, including the Stamina Meter, with a few very notable exceptions. These make it a bit more dynamic and arguably quite powerful when utilized well. This is largely due to the Parried Debuff, which will increase the damage of our next attack within a small window.
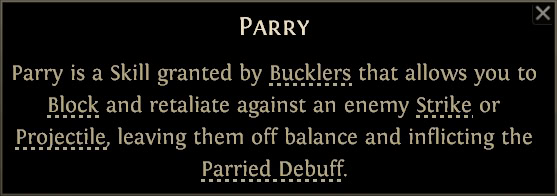
First is the offensive aspect of Parrying. When a hit is parried, the attacking monster will have its attack cycle interrupted, take retaliatory damage, and be afflicted with the Parried Debuff, increasing the damage of our next Attack and preventing enemies from evading hits. This Debuff can even be consumed by some attack like Disengage to provide additional benefits on top of the damage boost.
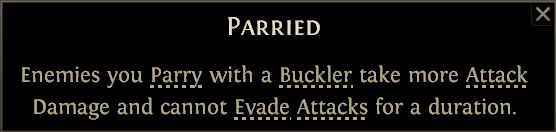
Unlike Block, we will be unable to get the full benefits of Parry against projectiles, unless we Parry in melee range. While it will still prevent the damage, the other benefits of parrying will not occur. This means it will not retaliate with damage, nor apply the Parried Debuff.
The other big exception is that Evasion applies while Parrying. Instead of evading the hit, we instead avoid Stun Buildup. This allows a high Evasion Rating to almost substitute for increases to Stun Threshold, though having both is generally going to work best.
Leech
Leech can be broken down into four main components: Base Leech, Leech Recovery, Leech Speed, and Leech Resistance.
Base Leech consists of the total post-mitigation damage dealt by our hits, multiplied by the percentage of damage we leech. In most cases, it will be rare to Leech for more than around 10% of our damage before any bonuses that apply to the amount Leeched, or Leech Recovery.
By default, Leech in POE2 lasts for 1 second. Leech Speed, and by extension, the recovery speed, can be modified. Increases to Leech Speed will provide the recovery at a quicker pace, but limit the maximum number of simultaneously active instances of Leech, while reducing its speed will do the exact opposite.
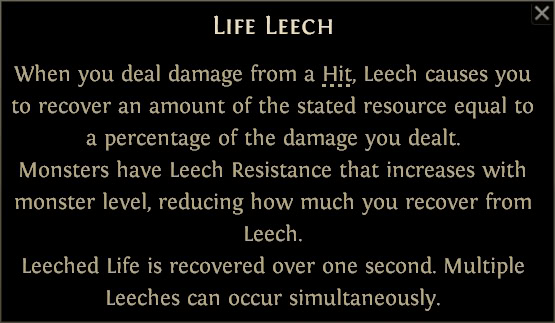
Finally, Leech Resistance will reduce the total amount of Leech we get from a given target. This is mostly to keep Leech from being able to instantly fill our Life or other resources.
So, how does this all come together then? Here’s a simplified formula for how it works.
Total Leech = Damage * ( 1 + Leech Recovery) * Leech Resistance over Leech Speed
Leech Speed = 1 / ( 1 + Speed Modifier )
Now, for example, let’s say we use the skill Rapid Shot with the Life Thief Support Gem, Leeching 8% of Physical Attack Damage.
For this example, we’ll assume the following:
- Rapid Shot deals 1000 damage post-mitigation, of which 400 is Physical due to its inherent conversion.
- We have 80% Increased Amount of Life Leeched, with 35% Slower Leech
- Enemies have 25% Leech Resistance
So, what does that look like?
Total Leech = 400 * ( 1 + 0.8 ) * 0.25 Life over (1 / 1 – 0.35)
Total Leech = 400 * 1.8 * 0.25 Life over 1.54 Seconds
Total Leech = 180 Life over 1.54 Seconds, or ~116 Life per second
As shown, we’d end up with a single instance of Leech recovering 180 Life over a period of 1.54 seconds. Any additional occurrences on top of this would apply simultaneously and fall off as each instance expires. So if we attacked 10 times a second, we’d get roughly 15 stacks active at the same time, resulting in roughly 1,740 Life per second when maintained while attacking.
Damage Taken As
Damage Taken covers a couple of different mechanics, but they’re all important as defensive layers. The main two consist of Damage taken as Element, and Damage Taken as Mana Before Life.
Damage Taken As Element consists of effects like those on the Catalysis passive node, Cloak of Flames, or even Ascendancy nodes like the Infernalist’s Altered Flesh. These effects convert a portion of Damage Taken to a different damage type, which can make it harder or easier to mitigate.
Let’s look at the Infenalist’s Altered Flesh as an example of how this would work. Altered Flesh Converts 20% of Cold and Lightning Damage Taken to Fire and 20% of Physical to Chaos. If we were to use Chaos Inoculation on top of this, this would act as 20% Physical Damage mitigation instead, as we’d be immune to the converted portion.
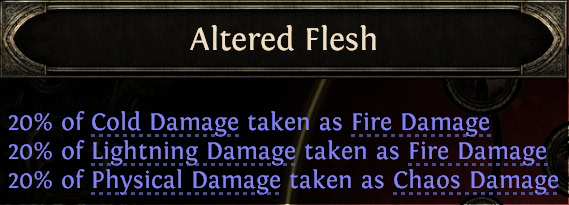
Meanwhile, only 80% of Cold and Lightning Damage would hit the respective Resistances. This doesn’t alter the damage here unless Fire has a higher Maximum, or is just higher in general. If Fire had the absolute maximum of 85%, the converted portion would result in ~3% less damage taken than if all of the damage were to hit a 75% resistance instead.
Damage Taken as Mana Before Life is different, instead allowing our Mana Pool to contribute to our Hit Pool on top of Life. The most common way this is used is through the Mind over Matter Keystone, but it is also possible to achieve the same 100% of Damage Taken as Mana before Life with Cloak of Defiance and Jewels.
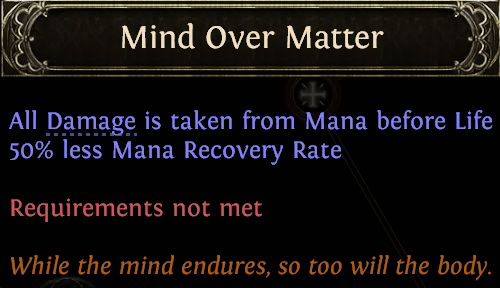
This is often used as a defensive layer, combined with Eldritch Battery to further boost our Mana Pool. The important thing to note with using this is that Mana Regeneration Rate effectively becomes Life Regeneration, but unlike Life Regeneration, we have a base Mana Regen value we get to scale.
One important thing to note, especially when not using the Mind over Matter Keystone, Damage Taken as Mana Before Life should never exceed 100%, doing so results in taking more damage. So any more of this stat in addition to Mind over Matter will result in less effective Hit Pool.
Deflection
Deflection is a great addition to any Pure Evasion or Hybrid Evasion setup. This allows our Evasion Rating to also provide Deflection Rating if we get the modifier for it on our gear. Deflection grants us a chance for any hit we take to be reduced by 40%.
By default, Deflection is tied strictly to Evasion and Evasion Rating, but through the use of certain Ascendancies like Tactician’s Polish That Gear, or Unique Items like Shankgonne, it can also be extended to Armour as well.
Similarly to Evasion, it’s very RNG reliant, but doesn’t appear to follow the same Entropy system as Evasion, and can be applied to all hit damage, including the boss attacks Evasion can’t prevent.
Like many other defensive layers we have access to, there’s plenty of Passive support for this as well. Scaling Deflection rating, the amount of damage deflected, or even making deflection Lucky if we wanted to go that route.
Recoup
Generically, Recoup is a form of Life Recovery triggered by damage. It acts like damage mitigation, but is provided as Life Recovery, rather than pure mitigation like Armour or Resistances.
Recoup requires investment to be a proper defensive layer, as the base Recoup Speed of 8 seconds can make it pretty weak to use. Additionally, stacking Damage Recouped as Life as well as Life Recovery Rate enables it to work even better.
So why is Recoup Speed important to Recoup? Simply put, the faster Recoup recovers the damage we take, the less likely we are to die from subsequent hits. We’re extremely limited in terms of this stat, with only a mere 25% being available from a single node on the passive tree.
If we go out of our way to allocate it, we’ll reduce the Recoup time from 8 Seconds to 6 Seconds. However, the Chronomancer’s Rapid River Ascendancy cuts that down to 4 seconds regardless of whether we allocate that passive or not.
Unlike any form of Damage Taken As, Recoup is a stat we’d like to increase over 100%, as at 100% we’ll fully recover any damage taken, but exceeding it means we’ll heal for more than we take. Unfortunately, just like Recoup Speed, we have a hard limit of 83% (87% of Chronomancer) if we grab every bit we can from the Passive Tree.
We can, however, push that higher with Life Recovery Rate. Unlike Life Regeneration Rate, Life Recovery Rate is a bonus to all forms of Life Recovery, which includes Recoup. Granted, there’s only a single 15% node available to all classes, it’s enough to reach just over 100% Recoup Effect. The Ritualist has access to far more via Ascendancies.
Resistances
We save Resistances for last, not only because it works out that way alphabetically, but also because it’s the most straightforward of the Secondary Defensive Layers.
Resistances reduce the damage taken by a given element by up to 85%. This value is the absolute maximum it can reach by investing in Maximum Resistance via Jewels or passives. By Default, this value is instead 75%.
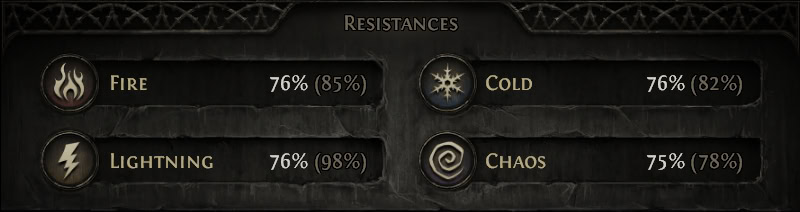
At the Default maximum of 75% Resistance, this increases our effective Hit Pool to a given element by four times our base Hit Pool. With the absolute maximum of 85%, this is nearly seven times instead. Simply put, this is why all of our resistances should be capped, especially going into the endgame.
Path of Exile 2: Defensive Order of Operations

To round off our guide to how defences work in Path of Exile 2, we want to provide an example that highlights how each check with defences is applied.
Instructions
Step 1 - Hit Avoidance
Avoidance is where Evasion, Accuracy, and Blind come into play. When any attack is done, it will make all the necessary rolls to determine the Chance to Hit and proceed as follows:
- If the Check Fails, and the relevant Evasion Entropy is added to further checks.
- If the Check Succeeds, the attack will hit, and we move on to Step 2.
Damage over Time and many Area of Effect attacks will bypass this check entirely, rendering Evasion less effective against them.Block is calculated at a later step as it only prevents damage, not the hit itself.
Step 2 - Damage Calculation
Every Attack in Path of Exile has its way of dealing damage, which we won't go into here, as it's a topic of its own. Damage is calculated now, as many of the future steps rely on it to determine effects like Ailments, as well as what type(s) of damage are being dealt.
Step 3 - Damage Taken As Element
With the initial damage and damage types all sorted out, this is where Damage Taken As Element comes in. This just rearranges the incoming damage according to the effects in play.
Referring to our earlier Example, this is when a passive like Altered Flesh would turn Cold and Lightning Damage partially into Fire as well as the Physical to Chaos.
Step 4 - Mitigation
The Mitigation step is where Armour and Resistances come into play. This also includes effects like the Chaos Immunity granted by Chaos Inoculation as well as "Chance to Avoid Damage" modifiers found on unique items like Perfidy.
Despite the wording of "Chance to Avoid Damage", this is applied here as it's only avoiding the damage, not the hit. This changes how it interacts with effects that check if we were hit recently.
Step 5 - Damage Modifier
This is a shorter step that only applies a handful of effects. These also have their own order in which they apply:
- Flat Damage Reduction, such as Astramentis' "-4 Physical Damage Taken from Attack Hits" modifier.
- Increases or reductions to damage taken from effects like Shock or Intimidate
- Less/More Damage Taken modifiers, such as the Bulwark Keystone's "Take 30% less Damage from Hits while Dodge Rolling" modifier.
Step 6 - Stun
It's at this point where Stun is determined, since the final damage is now calculated. For us, a hit needs to deal at least 10% of our Maximum Life to have a chance to Stun us at all. This chance increases linearly, so damage that deals 100% of our Life would always Stun.
This is why Chaos Inoculation builds in particular need to invest in "Stun Threshold is based on X% of Maximum Energy Shield", otherwise every hit will Light Stun them.
When Actively Blocking or Parrying, this instead determines how much of our Stamina is depleted, instead applying a Heavy Stun on reaching zero.
Step 7 - Block
Finally, the chance to Block is checked. This will determine if we take the damage at all, as Block will prevent all damage. As previously stated with Block, this does not prevent on-hit Debuffs, such as Freeze.
Step 8 - Damage Application
Now that we know how much damage is being applied, we can now figure out how it will be spread across our various resources. Like many other steps before this point, these are done in a specific order.
First is Damage Redirection. Typically, when this is in play, it has the specific phrasing of "Damage from Hits is taken from [Redirection Target]'s Life Before You." So this would include the Loyalty Support for Companion Skills and Warbringer's Wooden Wall Ascendnacy.
Then, Damage will hit Resource Buffs, these are effects that act similarly to Guard, but are separate from it. The only notable example here is Witchhunter's Sorcery Ward.
Next, is Guard. This is a more active form of damage mitigation, as Guard will expire if not used within its active window. The only really notable examples of this are the Warbringer's Encased in Jade Ascendancy Skill, the Prefix on Charms, and the Oloroth's Resolve Unique Life Flask.
After that, Remaining damage will be applied to Life. If we have Energy Shield, this will be hit first. If we also have Mind over Matter, this would take any damage that gets past the Energy Shield, continuing to prevent Damage Taken to Life.
Finally, effects like Blood Mage's Grasping Wound, or "Life Loss from Hits is Prevented, then lost over 4 seconds instead". Currently, this is unique to this specific Ascendancy and not found anywhere else. This only applies to Life, hence why it applies last as damage may need to get past other Resources.