An in-depth SWTOR 6.0 Onslaught Shield Specialist Vanguard Tank Guide (the Shield Specialist Discipline) for PvE, suitable for beginner players who seek to learn how to improve their performance!
This Guide is written by Cӓboose
Table of contents
INTRO
Shield Specialist Vanguard is one of the three Tanking Disciplines in SWTOR, available to Vanguards level 10 and over. Shield Specialist Vanguards offer great passive mitigation through our Shield and Absorb Stats and procs, as well as the best out of combat Damage Reduction against Kinetic/Energy Damage. The class also offers great threat generation, tank dps, mobility, and crowd control abilities that allow you to protect your allies from whatever you face. This guide will go over gearing, utility, rotational and miscellaneous advice for the Discipline, with a focus on PvE content.
What is Shield Specialist Good for?
Shield Specialist excels in mitigating damage passively through a combination of our Damage Reduction and our Shield and Absorb Stats. Shield Specialists shine out among their peers in fights where a lot of Kinetic and Energy Damage is being dealt out, as this allows us to take full advantage of our High Armor Rating, Shield and Absorb Procs, and many of our defensive cooldowns. We also have great damage and threat generation as a tank, with Energy Blast, one of our core abilities for threat generation and Damage mitigation, as well as shoulder cannons, being off the gcd, as well as many of our important passives increasing the threat generation for core abilities. We also have access to great crowd control through Riot Gas, Cryo Grenade, Neural Surge and Harpoon, and Hold the Line makes us one of the most mobile classes in the game. Like other Tank Classes, Shield Specialist Vanguards won’t be as efficient at leveling or solo content like MM chapters or Story Content. However, we are always needed, and often in short supply, for group content, such as Flashpoints or Operations.
Shield Specialist compared to other tanks
As stated before, Shield Specialists are great with their passive mitigation, allowing us to even many unpredictable damage spikes you will take. This reliance on our Shield, Absorb, and DR is both a blessing and a curse, as the trade-off is that we have less Defensive cooldowns than our Guardian and Shadow Counterparts. We also lack a cooldown like Resilience or Saberward that gives us a guaranteed or near guaranteed chance to dodge / resist a certain type of damage. These factors mean that Shield Specialists may not be quite as adept at managing predictable Damage spikes, nor do we have the same potential to ignore certain fight mechanics as our peers. While this can often be a dissuading factor from playing a Shield Specialist in high level content, our weaknesses can be greatly compensated for through knowledge of the discipline, fight mechanics, and learning how to stretch your cooldowns out so you will never feel like you don’t have a response for incoming damage spikes.
GEARING AND STATS
Defensive Stats Overview
It is essential to know exactly what each defensive stat does, and what types of damage each can mitigate. Your character sheet takes shortcuts in telling you how each stat is affecting each damage type, (eg: The DR percentage you see on your character sheet includes armor from DR, so it isn’t accurate for Internal/ Element attacks.) Always check your pop up tooltips to see the full story of how much you will mitigate. Here’s a quick overview:
Attack types:
- Melee/ ranged : Always deals Kinetic/ energy damage
- Force/ Tech : Can be either Kinetic/ Energy OR internal/elemental.
Defense Stats:
- Damage Reduction “Proper”: Reduces damage taken from all attacks by x percent. Abbreviated as DR
- Armor Rating: Increases your DR against Kinetic/Energy Damage types. No affect on Internal / elemental damage. The sum of this and DR “proper” is what you see on the Character sheet unless you look at the tooltip.
- Defense: increases your Chances to dodge or parry melee/ranged attacks. 2% chance to resist Force tech damage. (The latter is not affected by defense rating, but buffs that increase your defense chance will affect it.)
- Shield: Increases your chance to shield Kinetic/energy damage.
- Absorb: Increases the amount of damage mitigated when you shield an attack.
Gearing Up
Compared to DPS and healers, Tanks in SWTOR have a bit more freedom in how they gear, resulting in many different viable builds you can use for you’re gearing. While below is a good baseline setup for a Shield Specialist Vanguard, keep in mind that it is good to experiment with different setups, and use whatever feels most comfortable to you. Note that older content, such as operations, is scaled down to level 70, so you gearing method may change depending on what content you plan on tackling.
What items to use
- Armorings: Use either Resistive 80 or 80R-1 armorings.
- Mods: I’d recommend Warding Unlettered, Warding B, or Lethal B mods. In the build below I am using a combination of Warding B and Lethal B mods. Use only Unlettered Warding Mods for scaled down content.
- Enhancements: I recommend you use Superior Bulwark or Superior Bastion enhancements, as they have the most tertiary stat pool.
- Augments: Use Advanced Shield/Absorb 74 augments.
- Earpiece/Implants : Any Bastion or Bulwark Earpieces/ Implants will work. The build below uses the Sha’tek variant, as they are the most common drop, but in most builds I would recommend using the High Tertiary Stat Sund Tech variants, if you have them.
- Relics: Use either Relics of Avoidance or Relics of the Shield Matrix. I use one of each for the build below.
Stat Priority
Shield Rating should be the stat you focus on most as a Shield Specialist Vanguard, followed by Absorption Rating, then Defense Rating.
Shield/ Absorb: I would recommend you start any Tank build by first making sure you reach at least 50% Shield Chance, and then placing your remaining stats as you see fit. A build with similar Shield Chance and Shield Absorption percentages like the one below will offer better mitigation per shielded attack than a high Shield Chance build, albeit less consistently. I do not recommend having a Higher Shield Absorption percentage than a Shield Chance percentage, as Shield Absorption becomes less useful the less likely you are to actually shield an attack.
Defense: Your Defense rating should run anywhere between 3492 and 5297, depending on what type of build you are going for. 3492 is the soft cap for Defense Rating, which is where the mitigated gains start to become noticable, and 5297 is your hard cap, which is where it is no longer worth increasing your defense rating. Typically, the less you put into Defense, the more you can put into Endurance, increasing your health pool. The build below is closer to the Hard cap, but still offers plenty of endurance for all content. *In Scaled down content, you should use only unlettered Defense mods, even if you pass the 5297 Defense rating Threshold*
Example Build
This is a baseline build that will give you a good starting point for the horizontal gearing of your Shield Specialist Vanguard. Remember, it is great to experiment with different builds for your tanks, and I highly recommend finding what works for you and using that build.
- Mastery: 12466
- Endurance: 17328
- Power: 3441
- Defense: 5011 (28.67%)
- Shield: 4282 (51.71%)
- Absorb: 2986 (50.49%)
- Armorings: Resistive 80 or 80R-1 Armorings x 8, + Resistive 80 or 80R-1 Barrel x1
- Mods: Superior Warding Mod 80B x4 + Superior Lethal Mod 80B x5
- Enhancements: Superior Bastion Enhancement 80 x3 + Superior Bulwark Enhancement x4
- Implants/Earpiece: Sha’tek Bastion Package Mk-19 x 2 + Sha’tek Bulwark Device Mk-19 x 1
- Augments: Advanced Shield Augment 74 x 13 + Advanced Absorb Augment 74 x 1
To see a more indepth look at 6.0 Theorycrafting for tank stats and baselines for High Endurance and High Defense Tank builds for all classes, I recommend looking at Dipstik’s forum thread on the topic here.
Set Bonuses
With 6.0, Shield Specialist Vanguards lost our old Set bonus. This means we no longer have our Taunt CD reduction on Stockstrike, which allowed vanguards to have the shortest possible single taunt cd (we could get the cooldown down to 6 seconds in some instances) and the highest threat generating tank. Below I have listed the set bonuses that are available and relevant to Vanguard tanks, and to what degree I see them being useful as a tank. For a more in-depth look at all the different Set Bonuses and how to get them, I recommend checking out Vulkk’s guide on the topic.
Emergency Power
- (2): +2% Endurance
- (4): Increases the Duration of Reactive Shield by 5 seconds
- (6): Activating Power Yield grants you a major Absorb shield for 3 seconds
- Source: Dxun Op. Not available from Tech Fragment Vendor
This set was introduced in 6.0.1, possibly to give a Shield Specialist Vanguards a set that was definitely tailored towards them. The buff to reactive shield is good, having a pseudo sage bubble while power yield gains stacks is also nice. The bonuses are straightforward, and will perform consistently well in all situations, making this set a good fit for those who are new to the class, as well as veterans who are looking for more guaranteed mitigation.
Right Price
- (2) +2% Mastery
- (4) Battle Focus increases damage dealt by 20% when Ion Cell is active, and increases Dr by 5% when Ion cell is not active.
- (6) Whenever you taken damage while Power Yield is up, the cooldown of Battle Focus is reduced by 3 seconds. This effect can only occur once every 3 seconds.
- Source: Conquest Crates
Despite the Nerf to the 6 piece bonus that came with 6.0.1, this is as of right now still my favorite Set Bonus to run as a Shield Specialist Vanguard. For some reason the set doesn’t seem to distinguish how long Power Yield actually lasts, as the cooldown reduction effect continues to occur for 30 seconds after Power Yield is activated, regardless of whether or not you are a DPS or Tank, or if you actually have the utility that extends the duration of Power Yield when in DPS spec. This allows you to shave up to 30 seconds off the cooldown of Battle Focus when you use Power Yield. When used most effectively, this set bonus allows the first 1 minute and 15 seconds of Battle focus’s Cooldown to pass in only 45 seconds (15 Seconds when Battle Focus is active and 30 seconds after Power Yield is activated.) This set bonus gives Shield Specialist Vanguards the potential to greatly increase their defensive cooldown uptime, however, it is good to keep in mind that it can also make the usage of Power Yield and Riot Gas more conditional. (Using Power Yield when Battle Focus is off cooldown can be wasteful, and the cooldown of Riot Gas will no longer line up with the cooldown of Battle Focus.) While using this set you will also never want to use Power Yield when Battle Focus and or Riot Gas are active, as the Cooldown Reduction effect does not occur if you dodge/resist an attack. In its current state, I’d say this set is on tier with Emergency Power on paper, however, its usefulness can fluctuate higher or lower depending on the situation (Right Price is amazing when tanking a boss like Tu’chuck, since he hits you several times each GCD for exclusively weapon damage, but isn’t very effective on a fight like Izax, where you are being hit less often, but each hit does lots of Tech Damage,) and on the skill and knowledge of the user (Proper knowledge of a boss’s damage profile and understanding of fight mechanics makes it easier to know if you can rely on the benefits of Right Price ahead of time.)
Meteor Brawler
- (2) +2% Endurance
- (4) Energy cost of Stockstrick/Shockstrike reduced by 4. Stockstrike/ Shockstrike and Energy blast increase damage dealt by 10% for 15 seconds. Can occur once every 30 seconds.
- (6) Activating Battle Focus gives you Firefall for the duration of Battle Focus. During this time, dealing damage with Ion Wave, Ion Pulse, Stockstrike, or Shockstrike builds up to 7 stacks of Firefall. When Battle Focus ends, it detonates dealing elemental damage to all enemies around that scales with Firefall stacks. After it explodes, your energy abilities cost 50% less energy for 20 seconds.
- Source: Increased Drop chance from Ops
If you want to go for a maximum damage dealing tank, this is the way to go. The 6.0.1 change to allow energy blast to proc the 4 piece damage buff slightly increased Shield Specialist compatibility with this set.
Squad Leader
- (2) +2% Endurance
- (4) Taking damage while Reactive Shield is up grants a weaker Reactive Shield to nearby Allies.
This set bonus is not bad, but Reactive Shield is a cooldown you typically will want to save until you need it. The rest of the group should be avoiding avoidable damage, and have their own cooldowns for raidwide damage
Amplified Champion
This set contains an additional Primary Amplifier on each piece’s shell. These Amplifiers have lower than standard rolls.
Replaces the Quality of Life/ Crafting/ Experience Amplifiers usually found on Shells and replaces them with Combat amplifiers usually found on Armorings/ Hilts/ Barrels. Amplifiers on these pieces can only reach the 2nd Tier (Blue) Quality. Any gear piece that does not contribute to your set bonus should be an Amplified Champion Set Piece (So if you use a set with a 6 piece bonus, your seventh shell should be Amplified Champion. If you use a set with a 4 piece bonus, you should use 3 Amplified Champions Pieces.)
Tacticals
Tacticals are a new gear piece introduced in the Onslaught expansion. Tacticals have no stats, but they can alter the way you play your discipline. I will be going over the Tacticals that are relevant to Shield Specialist Vanguards, but there are many others you can obtain and use in the game that I won’t be mentioning. For a more in-depth look at all the different Tacticals and how to get them, I recommend checking out Vulkk’s guide on the topic.
 Thermal Screen
 Thermal Screen
Effect: Power Screen now Stacks up to 6 times. Using Power Yield finishes the cooldown on Energy blast and grants 3 Power Screens.
My personal favorite tactical to use. You get a near permanent passive 3% increase to Shield Absorption, which will intermittently be as high as a 6% increase. It can also give you 12 seconds of extra 30% Shield Absorption, if you proc a second Energy Blast with Power Yield as the first Energy Blast Buff drops off. Unfortunately, you cannot stack 2 energy blasts for 100% Shield Absorption. Using Energy Blast when you already have the buff simply refreshes the cooldown.
Oil Fire
 Oil Fire
Effect: Each enemy hit by Ion Storm while affected by Riot gas increases DR by 2% for 8 Seconds, and reduces the cooldown of Riot Gas by 1 second. Ion Storm Hits for 20% more damage on targets in Riot Gas.
Another good tactical. Strengthens Riot gas to varying degrees based on the scenario. Unfortunately, Shadows and Guardians have similar set bonuses/ Tacticals that grant them the same benefits without the requirement of using a cooldown.
AS OF PATCH 6.0.1 THIS TACTICAL IS BUGGED, AND ONLY GIVES ~.13% DR PER ENEMY HIT
Holoswap
Effect: Transposing a guarded target grants the 40% DR and causes them to taunt all nearby enemies for 6 seconds. After six seconds you swap back.
It’s an interesting tactical if nothing else . I wouldn’t recommend using it often, but if you can find a strat to use it on certain fights, go for it.
Flying Fists
 Flying Fists
Effect: Stockstrike / Rocket Punch and Shockstrike / Flaming Fist now have a range of 10m.
Not very useful in PvE unless you plan on kiting a lot.
Neural Trigger
 Neural Trigger
 Effect: Dealing damage to an enemy affected by your Neural Jolt / Neural Dar stuns them for 2 seconds and ends the taunt.
Not Very Useful in PvE.
The Life Warden
 The Life Warden
Effect: Taking damage below 20% health will rapidly heal you for a large amount. 10 minute cooldown.
General Tactical available to all classes that can be situationally useful when you cannot cycle through all your cooldowns. An example of this is when tanking NiM Zorn with no tank swaps. Since not all of your cooldowns (primarily Battle Focus and Riot Gas, and Power Yield to a lesser degree,) are effective at mitigating Zorns damage, and your medpac is restricted due to the baradium sickness mechanic, this cooldown can act as a conditional medpac.
Amplifiers
Amplifiers are a new aspect of gearing introduced with the Onslaught expansion. Amplifiers can buff your Combat, Crafting, Activity Rewards, or make Quality of life changes. There are many amplifiers to choose from, but I will only be going over the Combat Amplifiers Relevant to Shield Specialist Vanguards. For a more in-depth look at all the different Amplifiers and how to get them, I recommend checking out Vulkk’s guide on the topic.
There are many Amplifiers that are available in the Armoring/ Hilt slot. For Shield Specialist Vanguards, I’d recommend using either Aural Resistence or Tech Wizardry. While there are many defensive Amplifiers other than Aural Resistance, many of them are very niche, and will work great on some fights but be useless on others, requiring you have multiple sets of gear or constantly reroll your Amplifiers. Most bosses do plenty of cleaving and AoE damage, so Aural Resistance will be helpful in most or all fights in the game. Tech Wizardry is useful if you want to do a bit more dps as a Shield Specialist.
COMBAT ABILITIES
Passives
Below is the List of the Passive Ability Tree available to the Shield Specialist Vanguard, as well as a short explanation as to how your important Passives will affect your rotation.
[table “141” not found /]In short, your rotational priority should focused on maintaining your shield Amplifiers, and generating Power Screens so you can use Energy Blast. This means using Stockstrike and High Impact Bolt on cooldown, since they guarantee to grant stacks of both these.
Core Abilities
[table “143” not found /]Other Abilities
[table “144” not found /]Defensive Cooldowns
[table “145” not found /]UTILITIES
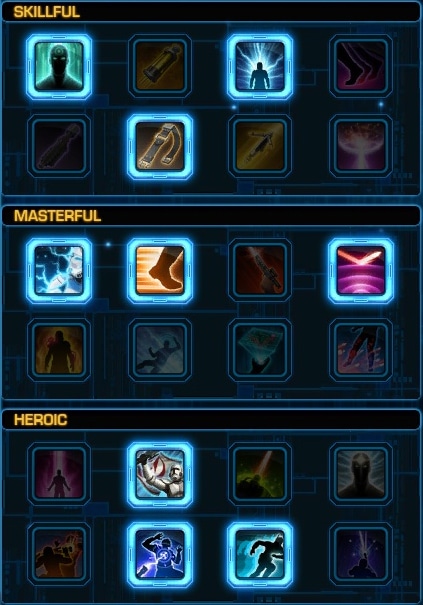
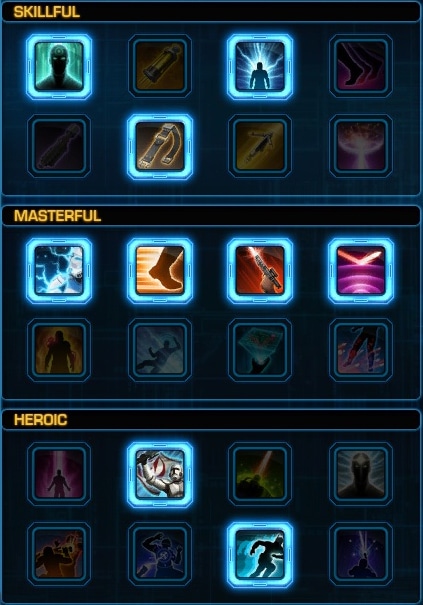
Skillful
Iron Will
- Effect: Reduced the cooldown of Tenacity by 30 seconds and the cooldown of Hold the Line by 10 seconds.
- Note: Always take this. Stunbreaker and Hold the Line are valuable in any fight.
Reflective Armor
- Effect: When Into the Fray is triggered, it will also deal elemental damage to the attacker if the attacker is within 10 meters.
- Note: Always take this. Its free damage every time you take AoE damage
Shrap Satchel
- Effect: Increases Explosive Surge damage by 25%
- Note: Usually Take this. Best remaining option in skillful, useful in most fights.
Masterful
Battlefield Training
- Effect: Increases in combat movement speed by 15%
- Note: Always take this. Being able to get from place to place faster is always good.
Sonic Rebounder
- Effect: Sonic Round protects all friendly targets in its area of impact, excluding you, granting Sonic Rebounder, which reflects the next direct, single-target attack back at the attacker.
- Note: Always take this. Rebounders is one of the best group utilities in the game.
Electro Shield
- Effect: When activated, your Reactive Shield charges with electricity, zapping attackers for elemental damage when they deal direct damage to you. This effect cannot occur more than once each second.
- Note: Always take this. It’s free damage when you have Reactive Shield Up
Frontline Defense
- Effect: Reduces the cooldown of Riot Strike by 2 seconds, and reduces damage taken while stunned by 30% when Ion Cell is active.
- Note: Sometimes take this. Anytime you know you will be taking hits after being stunned in a fight, or have to interrupt something, I’d recommend you take this.
Heroic
Advance the Line
- Effect: Increases the duration of Hold the Line by 4 seconds.
- Note: Always take this. Makes Hold the line better, which is great
Charge the Line
- Effect: Hold the Line increases movement speed by an additional 45% while active.
- Note: Always take this. Same reason as above.
Power Focus
- Effect: Power Yield increases damage done by an additional 2% when hit while Ion Cell is active
- Note: Usually take this. Extra damage is always nice. If you don’t need Pull and Pummel or Frontline Defense, take this.
Pull and Pummel
- Effect: Harpoon deals tech damage to pulled targets and grants Reel and Rattle, causing your next Stockstrike or against the pulled target to deal 20% additional kinetic damage and stun the target for 1.5 seconds. This effect lasts for 6 seconds.
- Note: If you are having threat problems in you opener, you can take this to help a little bit.
Example Builds

General Use PVE Utility Build Increased Opener Threat (PVE) Interupt and Stun Defense PVE Build

OPENER AND ABILITY PRIORITY SYSTEM
Vanguard has a relatively straight forward priority system and Opener which we alluded to earlier. Below is an example of a standard opener that you can use. Note that in some fights you may need to alter this in the interest of mechanics.
Opener
 Preload Shoulder Cannon
- Harpoon
- Storm
- Battle Focus, if not needed later
- Ion Storm + Shoulder Cannon + Taunt
- Stock Strike + Shoulder Cannon
 High Impact Bolt + Energy Blast + Shoulder Cannon
- Ion Pulse / Ion Storm + Shoulder Cannon
- Ion Pulse + AoE Taunt
- Priority
 Preload Shoulder Cannon
 Harpoon
 Storm
Storm Battle Focus, if not needed later
 Ion Storm +
  Stock Strike +
  High Impact Bolt +
  Energy Blast +
  Ion Pulse /
  AoE Taunt
Priority
The priority is very simple for Vanguards. The goal of this is to get enough Power Screens to use Energy blast as often as possible, and maintaining Shield Amplifiers. You can pretty much follow this to the T.
- Energy Blast / Shoulder Cannon. They are off the GCD so they wont conflict.
- Stockstrike
- High Impact Bolt
- Ion Storm (Even if it doesn’t proc.)
- Ion Pulse (filler if you have Cells)
- Hammer Shot (If you are running low on Cells)
 Hammer Shot (If you are running low on Cells)
 x)  Single Target taunt frequently if you don’t need to save it for an add or tank swap.
CONCLUSIONS
Quick and easy Tips to make you a better Vanguard Tank (or any tank in general):
- Know the damage profiles of what you are fighting. Figuring out what types of damage a boss will be dealing at a certain time, and when the boss will be dishing out large amounts of damage in a short time will improve your tanking experience greatly. Tools like StarParse are invaluable for tanks, as it easy gives you a breakdown of all the damage you take, sorted into each ability the boss uses, what type of damage each ability deals, how much damage each ability deals, and when it is used. This information allows you to better prepare for each phase of a boss fight, plan out when you will need to use a cooldown, and what cooldowns will be most effective at any given point, so that you never get caught on your back foot.
- Learning to Stretch out your Cooldowns. This tip goes in tandem with the first tip, but with Vanguards you want to make each of your cooldowns pay its dividends and then some. Knowing when you can rely on your passive mitigation, making sure you use a cooldown that is effective against the type of damage you take, and not overusing your cooldowns, will allow you to make the most out of your toolbox. For example, while fighting Warlord Kephess, you will be taking only Melee Kinetic Damage while you hold the boss, but when it is your turn to eat Kephess’s Slam and dot, you take large amounts of Force Elemental damage. Knowing that your Shield and Passive Damage Reduction and Energy Blast will be effective while holding Kephess, with having Battlefocus and Riot gas in a pinch, and saving Reactive Shield for Kephess’s Slam and Dot, is effective use of your cooldowns, allowing you to stretch out your cooldowns later in the fight. Panicking, and spamming cooldowns can leave you with no response to a big burst of damage later in the fight.
- Stay Calm, trust your team. I cannot stress this enough, but being able to stay relaxed and have strong judgement throughout a fight will greatly improve your time in raids. As stated before, spamming all your cooldowns because you took an unexpected burst or your healers are spread thin will often bite you in the back later. Make sure you show confidence in your healers, and your ability to maximize your passive mitigation, to keep you alive through unexpected bursts, especially if there won’t be another large hit for some time. And if you mess up, make sure you figure out what you did wrong, and then move on. Don’t give yourself a hard time if you learned from your mistakes.
- Ask questions. Ask every question you have. Speak up if don’t fully understand what your roles are in a fight. People will appreciate your transparency, and your willingness to learn.
As said before, Shield Specialist Vanguard is one of the three Tanking classes in SWTOR. Shield Specialists rely on their Shielding and Passive DR stats to take use the length, but also have a toolbox full of great cooldowns for any situation, a bevy of unique utilities to assist your team, as well as personal utilities to keep us in your opponent’s face, and out of your friends. You will find that Shield Specialist Vanguard is not only viable in all content at all difficulties in the game, but is also a blast to play at all levels, being easy and straightforward to pick up, while also possessing a high skill ceiling as you settle in with the class. I hope this guide was helpful for anyone who was interested in trying out or had questions about Shield Specialist Vanguards, and gave you the confidence to leap into the discipline, and also taught something new to returning and veteran Shield Specialist players, and that you all have as much fun with the class as I do.
About the Author and Recgnitions
My name is Cӓboose, and I raid on the Pub Side Star Forge server, but occasionally pop on my Powertech Kӓboose. I jumped into SWTOR in 1.0 as a Level 15 Free Trial player, before Swtor became Free to Play. The second character I created was my Vanguard, and it was the first character I max leveled and completed the story. SWTOR was my first MMO, and I leveled all the way to 50 in tank spec because I didn’t understand the difference between DPS and Tanks, so I’ve mained Shield Specialist for my entire time in SWTOR. I began raiding in 3.0 and joined my first raid team in 5.0. Since then I’ve become proficient in all the tank Classes in Swtor, but Shield Specialist has always remained my bread and butter, and I’ve cleared most MM and HM endgame content as a Shield Specialist. I really enjoy meeting people in the game, and will always /wave at you if I see you around fleet, so feel free to /wave at me anytime.
I’d like to first of all thank Vulkk for giving me the opportunity to write this guide, and for his wider contributions to the SWTOR community as a whole. This was my first voyage into writing a class guide, and I’ve had a bunch of fun putting all my thoughts and advice on the class into writing, and I hope that I’ve been helpful to the community through this guide. I’d like to also thank Nyyah and Riku for proofreading and providing feedback on this guide, and Nyyah again for teaching me so much about Shield Specialist, and being an amazing person to raid with. Finally, I’d like to thank everyone that I’ve raided with in the past, be it in a raid team, as a fill, or as a pug. There are too many guilds, teams, and individuals to name them all, but they know who they are, and are all amazing people.
From Vulkk
I would like to thank Caboose for providing this Vanguard Shield Specialist tanking guide for PvE. The Tank is the single most important role in SWTOR and usually hardest to find. Being a tank means you are carrying a whole team of players on your back and the beginning is always tough and challenging. I am happy we now have a source for new or returning players, as well as veteran ones, to find tips and suggestions on how to improve their level 75 gameplay and become the leaders each SWTOR team needs.
I would also like to thank Endonae and Erika for checking out the guide and providing their unique notes and opinion.
In this article I have used abilities icons from the Jedipedia and Torcommunity databases.
If you are skilled with a Class and Discipline that has not yet been covered with a guide on VULKK (check the list here), and you want to provide one for the SWTOR Community, contact me via email or wherever you see Vulkk present.
Related content:
- SWTOR 6.0 Class Guides List
- SWTOR 6.0 Shield Tech Powertech PvE Guide by Caboose
- SWTOR 6.0 Advanced Prototype Powertech PvE Guide by Prasah
- SWTOR 6.0 Pyrotech Powertech PvE Guide by Prasah
- SWTOR 6.0 Tactics Vanguard PvE Guide by Prasah
- SWTOR 6.0 Plasmatech Vanguard PvE Guide by Prasah
How is the Class and Spec changing with SWTOR 7.0
In Update 7.0 BioWare is introducing a new term “Combat Styles”, which will replace the traditional class-specific disciplines. If you are curious and want to get a head-start, check out the SWTOR 7.0 Class Changes Previews available on the Public Test Server.
And if you are behind on the news, find out what the SWTOR Legacy of the Sith Expansion will have to offer.