This is an in-depth Onslaught Hatred Assassin 6.0 + SWTOR class guide focusing exclusively on PvP, written by Kre’a. It’s suitable for beginner players as well as veterans, who seek to learn how to improve their performance! This Guide is written for VULKK.com by Kre’a
Table of contents
INTRO
Hatred Assassin is a medium range melee combatant, capable of utilizing both Force and Melee damage in synergy to bring their opponents down. In order to play this specialization to its maximum potential, you must be able to both stick to your targets in melee range as well as understand when it is necessary to kite and deal damage from afar. Players who enjoy the play style of Madness Sorcerer but enjoy playing melee-based classes, will enjoy what Hatred Assassin has to offer. Without further ado, let’s get into the guide!
GEAR AND STATS
- Set Bonus: 6pc Death Knell + 1pc Amplified Champion
- Tactical: Quick Escalation
- Accuracy: 5% is optional
- Alacrity: 1213 rating
- Combat Amplifiers: Weapon Expertise or Armor Penetration
- Bonus Amplifiers: Featherweight
- Critical Rating: 45% ; All remaining tertiary stats after reaching Accuracy and Alacrity thresholds(obtain 45% critical rating FIRST, as it’s critical to this build)
- Relics: Serendipitous Assault and Focused Retribution
There are two options for set bonuses. Murderous Revelation and Death Knell are both viable options and are strong for different reasons. Murderous Revelation allows this spec to deal roughly 70% of a target’s max health in damage during the initial 6 second opener, giving the spec burst that it would normally lack. The Death Knell set will instead off an increase in sustained damage via the 6 pc, which boosts all melee damage by 30% damage for 30 seconds. Death Knell has the edge because of the 30% damage boost on melee damage, which will augment your Leeching Strike’s damage and healing.
As for the tactical, you will be wanting to use the Quick Escalation tactical. This tactical, when combined with 45% crit rating and certain utilities, will allow you to sustain yourself in combat with heals equal to about 1/4th of the total damage you deal, giving Hatred much better survivability.
UTILITIES AND ABILITIES
Utilities
Below are my utilities of choice. After listing them, I will explain what abilities are affected by these utilities and why I have chosen them:
Skillful
Avoidance – Reduces the cooldown of Jolt by 2 seconds, Unbreakable will by 30 seconds, and Force Speed by 5 seconds
Electric Bindings – Overload immobilizes targets for 5 seconds.
Formless Phantom – Reduces damage taken from Area of Effect attacks by 30%.
Masterful
Emersion – Force Speed breaks immobilizing effects and grants immunity to them for its duration
Dark Stability – Activating Deflection grants 6 seconds of immunity to stun, sleep, lift, and incapacitating effects
Haunted Dreams – Whirlwind activates instantly and stuns the target for 2 seconds if broken early by damage
Heroic
Shroud of Madness – Activating Force Cloak grants 2 seconds of Force Shroud
Disjunction – Increases the duration of Force Shroud by 2 seconds and Force Speed by .5 seconds. Additionally, Force Speed slows all enemies within 5 meters by 75% for 2.5 seconds when activated
Hand of Darkness – Leeching Strike immobilizes the target for 2 seconds and mind trap will give your next ability 100% crit chance.
Explanation
This set of utilities is built to give us as much control as possible. We pick up roots on our Knockback and our Leeching Strike. These roots allow us to pin targets down and may cause targets to use defensive cooldowns that they would otherwise not use because they are immobilized. The Quick Escalation tactical allows us to spam our Leeching Strike, which will allow us to constantly heal for 30k~ per hit, as well as keep the target rooted in place. Lastly, we want utilities like Audacity and an increased Shroud duration to allow us to stay in the fight, and we want instalift so that we can control targets who are out away from our DoT spread.
Abilities
Primary Offensive Abilities
[table “147” not found /]Primary Defensive Abilities
[table “148” not found /]Priorities
The opener that you use will depend on your set bonus. With the Murderous Revelation set bonus, you will want to go for a burst opener which looks like:
 Stealth
 Phantom Stride
- Recklessness + Spike
- Eradicate
- Death Field
- Leeching Strike OR Assassinate
 Stealth
 Phantom Stride
 Recklessness +
  Spike
Spike Eradicate
 Death Field
 Leeching Strike OR
  Assassinate
 If you get a Bloodletting proc from your Eradicate, use Assassinate as your final GCD of the opener. If not, use Leeching Strike. This opener will deal roughly 70% of the targets max health in damage.
If you are using the Death Knell set bonus, the opener I recommend is:
- Stealth
- Mind Trap + Spike
- Force Potency
- Eradicate
- Death Field
- Discharge
- Leeching Strike
 Mind Trap +
  Force Potency
 Discharge
This opener is not nearly as bursty but will activate your 6 pc set as soon as possible, allowing your melee abilities to benefit from the 30% increased damage buff from the Death Knell set.
After the opener, the priority is:
- Leeching Strike
- Assassinate
- Death Field
- Eradicate
- Discharge
- Creeping Terror
- Lacerate to reapply DoT Spread.
 Creeping Terror
 Lacerate to reapply DoT Spread.
LINE OF SIGHT
In this section I want to discuss the idea of Line of Sight. Line of Sight is a term that means to hide behind an object which blocks the visual line between you and an enemy, meaning that you cannot hit them with any abilities and they cannot hit you. Hatred is a very flimsy spec and in order to get the most out of it you need to be able to Line of Sight. To get a better understanding of how to properly utilize Line of Sight, check out this video here:
This is one of those topics that is much easier to understand if you see it first hand as opposed to reading about it, but the long story short is that you want to always be utilizing LoS whenever you are not in melee range spreading your DoTs. Make sure to weave melee abilities in and go back behind LoS (line of sight) when your GCD is ticking. This will only serve to bolster your survivability and increase your uptime when in a warzone.
MAP STRATEGIES
In this section I will expand on some of the various maps in both arena and objective format, as well as what should be required and expected of you as an assassin player on each map.
Ranked Arenas
The best way to perform sufficiently in ranked as Hatred is to force your enemies into specific choke points by utilizing Line of Sight, and then cleaving them down with your DoTs and Lacerate. Below, I will go over a few good choke points, as well as where you will primarily want to be to line of sight your enemies to both mitigate incoming damage while maximizing your damage output, in a safe manner.
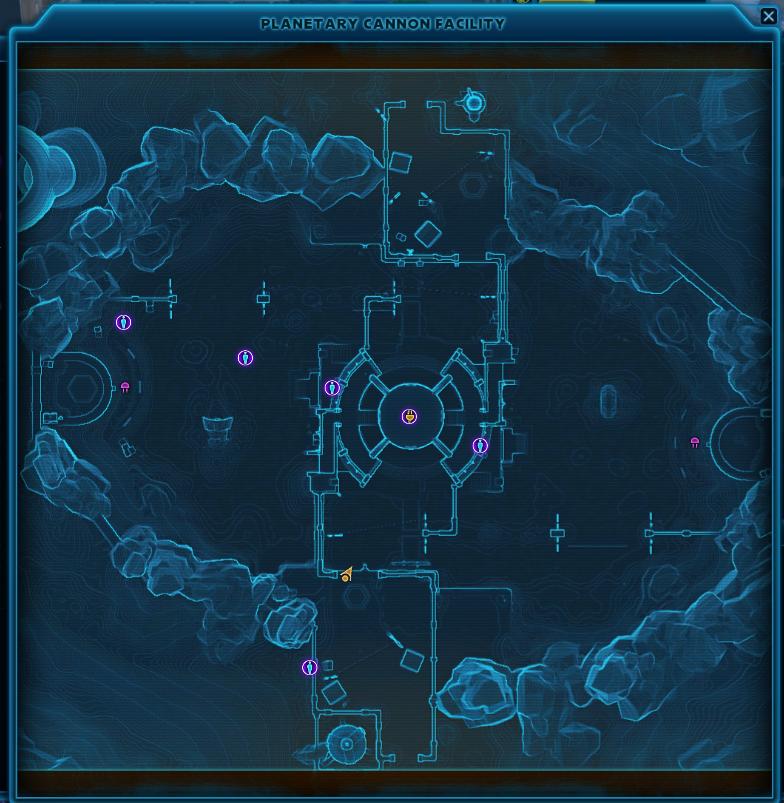
Orbital Station
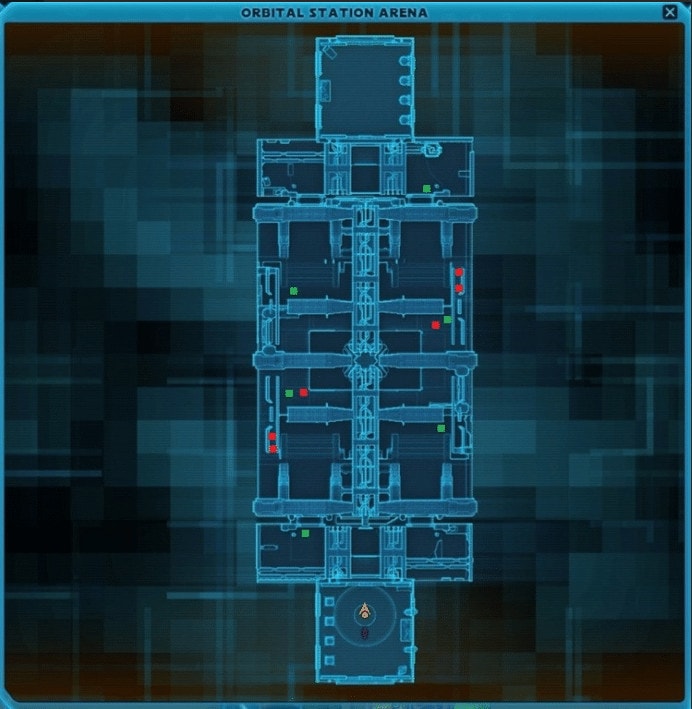
The green squares are locations that your team mates (Snipers and Sorcerers) will likely set up their Phase Walk abilities. The red locations are areas where your enemy might want to set up their own respective abilities. This is a two tiered map with multiple limited visibility areas which means that this map is great for Hatred and your ability to kite. Between the two GTNs on the ground floor, the large force field walls by the initial spawn points, and the central column in the middle of the map, there are a plethora of areas to choose from when utilizing line of sight. One of the major benefits of this map to you as a Hatred player is that the tight corners allow you to use your 10 meter abilities against an opposing melee or ranged player and immediately take cover to disallow enemy melee classes to leap to you or enemy ranged classes from picking you off with their 30 meter abilities. This is especially good for Hatred, as it means we can clump up multiple ranged DPS into certain choke points that allow us to get off optimal DoT spreads on them.
Makeb Mesa Arena

This is probably the 2nd worse map to play as an Assassin, with Corellia Square being one of the worst. Green circles are where your teammate sniper and sorcs may set up their phase walk. Red is where the enemy will likely place theirs. There is a ton of open space here with only a handful of objects to LoS behind. Additionally, the bridge is a ranged DPS player’s dream spot, they can turret away atop the bridge while utilizing displacement abilities to knock the melee characters down and continue to DPS them. Yes, as a melee player we can hide beneath the bridge, but then most ranged DPS can then simply heal back to full HP which is detrimental to us winning the match. For this reason, we need to utilize specific choke points to clump up the enemy team so that we can DoT spread better. The primary point you want to use is on the metal ramp. These ramps have walls that block all LoS from the left, on both the bridge and beneath the bridge, meaning the enemy will need to run to either the top of the ramp or the base of the ramp to hit you. This is the perfect opportunity to get off a well timed DoT spread and to jump off the ramp and go beneath it to continue to LoS and make the enemy team chase you. Despite being a melee class, we still have some 10-30m abilities. Use your ranged capabilities to your advantage!
Corellia Square Arena
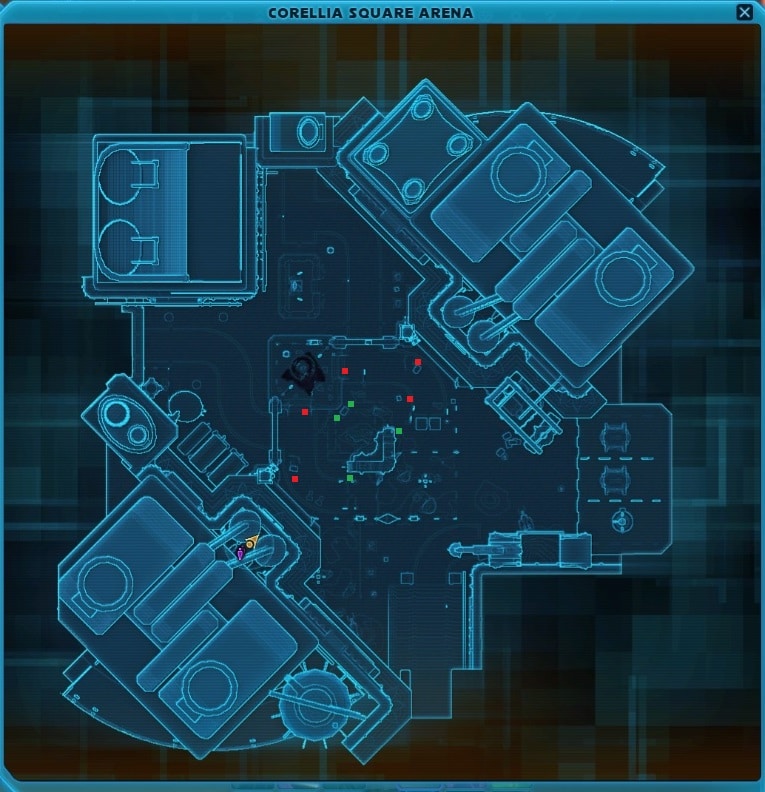
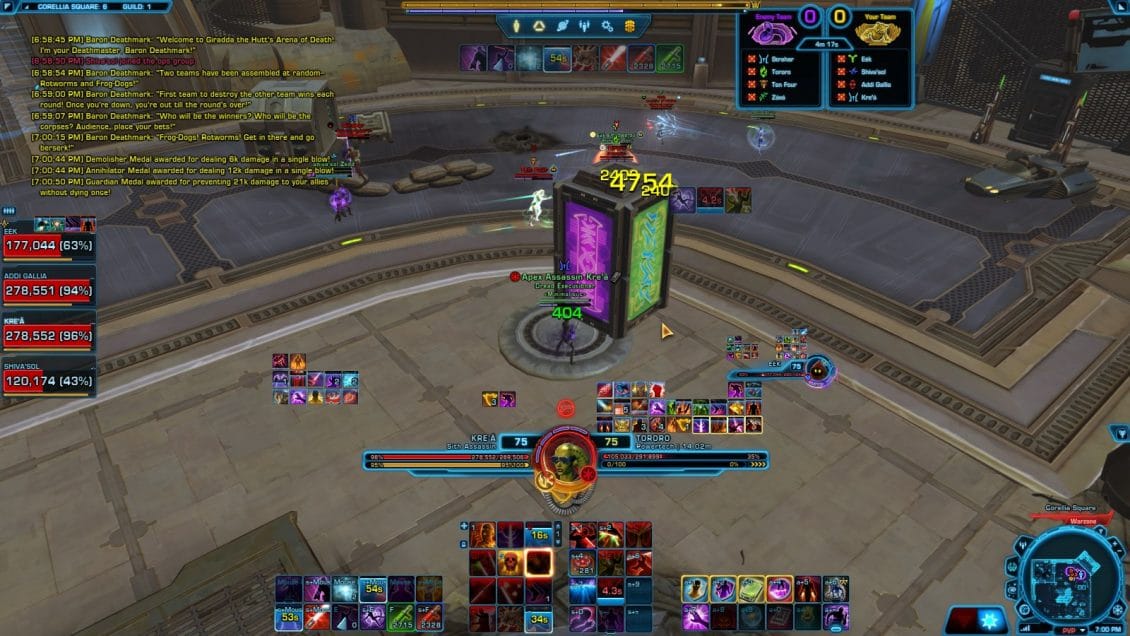
Easily the worst of the maps for Assassin players and melee players as a whole. This map is very open and offers very little protection from certain ranged classes. It’s crucial that you dictate the flow of the battle and force the fight around either one of the transformers right outside of the spawn point, or the transformer in the center of the map. Speaking of the center transformer, this is the choke point to group up enemies who are gunning for you to get off a premium DoT spread. Make sure that you are carrying some Stun Grenades and when the enemy groups up, throw a stun grenade out and move to another LoS object. If the enemy has multiple ranged dps and manages to get the fight to occur at the south eastern transformer, you will have a really bad time, there are no LoS objects anywhere in that clearing and you will be easy pickings. Here’s a good example of where you would want the fight to occur, as a Hatred player:

Make sure that when you are focused that you are using the various pillars to mitigate the incoming damage while still throwing out 10 meter abilities to deal damage, as seen here:
Tatooine Canyon

This is probably the best map for us as Hatred players. There are a ton of choke points to bait the enemy to, as well as multiple objects for us to Line of Sight behind. Between the four pylons in the sand pit and the two buildings on the east and west, there’s a ton of options for us to LoS and mitigate damage. Keep note of where the enemy Sorc and Snipers may place their Phase Walks, as it can be easy to lose track of them when the activate the ability to try to recover lost health. The same goes for enemy Operative and Assassins. Whenever they vanish, the will often try to go behind one of the 4 pylons or the two buildings to heal up, whichever is farthest away from the fight. This knowledge can be useful to kill off a low HP opponent before they get a chance to heal back up to full health.
Rishi Cove Arena
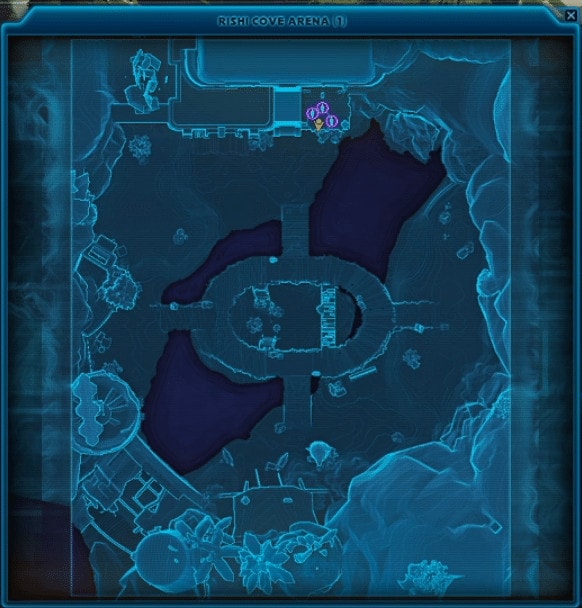
This arena is pretty similar in playstyle to Orbital Station. There are two levels, but most of the Line of Sight objects are on the 2nd level, atop the platform. There’s not too much to say about this map that wasn’t already said about Orbital Station. If your team primarily comprises of ranged DPS, make sure that you are utilizing your knockback to capitalize on it and create an advantageous situation where your teammates are capable of dealing damage while taking very little damage in return.
Mandalorian Battle Ring
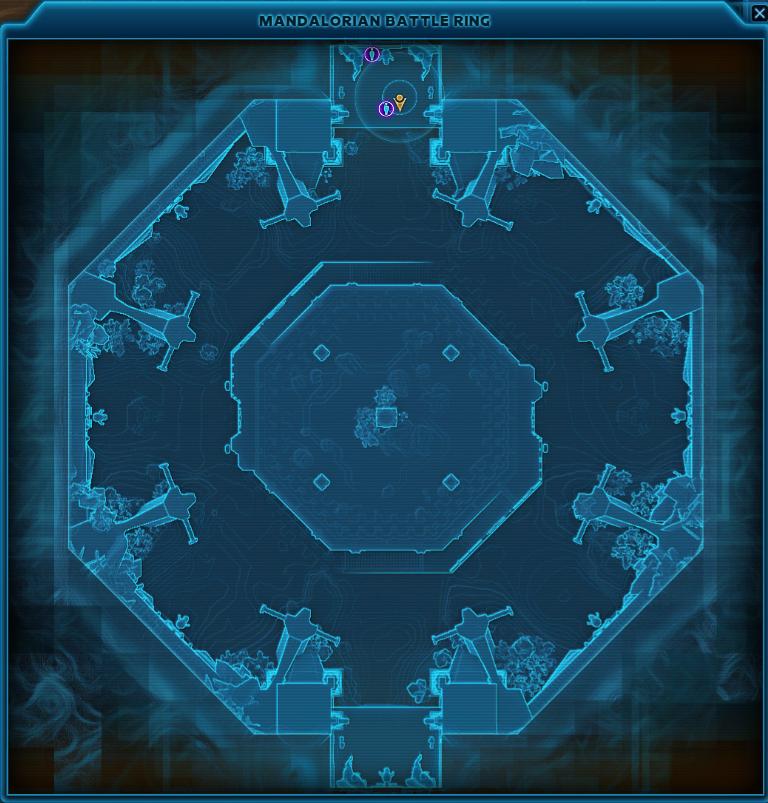
Hands down, one of the best maps for stealth classes and one of the worst maps for chasing down enemies. This map not only offers a decent amount of LoS objects up top, but it also has two very distinct levels, meaning that stealth players can go to the bottom or top level to heal up to full if they are brought low. Additionally, getting knocked down on this map comes with a severe penalty of being separated from the rest of your team, so try to bait players to the edge of the top platform by utilizing Line of Sight behind a pillar to draw them in, then root them with Creeping Terror and position yourself behind them to knock them down to the ground level. This will give your team a huge advantage of a 4v3, while wasting the time of the player(s) who tried to deal damage to you.
Objective Based Warzones
Hypergate

You are most useful here as a node defender, though you can try to sap/cap the enemy node if they have only a singular defender. As Hatred, you lack the burst that Deception has when it comes to capturing the node before the enemy reaches you from their spawn point, so I highly recommend just scoring points by obtaining kills in mid or on your own node. If you do decide to defend your node, make use of some of the small pylons to defend from multiple enemies at once, as can be seen here:
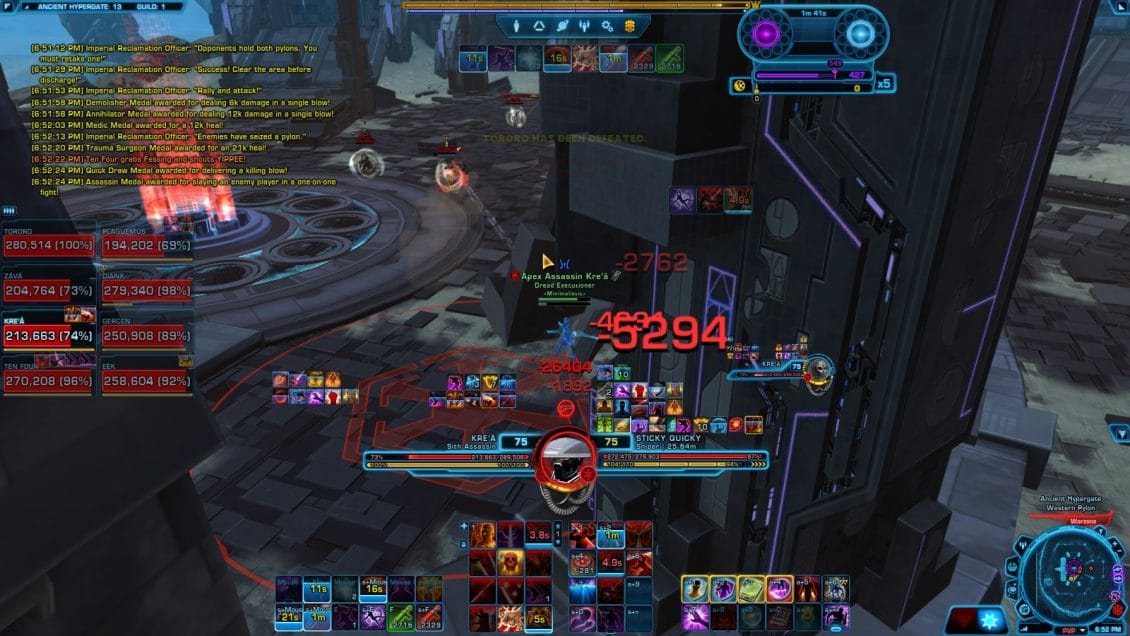
You’ll note that in this image, I have been hit with a mercenary’s electro-net, preventing me from using Force Cloak to vanish out of this sticky situation. However, utilizing Line of Sight, the enemy is forced to used weak AoE abilities to deal very little damage to me while I wait out the duration of the electro-net and stealth away to safety. Hatred is a very squishy spec, so make sure that you are capitalizing on proper positioning at all times.
Civil War (Both Variations)
On these maps, our best friend is the ability to utilize stealth to our advantage to capture off-nodes that are normally guarded by only one target. We can do this by sapping our enemy and then capturing the node. If they try to contest by using their CC breaker, we can stealth out, sap them and then immediately capture the node again. Try to make sure that when you go to capture a node, you are Line of Sighting the enemy in such a way that would require them to move their character in order to be able to hit you. This will give you a little bit of extra time after they come out of their mez to try to capture the node. Both variations of civil war have platforms that you can use to Line of Sight multiple enemies while you are focusing down your main target. Here’s a good example of this:
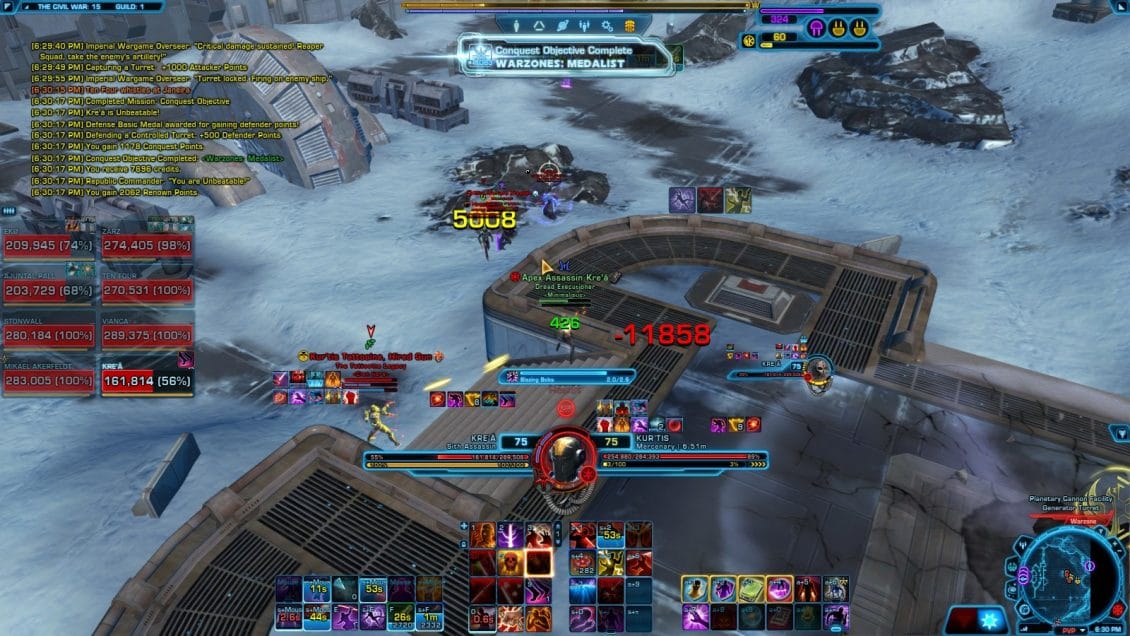
Notice that in this picture, I am out of line of sight for 3 enemies while I focus down my main target, the mercenary. It’s important to use line of sight at ALL times because in this particular situation, I would have died almost immediately if those other three enemy players were able to see me and deal damage to me. A 1v1 is always easier than a 1v4, so make sure to utilize line of Sight whenever you can. Also, notice that the Powertech was still taking damage from my DoTs, even though I wasn’t directly engaged with him in battle. This is another primary benefit of utilizing Line of Sight as Hatred. It allows us to deal damage to the enemy while taking no damage ourselves, while we focus on a different target, if need be. Line of sight is a powerful tool and its use cannot be stated enough.
Novare Coast

There’s two roles you can perform here. Either stealing the off-node or protecting your own. As a Hatred assassin, you will probably have better luck protecting your own node since you lack the burst to effectively kill a player and capture the node before reinforcements arrive. The primary area you want to use to line of sight is the bunker where the node is captured, as displayed here:
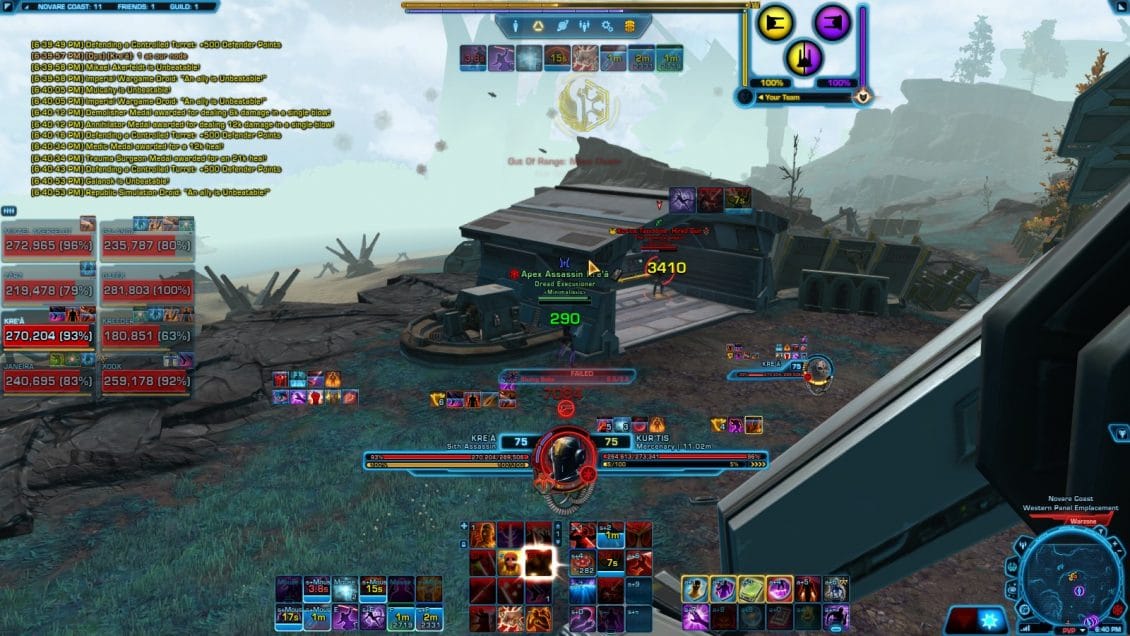
Notice that in the above picture, right above my player portrait, you can see a “Failed” cast of Blazing Bolts. This is a great example of how to use weave in your offensive abilities to damage the opponent while properly mitigating damage taken by line of sighting their abilities. Use this to your advantage to push damage and potentially take on multiple opponents at once, to successfully defend a node. Creeping Terror is a great tool here due to the root that will keep the enemy in place while you position yourself accordingly.
Odessen
The objective here is to control various “Control Points” by standing in them and maintaining them for their duration. You lose the point when you are knocked out of the area for more than a couple seconds. For this reason, we will want to use our knockback in conjunction with Creeping Terror to root our enemy in place after we knock them back. We can follow this up with an Electrocute to ensure that they do not reenter the control point so that we can capture it. There are a ton of areas to line of sight, but most of these areas are outside of the control point, so if you are maintaining a node you will need to face tank a lot of the damage that’s coming towards you.
Huttball (All Vatiations)
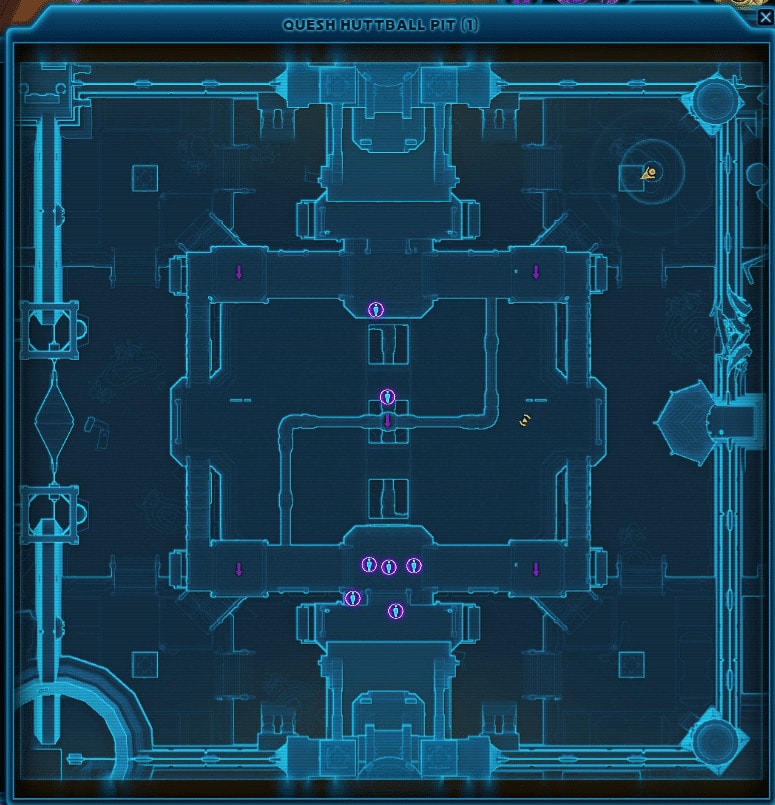
An assassin’s role in huttball, regardless of the map is to give the ball carrier guard. The best ball carriers are Operatives and Juggernauts, so giving them guard so that they can survive long enough to make it to the goal line is of #1 importance. Bonus points if you have the Friend of the Force tactical, which will give your guarded target Force Shroud when you activate yours, further enhancing their abilities to mitigate damage and crowd control effects and to score effectively. You can also ensure that you hug certain corners when you aren’t protecting the ball carrier. All of the huttball maps have some large terrain that you can use to LoS, like this one:

TIPS VS OTHER PLAYERS
Mercenary
Defeating a mercenary is now much easier with the addition of the Two Cloaks tactical as we now have access to an additional Force Shroud. The only new tool that mercs received in 6.0 was an extra Rocket Out charge, which isn’t really relevant to us since we can still close the gap with either Phantom Stride or Force Speed.
Arsenal
This is the burst spec between the two and it’s also one of the easier specs to counter with Line of Sight. A lot of their moves are telegraphed and have pretty long travel times. Between Blazing Bolts, Heatseeker missile and Tracer missile, it’s pretty easy to see the ability coming at you and either LoS it or Shroud it.
Innovative Ordnance
This spec isn’t seen very often but they do have a respectable amount of damage up their sleeve. When you see the thermal detonator attached to you, be sure to shroud it. Additionally, I like to wait until they apply their DoTs before cleansing so that they waste a couple GCDs and then need to reapply their DoTs.
Powertech
This class is hands down one of the scariest this expansion. The amount of damage they can do with their meteor brawler set can go into the 100ks. They also got a new ability which allows them to do more damage the more they are tunneled. But most importantly, when you see them pop explosive fuel and get a buff on their bar that looks like this ![]() you need to be prepared for a 100k AoE ability to come your way, in the form of their set bonus called Meteor Brawler.
you need to be prepared for a 100k AoE ability to come your way, in the form of their set bonus called Meteor Brawler.
Pyro
Meteor Brawler, Meteor Brawler, METEOR BRAWLER. I cannot state this enough. Combined with Pyros DoTs, AoE carbonize which goes through our shroud (a bug perhaps?) and the ability to grapple us back in when our shroud is down, Pyro PT is one of the scariest melee dps around and should their damage should be respected. You will know when they are priming their meteor brawler set when they pop explosive fuel. They can preemptively use their meteor brawler effect by right clicking off the Explosive Fuel buff as well, so any time you see the Explosive Fuel symbol, it’s best to just kite around and get out of the area for awhile while dealing damage from afar.
AP
This expansion, AP is a bit weaker than Pyro. It still has pretty good burst but the sustained DPS is much lower than that of Pyro, which is capable of putting up numbers upwards of 20k DPS. AP still has access to meteor brawler though, so the same advice as above applies, you see Explosive Fuel, you get outta there.
Assassin
What better way to understand your class than to understand how to turn your class’s strengths against them? Similar to Operatives, Assassins are able to cleanse your DoTs. Whenever you see ![]() on their buff bar, it means that you should hold out on using any Force abilities, because they will all be resisted. I will quite often target the enemy Assassin as my kill target and simply wait in stealth until they pop their Force Shroud and then wait out the duration of it. The reason this is a viable strategy is because most Assassins will use this ability as their first line of defence simply because it has such a short cooldown (60 seconds) and thus will be available again in a short time period. Make sure to reapply your DoTs after you see that buff so that you can begin ramping your damage up again.
on their buff bar, it means that you should hold out on using any Force abilities, because they will all be resisted. I will quite often target the enemy Assassin as my kill target and simply wait in stealth until they pop their Force Shroud and then wait out the duration of it. The reason this is a viable strategy is because most Assassins will use this ability as their first line of defence simply because it has such a short cooldown (60 seconds) and thus will be available again in a short time period. Make sure to reapply your DoTs after you see that buff so that you can begin ramping your damage up again.
Hatred
There’s not much to say here. You are a Hatred Assassin, so naturally, you know your own weaknesses. This spec is susceptible to burst damage and has a hard time recovering from burst, so try to line up your Recklessness cooldown with your Death Field, Spike, and Eradicate abilities. Swap to melee damage after they pop Force Shroud, and then back to force abilities when you see ![]() , which indicates they’ve used Deflection.
, which indicates they’ve used Deflection.
Deception
As we’ve just mentioned, Hatred is susceptible to burst damage. Well, as luck would have it, Deception has some of the best burst damage available in the game at the moment. If you see that your opponent has stacks of a blue buff which looks like this ![]() , then you need to be aware that you are about to get hit for roughly 60k damage multiple times in a row, equal to how many stacks they have. That means that you should save your Deflection if possible to cause them to miss. If they miss, it does NOT consume the buff, but it does buy you time for your damage mitigation cooldowns to become available, such as Force Speed, your Warzone Adrenal, or your Mass Mind Control.
, then you need to be aware that you are about to get hit for roughly 60k damage multiple times in a row, equal to how many stacks they have. That means that you should save your Deflection if possible to cause them to miss. If they miss, it does NOT consume the buff, but it does buy you time for your damage mitigation cooldowns to become available, such as Force Speed, your Warzone Adrenal, or your Mass Mind Control.
Socrecer
Madness
This is similar to fighting a Hatred Assassin, except a bit easier. They lack cooldowns such as Shroud or Deflection and cannot vanish with Force Cloak. They can use Phase walk, but it’s really easy to make an educated guess on where they went to, just take a look at the maps section to have an idea of where they might have set up their Phase Walk. They do have a rotational root on their Creeping Terror, but it’s nothing that your Phasing Phantasm can’t break.
Lightning
This spec is pretty difficult. Not only do they get a crazy amount of damage reduction rotationally, but they also have a deceptive amount of burst damage as well as a crazy amount of AoE damage, which is important to note, because this AoE can pull you out of stealth if you are too close to your teammates. Make sure that you’re spread out when you decide to open up on a Lightning Sorc and keep your Force Shroud available for the incoming Thundering Blasts. If they are using the Stormwatch tactical, it will deal damage to you whenever their Crushing Darkness ticks, so be sure to cleanse that DoT as well.
Sniper
Probably one of the most finicky classes to take down, purely based on the current terrain you are fighting on, Sniper boasts a ton of extremely powerful burst damage that is almost impossible to mitigate as an Assassin, let alone as Hatred. Our only real DCD against them is Deflection, so our best bet to take down a sniper is Line of Sight. Our second strongest actual ability that we can use against a sniper is our Force Cloak. This is because it allows us to reset the fight and engage on our own terms. This is important because of Sniper’s Entrench ability. Any time you see this purple buff on their bar ![]() then you should wait out its duration while in stealth. Stealth is our best tool here, because as long as that buff is up, we cannot stun them or control them in any way.
then you should wait out its duration while in stealth. Stealth is our best tool here, because as long as that buff is up, we cannot stun them or control them in any way.
Marksmanship
While there aren’t any passive abilities to be on the look-out for with this spec, there are some offensive ones that are problematic. Simply put, Ambush is the ability that we want to avoid here. There are multiple ways for them to instant cast this ability, but for the times when they can’t, make sure that you are cancelling the ability by using Line of Sight.
Engineering
The most annoying part of engineering is the large pulsing fire AoE effect that they can put on areas at will. This is annoying because they can throw an interrogation probe on you and then detonate their EMP to stun you, as long as you are in that AoE fire effect. Make sure to Shroud when going through a choke point to reach the sniper because it’s very likely that they will get their stun off and then displace you using one of their many knockback abilities.
Virulence
This spec isn’t nearly as dangerous as the other two. We can cleanse their DoTs and the spec lacks the burst of the other two specs. Cleanse the DoTs with your regular Shroud as well as your Force Cloak Shrouds and you will be golden.
Operative
One of the hardest classes to counter, Operative boasts some of the strongest sustained damage in the game, along with the strongest DCD in the game in the form of Exfiltrate. Between all Operative specs, seeing this buff: ![]() means that you will need to reapply your DoTs, as they have self-cleansed them. Operatives ability to cleanse our DoTs with their Evasion is one of the few reasons they are extremely strong against Hatred Sins. Below, I will list a more detailed look at what makes each of the specs strong against our class.
means that you will need to reapply your DoTs, as they have self-cleansed them. Operatives ability to cleanse our DoTs with their Evasion is one of the few reasons they are extremely strong against Hatred Sins. Below, I will list a more detailed look at what makes each of the specs strong against our class.
Concealment
Aside from being able to cleanse our DoTs, concealment also gets 100% resist/dodge chance when using their Exfiltrate ability. This means that every 6-8 seconds, they are capable of mitigating 100% of the offensive abilities that we throw at them, whether that be crowd control or damaging abilities. Additionally, concealment has extremely potent burst. If at any point you see this ![]() icon on your debuff bar, it’s time to pop Force Shroud, because you’re about to take roughly 100k damage in the next 3-4 GCDs.
icon on your debuff bar, it’s time to pop Force Shroud, because you’re about to take roughly 100k damage in the next 3-4 GCDs.
Lethality
Lethality is much less potent than its concealment counterpart, however it is still capable of cleansing off our DoTs while also having access to some instant cast Kolto Infusions, which will also ensure that the enemy team remains healthy. Unlike Concealment, however, they do not have a 100% resist roll, their roll is only viable against Melee and Ranged damage, so your Electrocute and other Force based abilities will still work on them.
Marauder
Marauders are probably one of the most resilient melee DPS that exist in today’s meta. Of all of their tricks, the primary icon that we want to pay attention to between all marauder specs is this one ![]() , as it means they take 99% reduced damage for 4-6 seconds, depending on their talents. Below, I will detail some of the more specific buffs or debuffs you may encounter, depending on the marauder’s spec.
, as it means they take 99% reduced damage for 4-6 seconds, depending on their talents. Below, I will detail some of the more specific buffs or debuffs you may encounter, depending on the marauder’s spec.
Fury
The primary buff that we care about avoiding against a Fury marauder is this one: ![]() . You will see this buff once every 30 seconds and it is acquired when they use Force Crush on you. You’ll know that they’ve used Force Crush because your character will get progressively slower until you are practically moving at a crawling pace (95% movespeed reduction). When this occurs, check your enemy’s ability bar for this buff. While this buff is active (6 second duration) the marauder is completely immune to any crowd controlling effects. This is extremely important information to know, because Fury marauders can hit like a truck and feel like an unstoppable wrecking ball of damage if you don’t understand what’s happening. As long as you are keeping track of their Gravity Vortex buff (the purple buff that’s seen above) you will have a much better understanding of when you can apply crowd control to keep the marauder in check.
. You will see this buff once every 30 seconds and it is acquired when they use Force Crush on you. You’ll know that they’ve used Force Crush because your character will get progressively slower until you are practically moving at a crawling pace (95% movespeed reduction). When this occurs, check your enemy’s ability bar for this buff. While this buff is active (6 second duration) the marauder is completely immune to any crowd controlling effects. This is extremely important information to know, because Fury marauders can hit like a truck and feel like an unstoppable wrecking ball of damage if you don’t understand what’s happening. As long as you are keeping track of their Gravity Vortex buff (the purple buff that’s seen above) you will have a much better understanding of when you can apply crowd control to keep the marauder in check.
Annihilation
Aside from the typical marauder DCDs that we care about paying attention to, the main passive that we would like to pay attention to against Annihilation is ![]() . These are stacks of a buff called Annihilator. These stacks will reduce the cooldown of their primary bread and butter ability, Annihilate. The more stacks they have, the more it’s cooldown is reduced. This is important to know, because when the marauder starts out, they will have only a couple stacks of this buff, meaning their capabilities of bursting you down are pretty low. However, as they obtain more stacks, their burst windows will become more frequent, so it’s important to note how many stacks they have, in addition to paying attention to the usual DCDs that I’ve listed above. Overall, Annihilation marauder isn’t as threatening as the other marauder specs, but you must still respect their damage, as it’s easy to fall victim to their DoTs and burst damage when becoming too cocky.
. These are stacks of a buff called Annihilator. These stacks will reduce the cooldown of their primary bread and butter ability, Annihilate. The more stacks they have, the more it’s cooldown is reduced. This is important to know, because when the marauder starts out, they will have only a couple stacks of this buff, meaning their capabilities of bursting you down are pretty low. However, as they obtain more stacks, their burst windows will become more frequent, so it’s important to note how many stacks they have, in addition to paying attention to the usual DCDs that I’ve listed above. Overall, Annihilation marauder isn’t as threatening as the other marauder specs, but you must still respect their damage, as it’s easy to fall victim to their DoTs and burst damage when becoming too cocky.
Carnage
Probably one of the scariest specs, Carnage boasts of extremely impressive burst windows called Ferocity windows. Ferocity looks like this: ![]() and can be used every 12-ish seconds. When you see this buff, the marauder will have 100% armor penetration on some of their abilities. This means you’re gonna get hit like a truck, so either run away and LoS, or keep them controlled via roots, stuns, and lifts. One of the abilities that they will hit you with is called Gore, and this ability will apply the Hindered debuff, as seen here:
and can be used every 12-ish seconds. When you see this buff, the marauder will have 100% armor penetration on some of their abilities. This means you’re gonna get hit like a truck, so either run away and LoS, or keep them controlled via roots, stuns, and lifts. One of the abilities that they will hit you with is called Gore, and this ability will apply the Hindered debuff, as seen here: ![]() on your debuff bar. If you see this debuff, it means that you are unable to use Force Speed or, more importantly, Force Cloak, for 1.5 seconds. This is the exact same debuff that Mercs can apply to you with their Electro-net ability. So not only can Carnage marauders burst you down with 100% armor penetration, they can also hinder you from using Force Cloak. A deadly combination. Pay close attention to these buffs/debuffs, and react accordingly (LoS, Crowd Control, etc).
on your debuff bar. If you see this debuff, it means that you are unable to use Force Speed or, more importantly, Force Cloak, for 1.5 seconds. This is the exact same debuff that Mercs can apply to you with their Electro-net ability. So not only can Carnage marauders burst you down with 100% armor penetration, they can also hinder you from using Force Cloak. A deadly combination. Pay close attention to these buffs/debuffs, and react accordingly (LoS, Crowd Control, etc).
Juggernaut
Juggernauts are one of the easiest classes to fight as a Hatred sin. Despite their plethora of DCDs, they die fairly quickly. Take note that once they pop Enraged Defence, you will see this buff icon: ![]() , however there is very little you can do to counter it since your DoTs will inevitably heal them to full. This is fine though, as your damage output should outscale their defensive capabilities. Below is a more detailed look at what the various Juggernaut specs are capable of.
, however there is very little you can do to counter it since your DoTs will inevitably heal them to full. This is fine though, as your damage output should outscale their defensive capabilities. Below is a more detailed look at what the various Juggernaut specs are capable of.
Vengeance
The biggest thing to play around when facing a Veng Jugg is the Brawn buff, which looks like this: ![]() . Here is a more in-depth look at the buff:
. Here is a more in-depth look at the buff:

If you see this buff on the enemy Juggernauts buff bar, it means they cannot be stunned or otherwise crowd controlled for 4 seconds. This means that you won’t be able to use your Electrocute or grenades on them. This is an important buff to take note of and you will see the visual cue for this ability when you see this shield go up around the Juggernaut:
Save all of your CC for after this ability wears off. Juggernauts are otherwise pretty easy to kill, even with their plethora of DCDs.
Rage
The buff that we care about avoiding here is this one: ![]() . When you see this buff on the enemy’s bar, you know that their next Furious Strike (white damage) or Raging Burst (yellow damage) will be an auto-crit. They obtain this buff by using either of their leap abilities (Force Charge or Obliterate). This means that once a jugg leaps to you, it’s probably in your best interest to Force Speed and use a Warzone Adrenal to start mitigating damage, otherwise you’re going to want to prepare your Force Shroud or Deflection to hopefully avoid the incoming auto-crit damage.
. When you see this buff on the enemy’s bar, you know that their next Furious Strike (white damage) or Raging Burst (yellow damage) will be an auto-crit. They obtain this buff by using either of their leap abilities (Force Charge or Obliterate). This means that once a jugg leaps to you, it’s probably in your best interest to Force Speed and use a Warzone Adrenal to start mitigating damage, otherwise you’re going to want to prepare your Force Shroud or Deflection to hopefully avoid the incoming auto-crit damage.
ADVANCED RESOLVE MECHANICS
The final section I want to discuss is resolve. Many people refer to this as your “white bar”. The way that resolve works is actually quite simple. It starts at an empty bar and goes up to 1,000. After obtaining 1,000 units of resolve, your character becomes immune to all Sleep, lift, stun and otherwise incapacitating effects. Attempting to crowd control a player who has a full resolve bar will result in a “resist” and the crowd control will be converted to a 50% slow. A hard stun will contribute 200 units of resolve for every 1 second of crowd control, while a mez or “soft stun” will contribute 100 units of resolve for every 1 second of crowd control.
For clarification, a hard stun is a type of crowd control that does not break upon the target taking damage. A mez, or soft stun is a type of crowd control that does break on damage. It’s important to note that when factoring in resolve, a mez will always apply its full amount of resolve to a player, even if they don’t actually sit through the full duration of the crowd control. For example, Whirlwind is an 8 second mez (cc that breaks on damage). The target will receive 800 units of resolve, even if you damage them 1 second into the mez and break the crowd control effect. For this reason, you always want to utilize your hard stuns before you use your mez effects, to get the most out of the enemy’s resolve bar.
After you apply enough CC to give the enemy a full bar of resolve (white bar), they will be immune from CC until the resolve runs out. The duration of the white bar resolve is always equal to the total amount of units over 1,000, divided by 100. For example, if I get whirlwinded twice in a row, I will have 1,600 resolve. 1,600 divided by 100 equals 16. This means I’ll be white barred for 16 seconds and have a total of 16 seconds of cc immunity.
It’s important to understand how Crowd Control abilities work, as this knowledge will give you a good idea of how potent it will be for you to sit through a certain amount of CC, while also giving you a good idea of how much CC you can throw out towards your enemies to maximize your kill potential on any given enemy.
CONCLUSIONS
About the Author
I hope that my guide was of use to you all. If you have any questions, feel free to ask! You can find me on Youtube at Krea Gaming or on twitter @KreaGaming. Additionally, you can reach out to me with your questions on discord, Krea#5985. Thanks for reading friends and good luck on the battlefield!
From Vulkk
I would like to thank Kre’a for writing this in-depth Hatred Assassin PvP guide for SWTOR 6.0 expansion Onslaught. Whether you are a new player, returning veteran or someone who seeks to improve their skills and gameplay, I believe and hope this article has been of great help to you!
If you are skilled with a Class and Discipline that has not yet been covered with a guide on VULKK (check the list here), and you want to provide one for the SWTOR Community, contact me via email or wherever you see Vulkk present.
Related content:
- SWTOR 6.0 Class Guides List
- SWTOR 6.0 Serenity PvP Guide by Kre’a
- SWTOR 6.0 Deception Assassin PvP Guide by Kre’a
- SWTOR 6.0 Infiltration Shadow PvP Guide by Kre’a
- SWTOR 6.0 Deception Assassin PvP Guide by Zak
- SWTOR 6.0 Infiltration Shadow PvE Guide by Zak
- SWTOR 6.0 Hatred Assassin PvE Guide by Mebrithiel
- SWTOR 6.0 Serenity Shadow PvE Guide by Mebrithiel
How is the Class and Spec changing with SWTOR 7.0
In Update 7.0 BioWare is introducing a new term “Combat Styles”, which will replace the traditional class-specific disciplines. If you are curious and want to get a head-start, check out the SWTOR 7.0 Class Changes Previews available on the Public Test Server.
And if you are behind on the news, find out what the SWTOR Legacy of the Sith Expansion will have to offer.