This guide will show you how to complete the Feast of Prosperity missions while the event is running in SWTOR, what rewards you can get, all vendor items, and achievements (including the hidden ones).
Up to date for the October, 7th – November 4th, 2025 edition of the event!
Use the Table of Contents, located in the left panel (top left button on the mobile menu) to navigate through this long guide more easily and quickly.
What is the Feast of Prosperity
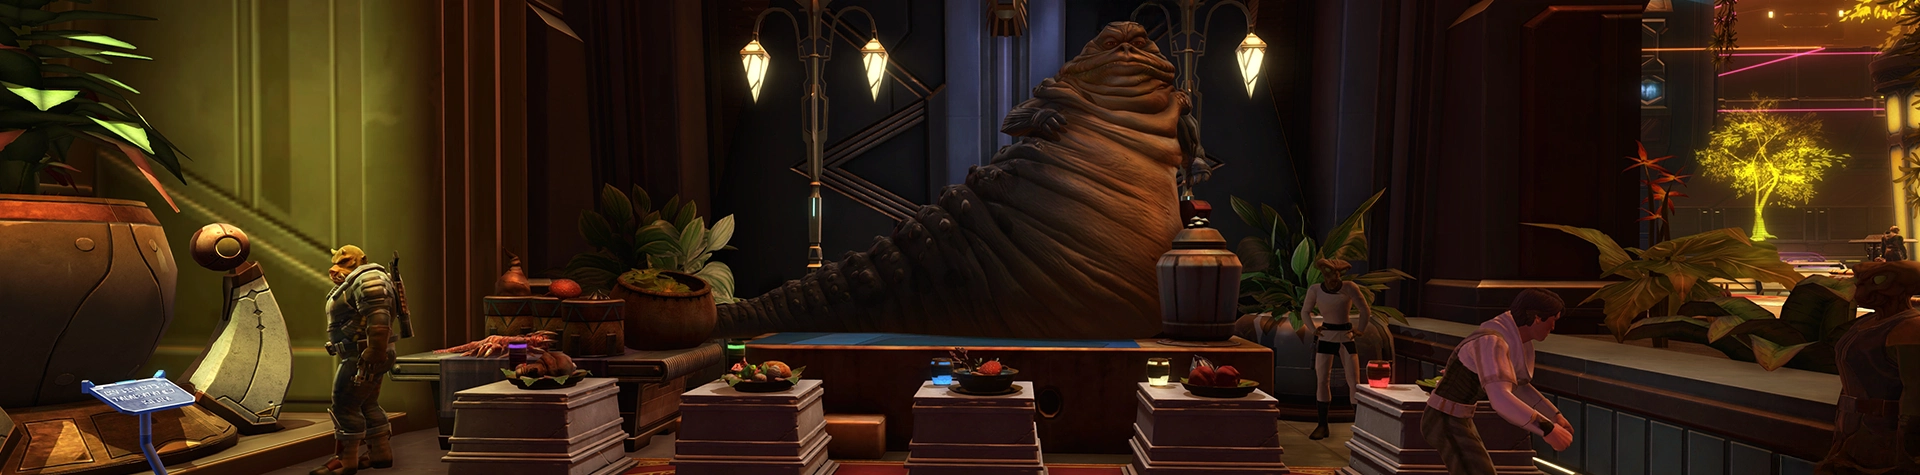
The Hutts have organized a charity feast for the “poor” people on Nar Shaddaa and are seeking to make this event as popular as possible across the whole galaxy.
Like the other seasonal events, the Feast of Prosperity is a departure from normal SWTOR gameplay. While it has some of the normal stuff like a couple of story quests written with KOTOR-style cutscenes and some traditional combat-oriented missions, there are several non-combat minigames as well.
There are a bunch of achievements, including a few hidden ones, and a ton of rewards you can buy with Prosperity Tokens, the event’s currency.
Each week a new story mission will unlock, allowing you to explore the secrets behind this feast. Even if you join the festivities later, you will be able to complete all story missions. The only requirement is that you do them while the event is active.
How to start the event
To start SWTOR’s Seasonal event Feast of Prosperity you need a level 20 or higher character. Find the Festival Crier NPC, located just outside the Bazaar on the Empire and Republic Fleets.

This will give you the starter mission, which will take you to Nar Shaddaa, where the actual event takes place. You will meet the two hosts and organizers of the feast – the hutts Gaboorga and Duuba.
There are Daily and Weekly Missions available as part of the event. Most are designed for solo players, while some will require a group to complete. In the next section of the guide I will explain each available mission in-depth.
Main Missions Walkthrough
Following the guide so far you have no doubt started the event by speaking to a Festival Crier NPC located on the Fleet. Each week a new event mission unlocks and allows you to follow through the story of the Feast and the secrets and schemes of the two hutts Gaboorga and Duuba.
Over the years, the Hutt Cartel’s reputation has taken a hit. The once powerful organization no longer instills respect and fear. To restore the Cartel’s influence, two up-and-coming Hutts, Gaboorga the Abundant and Duuba the Magnanimous, are throwing the most lavish “charitable banquet” in history for the galaxy’s underprivileged. And if the Cartel happens to advance their business interests during the Feast, everyone wins!
If Gaboorga and Duuba can cooperate, they could rocket the Cartel back into the upper echelons of the galactic underworld. But the Hutts’ conflicting priorities means they’re constantly undermining each other. Each week a new Story Mission will unlock to progress this storyline, leading to the climatic choice during the third and final week: Gaboorga or Duuba? Only one Hutt can win, and the fate of the Feast of Prosperity is at stake. Choose wisely!
Week 1 Story Mission Walkthrough
The very first mission is the introductory one called “The Feast of Prosperity“. Speaking to the Festival Crier you learn of this special Galactic Feast two Hutts are hosting.
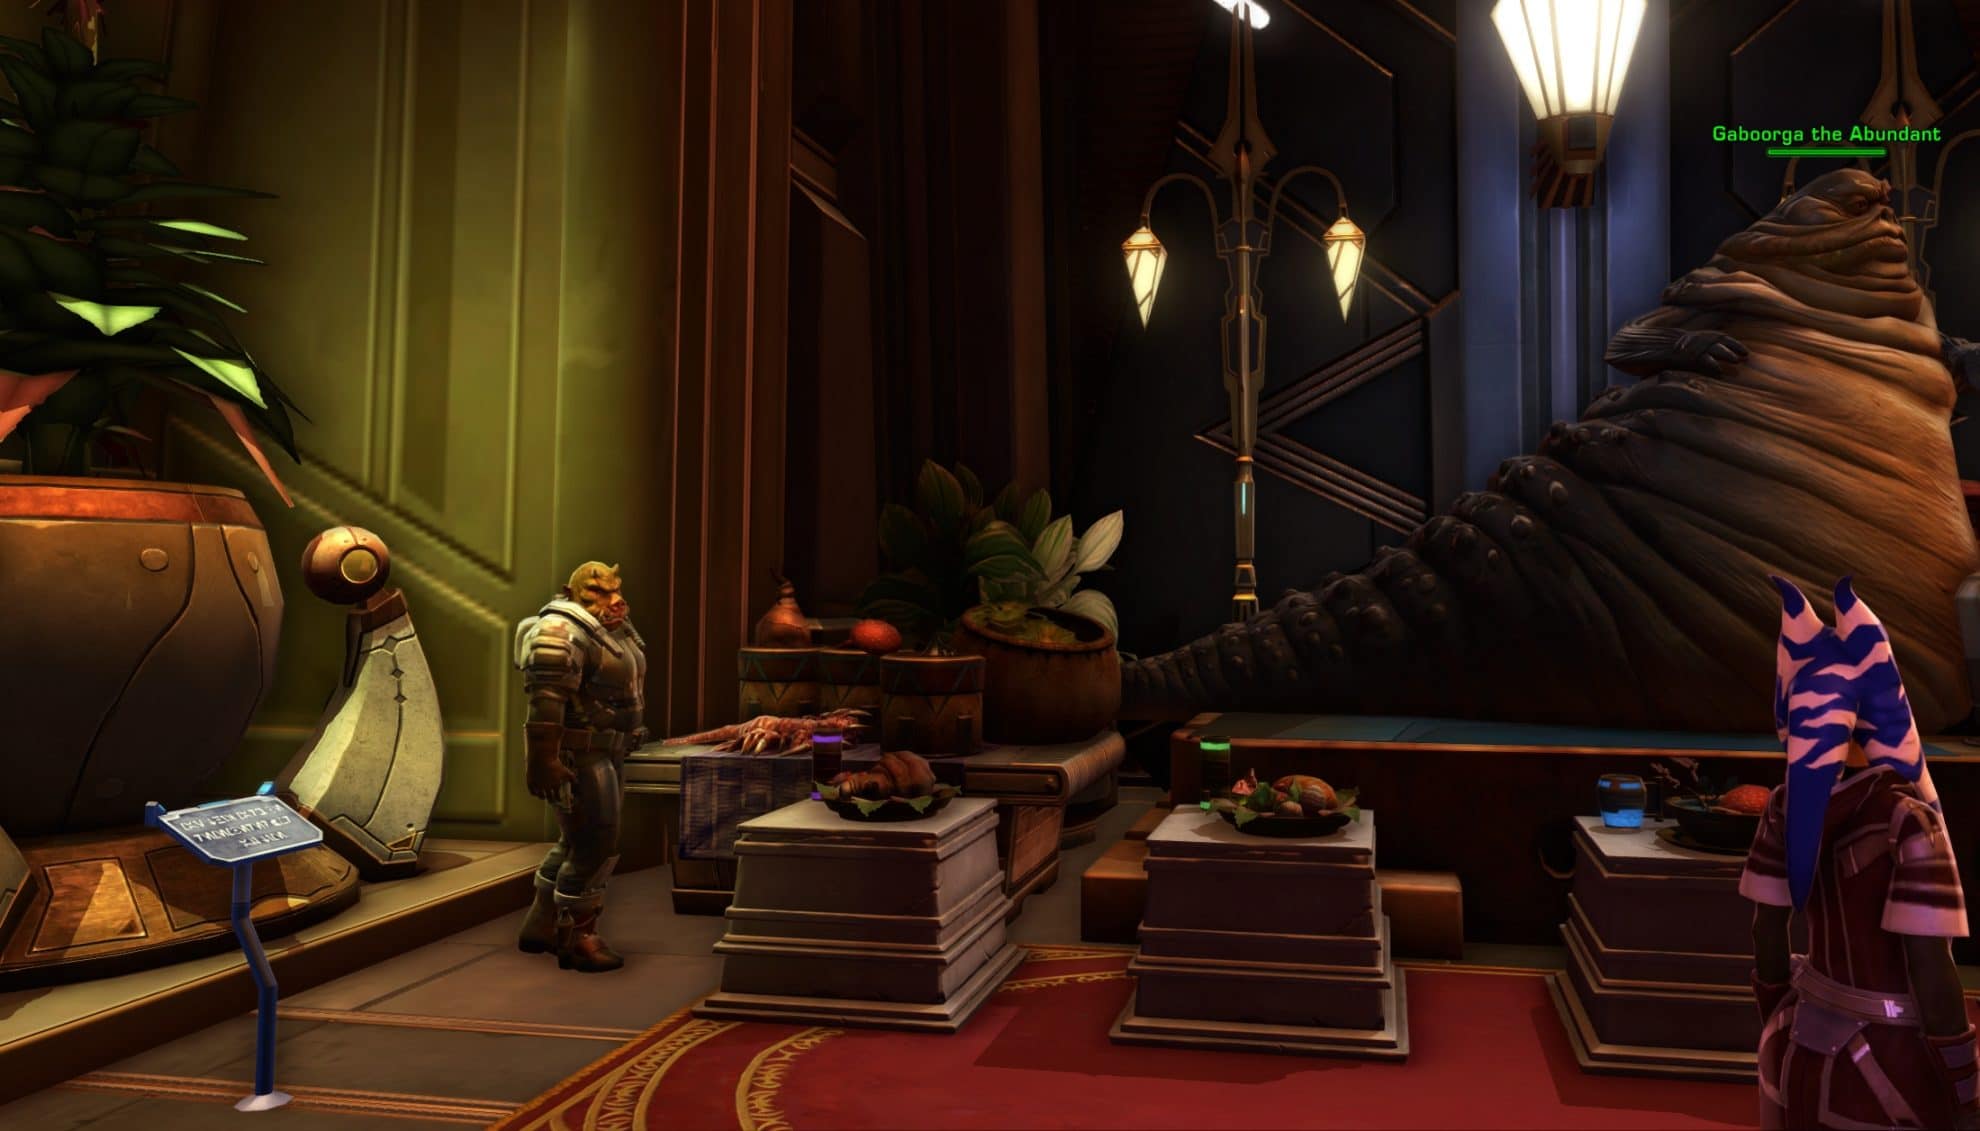
Gaboorga and Duuba are located on Nar Shaddaa and you have to talk to each one of them to learn a little bit of their intentions and perhaps a hint at their secret goals.
When you arrive to Nar Shaddaa, head to the Lucent Square Overlook in Upper Promenade, speak to Gaboorga the Abundant and Duuba the Magnanimous to let them introduce themselves to you, which will help you investigate the event on Nar Shaddaa.

I am telling you the story from the point of view of a suspicious Sith Empire member, to make things a bit more interesting. There are several different dialogue options during the conversation, but none others reveal any more interesting secrets or hints at what is to come next week(s).
Gaboorga is a little reluctant to speak to you, expressing how busy he is with his charity work. He yet agrees to indulge you for a moment and shares that it is his personal mission to secure donations for the Feast and to build relationships and foundations for a “long-lasting tradition”.
Gaboorga also informs you that with the help of his fellow Hutt Duuba and some up-front capital and growing network of donors they are organizing this feast across the galacy to help feed the less fortunate.
The Hutt Cartel is involved with this, Gaboorga admits. He slips up for a moment when he tells you that the Cartel should rightfully benefit from any recognition. Instead of “they” Gaboorga says “I should” and then quickly corrects himself. First clue that something is not right with this feast.
No matter how much you attempt to press him to drop the act, Gaboorga sticks to his story that he and his colleague Duuna do this with purest of intentions.

Your conversation with Duuba starts similarly as the hutt complains how much work he has to do and how busy he is with the charity event.
Duuba’s basic is quite rough, so he speaks short and to the point. His point, of course. When you ask him why are they doing this, he cited Gaboorga’s answer “to enrich the foundation of generosity established by the Feast of Prosperity by creating lasting, multy-beneficial donor-to-charity relationships”.
Duuba doesn’t hide that the Cartel is involved. He admits that for every Hutt sooner or later the Cartel gets involved in their activities, business and… lives. Duuba admits that things haven’t been good for the Hutt Cartel lately. It’s time for them to correct this, hence the Feast.
Duuba also spits a mini-secret telling you that he wishes that Gaboorga would pay more attention to the actual charity side of things. They both have similar goals still. Gaboorga is more involved with the political side of things, something Duuna is not a fan of, apparently. Gaboorga is the one that cares more about the donors and credits as well.
From the first conversation with the two Hutts you learn that Duuna is more passionate about the festivities and the charity and Gaboorga seems more interested in donors, relationships and personal profit. How will things turn out? We’ll find out next week!
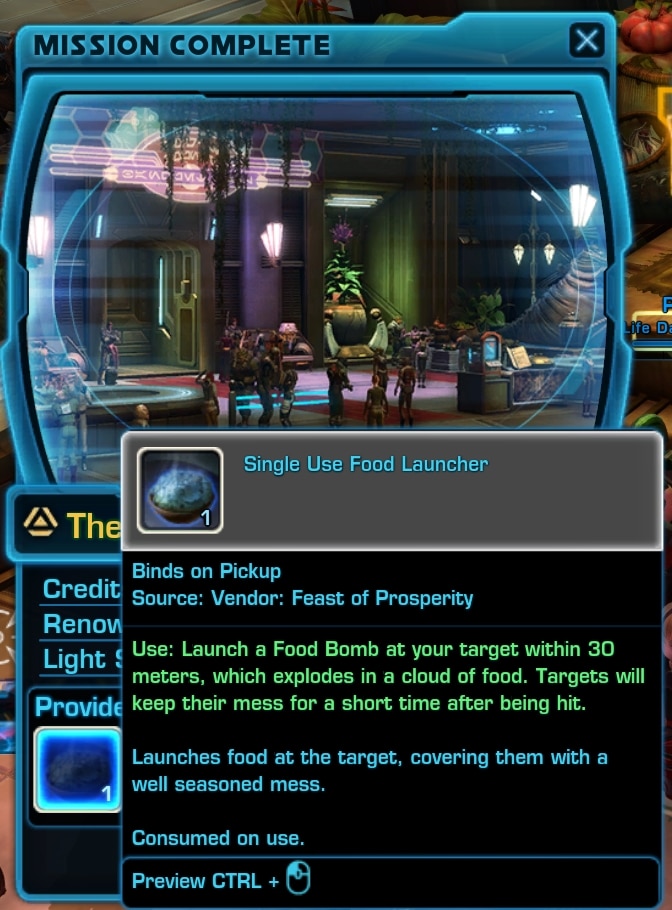
For completing “The Feast of Prosperity” mission you receive credits and a “Single Use Food Launcher”. This item launches a Food Bomb at your target within 30 meters, which explodes in a cloud of food. Targets will keep their mess for a short time after being hit. Hint: this item is involved in a secret achievement (more on that further down in this guide)
Talkint to Gaboorga again gives you a new mission “Sharing Our Bounty“. The hutt sends you to Rishi, where he ran into some trouble. Local ex-pirates refuse to allow the Hutts to establish a Feast on the planet.

After you travel to Rishi, you speak to Jek-Burz. You will find him in the Bootlegger’s Market. After the initial tough-guy act, he realizes that you are not a random guy (I choose to threaten him, one of several options at this point of the dialogue).

Jek-Burz agrees to allow the Feast of Rishi, but first he needs you to do something for him, of course. Defeat five Nova Blade members or go to the Blaster’s Path Cantina and steal some wine. Both missions take in Raider’s Cove. The Wine option is quicker if there are other players around.
After the mission you return to Jek-Burz. He is happy to hear that you are successful. Next, you head to north-western corner of Raider’s Cove Trade Post to speak to Navolii.
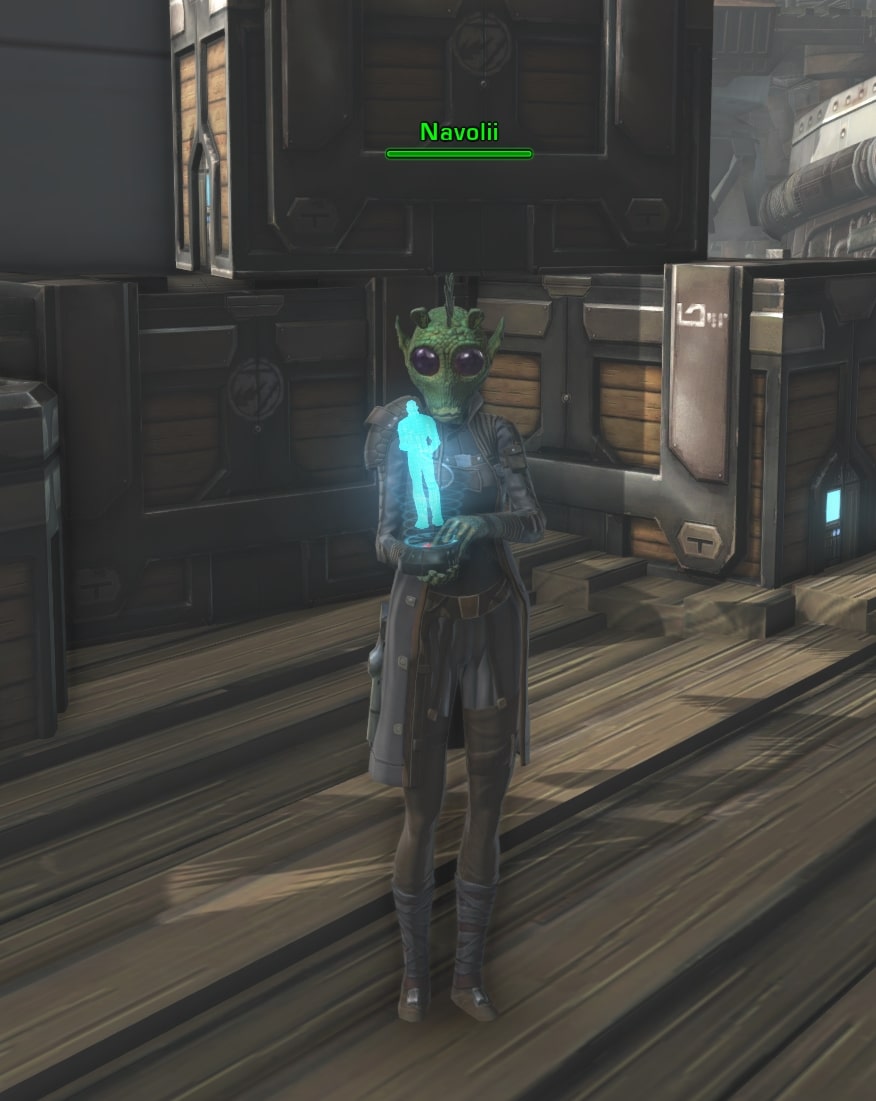
Navolii is not happy to hear why you are here either. She also refuses to listen to you at first. As expected, she also needs a favor from you. She asks you to help her examine three Water Mains on the ground floor beneath the city.

If you choose to threaten her, the mission will be complete right away as she is not the fighter type and bends to your will.

In case you decide to go do what she wants, the locations of your objectives are marked on your map and all three are in the southern area of the Raider’s Cove Slums. All you have to do is stand in front of the columns and wait for them to “respawn”, then click on the flashing blue pipe.
Navolii is pleased with the results, no matter if you tell the truth or lie about Nova Blades being involved. After the conversation you receive a personal holocom call from Gaboorga. The Hutt is very happy that you have helped him make progress and establish the Feast of Rishi event.
Gaboorga asks you to find a rare Orobird next. You travel to the Horizon Island and head south, where the location marker is placed on your map.

When you arrive at the location, you meet a naturalists Selonian (Cheyl), who convinces you (in this specific case, for the story, it’s your choice to listen or hunt the bird) to protect the rare Orobird.

If you choose to listen to the Selonian, you return with a look-alike meat. There is an option to deliver the original meat as well. If you choose option 3, Orobirds (champion NPCs) are nearby and they will drop the item for you.
Gaboorga is pleased you managed to allow the Feast of Rishi to happen and half-ignores the fact that you returned empty-handed without the Orobird spleen he asked of you.
In this conversation Gaboorga openly admits he is unhappy with Duuba’s accusations that his partner attempts to fill up his own pockets from this event.
This ends the mission and brings you the reward from it, which includes Credits, XP and 1000 Prosperity Tokens.
This is all that is available for the first week of the event when it comes to the Main Storyline of Feast of Prosperity. Now, it’s time for you to do some Dailies and Weeklies. Guides for all of them are available further below in this guide!
Week 2 Story Mission Walkthrough
The Week 2 storyline of Feast of Prosperity opens up with a mission from Duuba the Magnanimous this time around. He welcomes you back and expresses his gratitude for your participation in the festivities so far.

Duuba, of course, has a favor he needs you to do for him. He is not overly fond of the chef Gaboorga hired and wants to bring one of his own choosing – Nuura Yendo. Apparently she went dark on Mek-Sha some time ago. Duuba also wants you to “help” Gaboorga with some deliveries to Mek-Sha – “two hits with one stone” kind of situation.
You accept the mission and travel to Mek-Sha. What would a “well-known for their charity chef be doing in such a shady place”? Let’s find out!
The mission Duuba gives you is called “A Dash of Kindness“. When you arrive to Mek-Sha, you travel to Slugfall Harbor.
In the north-eastern corner of the platform, you find a Rodian named Line Cook and talk to him. As expected, Line is not very talkative. Your options are to threaten him or to “play it nice”.

You threaten him (for the sake of this story) and Line reveals what he knows. Nuura was on Mek-Sha, taking it slow and careful. But one day a bunch of mercs appeared and took her. It seems they were planning to sell her off to the Brothers to get their money. The Rodian gives you directions to head to the Red Zone and you are off on your way.
Next you travel to The Red Zone district to search for The Brothers gang. You get to the marked location, pull out your microbinoculars and find nothing. Off to the next location. At the second location you encounter an ambush by a few of The Brothers members. The third location you visit is in the Scrap Pit. The fourth is to the east, out of the pit. Nuuna is here, finally.

She isn’t exactly very thankful that you rescued her at first. In the second conversation she does thank you and you talk about the Feast of Prosperity and how Duuba sent you for her.
Nuuna reveals to you that she had some gambling troubles, but this is all behind her now, she promises. She agrees to go to Nar Shaddaa and help.
Duuba calls you to thank you for rescuing Nuuna and reminds you that your next job is to deliver the “bribes” to Duuba’s targeted people on Mek-Sha.
The first package is in Slugfall Harbor, inside the Cantina – a twi-lek dancer girl. Next stop – Three Point – the delivery is to a Hopeful Petitioner, who represents the Home for Lost Children organization on Mek-Sha. The final delivery is for a Despondend Worker, who lost his job after an accident in the plasteel factory.
After you deliver Gaboorga’s bribes to these poor folks Duuba told you about instead of the influential people Gaboorga originally planned to send them to, you return to Duuba on Nar Shaddaa for a chat. Duuba admits that he has started doubting Gaboorga’s honesty in all of this “charity” stuff. HE thinks that his partner is making personal benefits on the back of the charity event.
In the final conversation with Duuba you have a chance to show whose actions you support, but this isn’t yet the real choice that will determine the Achievements you earn at the end of the story.
The mission is rather short, but it reveals that there are real and big issues between the two Hutts hosting the Feast of Prosperity! Things should be fully revealed in the third week of the event.
Week 3 Story Mission Walkthrough
In the final week of the Feast of Prosperity the third main quest is revealed and you can impact directly the fate of the feast.
Duuba made an interesting decision to finally come out and say things to Gaboorga openly and plainly. Duuba is not happy with the shady and sleaze methods his partner is using and thus undermining his efforts to offer a pure and real charity event for those in need.
Speaking to Duuba you learn that he actually challenged Gaboorga to a… cooking duel. And he wants your help, of course! This duel is organized as part of the event, so the world would not know that the two hutts are competing for the leadership. Whoever wins this cooking match, will be the one making all important decisions about the event.
After you speak to Duuba and hear his side of the conflict, you tell him to give you a moment to think and go to speak with Gaboorga to see what he will offer.
Gaboorga, of course, acts as if he is completely innocent of Duuba’s accusations. This is nothing more than a “baseless slander” as he calls it. Gaboorga, as can be expected, also asks for your assistance to secure the win for himself.
This is the point where you have to decide whose side will you take. This choice is related to the event’s achievements (listed at the end of this guide).
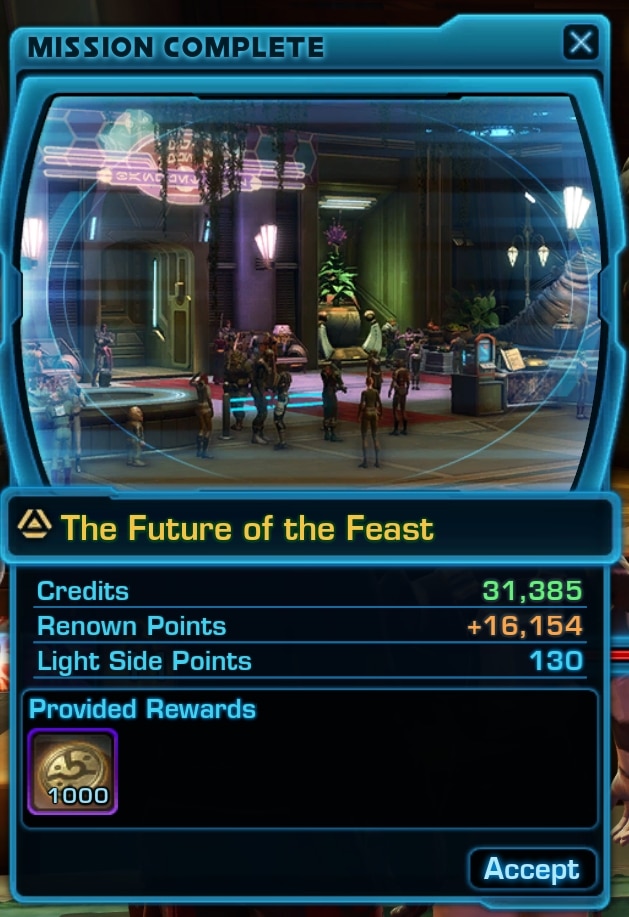
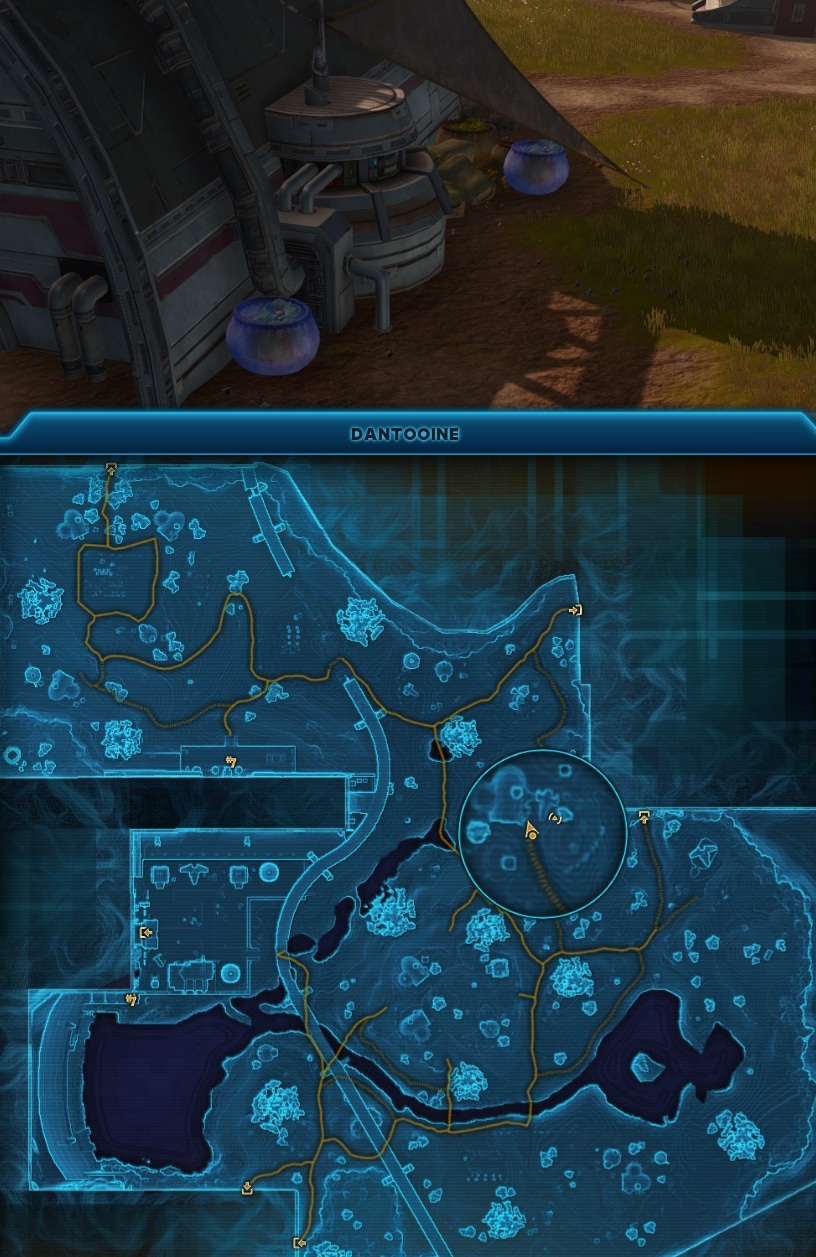
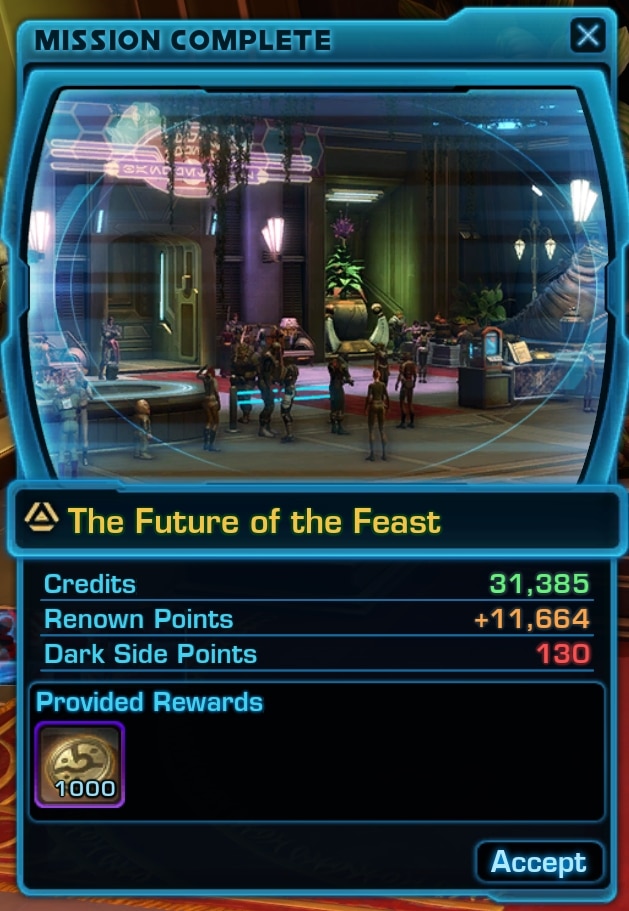
Siding with Duuba starts off a new quest for you “The Future of the Feast“. You have to find three Recipe Datacrons for his chef Nuura – one on Voss, one on Onderon and one on Dantooine.
Time to travel! Note that if you click on the planet symbol to teleport yourself, it will bring you to Voss, then once Voss is one, to Onderon and finally to Dantooine. You don’t need to travel manually.
The Voss Recipe Datacron is inside the Voss-Ka Judicial Quarter Cantina. Go to the back side of the bar to find the Datacron sitting on the right side on a shelf.

The Onderon Recipe Datacron is located a little to the north from the Crashed Ship.
The third and final Recipe Datacron is on Dantooine. It’s sitting on a table inside one of the little buildings (the one to the south) in the very middle of the map.
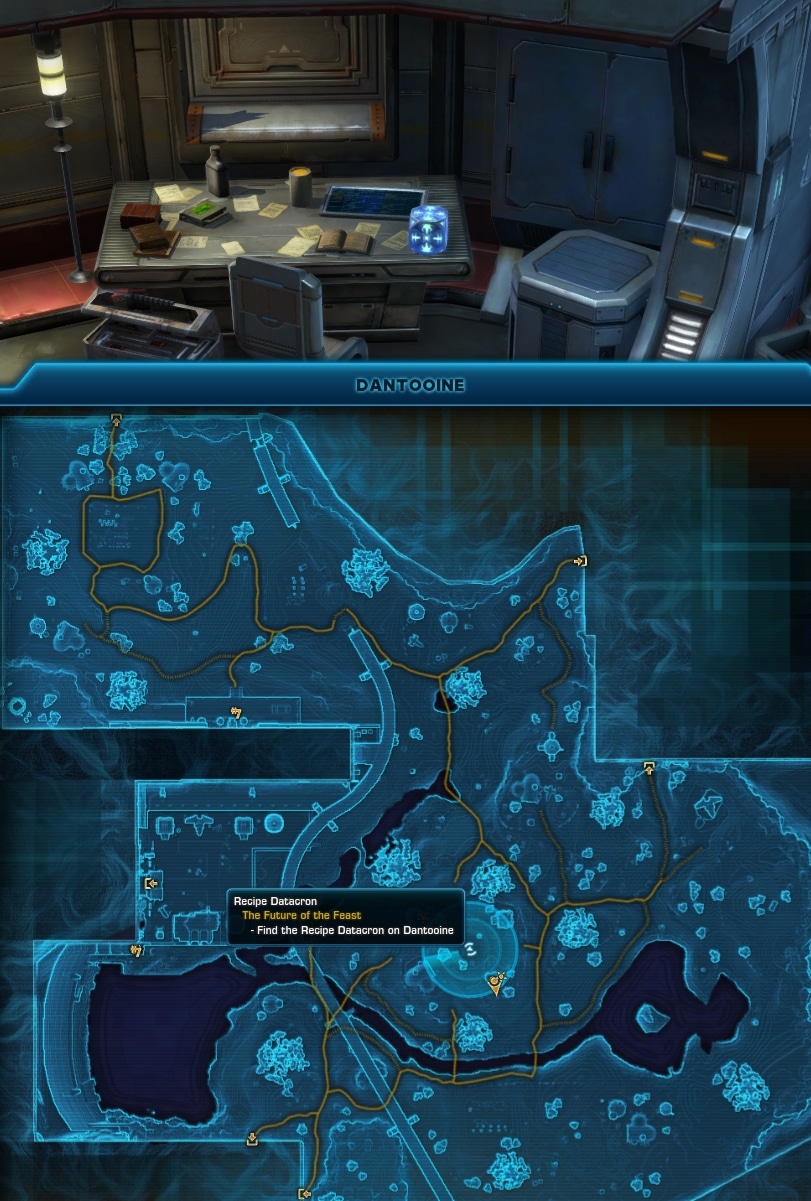
As soon as you pick the last Datacron, your holocomm rings. Duuba thanks you for your help and confirms that the datacrons’ information is uploaded and Nuura is happy too.
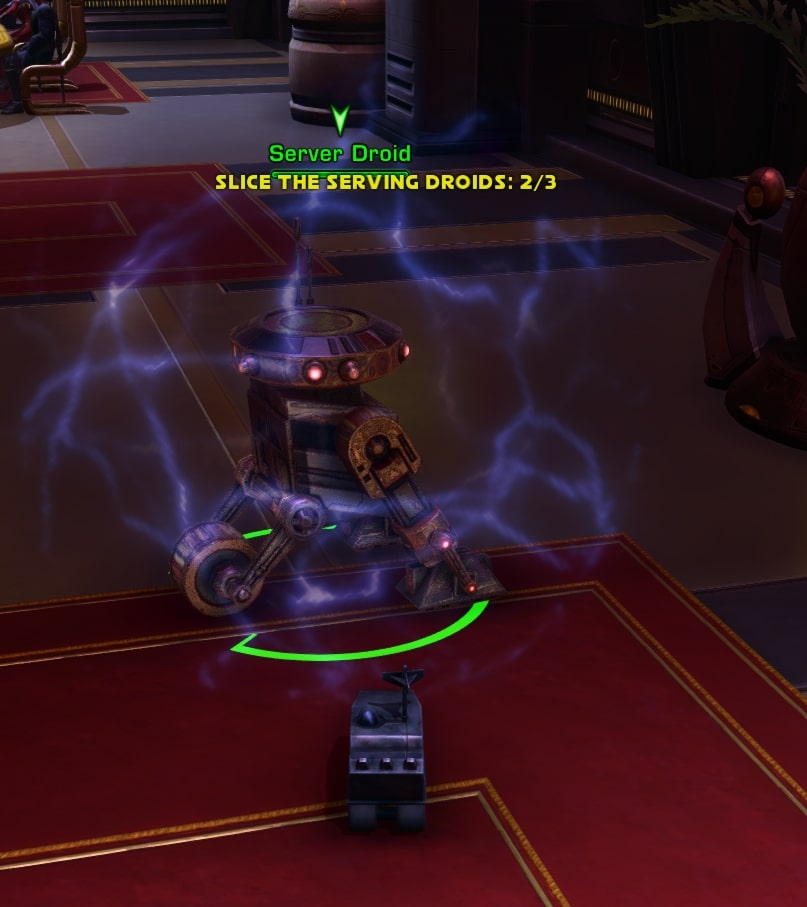
Back on Nar Shaddaa you are on monitor duty. During the match Duuba believes that his partner will try to sabotage him one way or another. Your job is to use a little mouse droid and prevent that from happening.
Inside the cantina there are three malfunctioning serving droids. Use the first ability of your mouse droid to fix them. Then enter the Kitchen for the next stage of the mission.
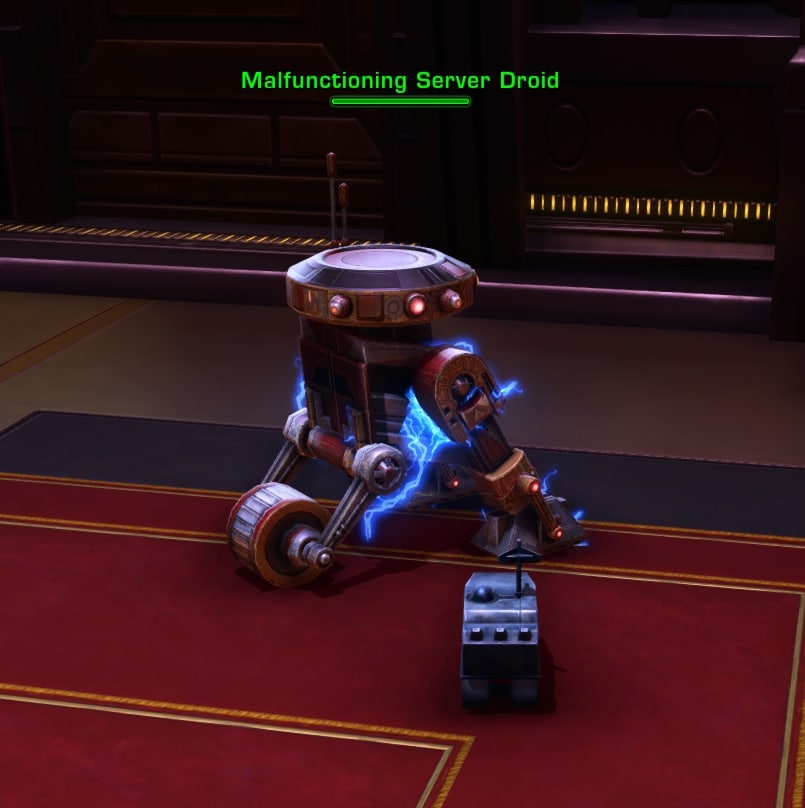
Your task in the kitchen is to repair the three broken parts of the kitchen equipment – supplies storage, stove and freezer. Move next to them and right-click to fix them. Then leave the kitchen through the vent next to the entrance door.

Duuba is happy that you helped him prevent Gaboorga’s sabotage plan. Next, speak to the Head Judge, who is nearby.

Thanks to your support Duuba and his chef Nuura win the competition. Nuura prepared dish inspired by her childhood while Gaboorga’s chef relied on rare and expensive ingredients, but they didn’t have you on their side…
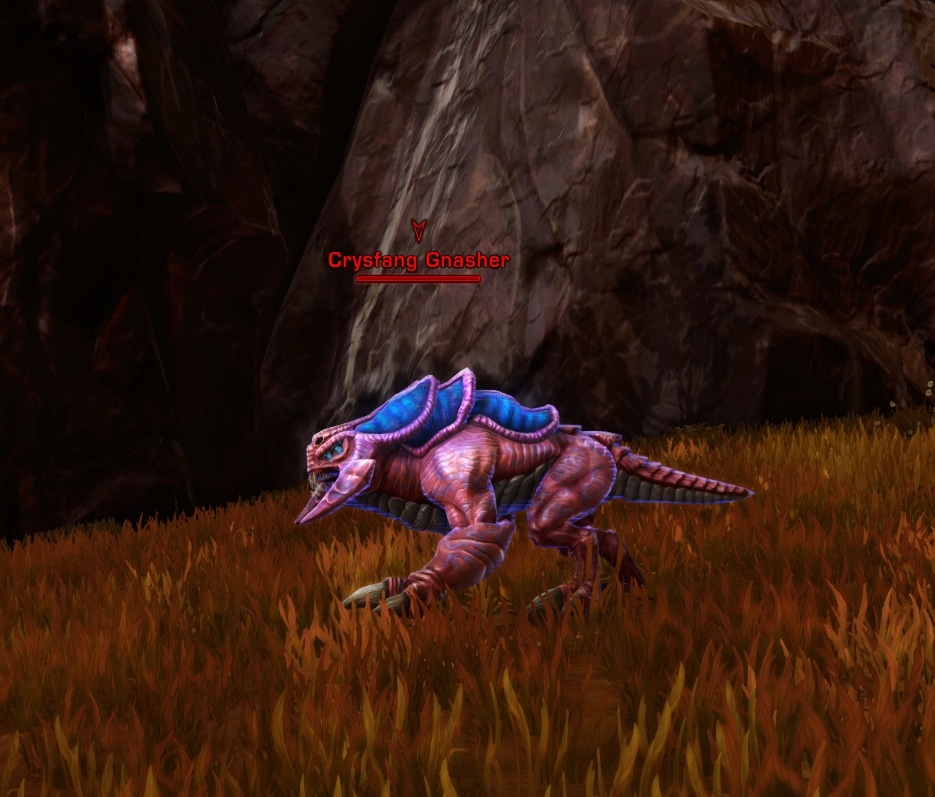
If you side with Gaboorga, you receive an alternative mission under the same name “The Future of the Feast“. The objective this time is to retrieve a number of exotic ingredients from the same three planets – Voss, Onderon and Dantooine.
First you travel to Voss. In the Nightmare Lands, defeat Crysfang monsters to loot the three Crysfang Chromatophore Plates. You do not need to go all the way to the south, where the map marker is placed.
Next up – Onderon. In the north-western end of the map, in the Lake Encampments area you’ll find the three Orlax Heaters.

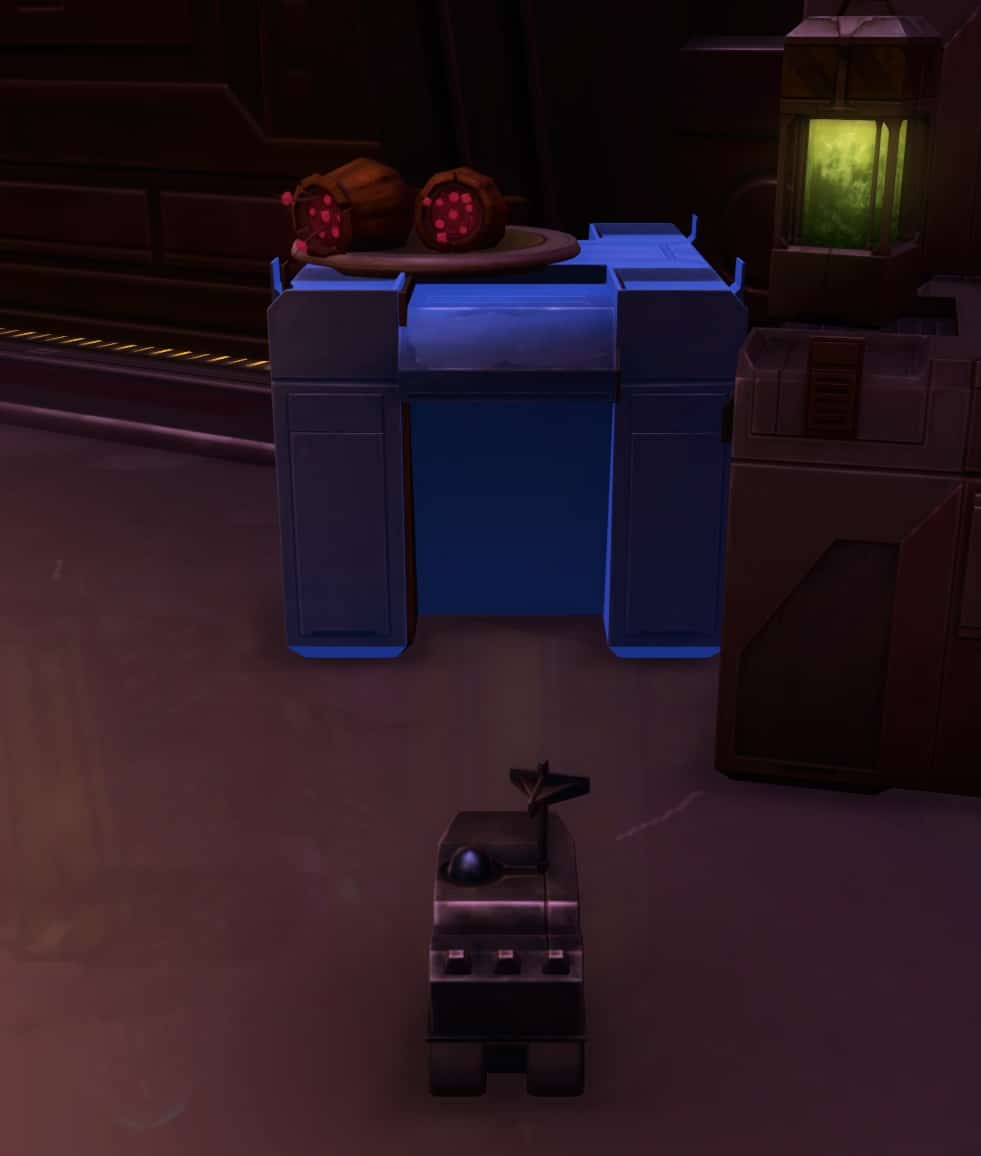
The final ingredient is the easiest ne to pick – head to Dantooine for the Kibla Greens.
Gaboorga’s plan includes you joining the cooking game secretly by piloting a little droid and disrupting Duuba’s check’s work.
Using the same terminal you would have used if you sided with Duuba, you pilot a remote accessed mouse droid to sabotage three serving droids in the cantina. Stand next to a serving droid and use the mouse droid’s first ability to disable the serving droid.
Head to the Kitchen next to do some damage to the equipment there. Use the vent shaft that glows blue below the bar. Hit the supplies storage, stove and freezer to break them. Right-click on the items when you are close enough.
Finally, leave the kitchen, talk to Gaboorga, then hear the final results of the cooking competition by speaking to the Head Judge.
Thanks to your support Gaboorga is victorious and he gets to decide who he will partner up with and deal with for the future of the event. Duuba will have to keep his mouth shut or be booted off from the Feast of Prosperity from now on.
How to earn The Abundant and The Magnanimous titles
If you want to earn the two titles from the two Hutts on the same character, after you complete the story of Week 3, click on the glowing in blue placards near the Hutt.
The one whose title you have earned through your story choice will give you nothing, the other one will register for you a new Title earned and a Title-related achievement. Thanks to @kaldannan for the tip! I had missed the glowing placards.

Repeatable Missions
Wondering what daily and weekly missions are available longside the main story ones for event? There are four types of quests. I’ve listed them below along with a short description of what they task you with and how they differ from each other. Detailed walkthroughs are in the next section of this guide.
- Cooking mini-game is available in Easy and Hard Mode. You can pick only one at a time.
- Serving meals mini-game is available in Easy and Hard Mode. You can pick only one at a time.
- Gathering of resources (ingredients) – explore various planets looking for specific items. One mission available at a time and per day. You may be able to complete two missions of this type in one day (most likely a bug). Each one tasks you to get different items with a different destination planet to travel to.
- World Bosses – defeat certain world bosses to loot special ingredients. NPC quest icon shows up after you have picked up the Prep Work mission (resource gathering). It’s standing right next to the terminal.
Special Event Currency
A special currency is available as reward from the all event-related missions. This includes all dailies and weeklies, the intro mission as well as the follow-up story missions the two Hutts give you. It’s called “Prosperity Tokens” and is used to purchase the rewards from the event vendor. These tokens are Legacy Bound. More on their contents further down in this guide.

Daily Missions List
- Ingredients Gathering missions
- [Daily] Prep Work: Sour Bellfruit (Belsavis)
- [Daily] Prep Work: Primeval Marrow (Belsavis)
- [Daily] Prep Work: Nexu Tongue (Corellia)
- [Daily] Prep Work: Perfect Ice Crystals (Hoth)
- [Daily] Prep Work: Larval Geo Beast Brains (Hoth)
- [Daily] Prep Work: Lost Recipe Data (Nar Shaddaa)
- [Daily] Prep Work: Scyk Belly (Tatooine)
- Cantina Serving missions (mini-games)
- [Daily] Cantina Rush: Lunch Service (Easy Mode)
- [Daily] Cantina Rush: Dinner Service (Hard Mode)
- Cooking missions (mini-games)
- [Daily] Cooking: Braised Scyk Belly
- [Daily] Cooking: Exotic Medley Delight
- [Daily] Cooking: Jellied Glowshroom Stew
- [Daily] Challenge Dish: Ultimate Galactic Sampler (Timed)
- World Boss Daily Missions
- [World Boss] Special Request: Belsavis
- [World Boss] Special Request: Corellia
- [World Boss] Special Request: Hoth
- [World Boss] Special Request: Nar Shaddaa
- [World Boss] Special Request: Tatooine
Weekly Missions list
- [Weekly] Cantina Rush – complete 3 Cantina Rush Daily Missions
- [Weekly] Kitchen Duty – complete 3 Cooking Daily Missions
- [Weekly] Ingredient Acquisition – complete 3 resource gathering Daily Missions
- [Weekly] World Boss Ingredients – complete 3 World Boss Daily Missions
- [Weekly] The Feast of Prosperity – complete 3 Weekly Missions
Each Weekly mission rewards you with Credits, XP and 750 Prosperity Tokens. The Feast of Prosperity Weeky grants you 2500 Prosperity Tokens.
If you complete all missions, you will end up with over 7000 Prosperity Tokens without counting repeating the Dailies and farming on multiple characters.
How to pick up the event missions
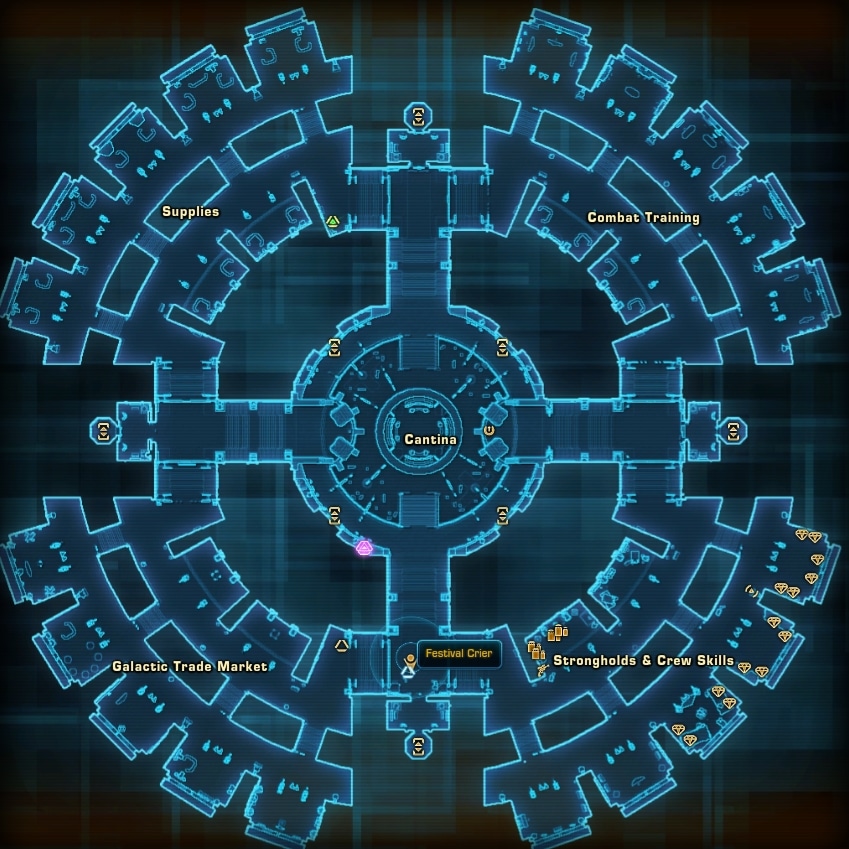
All of the above-mentioned missions are available from a few terminals, located near each other at the event’s main ground area on Nar Shaddaa. There are a few requirements for you to pick up some of the missions, but they are nothing serious.
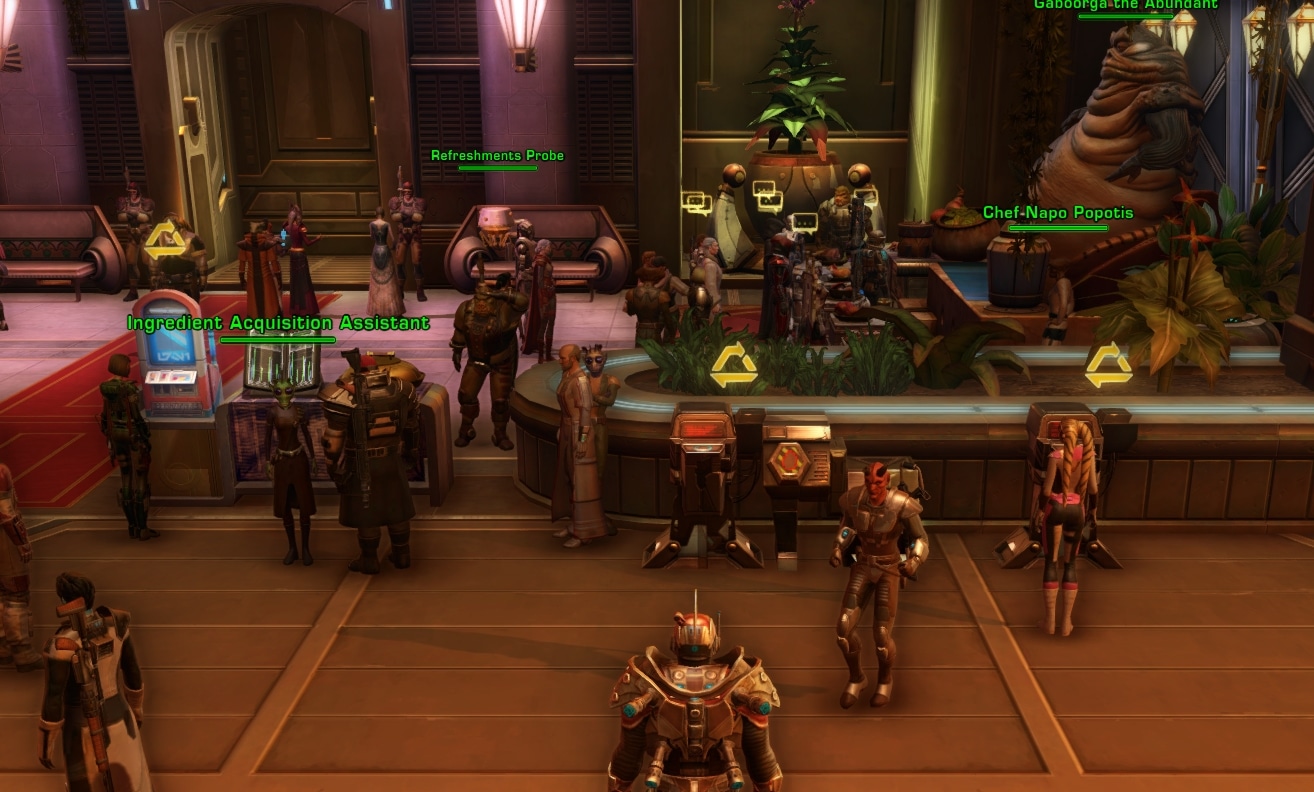
Right next to Gaboorga and Duuba you will find three mission terminals. From left to right in the image above:
- Feast of Prosperity Ingredients Requests (resources gathering terminal)
- Ingredient Acquisition Assistant (world boss mission)
- Work Request Board (mini-games terminal)
- Work Request Board (weekly missions terminal)
Mission requirements, availability and limitations
As I mentioned earlier, you need to be at least level 20 to be able to participate in this ever at all. I have not tested it, but I assume you will not be able to speak to the Festival Crier NPCs if you are lower level.
For the World Boss missions to appear for you, you first have to pick up the gathering ingredients daily mission. Speak to the Ingredients Acquisition Assistant droid to get it.
If you pick up a World Boss mission, but do not complete it on the same day, keep the mission in your mission log. You will be able to complete it any other day during the event as long as you have it active.
If you have the World Boss and the Prep Work missions from a previous day, you can abandon them both, then pick up the new current missions from the terminal and the Rodian NPC.
You cannot have the Easy and Hard Mode of the Cooking or Serving missions at the same time. If you pick up the wrong mission”, you can abandon it and pick another from the terminal right away. You can complete both in one day, just have to pick one, complete it then pick the other one and complete it.
Since only one daily mission is available per day and per character, you will need to participate in the Feast of Prosperity event at least on three different days of the week to finish the Weekly mission.
Daily and Weekly Event Missions Walkthrough
In the following segment I have for you a detailed breakdown of all missions: requirements, walkthrough to completion, rewards. All missions will appear in your Log under the “Event” category when you pick them up.
[Daily] Prep Work: Sour Bellfruit (Belsavis)
Mission objective:
This quest is available at the Feast of Prosperity Ingredient Requests mission terminal. It is one of the rotating “resource gathering” daily missions. Travel to Belsavis to find this item. You need five of them. The mission is related to the [World Boss] Special Request: Belsavis mission.
Task: Retrieve 5 Sour Bellfruits
Mission rewards:
– Credits
– XP
– ![]() 100 Prosperity Tokens
100 Prosperity Tokens
Travel to the Maximum Security Section and enter the cave south from the speeded location. Use the teleporter to get to Deep Launchpoint Transporter.
The Sour Bellfruits are available in the northern section of The Tomb area on Belsavis, this is the area where the World Boss is located as well. Circle around the giant tree and look for the flashing fruits around it on that small hill.


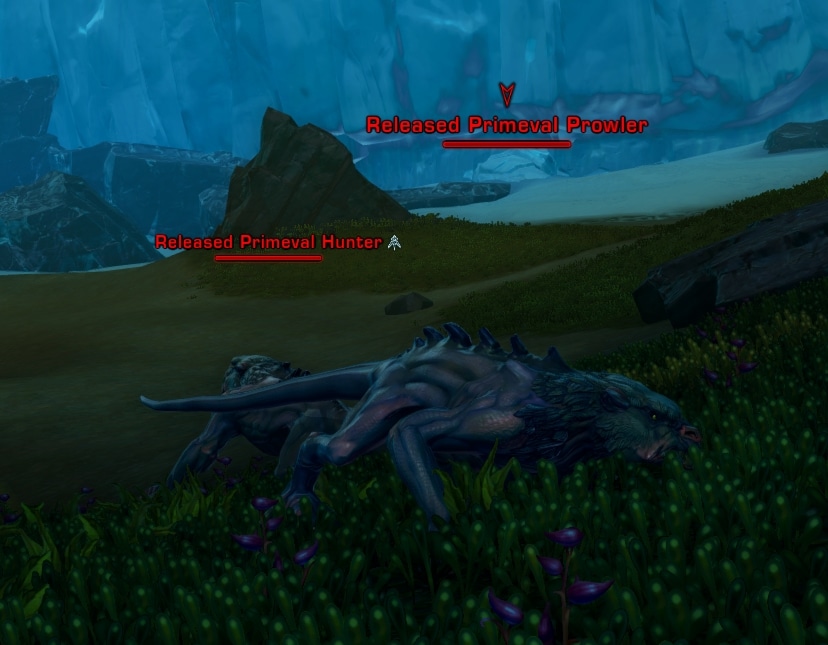
[Daily] Prep Work: Primeval Marrow (Belsavis)
Mission objective:
This quest is available at the Feast of Prosperity Ingredient Requests mission terminal. It is one of the rotating “resource gathering” daily missions. Travel to Belsavis to find this item. You need five of them. The mission is related to the [World Boss] Special Request: Belsavis mission.
Task: Retrieve 5 Primeval Marrows
Mission rewards:
– Credits
– XP
– ![]() 100 Prosperity Tokens
100 Prosperity Tokens
The location is the same as for the other Prep Work mission on Belsavis – around the World Boss area in the northern section of The Tomb area on Belsavis. The items drop as loot from Primeval Prowlers, roaming around.
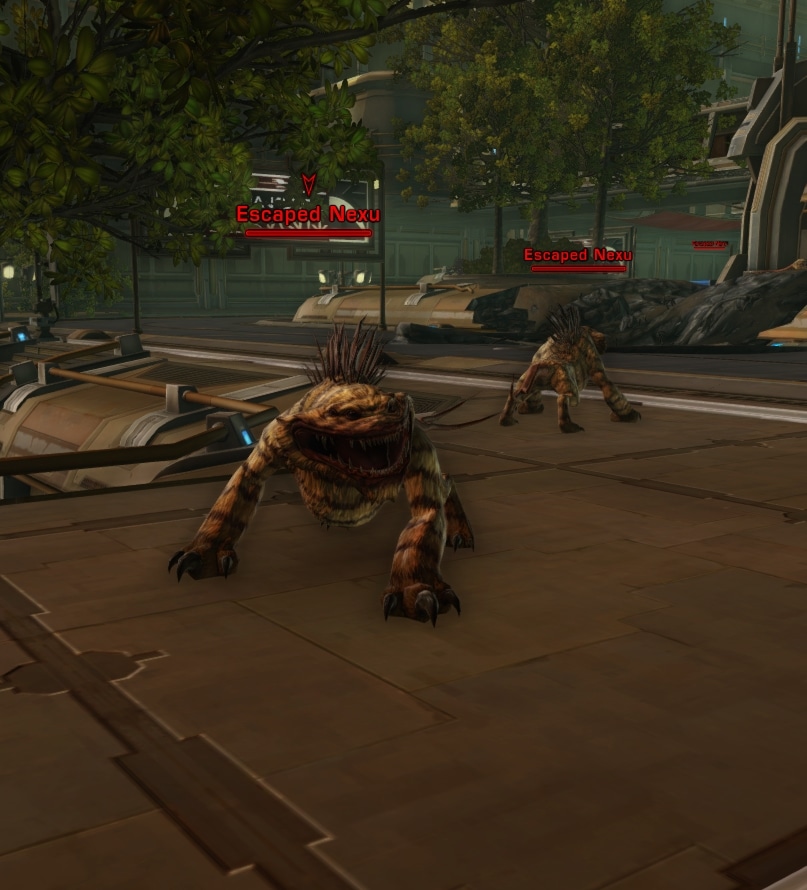
[Daily] Prep Work: Nexu Tongue (Corellia)
Mission objective:
This quest is available at the Feast of Prosperity Ingredient Requests mission terminal. It is one of the rotating “resource gathering” daily missions. Travel to Corellia to find this item. You need five of them. The mission is related to the [World Boss] Special Request: Corellia mission.
Task: Retrieve 5 Nexu Tongues (some times it’s the same mission, but with 3 Nexu Tongues)
Mission rewards:
– Credits
– XP
– ![]() 85 Prosperity Tokens
85 Prosperity Tokens
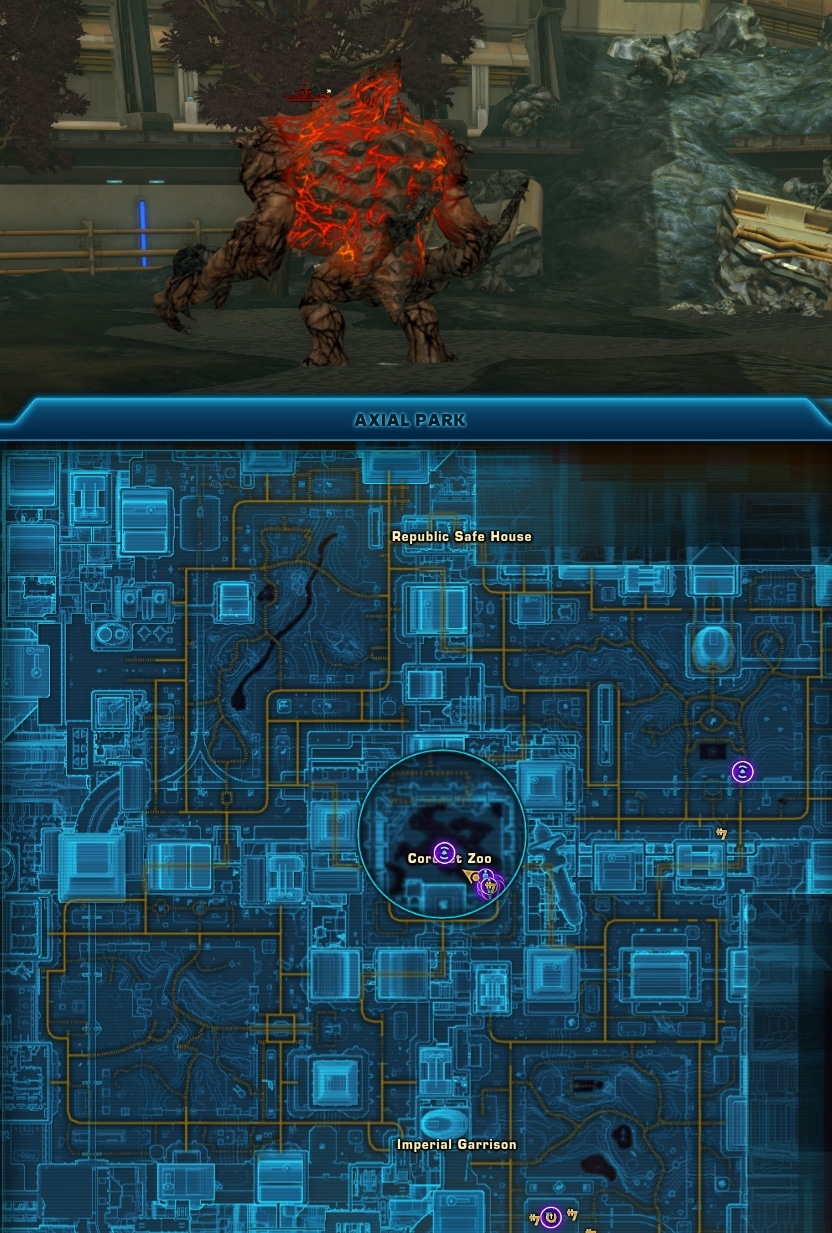
Nexu that drop the items for this quest are all around the Coronet Zoon in Axial Park, nearby the World Boss location.
[Daily] Prep Work: Perfect ice Crystals (Hoth)
Mission objective:
This quest is available at the Feast of Prosperity Ingredient Requests mission terminal. It is one of the rotating “resource gathering” daily missions. Travel to Hoth to find these items. You need five of them. The mission is related to the [World Boss] Special Request: Hoth mission.
Task: Retrieve 5 Perfect Ice Crystals
Mission rewards:
– Credits
– XP
– ![]() 80 Prosperity Tokens
80 Prosperity Tokens
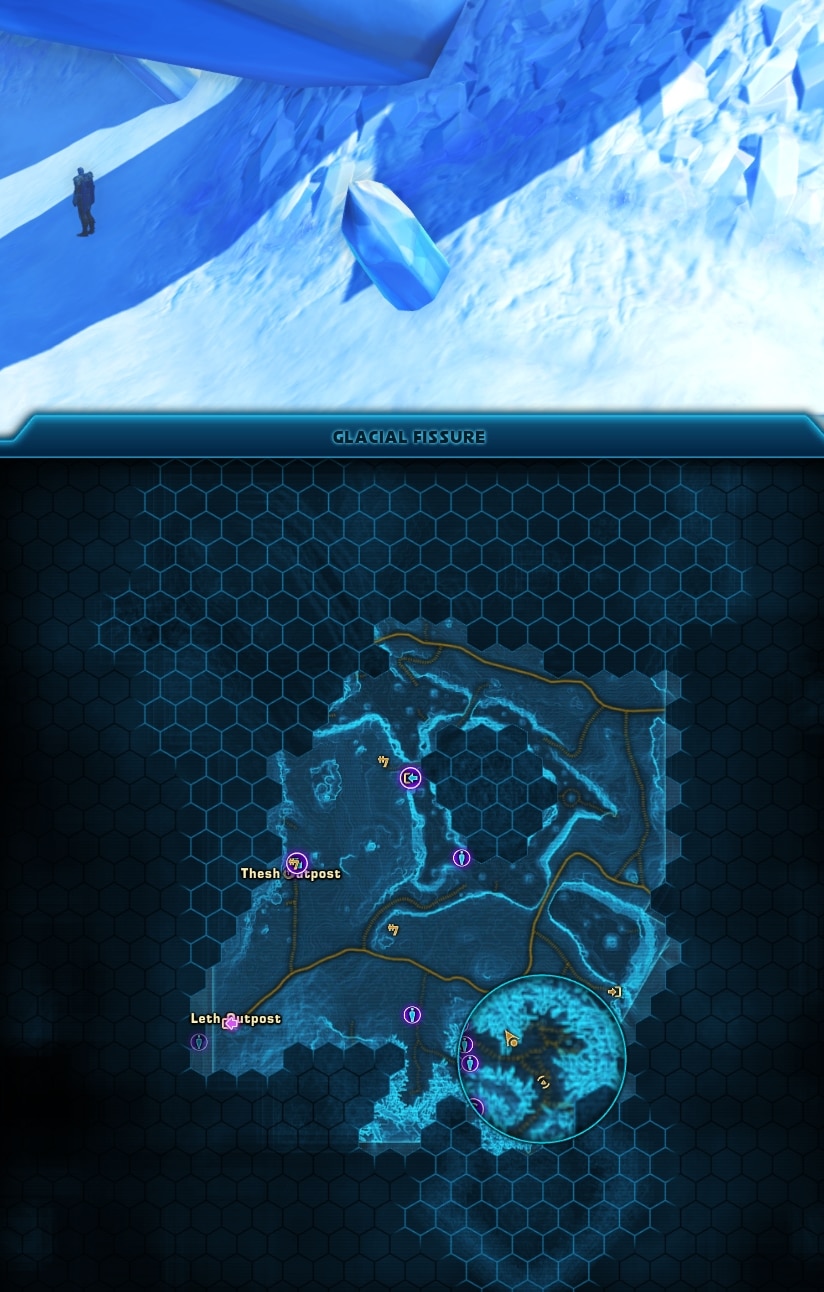
The Crystals are available around the Heroic area in the most southern region of the Glacial Fissure. The place is called Crystal Wastes. Crystals are usually located nearby the edges of the ice mountains.
[Daily] Prep Work: Larval Geo Beast Brains (Hoth)
Mission objective:
This quest is available at the Feast of Prosperity Ingredient Requests mission terminal. It is one of the rotating “resource gathering” daily missions. Travel to Hoth to find these items. You need five of them. The mission is related to the [World Boss] Special Request: Hoth mission.
Task: Retrieve 5 Larval Geo Beast Brains
Mission rewards:
– Credits
– XP
– ![]() 80 Prosperity Tokens
80 Prosperity Tokens
Similarly to the Crystals daily prep work mission, this one sends you “behnd” Snowblind’s Crystal Wastes area in the Glacial Fissure region. You will have to venture further south and into the Molten Rift. Walk the path that surrounds the hill with the lava rivers and search for the little beasts. They may prove hard to find with so many players hunting them and their slow respawn times.

[Daily] Prep Work: Lost Recipe Data (Nar Shaddaa)
Mission objective:
This quest is available at the Feast of Prosperity Ingredient Requests mission terminal. It is one of the rotating “resource gathering” daily missions. Stay on Nar Shaddaa to find these items. You need five of them. The mission is related to the [World Boss] Special Request: Nar Shaddaa mission.
Task: Retrieve 5 Lost Recipe Data
Mission rewards:
– Credits
– XP
– ![]() 60 Prosperity Tokens
60 Prosperity Tokens
The items you need are in the same area where the world boss is – Network Security District, Grid Databanks (north-east corner of the map). In the Nar Shaddaa World Boss mission I have a description of how to get to that place, because Nar Shaddaa’s maze can be a bit confusing some times.
Defeat droids around the world boss (but don’t aggro it) and then loot the Recipe Data items from them.
[Daily] Prep Work: Scyk Belly (Tatooine)
Mission objective:
This quest is available at the Feast of Prosperity Ingredient Requests mission terminal. It is one of the rotating “resource gathering” daily missions. Travel to Tatooine to find these items. You need five of them. The mission is related to the [World Boss] Special Request: Nar Shaddaa mission.
Task: Retrieve 5 (or 3) Scyk Belly
Mission rewards:
– Credits
– XP
– ![]() 70 Prosperity Tokens
70 Prosperity Tokens
Scyks lizards are roaming The Dune Sea on Tatooine. They can be encountered in many places, outside of the marked area for this mission. You do not need to be inside the circle that is displayed on your map to loot the items for the mission.

[World Boss] Special Request: Belsavis
Mission objective:
This mission becomes available after you pick up the “Prep Work: Sour Bellfruit” mission from the terminal on Nar Shaddaa. Speak to the Ingredient Acquisition Assistant, standing right in front of the terminal to pick up the World Boss quest. Travel to Belsavis to defeat the world boss “Primeval Destroyer” to grab the loot. You can use a quick travel from the Activities Window by selecting Belsavis Heroic missions.
Task: Retrieve Parasitic Clingmoss
Mission rewards:
– Credits
– XP
– ![]() 200 Prosperity Tokens
200 Prosperity Tokens
The World Boss is located in The Tomb, far to the north on Belsavis. If you cannot find it in one instance, switch to another and check. The monster does not move. It’s an encounter for players level 45 or higher. Gear doesn’t matter much if you are level 75 and in a large enough group.


Soon after the fight starts, three adds spawn. If you have a second tank in the group, have them pull the adds and move them away from the group. If you defeat an add before the boss, the Primeval Destroyer will get very angry. Avoid that. There are no other tactics worth mentioning except that as a large creature the boss does frontal cleave attacks and you should stay behind if you are not a tank. Adds place a small DoT debuff on you, not really worth worrying about.

After you defeat the boss, loot its corpse to get the item for the quest. Get back to Nar Shaddaa to deliver it to the Drop Box (near the terminal) and get your reward.
[World Boss] Special Request: Corellia
Mission objective:
This mission becomes available after you pick up the “Prep Work: Nexu Tongues” mission from the terminal on Nar Shaddaa. Speak to the Ingredient Acquisition Assistant, standing right in front of the terminal to pick up the World Boss quest. Travel to Corellia to defeat the world boss “Lucky” to grab the loot. You can use a quick travel from the Activities Window by selecting Corellia Heroic missions.
Task: Retrieve Parasitic Clingmoss
Mission rewards:
– Credits
– XP
– ![]() 175 Prosperity Tokens
175 Prosperity Tokens
Lucky is a giant rancor boss with no special tactics or mechanics. It doesn’t hit too hard, but has a ton of HP. Lycky also has no enrage timer. He is located in the middle of the Coronet Zoo in the Axial Park area on Corellia. Lucky does two interruptible special attacks – Ground Stomp and Ground Smash.
Defeating Lucky will grant you a title that is not related to this event – “Lucky”. Getting defeated by Lucky will also grant you a title – “Unlucky”.
[World Boss] Special Request: Hoth
Mission objective:
This mission becomes available after you pick up the “Prep Work: Perfect Ice Crystals” or the “Prep Work: Larval Geo Beast Brains” mission from the terminal on Nar Shaddaa. Speak to the Ingredient Acquisition Assistant, standing right in front of the terminal to pick up the World Boss quest. Travel to Hoth to defeat the world boss “Snowblind” to grab the loot. You can use a quick travel from the Activities Window by selecting Hoth Heroic missions.
Task: Retrieve Ice Cat Whisker
Mission rewards:
– Credits
– XP
– ![]() 175 Prosperity Tokens
175 Prosperity Tokens
Snowblind spawns in the most southern area of the Glacial Fissure, in the Heroic area Snowblind’s Hunting Grounds. The boss is very easy to defeat. It does one special attack called Terrifying Road. Simply stand behind the boss if you are not the tank. When Snowbind disappears a Snowstorm will spawn in the area. Huddle up for warmth to avoid a nasty damage-over-time debuff. When the boss appears again, continue damaging. This repeats until you defeat it.
[World Boss] Special Request: Nar Shaddaa
Mission objective:
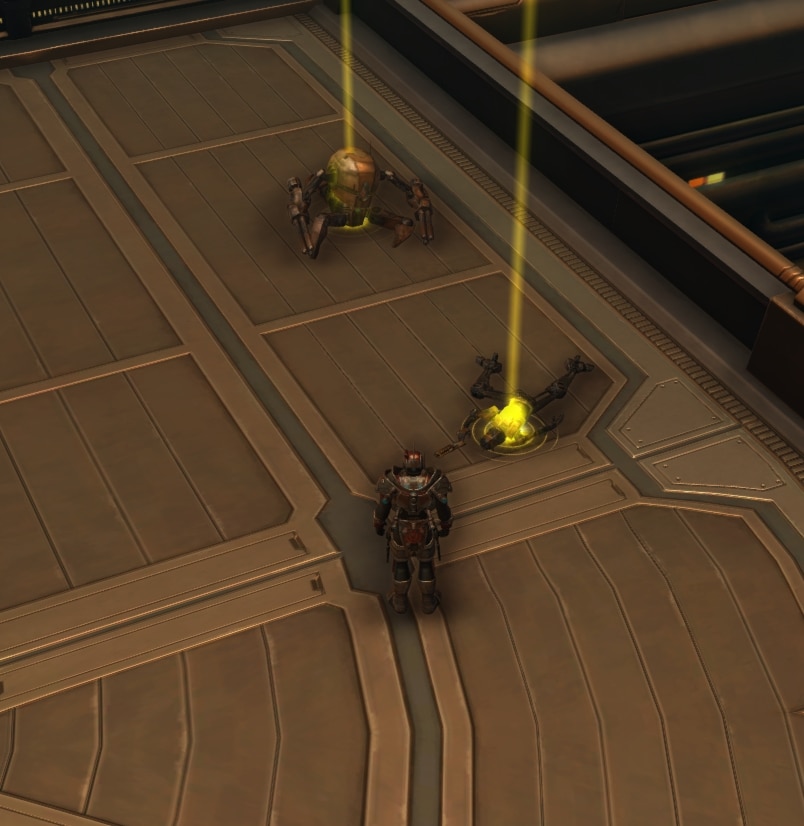
This mission becomes available after you pick up the “Prep Work: Lost Recipe Data” mission from the terminal on Nar Shaddaa. Speak to the Ingredient Acquisition Assistant, standing right in front of the terminal to pick up the World Boss quest. Travel to Nar Shaddaa to defeat the world boss “Battledroid R4-GL” to grab the loot.
Task: Retrieve Poola Blossom Threads
Mission rewards:
– Credits
– XP
– ![]() 125 Prosperity Tokens
125 Prosperity Tokens
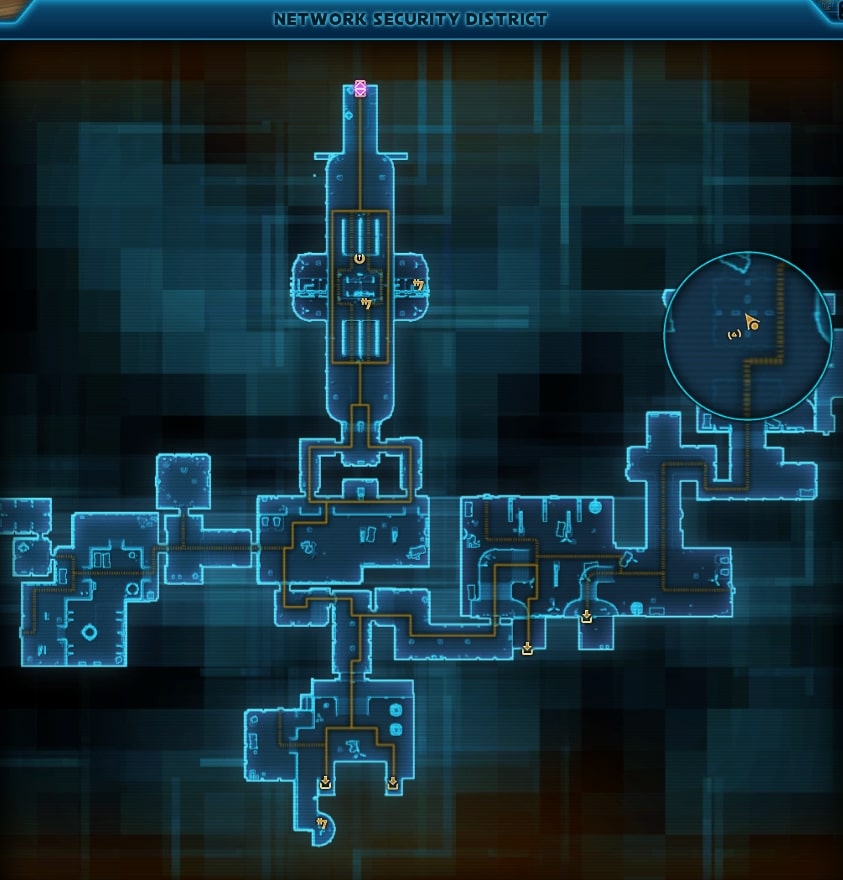
The Nar Shaddaa world boss “Battledroid R4-GL sits quietly in the corner of a platform in the NEtwork Security District Grid Databanks area. Nar Shaddaa is designed a bit tricky and you may feel lost in the endless corridors and platforms Here’s a quick “how to get there guide:
- Empire players: Go to Upper Industrial Sector, then turn east and enter Republic Research Division, take the Systech West Elevator in the bottom right corner of the map to get to the Network Security District. Once there, travel south and take a left turn at the second junction. The boss’s area is in the top right corner of the map.
- Republic players: Start at Lower Industrial Sector. Travel east to the bottom right corner of the map and get the Systech East Elevator. It will take you to High Security Lockdown area. From there head south and then west to reach the Network Security District. In this area travel north and make a right then head north until you reach the far top right corner of the map, where the boss is.
This boss is designed for low level players and has almost nothing special to it. You can interrupt his Repeater Cannon special ability.
Please note that in the image below you see the remains of a previous boss spawn in the same spot. A lot of groups are clearing these bosses during the event and this kind of bug is normal to happen with a quick respawn.
[World Boss] Special Request: Tatooine
Mission objective:
This mission becomes available after you pick up the “Prep Work” daily mission from the terminal on Nar Shaddaa. Speak to the Ingredient Acquisition Assistant, standing right in front of the terminal to pick up the World Boss quest. Travel to Tatooine to defeat the world boss “Trapjaw” to grab the loot.
Task: Retrieve Wraid Ampulla Jelly
Mission rewards:
– Credits
– XP
– ![]() 125 Prosperity Tokens
125 Prosperity Tokens
Trapjaw is in the dead middle of the Dune Sea on Tatooine. To spawn it, click on the glowing in blue Skull surrounded by brown rocks.


It’s a simple boss fight with minimal challenge in terms of mechanics. Tank or tanking player should turn the boss away from the group and maybe be prepared to use one or two cooldowns. The encounter is designed for level 30-ish players, so it’s not a surprise that if you go there with a bunch of high level (mostly 75 probably), you will defeat it before you blink twice.
[Daily] Cantina Rush: Lunch Service (Easy)
Mission objective:
This mission is a mini-game and can be obtained from the Work Request Board (the middle terminal at the Feast of Prosperity event on Nar Shaddaa.
Task: Enter the Bog’s Bounty Banquet Hall and perform the required tasks of you.
Mission rewards:
– Credits (for the bonus)
– XP
– ![]() 75 Prosperity Tokens + 10
75 Prosperity Tokens + 10 ![]() Prosperity Tokens for the bonus objective
Prosperity Tokens for the bonus objective
Enter the Cantina to start the mission. The objectives are to serve tables. You need to complete 25 served meals to finish the mission. Making five errors will fail the attempt.
On the back-end wall of the kitchen there are two counters. On the left side is the number of dishes you need to serve (25 for the Easy mission). On the right side are the number or errors you have made. In front of you, on the bar counter, there are five meals to pick up. Above each one there is an icon with color. From left to right:
- Red – Honey Glazed K’lor’slug
- Yellow – Vegetarian Combo
- Green – Full Huttese Breakfast Platter
- Blue – Swamp Lentil Soup
- Purple – Roast Bog Snarler
You pick up a dish by right-clicking on it when you are close it. There are five special abilities on your bar.

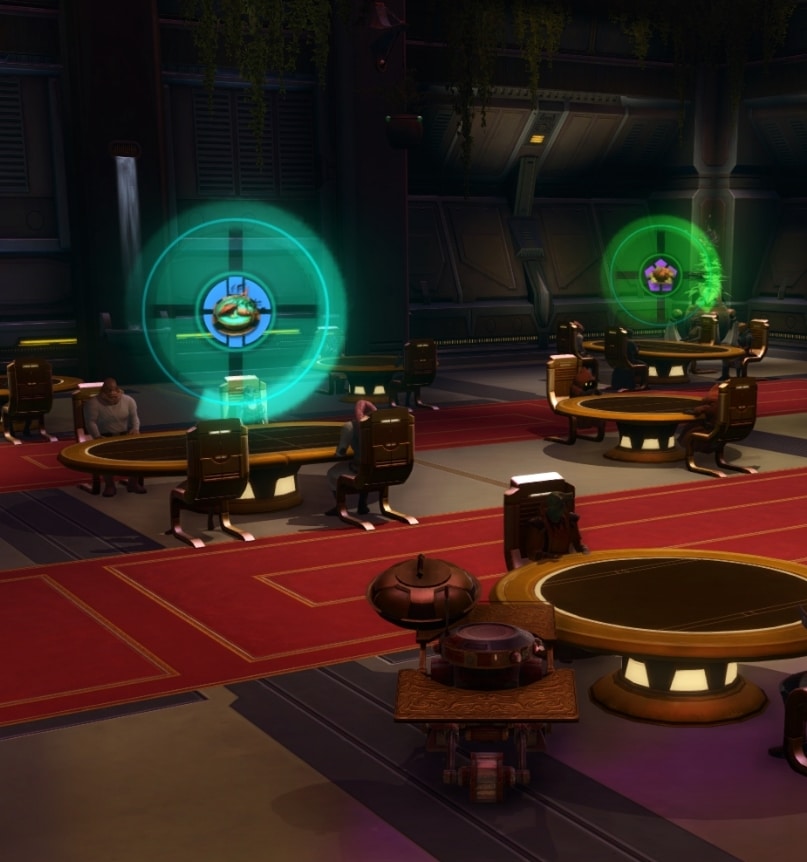
They correspond to the above-mentioned colored dishes and light-up when you are carrying that specific dish. When you are near a client’s table, click on the ability that corresponds to the order of this client. You will know what the patrons want by the color icon above their table.
Example below is a table that wants the Yellow dish (Vegetarian Combo). Note how there is only one quadrant yellow. They are getting impatient:
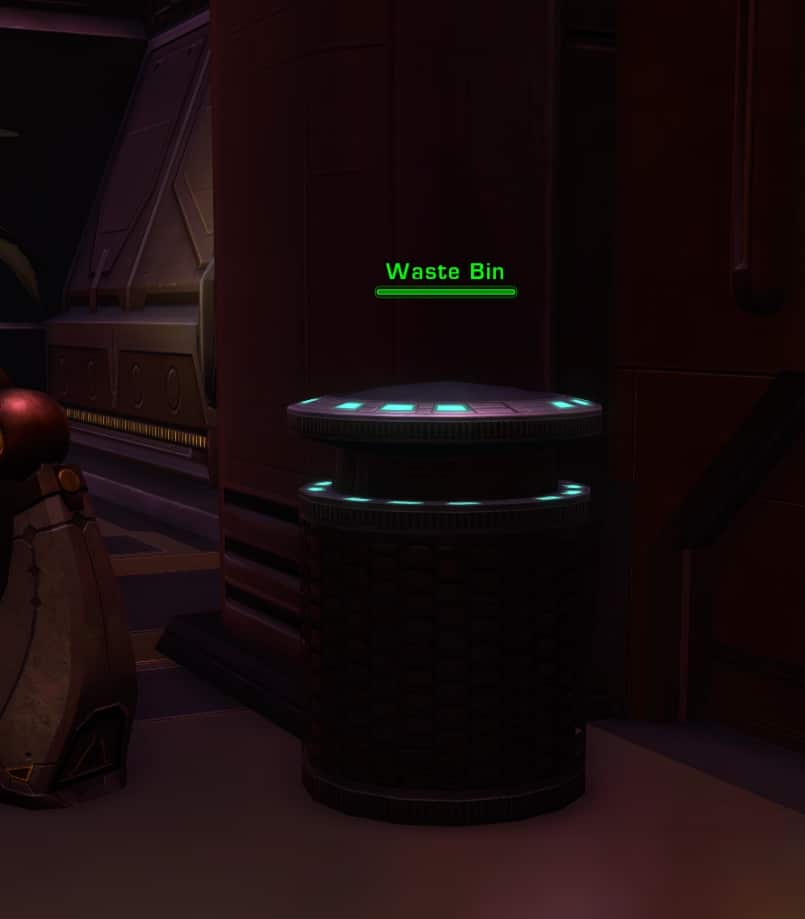
If you pick up a dish that is not currently requested, throw it in the Waste Bin located next to the bar on the left and right sides.
If you want to abandon the mission and try again, the door is to the wall opposite of the bar.
Each customer is willing to wait only a limited time. If you do not deliver the meal to them before the timer expires (visible on the icon above their table), you will gain an “error”. One error and you will fail the special bonus objective “Perfect Rush”. Five errors will result in failed mission.
In the Easy mission you still have the timer, which is attached to a secret achievement and the bonus objective, but here the customers are far less hungry and grumpy and are willing to wait longer for their orders to arrive, compared to the Hard version of this mini-game, which is explained below. Here these patrons also make request less frequently.
This mission may sound weird, confusing and complex, but it really isn’t. You can always walk out the door of the Cantina to reset it and try again. After one or two dishes served, you will get the hang of it. Always keep rotating your camera to find out when new orders appear and from which table they come from, then plan your route.
[Daily] Cantina Rush: Dinner Service (Hard)
Mission objective:
This mission can be picked up from the Work Request Board on Nar Shaddaa. This mini-game is similar to the Easy Mode, but present an additional challenge.
Task: Enter Bog’s Bounty Banquet Hall to perform the actions required of you.
Mission rewards:
– Credits (for the bonus)
– XP
– ![]() 125 Prosperity Tokens +
125 Prosperity Tokens + ![]() 20 Prosperity Tokens for the bonus objective
20 Prosperity Tokens for the bonus objective
This one has similar requirements to the Easy Mode mission explained above. The main difference is that here you are much more time-pressed to deliver the dishes. Please see explanation for the Easy version of this mission to get the basics.
The difference here is that you have to complete four courses of services, each one gets tougher as the customers’ timers get shorter and shorter, but has fewer dishes you need to serve to complete it:
- Course 1: 25 dishes served, 5 errors allowed
- Course 2: 20 dishes served, 5 errors allowed
- Course 3: 18 dishes served, 4 errors allowed
- Course 4: 15 dishes served, 3 errors allowed
To be able to complete the bonus objective (no errors in deliveries), you would have to pick up two and some times three dishes at a time. Prioritize deliveries of dishes to customers’ tables bundled up closer to each other and those whose timer is about to expire sooner. Note that the more dishes you carry, the slower your movement speed is.
[Daily] Cooking: Braised Scyk Belly
Mission objective:
This mission is available at the Work Request Board on Nar Shaddaa.
Task: Enter the Kitchen
Mission rewards:
– Credits
– XP
– ![]() 75 Prosperity Tokens
75 Prosperity Tokens
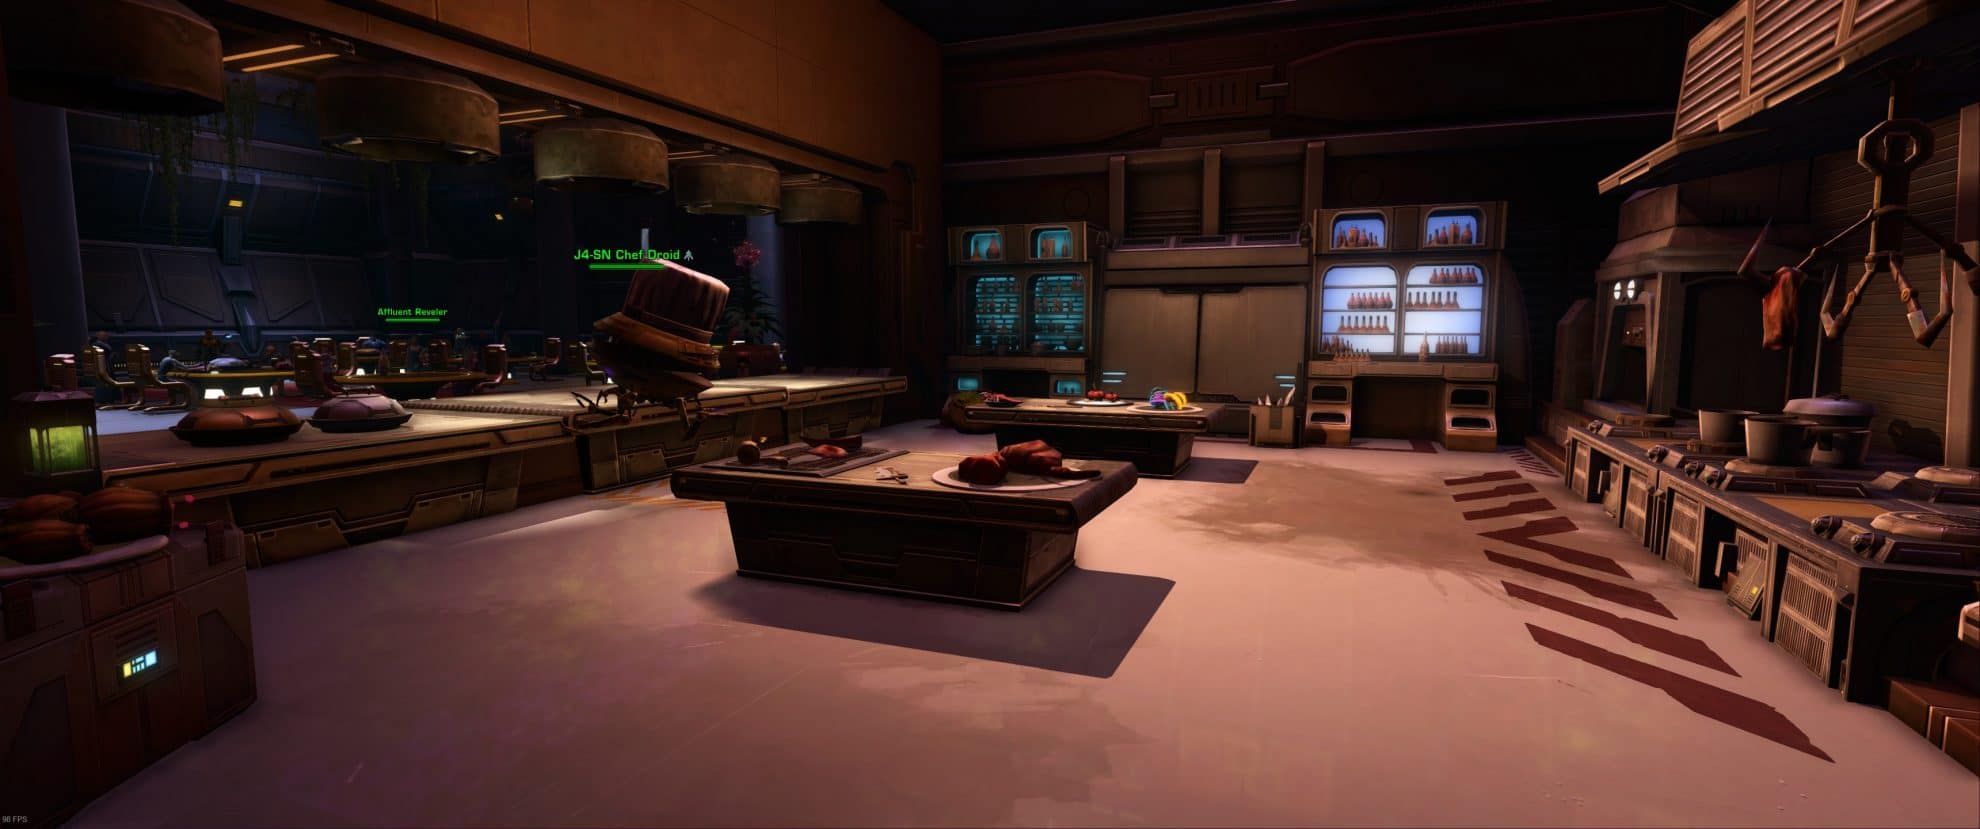
The Kitchen is located a little to the east from the Terminals. The easy version of the mission has detailed instructions for you what to do and where the item you need is located.
Follow the instructions from the mission objective to complete the meal and finish the quest. Each item is marked and flashing blue or has a green arrow above it. When you need to place something somewhere, use the special ability that pops up in the additional special bar and then “throw” the item in the marked location.

Below are step-by-step detailed instructions for cooking the Braised Scyk Belly:
Possible Combination 1
- Tenderize the Tough Scyk Belly
- Add the Tough Scyk Belly to the Cookpot
- Get the Sweet Vormfruit
- Add the Sweet Vormfruit to Cookpot
- Get the Gelatinoys Geo Beast Brain
- Add the Gelatinoys Geo Beast Brain to the Cookpot
- Click the Flame Adjustment Knob to heat the Cookpot
- Get the Salinated Soz Juice
- Add the Salinated Soz Juice to the Cookpot
- Click on the Grill Control to turn it on
- Get the Cookpot from the stove
- Place the Cookpot item onto the Grill
- Wait for a moment while it’s grilling
- Remove the meal from the Grill
- Place dish on Expo Station (bar counter)
- Add three Seasonings from the special pop-up abilities minibar
- Wait for the mission to complete
Possible Combination 2
- Tenderize Scyk Belly
- Add Scyk Belly to Pot
- Get Bekbek Root
- Add Bekbek Root to Pot
- Get Primeval Marrow
- Add Primeval Marrow to Pot
- Turn up the heat
- Get Balmorran Vinegar
- Add Balmorran Vinegar to Pot
- Turn on Grill
- Collect Dish from Stove
- Place Scyk Belly on Grill
- Wait for Perfect Char
- Remove Dish from Grill
- Place Dish on Expo Station
- Add three Seasonings
- Wait for Judgement (complete quest)
Possible Coombination 3
- Tenderize Scyk Belly
- Add Scyk Belly to Pot
- Get Bekbek Root
- Add Bekbek Root to Pot
- Get Primeval Marrow
- Add Primeval Marrow to Pot
- Turn up the heat
- Get Glort Slurry
- Add Glort Slurry to Pot
- Turn on Grill
- Collect Dish from Stove
- Place Scyk Belly on Grill
- Wait for Perfect Char
- Remove Dish from Grill
- Place Dish on Expo Station
- Add three Seasonings
- Wait for Judgement (complete quest)
[Daily] Cooking: Exotic Medley Delight
Mission objective:
This mission can be picked up from the Daily Mission Terminel, whenever it is available. It’s not available every day. Simply follow the instructions to complete it.
Enter the Kitchen
Mission rewards:
– Credits
– XP/
– ![]() 75 Prosperity Tokens
75 Prosperity Tokens
Possible Solution:
- Fire up the Grill
- Get Vormfruit
- Add Vormfruit to Grill
- Get Primeval Marrow
- Add Primeval Marrow to Grill
- Turn on Stove
- Prep Vegetable Medley x3
- Add Medley to Pot
- Get Nexu Tongue
- Add Nexu Tongue to Pot
- Collect Stewed Ingredients
- Collect Grilled Ingredients
- Place Dish on Expo Station
- Await Judgement and complete mission
[Daily] Cooking: Jellied Glowshroom Stew
Mission objective:
This mission can be picked up from the Daily Mission Terminel, whenever it is available. It’s not available every day. Simply follow the instructions to complete it.
Enter the Kitchen
Mission rewards:
– Credits
– XP
– ![]() 75 Prosperity Tokens
75 Prosperity Tokens
Possible Solution:
- Turn on the Stove
- Prepare Glowshrooms x3
- Added Chopped Glowshrooms
- Get Kibla Greens
- Add Kibla Greens
- Lower Heat
- Wait
- Raise Heat
- Get Scyk Belly
- Add Scyk Belly
- Get Soz Juice
- Add Soz Juice
- Take Dish from Stove
- Place in Flash Freezer
- Wait
- Remove Dish from Freezer
- Place Dish on Expo station
- Add Seasonings (remember the secret achievement!)
- Await judgement and complete the mission
Thanks to simurgh559 for their comment and reminder. I almost missed that mission when it first appeared.
[Daily] Challenge Dish: Ultimate Galactic Sampler
Mission objective:
This mission is available from the Work Request Board. It is an alternative and harder version of the Cooking mission. To complete this challenge, you have to prepare a meal before the timer expires.
Task: Enter the Kitchen
Mission rewards:
– Credits
– XP
– ![]() 100 Prosperity Tokens
100 Prosperity Tokens
In the Hard version of this mini-game you have a very short time to react and do what the objective asks of you. The items in the Kitchen are exactly the same in the exact same layout, but they are not flashing or indicated in any wat. You have to remember what is where and how to reach it.
Below I have a few images to help you out get more familiar with the Kitchen’s layout and where each item is located.
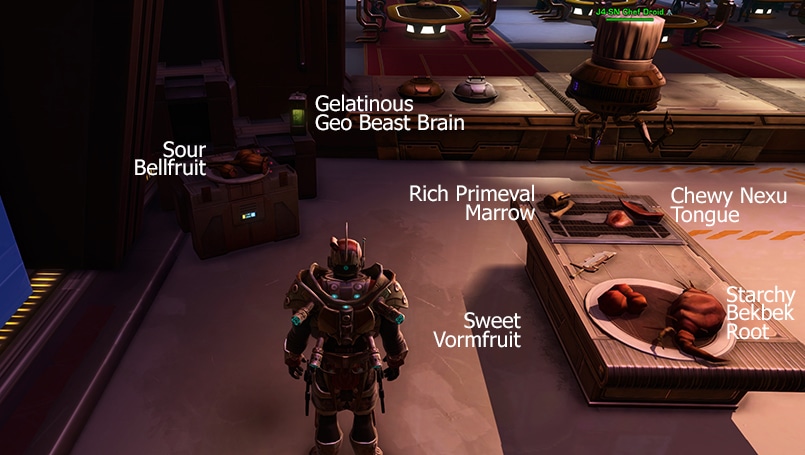
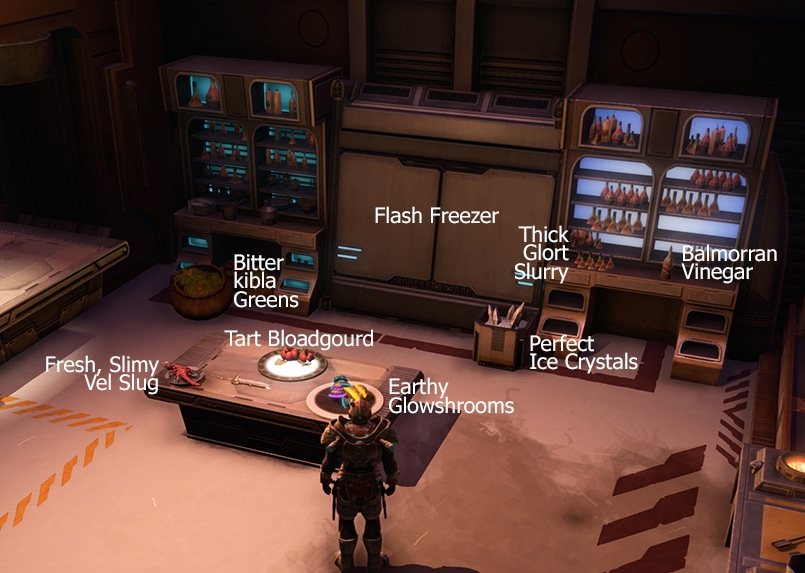
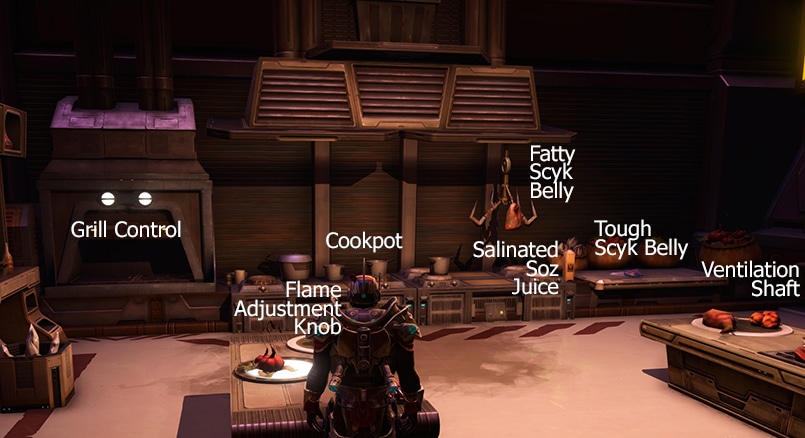
Here is also a quick list of items, described by their locations, as you stand at the entrance door and look around the kitchen:
| IMAGE | ITEM DESCRIPTION |
|---|---|
 | Sour Bellfruit left side, next to the entrance door |
 | Gelatinous Geo Beast Brain left side, next to the entrance door |
 | Rich Primeval Marrow close table, close left corner |
 | Chewy Nexu Tongue close table, far left corner |
 | Sweet Vormfruit close table, close right corner |
 | Sour Bellfruit left side, next to the entrance door |
 | Gelatinous Geo Beast Brain left side, next to the entrance door |
 | Rich Primeval Marrow close table, close left corner |
 | Starchy Bekbek Root close table, far right corner |
 | Fresh, Slimy Vel Slug far table, left corner |
 | Tart Bloatgourd far table, middle dish |
 | Earthy Glowshrooms far table, right corner |
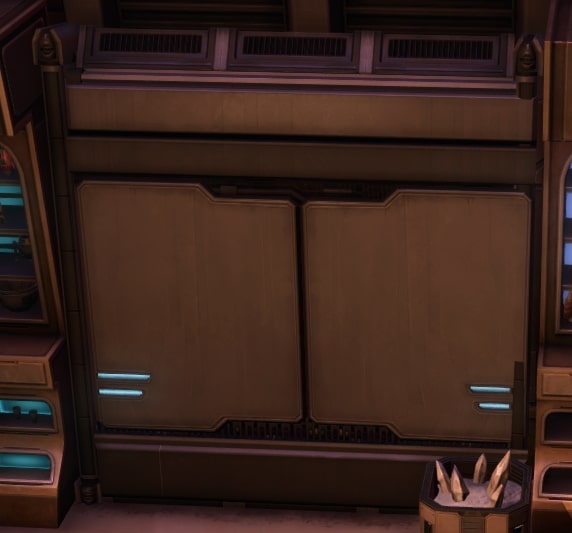 | Flash Freezer on the far wall |
 | Thick Glort Slurry right cabinet on the far wall, left side |
 | Perfect Ice Crystals next to the far wall, on the ground, in middle |
 | Balmorran Vinegar right cabinet on the far wall, right side |
 | Grill Control right side, far corner |
 | Cookpot right side, on the stove |
 | Salinated Soz Juice right side, to the right of the stove |
 | Fatty Scyk Belly right side, hanging above the stove |
 | Prep Table right side, close to entrance |
 | Ventilation Shaft right side, near the entrance door, low |
These are the four options for seasonings in the end. As far as I can tell from my experience, you can just click on all four of them without paying attention which ones are required, just do it quick.

From left to right:
 Crushed Black Hole Pepper – adds a bit of a brain-bending heat to the dish.
 Comet Dust – adds a unique tingling salty flavor to the dish.
 Gloambean Sauce – Sprincle a bit of this sauce to add a rich, deep heartiness to the dish.
 J4-SN’s Seasoning Combo – A bit of this secret combination makes any dish better.
There may be exceptions, but the majority of the cooks happen with two products picked up and thrown at the Grill, then two products picked up and thrown at the Pot. After that you usually have to visit the prep table, throw that into the pot, pick vinegar or glort slurry and ad them. Finally, pick up both of the meals, throw them into the freezer, then finally add the seasonings.
If something can be explained better, feel free to help me and the community out by providing better descriptions for these items in the comments below.
More Missions will be added as they become available in the next days of the event. Check back later, please!
Conquest objectives
While the event doesn’t have its own dedicated Conquest weekly event, there are a number of Conquest objectives available. I sorted them based on amount of Conquest Points earned from most to least in the table below.
| OBJECTIVE | DESCRIPTION |
|---|---|
| Feast of Prosperity: Hutts-theme Epicure | Complete the mission [Weekly] The Feast of Prosperity during the Feast of Prosperity event |
| Feast of Prosperity: Galactic Delicacies | Complete the mission [Weekly] World Boss Ingredients during the Feast of Prosperity event |
| Feast of Prosperity: Ingredient Connoisseur | Complete the mission [Weekly] Ingredient Acquisition during the Feast of Prosperity |
| Feast of Prosperity: Story | Complete any Feast of Prosperity Story mission during the Feast of Prosperity event |
| Feast of Prosperity: Front of House Manager | Complete the mission [Weekly] Cantina Rush during the Feast of Prosperity event |
| Feast of Prosperity: Master Chef | Complete the mission [Weel;y] Kitchen Duty during the Feast of Prosperity event |
| Feast of Prosperity: Prepped for Success | Complete any Prep Work mission during the Feast of Prosperity event |
| Feast of Prosperity: Expedited Service | Complete any Cantina Mission during the Feast of Prosperity event |
| Feast of Prosperity: Sous-Chef | Complete any Cooking mission during the Feast of Prosperity event |
Rewards and Vendor Items Overview
The Feast of Prosperity Token Vendor is located on the northern side of the Upper Promenade on Nar Shaddaa, right next to everything else related to this little shindig. He sells various decorations, outfits, mounts, pets, emotes, weapons, and toys for Prosperity Tokens.
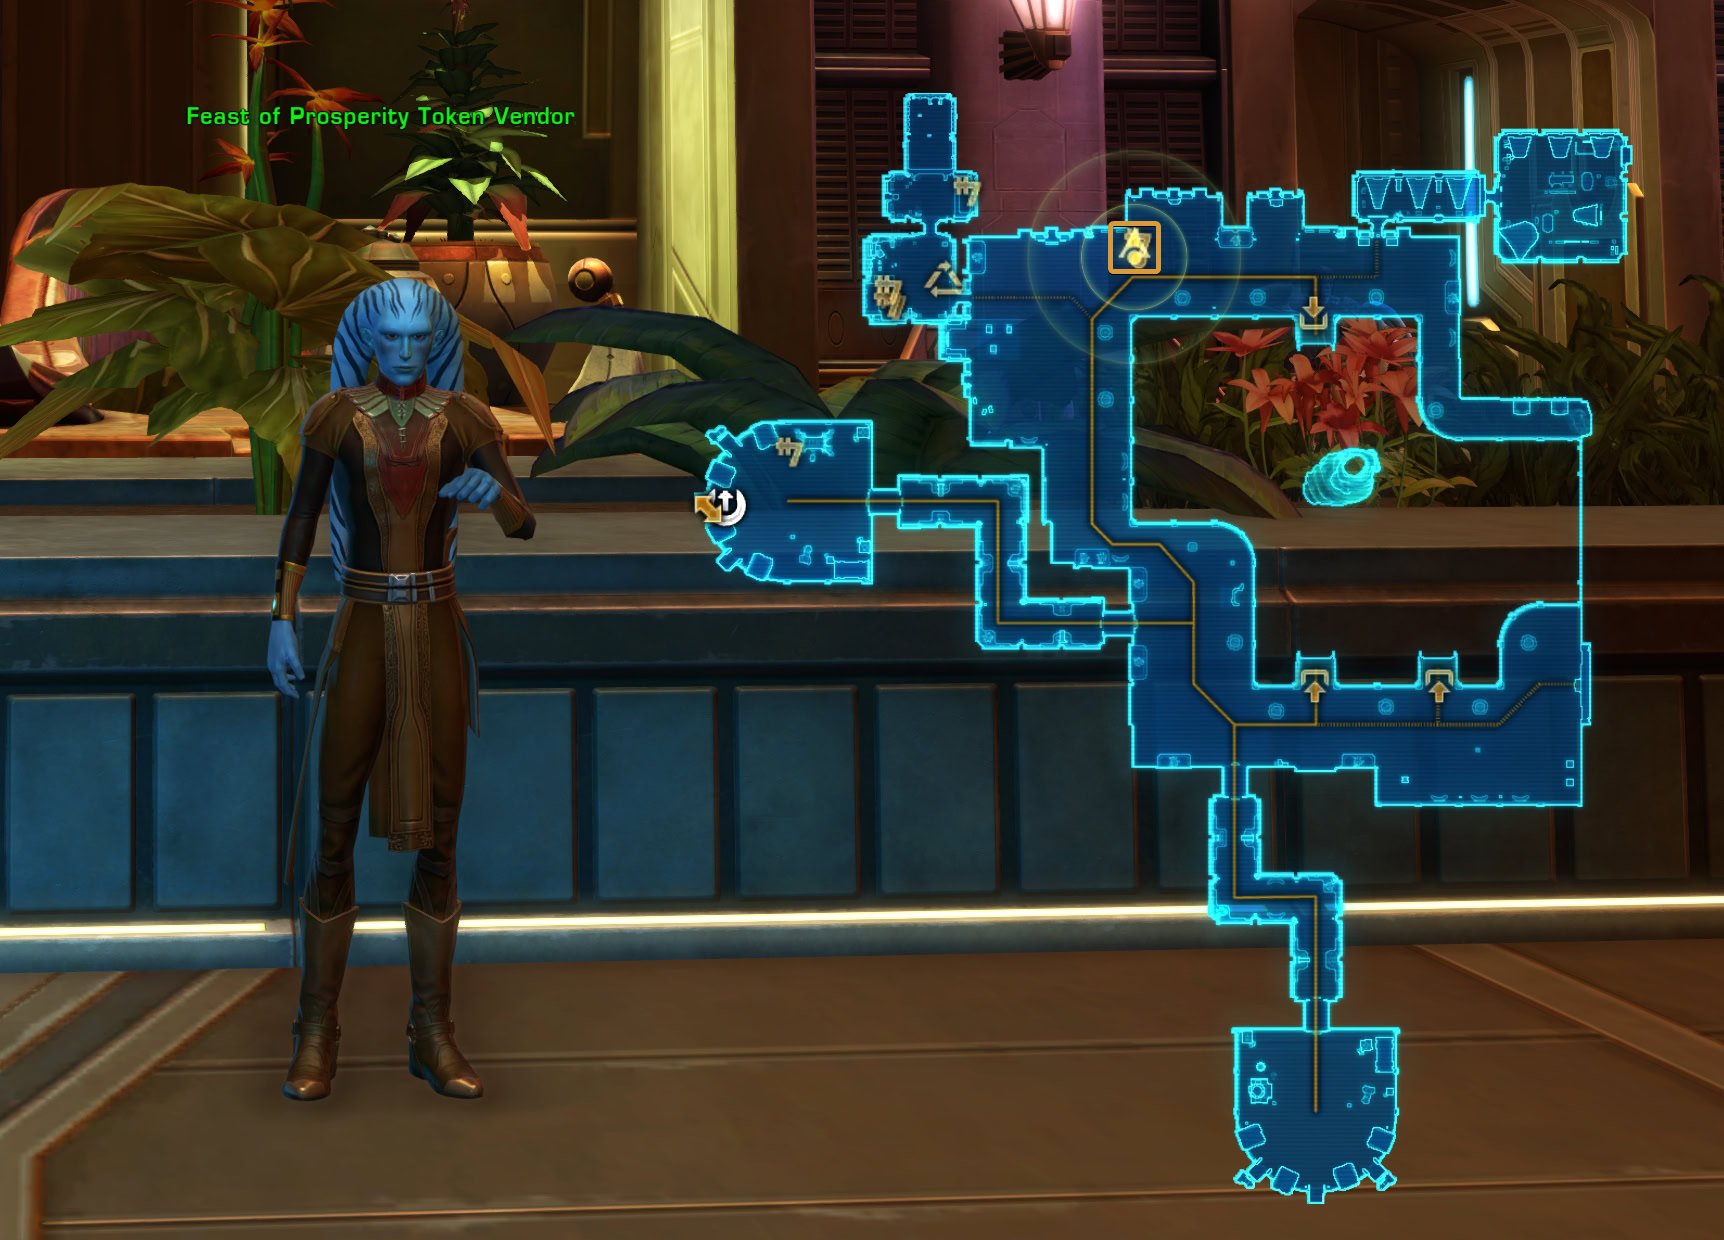
The table below contains all rewards from the Feast of Prospetity Token Vendor on Nar Shaddaa. You can filter, search and sort the table. Below the table, you will find full preview of every item.
| Icon | Item Name | Type | Price | Added |
|---|---|---|---|---|
| Feast Thermalguard Belt | Armor | 2024 | ||
| Feast Thermalguard Boots | Armor | 2024 | ||
| Feast Thermalguard Chestplate | Armor | 2024 | ||
| Feast Thermalguard Helmet | Armor | 2024 | ||
| Feast Thermalguard Leggings | Armor | 2024 | ||
| Feast Thermalguard Wrists | Armor | 2024 | ||
 | Feast Attendee Headwrap | Armor | 2025 | |
 | Feast Attendee Belt | Armor | 2025 | |
 | Feast Attendee Robe | Armor | 2025 | |
| Feast Attendee Robe (Scarf) | Armor | 2025 | |
 | Feast Attire Belt | Armor | 2020 | |
 | Feast Attire Boots | Armor | 2020 | |
 | Feast Attire Chestplate | Armor | 2020 | |
 | Feast Attire Gauntlets | Armor | 2020 | |
 | Feast Attire Helmet | Armor | 2020 | |
 | Feast Attire Robes | Armor | 2020 | |
 | Feast Preparation Hat | Armor | 2020 | |
| Feast Trader’s Belt | Armor | 2021 | ||
| Feast Trader’s Boots | Armor | 2021 | ||
| Feast Trader’s Chestplate | Armor | 2021 | ||
| Feast Trader’s Helmet | Armor | 2021 | ||
| Feast Trader’s Robes | Armor | 2021 | ||
 | Single Use Food Launcher | Consumable | 2020 | |
| Aqualish Banquet Guest | Decoration | 1875 | 2024 | |
| Banquet Chair | Decoration | 2025 | ||
| Banquet Hanging Light | Decoration | 2025 | ||
| Banquet Sculpture | Decoration | 2025 | ||
| Bith Banquet Guest | Decoration | 2024 | ||
| Drinking Banquet Guest (Standing) | Decoration | 2025 | ||
| Grand Feast Carpet (Red) | Decoration | 2025 | ||
| Grand Feast Rug (Green) | Decoration | 2025 | ||
| Grand Feast Mantel | Decoration | 2025 | ||
| Ishi Tib Banquet Guest | Decoration | 2024 | ||
| Regal Banquet Rug | Decoration | 2024 | ||
| Regal Banquet Side Table | Decoration | 2025 | ||
| Regal Banquet Table | Decoration | 2024 | ||
| Regal Chandelier Vessel | Decoration | 2024 | ||
| Regal Floral Arrangement | Decoration | 2024 | ||
| Regal Grill Bar | Decoration | 2024 | ||
| Regal Grill Barstool | Decoration | 2024 | ||
| Regal Table Chair | Decoration | 2024 | ||
| Regal Wall Garden | Decoration | 2024 | ||
| Regal Wall Sconce (Double) | Decoration | 2024 | ||
| Regal Wall Sconce (Single) | Decoration | 2024 | ||
| Regal Wall Shelf | Decoration | 2025 | ||
| Snivvian Banquet Guest | Decoration | 2024 | ||
| Arrangement: Roast Scyk Belly | Decoration | 2021 | ||
| Feast Trader (Male) | Decoration | 2021 | ||
| Feast Trader (Female) | Decoration | 2021 | ||
| Feast of Prosperity Poster I | Decoration | 2021 | ||
| Feast of Prosperity Poster I (Large) | Decoration | 2021 | ||
| Feast of Prosperity Poster II | Decoration | 2021 | ||
| Feast of Prosperity Poster II (Large) | Decoration | 2021 | ||
| Ugnaught Feast Celebrator | Decoration | 2020 | ||
| Arrangement: Braised Vel Slug | Decoration | 2020 | ||
| Arrangement: Exotic Medley Delight | Decoration | 2020 | ||
| Arrangement: Feast Spread | Decoration | 2020 | ||
| Arrangement: Galactic Sampler | Decoration | 2020 | ||
| Arrangement: Glowshroom Stew | Decoration | 2020 | ||
| Arrangement: Meal for Three | Decoration | 2020 | ||
| Basket of Fruit | Decoration | 2020 | ||
| Basket of Root Vegetables | Decoration | 2020 | ||
| Basket of Vegetables | Decoration | 2020 | ||
| Bothan Banquet Guest (Sitting) | Decoration | 2025 | ||
| Crate of Grain | Decoration | 2020 | ||
| Daichyura Feast Celebrator | Decoration | 2020 | ||
| Disguise Terminal: Cantina Dasher | Decoration | 2020 | ||
| Disguise Terminal: Ultimate Chef | Decoration | 2020 | ||
| Duuba’s Guard | Decoration | 2020 | ||
| Duuba’s Protector | Decoration | 2021 | ||
| Feast Attendee (Female) | Decoration | 2020 | ||
| Feast Attendee (Male) | Decoration | 2020 | ||
| Feast Chef (Male) | Decoration | 2020 | ||
| Feast Chef (Female) | Decoration | 2020 | ||
| Human Banquet Guest (Sitting) | Decoration | 2025 | ||
| Human Banquet Guest (Standing) | Decoration | 2025 | ||
| Refreshments Probe | Decoration | 2020 | ||
 | Emote: Feel the Groove | Emote | 2020 | |
 | Emote: Overeat | Emote | 2020 | |
 | Emote: Toast of Prosperity | Emote | 2020 | |
 | Duuba’s Transport Skiff | Mount | 2020 | |
 | Gaboorga’s Transport Skiff | Mount | 2020 | |
 | Feast Ingredient Transport | Mount | 2020 | |
 | Earthen Thurrb | Pet | 2020 | |
 | Hairless Mudhorn | Pet | 2020 | |
| Curious Rodir Cub | Pet | 2020 | ||
| Young Wetlands Mudhorn | Pet | 2020 | ||
 | Meditative Satiation | Regen Item | 2020 | |
| Enhanced Seasoning for New Cooks | Tactical | 2020 | ||
 | Improved Axel Grease | Tactical | 2020 | |
| Character Title: The Finest Ingredient | Title | 2020 | ||
| Character Title: Well Seasoned | Title | 2020 | ||
 | Feast of Prosperity Food Launcher | Toy | 2020 | |
 | Feast of Prosperity Holo-Feast | Toy | 2020 | |
 | Overstuffed Food Sack | Toy | 2020 | |
 | Gourmand’s Favorite Assault Cannon | Weapon | 2020 | |
 | Gourmand’s Favorite Blaster Pistol | Weapon | 2020 | |
 | Gourmand’s Favorite Blaster Rifle | Weapon | 2020 | |
 | Gourmand’s Favorite Dualsaber | Weapon | 2020 | |
 | Gourmand’s Favorite Lightsaber | Weapon | 2020 | |
 | Gourmand’s Favorite Sniper Rifle | Weapon | 2020 |
Achievements
There are twenty achievements, split into three categories for this event: General, Story and Dailies. Five of the achievements are hidden (secret). In the table below, you will find them listed in bold. Below the table, you will find detailed instructions for unlocking the Hidden Achievements.
| Icon | Name | Category | Legacy Points | Visibility | Description: | Reward: | Has Reward? |
|---|---|---|---|---|---|---|---|
| Master of the Feast | General | 50 | Normal | Completed all of the achievements related to the Feast of Prosperity. – A Show of Abundance – A Show of Magnanimity – Cantina Rush: Food-Runner – Cantina Rush: Head Waiter – Cantina Rush: New Hire – Cooking: Head Chef – Cooking: Line Cook – Cooking: Sous Chef – Feast of Prosperity Organizer – Feast of Prosperity Partner – Feast of Prosperity Volunteer – Food Fight! – What Did You Put in This?! – World Boss Ingredient Connoisseur – World Boss Ingredient Enthusiast – World Boss Ingredient Sampler Does not require you to complete the “I don’t have to put up with this” achievement – changed with Update 6.2. | Legacy Title: Galactic Chef | Yes | |
 | What did you Put in This? | General | 25 | Hidden | Completed the Cantina Challenge (Hard) and Cooking Challenge missions 25 times each and threw 75 Black Hole Pepper spices. | Legacy Title: Spicy | Yes |
 | Food Fight | General | 10 | Hidden | Threw food at banquet attendees from the kitchen of Bog’s Bounty Banquet Hall. | No | No |
| I don’t have to Put up with This | General | 10 | Hidden | Leave the kitchen before finishing the mission in which you need to prepare a dish. Do this for each one of the five (3+2) dishes available. | No | No | |
| A Show of Abundance | Story | 10 | Normal | Supported Gaboorga’s efforts to lead the Feast of Prosperity into a mutually-enriching future. | Character Title: The Abundant | Yes | |
| A Show of Magnanimity | Story | 10 | Normal | Supported Duuba’s efforts to lead the Feast of Prosperity into a truly charitable future. | Character Title: The Magnanimous | Yes | |
| Cantina Rush: New Hire | Dailies | 5 | Normal | Completed 5 Cantina Rush missions on any difficulty. | No | No | |
| Cantina Rush: Food Runner | Dailies | 5 | Normal | Completed 15 Cantina Rush missions on any difficulty. | No | No | |
| Cantina Rush: Head Waiter | Dailies | 10 | Normal | Completed 25 Cantina Rush missions on any difficulty | No | No | |
| Cantina Rush: A Perfect Lunch Rush | Dailies | 5 | Hidden | Completed Cantina Rush: Lunch Service without missing a table. | No | No | |
| Cantina Rush: A Perfect Dinner Rush | Dailies | 10 | Hidden | Completed Cantina Rush: Dinner Service without missing a table. | No | No | |
| Cooking: Line Cook | Dailies | 5 | Normal | Completed 5 Cooking Missions on any difficulty. | No | No | |
| Cooking: Sous Chef | Dailies | 5 | Normal | Completed 15 Cooking Missions on any difficulty. | No | No | |
| Cooking: Head Chef | Dailies | 10 | Normal | Completed 25 Cooking Missions on any difficulty. | No | No | |
| World Boss Ingredient Sample | Dailies | 5 | Normal | Completed 5 Ingredient Special Requests for ingredients from World Bosses. | No | No | |
| World Boss Ingredient Enthusiast | Dailies | 10 | Normal | Completed 10 Ingredient Special Requests for ingredients from World Bosses. | No | No | |
| World Boss Ingredient Connoisseur | Dailies | 25 | Normal | Completed 20 Ingredient Special Requests for ingredients from World Bosses. | No | No | |
| Feast of Prosperity Volunteer | Dailies | 5 | Normal | Completed 10 Daily Missions for the Feast of Prosperity. | No | No | |
| Feast of Prosperity Partner | Dailies | 10 | Normal | Completed 25 Daily Missions for the Feast of Prosperity. | No | No | |
| Feast of Prosperity Organizer | Dailies | 25 | Normal | Completed 50 Daily Missions for the Feast of Prosperity. | No | No |
 What did you Put in This? (Hidden)
This hidden achievement is part of the General section of the Feast of Prosoerity achievements tab. To earn it you need to complete 25 times the Cantina Rush (Hard) serving mission and 25 times the Challenge Dish (Hard) cooking mission.
You also must use the Black Hole Pepper spice 75 times in the “easy” mission variant to get the third and final requirement for the achievement complete.
Thanks to Tony, Kira-Jaga, EmpressShaynra and Randomno_2 for sharing their discoveries with me and confirming the method of completing this achievement. Thanks to SourApple for confirming that you can only use the Black Pepper in Easy Mode. Hard Mode doesn’t count progress towards this achievement.
Food Fight (Hidden)
This achievement is located in the General category for the Feast of Prosperity event. To earn it you must enter Bog’s Bounty Banquet Hall’s kitchen and throw food at one of the patrons sitting on the tables in the hall.
During the mission, pick up a piece of food from the tables and instead of throwing it in the Grill or in the Pot, throw it at one of the patrons in the hall. I completed mine in the Easy mode of the Cooking mission, but it can be completed in the Challenge version as well.
Thanks to Mendi for sharing with me the method of completing this achievement on PTS. It works the same in the live event.
As player vzbrst stated in the comments below the guide, if you are not succeeding with the recommended method above, try throwing the food onto the tables.
I don’t have to Put up with This (Hidden)
This hidden achievement appears in the General section of the Feast of Prosperity after you unlock it.
To earn this achievement you need to enter and leave without finishing the dish in the “easy” and “hard” mode of this mini-game mission.
There are five different daily cooking missions and you have to do it once for each mission. Three of the types of dishes appear in “easy” and two in “hard”. Check each day this daily mission until you eventually complete it.
Thanks to SourApple and Katschaba for their help with this achievement.
Cantina Rush: A Perfect Lunch Rush (Hidden)
You can unlock the hidden achievement “A Perfect Lunch Rush” by completing the easy version of the Cantina Serving mini-game mission without an error (don’t miss a table).
Cantina Rush: A Perfect Dinner Rush (Hidden)
The “A Perfect Dinner Rush” achievement demands of you to complete the Cantina Rush Hard version of the serving mini-game mission without making an error and missing a table’s orders.